RoadRunners Evolution User Guide v2 - GfK Etilizecontent.etilize.com/User-Manual/1016423287.pdf ·...
25
RoadRu © unners Evolution User G ©Baracoda TM – March 2010 Data Capture for Workforce in Motion Guide
Transcript of RoadRunners Evolution User Guide v2 - GfK Etilizecontent.etilize.com/User-Manual/1016423287.pdf ·...

RoadRunners Evolution
©
RoadRunners Evolution User Guide
©Baracoda TM – March 2010
Data Capture
for Workforce
in Motion
User Guide
Baracoda RoadRunners Evolution – User Guide v2.1 - 2 -
Data Capture
for Workforce
in Motion
SUMMARYSUMMARYSUMMARYSUMMARY
SUMMARY ................................................................... 2
REVISION HISTORY .......................................................... 4
INTRODUCTION .............................................................. 5
STATUS DISPLAY SUMMARY .................................................... 6
PDA STYLUS ................................................................ 8
RECHARGING THE BATTERY .................................................... 8
INSTALLING / REPLACING BATTERIES .......................................... 9
SWITCHING ON THE READER ................................................... 9
CONFIGURING YOUR SCANNER ................................................. 10
RESET YOUR SCANNER .......................................................... 10 SECURITY .................................................................. 10 SYMBOLOGY ................................................................. 10 DATA FORMAT ................................................................ 11
BARACODA HEADER ..................................................... 11
TIMESTAMP .......................................................... 11
GENERAL PREFIX / SUFFIX .............................................. 11
SYMBOLOGY PREFIX / SUFFIX ............................................. 11
BARCODE IDENTIFIER ................................................... 12 BEEPS AND LEDS ............................................................. 12 POWER MANAGEMENT ............................................................ 12 LOW BATTERY ................................................................ 12
QUICK START UP GUIDE ..................................................... 13
HOW TO READ BARCODES......................................................... 13 THE DIFFERENT USAGE MODES..................................................... 15 THE DIFFERENT CONNECTION METHODS ............................................... 16 THE DIFFERENT READING MODES ................................................... 17 THE DIFFERENT WAYS TO CONNECT ROADRUNNERS EVOLUTION TO A HOST ....................... 18
IMAGE & SIGNATURE CAPTURE ................................................ 20
IMAGE CAPTURE .............................................................. 20 SIGNATURE CAPTURE ........................................................... 21
SAFETY / REGULATORY. ..................................................... 23
FCC: ..................................................................... 23 EU: ...................................................................... 24 LASER NOTICE ............................................................... 24
Baracoda RoadRunners Evolution – User Guide v2.1 - 3 -
Data Capture
for Workforce
in Motion OTHERS INDICATIONS: ......................................................... 24
LIMITED WARRANTY. ........................................................ 25
Baracoda RoadRunners Evolution – User Guide v2.1 - 4 -
Data Capture
for Workforce
in Motion
Revision HistoryRevision HistoryRevision HistoryRevision History
Changes to the original manual are listed below.
Document Date Description
1.0 17 June 08 Initial release
1.1 25 Aug. 08 Add “The different connection method” section
1.2 11 Sept. 08 Add “Smart Autoscan” option
1.3 15 Oct. 08 Modify the “MASTER mode” section.
1.4 06 Feb. 09 Modify the “Status Display Summary” section.
1.5 29 April 09 Modify “Installing / Replacing batteries” & “Safety / Regulatory” sections
1.6&1.7 29 May 09 Modify “Safety / Regulatory” sections
1.8 2 July 09 Add EU countries where product can be used.
1.9 25 nov 09 Modify 2D barcode of decoder configuration
2.0 15 March 10 No duplicate scan precision ; Image & Signature capture added
Baracoda RoadRunners Evolution – User Guide v2.1 - 5 -
Data Capture
for Workforce
in Motion
IntroductionIntroductionIntroductionIntroduction
The RoadRunners Evolution is easy to use. Just press the trigger in order to switch on the scanner and simply
press it again to scan a barcode. The colours of the LEDs indicate the status of the device. A beep indicates
when the scanner connects to the remote device and when a barcode is scanned successfully.
Acknowledgement of a completed scan is configurable by the user.
Barcodes are transmitted in real time to the remote host devices/terminals using Bluetooth wireless
technology or barcodes can be stored in the scanner and later uploaded to a remote device/terminal using
Bluetooth wireless technology. You can download software updates as well as additional documentation from
http://www.baracoda.com after registration.
Note :
How to know if you have RoadRunners or RoadRunners Evolution?
On the back casing, you can read the Part Number:
� B4003xxxx for RoadRunners
� B4016xxxx for RoadRunners Evolution.
Baracoda RoadRunners Evolution – User Guide v2.1 - 6 -
Data Capture
for Workforce
in Motion
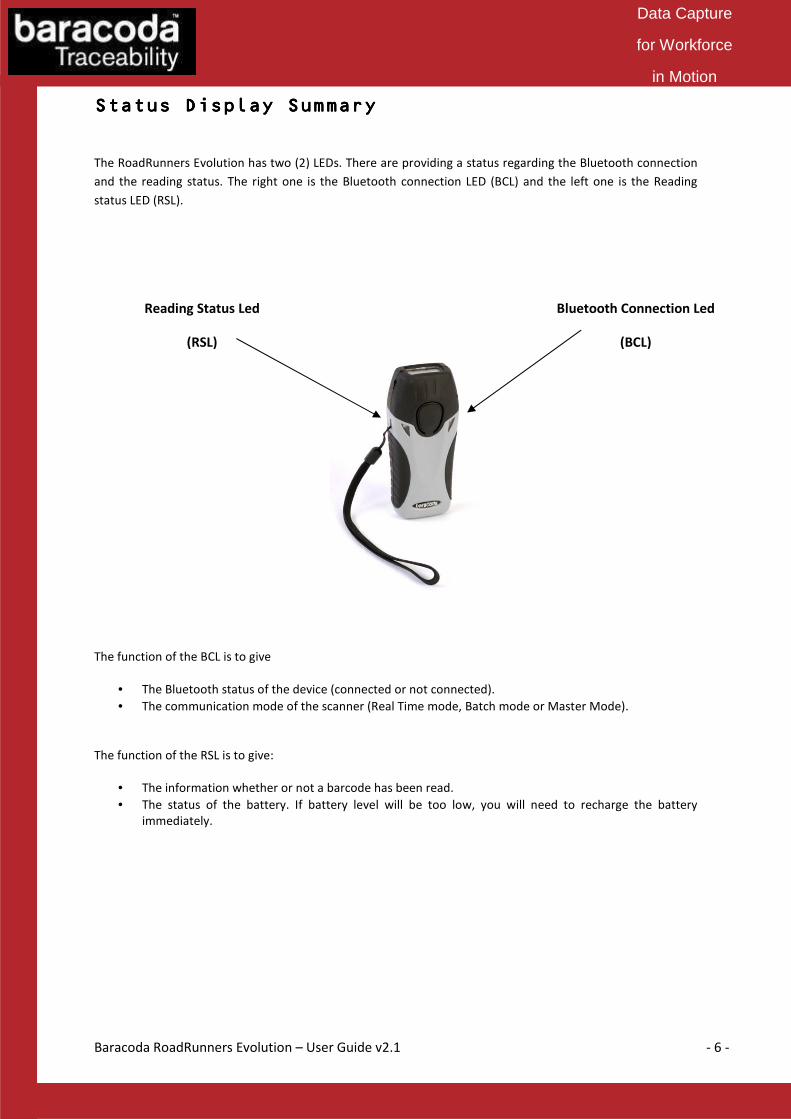
Reading Status Led
(RSL)
Status Display SummaryStatus Display SummaryStatus Display SummaryStatus Display Summary
The RoadRunners Evolution has two (2) LEDs. There are providing a status regarding the Bluetooth connection
and the reading status. The right one is the Bluetooth connection LED (BCL) and the left one is the Reading
status LED (RSL).
The function of the BCL is to give
• The Bluetooth status of the device (connected or not connected).
• The communication mode of the scanner (Real Time mode, Batch mode or Master Mode).
The function of the RSL is to give:
• The information whether or not a barcode has been read.
• The status of the battery. If battery level will be too low, you will need to recharge the battery
immediately.
Bluetooth Connection Led
(BCL)
Baracoda RoadRunners Evolution – User Guide v2.1 - 7 -
Data Capture
for Workforce
in Motion
BCL LED:
Single Blinks (e.g. *pause*pause*…) The scanner is ready to be connected
Double fast Blinks (e.g. **pause**pause**…) The scanner is connected
The led colour is Green The Scanner is set in Real Time mode or in Master mode
The Led Colour is Orange The Scanner is set in Batch mode
The Led Colour is blinking Orange/Green The Scanner is set in Batch mode, but no barcode is
stored in the memory
RSL LED:
One Single long Blink (green colour) The scanner has just read and decoded a barcode
One Single long Blink (orange colour) The scanner is set in Master mode and is trying to connect
to the Host address
Double fast Blinks Red Battery level is low. Please recharge the battery
immediately
One Single long Blink Red + Green (solid) The scanner is charging
Green (solid) The scanner is fully charged
Special cases:
Both LEDs blinks orange The scanner is set in the “Real Time with No Data Loss
mode” but with no bufferisation (buffer configured to 0)
and is not connected. In this particular situation the
trigger will not activate the beam: impossible to read
barcodes in this mode.
Baracoda RoadRunners Evolution – User Guide v2.1 - 8 -
Data Capture
for Workforce
in Motion
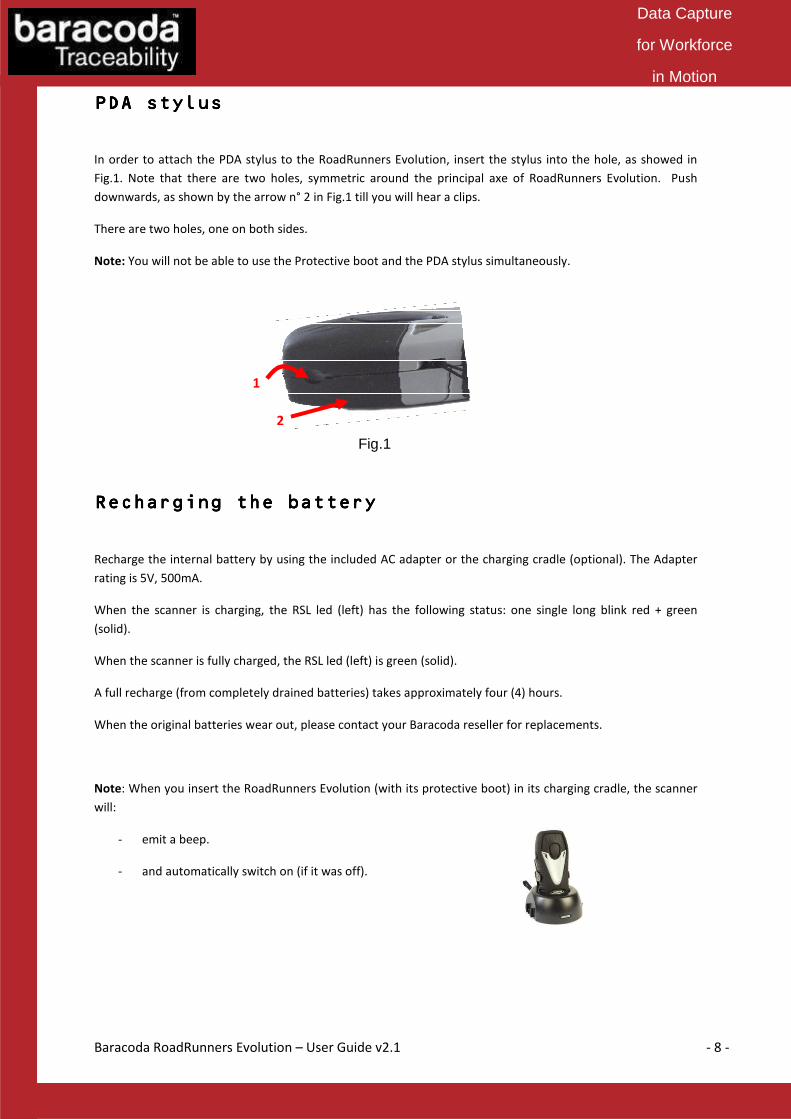
PDA stylusPDA stylusPDA stylusPDA stylus
In order to attach the PDA stylus to the RoadRunners Evolution, insert the stylus into the hole, as showed in
Fig.1. Note that there are two holes, symmetric around the principal axe of RoadRunners Evolution. Push
downwards, as shown by the arrow n° 2 in Fig.1 till you will hear a clips.
There are two holes, one on both sides.
Note: You will not be able to use the Protective boot and the PDA stylus simultaneously.
Recharging the batteryRecharging the batteryRecharging the batteryRecharging the battery
Recharge the internal battery by using the included AC adapter or the charging cradle (optional). The Adapter
rating is 5V, 500mA.
When the scanner is charging, the RSL led (left) has the following status: one single long blink red + green
(solid).
When the scanner is fully charged, the RSL led (left) is green (solid).
A full recharge (from completely drained batteries) takes approximately four (4) hours.
When the original batteries wear out, please contact your Baracoda reseller for replacements.
Note: When you insert the RoadRunners Evolution (with its protective boot) in its charging cradle, the scanner
will:
- emit a beep.
- and automatically switch on (if it was off).
Fig.1
1
2
Baracoda RoadRunners Evolution – User Guide v2.1 - 9 -
Data Capture
for Workforce
in Motion
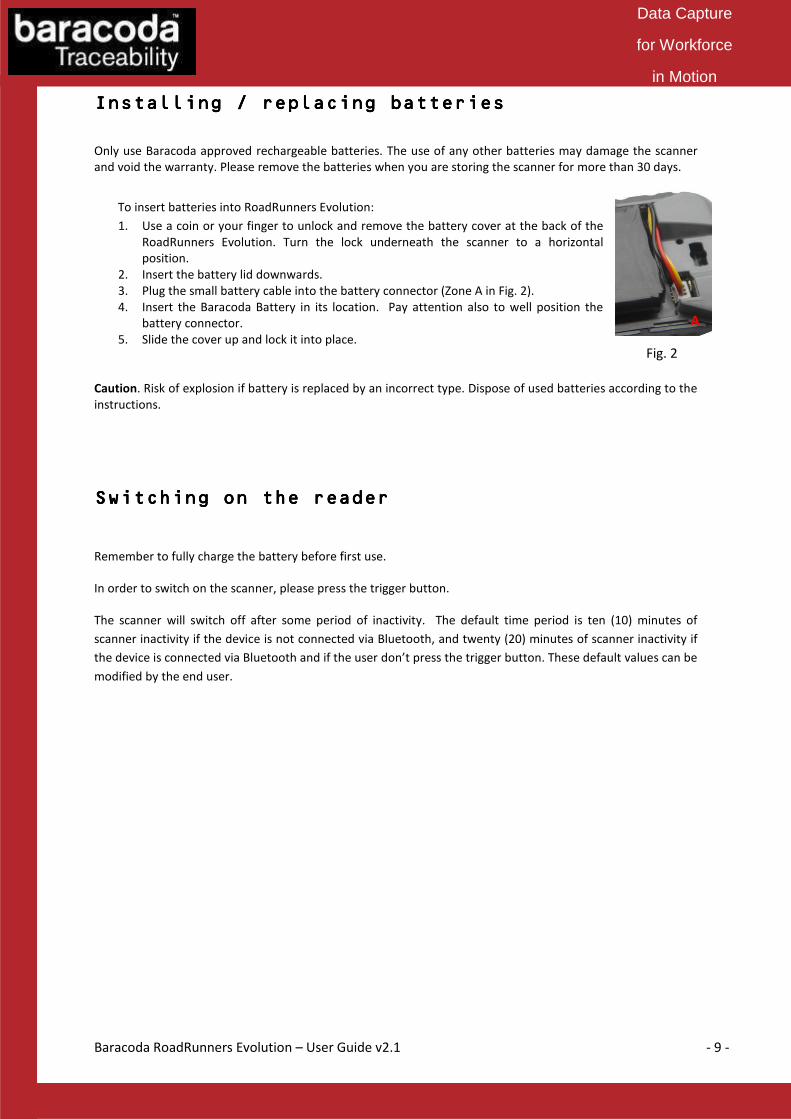
Installing / replacing batteries Installing / replacing batteries Installing / replacing batteries Installing / replacing batteries
Only use Baracoda approved rechargeable batteries. The use of any other batteries may damage the scanner
and void the warranty. Please remove the batteries when you are storing the scanner for more than 30 days.
To insert batteries into RoadRunners Evolution:
1. Use a coin or your finger to unlock and remove the battery cover at the back of the
RoadRunners Evolution. Turn the lock underneath the scanner to a horizontal
position.
2. Insert the battery lid downwards.
3. Plug the small battery cable into the battery connector (Zone A in Fig. 2).
4. Insert the Baracoda Battery in its location. Pay attention also to well position the
battery connector.
5. Slide the cover up and lock it into place.
Caution. Risk of explosion if battery is replaced by an incorrect type. Dispose of used batteries according to the
instructions.
Switching on theSwitching on theSwitching on theSwitching on the readerreaderreaderreader
Remember to fully charge the battery before first use.
In order to switch on the scanner, please press the trigger button.
The scanner will switch off after some period of inactivity. The default time period is ten (10) minutes of
scanner inactivity if the device is not connected via Bluetooth, and twenty (20) minutes of scanner inactivity if
the device is connected via Bluetooth and if the user don’t press the trigger button. These default values can be
modified by the end user.
A
Fig. 2
Baracoda RoadRunners Evolution – User Guide v2.1 - 10 -
Data Capture
for Workforce
in Motion
ConfiguConfiguConfiguConfiguring your scannerring your scannerring your scannerring your scanner
There are two (2) ways to configure your scanner:
• When connected to a host device, the BaracodaManager software (v3.34 min) can be used for
multiple setting changes.
• The Configuration barcodes In the Programming Guide can be used to configure the scanner without
using outside software applications.
Reset your scannerReset your scannerReset your scannerReset your scanner
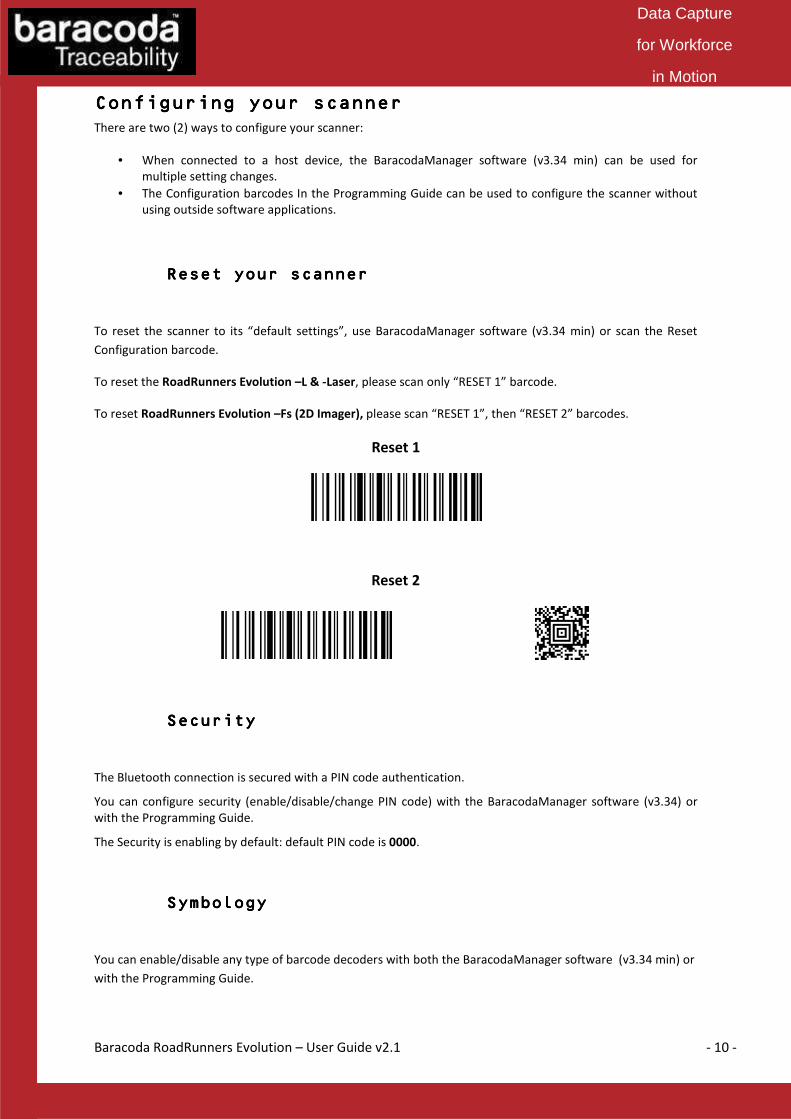
To reset the scanner to its “default settings”, use BaracodaManager software (v3.34 min) or scan the Reset
Configuration barcode.
To reset the RoadRunners Evolution –L & -Laser, please scan only “RESET 1” barcode.
To reset RoadRunners Evolution –Fs (2D Imager), please scan “RESET 1”, then “RESET 2” barcodes.
Reset 1
Reset 2
SecuritySecuritySecuritySecurity
The Bluetooth connection is secured with a PIN code authentication.
You can configure security (enable/disable/change PIN code) with the BaracodaManager software (v3.34) or
with the Programming Guide.
The Security is enabling by default: default PIN code is 0000.
SymbologySymbologySymbologySymbology
You can enable/disable any type of barcode decoders with both the BaracodaManager software (v3.34 min) or
with the Programming Guide.
Baracoda RoadRunners Evolution – User Guide v2.1 - 11 -
Data Capture
for Workforce
in Motion
Data formatData formatData formatData format
The data format is the following: Header + Timestamp + Prefix + Barcode + Suffix
Header Timestamp General
Prefix
Symbology
Prefix
Barcode Symbology
Suffix
General
Suffix
Baracoda HeaderBaracoda HeaderBaracoda HeaderBaracoda Header
It is a proprietary data encapsulation. It is necessary to activate the Baracoda header in 2 cases:
• to use the Baracoda keyboard emulation (Kemul) and Terminal.
• to use the “No data loss” mode.
You can configure Baracoda Header through BaracodaManager software.
The Baracoda header is enabled in default settings.
TimestampTimestampTimestampTimestamp
Timestamp can be configured (ON/OFF, synchronise new time) by BaracodaManager and by configuration
barcodes.
Timestamp will be in the following format: YYMMDDhhmmss:
YY: YEAR MM: MONTH DD: DAY hh: Hours mm: Minutes ss: Seconds
General Prefix / SuffixGeneral Prefix / SuffixGeneral Prefix / SuffixGeneral Prefix / Suffix
A prefix and/ or suffix can be added to every barcode sent to the host device. You can configure prefix/suffix
through BaracodaManager software or with the Programming Guide.
There is no prefix/suffix in default settings.
Symbology Prefix / SuffixSymbology Prefix / SuffixSymbology Prefix / SuffixSymbology Prefix / Suffix
A prefix and/or suffix can be added to a specific symbology barcode sent to a host device.
Meaning a certain prefix/suffix will be added while reading a specific symbology.
You can configure prefix/suffix through BaracodaManager software.
There is no “symbology prefix/suffix” in default settings.
Baracoda RoadRunners Evolution – User Guide v2.1 - 12 -
Data Capture
for Workforce
in Motion
Barcode IdentifierBarcode IdentifierBarcode IdentifierBarcode Identifier
The scanner can transmit a maximum of 3 digit barcode identifier codes for different types of barcodes
(symbologies).
If the option is selected, the Barcode Identifier is added at the beginning of the barcode frame.
List of identifier codes can be found in the Programming Guide. You can activate barcode identifier through
BaracodaManager software or with the Programming Guide.
The barcode identifier is disabled in default settings.
Beeps and LEDsBeeps and LEDsBeeps and LEDsBeeps and LEDs
You can enable/disable Beeps / LED Lightening using both the BaracodaManager software (v3.34 min) or the
Programming Guide.
PPPPower managementower managementower managementower management
Mutliple parameters exist to optimize the battery autonomy (“Sniff period”, “Shutdown timer”, etc…)
RoadRunners Evolution is configured at 20dBm (Bluetooth Class.1) by default.
The BaracodaManager software (v3.34 min) can be used for multiple setting changes.
Low batteryLow batteryLow batteryLow battery
An alternation of red and green blinking on the two (2) LEDs indicates that the battery level is low. Recharge
battery immediately. If you continue using the scanner, it will continue working until a triple beep occurs: at
that moment the reader will shut down and you will be forced to charge the scanner.
Baracoda RoadRunners Evolution – User Guide v2.1 - 13 -
Data Capture
for Workforce
in Motion
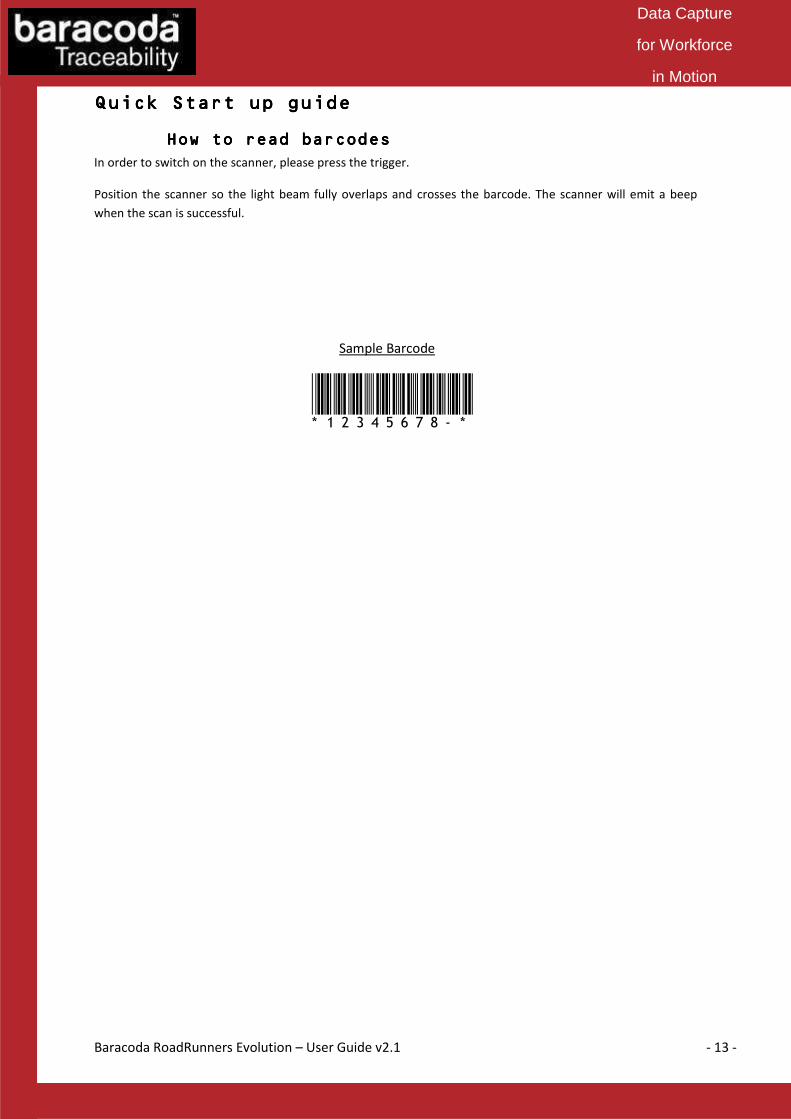
Quick Start up guideQuick Start up guideQuick Start up guideQuick Start up guide
How to read barcodesHow to read barcodesHow to read barcodesHow to read barcodes
In order to switch on the scanner, please press the trigger.
Position the scanner so the light beam fully overlaps and crosses the barcode. The scanner will emit a beep
when the scan is successful.
Sample Barcode
* 1 2 3 4 5 6 7 8 - *
Baracoda RoadRunners Evolution – User Guide v2.1 - 14 -
Data Capture
for Workforce
in Motion
Proper scanning position
BRR –L Evolution : CMOS
40°
BRR-LA Evolution : Laser
47°
BRR-Fs Evolution : 2D Imager
40°
Baracoda RoadRunners Evolution – User Guide v2.1 - 15 -
Data Capture
for Workforce
in Motion
The different usage modeThe different usage modeThe different usage modeThe different usage modessss
Real Time mode
In real time mode, the barcode is decoded and transmitted to the remote host without any delay. If the
scanner is not connected, the data is lost (Status RSL Led: red flash).
Real Time mode with No Data Loss option
If the No Data Loss option is activated and if the scanner is not connected or out of Bluetooth range, the
scanner will store the data. It can memorise up to 10 000 barcodes (UPC format) and later automatically upload
them to the remote host when a Bluetooth connection is established to the host.
Every barcode sent to the host must be acknowledged by the host. If the host fails to send an
acknowledgement, the scanner will continue to transmit the barcode until the host does send an
acknowledgement.
This acknowledgment is disabled in the default settings. It is strongly recommended to set the No Data Loss
mode to ON. This configuration can be set with the BaracodaManager software or with the Programming
Guide.
Additionally, this protocol acknowledgment allows an end user to set an audio acknowledgment indicating that
the barcode has been successfully transmitted to the host.
Batch mode
Barcodes are always stored in the scanner. Once the batch mode is selected, the BCL led (right) emits an
orange flash. In batch mode, the barcode can read up to 10 000 barcodes (UPC format) and store them into its
non-volatile memory for later transmission to the host.
To upload barcodes from the scanner, connect it to the host computer via Bluetooth. The BaracodaManager
software is used to configure the location where the barcodes are sent once the barcodes are extracted from
the scanner.
Once connected, the scanner will wait for the appropriate command in order to start uploading the barcodes:
this command can come from:
• The BaracodaManager: The user has to click on the button “Upload”.
• A configuration scan barcode: the user has to read the appropriate configuration barcode.
Be aware that with BaracodaManager (v3.34 min), two (2) different ways to upload barcodes are possible:
• To an application window: In this case always double check before starting the upload
procedure that the cursor in your text window is active. Otherwise you will loose all the data
saved into your scanner.
• To a .txt file (default option). The BaracodaManager gives you the possibility to modify the
name of the file in which you may want to save the data.
The scanner can be configured to automatically reconnect with the BaracodaManager software.
Another connectivity parameters exists: Master mode (the scanner will create the connection to the Host).
Baracoda RoadRunners Evolution – User Guide v2.1 - 16 -
Data Capture
for Workforce
in Motion
The differentThe differentThe differentThe different cccconnection methodonnection methodonnection methodonnection methodssss
There are two (2) different ways to create a connection from a Host and a scanner:
- Slave mode (by default)
The Host (PC, BaracodaManager, …) is creating the connection onto the scanner.
- Master mode
The scanner is creating itself a connection to the recorded Host Bluetooth address. This connection
attempt is set after a scan of barcode. The configuration of Host address (on which the scanner will set
up a connection to) can be done:
o Via BaracodaManager software (v3.35 min).
o Via scan of barcodes.
All usage modes (Real Time, No Data Loss, Batch) are obviously available.
Baracoda RoadRunners Evolution – User Guide v2.1 - 17 -
Data Capture
for Workforce
in Motion
The different reading modeThe different reading modeThe different reading modeThe different reading modessss
RoadRunners Evolution has four (4) reading modes. These modes can be changed through both the
BaracodaManager software and the Programming Guide.
Trigger mode (default setting)
Simply press the trigger when you want to scan a barcode.
Aiming mode (only available for RoadRunners Evolution 1D & Laser, not for 2D Imager)
The Aiming mode has been developed for users who need to scan barcodes very close one to another and need
to avoid reading a wrong code. Once in this mode, in order to read a barcode user will have to press the trigger
twice. Pressing it the first time will switch on the beam but will not switch on the decoder (thus allowing user to
aim at the correct barcode) while pressing the trigger the second time will activate the decoder thus allowing
the scanner to actually decode the barcode.
Autoscan mode
This mode enables to scan continuously. In Autoscan mode, the scan beam is continuously on.
Smart Autoscan mode
For a battery power consumption optimization issue, the scanner will be continuously flashing.
Option: RoadRunners Evolution allows the “No duplicate scans” feature activation. It avoids user to scan
consecutively twice in the same barcode. By default, this option is disabled, but can be changed through both
BaracodaManager software or Programming Guide.
Baracoda RoadRunners Evolution – User Guide v2.1 - 18 -
Data Capture
for Workforce
in Motion
The different ways to connect RoadrunnersThe different ways to connect RoadrunnersThe different ways to connect RoadrunnersThe different ways to connect Roadrunners
EvolutionEvolutionEvolutionEvolution to a hostto a hostto a hostto a host
Baracoda proposes three (3) ways to simplify this process. Just choose the most appropriate one according to
your specific needs.
For users: Complete Plug&Scan hardware solutions
The easiest way to connect a Baracoda scanner with a host computer is to use the Baracoda Plug and Scan
Bluetooth dongles. Baracoda offers the RS232 Plug&Scan Bluetooth serial dongle or the USB Plug&Scan
Bluetooth dongle to get connected to a host computer. To use one of these devices:
1. Plug the dongle into the USB port or into the RS232 port of the computer.
2. Wait 5 seconds for the host computer to recognize the Plug&Scan dongle.
3. Scan the “Connect barcode” available on the Plug & Scan dongle just once.
4. Within less than 20 seconds the LED on the scanner will start double flashing green: you are now
paired and connected!
For the USB Plug and Scan Dongle: Once the dongle is connected to the scanner open the target application
(such as Notepad, Excel and Word). Make sure the active cursor is where the user wants the barcode
information to be placed and start scanning barcodes.
For the RS232 Plug and Scan Dongle, the application will have to receive the information from the serial port in
order for the application to receive data from the serial port download the Kemul Software on the Baracoda
Website http://www.baracoda.com/
Pease note that The scanners are set by the Baracoda Plug&Scan USB in “no data loss mode” ON by default.
The No Data Loss mode allows the reader to buffer barcodes if the barcodes are read out of range.
For users: software solutions
Baracoda provides two different software packages to manage the Baracoda Bluetooth barcode devices:
- K-Emul lets you insert the scanned barcode value in the selected field. It also allows adding a prefix
and a suffix.
- BaracodaManager is a user-friendly, advanced software that inserts the scanned barcode in a text field
of the target application (Kemul plug-in) or displaying the barcode (Terminal plug-in), presents the
following features: very easy connection (one click connectivity), automatic reconnection, buffers
data in memory and automatic re-transmission.
Please check the compatibility for some specific hosts (see BaracodaManager compatibility table on
www.baracoda.com).
How to quickly verify that your scanner is working correctly, using the BaracodaManager:
1. Make sure that your host device (PC or PDA) is Bluetooth enabled. If not, please contact your reseller.
2. Install the BaracodaManager (updates can be downloaded from http://www.baracoda.com/). Refer to
compatibility table for specific hosts. If your Bluetooth software is not compatible, you can test your scanner with Hyperterminal or Kemul. Refer to
Communication Protocol documentation. (Download on http://www.baracoda.com/download.)
3. Configure the BaracodaManager.

Baracoda RoadRunners Evolution – User Guide v2.1 - 19 -
Data Capture
for Workforce
in Motion
• Start the BaracodaManager by selecting Start> Programs> BaracodaManager>
BaracodaManager. The application automatically searches for wireless scanners.
• Place the scanner in discovery mode by pressing the trigger button.
• Highlight the scanner in the Devices in Range box and click the Add Button.
• The Bluetooth Stack asks for the passkey. While the message displays, click on the Bluetooth
connection icon in the system tray at right side of the task bar.
• Enter 0000 as the default Bluetooth Passkey Request dialog box.
• Look at the status of the scanner in the BaracodaManager application window. When the
status changes to “connected”, the scanner is ready to be used.
4. The first time the scanner is configured, the BaracodaManager opens a terminal window. Scan a
barcode and the data will appear in the terminal window
• Close the Terminal window by clicking on exit
• Select the Kemul plug-in from the drop down menu. For more information, see the
BaracodaManager documentation.
5. When you have finished your session, click on the Exit Button of the application to save your
configuration.
For developers: Baracoda Software Development Kit (SDK)
The Baracoda SDKs are created for developers who want to integrate the barcode collection functions into
their own program code, thus enabling end-users to run a single software program. This eliminates the need to
run the Baracoda Manager software in addition to a third party application.
BaracodaManager uses libraries that provide an abstraction layer allowing developers to integrate Baracoda
products into their own application very rapidly. Moreover, these libraries will deal with all the low-level
routines, timeouts, connections and configuration management.
These libraries are available to developers for free (www.baracoda.com for more information)
Baracoda RoadRunners Evolution
Image & Signature CaptureImage & Signature CaptureImage & Signature CaptureImage & Signature Capture
ImageImageImageImage capturecapturecapturecapture
RoadRunners 2D (from firmware version v
and scanning a dedicated barcode first ; the wished picture in second
As a barcode data captured, this picture could be sent over Bluetooth in real time or stored in the scanner
memory in waiting for an upload command.
Here is the process to take a picture
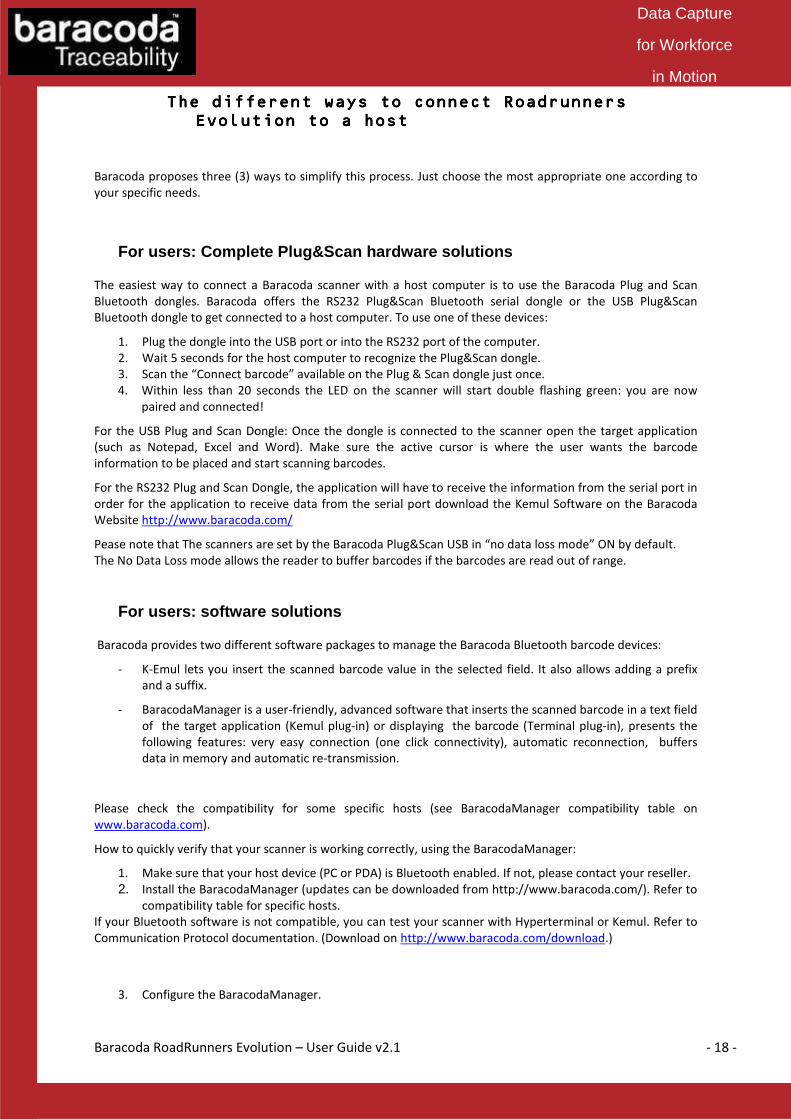
1. Scan the ‘take Picture’ barcode
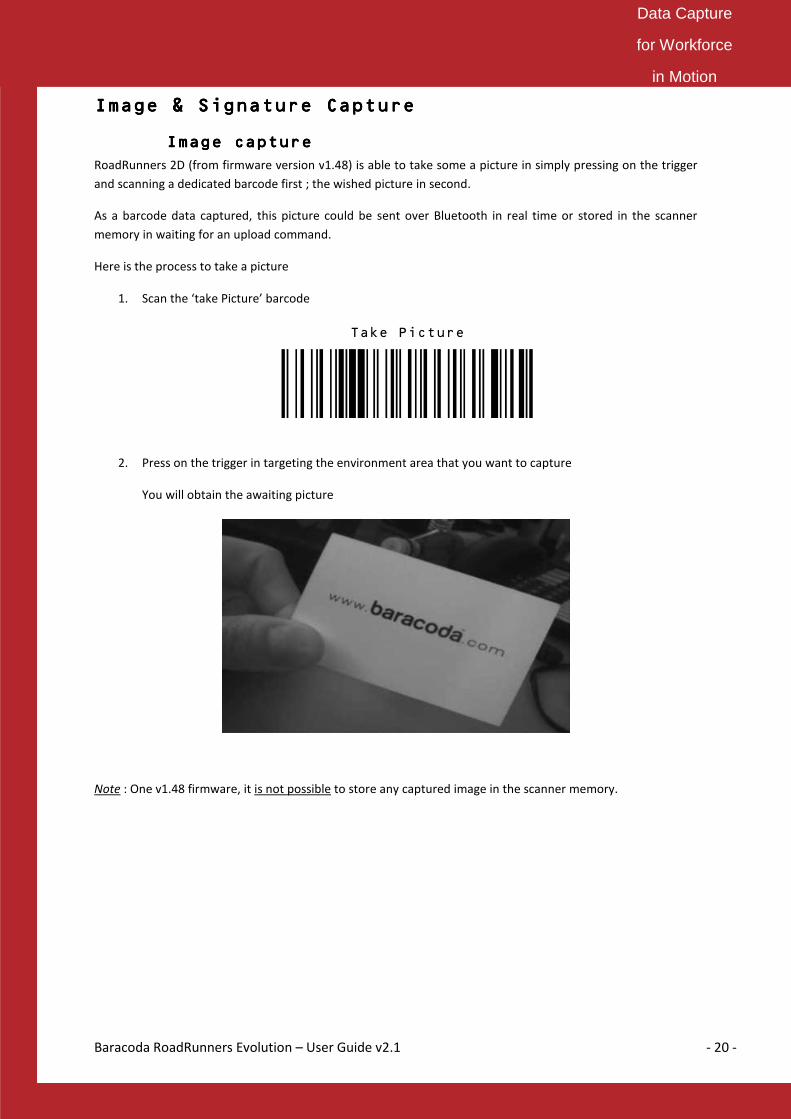
2. Press on the trigger in targeting the environment area that you want to capture
You will obtain the awaiting picture
Note : One v1.48 firmware, it is not possible
ners Evolution – User Guide v2.1
Image & Signature CaptureImage & Signature CaptureImage & Signature CaptureImage & Signature Capture
capturecapturecapturecapture
firmware version v1.48) is able to take some a picture in simply pressing on the trigger
and scanning a dedicated barcode first ; the wished picture in second.
As a barcode data captured, this picture could be sent over Bluetooth in real time or stored in the scanner
iting for an upload command.
Here is the process to take a picture
Scan the ‘take Picture’ barcode
Press on the trigger in targeting the environment area that you want to capture
You will obtain the awaiting picture
is not possible to store any captured image in the scanner memory.
Take Picture
- 20 -
Data Capture
for Workforce
in Motion
is able to take some a picture in simply pressing on the trigger
As a barcode data captured, this picture could be sent over Bluetooth in real time or stored in the scanner
to store any captured image in the scanner memory.
Baracoda RoadRunners Evolution
Signature captureSignature captureSignature captureSignature capture
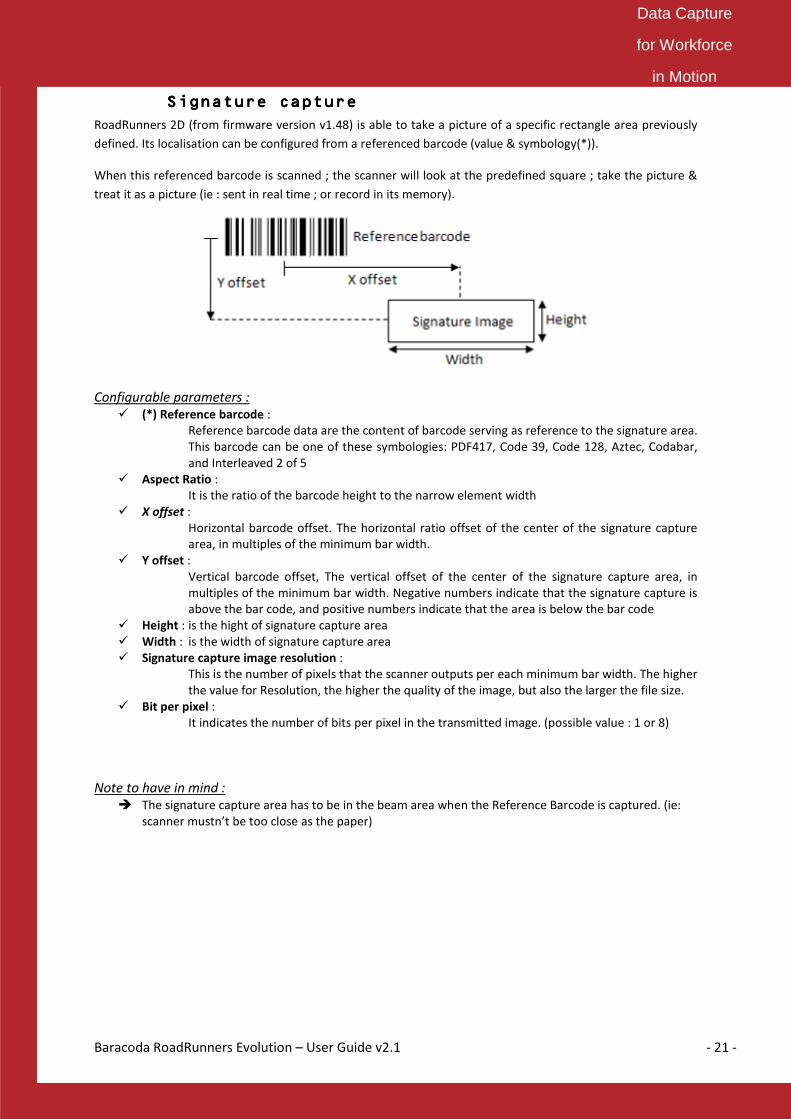
RoadRunners 2D (from firmware version
defined. Its localisation can be configured from a referenced barcode (value & symbology(*)).
When this referenced barcode is scanned ;
treat it as a picture (ie : sent in real time ; or record in its memory).
Configurable parameters :
� (*) Reference barcode :
Reference barcode data are the content of barcode serving as reference to the signature area.
This barcode can be one of these symbologies: PDF417, Code 39, Code 128, Aztec, Codabar,
and Interleaved 2 of 5
� Aspect Ratio :
It is the ratio of the bar
� X offset :
Horizontal barcode offset.
area, in multiples of the minimum bar width
� Y offset :
Vertical barcode o
multiples of the minimum bar width. Negative numbers indicate that the signature capture is
above the bar code, and positive numbers indicate that the area is below the bar
� Height : is the hight of signature capture area
� Width : is the width of signature capture area
� Signature capture image resolution
This is the number of pixels that the scanner outputs per each minimum bar width. The higher
the value for Resolutio
� Bit per pixel :
It indicates the number of bits per pixel in the transmitted image
Note to have in mind :
� The signature capture area has to be in the
scanner mustn’t be too close as the paper)
ners Evolution – User Guide v2.1
Signature captureSignature captureSignature captureSignature capture
RoadRunners 2D (from firmware version v1.48) is able to take a picture of a specific rectangle area previously
configured from a referenced barcode (value & symbology(*)).
scanned ; the scanner will look at the predefined square ; take the picture &
treat it as a picture (ie : sent in real time ; or record in its memory).
Reference barcode data are the content of barcode serving as reference to the signature area.
This barcode can be one of these symbologies: PDF417, Code 39, Code 128, Aztec, Codabar,
and Interleaved 2 of 5
ratio of the barcode height to the narrow element width
barcode offset. The horizontal ratio offset of the center of the signature capture
area, in multiples of the minimum bar width.
offset, The vertical offset of the center of the signature capture area, in
multiples of the minimum bar width. Negative numbers indicate that the signature capture is
above the bar code, and positive numbers indicate that the area is below the bar
is the hight of signature capture area
is the width of signature capture area
Signature capture image resolution :
he number of pixels that the scanner outputs per each minimum bar width. The higher
the value for Resolution, the higher the quality of the image, but also the larger the file size.
indicates the number of bits per pixel in the transmitted image. (possible value : 1 or 8)
he signature capture area has to be in the beam area when the Reference Barcode is captured.
scanner mustn’t be too close as the paper)
- 21 -
Data Capture
for Workforce
in Motion
of a specific rectangle area previously
configured from a referenced barcode (value & symbology(*)).
the scanner will look at the predefined square ; take the picture &
Reference barcode data are the content of barcode serving as reference to the signature area.
This barcode can be one of these symbologies: PDF417, Code 39, Code 128, Aztec, Codabar,
The horizontal ratio offset of the center of the signature capture
The vertical offset of the center of the signature capture area, in
multiples of the minimum bar width. Negative numbers indicate that the signature capture is
above the bar code, and positive numbers indicate that the area is below the bar code
he number of pixels that the scanner outputs per each minimum bar width. The higher
n, the higher the quality of the image, but also the larger the file size.
. (possible value : 1 or 8)
beam area when the Reference Barcode is captured. (ie:
Baracoda RoadRunners Evolution – User Guide v2.1 - 22 -
Data Capture
for Workforce
in Motion
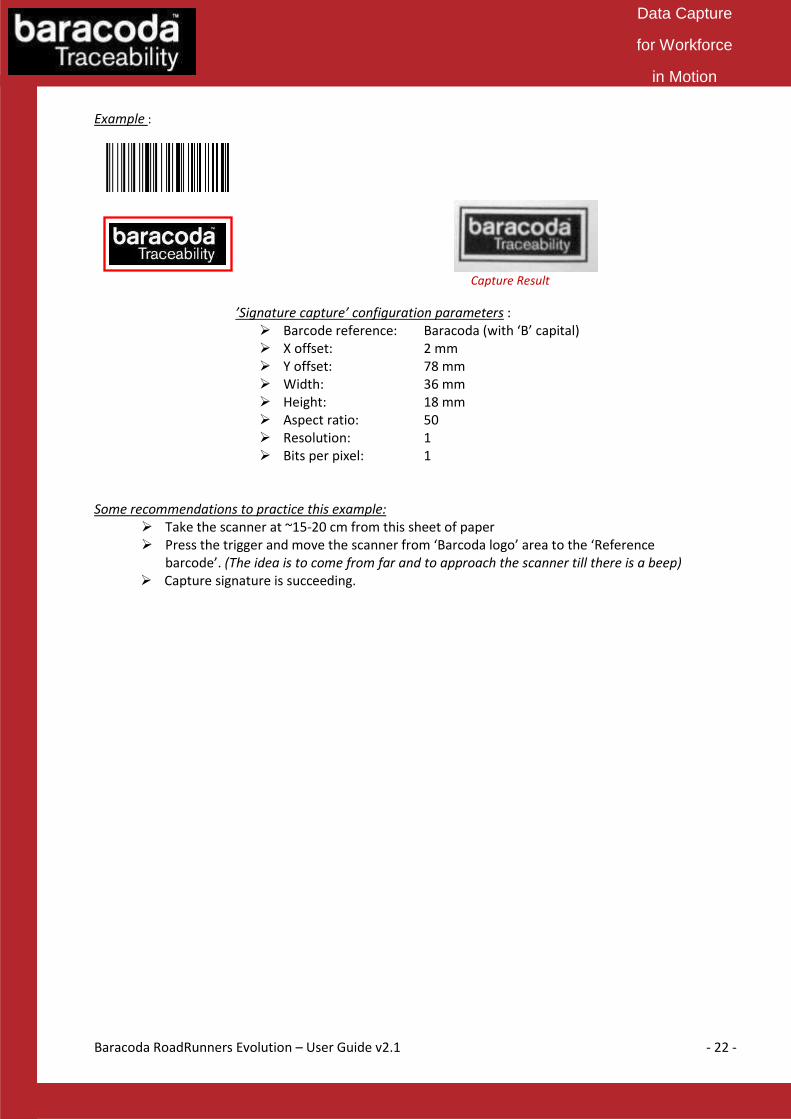
Example :
Capture Result
’Signature capture’ configuration parameters :
� Barcode reference: Baracoda (with ‘B’ capital)
� X offset: 2 mm
� Y offset: 78 mm
� Width: 36 mm
� Height: 18 mm
� Aspect ratio: 50
� Resolution: 1
� Bits per pixel: 1
Some recommendations to practice this example:
� Take the scanner at ~15-20 cm from this sheet of paper
� Press the trigger and move the scanner from ‘Barcoda logo’ area to the ‘Reference
barcode’. (The idea is to come from far and to approach the scanner till there is a beep)
� Capture signature is succeeding.
Baracoda RoadRunners Evolution – User Guide v2.1 - 23 -
Data Capture
for Workforce
in Motion
Safety / Regulatory.Safety / Regulatory.Safety / Regulatory.Safety / Regulatory.
FCC:
Product FCC Id: QSH AIRRNA
Interference statement:
This device complies with Part 15 of the FCC Rules.
Operation is subject to the following two conditions:
(1) this device may not cause harmful interference, and
(2) this device must accept any interference received, including interference that may cause undesired
operation.
Modification statement:
The FCC requires the user to be notified that any changes or modifications made to this device that are not
expressly approved by Baracoda Wireless Technology, may void the user’s authority to operate the equipment.
Class B digital devices regulatory notice:
This equipment has been tested and found to comply with the limits for a Class B digital device, pursuant to
Part 15 of the FCC Rules. These limits are designed to provide reasonable protection against harmful
interference in a residential installation. This equipment generates, uses, and can radiate radio frequency
energy and, if not installed and used in accordance with the instructions, may cause harmful interference to
radio communications. However, there is no guarantee that interference will not occur in a particular
installation. If this equipment does cause harmful interference to radio or television reception, which can be
determined by turning the equipment off and on, the user is encouraged to try to correct the interference by 1
or more of the following measures:
• Reorient or relocate the receiving antenna
• Increase the separation between the equipment and receiver
• Connect the equipment into an outlet on a circuit different from that to which the receiver is
connected
• Consult the dealer or an experienced radio or television technician for help
Wireless notice
This product emits radio frequency energy, but the radiated output power of this device is far below the FCC
radio frequency exposure limits. Nevertheless, the device should be used in such a manner that the potential
for human contact with the antenna during normal operation is minimized. The system antenna(s) used for this
transmitter must not be co-located or operating in conjunction with any other antenna or transmitter.
Baracoda RoadRunners Evolution
EU:
This equipment is intended to be commercialised in all the countries of the European Union and there is no
commercialisation or operational restrictions in any of the countries.
Hereby, Baracoda Wireless Technology declares that this Bluetooth barcode scanner is in complian
essential requirements and other relevant provisions of Directive 1999/5/EC.
in progress.
European countries, where this equipment
Switzerland/Liechtenstein (CH) - Cyprus (CY)
- Finland (FI) - France (FR) - Greece (GR)
(LU) - Latvia (LV) - Malta (MT) - Netherlands (NL)
Slovenia (SI) – Slovak Republic (SK) -
Laser notice
Use of controls or adjustments or performance of procedures other than those specified herein may result in
exposure to hazardous visible laser light.
The laser scanner utilizes a low-power laser diode. Although staring directly at the laser beam momentarily
causes no known biological damage, avoid staring at the beam as one would with any very strong light source,
such as the sun. Avoid that the laser beam hits the eye of an observer, even through reflective surfaces such as
mirrors, etc.
The following information is shown on the laser scanner device class label:
Others indications:
This device is a radio transmitter and receiver. It is designed and manufactured to not exceed the limits
exposure to radio-frequency (RF) energy, as
comprehensive guidelines and establish permitted
This device must maintain a distance of al least 20cm from the user’s body when transmitting
This directive includes as one of its
and any other person. In respect of these recomme
for example) while it is operational. The unit should be
ners Evolution – User Guide v2.1
intended to be commercialised in all the countries of the European Union and there is no
commercialisation or operational restrictions in any of the countries.
Hereby, Baracoda Wireless Technology declares that this Bluetooth barcode scanner is in complian
essential requirements and other relevant provisions of Directive 1999/5/EC. The declaration
where this equipment can be used are : Austria (AT) - Belgium (BE)
Cyprus (CY) - Czech Republic (CZ) - Germany (DE) – Denmark (DK)
Greece (GR) - Hungary (HU) - Ireland (IE) - Iceland (IS) - Lithuan
Netherlands (NL) - Norway (NO) - Portugal (PT) - Romania (RO)
- United Kingdom (UK)-Italy (IT)-Poland (PO)-Spain (SP).
or adjustments or performance of procedures other than those specified herein may result in
exposure to hazardous visible laser light.
power laser diode. Although staring directly at the laser beam momentarily
own biological damage, avoid staring at the beam as one would with any very strong light source,
such as the sun. Avoid that the laser beam hits the eye of an observer, even through reflective surfaces such as
wn on the laser scanner device class label:
This device is a radio transmitter and receiver. It is designed and manufactured to not exceed the limits
frequency (RF) energy, as recommended by the EU & FCC Councils. These limits are part
comprehensive guidelines and establish permitted levels of RF energy for the general population.
his device must maintain a distance of al least 20cm from the user’s body when transmitting
one of its essential requirements the protection of the health and
In respect of these recommendations, the device should not be body worn (in the pocket
for example) while it is operational. The unit should be turned off or not transmitting in those circumstances.
- 24 -
Data Capture
for Workforce
in Motion
intended to be commercialised in all the countries of the European Union and there is no
Hereby, Baracoda Wireless Technology declares that this Bluetooth barcode scanner is in compliance with the
The declaration of conformity is
Belgium (BE) - Bulgaria (BG) -
Denmark (DK) - Estonia (EE)
Lithuania (LT) – Luxembourg
Romania (RO) - Sweden (SE) -
Spain (SP).
or adjustments or performance of procedures other than those specified herein may result in
power laser diode. Although staring directly at the laser beam momentarily
own biological damage, avoid staring at the beam as one would with any very strong light source,
such as the sun. Avoid that the laser beam hits the eye of an observer, even through reflective surfaces such as
This device is a radio transmitter and receiver. It is designed and manufactured to not exceed the limits for
Councils. These limits are part of
levels of RF energy for the general population.
his device must maintain a distance of al least 20cm from the user’s body when transmitting.
essential requirements the protection of the health and safety of the user
body worn (in the pocket
turned off or not transmitting in those circumstances.
Baracoda RoadRunners Evolution – User Guide v2.1 - 25 -
Data Capture
for Workforce
in Motion
Limited Warranty.Limited Warranty.Limited Warranty.Limited Warranty.
Manufacturer warrants that the product will be free of defects in material and workmanship for one (1) year
from the date of shipment. Manufacturer will, at its option, either repair, replace or refund the purchase price
paid by buyer for the defective products.
Such repair, replacement or refund shall be buyer's sole remedy in the event of Manufacturer's breach of this
limited warranty. Repaired or replaced parts or product may include new, reconditioned or remanufactured
parts and equipment at Manufacturer's option. All costs associated with shipment to Manufacturer for
warranty service, including but not limited to freight, duties, insurance and customs fees are buyer's
responsibility. Manufacturer will pay the freight costs (duties, insurance, customs and any other fees are
buyer's responsibility) associated with the return shipment to buyer. The method of shipment will be at
Manufacturer's discretion. Repair or replacement of any parts or equipment does not extend the period of
warranty provided for herein. THIS LIMITED WARRANTY IS MANUFACTURER'S ONLY WARRANTY.
MANUFACTURER DOES NOT GIVE WARRANTIES OF MERCHANTABILITY OR WARRANTIES OF FITNESS FOR A
PARTICULAR PURPOSE. To take advantage of this warranty, buyer should contact the seller not the
Manufacturer. The warranty set forth herein does not cover and Manufacturer will have no obligations
hereunder if any non-conformance is caused in whole or in part by; accident, transportation, neglect, misuse,
alteration, modification, or enhancement of the products or incorporation, interfacing, attachment of any
feature, program, or device to the Products by a person or entity other than Manufacturer, failure to provide a
suitable installation environment, use of the products for other than the specific purpose for which the
products are designed or any use of the product not in accordance with the User Guide or other misuse or
abuse of the product. The warranty does not cover problems linked to batteries.


![T-76.115 Project Review RoadRunners [IM1] Iteration 02.12.2003.](https://static.fdocuments.in/doc/165x107/56649f3e5503460f94c5e794/t-76115-project-review-roadrunners-im1-iteration-02122003.jpg)