REQUISITIONS – REQUESTS FOR PURCHASE › business-finance › purchasing › ...Requisitions...
93
REQUISITION INITIATION 9.1 Rev. March 2013 Purchasing 9.1 Page 1 REQUISITIONS – REQUESTS FOR PURCHASE OVERVIEW This section outlines the steps necessary to enter a Requisition into the FAST Financials System. Departmental Users (a.k.a. Initiators, Requesters) will initiate a request for purchase by utilizing the online Requisition functionality in the FAST Purchasing module to initiate a request for purchase. Identification of where expenses should be charged will be entered on the Requisition and will carry forward automatically to the PO, the Receipt and finally to the Voucher. Individuals are identified in each of the units with authority to initiate requests for purchases of goods and services. They are given the FAST security role of USF_POREQINIT which enables them to enter requisitions and push them into Workflow, the FAST approval routing process. Requisitions approved by the individuals with departmental authority for approving purchases and expenditures move along to the Purchasing Department for final approval and the creation of a Purchase Order. The Purchase Order, not the requisition, is USF’s official document authorizing the department to purchase the goods or services requested. Sections will provide navigation, screenshots, data selection information and procedure. A Purchasing Hands-on Job Aid is available for experienced initiators who need only reminders. Additional Fast Purchasing Manuals are available for related purchasing functions.
Transcript of REQUISITIONS – REQUESTS FOR PURCHASE › business-finance › purchasing › ...Requisitions...

REQUISITION INITIATION 9.1
Rev. March 2013 Purchasing 9.1 Page 1
REQUISITIONS – REQUESTS FOR PURCHASE OVERVIEW
This section outlines the steps necessary to enter a Requisition into the FAST Financials System. Departmental Users (a.k.a. Initiators, Requesters) will initiate a request for purchase by utilizing the online Requisition functionality in the FAST Purchasing module to initiate a request for purchase. Identification of where expenses should be charged will be entered on the Requisition and will carry forward automatically to the PO, the Receipt and finally to the Voucher. Individuals are identified in each of the units with authority to initiate requests for purchases of goods and services. They are given the FAST security role of USF_POREQINIT which enables them to enter requisitions and push them into Workflow, the FAST approval routing process.
Requisitions approved by the individuals with departmental authority for approving purchases and expenditures move along to the Purchasing Department for final approval and the creation of a Purchase Order. The Purchase Order, not the requisition, is USF’s official document authorizing the department to purchase the goods or services requested.
Sections will provide navigation, screenshots, data selection information and procedure.
A Purchasing Hands-on Job Aid is available for experienced initiators who need only reminders.
Additional Fast Purchasing Manuals are available for related purchasing functions.
REQUISITION INITIATION 9.1
Rev. March 2013 Purchasing 9.1 Page 2
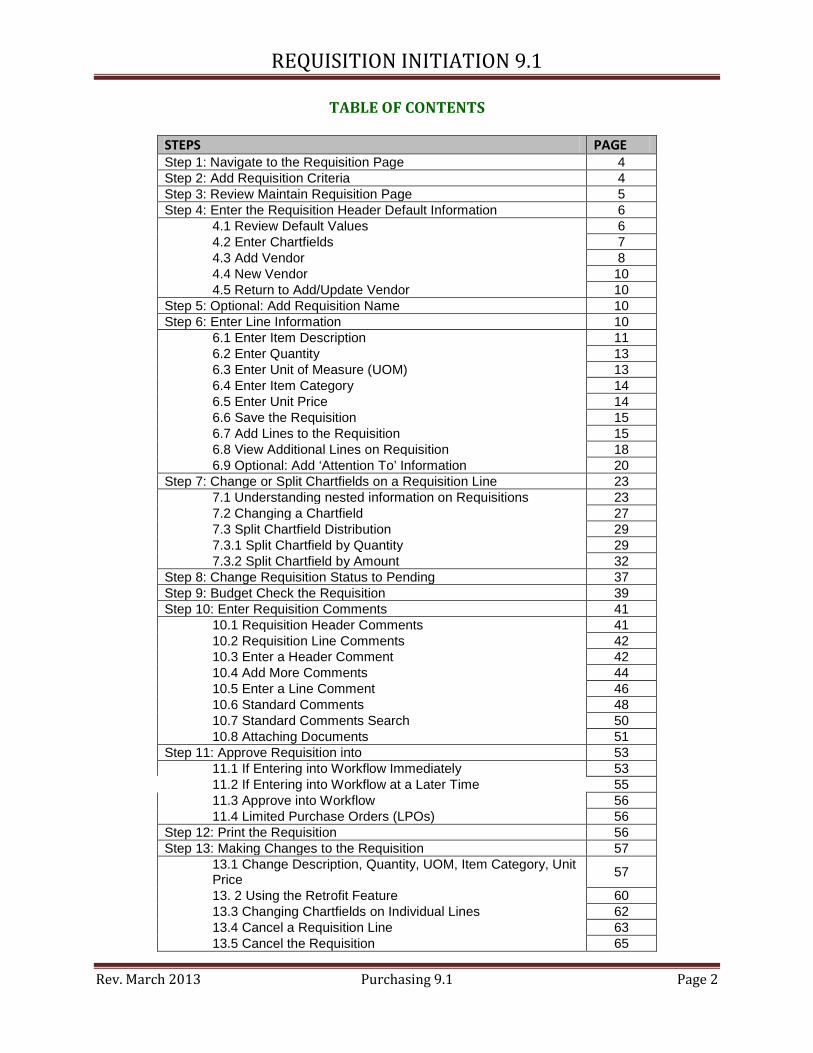
TABLE OF CONTENTS
STEPS PAGE Step 1: Navigate to the Requisition Page 4 Step 2: Add Requisition Criteria 4 Step 3: Review Maintain Requisition Page 5 Step 4: Enter the Requisition Header Default Information 6
4.1 Review Default Values 6 4.2 Enter Chartfields 7 4.3 Add Vendor 8 4.4 New Vendor 10 4.5 Return to Add/Update Vendor 10
Step 5: Optional: Add Requisition Name 10 Step 6: Enter Line Information 10
6.1 Enter Item Description 11 6.2 Enter Quantity 13 6.3 Enter Unit of Measure (UOM) 13 6.4 Enter Item Category 14 6.5 Enter Unit Price 14 6.6 Save the Requisition 15 6.7 Add Lines to the Requisition 15 6.8 View Additional Lines on Requisition 18 6.9 Optional: Add ‘Attention To’ Information 20
Step 7: Change or Split Chartfields on a Requisition Line 23 7.1 Understanding nested information on Requisitions 23 7.2 Changing a Chartfield 27 7.3 Split Chartfield Distribution 29 7.3.1 Split Chartfield by Quantity 29 7.3.2 Split Chartfield by Amount 32
Step 8: Change Requisition Status to Pending 37 Step 9: Budget Check the Requisition 39 Step 10: Enter Requisition Comments 41
10.1 Requisition Header Comments 41 10.2 Requisition Line Comments 42 10.3 Enter a Header Comment 42 10.4 Add More Comments 44 10.5 Enter a Line Comment 46 10.6 Standard Comments 48 10.7 Standard Comments Search 50 10.8 Attaching Documents 51
Step 11: Approve Requisition into 53 11.1 If Entering into Workflow Immediately 53 11.2 If Entering into Workflow at a Later Time 55 11.3 Approve into Workflow 56 11.4 Limited Purchase Orders (LPOs) 56
Step 12: Print the Requisition 56 Step 13: Making Changes to the Requisition 57
13.1 Change Description, Quantity, UOM, Item Category, Unit Price 57
13. 2 Using the Retrofit Feature 60 13.3 Changing Chartfields on Individual Lines 62 13.4 Cancel a Requisition Line 63 13.5 Cancel the Requisition 65

REQUISITION INITIATION 9.1
Rev. March 2013 Purchasing 9.1 Page 3
Step 14: Copy a Requisition 67 Step 15. Create Amount-Only Requisition Lines 72
15.1 Follow Steps 1-6 72 15.2 Line Details Page 72 15.3 Select Attributes 72 15.4 Select Amount Only Flag 73 15.5 Add Header Comment 74 15.6 Optional: Split Chartfield Distribution 74 15.7 Quantity Notification 74 15.8 Allocation Notification 74
Step 16. Customization of Chartfield String 75 Appendix I: Common Error Messages and Warnings 81
Save Warning 81 Budget Status Error 81 PC Bus Unit, Project and Activity are Required 84 Chartfield Combination Error 85
Appendix II: About Item Categories 87 Price Tolerances 87 Codes, Descriptions and Searching for an Item Category 88 Account Numbers 89 Equipment Purchases 89
Appendix III: Useful Standard Statements for Requesters 90
REQUISITION INITIATION 9.1
Rev. March 2013 Purchasing 9.1 Page 4
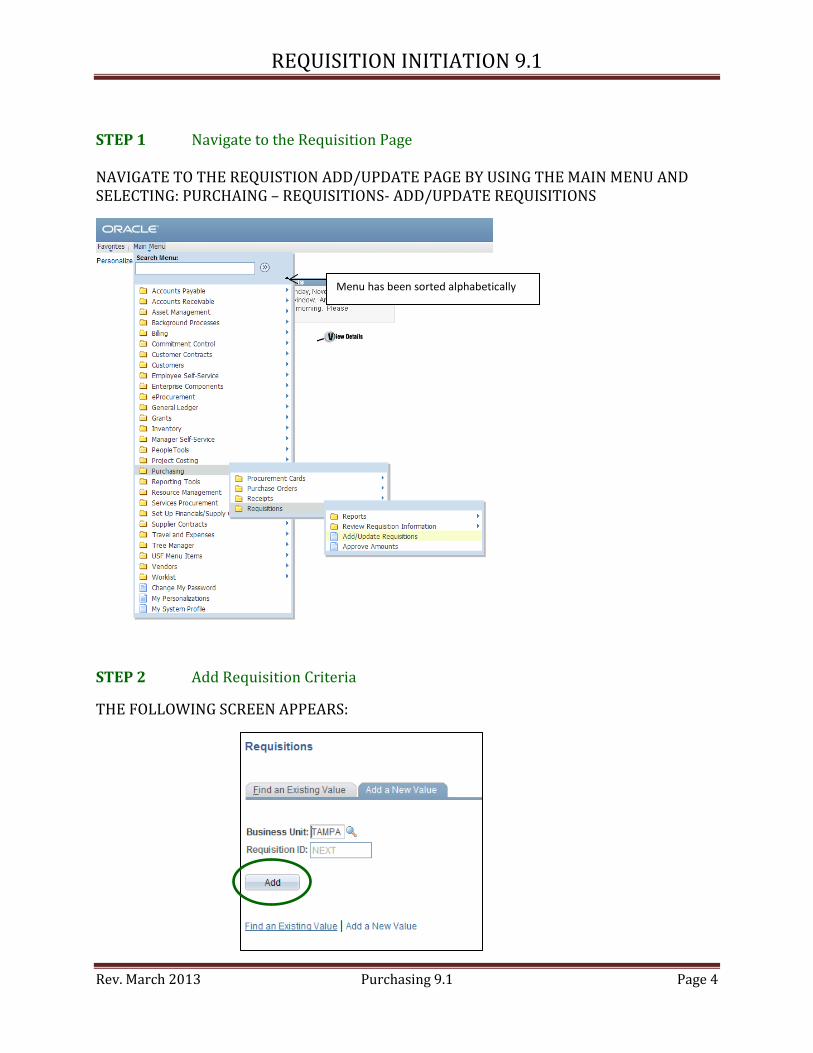
STEP 1 Navigate to the Requisition Page NAVIGATE TO THE REQUISTION ADD/UPDATE PAGE BY USING THE MAIN MENU AND SELECTING: PURCHAING – REQUISITIONS- ADD/UPDATE REQUISITIONS
STEP 2 Add Requisition Criteria
THE FOLLOWING SCREEN APPEARS:
Menu has been sorted alphabetically

REQUISITION INITIATION 9.1
Rev. March 2013 Purchasing 9.1 Page 5
The system should pre-select the Add a New Value tab
Select the Purchasing Business Unit for this Requisition if it does not default in
Note: The Purchasing Business Unit represents the entity for which the purchase is being made and will default in from the Requester’s default setup. This value can be changed if necessary. The available values are as follows:
TAMPA – Tampa & FIPR purchases excluding Physical Plant PPLNT – Purchases made by Tampa Physical Plant STPTE – St Petersburg Campus purchases SRSTA – Sarasota Campus purchases LKLND – Polytechnic Campus purchases
The General Ledger Business Unit used for accounting purposes is always USF01. Do not confuse business units, there are several more used in FAST.
Allow the Requisition ID to default to ‘NEXT’. Do NOT type in this box. This will flag the system to automatically assign the Requisition ID. Requisitions from the Sarasota Business Unit will begin with 006, those from St. Petersburg will begin with 007, those from Polytechnic with 008 those from Physical Plant with 009 and the Tampa Requisitions will remain 000. Requisitions are 10 digits long. E.g. a Sarasota Requisition will be 0060001123.
Click on the Add button to get to the Maintain Requisition page
STEP 3 Review Maintain Requisition Page
THE FOLLOWING SCREEN APPEARS:

REQUISITION INITIATION 9.1
Rev. March 2013 Purchasing 9.1 Page 6
Verify the correct Requester name is your own user id Do not enter or change information on this page until you have added default information on the Requisition Defaults page Click on the Requisition Defaults hyperlink to change your defaults (if necessary) and to select the Vendor.
STEP 4 Enter the Requisition Header Default Information
NOTE: The Header Default page is a template for the lines of the Requisition which will be added after the template is filled out. Information entered here will be placed on each Line of the Requisition. Its intent is to save unnecessary and repetitive input. The system does not read this part of the Requisition. It will only read what is on the Requisition Line and each line’s Schedule and Distribution.
4.1 Review Default Values Some values will default in based on the Requester setup, all of which can be overridden by changing the default values on this page or individual on the requisition lines which will be added
4.1 Default Options – Do NOT Change
4.1 Ship To
4.1 Location 4.1 Chartfield String

REQUISITION INITIATION 9.1
Rev. March 2013 Purchasing 9.1 Page 7
• Ship To location – identifies the shipping information that the vendor needs
• Location – identifies the building and room code for central receiving to deliver the goods
• Chartfield String – identifies where the cost of the purchase will be charged to in the General Ledger.
Note: The Default Option is set to “Override” do NOT change this option or the values you enter may be changed 4.2 Enter Chartfields Enter the chartfields for the purchase, if the default chartfields are incorrect. Frequently changed chartfields are Fund, Product and Initiative. DO NOT ENTER AN ACCOUNT NUMBER Account numbers are added by the Item Category on each line of the requisition. If a Project is being used, the PC Business Unit must be selected before the project number can be entered. Sponsored Research projects use PC Business Unit GRT01 Construction (PECO) projects use PC Business Unit USF01 All projects require an Activity to be selected. Chartfields should be obtained from a department authority that has budget responsibilities.
NOTE: The Initiative field defaults to the far right of the page. Use the Customization feature to move the field to the left. See Step 15 Customization

REQUISITION INITIATION 9.1
Rev. March 2013 Purchasing 9.1 Page 8
4.3 Add Vendor Each requisition should have only one (1) vendor. Vendors should be selected using the Vendor Lookup. This will ensure the vendor is currently active and open for ordering in the system.
Click on the Vendor Lookup link Enter a vendor name and click the Search button. It is best to enter only part of the Vendor name and use the wildcard % for this purpose.
4.3 Search results

REQUISITION INITIATION 9.1
Rev. March 2013 Purchasing 9.1 Page 9
Vendor addresses are indicated by the ‘Location’ code. The first line of the vendor’s address is displayed up to 10 characters. To view the complete address, click the ‘Sel’ box and then the Address link at the bottom of the page.
Click OK to return to the Vendor Search results.
Once the correct address of the vendor is ascertained, Select that vendor by checking the appropriate box and click the ‘OK’ button. This action will return you to the Requisition Defaults page. The vendor id, name and location will appear on the header.
NOTE: DO NOT ENTER A BUYER NAME. Buyers are assigned by the Workflow process. Make sure this field is blank at this point in the requisition entry process.

REQUISITION INITIATION 9.1
Rev. March 2013 Purchasing 9.1 Page 10
4.4 New Vendor If the vendor is not in the Fast system, the requisition can still be created. Obtain a W-9 form from the vendor. The USF format is online here and is the best form to use for the university. The W-9 should be scanned as an Adobe .pdf file. The W-9 MUST have a physical street address and email address. The physical address does not have to be used as a mailing address but must be supplied for verification and audit purposes. Enter a Standard Comment Type REQ Standard Comment id NEWV and attach the scanned W-9 to the comment. See Step 12 Enter Requisition Comments, below 4.5 Return to Add/Update Requisitions Once the chartfields and vendor are entered, click the OK button to return to the Add/Update Requisition page to add specific items to the requisition.
STEP 5 OPTIONAL: Enter Requisition Name
A requisition name can be entered to provide an additional search criterion when searching for a requisition or group of requisitions. The name is an alpha/numeric character field that is not case sensitive. It is not restricted by user id. Using an event, semester, name, course, the Requisition Name should be coupled with the user’s id or the department number for best results. This is an optional field. If it is not used, the requisition number will populate this field.
STEP 6 Enter Line Information Each, different commodity or service being ordered is given a separate line on a requisition. The multiple of each item is indicated by the quantity field. Important Note: Requisitions must have a Line 1. Do not under any circumstances delete Line 1 from any requisition or the requisition will not flow through the system.
ndellapo
Typewritten Text
Refer to New Vendor information on the Accounts Payable website at http://www.usf.edu/business-finance/controller/payment-services/vendors.aspx
ndellapo
Line
ndellapo
Line

REQUISITION INITIATION 9.1
Rev. March 2013 Purchasing 9.1 Page 11
Commodities should be entered with broad descriptions which narrow down to specific details of the item.
Examples:
Services should include dates, rates, deliverables and billing information
Examples:
In the 2nd example, the equipment is being rented for 2 days and this will be indicated in the quantity (2) and unit of measure (day)
6.1 Enter item description
Type the description in the Description field. The information will scroll as it is being typed in.

REQUISITION INITIATION 9.1
Rev. March 2013 Purchasing 9.1 Page 12
An alternative is to click the Modal icon to open the entire field:
Click OK when complete

REQUISITION INITIATION 9.1
Rev. March 2013 Purchasing 9.1 Page 13
6.2 Enter Quantity being ordered
6.3 Enter Unit of Measure (UOM)
Use the drop-down search icon to view available units. Frequently used UOMs are:
EA Each LOT Lot (often used for amount only purchases) CTN Carton CS Case HR Hour
Select the UOM by clicking on it
Here, DAY has been selected

REQUISITION INITIATION 9.1
Rev. March 2013 Purchasing 9.1 Page 14
6.4 Enter Item Category
IMORTANT: Please read the About Item Categories in Appendix II at the end of this manual for a full explanation of how Item Categories are organized and the GL Account numbers and Matching tolerances that are established for each category.
Click the Look-up icon and select an Item Category.
Each category should reflect the general description of the good/services being purchases.
Search by using general terms in the Category ID field:
The Description can be used for more specific definitions if there is a problem finding a good match:

REQUISITION INITIATION 9.1
Rev. March 2013 Purchasing 9.1 Page 15
Use the “contains” parameter to find the word within the Category ID or Description.
For an individual commodity that costs less than $5000, select an Item Category with Supply as part of the Category ID or in the Description.
Individual items costing $5000 or more are considered Assets of the University and are recorded, tagged and reported to the state.
These items are considered ‘Capital Equipment’. Look for Item Categories with ‘Equip’ or ‘OCO’ (Other Capital Outlay) in their Category ID or Description.
The Item Category selected will place an Account number on the Distribution of the requisition line being entered.
For Sponsored Research Projects, user should refer to the Rosetta Stone for a correlation between Item Category GL Expense Account numbers and their roll up to Budget Accounts
6.5 Enter Unit Price
This is the price of the individual item. The Unit Price will be multiplied by the quantity to calculate the total cost of the line.

REQUISITION INITIATION 9.1
Rev. March 2013 Purchasing 9.1 Page 16
2 x $150 = $300
6.6 Save the Requisition
After entering the first line, save the requisition by clicking the Save button at the bottom left of the screen.
A requisition number will be assigned.
If the Requisition Name is not used, the Requisition Number will appear in the Requisition Name field.
If more information is added to the requisitions, make sure to Save every few lines to ensure the changes will not be lost.
6.7 Add Lines to Requisition
Click the plus + sign to the right of the first requisition line.
6.4 Save

REQUISITION INITIATION 9.1
Rev. March 2013 Purchasing 9.1 Page 17
Enter the number of additional lines you expect to need in the dialog box that appears and click OK
Additional blank lines appear on the requisition to complete.

REQUISITION INITIATION 9.1
Rev. March 2013 Purchasing 9.1 Page 18
If more lines are needed click the + sign and repeat.
6.8 View Additional Lines on Requisition
The Requisition Add/Update page is defaulted to display a limited number of lines on a page.
To scroll to additional lines, use the line display feature to the right. Use the arrows to scroll up and down each set of lines and the ‘Last’ and ‘First’ links to go to last line or back to line 1.

REQUISITION INITIATION 9.1
Rev. March 2013 Purchasing 9.1 Page 19
Using the View All link, the page will display up to 15 requisition lines.
To navigate to specific lines, use the Select Lines to Display and enter the lines from line number xxx to line number xxx and click Retrieve
The system will warn that any changes made to the PO up to this point will be saved.
Click “OK.”
The system will return only the lines requested.

REQUISITION INITIATION 9.1
Rev. March 2013 Purchasing 9.1 Page 20
Select a new range of lines to retrieve or return to Search to pull up the entire PO again.
6.9 Optional: Add ‘Attention To’ Information
The Schedule page is normally left alone by initiators. (Please see Step 7.1 Understanding Nested Information on Requisitions)
In the situation where a requisition has multiple lines that are intended for several different people, the user can keep track of what item belongs to whom by indicating that person on the ‘Attention To’ field on the Schedule of the requisition line for that item.

REQUISITION INITIATION 9.1
Rev. March 2013 Purchasing 9.1 Page 21
Click on the Schedule icon for requisition line 1
Click ‘View All’ on the Line bar

REQUISITION INITIATION 9.1
Rev. March 2013 Purchasing 9.1 Page 22
View All displays the Schedule for each Requisition Line. Type in the individual name or any other information desired such as room number. The field is limited to 30 characters.
When the receipt for some or all items is created, the Receiving Report will display the information. (See the Receiving manual on the Purchasing Manuals page)
Type in the different individuals who will get these items
Requisition Line Numbers

REQUISITION INITIATION 9.1
Rev. March 2013 Purchasing 9.1 Page 23
Receiving Report with Attention To information
STEP 7 Change or Split Chartfields on Requisition Lines
Occasionally there is a need to change the chartfield on a requisition line to a different chartfield. This may be for a different product or fund.
For the purchase of some items or services, the cost is being split between two or more areas and the cost has to reflect this split distribution.
Although the Requisition Header default allows for split distribution over all lines, this often requires difficult calculation of percentages that are often wrong.
The best place to split the charge is on the requisition line, itself.
7.1 Understanding nested information on Requisitions
Each requisition line copies the vendor, shipping and chartfield information that was entered on the Requisition Header Default page. This page is NOT read by the system when budget checking and processing. This page is a template and the information on it is placed on each line of the requisition created.

REQUISITION INITIATION 9.1
Rev. March 2013 Purchasing 9.1 Page 24
If the information is not on the template when the line is entered, the information will not appear on the line and the system may find that line in error or it may ignore the line completely.
The information from the default page creates a Requisition Header.
The Header contains payment terms, Requester information, accounting dates and links to other pages within the requisition and elsewhere in the system.
The Requisition Line contains the item Description, Item Category and Vendor name.
Each Requisition Line has an associated Requisition Schedule.
To view the Schedule, click the Schedule icon to the right of the line.

REQUISITION INITIATION 9.1
Rev. March 2013 Purchasing 9.1 Page 25
Requisition Line Schedule
Each Requisition line should only have one Schedule.
The Schedule contains the Ship To address, the quantity and the unit price. The system allows multiple Schedules for each line, however users should NEVER create an additional Schedule for a requisition line. This will create problems with the transaction due to the way the university handles its processes.
To View the Chartfields for the line, click on the Distribution icon
Refers to Requisition Line 1 of 1
Refers to Schedule 1 of 1

REQUISITION INITIATION 9.1
Rev. March 2013 Purchasing 9.1 Page 26
Requisition Distribution Line
Note: This view has been Customize to hide unused fields and rearrange other fields
Requisition lines may have many Distribution lines associated with them.
Distributions are nested up to one Schedule and the Schedule is nested into the Line. The Lines, in turn are nested into the Requisition Header. (Do not confuse the Requisition Header with the Requisition Header Defaults.)
Requisition Schedule Number
Requisition Line Number
Requisition Id
Requisition Distribution Number

REQUISITION INITIATION 9.1
Rev. March 2013 Purchasing 9.1 Page 27
7.2 Changing a chartfield
See screenshots in 7.1 above Find the Schedule icon to the right of the Requisition Line to be changed and click on it.
Click on the Distribution icon on the Schedule.
On the Distribution page type over the chartfield value with the new chartfield value.
Click OK to return to the Schedule.
Click in the field and type in the new Project Or use the Look Up icon to the right.

REQUISITION INITIATION 9.1
Rev. March 2013 Purchasing 9.1 Page 28
On the Schedule page, click Save.
Click Return to Main Page link to return to the Add/Update Requisition page.
If changes need to be made to additional requisition lines, it is unnecessary to return to the main page each time.
On the Schedule, users may scroll up and down line numbers using the Line bar and clicking the arrows
REQUISITION INITIATION 9.1
Rev. March 2013 Purchasing 9.1 Page 29
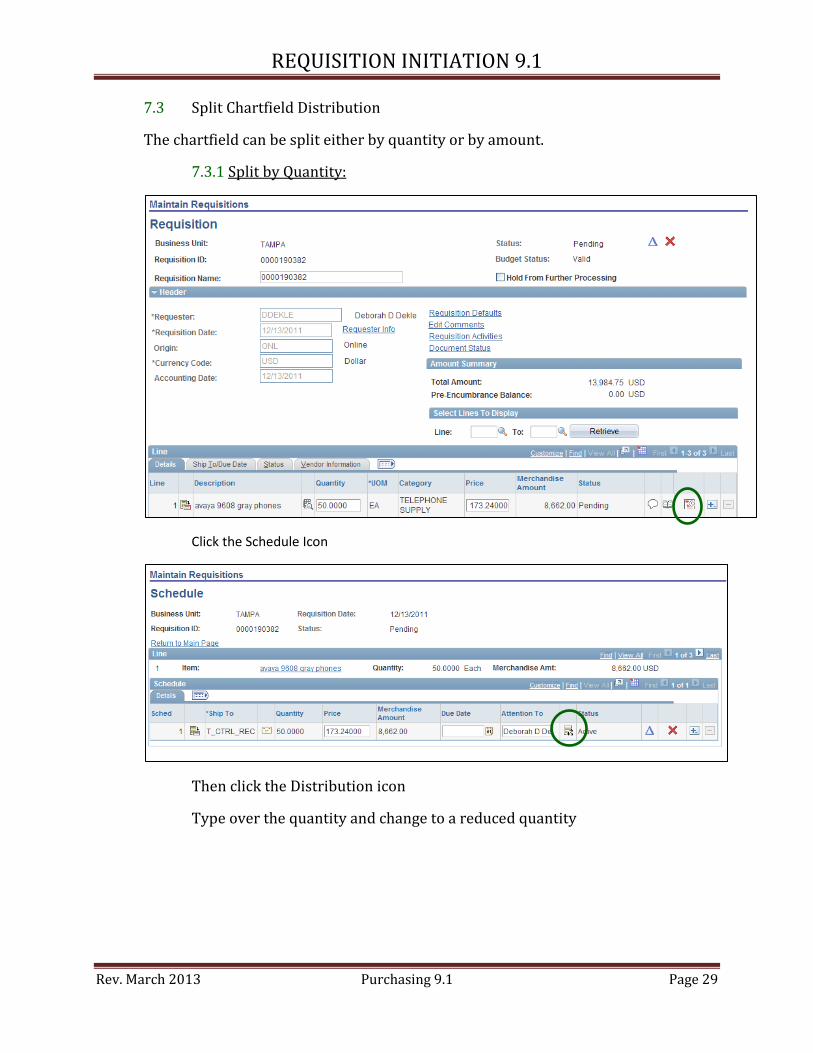
7.3 Split Chartfield Distribution
The chartfield can be split either by quantity or by amount.
7.3.1 Split by Quantity:
Click the Schedule Icon
Then click the Distribution icon
Type over the quantity and change to a reduced quantity

REQUISITION INITIATION 9.1
Rev. March 2013 Purchasing 9.1 Page 30
Scroll to the right and click the add + button
In the dialog box that appears, enter the number of additional chartfield lines you need and click OK.
In this example the 25 items are being split into two more chartfields:
On each line, type in the quantity and the chartfields desired and click the OK button
Complete the new lines with the quantities and chartfield strings needed for each
Click + button
Quantity reduced to 25
In the dialog box, enter the number of additional lines needed and click OK

REQUISITION INITIATION 9.1
Rev. March 2013 Purchasing 9.1 Page 31
Note that the 2nd line automatically calculates the remaining quantity.
Instead of calculating the total of each line, the lines can be added one by one and each time the new line will reflect the balance. (See Amount Split below)
Completed quantity split.

REQUISITION INITIATION 9.1
Rev. March 2013 Purchasing 9.1 Page 32
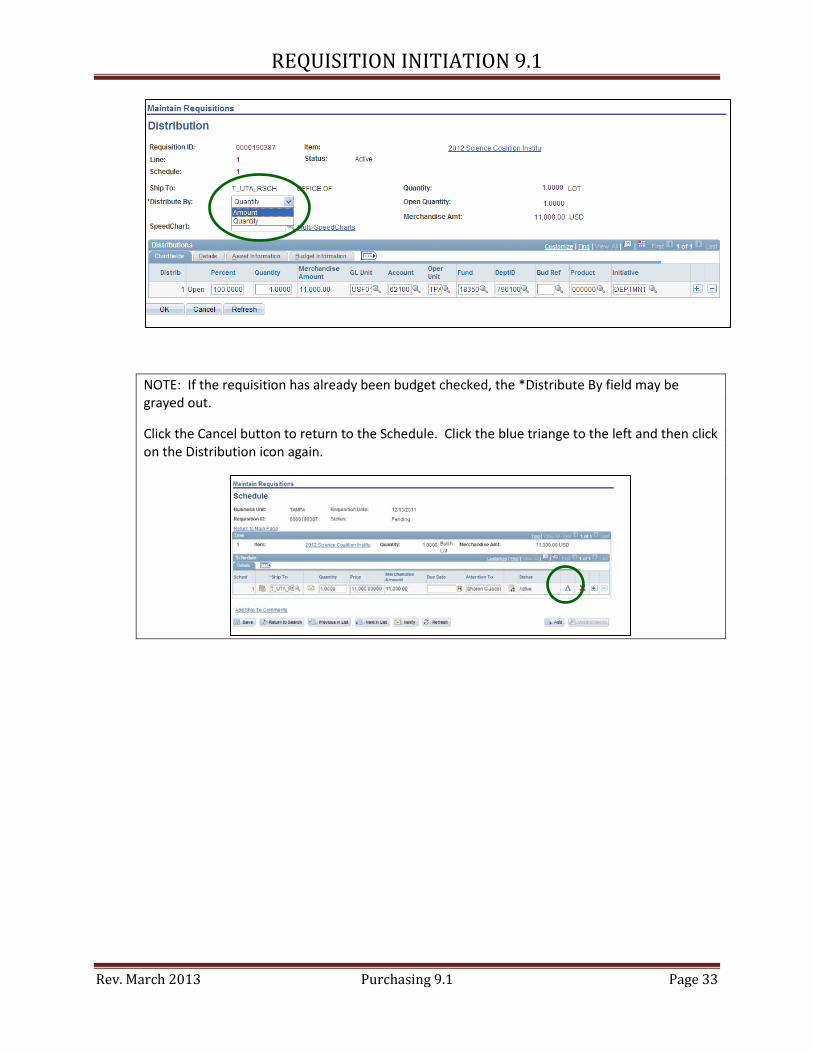
7.3.2 Split by Amount
Navigate to the distribution by clicking on the Schedule and Distribution icons (See 8.3.1 above)
Using the dropdown box, change the “*Distribute by” from Quantity to Amount
REQUISITION INITIATION 9.1
Rev. March 2013 Purchasing 9.1 Page 33
NOTE: If the requisition has already been budget checked, the *Distribute By field may be grayed out.
Click the Cancel button to return to the Schedule. Click the blue triange to the left and then click on the Distribution icon again.

REQUISITION INITIATION 9.1
Rev. March 2013 Purchasing 9.1 Page 34
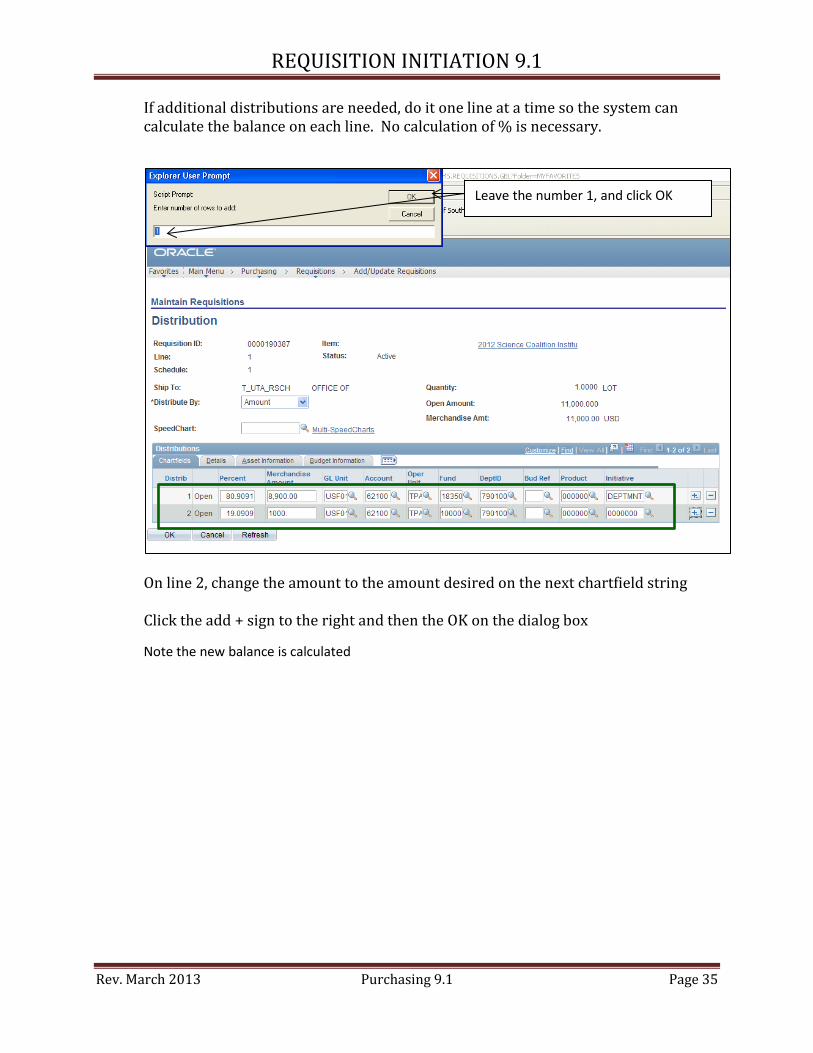
Change the amount of the line to the amount to be charged to the current chartfield and click the add + button
Use 1 for the number of additional rows regardless of total number needed, and click the OK button.
The system calculates the balance. Enter the new chartfield string for the new line.
REQUISITION INITIATION 9.1
Rev. March 2013 Purchasing 9.1 Page 35
If additional distributions are needed, do it one line at a time so the system can calculate the balance on each line. No calculation of % is necessary.
On line 2, change the amount to the amount desired on the next chartfield string Click the add + sign to the right and then the OK on the dialog box
Note the new balance is calculated
Leave the number 1, and click OK
REQUISITION INITIATION 9.1
Rev. March 2013 Purchasing 9.1 Page 36
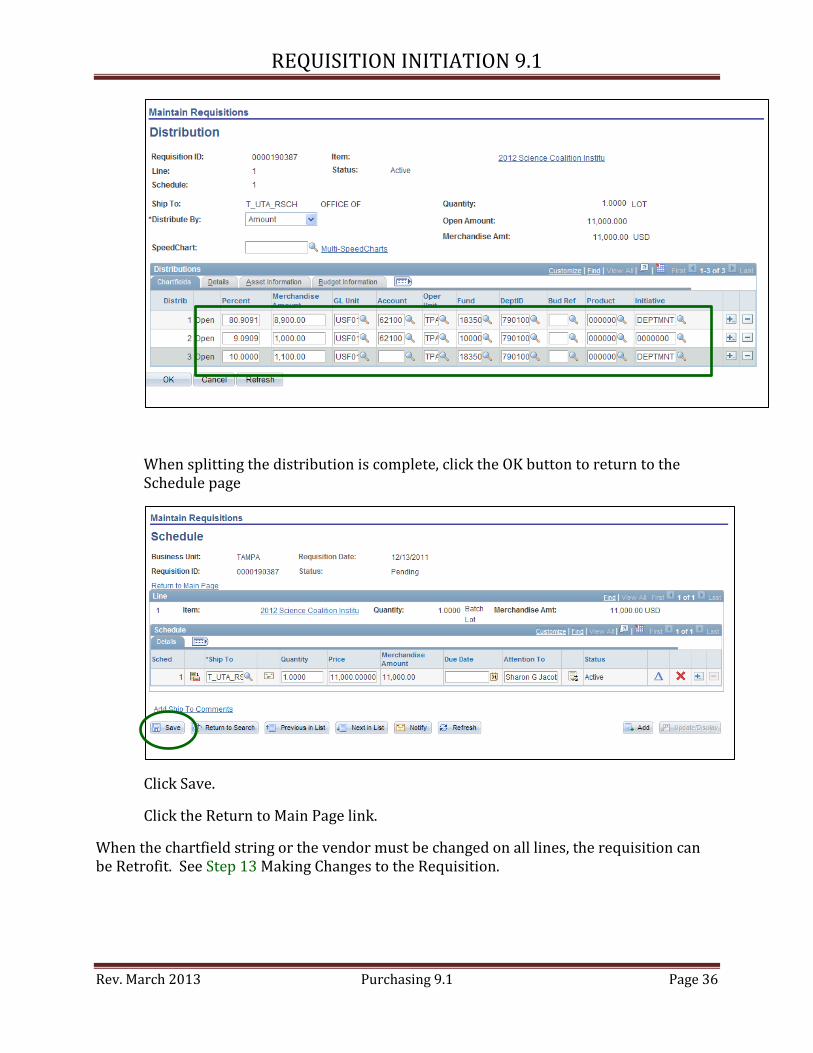
When splitting the distribution is complete, click the OK button to return to the Schedule page
Click Save.
Click the Return to Main Page link.
When the chartfield string or the vendor must be changed on all lines, the requisition can be Retrofit. See Step 13 Making Changes to the Requisition.
REQUISITION INITIATION 9.1
Rev. March 2013 Purchasing 9.1 Page 37
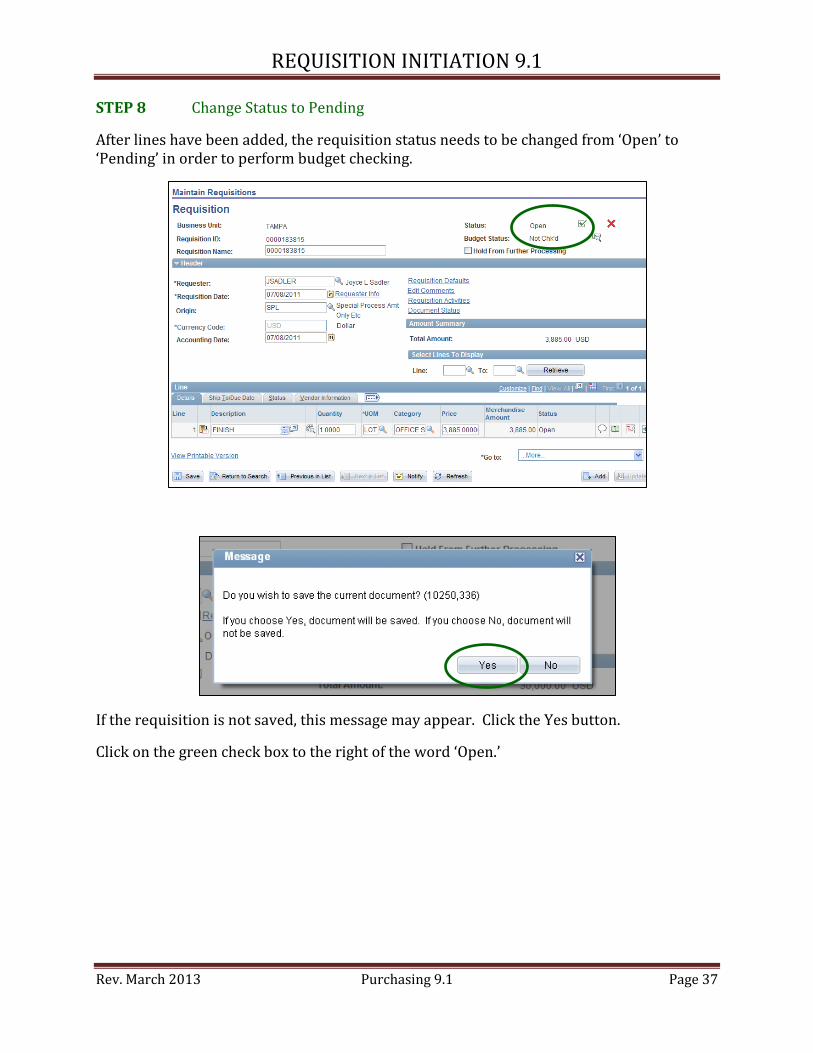
STEP 8 Change Status to Pending
After lines have been added, the requisition status needs to be changed from ‘Open’ to ‘Pending’ in order to perform budget checking.
If the requisition is not saved, this message may appear. Click the Yes button.
Click on the green check box to the right of the word ‘Open.’
REQUISITION INITIATION 9.1
Rev. March 2013 Purchasing 9.1 Page 38
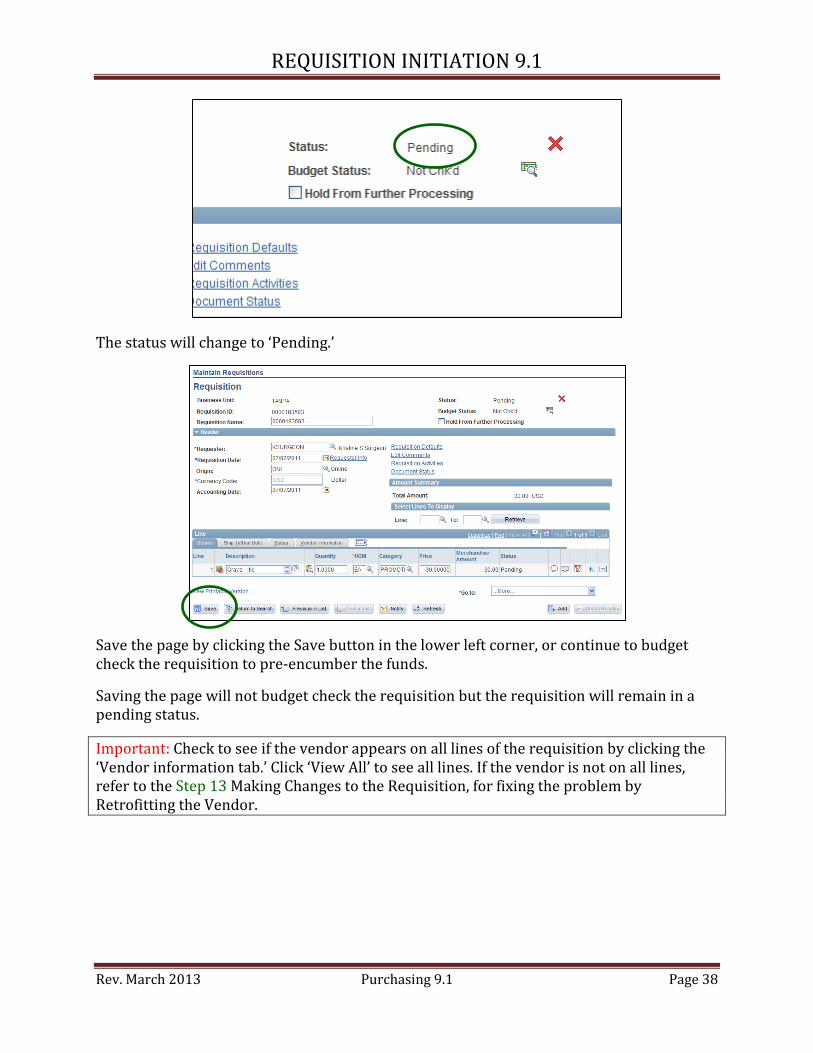
The status will change to ‘Pending.’
Save the page by clicking the Save button in the lower left corner, or continue to budget check the requisition to pre-encumber the funds.
Saving the page will not budget check the requisition but the requisition will remain in a pending status.
Important: Check to see if the vendor appears on all lines of the requisition by clicking the ‘Vendor information tab.’ Click ‘View All’ to see all lines. If the vendor is not on all lines, refer to the Step 13 Making Changes to the Requisition, for fixing the problem by Retrofitting the Vendor.

REQUISITION INITIATION 9.1
Rev. March 2013 Purchasing 9.1 Page 39
STEP 9 Budget Check the Requisition
Budget checking the requisition does several things.
It automatically saves the transaction.
Budget checking will cause the funds to be deducted from the available balance indicated on the chartfield string. Budget must be set up in the chartfield string which is being used on the requisition. Some budgets, grants and RIA (initiatives) in particular will fail budget checking if there are insufficient funds available.
Budget checking is also the point at which Workflow approval routes are set up. Workflow is the process that moves the requisition through levels of approval until the requisition is ‘sourced’ via ‘autosourcing’ an internal process.
Routes must be in place before the requisition is budget checked. If they are not, the requisition will route to the Workflow Administrator (a default route) and remain unapproved.
Vendor Information tab. View lines for vendor.
Click ‘View All’ or use the scrolling options to view all the lines.

REQUISITION INITIATION 9.1
Rev. March 2013 Purchasing 9.1 Page 40
Click the Budget Checking icon and the system will start processing
When the budget checking process is complete the Budget Status will read ‘Valid’ providing that the budget is available.
Processing symbol

REQUISITION INITIATION 9.1
Rev. March 2013 Purchasing 9.1 Page 41
Refer to Appendix I if the Budget Status returns an Error.
An Adobe .pdf file can be created at this point to save or print. (See Step 12 Print the Requisition.)
STEP 10 Enter Requisition Comments
Comments are used to enter additional information and attach documentation and other required information to justify or explain the purchase request.
There are 2 types of comments on a requisition; Header Comments and Line Comments
10. 1 Requisition Header Comments
Header Comments are used for general information that pertains to the requisition and for the addition of necessary documents.
Examples include:
• New or revised vendor • W9 • After the fact justification • Quotes • Independent Contractor Worksheet • Logo Approval • Special delivery or billing instructions • Location information for purchase of equipment • Justification • Contract information • Instructions to vendor • Legal authority for purchase • Bid information

REQUISITION INITIATION 9.1
Rev. March 2013 Purchasing 9.1 Page 42
• State contract • Single source justification
The Header Comment is also used by Purchasing for
• Legal authority • Approval of documents • Communication between the Purchasing Agent and Requester with needed
information, documentation or clarification requests or comments
10. 2 Requisition Line Comments
Line comments should only be used for expanding a description of the specific item on that line.
Examples include:
• Continued definitions that exceed the character limit of 256 • Special instructions to the vendor that pertains only to the item
10. 3 Enter a Header Comment
Click on the ‘Add Comments’ link

REQUISITION INITIATION 9.1
Rev. March 2013 Purchasing 9.1 Page 43
Place the cursor in the space provided and type in the information
The message can be made available by selecting one of the buttons below the comment:
Send to Vendor – if selected, the comment will be printed on the Purchase Order. Select this for information the Vendor must see or for any bid, contract or regulation that applies to the requisition. Checked comments will be printed at the bottom of the Purchase Order once it is processed.
Show at Voucher – this comment will be made available to Accounts Payable during the voucher process
Show at Receipt – this comment will be made available to the Receiver when a receipt is entered for goods or services
When finished, click the OK button to return to the Main Page.
Up to 2000 characters can be added to each comment
REQUISITION INITIATION 9.1
Rev. March 2013 Purchasing 9.1 Page 44
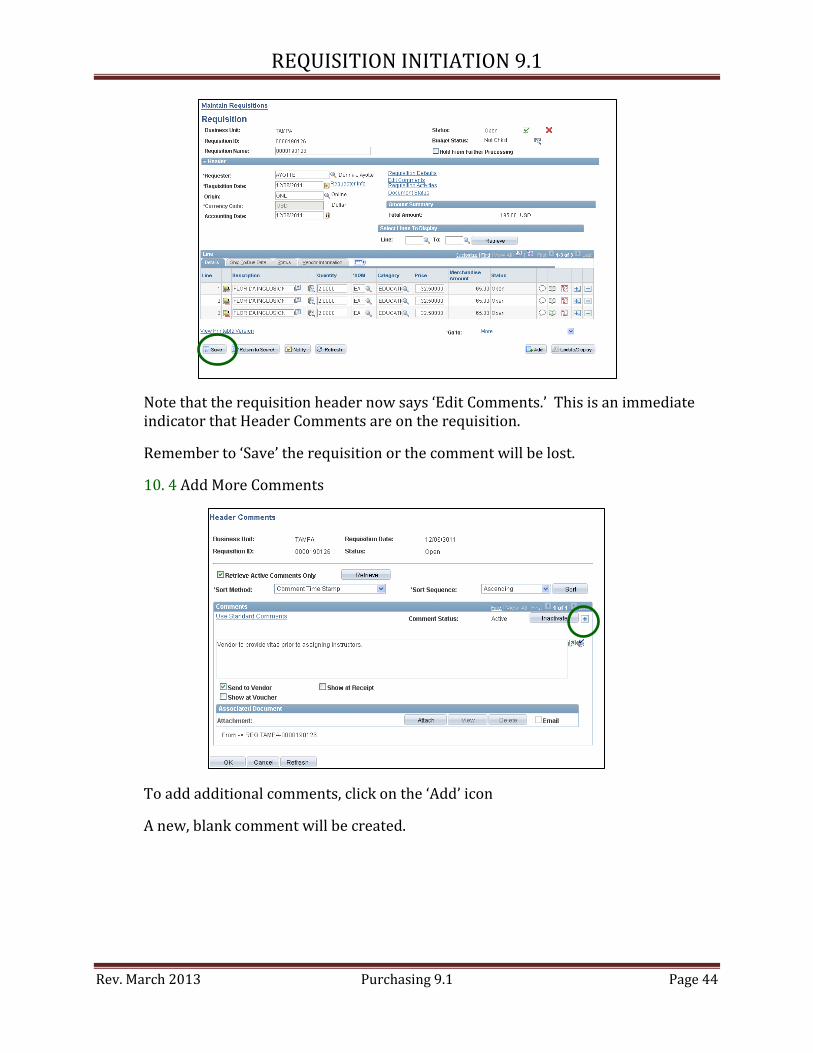
Note that the requisition header now says ‘Edit Comments.’ This is an immediate indicator that Header Comments are on the requisition.
Remember to ‘Save’ the requisition or the comment will be lost.
10. 4 Add More Comments
To add additional comments, click on the ‘Add’ icon
A new, blank comment will be created.

REQUISITION INITIATION 9.1
Rev. March 2013 Purchasing 9.1 Page 45
Note that the Comment line now shows 2 of 2 indicating that this is the 2nd comment of 2 on the requisition. The arrows and ‘First’ and ‘Last’ allow the comments to be scrolled through.
Click ‘View All’ to see all comments

REQUISITION INITIATION 9.1
Rev. March 2013 Purchasing 9.1 Page 46
Click ‘View 1’ to return to the one comment view
10. 5 Enter a Line Comment These comments should only be used for specific information on the specific line item, such as additional description or vendor instruction

REQUISITION INITIATION 9.1
Rev. March 2013 Purchasing 9.1 Page 47
Click on the Line Comment Icon. Note that the icon is a blank cartoon ‘balloon.’
Line comments work the same way as header comments. Add the comment, select ‘Send to Vendor’ and click OK.
Note that the cartoon balloon now appears to have writing it in indicating that a comment has been added.
Click Save.

REQUISITION INITIATION 9.1
Rev. March 2013 Purchasing 9.1 Page 48
10. 6 Standard Comments Standard Comments are pre-written comments that are available for anyone to use to save typing type and standardize text.
Requesters will typically use a Standard Comment Type of ‘REQ’ to add requisition comments, but other types are available as well.
A list of commonly used Standard Comments is in Appendix III.
On the Comment page, click the ‘Use Standard Comments’ link
Type in the ‘Comment Type’ and ‘Comment ID’ and hit the Enter Key or click the ‘OK’ button

REQUISITION INITIATION 9.1
Rev. March 2013 Purchasing 9.1 Page 49
Only one Standard Comment can be selected per comment page, but that comment can be edited
Select ‘Send to Vendor’ or any other box, if desired, then add more comments or Click ‘OK’ to return to the main page.

REQUISITION INITIATION 9.1
Rev. March 2013 Purchasing 9.1 Page 50
10. 7 Standard Comment Search
If the Comment Type and ID are unknown, use the search features
Click on the Comment Type and ID to select the values
The Standard Comment selected is displayed. If it is the right one, click OK to bring the comment into the requisition where it can be edited if necessary.

REQUISITION INITIATION 9.1
Rev. March 2013 Purchasing 9.1 Page 51
10. 8 Attaching Documents
FAST supports the addition of documents to the Requisition. Many purchases require additional documentation and these must be added to the requisition by the Requester.
The preferred format is an Adobe .pdf file. These take up the least amount of space in the system and are viewable in all browsers. Other formats may not be viewable by Purchasing
Each comment can hold one document.
The document file name is limited to 64 characters. Each document is connected to the requisition and comment number so long, complicated file names are not necessary and can cause problems.
Documents are attached to Comments from the user’s directory in the same way attachments are made to emails.

REQUISITION INITIATION 9.1
Rev. March 2013 Purchasing 9.1 Page 52
Type in a description of the document and click the ‘Attach’ button
Click the “Browse…” button

REQUISITION INITIATION 9.1
Rev. March 2013 Purchasing 9.1 Page 53
Find the file in your directory as you would for attaching a document to an email
Click ‘Open’
Click the ‘Upload’ button
The ‘Attach’ button is now grayed out and the ‘View’ button is activated.
The file name appears on the page.
To see the document, click the ‘View’ button.
Click OK to return to the Main Page and click ‘Save’
To Delete the document, click the ‘Delete’ button, Click ‘OK’ and ‘Save.’ Documents are deleted upon save. A new document can be added in its place.
If more than one document needs to be added, simply add a new comment by clicking the ‘Add’ icon.
Click OK and save when attaching or deleting a comment
Add a new comment for additional

REQUISITION INITIATION 9.1
Rev. March 2013 Purchasing 9.1 Page 54
STEP 11 Approve Requisition into Workflow
The requisition is now ready for approval by the department. Most departments have only one level of approval. The requisition must be approved by a Requisition Manager in order
11.1 If Entering into Workflow Immediately
Click the “Go To Approve Amounts” link
11.2 If entering into Workflow at a later time
If the requisition isn’t ready for approval when it is complete, it can be pushed into Workflow at a later time. Make sure to Save the Requisition before leaving the page.
Navigate: Purchasing – Requisitions – Approve Amounts

REQUISITION INITIATION 9.1
Rev. March 2013 Purchasing 9.1 Page 55
Enter the Requisition number and click Search.
11.3 Approve into Workflow
The requisition will be in ‘Initial’ status.
Click the ‘Save’ button.

REQUISITION INITIATION 9.1
Rev. March 2013 Purchasing 9.1 Page 56
This or a similar warning will appear as a reminder that further departmental approval is required before the requisition can receive final approval.
Click the OK button.
The Approval Status will change to ‘In Process’
Requisition Initiation is now complete.
If you choose, you may create an Adobe .pdf file to save or print the requisition.
*** Interested in the Workflow process? Click here: Workflow ***
11.4 Limited Purchase Orders (LPOs)
Most requisitions will require review and approval by Purchasing. After approval by the department Requisition Approver/Manger, the requisition will route to a Purchasing Agent.
Some requisitions do not require additional approval by Purchasing. These are requisitions that total less than $1000 and are for supplies and repairs. After

REQUISITION INITIATION 9.1
Rev. March 2013 Purchasing 9.1 Page 57
approval by the Requisition Manager, the requisition will source to a Purchase order without further review.
The preferable method to handle small purchases is through the university’s Procurement Card (PCard) program.
STEP 12 Print the Requisition
On the Add/Update Requisition page, pull up the requisition.
Click on the Find an Existing Value tab, enter the requisition number, name or any other variable and click the Search button

REQUISITION INITIATION 9.1
Rev. March 2013 Purchasing 9.1 Page 58
Click the ‘View Printable Version’ link
This brings up the Report Manager – Administration page
Click the Refresh button occasionally until the print job appears and has a status of ‘Posted.’
Click on the report name ‘Requisition Print SQR’ and the .pdf file should open.
Either save it or print it.
When complete, close the browser window or tab with the .pdf file, then close the browser window or tab on the Report Manager – Administration page.

REQUISITION INITIATION 9.1
Rev. March 2013 Purchasing 9.1 Page 59
This will return you to the Add/Update Requisition page.
STEP 13 Making Changes to the Requisition
13.1 Change Description, Quantity, Unit of Measure, Item Category, Unit Price
If the requisition is in an Open status, the description field is easily changed by typing over the existing text or using the dropdown to select a new UOM or Item Category
Click the Save button
If the requisition is in a Pending status, Quantity and Unit Price can be changed, but an additional step is necessary to change the Description or Item Category
Click on the Details Icon to the left of the line
Place cursor here and delete, backspace or insert new text. Use dropdown to select
a different value.

REQUISITION INITIATION 9.1
Rev. March 2013 Purchasing 9.1 Page 60
On the Line Details page, click on the Blue Triangle (Blue Delta, Change Icon.)
The description field will open to allow changes. When complete click the OK button
If to the other fields are needed, simply click OK after clicking the Blue Triangle and the requisition will return to the main page for changes
Field is open for editing
Spellcheck is available on this page
REQUISITION INITIATION 9.1
Rev. March 2013 Purchasing 9.1 Page 61
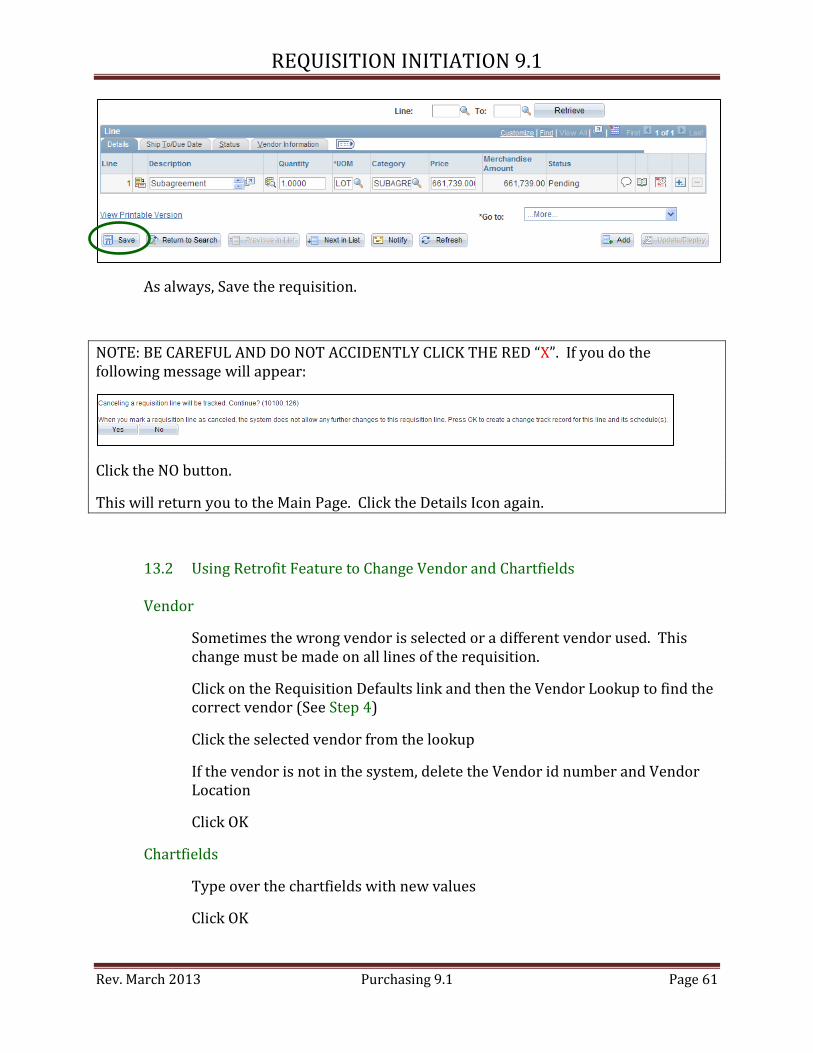
As always, Save the requisition.
NOTE: BE CAREFUL AND DO NOT ACCIDENTLY CLICK THE RED “X”. If you do the following message will appear:
Click the NO button.
This will return you to the Main Page. Click the Details Icon again.
13.2 Using Retrofit Feature to Change Vendor and Chartfields Vendor
Sometimes the wrong vendor is selected or a different vendor used. This change must be made on all lines of the requisition.
Click on the Requisition Defaults link and then the Vendor Lookup to find the correct vendor (See Step 4)
Click the selected vendor from the lookup
If the vendor is not in the system, delete the Vendor id number and Vendor Location
Click OK
Chartfields
Type over the chartfields with new values
Click OK

REQUISITION INITIATION 9.1
Rev. March 2013 Purchasing 9.1 Page 62
Retrofit Page
After changing the vendor (or deleting it) and a chartfield (in this example the Fund is being changed) clicking OK will take you to the ‘Retrofit’ page
If you click the ‘Mark All’ link, all boxes in the ‘Apply’ column will be checked.
The ‘Unmark All’ link will remove all checks
Alternatively, selected boxes can be individually checked by clicking on it

REQUISITION INITIATION 9.1
Rev. March 2013 Purchasing 9.1 Page 63
Here, there is no point in changing the GL unit as it is already USF01.
This changes the Requisition Line information for the vendor on all lines and changes the first Distribution of each requisition line
If there are more distributions that need to be changed, the boxes on the ‘Apply to All Distribs’ column should be checked
Click the OK button
In the case of multiple distributions that do not all need changing, those changes must be made to the individual Distributions of each line.
To check to see if the vendor has been placed on all lines, click the Vendor Info tab
To check the distribution change, click on the Schedule Icon and then the Distribution Icon.
13.3 Changing Chartfields on Individual Lines
If changes are being made to only some lines of distribution and not others, then the change has to be made line by line.
See Step 7.1 and Step 7.2

REQUISITION INITIATION 9.1
Rev. March 2013 Purchasing 9.1 Page 64
13.4 Cancel a Requisition Line
NOTE: Never cancel or delete line 1 of a Requisition. Instead, change the description, UOM, quantity, Item Category and Unit Price.
If the Requisition is in an Open or Pending Status and Not Yet Budget Checked
Simply click the Delete Row icon
Click OK on the dialog box
And click Save

REQUISITION INITIATION 9.1
Rev. March 2013 Purchasing 9.1 Page 65
If the Requisition is in a Pending Status and Has been Budget Checked
Click the Status tab
Click the Red “X” on the line to be canceled (NOTE: DO NOT CANCEL LINE 1)

REQUISITION INITIATION 9.1
Rev. March 2013 Purchasing 9.1 Page 66
Click Yes
The line will display a ‘Canceled’ status
Save and Budget Check again
13.5 Cancel the Requisition
If in Pending Status and Budget Checked
REQUISITION INITIATION 9.1
Rev. March 2013 Purchasing 9.1 Page 67
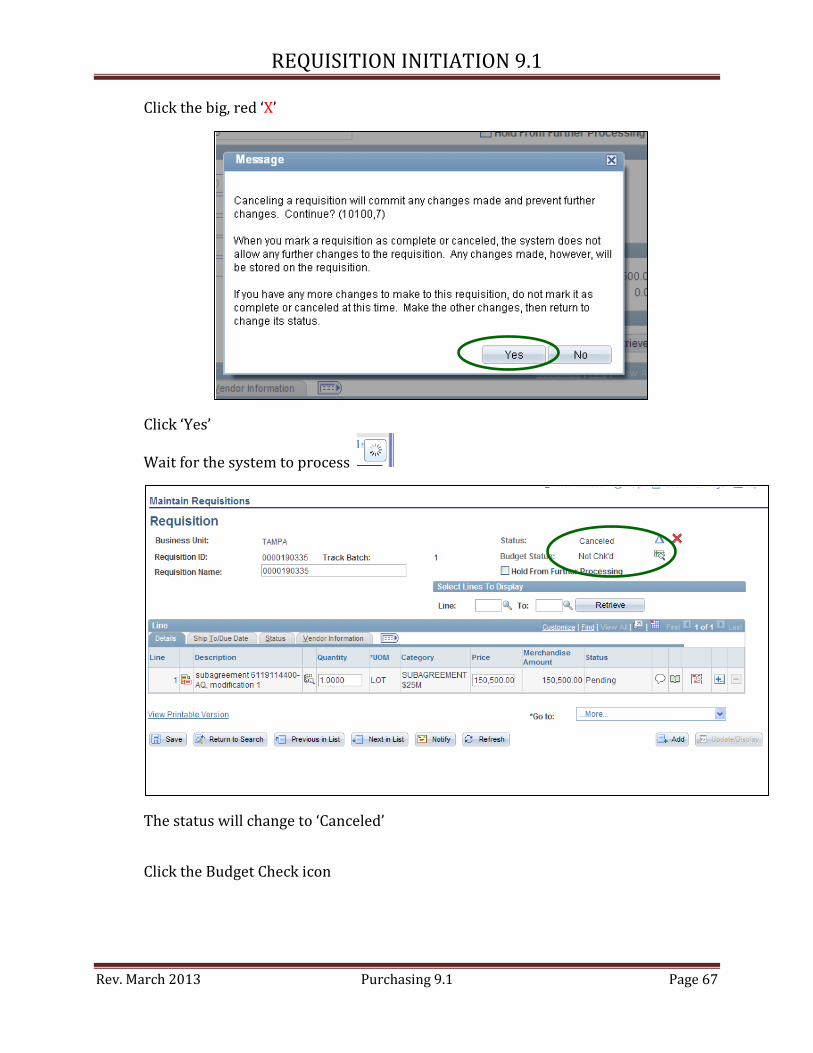
Click the big, red ‘X’
Click ‘Yes’
Wait for the system to process
The status will change to ‘Canceled’
Click the Budget Check icon

REQUISITION INITIATION 9.1
Rev. March 2013 Purchasing 9.1 Page 68
When budget check is complete, the system should return to the Search page
If in Pending Status and Budget Checked
Follow the above procedure; however the requisition will not have to be budget checked
STEP 14 Copy a Requisition
Old requisitions can be copied into new requisitions and changed for current needs. This is especially helpful during the start of a new fiscal year when old blankets and maintenance agreements need to be replaced.
Navigate to the Add/Update Requisitions page.
Click the ‘Add’ button.

REQUISITION INITIATION 9.1
Rev. March 2013 Purchasing 9.1 Page 69
Click the ‘Copy From’ hyperlink
Enter the requisition number to be copied and click the Search Button.
The requisition is automatically Selected.
Click the OK button.
If the requisition being copied was entered by another Requester, the following message will appear:

REQUISITION INITIATION 9.1
Rev. March 2013 Purchasing 9.1 Page 70
This means that the information tied to the original requester will be copied into the requisition; requester information, default chartfields, ship to information
Click the ‘Yes’ button. All this information can be changed.
All the requisition information is copied into the requisition page.
Change the Requester ID to your own if necessary.
The system verifies the default settings.
Click the ‘Yes’ button.

REQUISITION INITIATION 9.1
Rev. March 2013 Purchasing 9.1 Page 71
The Requester information is now updated yet the description, vendor and comments remain the same.
Click the Requisition Defaults link
Highlight Buyer id, then click the Delete button on your keyboard

REQUISITION INITIATION 9.1
Rev. March 2013 Purchasing 9.1 Page 72
Highlight and Delete the Buyer name. This is very important. If the buyer is no longer with the university, the requisition will not be routed to the correct Purchasing Agent.
Make any necessary chartfield or vendor changes and retrofit the changes (see Step 13 – Making Changes to the Requisition)
Click OK
Comments should be reviewed and edited as needed.
Continue to complete the requisition.

REQUISITION INITIATION 9.1
Rev. March 2013 Purchasing 9.1 Page 73
STEP 15 Create Amount-Only Requisition Line A new feature in 9.1 is the ability for users to make requisition lines ‘Amount Only.’ This feature must be applied line by line. Most Amount-Only requisitions should have only one line. However, in some cases like Copier Leases, one line may need to be amount only (copy overages) and the other line left as a Quantity (fixed monthly charges.) Amount-Only lines must have a Quantity of 1 and a UOM of ‘LOT.’
15.1 Follow Steps 1 through 6
15.2 Line Details Page
After entering the Unit Price, click on the Line Details icon to the left of the line to be made Amount-Only.
15.3 Select Attributes

REQUISITION INITIATION 9.1
Rev. March 2013 Purchasing 9.1 Page 74
Click on the arrow to the left of the Attributes line to expand it
15.4 Select Amount Only flag
Click on the box to the left of ‘Amount Only’ to select it.
Click OK.
NOTE: Do Not Alter the Other Areas Under the ‘Expand All’ Hyperlink

REQUISITION INITIATION 9.1
Rev. March 2013 Purchasing 9.1 Page 75
15.5 Add Header Comment Amount-Only lines require different Price Tolerances than other lines. Please add a Header Comment telling your Purchasing Agent that you made the requisition line Amount-Only. The PA will need to make note and change the tolerances once the requisition becomes a PO. Regardless, a receiver will be able to receive by amount when the PO is in Distributed status. Incorrect tolerances will create Matched Exceptions. Should this be the case, remind the Purchasing Agent to correct the tolerances. The Purchasing Agent is listed as the Buyer on the Purchase Order. 15.6 Optional: Split Chartfield Distribution Only after changing the line to Amount Only should any chartfield split take place. Follow Step 7 15.7 Quantity Notification If the following message appears, the requisition line was given a quantity larger than 1.
Adjust the Unit Price so it is the total price expected to be paid from the line. 15.8 Allocation Notification If the following message appears, the steps for creating the requisition were not followed in order. This will cause the system to split the distribution using delivered round-up features that will change the amounts distribute.

REQUISITION INITIATION 9.1
Rev. March 2013 Purchasing 9.1 Page 76
Either start over or uncheck Amount-Only, unsplit the Distribution, save. Change the line to Amount Only and then split the chartfield.
STEP 16 Customization of Chartfield String
FAST offers various ways to customize pages. The two that best serve the Requisition Initiation process are Customization of Chartfields and View All
As delivered, chartfields are displayed on distribution pages that can be changed to make viewing and entry easier. To see all the chartfields USF uses, one must scroll across the page. The order of the chartfields may not be the most logical one for the user.
Scroll right to see Project Activity and Initiative

REQUISITION INITIATION 9.1
Rev. March 2013 Purchasing 9.1 Page 77
Click on the ‘Customize’ link that appears on the blue line above the chartfields
All the fields shown on the chartfield line are listed to the left. Some fields are marked (frozen) which means they will not move as changes are made. Some fields can be (hidden) if they are fields the user does not need to see.

REQUISITION INITIATION 9.1
Rev. March 2013 Purchasing 9.1 Page 78
By highlighting the field, it can be hidden, frozen or moved up and down.
Highlight fields to be hidden
Select Hidden by clicking in the box. Note the fields are marked (hidden)

REQUISITION INITIATION 9.1
Rev. March 2013 Purchasing 9.1 Page 79
The Initiative can be moved to the Product. Highlight it.
Click the Move Up button to move it up. This moves the field to the left on the distribution page.
Click the Move Down button to move a field down and to the right on the distribution page.
Click the Preview button
Move Up button
Move Down button

REQUISITION INITIATION 9.1
Rev. March 2013 Purchasing 9.1 Page 80
Initiative still in the wrong place? Click the ‘Move Up’ button a few more times and Preview again
Perfect!
To sort a select group, highlight the fields to sort and click the ‘Add to Sort’ button
If the entire group of fields is highlighted, the order can be reversed by using the Move Up and Move Down buttons. Or select just one field to move.
The Descending button will allow the field to be opened to all distributions on a multi-distribution requisition line.
Click the OK button at the bottom left.

REQUISITION INITIATION 9.1
Rev. March 2013 Purchasing 9.1 Page 81
Compare the new distribution image with the image at the beginning of this section to see the difference.
The Customization on the Requisition Distribution page will NOT automatically be carried over to other pages with distributions. (The Copy Settings feature uses Public Profiles which are not used at USF.)
Pages such as the Header Default and Requisition Inquiry need to be customized individually.

REQUISITION INITIATION 9.1
Rev. March 2013 Purchasing 9.1 Page 82
APPENDIX I - Common Error Messages and Warnings
Save Warning
This is a warning that the user is leaving a page that has unsaved data. If the information is unneeded, click Cancel to navigate elsewhere in the system.
If the information on the page, click OK and save the transaction or all newly added information will be lost, then proceed.
Budget Status Error
A budget error indicates that budget is not valid for the chartfield string used in the requisition. To review the error, click on the word ‘Error’

REQUISITION INITIATION 9.1
Rev. March 2013 Purchasing 9.1 Page 83
This page shows that the error is ‘No Budget Exists’ in the ‘ORG’ ledger for the chartfield. The ‘Org’ ledger contains E&G, Auxiliary, Local and pass through funds.
Other ledgers are used for different funds:
CC_DRG - RIA, Initiative CC_GM_CHD – Sponsored Research Child ledger, specific to a Budget Account CC_GM_PAR – Sponsored Research Parent ledger, overall spend on the grant CC_PR_PAR – Construction project
Click the Details link to see if the chartfields on the requisition line are correct.
The Details link displays the chartfield string and the amount on the requisition line
Click the OK button to return to the Error page

REQUISITION INITIATION 9.1
Rev. March 2013 Purchasing 9.1 Page 84
The Line Exceptions tab shows which Schedule (should always be Schedule 1) and Distribution lines are in error (should there be multiple distributions. Tabs are available for chartfield string and amount.
Click back to Requisition Exceptions tab and click on the lover Budget Chartfields tab.
These are the budget chartfields that the requisition distribution is rolling up to.
Note the different Account number. This is a Budget Account. The Account on the requisition distribution is the Expense Account. Expense accounts roll up into Budget accounts for reporting and budgeting purposes.
Check to ensure the Item Category selected on the Requisition line is correct for the item or service you are purchasing. The Item Category assigns the Account number to the line. It may be that the category is wrong for purchase.

REQUISITION INITIATION 9.1
Rev. March 2013 Purchasing 9.1 Page 85
The Item Category list shows the accounts that are assigned. It is possible that a similar category with a different account number will suffice.
If not, contact the individual responsible for the department’s budget or the Grant Specialist in Research Financial Management, should this be a Sponsored Research or RIA fund, to discuss a transfer of funds or the appropriateness of the purchase.
Close the browser window or tab to return to the requisition.
Budget Date out of Bounds references a Sponsored Research Project that has either ended or has not yet been activated.
Click the Budget Chartfields tab to review the project and budget account.
If necessary, contact the Grant Specialist in RFM to investigate.
PC Bus Unit, Project and Activity are Required (9000,229)
This error indicates that a PC Business Unit was put on the distribution of the requisition but the Project (Sponsored Research Grant or Construction) and Activity values are empty.

REQUISITION INITIATION 9.1
Rev. March 2013 Purchasing 9.1 Page 86
The most common reason is that the user has erroneously entered the Project Costing Business Unit mistaking it for the General Ledger Business Unit and the transactions is not really on a Project.
Simply delete, type over or backspace over the PC Business Unit to erase it, click the OK button and save the requisition.
Chartfield Combination Error
There are relatively few chartfield combinations set up in the system. These are the most common.
This error indicates that the chartfields being used together on a distribution line do not go together.
The error indicates where the problem is; Line 1, Schedule 1, Distribution 1 and what the problem is; “Deptid/Product/Chartfield 1 in Group Department” means that the department ,product and initiative do not belong together. (USF uses ‘Chartfield 1’ to indicate Initiative, RIA.)
GL Business Unit PC Business Unit

REQUISITION INITIATION 9.1
Rev. March 2013 Purchasing 9.1 Page 87
The 0000000 Initiative is a default number and is valid with every department. The issue is the Product which does not belong with the department id.
Budget Officers for the department should know which chartfields apply to their areas.
This error indicates an error with the Department ID and Operating Unit combination.
Here, the Operating Unit is HSC for the Health Science Center. The Department belongs to the College of Arts and Sciences. Either the HSC needs to be changed to TPA or the Department is a typo.

REQUISITION INITIATION 9.1
Rev. March 2013 Purchasing 9.1 Page 88
APPENDIX II – About Item Categories
Item Categories are used to select the correct expense account number, asset profile and price tolerances for your purchases. Except for specific equipment categories, they generally cover a broad area or type of purchase such as Athletic or Electronic. This type is paired with three broad areas of expenditure; supplies, equipment and services. This results in three Item Categories as seen in the sample below:
ATHLETIC SUPPLY ATHLETIC EQUIPMENT ATHLETIC SERVICE
PRICE TOLERANCES In the system, the Item Categories provide the ability to add tolerances to the price of goods and services. These tolerances allow for a difference between the price on a purchase order and the actual amount invoiced. Tolerances are placed on both the unit price and the extended total price of each line item on a Requisition and its subsequent purchase order. Without tolerances, any variation of the price, even as little as one cent, will cause the system to create a “matched exception” and notify the department that the invoice cannot be paid because it was higher, or lower, than the price on the purchase order. However, there are times when a price is firm and a department does not wish to pay any more than is stated on the order. In order to accommodate both situations, a second Item Category was created for each type and expenditure. These Item Categories were prefixed with a “C” to represent “contract” but has been re-defined as "zero tol" for clarity. For example we have these two categories for athletic supplies:
ATHLETIC SUPPLY (expense account is 53500) C ATHLETIC SUPPLY (expense account is 53500)
The “C” does NOT mean there is or has to be an actual contract in existence to use this Category. You might have a verbal quote from the vendor or you might simply not want to pay any more than you indicate. ) The “C” prefixed Categories are all set for a “0” (zero) tolerance ("Zero tol") for an increase in the price over that on the purchase order.

REQUISITION INITIATION 9.1
Rev. March 2013 Purchasing 9.1 Page 89
Due to the philosophy that getting a price break is always acceptable, the tolerance for a decrease in price is set to 10%. This under-price tolerance is not set higher because a vendor charging you a great deal less than expected might very well mean you did not get what you ordered or expected and it should be checked out. Those Item Categories without a “C” are set for over and under tolerances of 10% with one or two exceptions such as Printing which only has one Item Category with 5% tolerance and categories for construction and subagreements which are automatically set for "amount only" receiving.
CODES, DESCRIPTIONS AND SEARCHING FOR AN ITEM CATEGORY
Item Category “codes” are limited to 18 characters and a 30 character description. A variety of words, synonyms and examples were used to make it easier to search for the right category. Using the example above, the system will show:
CODE DESCRIPTION ATHLETIC SUPPLY Athletic Supply Sports Team C ATHLETIC SUPPLY ZeroTol Athletic Supply ELECTRONIC SUPPLY Electronic Part Supply Battery C ELECTRONIC SUPPL Zero Tol Eltronic Part Supply
Battery
This enables you to search on either the Code or Description. Using the “contains” search criteria is the best way to use this particular Search. You can also utilize your Windows “Find” feature to read through any long list your search criteria may return. The Item Categories are not meant to be exclusive. For example, the ELECTRONIC SUPPLY categories are not to be used only for purchase of batteries and parts. These words were intended to aid you when searching. Definitions sometimes simply include the most common purchases of the type.
ACCOUNT NUMBERS Each category has a General Ledger Account number associated with it. Because the system automatically assigns the correct expense Account using the Item Category do NOT fill out the Account chartfield on Requisition Header Defaults when creating Requisitions (See Step 4.) This is especially important for Sponsored Research Grants. Funds are placed in allowable budget accounts that are split up into various expense accounts. If you use the correct Item Category for the product or service you are buying, the system will tell you if it is an allowable expense against that Grant. It does this by returning a “Valid” budget check status when the requisition is budget checked prior to approval.

REQUISITION INITIATION 9.1
Rev. March 2013 Purchasing 9.1 Page 90
If the item is not an allowable expense, the system will return an “Error” stating “No Budget Exists.” While some purchases may fit more than one Item Category (e.g. ‘Participant Fees’ account 51125 and ‘Independ Contracto’ account 51115) this error does not mean that you should try various Item Categories until you find one that passes budget checking regardless of the definition.
When the requisition reaches Purchasing, one of the things checked for is a match of the Item Category to the actual purchase and will change the Item Category if it does not fit. One available resource for selecting Item Categories for grants related purchases is the Rosetta Stone. Another is the list of available Item Categories in the system. Both are on the Fast Financials website under FAST Purchasing Manuals.
EQUIPMENT PURCHASES Equipment or “OCO” (operating capital outlay) items are purchases that add to the intrinsic, assessed value of the university. They are items that cost $5000 and up and have a life expectancy of more than one year.
Replacement parts exceeding $5000 are not considered equipment as they simply replace existing pieces that are already evaluated. Some Item Categories are set up for specific Equipment purchases in order to add the correct Asset Profile required for inventory reporting. These all have a choice of a 0% tolerance as well as a 10% tolerance although equipment prices should always have a firm quote from a vendor. When purchasing equipment, use more specific words such as “microscope” and “van” rather than a general description such as “medical” or “automotive” to see if that specific item has its own category. This will provide more accurate information to Asset Management for assessing the University’s net worth.

REQUISITION INITIATION 9.1
Rev. March 2013 Purchasing 9.1 Page 91
APPENDIX III – Useful Standard Comments for Requesters
COMMENT TYPE COMMENT ID DESCRIPTION TEXT BID BID Award of
Bid/RFP/ITN This is our acceptance of your offer on our Invitation to Bid #____________ and is subject to all terms and conditions stated therein.
EXP FISH Fisher Sci ITN07T)135 (USF Fisher Scientific Contract
This is our acceptance of your offer on University of Florida Invitation to Negotiate # ITN07TO-135 and is subject to all terms and conditions stated there in, per USF regulation USF4.02040(2)(c)
EXP KONI Konica Minolta Leases
This purchase order serves as a schedule as that term is used in the Master Agreement #1226275 to ITN-9-13-G. The terms and conditions of the Master Agreement supersede any terms and conditions included on this purchase order. Remittance to: Konica Minolta Premier Finance PO Box 790448 St. Louis MO 63179
EXP KRMT Konica Minolta Purchase Maint
This purchase order serves as a schedule as that term is used in the Master Agreement #1226275 to ITN-9-13-G. The terms and conditions of the Master Agreement supersede any terms and conditions included on this purchase order. Remittance to: Konica Minolta Business Solutions Dept AT-952823 Atlanta GA 31192-2823
EXP TEMP Temporary Services (from USF Kelly Services contract)
This is our acceptance of your offer on our Invitation to Negotiate # 11-01A-JW and is subject to all terms and conditions stated therein. [ENTER YOUR DEPARTMENT INFO IN THE DESIGNATED SPACES BELOW] USF Contact Name: USF Contact Number: USF Contact Email: USF Department: CAMPUS ADDRESS: All POs should be emailed to: [email protected] (etc.)
MSC BLNK Blanket Orders Blanket Purchase Orders for the purchase of daily needs shall not include equipment costing $1000.00 or more. Effective 7/1/XX-6/30/XX. This is an Anticipated Requirements Purchase Order through June 30, 20XX. Do NOT ship amount shown. Departments will release orders/shipments as needed. For the protection of both parties, this contract may be canceled in whole or in part by either party by giving thirty (30) days prior notice in writing to the other party. A termination penalty may not be charged to the University. The University shall be liable only for payment of services rendered prior to the effective date of termination. The University will not be held responsible for any purchase in excess of the allotted amount as shown on

REQUISITION INITIATION 9.1
Rev. March 2013 Purchasing 9.1 Page 92
the Purchase Order. The amount may only be amended by an official Change Order.
MSC TRAV
PRQ PERQ Perquisite on File
Perquisite #____ is approved and on file in Purchasing.
REQ CONF Confirming Order
CONFIRMING ORDER - DO NOT DUPLICATE THIS CONFIRMS A VERBAL ORDER PREVIOUSLY PLACED WITH YOUR FIRM.
REQ CERT Certificate of Expenditure (for Concession Funds)
I, THE REQUISITION APPROVER AND ACCOUNTABLE OFFICER, HEREBY CERTIFY THAT THE PURPOSE OF THIS EXPENDITURE IS: -RECRUITMENT -IMPROVED FACULTY AND STAFF MORALE ACTIVITIES -PROFESSIONAL DEVELOPMENT (etc.)
REQ IC1P IC (Independent Contractor) One Payment
One Payment Upon Satisfactory Completion of Services
REQ ICRM IC Cost Reimbursable
Cost/Deliverable Reimbursement Upon Satisfactory Completion of Invoiced Services
REQ INDE Independent Contractors
The University will not be held responsible for any purchase in excess of the allotted amount as shown on the Purchase Order. The amount may only be amended by an official Change Order For the protection of both parties, this contract may be canceled in whole or in part by either party by giving sixty (60) days prior notice in writing to the other party. A termination penalty may not be charged to the University. The University shall be liable only for payment of services rendered prior to the effective date of termination. Invoices shall be in sufficient detail for a proper pre-audit and post-audit thereof. The performance of the University of any of its obligations under this agreement shall be subject to and contingent upon the availability of funds appropriated by the legislature or otherwise lawfully expendable for the purposes of this agreement for the current and future periods.
REQ NEWV New Vendor The following fields in items 1-12 must be completed before new vendor information can be added into FAST (Insert "N/A" in fields that are not applicable): 1. Vendor Name: 2. Ordering Address (address where purchase orders should be mailed): (etc.)
REQ STAT State Contract IN ACCORDANCE WITH DIVISION OF PURCHASING STATE CONTRACT NUMBER (NO SUBSTITUTIONS WILL BE ACCEPTED)
REQ UPVN Update Vendor Request to Update/Correct Existing Vendor Information in FAST Instructions: Please use this template to update existing vendor information in FAST. Complete the information requested in the two

REQUISITION INITIATION 9.1
Rev. March 2013 Purchasing 9.1 Page 93
********************************************* Place an (X) on the action(s) below for this request: a) Add New Address____ (etc.)
VEN QUOT Quote from Vendor
NOTE TO VENDOR: * QUOTE PROVIDED BY _____ ____ DATED __/__/__ * NO SUBSTITUTIONS WILL BE ACCEPTED. * NO OVER SHIPMENTS/DUPLICATE ORDERS WILL BE ACCEPTED.