Procurement: Purchases, Purchase Orders, Requisitions, and ... · Procurement: Purchases, Purchase...
18
1 Update 8/8/2018 Procurement: Purchases, Purchase Orders, Requisitions, and Receipts There are two purchasing paths in Workday. Both begin with Create Requisition, below. 1. Purchase items from preferred vendors directly connected to Workday: Use Connect to Supplier Website (page 3) Proceed to Checkout (page 5) Create Receipt (page 14) 2. Purchase items from vendors not connected to Workday: Use Request Non‐Catalog Items (page 12) Proceed to Checkout (page 5) Create Receipt (page 14) Finally, the My Requisitions report is helpful for referring to purchases (page 16). _____________________________________________________________________________________ Create Requisition Search for and select Create Requisition. 1. The requester is also the person who submits the receipt for the purchase.
Transcript of Procurement: Purchases, Purchase Orders, Requisitions, and ... · Procurement: Purchases, Purchase...

1 Update 8/8/2018
Procurement: Purchases, Purchase Orders, Requisitions, and Receipts
There are two purchasing paths in Workday. Both begin with Create Requisition, below.
1. Purchase items from preferred vendors directly connected to Workday:
Use Connect to Supplier Website (page 3)
Proceed to Checkout (page 5)
Create Receipt (page 14)
2. Purchase items from vendors not connected to Workday:
Use Request Non‐Catalog Items (page 12)
Proceed to Checkout (page 5)
Create Receipt (page 14)
Finally, the My Requisitions report is helpful for referring to purchases (page 16).
_____________________________________________________________________________________
Create Requisition
Search for and select Create Requisition.
1. The requester is also the person who submits the receipt for the purchase.
2 Update 8/8/2018
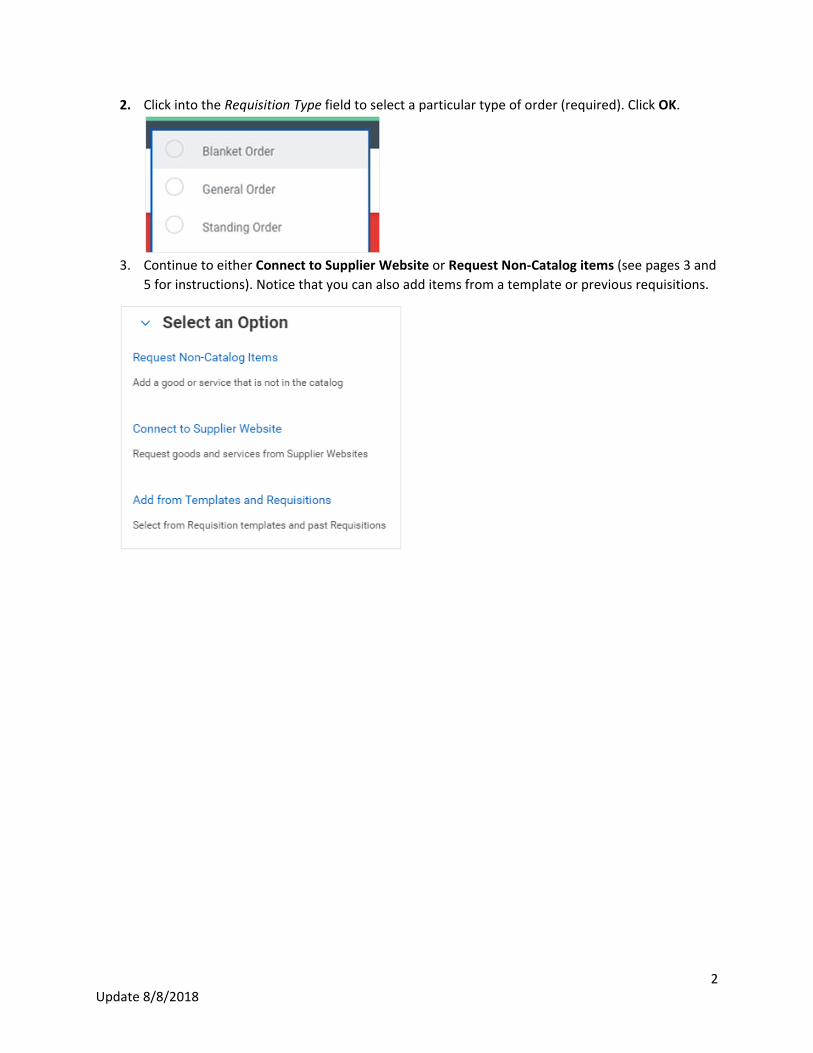
2. Click into the Requisition Type field to select a particular type of order (required). Click OK.
3. Continue to either Connect to Supplier Website or Request Non‐Catalog items (see pages 3 and
5 for instructions). Notice that you can also add items from a template or previous requisitions.
3 Update 8/8/2018
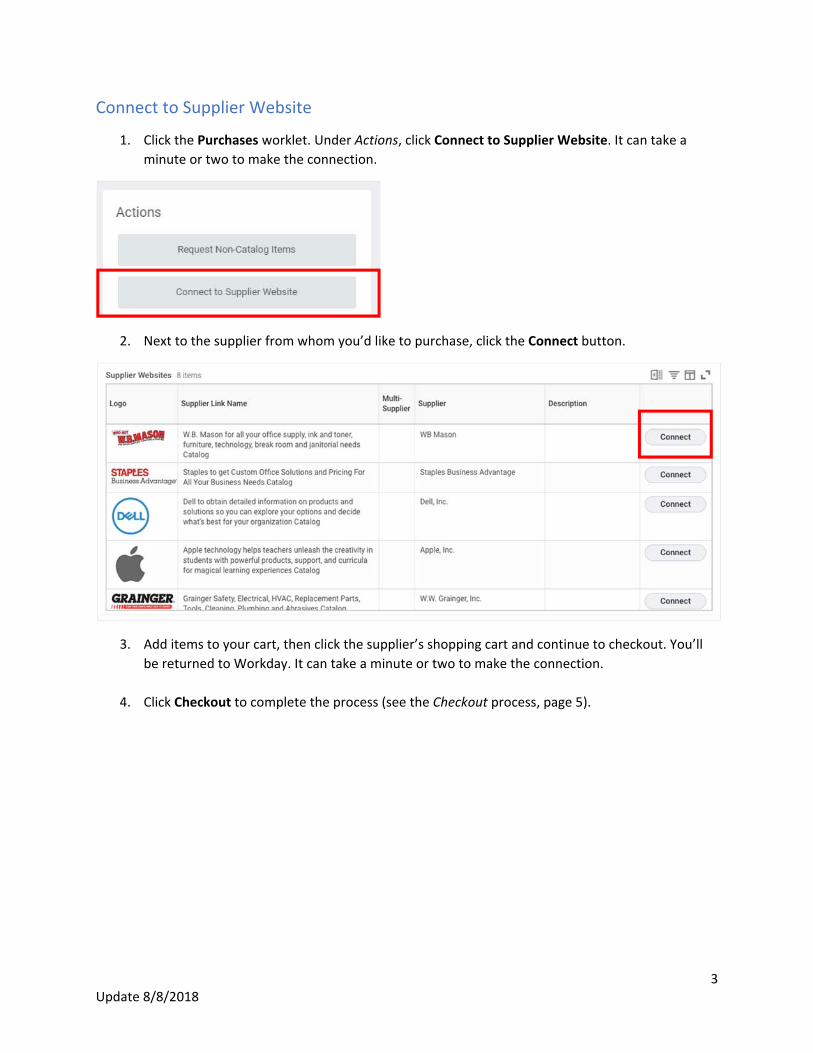
Connect to Supplier Website
1. Click the Purchases worklet. Under Actions, click Connect to Supplier Website. It can take a
minute or two to make the connection.
2. Next to the supplier from whom you’d like to purchase, click the Connect button.
3. Add items to your cart, then click the supplier’s shopping cart and continue to checkout. You’ll
be returned to Workday. It can take a minute or two to make the connection.
4. Click Checkout to complete the process (see the Checkout process, page 5).

4 Update 8/8/2018
5 Update 8/8/2018
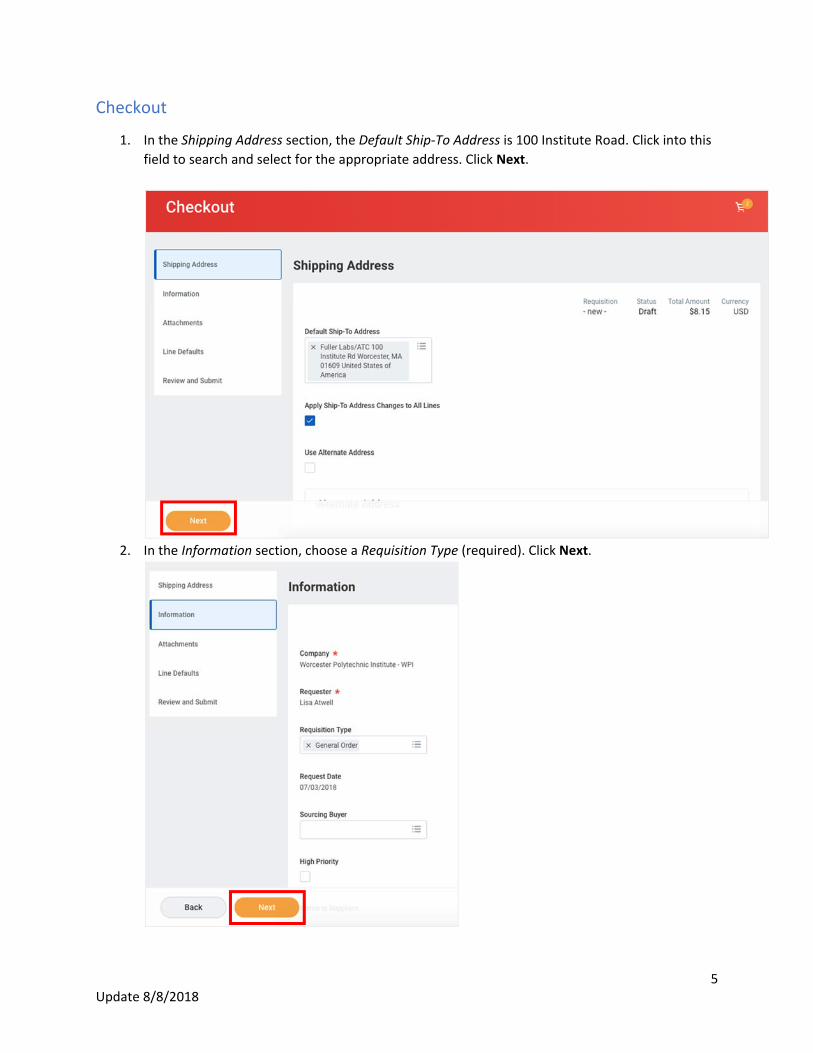
Checkout
1. In the Shipping Address section, the Default Ship‐To Address is 100 Institute Road. Click into this
field to search and select for the appropriate address. Click Next.
2. In the Information section, choose a Requisition Type (required). Click Next.
6 Update 8/8/2018
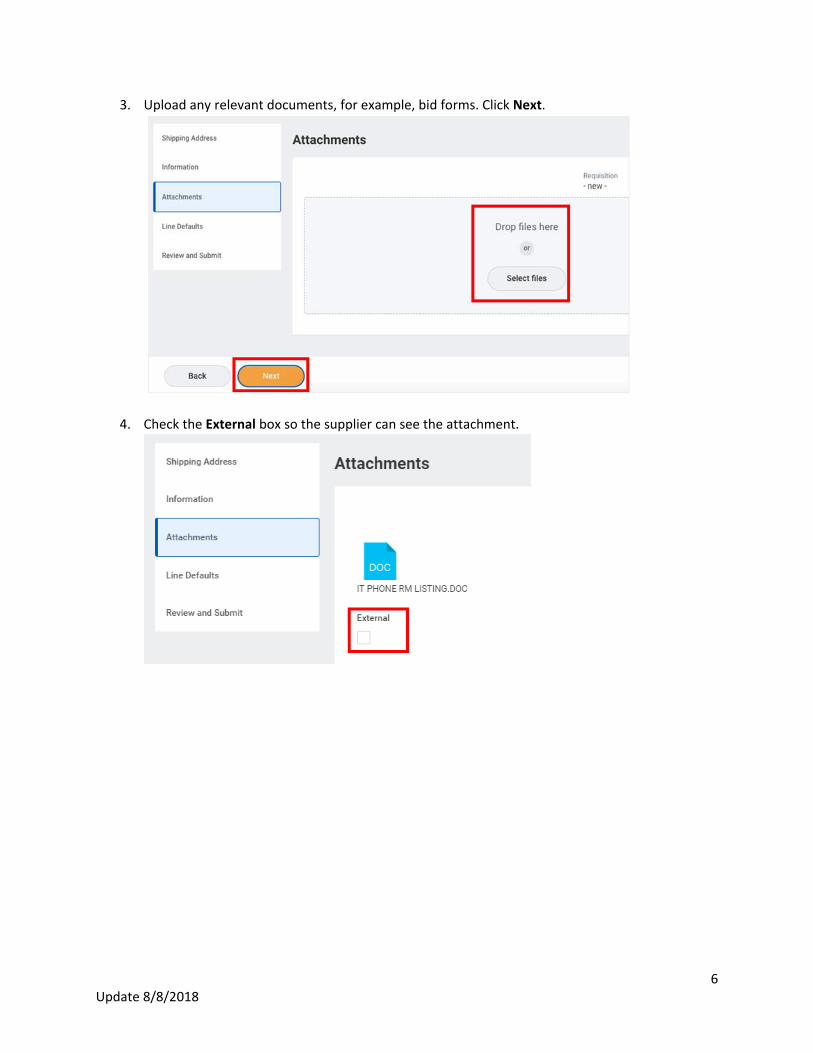
3. Upload any relevant documents, for example, bid forms. Click Next.
4. Check the External box so the supplier can see the attachment.

7 Update 8/8/2018
5. Add a Requested Delivery Date and Supplier. Scroll down…
8 Update 8/8/2018
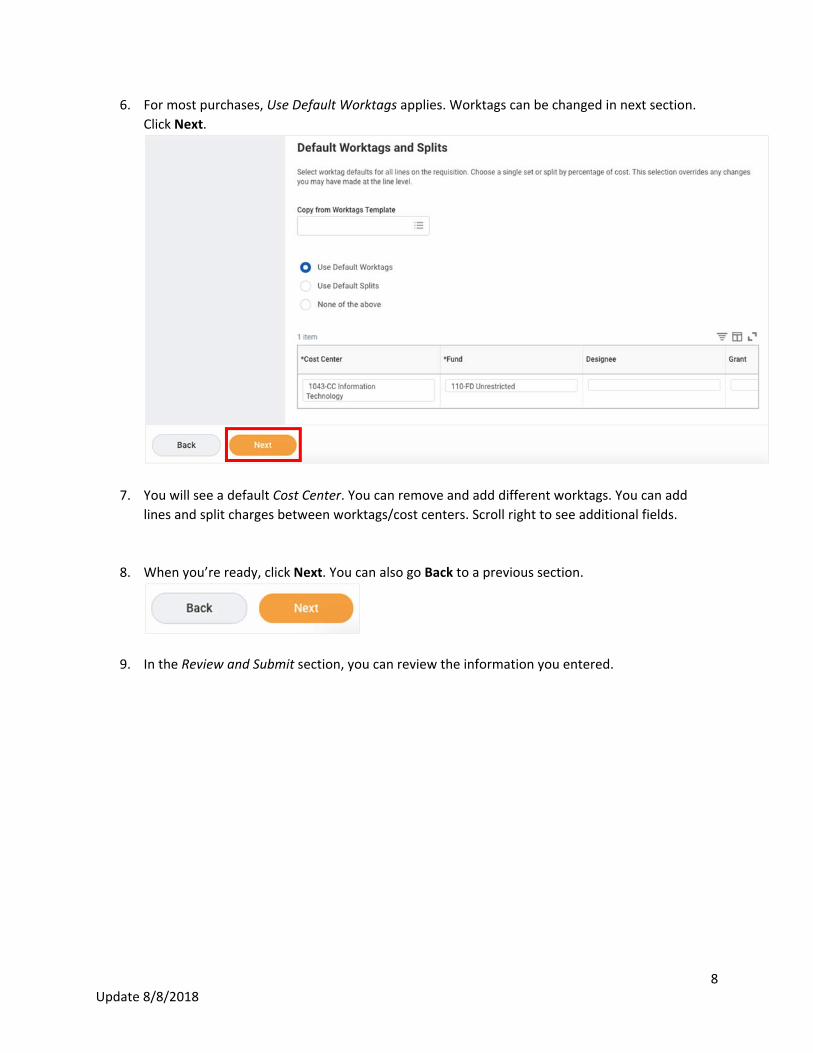
6. For most purchases, Use Default Worktags applies. Worktags can be changed in next section.
Click Next.
7. You will see a default Cost Center. You can remove and add different worktags. You can add
lines and split charges between worktags/cost centers. Scroll right to see additional fields.
8. When you’re ready, click Next. You can also go Back to a previous section.
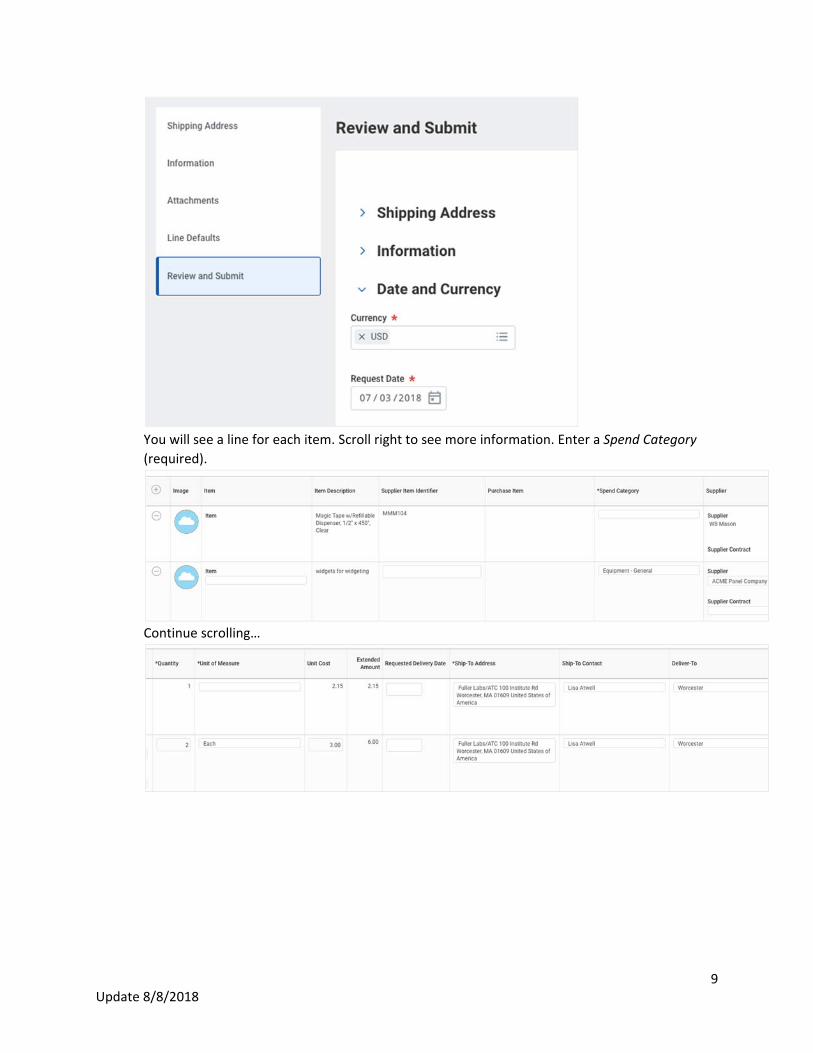
9. In the Review and Submit section, you can review the information you entered.
9 Update 8/8/2018
You will see a line for each item. Scroll right to see more information. Enter a Spend Category
(required).
Continue scrolling…

10 Update 8/8/2018
And further right…
Notice the option to split a single item between cost centers/worktags. Once open, you can add
multiple lines.
10. When you’re ready, click Submit. You can also Save for Later, searching for My Requsitions to
edit a requisition (see below).
11. The requisition goes for approval to the Department Buyer who can edit the requisition,
approve it, add approvers, or send it back to the requester. When it is approved, you will receive
a Notification.
12. Next to Details, click the blue Requisition link.

11 Update 8/8/2018
13. Mouse to the right of the Purchase Order number for the Related Actions button, selecting
Purchase Order > Printable Version.
12 Update 8/8/2018
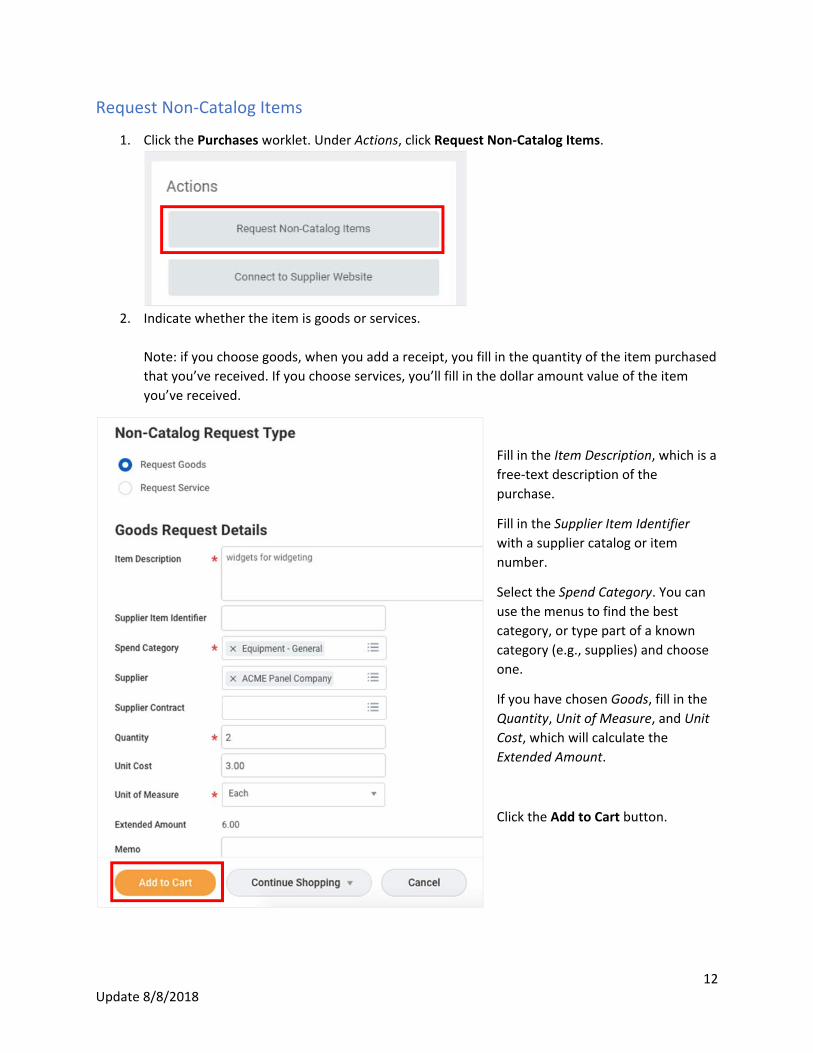
Request Non‐Catalog Items
1. Click the Purchases worklet. Under Actions, click Request Non‐Catalog Items.
2. Indicate whether the item is goods or services.
Note: if you choose goods, when you add a receipt, you fill in the quantity of the item purchased
that you’ve received. If you choose services, you’ll fill in the dollar amount value of the item
you’ve received.
Fill in the Item Description, which is a
free‐text description of the
purchase.
Fill in the Supplier Item Identifier
with a supplier catalog or item
number.
Select the Spend Category. You can
use the menus to find the best
category, or type part of a known
category (e.g., supplies) and choose
one.
If you have chosen Goods, fill in the
Quantity, Unit of Measure, and Unit
Cost, which will calculate the
Extended Amount.
Click the Add to Cart button.
13 Update 8/8/2018
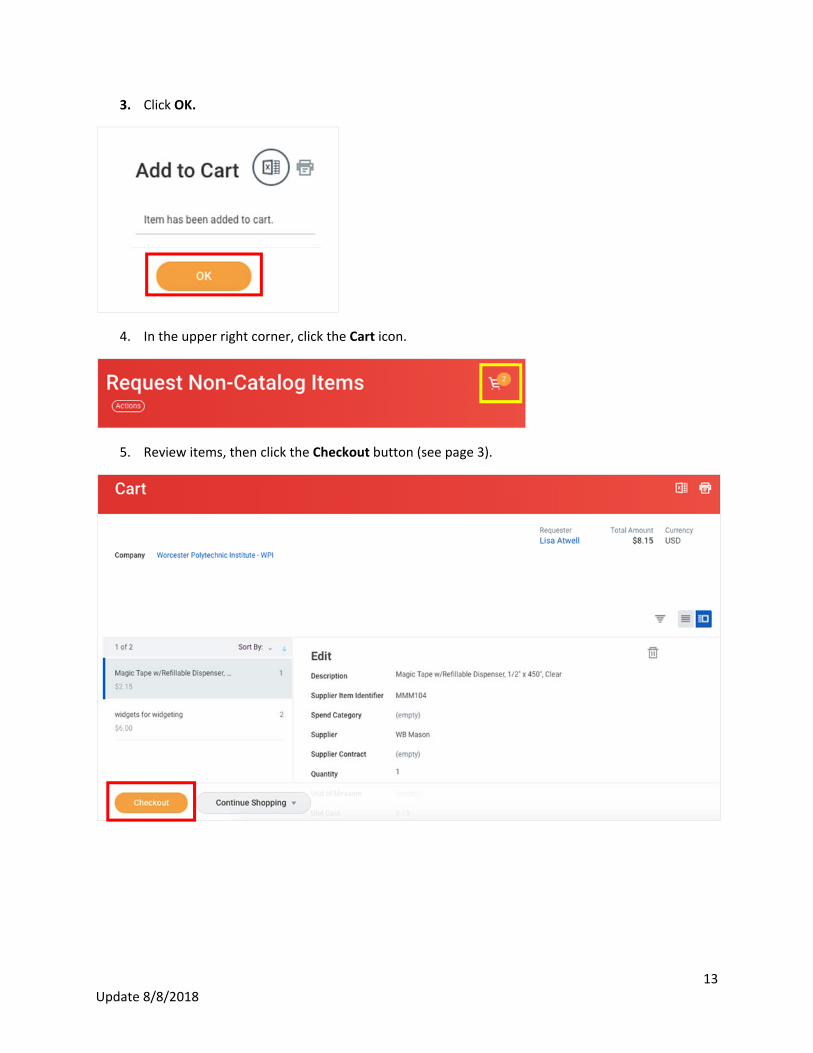
3. Click OK.
4. In the upper right corner, click the Cart icon.
5. Review items, then click the Checkout button (see page 3).
14 Update 8/8/2018
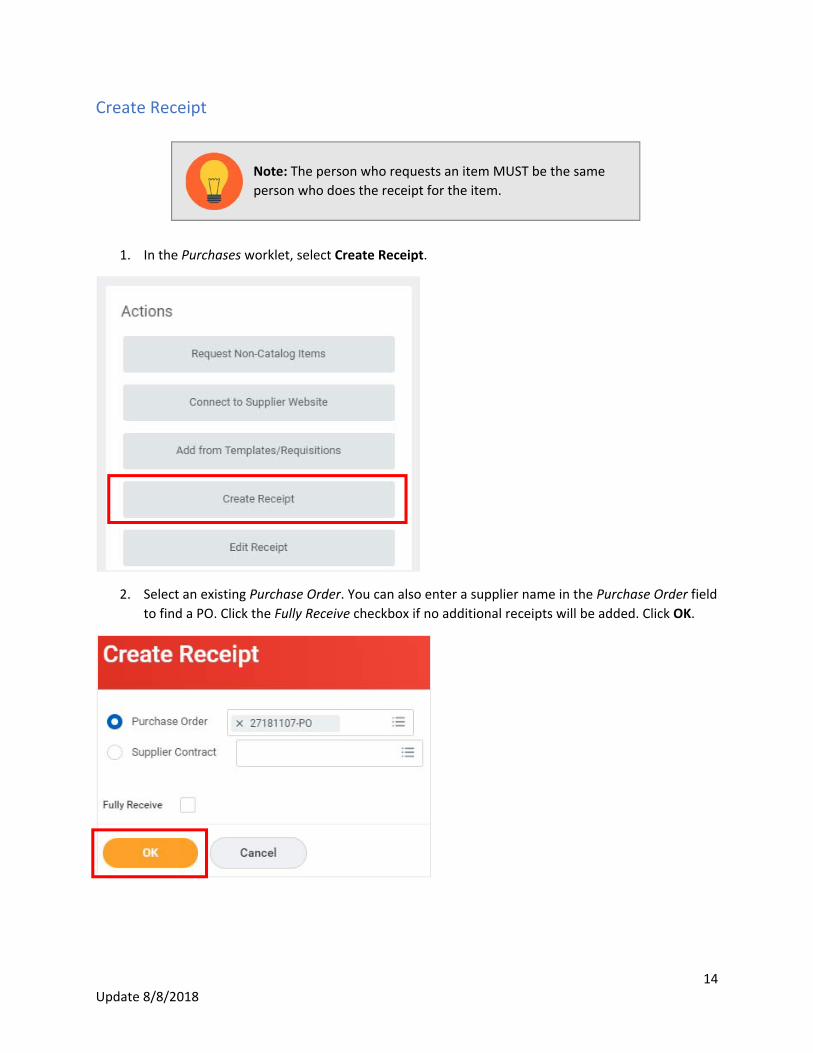
Create Receipt
1. In the Purchases worklet, select Create Receipt.
2. Select an existing Purchase Order. You can also enter a supplier name in the Purchase Order field
to find a PO. Click the Fully Receive checkbox if no additional receipts will be added. Click OK.
Note: The person who requests an item MUST be the same
person who does the receipt for the item.

15 Update 8/8/2018
3. The Receipt Date will default to the current day, change if needed.
Under Goods Lines, scroll to the right and you will see a Quantity to Receive field to fill in. If it
was for services, you would fill in a received dollar amount.
Note: You must add an attachment before you click Submit.
You will not be allowed to add any attachments after clicking
Submit.
16 Update 8/8/2018
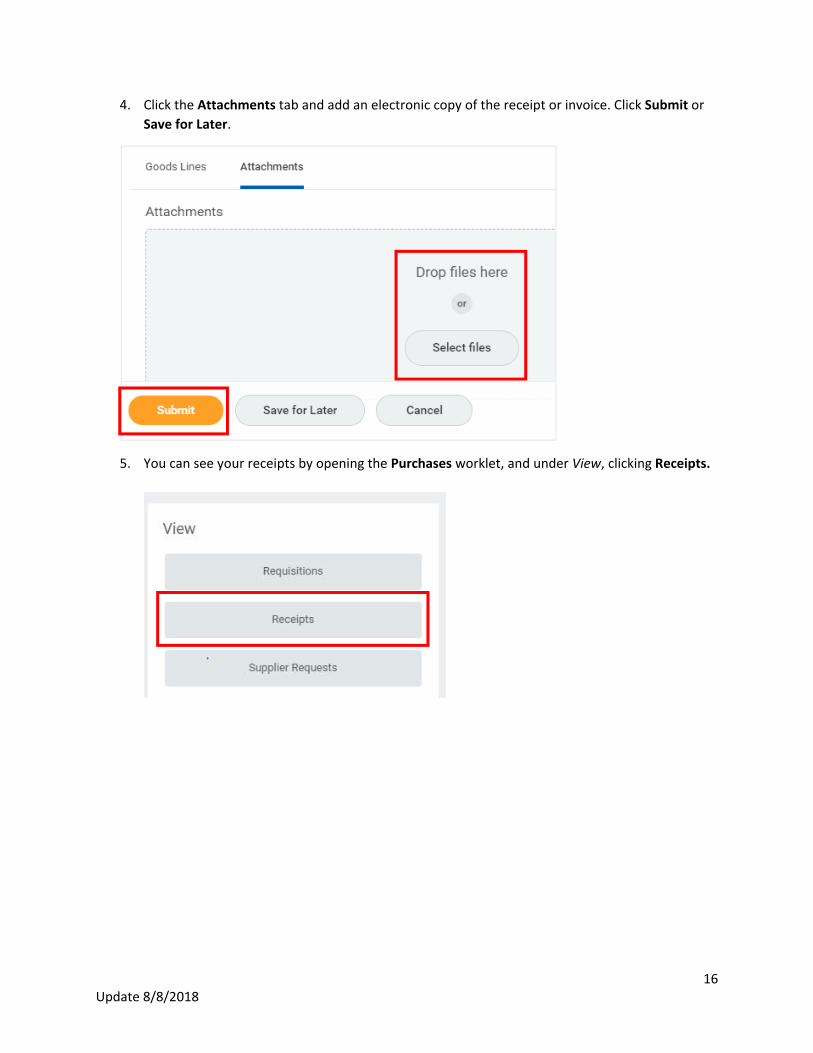
4. Click the Attachments tab and add an electronic copy of the receipt or invoice. Click Submit or
Save for Later.
5. You can see your receipts by opening the Purchases worklet, and under View, clicking Receipts.
17 Update 8/8/2018
My Requisitions Use the My Requisitions report to:
Edit a requisition
Find a requisition number
Find a purchase order number
Get a printable version of the purchase order
Review order status
View how the PO is sent to the supplier
Create a Receipt – used to enter a receipt, see page 16
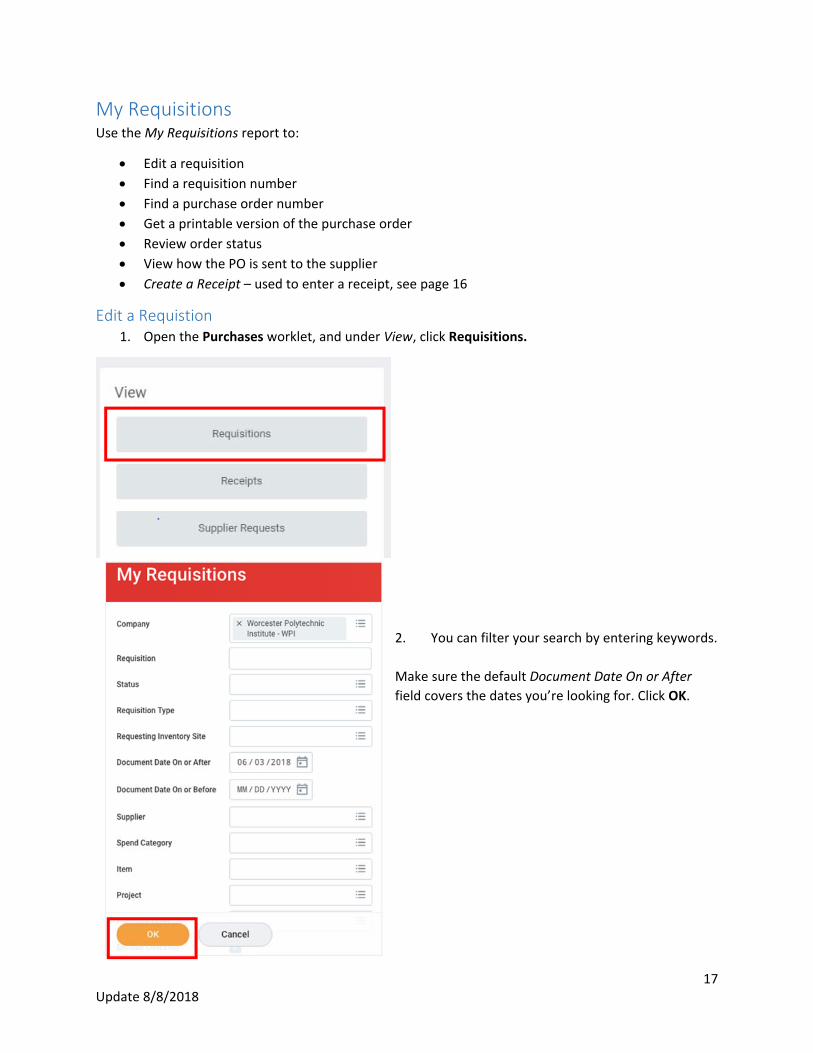
Edit a Requistion 1. Open the Purchases worklet, and under View, click Requisitions.
2. You can filter your search by entering keywords.
Make sure the default Document Date On or After
field covers the dates you’re looking for. Click OK.
18 Update 8/8/2018
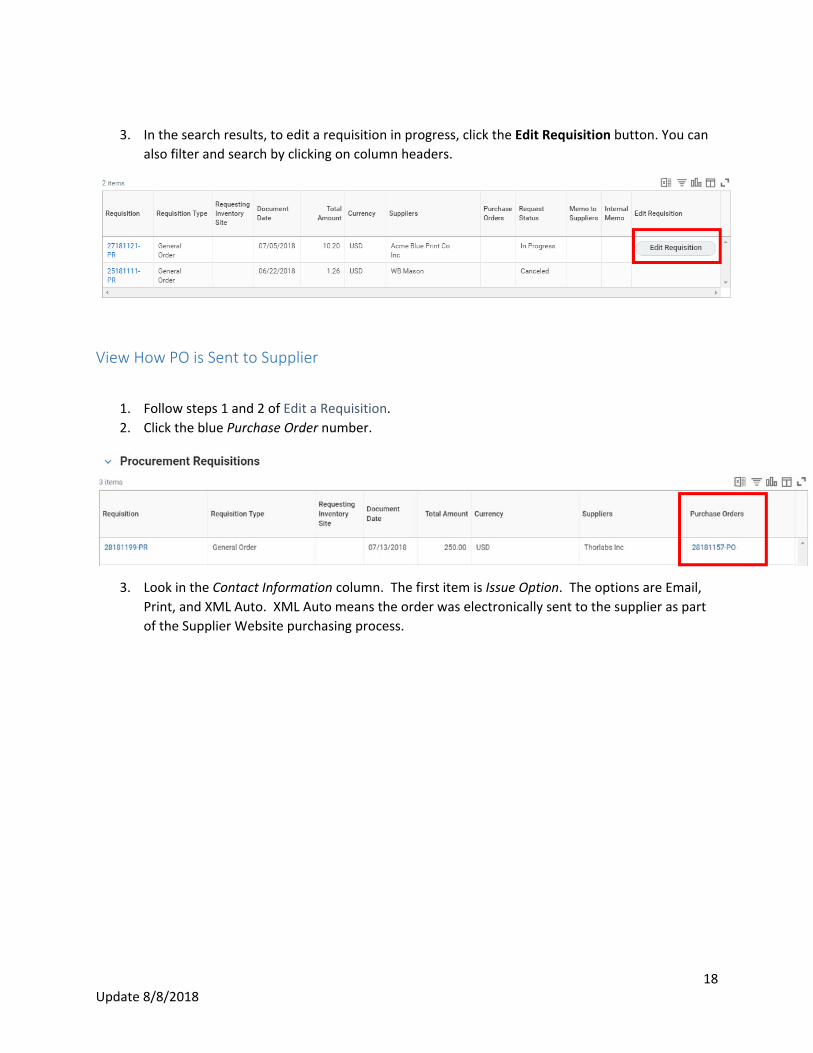
3. In the search results, to edit a requisition in progress, click the Edit Requisition button. You can
also filter and search by clicking on column headers.
View How PO is Sent to Supplier
1. Follow steps 1 and 2 of Edit a Requisition.
2. Click the blue Purchase Order number.
3. Look in the Contact Information column. The first item is Issue Option. The options are Email,
Print, and XML Auto. XML Auto means the order was electronically sent to the supplier as part
of the Supplier Website purchasing process.