
Rep-Dealer BASIC TRAINING MANUAL 091207 - FEX DMS · PDF fileFinance Express – Basic...
41
Basic FEX Manual – Page 1(41) Chapter Page Number 1. INITIAL DEALERSHIP SETUP 3 2. APPLICATION OVERVIEW - DEFINITIONS 3 3. SETTING UP COMPANY – BUSINESS BOOKS 5 4. PORTFOLIOS 6 4.1 Add Or Modify A Portfolio 6 4.2 Configure How Past Due Accounts Are Monitored 8 4.3 Nightly Letter/Notice Generation Setup 8 5. CHANNELS 9 5.1 Adding A New Sales Location / Branch 9 Buyers Guides Defaults (As Is, Warranty & Limited Warranty) 10 Seller Fees 11 Seller Taxes 12 Tax Info (Dealer Sales Tax ID/VIT ID) 13 Setting Up The Contract Used For In-House Financed Deals. 13 Setting Up In-House Financed Worksheet And Calculation Defaults/Lien Holder Info 13-14 5.2 Modifying Existing Sales Location / Branch 15 5.3 Adding A New (Non Finance Related) Channel 15-16 5.4 Adding A New (Finance Related) Channel 16-17 Setting Up Lender Address Information 17 Setting Up The Contract Used By Lender 18 Setting Up Lender Worksheet Defaults 18 5.5 Flags 18 Adding A Flag 19 5.6 Adding New Users 19 User Access 19 5.7 User HOME Page Settings 21 5.8 Dealer Profile 22 6. HOME / DASHBOARD SPECIFICS 23 Command Center/Dashboard 23 In-House Finance Dashboard 23 FEX Lender Dashboard 23 7. INVENTORY 24 7.1 Add New Inventory 24 7.2 Installed Options 26 7.3 Inventory Purchase Information 27 7.4 Add/View Expenses 27 7.5 Inventory Flags 27 7.6 Request Inventory Valuations (NADA/Blackbook/Kelly Blue Book) 28 7.7 How To Delete A Vehicle 28 7.8 Pictures 28 7.9 Inventory Documents 29 8. SALES AREA – HOW TO SELL A CAR 30 8.1 DEALS Submenu Selections 30 - NEW DEAL - DEAL List - CRM List - Figure A Deal Calculator - Printing A Blank Credit Application Finance Express – Basic Training Manual
Transcript of Rep-Dealer BASIC TRAINING MANUAL 091207 - FEX DMS · PDF fileFinance Express – Basic...

Basic FEX Manual – Page 1(41)
Chapter Page Number 1. INITIAL DEALERSHIP SETUP 3 2. APPLICATION OVERVIEW - DEFINITIONS 3 3. SETTING UP COMPANY – BUSINESS BOOKS 5 4. PORTFOLIOS 6 4.1 Add Or Modify A Portfolio 6 4.2 Configure How Past Due Accounts Are Monitored 8 4.3 Nightly Letter/Notice Generation Setup 8 5. CHANNELS 9 5.1 Adding A New Sales Location / Branch 9 Buyers Guides Defaults (As Is, Warranty & Limited Warranty) 10 Seller Fees 11 Seller Taxes 12 Tax Info (Dealer Sales Tax ID/VIT ID) 13 Setting Up The Contract Used For In-House Financed Deals. 13 Setting Up In-House Financed Worksheet And Calculation Defaults/Lien Holder Info 13-14 5.2 Modifying Existing Sales Location / Branch 15 5.3 Adding A New (Non Finance Related) Channel 15-16 5.4 Adding A New (Finance Related) Channel 16-17 Setting Up Lender Address Information 17 Setting Up The Contract Used By Lender 18 Setting Up Lender Worksheet Defaults 18 5.5 Flags 18 Adding A Flag 19 5.6 Adding New Users 19 User Access 19 5.7 User HOME Page Settings 21 5.8 Dealer Profile 22 6. HOME / DASHBOARD SPECIFICS 23 Command Center/Dashboard 23 In-House Finance Dashboard 23 FEX Lender Dashboard 23 7. INVENTORY 24 7.1 Add New Inventory 24 7.2 Installed Options 26 7.3 Inventory Purchase Information 27 7.4 Add/View Expenses 27 7.5 Inventory Flags 27 7.6 Request Inventory Valuations (NADA/Blackbook/Kelly Blue Book) 28 7.7 How To Delete A Vehicle 28 7.8 Pictures 28 7.9 Inventory Documents 29 8. SALES AREA – HOW TO SELL A CAR 30 8.1 DEALS Submenu Selections 30
- NEW DEAL - DEAL List - CRM List - Figure A Deal Calculator - Printing A Blank Credit Application
Finance Express – Basic Training Manual

Basic FEX Manual – Page 2(41)
- Printing A Blank Test Drive Document 8.2 Choose Type of Deal: CASH, Finance (BHPH, FEX/Local Lender) or Wholesale 30 8.3 Joint or Individual Application 31 8.4 Entering Applicant Information 31 8.4.1 Application Information 31 8.4.2 Employment Information 31 8.4.3 Credit Information – Pulling A Credit Bureau 32 8.5 Opening A New Worksheet 32 8.5.1 Opening/Generating Multiple Worksheets 32 8.5.2 How to Print Forms 33 8.6 Posting Down Payment From DEALS Tab: Cash, FEX/Local Lender, Wholesale deals 33 8.7 eCabinet/Archives 34 9. HOW TO GENERATE A FEX LENDER DEAL 34 9.1 FEX Lender Options 34 9.1.1 FEX Lender Fees/Reserves 34 9.2 FEX Lender Worksheet Options 34-35 9.2.1 Taxes/Fees 35 9.3 Submitting A Deal To A FEX Lender 35-36 9.3.1 Viewing FEX Lender Decisions 36 9.3.2 Contracting A FEX Lender Deal 37 9.4 How To Post A Payoff With And Without Lender Discount 37 10. NOTES RECEIVABLE 39 10.1 NOTES REC Submenu Selections 39 - Collector Statistics - Asset Recovery (TBA) - Queue Builder - Collection Queue 10.2 Account And Collections Screen Details 39 10.3 Account And Collections Screen Action Buttons/Features 40 10.4 Select Action Drop-Down Button Features 40 - Add Account Notes/Promises - View Account Notes - Add/Remove Account Flags - Request An Account Letter/Document - Create A Side Note - Place Out For Repossession / Record Repossession - Move To Bankruptcy - Update Borrowers Insurance Information - Edit Alert Message - Update Credit Reporting Status - View Transaction History - View Full Payment Schedule 10.5 Post A Transaction Drop-Down Button Features 40-41 - Post A Payment - Post A Payoff 41 - Post An Extension - Post A Charge Off - Post Account Write Down - Reverse A Payment - Post NSF Check - Reverse An Extension - Post A Principle Adjustment - Post Non-Earning Principle Adjustment - Post Interest Adjustment - Post Miscellaneous Fee Adjustment - Post Account Transfer 11. REPORTS (PRE-PROGRAMMED AND CUSTOM REPORTS) 41
Basic FEX Manual – Page 3(41)
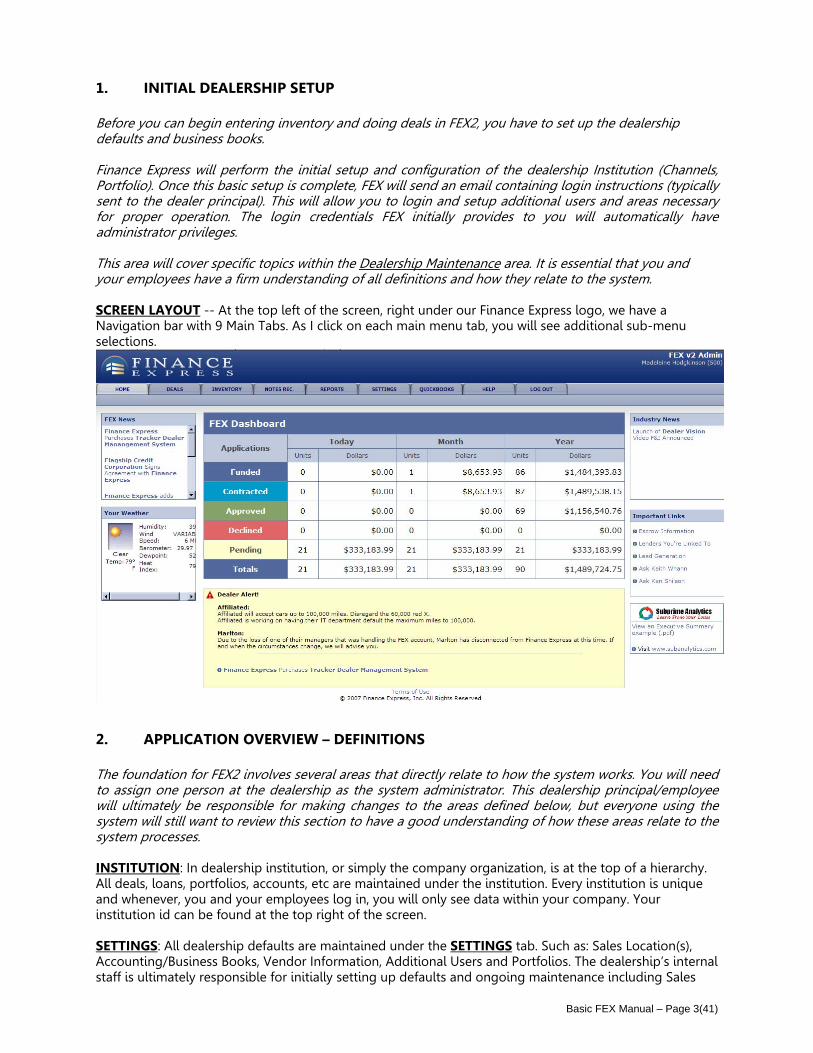
1. INITIAL DEALERSHIP SETUP Before you can begin entering inventory and doing deals in FEX2, you have to set up the dealership defaults and business books. Finance Express will perform the initial setup and configuration of the dealership Institution (Channels, Portfolio). Once this basic setup is complete, FEX will send an email containing login instructions (typically sent to the dealer principal). This will allow you to login and setup additional users and areas necessary for proper operation. The login credentials FEX initially provides to you will automatically have administrator privileges. This area will cover specific topics within the Dealership Maintenance area. It is essential that you and your employees have a firm understanding of all definitions and how they relate to the system. SCREEN LAYOUT -- At the top left of the screen, right under our Finance Express logo, we have a Navigation bar with 9 Main Tabs. As I click on each main menu tab, you will see additional sub-menu selections.
2. APPLICATION OVERVIEW – DEFINITIONS The foundation for FEX2 involves several areas that directly relate to how the system works. You will need to assign one person at the dealership as the system administrator. This dealership principal/employee will ultimately be responsible for making changes to the areas defined below, but everyone using the system will still want to review this section to have a good understanding of how these areas relate to the system processes. INSTITUTION: In dealership institution, or simply the company organization, is at the top of a hierarchy. All deals, loans, portfolios, accounts, etc are maintained under the institution. Every institution is unique and whenever, you and your employees log in, you will only see data within your company. Your institution id can be found at the top right of the screen. SETTINGS: All dealership defaults are maintained under the SETTINGS tab. Such as: Sales Location(s), Accounting/Business Books, Vendor Information, Additional Users and Portfolios. The dealership’s internal staff is ultimately responsible for initially setting up defaults and ongoing maintenance including Sales

Basic FEX Manual – Page 4(41)
Location(s), all Channels (vendors) including side product companies like for Warranties, Repair Shops and Portfolios. If you have any questions or need assistance, your local sales representative and our support team is happy to answer questions and help. CHANNELS: Channels are defined as a category or type of business. Prior to using the system, you, the dealer, will initially setup various channels that your institution (company) will reference during normal operations. For example, if you set up a new channel called Bob’s Repo, you would assign the channel type Repo Agent to that vendor.
Channels are used extensively throughout the system and the current types of channels available are:
• Sales Location / Branch: if you sell cars from multiple locations, then you can assign this type to each location. In either case, you will still need to setup at least one branch for your institution.
• Insurance Agent: you are able to setup and assign an insurance agent to a buyer • Insurance Company: you are able to setup and assign the insurance company to the buyer. • Investors: most commonly used within the Portfolio area, you can setup and assign an investor(s)
to a particular portfolio. By default, a primary investor is setup when your dealership was established.
• Source: represents the source in which you acquired/obtained your loan(s). Primarily used when finance companies book/load loan accounts.
• Repo Agent: if you ever have a need to process a repossession, you will need to setup your repo agents first. You can then assign the repo agent to an account.
• Department: (future use) • Transportation/Towing Company: represents a company used for transporting or towing
vehicles this channel will show up in the inventory expenses record under the Service Company dropdown list.
• Floor Plan/Inventory Finance: typically used for financial organizations that provide floor plans for your dealership. This channel exists in inventory under the Purchase/Finance area, any company that you add using this channel type will show up in the Floored By dropdown.
• Finance Company / Bank: Any non-FEX lenders need to be added as a Finance/Bank channel type. The information that prints on certain documents, like the contract, will contain the information you entered for these entities. Any company setup as a Finance Company/Bank will show up in the [Select Local Lender] dropdown box when creating a new deal worksheet.
• Repair Service Shop: Any company that performs work on your vehicles needs to be added as this type of channel. When you add a service record / expense for your inventory, you can select from any of these channel types.
• Dealer / Wholesaler / Auction: reflects any company from where you might obtain your vehicles.
• Vendor Company: This typically represents any warranty, credit life, gap and other related add-on type companies that are used during the deal process.
• Company / Business Books: This channel is directly related to QuickBooks Pro and is a required channel if you intend on exporting QB transactions or run any of the GL reports. You are able to assign this channel to both a Sales Location and Portfolio. Typically, you will only have one “Company – Business Books” channel. Depending on the Company – Business Books channel, the QuickBooks export will only export transactions relating to that channel. If you have a Related Finance Company (RFC), you probably will have two sets of business books, one for the dealership and another for the RFC.
• Alternate Inventory Location: This channel allows you to enter a secondary location for your inventory. (i.e., Repair Shop, Principal Loaner Car etc.)
• Inventory Buyer: This channel represents the individual who from your dealership actually purchased the vehicle from the auction/wholesale company. The dropdown is located within the Purchase/Finance window of the vehicle record.
• Salesperson: Salespersons can be assigned during the Deal process. • All Channel Types: If this selection is chosen in a search, all channels will be listed.
All channel types fall into two basic categories: Finance Related or Non-Finance Related.
Basic FEX Manual – Page 5(41)
Any Finance Related channel that you setup will require additional information that only relates to that channel. For each Finance Related channel that you setup, you can default which Portfolio the loan should go to, which contract the lender requires, and so on. Finance Related: The channel types that will require additional information and fall into this category are: • Finance Company / Bank • Branch / Sales Location Non-Finance Related: channel types would include the remaining types: • Insurance Agent • Insurance Company • Investor • Source • Repo Agent • Department • Inventory Acquisition • Inventory Finance • Repair / Body Shop • Dealer / Wholesaler / Auction • Vendor Company • Company – Business Books Before setting up the dealership portfolio, you would have to verify the accuracy of your Bookkeeping Company in the CHANNEL “Company – Business Books”.
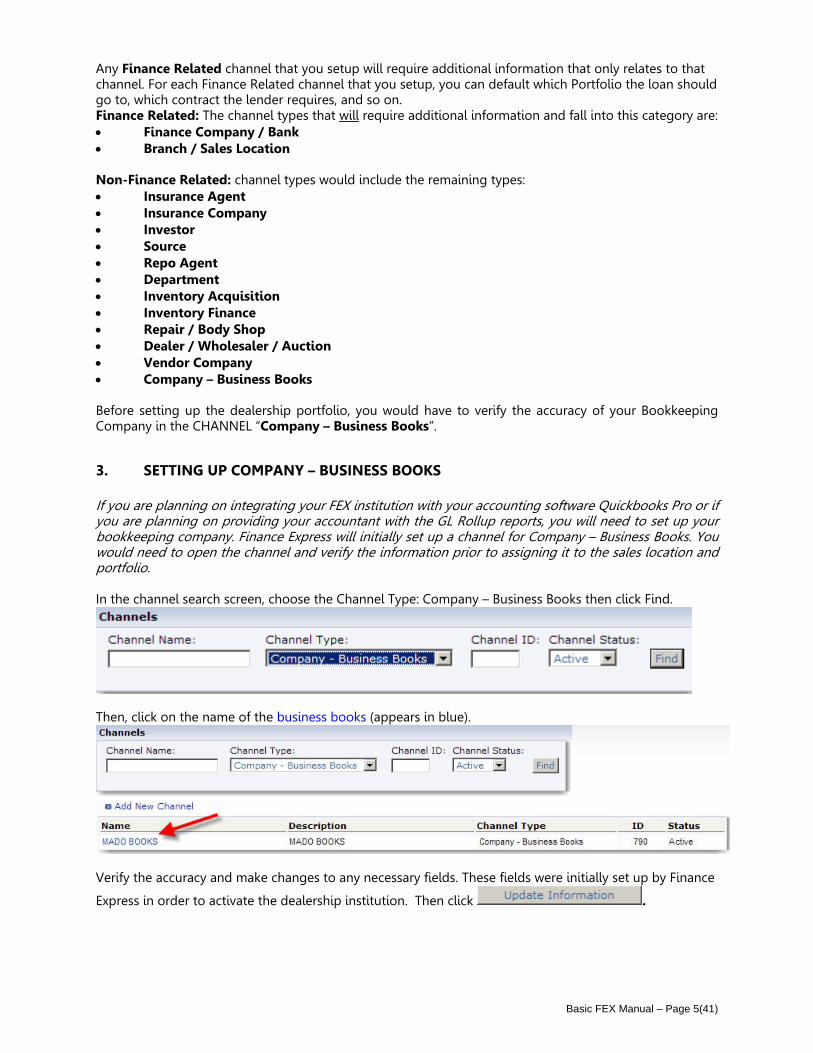
3. SETTING UP COMPANY – BUSINESS BOOKS If you are planning on integrating your FEX institution with your accounting software Quickbooks Pro or if you are planning on providing your accountant with the GL Rollup reports, you will need to set up your bookkeeping company. Finance Express will initially set up a channel for Company – Business Books. You would need to open the channel and verify the information prior to assigning it to the sales location and portfolio. In the channel search screen, choose the Channel Type: Company – Business Books then click Find.
Then, click on the name of the business books (appears in blue).
Verify the accuracy and make changes to any necessary fields. These fields were initially set up by Finance
Express in order to activate the dealership institution. Then click .
Basic FEX Manual – Page 6(41)
4. PORTFOLIOS Portfolios are primarily setup to separate bookkeeping companies, monitor past dues, and are also used for secondary marketing purposes for BHPH dealers that want to sell loans. Every institution will have at least one defined portfolio. Multiple investors can be assigned to each portfolio and percentage ownership of these portfolios can be maintained for payout purposes. Portfolios also maintain additional collection items including Notice types to be sent and next loan number. Every dealer will have at least one Portfolio that all loan accounts fall into; however, portfolios are extremely important because they directly affect the following areas:
• Collections and the assignment of collections officers to accounts • Loan Investor Participation percentages • How Past Dues are handled in the system • Automatic generation of reminder notices and past due notices
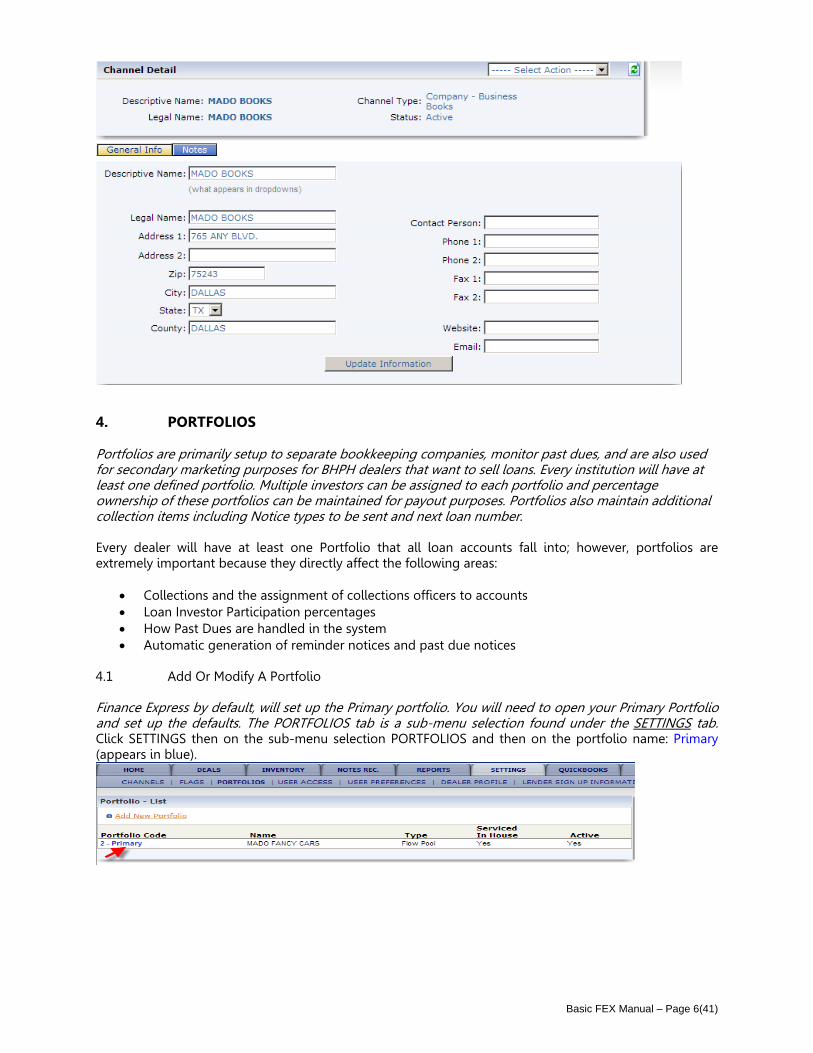
4.1 Add Or Modify A Portfolio Finance Express by default, will set up the Primary portfolio. You will need to open your Primary Portfolio and set up the defaults. The PORTFOLIOS tab is a sub-menu selection found under the SETTINGS tab. Click SETTINGS then on the sub-menu selection PORTFOLIOS and then on the portfolio name: Primary (appears in blue).

Basic FEX Manual – Page 7(41)
What Bookkeeping Company Owns This Location: This selection allows you to establish which company to attribute all transaction related items to and is directly related to the QuickBooks Pro export function. You must first setup a new “Company – Business Books” channel, otherwise, this dropdown will be blank. All transactions that take place under this Branch will then be exported for this Company. Address used on Account Collection Letters: If your company generates letters for past due accounts, this is the address that will printed on all collection type letters. Definitions - Detail Area Portfolio Type: current values are: Flow Pool: would typically consist of a fluctuating number of loans. Loans “flow” in and out Bulk Sale: would typically contain a fixed number of loans that never changes (E.g. a BHPH dealers’ sold loans) Portfolio Description: A descriptive name of the pool. (E.g. Mado’s or Mado’s RFC) Portfolio Name: The name of the portfolio (E.g. Mado’s Fancy Cars or Mado’s RFC – Related Finance Company) Origination Date: The date activated in FEX2. Actively Used: select Yes to make this an available portfolio to choose from. Serviced “In House”: answer Yes if you want to separate this portfolio from other portfolios that might be serviced by an outside loan servicing company. If this is set to No, then any loan in this portfolio will not accrue interest. Loan Number Prefix: If you have more than one portfolio, these have to be unique. E.g. 001, 002 or 003 etc. Next Loan Number: These will be incremented automatically by FEX2 as loans are generated in the system. Select Loan Investor Participation: Each portfolio can have a number of investors that actively participate. You must select an investor(s) and your respective ownership percentage for each portfolio. These Investors have to be first set up in the FEX system as CHANNELS. For most dealers, you will assign your company as the investor with 100% ownership. The dealership by default, has been setup by Finance Express as the 100% owner. You would change this if applicable by adding new investor CHANNEL(S) and then changing the information in the PORTFOLIO.
Basic FEX Manual – Page 8(41)
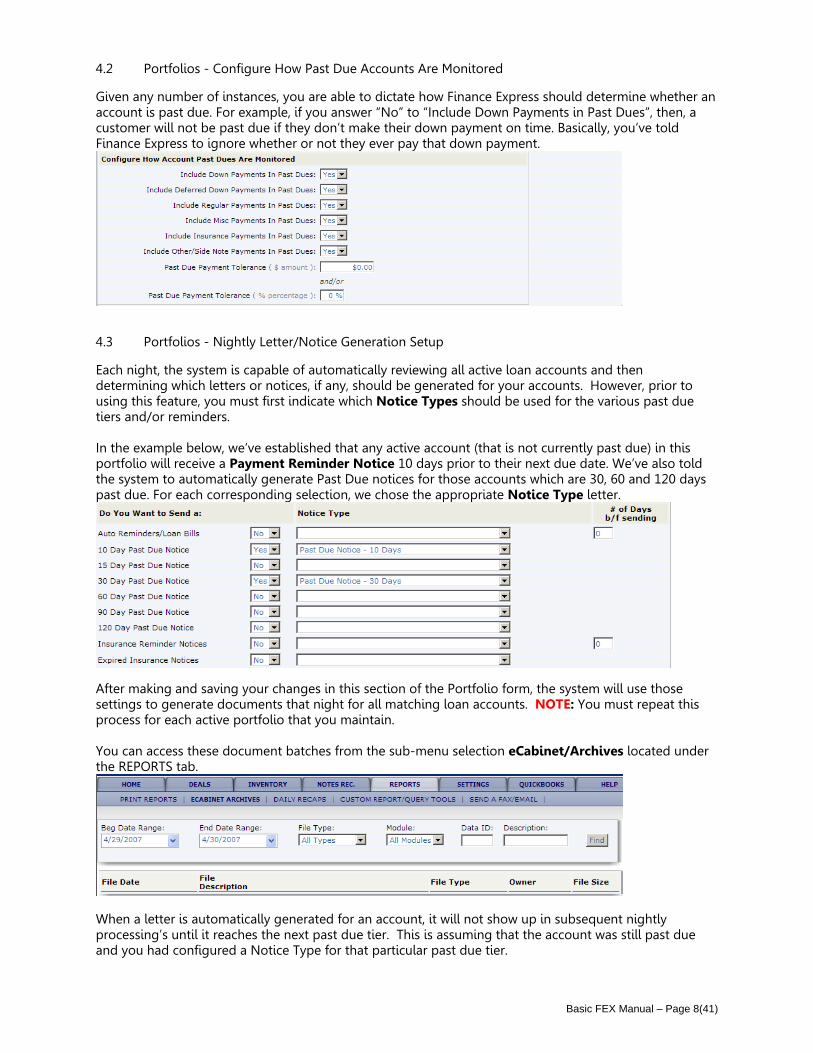
4.2 Portfolios - Configure How Past Due Accounts Are Monitored Given any number of instances, you are able to dictate how Finance Express should determine whether an account is past due. For example, if you answer “No” to “Include Down Payments in Past Dues”, then, a customer will not be past due if they don’t make their down payment on time. Basically, you’ve told Finance Express to ignore whether or not they ever pay that down payment.
4.3 Portfolios - Nightly Letter/Notice Generation Setup Each night, the system is capable of automatically reviewing all active loan accounts and then determining which letters or notices, if any, should be generated for your accounts. However, prior to using this feature, you must first indicate which Notice Types should be used for the various past due tiers and/or reminders. In the example below, we’ve established that any active account (that is not currently past due) in this portfolio will receive a Payment Reminder Notice 10 days prior to their next due date. We’ve also told the system to automatically generate Past Due notices for those accounts which are 30, 60 and 120 days past due. For each corresponding selection, we chose the appropriate Notice Type letter.
After making and saving your changes in this section of the Portfolio form, the system will use those settings to generate documents that night for all matching loan accounts. NOTE: You must repeat this process for each active portfolio that you maintain. You can access these document batches from the sub-menu selection eCabinet/Archives located under the REPORTS tab.
When a letter is automatically generated for an account, it will not show up in subsequent nightly processing’s until it reaches the next past due tier. This is assuming that the account was still past due and you had configured a Notice Type for that particular past due tier.

Basic FEX Manual – Page 9(41)
5. CHANNELS The first sub-menu selection under the SETTINGS tab is a current list of all defined channels. You can narrow down the list by typing in a portion of the company name in the Channel Name textbox. You can also select a channel type from the Channel Type dropdown window, or, you can use a combination of both areas to locate the channel you are looking for.
Adding / Changing Channel (Sales Location/Branch) (Finance Related Channel) Branch/Sales Location Channel – When you first log in, the system looks at the person’s user profile for default Sales Location / Branch. This location will be defaulted on all new deals this user creates. This can be changed “on the fly” in the worksheet. This defaulted Branch Location serves a couple different purposes.
1. It is useful for tracking sales by branch location. When a deal is contracted, the system retains the branch tagged to that deal and you can run reports for your various branches.
2. It establishes the tax rate percentages and other deal related defaults to be used when a deal is created.
3. It uses these figures as defaults in the “Figure a Deal” – Calculator. 4. It determines which Cash or Dealer portfolio to use on new Cash or Dealer type deals. 5. It establishes the Contract to use on any deal generated by that branch/lot. The contract type
determines the finance charge calculations and contract to use on the deal. 6. It allows you to enter Sales Tax (and Inventory Tax) rate, and address information to be used on
monthly reports. 7. It allows you to enter different insurance requirements, if applicable, in different branches. 5.1 Channels - Adding New Sales Location To Add a sales location, click on “Add New Channel”. To search for an existing sales location, click on the drop-down arrow to choose Sales Location / Branch. Then click “Find”.

Basic FEX Manual – Page 10(41)
Choose Channel Type Sales Location/Branch
General Info: Once you’ve completed all the required fields (see below), click . Additional information tabs appear as well as an “Action drop-down” menu at the top right of the screen. Complete all tabs (SALES DEFAULTS, SELLER FEES, SELLER TAXES, TAX INFO, SALES DOCUMENTS AND LENDER DEFAULTS) and click the “Update” button located at the bottom of each page.
Click on the next tab . Sales Defaults: Choose your Bookkeeping Company, Portfolios, and Contract/Registration State by clicking on the drop-down arrows. Then answer “Yes or No” if the dealership offers: Dealer Rebates and/or Manufacturer Rebates (this typically only applies to franchise dealers, not BHPH or Special Finance dealerships).
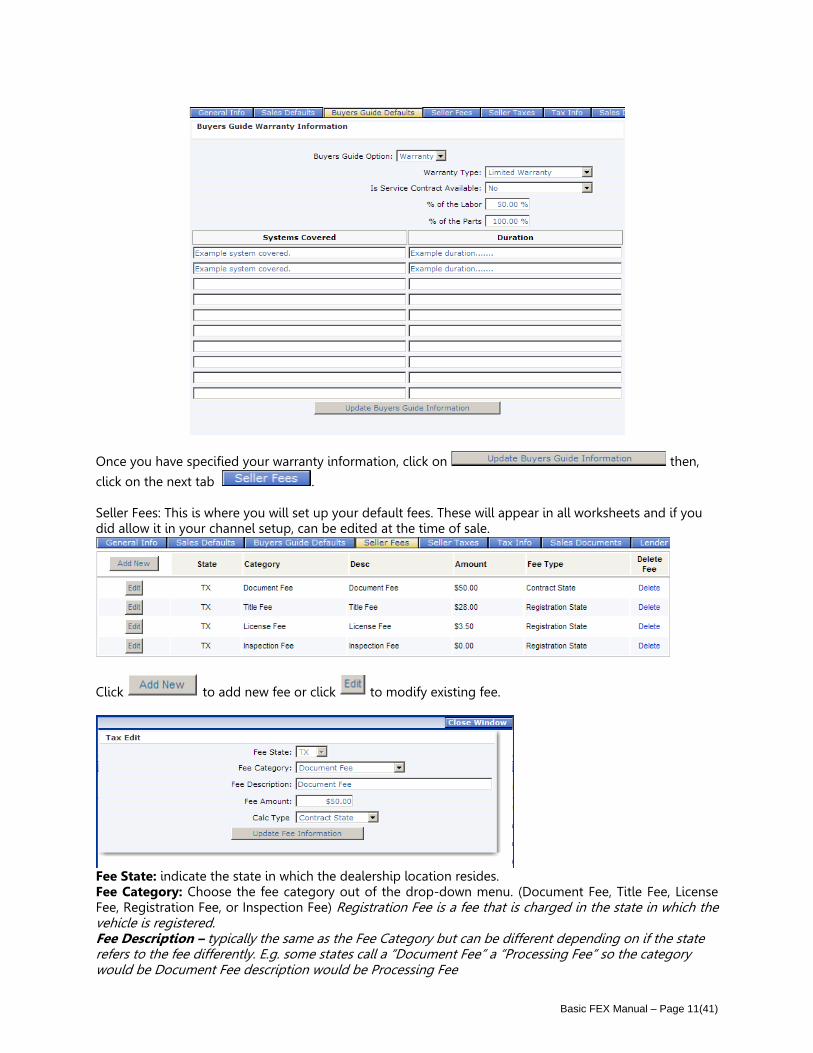
Click then, click on the next tab . Buyers Guide Defaults: This option is state specific. In states where an Implied Warranty is required, you would choose the Buyers Guide Option “Warranty” and then choose the Warranty Type “Limited Warranty”.
Basic FEX Manual – Page 11(41)
Once you have specified your warranty information, click on then,
click on the next tab . Seller Fees: This is where you will set up your default fees. These will appear in all worksheets and if you did allow it in your channel setup, can be edited at the time of sale.
Click to add new fee or click to modify existing fee.
Fee State: indicate the state in which the dealership location resides. Fee Category: Choose the fee category out of the drop-down menu. (Document Fee, Title Fee, License Fee, Registration Fee, or Inspection Fee) Registration Fee is a fee that is charged in the state in which the vehicle is registered. Fee Description – typically the same as the Fee Category but can be different depending on if the state refers to the fee differently. E.g. some states call a “Document Fee” a “Processing Fee” so the category would be Document Fee description would be Processing Fee

Basic FEX Manual – Page 12(41)
Fee Amount: Enter Fee amount. Calc Type: Contract State or Registration State. (Contract State Fee – a fee that is charged no-matter in what state the buyer resides. A good question to ask for a 99.9% accuracy: “Would this fee be charged no-matter in which state the buyer lives?” If the answer is “yes”, then it’s a Contract State Fee. Registration State Fee - a fee charged in association with Title/Registration state and not always charged depending on the residence of the buyer. A good question to ask for a 99.9% accuracy: “Would this fee be charged no-matter in which state the buyer lives?” If the answer is “no”, then it’s a Registration
State Fee. Once done, click . Then click on the next tab .
Seller Taxes: Click to add new tax or click to modify existing tax.
Tax State: indicate the state in which the dealership location resides. Tax Category: Choose the tax category from the drop-down menu. (State Sales Tax, Local Sales Tax, or Inventory Tax)
Tax Description: Typically the same as Tax Category, but can be different depending on if the state refers to the fee differently. (Example DE: Sales Tax Tax Category, Description Processing Fee) Tax Rate: Enter the tax rate. Tax Fixed: “Yes/No” NO - Means the rate applies only to the taxable amount within the taxable amount range – some luxury taxes are on sales price > than a certain amount. If it’s not fixed, there might be more than one tax rate. (Example TN. Different tax % for different sales price amounts). If “NO”, then use the Tax Range fields to enter dollar figures that correspond with this tax rate. YES - Means the rate applies to the entire taxable amount within the taxable amount range. Calc Type: Contract State or Registration State. (Contract State Tax – a tax that is charged no-matter in what state the buyer resides. A good question to ask for a 99.9% accuracy: “Would this tax be charged no-matter in which state the buyer lives?” If the answer is “yes”, then it’s a Contract State Tax. Registration State Tax - a tax not always charged depending on the residence state of the buyer. A
Basic FEX Manual – Page 13(41)
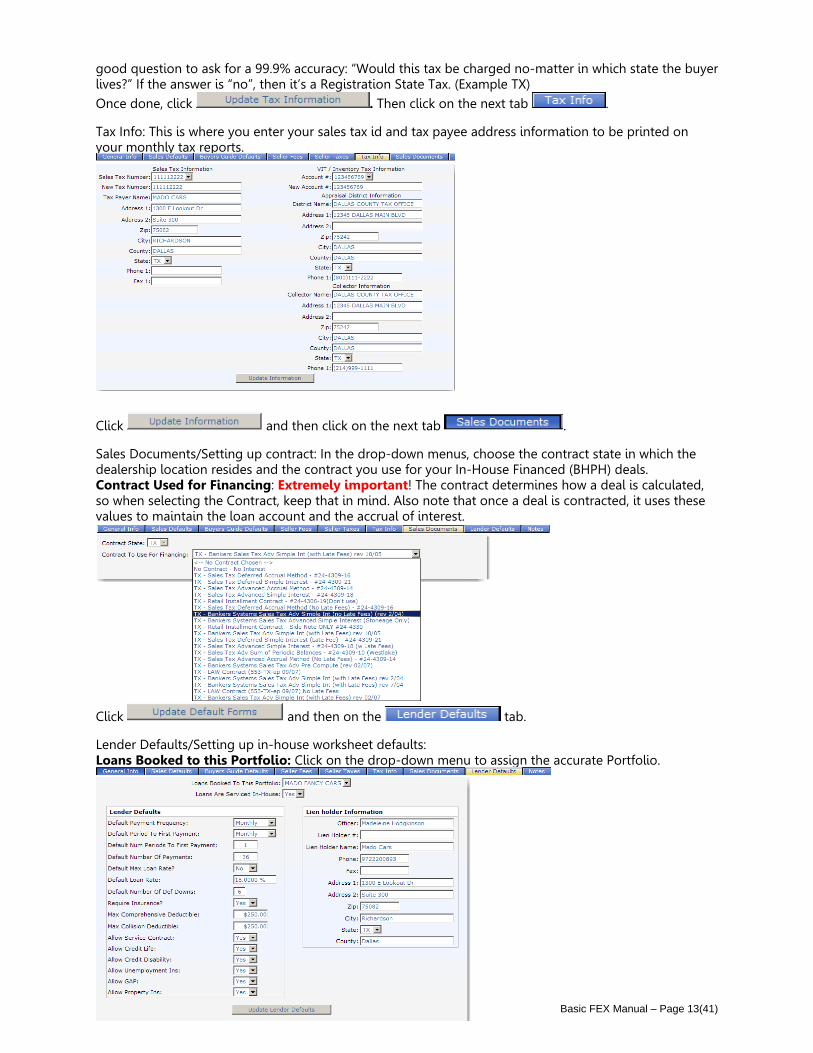
good question to ask for a 99.9% accuracy: “Would this tax be charged no-matter in which state the buyer lives?” If the answer is “no”, then it’s a Registration State Tax. (Example TX) Once done, click . Then click on the next tab . Tax Info: This is where you enter your sales tax id and tax payee address information to be printed on your monthly tax reports.
Click and then click on the next tab . Sales Documents/Setting up contract: In the drop-down menus, choose the contract state in which the dealership location resides and the contract you use for your In-House Financed (BHPH) deals. Contract Used for Financing: Extremely important! The contract determines how a deal is calculated, so when selecting the Contract, keep that in mind. Also note that once a deal is contracted, it uses these values to maintain the loan account and the accrual of interest.
Click and then on the tab. Lender Defaults/Setting up in-house worksheet defaults: Loans Booked to this Portfolio: Click on the drop-down menu to assign the accurate Portfolio.
Basic FEX Manual – Page 14(41)
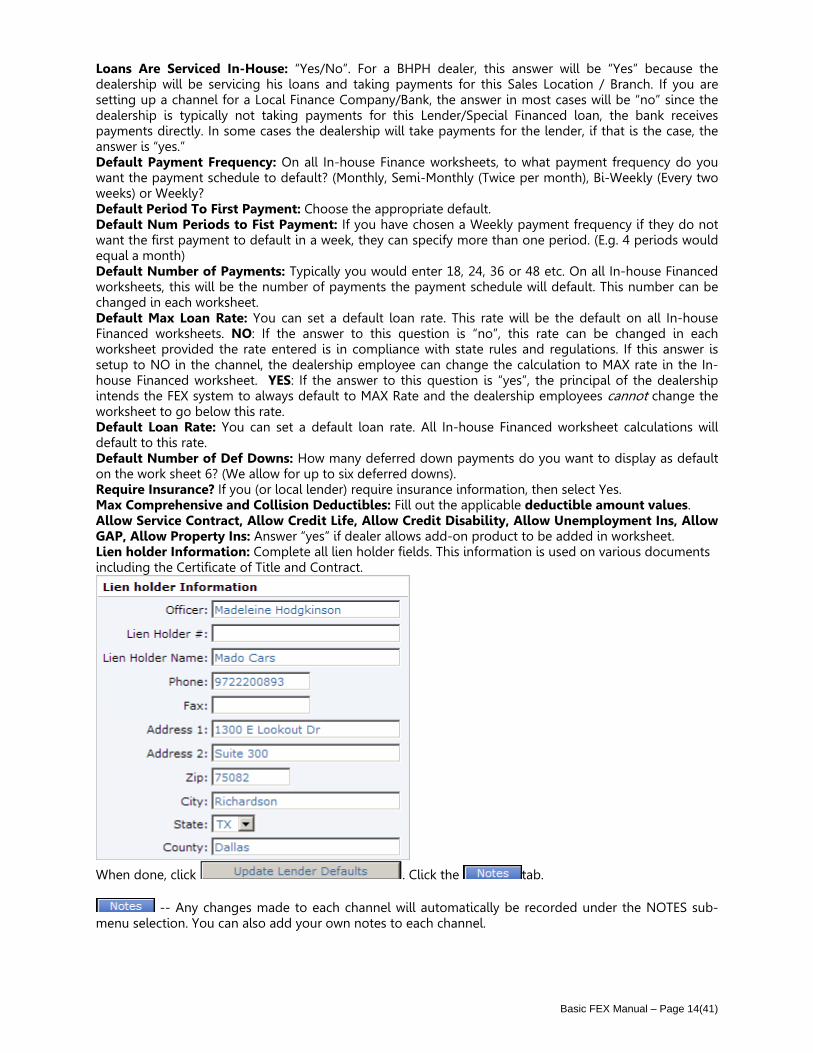
Loans Are Serviced In-House: “Yes/No”. For a BHPH dealer, this answer will be “Yes” because the dealership will be servicing his loans and taking payments for this Sales Location / Branch. If you are setting up a channel for a Local Finance Company/Bank, the answer in most cases will be “no” since the dealership is typically not taking payments for this Lender/Special Financed loan, the bank receives payments directly. In some cases the dealership will take payments for the lender, if that is the case, the answer is “yes.” Default Payment Frequency: On all In-house Finance worksheets, to what payment frequency do you want the payment schedule to default? (Monthly, Semi-Monthly (Twice per month), Bi-Weekly (Every two weeks) or Weekly? Default Period To First Payment: Choose the appropriate default. Default Num Periods to Fist Payment: If you have chosen a Weekly payment frequency if they do not want the first payment to default in a week, they can specify more than one period. (E.g. 4 periods would equal a month) Default Number of Payments: Typically you would enter 18, 24, 36 or 48 etc. On all In-house Financed worksheets, this will be the number of payments the payment schedule will default. This number can be changed in each worksheet. Default Max Loan Rate: You can set a default loan rate. This rate will be the default on all In-house Financed worksheets. NO: If the answer to this question is “no”, this rate can be changed in each worksheet provided the rate entered is in compliance with state rules and regulations. If this answer is setup to NO in the channel, the dealership employee can change the calculation to MAX rate in the In-house Financed worksheet. YES: If the answer to this question is “yes”, the principal of the dealership intends the FEX system to always default to MAX Rate and the dealership employees cannot change the worksheet to go below this rate. Default Loan Rate: You can set a default loan rate. All In-house Financed worksheet calculations will default to this rate. Default Number of Def Downs: How many deferred down payments do you want to display as default on the work sheet 6? (We allow for up to six deferred downs). Require Insurance? If you (or local lender) require insurance information, then select Yes. Max Comprehensive and Collision Deductibles: Fill out the applicable deductible amount values. Allow Service Contract, Allow Credit Life, Allow Credit Disability, Allow Unemployment Ins, Allow GAP, Allow Property Ins: Answer “yes” if dealer allows add-on product to be added in worksheet. Lien holder Information: Complete all lien holder fields. This information is used on various documents including the Certificate of Title and Contract.
When done, click . Click the tab.
-- Any changes made to each channel will automatically be recorded under the NOTES sub-menu selection. You can also add your own notes to each channel.

Basic FEX Manual – Page 15(41)
5.2 Channels - Modifying Existing Sales Location To search for already existing Sales Location/Branch, on the drop-down arrow for Channel Type, choose
“Sales Location/Branch”, then click .
You will get a list of your sales locations. Click on the dealership name (appears in blue) to bring up the channel
5.3 Channels - Adding A New Channel (Non-Finance Related) To ad a channel, click on the blue shortcut “Add New Channel”.

Basic FEX Manual – Page 16(41)
Click on the drop-down menu and choose the channel type you are adding.
Fill in all required information. The Description is an abbreviated version of the Channel Name. For example, you might call the Description, Repo Joe. You could then enter Repo Joe Asset Recovery in the Name field.
Once complete, click on the . Required fields are listed to the right of the information fields in the text box. They will be checked off as you complete the fields. Once a channel has been added, it is immediately available throughout Finance Express.
5.4 Channels - Adding A New Channel (Finance Related) Similar to the fields you fill out in the Non-Finance related section above, you are also required to fill out additional fields that directly relate to the Branch/Sales Location or Finance/Bank channel that you are setting up. To set up a local lender such as a local credit union or a bank, click Add New Channel.

Basic FEX Manual – Page 17(41)
Click on the drop-down menu and choose Finance Company/Bank
General info/Setting up lender address information: Complete the required fields and then click Update New Channel.
The General Information about the channel has been added. You now have to specify that particular Finance Company/Bank’s defaults under the Sales Documents and Lender Defaults tabs.
Click on the next tab .

Basic FEX Manual – Page 18(41)
Sales Documents/Setting up contract used by lender: Click on the drop-down menu to indicate contract state and contract to use for financing for this lender. If the lender requires an impact printed contract, you would choose the type of contract here for default calculation purposes in the worksheet.
Then Click . Then click the next tab . Lender Defaults: This is where your worksheet default terms and lien holder information are set. Complete all fields then click on .
-- Any changes made to each channel will automatically be recorded under the NOTES sub-
menu selection. You can also add your own notes to each channel. 5.5 Flags Custom Fields that allow you to flag or categorize inventory, accounts or sales. (E.g. Cut Keys, In Transit, Title not on lot, Maintenance Items or if you have inventory off site. Maybe vehicles are floor planned and someone comes in for a floorplan audit and a vehicle is missing. You can run a quick screen report or custom report to find out where it is.
Inventory Screen Report – Search by Flags

Basic FEX Manual – Page 19(41)
Adding a FLAG
5.6 Channels - Adding New Users USER ACCESS -- Contains basic information about the user including password related selections. It also includes an Allowable Login Times area. This area allows you to set when a user can login. The user will only be allowed to login between the times you establish. Using the same principals you learned in CHANNELS and PORTFOLIOS, you can Add New Users or Edit existing users.
Click on either Add New User or to Edit current user, click on their respective name.
Pulling Screen Report – Flag(s)

Basic FEX Manual – Page 20(41)
Once you have added additional users, each user will receive an email with a temporary password. When they log on, they will be asked to change it. Email: Enter users’ email address. User Code: The users email address will be their login id. User Administrator: You, the dealer, typically only have one or two Administrators. These Administrator(s) typically have rights to add and delete people. ONLY A SELECT FEW should have this right. Active User: If you unclick the Active User selection, the user will not be able to login. Password Never Expires: The user will not have to (by system requirements) reset their password unless they themselves reset it incase forgotten. Receives System Messages: (future use) Cannot Change Password: If checked, the user themselves, cannot change their password. IMPORTANT: Passwords are case sensitive. If a user changes their password and then calls saying they can’t login the following day, chances are their CAPS LOCK were on when the password was entered. (i.e., GOLDRUSH is not the same as goldrush)
Complete all fields under the General Info tab. Click , then on the next tab
. By clicking on the drop-down menus, assign the accurate institution id, Branch, Command Center Default, indicate whether or not this person is a collection and appropriate security role. You can also allow a user to only log in on certain days during certain hours.
NOTE: Once you make a change to a particular user and his/her user rights, they will not take affect until the next time they login. You can assign different security roles to different employees. Depending on which role is chosen, different tasks will be checked off in the boxes below. You can always add or delete tasks by checking or unchecking the box next to the task. If changes are made to a security role, the role automatically changes to “Custom”.
When assigning user rights for the user in each of the various areas, if the user does not have a checkmark next to a particular right, then they are not able perform that task.

Basic FEX Manual – Page 21(41)
5.7 User Home Page Settings Under the SETTINGS tab, click on the sub-menu selection USER ACCESS.
Settings for: For what Institution are you setting user access defaults? Typically you will only have one institution. Default Branch: Defaults apply to this branch. Command Center: Choose the BHPH or FEX Dashboard.

Basic FEX Manual – Page 22(41)
5.8 Dealer Profile When the company institution was first setup, Finance Express entered most of the data you see below with the information you initially supplied us. Since this information is used throughout the system, you should verify that the information is correct. If changes need to be made, do so and then click the Update button. Press “Save” after each completed / modified section. Next Available Stock #: FEX2 will increment the stock #’s from this point forward. Stock Number Purchase Prefix: If this is set, every new vehicle that is added through Inventory will begin with the value you enter. For example if you enter "P", then when you add a new vehicle, it will place a P in front of the next available stock number. Stock Number Repo Prefix: If this is set, every vehicle that is repossessed through the system will begin with the value you enter. For example, if you enter "R", then the system will place an R in front of the vehicles stock number. Use Stock Number Trade-In Alpha Suffix: If this value is set to a Yes, then each time you take a trade-in on a deal, the system will automatically add a letter starting at the end of the stock #. For example, the stock number, P12221A, would be assigned to the vehicle being taken in on a trade. Required User ID Length: This value is used by your Institution to improve security, by requiring a minimum length for a User ID. The minimum length allowed by the Finance Express is 4. Required Minimum Length of Password: This value is highly recommended. This setting will improve security by forcing users to make their password length match or exceed this value. The Finance Express minimum length allowed is 4. How long are password valid (days): This value is highly recommended. Anything greater than 0 will force your users to change their password based on the number of days you enter. Required Strong Typed Password: Highly recommended. If this value is set to a Yes, then each users password will be required to be a combination of letters and numbers.

Basic FEX Manual – Page 23(41)
6. HOME TAB – DASHBOARD SPECIFIES COMMAND CENTER This refers to the DASHBOARD, which is the very first screen you see once you are logged on is your Dashboard. This one designed specifically to the needs of the BHPH dealer. There is another designed to the FEX Lender dealerships. You can change the dashboard according to your preference. The Dashboard updates every 5 minutes and it gives a broad overview (or a “manager’s view” of what is going on at the dealership). To get more detailed reports than what the dashboard provides, one would go to the tab called “Reports” in the Navigation bar across the top of the screen. BHPH Dashboard
FEX Lender Dashboard

Basic FEX Manual – Page 24(41)
7. INVENTORY When you click on the main menu tab “Inventory”, you will see the following sub-menu selections: “Add New Inventory”, “Lookup Existing Inventory”, “Listing Manager”, “Bulk Inventory Valuation”, and at last “Valuations”.
7.1 Inventory - Add New Inventory The FEX system tracks the status of your inventory. When you sell the car, it will take it out of Available status and change it to Sold. When you take a trade-in, on a deal, our system will put that vehicle in inventory for you and assign a stock number with an A, B, C…etc indicating that it was a trade in. If you repossess a vehicle and choose to put it back into inventory when you charge off the account, the FEX system will stock the vehicle for you adding an “R” to the stock number, indicating repossessed vehicle. When you choose to add a vehicle to your web listings, and when you sell those vehicles, our system will accurately add and delete them accordingly. Begin by typing a VIN Number in the VIN Number field. Once done, press the DECODE button and watch as the FEX system decodes the VIN. (…If it doesn’t decode, verify accuracy, if you still get an error, you can over-ride the error by manually entering the information. (Year, Make, Model) Sometimes a VIN will not decode and therefore we have the capability of manually adding the information.
Notice on the right hand side of your screen. There’s a checklist of required information This checklist will be checked off as you complete the required fields.
Lot Assign Lot Location Stock Number FEX will auto assign but you can override by manually entering stock number Mileage Enter accurate mileage Mileage Status Choose accurate mileage status

Basic FEX Manual – Page 25(41)
Vehicle Cost Enter vehicle cost (what the dealership purchased the vehicle for excluding expenses) Purchase Date Enter purchase date (FEX will default to today’s date, but you can change this) Asking Price Enter sales price Buyer Who, from your dealership, went to the auction or wholesaler to purchase that particular vehicle Acquired From Specify where you purchased your vehicle (Auction, Wholesaler or Dealership. All these are “Channels” specified in the SETTINGS tab) Payment Method (Cash, Draft, ARM, Floorplan… If you choose Floorplan, an information box will pop up for you to fill in floorplanning details. The Floorplanning company is a Channel specified in the SETTINGS tab). Once the required info has been entered, click on the rectangular button at the bottom “Save and Edit This Vehicle”.
Once the vehicle has been saved, the Edit screen will have more fields for you to fill in and also, 3 information tabs appear on the top left of the screen: Inventory, Pictures and Documents. Further, notice that an Action Button opened to the top right of your screen.
Basic FEX Manual – Page 26(41)
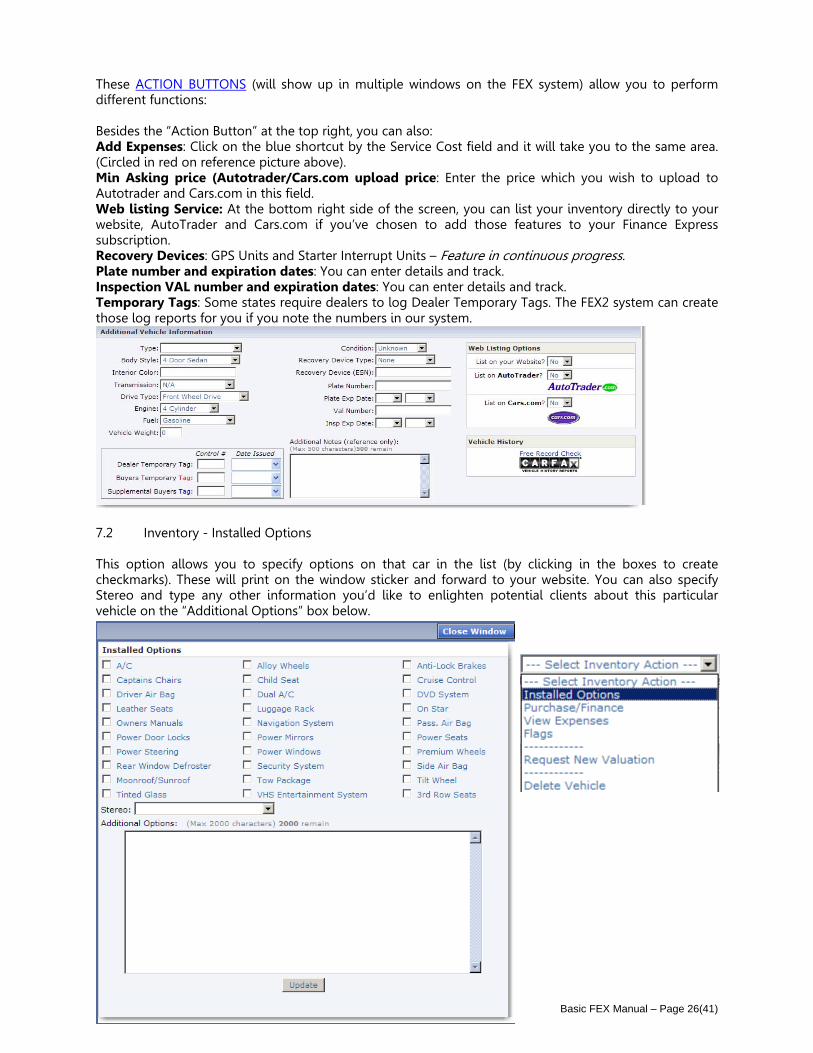
These ACTION BUTTONS (will show up in multiple windows on the FEX system) allow you to perform different functions: Besides the “Action Button” at the top right, you can also: Add Expenses: Click on the blue shortcut by the Service Cost field and it will take you to the same area. (Circled in red on reference picture above). Min Asking price (Autotrader/Cars.com upload price: Enter the price which you wish to upload to Autotrader and Cars.com in this field. Web listing Service: At the bottom right side of the screen, you can list your inventory directly to your website, AutoTrader and Cars.com if you’ve chosen to add those features to your Finance Express subscription. Recovery Devices: GPS Units and Starter Interrupt Units – Feature in continuous progress. Plate number and expiration dates: You can enter details and track. Inspection VAL number and expiration dates: You can enter details and track. Temporary Tags: Some states require dealers to log Dealer Temporary Tags. The FEX2 system can create those log reports for you if you note the numbers in our system.
7.2 Inventory - Installed Options This option allows you to specify options on that car in the list (by clicking in the boxes to create checkmarks). These will print on the window sticker and forward to your website. You can also specify Stereo and type any other information you’d like to enlighten potential clients about this particular vehicle on the “Additional Options” box below.

Basic FEX Manual – Page 27(41)
7.3 Inventory - Purchase/Finance Info Allows you to specify from whom you purchased the vehicle. Also, you are able to track the vehicle location and title location if not currently in your possession. The Clear Title field allows you to track vehicles with clear or branded titles.
7.4 Inventory- Add/View Expenses Allows you to add/view expenses. Expenses can be added at anytime. This is important especially if you use the Quickbooks Pro export feature. Dealers that use that function usually export the information at the beginning of each day.
7.5 Inventory Flags Allows you to flag or categorize inventory for certain things like, Cut Keys, In Transit, Title not on lot, Maintenance Items or if you have inventory off site (Maybe you have your vehicles floorplanned and someone comes in for a floorplan audit and you are missing a vehicle. You’d be able to go into the FEX system and see where it is located.
Basic FEX Manual – Page 28(41)
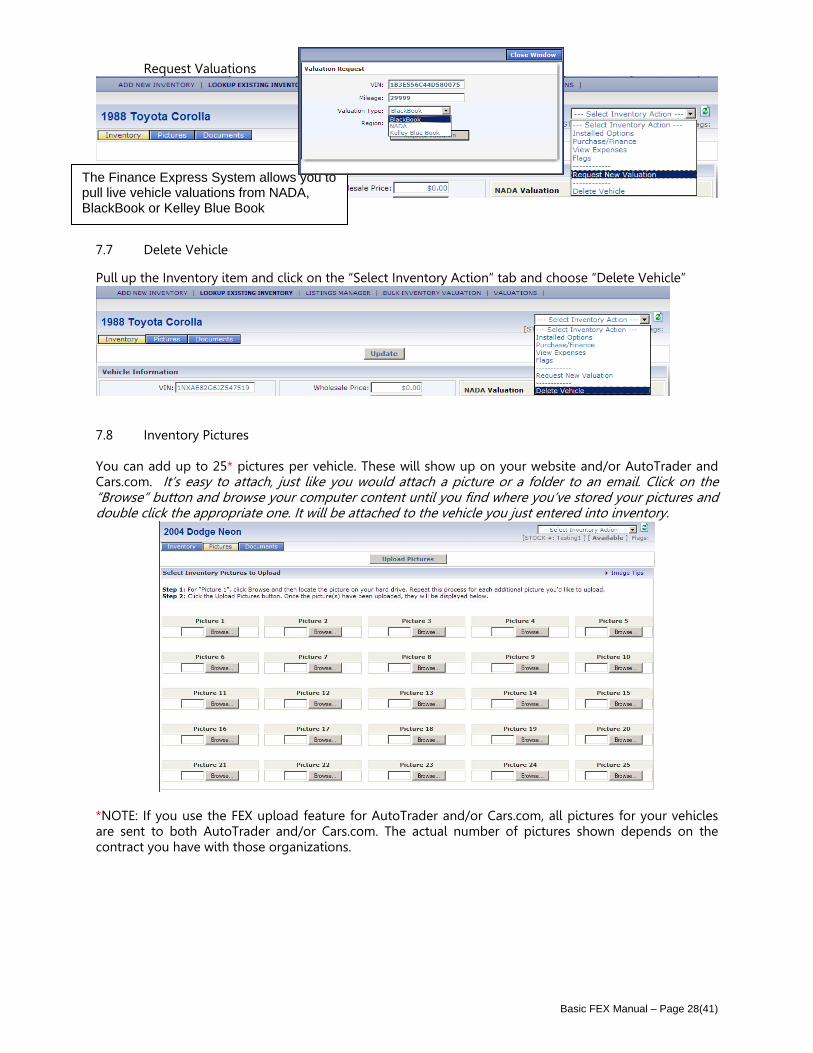
Request Valuations
7.7 Delete Vehicle Pull up the Inventory item and click on the “Select Inventory Action” tab and choose “Delete Vehicle”
7.8 Inventory Pictures You can add up to 25* pictures per vehicle. These will show up on your website and/or AutoTrader and Cars.com. It’s easy to attach, just like you would attach a picture or a folder to an email. Click on the “Browse” button and browse your computer content until you find where you’ve stored your pictures and double click the appropriate one. It will be attached to the vehicle you just entered into inventory.
*NOTE: If you use the FEX upload feature for AutoTrader and/or Cars.com, all pictures for your vehicles are sent to both AutoTrader and/or Cars.com. The actual number of pictures shown depends on the contract you have with those organizations.
The Finance Express System allows you to pull live vehicle valuations from NADA, BlackBook or Kelley Blue Book

Basic FEX Manual – Page 29(41)
7.9 Inventory Documents Different documents are available in different areas throughout the system. When I click on the rectangular button “Select Documents to Generate” you will see the list of inventory documents you can choose to generate. Click in the corresponding box of the documents you wish to generate and then click on the grey rectangular button at the bottom of the document list “Generate Selected Documents”. You can also fax or email these documents to up to 4 recipients at a time. The documents will generate and show through Adobe (your Adobe might try to update at the same time so say “no” to the update – you can do an Adobe update at a later time). Once you’ve verified the accuracy of the documents these can be printed on regular 8 ½ x 11 paper on your inkjet or laser printer. Simply click on the little icon in the document box that looks like a small printer.

Basic FEX Manual – Page 30(41)
8. SALES AREA – HOW TO SELL A CAR DEALS -- Look at your main menu tabs at the top of your screen. Click on second tab to your left named “Deals”. Under that main menu tab, additional subcategories appeared: “New Deal”, “Deal List”, “CRM List”, “”Figure A Deal”, “Credit App”, and “Test Drive”. Let me show you what appears under each subcategory. 8.1 Selling A Car - Sub Menu Selections NEW DEAL – allows you to create a deal from scratch. DEAL LIST – lists deals that are either in Pending, Working or Approved status. CRM LIST – lists potential clients where you have contact information but never created a worksheet FIGURE A DEAL – a “scratch pad” that allows you to quote a deal in seconds. CREDIT APP – provides you with a credit application to by completed by hand. TEST DRIVE – this form goes through terms & conditions for the client to sign prior to taking the vehicle for a drive. A preprinted form is also available from the worksheets tab once you are in a working DEAL.
New Deal: When you click on the “New Deal” tab, the FEX system will walk you through all the steps from entering the client information to calculating the worksheet to producing the paperwork and taking the down payment.
8.2 Choosing Type of DEAL
Step 1: Click on the type of sale. New Cash Deal, New Finance Deal (BHPH, FEX/Local Lender Deal) or New Wholesale Deal.

Basic FEX Manual – Page 31(41)
8.3 Joint or Individual Application
Step 2: Indicate Application Type (Joint or Individual) and if you have a Trade-In. ~~ When you indicate the trade-in and enter the information in the deal, the FEX system will add that vehicle to inventory with a stock number indicating that it is a trade-in. Click “Continue to Finance Application”. Once you have entered into the Finance Application, 4 information tabs appear at the top left of the screen: App Info, Emp Info, Credit Info, and Worksheets. Again, the familiar Action Button opened to the top right. I am going to begin by entering either a SS#, or First and Last Name. ~~If you enter a name of someone previously entered into FEX, (borrower, co-borrower or reference) the similar name will appear below the entry box. You can choose to accept the information. If accepted, the previous data will populate in the deal.
8.4 Entering Applicant Information 8.4.1 Application Info App Info: Complete the list of Required Information listed on the right-hand side of the screen. Once the required fields have been completed, click “Next” to save the information and move to the Employment Information tab. 8.4.2 Employment Info As seen above, complete the required fields. Once the checklist is checked off, click “Save & Next”.

Basic FEX Manual – Page 32(41)
8.4.3 Credit Info – Pulling A Credit Bureau Put a checkmark next to the bureau you wish to request and you can choose to include OFAC then click Request Credit. The FEX system will acquire the information. Click “Next” to continue.
8.5 Opening A New Worksheet Step 1 – Find a vehicle. Either specify in the search fields or just click “Search”. A list of available vehicles pull up from inventory. Click on the blue stock number of the vehicle you are selling. Step 2 – Create a Worksheet. Choose FEX Lender, Local Lender or In-House Finance Worksheet. Click In-House Finance Worksheet. (6 deferred down payments are allowed. The last has to be scheduled prior to the second regular payment of the payment schedule). As you make a change to the fields, see the calculations turn yellow, click the Calculate button to get a “green light”. Analysis – Hidden on the top right hand side of your screen, you have the deal Analysis. This gives you the P/L on that particular deal. Once the deal looks good to you and your client, click on “Update Worksheet” to save the information. Click on “Return to Lender Status Page”.
8.5.1 Opening/Generating Multiple Worksheets You can generate multiple worksheets. Generate and print/fax or email presale or contractual documents for each. Once you’ve picked a worksheet, contract the deal in order to create the contractual documents. Click on the “Contract” button to the right of the deal. A screen will appear asking you if you are sure you wish to contract this deal. Click “Contract Deal”. The FEX system will now change the status of the car to “Sold” and if you have the vehicle listed through the FEX web listing service, FEX will take it off those lists. If you subsequently, uncontract the deal, the FEX system will change the status of that vehicle to

Basic FEX Manual – Page 33(41)
“Available” and add it to the listings. Click “Close Window”. The status box will turn blue change to Contracted or Loan Booked. Click “Print Forms” to print contractual documents.
8.5.2 How To Print Forms You will see a list of Contractual documents. Go down the list and click in each box to check off the forms you wish to generate. At the bottom of the box, you have the option to FAX or EMAIL this document packet to up to 4 recipients at a time. Click “Generate Selected Documents”. The documents will generate and pull up in Adobe. You would print these on your laser or ink jet printer on regular 8 ½ x 11 paper. ~~ There’s no need to keep special legal size paper. These contracts are the same contracts you have been hard-impact printing, up ‘til now, but now, generated through a plain paper printer. Once you’ve printed the paperwork and the client has signed the originals, you would make a copy to give to the client. Then, you would take the down payment. This document list will also have an area (on the right) for Dot Matrix forms, if they exist for your state and/or institution. 8.6 Post The Down Payment/Post A Payoff From The Deals Tab Open the deal from the DEALS tab. Then click on the down-arrow for the action button “Post a Transaction” and choose “Post Down Payment”. Your payment window will appear. This is what the payment window will look like taking any payment.
At the top left you see today’s date, the Post Date, You can change the Effective Date if for example you are receiving payments by mail and you honor the post date of the payment, Then choose the accurate Payment Method. If applicable, complete the Reference and Comments fields. In the next column enter “Amount Paying” and press the tab key on your keyboard. The amount you entered will be applied to the Down Payment that appears below. If the entire amount was paid, the Remaining Due column will turn green and show a 0 balance. Look at the bottom of the pop up window and click on the “Post Payment” button. FEX will now generate a receipt for you. NOTE: Depending on what type of contract calculation is used, this receipt will show balances including interest on pre-computed (E.g.: Accrual Method, Rule 78) contract calculations and without interest on simple interest contract calculations.
Basic FEX Manual – Page 34(41)
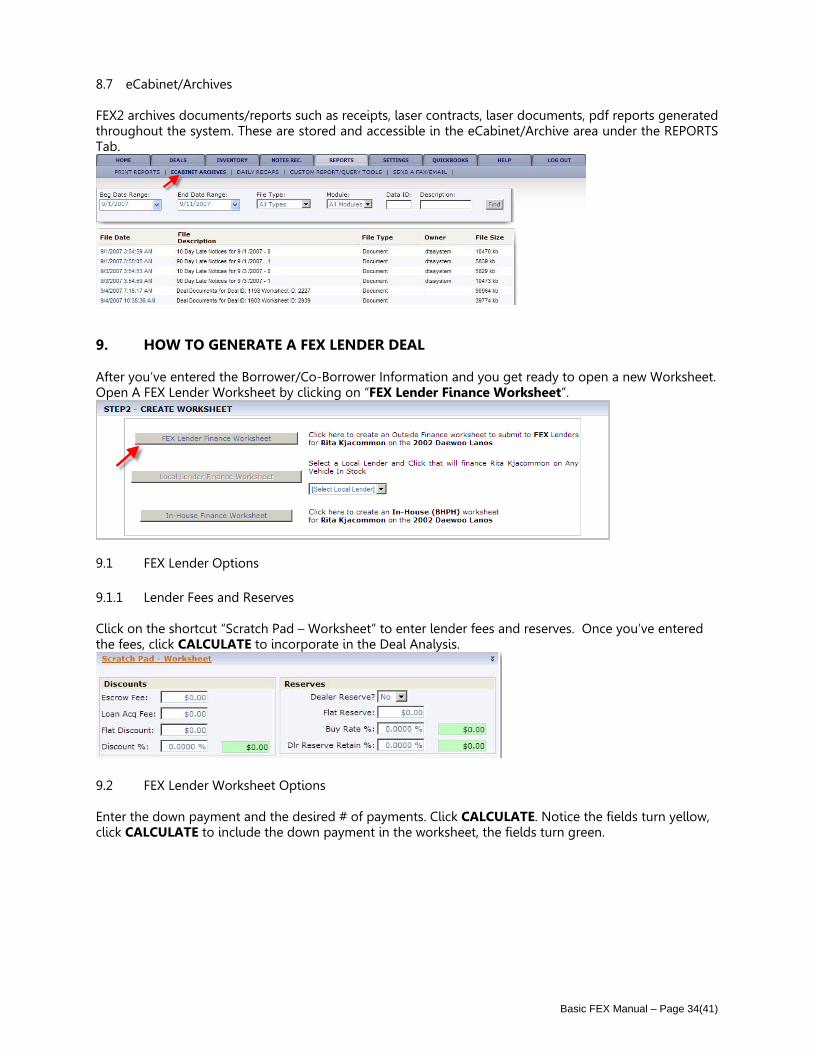
8.7 eCabinet/Archives FEX2 archives documents/reports such as receipts, laser contracts, laser documents, pdf reports generated throughout the system. These are stored and accessible in the eCabinet/Archive area under the REPORTS Tab.
9. HOW TO GENERATE A FEX LENDER DEAL After you’ve entered the Borrower/Co-Borrower Information and you get ready to open a new Worksheet. Open A FEX Lender Worksheet by clicking on “FEX Lender Finance Worksheet”.
9.1 FEX Lender Options 9.1.1 Lender Fees and Reserves Click on the shortcut “Scratch Pad – Worksheet” to enter lender fees and reserves. Once you’ve entered the fees, click CALCULATE to incorporate in the Deal Analysis.
9.2 FEX Lender Worksheet Options Enter the down payment and the desired # of payments. Click CALCULATE. Notice the fields turn yellow, click CALCULATE to include the down payment in the worksheet, the fields turn green.

Basic FEX Manual – Page 35(41)
9.2.1 FEX Lender Worksheet Options - Taxes and Fees Change the fees and taxes / Tax Exempt Deals. On the right hand side in the “Calculation Details” click either blue word: Fees or Taxes. For details, see page 38. Change Sales Location / Branch. For details, see page 38. 9.3 How To Submit A Deal To FEX Lenders Click “Update Worksheet”, then to submit to up to 5 FEX Lenders, click “Find Lenders”.
FEX Lender List – This FEX Lender list shows a “red light” for lenders not accepting the deal and a “green light” for lenders that would accept the deal. As you click on the button “Send To Lender”, the Action changes to “Sent”. Once you’ve scrolled down the list, click “Close Window” to return to the worksheet.

Basic FEX Manual – Page 36(41)
When you’ve submitted the deal and closed the Window listing the FEX Lenders, the system returns you to the Lender Status Page where you can see all the worksheets submitted to each lender. To the right of the window, you will see the status “Pending Decision” of that particular deal. As a response comes back from the lender, this status will change to Approved, Conditional Approval, Denied etc.
When a decision comes back from one of the lenders, pull up the client under DEALS. The system will by default pull up the DEAL LIST. FEX Lender Deals will show on this list in contracted status until all funding has been received from the lender and posted by you (the dealer).
9.3.1 Viewing Lender Decisions
The worksheets submitted to all lenders are listed under the “Worksheets” tab. Click on “Notes/Stips” to see the detail of the lender Call Back Notes. Click on “View” to look at or make changes to the worksheet. If you wish to contract the deal, click “Contract”.

Basic FEX Manual – Page 37(41)
9.3.2 Contracting a FEX Lender Deal Click the “Contract” button. A window will appear asking you to verify that you wish to contract the deal. Click “Contract Deal”. You will receive a message that the worksheet has been contracted, click “Close Window”.
The deal changed status to Contracted. If there is a down payment due, you can take the down payment from the “Post Transaction” button.
9.4 Post Funding/Post Payoff (FEX Lender Deals) To post funding on a deal, go to DEALS. The contracted FEX Lender deal shows up in the DEAL LIST. Click on “Post Funding”.

Basic FEX Manual – Page 38(41)
Click “Take This Payoff” and verify that all Down Payment Balances have been posted to the account. NOTE: All down payment balances must be posted PRIOR to posting a payoff. Once you’ve posted the down payments, enter the amount of the payoff. Indicate pay method and if there is a discount involved, choose “Yes” to Write Off Uncollected. Type in a note and click “Post Payoff”.
The FEX System generates a receipt and closes the account.
Posting A Payoff Including A Lender Discount: If the lender charged a discount, please answer “Yes” to this question and enter the amount of the discount in the “Comments” field. Then click “Post Payoff”. This will write down the amount of the discount and show as a loss for the dealership and will close the account balance.

Basic FEX Manual – Page 39(41)
10. NOTES RECEIVABLE 10.1 Notes Receivable Submenu Selections Click NOTES REC tab. The following subcategory tabs appear: “Lookup an Account”, “Collection Queue”, “Queue Builder”, “Daily Recaps”, “Asset Recovery”, and “Collector Stats”
COLLECTOR STATS – allow you to monitor collectors’ performance ASSET RECOVERY – (Future enhancement) Allows you to access your Starter Interrupt Unit or GPS device (if a FEX integrated unit was installed on the vehicle) QUEUE BUILDER – Before you can use the Collection Queues, the "Collection Queues" have to be defined. A collection queue, can be defined by different criteria such as, alphabetical, zip code, or by amount due. If you want to get into this in more detail, you are more than welcome to set up a time for continuing education on collection queues through your local sales rep. COLLECTION QUEUE – Each collector would have collection queue(s) assigned. When they log on and go to this area, their queue would automatically pull up. If the collector has not been assigned a queue, they can still view/work any of the other existing queues. Click on the dropdown arrow for “Queue View” and choose “All Queues”. Wait a second or two for the screen to refresh. Then click on the dropdown arrow for “Current Queue” and choose one of the defined queues. You can sort the queue by clicking on any of the column headers. If you want to reverse the sort, simply click on the column header again. Click on one of the accounts. The collections screen opens. COLLECTIONS SCREEN – On the collections screen you will see the primary buyers information and references if they have been entered on the account. You can edit and add information. We also see the Action Buttons at the top right of the screen and below we have 4 information tabs: “Collection View”, “Collateral”, “Balance Detail” and “Snapshot”. 10.2 Account And Collections Screen Details
References – Click on the button “Add” next to the word “Reference”. This allows you to add an unlimited amount of references to this account. These references will be listed on the collections screen as your collector works the accounts. Simply click “Add New” and complete the fields. Click “Add New Reference” to save the information and then click on “Close Window”. Account Tabs Collection View – allows a collector to see any note history, transaction history and remaining payments on one screen. Collateral – allows a collector to view the collateral on the note.

Basic FEX Manual – Page 40(41)
Balance Detail – shows original and current balances and one can also click on the blue shortcut that allows a view of the original deal details. You can view the Primary Loan or a Side Note if there is one connected to this account. Snapshot – shows a snapshot of the account. Current Balances, past dues, remaining payments and payment history.
10.3 Account And Collections Screen Action Buttons/Features
10.4 Select Action Features ADD NOTES/PROMISE: You can enter and track promises. Can be anything you want. FEX keeps track of promisary notes, number kept and broken. You can also put alerts on accounts. These can be whatever you want them to be. For example: Cash Only, or Talk to Joe etc… VIEW NOTES: Choose this option to view account notes. ADD/REMOVE FLAGS: You can add and remove flags assigned to the accounts module. REQUEST A LETTER/DOCUMENT: Browse through the list of post-sale documents available to you. CREATE A SIDE NOTE: If you perform a repair on the vehicle, which the borrower cannot pay at time of completed service, you can set up a side note and collect on it in FEX as well. PLACE OUT FOR REPOSSESSION/RECORD A REPOSSESSION You can put a vehicle on the “repo board” by placing it out for repo. Once you have obtained the car, you would go to the “repo board” located in the A/R area off of DT Main. Bring the car in from repo, charge off the account and that brings the vehicle back into inventory. MOVE TO BANKRUPTCY: You can move an account to bankruptcy. UPDATE INSURANCE: Allows you to enter/update your clients’ insurance information (insurance company/agent, policy number and expiration dates). EDIT ALERT MESSAGE: Alert messages can be entered. These will appear in red in the NOTES REC. area. UPDATE CREDIT REPORTING STATUS: You can choose to report to Equifax or Transunion. Each dealer has to qualify w each company. Under this tab, you can choose whether to report or not report the credit on this account. VIEW TRANSACTION HISTORY: All previous transactions on this account can be viewed here. This is also where the receipt is archived. 10.5 Post A Transaction Features POST A PAYMENT: Choose this option if you wish to post a payment. POST A PAYOFF: Choose this option if you wish to view or post a payoff.

Basic FEX Manual – Page 41(41)
POST AN EXTENSION: Choose this option if you wish to post an extension to the end of the note. POST A CHARGE OFF: Choose this option if you wish to post a charge-off. NOTE: If you are reporting to the credit bureau(s), this will report negative on the borrower. POST AN ACCOUNT WRITE DOWN: Choose this option if you wish to post an account write down. This transaction will reduce the account balance to zero. NOTE: If you are reporting to the credit bureau(s), this will NOT report negative. REVERSE A TRANSACTION: Transactions that can be reversed. REVERSE A PAYMENT: Choose this option if you wish to reverse a previously posted payment. POST NSF CHECK: Choose this option if you wish to post an NSF for a check payment received. REVERSE AN EXTENSION: Choose this option if you wish to post a reversal of a previously posted extension. POST AN ADJUSTMENT: Adjustments that can be made on the account. POST PRINCIPLE ADJUSTMENT: Choose this option if you wish to post an increase/decrease to the principle balance. POST NON EARNING PRINCIPLE ADJUSTMENT: Choose this option if you wish to post a non earning increase/decrease in principle. POST INTEREST ADJUSTMENT: Choose this option if you wish to post an accrued interest increase/decrease. POST MISC FEE ADJUSTMENT: Choose this option if you wish to post an increase/decrease to miscellaneous fees. POST OTHER: POST ACCOUNT TRANSFER: Allows you to transfer an account from one Portfolio to another. E.g. you would perform this function if you wish to transfer an in-house financed loan to your Related Finance Company or if you are selling loans to an outside lender. 11. REPORTS Click on each report section to see the pre-programmed reports available in FEX. Any report can be grouped and sorted different ways creating 100’s of report results. These reports are generated as pdf reports. If you want to create custom reports, click on the submenu selection: “Custom Report/Query Tools). The custom reports can be extracted into Excel for further manipulation.