ESR RAPTOR - Hosting Miarrobasinreparos.webcindario.com/ESR RAPTOR.pdfTitle ESR RAPTOR Keywords ()
Raptor HDx
User Manual
June 2013
Playback Technologies, Inc.
Burbank, CA
Raptor User Manual 2
Table of ContentsIntroduction......................................................................................................................................7Technical Specifications.................................................................................................................. 8
Recommended Accessories.........................................................................................................8Common Tasks.................................................................................................................................9
Connections.................................................................................................................................9Video Input..................................................................................................................................9
Auto-detection........................................................................................................................ 9Changing Input Manually.......................................................................................................9
Audio Input................................................................................................................................. 9Backup Clips............................................................................................................................. 10Delete Clips............................................................................................................................... 11
Delete Individual Clips using the Clip List.......................................................................... 11Selecting Clips Manually using Windows............................................................................11Deleting All Clips................................................................................................................. 11
Rename Clips............................................................................................................................ 13Renaming Clips manually.................................................................................................... 13
Re-Read Clips on Local Deck...................................................................................................14Main Interface................................................................................................................................15
Deck Status................................................................................................................................16Audio Level Meters..............................................................................................................16Monitor (Video Window)..................................................................................................... 16Timeline................................................................................................................................17Deck Status block................................................................................................................. 17
Machine Controls...................................................................................................................... 17Playback: Play...................................................................................................................... 17Playback: In & Out...............................................................................................................17Playback: 1s..........................................................................................................................18Playback: 1f.......................................................................................................................... 18Playback: B...........................................................................................................................18Recording: Time Available................................................................................................... 18Recording: Live.................................................................................................................... 18Recording: Record................................................................................................................18Recording: Abort.................................................................................................................. 18Recording: In, Book, Out..................................................................................................... 19Recording: Poster................................................................................................................. 19Recording: Record mix.........................................................................................................19
Clip List.....................................................................................................................................19Sorting.................................................................................................................................. 19Searching.............................................................................................................................. 20Filters....................................................................................................................................20
Clip Attributes........................................................................................................................... 20Miscellaneous Options & Status............................................................................................... 21
Network Master.................................................................................................................... 21Loop Playback...................................................................................................................... 21Camera ID............................................................................................................................ 21
Raptor User Manual 3
Playback expansion.............................................................................................................. 21Network Status..................................................................................................................... 21
Secondary Monitors.................................................................................................................. 22File Menu....................................................................................................................................... 23
Backup deck......................................................................................................................... 23Copy clips.............................................................................................................................23Export Clip List.................................................................................................................... 23Generate batch ALE............................................................................................................. 23Re-read clips on local deck...................................................................................................23Re-read clips on remote decks..............................................................................................23Re-read plates....................................................................................................................... 23Rename current clip..............................................................................................................23Delete current clip (Ctrl+Del).............................................................................................. 23Delete all clips from this deck.............................................................................................. 23Sleep deck.............................................................................................................................23Restart deck.......................................................................................................................... 23Shutdown deck..................................................................................................................... 23
Edit Menu.......................................................................................................................................24Delete Current Bookmark......................................................................................................... 24
Options Menu.................................................................................................................................24Video Input Options.................................................................................................................. 24
SDI & Dual SDI................................................................................................................... 24Component........................................................................................................................... 24HDMI................................................................................................................................... 24Y/C....................................................................................................................................... 24Composite.............................................................................................................................24
Audio Input Sub-Menu............................................................................................................. 25Analog video output Sub-Menu (Raptor HD, HDx, 3D, HD+)................................................ 25QuickMix output format........................................................................................................... 25Timecode................................................................................................................................... 25Rear panel audio playback source (Raptor HD Dual and Quad)..............................................25XLR audio output muting (Raptor HD Dual and Quad)...........................................................25
Mute in Live......................................................................................................................... 25Mute in Record..................................................................................................................... 25Mute during all playback......................................................................................................25Mute during slave playback..................................................................................................26
Action at end of clip playback.................................................................................................. 26Combine matching clips in list for sync playback.................................................................... 26Show Big Video Window..........................................................................................................26Shrink primary monitor.............................................................................................................26Shrink secondary monitors........................................................................................................26Shrink secondary router controls.............................................................................................. 26Hide secondary monitor windows.............................................................................................27Screen Resolution......................................................................................................................27Preferences................................................................................................................................ 28
Deinterlace VGA and QuickMix windows in SD................................................................ 28
Raptor User Manual 4
Deinterlace VGA and QuickMix windows in 1080 HD.......................................................28Deinterlace video outputs when paused............................................................................... 28Auto-check network-master at startup..................................................................................28Record NTSC as DV AVI files............................................................................................. 28Show recording status in maroon......................................................................................... 28Clear notes on scene changes............................................................................................... 28Auto-select next available take on scene change................................................................. 28Show IP address on front panel............................................................................................ 28Don't scan external media for clips...................................................................................... 28Save valid TC to Notes.........................................................................................................28Don't automatically save poster frames................................................................................29Don't show OSD info while cueing......................................................................................29Unchecked decks will play back.......................................................................................... 29Record HIT bookmarks(Raptor 3D only)...................................................................................................................29Show numbered bookmarks................................................................................................. 29Normal camera rate for off-speed calculations.....................................................................29Clip list options.....................................................................................................................29Reset all preferences to factory defaults...............................................................................29Note for “Normal camera rate for off-speed calculations”...................................................30
VFX Menu..................................................................................................................................... 30Make current video file available as a plate......................................................................... 30Select JPG file to use as a plate............................................................................................ 30Grab JPG still frame (Ctrl+G).............................................................................................. 30Key live through plate file....................................................................................................30
Tools Menu.................................................................................................................................... 31Set Date and Time................................................................................................................ 31Disk speed test......................................................................................................................31Long disk speed test............................................................................................................. 31Launch Decklink control panel............................................................................................ 31Launch Remote Desktop...................................................................................................... 31Launch Disk Defragmenter.................................................................................................. 31Launch video disks error check (quick)............................................................................... 31Launch detailed hard drive testing tool (slow)..................................................................... 31Launch Windows Explorer on local disk..............................................................................31
Help Menu..................................................................................................................................... 32Videohub driver.........................................................................................................................32
QuickMix....................................................................................................................................... 33Background Plate...................................................................................................................... 33Keying....................................................................................................................................... 33
Level..................................................................................................................................... 33Range....................................................................................................................................33Tolerance.............................................................................................................................. 33Background plate options..................................................................................................... 33
Mixing....................................................................................................................................... 343D mux (Raptor 3D only)......................................................................................................... 34
Raptor User Manual 5
Video Router Control.....................................................................................................................35User Interface Overview........................................................................................................... 35Features..................................................................................................................................... 36
Presets...................................................................................................................................36Naming Inputs & Outputs.................................................................................................... 36Coloring Inputs.....................................................................................................................36Routes................................................................................................................................... 36
Secondary Router Controls....................................................................................................... 36Networked Operation.....................................................................................................................37
Equipment and Wiring.............................................................................................................. 37Setup..........................................................................................................................................37Synchronized Recording........................................................................................................... 39Synchronized Playback............................................................................................................. 39Network access to video files....................................................................................................40
File system structure.............................................................................................................40Accessing Raptor files from a networked Windows computer............................................41Accessing Raptor files from a networked Mac computer.................................................... 42
MacDrive (optional).......................................................................................................................43Appendix A. Application Keyboard Shortcuts...............................................................................44Appendix B. Front Panel Keystrokes.............................................................................................45Appendix C. Rear Panel I/O Diagrams..........................................................................................47
Raptor HD Quad....................................................................................................................... 47Raptor HD Dual........................................................................................................................ 47
Rear panel XLR audio connectors........................................................................................47Raptor HD+...............................................................................................................................48Raptor 3D.................................................................................................................................. 48Raptor HDx............................................................................................................................... 49
Appendix D. Breakout Cable (Raptor HDx, HD+ and 3D)...........................................................50Appendix E. Technical Specifications (Raptor HD Dual & Quad)...............................................51
Supported Modes...................................................................................................................... 51Video I/O...................................................................................................................................51Audio I/O.................................................................................................................................. 51Storage.......................................................................................................................................51Network.....................................................................................................................................51Standard I/O.............................................................................................................................. 51Power.........................................................................................................................................51Weight and Dimensions............................................................................................................ 51Recommended Accessories.......................................................................................................51
Appendix F. Technical Specifications (Raptor HD+ and 3D)........................................................52Supported Modes...................................................................................................................... 52Video I/O...................................................................................................................................52Audio I/O.................................................................................................................................. 52Storage.......................................................................................................................................52Network.....................................................................................................................................52Standard I/O.............................................................................................................................. 52Power.........................................................................................................................................52
Raptor User Manual 6
Weight and Dimensions............................................................................................................ 52Recommended Accessories.......................................................................................................52
Appendix G. Technical Specifications (Raptor HDx)................................................................... 53Supported Modes...................................................................................................................... 53Video I/O...................................................................................................................................53Audio I/O.................................................................................................................................. 53Storage.......................................................................................................................................53Network.....................................................................................................................................53Standard I/O.............................................................................................................................. 53Power.........................................................................................................................................53Weight and Dimensions............................................................................................................ 53Recommended Accessories.......................................................................................................53
Appendix H. Troubleshooting........................................................................................................54Video Input Issues..................................................................................................................... 54
Auto-detection...................................................................................................................... 54Input Error message..............................................................................................................54
Missing Clips............................................................................................................................ 54VGA Output Issues................................................................................................................... 54Reset Preferences...................................................................................................................... 54Videohub Driver........................................................................................................................55Hard drive issues....................................................................................................................... 55Network connectivity issues..................................................................................................... 55Date and Time........................................................................................................................... 55
Appendix J. Further Support..........................................................................................................56Warranty.................................................................................................................................... 56Email Support............................................................................................................................56Phone Support........................................................................................................................... 56Mailing Address........................................................................................................................ 56
Raptor User Manual 7
IntroductionThe latest Raptor HD decks use a single 3.5-inch fixed internal 4TB hard drive, which can hold over 200 hours of high quality HD material. The Raptor records .avi files using a highly efficient Motion-JPEG codec that has a variable quality setting, balancing picture quality and recording time to best suit the job requirements.
All Raptor HD decks are designed to be operated primarily with an attached VGA monitor and USB keyboard & mouse, but run-and-gun operation is possible using the front panel controls.
Raptor decks are designed around a robust and reliable platform running Windows 7 Embedded; the system has a boot-up time of about 90 seconds. We recommend that the Raptor be powered from a UPS (uninterruptible power supply), if using the factory-supplied AC to DC power supply. This can help prevent sudden reboots, since power can be interrupted frequently in a hectic production environment.
The Raptor HD Quad runs from AC power and requires up to 180 watts, while the HD+ and Dual run from 10–16VDC. These decks draw up to 120 watts during normal use.
Raptor User Manual 8
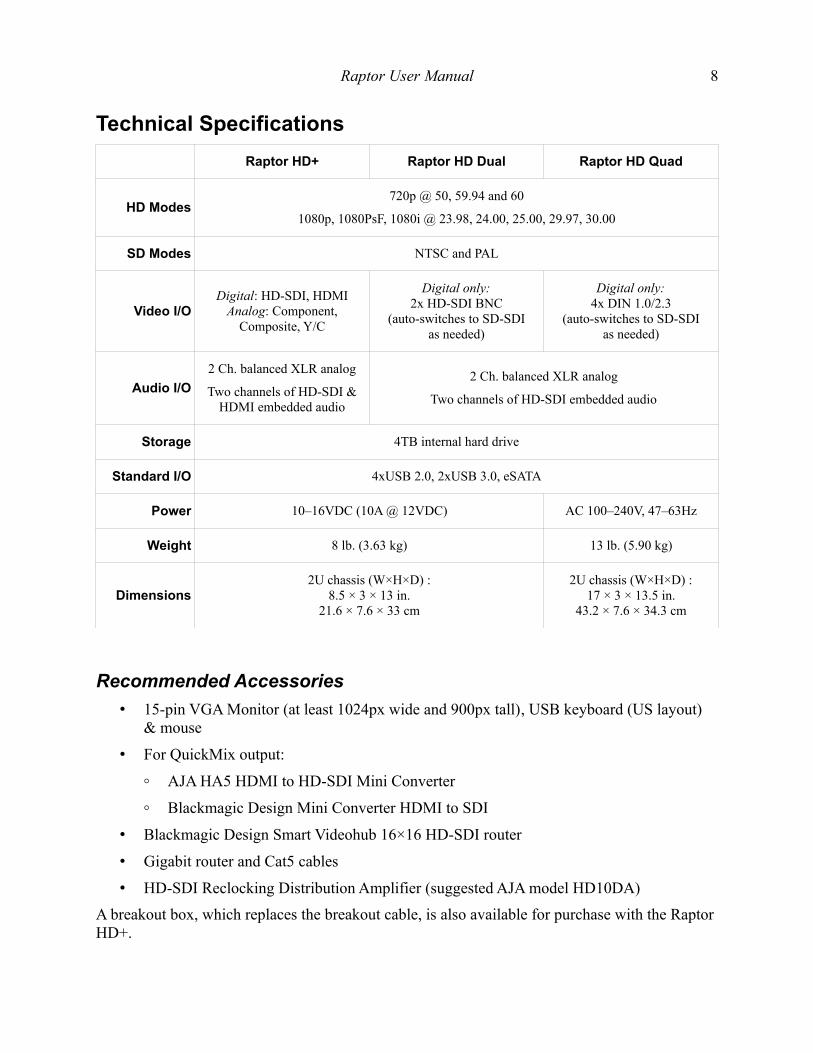
Technical Specifications
Raptor HD+ Raptor HD Dual Raptor HD Quad
HD Modes720p @ 50, 59.94 and 60
1080p, 1080PsF, 1080i @ 23.98, 24.00, 25.00, 29.97, 30.00
SD Modes NTSC and PAL
Video I/ODigital: HD-SDI, HDMI
Analog: Component,Composite, Y/C
Digital only:2x HD-SDI BNC
(auto-switches to SD-SDIas needed)
Digital only:4x DIN 1.0/2.3
(auto-switches to SD-SDIas needed)
Audio I/O
2 Ch. balanced XLR analog
Two channels of HD-SDI &HDMI embedded audio
2 Ch. balanced XLR analog
Two channels of HD-SDI embedded audio
Storage 4TB internal hard drive
Standard I/O 4xUSB 2.0, 2xUSB 3.0, eSATA
Power 10–16VDC (10A @ 12VDC) AC 100–240V, 47–63Hz
Weight 8 lb. (3.63 kg) 13 lb. (5.90 kg)
Dimensions2U chassis (W×H×D) :
8.5 × 3 × 13 in.21.6 × 7.6 × 33 cm
2U chassis (W×H×D) :17 × 3 × 13.5 in.
43.2 × 7.6 × 34.3 cm
Recommended Accessories
• 15-pin VGA Monitor (at least 1024px wide and 900px tall), USB keyboard (US layout) & mouse
• For QuickMix output:
◦ AJA HA5 HDMI to HD-SDI Mini Converter
◦ Blackmagic Design Mini Converter HDMI to SDI
• Blackmagic Design Smart Videohub 16×16 HD-SDI router
• Gigabit router and Cat5 cables
• HD-SDI Reclocking Distribution Amplifier (suggested AJA model HD10DA)
A breakout box, which replaces the breakout cable, is also available for purchase with the Raptor HD+.
Raptor User Manual 9
Common TasksThis section shows how to complete common tasks. Please refer to the Main Interface section for details concerning specific controls and features (see page 15).
Connections
Please refer to Appendix C, page 47 for information on the various connectors and I/O ports on the Raptor. Also, the Raptor HD+ ships with a breakout cable; see page 50.
Video Input
It is necessary to set the video input in the software application. If you know exactly what your input signal is (interface, resolution, framerate), you can set it directly. Otherwise, the Raptor provides a mechanism to detect the resolution and framerate for a given input.
Auto-detection
Pull down the Options menu, open the Video Input sub-menu, open the sub-menu corresponding to your video input, and select Auto-detect.
Auto-detection can also be activated via the Front Panel: OPTION + RECORD + >>.
For more information, see Auto detection on page 24.
Changing Input Manually
The Raptor supports a wide variety of formats for video input. These are accessed via the Options > Video Input menu. Please see Video Input on page 24 for more information.
Audio Input
The Raptor supports both XLR analog audio input and Embedded audio. These can be selected in the Options > Audio Input menu (see page 25).
Raptor User Manual 10
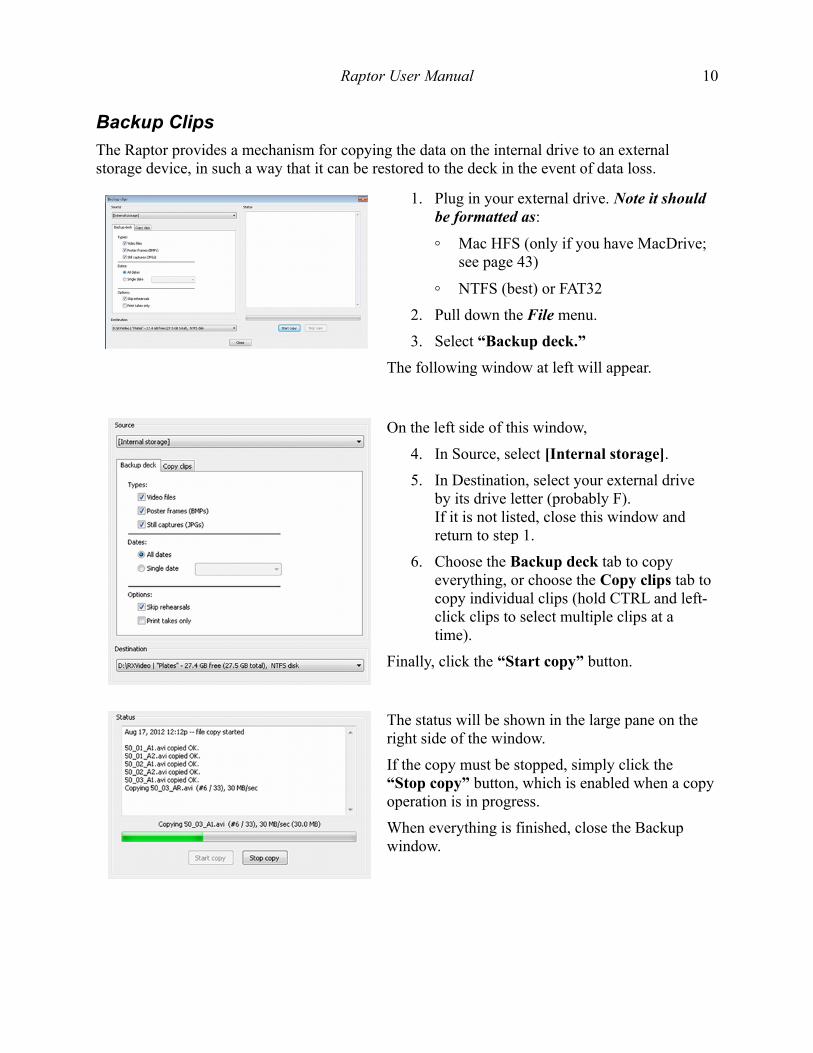
Backup Clips
The Raptor provides a mechanism for copying the data on the internal drive to an external storage device, in such a way that it can be restored to the deck in the event of data loss.
1. Plug in your external drive. Note it should be formatted as:
◦ Mac HFS (only if you have MacDrive; see page 43)
◦ NTFS (best) or FAT32
2. Pull down the File menu.
3. Select “Backup deck.”
The following window at left will appear.
On the left side of this window,
4. In Source, select [Internal storage].
5. In Destination, select your external drive by its drive letter (probably F). If it is not listed, close this window and return to step 1.
6. Choose the Backup deck tab to copy everything, or choose the Copy clips tab to copy individual clips (hold CTRL and left-click clips to select multiple clips at a time).
Finally, click the “Start copy” button.
The status will be shown in the large pane on the right side of the window.
If the copy must be stopped, simply click the “Stop copy” button, which is enabled when a copy operation is in progress.
When everything is finished, close the Backup window.

Raptor User Manual 11
Delete Clips
There are three ways to delete clips – use the Clip List, use Windows Explorer, or use the application to delete all clips on the deck. There are safeguards in place to avoid accidental deletion.
Delete Individual Clips using the Clip List
1. Select the clip you wish to delete.
2. Open the File menu and select “Delete current clip.”
3. A confirmation box will appear listing the specific files that will be deleted. Click “Yes” to delete them or “No” to return to the application without deleting them.
Selecting Clips Manually using Windows
First, open Windows Explorer on the Local Disk:
1. Open the Tools menu.
2. Select “Launch Windows Explorer on local disk.”
This opens to E:\RXVideo, which contains all of the video recorded on the deck.
Simply delete the .avi files representing the video you wish to delete. The file names follow the following format: Scene_Take_Camera.avi
After deleting the files, close Windows Explorer and return to the Raptor software.
Since clips were deleted, it is advisable to force the software to re-read the clips from disk using the File menu option (see page 14).
Note: Do not delete any clips that end with .ini: these are used by the Raptor to store metadata.
Deleting All Clips
This section describes the procedure to delete all clips from the deck using the software application. This is useful when starting a new job and reclaims all available storage on the deck. Note that it is also possible to delete all clips via the manual method described above.
Raptor User Manual 12
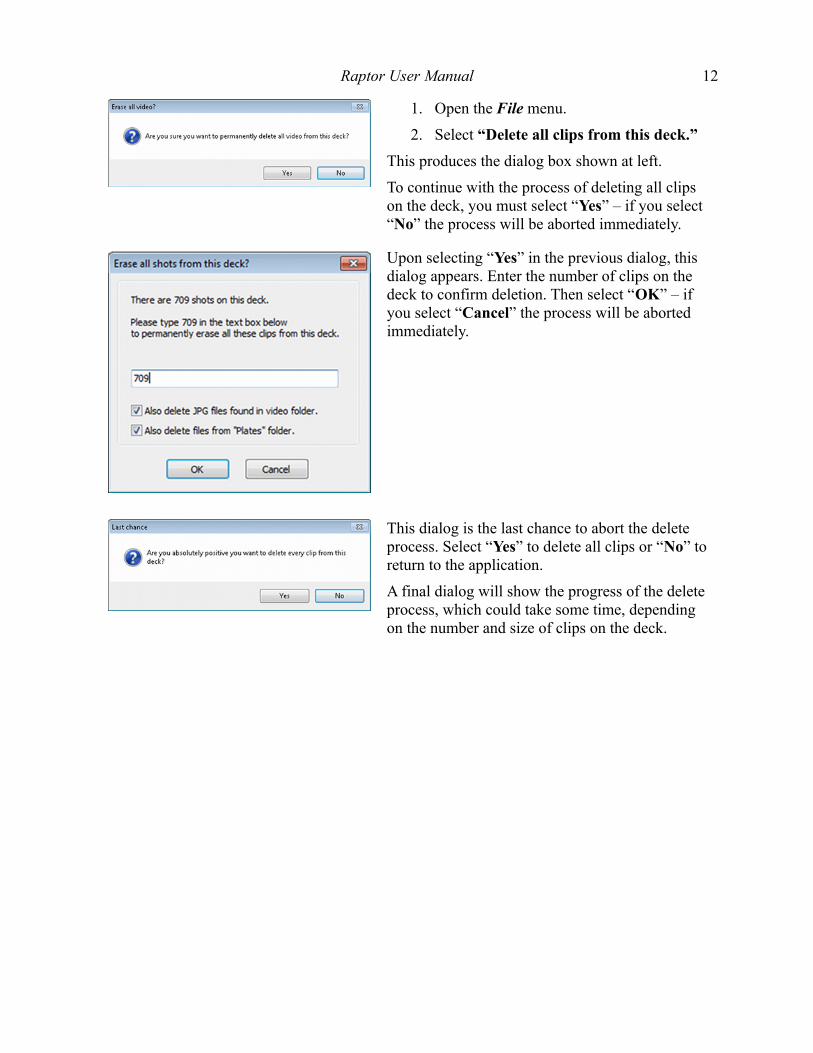
1. Open the File menu.
2. Select “Delete all clips from this deck.”
This produces the dialog box shown at left.
To continue with the process of deleting all clips on the deck, you must select “Yes” – if you select “No” the process will be aborted immediately.
Upon selecting “Yes” in the previous dialog, this dialog appears. Enter the number of clips on the deck to confirm deletion. Then select “OK” – if you select “Cancel” the process will be aborted immediately.
This dialog is the last chance to abort the delete process. Select “Yes” to delete all clips or “No” to return to the application.
A final dialog will show the progress of the delete process, which could take some time, depending on the number and size of clips on the deck.
Raptor User Manual 13
Rename Clips
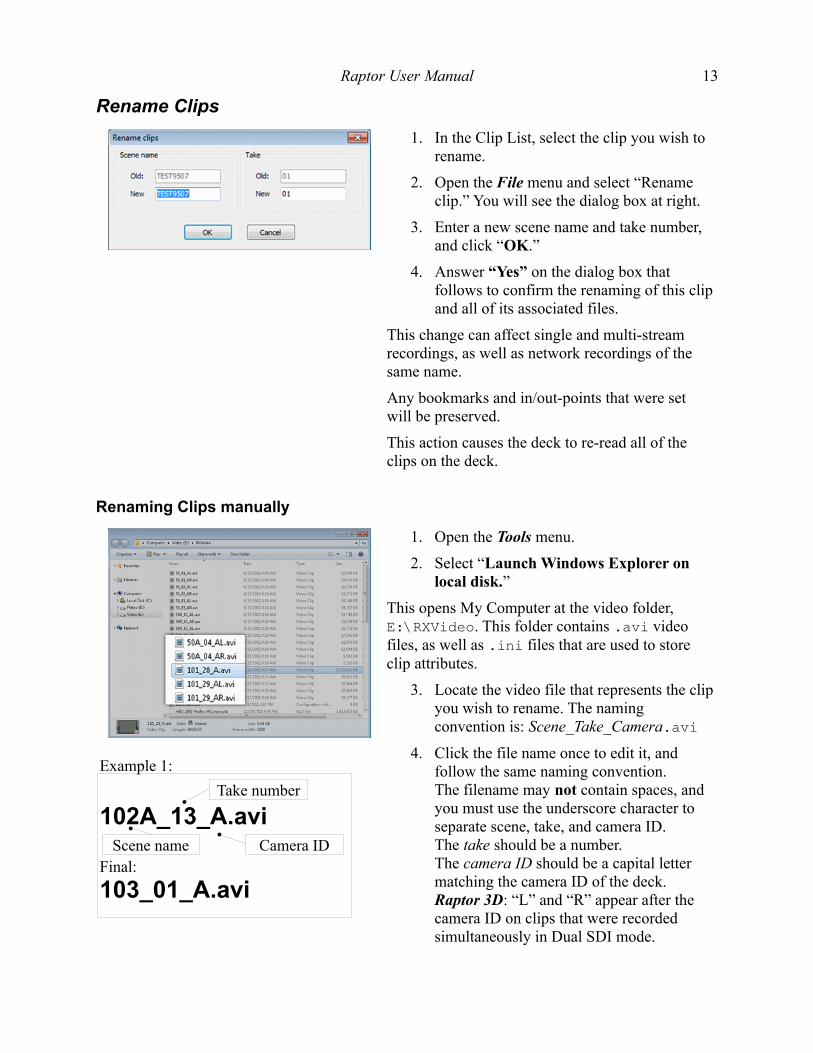
1. In the Clip List, select the clip you wish to rename.
2. Open the File menu and select “Rename clip.” You will see the dialog box at right.
3. Enter a new scene name and take number, and click “OK.”
4. Answer “Yes” on the dialog box that follows to confirm the renaming of this clip and all of its associated files.
This change can affect single and multi-stream recordings, as well as network recordings of the same name.
Any bookmarks and in/out-points that were set will be preserved.
This action causes the deck to re-read all of the clips on the deck.
Renaming Clips manually
Example 1:
102A_13_A.avi
Final:
103_01_A.avi
1. Open the Tools menu.
2. Select “Launch Windows Explorer on local disk.”
This opens My Computer at the video folder, E:\RXVideo. This folder contains .avi video files, as well as .ini files that are used to store clip attributes.
3. Locate the video file that represents the clip you wish to rename. The naming convention is: Scene_Take_Camera.avi
4. Click the file name once to edit it, and follow the same naming convention.The filename may not contain spaces, and you must use the underscore character to separate scene, take, and camera ID.The take should be a number.The camera ID should be a capital letter matching the camera ID of the deck.Raptor 3D: “L” and “R” appear after the camera ID on clips that were recorded simultaneously in Dual SDI mode.
Scene name Camera ID
Take number
Raptor User Manual 14
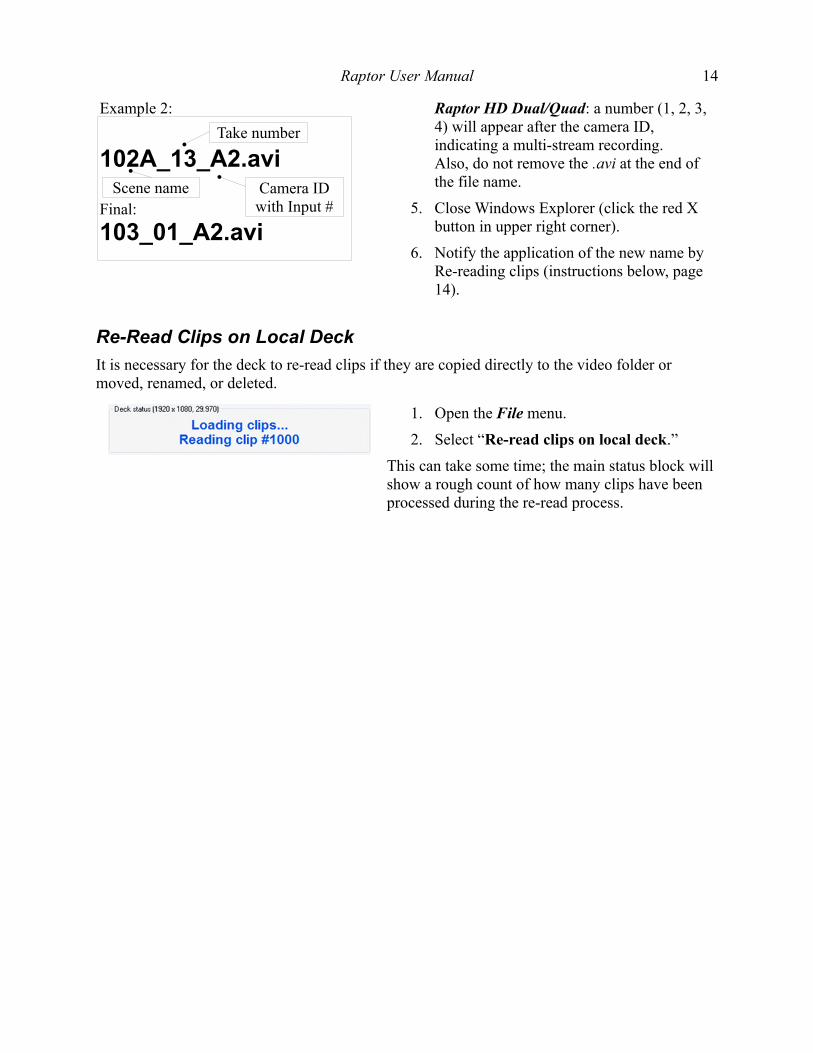
Example 2:
102A_13_A2.avi
Final:
103_01_A2.avi
Raptor HD Dual/Quad: a number (1, 2, 3, 4) will appear after the camera ID, indicating a multi-stream recording.Also, do not remove the .avi at the end of the file name.
5. Close Windows Explorer (click the red X button in upper right corner).
6. Notify the application of the new name by Re-reading clips (instructions below, page14).
Re-Read Clips on Local Deck
It is necessary for the deck to re-read clips if they are copied directly to the video folder or moved, renamed, or deleted.
1. Open the File menu.
2. Select “Re-read clips on local deck.”
This can take some time; the main status block will show a rough count of how many clips have been processed during the re-read process.
Scene name Camera IDwith Input #
Take number
Raptor User Manual 15
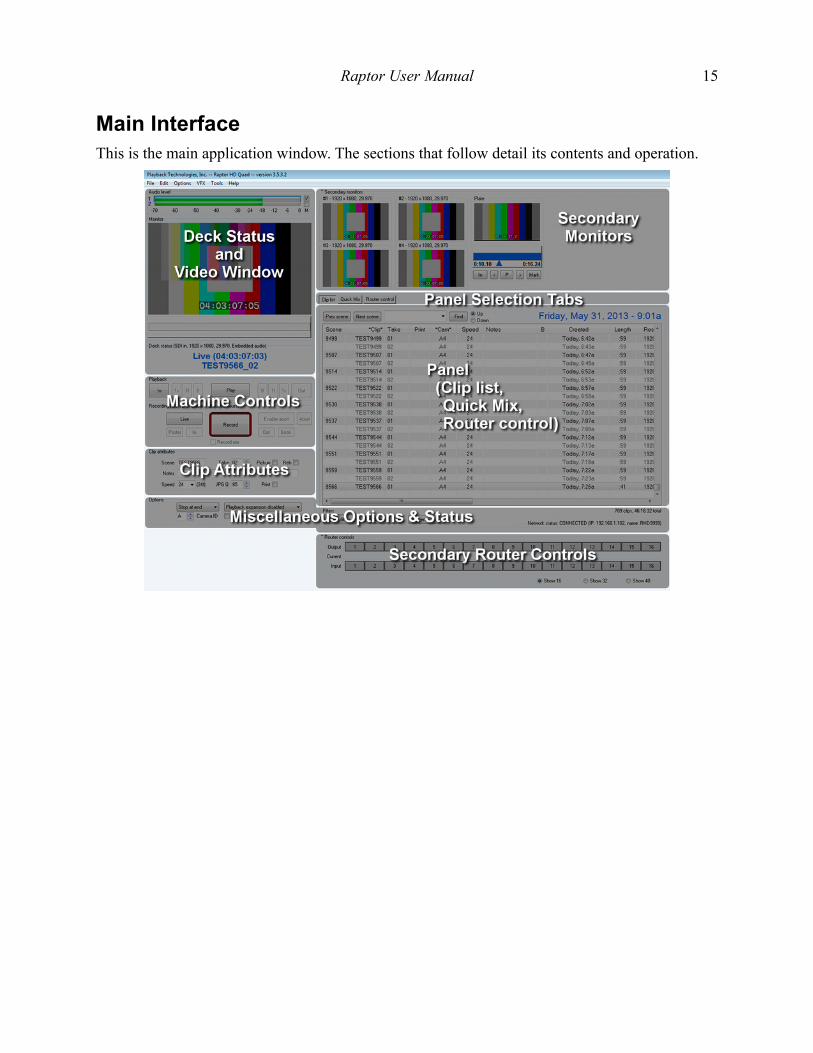
Main InterfaceThis is the main application window. The sections that follow detail its contents and operation.
Raptor User Manual 16
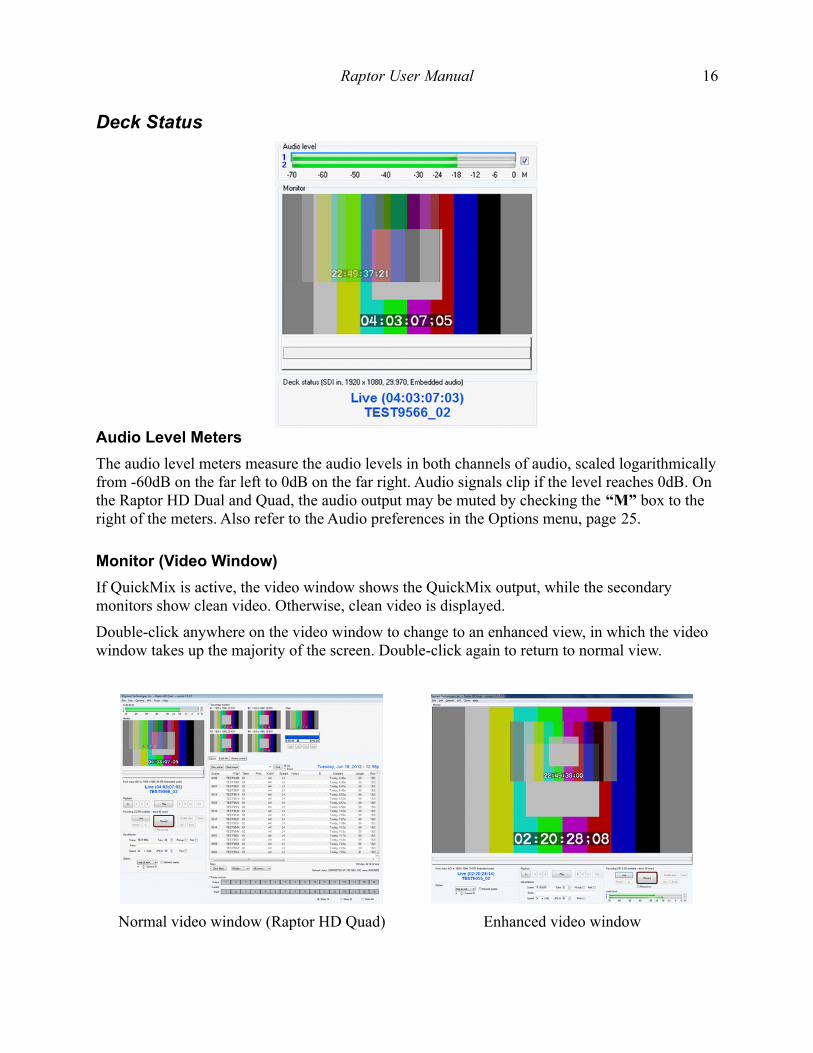
Deck Status
Audio Level Meters
The audio level meters measure the audio levels in both channels of audio, scaled logarithmically from -60dB on the far left to 0dB on the far right. Audio signals clip if the level reaches 0dB. On the Raptor HD Dual and Quad, the audio output may be muted by checking the “M” box to the right of the meters. Also refer to the Audio preferences in the Options menu, page 25.
Monitor (Video Window)
If QuickMix is active, the video window shows the QuickMix output, while the secondary monitors show clean video. Otherwise, clean video is displayed.
Double-click anywhere on the video window to change to an enhanced view, in which the video window takes up the majority of the screen. Double-click again to return to normal view.
Normal video window (Raptor HD Quad) Enhanced video window
Raptor User Manual 17
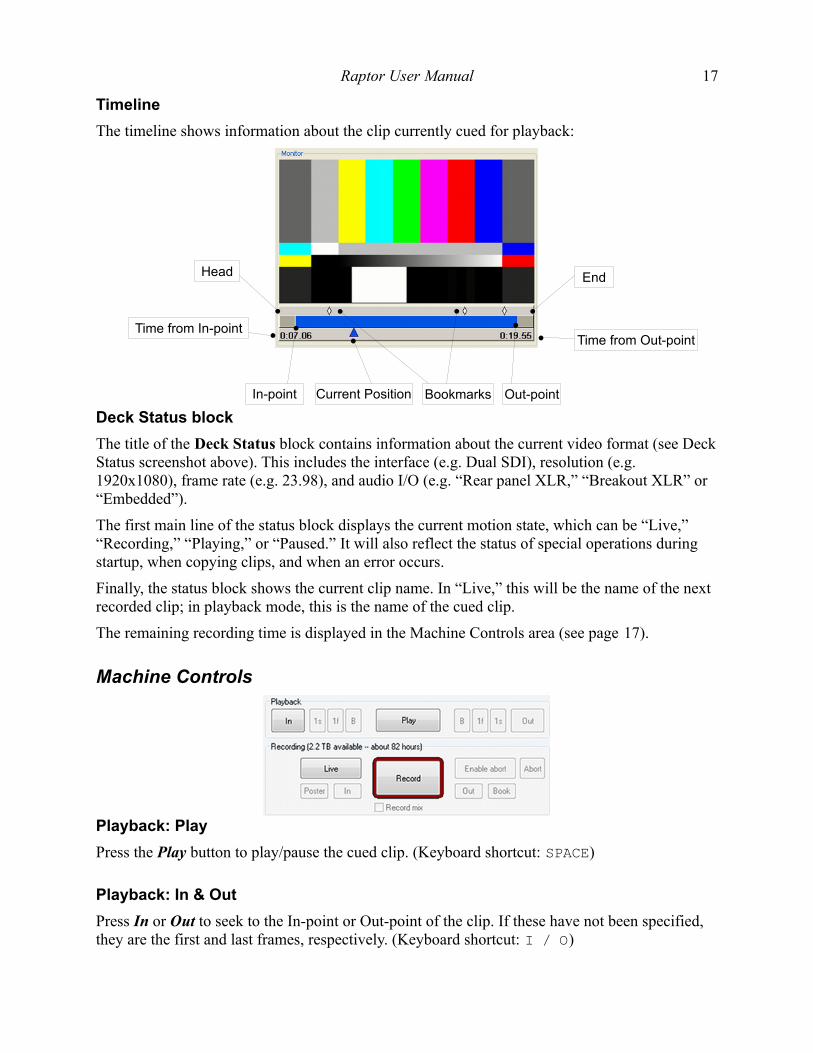
Timeline
The timeline shows information about the clip currently cued for playback:
Deck Status block
The title of the Deck Status block contains information about the current video format (see Deck Status screenshot above). This includes the interface (e.g. Dual SDI), resolution (e.g. 1920x1080), frame rate (e.g. 23.98), and audio I/O (e.g. “Rear panel XLR,” “Breakout XLR” or “Embedded”).
The first main line of the status block displays the current motion state, which can be “Live,” “Recording,” “Playing,” or “Paused.” It will also reflect the status of special operations during startup, when copying clips, and when an error occurs.
Finally, the status block shows the current clip name. In “Live,” this will be the name of the next recorded clip; in playback mode, this is the name of the cued clip.
The remaining recording time is displayed in the Machine Controls area (see page 17).
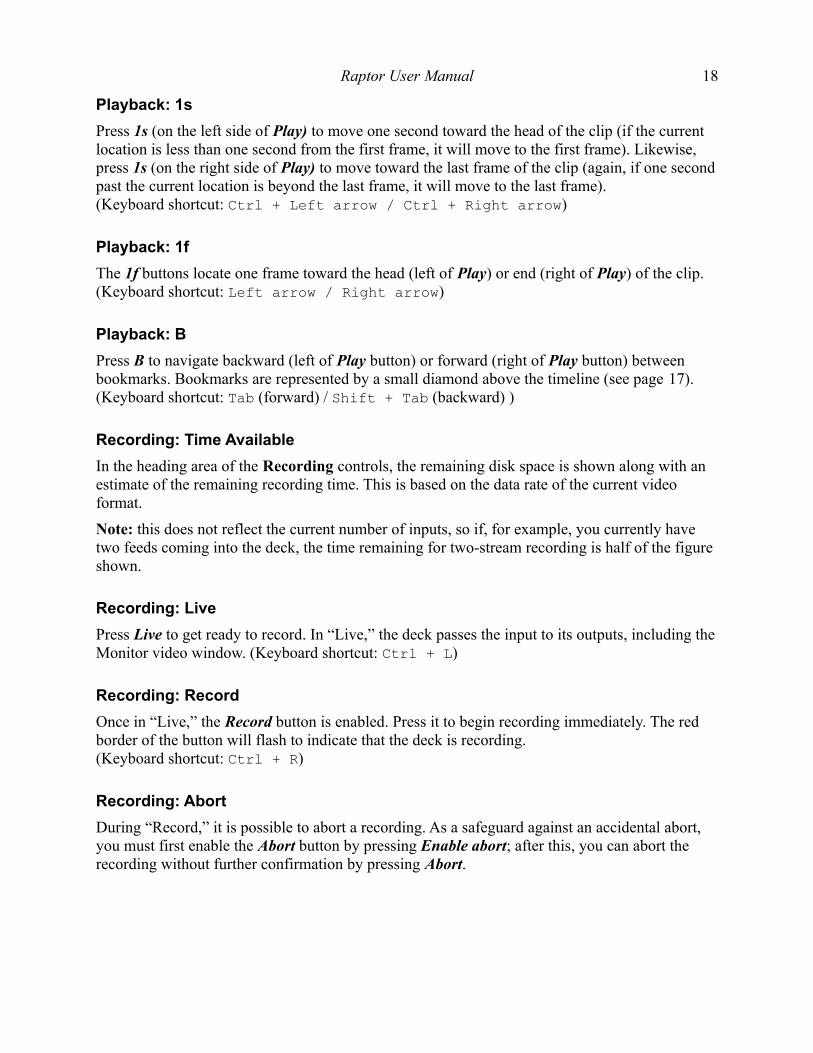
Machine Controls
Playback: Play
Press the Play button to play/pause the cued clip. (Keyboard shortcut: SPACE)
Playback: In & Out
Press In or Out to seek to the In-point or Out-point of the clip. If these have not been specified, they are the first and last frames, respectively. (Keyboard shortcut: I / O)
Time from In-pointTime from Out-point
Current PositionIn-point Out-pointBookmarks
Head End
Raptor User Manual 18
Playback: 1s
Press 1s (on the left side of Play) to move one second toward the head of the clip (if the current location is less than one second from the first frame, it will move to the first frame). Likewise, press 1s (on the right side of Play) to move toward the last frame of the clip (again, if one second past the current location is beyond the last frame, it will move to the last frame).(Keyboard shortcut: Ctrl + Left arrow / Ctrl + Right arrow)
Playback: 1f
The 1f buttons locate one frame toward the head (left of Play) or end (right of Play) of the clip. (Keyboard shortcut: Left arrow / Right arrow)
Playback: B
Press B to navigate backward (left of Play button) or forward (right of Play button) between bookmarks. Bookmarks are represented by a small diamond above the timeline (see page 17). (Keyboard shortcut: Tab (forward) / Shift + Tab (backward) )
Recording: Time Available
In the heading area of the Recording controls, the remaining disk space is shown along with an estimate of the remaining recording time. This is based on the data rate of the current video format.
Note: this does not reflect the current number of inputs, so if, for example, you currently have two feeds coming into the deck, the time remaining for two-stream recording is half of the figure shown.
Recording: Live
Press Live to get ready to record. In “Live,” the deck passes the input to its outputs, including the Monitor video window. (Keyboard shortcut: Ctrl + L)
Recording: Record
Once in “Live,” the Record button is enabled. Press it to begin recording immediately. The red border of the button will flash to indicate that the deck is recording. (Keyboard shortcut: Ctrl + R)
Recording: Abort
During “Record,” it is possible to abort a recording. As a safeguard against an accidental abort, you must first enable the Abort button by pressing Enable abort; after this, you can abort the recording without further confirmation by pressing Abort.
Raptor User Manual 19
Recording: In, Book, Out
During record or playback, these three buttons can be used to place markers in a clip's timeline. In marks the current frame as the in-point of the clip; Book places a bookmark at the current frame; Out marks the current frame as the out-point of the clip. See also Timeline, page 17. Note that a clip can only have one in-point and one out-point, but an unlimited number of bookmarks. (Keyboard shortcuts for In, Book, Out: I / B / O)
Recording: Poster
Export the current frame as a poster frame for this clip. See also OSD preference, page 29.
Recording: Record mix
Check this box to record the current QuickMix output. The mix file will appear in the clip list as a separate entry, with “mix” appended to its name.
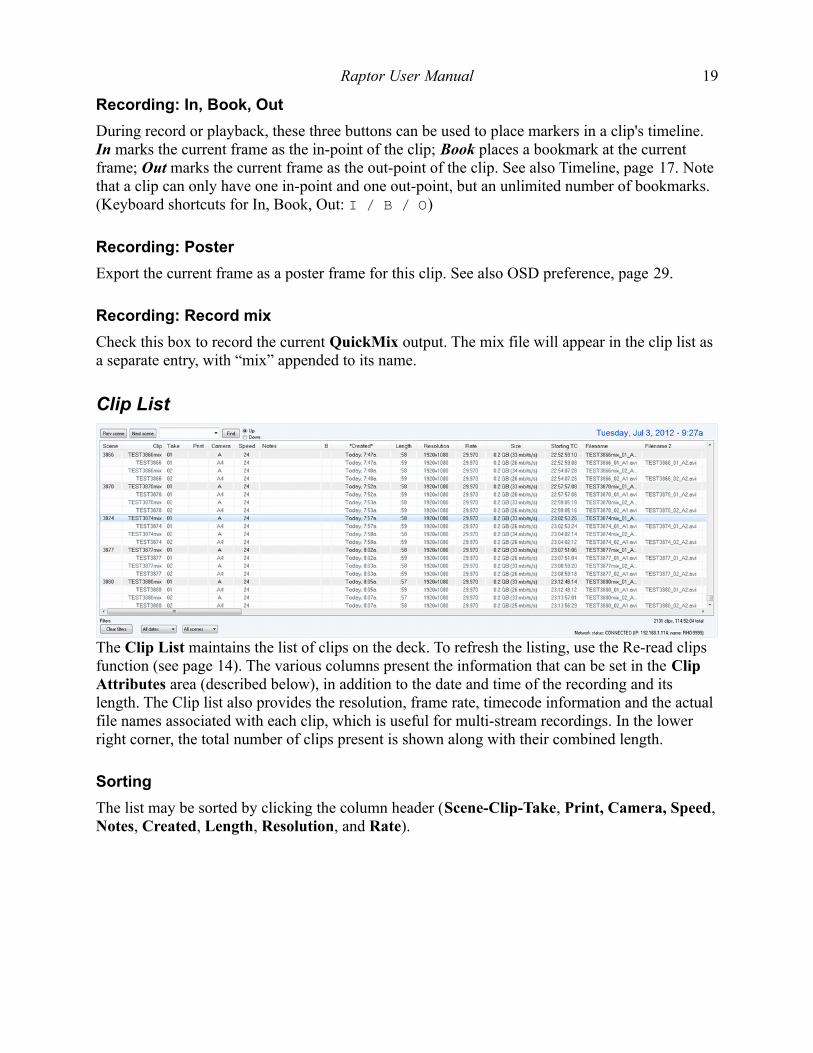
Clip List
The Clip List maintains the list of clips on the deck. To refresh the listing, use the Re-read clips function (see page 14). The various columns present the information that can be set in the Clip Attributes area (described below), in addition to the date and time of the recording and its length. The Clip list also provides the resolution, frame rate, timecode information and the actual file names associated with each clip, which is useful for multi-stream recordings. In the lower right corner, the total number of clips present is shown along with their combined length.
Sorting
The list may be sorted by clicking the column header (Scene-Clip-Take, Print, Camera, Speed,Notes, Created, Length, Resolution, and Rate).
Raptor User Manual 20
Searching
The list may also be searched, using the controls in the upper-left corner of the list:
1. Enter a query in the text box.
2. Select a direction to search, starting at the currently-selected clip (Up or Down).
3. Press the “Find” button. Successive presses will continue searching through the list until the end is reached. (Keyboard shortcuts: Ctrl + F and F3)
It is also possible to jump from scene to scene using the “Prev scene” and “Next scene” buttons.
Filters
In the lower-left corner of the clip list are controls for filtering the list. You can select either a date or scene, or both, and only show clips that match these criteria.
Press “Clear filters” to return to a full list of all clips present on the deck.
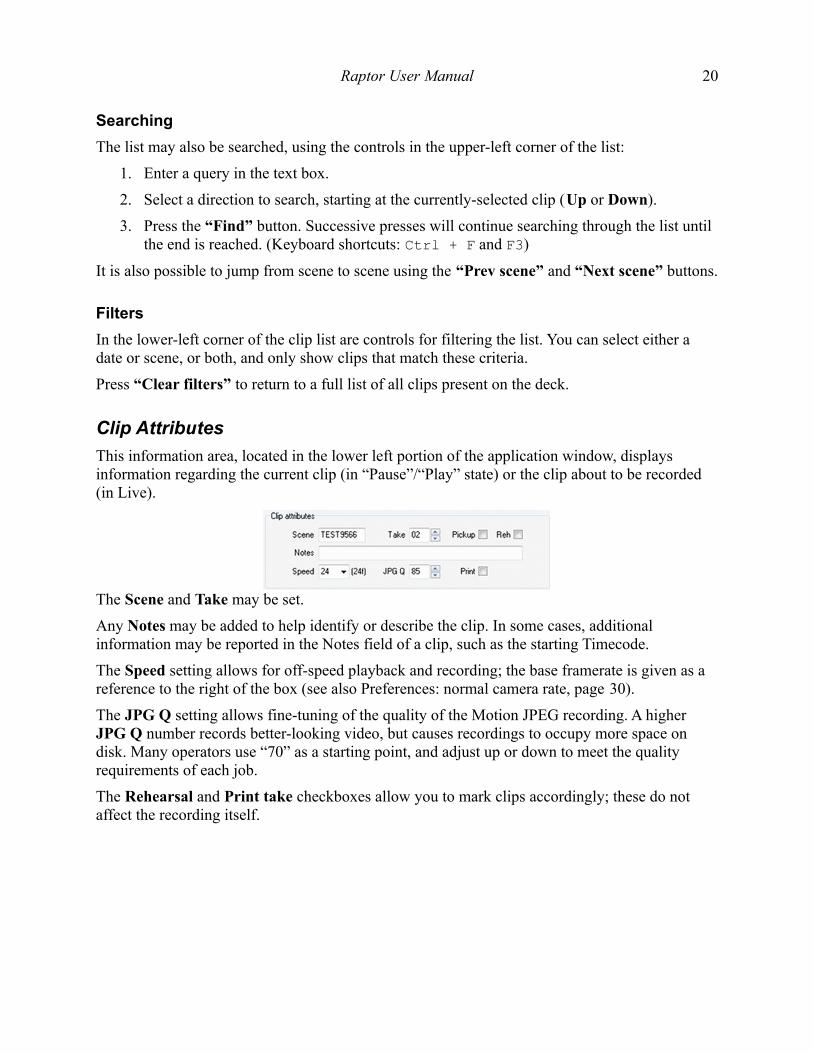
Clip Attributes
This information area, located in the lower left portion of the application window, displays information regarding the current clip (in “Pause”/“Play” state) or the clip about to be recorded (in Live).
The Scene and Take may be set.
Any Notes may be added to help identify or describe the clip. In some cases, additional information may be reported in the Notes field of a clip, such as the starting Timecode.
The Speed setting allows for off-speed playback and recording; the base framerate is given as a reference to the right of the box (see also Preferences: normal camera rate, page 30).
The JPG Q setting allows fine-tuning of the quality of the Motion JPEG recording. A higher JPG Q number records better-looking video, but causes recordings to occupy more space on disk. Many operators use “70” as a starting point, and adjust up or down to meet the quality requirements of each job.
The Rehearsal and Print take checkboxes allow you to mark clips accordingly; these do not affect the recording itself.
Raptor User Manual 21
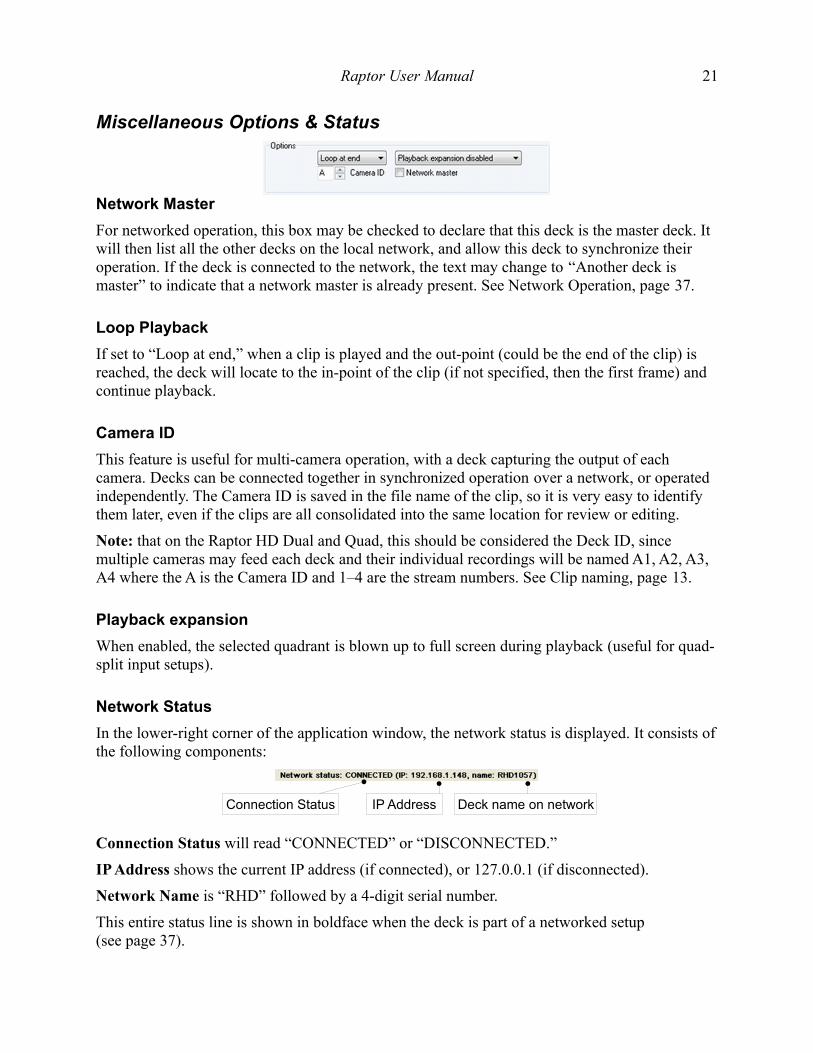
Miscellaneous Options & Status
Network Master
For networked operation, this box may be checked to declare that this deck is the master deck. It will then list all the other decks on the local network, and allow this deck to synchronize their operation. If the deck is connected to the network, the text may change to “Another deck is master” to indicate that a network master is already present. See Network Operation, page 37.
Loop Playback
If set to “Loop at end,” when a clip is played and the out-point (could be the end of the clip) is reached, the deck will locate to the in-point of the clip (if not specified, then the first frame) and continue playback.
Camera ID
This feature is useful for multi-camera operation, with a deck capturing the output of each camera. Decks can be connected together in synchronized operation over a network, or operated independently. The Camera ID is saved in the file name of the clip, so it is very easy to identify them later, even if the clips are all consolidated into the same location for review or editing.
Note: that on the Raptor HD Dual and Quad, this should be considered the Deck ID, since multiple cameras may feed each deck and their individual recordings will be named A1, A2, A3, A4 where the A is the Camera ID and 1–4 are the stream numbers. See Clip naming, page 13.
Playback expansion
When enabled, the selected quadrant is blown up to full screen during playback (useful for quad-split input setups).
Network Status
In the lower-right corner of the application window, the network status is displayed. It consists of the following components:
Connection Status will read “CONNECTED” or “DISCONNECTED.”
IP Address shows the current IP address (if connected), or 127.0.0.1 (if disconnected).
Network Name is “RHD” followed by a 4-digit serial number.
This entire status line is shown in boldface when the deck is part of a networked setup(see page 37).
Connection Status IP Address Deck name on network

Raptor User Manual 22
Secondary Monitors
In the collapsible Secondary Monitors panel, one video window will be displayed for each active input. The format of the input video (resolution and framerate) will be shown with it. These video windows are clean, unaffected by any QuickMix settings. To the right of the secondary monitors is the frame selection for background plates to be used with QuickMix (see page 33).
Raptor User Manual 23
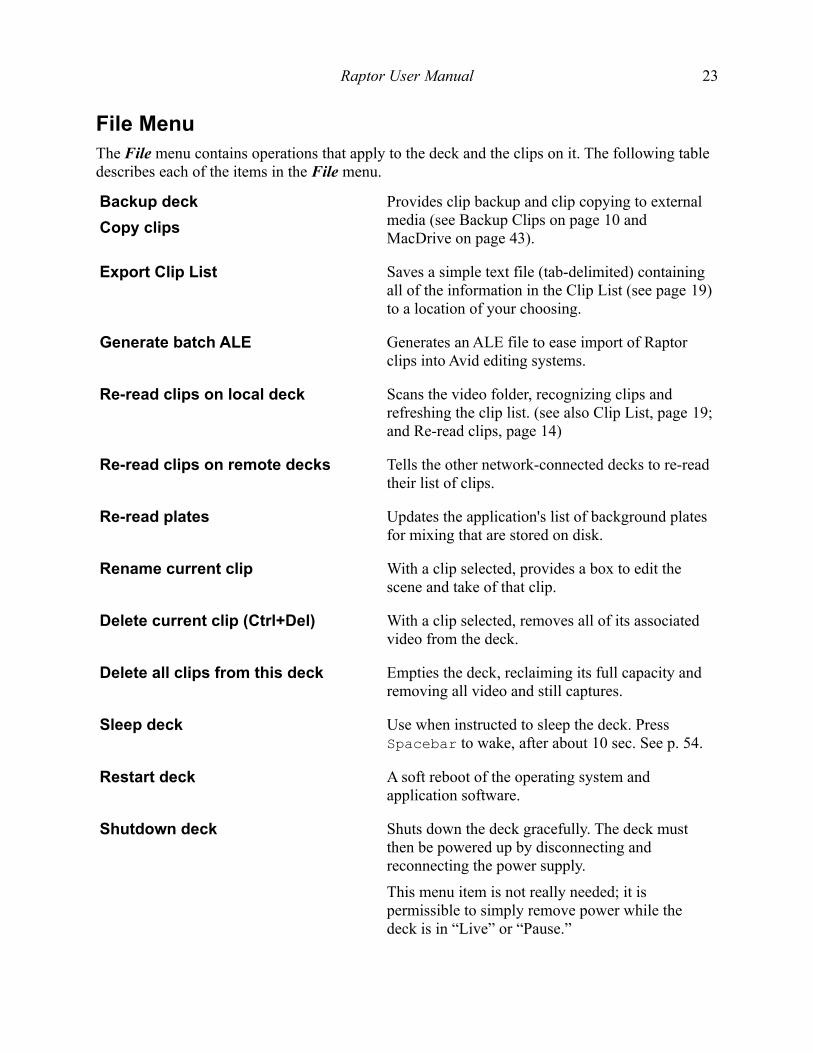
File MenuThe File menu contains operations that apply to the deck and the clips on it. The following table describes each of the items in the File menu.
Backup deck
Copy clips
Provides clip backup and clip copying to external media (see Backup Clips on page 10 and MacDrive on page 43).
Export Clip List Saves a simple text file (tab-delimited) containing all of the information in the Clip List (see page 19) to a location of your choosing.
Generate batch ALE Generates an ALE file to ease import of Raptor clips into Avid editing systems.
Re-read clips on local deck Scans the video folder, recognizing clips and refreshing the clip list. (see also Clip List, page 19; and Re-read clips, page 14)
Re-read clips on remote decks Tells the other network-connected decks to re-read their list of clips.
Re-read plates Updates the application's list of background plates for mixing that are stored on disk.
Rename current clip With a clip selected, provides a box to edit the scene and take of that clip.
Delete current clip (Ctrl+Del) With a clip selected, removes all of its associated video from the deck.
Delete all clips from this deck Empties the deck, reclaiming its full capacity and removing all video and still captures.
Sleep deck Use when instructed to sleep the deck. Press Spacebar to wake, after about 10 sec. See p. 54.
Restart deck A soft reboot of the operating system and application software.
Shutdown deck Shuts down the deck gracefully. The deck must then be powered up by disconnecting and reconnecting the power supply.
This menu item is not really needed; it is permissible to simply remove power while the deck is in “Live” or “Pause.”
Raptor User Manual 24
Edit Menu
Delete Current Bookmark
When a clip has been cued and there is a bookmark at the current location, this menu item will be enabled. Click to remove the bookmark at the current frame.
Options Menu
Video Input Options
On the single-channel Raptor HD+, the Video Input sub-menu contains submenus for each input type (SDI, HDMI, etc) and within each input type, the compatible signal formats are listed (resolution and framerate). The first option in each submenu is “Auto-detect” – this begins a process of detecting the signal format automatically.
On the Raptor HD Dual and Quad, which only provide SDI video input, the Video Input sub-menu contains a selection of how many SDI inputs are desired, and the corresponding number of SDI inputs are then reflected in the rest of that menu. As on the other decks, each SDI's signal format may be selected manually or auto-detected.
SDI & Dual SDI
SDI (Serial Digital Interface) can carry multiple signal formats, both in high definition and standard definition. Dual SDI input is only available on the Raptor 3D.
Component
To use Component video input, connect an analog component signal to the “Y in,” “R-Y in,” and “B-Y in” connectors on the breakout cable (see page 50).
HDMI
The Raptor supports HDCP (High-bandwidth Digital Content Protection) and will not accept input signals with copy protection, which are common on the outputs of game consoles and commercial Blu-ray video discs.
Y/C
To use Y/C video input, use “Y in” and “B-Y in” connectors on the breakout cable (see page 50).
Composite
When you select composite video input, use “Y in” and “Y out” connectors on the breakout cable (see page 50).
Raptor User Manual 25
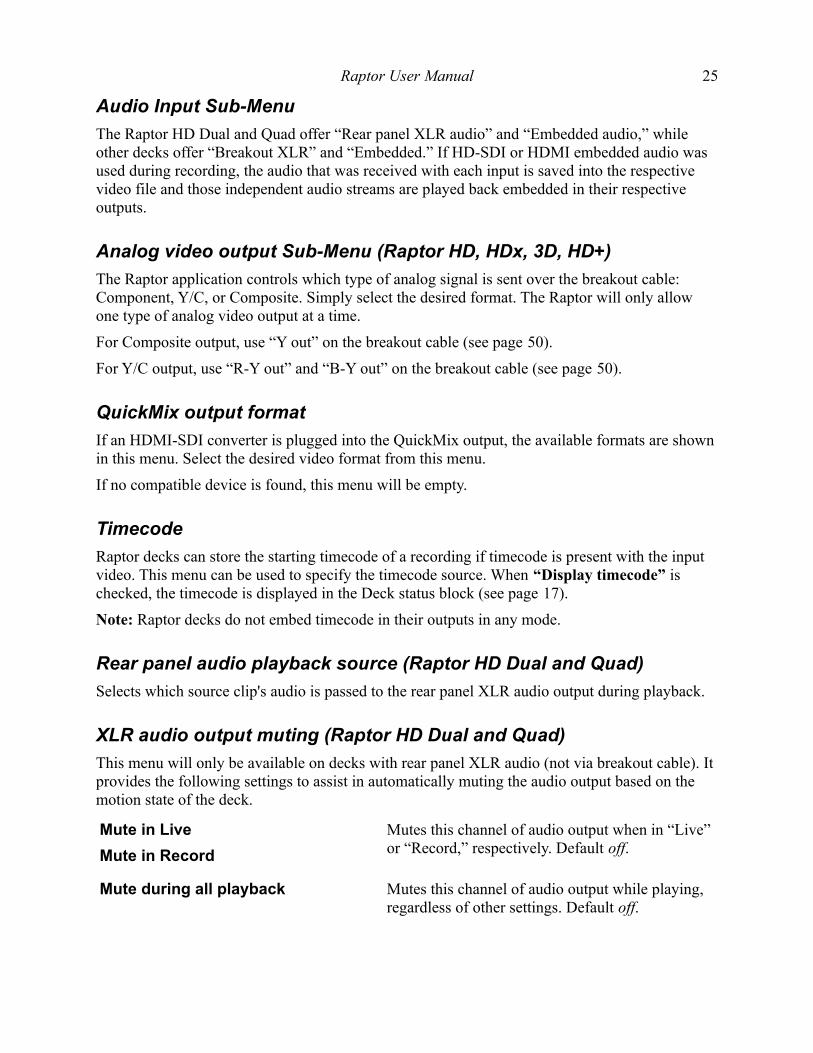
Audio Input Sub-Menu
The Raptor HD Dual and Quad offer “Rear panel XLR audio” and “Embedded audio,” while other decks offer “Breakout XLR” and “Embedded.” If HD-SDI or HDMI embedded audio was used during recording, the audio that was received with each input is saved into the respective video file and those independent audio streams are played back embedded in their respective outputs.
Analog video output Sub-Menu (Raptor HD, HDx, 3D, HD+)
The Raptor application controls which type of analog signal is sent over the breakout cable: Component, Y/C, or Composite. Simply select the desired format. The Raptor will only allow one type of analog video output at a time.
For Composite output, use “Y out” on the breakout cable (see page 50).
For Y/C output, use “R-Y out” and “B-Y out” on the breakout cable (see page 50).
QuickMix output format
If an HDMI-SDI converter is plugged into the QuickMix output, the available formats are shown in this menu. Select the desired video format from this menu.
If no compatible device is found, this menu will be empty.
Timecode
Raptor decks can store the starting timecode of a recording if timecode is present with the input video. This menu can be used to specify the timecode source. When “Display timecode” is checked, the timecode is displayed in the Deck status block (see page 17).
Note: Raptor decks do not embed timecode in their outputs in any mode.
Rear panel audio playback source (Raptor HD Dual and Quad)
Selects which source clip's audio is passed to the rear panel XLR audio output during playback.
XLR audio output muting (Raptor HD Dual and Quad)
This menu will only be available on decks with rear panel XLR audio (not via breakout cable). It provides the following settings to assist in automatically muting the audio output based on the motion state of the deck.
Mute in Live
Mute in Record
Mutes this channel of audio output when in “Live” or “Record,” respectively. Default off.
Mute during all playback Mutes this channel of audio output while playing, regardless of other settings. Default off.
Raptor User Manual 26
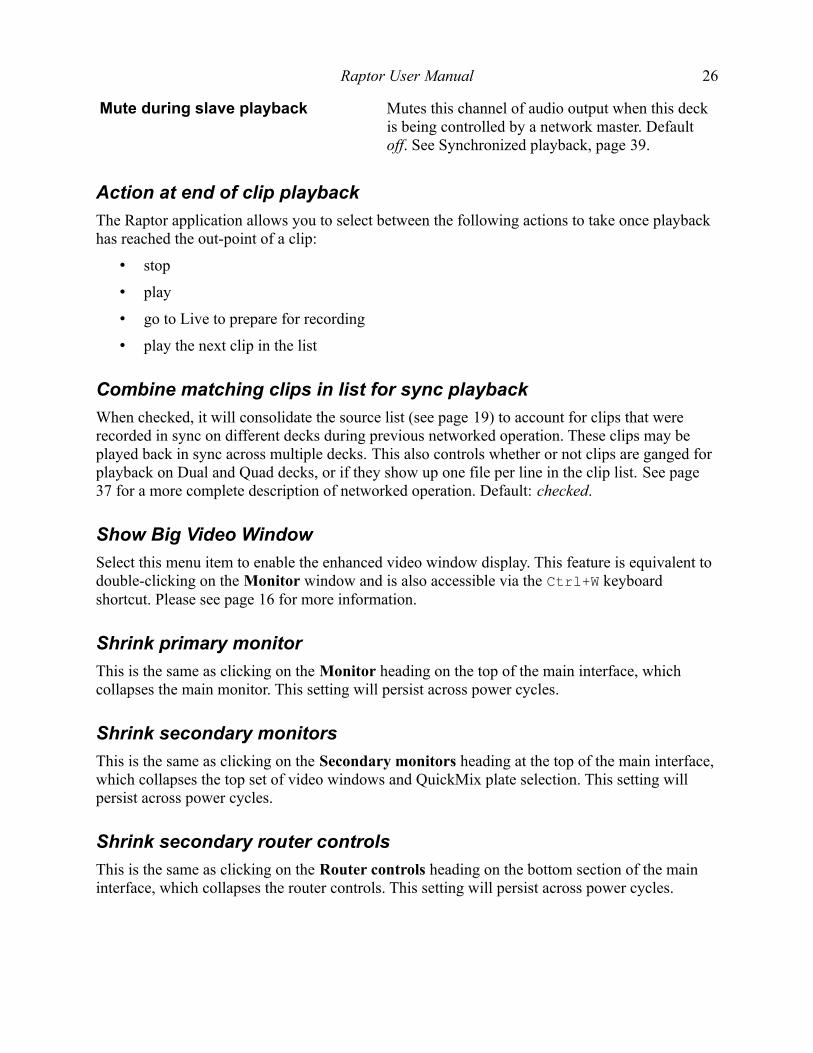
Mute during slave playback Mutes this channel of audio output when this deck is being controlled by a network master. Default off. See Synchronized playback, page 39.
Action at end of clip playback
The Raptor application allows you to select between the following actions to take once playback has reached the out-point of a clip:
• stop
• play
• go to Live to prepare for recording
• play the next clip in the list
Combine matching clips in list for sync playback
When checked, it will consolidate the source list (see page 19) to account for clips that were recorded in sync on different decks during previous networked operation. These clips may be played back in sync across multiple decks. This also controls whether or not clips are ganged for playback on Dual and Quad decks, or if they show up one file per line in the clip list. See page37 for a more complete description of networked operation. Default: checked.
Show Big Video Window
Select this menu item to enable the enhanced video window display. This feature is equivalent to double-clicking on the Monitor window and is also accessible via the Ctrl+W keyboard shortcut. Please see page 16 for more information.
Shrink primary monitor
This is the same as clicking on the Monitor heading on the top of the main interface, which collapses the main monitor. This setting will persist across power cycles.
Shrink secondary monitors
This is the same as clicking on the Secondary monitors heading at the top of the main interface, which collapses the top set of video windows and QuickMix plate selection. This setting will persist across power cycles.
Shrink secondary router controls
This is the same as clicking on the Router controls heading on the bottom section of the main interface, which collapses the router controls. This setting will persist across power cycles.
Raptor User Manual 27
Hide secondary monitor windows
This setting removes the secondary monitors from the interface. When controlling a deck using Remote Desktop, the secondary monitors cease to function, and the Raptor application will automatically enable this setting to hide them. This setting will persist across power cycles.
Screen Resolution
This submenu allows you to change the resolution of the VGA display attached to the deck. The menu will only contain resolutions supported by the currently-attached monitor. If a resolution is selected that cannot be displayed, press Ctrl+Alt+Shift+S to force output to “safe mode,” 1024x768. Then, select a new resolution from this menu.
Raptor User Manual 28
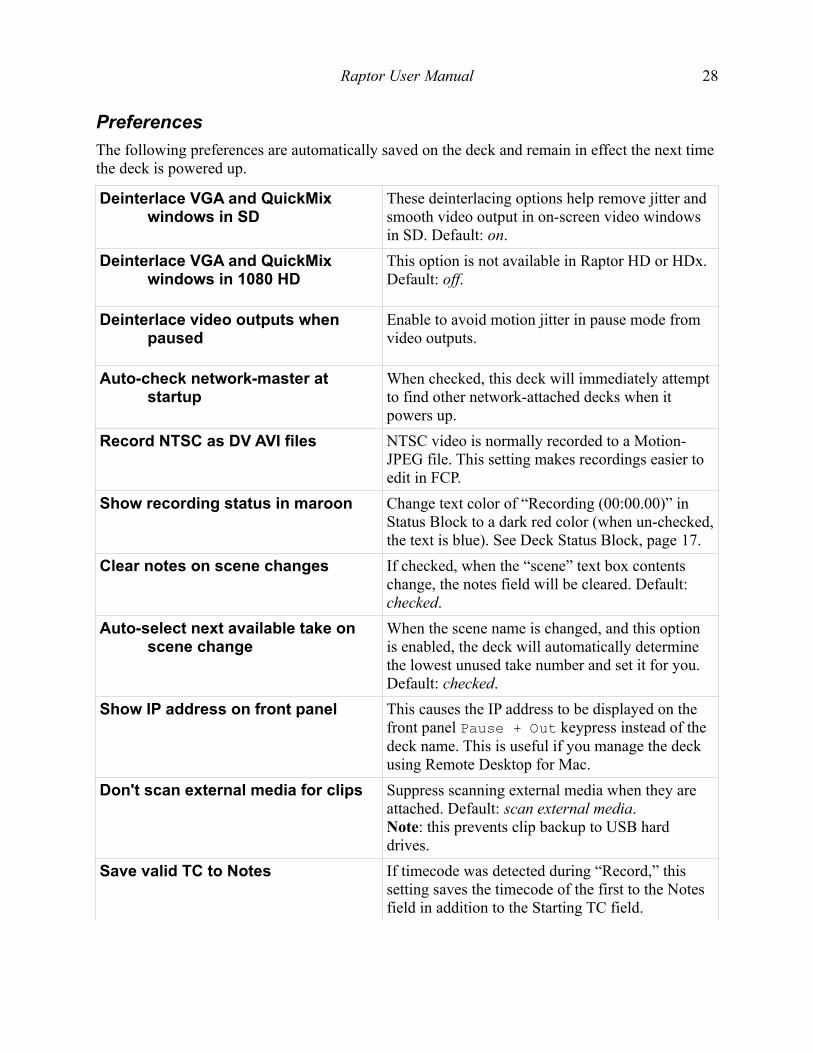
Preferences
The following preferences are automatically saved on the deck and remain in effect the next time the deck is powered up.
Deinterlace VGA and QuickMix windows in SD
These deinterlacing options help remove jitter and smooth video output in on-screen video windows in SD. Default: on.
Deinterlace VGA and QuickMix windows in 1080 HD
This option is not available in Raptor HD or HDx. Default: off.
Deinterlace video outputs when paused
Enable to avoid motion jitter in pause mode from video outputs.
Auto-check network-master at startup
When checked, this deck will immediately attempt to find other network-attached decks when it powers up.
Record NTSC as DV AVI files NTSC video is normally recorded to a Motion-JPEG file. This setting makes recordings easier to edit in FCP.
Show recording status in maroon Change text color of “Recording (00:00.00)” in Status Block to a dark red color (when un-checked, the text is blue). See Deck Status Block, page 17.
Clear notes on scene changes If checked, when the “scene” text box contents change, the notes field will be cleared. Default: checked.
Auto-select next available take on scene change
When the scene name is changed, and this option is enabled, the deck will automatically determine the lowest unused take number and set it for you. Default: checked.
Show IP address on front panel This causes the IP address to be displayed on the front panel Pause + Out keypress instead of the deck name. This is useful if you manage the deck using Remote Desktop for Mac.
Don't scan external media for clips Suppress scanning external media when they are attached. Default: scan external media.Note: this prevents clip backup to USB hard drives.
Save valid TC to Notes If timecode was detected during “Record,” this setting saves the timecode of the first to the Notes field in addition to the Starting TC field.
Raptor User Manual 29
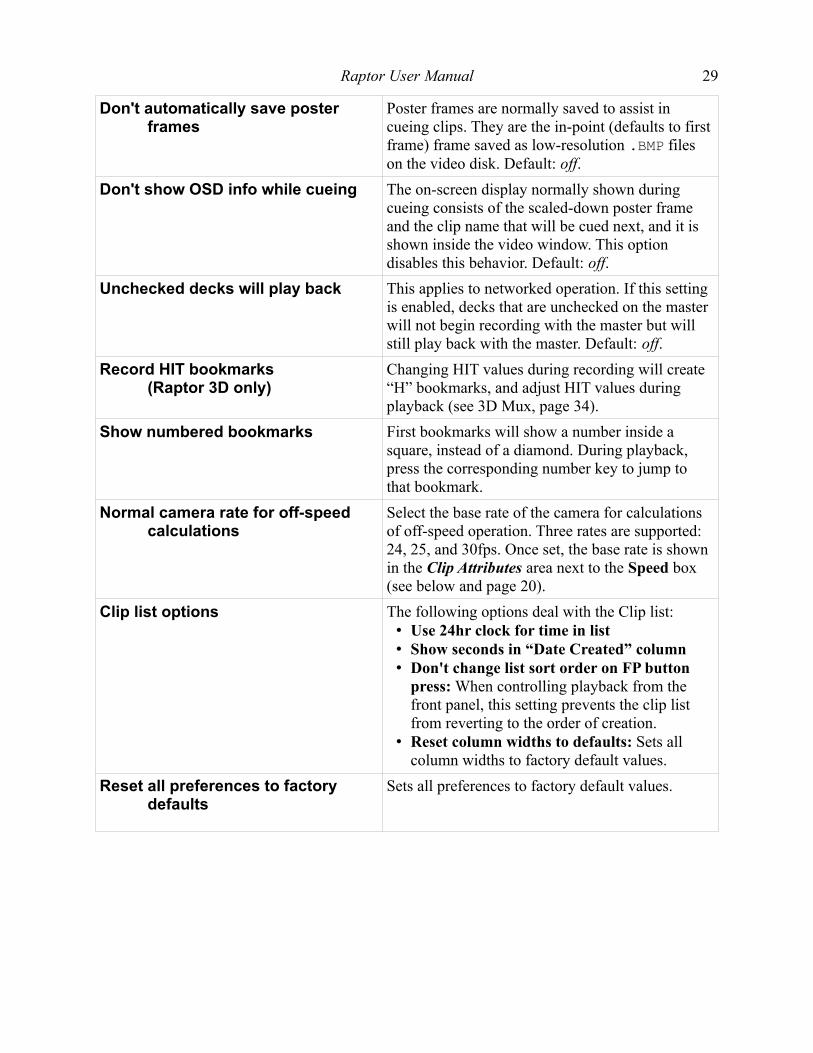
Don't automatically save poster frames
Poster frames are normally saved to assist in cueing clips. They are the in-point (defaults to first frame) frame saved as low-resolution .BMP files on the video disk. Default: off.
Don't show OSD info while cueing The on-screen display normally shown during cueing consists of the scaled-down poster frame and the clip name that will be cued next, and it is shown inside the video window. This option disables this behavior. Default: off.
Unchecked decks will play back This applies to networked operation. If this setting is enabled, decks that are unchecked on the master will not begin recording with the master but will still play back with the master. Default: off.
Record HIT bookmarks(Raptor 3D only)
Changing HIT values during recording will create “H” bookmarks, and adjust HIT values during playback (see 3D Mux, page 34).
Show numbered bookmarks First bookmarks will show a number inside a square, instead of a diamond. During playback, press the corresponding number key to jump to that bookmark.
Normal camera rate for off-speed calculations
Select the base rate of the camera for calculations of off-speed operation. Three rates are supported: 24, 25, and 30fps. Once set, the base rate is shown in the Clip Attributes area next to the Speed box (see below and page 20).
Clip list options The following options deal with the Clip list:• Use 24hr clock for time in list• Show seconds in “Date Created” column• Don't change list sort order on FP button
press: When controlling playback from the front panel, this setting prevents the clip list from reverting to the order of creation.
• Reset column widths to defaults: Sets all column widths to factory default values.
Reset all preferences to factory defaults
Sets all preferences to factory default values.
Raptor User Manual 30
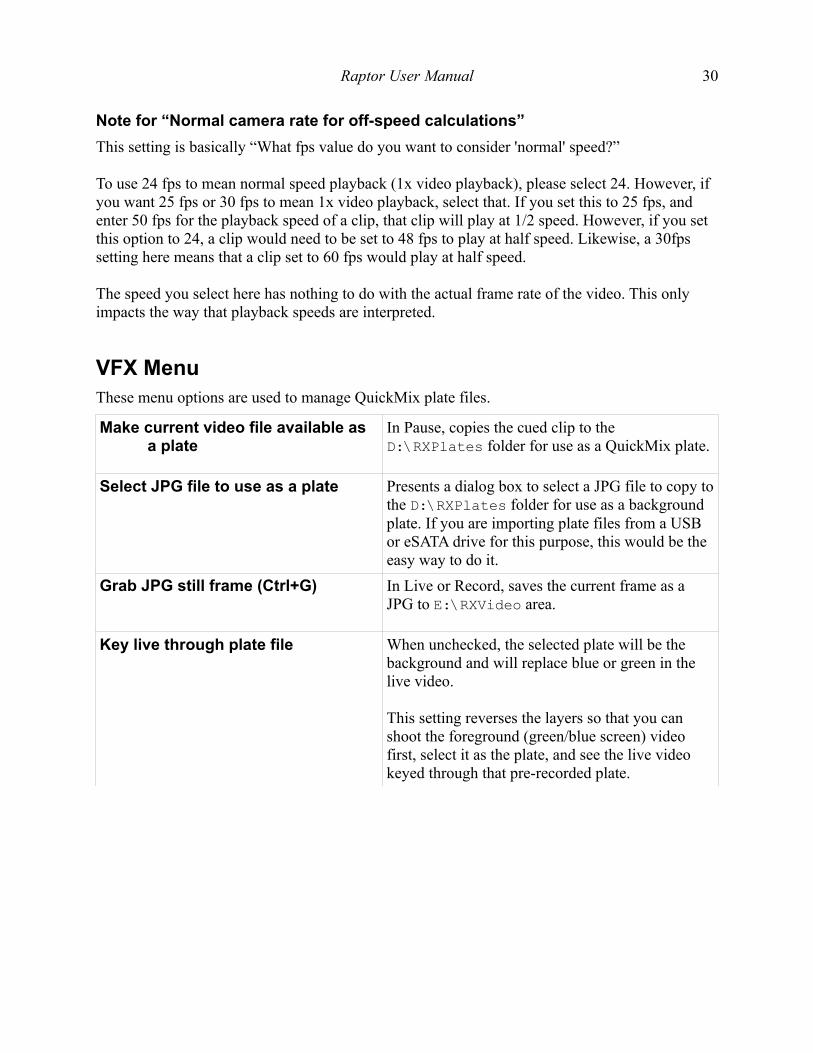
Note for “Normal camera rate for off-speed calculations”
This setting is basically “What fps value do you want to consider 'normal' speed?”
To use 24 fps to mean normal speed playback (1x video playback), please select 24. However, if you want 25 fps or 30 fps to mean 1x video playback, select that. If you set this to 25 fps, and enter 50 fps for the playback speed of a clip, that clip will play at 1/2 speed. However, if you set this option to 24, a clip would need to be set to 48 fps to play at half speed. Likewise, a 30fps setting here means that a clip set to 60 fps would play at half speed.
The speed you select here has nothing to do with the actual frame rate of the video. This only impacts the way that playback speeds are interpreted.
VFX MenuThese menu options are used to manage QuickMix plate files.
Make current video file available as a plate
In Pause, copies the cued clip to the D:\RXPlates folder for use as a QuickMix plate.
Select JPG file to use as a plate Presents a dialog box to select a JPG file to copy to the D:\RXPlates folder for use as a background plate. If you are importing plate files from a USB or eSATA drive for this purpose, this would be the easy way to do it.
Grab JPG still frame (Ctrl+G) In Live or Record, saves the current frame as a JPG to E:\RXVideo area.
Key live through plate file When unchecked, the selected plate will be the background and will replace blue or green in the live video.
This setting reverses the layers so that you can shoot the foreground (green/blue screen) video first, select it as the plate, and see the live video keyed through that pre-recorded plate.
Raptor User Manual 31
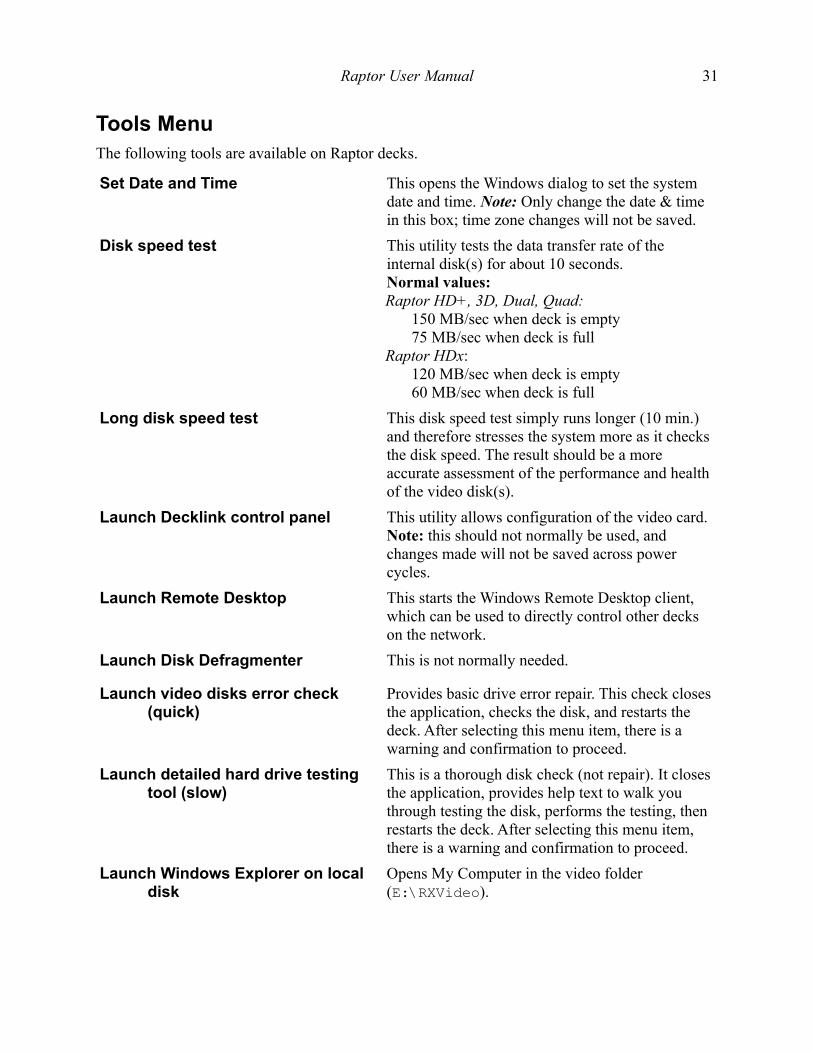
Tools MenuThe following tools are available on Raptor decks.
Set Date and Time This opens the Windows dialog to set the system date and time. Note: Only change the date & time in this box; time zone changes will not be saved.
Disk speed test This utility tests the data transfer rate of the internal disk(s) for about 10 seconds.Normal values:Raptor HD+, 3D, Dual, Quad:
150 MB/sec when deck is empty75 MB/sec when deck is full
Raptor HDx:120 MB/sec when deck is empty60 MB/sec when deck is full
Long disk speed test This disk speed test simply runs longer (10 min.) and therefore stresses the system more as it checks the disk speed. The result should be a more accurate assessment of the performance and health of the video disk(s).
Launch Decklink control panel This utility allows configuration of the video card.Note: this should not normally be used, and changes made will not be saved across power cycles.
Launch Remote Desktop This starts the Windows Remote Desktop client, which can be used to directly control other decks on the network.
Launch Disk Defragmenter This is not normally needed.
Launch video disks error check (quick)
Provides basic drive error repair. This check closes the application, checks the disk, and restarts the deck. After selecting this menu item, there is a warning and confirmation to proceed.
Launch detailed hard drive testing tool (slow)
This is a thorough disk check (not repair). It closes the application, provides help text to walk you through testing the disk, performs the testing, then restarts the deck. After selecting this menu item, there is a warning and confirmation to proceed.
Launch Windows Explorer on local disk
Opens My Computer in the video folder (E:\RXVideo).
Raptor User Manual 32
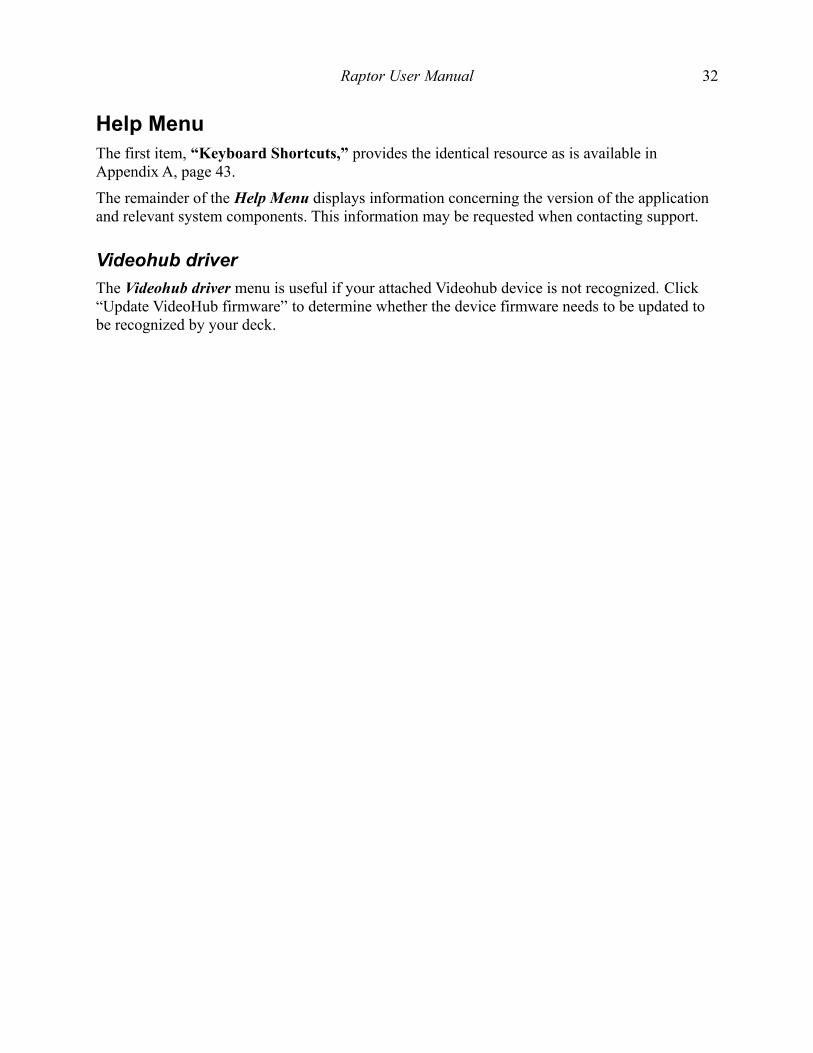
Help MenuThe first item, “Keyboard Shortcuts,” provides the identical resource as is available in Appendix A, page 43.
The remainder of the Help Menu displays information concerning the version of the application and relevant system components. This information may be requested when contacting support.
Videohub driver
The Videohub driver menu is useful if your attached Videohub device is not recognized. Click “Update VideoHub firmware” to determine whether the device firmware needs to be updated to be recognized by your deck.
Raptor User Manual 33
QuickMixThe QuickMix panel allows you to mix streams in real-time in various ways. The Raptor supports video mixing, and green and blue keying, with a pre-recorded background plate present on the deck. Select None on the QuickMix panel to disable all mixing. Mixes may be viewed live via a dedicated HDMI output, and they may be recorded onto the deck (only on Raptor HD+ and newer). You may also play a video file used as the background plate.
The “Live video options” panel can be used to scale/crop/position/flip the live image without any other mixing effect.
On the Raptor 3D, QuickMix can also be set to output a side-by-side 3D muxed image, for display on a 3D monitor.
Background Plate
The background plate comes from either a video or JPG file stored in the D:\RXPlates folder. You may use a USB drive or the network to transfer the file to the deck (see Network access to video files on page 40, Launch Windows Explorer on page 31, and MacDrive on page 43).
When using a video, select the frame for your background plate using the slider on the Plate secondary monitor (see Secondary monitors, page 22). You may also play the video using the controls provided there. The “In” button will navigate to the in-point of the plate; “Mark” will set the in-point. The arrows will advance 1 frame per click. The “P” button will Play/Pause the plate.
On Raptor 3D decks, you can select “Right channel video input” for the background plate, instead of using a pre-recorded plate.
Keying
QuickMix provides both Green keying and Blue keying. When these are selected, the following controls are available to control the keying on the foreground plate.
Level This setting varies the intensity of the color used for the key.
Range This setting varies the range of green or blue values (centered around the Level setting) that are used for the key.
Tolerance This setting allows the deck to key on colors other than just pure green/blue. Lower values exclude more colors; higher values include more colors in the key.
Background plate options These controls let you scale, crop, position, or flip the background plate.
Raptor User Manual 34
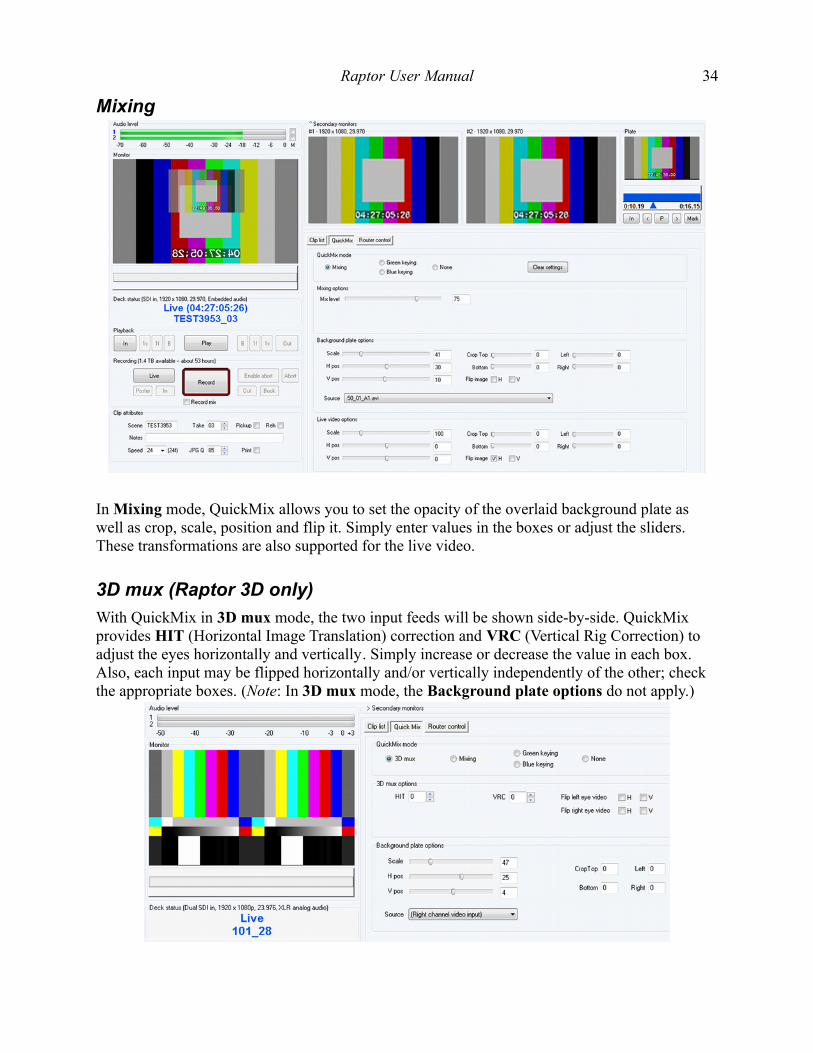
Mixing
In Mixing mode, QuickMix allows you to set the opacity of the overlaid background plate as well as crop, scale, position and flip it. Simply enter values in the boxes or adjust the sliders. These transformations are also supported for the live video.
3D mux (Raptor 3D only)
With QuickMix in 3D mux mode, the two input feeds will be shown side-by-side. QuickMix provides HIT (Horizontal Image Translation) correction and VRC (Vertical Rig Correction) to adjust the eyes horizontally and vertically. Simply increase or decrease the value in each box. Also, each input may be flipped horizontally and/or vertically independently of the other; check the appropriate boxes. (Note: In 3D mux mode, the Background plate options do not apply.)
Raptor User Manual 35
Video Router ControlRaptor decks may be used to control the Blackmagic Design Videohub series of video routers using a standard USB cable.
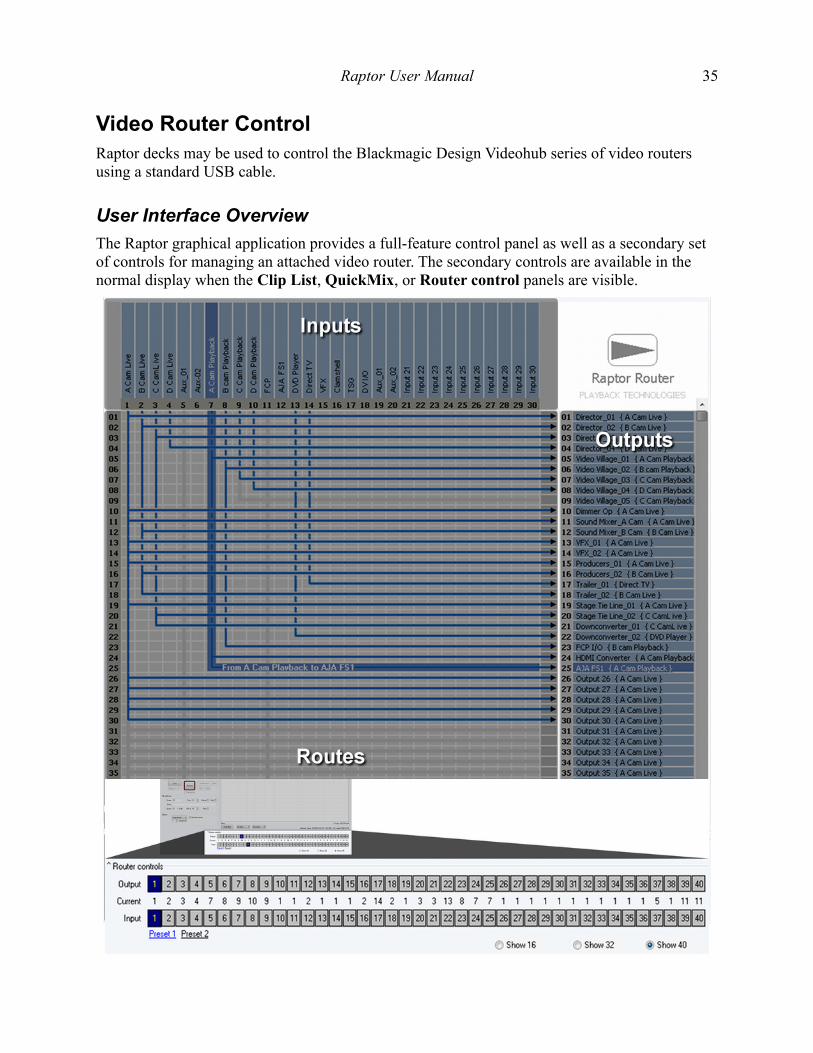
User Interface Overview
The Raptor graphical application provides a full-feature control panel as well as a secondary set of controls for managing an attached video router. The secondary controls are available in the normal display when the Clip List, QuickMix, or Router control panels are visible.
Raptor User Manual 36
Features
The Router control interface supports naming inputs and outputs and storing defined routes in named presets. It is easy to create additional presets and toggle between them.
Presets
Right-click on the preset tab to rename, clear (delete all routes) or delete it. Left-click a preset tab to make it active and make changes to it.
Naming Inputs & Outputs
Simply click on the blue area adjacent to the number of the input (top) or output (right side) you would like to name. Enter the name in the resulting dialog box, and press “OK.” There are scroll bars along the bottom and right edges of the grid.
Coloring Inputs
Inputs may be colored for ease of tracing routes. Simply click the input number and select a color from the resulting dialog box.
Routes
To create a new route, left-click in the grid at the intersection of an input and an output. As you move the mouse cursor over the grid, the current potential route will be highlighted.
To remove a route, left-click the arrow pointing to an output.
The name of the selected input is shown in braces next to the name of each output.
Secondary Router Controls
On the secondary control panel, use the router preset links at the bottom left to change between presets. Use the radio buttons at the bottom-right to change how many inputs and outputs are displayed in the panel.
First choose an output from the top row. Its assigned input will be highlighted and may be changed by left-clicking the new one. Every output's assigned input is printed immediately below it, between the rows of outputs and inputs.
If the assigned names of inputs or outputs fit within the allocated space on screen, they will be shown in place of the input/output numbers.
Note: Do not plug routers into the blue USB3 ports on the Raptor. If a Videohub is hooked up to the deck over USB and is not recognized, please update the Videohub firmware by clicking “Videohub driver” under the Help menu (see page 32).
Raptor User Manual 37
Networked Operation
Equipment and Wiring
It is recommended to use a Gigabit (10/100/1000) router, and one (1) Cat5 cable for each deck connected. It is not recommended to connect the router to the Internet.
Setup
1. Connect all the cables. Do not plug into port labeled “Internet” or “WAN”—use “regular” numbered ports.
2. Choose one deck to be the central point of control for all decks' recording and playback and set its Camera ID (see page 21) to A (this is just a convention, not a requirement).
3. On the remaining decks, set the Camera IDs to all different letters (B, C, D, etc).
4. Verify that all the decks are connected to the network (see Network Status, page 21).
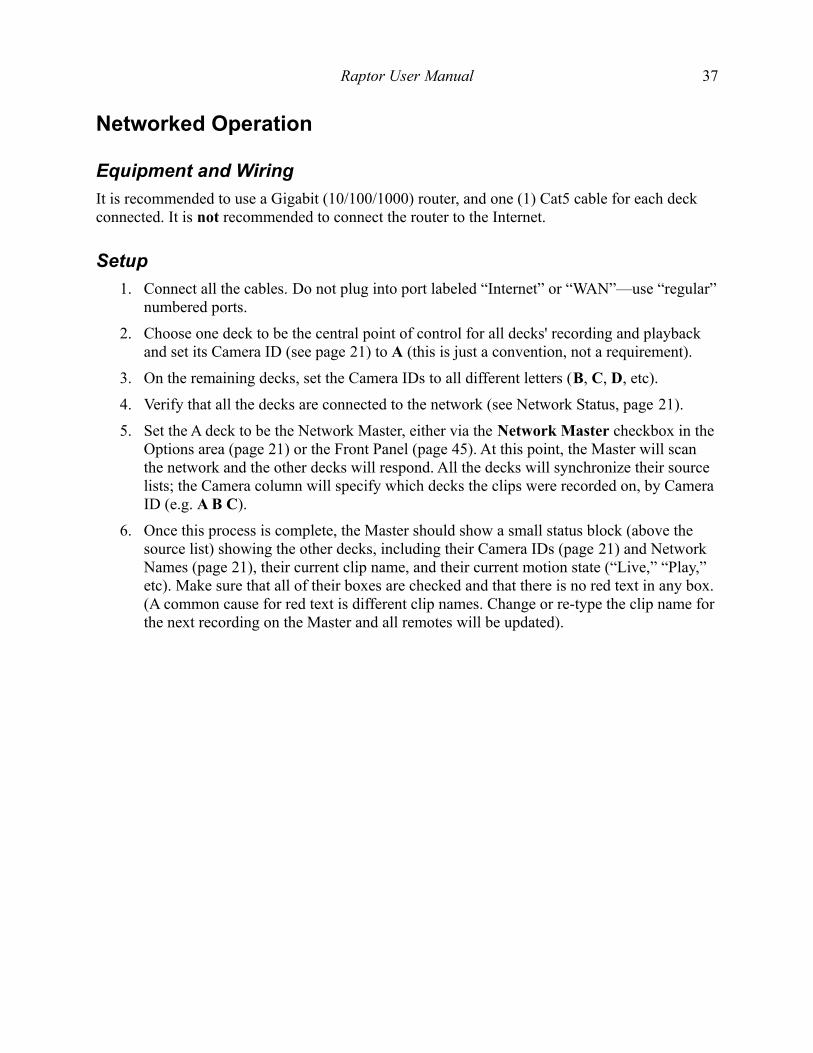
5. Set the A deck to be the Network Master, either via the Network Master checkbox in the Options area (page 21) or the Front Panel (page 45). At this point, the Master will scan the network and the other decks will respond. All the decks will synchronize their source lists; the Camera column will specify which decks the clips were recorded on, by Camera ID (e.g. A B C).
6. Once this process is complete, the Master should show a small status block (above the source list) showing the other decks, including their Camera IDs (page 21) and Network Names (page 21), their current clip name, and their current motion state (“Live,” “Play,” etc). Make sure that all of their boxes are checked and that there is no red text in any box. (A common cause for red text is different clip names. Change or re-type the clip name for the next recording on the Master and all remotes will be updated).
Raptor User Manual 38
VGA screen of Network Master (A) with one other connected deck
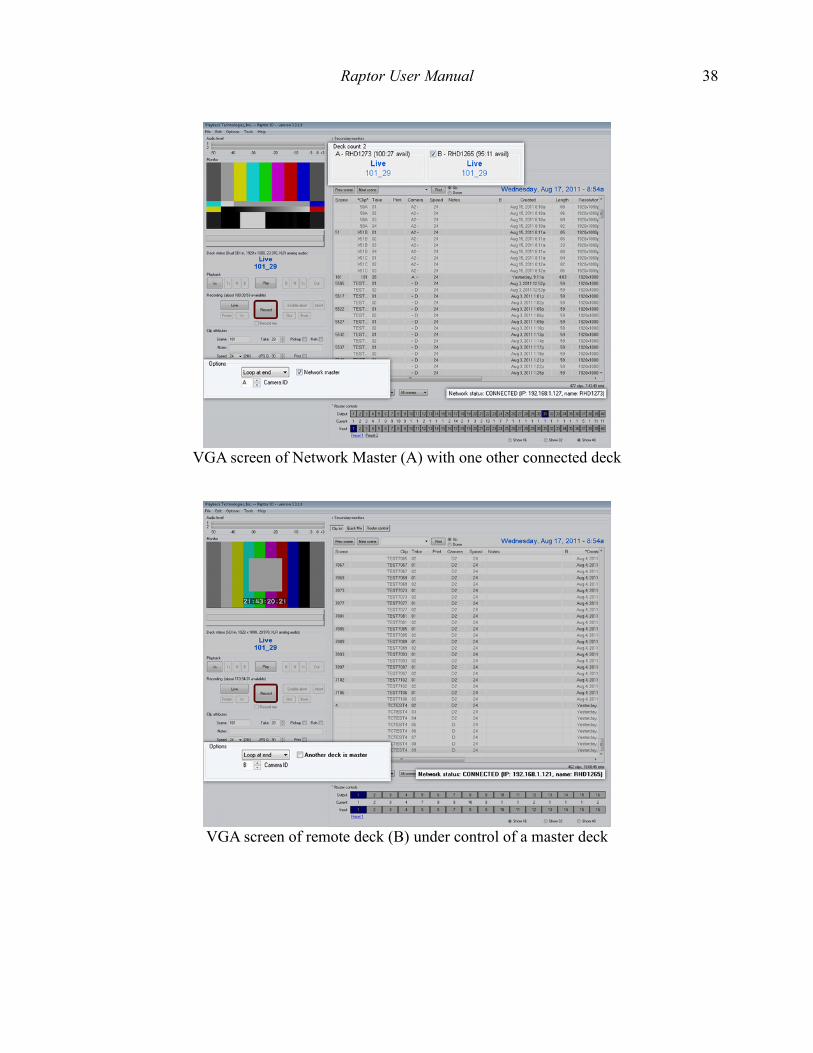
VGA screen of remote deck (B) under control of a master deck
Raptor User Manual 39
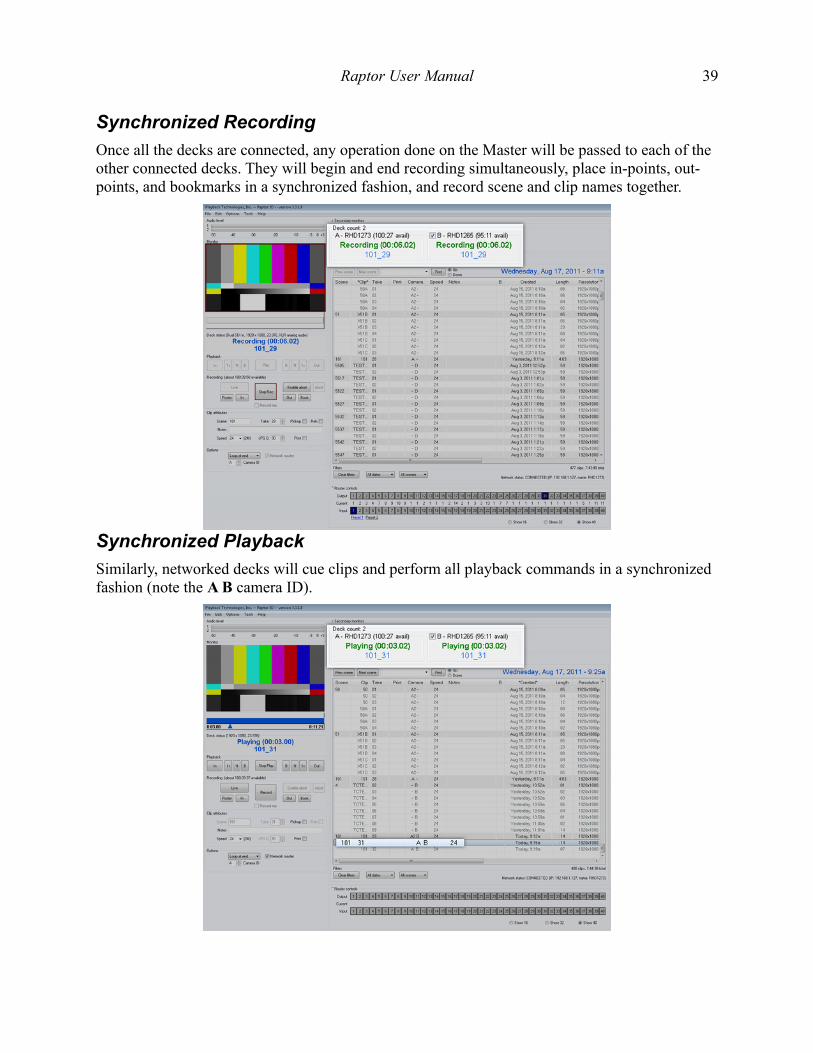
Synchronized Recording
Once all the decks are connected, any operation done on the Master will be passed to each of the other connected decks. They will begin and end recording simultaneously, place in-points, out-points, and bookmarks in a synchronized fashion, and record scene and clip names together.
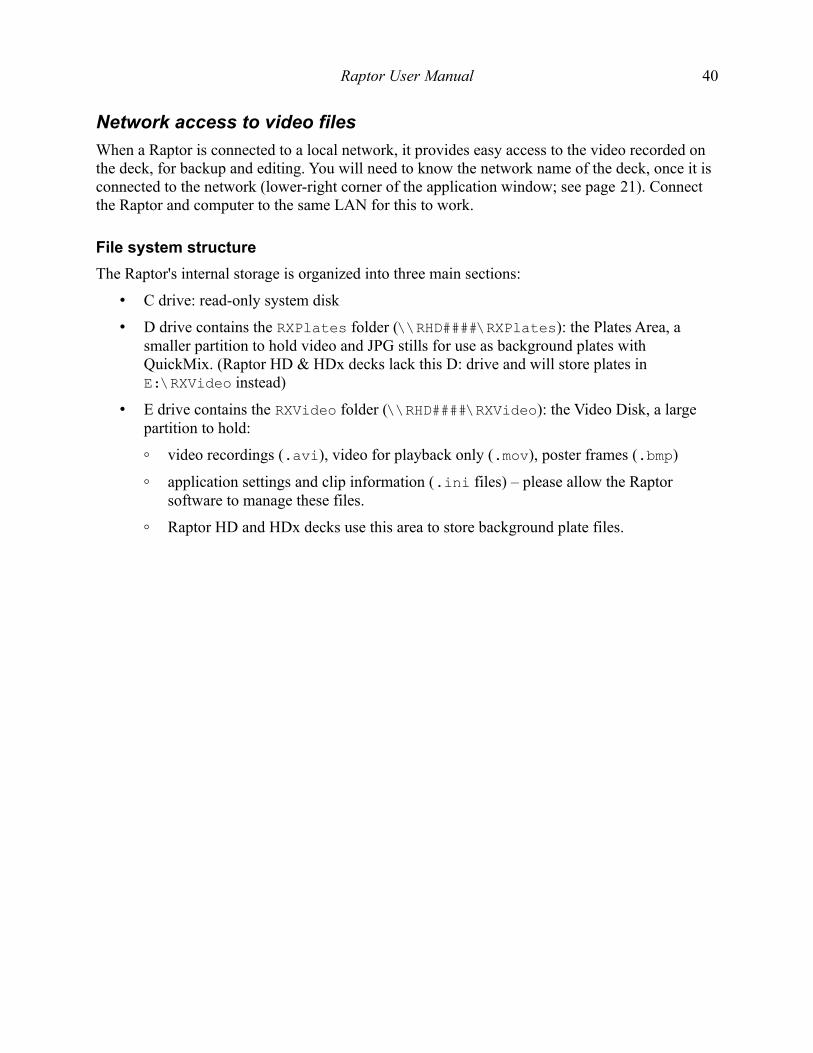
Synchronized Playback
Similarly, networked decks will cue clips and perform all playback commands in a synchronized fashion (note the A B camera ID).
Raptor User Manual 40
Network access to video files
When a Raptor is connected to a local network, it provides easy access to the video recorded on the deck, for backup and editing. You will need to know the network name of the deck, once it is connected to the network (lower-right corner of the application window; see page 21). Connect the Raptor and computer to the same LAN for this to work.
File system structure
The Raptor's internal storage is organized into three main sections:
• C drive: read-only system disk
• D drive contains the RXPlates folder (\\RHD####\RXPlates): the Plates Area, a smaller partition to hold video and JPG stills for use as background plates with QuickMix. (Raptor HD & HDx decks lack this D: drive and will store plates in E:\RXVideo instead)
• E drive contains the RXVideo folder (\\RHD####\RXVideo): the Video Disk, a large partition to hold:
◦ video recordings (.avi), video for playback only (.mov), poster frames (.bmp)
◦ application settings and clip information (.ini files) – please allow the Raptor software to manage these files.
◦ Raptor HD and HDx decks use this area to store background plate files.

Raptor User Manual 41
Accessing Raptor files from a networked Windows computer
In order to work with the video stored on the deck, you need to map a network drive from a PC (desktop or laptop) to the Raptor.
1. On the PC, open My Computer.2. From the Tools menu, select “Map
Network Drive...”
3. For Drive, choose an available letter.4. Then, for Folder, enter the network name
of the deck (like RHD1057) followed by RXVideo or RXPlates, like this: \\RHD1057\RXVideo or \\RHD1057\RXPlates
5. You may choose to leave the Reconnect at logon box checked so that you do not have to complete this process at the beginning of every session.
6. Skip this step for Raptor HD and HDx. Click the link labeled “different user name” (on Windows 7, check the box labeled “Connect using different credentials”). Enter the user name “raptor” and password “password.”
7. Click Finish to complete the process.
A new window should appear, showing the contents of the video folder on the deck.
You may now use the video files that are stored on the deck directly on your PC.
Raptor User Manual 42
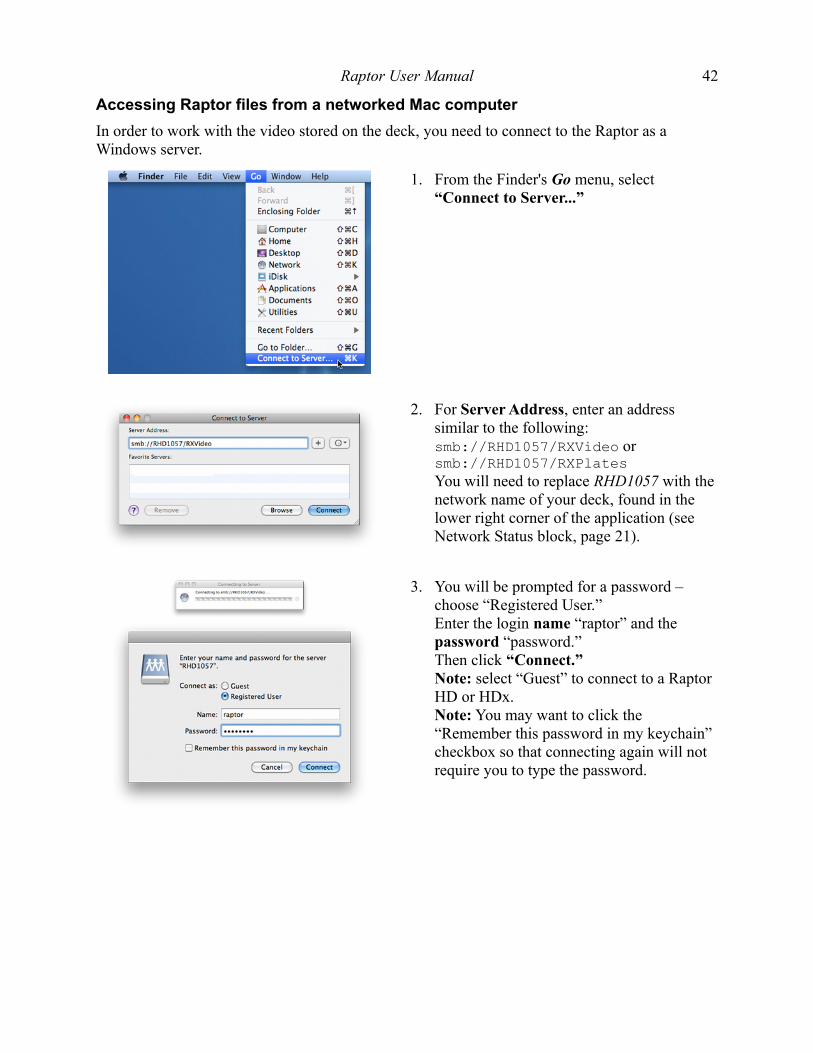
Accessing Raptor files from a networked Mac computer
In order to work with the video stored on the deck, you need to connect to the Raptor as a Windows server.
1. From the Finder's Go menu, select “Connect to Server...”
2. For Server Address, enter an address similar to the following: smb://RHD1057/RXVideo or smb://RHD1057/RXPlatesYou will need to replace RHD1057 with the network name of your deck, found in the lower right corner of the application (see Network Status block, page 21).
3. You will be prompted for a password – choose “Registered User.”Enter the login name “raptor” and the password “password.”Then click “Connect.”Note: select “Guest” to connect to a Raptor HD or HDx.Note: You may want to click the “Remember this password in my keychain” checkbox so that connecting again will not require you to type the password.
Raptor User Manual 43
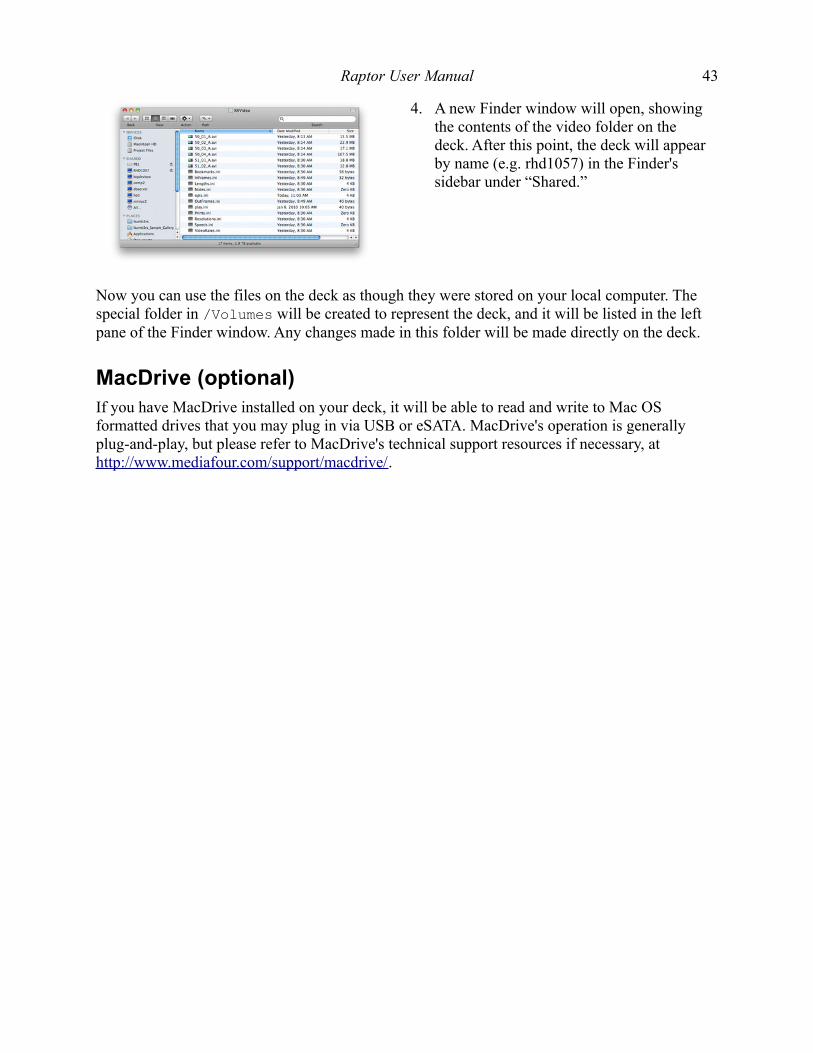
4. A new Finder window will open, showing the contents of the video folder on the deck. After this point, the deck will appear by name (e.g. rhd1057) in the Finder's sidebar under “Shared.”
Now you can use the files on the deck as though they were stored on your local computer. The special folder in /Volumes will be created to represent the deck, and it will be listed in the left pane of the Finder window. Any changes made in this folder will be made directly on the deck.
MacDrive (optional)If you have MacDrive installed on your deck, it will be able to read and write to Mac OS formatted drives that you may plug in via USB or eSATA. MacDrive's operation is generally plug-and-play, but please refer to MacDrive's technical support resources if necessary, at http://www.mediafour.com/support/macdrive/.
Raptor User Manual 44
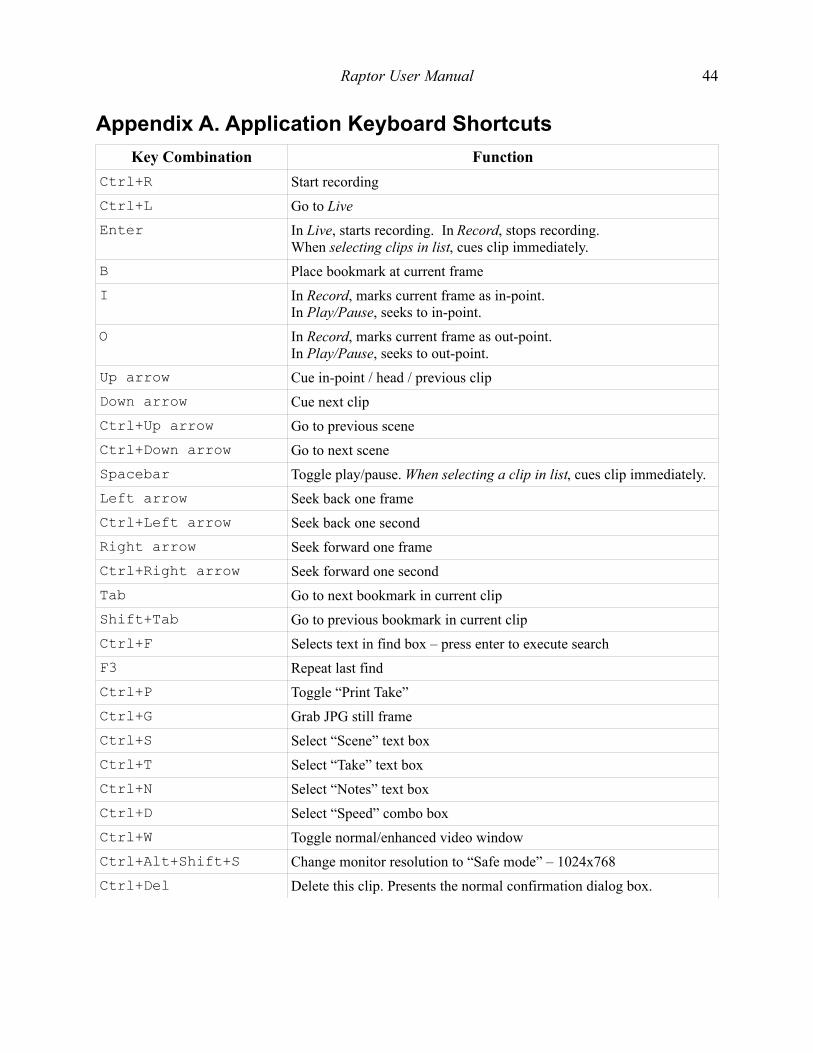
Appendix A. Application Keyboard Shortcuts
Key Combination Function
Ctrl+R Start recording
Ctrl+L Go to Live
Enter In Live, starts recording. In Record, stops recording.When selecting clips in list, cues clip immediately.
B Place bookmark at current frame
I In Record, marks current frame as in-point.In Play/Pause, seeks to in-point.
O In Record, marks current frame as out-point.In Play/Pause, seeks to out-point.
Up arrow Cue in-point / head / previous clip
Down arrow Cue next clip
Ctrl+Up arrow Go to previous scene
Ctrl+Down arrow Go to next scene
Spacebar Toggle play/pause. When selecting a clip in list, cues clip immediately.
Left arrow Seek back one frame
Ctrl+Left arrow Seek back one second
Right arrow Seek forward one frame
Ctrl+Right arrow Seek forward one second
Tab Go to next bookmark in current clip
Shift+Tab Go to previous bookmark in current clip
Ctrl+F Selects text in find box – press enter to execute search
F3 Repeat last find
Ctrl+P Toggle “Print Take”
Ctrl+G Grab JPG still frame
Ctrl+S Select “Scene” text box
Ctrl+T Select “Take” text box
Ctrl+N Select “Notes” text box
Ctrl+D Select “Speed” combo box
Ctrl+W Toggle normal/enhanced video window
Ctrl+Alt+Shift+S Change monitor resolution to “Safe mode” – 1024x768
Ctrl+Del Delete this clip. Presents the normal confirmation dialog box.
Raptor User Manual 45
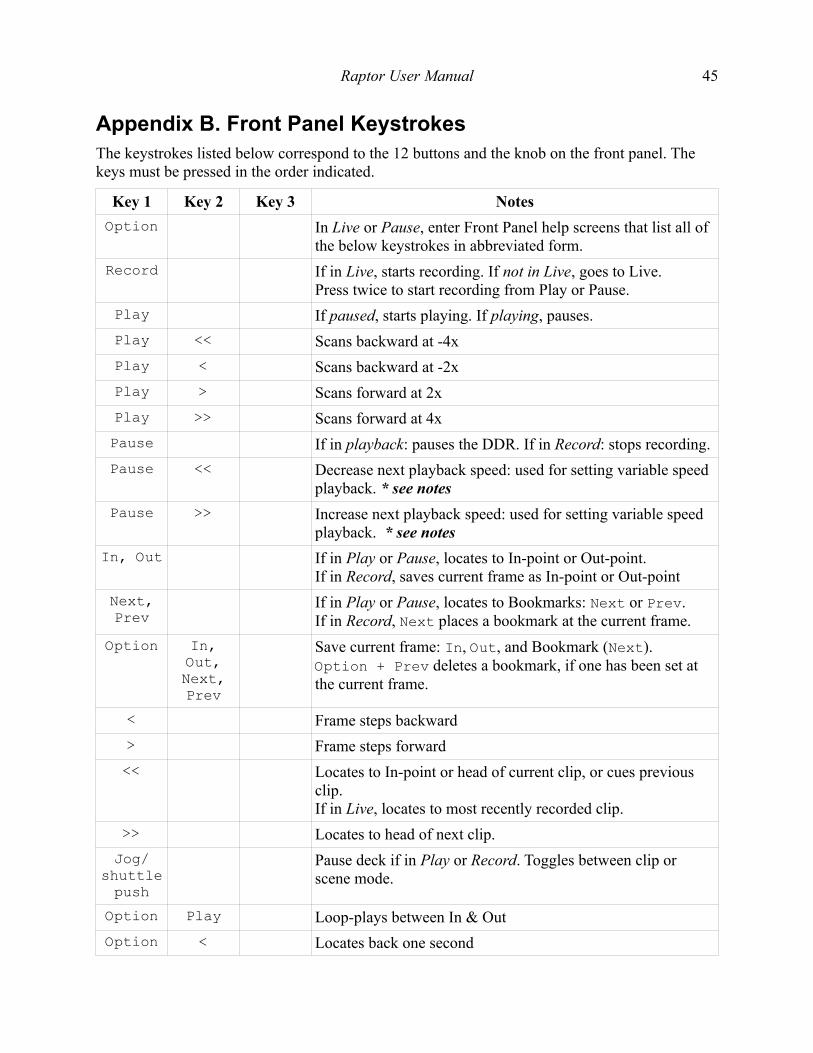
Appendix B. Front Panel KeystrokesThe keystrokes listed below correspond to the 12 buttons and the knob on the front panel. The keys must be pressed in the order indicated.
Key 1 Key 2 Key 3 Notes
Option In Live or Pause, enter Front Panel help screens that list all of the below keystrokes in abbreviated form.
Record If in Live, starts recording. If not in Live, goes to Live.Press twice to start recording from Play or Pause.
Play If paused, starts playing. If playing, pauses.
Play << Scans backward at -4x
Play < Scans backward at -2x
Play > Scans forward at 2x
Play >> Scans forward at 4x
Pause If in playback: pauses the DDR. If in Record: stops recording.
Pause << Decrease next playback speed: used for setting variable speed playback. * see notes
Pause >> Increase next playback speed: used for setting variable speed playback. * see notes
In, Out If in Play or Pause, locates to In-point or Out-point.If in Record, saves current frame as In-point or Out-point
Next,Prev
If in Play or Pause, locates to Bookmarks: Next or Prev.If in Record, Next places a bookmark at the current frame.
Option In,Out,Next,Prev
Save current frame: In, Out, and Bookmark (Next).Option + Prev deletes a bookmark, if one has been set at the current frame.
< Frame steps backward
> Frame steps forward
<< Locates to In-point or head of current clip, or cues previous clip.If in Live, locates to most recently recorded clip.
>> Locates to head of next clip.
Jog/shuttlepush
Pause deck if in Play or Record. Toggles between clip or scene mode.
Option Play Loop-plays between In & Out
Option < Locates back one second
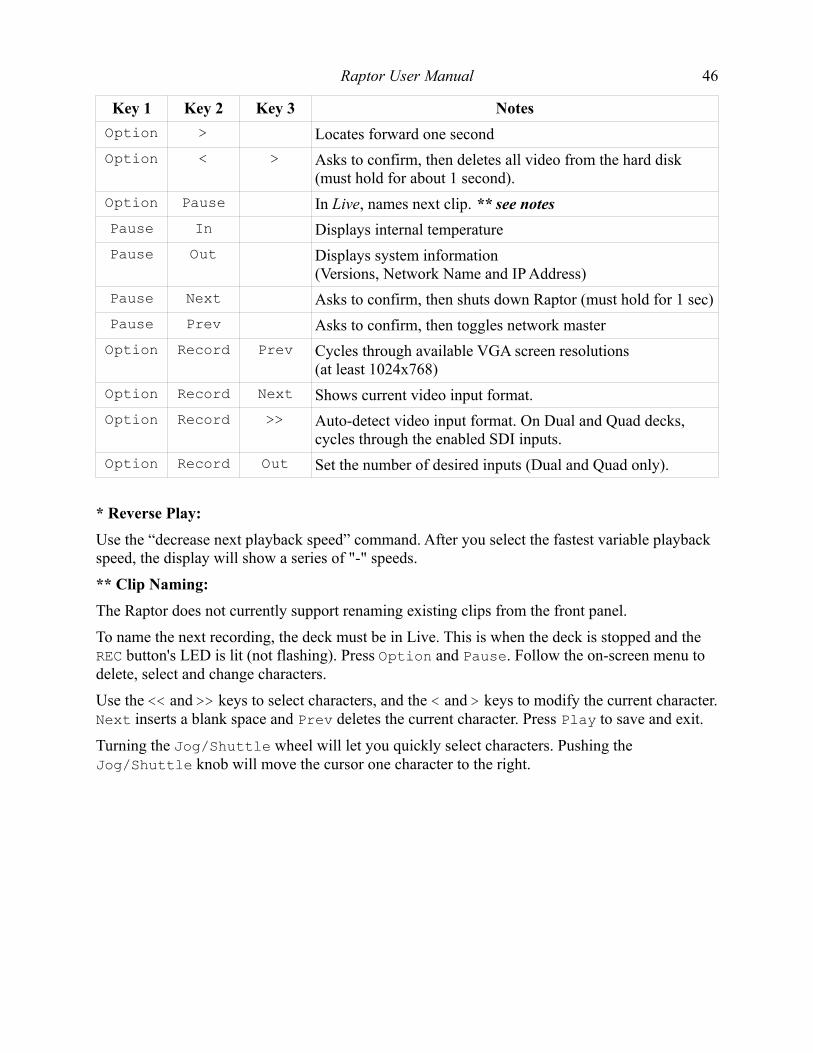
Raptor User Manual 46
Key 1 Key 2 Key 3 Notes
Option > Locates forward one second
Option < > Asks to confirm, then deletes all video from the hard disk (must hold for about 1 second).
Option Pause In Live, names next clip. ** see notes
Pause In Displays internal temperature
Pause Out Displays system information(Versions, Network Name and IP Address)
Pause Next Asks to confirm, then shuts down Raptor (must hold for 1 sec)
Pause Prev Asks to confirm, then toggles network master
Option Record Prev Cycles through available VGA screen resolutions(at least 1024x768)
Option Record Next Shows current video input format.
Option Record >> Auto-detect video input format. On Dual and Quad decks, cycles through the enabled SDI inputs.
Option Record Out Set the number of desired inputs (Dual and Quad only).
* Reverse Play:
Use the “decrease next playback speed” command. After you select the fastest variable playback speed, the display will show a series of "-" speeds.
** Clip Naming:
The Raptor does not currently support renaming existing clips from the front panel.
To name the next recording, the deck must be in Live. This is when the deck is stopped and the REC button's LED is lit (not flashing). Press Option and Pause. Follow the on-screen menu to delete, select and change characters.
Use the << and >> keys to select characters, and the < and > keys to modify the current character. Next inserts a blank space and Prev deletes the current character. Press Play to save and exit.
Turning the Jog/Shuttle wheel will let you quickly select characters. Pushing the Jog/Shuttle knob will move the cursor one character to the right.
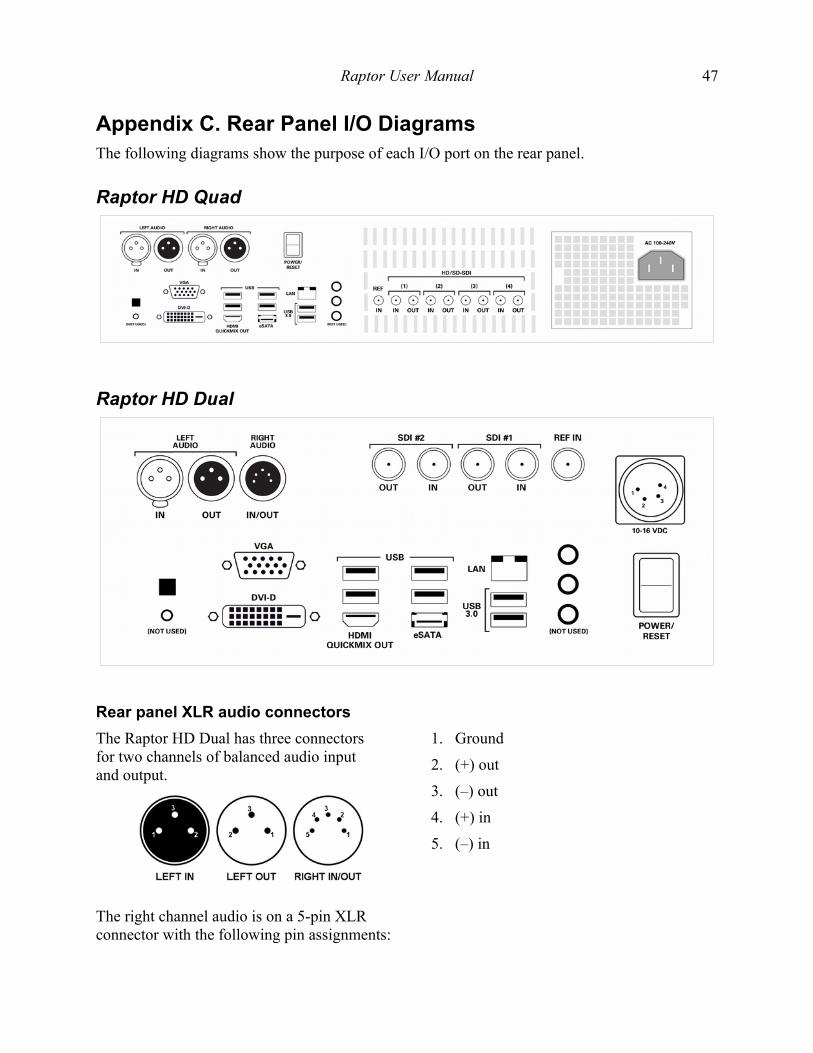
Raptor User Manual 47
Appendix C. Rear Panel I/O DiagramsThe following diagrams show the purpose of each I/O port on the rear panel.
Raptor HD Quad
Raptor HD Dual
Rear panel XLR audio connectors
The Raptor HD Dual has three connectors for two channels of balanced audio input and output.
The right channel audio is on a 5-pin XLR connector with the following pin assignments:
1. Ground
2. (+) out
3. (–) out
4. (+) in
5. (–) in
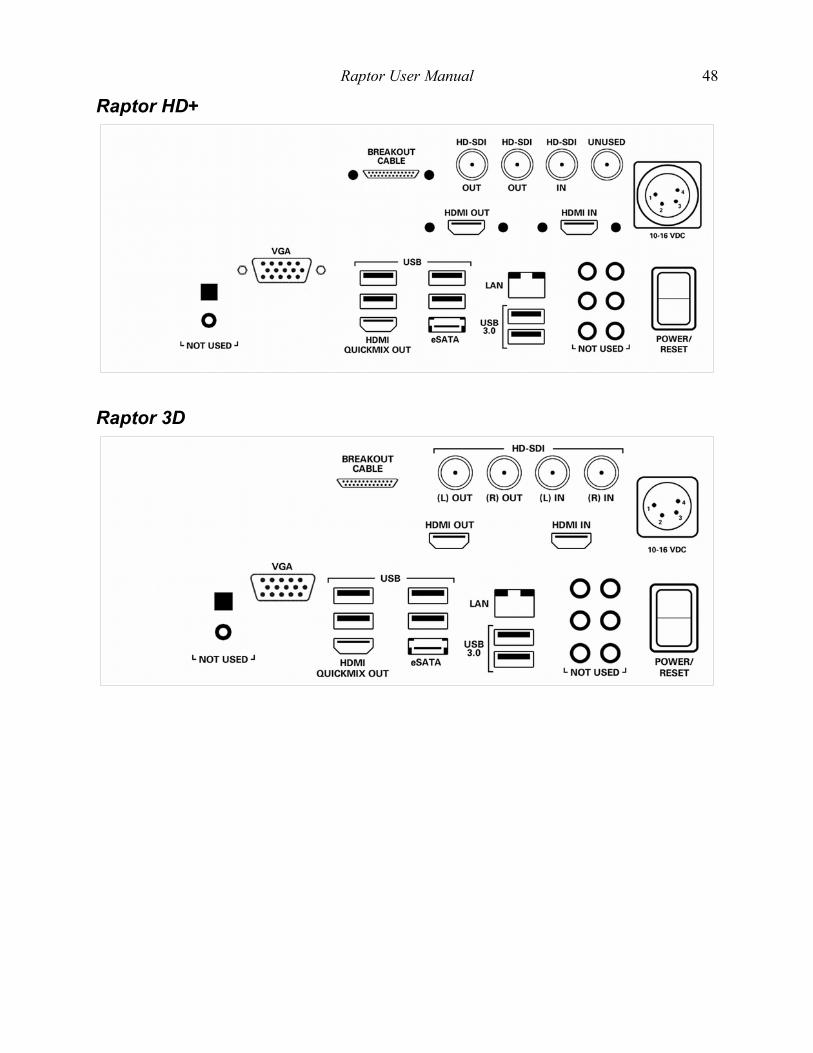
Raptor User Manual 48
Raptor HD+
Raptor 3D
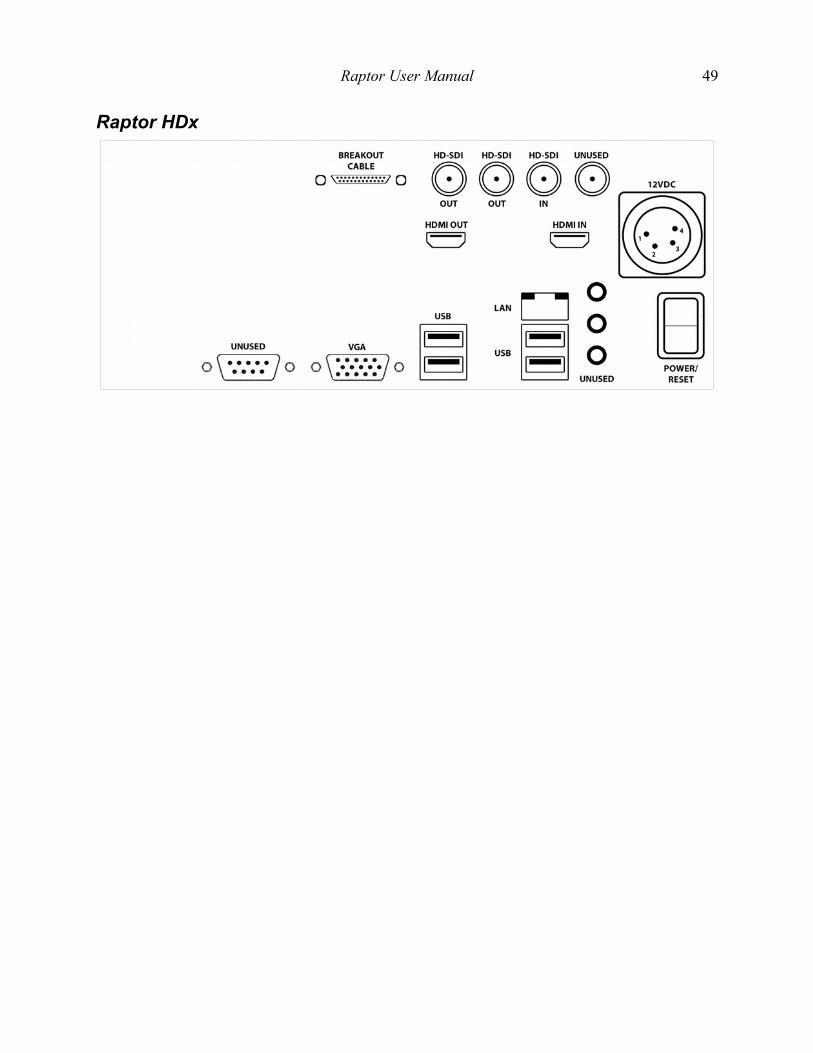
Raptor User Manual 49
Raptor HDx
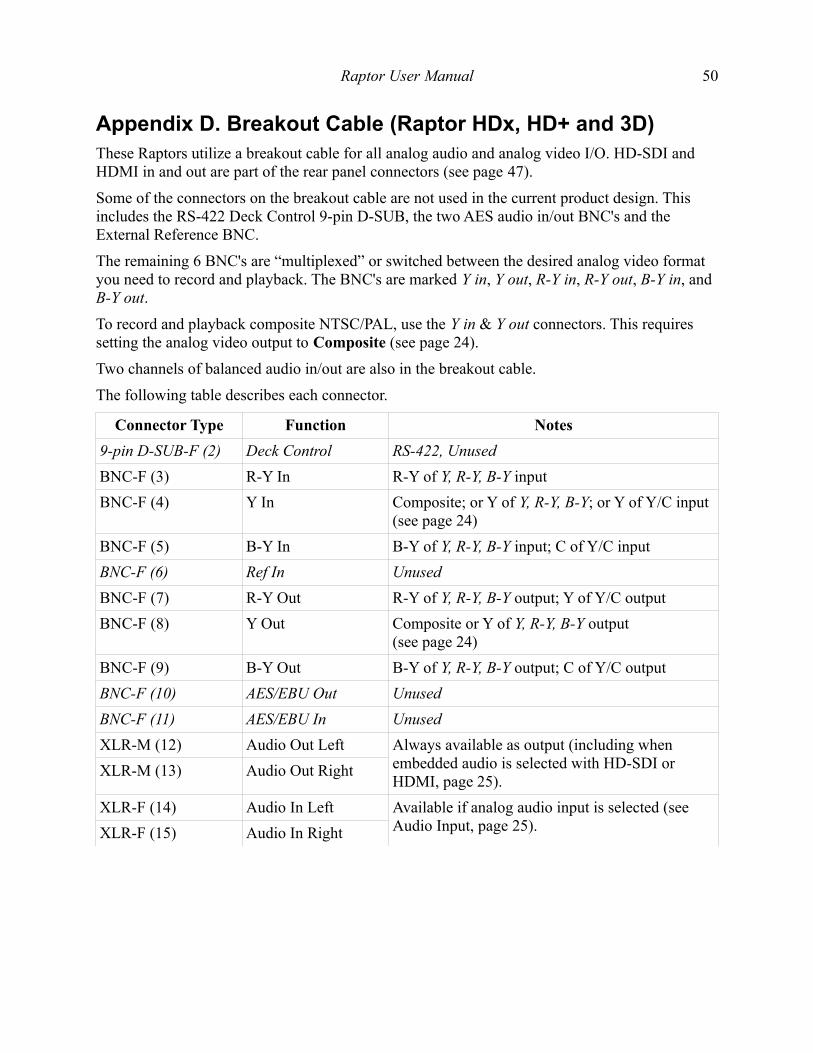
Raptor User Manual 50
Appendix D. Breakout Cable (Raptor HDx, HD+ and 3D)These Raptors utilize a breakout cable for all analog audio and analog video I/O. HD-SDI and HDMI in and out are part of the rear panel connectors (see page 47).
Some of the connectors on the breakout cable are not used in the current product design. This includes the RS-422 Deck Control 9-pin D-SUB, the two AES audio in/out BNC's and the External Reference BNC.
The remaining 6 BNC's are “multiplexed” or switched between the desired analog video format you need to record and playback. The BNC's are marked Y in, Y out, R-Y in, R-Y out, B-Y in, and B-Y out.
To record and playback composite NTSC/PAL, use the Y in & Y out connectors. This requires setting the analog video output to Composite (see page 24).
Two channels of balanced audio in/out are also in the breakout cable.
The following table describes each connector.
Connector Type Function Notes
9-pin D-SUB-F (2) Deck Control RS-422, Unused
BNC-F (3) R-Y In R-Y of Y, R-Y, B-Y input
BNC-F (4) Y In Composite; or Y of Y, R-Y, B-Y; or Y of Y/C input (see page 24)
BNC-F (5) B-Y In B-Y of Y, R-Y, B-Y input; C of Y/C input
BNC-F (6) Ref In Unused
BNC-F (7) R-Y Out R-Y of Y, R-Y, B-Y output; Y of Y/C output
BNC-F (8) Y Out Composite or Y of Y, R-Y, B-Y output(see page 24)
BNC-F (9) B-Y Out B-Y of Y, R-Y, B-Y output; C of Y/C output
BNC-F (10) AES/EBU Out Unused
BNC-F (11) AES/EBU In Unused
XLR-M (12) Audio Out Left Always available as output (including when embedded audio is selected with HD-SDI or HDMI, page 25).
XLR-M (13) Audio Out Right
XLR-F (14) Audio In Left Available if analog audio input is selected (see Audio Input, page 25).XLR-F (15) Audio In Right
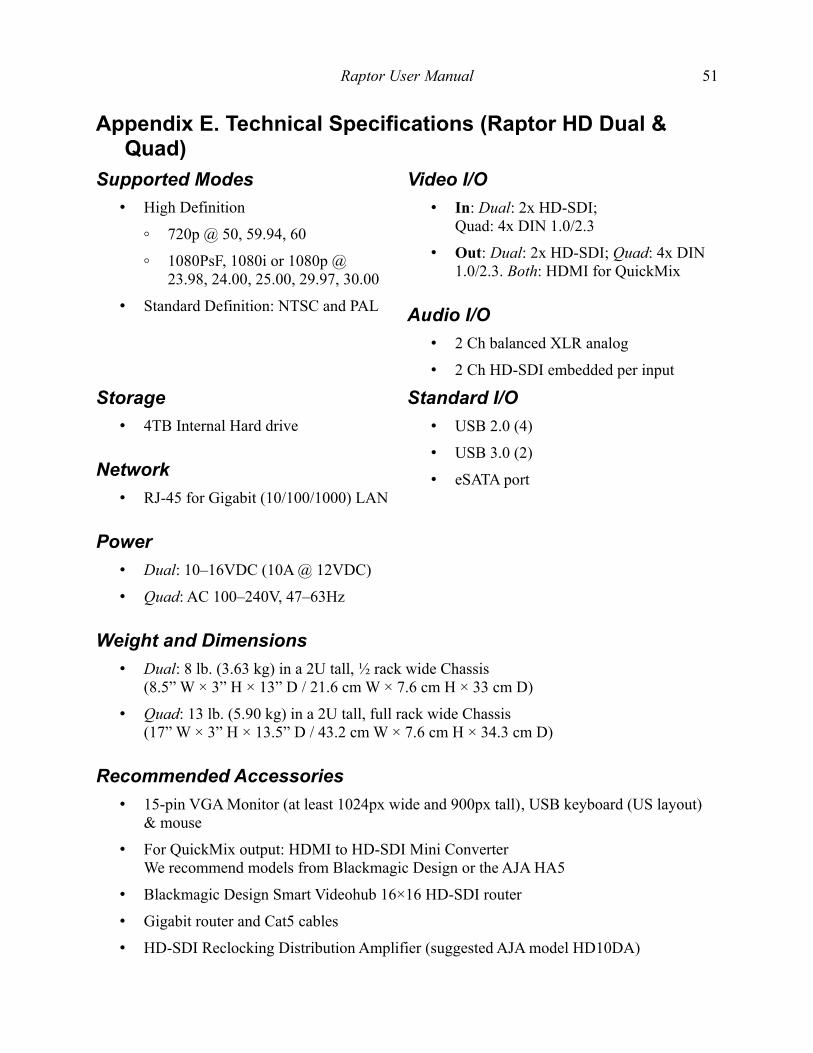
Raptor User Manual 51
Appendix E. Technical Specifications (Raptor HD Dual & Quad)
Supported Modes
• High Definition
◦ 720p @ 50, 59.94, 60
◦ 1080PsF, 1080i or 1080p @23.98, 24.00, 25.00, 29.97, 30.00
• Standard Definition: NTSC and PAL
Video I/O
• In: Dual: 2x HD-SDI; Quad: 4x DIN 1.0/2.3
• Out: Dual: 2x HD-SDI; Quad: 4x DIN 1.0/2.3. Both: HDMI for QuickMix
Audio I/O
• 2 Ch balanced XLR analog
• 2 Ch HD-SDI embedded per input
Storage
• 4TB Internal Hard drive
Network
• RJ-45 for Gigabit (10/100/1000) LAN
Standard I/O
• USB 2.0 (4)
• USB 3.0 (2)
• eSATA port
Power
• Dual: 10–16VDC (10A @ 12VDC)
• Quad: AC 100–240V, 47–63Hz
Weight and Dimensions
• Dual: 8 lb. (3.63 kg) in a 2U tall, ½ rack wide Chassis(8.5” W × 3” H × 13” D / 21.6 cm W × 7.6 cm H × 33 cm D)
• Quad: 13 lb. (5.90 kg) in a 2U tall, full rack wide Chassis(17” W × 3” H × 13.5” D / 43.2 cm W × 7.6 cm H × 34.3 cm D)
Recommended Accessories
• 15-pin VGA Monitor (at least 1024px wide and 900px tall), USB keyboard (US layout) & mouse
• For QuickMix output: HDMI to HD-SDI Mini ConverterWe recommend models from Blackmagic Design or the AJA HA5
• Blackmagic Design Smart Videohub 16×16 HD-SDI router
• Gigabit router and Cat5 cables
• HD-SDI Reclocking Distribution Amplifier (suggested AJA model HD10DA)
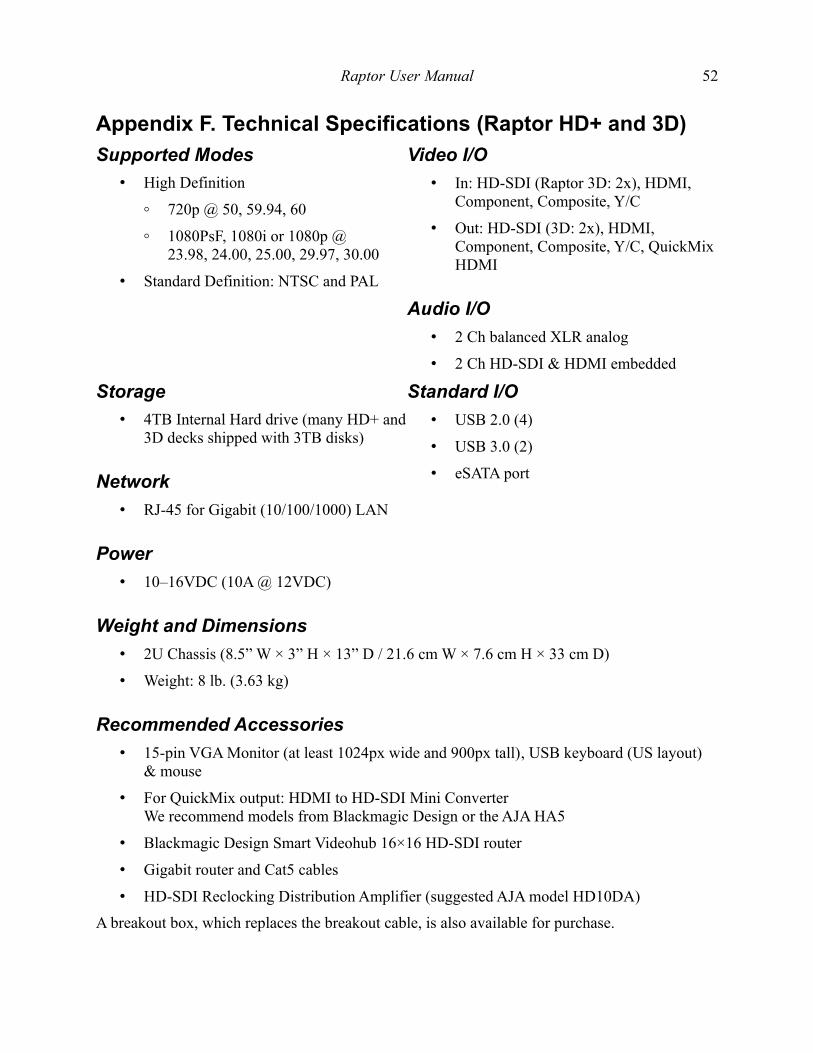
Raptor User Manual 52
Appendix F. Technical Specifications (Raptor HD+ and 3D)
Supported Modes
• High Definition
◦ 720p @ 50, 59.94, 60
◦ 1080PsF, 1080i or 1080p @23.98, 24.00, 25.00, 29.97, 30.00
• Standard Definition: NTSC and PAL
Video I/O
• In: HD-SDI (Raptor 3D: 2x), HDMI, Component, Composite, Y/C
• Out: HD-SDI (3D: 2x), HDMI, Component, Composite, Y/C, QuickMix HDMI
Audio I/O
• 2 Ch balanced XLR analog
• 2 Ch HD-SDI & HDMI embedded
Storage
• 4TB Internal Hard drive (many HD+ and 3D decks shipped with 3TB disks)
Network
• RJ-45 for Gigabit (10/100/1000) LAN
Standard I/O
• USB 2.0 (4)
• USB 3.0 (2)
• eSATA port
Power
• 10–16VDC (10A @ 12VDC)
Weight and Dimensions
• 2U Chassis (8.5” W × 3” H × 13” D / 21.6 cm W × 7.6 cm H × 33 cm D)
• Weight: 8 lb. (3.63 kg)
Recommended Accessories
• 15-pin VGA Monitor (at least 1024px wide and 900px tall), USB keyboard (US layout) & mouse
• For QuickMix output: HDMI to HD-SDI Mini ConverterWe recommend models from Blackmagic Design or the AJA HA5
• Blackmagic Design Smart Videohub 16×16 HD-SDI router
• Gigabit router and Cat5 cables
• HD-SDI Reclocking Distribution Amplifier (suggested AJA model HD10DA)
A breakout box, which replaces the breakout cable, is also available for purchase.
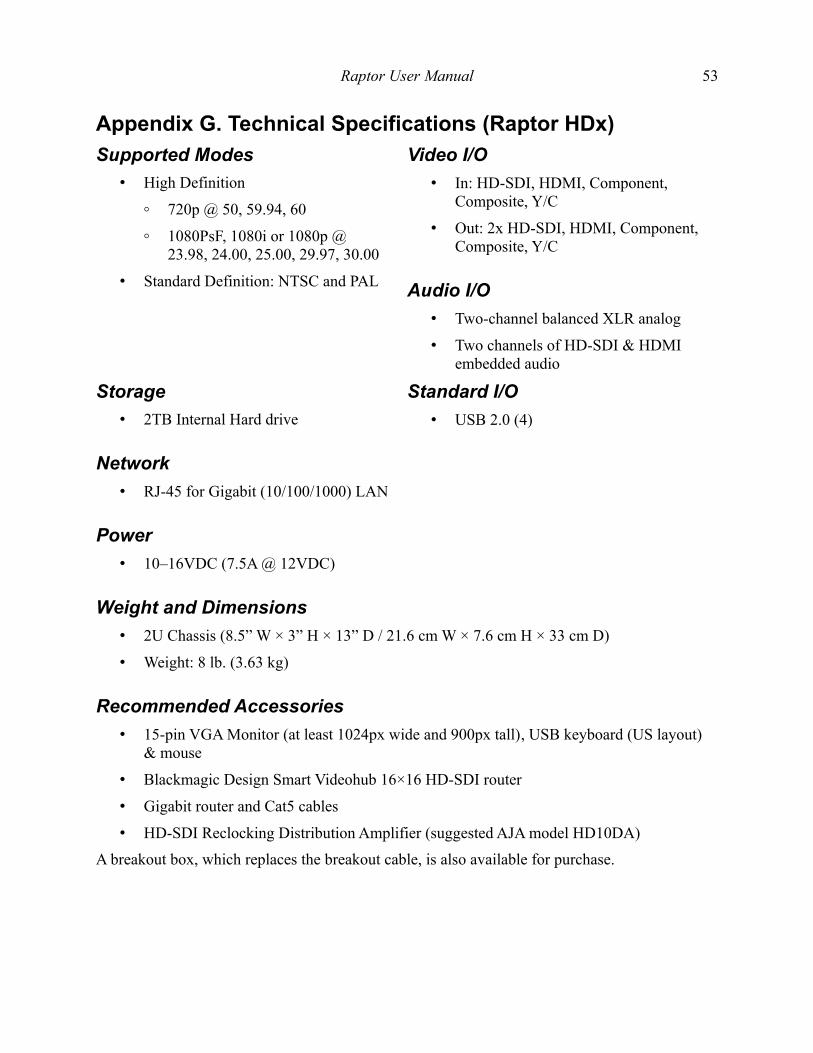
Raptor User Manual 53
Appendix G. Technical Specifications (Raptor HDx)
Supported Modes
• High Definition
◦ 720p @ 50, 59.94, 60
◦ 1080PsF, 1080i or 1080p @23.98, 24.00, 25.00, 29.97, 30.00
• Standard Definition: NTSC and PAL
Video I/O
• In: HD-SDI, HDMI, Component, Composite, Y/C
• Out: 2x HD-SDI, HDMI, Component, Composite, Y/C
Audio I/O
• Two-channel balanced XLR analog
• Two channels of HD-SDI & HDMI embedded audio
Storage
• 2TB Internal Hard drive
Network
• RJ-45 for Gigabit (10/100/1000) LAN
Standard I/O
• USB 2.0 (4)
Power
• 10–16VDC (7.5A @ 12VDC)
Weight and Dimensions
• 2U Chassis (8.5” W × 3” H × 13” D / 21.6 cm W × 7.6 cm H × 33 cm D)
• Weight: 8 lb. (3.63 kg)
Recommended Accessories
• 15-pin VGA Monitor (at least 1024px wide and 900px tall), USB keyboard (US layout) & mouse
• Blackmagic Design Smart Videohub 16×16 HD-SDI router
• Gigabit router and Cat5 cables
• HD-SDI Reclocking Distribution Amplifier (suggested AJA model HD10DA)
A breakout box, which replaces the breakout cable, is also available for purchase.
Raptor User Manual 54
Appendix H. Troubleshooting
Video Input Issues
Auto-detection
If you have connected good video signals but the deck does not recognize them, try Video input auto-detection: see page 24.
Auto-detection can also be activated via the Front Panel: OPTION + RECORD + >>. Each subsequent press of >> will change which input is detected when the buttons are released.
Input Error message
A red message may appear above the Recording controls, indicating that you should sleep and wake the deck to resolve it. Under the File menu, select Sleep deck, wait until the front panel LCD turns off, and then press spacebar on a connected keyboard to wake the deck; you should no longer see the message. This process takes about 10 seconds.
Missing Clips
If you have recently copied clips onto your deck using Windows Explorer or over the network, the Raptor application will need to detect them. You can trigger this process manually: open the File menu, and select Re-Read Clips on Local Deck (see also page 23).
If you are operating your decks synchronized over a network, you will need to re-read the clips on the other connected decks. From the Network Master, select Re-read clips on remote decks from the File menu (see also page 23).
If you have recently copied background plate images or video into the Plates folder, notify the application by selecting Re-read plates from the File menu (see also page 23).
VGA Output Issues
If your attached VGA monitor does not display the application interface, you can try switching to a “safe” resolution that it may recognize: set the display to 1024×768 by pressing Ctrl+Alt+Shift+S on an attached USB keyboard, or by pressing Option+Record+Prev on the front panel of the deck.
Reset Preferences
The preferences available from the sub-menu at the bottom of the Options menu can be reset by selecting Reset all preferences to factory defaults.
Raptor User Manual 55
Videohub Driver
If you see an error message about a videohub.sys driver file, ignore the error message and open the Help menu of the Raptor application. Under the Videohub driver sub-menu, select Make “Files needed” … “videohub.sys” dialog go away. The deck will then restart, and that message should not reappear.
Hard drive issues
The Raptor application contains links to several hard drive-related tools. Under the Tools menu, you have access to two disk speed tests, defragmentation, and two error checking tools. See Tools menu, page 31, for a more complete description of these features.
If the deck seems to drop frames while recording or playing back clips or takes an unusually long time to read clips on startup or when finishing a recording, your video disk may be on the verge of failing. This would be a good opportunity to run the built-in tests to see if the hard drive is to blame. A local computer repair shop should be able to replace the hard drive, but many sensitive components will have to be removed to access it. For this reason, customers often send decks to us for disk replacement.
After replacing hard drive, setup the deck by following the instruction sheet available in the “tech notes” section of the Raptor DDR website, at www.raptorddr.com.
Network connectivity issues
It is best to connect your network cable to a running router before powering up your Raptor deck. If you plug a live network cable into your running deck and it does not detect the network, simply power cycle it and the network should be connected. You can verify this by checking the Network status line under the Clip list on the main window (see page 21).
Date and Time
If your deck shows the wrong date or time in the main window, you can access this setting under the Tools menu. If your deck repeatedly starts up showing the wrong time, you may need to change the BIOS/CMOS battery on the internal motherboard. This can be done by a local computer repair shop, but requires opening multiple panels of the enclosure and removing several sensitive components to access the motherboard.
After replacing a BIOS battery, please setup BIOS options by following the instruction sheet available in the “tech notes” section of the Raptor DDR website, at www.raptorddr.com.
Raptor User Manual 56
Appendix J. Further Support
Warranty
Playback Technologies, Inc. warrants that each Raptor will be free from defects in materials and workmanship, covering parts and labor for a period of one year from the date of purchase.
Email Support
Steve Irwin: [email protected]
Steve Sexton: [email protected]
Phone Support
Call Playback Technologies at +1-818-556-5030, Monday–Friday 9am–5pm except U.S. holidays.
If you call when the office is closed, please leave a voicemail message including your contact information.
Mailing Address
Playback Technologies, Inc.
2530 N. Ontario St.
Burbank, CA 91504