Purchasing Card Reconciliation Process · 2015-10-29 · Logging into PeopleSoft Finance Navigate...
28
PURCHASING CARD RECONCILIATION HANDBOOK PEOPLESOFT FINANCE Instruction Manual Updated - August 2015
Transcript of Purchasing Card Reconciliation Process · 2015-10-29 · Logging into PeopleSoft Finance Navigate...

PURCHASING CARD RECONCILIATION HANDBOOK
PEOPLESOFT FINANCE
Instruction Manual Updated - August 2015

Table of Contents
Logging into PeopleSoft Finance – page 3
How to Display Transactions: If you are responsible for one purchasing card – page 4-5 If you reconcile multiple purchasing card – page 6
How to Reconcile Transactions: Split Transaction so that Unique Descriptions are assigned – page 7-9 Split Transaction so that charge is assigned to different Allocations – page 13-15
Icon Definitions: Line Details – page 10 Comments – page 11 Distribution – page 12
How to find the Correct PeopleSoft Account – page 16
Approving Transactions – page 17-18
Generating/Printing Expense Report – page 19-21
How to Display Closed Transactions – page 22
How to Display Closed Transactions when Current Charges need to be Reconciled – Page 23
Miscellaneous Information – page 24-27
Purchasing Card Application – page 28
2

Logging into PeopleSoft Finance Navigate to the Login page through the Controller’s Office website or type in the URL listed below.
finance.williams.edu UserID is your Employee ID number preceded by a capital W.
The password is in sync with your self-serve password, so there is only one to remember.
3

How do I reconcile a Purchasing Card transaction in PeopleSoft?
To display current transactions that need to be reconciled, follow the navigation below. Main Menu/Purchasing/Procurement Cards/Reconcile/Reconcile Statement
4

To display transactions that need to be reconciled. Enter the cardholders Employee ID number without the leading W or click on the magnifying glass next to the Name field. This will open up a search window to find the correct cardholder.
Click on the “Search” button. This will direct you to the transactions that need to be approved.
If the system currently has no transactions that need to be reconciled, you will see the following message. “No transactions found, specify different search criteria”
5

If you have access to multiple pcards, click on the magnifying glass next to the blank box for “Name”, to display the cardholders that you are proxy to. You will see a display similar to the one below. Click on the name of the cardholder you need to reconcile transactions for.
6
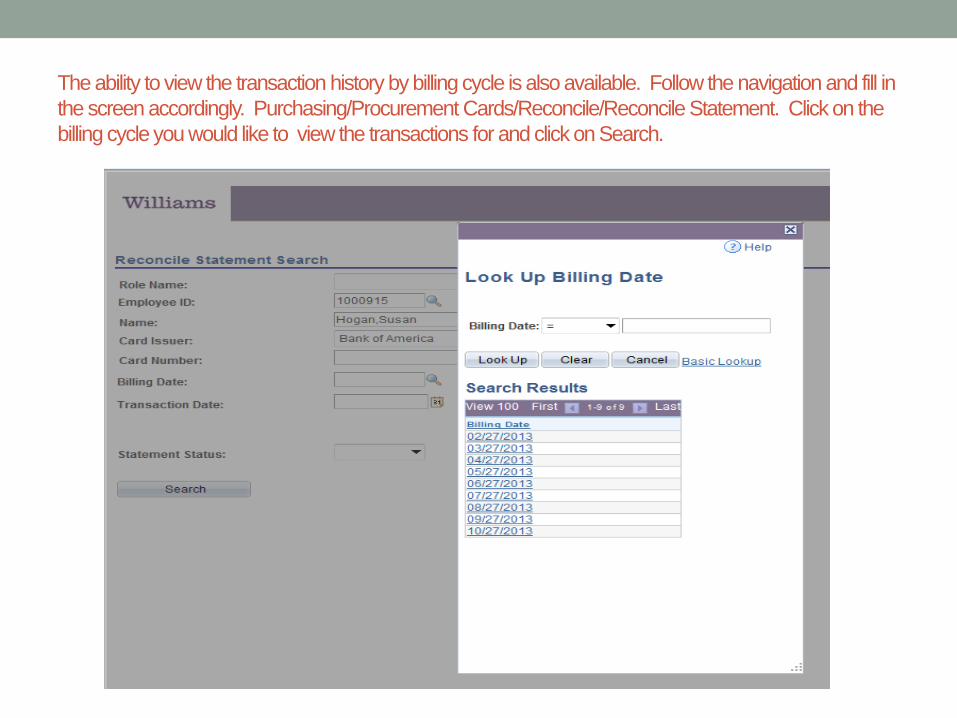
The ability to view the transaction history by billing cycle is also available. Follow the navigation and fill in the screen accordingly. Purchasing/Procurement Cards/Reconcile/Reconcile Statement. Click on the billing cycle you would like to view the transactions for and click on Search.

The transactions are loaded into PeopleSoft in the “staged” status. This means that the transactions are available for editing. On this panel you will enter a brief description of the transaction. This description will appear on the monthly financial reports and the expense report. If a transaction needs to be split, place a check mark next to the line number of the transaction and click on the “split line” at the bottom of the panel.
8

Individual Descriptions - This panel will split a transaction so that the separate lines have individual descriptions. Enter the description you want entered on the first line and edit the billing amount. Click on the “+” sign at the end of the first line. The system will add a line. You can then enter the next description and the corresponding dollar amount for that transaction. This can be repeated as many times as necessary. When completed click on “OK”. This will return you to the transaction panel.
9

Now you can see that the first transaction has been divided three ways, each with individual descriptions and the corresponding dollar amounts. I would suggest clicking on the “save” button to save your work. You can “save” your work as often as necessary.
10

Line Details – This icon is for reference information only. Some vendors provide level 3 data, which is an itemization of the purchase. If this information is available it will be found here. If assistance is needed, please call the Controller’s Office for assistance.
11
Line Details Line Details

Comments – This icon is where you will enter the description overflow from the line description on the transaction panel. Enter all information regarding meal purchases on the screen. If you can enter the entire description on the transaction panel, there will be no need to enter any information here. This data will only print on the expense report. It will not print on the monthly financial reports.
12
Comments

Distribution – Finally, this is where all editing to the account string will occur. The PeopleSoft process automatically assigns the default accounting to the transaction, so if any part of the default is incorrect, it will need to be edited. If the transaction needs to be split between two or more accounts, you will need to click on this distribution icon. (see next panel)
13
Distribution

If necessary, you will edit the accounting and/or split the transaction so that multiple allocations are charged. (see next page)
14

If it’s necessary to split the transaction, click on the “+” at the end of the line. A window will open asking how many lines you would like to enter.
The system will automatically populate the percent and amount fields if you edit them prior to creating an additional row.
15

The system added the requested additional row and populated the percent, dollar amount and the same accounting from row 1. You can now edit the accounting. You have the option to split the transaction by dollar amount or by percent. The system will automatically calculate the other for you. When your editing is completed, click on the “OK” button, and you’ll be sent back to the transaction panel.
16
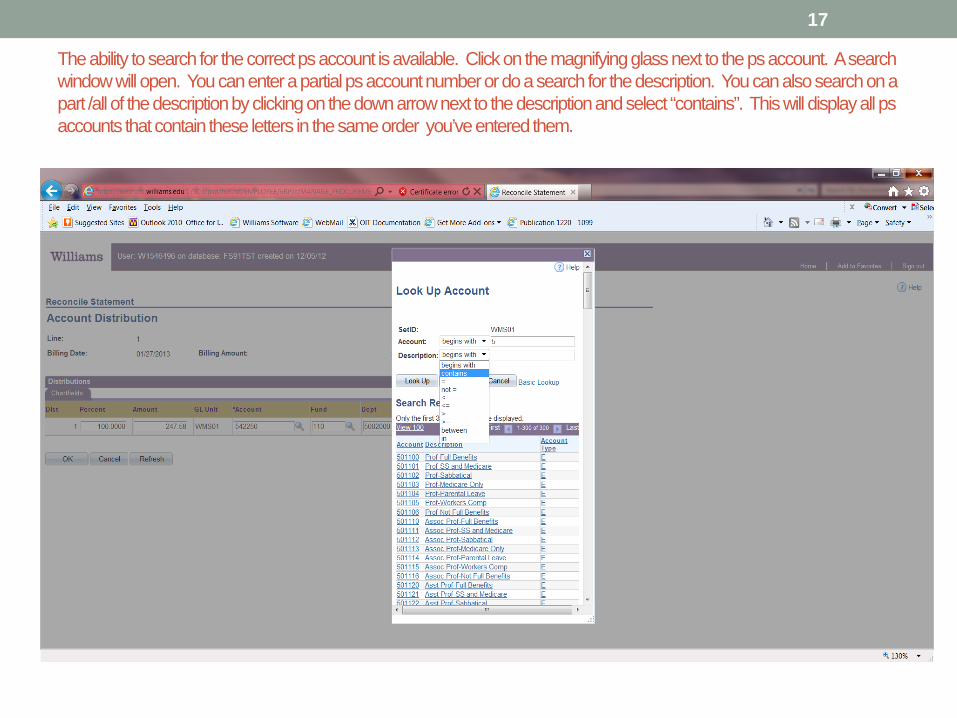
The ability to search for the correct ps account is available. Click on the magnifying glass next to the ps account. A search window will open. You can enter a partial ps account number or do a search for the description. You can also search on a part /all of the description by clicking on the down arrow next to the description and select “contains”. This will display all ps accounts that contain these letters in the same order you’ve entered them.
17

When you have completed the editing, you need to “approve” the transactions. Only “approved” transactions will be posted to the financial reports weekly. On the 5th of the month, all transactions will be posted regardless of status. You can approve transactions individually, by clicking on the down arrow and selecting approve. Click on “Save”. Once you’ve approved & saved your work the system doesn’t allow any further editing to the accounting. A journal entry will need to be done to correct any errors.
18
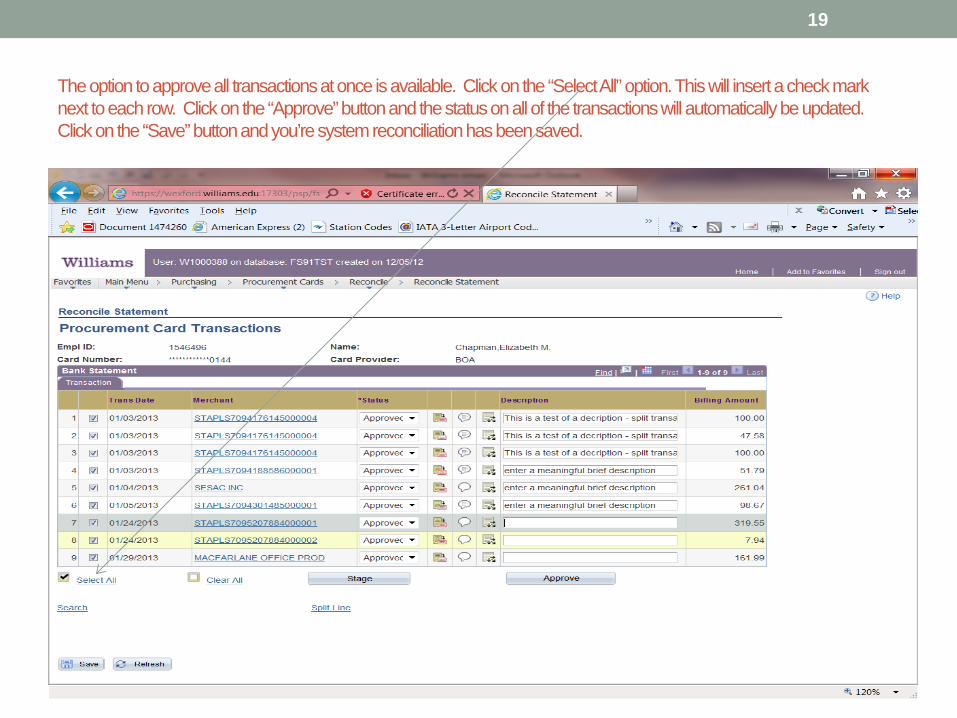
The option to approve all transactions at once is available. Click on the “Select All” option. This will insert a check mark next to each row. Click on the “Approve” button and the status on all of the transactions will automatically be updated. Click on the “Save” button and you’re system reconciliation has been saved.
19

The next step is to run and print the expense report for the hardcopy reconciliation that needs to be sent to the Controller’s Office. Follow this navigation - Main Menu/Purchasing/Procurement Cards/Reports/WMS Pcard Expense Report Enter the billing cycle for the expense report that’s needed. Enter the Employee ID number for the cardholder that the report is required – or – if you reconcile multiple pcards, you can click on “All Employees” (leave Empl ID blank) and all reports will be generated in one .pdf file. They do print as individual reports.
20

The next two pages are an example of the expense report. This report will need to be printed for each month’s activity and sent to the Controller’s Office along with all receipts. Note: the both description fields are printed on this report along with any splits that were entered.
21

Expense Report – page 2
22

Historical Transactions (closed)
Transactions that have been posted to the monthly financial statements are now called “Closed”. To look up closed transactions – see the panel below.
23

Displaying transactions that have already been posted to your reports (Closed) when you have current transactions that need to be reconciled. Allow the system to display the current transactions, then click on the Search link at the bottom left. This will take you to the search criteria screen. Follow the instructions on page 22.
24

Email Notifications
•
•
All cardholders are set “on” and will receive the monthly email. This is a reminder to log into PeopleSoft finance and reconcile their staged transactions before the 5th of the month.
•
Email [email protected] if you do “NOT” want to receive this email.
•
We also offer the option to have the email re-directed to someone other than the cardholder. If you would prefer this option, email [email protected] with the cardholder name and to whom to direct the email.
•
•
NOTE: If you manage multiple purchasing cards and opt to receive emails for each ofthe accounts, the potential of receiving multiple emails per week, is likely based on theactivity on the accounts.
25

It is the responsibility of the cardholder, whether they be faculty, students or staff, to adhere to and follow the policies mandated by the college’s senior administration. It is the responsibility of the cardholder to ensure each transaction meets the business expense guidelines and that supporting documentation includes complete information about the transaction. The Controller’s Office highly recommends that each cardholder review the Travel & Business Expense Guidelines, which can be found on the Controller’s Office website or by typing in the URL below.
http://web.williams.edu/admin/controller/travel/
26

Reconciliation Requirements:
The documentation must contain the following: WHO initiated the transaction?
If a meal was purchased, a list of who attended is required.WHAT is being purchased? WHERE and WHEN did/will the activity take place? WHY is the transaction being initiated?
All receipts and any other documentation (i.e. missing receipt affidavit) should clearly explain the transactions to someone who audits the reconciliation at a later date, such as an auditor. MEALS:
When dining or entertaining, the following is required: List of attendees (self, if alone) Description of business purpose Original itemized receipt:
showing items purchased – NO AMOUNT IS EXEMPTNO AMOUNT IS E
Location of the event The date of the event Description of the meal (breakfast, lunch or dinner)
27

Fast facts 1. The Billing Cycle will continue to be the 28th to the 27th of each month.2. Transactions are sent daily by MasterCard. 3. Transactions will be available daily for review and editing.
4. All transactions approved by midnight on Thursday will be posted in PSFinance on Friday and will be reflected on the financial reports the following day.
5. Regardless of status, all remaining transactions will be posted in PS onthe 5th of each month. Allowances will be made for holidays &weekends.
6. The paper reconciliation is due by the 10th of each month in theController’s Office. Again, allowances will be made for holidays &weekends.
7. Email [email protected] with any questions or updates to your card profiles.