Procreate User Guide
59
Transcript of Procreate User Guide

Welcome to Procreate! This chapter introduces you to Procreate and the key features that make it the only
choice for serious artists.

Welcome to Procreate Procreate 1.6 User Guide 3
Step into the world of a professional artistProcreate is the only studio-grade sketchbook for iPad®. Whether you're storyboarding the next Hollywood blockbuster, illustrating a children's book or a casual artist, Procreate puts you in a league of your own.

Welcome to Procreate Procreate 1.6 User Guide 4
A revolutionary painting engineThe f i rst th ing you’ l l not ice is that Procreate paints fast. Real ly fast.
Each and every one of your strokes are painted with precision and speed unlike anything you’ve ever seen. You’ll see your paint blend, decay and and even smudge in realtime.
It’s all thanks to Silica™ the next generation painting engine—developed using state-of-the-art OpenGL ES technologies. Silica™ squeezes every last drop of juice from the GPU (graphics processing unit). The result delivers unparalleled performance on a mobile device. Silica™ brings graphics-accelerated painting to your iPad® for the first time.

Welcome to Procreate Procreate 1.6 User Guide 5
A giant step forwardProcreate is di f ferent to other dig i ta l paint ing apps. I t puts the most-used tools r ight up front. You’ l l a lways f ind your brush size and opacity handy, in the form of 2 precis ion sl iders.
Precision is keyWhen you hold down a precision slider, a real-time preview will appear. Letting go will select the value and hide the preview.
No matter what zoom you work at, the preview will always represent what will be applied to your canvas.
Unlike normal sliders, these have been engineered to give you more control towards low values when extreme precision is required.
Pull-away featureTry holding the slider and pulling away horizontally. The further you are away from the graphic of the slider, the smaller the increments will change. Allowing minuscule changes to brush attributes. This pull-away feature works in all sliders in Procreate.
Pro tip
In the settings (via Canvas view) you can swap which side the precision sliders and undo/redo appear on. Great for lefties!
Size
Opacity
Live brushpreview
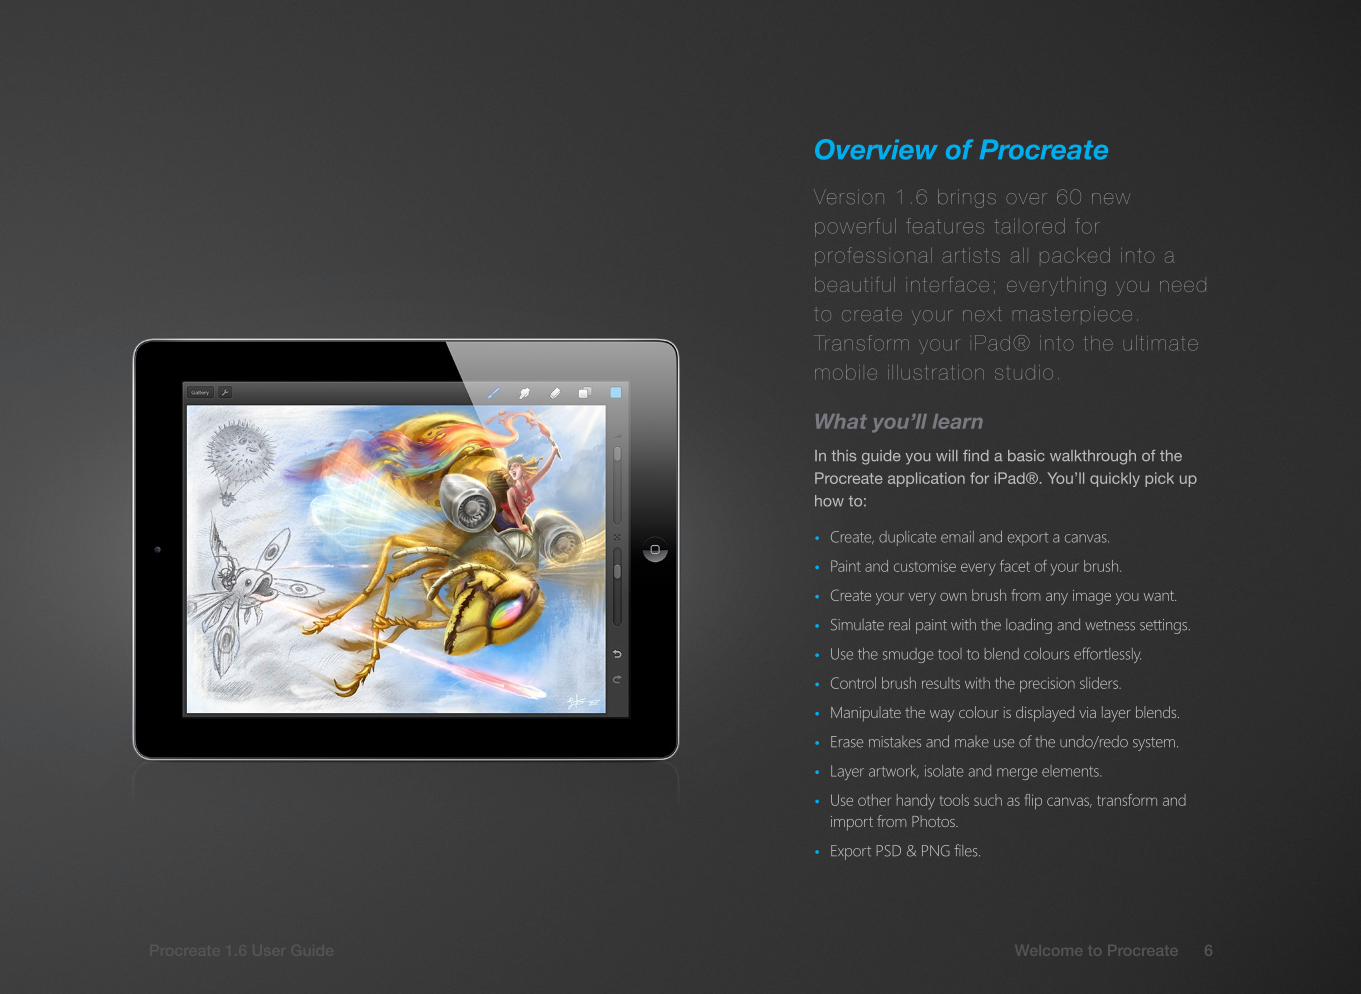
Overview of ProcreateVersion 1.6 br ings over 60 new powerfu l features ta i lored for professional art ists al l packed into a beaut i fu l inter face; everything you need to create your next masterpiece. Transform your iPad® into the ul t imate mobi le i l lustrat ion studio.
What you’ll learnIn this guide you will find a basic walkthrough of the Procreate application for iPad®. You’ll quickly pick up how to:
• Create, duplicate email and export a canvas.
• Paint and customise every facet of your brush.
• Create your very own brush from any image you want.
• Simulate real paint with the loading and wetness settings.
• Use the smudge tool to blend colours effortlessly.
• Control brush results with the precision sliders.
• Manipulate the way colour is displayed via layer blends.
• Erase mistakes and make use of the undo/redo system.
• Layer artwork, isolate and merge elements.
• Use other handy tools such as flip canvas, transform and import from Photos.
• Export PSD & PNG files.
Welcome to Procreate Procreate 1.6 User Guide 6

Inside this chapter you learn about creating, moving and editing artwork. Also, learn how to create gallery stacks
to group your artwork and stay organised.

Procreate 1.6 User Guide 8Gallery
Create a new canvasTapping on the + icon in the top right of your screen will make a new canvas. Upon returning to the Gallery you can rename your art by tapping on the placeholder title.
Choose a canvas sizeYou can chose between 2 canvas sizes in Procreate:
• Standard Definition – 960 pixels wide by 704 pixels high; or
• High Definition – 1920 pixels wide by 1408 pixels high
Note: Due to hardware limitations, first generation iPad® owners will only be able to use a standard definition canvas and will load straight into a canvas without the selection screen.
Create new canvas

Procreate 1.6 User Guide 9Gallery
RenamingArtworkTap the title inside the artwork’s thumbnail to bring up the keyboard. Hit Done or dismiss the keyboard to save the title. Until you edit an artwork’s title it will be called “Untitled Artwork”.
StacksWhen you create a stack it will be automatically be called “Untitled Stack”. You can edit the name of the stack by tapping on the text in the thumbnail (just like editing the title of a singular artwork).
To read more on stacks, see page 11.
Tap title
Procreate 1.6 User Guide 10Gallery
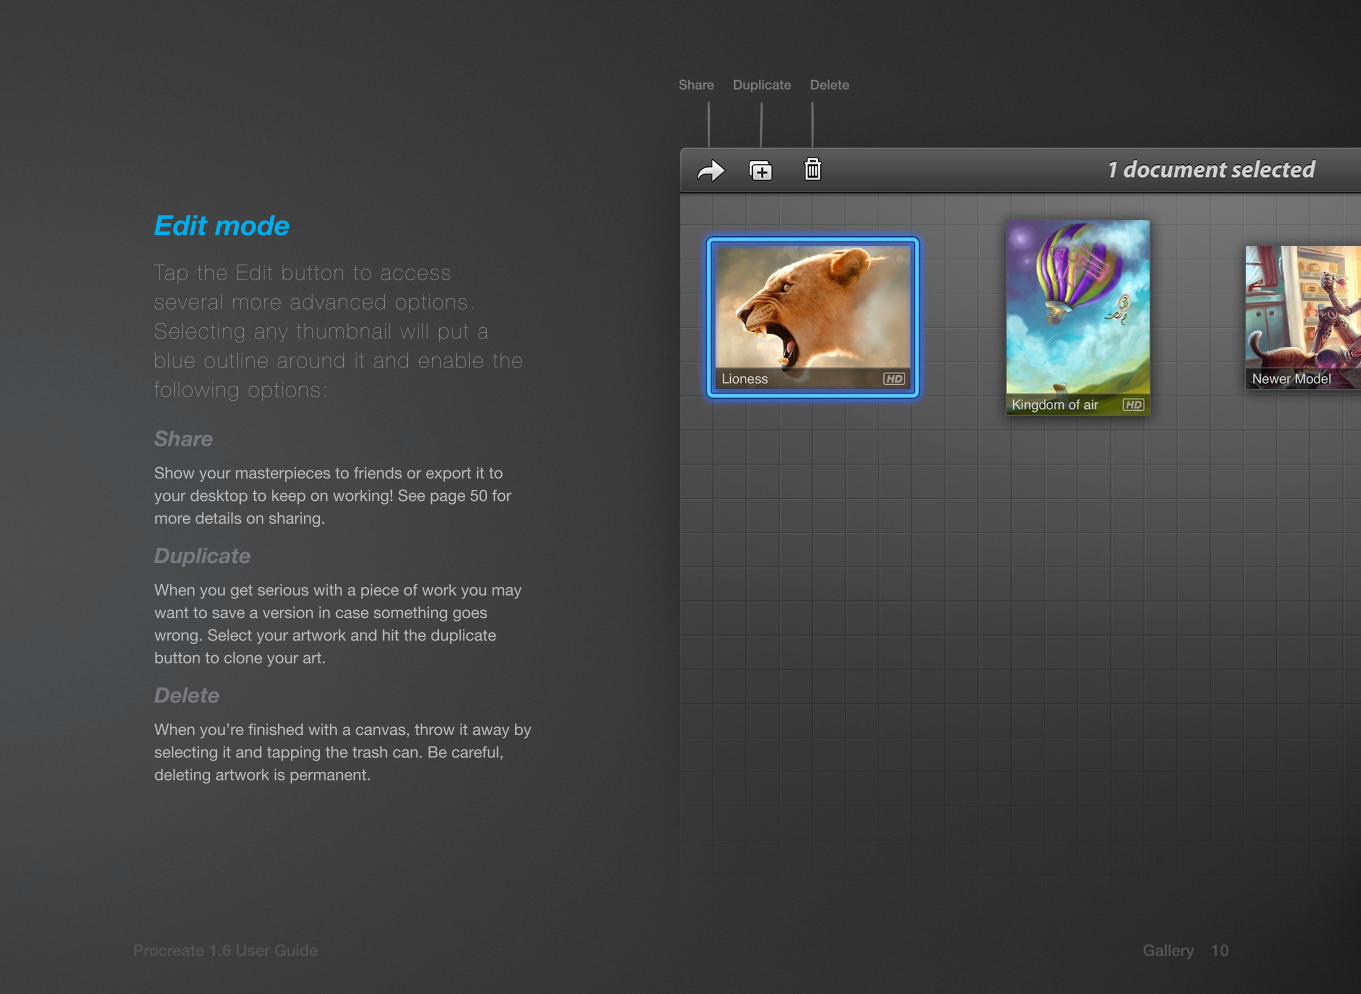
Edit mode Tap the Edit button to access several more advanced opt ions. Select ing any thumbnai l wi l l put a blue out l ine around i t and enable the fo l lowing opt ions:
ShareShow your masterpieces to friends or export it to your desktop to keep on working! See page 50 for more details on sharing.
DuplicateWhen you get serious with a piece of work you may want to save a version in case something goes wrong. Select your artwork and hit the duplicate button to clone your art.
DeleteWhen you’re finished with a canvas, throw it away by selecting it and tapping the trash can. Be careful, deleting artwork is permanent.
DeleteDuplicateShare

Procreate 1.6 User Guide 11Gallery
Moving artwork Keep your art your way with easy drag and dropping of artwork.
Single itemsYou can drag and drop one item at a time at any point in the Gallery view. Just tap and hold until the thumbnail lifts out of the Gallery. Just let go to drop it where you want.
Multiple itemsHead into Edit mode and select multiple items by tapping them. A blue border will surround the items to indicate they are selected. Drag and drop these items to the desired location to complete the move.
You can also make a stack out of multiple items by dropping on top of another thumbnail. See next page for more info.
Drag and drop

Procreate 1.6 User Guide 12Gallery
Gallery stacksThe wor ld of an art ist can be pretty messy. To help keep things organised, Procreate lets you group your artwork in stacks.
Creating a stackA stack can be recognised by several thumbnails on top of each other.
To create a stack drop a thumbnail on top of another. When the lower thumbnail enlarges, it’s ready to make the stack.
From here, you can name the stack just like any other thumbnail by tapping the title.
Moving artwork out of a stackWhile dragging a thumbnail(s), hover over the back button to leave the current stack. If you move all items out of a stack, the stack will disappear.
Stack

Shortcuts are a important part of every artist’s repertoire. Learn how Procreate uses iPad’s multi-touch display to
keep maximum productivity.

Paint, Smudge & EraseTap or drag your f inger on the canvas to apply paint, erase or smudge your art. Try vary ing your drawing speeds. as many brushes are af fected by how fast you draw!
14Procreate 1.6 User Guide Gestures

15Procreate 1.6 User Guide Gestures
Undo an actionProcreate comes with 100 undo states, to make paint ing a l i t t le less stressful. Just swipe with 3 f ingers from r ight to lef t to go back one step at a t ime.

16Procreate 1.6 User Guide Gestures
Redo an actionTo go forward a step when you have perhaps undone too many steps, swipe from left to r ight with 3 f ingers.

17Procreate 1.6 User Guide Gestures
Clear layerInstant ly c lear your layer by using a Z-mot ion anywhere on the canvas. This can be very handy when you’re speed paint ing or sketching concepts.

18Procreate 1.6 User Guide Gestures
Zoom in/outPinching the screen al lows you to zoom in and out of the canvas. The Procreate zoom feature is based largely on speed, so try a l ternat ing your speed to sui t your sty le.

19Procreate 1.6 User Guide Gestures
Rotate CanvasBy simply rotat ing your f ingers whi lst you pinch the screen you can change the angle of your canvas. This is great for gett ing the perfect angle on those di f f icul t strokes.

20Procreate 1.6 User Guide Gestures
Fit to screenTo instant ly f i t the canvas to screen, quickly pinch inwards. For best results, t ry l i f t ing your f ingers of f the screen as your pinch f in ishes.

21Procreate 1.6 User Guide Gestures
View 1:1 pixelsWhen working on a HD canvas i t can be handy to v iew your art at a 1:1 pixel level. Tapping three f ingers wi l l adjust your v iew to 1:1. This gesture wi l l not af fect your canvas rotat ion

22Procreate 1.6 User Guide Gestures
Straighten canvasThis gesture wi l l only disregard the canvas rotat ion, returning i t to i ts in i t ia l or ientat ion. i .e. a l igned with the iPad.

Procreate’s revolutionary brush system introduces the most creative brushes available on a mobile device. Learn the ins-and-outs to get the most out of the
Pro Tools and begin creating your own.

Procreate 1.6 User Guide 24Brushes
Game-changing brushesYou’ l l not ice that the brushes just feel di f ferent in Procreate. That ’s because we’ve made them di f ferent.
We decided it was time to move forward from the 1980s and really put some power into our brushes system. We do this by splitting our brushes into 2 core elements; Shape and Grain.
By treating them separately you’ll find you can achieve some incredible results. Anything from realistic brushes, to imaginative, out-there textures are all possible with the advanced brush behaviours in Procreate.
For more info on shapes and grains see page 31, later in this chapter. We have also made a detailed explanation on brushes in our Tutorials section of our website.
Brush shape
Brush grain
Resulting stroke

Procreate 1.6 User Guide 25Brushes
Using the brush toolTapping the Paintbrush icon will switch to paint mode. Your selected tool will appear blue to indicate it is active. Tap it again to invoke the brush library. Instead of a double tap you may prefer to tap and hold on a tool to go straight to the brush library.
You will notice your brushes are inside sets. You can swipe the brush sets page left and right to navigate. The pages are represented by dots below the icons.
Once you’ve selected your Brush Group, select a brush and tap outside the pane to close it.
The Smudge and Eraser tools work in the same manner. These will also remember which brush, size and opacity you used last, so there’s no need to open the brush library every time you switch tools.
Pro tip
The Paint, Smudge and Eraser tools use the same brush libraries. That means you only need to create a brush once to use it across all three tool types! Why not try your favourite rough brush as a smudge? (See page 33 for more info on smudging.)
Brush sets

Procreate 1.6 User Guide 26Brushes
Complete controlProcreate features a groundbreaking drawing engine cal led Si l ica™, This al lows unparal le led control over every one of your brushes.
Tweaking your brushWhile viewing the brush library, double tap (or single tap if it’s already selected) to enter the Advanced Brush settings dialogue. You will notice six selectors that contain the characteristics of your brush. Use the sliders in each tab to change the behaviour of your selected brush. Once you are happy with your brush, tap outside the popover to start drawing.
To save you the time of having to create a brush multiple times, Procreate uses one library between the paint, smudge and eraser tools. This means a brush that is created in paint, will also be available in smudge and erase (and vice versa).
Pro tip
In the Advanced Brush Settings popover there is an info button. Tapping this will explain how each slider will affect your brush. Some settings are best understood by playing with them!
For more info, see the Pro Guide: How Brushes Work on the Si website.
Procreate 1.6 User Guide 27Brushes
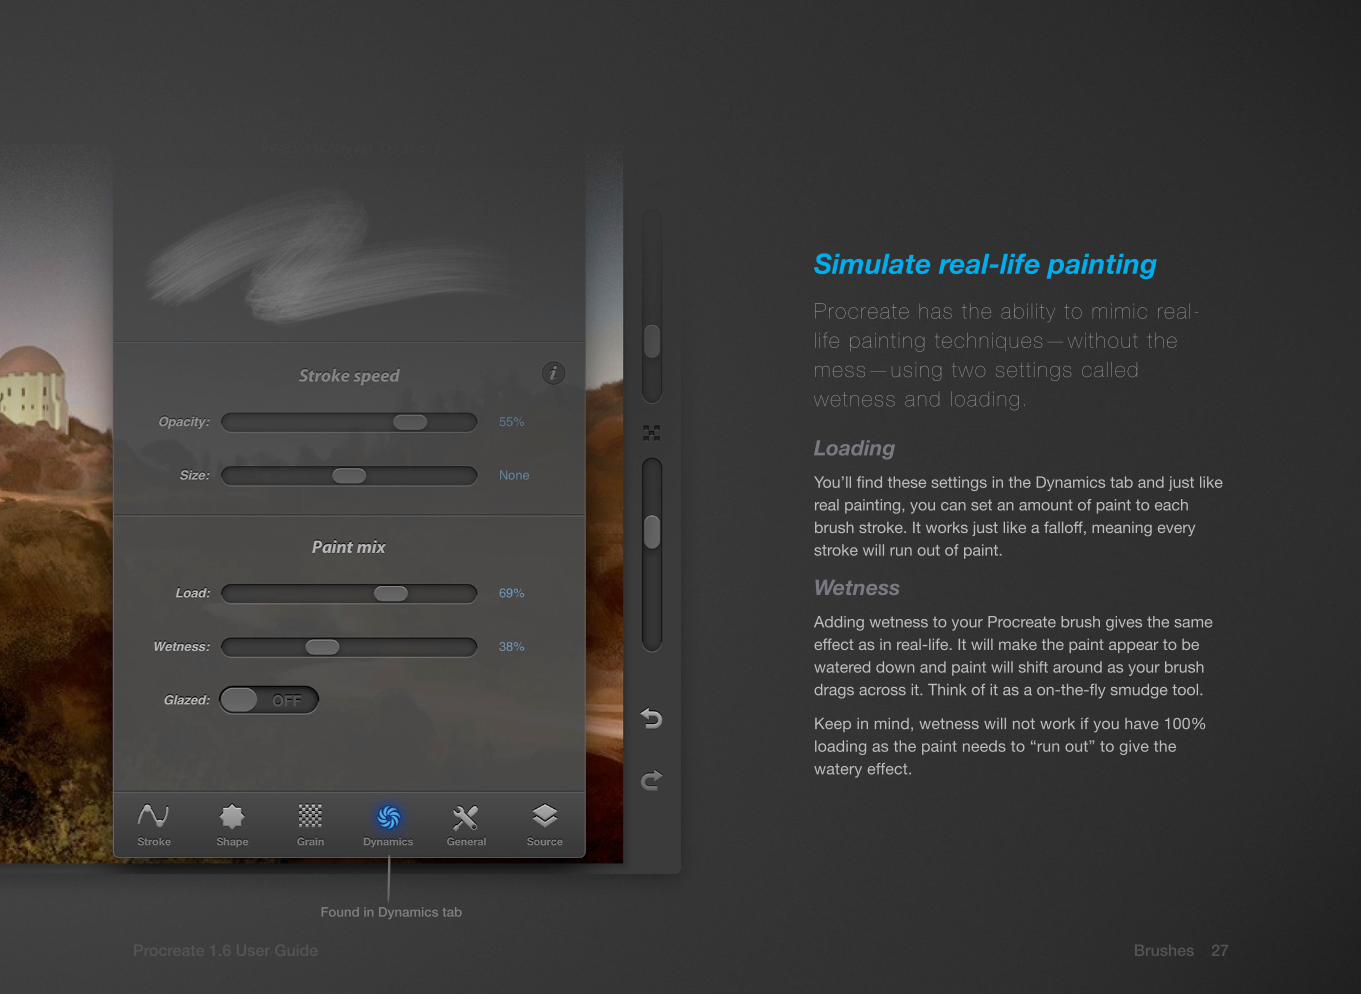
Simulate real-life paintingProcreate has the abi l i ty to mimic real-l i fe paint ing techniques—without the mess—using two sett ings cal led wetness and loading.
LoadingYou’ll find these settings in the Dynamics tab and just like real painting, you can set an amount of paint to each brush stroke. It works just like a falloff, meaning every stroke will run out of paint.
WetnessAdding wetness to your Procreate brush gives the same effect as in real-life. It will make the paint appear to be watered down and paint will shift around as your brush drags across it. Think of it as a on-the-fly smudge tool.
Keep in mind, wetness will not work if you have 100% loading as the paint needs to “run out” to give the watery effect.
Found in Dynamics tab

Procreate 1.6 User Guide 28Brushes
A style for everyoneThanks to the agi l i ty of the Si l ica™ engine, Procreate can also paint in a purely dig i ta l manner with a sett ing cal led Glaze.
GlazeWhen you turn Glaze on (Advanced Brush settings > Dynamics tab) your brush will behave like a digital brush in a program such as Adobe® Photoshop®. It will not build up on itself until you release your finger and paint again.
This is perfect for creating a high gloss sheen on an eye, glass or any other reflective surface. It can also be great for creating smooth, consistent shades and gradients similar to a graphic novel-style.
NOTE: Glaze and Wetness can not both be on at the same time.
Turn Glaze on/off

Procreate 1.6 User Guide 29Brushes
Rearranging your brushesFrom time to time you’ll want to delete, shuffle, or duplicate a brush. You’ll find most of the organising you’ll need to do is available via a few easy gestures.
Drag and dropTap and hold a brush OR a group to pull it out of it’s location. Let go to drop it into the desired location.
Pro Tools cannot be moved or from their current set. If you try to move one it will duplicate instead, keeping the original in its place. A duplicate overlay will appear over the floating thumbnail to indicate the duplication.

30Procreate 1.6 User Guide Brushes
Swipe-to-actionIf you swipe across a brush you will be presented with 2 options, depending on what kind of brush you have selected.
• Pro Tools (i.e. that are built by Si) can either be reset to the default settings or duplicated. Pro Tools cannot be deleted.
• User-Created Tools can either be duplicated or deleted.
Pro tip
Duplicate an awesome brush and make changes to it. That way you have a good base to start from and you won’t lose your original brush!
Swipe to reveal

31Procreate 1.6 User Guide Brushes
Renaming brushes and setsCustom brushes, dupl icated brushes and custom brush sets can be renamed to personal ise your tools.
BrushesOnly user-created brushes, or duplicated Pro Tools can be renamed. To edit the name of your custom brush, go to the General tab inside the Advanced Brush Settings popover and tap in the name field to bring up the keyboard.
Brush setsIf you tap on a brush group that is already selected you will get an option to rename it or delete it. If it is not already selected a double tap will bring up the options.
Tap to edit name
Double tap toshow options
General tab

Procreate 1.6 User Guide 32Brushes
Custom brushesAs a f i rst for dig i ta l paint ing on the iPad, you can now create your very own brushes. And i t ’s easy!
Create your own brushTapping the + icon in the top right of the Brushes popover will flip over and highlight the Source selector in Advanced Brush settings. The two empty squares indicate the foundations of a Procreate brush; Shape and Grain.
ShapeThe brush shape is a container that houses the grain. Whatever your grain is, it will fit inside the shape just like a stencil.
GrainThink of the grain as a paint roller. When you paint a stroke, the grain is ‘rolled’ onto the canvas.
You can load an image from the Pro Library or your own Photos camera roll. The images found in the Pro Library are those used by the Pro tools.
Once you have entered both Shape and Grain you’ll notice the remaining selectors along the bottom will light up, allowing you to start editing your brush’s behaviour. If you don’t enter both Shape and Grain the incomplete brush will be automatically deleted.
Pro tips:
Pure black will be 100% transparent, while 100% white will be solid. Anywhere in between will be semi-transparent.
Remember, grains work better when they are seamless. There are some great tutorials online on how to make seamless textures.
The key to discovering great brushes is to experiment. Put any old photo into grain and shape, tweak a few sliders and see what happens!
For more info, see the Pro Guide: How Brushes Work on the Si website.

The most delicious and fastest smudge tool in an il lustration app. So good, it needs to be seen to be believed.

Procreate 1.6 User Guide 34Smudge
Smudging Colours Procreate uses 64-bits per pixel, giving you the smoothest, most accurate colour-blending on a mobile platform.
Smudge toolSelect the smudge icon and tap it again to bring up the brush pane. Once you have selected your smudging brush, tap outside the pane to close it.
Pro tip:
Remember that Smudge uses the same library as Paint. Try using a scratchy, textured brush to smudge with a rougher effect.
Smudge

35Procreate 1.6 User Guide Smudge
Different strengths While using the smudge tool t ry play ing with vary ing levels of opacity as i t works sl ight ly di f ferent to paint.
Higher strengthsBy using smudge at full pressure, colour will really be pushed around, like wet paint. It will mess up colours very quickly and quite often give harsh drag lines as you smear the paint.
Lower strengthsIf you use smudge at low pressure, it will behave like you are smudging a pencil with your finger; not all colour will be pulled away and the trails will be much more gentle. This is particularly useful for creating very smooth gradients.
Pro tip:
Use a combination of strengths for a polished result. Try smudging at higher strength to quickly get the blend started and use lower strengths to refine and smooth the effect.

For absolute control when cleaning up art, you can use the same brushes library for erase as painting and smudge. Repairing artwork has never been easier.

Procreate 1.6 User Guide 37Erase
Fixing mistakesSl ip-ups happen to the best of us. Lucki ly, Procreate has a few great features to help you correct errors.
Eraser toolThe eraser tool is controlled just like the paint and smudge tools. Tap the icon once to select it, or twice to choose your brush.
Undo and redoProcreate comes with up to 100 undo and redo states. Tap the undo/redo arrow to find where you went wrong, and try again. When cycling through your undos and redos a notification will let you know which action was last affected by the undo/redo.
Pro tip:
Using the eraser with a hard brush shape can be great for making rough edges smooth and sharp.
Alternatively, try a rough brush at a low opacity to blend a layer without seeing an obvious edge.
Eraser
Undo
Redo

Thanks to the Silica™ engine, Procreate allows a deep 48-bit colour range. This chapter explains the HSB
sliders and how to save your favourite colours.
Procreate 1.6 User Guide 39Colours
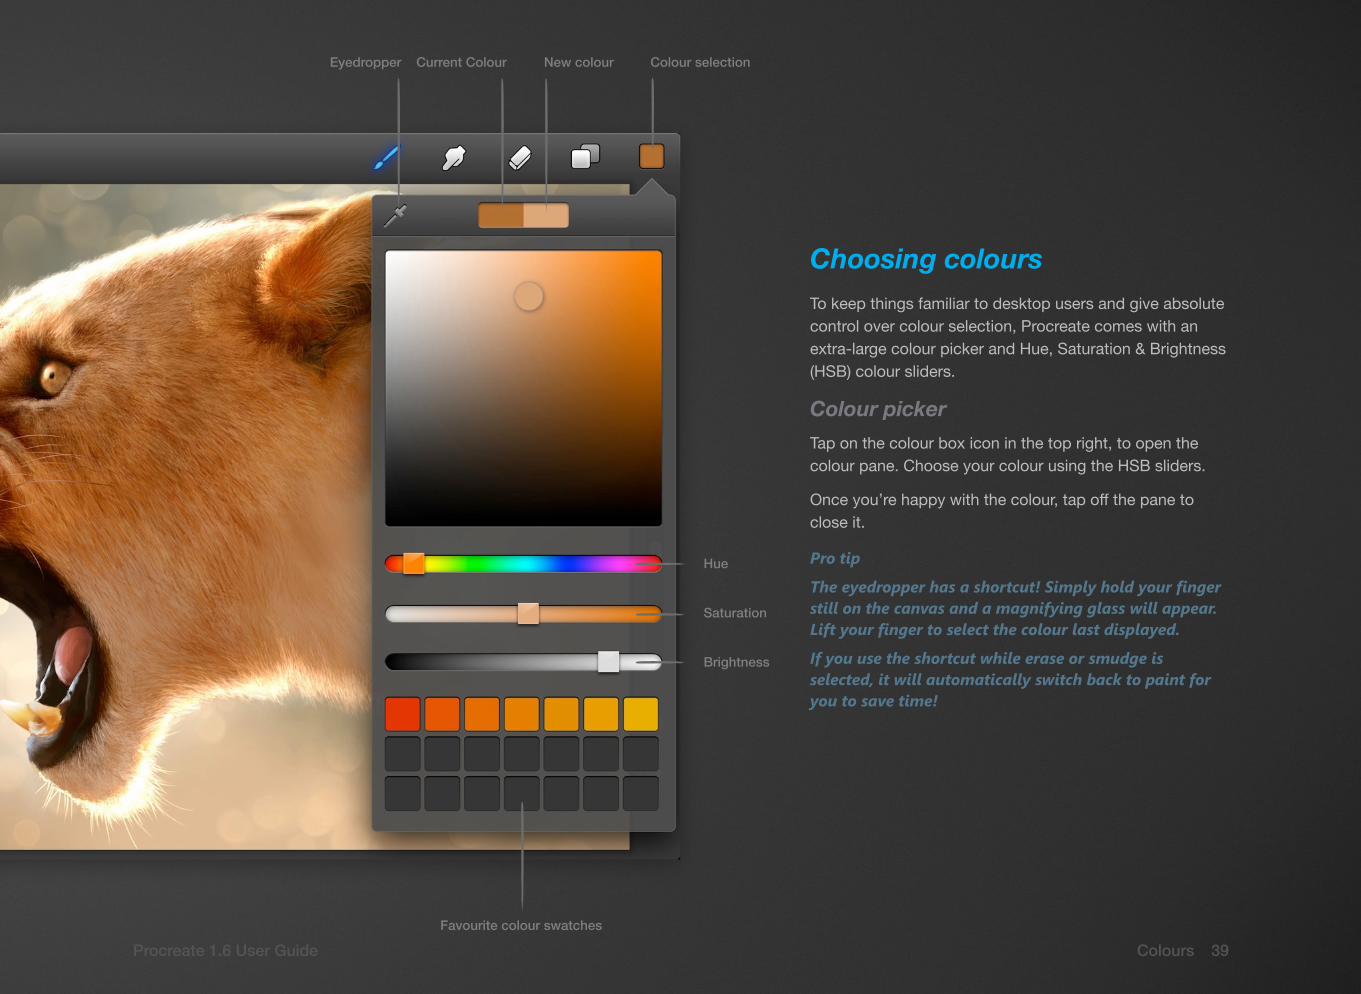
Choosing coloursTo keep things familiar to desktop users and give absolute control over colour selection, Procreate comes with an extra-large colour picker and Hue, Saturation & Brightness (HSB) colour sliders.
Colour pickerTap on the colour box icon in the top right, to open the colour pane. Choose your colour using the HSB sliders.
Once you’re happy with the colour, tap off the pane to close it.
Pro tip
The eyedropper has a shortcut! Simply hold your finger still on the canvas and a magnifying glass will appear. Lift your finger to select the colour last displayed.
If you use the shortcut while erase or smudge is selected, it will automatically switch back to paint for you to save time!
Colour selectionNew colourCurrent ColourEyedropper
Favourite colour swatches
Hue
Saturation
Brightness
Procreate 1.6 User Guide 40Colours
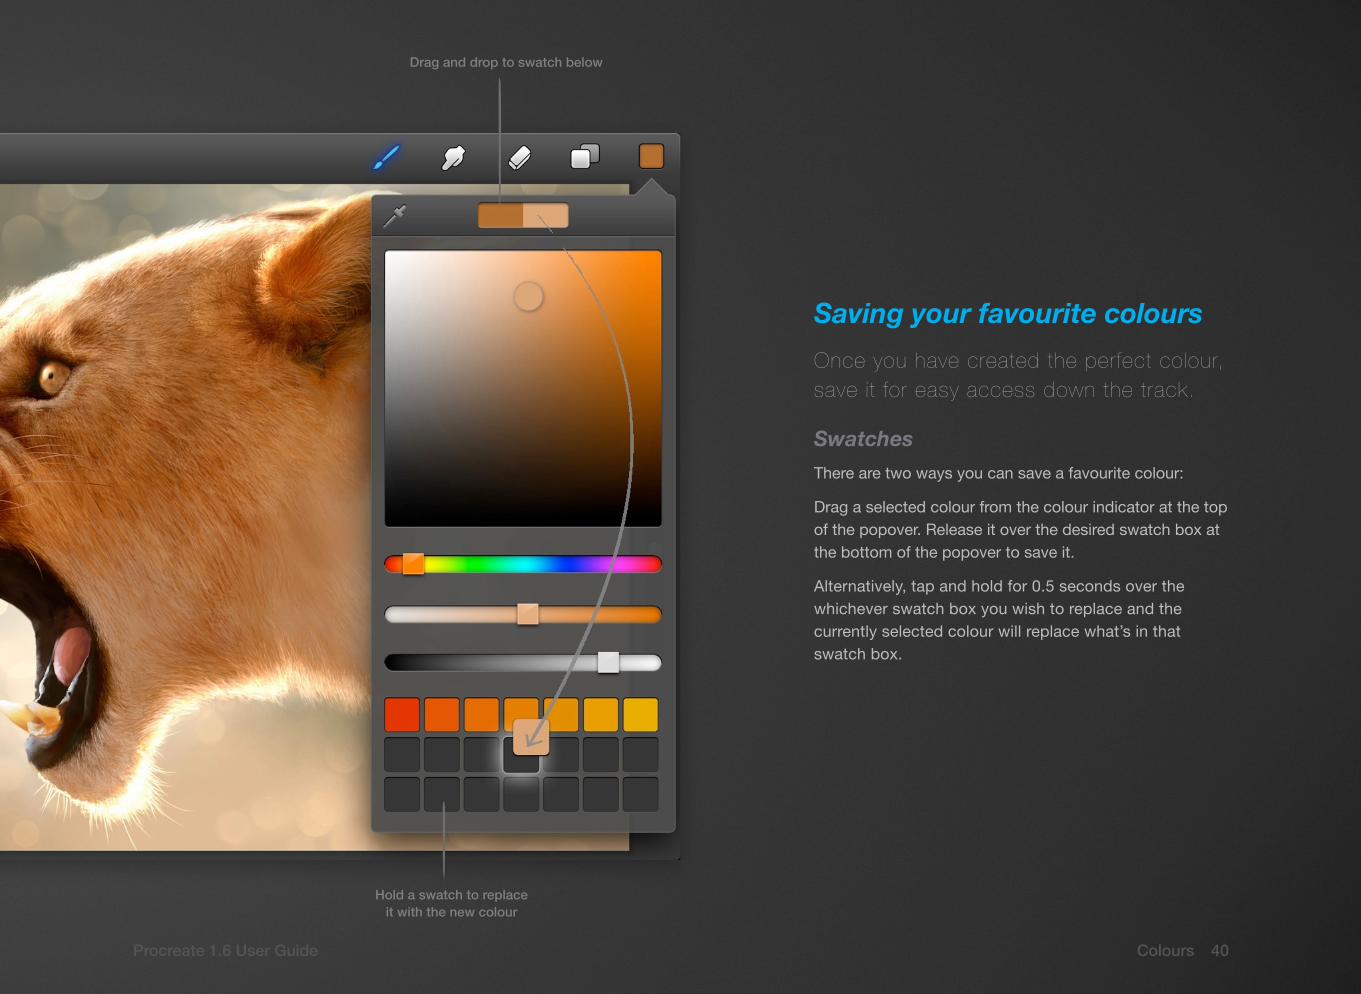
Saving your favourite coloursOnce you have created the perfect colour, save it for easy access down the track.
SwatchesThere are two ways you can save a favourite colour:
Drag a selected colour from the colour indicator at the top of the popover. Release it over the desired swatch box at the bottom of the popover to save it.
Alternatively, tap and hold for 0.5 seconds over the whichever swatch box you wish to replace and the currently selected colour will replace what’s in that swatch box.
Hold a swatch to replace it with the new colour
Drag and drop to swatch below

Procreate 1.6 User Guide 41Colours
Eyedropper shortcutStay focused on your canvas with the quick eyedropper shortcut.
You can quickly chose a colour from your canvas without going into the colour popover.
Tap and hold anywhere on the canvas and let go to select the colour shown in the loupe.
By default you need to hold for 0.40 seconds before the eyedropper activates. If you find this too short, head to the Actions popover > Settings tab to change the delay.
See page 52 for more info on the Actions popover.
Eyedropper loupe

Layers are a necessary tool for professional artists. Learn about merging layers, blend modes, modifiers and the
powerful alpha lock.

Procreate 1.6 User Guide 43Layers
Building up artworkProcreate al lows you to use up to 16 layers at any one t ime which el iminates merging before you’re ready.
Overview of layersLayers are a very handy to isolate elements of your artwork or try something new without destroying what’s underneath.
Creating a new layerCreate new layers with the + icon. A new layer will automatically be inserted above the current layer.
Moving layersTo change the order of the layers, hold the layer handle and drag up of down. Release to set the new order.
Layer visibilityTurn a layer’s visibility on or off by tapping the eye icon. If a layer is hidden, the thumbnail will go semi-transparent and it cannot be drawn on.
Pro tip:
Try sketching a concept and turn the opacity of that layer down. Then, refine it on a new layer above.
New layerDelete Layer
Layer opacity
Layer handle
Alpha lock(page 44)
Selected layer
Blend mode (next page)
Layer visibility

Procreate 1.6 User Guide 44Layers
Blending layersUsers familiar with desktop painting will be at home with Procreate’s blend modes.
Layer blend modes There are several blend modes available in Procreate:
NormalLike drawing on plain paper with no effects.
MultiplyMakes dark pixels darker and lighter pixels transparent.
ScreenThe opposite to multiply mode, it will make dark pixels more transparent.
AddCreates awesome effects that look like blooming lights or image burn.
LightenVery close to screen mode except with Lighten, the threshold will be stronger.
ExclusionCan produce different filter-like effects depending on the colour used. Try making your top layer navy blue, set to exclusion and lower the opacity.
Current mode

Procreate 1.6 User Guide 45Layers
Alpha lockProcreate comes with the abi l i ty to lock a layer ’s transparency (or a lpha). This feature means once your edges are r ight, you wi l l never have to do them again.
Lock your layer’s alphaTry blocking out your shape in any colour. Once you have tidied up the edge, hit the alpha icon to lock the alpha pixels in place. From here on, you will only be able to paint or smudge inside the area that already has paint on it.
If you want to touch up an edge, or add to it, simply turn the alpha lock off, tidy it up and flick it back on to preserve the alpha once again.
Pro tip:
If you lock a layer’s alpha you can fill it with a solid colour by tapping Fill in the layer modifiers.
Alpha lock (ON)

46Procreate 1.6 User Guide Layers
Merging LayersTap and hold a selected layer’s thumbnail to merge a layer up or down. Keep in mind that the top layer will only be presented with merge down, while the bottom layer will only be able to merge up.
Merging layers will apply any blending mode to the pixels below and will also disregard any alpha lock.
When you reach 16 layers, you will need to start merging if you wish to create another layer.
Pro tip:
When trying different ideas on your precious art, use a separate layer until you’re sure you’re happy with the result. Then, merge the layers and keep painting!
Merge options

Procreate 1.6 User Guide 47Layers
Layer modifiersWhen you tap on a selected layer’s thumbnail, you’ll be presented with several options that will affect that layer only. You’ll be able to:
TransformScale, rotate & move layer. (see next page for more)
Duplicate Duplicates the current layer.
Clear Erase all art on current layer leaving an empty layer.
Fill Cover current layer with your currently selected colour. Fill will cover all art on the current layer.
Pro tip:
Use duplicate as a way of making changes to a layer while having a backup. You can even erase parts of a layer and chose a blending mode to accentuate areas or give extra contrast.
Layer modifiers

Procreate 1.6 User Guide 48Layers
Transforming layersBy tapping a selected layer’s thumbnail you will be greeted with 4 options. Choose transform to close the layers popover and go back to a modified canvas view. While in transform mode, you can not paint. To get back to paint mode, accept or cancel the transform.
The following gestures work while in transform mode:
• One finger drag to move layer around.
• Two finger pinch to increase or decrease layer.
• Two finger turn to rotate layer.
Along with these gestures you have some handy shortcut icons on the side. These include flip horizontally and vertically, and rotate by 45° increments for precision transforming.
rotate 45°anti-clockwise
rotate 45°clockwise
flip vertically
flip horizontally

Inside the actions popover you’ll find several options that affect your canvas. You can insert photos, share artwork,
tweak your interface and read more on Procreate.

Procreate 1.6 User Guide 50Actions
Canvas actionsInsert photoImport an image from your Camera Roll. You might want to use it to trace, or just as a reference. Once you select the image you can transform it to whatever size you like.
Take photoIf your iPad® is equipped with a camera, you will be able to take a photo and put it straight onto the canvas!
Flip horizontally or verticallyMany artists flip their artwork to check proportions. Tap either button to flip your canvas.
Set artwork orientationIf you ever find your canvas is upside down in the gallery, turn your device to get it the artwork the right way up and hit this button to have it remember which way is up.

Procreate 1.6 User Guide 51Actions
Share your artworkProcreate features several ways to show off your artwork.
Send via EmailTo stay within the limitations of email size, you can only email your Procreate canvas in a flat JPEG or PNG with alpha (meaning any transparency will be saved).
Share via Twitter If you have set up a Twitter account with iOS 5 you can send your art straight to Twitter. If you haven’t, head to your iPad’s Settings App > Twitter and follow the steps.
Send to iTunes® iTunes you can receive a flattened JPEG or PNG with alpha. Or when you’re serious about your art, you can send a layered PSD (native Adobe® Photoshop® file),
To make use of the files, head to iTunes and select your device in the left pane. Choose the Apps tab up the top, and scroll down to File Sharing, with a list of apps. Select Procreate and you should see your files.
Send to PhotosSend a flattened JPEG or PNG with alpha to your camera roll. If your image looks strange it might be because you forgot to turn your background layer on before exporting!

Procreate 1.6 User Guide 52Actions
More infoGestures GuideIt is a great idea to learn these gestures, as it can make your Procreate experience even faster. Tapping this button will launch Safari and go to The Gestures tutorial on the Si website.
User GuideA quick link to the guide you are reading now, should you ever delete it from your iBooks app. Tapping this button will take you to the download link.
Tutorials & ResourcesTo help you realise the full potential of Procreate and further your own skills, we have prepared a few gems of wisdom for you. Tapping this button will visit the Tutorials page in Safari.
Support & FeedbackWe love to hear from the artistic community. If you’re loving what we’re doing, let us know. If you’re not loving it so much, let us know too! We’re always active on our support pages taking in your thoughts, so get vocal! Tapping this button will open Safari and head to the Si support forum.

Procreate 1.6 User Guide 53Actions
User interface settingsRotate with zoomThis allows you to turn your canvas as you zoom in; it can be great for getting the perfect angle on your art. Turning it OFF will lock your canvas to stay straight. By default this setting is ON.
Eyedropper delayUse the slider to set the delay before the eyedropper shortcut activates. Sliding all the way to the left will turn the shortcut OFF. By default, this setting is 0.40 seconds.
Right-aligned slidersChange which side the precision sliders are placed. By default this setting is ON. Turning it OFF will place the sliders on the left.

This section credits the awesome artists whose work we used in this guide. It also has a few resource links, a Si
biography and the obligatory legal jargon.

Procreate 1.6 User Guide 55Reference
Newer Model by Laurent Canniccionihttp://bonaparte333.cghub.com
Artwork creditsThe following Procreate fan art has been used in this User Guide:
Unfinished Businessby Laurent Canniccionihttp://bonaparte333.cghub.com
Love Sick by Laurent Canniccionihttp://bonaparte333.cghub.com
Elfby Patipat Asavasena (aka Asuka111)http://asuka111.net
Homeby Jonathan Gesinskihttp://www.goosekeeper.com
Kingdom of Air by Dan Hoffmanhttp://pocketeasel.tumblr.com

Procreate 1.6 User Guide 56Reference
Eleusinian Mask by Dan Hoffmanhttp://pocketeasel.tumblr.com
Artwork credits (continued)
Totuskey Silosby Eric Weikhttp://newriversdigital.com
Centurion by Jonathon Gesinskihttp://www.goosekeeper.com
Bus Rideby Haibo Zhuhttp://zhuzhu.deviantart.com
For Sisu by Jonathan Gesinskihttp://www.goosekeeper.com

Procreate 1.6 User Guide 57Reference
More infoTutorials and ResourcesTo help you realise the full potential of Procreate, we have prepared a few gems of wisdom. Besides Googling Procreate, visit savage.si/resources-and-guides page for more.
The internet is a wealth of resources! The artistic community is huge and fortunately, love to share and help each other. Besides the fore-mentioned resources we have, try searching “Procreate iPad” in a search engine or YouTube.
We also have a Flickr group that you can submit your artwork to. While you’re there, why not get some inspiration! Go to: flickr.com/groups/procreate
Feedback & SupportWe always keep a close eye on what our community has to say. If you have some feedback, we’d love to hear from you. Whether it be praise, suggestions for future updates, or you simply want to know the meaning of life—drop us line at savage.si/support
Also, stay up-to-date by following us on Twitter @SiPropaganda, joining us on Facebook, or our blog at savage.si/blog

Procreate 1.6 User Guide 58Reference
About SiSavage Interactive (aka Si) is based in Hobart, Australia.
All four of us set our bar pretty high when it comes to our work and appreciate the same attention to detail in other people’s work.
Outside of software development, we indulge in the dark arts of video games.

59Procreate 1.6 User Guide Reference
iPad is a registered trade mark of Apple Inc, registered in the U.S. and other countries. App Store is a service mark of Apple, Inc. Adobe and Photoshop are registered trademarks or trademarks of Adobe Systems Incorporated in the United
States and/or other countries. Procreate is a trademark of Savage Interactive Pty Ltd.
![User Guide...User. {{]}]} {}]}](https://static.fdocuments.in/doc/165x107/60918ca14327954d24291644/-user-guide-user-.jpg)