PRIMEQUEST 500A/500 SERIES -...
108
U41805-J-Z816-2-76/C122-E087-03EN PRIMEQUEST 500A/500 SERIES Microsoft® Windows Server® 2008 USER'S GUIDE
Transcript of PRIMEQUEST 500A/500 SERIES -...

U41805-J-Z816-2-76/C122-E087-03EN
PRIMEQUEST
500A/500 SERIES
Microsoft® Windows Server® 2008
USER'S GUIDE

PRIMEQUEST Microsoft Windows Server 2008 User's Guide
U41805-J-Z816-2-76/C122-E087-03EN 2
Preface
Purpose
This manual explains the preparations and procedures for installing Windows Server 2008 on the PRIMEQUEST
server and provides notes on operation and maintenance.
Intended Readers
This manual is intended for system administrators.
High-risk Use of This Product
This product is designed and manufactured for use in standard applications such as office work, personal device,
household appliance, and general industrial applications. This product is not intended for use in nuclear-reactor
control systems, aeronautical and space systems, air traffic control systems, mass transportation control systems,
medical devices for life support, missile launch control systems or other specialized uses in which extremely high
levels of reliability are required, the required levels of safety cannot be guaranteed, or a failure or operational error
could be life-threatening or could cause physical injury (referred to hereafter as "high-risk" use). You shall not
use this product without securing the sufficient safety required for high-risk use. If you wish to use this product
for high-risk use, please consult with sales representatives in charge before such use.

PRIMEQUEST Microsoft Windows Server 2008 User's Guide
U41805-J-Z816-2-76/C122-E087-03EN 3
Organization
This manual is organized as follows.
Chapter title Description Chapter 1 Overview of Windows Server 2008 Describes the functions and operating
environment of Windows Server 2008.
Chapter 2 System Design Provides notes on the system design for Windows
Server 2008.
Chapter 3 Installation Explains preparations for installing Windows
Server 2008 and the installation procedure.
Chapter 4 Environment Setting Explains the environment settings that must be
made before the start of operation.
Chapter 5 Maintenance/Operation Provides notes on maintenance and operation.
Appendix A Bundled Software Describes the standard software bundle for the
PRIMEQUEST server.
How to Read This Manual
・ If you are reading this manual for the first time, be sure to start from Chapter 1.
・ Before installing Windows Server 2008, read Chapters 2 and 3.
・ After installing Windows Server 2008 and before starting operation, read Chapters 4 and 5.
・ Read Appendix A for the parts of the standard software bundle that you are going to use on the
PRIMEQUEST server.
Other Reference Manuals
Referring to the following manuals, confirm the PRIMEQUEST hardware configuration and operation methods
before reading this manual:
・ PRIMEQUEST 580A/540A/580/540/480/440 System Design Guide
(U41630-J-Z816-x-76/C122-B001EN)
・ PRIMEQUEST 520A/520/420 System Design Guide (U41643-J-Z816-x-76/C122-B009EN)

PRIMEQUEST Microsoft Windows Server 2008 User's Guide
U41805-J-Z816-2-76/C122-E087-03EN 4
・ PRIMEQUEST 510A System Design Guide (U41643-J-Z816-x-76/C122-B018EN)*
・ PRIMEQUEST 500A/500/400 Series Installation Manual (U41632-J-Z816-x-76/C122-E001EN)
・ PRIMEQUEST 580A/540A/520A/500/400 Series Reference Manual: Basic
Operation/GUI/Commands (U41633-J-Z816-x-76/C122-E003EN)
・ PRIMEQUEST 510A Reference Manual: Basic Operation/GUI/Commands (C122-E096EN)*
・ PRIMEQUEST 500A/500/400 Series Reference Manual: Tools/Operation Information
(U41757-J-Z816-x-76/C122-E074EN)
・ PRIMEQUEST 580A/540A Dynamic Partitioning (DP) Manual
(U41799-J-Z816-x-76/C122-E085EN)
Notational Conventions ■ Text Conventions
Fonts/symbols Meaning Example Italic Indicates names of manuals. See the PRIMEQUEST 500A/500/400 Series
Installation Manual
(U41632-J-Z816-x-76/C122-E001EN).
" " Indicates names of chapters and
sections.
See "Chapter 3 Installation".
[ ] Indicates window names, window
button names, tab names, and
dropdown menu selections.
Click the [OK] button.
■ Syntax of the Command Line Interface (CLI)
The command syntax is described below.
• A variable that requires input of a value must be enclosed in < >.
• An optional element must be enclosed in [ ].
• A group of options for an optional keyword must be enclosed in [ ] and delimited by |.
• A group of options for a mandatory keyword must be enclosed in { } and delimited by |. The command syntax or file path is shown in a frame such as this one.
*: not supported by Fujitsu Technology Solutions

PRIMEQUEST Microsoft Windows Server 2008 User's Guide
U41805-J-Z816-2-76/C122-E087-03EN 5
■ Product Names and Abbreviations
In this manual, the product names are abbreviated as follows.
Long title Abbreviations Microsoft® Windows® XP Professional
Microsoft® Windows® XP Home Edition
Windows XP
Microsoft® Windows Vista® Business
Microsoft® Windows Vista® Enterprise
Windows Vista
Microsoft® Windows Server® 2003 (*) Windows Server 2003
Microsoft® Windows Server® 2003, Enterprise Edition for Itanium-based
Systems
Microsoft® Windows Server® 2003, Datacenter Edition for Itanium-based
Systems
Windows Server 2003 (IA64)
Microsoft® Windows Server® 2008 (*) Windows Server 2008
Microsoft® Windows Server® 2008 for Itanium-Based Systems Windows Server 2008 (IA64)
* This is used when no platform is specified.
Trademark Acknowledgements
Microsoft, Windows, Windows Vista, and Windows Server are trademarks or registered trademarks of Microsoft
Corporation in the United States and other countries.
All other product names mentioned herein are the trademarks or registered trademarks of their respective owners.
All other products are the property of their respective owners.
Fujitsu has obtained permission from Microsoft Corporation to use figures showing the relevant windows and
other GUI components.
All Rights Reserved, Copyright © FUJITSU LIMITED 2008-2009
PRIMEQUEST Microsoft Windows Server 2008 User's Guide
U41805-J-Z816-2-76/C122-E087-03EN 6
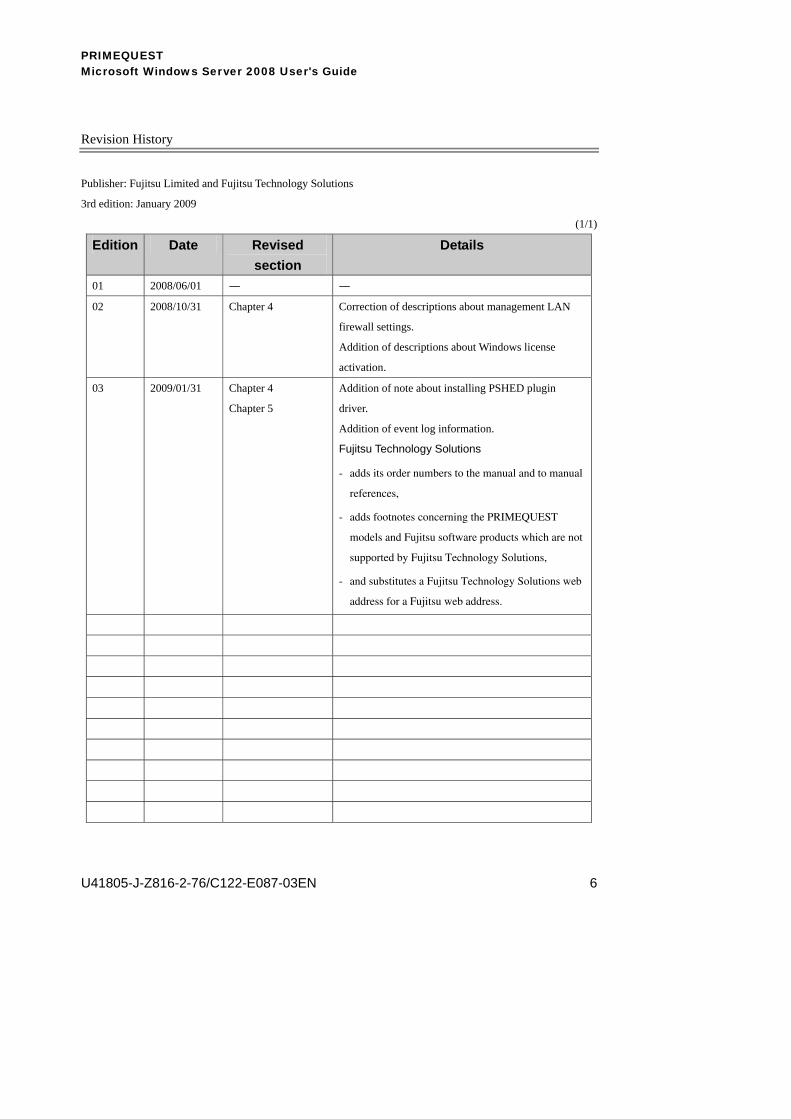
Revision History
Publisher: Fujitsu Limited and Fujitsu Technology Solutions
3rd edition: January 2009
(1/1)
Edition Date Revised section
Details
01 2008/06/01 ― ―
02 2008/10/31 Chapter 4 Correction of descriptions about management LAN
firewall settings.
Addition of descriptions about Windows license
activation.
03 2009/01/31 Chapter 4
Chapter 5
Addition of note about installing PSHED plugin
driver.
Addition of event log information.
Fujitsu Technology Solutions
- adds its order numbers to the manual and to manual
references,
- adds footnotes concerning the PRIMEQUEST
models and Fujitsu software products which are not
supported by Fujitsu Technology Solutions,
- and substitutes a Fujitsu Technology Solutions web
address for a Fujitsu web address.
PRIMEQUEST Microsoft Windows Server 2008 User's Guide
U41805-J-Z816-2-76/C122-E087-03EN 7
Contents Preface ........................................................................................................................................................................... 2
Purpose ...................................................................................................................................................................... 2 Intended Readers....................................................................................................................................................... 2 High-risk Use of This Product .................................................................................................................................. 2 Organization .............................................................................................................................................................. 3 How to Read This Manual ........................................................................................................................................ 3 Other Reference Manuals ......................................................................................................................................... 3 Notational Conventions ............................................................................................................................................ 4 Trademark Acknowledgements ................................................................................................................................ 5 Revision History........................................................................................................................................................ 6
Contents......................................................................................................................................................................... 7 Chapter 1 Overview of Windows Server 2008........................................................................................................... 10
1.1 Features ............................................................................................................................................................. 10 1.2 Supporting Models............................................................................................................................................ 11
Chapter 2 System Design............................................................................................................................................ 12 2.1 Notes on Using the DP Function ...................................................................................................................... 12 2.2 I/O Units That Can Be Used ............................................................................................................................. 12
2.2.1 Supported storage units.............................................................................................................................. 12 2.2.2 Supported PCI cards .................................................................................................................................. 12 2.2.3 Mounting conditions of PCI cards and usable built-in I/Os ..................................................................... 13 2.2.4 Notes on the PCI address mode (PRIMEQUEST 580A/540A/580/540) ................................................. 13 2.2.5 Notes on the display monitor resolution.................................................................................................... 14
2.3 Clustering .......................................................................................................................................................... 15 2.3.1 Configuration ............................................................................................................................................. 16 2.3.2 Range for recovery of a Windows cluster ................................................................................................. 17 2.3.3 System construction................................................................................................................................... 17
Chapter 3 Installation .................................................................................................................................................. 18 3.1 Installation Flow ............................................................................................................................................... 19 3.2 Preparation for Installation ............................................................................................................................... 21
3.2.1 Preparing the required items...................................................................................................................... 21 3.2.2 Building a SAN boot environment ............................................................................................................ 21 3.2.3 Connecting the MMB and making settings............................................................................................... 22 3.2.4 Making a single-path configuration and removing internal disks ............................................................ 23
3.3 Windows Installation Using SystemcastWizard Lite ....................................................................................... 26

PRIMEQUEST Microsoft Windows Server 2008 User's Guide
U41805-J-Z816-2-76/C122-E087-03EN 8
3.4 Manual Installation of Windows....................................................................................................................... 27 3.4.1 Required items ........................................................................................................................................... 27 3.4.2 Installation flow ......................................................................................................................................... 27 3.4.3 Switching the KVM/DVD-ROM drive ..................................................................................................... 28 3.4.4 Installing Windows .................................................................................................................................... 31
3.5 Post-installation Work....................................................................................................................................... 38 3.5.1 Installing the High-reliability Tools .......................................................................................................... 38 3.5.2 Connecting internal disks .......................................................................................................................... 41 3.5.3 Installing the multipath driver ................................................................................................................... 41
Chapter 4 Environment Settings ................................................................................................................................. 42 4.1 PSA Settings...................................................................................................................................................... 42
4.1.1 Management LAN settings........................................................................................................................ 45 4.1.2 Installing the PSHED plug-in driver ......................................................................................................... 51 4.1.3 Setting a trap destination ........................................................................................................................... 53 4.1.4 Setting a trap destination and mail destination via the MMB................................................................... 54 4.1.5 Making Windows Firewall settings ........................................................................................................... 55 4.1.6 Setting Watchdog monitoring for a period after a STOP error occurrence .............................................. 69
4.2 Setting Up the Memory Dump Environment ................................................................................................... 70 4.2.1 Memory dump............................................................................................................................................ 70 4.2.2 Paging file .................................................................................................................................................. 75
4.3 Configuring the Network .................................................................................................................................. 79 4.4 Activating Windows.......................................................................................................................................... 80 4.5 NTP Client Settings .......................................................................................................................................... 81
4.5.1 NTP operation method for the PRIMEQUEST server.............................................................................. 81 4.5.2 NTP server settings .................................................................................................................................... 82 4.5.3 NTP client settings of each partition ......................................................................................................... 83
4.6 Saving Setting Information............................................................................................................................... 85 Chapter 5 Maintenance/Operation.............................................................................................................................. 86
5.1 System Startup and Shutdown .......................................................................................................................... 86 5.1.1 Starting the system..................................................................................................................................... 86 5.1.2 Shutting down the system.......................................................................................................................... 86 5.1.3 Shutdown after logon to Windows ............................................................................................................ 87 5.1.4 Shutdown with the shutdown command ................................................................................................... 87
5.2 Backup and Restore .......................................................................................................................................... 89 5.2.1 Backup/Restore using SystemcastWizard Lite.......................................................................................... 89 5.2.2 Backup/restore using Windows Server Backup ........................................................................................ 90

PRIMEQUEST Microsoft Windows Server 2008 User's Guide
U41805-J-Z816-2-76/C122-E087-03EN 9
5.3 Management LAN Reconfiguration Required When the BMM Is Replaced (PRIMEQUEST
580A/540A/580/540) .............................................................................................................................................. 96 5.4 Obtaining Maintenance Data ............................................................................................................................ 99
5.4.1 Software Support Guide / DSNAP............................................................................................................ 99 5.4.2 Memory dump............................................................................................................................................ 99 5.4.3 User Mode Process Dumper and Desktop Heap Monitor....................................................................... 100
5.5 Event Log List................................................................................................................................................. 101 5.5.1 Method of checking an event log ............................................................................................................ 101 5.5.2 Event log list ............................................................................................................................................ 101
Appendix A Bundled Software ................................................................................................................................. 102 A.1 Types of Software in the Bundled Software.................................................................................................. 102 A.2 PSA................................................................................................................................................................. 103
A.2.1 Messages ................................................................................................................................................. 103 A.2.2 Notes........................................................................................................................................................ 104
A.3 DSNAP........................................................................................................................................................... 105 A.4 Software Support Guide................................................................................................................................. 106 A.5 SystemcastWizard Lite................................................................................................................................... 107

PRIMEQUEST Microsoft Windows Server 2008 User's Guide
U41805-J-Z816-2-76/C122-E087-03EN 10
Chapter 1 Overview of Windows Server 2008
This chapter describes the functions and operating environment of Windows Server 2008.
1.1 Features Windows Server 2008 is a next-generation operating system with enhanced functionality and improved reliability
built upon the features of the preceding Windows Server families to enable easier server management and security
control. With Windows Server 2008 running on it, the PRIMEQUEST server becomes a platform that has the
manageability, robustness, and flexibility of a mission-critical system.
PRIMEQUEST supports Microsoft® Windows Server® 2008 for Itanium-Based Systems (*).
(*) The edition is not included in notations in this manual. Enterprise and Datacenter are not distinguished
in Itanium-based systems.
■ Management enhancements
Dispersed information and tools can now be referenced and manipulated with Server Manager.
Moreover, not only have the standard built-in management commands been improved but also the possible
range of management through CUI operations has been expanded. Some operations that require the same
steps to be repeated many times manually in a GUI can easily be automated in a CUI.
Note:
The Server Core Installation Option cannot be selected for Windows Server 2008 (IA64).
■ Security improvements
For each executed operation or function that has an influence on the entire system, User Account Control
(UAC) displays a dialog box to ask for confirmation that execution is permitted. This prevents damage from
the abuse of system administrator privileges.
Furthermore, Windows Firewall has been improved compared with Windows Server 2003.

PRIMEQUEST Microsoft Windows Server 2008 User's Guide
U41805-J-Z816-2-76/C122-E087-03EN 11
■ Dynamic Partitioning function (PRIMEQUEST 580A/540A*)
In the past, to replace or add a system board (SB) that has mounted CPUs or memory, the system must be
stopped.
The Dynamic Partitioning (DP) function developed by Fujitsu in cooperation with Microsoft has been
implemented in Windows Server 2008. With this function, an SB can be replaced or added in the
PRIMEQUEST 580A/540A* (**) without rebooting the system.
(**) This function, which requires measures be taken on the hardware level, is supported by the
PRIMEQUEST 580A/540A* and later models.
1.2 Supporting Models The following models in the PRIMEQUEST series support Windows Server 2008:
・ PRIMEQUEST 580A/580
・ PRIMEQUEST 540A*/540
・ PRIMEQUEST 520A*/520
・ PRIMEQUEST 510A*
*: not supported by Fujitsu Technology Solutions

PRIMEQUEST Microsoft Windows Server 2008 User's Guide
U41805-J-Z816-2-76/C122-E087-03EN 12
Chapter 2 System Design
The basic system design policy does not have any major changes from Windows Server 2003. For details on the
system design, see the following system design guides:
→ PRIMEQUEST 580A/540A/580/540/480/440 System Design Guide (U41630-J-Z816-x-76/C122-B001EN)
→ PRIMEQUEST 520A/520/420 System Design Guide (U41643-J-Z816-x-76/C122-B009EN)
→ PRIMEQUEST 510A System Design Guide (C122-B018EN)*
This chapter explains the requirements and necessary considerations for the system design for Windows Server
2008, and it provides notes on the system design.
2.1 Notes on Using the DP Function The system board (SB) configuration must be taken into account in use of the DP function. For details on design,
see the PRIMEQUEST 580A/540A Dynamic Partitioning (DP) Manual (U41799-J-Z816-x-76/C122-E085EN).
2.2 I/O Units That Can Be Used
2.2.1 Supported storage units The PRIMEQUEST/Windows system has a SAN boot environment that uses disk array units through Fibre
Channel connections, and the use of such storage units as ETERNUS* systems is recommended. The
explanations of procedures in this manual assume that ETERNUS* storage units are used.
2.2.2 Supported PCI cards For details on supported PCI cards, see the following manuals:
→ Section 2.3.4, "Compatible PCI card", in the PRIMEQUEST 580A/540A/580/540/480/440 System Design
Guide (U41630-J-Z816-x-76/C122-B001EN)
→ Section 2.3.4, "Compatible PCI card", in the PRIMEQUEST 520A/520/420 System Design Guide
(U41643-J-Z816-x-76/C122-B009EN)
→ Section 2.3.4, "Compatible PCI card", in the PRIMEQUEST 510A System Design Guide (C122-B018EN)*
*: supply and support in EMEA for Fujitsu´s global accounts only

PRIMEQUEST Microsoft Windows Server 2008 User's Guide
U41805-J-Z816-2-76/C122-E087-03EN 13
2.2.3 Mounting conditions of PCI cards and usable built-in I/Os For details on the mounting conditions of PCI cards and usable built-in I/Os, see the following manuals:
→ Section 2.3.5, "Mounting conditions of PCI cards and usable built-in I/Os", in the PRIMEQUEST
580A/540A/580/540/480/440 System Design Guide (U41630-J-Z816-x-76/C122-B001EN)
→ Section 2.3.5, "Mounting conditions of PCI cards and usable built-in I/Os", in the PRIMEQUEST
520A/520/420 System Design Guide (U41643-J-Z816-x-76/C122-B009EN)
→ Section 2.3.5, "Mounting conditions of PCI cards and usable built-in I/Os", in the PRIMEQUEST 510A System
Design Guide (C122-B018EN)*
■ Notes
If Windows Server 2008 installation is performed in an environment where an FC card is connected to PCI
Express Slot#1 or Slot#3 in an I/O Unit or Slot#1 in a PEXU connected to the PRIMEQUEST 520A*/520,
installation fails.
To install Windows Server 2008, disconnect the FC card, or connect it to Slot#0 or Slot#2. After installation,
there is no problem in using Slot#1 or Slot#3.
The following Web site provides the latest released information on mounting conditions in detail (firmware
version, driver version, etc.):
http://support.ts.fujitsu.com/com/support/downloads.html (select “Mission Critical IA Server” as product)
2.2.4 Notes on the PCI address mode (PRIMEQUEST 580A/540A*/580/540) Fujitsu recommend PCI address mode to be set to PCI Segment Mode.
If the PCI address mode is changed after Windows installation, Windows may not start up. Determine the PCI
address mode when designing the system, and do not change it after installing Windows.
For the procedure for setting the PCI address mode and related details, see the following manual:
→ Section 2.6.8, "Setting various modes", in the PRIMEQUEST 500A/500/400 Series Installation Manual
(U41632-J-Z816-x-76/C122-E001EN)
*: not supported by Fujitsu Technology Solutions

PRIMEQUEST Microsoft Windows Server 2008 User's Guide
U41805-J-Z816-2-76/C122-E087-03EN 14
2.2.5 Notes on the display monitor resolution No driver that supports Windows Server 2008 is provided for the PRIMEQUEST video controller. Therefore,
the display monitor connected to the PRIMEQUEST server has only one resolution, 640 x 480 (VGA).
However, a high-resolution display can be used for a remote desktop, and Fujitsu recommends using a remote
desktop connection for system management. Prepare a management console PC that can be used with a remote
desktop connection.

PRIMEQUEST Microsoft Windows Server 2008 User's Guide
U41805-J-Z816-2-76/C122-E087-03EN 15
2.3 Clustering PRIMEQUEST supports failover clustering (WSFC), which is a standard function of Windows Server 2008.
A server that is a component of a cluster is called a node. If each node is a PRIMEQUEST server with Windows
running on it, the most basic cluster system has a configuration of two nodes using shared disks. If Windows
Server 2008 is running on each node, a cluster system consisting of up to eight nodes can be constructed.
There are two types of cluster configuration with the PRIMEQUEST server: an inter-cabinet cluster whose
configuration is spread across cabinets, and an intra-cabinet cluster whose configuration consists of partitions
within one cabinet.
■ Remarks
・ To configure WSFC, a separate Active Directory environment is required.
・ To configure a cluster system that does not have the basic cluster configuration (two-node
configuration with shared disks), contact your a certified service engineer.
Figure 2-1 Sample basic configuration for an inter-cabinet cluster
Cabinet
IOUMMB#0PCI Card
Crossbar
MMB#1
HDD
Cabinet SB
IOU MMB#0 PCI Card
Crossbar
MMB#1
GSWB/GTHBGSWB/GTHB GSWB/GTHB
HDD IO Port IO Port
SB
SW SW SShhaarreedd
ddiisskk
FC Management LAN Private LAN Public LAN
Domain controller

PRIMEQUEST Microsoft Windows Server 2008 User's Guide
U41805-J-Z816-2-76/C122-E087-03EN 16
Figure 2-2 Sample basic configuration for an intra-cabinet cluster
2.3.1 Configuration ■ Shared disks
Data used for business operation is stored on individual shared disk units (ETERNUS*) so that any node can
access the data. However, multiple nodes cannot access the same data simultaneously.
■ Network configuration
The nodes configuring a cluster are connected via a dedicated LAN used for communication by each node to
monitor errors on the other node(s) and ensure data consistency among the nodes. This LAN is called a
private network (private LAN). In contrast, the LAN used for business operation is called a public network
(public LAN).
■ Business applications
Business applications are installed on all active and standby nodes.
*: supply and support in EMEA for Fujitsu´s global accounts only
Cabinet
IOU MMB#0PCI Card MMB#1
HDDIOU PCI Card
Partition#1 Partition#2
GSWB/GTHB*
HDD IO Port IO Port
Crossbar
SB
SB
SW SW
SShhaarreedd ddiisskk
FC Management LAN Private LAN Public LAN
Domain controller

PRIMEQUEST Microsoft Windows Server 2008 User's Guide
U41805-J-Z816-2-76/C122-E087-03EN 17
2.3.2 Range for recovery of a Windows cluster The cluster can be recovered from faults in hardware components, such as a CPU, motherboard, and LAN card,
and software errors, such as an application error.
However, the cluster is not a fault tolerant (FT) system. In the event of business failover, business is suspended
for a short period.
2.3.3 System construction A dedicated startup service is provided for construction of Active Directory (AD) systems and cluster systems.
For details, contact a certified service engineer.

PRIMEQUEST Microsoft Windows Server 2008 User's Guide
U41805-J-Z816-2-76/C122-E087-03EN 18
Chapter 3 Installation
This chapter explains the procedures for installing Windows Server 2008 on the PRIMEQUEST server.
・ The recommended configuration for Windows is a SAN boot configuration using SAN storage units
(ETERNUS*).
・ The explanations of procedures in this chapter assume that the SAN storage units used are
ETERNUS units.
■ Remarks
・ Windows Server 2008 for Itanium-based Systems does not support the Server Core Installation
Option.
・ Upgrade installation from Windows Server 2003 cannot be performed.
*: supply and support in EMEA for Fujitsu´s global accounts only

PRIMEQUEST Microsoft Windows Server 2008 User's Guide
U41805-J-Z816-2-76/C122-E087-03EN 19
3.1 Installation Flow
The Windows Server 2008 installation flow is shown below.
Figure 3-1 Installation flow
The following two methods are available for installing Windows Server 2008 on the PRIMEQUEST server:
・ Installation using SystemcastWizard Lite
・ Manual installation (through operations using the display, keyboard, and mouse connected to the
main unit)
Preparation for installation (→ 3.2) 1. Build SAN boot environment (→ Appendix D in installation manual) 2. Connect MMB and make settings 3. Remove internal disks
Installation using SystemcastWizard Lite (→3.3)
Manual installation (→3.4)
Settings after installation (→3.5) 1. Install High-reliability Tools 2. Connect internal disks 3. Install multipath driver

PRIMEQUEST Microsoft Windows Server 2008 User's Guide
U41805-J-Z816-2-76/C122-E087-03EN 20
Table 3-1 Comparison of installation methods
Installation using SystemcastWizard
Lite
Manual installation
Preparation of deployment server (*1) Required Not required
Time required for installation (rough
standard) (*2)
About one hour One hour and a half or
longer
Application of drivers/necessary tools Automatic application Manual application
Simultaneous installation in multiple
partitions
Possible Not possible
*1 A deployment server is a server on which SystemcastWizard Lite is installed. The prepared
deployment server must be separate from the PRIMEQUEST server. For details, see the PRIMEQUEST
SystemcastWizard Lite User's Guide (C122-E010EN).
*2 This is a rough standard time from the start of installation, after preparation for installation, until
Windows is ready for operation. It does not include the preparation time and the post-installation work time.
This value may vary depending on the hardware configuration.
Though preparations must be made (build of a deployment server and registration of resources) for installation
using SystemcastWizard Lite, the time taken for installation is shorter than the time taken for manual installation.
Also, SystemcastWizard Lite can perform simultaneous installation in multiple partitions. Furthermore, drivers
and necessary tools are automatically applied.
In contrast, manual installation can be started immediately with the Windows Server 2008 Installation DVD-ROM
disk and the PRIMEQUEST Drivers CD for Microsoft® Windows Server® 2008. However, the time taken for
installation is slightly longer than the time taken for installation using SystemcastWizard Lite, and drivers and
necessary tools must be installed manually after Windows installation. Furthermore, installation in multiple
partitions within a cabinet must be performed partition by partition in manual installation because the DVD-ROM
drive is occupied.
Select the installation method appropriate to the environment.
・ To perform installation in multiple partitions, the recommended method is installation using
SystemcastWizard Lite.
・ To perform installation in one partition, or if a deployment server cannot be prepared, the
recommended method is manual installation.

PRIMEQUEST Microsoft Windows Server 2008 User's Guide
U41805-J-Z816-2-76/C122-E087-03EN 21
3.2 Preparation for Installation Complete these steps before starting Windows installation. Always use these steps for preparation, regardless of
the installation method.
3.2.1 Preparing the required items The following items must be prepared for installation of Windows on the PRIMEQUEST server:
■ Installation using SystemcastWizard Lite
− Deployment server (server on which SystemcastWizard Lite is installed)
− Windows Server 2008 Installation DVD-ROM disk
− PRIMEQUEST Drivers CD for Microsoft® Windows Server® 2008
■ Manual installation
− Console (with the keyboard, display, and mouse (KVM) connected)
− Windows Server 2008 Installation DVD-ROM disk
− PRIMEQUEST Drivers CD for Microsoft® Windows Server® 2008
3.2.2 Building a SAN boot environment Build a SAN boot environment by following the steps below.
For details on the steps, see "Appendix D Installation in the SAN Boot Environment", in the PRIMEQUEST
500A/500/400 Series Installation Manual (U41632-J-Z816-x-76/C122-E001EN).
■ Design the SAN boot environment
The reliability of the PRIMEQUEST server varies significantly depending on the ETERNUS* or Fibre Channel
connections used.
■ Make SAN boot settings on the PRIMEQUEST server
Based on the environment design, make ETERNUS* settings and related settings on the PRIMEQUEST server.
Appropriate settings must be made for the Fibre Channel EFI driver.
■ Make ETERNUS*/Fibre Channel switch settings
Based on the cable connection drawing created during environment design, make settings for the
ETERNUS*/Fibre Channel switch and PRIMEQUEST server, connect cables to them, and make other
necessary settings and adjustments.
*: supply and support in EMEA for Fujitsu´s global accounts only

PRIMEQUEST Microsoft Windows Server 2008 User's Guide
U41805-J-Z816-2-76/C122-E087-03EN 22
Note:
Before starting installation, initialize the LUNs of the disk that is the Windows installation destination.
If the disk has data remaining from a previously installed operating system, installation may fail.
3.2.3 Connecting the MMB and making settings The MMB comes prepared with the test environment configured by a certified service engineer, and test programs
have been run on it. Therefore, switch from the setting for the test environment to that for the business operation
environment.
The necessary work items include setting the MMB IP address for business operation and connecting cables.
After connecting the MMB, use the MMB Web user interface (Web-UI) to register a user account, make security
settings, set the time, and make other MMB settings.
Connect the MMB and make settings by following the steps below.
Figure 3-2 MMB connection and setting workflow
Connection environment settings for business operation
Network settings for business operation
Various initial settings for MMB
- Make connection environment settings for business operation since connections have been set for testing purposes only.
Connection environment settings for business operation
Network settings for business operation
Various initial settings for MMB
- Make network settings and Web server settings for business operation since the existing settings are for testing purposes only.
- Register a user account. - Set up a user account for your Fujitsu
certified service engineer. - Set a system name. - Set the date and time. - Set up telnet. - Make VLAN settings for the management
LAN hub.

PRIMEQUEST Microsoft Windows Server 2008 User's Guide
U41805-J-Z816-2-76/C122-E087-03EN 23
The following items must be determined in advance for MMB settings:
・ IP address, host name, subnet mask, and gateway address
・ IP address of the personal computer used as the MMB console
・ User account
・ PRIMEQUEST system name (also used as the SNMP system name)
・ Environment in which the management VLAN operates
For details on the steps, see "Chapter 2 Setup", in the PRIMEQUEST 500A/500/400 Series Installation Manual
(U41632-J-Z816-x-76/C122-E001EN).
3.2.4 Making a single-path configuration and removing internal disks Before starting installation of the operating system, remove the disks not used for installation.
1. On the [Power Control] page of the MMB Web-UI, confirm that "Power Off" is displayed for the target
partition in the System Progress column.
PRIMEQUEST 580A/540A*/520A*/580/540/520: [Partition] → [Power Control]
PRIMEQUEST 510A*: [System] → [Power Control]
*: not supported by Fujitsu Technology Solutions

PRIMEQUEST Microsoft Windows Server 2008 User's Guide
U41805-J-Z816-2-76/C122-E087-03EN 24
Figure 3-3 [Power Control] page (PRIMEQUEST 580A/580/540A*/540)
Figure 3-4 [Power Control] page (PRIMEQUEST 520A*/520)
*: not supported by Fujitsu Technology Solutions

PRIMEQUEST Microsoft Windows Server 2008 User's Guide
U41805-J-Z816-2-76/C122-E087-03EN 25
Figure 3-5 [Power Control] page (PRIMEQUEST 510A*)
2. In an FC multipath configuration, disconnect the cable(s) on one side to make it a single-path configuration.
3. Remove any connected SCSI/SAS disks.
*: not supported by Fujitsu Technology Solutions
PRIMEQUEST Microsoft Windows Server 2008 User's Guide
U41805-J-Z816-2-76/C122-E087-03EN 26
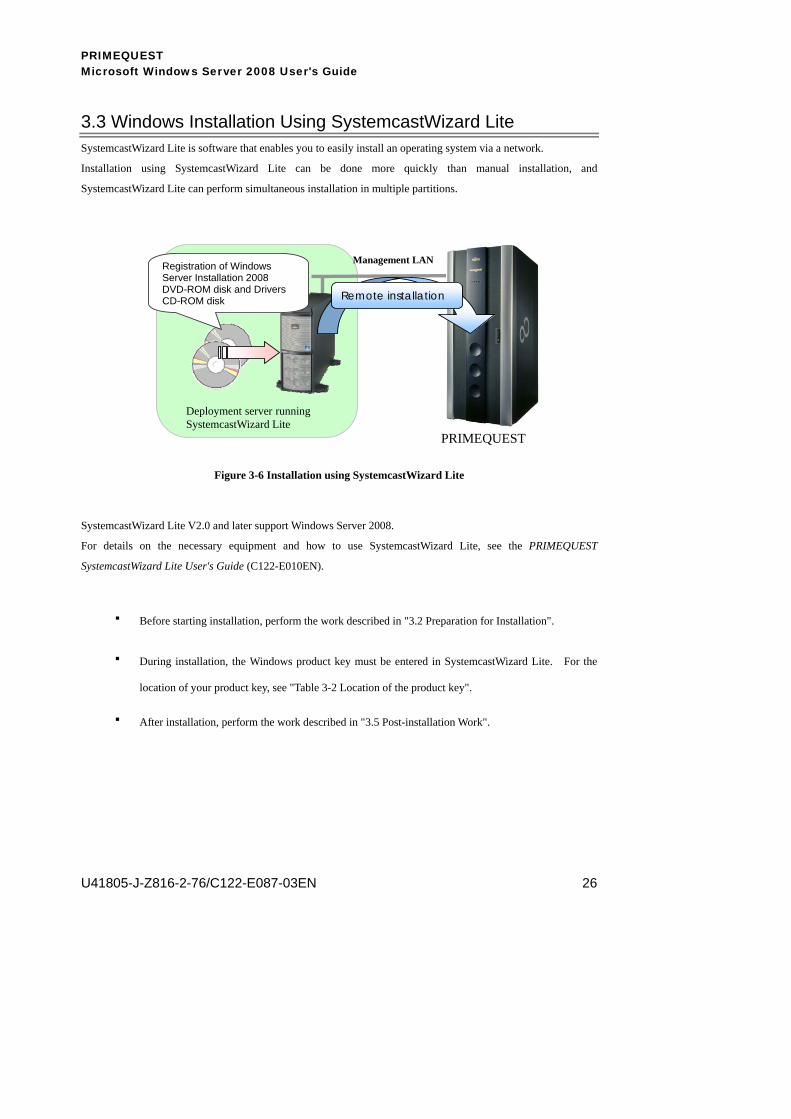
3.3 Windows Installation Using SystemcastWizard Lite SystemcastWizard Lite is software that enables you to easily install an operating system via a network.
Installation using SystemcastWizard Lite can be done more quickly than manual installation, and
SystemcastWizard Lite can perform simultaneous installation in multiple partitions.
Figure 3-6 Installation using SystemcastWizard Lite
SystemcastWizard Lite V2.0 and later support Windows Server 2008.
For details on the necessary equipment and how to use SystemcastWizard Lite, see the PRIMEQUEST
SystemcastWizard Lite User's Guide (C122-E010EN).
・ Before starting installation, perform the work described in "3.2 Preparation for Installation".
・ During installation, the Windows product key must be entered in SystemcastWizard Lite. For the
location of your product key, see "Table 3-2 Location of the product key".
・ After installation, perform the work described in "3.5 Post-installation Work".
Management LAN
PRIMEQUEST
Deployment server running SystemcastWizard Lite
Remote installation
Registration of Windows Server Installation 2008 DVD-ROM disk and Drivers CD-ROM disk

PRIMEQUEST Microsoft Windows Server 2008 User's Guide
U41805-J-Z816-2-76/C122-E087-03EN 27
3.4 Manual Installation of Windows This section explains the procedures for manual installation of Windows.
In contrast with the automated installation using SystemcastWizard Lite, which eliminates KVM operations
during installation, ordinary installation using the KVM is called manual installation, in this manual.
3.4.1 Required items The following items are required:
・ KVM (keyboard, display, and mouse connected to the main unit)
・ Windows Server 2008 Installation DVD-ROM disk
・ PRIMEQUEST Drivers CD for Microsoft® Windows Server® 2008 (Drivers CD-ROM)
The explanations of the procedures in subsequent sections assume that installation has been completed and
equipment has been connected as described in the procedures in the sections up to and including "3.2 Preparation
for Installation".
3.4.2 Installation flow Perform installation by following the procedure below.

PRIMEQUEST Microsoft Windows Server 2008 User's Guide
U41805-J-Z816-2-76/C122-E087-03EN 28
Figure 3-7 Manual installation flow
3.4.3 Switching the KVM/DVD-ROM drive If the PRIMEQUEST server has multiple partitions, switch the KVM and DVD-ROM drive connected to the
cabinet to the target partition before starting these operations.
If the server is the PRIMEQUEST 520A*/520, the switching is only for the DVD-ROM drive.
If the server is the PRIMEQUEST 510A*, the switching is not required since it does not have partitions.
Make the switch setting from the MMB.
*: not supported by Fujitsu Technology Solutions
Switch KVM/DVD-ROM drive
Insert Windows DVD-ROM disk
Turn on power to partition
Install Windows
Perform post-installation work

PRIMEQUEST Microsoft Windows Server 2008 User's Guide
U41805-J-Z816-2-76/C122-E087-03EN 29
Figure 3-8 KVM connection in the PRIMEQUEST 580A/540A*/580/540
Figure 3-9 KVM connection in the PRIMEQUEST 520A*/520
4. Log in to the MMB Web-UI.
For the MMB Web-UI login procedure, see "Section 2.3.2.1 Login to and logout from the MMB Web-UI", in
the PRIMEQUEST 500A/500/400 Series Installation Manual (U41632-J-Z816-x-76/C122-E001EN).
5. Display the following page:
[Partition] → [USB/Video/DVD Switch] (for the PRIMEQUEST 580A/540A*/580/540)
[Partition] → [DVD Switch] (for the PRIMEQUEST 520A*/520)
*: not supported by Fujitsu Technology Solutions
MMB
Partition Partition
DVD-ROMdrive
Management
KVM
Independent KVM switch
PRIMEQUEST
MMB Partition
Partition
Partition KVM interface unit
Management LAN
KVM
PRIMEQUEST
: :

PRIMEQUEST Microsoft Windows Server 2008 User's Guide
U41805-J-Z816-2-76/C122-E087-03EN 30
Figure 3-10 [USB/Video/DVD Switch] page (PRIMEQUEST 580A/540A*/580/540)
Figure 3-11 [USB/Video/DVD Switch] page
6. Select the [USB], [Video], and [DVD] radio buttons of the partition that is the Windows installation
destination, and click the [Apply] button.
*: not supported by Fujitsu Technology Solutions

PRIMEQUEST Microsoft Windows Server 2008 User's Guide
U41805-J-Z816-2-76/C122-E087-03EN 31
3.4.4 Installing Windows
7. Click [Power Control] from the MMB Web-UI.
PRIMEQUEST 580A/540A*/520A*/580/540/520: [Partition] → [Power Control]
PRIMEQUEST 510A*: [System] → [Power Control]
Figure 3-12 [Power Control] page (PRIMEQUEST 580A/540A*/580/540)
Figure 3-13 [Power Control] page (PRIMEQUEST 520A*/520)
*: not supported by Fujitsu Technology Solutions
Formatiert: Nummerierungund Aufzählungszeichen

PRIMEQUEST Microsoft Windows Server 2008 User's Guide
U41805-J-Z816-2-76/C122-E087-03EN 32
Figure 3-14 [Power Control] page (PRIMEQUEST 510A*)
8. Select [Power On] for the partition that is the Windows installation destination, in the Power Control column.
Remarks: If the power to the partition is already on, select [Reset].
9. Click the [Apply] button.
The [EFI Boot Manager] screen is displayed on the display monitor connected to the KVM interface unit.
EFI Boot Manager ver 1.xx [1.xx] Please select a boot option EFI Shell [Built-in] DVD/Acpi(xxxxxxxx,x)/Pci(xx|x)/Usb(x, x)/Usb(x, x) Network/Acpi(xxxxxxx,x)/Pci(xx|x)/Pci(x|x)/Mac(xxxxxxxxxxxx) Boot Option Maintenance Menu Setup Menu Use ^ and v to change option(s). Use Enter to select an option
10. Insert the Windows Server 2008 Installation DVD-ROM disk into the DVD-ROM drive of the KVM
interface unit.
11. Select "DVD/Acpi", and press the [Enter] key to start booting from the DVD-ROM disk.
When the following message is displayed, press any key:
Press any key to boot from CD or DVD...
12. The message shown below is displayed. The setup program takes about 10 minutes to start.
Windows is loading files...
*: not supported by Fujitsu Technology Solutions
Formatiert: Nummerierungund Aufzählungszeichen
Formatiert: Nummerierungund Aufzählungszeichen
Formatiert: Nummerierungund Aufzählungszeichen
Formatiert: Nummerierungund Aufzählungszeichen

PRIMEQUEST Microsoft Windows Server 2008 User's Guide
U41805-J-Z816-2-76/C122-E087-03EN 33
13. The window for language settings is displayed. Select the settings suitable for your environment, and click
[Next].
Figure 3-15 Selection of a language
14. The Windows installation window is displayed. Click [Install Now].
Figure 3-16 Windows installation
15. If the product key window is displayed, enter the product key. The location of your product key depends on
how you procured the product.
Formatiert: Nummerierungund Aufzählungszeichen
Formatiert: Nummerierungund Aufzählungszeichen
Formatiert: Nummerierungund Aufzählungszeichen

PRIMEQUEST Microsoft Windows Server 2008 User's Guide
U41805-J-Z816-2-76/C122-E087-03EN 34
Table 3-2 Location of the product key
Method by which Windows was
procured
Location of product key
Volume license Access the site at the URL shown on the Microsoft Open
License Order Confirmation sheet.
Bundled with hardware CoA sticker affixed to the main unit, or CoA sticker
provided as a component (*1)
*1 If the CoA sticker is provided as a component, confirm the contents of the "Important Notice"
included in the product package, and be sure to affix the sticker to the main unit.
Note.
In Windows Server 2008, two keys to "Product Key" and "Virtual Key" might have been described. In
that case, please enter the "Product Key".
16. The [Please Read the License Terms] page is displayed. Read the contents carefully. To accept the terms,
check the [I accept the license terms] check box, and click the [Next] button.
17. The [Which Type of Installation Do You Want?] page is displayed. Click [Custom (Advanced)].
Figure 3-17 Installation type
18. Load the FC driver. When the [Where Do You Want to Install Windows?] page is displayed, click [Load
Driver] at the bottom of the window.
Formatiert: Nummerierungund Aufzählungszeichen
Formatiert: Nummerierungund Aufzählungszeichen
Formatiert: Nummerierungund Aufzählungszeichen

PRIMEQUEST Microsoft Windows Server 2008 User's Guide
U41805-J-Z816-2-76/C122-E087-03EN 35
Figure 3-18 Installation location
19. When the [Load Driver] dialog box is displayed, remove the Windows Server Installation 2008 DVD-ROM
disk from the DVD-ROM drive, insert the Drivers CD-ROM disk, and click the [Browse] button.
Figure 3-19 [Load Driver] dialog box
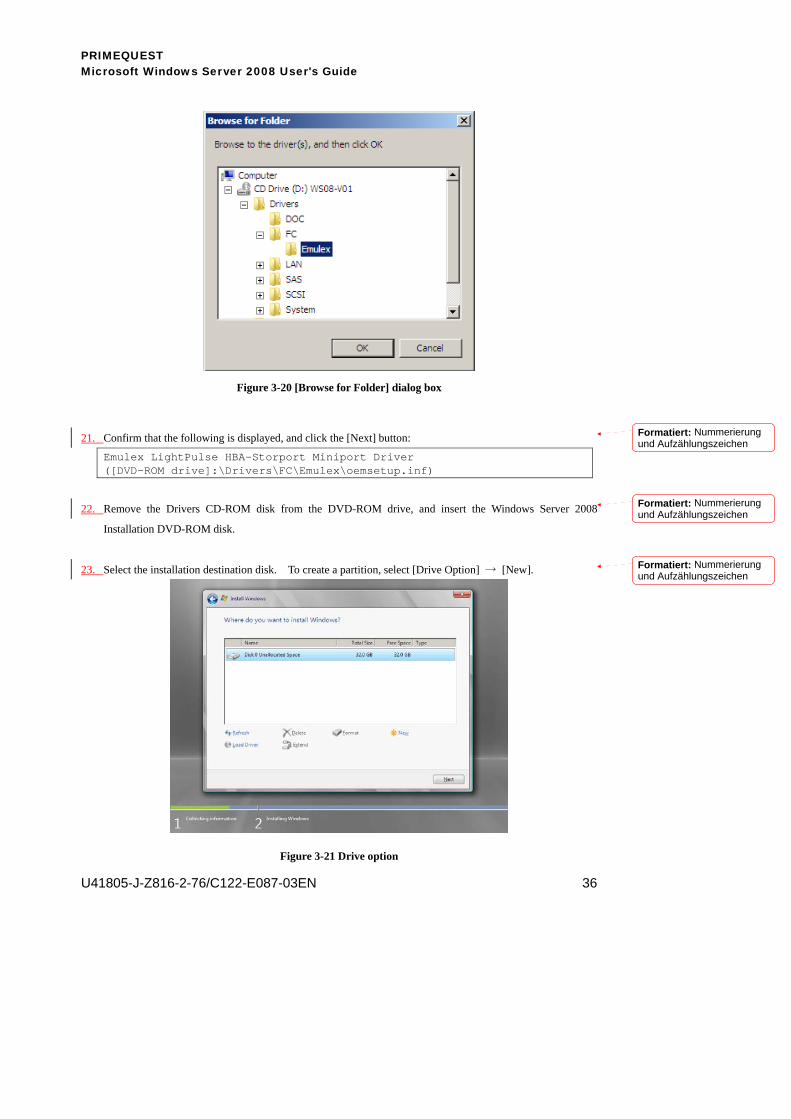
20. The [Browse for Folder] dialog box is displayed. Select the following folder on the Drivers CD-ROM disk,
and click the [OK] button:
[DVD-ROM-drive]:\Drivers\FC\Emulex
Formatiert: Nummerierungund Aufzählungszeichen
Formatiert: Nummerierungund Aufzählungszeichen
PRIMEQUEST Microsoft Windows Server 2008 User's Guide
U41805-J-Z816-2-76/C122-E087-03EN 36
Figure 3-20 [Browse for Folder] dialog box
21. Confirm that the following is displayed, and click the [Next] button:
Emulex LightPulse HBA-Storport Miniport Driver ([DVD-ROM drive]:\Drivers\FC\Emulex\oemsetup.inf)
22. Remove the Drivers CD-ROM disk from the DVD-ROM drive, and insert the Windows Server 2008
Installation DVD-ROM disk.
23. Select the installation destination disk. To create a partition, select [Drive Option] → [New].
Figure 3-21 Drive option
Formatiert: Nummerierungund Aufzählungszeichen
Formatiert: Nummerierungund Aufzählungszeichen
Formatiert: Nummerierungund Aufzählungszeichen

PRIMEQUEST Microsoft Windows Server 2008 User's Guide
U41805-J-Z816-2-76/C122-E087-03EN 37
24. Windows installation begins. Wait until installation is completed.
The installation process involves several reboots, but do not operate the console during installation.
25. The screen prompting you to enter an administrator password is displayed when installation is completed.
Specify the password.
26. After Windows starts up, install the High-reliability Tools.
For details, see "3.5.1 Installing the High-reliability Tools".
Formatiert: Nummerierungund Aufzählungszeichen
Formatiert: Nummerierungund Aufzählungszeichen
Formatiert: Nummerierungund Aufzählungszeichen
PRIMEQUEST Microsoft Windows Server 2008 User's Guide
U41805-J-Z816-2-76/C122-E087-03EN 38
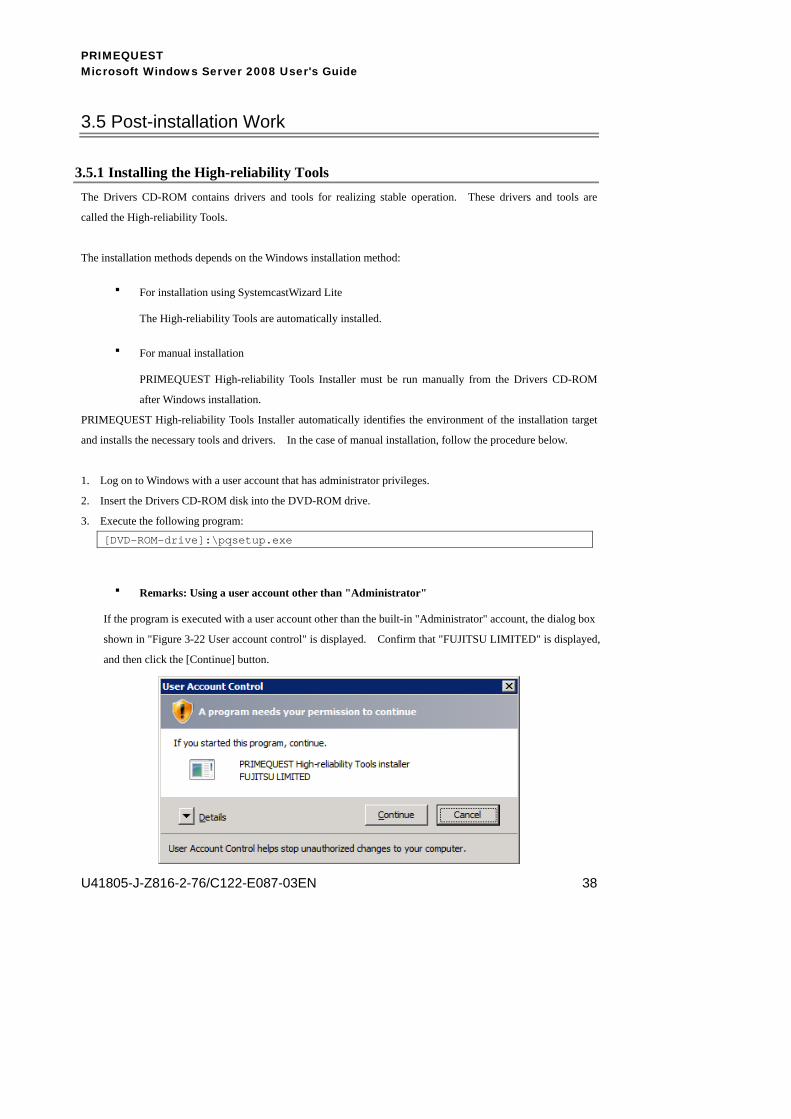
3.5 Post-installation Work
3.5.1 Installing the High-reliability Tools The Drivers CD-ROM contains drivers and tools for realizing stable operation. These drivers and tools are
called the High-reliability Tools.
The installation methods depends on the Windows installation method:
・ For installation using SystemcastWizard Lite
The High-reliability Tools are automatically installed.
・ For manual installation
PRIMEQUEST High-reliability Tools Installer must be run manually from the Drivers CD-ROM
after Windows installation.
PRIMEQUEST High-reliability Tools Installer automatically identifies the environment of the installation target
and installs the necessary tools and drivers. In the case of manual installation, follow the procedure below.
1. Log on to Windows with a user account that has administrator privileges.
2. Insert the Drivers CD-ROM disk into the DVD-ROM drive.
3. Execute the following program:
[DVD-ROM-drive]:\pqsetup.exe
・ Remarks: Using a user account other than "Administrator"
If the program is executed with a user account other than the built-in "Administrator" account, the dialog box
shown in "Figure 3-22 User account control" is displayed. Confirm that "FUJITSU LIMITED" is displayed,
and then click the [Continue] button.

PRIMEQUEST Microsoft Windows Server 2008 User's Guide
U41805-J-Z816-2-76/C122-E087-03EN 39
Figure 3-22 User account control
4. PRIMEQUEST High-reliability Tools Installer starts, and a dialog box is displayed.
Figure 3-23 [PRIMEQUEST Software Installer] dialog box displayed at startup
5. Confirm the information displayed under "Following software will be installed", and click the [Run] button.
Installation of the High-reliability Tools and drivers begins.
6. When a message is displayed to indicate the completion of installation, click the [Exit] button.
7. Restart the system.
■ Remarks
Log files are created at the following locations:
− Results of software installation %systemroot%\system32\LogFiles\PQSetup.log
− Results of driver installation %systemroot%\system32\LogFiles\pqdad-yyyymmdd.log
%systemroot%: Windows installation folder (usually, C:\Windows)
yyyymmdd: Year/month/day of driver installation

PRIMEQUEST Microsoft Windows Server 2008 User's Guide
U41805-J-Z816-2-76/C122-E087-03EN 40
■ High-reliability Tools list
Table 3-3 Software programs installed by PRIMEQUEST Software Installer and their settings
Software name / setting to be changed
Description
Tools
PSA PRIMEQUEST system management application
DSNAP Tool for collecting necessary information for support
Software Support Guide Tool for collecting necessary information for support
Drivers
Intel LAN Driver Intel LAN driver
Broadcom LAN Driver On-board LAN driver
Neterion LAN Driver Neterion LAN driver
Emulex FC Driver Fibre Channel card driver
LSI Logic SCSI Driver SCSI driver
LSI Logic SAS Driver SAS driver
Driver management tools
Intel PROSet Provides the Intel LAN adapter with a teaming function.
Xframe Control Panel Provides the Neterion LAN adapter with a teaming function.
Emulex HBAnyware Enables LUN state monitoring, etc. using Fibre Channel.
Broadcom Advanced Control
Suite
Provides the Broadcom On-board LAN adapter with a teaming function.
Setting
Remote desktop setting Set the remote desktop to enable remote management.
Kernel memory dump setting Set memory dump collection in preparation for any problems.
PXH setting Change the PXH setting.
PEX setting Change the PEX setting.
USB setting Change the USB setting.

PRIMEQUEST Microsoft Windows Server 2008 User's Guide
U41805-J-Z816-2-76/C122-E087-03EN 41
■ Notes on using PRIMEQUEST High-reliability Tools Installer
− The PSHED plug-in of PSA is not automatically installed.
The plug-in is stored in the Not_installed folder on the desktop and must be installed manually. The
installation procedure is explained in the next chapter, in Section "4.1.2 Installing the PSHED plug-in
driver".
− Intel PROSet and Neterion Xframe Control Panel are not automatically installed. They are stored in the
Not_installed folder on the desktop and must be installed manually. For the installation procedures, see
the documents listed below. These following documents are stored in the Drivers\DOC folder on the
Drivers CD-ROM:
• Intel PROSet installation procedure → LAN Card Users Guide (C122-E008)
• Neterion Xframe Control Panel installation procedure → 10Gigabit LAN card (PCI-X) Users Guide
(C122-E081)
− If a target device (e.g., LAN card, Fibre Channel card) has not been mounted at the time of driver/tool
installation, the corresponding driver and tools are not installed.
3.5.2 Connecting internal disks Any SCSI/SAS disks that were removed before the operating system was installed must be restored to their
original locations.
Shut down the system, and connect the SCSI/SAS disks.
3.5.3 Installing the multipath driver Multipath environment settings must be made after the operating system is set up in a single-path environment
using an FC cable.
Install the multipath driver, and make the multipath environment settings.
■ Note
・ Do not establish a multipath connection before installing the multipath driver. Doing so may
destroy data. For details on multipath driver installation and multipath connections, see the
ETERNUS Multipath Driver V2.0 User's Guide (Windows®).

PRIMEQUEST Microsoft Windows Server 2008 User's Guide
U41805-J-Z816-2-76/C122-E087-03EN 42
Chapter 4 Environment Settings This chapter explains the environment settings that must be made before the start of operation. Administrator
privileges are required in the procedures in this chapter.
Table 4-1 Work types
Work name Work description Required work?
Reference
PSA settings Install PSA, and make monitoring settings. Required 4.1
Dump environment
settings
Make dump environment settings. Required 4.2
Network settings Configure a network for on-board/optional cards. Optional 4.3
Windows activation Activate Windows Server 2008. Required 4.4
NTP client settings Specify an NTP client. Optional 4.5
Storage of setting
information
Save PSA setting information and EFI
configuration information.
Recommended 4.6
4.1 PSA Settings As explained below, confirm settings for operation of PSA as follows:
・ Required
− Confirming management LAN settings (→ "4.1.1")
− Installing the PSHED plug-in driver (→ "4.1.2")
・ Only as necessary
− Setting a trap destination (→ "4.1.3")
− Setting and confirming a trap destination and mail destination via the MMB (→ "4.1.4")
− Making Windows Firewall settings (→ "4.1.5")
− Setting Watchdog monitoring for a period after a STOP error (fatal system error) occurrence (→ "4.1.6")
PRIMEQUEST Microsoft Windows Server 2008 User's Guide
U41805-J-Z816-2-76/C122-E087-03EN 43
■ Remarks
・ Use PRIMEQUEST Software Installer or SystemcastWizard Lite to install PSA.
− For details on installation using PRIMEQUEST Software Installer, see "3.5.1 Installing the High-reliability
Tools".
− In Windows installation using SystemcastWizard Lite, PSA is automatically installed. For details on
SystemcastWizard Lite, see the PRIMEQUEST SystemcastWizard Lite User's Guide (C122-E010EN).
・ The necessary components for REMCS* functions on the operating system side are installed when
PSA is installed. A certified service engineer will make REMCS* settings.
Each of the following settings required for PSA operation are made automatically when PSA is installed:
1. Service settings
• PRIMEQUEST Server Agent
• PRIMEQUEST PEM Command Service
• PRIMEQUEST PSA Environment Control Service
2. Environment variable settings
• PATH variable
The values used by PSA are added to the existing PATH variable.
• FJSVpsa_INSTALLPATH variable
It is added as a new variable.
3. Port settings
The TCP:24450 port is set for use by PSA.
4. SNMP security setting
Security is set for the SNMP Service since PSA must receive SNMP packets from the MMB.
Processing varies depending on the selection made on the [Security] tab in the [SNMP Service Properties]
dialog box during PSA installation.
• "Accept SNMP packets from any host" is selected:
No SNMP security setting is made.
• "Accept SNMP packets from these hosts" is selected:
If the IP address of the MMB and localhost have not been set for SNMP security, localhost will be set.
*: not supported by Fujitsu Technology Solutions

PRIMEQUEST Microsoft Windows Server 2008 User's Guide
U41805-J-Z816-2-76/C122-E087-03EN 44
■ Notes
• If the SNMP Service security setting of "Accept SNMP packets from any host" is changed to "Accept
SNMP packets from these hosts" after PSA is installed, or if the IP address of the MMB is changed after
PSA is installed, execute the SNMP security setting command (setsnmpsec). For details on the
command, see the PRIMEQUEST 580A/540A/520A//500/400 Series Reference Manual: Basic
Operation/GUI/Command (U41633-J-Z816-x-76/C122-E003EN) or the PRIMEQUEST 510A Reference
Manual: Basic Operation/GUI/Command (C122-E096EN)*.
• When PSA is started for the first time after being installed, the error message "E_33077 PSA is Not
Active. (01:0000)" may be displayed following an attempt to display the PSA page from the Web-UI.
This is because collection of system sensor information takes more time when PSA is started for the first
time. Wait several minutes, and then display the PSA page again.
• When changing the IP addresses of the MMB and management LAN on the partition side, be sure to
restart PSA. Otherwise, a PSA page display error occurs in the MMB Web-UI, and errors detected by
PSA cannot be reported.
• Note the following about Windows settings:
Do not stop the Print Spooler Service, which is a Windows service. The operating system information
collection function uses Windows Management Instrumentation (WMI) to collect configuration
information. However, an error is reported to WMI when the Print Spooler Service is stopped, and then
configuration information cannot be correctly collected.
• If a value less than 20000 (20 seconds) is the specified value of the registry shown below, a hang may
occur at the operating system shutdown time. Make sure that the registry is set with a value of 20000
(20 seconds) or greater.
HKEY_LOCAL_MACHINE\SYSTEM\CurrentControlSet\Control
" WaitToKillServiceTimeout" (Type: REG_DWORD; default: 20000)
(The wait time (ms) until the service exits at the shutdown time can be specified in the above registry.)
• The following message may be recorded in the event log at PSA startup, but this message does not
represent an operational problem:
"PM child process abnormal end [6:750] (tagt) 1:0x00000000"
FJSVpsa event ID 62
*: not supported by Fujitsu Technology Solutions

PRIMEQUEST Microsoft Windows Server 2008 User's Guide
U41805-J-Z816-2-76/C122-E087-03EN 45
4.1.1 Management LAN settings This section explains how to make management LAN settings.
On the partition side, the network interface card (NIC) connected to the management LAN must be active since
PSA and the MMB communicate with each other via the management LAN. Set an available IP address for
TCP/IP (IPv4) and disable IPv6, because the management LAN does not support IPv6.
Also in this procedure, redundancy settings for the network adapters of the management LAN of the
PRIMEQUEST 580A/540A*/580/540 will be made using Intel PROSet Teaming.
■ Remarks
− Intel PROSet must be installed in advance.
− Specify "VLAN Mode" for the VLAN setting of the management LAN hub of the MMB.
→ Section 2.3.4.5, "Setting a VLAN in a management LAN hub", in the PRIMEQUEST 500A/500/400
Series Installation Manual (U41632-J-Z816-x-76/C122-E001EN)
− The spanning tree (STP) function of the switch connected to the MMB user port (management LAN) must
be set to OFF.
■ Disabling IPv6 for the management LAN
(1) Select [Control Panel] → [Network and Sharing Center] → [Manage network connections].
(2) Select and right-click [Intel(R) PRO/100 VE Network Connection], and then select [Properties] from the
menu.
(3) Uncheck the [Internet Protocol Version 6 (TCP/IPv6)] check box, and click [OK].
(4) For the PRIMEQUEST 580A/540A*/580/540, follow the same procedure with [Intel(R) PRO/100 M
Network Connection].
■ Redundant configuration setting procedure for the management LAN
(PRIMEQUEST 580A/540A*/580/540)
(1) Click the [Start] menu → [Server Manager].
(2) In the [Server Manager] window, select [Diagnostics] → [Device Manager].
(3) Expand [Network Adapters], and click [Intel(R) PRO/100 VE Network Connection].
*: not supported by Fujitsu Technology Solutions

PRIMEQUEST Microsoft Windows Server 2008 User's Guide
U41805-J-Z816-2-76/C122-E087-03EN 46
Figure 4-1 [Server Manager] (Device Manager) window
(4) The [Properties] dialog box is displayed.
Click the [Teaming] tab, select [Team with other adapters], and then click the [New Team] button.

PRIMEQUEST Microsoft Windows Server 2008 User's Guide
U41805-J-Z816-2-76/C122-E087-03EN 47
Figure 4-2 [Teaming] tab
(5) The [New Team Wizard] dialog box is displayed.
Enter a team name (default: Team#0), and click the [Next] button.

PRIMEQUEST Microsoft Windows Server 2008 User's Guide
U41805-J-Z816-2-76/C122-E087-03EN 48
Figure 4-3 [New Team Wizard] dialog box
(6) The network adapters that can be teaming targets are listed.
Check [Intel(R) PRO/100 VE Network Connection] and [Intel(R) PRO/100 M Network Connection],
and click the [Next] button.
Figure 4-4 Network adapter list

PRIMEQUEST Microsoft Windows Server 2008 User's Guide
U41805-J-Z816-2-76/C122-E087-03EN 49
(7) Select "Adapter Fault Tolerance" in the list of team types, and click [Next].
Figure 4-5 Selection of a team type
(8) When the following dialog box is displayed, click the [Finish] button to start teaming configuration
processing.
Figure 4-6 Dialog box displayed when you finish making selections

PRIMEQUEST Microsoft Windows Server 2008 User's Guide
U41805-J-Z816-2-76/C122-E087-03EN 50
(9) A teaming device is created and the properties are displayed when teaming configuration processing is
completed.
Click the [Settings] tab, and confirm that the correct adapter is displayed. When the correct adapter is
displayed, click the [OK] button to exit. If there is any error, click the [Delete Team] button to delete
the teaming device, and repeat step 2 and the subsequent steps.
Figure 4-7 Team#0 properties
(10) The display returns to the [Intel(R) PRO/100 VE Network Connection Properties] dialog box.
Click the [OK] button to exit, and close [Computer Management].
(11) Select [Control Panel] → [Network and Sharing Center] → [Manage network connections].
A list of networks is displayed.
(12) Select and right-click the device whose device name is the specified team name (e.g., Team#0), and
then select [Properties] from the menu.
(13) Select [Internet Protocol Version 4 (TCP/IPv4)], and click the [Properties] button. When the [Internet
Protocol Version 4 (TCP/IPv4)] dialog box is displayed, specify an IP address, subnet mask, default
gateway, and other information.

PRIMEQUEST Microsoft Windows Server 2008 User's Guide
U41805-J-Z816-2-76/C122-E087-03EN 51
(14) Uncheck the [Internet Protocol Version 6 (TCP/IPv6)] check box. After completing this setting, click
the [OK] button.
Figure 4-8 [Local Area Connection Properties] dialog box
As a result of the operations described above, link monitoring of the adapter begins, and the management LAN is
set in a redundant configuration.
Lastly, restart the operating system to enable teaming.
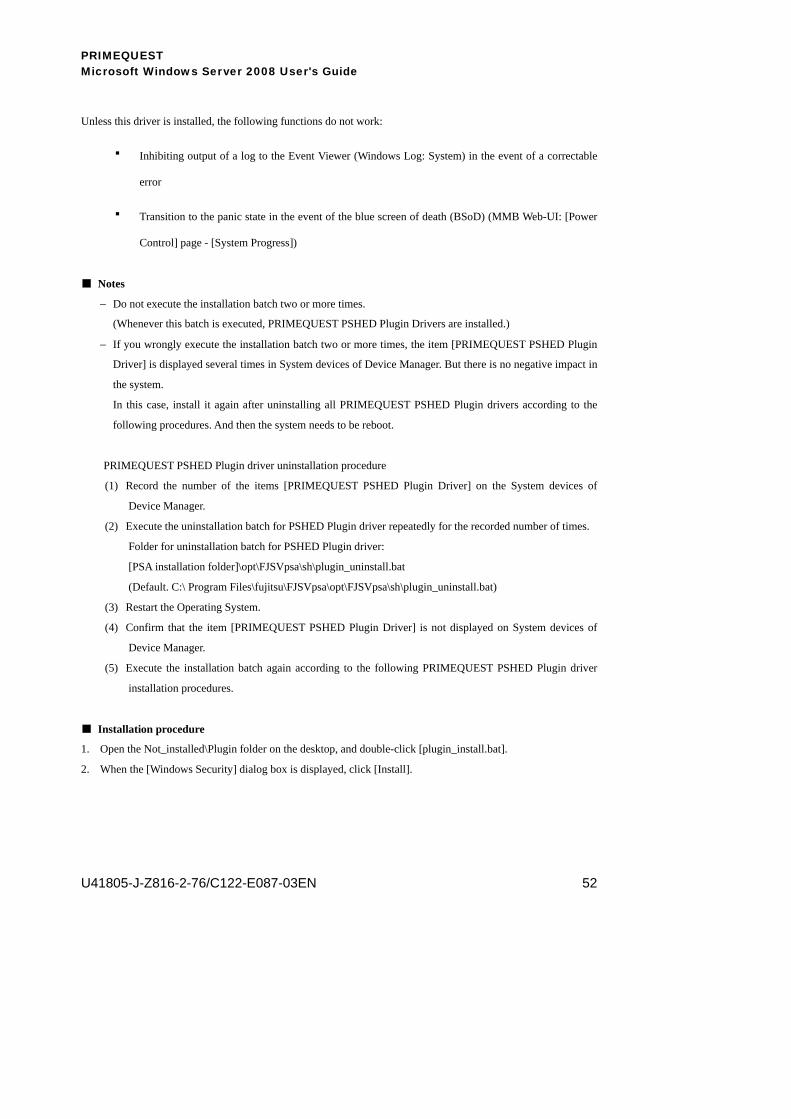
4.1.2 Installing the PSHED plug-in driver The PSHED plug-in is required for extending the functions of the Windows Hardware Error Architecture
(WHEA).
This driver is not automatically installed and must be installed manually using the batch file (plugin_install.bat)
stored in the Not_installed folder on the desktop.
PRIMEQUEST Microsoft Windows Server 2008 User's Guide
U41805-J-Z816-2-76/C122-E087-03EN 52
Unless this driver is installed, the following functions do not work:
・ Inhibiting output of a log to the Event Viewer (Windows Log: System) in the event of a correctable
error
・ Transition to the panic state in the event of the blue screen of death (BSoD) (MMB Web-UI: [Power
Control] page - [System Progress])
■ Notes
− Do not execute the installation batch two or more times.
(Whenever this batch is executed, PRIMEQUEST PSHED Plugin Drivers are installed.)
− If you wrongly execute the installation batch two or more times, the item [PRIMEQUEST PSHED Plugin
Driver] is displayed several times in System devices of Device Manager. But there is no negative impact in
the system.
In this case, install it again after uninstalling all PRIMEQUEST PSHED Plugin drivers according to the
following procedures. And then the system needs to be reboot.
PRIMEQUEST PSHED Plugin driver uninstallation procedure
(1) Record the number of the items [PRIMEQUEST PSHED Plugin Driver] on the System devices of
Device Manager.
(2) Execute the uninstallation batch for PSHED Plugin driver repeatedly for the recorded number of times.
Folder for uninstallation batch for PSHED Plugin driver:
[PSA installation folder]\opt\FJSVpsa\sh\plugin_uninstall.bat
(Default. C:\ Program Files\fujitsu\FJSVpsa\opt\FJSVpsa\sh\plugin_uninstall.bat)
(3) Restart the Operating System.
(4) Confirm that the item [PRIMEQUEST PSHED Plugin Driver] is not displayed on System devices of
Device Manager.
(5) Execute the installation batch again according to the following PRIMEQUEST PSHED Plugin driver
installation procedures.
■ Installation procedure
1. Open the Not_installed\Plugin folder on the desktop, and double-click [plugin_install.bat].
2. When the [Windows Security] dialog box is displayed, click [Install].

PRIMEQUEST Microsoft Windows Server 2008 User's Guide
U41805-J-Z816-2-76/C122-E087-03EN 53
Figure 4-9 [Windows Security] dialog box
3. Restart the operating system. This driver starts running after the restart of the operating system.
4. Confirm that the item [PRIMEQUEST PSHED Plugin Driver] is displayed on System devices of Device
Manager.
If it is not displayed, execute from procedure 1, again.
4.1.3 Setting a trap destination Set the SNMP trap destination.
■ Notes
− SNMPv3 is not supported in Windows.
− Make this setting only as necessary. In partitions managed by system management software, this setting
is required.
− The trap destination must be able to receive the standard trap of the SNMP Service, and applications for
receiving traps and management software must be running there.
1. Click the [Start] menu → [Administrative Tools] → [Services].
2. Double-click [SNMP Service] in the right pane.
The [SNMP Service Properties] dialog box is displayed.
3. Click [Traps].
4. Enter the community name that you want to set in [Community Name], and click [Add].
5. Click [Add] Under "Trap Destination".
6. Enter the host name or IP address of the server that will receives traps (send destination), and click [Add].
Click [OK].
7. Click [Operations] → [Restart] from the menu bar to restart the SNMP Service.

PRIMEQUEST Microsoft Windows Server 2008 User's Guide
U41805-J-Z816-2-76/C122-E087-03EN 54
■ Method for confirming the trap destination settings
To confirm the trap destination settings, send the standard trap of the SNMP Service when the SNMP Service is
restarted in step 7. The settings can be confirmed correct depending on whether this trap was received.
■ Remarks
Restart the SNMP Service by performing step 7 on the trap sending computer.
In that operation, "ColdStart", which is the standard trap of the SNMP Service, is posted to the trap receiving
application from the trap destination.
For example, suppose that the trap destination is a Linux machine and the trap is received by snmptrapd; then,
the following message is displayed, which confirms that traps can be correctly received:
Aug 17 14:50:03 pq-server snmptrapd[2600]: 2005-08-17 14:50:03 pq-server.fujitsu.com [192.168.0.162] (via 192.168.0.162) TRAP, SNMP v1, community public SNMPv2-SMI:: enterprises.211.1.31.1.2.100.3 Cold Start Trap (0) Uptime: 0:00:00.00
4.1.4 Setting a trap destination and mail destination via the MMB
■ Notes
− Make this setting only as necessary.
− In partitions managed by system management software, this setting is required.
The MMB Web-UI is used to set a trap destination and mail destination via the MMB.
For details on the trap destinations involving the MMB, see "Section 5.1.2 System SNMP settings", in the
PRIMEQUEST 500A/500/400 Series Installation Manual (U41632-J-Z816-x-76/C122-E001EN). For details on
the mail destinations involving the MMB, see "Section 2.3.3.5 SMTP settings", in the PRIMEQUEST
500A/500/400 Series Installation Manual (U41632-J-Z816-x-76/C122-E001EN).

PRIMEQUEST Microsoft Windows Server 2008 User's Guide
U41805-J-Z816-2-76/C122-E087-03EN 55
4.1.5 Making Windows Firewall settings
To enable Windows Firewall for operation, the following ports must be open so that they can be used to
communicate with MMB:
・ UDP:Port 161 used by SNMP Service [receive data from MMB]
・ TCP:Port 24450 used by fjpsawg.exe [receive data from MMB]
・ TCP port for sending used by fjpsammbs.exe [send data to MMB TCP:Port 5000]
・ ICMP to MMB port used by fjpsammbs.exe
The [Windows Firewall with Advanced Security] window is used to make Windows Firewall settings.
(1) Click [Administrative Tools] → [Windows Firewall with Advanced Security] from the [Start] menu.
(2) The [Windows Firewall with Advanced Security] window is displayed. Click [Inbound Rules] in the
left pane. The [Inbound Rules] pane is displayed in the center with a list in it.

PRIMEQUEST Microsoft Windows Server 2008 User's Guide
U41805-J-Z816-2-76/C122-E087-03EN 56
Figure 4-10 Windows Firewall
(3) Select and right-click [SNMP Service (UDP In)] in [Inbound Rules], and then select [Properties].
There are two rules named "SNMP Service (UDP In)": one has the Domain profile, and the other has
the Private, Public profile. Follow steps (3) to (6) for every SNMP Service (UDP In) rule.
(4) The [SNMP Service (UDP In) Properties] dialog box is displayed. Click the [General] tab, and check
the [Enabled] check box in "General". (It is checked by default.)

PRIMEQUEST Microsoft Windows Server 2008 User's Guide
U41805-J-Z816-2-76/C122-E087-03EN 57
Figure 4-11 SNMP Service (UDP In) Properties - General
(5) Click the [Scope] tab. Select [Any IP address] in "Local IP address". Select [These IP addresses] in
"Remote IP address", and click [Add].

PRIMEQUEST Microsoft Windows Server 2008 User's Guide
U41805-J-Z816-2-76/C122-E087-03EN 58
Figure 4-12 SNMP Service (UDP In) Properties - Scope
(6) The [IP Address] dialog box is displayed. Select [Predefined set of computers:], and then select [Local
subnet] from the list. Click [OK].

PRIMEQUEST Microsoft Windows Server 2008 User's Guide
U41805-J-Z816-2-76/C122-E087-03EN 59
Figure 4-13 IP Address
(7) Click [OK] to close the [SNMP Service (UDP In) Properties] dialog box.
(8) Click [New Rule…] in the right pane of the [Windows Firewall with Advanced Security] window. The
[New Inbound Rule Wizard] dialog box is displayed, with "Rule Type" highlighted at the upper left.
Select [Custom], and click [Next].

PRIMEQUEST Microsoft Windows Server 2008 User's Guide
U41805-J-Z816-2-76/C122-E087-03EN 60
Figure 4-14 New Inbound Rule Wizard - Rule Type
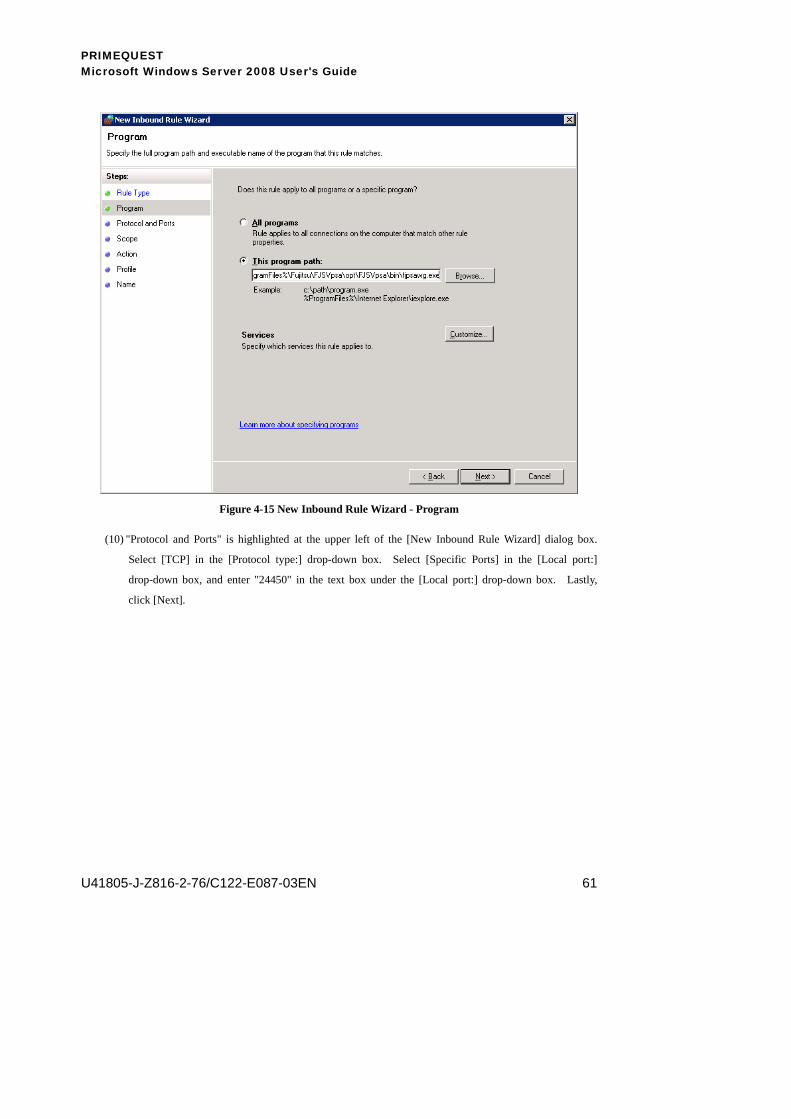
(9) "Program" is highlighted at the upper left of the [New Inbound Rule Wizard] dialog box. Select [This
program path], click [Browse…], and then select the fjpsawg.exe program. The fjpsawg.exe program
is in the opt\FJSVpsa\bin\ folder in the PSA install path. The default PSA install path is C:\Program
Files\fujitsu\FJSVpsa\. Next, click [Next].
PRIMEQUEST Microsoft Windows Server 2008 User's Guide
U41805-J-Z816-2-76/C122-E087-03EN 61
Figure 4-15 New Inbound Rule Wizard - Program
(10) "Protocol and Ports" is highlighted at the upper left of the [New Inbound Rule Wizard] dialog box.
Select [TCP] in the [Protocol type:] drop-down box. Select [Specific Ports] in the [Local port:]
drop-down box, and enter "24450" in the text box under the [Local port:] drop-down box. Lastly,
click [Next].

PRIMEQUEST Microsoft Windows Server 2008 User's Guide
U41805-J-Z816-2-76/C122-E087-03EN 62
Figure 4-16 New Inbound Rule Wizard - Protocol and Ports
(11) "Scope" is highlighted at the upper left of the [New Inbound Rule Wizard] dialog box. Select [Any IP
Address] under "Which local IP addresses does this rule match?" Select [These IP Addresses:] under
"Which remote IP addresses does this rule match?" Click [Add…], and enter the logical IP address of
the MMB. Click [Next].

PRIMEQUEST Microsoft Windows Server 2008 User's Guide
U41805-J-Z816-2-76/C122-E087-03EN 63
Figure 4-17 New Inbound Rule Wizard - Scope
(12) "Action" is highlighted at the upper left of the [New Inbound Rule Wizard] dialog box. Select [Allow
the connection], and click [Next].

PRIMEQUEST Microsoft Windows Server 2008 User's Guide
U41805-J-Z816-2-76/C122-E087-03EN 64
Figure 4-18 New Inbound Rule Wizard - Action
(13) "Profile" is highlighted at the upper left of the [New Inbound Rule Wizard] dialog box. Check all
check boxes ([Domain], [Private], and [Public]), and click [Next].

PRIMEQUEST Microsoft Windows Server 2008 User's Guide
U41805-J-Z816-2-76/C122-E087-03EN 65
Figure 4-19 New Inbound Rule Wizard - Profile
(14) "Name" is highlighted at the upper left of the [New Inbound Rule Wizard] dialog box. Enter
"PSAWG" in the [Name:] text box, and click [Finish].

PRIMEQUEST Microsoft Windows Server 2008 User's Guide
U41805-J-Z816-2-76/C122-E087-03EN 66
Figure 4-20 New Inbound Rule Wizard - Name
(15) Click [Outbound Rules] in the left pane of the [Windows Firewall with Advanced Security] window.
The [Outbound Rules] pane is displayed in the center.
(16) Click [New Rule…] in the right pane of the [Windows Firewall with Advanced Security] window. The
[New Outbound Rule Wizard] dialog box is displayed, with "Rule Type" highlighted at the upper left.
Select [Custom], and click [Next].
(17) "Program" is highlighted at the upper left of the [New Outbound Rule Wizard] dialog box. Select
[This program path], click [Browse…], and then select the fjpsammbs.exe program. The
fjpsammbs.exe program is in the opt\FJSVpsa\bin\ folder in the PSA install path. The default PSA
install path is C:\Program Files\fujitsu\FJSVpsa\. Next, click [Next].
(18) "Protocol and Ports" is highlighted at the upper left of the [New Outbound Rule Wizard] dialog box.
Select [TCP] in the [Protocol type:] drop-down box. Select [All Ports] in the [Local port:] drop-down
box. Select [Specific Ports] in the [Remote port:] drop-down box, and enter "5000" in the text box
under the [Remote port:] drop-down box. Lastly, click [Next].

PRIMEQUEST Microsoft Windows Server 2008 User's Guide
U41805-J-Z816-2-76/C122-E087-03EN 67
Figure 4-21 New Outbound Rule Wizard - Protocol and Ports
(19) "Scope" is highlighted at the upper left of the [New Outbound Rule Wizard] dialog box. Select [Any
IP Address] under "Which local IP addresses does this rule match?" Select [These IP Addresses:]
under "Which remote IP addresses does this rule match?" Click [Add...], and enter the logical IP
address of the MMB. Click [Next].
(20) "Action" is highlighted at the upper left of the [New Outbound Rule Wizard] dialog box. Select
[Allow the connection], and click [Next].
(21) "Profile" is highlighted at the upper left of the [New Outbound Rule Wizard] dialog box. Check all
check boxes ([Domain], [Private], and [Public]), and click [Next].
(22) "Name" is highlighted at the upper left of the [New Outbound Rule Wizard] dialog box. Enter
"PSAMMBS" in the [Name:] text box, and click [Finish].
(23) Click [New Rule…] again in the right pane of the [Windows Firewall with Advanced Security] window.
The [New Outbound Rule Wizard] dialog box is displayed, with "Rule Type" highlighted at the upper
left. Select [Custom], and click [Next].

PRIMEQUEST Microsoft Windows Server 2008 User's Guide
U41805-J-Z816-2-76/C122-E087-03EN 68
(24) "Program" is highlighted at the upper left of the [New Outbound Rule Wizard] dialog box. Select
[This program path], click [Browse…], and then select the fjpsammbs.exe program. The
fjpsammbs.exe program is in the opt\FJSVpsa\bin\ folder in the PSA install path. The default PSA
install path is C:\Program Files\fujitsu\FJSVpsa\. Next, click [Next].
(25) "Protocol and Ports" is highlighted at the upper left of the [New Outbound Rule Wizard] dialog box.
Select [ICMPv4] in the [Protocol type:] drop-down box, and click [Next].
Figure 4-22 New Outbound Rule Wizard - Protocol and Ports
(26) "Scope" is highlighted at the upper left of the [New Outbound Rule Wizard] dialog box. Select [Any
IP Address] under "Which local IP addresses does this rule match?" Select [These IP Addresses:]
under "Which remote IP addresses does this rule match?" Click [Add...], and enter the logical IP
address of the MMB. Click [Next].
(27) "Action" is highlighted at the upper left of the [New Outbound Rule Wizard] dialog box. Select
[Allow the connection], and click [Next].
(28) "Profile" is highlighted at the upper left of the [New Outbound Rule Wizard] dialog box. Check all
check boxes ([Domain], [Private], and [Public]), and click [Next].
(29) "Name" is highlighted at the upper left of the [New Outbound Rule Wizard] dialog box. Enter
"PSAICMP" in the [Name:] text box, and click [Finish].

PRIMEQUEST Microsoft Windows Server 2008 User's Guide
U41805-J-Z816-2-76/C122-E087-03EN 69
4.1.6 Setting Watchdog monitoring for a period after a STOP error occurrence If a STOP error (fatal system error) occurs in the system, the system enters the following state:
・ "Panic" is displayed for the relevant partition in the System Progress column on the [Partition] →
[Power Control] page of the MMB Web-UI.
・ The operating system executes processing for memory dump collection.
Monitoring can be set with Watchdog Timer as a measure for treating the system in a non-responsive state, such as
a system freeze.
Once the specified period elapses, the MMB performs a Hard Reset to reboot the operating system.
■ Setting procedure
・ Open the following file:
[PSA-installation-folder] \etc\opt\FJSVpsa\usr\pnwatchdog.conf
(Example: C:\fujitsu\FJSVpsa\etc\opt\FJSVpsa\usr\pnwatchdog.conf)
・ Set a value for the key shown below. The default setting value is 0.
Section: [WATCHDOG]
Key: [TIMER]
Setting value (unit: second): 0 (Watchdog Timer is not used.)
1 to 6000 (Watchdog Timer monitoring time)
■ Remarks
Determine an appropriate setting value for a partition by measuring the time taken for a memory dump in the
partition. If the time taken for memory dump processing is longer than 6000 seconds (one hour and 40
minutes), do not use Watchdog Timer.
If the setting value is shorter than the time taken for memory dump processing, a timeout occurs in Watchdog
Timer, causing a Hard Reset and preventing memory dumps from being obtained correctly.

PRIMEQUEST Microsoft Windows Server 2008 User's Guide
U41805-J-Z816-2-76/C122-E087-03EN 70
4.2 Setting Up the Memory Dump Environment
You can use a standard function of Windows Server 2008 to collect a memory dump. When Windows detects a
fatal problem, it automatically displays a STOP error (i.e., BSoD), creates a file (dump file), and outputs the
contents of memory to the file. If a system hang or slowdown occurs, Windows can be forcibly instructed by the
administrator as described below to collect a memory dump.
To perform a memory dump, sufficient space for the memory dump must have been made available on the system
disk.
This section explains how to set up the environment for performing a memory dump in Windows Server 2008.
For details on memory dump-related operations, see "Chapter 1 System Maintenance", in the PRIMEQUEST
500A/500/400 Series Reference Manual: Tools/Operation Information (U41757-J-Z816-x-76/C122-E074EN).
According to the emphasis placed on investigation of the cause of system problem vs. quick system recovery after
a system problem occurs, set up the memory environment as described in the following sections before starting
business operation.
4.2.1 Memory dump The memory dump file stores debug information for a STOP error (fatal system error) that occurred in the system.
After the operating system and applications used for business operation are installed, make settings for memory
dump collection.
4.2.1.1 Differences in information that can be collected in a memory dump
The three types of memory dump that can be set for the PRIMEQUEST server are described below, and each type
of memory dump collects a different range of information.
Before collecting a memory dump, confirm that the hard disk drive has sufficient free space.
・ Complete memory dump
The entire contents of physical memory in the boot volume are saved when the system is stopped. The size of
the dump file is approximately the physical memory size plus 1 MB. Only one memory dump can be stored.
If the specified storage destination has an existing dump file, the information in the file is overwritten. A
minimum memory dump is collected at the same time.

PRIMEQUEST Microsoft Windows Server 2008 User's Guide
U41805-J-Z816-2-76/C122-E087-03EN 71
・ Kernel memory dump
The recorded information covers only the kernel memory areas. The size of the dump file depends on the
memory usage conditions. As a rough standard, the size ranges from one gigabyte to several gigabytes (the
theoretical maximum size is the size of mounted physical memory plus 128 MB). Only one memory dump
can be stored. If the specified storage destination has an existing dump file, the information in the file is
overwritten. A minimum memory dump is collected at the same time.
・ Minimum memory dump
Only the minimum necessary information is recorded. The required amount of free space is 64 KB or 128 KB.
If this option is specified, a new file is created every time that the system stops unexpectedly.
Normally, since it is sometimes difficult to solve a problem with a minimum memory dump, specify complete
memory dump or kernel memory dump.
For details on the memory dumps, see the following URL:
http://support.microsoft.com/kb/254649/
Table 4-2 Memory dump types and dump file sizes
Memory dump type
Memory dump file size Recording method
Complete memory
dump
Mounted physical memory size + 1 MB Overwrite (*2)
Kernel memory dump Depends on memory space where operating
system is running
Usually: About one to several gigabytes
Maximum: Mounted physical memory size +
128 MB (*1)
Overwrite (*2)
Minimum memory
dump
64 KB or 128 KB In new file
created
*1 This is the maximum theoretical size. The actual size depends on the size of the kernel memory space.
*2 The existing file is overwritten by default. You can set that the dump file not be overwritten. In such a
case, however, note that no new file is created, unlike the case for a minimum memory dump.

PRIMEQUEST Microsoft Windows Server 2008 User's Guide
U41805-J-Z816-2-76/C122-E087-03EN 72
■ Note
When a dump file is generated, the boot volume (C:) must have sufficient free capacity. This is because the
boot volume is used temporarily to preserve the dump file in advance.
− When you preserve the dump file in the boot volume:
Please prepare twice of the size of the dump file empty capacity
− When you preserve the dump file besides the boot volume:
Please prepare the same size as dump file empty capacity in both the boot volume and the dump file
preservation ahead.
■ Selecting a dump setting
Consider the following about selecting the optimal setting for system operation:
・ Kernel memory dump is set as the dump type when PRIMEQUEST Software Installer is run. The
causes of most STOP errors are in drivers, and the causes can be roughly investigated with kernel
dumps. However, in the case of a system hang or slowdown, such as in a business application, the
processing state of a process in user mode is important, and the cause of the problem may be
impossible to determine without a complete memory dump.
・ For a complete memory dump, the time required in creating the dump increases in proportion to the
mounted physical memory size, and as a result, the system stop time before the resumption of
business operation is longer. Furthermore, more space on the disk drive is required for storing the
dump file. Therefore, if the mounted physical memory size is at or near the maximum, it may be
impractical to make available the necessary disk space for storing a complete memory dump.
Moreover, consideration must be given to how to send the dump file since the size of a collected
complete memory dump is huge.
If priority is placed on investigating the cause of a problem, the recommended type is complete memory dump;
and if priority is placed quicker recovery of business operation, the recommended type is kernel memory dump.
Determine the optimal setting by considering an acceptable length of time that system operation is suspended, the
customer's desired operation policy, and other factors.

PRIMEQUEST Microsoft Windows Server 2008 User's Guide
U41805-J-Z816-2-76/C122-E087-03EN 73
4.2.1.2 Method of setting complete memory dump
Complete memory dump cannot be set from the window for system dump settings. You can set it by changing
the registry value as follows:
HKEY_LOCAL_MACHINE\System\CurrentControlSet\Control\CrashControl
"CrashDumpEnabled" (Type: REG_DWORD; data: 1 )
After making the setting, restart the system.
The storage path and overwrite settings for the dump file are the same as for kernel memory dump. For details,
see "4.2.1.3 Method of setting kernel memory dump".
4.2.1.3 Method of setting kernel memory dump
Set the memory dump file by following the procedure below.
1. Log on to the server with administrator privileges.
2. Confirm that there is sufficient free space on the drive storing the memory dump file.
3. Click [Server Manager] → [Change System Properties].
The [System Properties] dialog box is displayed.
4. Click the [Advanced] tab, and then click [Settings] under "Startup and Recovery".
The [Startup and Recovery] dialog box is displayed.

PRIMEQUEST Microsoft Windows Server 2008 User's Guide
U41805-J-Z816-2-76/C122-E087-03EN 74
Figure 4-23 [Startup and Recovery] dialog box
5. Select the type of memory dump file for "Write debugging information". If complete memory dump has
already been selected, the setting need not be changed.
6. Click [OK] to close the [Startup and Recovery] dialog box.
7. Click [OK] to close the [System Properties] dialog box.
8. Restart the partition.
The setting becomes valid after the restart of the partition.
4.2.1.4 Confirming the memory dump settings Collect a dump to confirm that a dump file is created at the appropriate location in the specified path.
・ Confirm that the dump file update date and time are also the dump collection date and time.
・ In a complete memory dump, confirm that the size of the created dump file is the mounted memory
size plus several megabytes.

PRIMEQUEST Microsoft Windows Server 2008 User's Guide
U41805-J-Z816-2-76/C122-E087-03EN 75
・ In a kernel memory dump, confirm that the dump file size is not extraordinarily small (100 MB or
less), though the size depends on the environment.
Also, measure the actual time taken for outputting the dump, restarting the system, and executing other processing
in this operation, and estimate the time taken until business operation resumes. Then, reconsider the memory
dump type as necessary.
To obtain a memory dump, specify "INIT" for the target partition on the [Partition] → [Power Control] page of
the MMB Web-UI. For details, see the following manuals:
→ Chapter 5, "Web-UI Operations", in the PRIMEQUEST 500A/500/400 Series Reference Manual: Basic
Operation/GUI/Command (U41633-J-Z816-x-76/C122-E003EN)
→ Chapter 5, "Web-UI Operations", in the PRIMEQUEST 510A Reference Manual: Basic
Operation/GUI/Command (C122-E096EN)*
4.2.2 Paging file The paging file is ordinarily used to temporarily store data from memory on a hard disk drive, but it is sometimes
also used for temporary storage of a collected memory dump.
To ensure collection of a memory dump, confirm that the paging file settings are correct.
4.2.2.1 Making paging file settings
Change the setting by following the procedure below.
1. Log on to the server with administrator privileges.
2. Click [Server Manager] → [Change System Properties].
The [System Properties] dialog box is displayed.
3. Click the [Advanced] tab, and then click [Settings] under "Performance".
The [Performance Options] dialog box is displayed.
4. Click the [Advanced] tab.
*: not supported by Fujitsu Technology Solutions

PRIMEQUEST Microsoft Windows Server 2008 User's Guide
U41805-J-Z816-2-76/C122-E087-03EN 76
Figure 4-24 [Advanced] tab in the [Performance Options] dialog box
5. Click [Change] in "Virtual Memory".
The [Virtual Memory] dialog box is displayed.
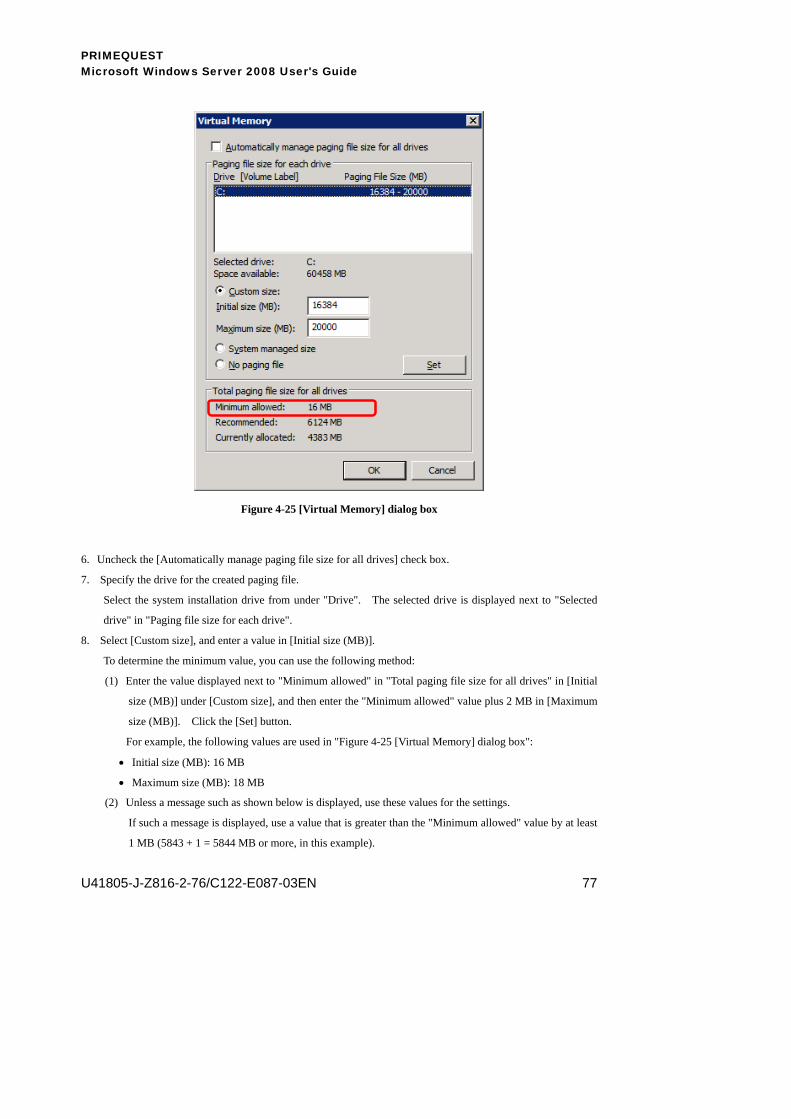
PRIMEQUEST Microsoft Windows Server 2008 User's Guide
U41805-J-Z816-2-76/C122-E087-03EN 77
Figure 4-25 [Virtual Memory] dialog box
6. Uncheck the [Automatically manage paging file size for all drives] check box.
7. Specify the drive for the created paging file.
Select the system installation drive from under "Drive". The selected drive is displayed next to "Selected
drive" in "Paging file size for each drive".
8. Select [Custom size], and enter a value in [Initial size (MB)].
To determine the minimum value, you can use the following method:
(1) Enter the value displayed next to "Minimum allowed" in "Total paging file size for all drives" in [Initial
size (MB)] under [Custom size], and then enter the "Minimum allowed" value plus 2 MB in [Maximum
size (MB)]. Click the [Set] button.
For example, the following values are used in "Figure 4-25 [Virtual Memory] dialog box":
• Initial size (MB): 16 MB
• Maximum size (MB): 18 MB
(2) Unless a message such as shown below is displayed, use these values for the settings.
If such a message is displayed, use a value that is greater than the "Minimum allowed" value by at least
1 MB (5843 + 1 = 5844 MB or more, in this example).

PRIMEQUEST Microsoft Windows Server 2008 User's Guide
U41805-J-Z816-2-76/C122-E087-03EN 78
Figure 4-26 Confirmation message dialog box
9. Enter an appropriate value in [Maximum size (MB)]. It must be greater than the value in [Initial size (MB)].
10. Save the settings.
Click [Set] in "Paging file size for each drive". The settings are saved, and the set values are displayed
under "Paging File Size (MB)" for the drive displayed under "Drive".
11. Click [OK] to close the [Virtual Memory] dialog box.
12. Click [OK] to close the [Performance Options] dialog box.
13. Click [OK] to close the [System Properties] dialog box.
14. Restart the partition.
The setting becomes valid after the restart of the partition.
4.2.2.2 Notes
If the paging file is placed in a volume that is not the boot volume (usually, the C: drive), a dump file is not
created at the time that a STOP error or another error occurs. Unless there is a special reason to do so, do not
move the paging file to any volume that is not the boot volume.
Formatiert: Französisch(Frankreich)
PRIMEQUEST Microsoft Windows Server 2008 User's Guide
U41805-J-Z816-2-76/C122-E087-03EN 79
4.3 Configuring the Network Make teaming (multipath) settings by using the utility corresponding to each network adapter.
■ PCI card network adapter (Intel GbE) settings
You can configure teaming that uses Intel PROSet. For details, see the Help for Intel PROSet.
To display the Help, expand the Intel_landl5.exe file in the Not_Installed\PROSet folder on the desktop, and
open the index.html file in the browser.
■ PCI card network adapter (Neterion 10GbE) settings
You can configure teaming that uses Neterion Xframe Control Panel. For details, see the Help for Neterion
Xframe Control Panel.
To display the Help, select the [Start] menu → [All Programs] → [Xframe Network Services] → [Xframe
Help].
■ On-board network adapter (Broadcom GbE) settings
You can configure teaming by using the Broadcom Advanced Server Program (BASP) in the Broadcom
Advanced Control Suite 3 (BACS3) utility. For details, see "Chapter 8 Onboard GbE (Broadcom Ethernet)
Network Configuration Under Windows Environment", in the PRIMEQUEST 500A/500/400 Series Reference
Manual: Tools/Operation Information (U41757-J-Z816-x-76/C122-E074EN).

PRIMEQUEST Microsoft Windows Server 2008 User's Guide
U41805-J-Z816-2-76/C122-E087-03EN 80
4.4 Activating Windows Windows Server 2008 must be activated before the start of operation.
■ OEM (bundled with hardware)
You can activate Windows via the Internet or by telephone.
1. Click [Start] → [Control Panel] → [System].
2. Activate Windows by following the instructions in [Windows Activation] from the [System] screen.
■ Volume license
You can activate Windows by using Volume Activation 2.0.
For details, see the following URL:
http://www.microsoft.com/licensing/index/worldwide.mspx

PRIMEQUEST Microsoft Windows Server 2008 User's Guide
U41805-J-Z816-2-76/C122-E087-03EN 81
4.5 NTP Client Settings
This section explains time correction operations with the network time protocol (NTP), particularly operation
methods for the PRIMEQUEST server.
NTP is a protocol defining the method used by computers to exchange time information with one other. NTP
provides a function that sets the system clock time to the time of a reference clock that maintains accurate time
and subsequently keeps any time differences within a certain range.
4.5.1 NTP operation method for the PRIMEQUEST server This section explains the time correction method using NTP in each partition of the PRIMEQUEST system.
In a PRIMEQUEST server, the MMB provides the NTP client function and NTP server function. Up to three
external NTP servers can be specified with the NTP client function. Each partition makes its own time
corrections using the NTP server function of the MMB.
Figure 4-27 outlines the operation with an external NTP server.
Figure 4-27 Operation with an external NTP server
MMB
NTP clientNTP
Partition #2 NTP client
システ
Partition #1
NTP client
システ
Partition #0
システム
NTP client
PRIMEQUEST #2
GSWB
NTP client
External NTP server #1
External NTP server #2
External NTP server #3
MMB
NTP client
NTP
Partition #2 NTP client
システム
Partition #1 NTP client
システム
Partition #0
System
NTP client
PRIMEQUEST #1
GSWB
NTP client

PRIMEQUEST Microsoft Windows Server 2008 User's Guide
U41805-J-Z816-2-76/C122-E087-03EN 82
4.5.2 NTP server settings Make settings for any NTP servers not included in the initial settings of the MMB.
Use the NTP client function to set the external NTP servers with which time is synchronized. Also, make the
MMB available as an NTP server for other clients.
1. Click [Network Configuration] → [Date/Time].
The [Data/Time] page is displayed.
Figure 4-28 [Date/Time] page
2. Click [Enable] of [NTP].
3. Enter the IP addresses of the external NTP servers.
(1) NTP Server1: Specify the primary NTP server.
(2) NTP Server2: Specify the secondary NTP server.
(3) NTP Server3: Specify another (tertiary) NTP server.
Remarks:
If the MMB is not synchronized with any external NTP server, set "0.0.0.0" for each of NTP Server1 to
NTP Server3.
The MMB serves as an NTP server for each partition, but the MMB itself is not synchronized with any
external NTP server.
4. Click the [Apply] button.
The time of the MMB is synchronized with the time of the NTP servers set for NTP Server1 to NTP Server3.
Subsequently, other clients can use the MMB as an NTP server.
5. Wait several minutes, click [Refresh], and confirm that the correct time is displayed.

PRIMEQUEST Microsoft Windows Server 2008 User's Guide
U41805-J-Z816-2-76/C122-E087-03EN 83
4.5.3 NTP client settings of each partition If the MMB is set as an NTP server, each partition serves as an NTP client.
4.5.3.1 Making NTP settings in a Windows partition This section explains the method of making NTP settings in a partition in which Windows is installed.
1. Log on to the system with a user account that has administrator privileges.
2. Click [Control Panel] → [Date and Time]. The [Date and Time] dialog box is displayed.
Figure 4-29 [Internet Time] tab
3. Click the [Internet Time] tab, and then click [Change Settings].
4. Enter the virtual IP address of the MMB in the [Server:] box, and click [OK] to close the dialog box.
5. The [Internet Time] tab of the [Date and Time] dialog box is displayed again. Click [Update Now].
Following correct communication with the NTP, the message "The clock was successfully synchronized" is
displayed as shown in "Figure 4-30 MMB virtual IP address setting example".

PRIMEQUEST Microsoft Windows Server 2008 User's Guide
U41805-J-Z816-2-76/C122-E087-03EN 84
Figure 4-30 MMB virtual IP address setting example
Notes:
1. If the [Automatically synchronize with an Internet time server] check box is checked, the clock is
automatically synchronized with the specified server.
2. By default, "time.windows.com" is specified in the [Server:] box.
3. If the clock cannot be synchronized with the NTP server, the "Time-Service" warning is recorded in
the event log.
4. The physical IP address is used for communication for synchronizing the clock to an external NTP
server. Note that a change to a security setting such as a firewall setting requires permission for
communication to be set for not only the virtual IP addresses but also the physical IP addresses of
both MMBs (MMB#0 IP address and MMB#1 IP address).
5. If the [Update Now] button is clicked within three minutes after the steps performed as described in
"4.5.2 NTP server", synchronization may fail. In this event, wait at least three minutes, and click the
button again.
6. Click [OK] to save the settings.
4.5.3.2 NTP settings for an Active Directory member
If a partition in which Windows is installed is an Active Directory (AD) member, the clock is automatically
synchronized with the NTP server of the domain controller. The [Internet Time] tab is not displayed in such
cases, as shown in the figure below.
A partition in a cluster environment using WSFC must be an Active Directory member. In this case, the clock is
automatically synchronized with the NTP server of the domain controller.
Formatiert: Nummerierungund Aufzählungszeichen
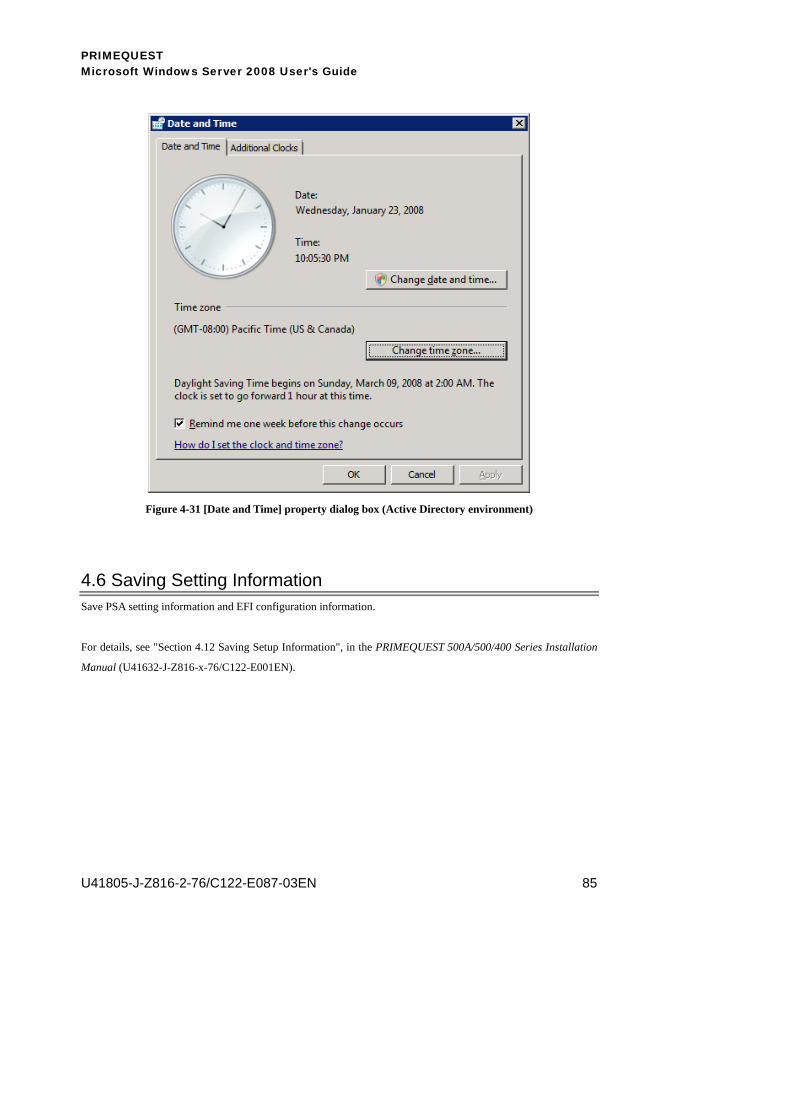
PRIMEQUEST Microsoft Windows Server 2008 User's Guide
U41805-J-Z816-2-76/C122-E087-03EN 85
Figure 4-31 [Date and Time] property dialog box (Active Directory environment)
4.6 Saving Setting Information Save PSA setting information and EFI configuration information.
For details, see "Section 4.12 Saving Setup Information", in the PRIMEQUEST 500A/500/400 Series Installation
Manual (U41632-J-Z816-x-76/C122-E001EN).

PRIMEQUEST Microsoft Windows Server 2008 User's Guide
U41805-J-Z816-2-76/C122-E087-03EN 86
Chapter 5 Maintenance/Operation
This chapter explains maintenance such as backup and restore operations, basic settings for operation, and
operation of Windows Server 2008.
5.1 System Startup and Shutdown This section explains the system startup and shutdown procedures.
5.1.1 Starting the system Start a partition from the MMB.
For the procedure, see the following manuals:
→ PRIMEQUEST 500A/500/400 Series Reference Manual: Basic Operation/GUI/Command
(U41633-J-Z816-x-76/C122-E003EN)
→ PRIMEQUEST 510A Reference Manual: Basic Operation/GUI/Command (C122-E096EN)*
5.1.2 Shutting down the system This section describes procedures for shutting down a partition in which Windows Server 2008 is running.
Two shutdown methods are available.
■ Shutdown after logon to Windows (→ 5.1.3)
− Log on to Windows with administrator privileges from the console or through a remote desktop connection,
and then shut down the system.
■ Shutdown with the shutdown command (→ 5.1.4)
− Perform remote shutdown from a personal computer on which Windows XP or a later version is installed.
■ Note
With the standard settings, a partition in which Windows Server 2008 is running cannot be shut down from the
MMB. Be sure to refer to the appropriate procedure in this section for shutting down the system.

PRIMEQUEST Microsoft Windows Server 2008 User's Guide
U41805-J-Z816-2-76/C122-E087-03EN 87
5.1.3 Shutdown after logon to Windows Log on to the system through the KVM connected to the cabinet or a remote desktop, and then shut down the
system.
■ Prerequisite for shutdown from the KVM
− The KVM is connected to the cabinet.
■ Prerequisites for shutdown from a remote desktop
− The management terminal is connected to the target partition via a LAN.
− The remote desktop connection is enabled in the settings of the target Windows system.
→ In Windows installation according to the procedure explained in Chapter 3, remote desktop
connectivity is enabled as a standard setting.
Log on to Windows as a user with administrator privileges, and click the shutdown button from the Start menu.
Figure 5-1 Shutdown button
5.1.4 Shutdown with the shutdown command Windows XP and later provide the shutdown.exe command. This command can be used for remote shutdown
from the management terminal.
■ Prerequisites
− The operating system of the management terminal is any of the following:
• Windows XP
• Windows Vista
• Windows Server 2003
• Windows Server 2008

PRIMEQUEST Microsoft Windows Server 2008 User's Guide
U41805-J-Z816-2-76/C122-E087-03EN 88
− The management terminal is connected via a network to the Windows system that will be shut down.
− Firewall settings of the target Windows system
• [File and printer sharing] is checked on the [Exceptions] tab for firewall settings.
− If the target system is in a workgroup environment
• The user name and password of the management terminal match those of Windows.
− If the target system is in an Active Directory environment
• The user has logged on to the management terminal as a user with administrator privileges for the
Windows system that will be shut down.
■ Usage shutdown -s -m \\<Server Name>
For <Server Name>, specify the name of the Windows computer to be shut down.
For details on other options of the shutdown command, see the Help. Simplified help information is displayed
by this command executed with the /? option.
Figure 5-2 Simplified help information on the shutdown command

PRIMEQUEST Microsoft Windows Server 2008 User's Guide
U41805-J-Z816-2-76/C122-E087-03EN 89
5.2 Backup and Restore
This section explains the backup/restore software included in the standard software bundle.
■ SystemcastWizard Lite bundled with the PRIMEQUEST main unit (→ 5.2.1)
■ Windows Server Backup, a standard backup function of Windows (→ 5.2.2)
5.2.1 Backup/Restore using SystemcastWizard Lite SystemcastWizard Lite is included in the standard software bundle for the PRIMEQUEST server, and you can use
it to easily back up and restore the system volume via a network.
■ Features
・ Agent or other software components need not be installed on the target system.
・ Work beginning from power-on of the target system until the completion of backup or restore can be
performed via a network.
SystemcastWizard Lite can be used effectively for work in the system construction stage or system verification
stage or in the event of a problem.
Figure 5-3 Backup/Restore using SystemcastWizard Lite
■ Remarks
Management
PRIMEQUEST SystemcastWizard Lite
Restore
Backup
Data stored as image files in system volume

PRIMEQUEST Microsoft Windows Server 2008 User's Guide
U41805-J-Z816-2-76/C122-E087-03EN 90
SystemcastWizard Lite does not support online backup, incremental backup, or differential backup, and it is
not suitable for periodic backup after the start of business operation.
For backup/restore during business operation, consider Brightstor ARCserve. For details, contact a certified
service engineer.
For the SystemcastWizard Lite operation methods, see the PRIMEQUEST SystemcastWizard Lite User's Guide
(C122-E010EN).
5.2.2 Backup/restore using Windows Server Backup
Windows Server 2003 and earlier provide Ntbackup as a standard backup function, and Windows Server 2008
supports Windows Server Backup, a completely revised version of the standard backup function.
■ Features of Windows Server Backup
・ Recovery is easier and quicker than Ntbackup.
・ Applications that support Volume Shadow Copy Service (VSS) are linked, ensuring safe backup
operations.
・ Its incorporation into the management console (MMC) enables management with a unified UI.
・ Enriched functions executed from the command line are helpful for automating management.
■ Remarks
・ Despite having many advantages over Ntbackup of Windows Server 2003, Windows Server Backup
cannot completely replace Ntbackup for reasons such as because it cannot save data to tape media.
・ If data must be saved to tape media or unified backup management is required, consider Brightstor
ARCserve. For details, contact a certified service engineer.
This section explains the procedure for backing up the system volume to an internal hard disk drive and the

PRIMEQUEST Microsoft Windows Server 2008 User's Guide
U41805-J-Z816-2-76/C122-E087-03EN 91
procedure for restoring backup data. For details on advanced uses such as scheduled backup, see the Help for
Windows Server Backup.
5.2.2.1 Installation Since the Windows Server Backup function is not installed by default, it must first be installed.
■ Remarks
・ If the Windows Server Backup function has already been installed, this procedure need not be
followed.
・ To install the Windows Server Backup function, administrator privileges are required. Log on to the
system as a user with administrator privileges, or escalate your privileges first.
■ Procedure
1. Select [Server Manager] from the [Start] menu.
2. Click [Features] in the left pane of [Server Manager].
3. Click [Add Features] in the right pane of [Server Manager].
4. The [Select Features] page of the Add Features Wizard is displayed. Click [Windows Server Backup
Function] → [Windows Server Backup] to check its check box.
5. Click the [Next] button.
6. Click [Install].
7. Wait until installation is completed. Then, click [Close].
The above step completes the installation procedure.
Click the [Start] menu → [Administrative Tools] → [Windows Server Backup], and then Windows Server
Backup starts.
5.2.2.2 System backup
This section explains the procedure for backing up the system volume to a local disk. Another disk that does not
contain the system volume must be prepared.
For details on methods of use, see the Help for Windows Server Backup.
■ Remarks
・ To use Windows Server Backup, the privileges of the "Administrator" or "Backup Operators" group
are required. Log on to the system as a user with such privileges, or escalate your privileges first.

PRIMEQUEST Microsoft Windows Server 2008 User's Guide
U41805-J-Z816-2-76/C122-E087-03EN 92
■ Procedure
1. Click the [Start] menu → [Administrative Tools] → [Windows Server Backup].
2. Windows Server Backup starts. Click [Backup Once] in the right pane.
3. The [Backup Options] page is displayed. Click the [Next] button.
Figure 5-4 Backup Once Wizard ([Backup Options] page)
4. The [Select Backup Configuration] page is displayed. Select [Custom], and click the [Next] button.
5. The [Select Backup Items] page is displayed. Verify the following points, and then click the [Next] button:
− The selected drive contains the EFI System Partition and has Windows is installed on it (usually, C:).
− Backup data will not be saved to the selected drive.
− [I want to be able to perform a system recovery using this backup] is checked.
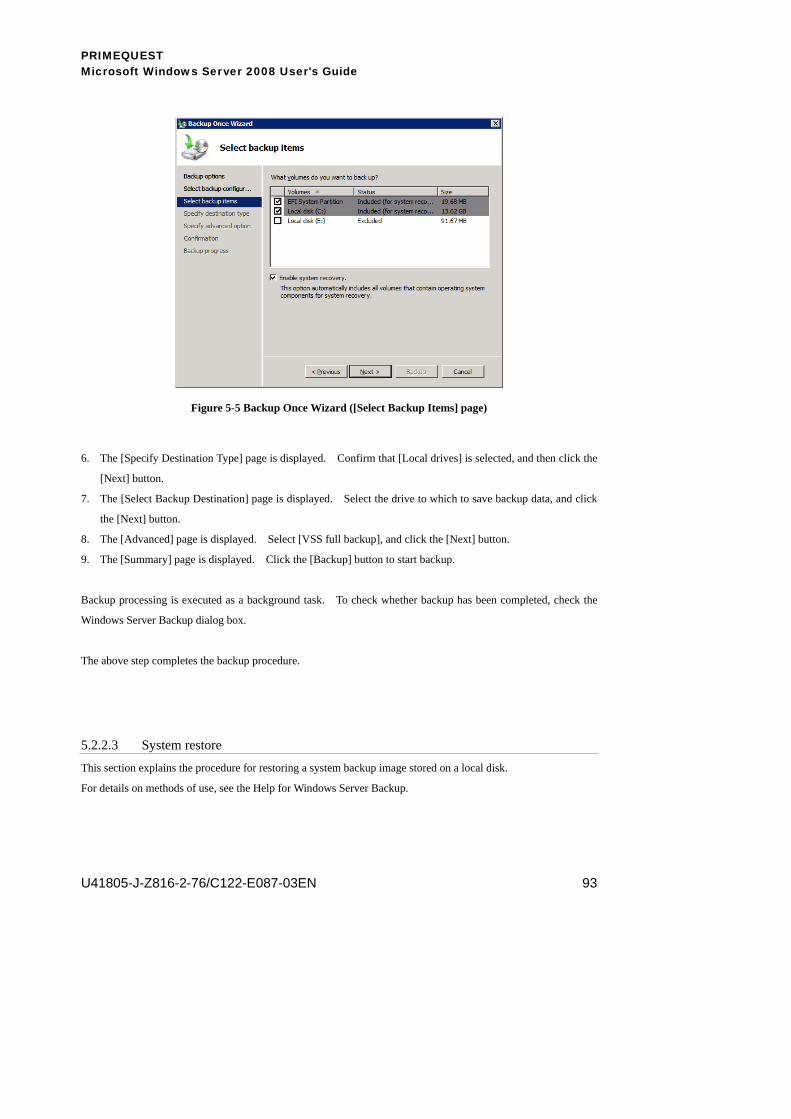
PRIMEQUEST Microsoft Windows Server 2008 User's Guide
U41805-J-Z816-2-76/C122-E087-03EN 93
Figure 5-5 Backup Once Wizard ([Select Backup Items] page)
6. The [Specify Destination Type] page is displayed. Confirm that [Local drives] is selected, and then click the
[Next] button.
7. The [Select Backup Destination] page is displayed. Select the drive to which to save backup data, and click
the [Next] button.
8. The [Advanced] page is displayed. Select [VSS full backup], and click the [Next] button.
9. The [Summary] page is displayed. Click the [Backup] button to start backup.
Backup processing is executed as a background task. To check whether backup has been completed, check the
Windows Server Backup dialog box.
The above step completes the backup procedure.
5.2.2.3 System restore This section explains the procedure for restoring a system backup image stored on a local disk.
For details on methods of use, see the Help for Windows Server Backup.

PRIMEQUEST Microsoft Windows Server 2008 User's Guide
U41805-J-Z816-2-76/C122-E087-03EN 94
■ Required items
・ KVM (the keyboard, mouse, and display connected to the main unit)
・ Windows Server 2008 Installation DVD-ROM disk
・ PRIMEQUEST Drivers CD for Microsoft® Windows Server® 2008 (Drivers CD-ROM)
■ Procedure
1. Start the system from the Windows Server 2008 Installation DVD-ROM disk. Insert the Installation
DVD-ROM disk into the DVD-ROM drive, and start the system from the DVD-ROM disk. The system
takes about 10 minutes to start.
2. The window for selecting a language is displayed. Select an appropriate language.
Figure 5-6 Selection of a language
3. The installation window is displayed. Click [Repair your computer] at the lower left.

PRIMEQUEST Microsoft Windows Server 2008 User's Guide
U41805-J-Z816-2-76/C122-E087-03EN 95
Figure 5-7 [Repair your computer]
4. If Windows is already installed on the system, the window for selecting the system to be repaired is displayed.
Click [Next] in the displayed window.
5. When the [System Recovery Options] dialog box is displayed, click [Windows Complete PC Restore].
6. Confirm that [Restore the following backup (recommended)] (the latest backup available) is selected, and
then click the [Next] button.
7. The following warning message is displayed:
Windows Complete PC Restore will erase all data on the disks you chose to restore.
8. Check [I confirm that I want to erase all existing data and restore the backup.], and the click the [OK] button.
The restore begins.
9. The system is automatically restarted when the restore is completed.
The above step completes the system restore procedure.

PRIMEQUEST Microsoft Windows Server 2008 User's Guide
U41805-J-Z816-2-76/C122-E087-03EN 96
5.3 Management LAN Reconfiguration Required When the BMM Is Replaced (PRIMEQUEST 580A/540A*/580/540)
If BMM hardware is replaced, the management LAN must be reconfigured.
■ Note
・ BMM replacement is a task for a a certified service engineer. If BMM replacement is required,
contact a certified service engineer before reconfiguring the management LAN.
・ Since the management LAN of the PRIMEQUEST 520A*/520/510A* uses only one port, these
models do not require the settings described in this section.
To replace the BMM, follow the procedure below.
Figure 5-8 BMM replacement flow
5.3.1.1 Deleting the management LAN teaming settings (PRIMEQUEST 580A/540A*/580/540)
Before replacing the BMM, record and then delete the management LAN teaming settings.
*: not supported by Fujitsu Technology Solutions
Shut down system
Replace BMM (Fujitsu service engineer)
Delete management LAN teaming setting (PRIMEQUEST 580A/540A*/580/540)
Reconfigure management LAN teaming (PRIMEQUEST 580A/540A*/580/540)

PRIMEQUEST Microsoft Windows Server 2008 User's Guide
U41805-J-Z816-2-76/C122-E087-03EN 97
■ Note
The team name and TCP/IP settings (IP address, subnet mask, and default gateway) are deleted when the
teaming settings are deleted. Before deleting the teaming settings, record this information.
1. Select the [Start] menu → [Server Manager].
2. In the [Server Manager] window, select [Diagnostics] → [Device Manager].
Figure 5-9 Server Manager (Device Manager) window
3. Expand [Network Adapters].
Select and right-click the device whose device name is the specified team name (e.g., Team#0), and then
select [Properties] from the menu.
4. The [Properties] dialog box is displayed. Select the [Settings] tab.

PRIMEQUEST Microsoft Windows Server 2008 User's Guide
U41805-J-Z816-2-76/C122-E087-03EN 98
Figure 5-10 [team#0 Properties] dialog box
5. Click the [Remove Team] button. Click [Yes] in the confirmation message dialog box.
Figure 5-11 Confirmation message dialog box
5.3.1.2 Setting management LAN teaming (PRIMEQUEST 580A/540A*/580/540)
Restore the management LAN teaming settings. For the procedure, see "4.1.1 Management LAN settings".
*: not supported by Fujitsu Technology Solutions
Feldfunktion geändert
Feldfunktion geändert
Formatiert: Französisch(Frankreich)

PRIMEQUEST Microsoft Windows Server 2008 User's Guide
U41805-J-Z816-2-76/C122-E087-03EN 99
5.4 Obtaining Maintenance Data
If a problem occurs in Windows, material appropriate to the condition of the problem is required for an accurate
and quick investigation. This section describes the material frequently required for an investigation and explains
how to obtain the material.
5.4.1 Software Support Guide / DSNAP Software Support Guide (SSG) and DSNAP are software programs used to obtain investigation material
accurately in batches for software problems that have occurred in Windows. They enable a certified service
engineer to correctly understand your system configuration (through a list of installed software programs,
operating system setting information, event logs, and other information indicating how the system is configured
and operated) and conduct a smooth investigation of a problem that has occurred in your system.
SSG and DSNAP are executed from the administrator command prompt.
For details on how they are used, see the following:
DSNAP : README_EN.TXT file in the [OS-installation-drive]:\DSNAP folder
SSG (QSS collection tool) : Help for SSG
5.4.2 Memory dump The contents of memory at the time that a problem occurs are saved as is in a memory dump.
A memory dump provides very useful information on a phenomenon that occurred, such as the following:
・ The desktop (screen) freezes.
The entire Windows system hangs (the desktop freezes, the mouse or keyboard cannot be operated, etc.) during
system operation.
・ The mouse or keyboard has extremely poor responsiveness.
Performance deteriorates significantly during system operation, and the mouse or keyboard continually have
poor responsiveness.

PRIMEQUEST Microsoft Windows Server 2008 User's Guide
U41805-J-Z816-2-76/C122-E087-03EN 100
For the method of making settings for memory dump files, see "4.2.1 Memory dump".
To obtain a memory dump, specify "INIT" for the target partition on the [Partition] → [Power Control] page of
the MMB Web-UI. For details, see the following manuals:
→ Chapter 5, "Web-UI Operations", in the PRIMEQUEST 500A/500/400 Series Reference Manual: Basic
Operation/GUI/Command (U41633-J-Z816-x-76/C122-E003EN)
→ Chapter 5, "Web-UI Operations", in the PRIMEQUEST 510A Reference Manual: Basic
Operation/GUI/Command (C122-E096EN)*
Notes:
・ Forcible collection of a memory dump involves the stopping of server operation.
・ Dump collection takes a long time to complete in some environments.
5.4.3 User Mode Process Dumper and Desktop Heap Monitor The Software Support Guide package includes User Mode Process Dumper and Desktop Heap Monitor.
■ User Mode Process Dumper
This tool collects information used for analysis of a process that runs in user mode and behaves abnormally or
hangs.
■ Desktop Heap Monitor
This tool is used for investigation of the depletion of the system resource called the desktop heap.
*: not supported by Fujitsu Technology Solutions

PRIMEQUEST Microsoft Windows Server 2008 User's Guide
U41805-J-Z816-2-76/C122-E087-03EN 101
5.5 Event Log List
This section describes the event log created during Windows Server installation or operation or during
High-reliability Tools installation.
■ Note
This section does not describe all events but only the error events that occurred during operating system
installation or operation or during High-reliability Tools installation.
Neither warning events nor events caused by applications are described.
5.5.1 Method of checking an event log Select the [Start] menu → [Server Manager].
Select [Diagnostics] → [Event Viewer] → [Windows Log] from the left pane.
5.5.2 Event log list Table 5-1 Event log
Log Name
Source Event ID
Description Response
System HttpEvent 15016 This event occurs when the operating system is set up on workgroup environment.
The event occurs according to the operating system specifications and causes no problem in operation. For details, see the following URL: http://support.microsoft.com/kb/949213/
System TBS 516 This event may occur every 40 minutes.
The event occurs according to the operating system specifications and causes no problem in operation. For details, see the following URL: http://support.microsoft.com/kb/950330/
System SpoolerWin32SPL
4 This event may occur every 30 minutes.
This event is by design, when WMI is worked by the System account. If you hope not to record this event, please create following registry key. HKEY_USERS\S-1-5-18\Printers\Connections
Application EventAgent 1020 2019 2020 3003
The event about SNMP Event Log Extension Agent occurs when operating system starts.
If you use SNMP to retrieve event log information, take the corrective action described at the following URL: http://support.microsoft.com/kb/950923/

PRIMEQUEST Microsoft Windows Server 2008 User's Guide
U41805-J-Z816-2-76/C122-E087-03EN 102
Appendix A Bundled Software
Appendix A describes the bundled software that comes with the PRIMEQUEST server.
A.1 Types of Software in the Bundled Software
Table A-1 Bundled software
Name Function Reference PSA System management application A.2
DSNAP Software for collecting investigation information on a
problem that has occurred
A.3
Software Support Guide Software for collecting investigation information on a
problem that has occurred
A.4
SystemcastWizard Lite System installation support software A.5

PRIMEQUEST Microsoft Windows Server 2008 User's Guide
U41805-J-Z816-2-76/C122-E087-03EN 103
A.2 PSA PSA is a system management application that runs on the operating system of each partition in the PRIMEQUEST
server.
■ Installation method
− For the installation method and details on settings, see "4.1 PSA Setting".
■ Operating environment
− PSA needs the SNMP Service to operate.
− Since PSA and the MMB communicate with each other via the management LAN, the management LAN
of the partition must be correctly configured.
A.2.1 Messages An abnormality detected in the system by PSA is recorded in a Windows event log. The method of displaying
PSA messages depends on the log type. This section explains how to read the messages stored in the log.
■ Log messages
Events detected by PSA are displayed as log messages of the operating system. In Windows, these messages
can be checked with the Windows Log (application) of the Event Viewer.
■ Agent log
A history of the actions taken by PSA (log output, REMCS* data transfer, SNMP trap transfer, etc.) is recorded
in an agent log (excluding events internally detected by PSA and whose event IDs are between 00000 and
09999).
The [Agent Log] page of the MMB Web-UI displays a log list for the partition. The list can be downloaded as
a CSV file from the [Agent Log] page.
■ Mail notification messages
System administrators and maintenance personnel are notified with messages by mail of errors detected by
PSA.
The first line of text is set as the title of the mail.
To receive mail notification messages, the setting for sending such e-mail must be made on the MMB, and
e-mail addresses for the system administrators and maintenance personnel (who will receive the notification)
must be set.
For details on how to set mail notification, see the following manuals:
→ PRIMEQUEST 580A/540A/520A/500/400 Series Reference Manual: Basic Operation/GUI/Command
(U41633-J-Z816-x-76/C122-E003EN)
→ PRIMEQUEST 510A Reference Manual: Basic Operation/GUI/Command (C122-E096EN)*
*: not supported by Fujitsu Technology Solutions

PRIMEQUEST Microsoft Windows Server 2008 User's Guide
U41805-J-Z816-2-76/C122-E087-03EN 104
A.2.2 Notes
・ When PSA is started for the first time after being installed, the error message "E_33077 PSA is Not
Active. (01:0000)" error message may be displayed following an attempt to display the PSA page
from the Web-UI. This is because collection of system sensor information takes more time when
PSA is started for the first time. Wait several minutes, and then display the PSA page again.
・ When changing the IP addresses of the MMB and management LAN on the partition side, be sure to
restart PSA. Otherwise, a PSA page display error occurs in the MMB Web-UI, and errors detected
by PSA cannot be reported.
・ Do not stop the Print Spooler Service, which is a Windows service. The operating system
information collection function uses Windows Management Instrumentation (WMI) to collect
configuration information. However, an error is reported to WMI when the Print Spooler Service is
stopped, and then configuration information cannot be correctly collected.

PRIMEQUEST Microsoft Windows Server 2008 User's Guide
U41805-J-Z816-2-76/C122-E087-03EN 105
A.3 DSNAP
DSNAP is software used to obtain investigation material accurately for a software problem that has occurred in
Windows. It enables a certified service engineer to correctly understand your system software configuration and
settings and conduct a smooth investigation of a problem that has occurred in your system.
■ Installation method
DSNAP and the other High-reliability Tools are collectively installed by PRIMEQUEST Software Installer.
For details, see "3.5.1 Installing the High-reliability Tools".
■ Usage
See the README_EN.TXT file in the [OS-installation-drive]:\DSNAP folder.

PRIMEQUEST Microsoft Windows Server 2008 User's Guide
U41805-J-Z816-2-76/C122-E087-03EN 106
A.4 Software Support Guide
Software Support Guide is a set of software programs used to obtain investigation material quickly and accurately
for a problem that has occurred in Windows.
It enables a certified service engineer to correctly understand your system software configuration and settings and
conduct a smooth investigation of a problem that has occurred in your system.
■ Installation method
Software Support Guide and the other High-reliability Tools are collectively installed by PRIMEQUEST
Software Installer. For details, see "3.5.1 Installing the High-reliability Tools".
■ Usage
The tools that come with Software Support Guide enable the following information to be collected and
problems to be quickly solved.
Table A-2 Tools provided with Software Support Guide and their functions
Tool name Function QSS (Quick Support System) Collects system information.
(Registry, event log, system file list, mini dump, MSFC log, and PSA
information)
User Mode Process Dumper Collects an application dump (snapshot).
Desktop Heap Monitor Displays the size of the desktop heap, which is a system resource.
SSG Dialog Displays and collects system information.
For details, see the Readme file or Help for Software Support Guide.

PRIMEQUEST Microsoft Windows Server 2008 User's Guide
U41805-J-Z816-2-76/C122-E087-03EN 107
A.5 SystemcastWizard Lite SystemcastWizard Lite installs operating systems and backs up and restores hard disks via a network.
You can use the network startup function on the PRIMEQUEST server and issue instructions from the
management terminal to execute processing, without needing to insert startup media such as a CD-ROM disk into
the DVD-ROM drive. SystemcastWizard Lite is effective for systems configured in multiple partitions, for
example.
SystemcastWizard Lite V2.0A and later support Windows Server 2008.
For details on the SystemcastWizard Lite functions and how to use them, see the PRIMEQUEST
SystemcastWizard Lite User's Guide (C122-E010EN).

PRIMEQUEST Microsoft Windows Server 2008 User's Guide
U41805-J-Z816-2-76/C122-E087-03EN 108
PRIMEQUEST Microsoft® Windows Server® 2008 User's Guide U41805-J-Z816-2-76/C122-E087-03EN Issued January 2009 Published by Fujitsu Limited and Fujitsu Technology Solutions
・ The contents of this manual are subject to change without notice for improvement purposes.
・ Fujitsu and Fujitsu Technology Solutions assume no liability for infringement of the patent rights or
other rights of third parties attributable to the use of any information given in this publication.
・ All Rights Reserved


![[7801 - 24092]tv_digital](https://static.fdocuments.in/doc/165x107/55cf978b550346d033923d06/7801-24092tvdigital.jpg)