Porsche 991.1 and 991.2 Turbo/S JB4 Install Guide · 991.1-991.2-Porsche-TurboS-Install-Guide...
20
Porsche 991.1 and 991.2 Turbo/S JB4 Install Guide Last updated 2/18/2020 Use subject to terms and conditions posted at https://burgertuning.com/pages/terms THIS PART IS LEGAL FOR USE ONLY IN COMPETITION RACING VEHICLES AS DEFINED UNDER CALIFORNIA LAW, AND IS NOT LEGAL FOR USE IN ANY OTHER MOTOR VEHICLE. California law defines a "racing vehicle" as "a competition vehicle not used on public highways." (Calif. Health & Safety Code 39048) This part may only be used on competition racing vehicles operated exclusively on a closed course in conjunction with a sanctioned racing event. Competition-only motor vehicles may not be driven to a racing event on a public highway and must be transported on a trailer or other carrier. USE OF THIS PART IN ANY OTHER VEHICLE MAY SUBJECT YOU TO FINES AND PENALTIES FOR VIOLATION OF FEDERAL AND/OR STATE LAW, WILL VOID YOUR WARRANTY FROM BURGER MOTORSPORTS, INC, AND CAN VOID YOUR VEHICLE'S WARRANTY. It is your responsibility to comply with all applicable federal and state laws relating to use of this part, and Burger Motorsports, INC hereby disclaims any liability resulting from the failure to use this part in compliance with all applicable federal and state laws.
Transcript of Porsche 991.1 and 991.2 Turbo/S JB4 Install Guide · 991.1-991.2-Porsche-TurboS-Install-Guide...

Porsche 991.1 and 991.2 Turbo/S JB4 Install Guide Last updated 2/18/2020Use subject to terms and conditions posted at https://burgertuning.com/pages/termsTHIS PART IS LEGAL FOR USE ONLY IN COMPETITION RACING VEHICLES AS DEFINED UNDER CALIFORNIA LAW, AND IS NOT LEGAL FOR USE IN ANY OTHER MOTOR VEHICLE. California law defines a "racing vehicle" as "a competition vehicle not used on public highways." (Calif. Health & Safety Code 39048) This part may only be used on competition racing vehicles operated exclusively on a closed course in conjunction with a sanctioned racing event. Competition-only motor vehicles may not be driven to a racing event on a public highway and must be transported on a trailer or other carrier. USE OF THIS PART IN ANY OTHER VEHICLE MAY SUBJECT YOU TO FINES AND PENALTIES FOR VIOLATION OF FEDERALAND/OR STATE LAW, WILL VOID YOUR WARRANTY FROM BURGER MOTORSPORTS, INC, AND CAN VOID YOUR VEHICLE'S WARRANTY. It is your responsibility to comply with all applicable federal and state laws relating to use of this part, and Burger Motorsports, INC hereby disclaims any liability resulting from the failure to use this part in compliance with all applicable federal and state laws.

First with engine off and ignition on, you will need to put the wing in service mode. Hold the wing button for about 1 minute until you see the wing go fully up, then you can let go of the button. Open the hood, lock the doors, place your key far enough from the car not to wake it up, and wait 5 min for the vehicles computer to go to sleep.

To remove the wing you will need to squeeze where the arrows are pointing and pull down. This will release the clips so you can remove the plastic panels to view the torx screws holding the wing.
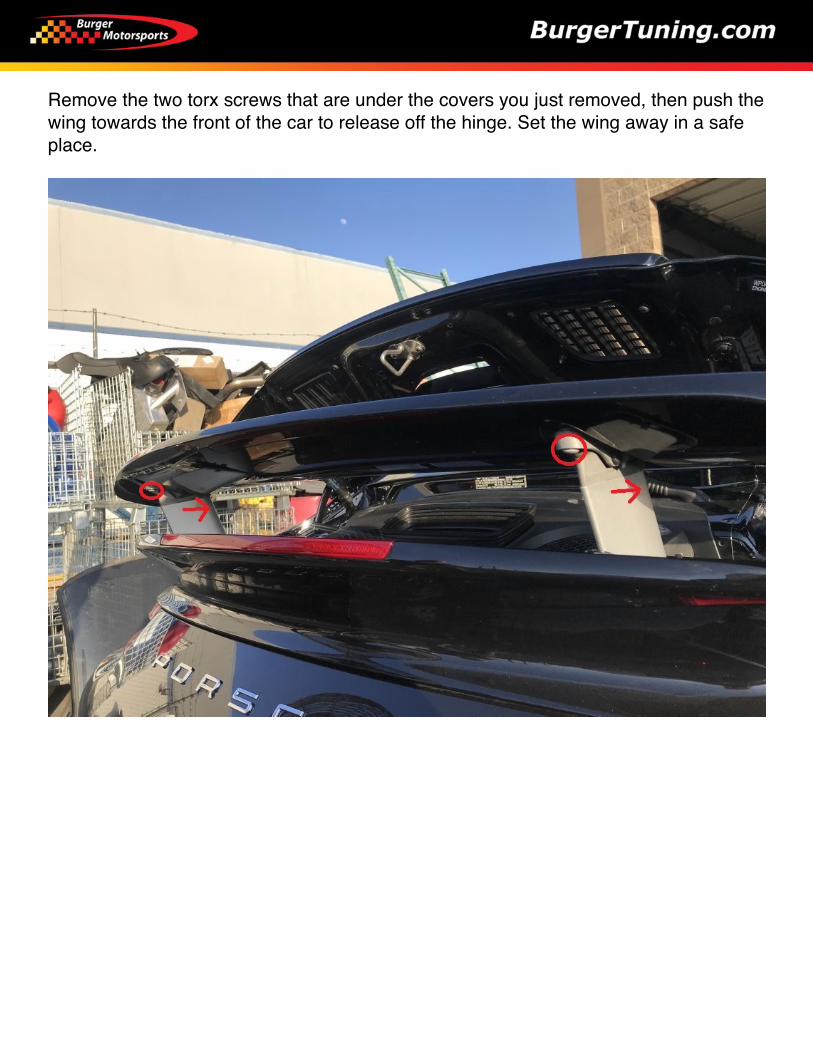
Remove the two torx screws that are under the covers you just removed, then push the wing towards the front of the car to release off the hinge. Set the wing away in a safe place.

Wing removed.

Remove the plastic piece inside the intake tube. There is a little tab on the top center that can be carefully pulled through the rubber to release it.

Now pull up on the fan cover which is secured by rubber grommets.

Pull the fans off which are secured by grommets also. Disconnect both fan harnesses.

Once the fans are removed you will need to remove the right plastic panel to view the connectors for the bottom half of the wing. Just pull up and remove, this is on rubber grommets as well.

To remove the bottom half of the wing you will need to use torx for the two screws holding it down and a 10mm socket on the bolt to the right of the oil and coolant filler cap.

Undo the brake light connector shown below. Now push the bottom half of the wing towards the front of the car to release it and set it aside in a safe place.

Next you will need to remove the wing carrier. First remove x4 torx screws holding the tail lights. x4 larger torx screws holding the wing carrier. x4 screws that are attached to the bumper. Once these are removed you will be able to remove the wing carrier by pushing straight towards the front of the car to clear the bumper. Once you clear the bumper, you can pull the wing carrier up and out.
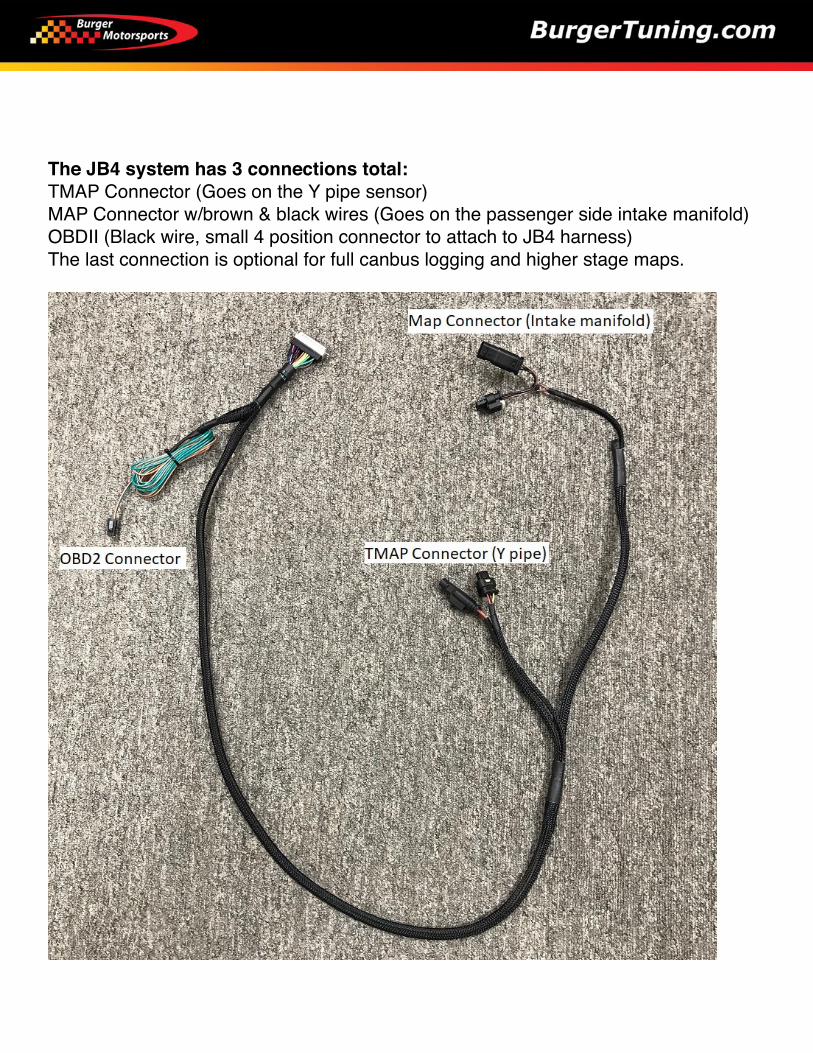
The JB4 system has 3 connections total:TMAP Connector (Goes on the Y pipe sensor)MAP Connector w/brown & black wires (Goes on the passenger side intake manifold)OBDII (Black wire, small 4 position connector to attach to JB4 harness)The last connection is optional for full canbus logging and higher stage maps.

Locate the rubber grommet on the right side of the engine compartment under the deck lid. This goes through to under the carpet under the rear window in both convertibles and hardtops. You can peel back the carpet inside the car to see this grommet. Cut a slit in the rubber grommet and run the JB4 wires through it into the engine compartment. Skip ahead 2 pages to see how to get under the carpet in the back of the car on the coupe. Convertible is shown in the below right photo. Hide the jb4 somewhere under the carpet in the car.

Now connect the JB4 to the engine. Use a small screwdriver to lift up the gray retaining clip, then squeeze the clip, and release the sensor on top of the y pipe. Push the JB4 harness in to the sensor and the factory harness in to the JB4 harness. Click the gray retaining clip down to lock it. Double check that it’s secure.
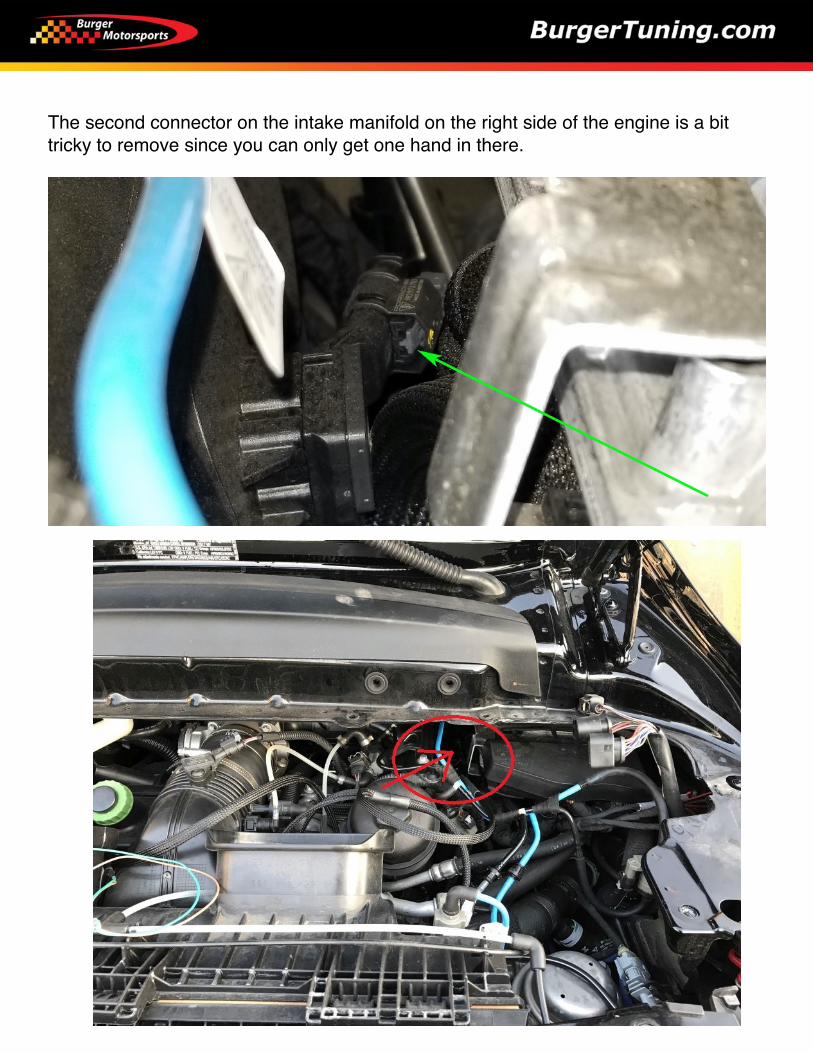
The second connector on the intake manifold on the right side of the engine is a bit tricky to remove since you can only get one hand in there.

Plug the OBDII connector into the JB4 connector with the green and brown wires.
Coupe: Go inside the cabin in the back seat. Pull the rear seats down for better access. You will need to pull the rear panel, they’re on clips where the arrows are pointing.
Convertible: Pull up on the weather stripping along the back of the car and gain access to underneath the carpet. (this is where the JB4 should be hidden.

You will start tucking in the OBDII cable through the corner of the rear and through the side of the seats. (Some of the wire is showing just for reference)
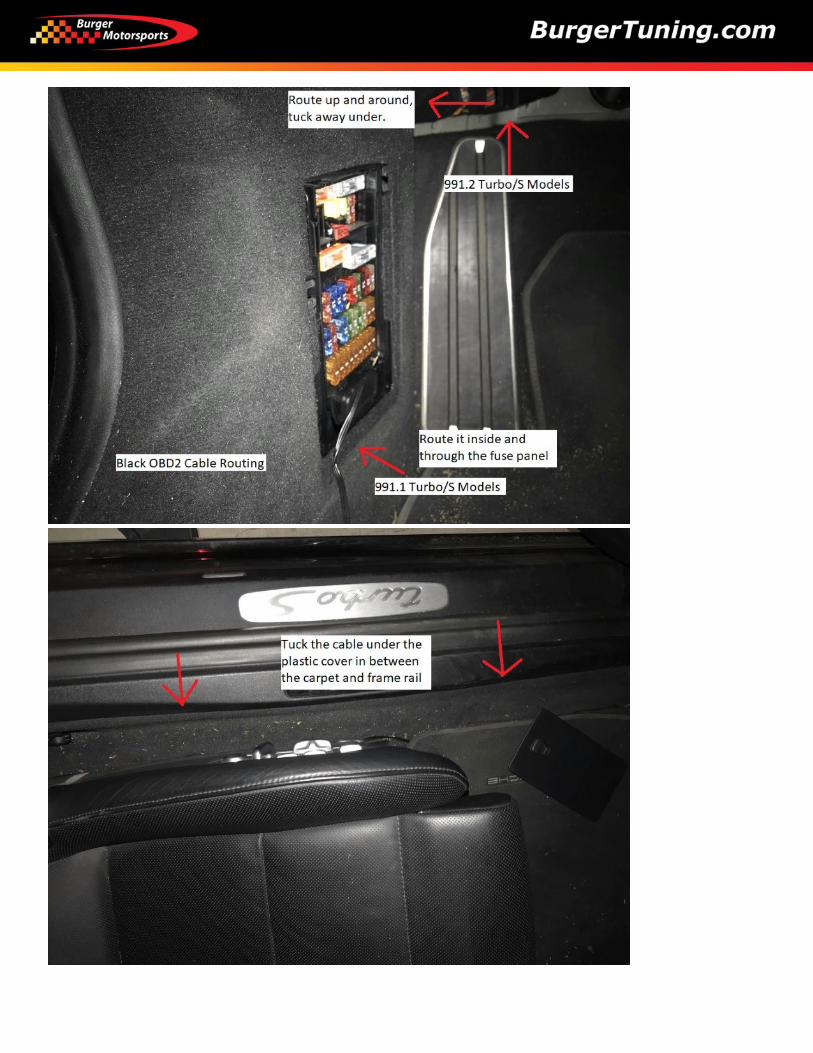
The black cable that connects directly to the OBD2 port will be routed the same way. For the 991.1 it’s located in the fuse panel, you will route it in and under from there. The 991.2 is located under the footwell, you will route it the same way. Some foot panels will need to be removed for the wiring to be tucked away. When connecting the black OBD2 connector to the green and brown molex connector. Make sure the locking tab aligns with the clip to ensure the correct orientation.

The JB4 comes preset to Map1 which is fairly conservative. Refer to this post for the full map guide, latest firmware, and additional details:https://www.n54tech.com/forums/showthread.php?t=58232