Plastering Process (Cement/Masonry/Finishing Layer)
15
Plastering Process Hume Cement
-
Upload
zelkhan -
Category
Engineering
-
view
198 -
download
6
Transcript of Plastering Process (Cement/Masonry/Finishing Layer)

Plastering Process
Hume Cement
OBJECTIVES
1. To find out properties of plaster preferred by consumers
2. To identify tools and materials used in plastering process
3. To point out the method of doing a plastering work.
4. Summarization
INTRODUCTION
• Plastering process is defined in various definition. Mostly, it will be considered as a 3-layered plasters with different methods and plasters for each layer. However, in this presentation, focus will be on the plastering process of the first layer, which is the base layer.
• This presentation will cover about cement plaster, the most commonly used plasters around the world.

PROPERTIES OF PLASTER
• Durable - Resistance to moisture penetration. Plaster serves as a protective layer, which prohibit water particle from penetrating through the layer, and thus causing cracks between the layers.
• Workable – Enough water inside mixture of cement and sand. Water used must be drinkable, free from chloride and impurities. Workable plaster will able to cover all irregular surface of the brick wall, increasing bonding surface area, thus improving bond strength between wall and plaster.
• *Ratio of mixture:
* Source: http://www.rdso.indianrailways.gov.in/ & http://www.muralist.org/fresco/plastering.html
PROPERTIES OF PLASTER
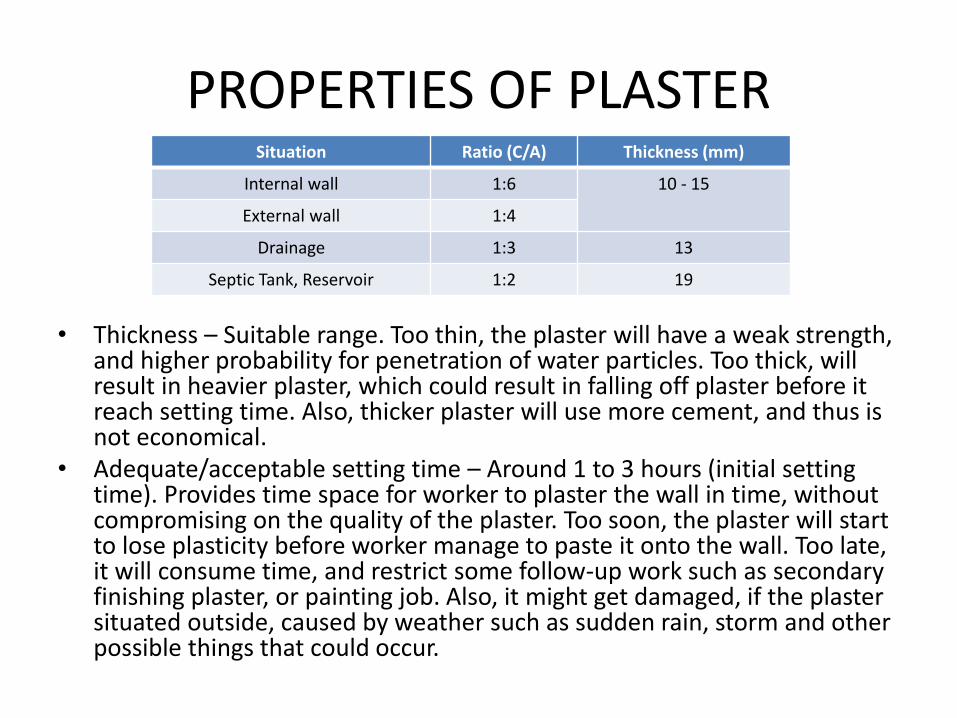
• Thickness – Suitable range. Too thin, the plaster will have a weak strength, and higher probability for penetration of water particles. Too thick, will result in heavier plaster, which could result in falling off plaster before it reach setting time. Also, thicker plaster will use more cement, and thus is not economical.
• Adequate/acceptable setting time – Around 1 to 3 hours (initial setting time). Provides time space for worker to plaster the wall in time, without compromising on the quality of the plaster. Too soon, the plaster will start to lose plasticity before worker manage to paste it onto the wall. Too late, it will consume time, and restrict some follow-up work such as secondary finishing plaster, or painting job. Also, it might get damaged, if the plaster situated outside, caused by weather such as sudden rain, storm and other possible things that could occur.
Situation Ratio (C/A) Thickness (mm)
Internal wall 1:6 10 - 15
External wall 1:4
Drainage 1:3 13
Septic Tank, Reservoir 1:2 19

TOOLS AND MATERIALS USED
TOOLS1. Plasterer’s Trowel – Tools to scoop the plaster, and apply it
to the wall.2. The Hawk – To hold or act as small reservoir for the
plaster, while plasterer applies it to the wall.3. Large bucket – For mixing of plaster to take place4. Mixer – For mixing purpose. Better if it is an electric
motorized mixer, for a better mixing process.5. Angle - bending – For a much easier and neater corner6. Scrapper - To roughen the plastered surface for
preparation of finishing plaster (Sometimes, workers tend to use their trowel to roughen the plaster applied)

TROWEL
ELECTRIC MIXER
BUCKET
HAWK
ANGLE BENDING
TOOLS AND MATERIALS USED
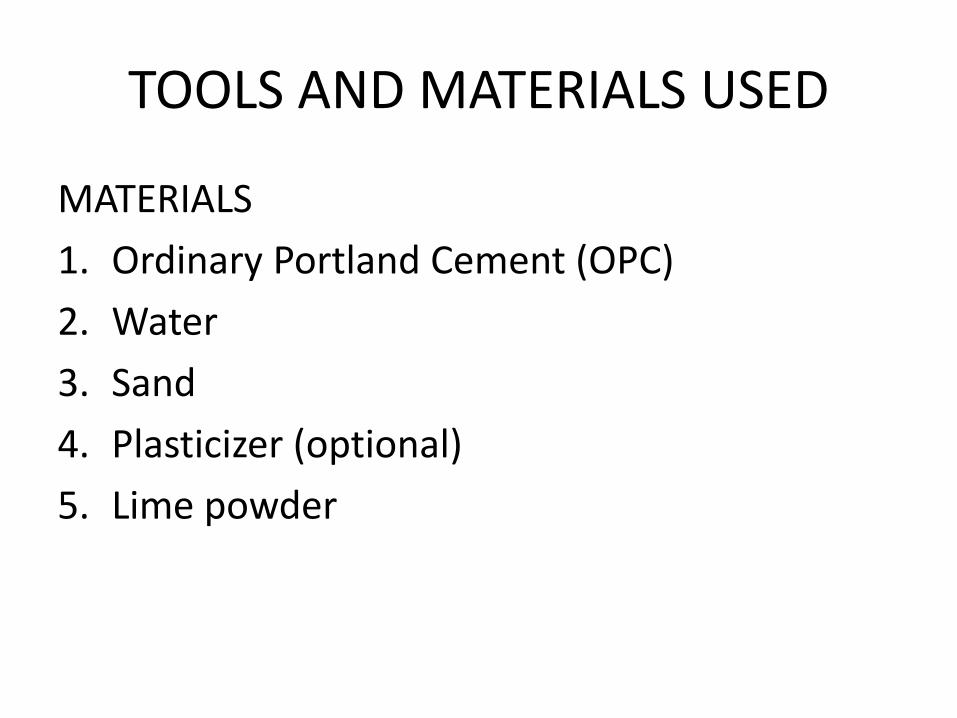
MATERIALS
1. Ordinary Portland Cement (OPC)
2. Water
3. Sand
4. Plasticizer (optional)
5. Lime powder

PLASTERING METHOD
Preparation of tools
Preparation of plaster
Applying Plaster
Finish
(Treatment)
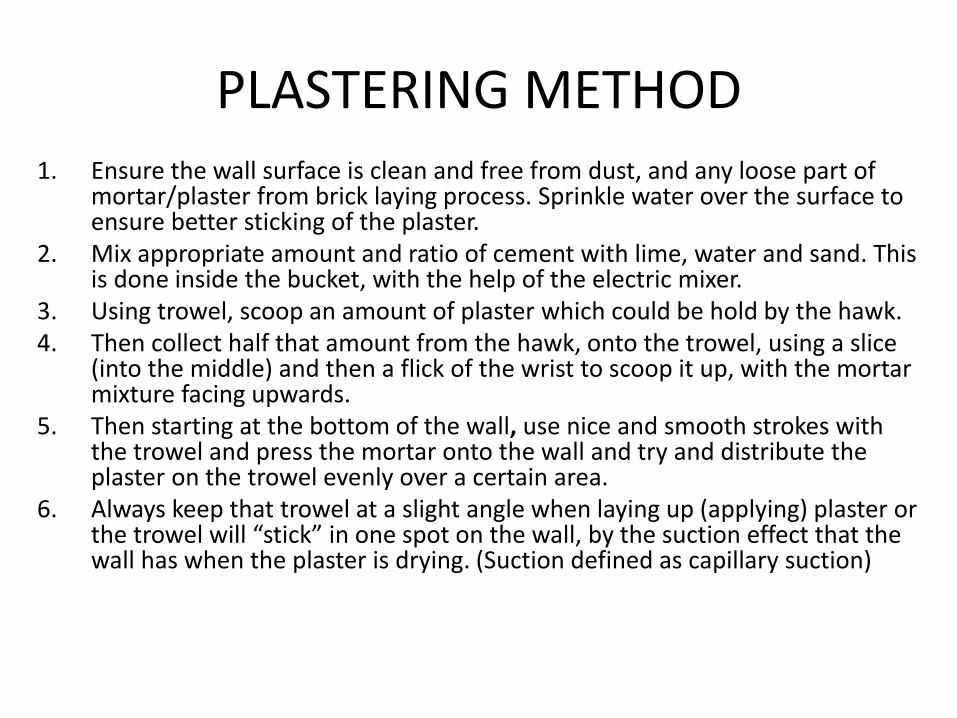
PLASTERING METHOD1. Ensure the wall surface is clean and free from dust, and any loose part of
mortar/plaster from brick laying process. Sprinkle water over the surface to ensure better sticking of the plaster.
2. Mix appropriate amount and ratio of cement with lime, water and sand. This is done inside the bucket, with the help of the electric mixer.
3. Using trowel, scoop an amount of plaster which could be hold by the hawk. 4. Then collect half that amount from the hawk, onto the trowel, using a slice
(into the middle) and then a flick of the wrist to scoop it up, with the mortar mixture facing upwards.
5. Then starting at the bottom of the wall, use nice and smooth strokes with the trowel and press the mortar onto the wall and try and distribute the plaster on the trowel evenly over a certain area.
6. Always keep that trowel at a slight angle when laying up (applying) plaster or the trowel will “stick” in one spot on the wall, by the suction effect that the wall has when the plaster is drying. (Suction defined as capillary suction)

PLASTERING METHOD
7. Repeat the process with the other area until the wall is fully covered with the plaster. Wall corners should be the last to be plastered.
8. Allow the plaster to dry. Increase ventilation if possible, such as opening windows for air to come in.
9. Scratching should be initiate after some hardness is achieved within the plasters, usually within few hours, if another layer of plaster (Usually finishing plaster) is needed.
Source: http://www.neverpaintagain.co.uk/

DEFECT IN PLASTERING
Cracks: Appear on the plastered surface in the form of hair cracks or wider cracks. Its due to old surface is not properly dressed, bad workman ship, and due to expansion and shrinkage in plaster coat during drying.Efflorescence: Some time soluble salts are present in plaster making materials or bricks. They appear on the plastered surface in whitish patches and produced ugly appearance. It may remove by brushing and washing the surface several times.Blistering of plastered surface: Small patches swell out beyond the plastered surface like boils.Falling out of plaster: Due to excessive thermal variation in plaster, Inadequate bonding between coats of plaster, and due to imperfect adhesion of the plaster to the background.

PREVENTION METHOD
• Cracking – Continuous damping of plaster, in order to slow down any rapid drying, to prevent cracking from happening.
• Blistering – Usually caused by uneven mixing of plaster, which could be prevented by ensuring a sufficient mixing between cement and its components to form plaster.
• Falling out of plaster – Thermal variation could be minimized my the means of water sprinkling method on the surface of the wall to reduce excessive thermal differences. For the case of inadequate bonding, it can be prevented by ensuring the plaster are plastic enough (workable) to stick into the wall. Imperfect adhesion could be minimized by the act of good workmanship/carpentership. Ensure to apply enough pressure to the plaster while plastering, to ensure the plaster mortar goes into any deep irregular surface, and cover any holes as much as possible.
CONCLUSION
• Some main properties of plaster that was highlighted by consumers are the durability, workability, thickness, and setting time.
• Also, the tools and materials used in plastering process was listed.
• In addition, the method to do plastering was explained.
• Finally, the problem for common plastering process and their suggested solution.

Thank You!