Pexip Infinity Hyper-V Installation GuideConfiguring Hyper-V for Pexip Infinity ... In Hyper-V, all...
18
Pexip Infinity Hyper-V Installation Guide Software Version 22 Document Version 22.a October 2019
Transcript of Pexip Infinity Hyper-V Installation GuideConfiguring Hyper-V for Pexip Infinity ... In Hyper-V, all...
Pexip Infinity
Hyper-V Installation Guide
Software Version 22
Document Version 22.a
October 2019
Pexip Infinity Hyper-V Installation Guide
© 2019 Pexip AS Version 22.a October 2019 Page 2 of 18
Contents
Introduction 4
Configuring Hyper-V for Pexip Infinity 5
Supported Hyper-V versions 5
Prerequisites 5
Synchronizing time 5
Using a static MAC address for the Management Node 5
Creating an external virtual switch 5
Additional information 6
Installing the Management Node 7
Deploying the Management Node template 7Enabling automatic startup 7
Running the installation wizard 7Opening a console window 8Running the installation wizard 8
Initial platform configuration 10
Accessing the Pexip Infinity Administrator interface 10
Configuring the Pexip Infinity platform 10
Manually deploying a Conferencing Node 12
Enabling automatic startup 14
Disabling processor compatibility mode 14
Testing and next steps after initial installation 15
Making a test call 15
Further configuration 15
Integrating with a call control system 16
Configuring the Pexip Distributed Gateway 16
Registering devices directly to the Pexip Infinity platform 16
Customizing the user experience 16
Informing users about the new video conferencing service 16
Pexip Infinity installation checklist 17
Prior to installation 17Hypervisor / host servers 17Pexip Infinity Administrator interface 17Hypervisor maintenance 17

Pexip Infinity Hyper-V Installation Guide
© 2019 Pexip AS Version 22.a October 2019 Page 3 of 18
Pexip Infinity configuration datasheet 18
Pexip Infinity Hyper-V Installation Guide Introduction
© 2019 Pexip AS Version 22.a October 2019 Page 4 of 18
IntroductionThis installation guide describes the minimum steps required to deploy and test a simple Pexip Infinity platform in a Hyper-V environment.
Full information on configuring and using Pexip Infinity is available:
l on the Pexip Infinity technical documentation website (from where all documentation can also be downloaded in PDF format)
l as online help, by clicking the Help link in the top right corner of the Pexip Infinity Administrator interface (available after the Management Node has been deployed).
You must ensure you have completed all necessary platform-based Planning and prerequisites prior to installation.

Pexip Infinity Hyper-V Installation Guide Configuring Hyper-V for Pexip Infinity
© 2019 Pexip AS Version 22.a October 2019 Page 5 of 18
Configuring Hyper-V for Pexip InfinityThis section describes the Hyper-V configuration required before you install the Management Node or install a Conferencing Node.
Supported Hyper-V versionsVersion 22 of Pexip Infinity supports Microsoft Hyper-V in the form of Microsoft Hyper-V Server 2012 and later, or Windows Server 2012 and later.
PrerequisitesYou must have a suitable Hyper-V environment already installed.
Synchronizing timePexip Infinity uses NTP servers to obtain accurate system time. This is necessary to ensure correct operation, including configuration replication and log timestamps.
All host servers must be synchronized with accurate time before you install the Pexip Infinity Management Node or Conferencing Nodes on them.
NTP must be enabled on the Management Node VM before you deploy any Conferencing Nodes (this is done during installation of the Management Node).
We strongly recommend that you configure at least three distinct NTP servers or NTP server pools on all your host servers and the Management Node itself. This will ensure that log entries from all nodes are properly synchronized.
Pexip Infinity Management Node and Conferencing Node VMs use the UTC timezone, and all logs are in UTC. Do not attempt to change the timezone on these systems. Note however that the administrator web interface uses your local time.
In Hyper-V, all time synchronization is configured using the Active Domain Controller. You must ensure that all VMs and host servers are using the same time. Consult your Hyper-V documentation for information on how to do this in your environment.
Using a static MAC address for the Management NodeWe recommend using a static MAC address for the virtual machine hosting your Management Node. This will ensure that the licenses on your Management Node do not become invalid if, for example, the node reboots and comes up on a different physical blade.
Creating an external virtual switchYou must create an external virtual switch on the host server to allow VMs on that host to access external network resources. To do this:
1. Log in to Hyper-V.
2. Right-click on the host server and select Virtual Switch Manager....The Virtual Switch Manager window opens.
3. Select External and then Create Virtual Switch.
4. Enter a Name for the switch. 5. Either accept the default options, or select the options appropriate for your environment.
6. Select Apply.

Pexip Infinity Hyper-V Installation Guide Configuring Hyper-V for Pexip Infinity
© 2019 Pexip AS Version 22.a October 2019 Page 6 of 18
Additional informationTo look at the steps taken in setting up an example lab deployment of a Conferencing Node in Microsoft Hyper-V, see https://www.graham-walsh.com/setting-up-pexip-infinity-with-microsoft-hyper-v-server-2012/.
Pexip Infinity Hyper-V Installation Guide Installing the Management Node
© 2019 Pexip AS Version 22.a October 2019 Page 7 of 18
Installing the Management NodeBefore installing the Management Node we recommend that you review the Hyper-V configuration prerequisites and the Installation checklist.
Installation of the Management Node is a two-step process:
1. Deploying the VM template: this creates a new unconfigured instance of a generic Management Node VM.
The process for deploying the template in a Microsoft Hyper-V hypervisor environment is described below.
2. Running the installation wizard: after deploying the Management Node template, the installation wizard allows you to enter the basic configuration details for your Management Node VM.
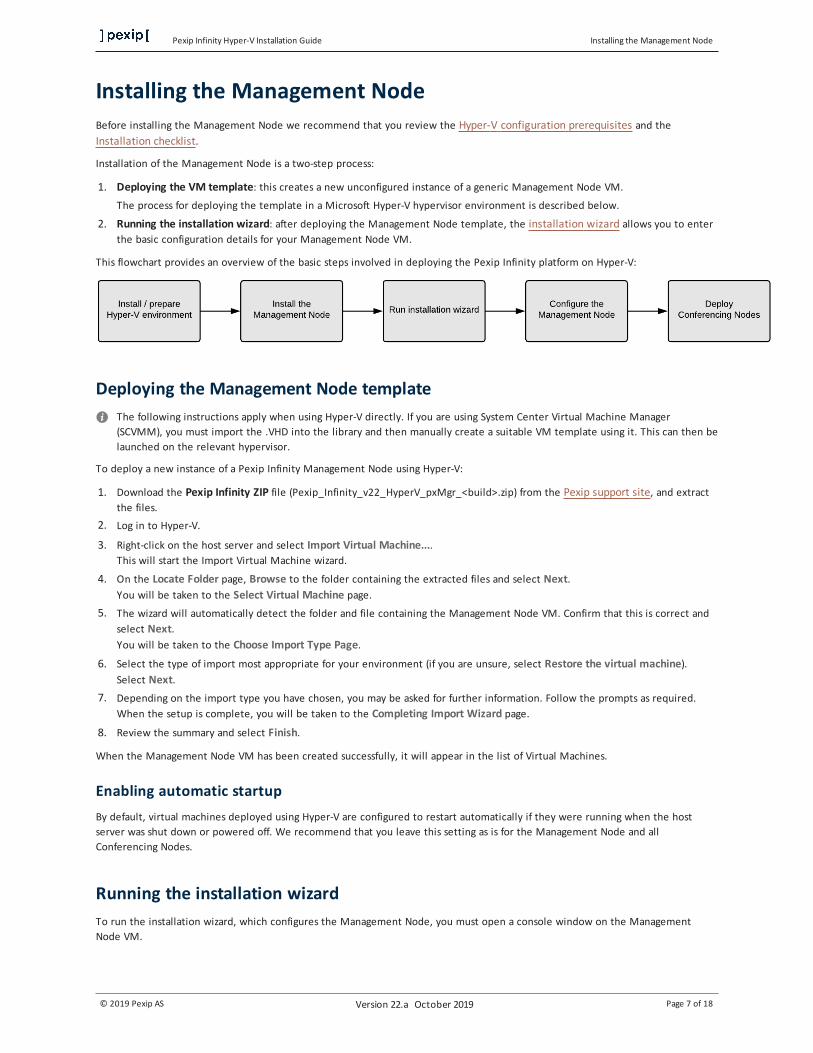
This flowchart provides an overview of the basic steps involved in deploying the Pexip Infinity platform on Hyper-V:
Deploying the Management Node templateThe following instructions apply when using Hyper-V directly. If you are using System Center Virtual Machine Manager (SCVMM), you must import the .VHD into the library and then manually create a suitable VM template using it. This can then be launched on the relevant hypervisor.
To deploy a new instance of a Pexip Infinity Management Node using Hyper-V:
1. Download the Pexip Infinity ZIP file (Pexip_Infinity_v22_HyperV_pxMgr_<build>.zip) from the Pexip support site, and extract the files.
2. Log in to Hyper-V.
3. Right-click on the host server and select Import Virtual Machine....This will start the Import Virtual Machine wizard.
4. On the Locate Folder page, Browse to the folder containing the extracted files and select Next.You will be taken to the Select Virtual Machine page.
5. The wizard will automatically detect the folder and file containing the Management Node VM. Confirm that this is correct and select Next.You will be taken to the Choose Import Type Page.
6. Select the type of import most appropriate for your environment (if you are unsure, select Restore the virtual machine). Select Next.
7. Depending on the import type you have chosen, you may be asked for further information. Follow the prompts as required.When the setup is complete, you will be taken to the Completing Import Wizard page.
8. Review the summary and select Finish.
When the Management Node VM has been created successfully, it will appear in the list of Virtual Machines.
Enabling automatic startupBy default, virtual machines deployed using Hyper-V are configured to restart automatically if they were running when the host server was shut down or powered off. We recommend that you leave this setting as is for the Management Node and all Conferencing Nodes.
Running the installation wizardTo run the installation wizard, which configures the Management Node, you must open a console window on the Management Node VM.
Pexip Infinity Hyper-V Installation Guide Installing the Management Node
© 2019 Pexip AS Version 22.a October 2019 Page 8 of 18
Opening a console window 1. Log in to Hyper-V.
2. Start the new Management Node VM (if it is not already running).
3. Right-click on the new Management Node VM and select Connect....
Running the installation wizard 1. At the prompt, enter the username admin.
The display will read:
You are required to change your password immediately (root enforced)Enter new UNIX password:
2. Create a password for the Management Node operating system by typing the password, pressing enter, retyping the password, and pressing enter again.
3. Ensure you record the password in a secure location. After you have finished running the installation wizard you will not need the password again unless you need to access the Management Node using SSH.
You are presented with another login prompt:[sudo] password for admin:
4. Log in again with the password you just created.
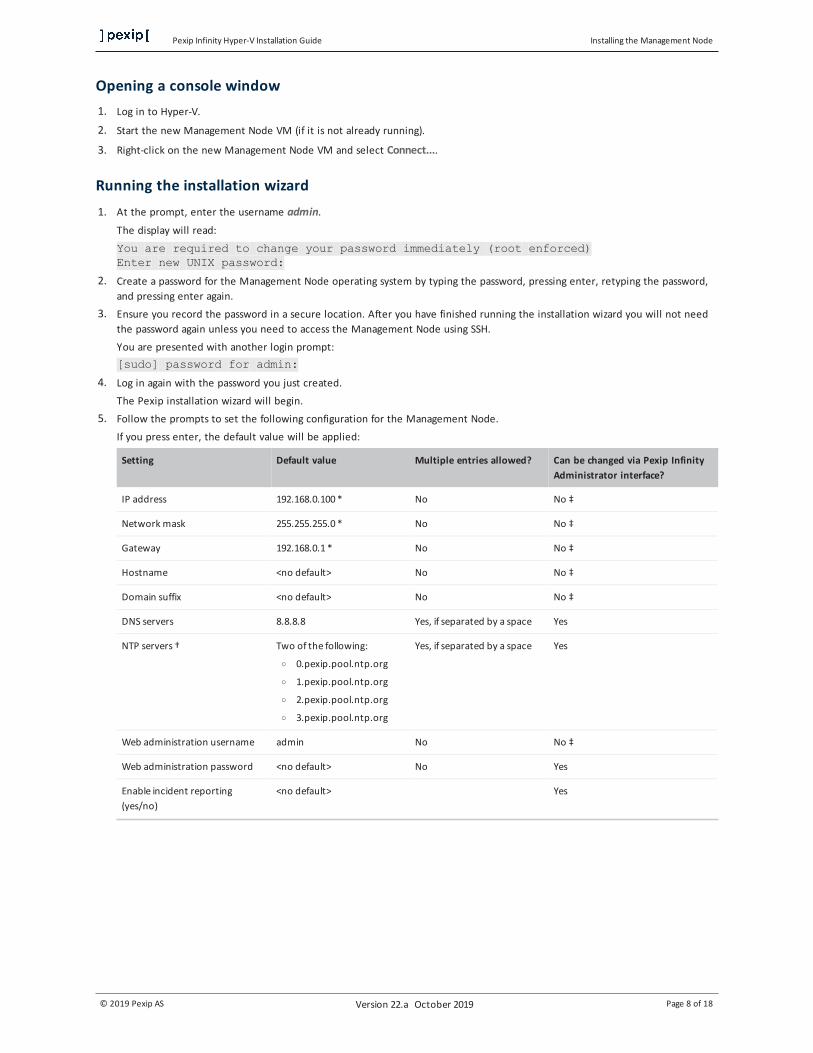
The Pexip installation wizard will begin. 5. Follow the prompts to set the following configuration for the Management Node.
If you press enter, the default value will be applied:
Setting Default value Multiple entries allowed? Can be changed via Pexip Infinity Administrator interface?
IP address 192.168.0.100 * No No ‡
Network mask 255.255.255.0 * No No ‡
Gateway 192.168.0.1 * No No ‡
Hostname <no default> No No ‡
Domain suffix <no default> No No ‡
DNS servers 8.8.8.8 Yes, if separated by a space Yes
NTP servers † Two of the following:
o 0.pexip.pool.ntp.org
o 1.pexip.pool.ntp.org
o 2.pexip.pool.ntp.org
o 3.pexip.pool.ntp.org
Yes, if separated by a space Yes
Web administration username admin No No ‡
Web administration password <no default> No Yes
Enable incident reporting (yes/no)
<no default> Yes
Pexip Infinity Hyper-V Installation Guide Installing the Management Node
© 2019 Pexip AS Version 22.a October 2019 Page 9 of 18
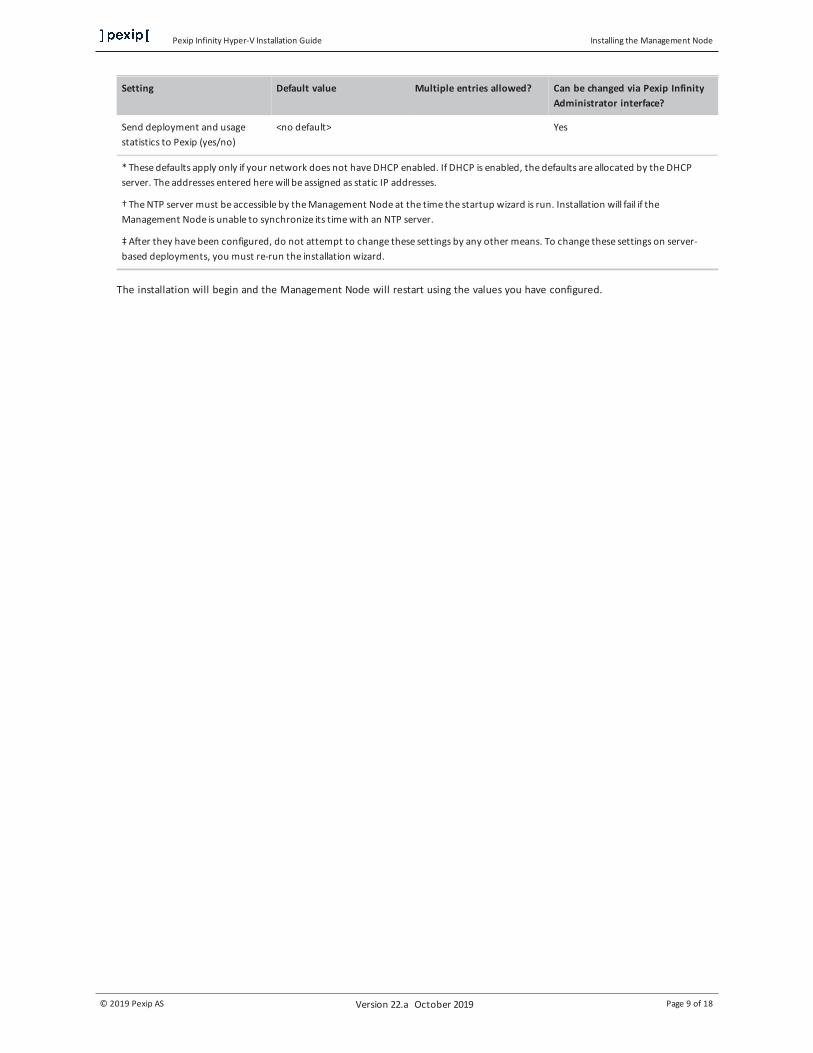
Setting Default value Multiple entries allowed? Can be changed via Pexip Infinity Administrator interface?
Send deployment and usage statistics to Pexip (yes/no)
<no default> Yes
* These defaults apply only if your network does not have DHCP enabled. If DHCP is enabled, the defaults are allocated by the DHCP server. The addresses entered here will be assigned as static IP addresses.
† The NTP server must be accessible by the Management Node at the time the startup wizard is run. Installation will fail if the Management Node is unable to synchronize its time with an NTP server.
‡ After they have been configured, do not attempt to change these settings by any other means. To change these settings on server-based deployments, you must re-run the installation wizard.
The installation will begin and the Management Node will restart using the values you have configured.
Pexip Infinity Hyper-V Installation Guide Initial platform configuration
© 2019 Pexip AS Version 22.a October 2019 Page 10 of 18
Initial platform configurationAfter you have run the installation wizard, you must perform some preliminary configuration of the Pexip Infinity platform before you can deploy a Conferencing Node.
This section lists the configuration required, and provides a summary of each step with a link to further information.
All configuration should be done using the Pexip Infinity Administrator interface.
No changes should be made to any Pexip VM via the terminal interface (other than as described when running the initial Pexip installation wizard) unless directed to do so by Pexip support. This includes (but is not limited to) changes to the time zone, changes to IP tables, configuration of Ethernet interfaces, or the installation of any third-party code/applications.
Accessing the Pexip Infinity Administrator interfaceThe Pexip Infinity Administrator interface is hosted on the Management Node. To access this:
1. Open a web browser and type in the IP address or DNS name that you assigned to the Management Node using the installation wizard (you may need to wait a minute or so after installation is complete before you can access the Administrator interface).
2. Until you have uploaded appropriate TLS certificates to the Management Node, your browser may present you with a warning that the website's security certificate is not trusted. You should proceed, but upload appropriate TLS certificates to the Management Node (and Conferencing Nodes, when they have been created) as soon as possible.
The Pexip Infinity Conferencing Platform login page will appear.
3. Log in using the web administration username and password you set using the installation wizard.
You are now ready to begin configuring the Pexip Infinity service and deploying Conferencing Nodes.
As a first step, we strongly recommend that you configure at least 2 additional NTP servers or NTP server pools to ensure that log entries from all nodes are properly synchronized.
It may take some time for any configuration changes to take effect across the Conferencing Nodes. In typical deployments, configuration replication is performed approximately once per minute. However, in very large deployments (more than 60 Conferencing Nodes ), configuration replication intervals are extended, and it may take longer for configuration changes to be applied to all Conferencing Nodes (the administrator log shows when each node has been updated).
Brief details of how to perform the initial configuration are given below. For complete information on how to configure your Pexip Infinity solution, see the Pexip Infinity technical documentation website at docs.pexip.com.
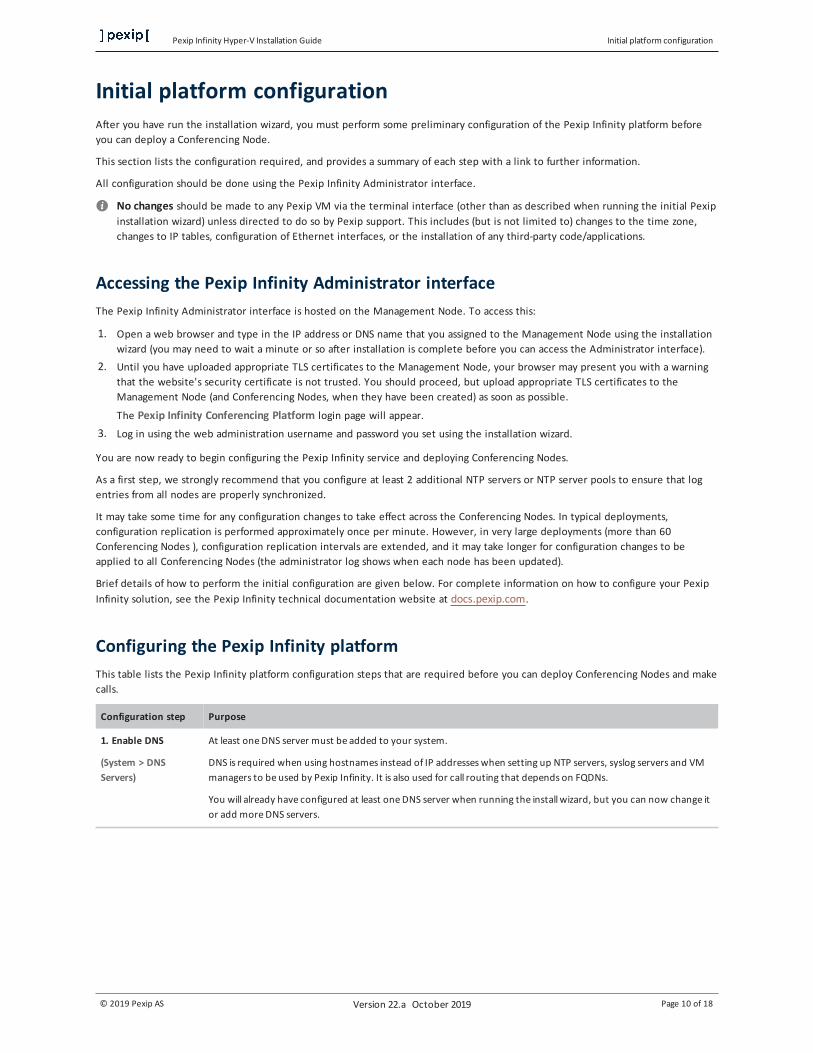
Configuring the Pexip Infinity platformThis table lists the Pexip Infinity platform configuration steps that are required before you can deploy Conferencing Nodes and make calls.
Configuration step Purpose
1. Enable DNS
(System > DNS Servers)
At least one DNS server must be added to your system.
DNS is required when using hostnames instead of IP addresses when setting up NTP servers, syslog servers and VM managers to be used by Pexip Infinity. It is also used for call routing that depends on FQDNs.
You will already have configured at least one DNS server when running the install wizard, but you can now change it or add more DNS servers.
Pexip Infinity Hyper-V Installation Guide Initial platform configuration
© 2019 Pexip AS Version 22.a October 2019 Page 11 of 18
Configuration step Purpose
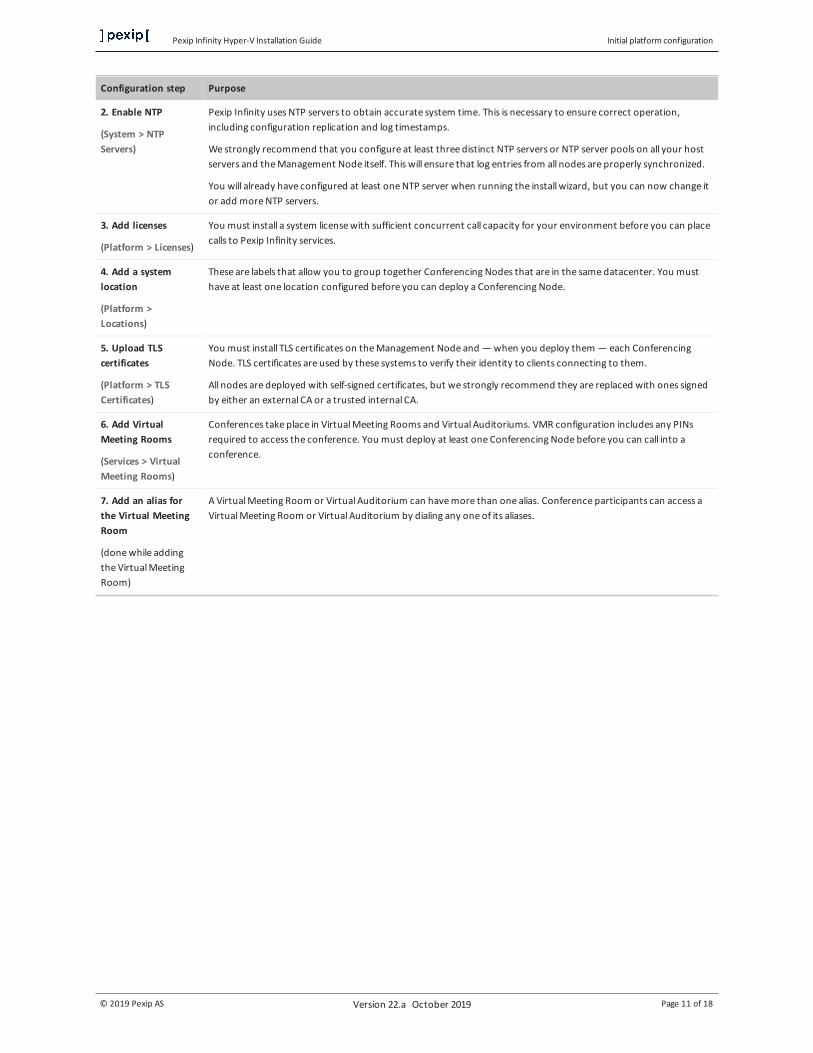
2. Enable NTP
(System > NTP Servers)
Pexip Infinity uses NTP servers to obtain accurate system time. This is necessary to ensure correct operation, including configuration replication and log timestamps.
We strongly recommend that you configure at least three distinct NTP servers or NTP server pools on all your host servers and the Management Node itself. This will ensure that log entries from all nodes are properly synchronized.
You will already have configured at least one NTP server when running the install wizard, but you can now change it or add more NTP servers.
3. Add licenses
(Platform > Licenses)
You must install a system license with sufficient concurrent call capacity for your environment before you can place calls to Pexip Infinity services.
4. Add a system location
(Platform > Locations)
These are labels that allow you to group together Conferencing Nodes that are in the same datacenter. You must have at least one location configured before you can deploy a Conferencing Node.
5. Upload TLS certificates
(Platform > TLS Certificates)
You must install TLS certificates on the Management Node and — when you deploy them — each Conferencing Node. TLS certificates are used by these systems to verify their identity to clients connecting to them.
All nodes are deployed with self-signed certificates, but we strongly recommend they are replaced with ones signed by either an external CA or a trusted internal CA.
6. Add Virtual Meeting Rooms
(Services > Virtual Meeting Rooms)
Conferences take place in Virtual Meeting Rooms and Virtual Auditoriums. VMR configuration includes any PINs required to access the conference. You must deploy at least one Conferencing Node before you can call into a conference.
7. Add an alias for the Virtual Meeting Room
(done while adding the Virtual Meeting Room)
A Virtual Meeting Room or Virtual Auditorium can have more than one alias. Conference participants can access a Virtual Meeting Room or Virtual Auditorium by dialing any one of its aliases.
Pexip Infinity Hyper-V Installation Guide Manually deploying a Conferencing Node
© 2019 Pexip AS Version 22.a October 2019 Page 12 of 18
Manually deploying a Conferencing NodeBefore you start, ensure that you are currently using the same machine that you will subsequently want to use to upload the generated file on to your host server.
To manually deploy a new Conferencing Node on to a Hyper-V host:
1. Go to Platform > Conferencing Nodes and select Add Conferencing Node.
2. From the Deployment type field, select Manual (Hyper-V).
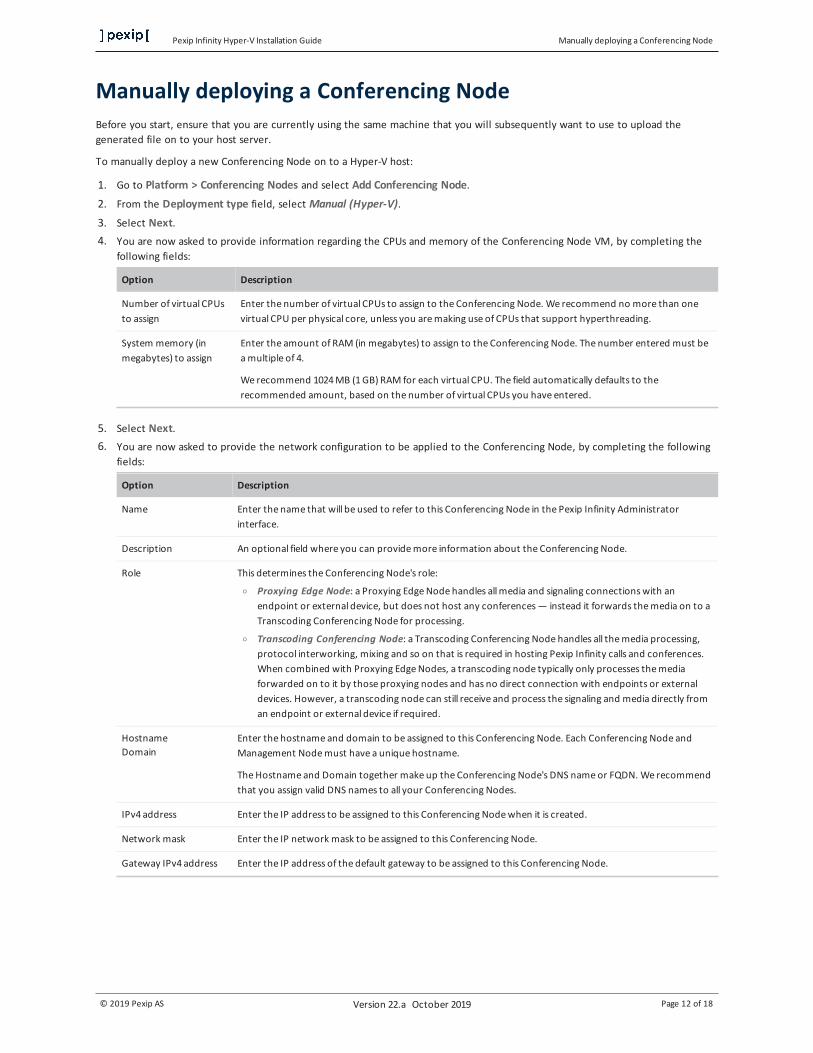
3. Select Next. 4. You are now asked to provide information regarding the CPUs and memory of the Conferencing Node VM, by completing the
following fields:
Option Description
Number of virtual CPUs to assign
Enter the number of virtual CPUs to assign to the Conferencing Node. We recommend no more than one virtual CPU per physical core, unless you are making use of CPUs that support hyperthreading.
System memory (in megabytes) to assign
Enter the amount of RAM (in megabytes) to assign to the Conferencing Node. The number entered must be a multiple of 4.
We recommend 1024 MB (1 GB) RAM for each virtual CPU. The field automatically defaults to the recommended amount, based on the number of virtual CPUs you have entered.
5. Select Next. 6. You are now asked to provide the network configuration to be applied to the Conferencing Node, by completing the following
fields:
Option Description
Name Enter the name that will be used to refer to this Conferencing Node in the Pexip Infinity Administrator interface.
Description An optional field where you can provide more information about the Conferencing Node.
Role This determines the Conferencing Node's role:
o Proxying Edge Node: a Proxying Edge Node handles all media and signaling connections with an endpoint or external device, but does not host any conferences — instead it forwards the media on to a Transcoding Conferencing Node for processing.
o Transcoding Conferencing Node: a Transcoding Conferencing Node handles all the media processing, protocol interworking, mixing and so on that is required in hosting Pexip Infinity calls and conferences. When combined with Proxying Edge Nodes, a transcoding node typically only processes the media forwarded on to it by those proxying nodes and has no direct connection with endpoints or external devices. However, a transcoding node can still receive and process the signaling and media directly from an endpoint or external device if required.
Hostname Domain
Enter the hostname and domain to be assigned to this Conferencing Node. Each Conferencing Node and Management Node must have a unique hostname.
The Hostname and Domain together make up the Conferencing Node's DNS name or FQDN. We recommend that you assign valid DNS names to all your Conferencing Nodes.
IPv4 address Enter the IP address to be assigned to this Conferencing Node when it is created.
Network mask Enter the IP network mask to be assigned to this Conferencing Node.
Gateway IPv4 address Enter the IP address of the default gateway to be assigned to this Conferencing Node.
Pexip Infinity Hyper-V Installation Guide Manually deploying a Conferencing Node
© 2019 Pexip AS Version 22.a October 2019 Page 13 of 18
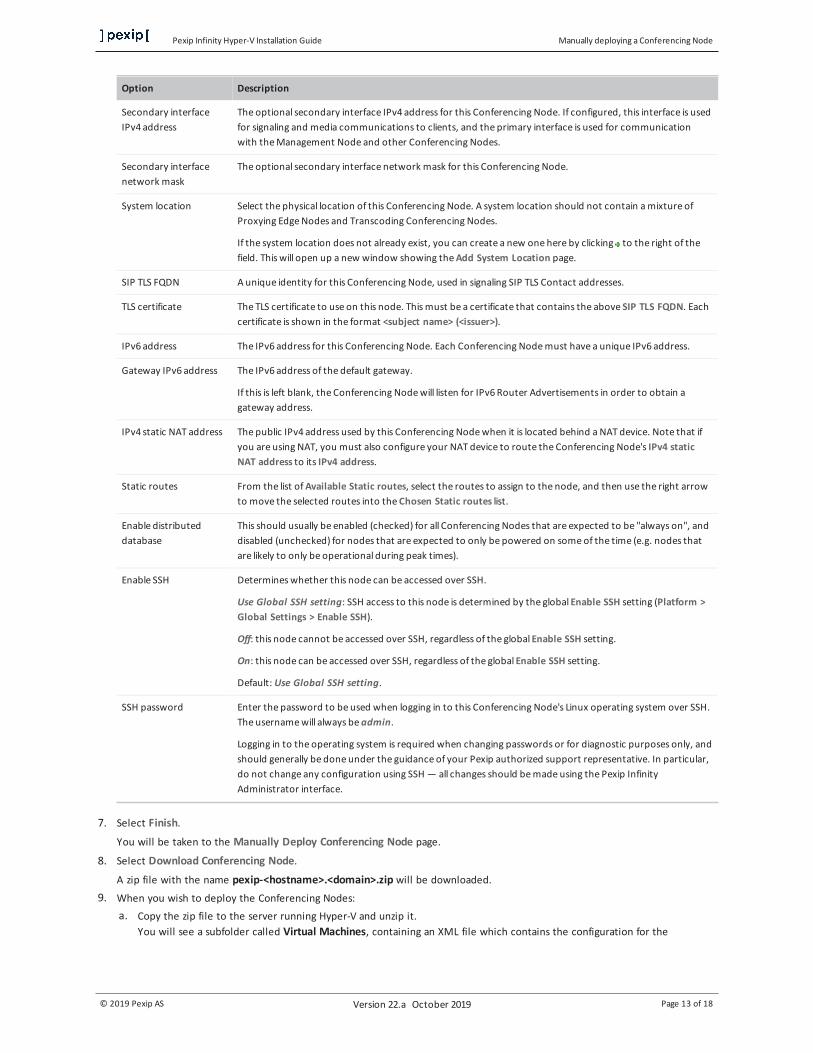
Option Description
Secondary interface IPv4 address
The optional secondary interface IPv4 address for this Conferencing Node. If configured, this interface is used for signaling and media communications to clients, and the primary interface is used for communication with the Management Node and other Conferencing Nodes.
Secondary interface network mask
The optional secondary interface network mask for this Conferencing Node.
System location Select the physical location of this Conferencing Node. A system location should not contain a mixture of Proxying Edge Nodes and Transcoding Conferencing Nodes.
If the system location does not already exist, you can create a new one here by clicking to the right of the field. This will open up a new window showing the Add System Location page.
SIP TLS FQDN A unique identity for this Conferencing Node, used in signaling SIP TLS Contact addresses.
TLS certificate The TLS certificate to use on this node. This must be a certificate that contains the above SIP TLS FQDN. Each certificate is shown in the format <subject name> (<issuer>).
IPv6 address The IPv6 address for this Conferencing Node. Each Conferencing Node must have a unique IPv6 address.
Gateway IPv6 address The IPv6 address of the default gateway.
If this is left blank, the Conferencing Node will listen for IPv6 Router Advertisements in order to obtain a gateway address.
IPv4 static NAT address The public IPv4 address used by this Conferencing Node when it is located behind a NAT device. Note that if you are using NAT, you must also configure your NAT device to route the Conferencing Node's IPv4 static NAT address to its IPv4 address.
Static routes From the list of Available Static routes, select the routes to assign to the node, and then use the right arrow to move the selected routes into the Chosen Static routes list.
Enable distributed database
This should usually be enabled (checked) for all Conferencing Nodes that are expected to be "always on", and disabled (unchecked) for nodes that are expected to only be powered on some of the time (e.g. nodes that are likely to only be operational during peak times).
Enable SSH Determines whether this node can be accessed over SSH.
Use Global SSH setting: SSH access to this node is determined by the global Enable SSH setting (Platform > Global Settings > Enable SSH).
Off: this node cannot be accessed over SSH, regardless of the global Enable SSH setting.
On: this node can be accessed over SSH, regardless of the global Enable SSH setting.
Default: Use Global SSH setting.
SSH password Enter the password to be used when logging in to this Conferencing Node's Linux operating system over SSH. The username will always be admin.
Logging in to the operating system is required when changing passwords or for diagnostic purposes only, and should generally be done under the guidance of your Pexip authorized support representative. In particular, do not change any configuration using SSH — all changes should be made using the Pexip Infinity Administrator interface.
7. Select Finish.
You will be taken to the Manually Deploy Conferencing Node page.
8. Select Download Conferencing Node.
A zip file with the name pexip-<hostname>.<domain>.zip will be downloaded. 9. When you wish to deploy the Conferencing Nodes:
a. Copy the zip file to the server running Hyper-V and unzip it. You will see a subfolder called Virtual Machines, containing an XML file which contains the configuration for the
Pexip Infinity Hyper-V Installation Guide Manually deploying a Conferencing Node
© 2019 Pexip AS Version 22.a October 2019 Page 14 of 18
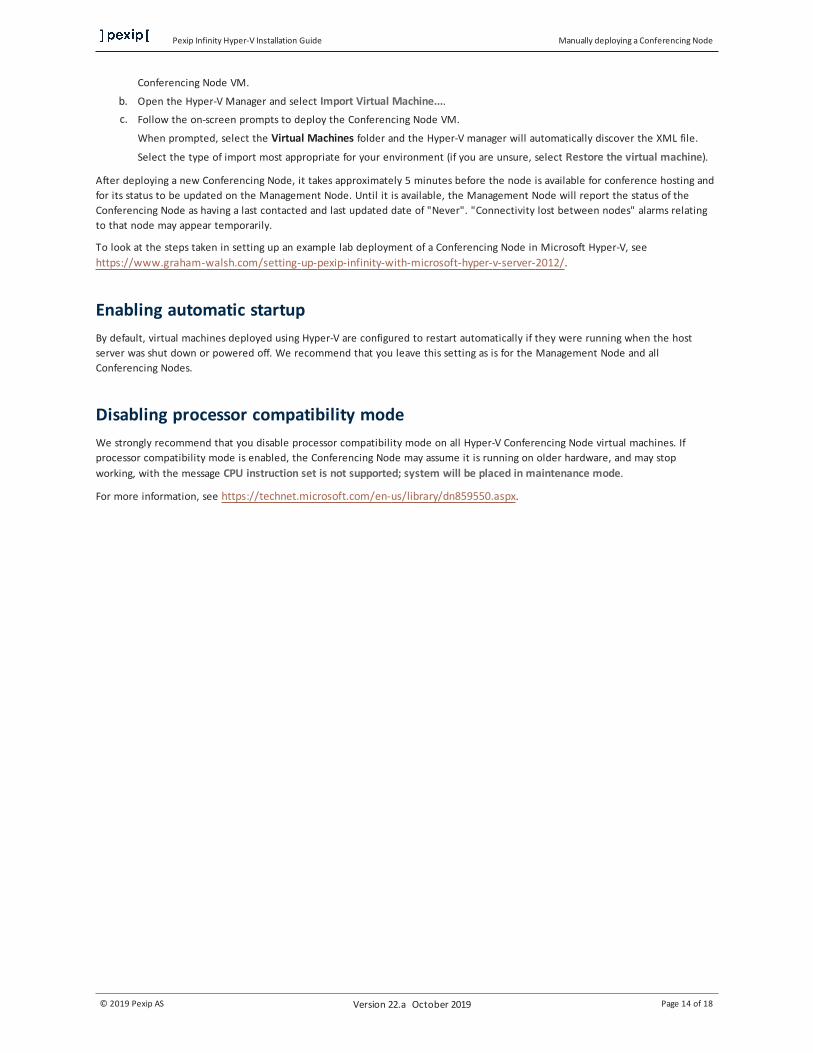
Conferencing Node VM.
b. Open the Hyper-V Manager and select Import Virtual Machine.... c. Follow the on-screen prompts to deploy the Conferencing Node VM.
When prompted, select the Virtual Machines folder and the Hyper-V manager will automatically discover the XML file.
Select the type of import most appropriate for your environment (if you are unsure, select Restore the virtual machine).
After deploying a new Conferencing Node, it takes approximately 5 minutes before the node is available for conference hosting and for its status to be updated on the Management Node. Until it is available, the Management Node will report the status of the Conferencing Node as having a last contacted and last updated date of "Never". "Connectivity lost between nodes" alarms relating to that node may appear temporarily.
To look at the steps taken in setting up an example lab deployment of a Conferencing Node in Microsoft Hyper-V, see https://www.graham-walsh.com/setting-up-pexip-infinity-with-microsoft-hyper-v-server-2012/.
Enabling automatic startupBy default, virtual machines deployed using Hyper-V are configured to restart automatically if they were running when the host server was shut down or powered off. We recommend that you leave this setting as is for the Management Node and all Conferencing Nodes.
Disabling processor compatibility modeWe strongly recommend that you disable processor compatibility mode on all Hyper-V Conferencing Node virtual machines. If processor compatibility mode is enabled, the Conferencing Node may assume it is running on older hardware, and may stop working, with the message CPU instruction set is not supported; system will be placed in maintenance mode.
For more information, see https://technet.microsoft.com/en-us/library/dn859550.aspx.

Pexip Infinity Hyper-V Installation Guide Testing and next steps after initial installation
© 2019 Pexip AS Version 22.a October 2019 Page 15 of 18
Testing and next steps after initial installationAfter you have completed your installation and initial configuration of Pexip Infinity, you can make a test call to check that your system is working. You can also extend your deployment by integrating it with other call control or third-party systems, or by customizing the user experience. You should also consider how to let your users know about their new video conferencing service.
Making a test callWhen you have deployed a Conferencing Node and configured a Virtual Meeting Room and an alias, you can make a test call to check that your system is working.
An easy way to do this is by using the Infinity Connect web app to dial the alias of one of the Virtual Meeting Rooms you've already created, as follows:
1. Open a browser (we recommend Chrome) and type in the IP address (or FQDN, if you've set it up already) of one of the Conferencing Nodes.
2. Ensure that your camera and microphone are enabled and working correctly:
o You should see your own image in the video window.
o The microphone icon should be green and you should see a green bar under the video image indicating the volume of audio being detected.
3. Select .
4. In the Search to call field, enter the alias of the VMR you want to use for testing and then press Enter. You will be connected to the VMR.
5. From another device, join the conference in the same way.
The two participants should be able to see and hear each other, and share content.
See About the Infinity Connect web app for more information.
Further configurationYou are now ready to continue configuring the Pexip Infinity platform and services and deploying more Conferencing Nodes.
Specifically, you should now do the following:
l Assigning hostnames and FQDNs l Enabling SNMP on Conferencing Nodes
At some point you may also want to:
l integrate the Pexip Infinity platform with your call control system l configure the Pexip Distributed Gateway l register devices directly to the Pexip Infinity platform l customize the user experience
Pexip Infinity Hyper-V Installation Guide Testing and next steps after initial installation
© 2019 Pexip AS Version 22.a October 2019 Page 16 of 18
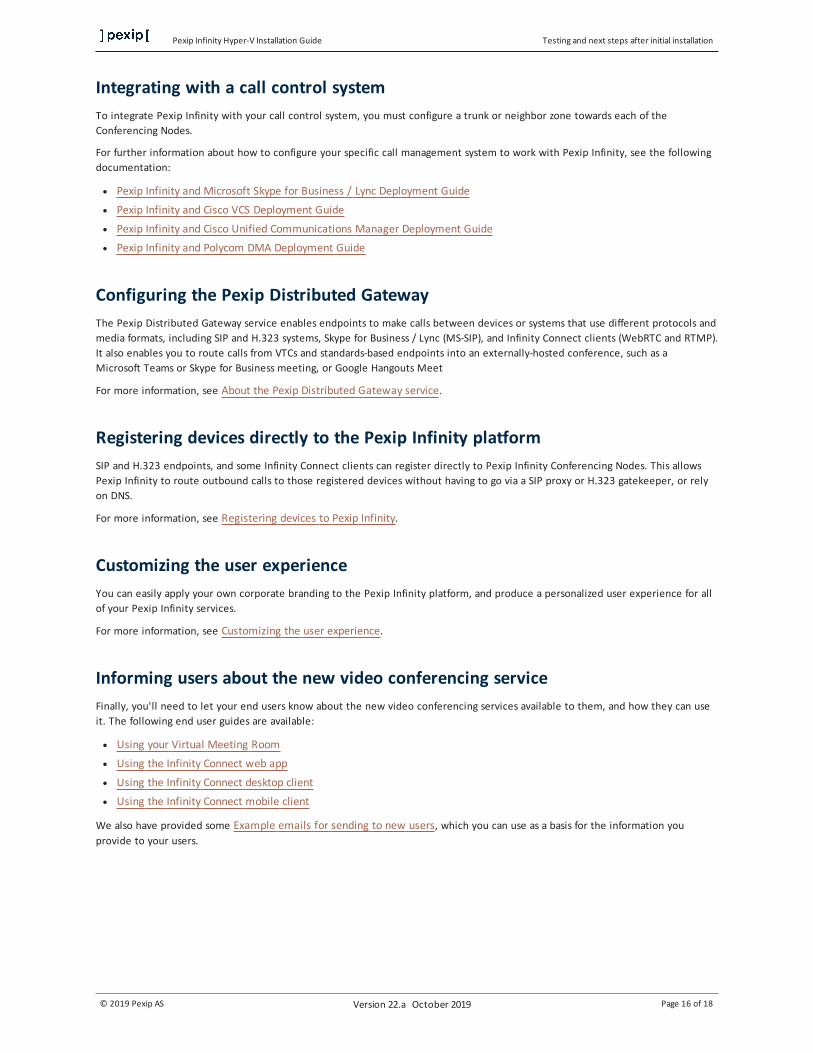
Integrating with a call control systemTo integrate Pexip Infinity with your call control system, you must configure a trunk or neighbor zone towards each of the Conferencing Nodes.
For further information about how to configure your specific call management system to work with Pexip Infinity, see the following documentation:
l Pexip Infinity and Microsoft Skype for Business / Lync Deployment Guide l Pexip Infinity and Cisco VCS Deployment Guide l Pexip Infinity and Cisco Unified Communications Manager Deployment Guide l Pexip Infinity and Polycom DMA Deployment Guide
Configuring the Pexip Distributed GatewayThe Pexip Distributed Gateway service enables endpoints to make calls between devices or systems that use different protocols and media formats, including SIP and H.323 systems, Skype for Business / Lync (MS-SIP), and Infinity Connect clients (WebRTC and RTMP). It also enables you to route calls from VTCs and standards-based endpoints into an externally-hosted conference, such as a Microsoft Teams or Skype for Business meeting, or Google Hangouts Meet
For more information, see About the Pexip Distributed Gateway service.
Registering devices directly to the Pexip Infinity platformSIP and H.323 endpoints, and some Infinity Connect clients can register directly to Pexip Infinity Conferencing Nodes. This allows Pexip Infinity to route outbound calls to those registered devices without having to go via a SIP proxy or H.323 gatekeeper, or rely on DNS.
For more information, see Registering devices to Pexip Infinity.
Customizing the user experienceYou can easily apply your own corporate branding to the Pexip Infinity platform, and produce a personalized user experience for all of your Pexip Infinity services.
For more information, see Customizing the user experience.
Informing users about the new video conferencing serviceFinally, you'll need to let your end users know about the new video conferencing services available to them, and how they can use it. The following end user guides are available:
l Using your Virtual Meeting Room l Using the Infinity Connect web app l Using the Infinity Connect desktop client l Using the Infinity Connect mobile client
We also have provided some Example emails for sending to new users, which you can use as a basis for the information you provide to your users.
Pexip Infinity Hyper-V Installation Guide Pexip Infinity installation checklist
© 2019 Pexip AS Version 22.a October 2019 Page 17 of 18
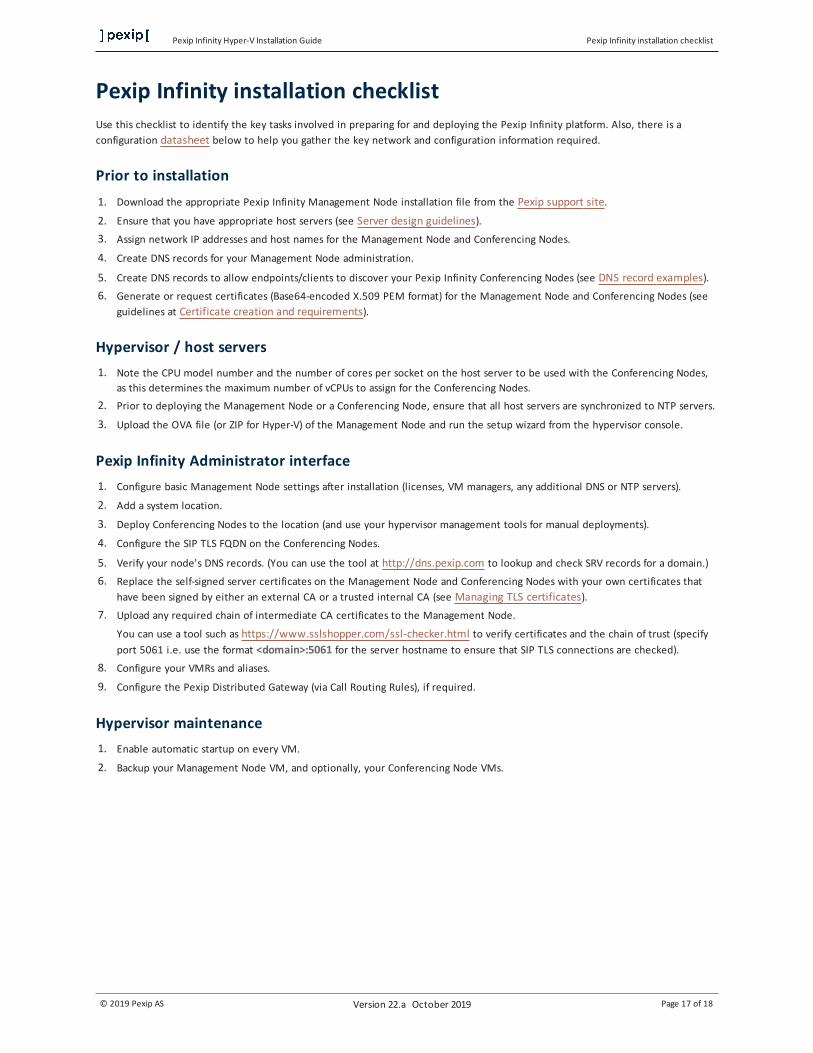
Pexip Infinity installation checklistUse this checklist to identify the key tasks involved in preparing for and deploying the Pexip Infinity platform. Also, there is a configuration datasheet below to help you gather the key network and configuration information required.
Prior to installation 1. Download the appropriate Pexip Infinity Management Node installation file from the Pexip support site.
2. Ensure that you have appropriate host servers (see Server design guidelines). 3. Assign network IP addresses and host names for the Management Node and Conferencing Nodes.
4. Create DNS records for your Management Node administration.
5. Create DNS records to allow endpoints/clients to discover your Pexip Infinity Conferencing Nodes (see DNS record examples). 6. Generate or request certificates (Base64-encoded X.509 PEM format) for the Management Node and Conferencing Nodes (see
guidelines at Certificate creation and requirements).
Hypervisor / host servers 1. Note the CPU model number and the number of cores per socket on the host server to be used with the Conferencing Nodes,
as this determines the maximum number of vCPUs to assign for the Conferencing Nodes. 2. Prior to deploying the Management Node or a Conferencing Node, ensure that all host servers are synchronized to NTP servers.
3. Upload the OVA file (or ZIP for Hyper-V) of the Management Node and run the setup wizard from the hypervisor console.
Pexip Infinity Administrator interface 1. Configure basic Management Node settings after installation (licenses, VM managers, any additional DNS or NTP servers).
2. Add a system location.
3. Deploy Conferencing Nodes to the location (and use your hypervisor management tools for manual deployments).
4. Configure the SIP TLS FQDN on the Conferencing Nodes.
5. Verify your node's DNS records. (You can use the tool at http://dns.pexip.com to lookup and check SRV records for a domain.)
6. Replace the self-signed server certificates on the Management Node and Conferencing Nodes with your own certificates that have been signed by either an external CA or a trusted internal CA (see Managing TLS certificates).
7. Upload any required chain of intermediate CA certificates to the Management Node.
You can use a tool such as https://www.sslshopper.com/ssl-checker.html to verify certificates and the chain of trust (specify port 5061 i.e. use the format <domain>:5061 for the server hostname to ensure that SIP TLS connections are checked).
8. Configure your VMRs and aliases.
9. Configure the Pexip Distributed Gateway (via Call Routing Rules), if required.
Hypervisor maintenance 1. Enable automatic startup on every VM.
2. Backup your Management Node VM, and optionally, your Conferencing Node VMs.
Pexip Infinity Hyper-V Installation Guide Pexip Infinity installation checklist
© 2019 Pexip AS Version 22.a October 2019 Page 18 of 18
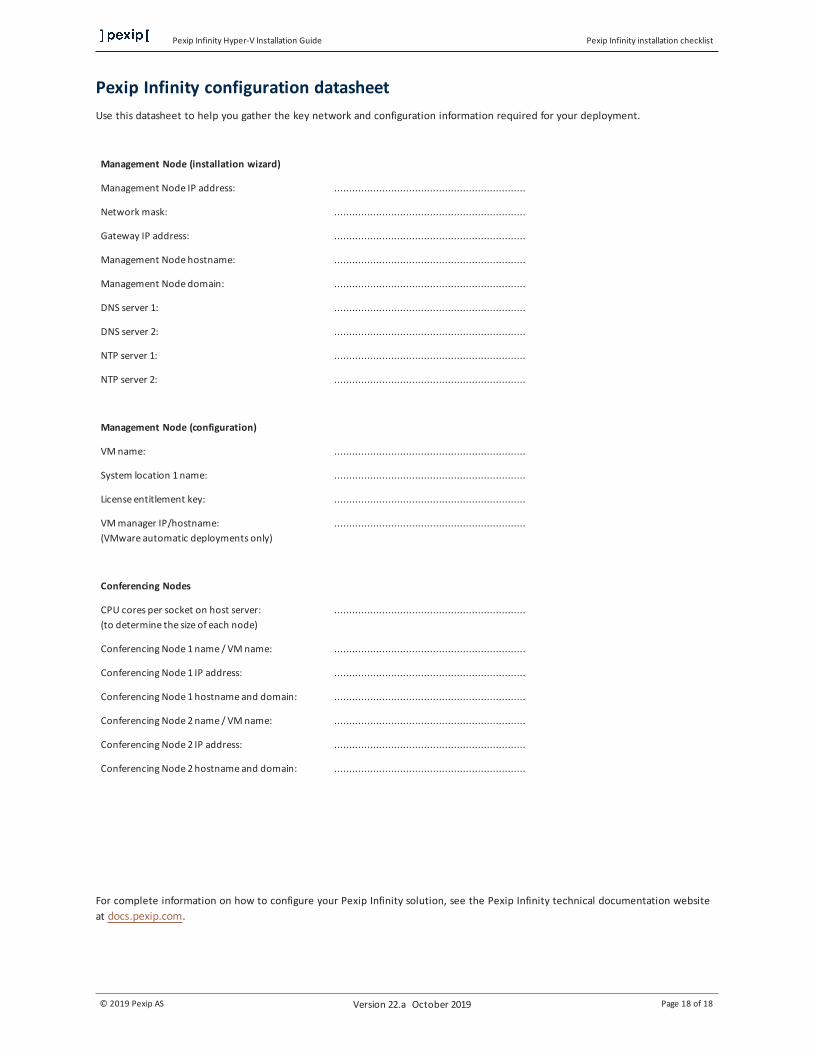
Pexip Infinity configuration datasheetUse this datasheet to help you gather the key network and configuration information required for your deployment.
Management Node (installation wizard)
Management Node IP address: ................................................................
Network mask: ................................................................
Gateway IP address: ................................................................
Management Node hostname: ................................................................
Management Node domain: ................................................................
DNS server 1: ................................................................
DNS server 2: ................................................................
NTP server 1: ................................................................
NTP server 2: ................................................................
Management Node (configuration)
VM name: ................................................................
System location 1 name: ................................................................
License entitlement key: ................................................................
VM manager IP/hostname:(VMware automatic deployments only)
................................................................
Conferencing Nodes
CPU cores per socket on host server:(to determine the size of each node)
................................................................
Conferencing Node 1 name / VM name: ................................................................
Conferencing Node 1 IP address: ................................................................
Conferencing Node 1 hostname and domain: ................................................................
Conferencing Node 2 name / VM name: ................................................................
Conferencing Node 2 IP address: ................................................................
Conferencing Node 2 hostname and domain: ................................................................
For complete information on how to configure your Pexip Infinity solution, see the Pexip Infinity technical documentation website at docs.pexip.com.


![Introducing Infinity 100 Power Point Presentation[4] Hyper Link](https://static.fdocuments.in/doc/165x107/55835bf9d8b42a68138b50c7/introducing-infinity-100-power-point-presentation4-hyper-link.jpg)