
Pexip Infinity VMware Installation Guide · · 2017-04-10Version 15 of the Pexip Infinity...
23
Pexip Infinity VMware Installation Guide Introduction This installation guide describes the minimum steps required to deploy and test a simple Pexip Infinity platform in a VMware environment. Full information on configuring and using Pexip Infinity is available: l on the Pexip Infinity technical documentation website (from where all documentation can also be downloaded in PDF format) l as online help, by clicking the Help link in the top right corner of the Pexip Infinity Administrator interface (available after the Management Node has been deployed). You must ensure you have completed all necessary platform-based Planning and prerequisites prior to installation. © 2017 Pexip AS Version 15.a April 2017 Page 1 of 23
Transcript of Pexip Infinity VMware Installation Guide · · 2017-04-10Version 15 of the Pexip Infinity...

Pexip InfinityVMware Installation Guide
IntroductionThis installation guide describes the minimum steps required to deploy and test a simple Pexip Infinity platform in a VMware environment.
Full information on configuring and using Pexip Infinity is available:
l on the Pexip Infinity technical documentation website (from where all documentation can also be downloaded in PDF format)
l as online help, by clicking the Help link in the top right corner of the Pexip Infinity Administrator interface (available after the Management Node has been deployed).
You must ensure you have completed all necessary platform-based Planning and prerequisites prior to installation.
© 2017 Pexip AS Version 15.a April 2017 Page 1 of 23

Pexip Infinity VMware Installation Guide Configuring VMware for Pexip Infinity
© 2017 Pexip AS Version 15.a April 2017 Page 2 of 23
Configuring VMware for Pexip InfinityThis section describes the basic VMware configuration required before you install the Management Node or automatically deploy / manually install a Conferencing Node. For more advanced deployments, see also Advanced VMware ESXi administration.
Supported ESXi versionsVersion 15 of the Pexip Infinity platform supports VMware vSphere ESXi 5.x and 6.x, although we recommend ESXi 5.5 or higher. Support for ESXi 4.1 is being deprecated - if you have upgraded from a version prior to v12, you can still deploy Conferencing Nodes to servers running ESXi 4.1; however if you have a new deployment using v12 or later and attempt to deploy a Conferencing Node to a server running ESXi 4.1, that node will go straight into maintenance mode.
Supported VMware editionsThe Pexip Infinity platform will run on the free edition of vSphere Hypervisor. However, this edition has a number of limitations (limited support from VMware, no access to vCenter or vMotion, no access to VMware API). In particular, the lack of access to the VMware API means that all Conferencing Nodes will have to be deployed manually. For this reason we do not recommend its use except in smaller deployments, or test or demo environments.
The minimum edition of VMware that we recommend is the vSphere Standard edition. This does not have the limitations of the free edition. If you do not already use VMware in your enterprise, the vSphere Essentials Kit is a simple way to get started and will provide you with Standard edition licenses for 3 servers (with 2 CPUs each) plus a vCenter license.
The Enterprise Plus edition includes further additional features relevant to the Pexip Infinity platform that could be of benefit to larger deployments. These include Storage DRS and Distributed Switch.
For a comparison of the VMware editions, see http://www.vmware.com/products/vsphere.html#compare.
PrerequisitesYou must have a suitable VMware environment already installed.
If an ESXi host is being managed by vCenter Server, all administration must be performed via vCenter Server. Do not log in directly to the ESXi host; configuration changes made in this way may be lost. To ensure that ESXi hosts being managed by vCenter Server are accessible via vCenter Server only and are not directly accessible, you should put them in Lockdown mode. Lockdown mode forces all operations to be performed through vCenter Server.
Synchronizing timeAll host servers must be synchronized with accurate time before you install the Pexip Infinity Management Node or Conferencing Nodes on them.
l NTP must also be enabled on the Management Node VM before you deploy any Conferencing Nodes (this is done during installation of the Management Node).
l We strongly recommend that you configure at least three distinct NTP servers or NTP server pools on all your host servers and the Management Node itself. This will ensure that log entries from all nodes are properly synchronized.
l Pexip Infinity Management Node and Conferencing Node VMs use the UTC timezone, and all logs are in UTC. Do not attempt to change the timezone on these systems.
The following instructions describe how to synchronize time on the host server using the vSphere desktop client. You can also use the vSphere web client for hosts managed using vCenter; for instructions on this see Configuring VMware for Pexip Infinity.
To synchronize time on the host server using the vSphere desktop client:

Pexip Infinity VMware Installation Guide Configuring VMware for Pexip Infinity
© 2017 Pexip AS Version 15.a April 2017 Page 3 of 23
1. Log in to the VM manager (vCenter Server or the ESXi host).
2. From the left-hand panel, select the host server on which the software image is to be installed.
3. Select the Configuration tab.
4. From the Software pane on the left-hand side, select Time Configuration.
5. On the top right of the page, select Properties. The Time Configuration dialog box appears.
6. In the NTP Configuration section, select NTP Client Enabled.
7. Select Options.
The NTP Daemon (ntpd) Options dialog box appears.
8. From the left-hand panel, select General. Under Startup Policy, select Start and stop with host.
9. Select OK.
10. Select Options again.
The NTP Daemon (ntpd) Options dialog box appears.
11. From the left-hand panel, select NTP Settings. Under NTP Servers, we strongly recommend that you configure at least 3 distinct NTP servers or NTP server pools to ensure that log entries from all nodes are properly synchronized.
12. Select Restart NTP service to apply changes, and then select OK.
To verify that NTP has been enabled correctly:
1. Select the Configuration tab.
2. From the Software pane on the left-hand side, select Time Configuration.
3. Ensure that value in the Date & Time field is correct.
Using a static MAC address for the Management NodeWe recommend using a static MAC address for the virtual machine hosting your Management Node. This will ensure that the licenses on your Management Node do not become invalid if, for example, the node reboots and comes up on a different physical blade.
Pexip Infinity VMware Installation Guide Advanced VMware ESXi administration
© 2017 Pexip AS Version 15.a April 2017 Page 4 of 23
Advanced VMware ESXi administrationSimple deployments of the Pexip Infinity platform should not require any special VMware knowledge or configuration beyond that described in Configuring VMware for Pexip Infinity.
This section describes some important requirements for advanced VMware ESXi administration when used with Pexip Infinity. It assumes that you are already familiar with VMware. For more information on VMware ESXi in general, see http://www.vmware.com/products/esxi-and-esx.html.
If an ESXi host is being managed by vCenter Server, all administration must be performed via vCenter Server. Do not log in directly to the ESXi host; configuration changes made in this way may be lost. To ensure that ESXi hosts being managed by vCenter Server are accessible via vCenter Server only and are not directly accessible, you should put them in Lockdown mode. Lockdown mode forces all operations to be performed through vCenter Server.
Management Node network requirementsWhen deploying Conferencing Nodes, the Management Node connects to the vCenter Server (or the ESXi host directly) on port 443 (https).
This communication port must be open when creating new Conferencing Nodes.
Permissions in vCenter Server (or on ESXi hosts)A valid username and password for the vCenter Server or ESXi host must be entered every time a new Conferencing Node is created. For security and tracking reasons, these credentials will not be stored by the Management Node.
The account used to log in to vCenter Server or the ESXi host from the Management Node must have sufficient permissions to create virtual machines (VMs) on the folder or resource group where the Conferencing Node will be deployed. The permissions listed below are required as a minimum (in vCenter Server, these permissions should be set on Datacenter level or higher):
l Datastore > Allocate space
l Datastore > Browse datastore
l Network > Assign network
l Resource > Assign virtual machine to resource pool
l vApp > Import
l Virtual Machine > Configuration > Add new disk
l Virtual Machine > Interaction > Configure CD media
l Virtual Machine > Interaction > Power On
The Administrator role includes all the above permissions (in addition to many others).
Host server requirementsThe recommended hardware requirements for the Management Node and Conferencing Node host servers are described in Server design recommendations. In addition to this:
l GPU: host servers do not require any specific hardware cards or GPUs.
l Disk: either direct attached storage or shared storage can be used. The primary disk activity will be logging.
l Multitenancy: this version of Pexip Infinity requires a dedicated VMware host for supported deployments. Multitenancy with other applications may be supported in the future, and is possible in a test environment as long as other applications on the same host server are not consuming significant CPU and Pexip Infinity can be given reserved memory.
Pexip Infinity VMware Installation Guide Advanced VMware ESXi administration
© 2017 Pexip AS Version 15.a April 2017 Page 5 of 23
General recommendationsPexip Infinity can take advantage of advanced CPU features, so for optimal performance we recommend that you run Conferencing Nodes on your newer host servers.
CPUs with a large cache (15–30 MB+) are recommended over CPUs with a smaller cache (4–10 MB), especially when running 10 or more participants per conference.
To protect the overall quality of the conference, we highly recommend that any hardware resources allocated to a Conferencing Node are reserved specifically for its own use.
Impact on virtual environment
CPUThe CPU is the most critical component in a successful deployment of the Pexip Infinity platform.
Newer Intel (or AMD) CPUs typically provide more features which Pexip Infinity will utilize to give better performance. We therefore recommend that you deploy Pexip Infinity on newer hardware, and move applications that are not so time-critical (for example, mail servers, web servers, file servers) to your older hardware.
MemoryThe memory specified for the Pexip Infinity deployment should not be shared with other processes, because Pexip Infinity accesses memory at a high speed when active. However, the amount of memory needed is quite small compared to the workload, and increasing the memory beyond the recommended scope will not significantly increase performance.
StorageApart from storing the Pexip Infinity application, the disk activity during operation will mainly be used for logging. There is therefore no need to deploy your fastest or newest SSD drives for this application, as most of the real-time activity happens in memory. Standard disk access as required for most servers should be used to get good logging performance.
NetworkGigabit Ethernet connectivity from the host server is strongly recommended, because Conferencing Nodes are sending and receiving real-time audio and video data, and any network bottlenecks should be avoided. The amount of traffic to be expected can be calculated based on the capacity of the servers, but typically 100 Mbps network links can easily be saturated if there is a large number of calls going through a given Conferencing Node. In general, you can expect 1–3 Mbps per call connection, depending on call control setup.
Traffic shapingAny shaping of the Conferencing Node traffic that can potentially limit its flow should not be used without considerable planning. If bandwidth usage to or from a Conferencing Node is too high, this should be addressed in the call control, as shaping it on the Conferencing Node level will most likely reduce the experience for the participants.
NIC teamingVMware NIC teaming is a way to group several network interface cards (NICs) to behave as one logical NIC. When using NIC teaming in ESXi, we recommend you load balance using originating Virtual Port ID due to its low complexity (it does not steal CPU cycles from the host). Source MAC hash is also usable; we do not recommend IP hash because of the CPU overhead for a lot of media packets.

Pexip Infinity VMware Installation Guide Advanced VMware ESXi administration
© 2017 Pexip AS Version 15.a April 2017 Page 6 of 23
vMotionConferencing Nodes (and the Management Node) can be moved across host servers using vMotion.
You must put the Conferencing Node into maintenance mode and wait until all conferences on that node have finished before migrating it to another host server. See Taking a Conferencing Node out of service for more information.
For more information on vMotion in general, see http://www.vmware.com/products/vsphere/features/vmotion.html.
Enhanced vMotion Compatibility (EVC)When EVC (Enhanced vMotion Compatibility) is enabled across a cluster of host servers, all servers in that cluster will emulate the lowest common denominator CPU. This allows you to move VMs between any servers in the cluster without any problems, but it means that if any servers in that cluster have newer-generation CPUs, their advanced features cannot be used.
Because Conferencing Nodes use the advanced features of newer-generation CPUs, (for example AVX on newer Intel CPUs), we recommend that you disable EVC (Enhanced vMotion Compatibility) for any clusters hosting Conferencing Nodes where the cluster includes a mix of new and old CPUs.
If you enable EVC on mixed-CPU clusters, the Pexip Infinity platform will run more slowly because it will cause the Conferencing Nodes to assume they are running on older hardware.
If you enable EVC, you must select the Sandy Bridge-compatible EVC mode as a minimum. This is the lowest EVC mode that supports the AVX instruction set, which is required to run the Pexip Infinity platform.
When enabling EVC or lowering the EVC mode, you should first shut down any currently running VMs with a higher EVC mode than the one you intend to enable.
When disabling EVC or raising the EVC mode, any currently running VMs will not have access to the new level until they have been shut down and restarted.
For instructions on disabling EVC, see Disabling EVC.
For more information on EVC in general, see https://pubs.vmware.com/vsphere-60/index.jsp?topic=%2Fcom.vmware.vsphere.vcenterhost.doc%2FGUID-9F444D9B-44A0-4967-8C07-693C6B40278A.html.
vSphere High AvailabilityvSphere High Availability (HA) can be configured so that, in the case of an ESXi host failure, it will automatically start the VM on another host in the cluster. This is supported for both Management Node and Conferencing Nodes and will provide protection against hosts failing.
Loss of a Conferencing Node in such circumstances will result in any participants connected to that node being disconnected. They will have to redial the Virtual Meeting Room alias to rejoin the conference.
Momentary loss of the Management Node will not affect running conferences.
For more information on HA, see http://www.vmware.com/solutions/business-continuity.html#highavailability.
vSphere Fault ToleranceFor zero downtime, the Management Node can be protected with vSphere Fault Tolerance (FT), because it is only using a single virtual CPU.
For more information on FT, see http://www.vmware.com/products/vsphere/features/fault-tolerance.html.
Pexip Infinity VMware Installation Guide Installing the Management Node
© 2017 Pexip AS Version 15.a April 2017 Page 7 of 23
Installing the Management Node Before installing the Management Node we recommend that you review the VMware configuration prerequisites and the .
Installation of the Management Node is a two-step process:
1. Deploying the VM template: this creates a new unconfigured instance of a generic Management Node VM.The process for deploying the template in a VMware hypervisor environment is described below.Instructions are provided for using either the vSphere desktop client or the vSphere web client.
2. Running the installation wizard: after deploying the Management Node template, the installation wizard allows you to enter the basic configuration details for your Management Node VM.
Deploying the Management Node templateIf an ESXi host is being managed by vCenter Server, all administration must be performed via vCenter Server. Do not log in directly to the ESXi host; configuration changes made in this way may be lost. To ensure that ESXi hosts being managed by vCenter Server are accessible via vCenter Server only and are not directly accessible, you should put them in Lockdown mode. Lockdown mode forces all operations to be performed through vCenter Server.
Using the vSphere desktop clientTo install a new instance of a Pexip Infinity Management Node using the vSphere desktop client:
1. Download the Pexip Infinity OVA file (Pexip_Infinity_v15_generic_pxMgr_<build>.ova) from www.pexip.com/software-download.
2. Log in to the VM Manager (vCenter Server or the ESXi host).
3. Select File > Deploy OVF Template.... You will be taken to the Source page.
4. Browse to the location of the Pexip Infinity OVA file and select Next >.You will be taken to the OVF Template Details page.
5. Select Next >.You will be taken to the End User License Agreement page.
6. Read the license agreement, and if you agree to the terms select Accept and then Next >.You will be taken to the Name And Location page.
7. Enter an appropriate name for the Management Node. This name will be used in the VMware interface to identify this Management Node virtual machine (VM).
8. Select Next >.You will be taken to the Resource Pool page.
9. Select the resource pool for the Pexip Infinity Management Node.
10. Select Next >.You will be taken to the Disk Format page.
11. Select Thick Provision Lazy Zeroed.
12. Select Next >. You will be taken to the Network Mapping page.
13. Select the appropriate mappings and select Next >. You will be taken to the Ready To Complete page.
14. Review the information and select Power on after deployment.
15. Select Finish.
A window will appear showing the deployment progress. When deployment is complete this will say Completed Successfully. You can then Close the window.
Pexip Infinity VMware Installation Guide Installing the Management Node
© 2017 Pexip AS Version 15.a April 2017 Page 8 of 23
Enabling automatic startupAfter deploying a new Management Node from VMware, you must enable automatic startup of that virtual machine (VM). In VMware, automatic startup is disabled by default for every new VM — which means that if the host server is powered down for any reason, when it restarts the VM will not restart and must be started manually.
You can only enable automatic startup after the Management Node has been deployed.
To enable automatic startup using the vSphere desktop client:
1. Log in to the VM manager (vCenter Server or the ESXi host).
2. From the left-hand panel, select the host server on which the node's VM is installed.
3. Select the Configuration tab.
4. From the Software pane on the left-hand side, select Virtual Machine Startup/Shutdown.
5. At the top right of the page, select Properties.
6. Select the relevant VM and use the Move Up button to move it to the Automatic Startup section.
7. Select OK.
Using the vSphere web clientTo install a new instance of a Pexip Infinity Management Node using the vSphere web client:
1. Download the Pexip Infinity OVA file from www.pexip.com/software-download.
2. Log in to the VM Manager (vCenter Server).
3. Select vCenter > VMs and Templates.
4. Click on the Actions menu and select Deploy OVF Template....You will be taken to the Select source page.
5. Browse to the location of the Pexip Infinity OVA file and select Next >.You will be taken to the Review Details page.
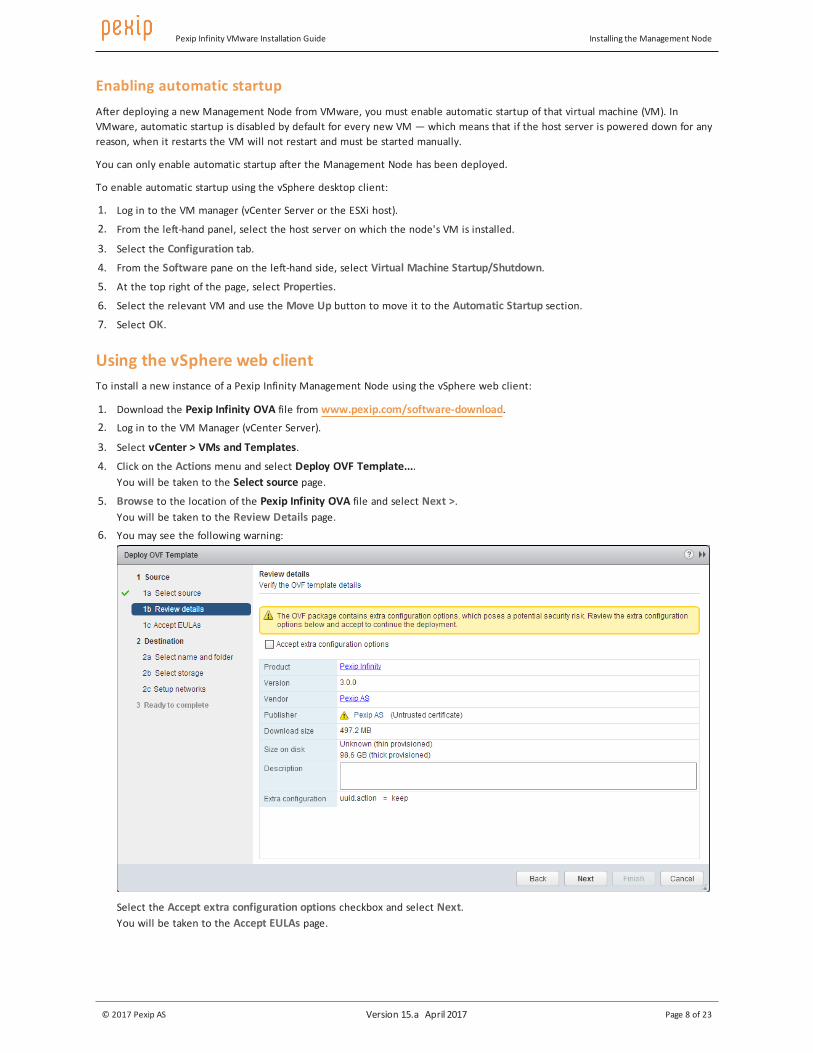
6. You may see the following warning:
Select the Accept extra configuration options checkbox and select Next.You will be taken to the Accept EULAs page.
Pexip Infinity VMware Installation Guide Installing the Management Node
© 2017 Pexip AS Version 15.a April 2017 Page 9 of 23
7. Read the license agreement, and if you agree to the terms select Accept and then Next >.
You will be taken to the Select name and folder page.
8. Enter an appropriate Name for the Management Node. This name will be used in the VMware interface to identify this Management Node virtual machine (VM).
9. Select the folder or datacenter within which the Management Node will be located.
10. Select Next.
11. Select the resource pool in which to run the template.
12. Select Next.
You will be taken to the Select storage page.
13. Select the virtual disk format and datastore to be used.
14. Select Next.
You will be taken to the Setup networks page.
15. Select the VM Network and configuration, and select Next.
You will be taken to the Ready to complete page.
16. Review the settings and select Power on after deployment.
17. Select Finish.
Progress is shown in the Recent Tasks tab to the right of the screen. When the template has been deployed successfully, a green tick will appear.
Enabling automatic startupAfter deploying a new Management Node from VMware, you must enable automatic startup of that virtual machine (VM). In VMware, automatic startup is disabled by default for every new VM — which means that if the host server is powered down for any reason, when it restarts the VM will not restart and must be started manually.
You can only enable automatic startup after the Management Node has been deployed.
To enable automatic startup using the vSphere web client:
1. Log in to the VM manager (vCenter Server).
2. From the left-hand panel, select VCenter > Hosts And Clusters and go to the host server on which the node's VM is installed.
3. Select the Manage tab.
4. From the pane on the left-hand side, select VM Startup/Shutdown.
5. At the top right of the page, select Edit.
6. Select the relevant node's VM and use the up arrow to move it to the Automatic Startup section.
7. Select OK.
Running the installation wizardTo run the installation wizard, which configures the Management Node, you must open a console window on the Management Node VM.
Opening a console window 1. Using either the vSphere desktop or web client, log in to the Management Node's VM Manager (vCenter Server or, for stand-
alone deployments, the ESXi host). 2. Power on the new Management Node VM (if it is not already powered on).
3. Right-click on the new Management Node VM and select Open Console.

Pexip Infinity VMware Installation Guide Installing the Management Node
© 2017 Pexip AS Version 15.a April 2017 Page 10 of 23
Running the installation wizard 1. At the prompt, enter the username admin.
The display will read:You are required to change your password immediately (root enforced)Enter new UNIX password:
2. Create a password for the Management Node operating system by typing the password, pressing enter, retyping the password, and pressing enter again.
3. Ensure you record the password in a secure location. After you have finished running the installation wizard you will not need the password again unless you need to access the Management Node using SSH.You are presented with another login prompt:Running Pexip installation wizard...[sudo] password for admin:
4. Log in again with the password you just created.The Pexip installation wizard will begin.
5. Follow the prompts to set the following configuration for the Management Node. If you press enter, the default value will be applied:
Setting Default value Multiple entries allowed? Can be changed via Pexip Infinity Administrator interface?
IP address 192.168.0.100 No No ‡
Network mask 255.255.255.0 No No ‡
Gateway 192.168.0.1 No No ‡
Hostname <no default> No No ‡
Domain suffix <no default> No No ‡
DNS servers 8.8.8.8 Yes, if separated by a space Yes
NTP servers † Two of the following:
o 0.pexip.pool.ntp.org
o 1.pexip.pool.ntp.org
o 2.pexip.pool.ntp.org
o 3.pexip.pool.ntp.org
Yes, if separated by a space Yes
Web administration username admin No No ‡
Web administration password <no default> No Yes
Enable incident reporting (yes/no)
<no default> Yes
Send deployment and usage statistics to Pexip (yes/no)
<no default> Yes
† The NTP server must be accessible by the Management Node at the time the startup wizard is run. Installation will fail if the Management Node is unable to synchronize its time with an NTP server.
‡ After they have been configured, do not attempt to change these settings by any other means. To change these settings on server-based deployments, you must re-run the installation wizard.
The installation will begin and the Management Node will restart using the values you have configured.

Pexip Infinity VMware Installation Guide Initial platform configuration
© 2017 Pexip AS Version 15.a April 2017 Page 11 of 23
Initial platform configurationAfter you have run the installation wizard, you must perform some preliminary configuration of the Pexip Infinity platform before you can then deploy a Conferencing Node.
This section lists the configuration required, and provides a summary of each step with a link to further information.
All configuration should be done using the Pexip Infinity Administrator interface.
No changes should be made to any Pexip VM via the terminal interface (other than as described when running the initial Pexip installation wizard) unless directed to do so by Pexip support. This includes (but is not limited to) changes to the time zone, changes to IP tables, and configuration of Ethernet interfaces.
Accessing the Pexip Infinity Administrator interfaceThe Pexip Infinity Administrator interface is hosted on the Management Node. To access this:
1. Open a web browser and type in the IP address or DNS name that you assigned to the Management Node using the installation wizard (you may need to wait a minute or so after installation is complete before you can access the Administrator interface).
2. Until you have uploaded appropriate TLS certificates to the Management Node, your browser may present you with a warning that the website's security certificate is not trusted. You should proceed, but upload appropriate TLS certificates to the Management Node (and Conferencing Nodes, when they have been created) as soon as possible.The Pexip Infinity Conferencing Platform login page will appear.
3. Log in using the web administration username and password you set using the installation wizard.
You are now ready to begin configuring the Pexip Infinity service and deploying Conferencing Nodes.
As a first step, we strongly recommend that you configure at least 2 additional NTP servers or NTP server pools to ensure that log entries from all nodes are properly synchronized.
Brief details of how to perform the initial configuration are given below. For complete information on how to configure your Pexip Infinity solution, see the Pexip Infinity technical documentation website at docs.pexip.com.
Configuring the Pexip Infinity platform
Enabling DNS(System Configuration > DNS Servers)
At least one DNS server must be added to your system. DNS is required when using hostnames instead of IP addresses when setting up NTP servers, syslog servers and VM managers. It is also used for call routing that depends on FQDNs.
You will already have configured at least one DNS server when running the install wizard, but you can now change it or add more DNS servers.
Enabling NTP(System Configuration > NTP Servers)
Pexip Infinity uses NTP servers to obtain accurate system time. This is necessary to ensure correct operation, including configuration replication and log timestamps.
We strongly recommend that you configure at least 3 distinct NTP servers or NTP server pools to ensure that log entries from all nodes are properly synchronized.
You will already have configured at least one NTP server when running the install wizard, but you can now change it or add more NTP servers.

Pexip Infinity VMware Installation Guide Initial platform configuration
© 2017 Pexip AS Version 15.a April 2017 Page 12 of 23
Adding licenses(Platform Configuration > Licenses)
You must install a system license with sufficient concurrent call capacity for your environment before you can place calls to Pexip Infinity services.
Adding a system location(Platform Configuration > Locations)
These are labels that allow you to group together Conferencing Nodes that are in the same datacenter. You must have at least one location configured before you can deploy a Conferencing Node.
Uploading TLS certificates(Platform Configuration > TLS Certificates)
You must install TLS certificates on the Management Node and each Conferencing Node. TLS certificates are used by these systems to verify their identity to clients connecting to them.
All nodes are deployed with self-signed certificates, but we strongly recommend they are replaced with ones signed by either an external CA or a trusted internal CA.
Adding a Virtual Meeting Room(Service Configuration > Virtual Meeting Rooms)
Conferences take place in Virtual Meeting Rooms and Virtual Auditoriums. Configuration includes any PINs required to access the conference.
Adding an alias for the Virtual Meeting Room(done while adding the Virtual Meeting Room)
A Virtual Meeting Room or Virtual Auditorium can have more than one alias. Conference participants can access a Virtual Meeting Room or Virtual Auditorium by dialing any one of its aliases directly.
Adding a VM manager(System Configuration > VM Managers)
This is the address of the application to use when automatically deploying your Conferencing Nodes. It is your vCenter Server, or if you are not using vCenter, it is vSphere on the ESXi host.
Pexip Infinity VMware Installation Guide Automatically deploying a new Conferencing Node on a VMware host
© 2017 Pexip AS Version 15.a April 2017 Page 13 of 23
Automatically deploying a new Conferencing Node on a VMware hostTo automatically deploy a new Conferencing Node on to a VMware ESXi host:
1. Ensure that the Management Node can connect directly to the ESXi host server over HTTPS (port 443/TCP), even if you are using vCenter server.
2. Go to Platform Configuration > Conferencing Nodes and select Add Conferencing Node.
3. From the Deployment type field, select Automatic (ESXi 4.1, 5.x and 6.x).
4. Select Next.
5. You are now asked to log in to the VM manager via which the Conferencing Node virtual machine is to be created, by completing the following fields:
Option Description
VM manager Select the VM manager via which this Conferencing Node VM will be created.
If the VM manager does not appear in the drop-down list, you can add it by clicking to the right of the field.
UsernamePassword
Enter a valid username and password to log in to the selected VM manager.
Verify TLS certificates Determines whether the certificate presented by the VM manager is verified before the connection is allowed.
6. Select Next.There may be a slight delay while Pexip Infinity locates and logs in to the VM manager, and obtains information from it.
7. You are now asked to select the datacenter on the VM manager where the Conferencing Node VM will be created, by completing the following field:
Option Description
Datacenter Select the path of the datacenter in which the Conferencing Node will be created.
The options available in the drop-down menu reflect what is currently configured in the VM manager.
Note that this step is skipped if there is only one datacenter configured in the VM manager.
8. Select Next.
9. You are now asked to nominate the resource pool on the VM manager where the Conferencing Node VM will be created, by completing the following field:
Option Description
Resource path Select the path of the resource pool in which the Conferencing Node will be created.
The options available in the drop-down menu are filtered by the datacenter selected in the previous step and reflect what is currently configured in the VM manager. To add a new path, you must do so using vCenter Server (or the ESXi host if you are not using vCenter Server) prior to creating the Conferencing Node.
10. Select Next.
Pexip Infinity VMware Installation Guide Automatically deploying a new Conferencing Node on a VMware host
© 2017 Pexip AS Version 15.a April 2017 Page 14 of 23
11. You are now asked to provide the VM manager with parameters relating to the Conferencing Node, by completing the following fields:
Option Description
Host network Select the host network on which this Conferencing Node will be deployed.
The options shown here are the vSphere switches that have been configured on the VM manager on which this Conferencing Node is being deployed.
Secondary interface host network
If a secondary network interface for this Conferencing Node is required, select the host network to use for that second interface.
Host datastore Select the datastore on the host server to be used by this Conferencing Node.
The options shown here are the datastores that have been configured on the VM manager via which this Conferencing Node is being deployed.
12. Select Next.
13. You are now asked to provide the VM manager with information regarding the CPUs and memory of the Conferencing Node, by completing the following fields:
Option Description
Number of virtual CPUs to assign
Enter the number of virtual CPUs to assign to the Conferencing Node. We recommend no more than one virtual CPU per physical core, unless you are making use of CPUs that support hyperthreading.
System memory (in megabytes) to assign
Enter the amount of RAM (in megabytes) to assign to the Conferencing Node. The number entered must be a multiple of 4.
We recommend 1024 MB (1 GB) RAM for each virtual CPU.
14. Select Next.
15. You are now asked to provide the network configuration to be applied to the Conferencing Node, by completing the following fields:
Option Description
Name Enter the name that will be used to refer to this Conferencing Node in the Pexip Infinity Administrator interface.
Description An optional field where you can provide more information about the Conferencing Node.
Hostname Domain
Enter the hostname and domain to be assigned to this Conferencing Node. Each Conferencing Node and Management Node must have a unique hostname.
The Hostname and Domain together make up the Conferencing Node's DNS name or FQDN. We recommend that you assign valid DNS names to all your Conferencing Nodes.
IPv4 address Enter the IP address to be assigned to this Conferencing Node when it is created.
Network mask Enter the IP network mask to be assigned to this Conferencing Node.
Gateway IPv4 address Enter the IP address of the default gateway to be assigned to this Conferencing Node.
Secondary interface IPv4 address
The optional secondary interface IPv4 address for this Conferencing Node. If configured, this interface is used for signaling and media communications to clients, and the primary interface is used for communication with the Management Node and other Conferencing Nodes.
Secondary interface network mask
The optional secondary interface network mask for this Conferencing Node.
System location Select the physical location of this Conferencing Node.
If the system location does not already exist, you can create a new one here by clicking to the right of the field. This will open up a new window showing the Add System Location page.
Pexip Infinity VMware Installation Guide Automatically deploying a new Conferencing Node on a VMware host
© 2017 Pexip AS Version 15.a April 2017 Page 15 of 23
Option Description
SIP TLS FQDN A unique identity for this Conferencing Node, used in signaling SIP TLS Contact addresses.
TLS certificate The TLS certificate to use on this node. This must be a certificate that contains the above SIP TLS FQDN. Each certificate is shown in the format <subject name> (<issuer>).
IPv6 address The IPv6 address for this Conferencing Node. Each Conferencing Node must have a unique IPv6 address.
Gateway IPv6 address The IPv6 address of the default gateway.
IPv4 static NAT address The public IPv4 address used by this Conferencing Node when it is located behind a NAT device. Note that if you are using NAT, you must also configure your NAT device to route the Conferencing Node's IPv4 static NAT address to its IPv4 address.
Static routes From the list of Available Static routes, select the routes to assign to the node, and then use the right arrow to move the selected routes into the Chosen Static routes list.
Enable distributed database
This should usually be enabled (checked) for all Conferencing Nodes that are expected to be "always on", and disabled (unchecked) for nodes that are expected to only be powered on some of the time (e.g. nodes that are likely to only be operational during peak times).
Enable transcoding This determines the Conferencing Node's role. When transcoding is enabled, this node becomes a Transcoding Conferencing Node and can handle all the media processing, protocol interworking, mixing and so on that is required in hosting Pexip Infinity calls and conferences. When transcoding is disabled, the node becomes a Proxying Edge Node and can only handle the media and signaling connections with an endpoint or external device, and it then forwards the media on to a node that has transcoding capabilities.
SSH password Enter the password to be used when logging in to this Conferencing Node's Linux operating system over SSH. The username will always be admin.
Logging in to the operating system is required when changing passwords or for diagnostic purposes only, and should generally be done under the guidance of your Pexip authorized support representative. In particular, do not change any configuration using SSH — all changes should be made using the Pexip Infinity Administrator interface.
16. Select Finish.
You will be taken to the Deploying Conferencing Node page. The deployment will take several minutes. When complete, the progress bar will show that the Conferencing Node VM has been deployed successfully and the Status will say Deployment succeeded.
Go to Platform Configuration > Conferencing Nodes to return to the list of Conferencing Nodes.
After deploying a new Conferencing Node, it takes approximately 5 minutes before the node is available for conference hosting and for its status to be updated on the Management Node. (Until it is available, the Management Node will report the status of the Conferencing Node as having a last contacted and last updated date of "Never".)
Enabling automatic startupAfter deploying a new Conferencing Node from VMware, you must enable automatic startup of that virtual machine (VM). In VMware, automatic startup is disabled by default for every new VM — which means that if the host server is powered down for any reason, when it restarts the VM will not restart and must be started manually.
You can only enable automatic startup after the Conferencing Node has been deployed.
Using the web client
To enable automatic startup using the vSphere web client:
1. Log in to the VM manager (vCenter Server).
2. From the left-hand panel, select VCenter > Hosts And Clusters and go to the host server on which the node's VM is installed.
3. Select the Manage tab.

Pexip Infinity VMware Installation Guide Automatically deploying a new Conferencing Node on a VMware host
© 2017 Pexip AS Version 15.a April 2017 Page 16 of 23
4. From the pane on the left-hand side, select VM Startup/Shutdown.
5. At the top right of the page, select Edit.
6. Select the relevant node's VM and use the up arrow to move it to the Automatic Startup section.
7. Select OK.
Using the desktop client
To enable automatic startup using the vSphere desktop client:
1. Log in to the VM manager (vCenter Server or the ESXi host).
2. From the left-hand panel, select the host server on which the node's VM is installed.
3. Select the Configuration tab.
4. From the Software pane on the left-hand side, select Virtual Machine Startup/Shutdown.
5. At the top right of the page, select Properties.
6. Select the relevant VM and use the Move Up button to move it to the Automatic Startup section.
7. Select OK.
Disabling EVCWe strongly recommend that you disable EVC (Enhanced vMotion Compatibility) for any ESXi clusters hosting Conferencing Nodes that include a mix of old and new CPUs. If EVC is enabled on such clusters, the Pexip Infinity platform will run more slowly because the Conferencing Nodes will assume they are running on older hardware.
For more information, see Enhanced vMotion Compatibility (EVC).
To disable EVC:
1. Log in to vCenter Server using either the vSphere desktop or web client.
2. Display the cluster in the inventory.
3. Right-click the cluster and select Edit Settings.
4. In the left panel, select VMware EVC.The dialog box displays the current EVC settings.
5. Select Change EVC Settings.
6. Select Disable EVC.

Pexip Infinity VMware Installation Guide Manually deploying a Conferencing Node on an ESXi host
© 2017 Pexip AS Version 15.a April 2017 Page 17 of 23
Manually deploying a Conferencing Node on an ESXi hostThe manual deployment process generates an .ova file that must then be manually deployed from within VMware on to an ESXi host. Note that:
l This file is specific to the Conferencing Node being deployed. It cannot be used to deploy multiple Conferencing Nodes.
l The file is single-use. It cannot be used to re-deploy the same Conferencing Node at a later date. To re-deploy the Conferencing Node, you must first delete it from the Pexip Infinity Management Node and from VMware, and then deploy a new Conferencing Node with the same configuration as the deleted node.
l Before you start, ensure that you are currently using the same machine that you will subsequently want to use to upload the generated file on to your host server.
To manually deploy a new Conferencing Node on to a VMware ESXi host:
1. Go to Platform Configuration > Conferencing Nodes and select Add Conferencing Node.
2. From the Deployment type field, select either Manual (ESXi 6.x), Manual (ESXi 5.x) or Manual (ESXi 4.1) as appropriate.
3. Select Next.
4. You are now asked to provide information regarding the CPUs and memory of the Conferencing Node, by completing the following fields:
Option Description
Number of virtual CPUs to assign
Enter the number of virtual CPUs to assign to the Conferencing Node. We recommend no more than one virtual CPU per physical core, unless you are making use of CPUs that support hyperthreading.
System memory (in megabytes) to assign
Enter the amount of RAM (in megabytes) to assign to the Conferencing Node. The number entered must be a multiple of 4.
We recommend 1024 MB (1 GB) RAM for each virtual CPU.
5. Select Next.
6. You are now asked to provide the network configuration to be applied to the Conferencing Node, by completing the following fields:
Option Description
Name Enter the name that will be used to refer to this Conferencing Node in the Pexip Infinity Administrator interface.
Description An optional field where you can provide more information about the Conferencing Node.
Hostname Domain
Enter the hostname and domain to be assigned to this Conferencing Node. Each Conferencing Node and Management Node must have a unique hostname.
The Hostname and Domain together make up the Conferencing Node's DNS name or FQDN. We recommend that you assign valid DNS names to all your Conferencing Nodes.
IPv4 address Enter the IP address to be assigned to this Conferencing Node when it is created.
Network mask Enter the IP network mask to be assigned to this Conferencing Node.
Gateway IPv4 address Enter the IP address of the default gateway to be assigned to this Conferencing Node.
Secondary interface IPv4 address
The optional secondary interface IPv4 address for this Conferencing Node. If configured, this interface is used for signaling and media communications to clients, and the primary interface is used for communication with the Management Node and other Conferencing Nodes.
Secondary interface network mask
The optional secondary interface network mask for this Conferencing Node.

Pexip Infinity VMware Installation Guide Manually deploying a Conferencing Node on an ESXi host
© 2017 Pexip AS Version 15.a April 2017 Page 18 of 23
Option Description
System location Select the physical location of this Conferencing Node.
If the system location does not already exist, you can create a new one here by clicking to the right of the field. This will open up a new window showing the Add System Location page.
SIP TLS FQDN A unique identity for this Conferencing Node, used in signaling SIP TLS Contact addresses.
TLS certificate The TLS certificate to use on this node. This must be a certificate that contains the above SIP TLS FQDN. Each certificate is shown in the format <subject name> (<issuer>).
IPv6 address The IPv6 address for this Conferencing Node. Each Conferencing Node must have a unique IPv6 address.
Gateway IPv6 address The IPv6 address of the default gateway.
IPv4 static NAT address The public IPv4 address used by this Conferencing Node when it is located behind a NAT device. Note that if you are using NAT, you must also configure your NAT device to route the Conferencing Node's IPv4 static NAT address to its IPv4 address.
Static routes From the list of Available Static routes, select the routes to assign to the node, and then use the right arrow to move the selected routes into the Chosen Static routes list.
Enable distributed database
This should usually be enabled (checked) for all Conferencing Nodes that are expected to be "always on", and disabled (unchecked) for nodes that are expected to only be powered on some of the time (e.g. nodes that are likely to only be operational during peak times).
Enable transcoding This determines the Conferencing Node's role. When transcoding is enabled, this node becomes a Transcoding Conferencing Node and can handle all the media processing, protocol interworking, mixing and so on that is required in hosting Pexip Infinity calls and conferences. When transcoding is disabled, the node becomes a Proxying Edge Node and can only handle the media and signaling connections with an endpoint or external device, and it then forwards the media on to a node that has transcoding capabilities.
SSH password Enter the password to be used when logging in to this Conferencing Node's Linux operating system over SSH. The username will always be admin.
Logging in to the operating system is required when changing passwords or for diagnostic purposes only, and should generally be done under the guidance of your Pexip authorized support representative. In particular, do not change any configuration using SSH — all changes should be made using the Pexip Infinity Administrator interface.
7. Select Finish.
You will be taken to the Manually Deploy Conferencing Node page.
8. Select Download Conferencing Node.
A file with the name pexip-<hostname>.<domain>.ova will be downloaded.
9. When you wish to deploy the Conferencing Node VM, use a vSphere client to log in to vCenter Server (or the ESXi host directly, if it is not managed in vCenter Server) and select File > Deploy OVF Template.... Follow the on-screen prompts to deploy the .ova file.After deploying a new Conferencing Node, it takes approximately 5 minutes before the node is available for conference hosting and for its status to be updated on the Management Node. (Until it is available, the Management Node will report the status of the Conferencing Node as having a last contacted and last updated date of "Never".)
Enabling automatic startupAfter deploying a new Conferencing Node from VMware, you must enable automatic startup of that virtual machine (VM). In VMware, automatic startup is disabled by default for every new VM — which means that if the host server is powered down for any reason, when it restarts the VM will not restart and must be started manually.You can only enable automatic startup after the Conferencing Node has been deployed.
Using the web client

Pexip Infinity VMware Installation Guide Manually deploying a Conferencing Node on an ESXi host
© 2017 Pexip AS Version 15.a April 2017 Page 19 of 23
To enable automatic startup using the vSphere web client: a. Log in to the VM manager (vCenter Server).
b. From the left-hand panel, select VCenter > Hosts And Clusters and go to the host server on which the node's VM is installed.
c. Select the Manage tab.
d. From the pane on the left-hand side, select VM Startup/Shutdown.
e. At the top right of the page, select Edit.
f. Select the relevant node's VM and use the up arrow to move it to the Automatic Startup section.
g. Select OK.
Using the desktop clientTo enable automatic startup using the vSphere desktop client: a. Log in to the VM manager (vCenter Server or the ESXi host).
b. From the left-hand panel, select the host server on which the node's VM is installed.
c. Select the Configuration tab.
d. From the Software pane on the left-hand side, select Virtual Machine Startup/Shutdown.
e. At the top right of the page, select Properties.
f. Select the relevant VM and use the Move Up button to move it to the Automatic Startup section.
g. Select OK.
Disabling EVCWe strongly recommend that you disable EVC (Enhanced vMotion Compatibility) for any ESXi clusters hosting Conferencing Nodes that include a mix of old and new CPUs. If EVC is enabled on such clusters, the Pexip Infinity platform will run more slowly because the Conferencing Nodes will assume they are running on older hardware.
For more information, see Enhanced vMotion Compatibility (EVC).
To disable EVC:
1. Log in to vCenter Server using either the vSphere desktop or web client.
2. Display the cluster in the inventory.
3. Right-click the cluster and select Edit Settings.
4. In the left panel, select VMware EVC.The dialog box displays the current EVC settings.
5. Select Change EVC Settings.
6. Select Disable EVC.

Pexip Infinity VMware Installation Guide Next steps after initial installation
© 2017 Pexip AS Version 15.a April 2017 Page 20 of 23
Next steps after initial installation
Making a test callWhen you have deployed a Conferencing Node and configured a Virtual Meeting Room and an alias, you can make a test call to check that your system is working.
An easy way to do this is by using the Infinity Connect Web App to dial the alias of one of the Virtual Meeting Rooms you've already created, as follows:
1. Open a browser (we recommend Chrome) and type in the IP address (or FQDN, if you've set it up already) of one of the Conferencing Nodes.
2. In the Person or conference to call field, enter the alias of the VMR you want to use for testing.
3. Select Connect and check your microphone, camera and speakers are working as expected.
4. Select Start. You will be connected to the VMR.
5. From another machine, join the conference in the same way.
The two participants should be able to see and hear each other, and share content.
See About the Infinity Connect Web App for more information.
Further configurationYou are now ready to continue configuring the Pexip Infinity platform and services and deploying more Conferencing Nodes.
Specifically, you should now do the following:
l Assigning hostnames and FQDNs l Enabling SNMP on Conferencing Nodes
At some point you may also want to:
l integrate the Pexip Infinity platform with your call control system l configure the Pexip Distributed Gateway l register devices directly to the Pexip Infinity platform l customize the user experience
Integrating with a call control systemTo integrate Pexip Infinity with your call control system, you must configure a trunk or neighbor zone towards each of the Conferencing Nodes.
For further information about how to configure your specific call management system to work with Pexip Infinity, see the following documentation:
l Pexip Infinity and Microsoft Lync / Skype for Business Deployment Guide l Pexip Infinity and Cisco VCS Deployment Guide l Pexip Infinity and Cisco Unified Communications Manager Deployment Guide l Pexip Infinity and Polycom DMA Deployment Guide

Pexip Infinity VMware Installation Guide Next steps after initial installation
© 2017 Pexip AS Version 15.a April 2017 Page 21 of 23
Configuring the Pexip Distributed GatewayThe Pexip Distributed Gateway service enables endpoints to make calls to other devices or systems that use different protocols and media formats.
For more information, see About the Pexip Distributed Gateway service.
Registering devices directly to the Pexip Infinity platformSIP and H.323 endpoints, and some Infinity Connect clients can register directly to Pexip Infinity Conferencing Nodes. This allows Pexip Infinity to route outbound calls to those registered devices without having to go via a SIP proxy or H.323 gatekeeper, or rely on DNS.
For more information, see Registering devices to Pexip Infinity.
Customizing the user experienceYou can easily apply your own corporate branding to the Pexip Infinity platform, and produce a personalized user experience for all of your Pexip Infinity services.
For more information, see Customizing the user experience.
Pexip Infinity VMware Installation Guide Pexip Infinity installation checklist
© 2017 Pexip AS Version 15.a April 2017 Page 22 of 23
Pexip Infinity installation checklistUse this checklist to identify the key tasks involved in preparing for and deploying the Pexip Infinity platform. Also, there is a configuration datasheet below to help you gather the key network and configuration information required.
Prior to installation 1. Download the appropriate Pexip Infinity Management Node installation file from www.pexip.com/software-download.
2. Ensure that you have appropriate host servers (see Server design guidelines).
3. Assign network IP addresses and host names for the Management Node and Conferencing Nodes.
4. Create DNS records for your Management Node administration.
5. Create DNS records to allow endpoints/clients to discover your Pexip Infinity Conferencing Nodes (see DNS record examples).
6. Generate or request certificates (Base64-encoded X.509 PEM format) for the Management Node and Conferencing Nodes (see guidelines at Certificate creation and requirements).
Hypervisor / host servers 1. Note the CPU model number and the number of cores per socket on the host server to be used with the Conferencing Nodes,
as this determines the maximum number of vCPUs to assign for the Conferencing Nodes. 2. Prior to deploying the Management Node or a Conferencing Node, ensure that all host servers are synchronized to NTP servers.
3. Upload the OVA file (or ZIP for Hyper-V) of the Management Node and run the setup wizard from the hypervisor console.
Pexip Infinity Administrator interface 1. Configure basic Management Node settings after installation (licenses, VM managers, any additional DNS or NTP servers).
2. Add a system location.
3. Deploy Conferencing Nodes to the location (and use your hypervisor management tools for manual deployments).
4. Configure the SIP TLS FQDN on the Conferencing Nodes.
5. Verify your node's DNS records. (You can use the tool at http://dns.pexip.com to lookup and check SRV records for a domain.)
6. Replace the self-signed server certificates on the Management Node and Conferencing Nodes with your own certificates that have been signed by either an external CA or a trusted internal CA (see Managing TLS certificates).
7. Upload any required chain of intermediate CA certificates to the Management Node.You can use a tool such as https://www.sslshopper.com/ssl-checker.html to verify certificates and the chain of trust (specify port 5061 i.e. use the format <domain>:5061 for the server hostname to ensure that SIP TLS connections are checked).
8. Configure your VMRs and aliases.
9. Configure the Pexip Distributed Gateway (via Call Routing Rules), if required.
Hypervisor maintenance 1. Enable automatic startup on every VM.
2. Backup your Management Node VM, and optionally, your Conferencing Node VMs.

Pexip Infinity VMware Installation Guide Pexip Infinity installation checklist
© 2017 Pexip AS Version 15.a April 2017 Page 23 of 23
Pexip Infinity configuration datasheetUse this datasheet to help you gather the key network and configuration information required for your deployment.
Management Node (installation wizard)
Management Node IP address: ................................................................
Network mask: ................................................................
Gateway IP address: ................................................................
Management Node hostname: ................................................................
Management Node domain: ................................................................
DNS server 1: ................................................................
DNS server 2: ................................................................
NTP server 1: ................................................................
NTP server 2: ................................................................
Management Node (configuration)
VM name: ................................................................
System location 1 name: ................................................................
License entitlement key: ................................................................
VM manager IP/hostname:(VMware automatic deployments only)
................................................................
Conferencing Nodes
CPU cores per socket on host server:(to determine the size of each node)
................................................................
Conferencing Node 1 name / VM name: ................................................................
Conferencing Node 1 IP address: ................................................................
Conferencing Node 1 hostname and domain: ................................................................
Conferencing Node 2 name / VM name: ................................................................
Conferencing Node 2 IP address: ................................................................
Conferencing Node 2 hostname and domain: ................................................................
For complete information on how to configure your Pexip Infinity solution, see the Pexip Infinity technical documentation website at docs.pexip.com.