Pearson Clinical Assessment Q-global User Guide · Q-Global User Guide 1 Setting up and...
16
Pearson Clinical Assessment Q-global ™ User Guide Setting up and Administering Pearson
Transcript of Pearson Clinical Assessment Q-global User Guide · Q-Global User Guide 1 Setting up and...
Pearson Clinical Assessment
Q-global™ User Guide
Setting up and Administering
Pearson
Contents
Setting up and Administering Assessments .................................................................... 1
Enter New User ....................................................................................................... 1
Enter New Examiner ................................................................................................ 3
Setting up a New Examinee ...................................................................................... 4
Assigning an Assessment.......................................................................................... 5
Generating Reports .................................................................................................... 8
Examinee Tab ......................................................................................................... 8
The Reports Tab .................................................................................................... 11
Examinee Report ................................................................................................... 11
Group Report ........................................................................................................ 12
Further Support .................................................................................................... 14
Q-Global User Guide 1
Setting up and Administering Assessments
Before you get started we recommend setting up your new Users and/or Examiner(s).
So you need to identify who in your organisation is going to administer tests, manage
your account and determine if examiners should be set up as users’ which will give
them a unique login ID and access to your account.
Enter New User
Users can have varying access to the Q-global platform based on the user role, which
allows them to set up candidates, view results, run reports and administer
assessments. Once you have identified your users we recommend creating a list with
roles before setting them up in Q-global.
Example:
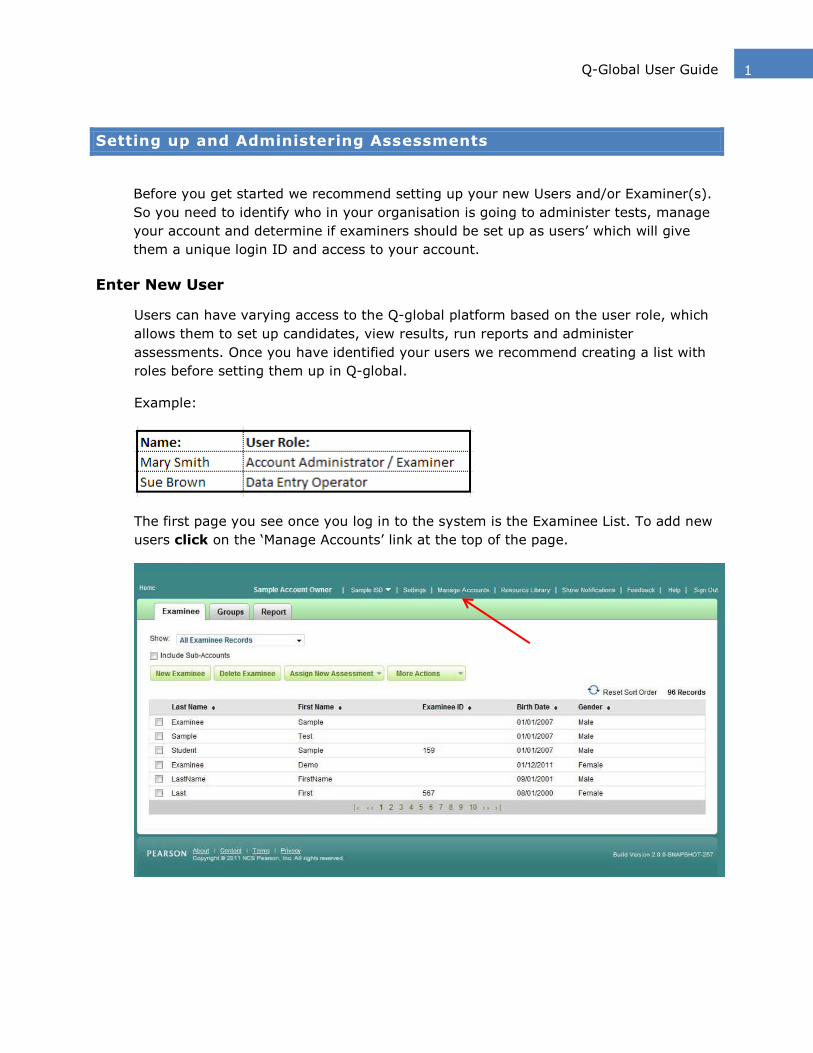
The first page you see once you log in to the system is the Examinee List. To add new
users click on the ‘Manage Accounts’ link at the top of the page.
Copyright© 2014 NCS Pearson, Inc. All rights reserved.
2 Q-Global User Guide
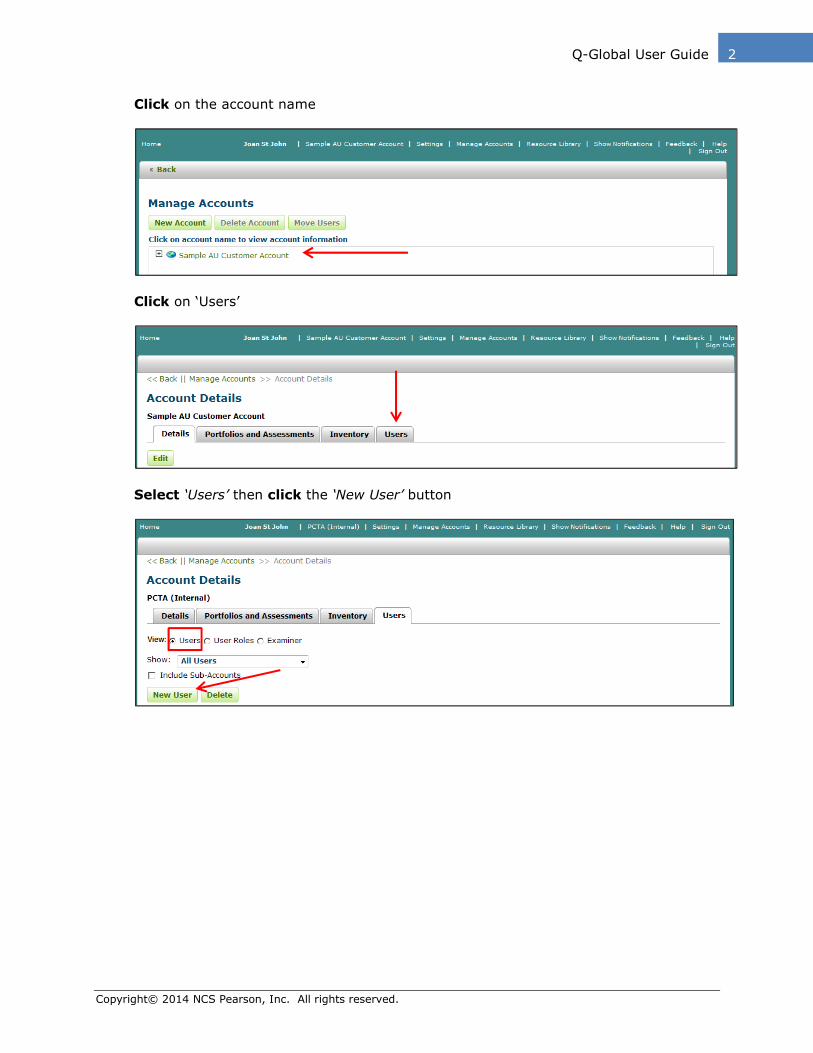
Click on the account name
Click on ‘Users’
Select ‘Users’ then click the ‘New User’ button
Copyright© 2014 NCS Pearson, Inc. All rights reserved.
3 Q-Global User Guide
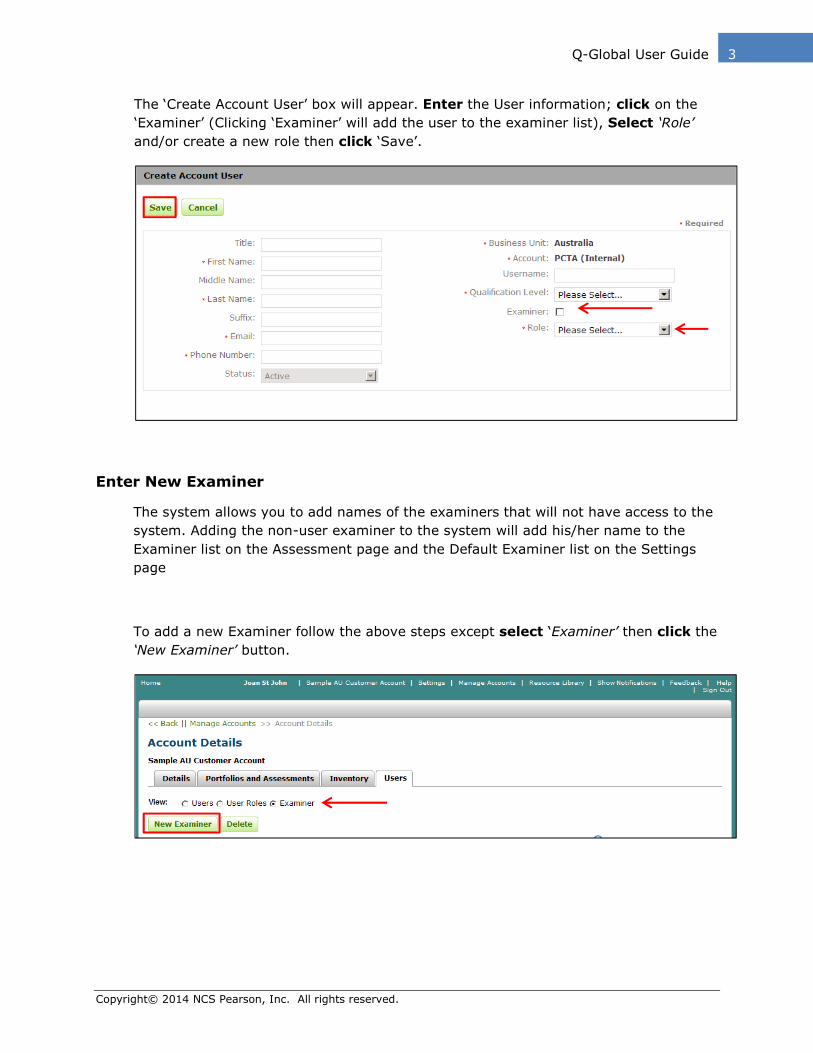
The ‘Create Account User’ box will appear. Enter the User information; click on the
‘Examiner’ (Clicking ‘Examiner’ will add the user to the examiner list), Select ‘Role’
and/or create a new role then click ‘Save’.
Enter New Examiner
The system allows you to add names of the examiners that will not have access to the
system. Adding the non-user examiner to the system will add his/her name to the
Examiner list on the Assessment page and the Default Examiner list on the Settings
page
To add a new Examiner follow the above steps except select ‘Examiner’ then click the
‘New Examiner’ button.
Copyright© 2014 NCS Pearson, Inc. All rights reserved.
4 Q-Global User Guide
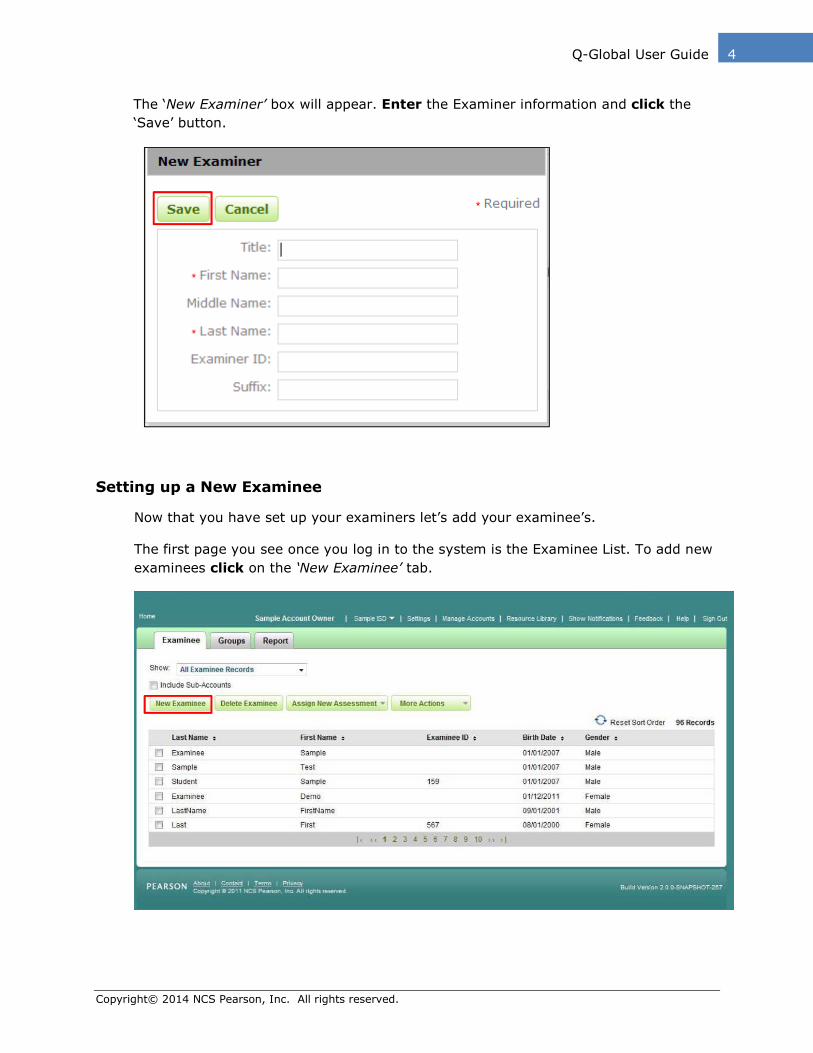
The ‘New Examiner’ box will appear. Enter the Examiner information and click the
‘Save’ button.
Setting up a New Examinee
Now that you have set up your examiners let’s add your examinee’s.
The first page you see once you log in to the system is the Examinee List. To add new
examinees click on the ‘New Examinee’ tab.
Copyright© 2014 NCS Pearson, Inc. All rights reserved.
5 Q-Global User Guide
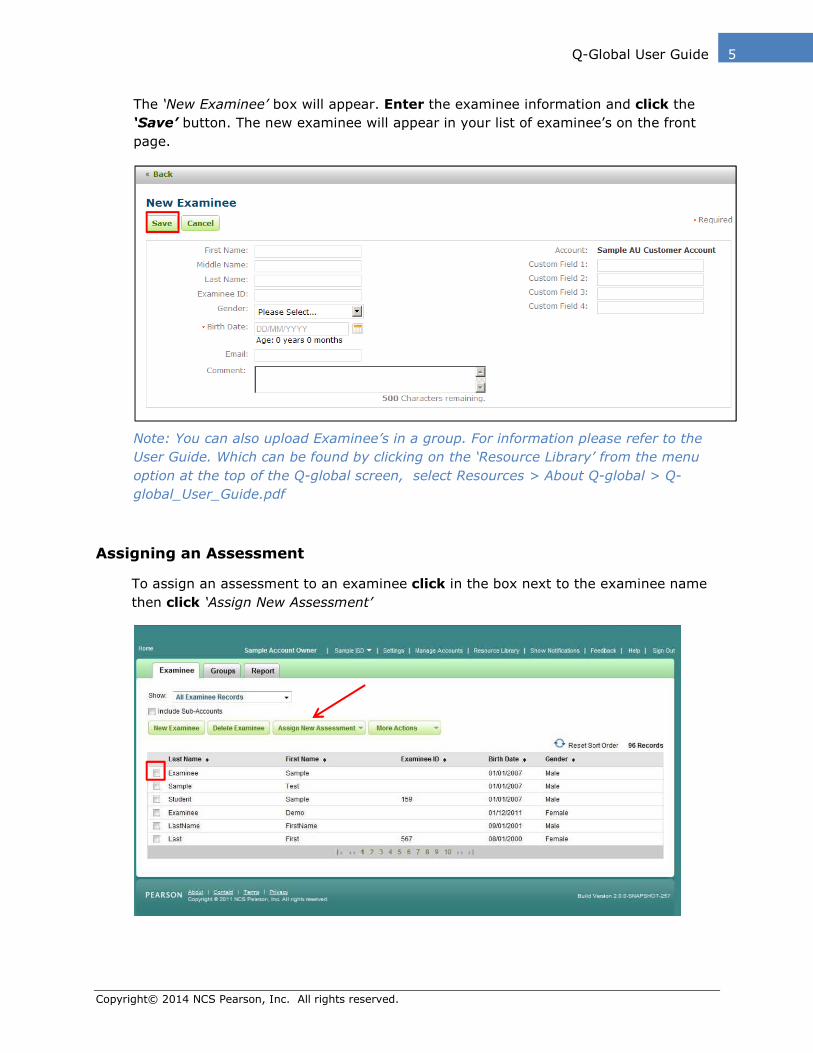
The ‘New Examinee’ box will appear. Enter the examinee information and click the
‘Save’ button. The new examinee will appear in your list of examinee’s on the front
page.
Note: You can also upload Examinee’s in a group. For information please refer to the
User Guide. Which can be found by clicking on the ‘Resource Library’ from the menu
option at the top of the Q-global screen, select Resources > About Q-global > Q-
global_User_Guide.pdf
Assigning an Assessment
To assign an assessment to an examinee click in the box next to the examinee name
then click ‘Assign New Assessment’

Copyright© 2014 NCS Pearson, Inc. All rights reserved.
6 Q-Global User Guide
From the list of available assessments Click the assessment you want to assign
The ‘Assessment Details’ screen will appear showing the Examinee and Assessment
details.
Copyright© 2014 NCS Pearson, Inc. All rights reserved.
7 Q-Global User Guide
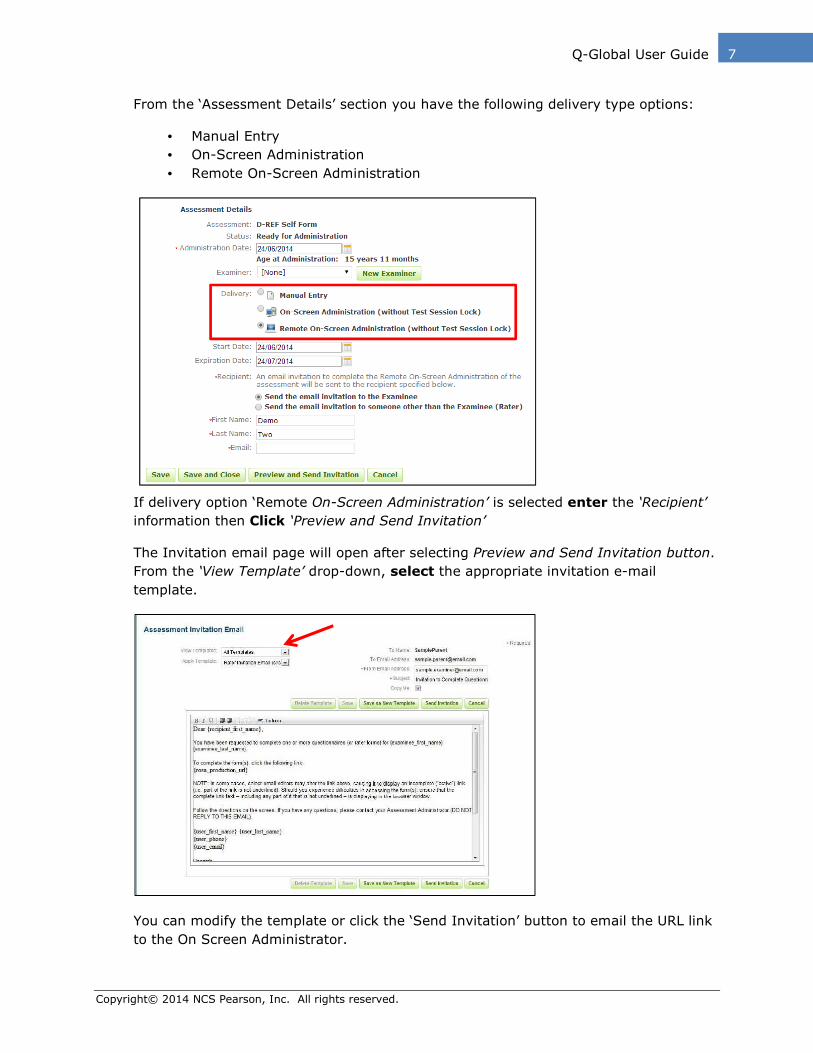
From the ‘Assessment Details’ section you have the following delivery type options:
• Manual Entry
• On-Screen Administration
• Remote On-Screen Administration
If delivery option ‘Remote On-Screen Administration’ is selected enter the ‘Recipient’
information then Click ‘Preview and Send Invitation’
The Invitation email page will open after selecting Preview and Send Invitation button.
From the ‘View Template’ drop-down, select the appropriate invitation e-mail
template.
You can modify the template or click the ‘Send Invitation’ button to email the URL link
to the On Screen Administrator.
Copyright© 2014 NCS Pearson, Inc. All rights reserved.
8 Q-Global User Guide
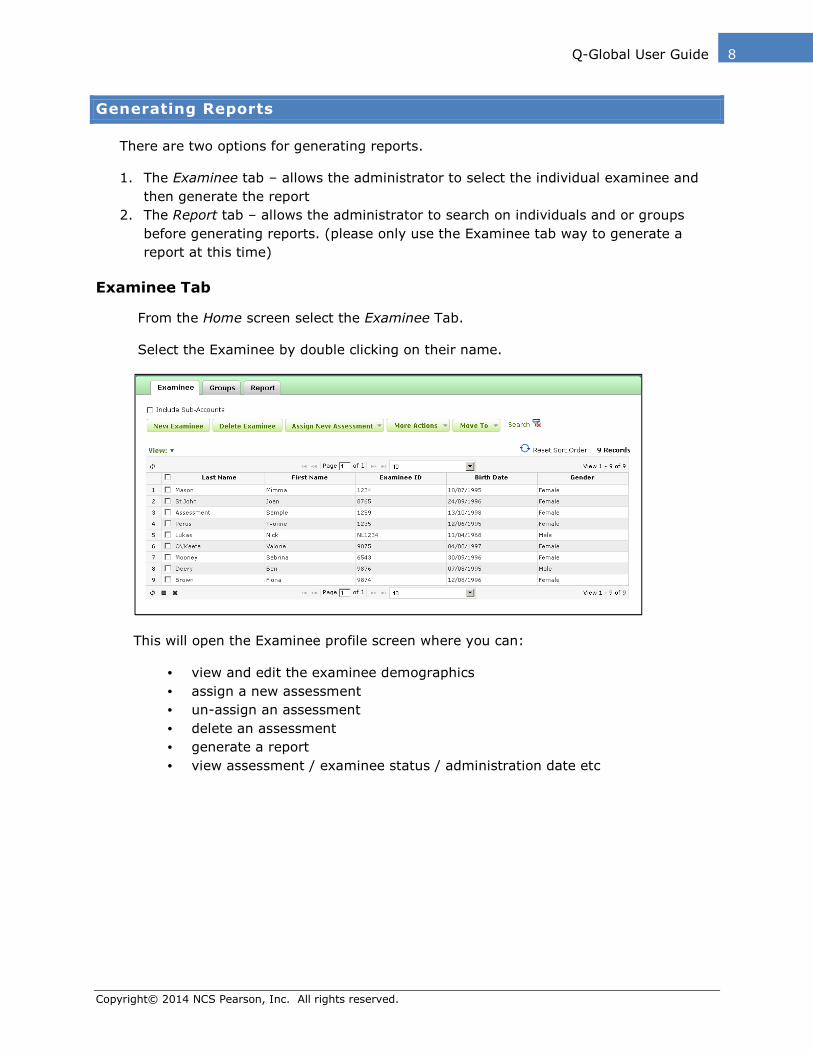
Generating Reports
There are two options for generating reports.
1. The Examinee tab – allows the administrator to select the individual examinee and
then generate the report
2. The Report tab – allows the administrator to search on individuals and or groups
before generating reports. (please only use the Examinee tab way to generate a
report at this time)
Examinee Tab
From the Home screen select the Examinee Tab.
Select the Examinee by double clicking on their name.
This will open the Examinee profile screen where you can:
• view and edit the examinee demographics
• assign a new assessment
• un-assign an assessment
• delete an assessment
• generate a report
• view assessment / examinee status / administration date etc
Copyright© 2014 NCS Pearson, Inc. All rights reserved.
9 Q-Global User Guide
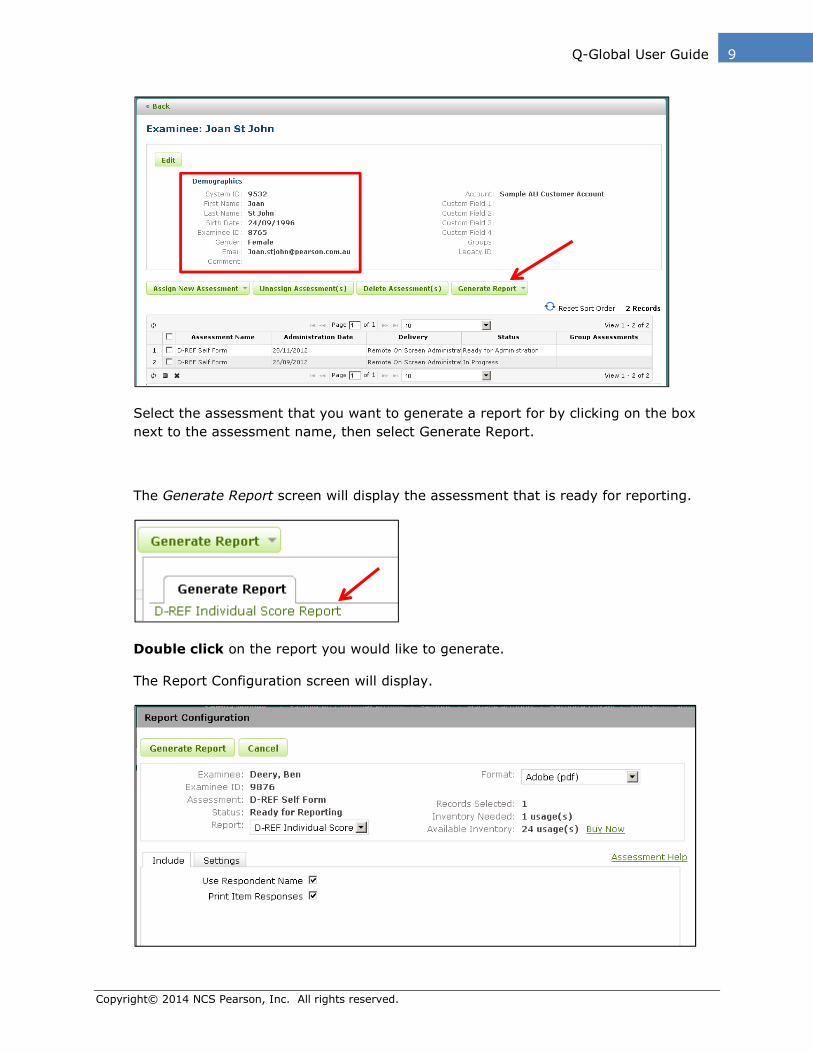
Select the assessment that you want to generate a report for by clicking on the box
next to the assessment name, then select Generate Report.
The Generate Report screen will display the assessment that is ready for reporting.
Double click on the report you would like to generate.
The Report Configuration screen will display.
Copyright© 2014 NCS Pearson, Inc. All rights reserved.
10 Q-Global User Guide
This screen displays:
• Examinee information
• Assessment
• Status
• Report - update and change from the drop down menu
• Format - note only PDF format available. This will be available in Word in
future releases
• Inventory Needed – number of usage(s) required to generate the report
• Available Inventory – how many usage(s) available in your inventory
• Include – option to Use Respondent Name and print item responses
• Settings – Select Norm Group / Significance Level for Confidence Intervals /
Significance level for Index Discrepancies
• Update options as required then select Generate Report (top left).
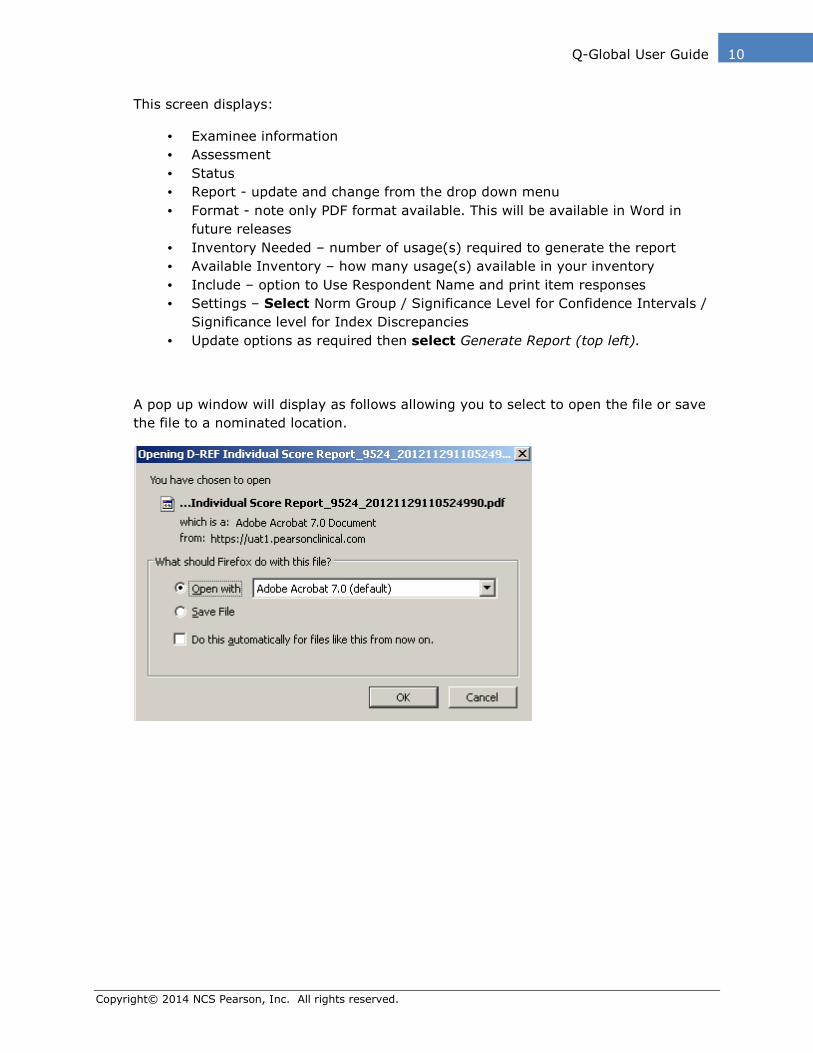
A pop up window will display as follows allowing you to select to open the file or save
the file to a nominated location.
Copyright© 2014 NCS Pearson, Inc. All rights reserved.
11 Q-Global User Guide
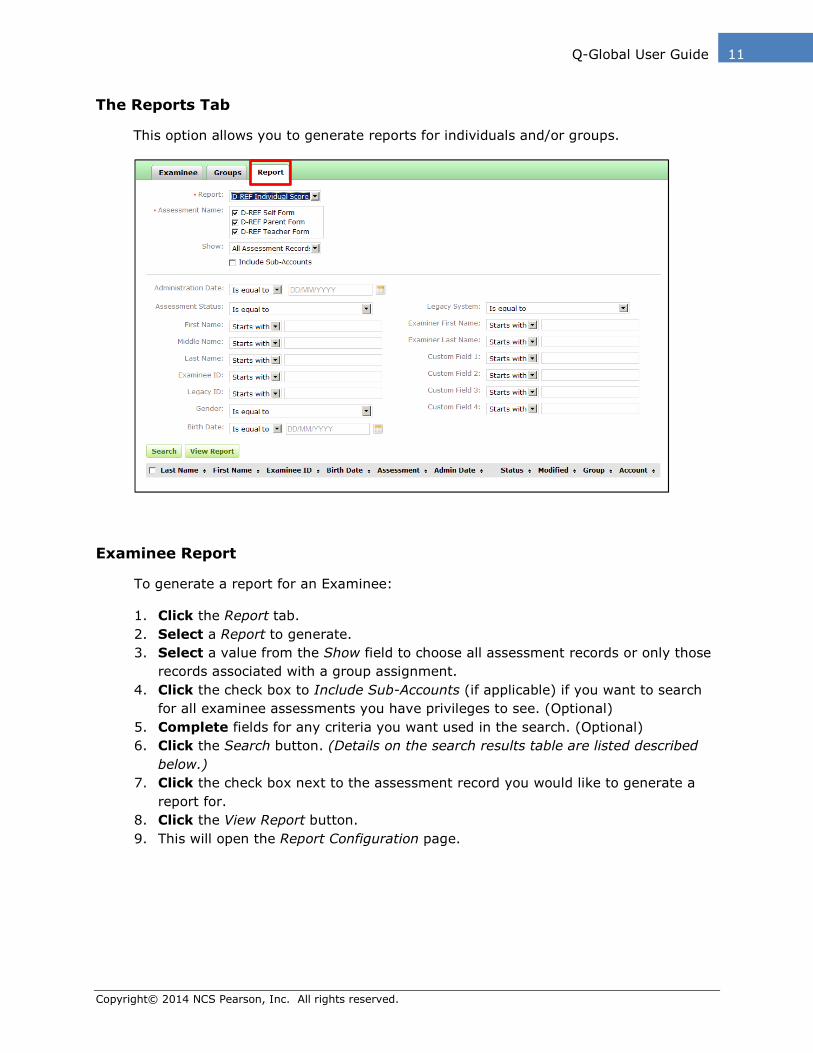
The Reports Tab
This option allows you to generate reports for individuals and/or groups.
Examinee Report
To generate a report for an Examinee:
1. Click the Report tab. 2. Select a Report to generate. 3. Select a value from the Show field to choose all assessment records or only those
records associated with a group assignment.
4. Click the check box to Include Sub-Accounts (if applicable) if you want to search for all examinee assessments you have privileges to see. (Optional)
5. Complete fields for any criteria you want used in the search. (Optional) 6. Click the Search button. (Details on the search results table are listed described below.)
7. Click the check box next to the assessment record you would like to generate a
report for.
8. Click the View Report button. 9. This will open the Report Configuration page.
Copyright© 2014 NCS Pearson, Inc. All rights reserved.
12 Q-Global User Guide
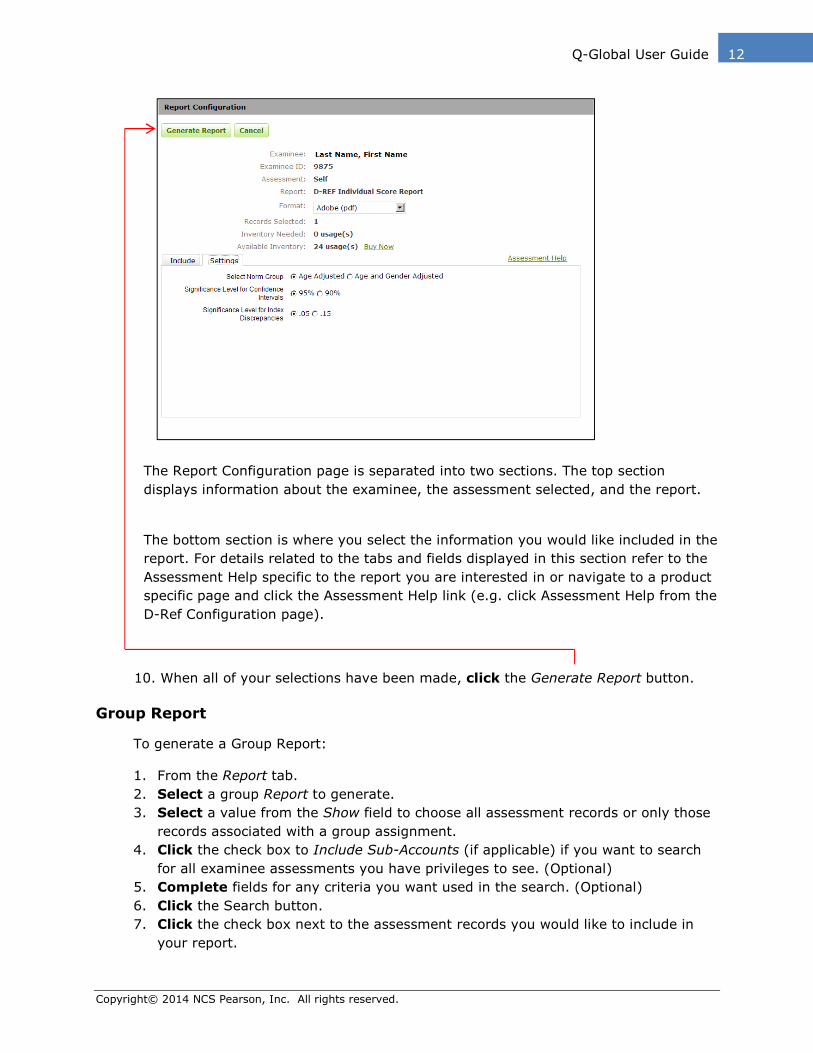
The Report Configuration page is separated into two sections. The top section
displays information about the examinee, the assessment selected, and the report.
The bottom section is where you select the information you would like included in the
report. For details related to the tabs and fields displayed in this section refer to the
Assessment Help specific to the report you are interested in or navigate to a product
specific page and click the Assessment Help link (e.g. click Assessment Help from the
D-Ref Configuration page).
10. When all of your selections have been made, click the Generate Report button.
Group Report
To generate a Group Report:
1. From the Report tab.
2. Select a group Report to generate. 3. Select a value from the Show field to choose all assessment records or only those
records associated with a group assignment.
4. Click the check box to Include Sub-Accounts (if applicable) if you want to search for all examinee assessments you have privileges to see. (Optional)
5. Complete fields for any criteria you want used in the search. (Optional) 6. Click the Search button. 7. Click the check box next to the assessment records you would like to include in
your report.
Copyright© 2014 NCS Pearson, Inc. All rights reserved.
13 Q-Global User Guide
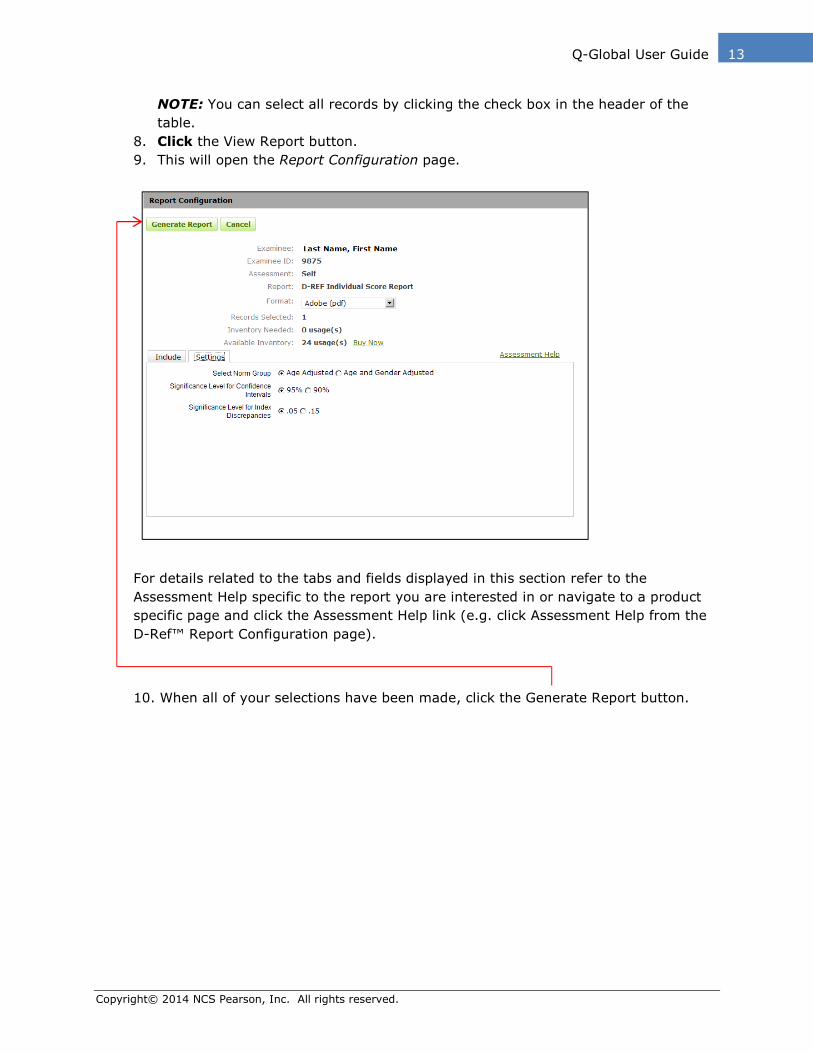
NOTE: You can select all records by clicking the check box in the header of the
table.
8. Click the View Report button. 9. This will open the Report Configuration page.
For details related to the tabs and fields displayed in this section refer to the
Assessment Help specific to the report you are interested in or navigate to a product
specific page and click the Assessment Help link (e.g. click Assessment Help from the
D-Ref™ Report Configuration page).
10. When all of your selections have been made, click the Generate Report button.
Copyright© 2014 NCS Pearson, Inc. All rights reserved.
14 Q-Global User Guide
Rules
• If you select more than one examinee to run the same report on (batch report),
the following information on the top of the window will not be shown, Examinee,
Examinee ID, Assessment, and Report.
• If you select more than one assessment for the same examinee (multi-rater
reports), a validation will occur on the selected assessments allowing or
disallowing the Generate Report button.
• Only assessments with a status of 'Ready for Reporting' or 'Report Generated'
can be used in a report.
• Assessment records without a valid reporting status will be returned with the
search results; however, you cannot select them for report generation.
• Assessments with a status of 'Ready for Reporting' require a report-specific usage
or subscription in your inventory. If you do not have usages or an active
subscription available, you can click the Buy Now link to purchase more.
Further Support
If you need further assistance please contact our client services team on 1800 882
385(AUS) or 0800 643 660 (New Zealand)