Automating Windows 7 Installation for Desktop and … Windows 7 Installation for Desktop and VDI...
22
Greg Shields Automating Windows 7 Installation for Desktop and VDI Environments
Transcript of Automating Windows 7 Installation for Desktop and … Windows 7 Installation for Desktop and VDI...

Greg Shields
Automating Windows 7 Installationfor Desktop andVDI Environments
Automating Windows 7 Installation for Desktop and VDI Environments
i
Ch apter 4: Layering Applications on Top of Deployed Windows Images ..................................... 48
Ste p Eight: Installing and Preparing the MDT ...................................................................................... 48
Importing an MDT Image ......................................................................................................................... 50
Importing Drivers ........................................................................................................................................ 52
Creating a Task Sequence......................................................................................................................... 53
Updating the Deployment Share ........................................................................................................... 54
Deploying a Basic Desktop with MDT ................................................................................................. 55
Ste p Nine: Learning Silent Installations and Repackaging ............................................................. 56
Three Ways to Silence Applications .................................................................................................... 58
MSI‐Based Installations ............................................................................................................................ 58
EXE‐Based Installations ............................................................................................................................ 59
Differential‐Based Installations ............................................................................................................. 60
Ste p Ten: Laying Applications Atop a Windows Image ................................................................... 61
Adding the Application to the MDT ..................................................................................................... 62
Configuring the Application for Deployment .................................................................................. 63
Thin Is Most Definitely In! ............................................................................................................................ 65
Download Additional eBooks from Realtime Nexus! ........................................................................ 66
Automating Windows 7 Installation for Desktop and VDI Environments
ii
Copyright Statement © 2010 Realtime Publishers. All rights reserved. This site contains materials that have been created, developed, or commissioned by, and published with the permission of, Realtime Publishers (the “Materials”) and this site and any such Materials are protected by international copyright and trademark laws.
THE MATERIALS ARE PROVIDED “AS IS” WITHOUT WARRANTY OF ANY KIND, EITHER EXPRESS OR IMPLIED, INCLUDING BUT NOT LIMITED TO, THE IMPLIED WARRANTIES OF MERCHANTABILITY, FITNESS FOR A PARTICULAR PURPOSE, TITLE AND NON-INFRINGEMENT. The Materials are subject to change without notice and do not represent a commitment on the part of Realtime Publishers or its web site sponsors. In no event shall Realtime Publishers or its web site sponsors be held liable for technical or editorial errors or omissions contained in the Materials, including without limitation, for any direct, indirect, incidental, special, exemplary or consequential damages whatsoever resulting from the use of any information contained in the Materials.
The Materials (including but not limited to the text, images, audio, and/or video) may not be copied, reproduced, republished, uploaded, posted, transmitted, or distributed in any way, in whole or in part, except that one copy may be downloaded for your personal, non-commercial use on a single computer. In connection with such use, you may not modify or obscure any copyright or other proprietary notice.
The Materials may contain trademarks, services marks and logos that are the property of third parties. You are not permitted to use these trademarks, services marks or logos without prior written consent of such third parties.
Realtime Publishers and the Realtime Publishers logo are registered in the US Patent & Trademark Office. All other product or service names are the property of their respective owners.
If you have any questions about these terms, or if you would like information about licensing materials from Realtime Publishers, please contact us via e-mail at [email protected].

Automating Windows 7 Installation for Desktop and VDI Environments
48
[Editor's Note: This eBook was downloaded from Realtime Nexus—The Digital Library for IT Professionals. All leading technology eBooks and guides from Realtime Publishers can be found at ttp://nexus.realtimepublishers.comh .]
Chapter 4: Layering Applications on Top of Deployed Windows Images
The previous chapter offered a half‐chapter of step‐by‐step Automating Windows 7 Installation content. In that chapter, you learned about Step Seven of the deployment process: where you can customize your basic Windows 7 images—those right off the DVD media—through the deploy‐modify‐capture method commonly called the thick approach. I mentioned that at the conclusion of Step Seven you’re absolutely ready to begin deploying images. Step Seven and those prior give you everything you need to be successful in deploying Windows 7 using that thick approach. Rejoice!
Yet the second half of Chapter 3 focused less on the step‐by‐step; it was dedicated towards pointing you in the direction of a new and arguably smarter approach: the thin approach. Using the thin approach, applications, customizations, and user data are not configured directly on the image; instead, those changes are layered on top of a basic image. They’re deployed using other tools. One tool that is commonly used (at least among Microsoft’s no‐cost options) is the Microsoft Deployment Toolkit (MDT).
This chapter will reposition your Windows 7 deployment solution inside the framework of the MDT to gain added flexibility in deployment. Yes, we’ll for a minute lose some of the automations that we’ve worked so hard to implement; but we’ll replace them with a much more capable interface for the real needs of our project. And don’t worry, I’ll help you add those customizations back by the book’s conclusion.
In this chapter, you’ll learn how to install and initially configure the MDT, how to deploy an image, and how to link applications to that deployed image. At its conclusion, you’ll see why the thin approach can be far superior to its thick alternative in dealing with applications. Time for an applications diet.
Step Eight: Installing and Preparing the MDT As of this writing, the MDT’s current version is MDT 2010 Update 1. Thus, start this step by locating and downloading this version from Microsoft’s Web site. Install it to your WDS server. You’ll find that the MDT installation is exceptionally simple, requiring only a few very basic questions to get started.
Automating Windows 7 Installation for Desktop and VDI Environments
49
Note The MDT requires the WAIK for its installation, which you already installed to the WDS server back in Step Five.
Once installed, your first step will be in creating a deployment share. It is within this deployment share where much of your work will be stored. You’ll find yourself here during most of your MDT administration. Right‐click the Deployment Share link, and choose New Deployment Share to begin. Six questions are asked as part of the New Deployment Share Wizard. You’ll need to provide a path, share name, and descriptive name for the location on disk where deployment data will be stored. I’ll use the location C:\DeploymentShare.
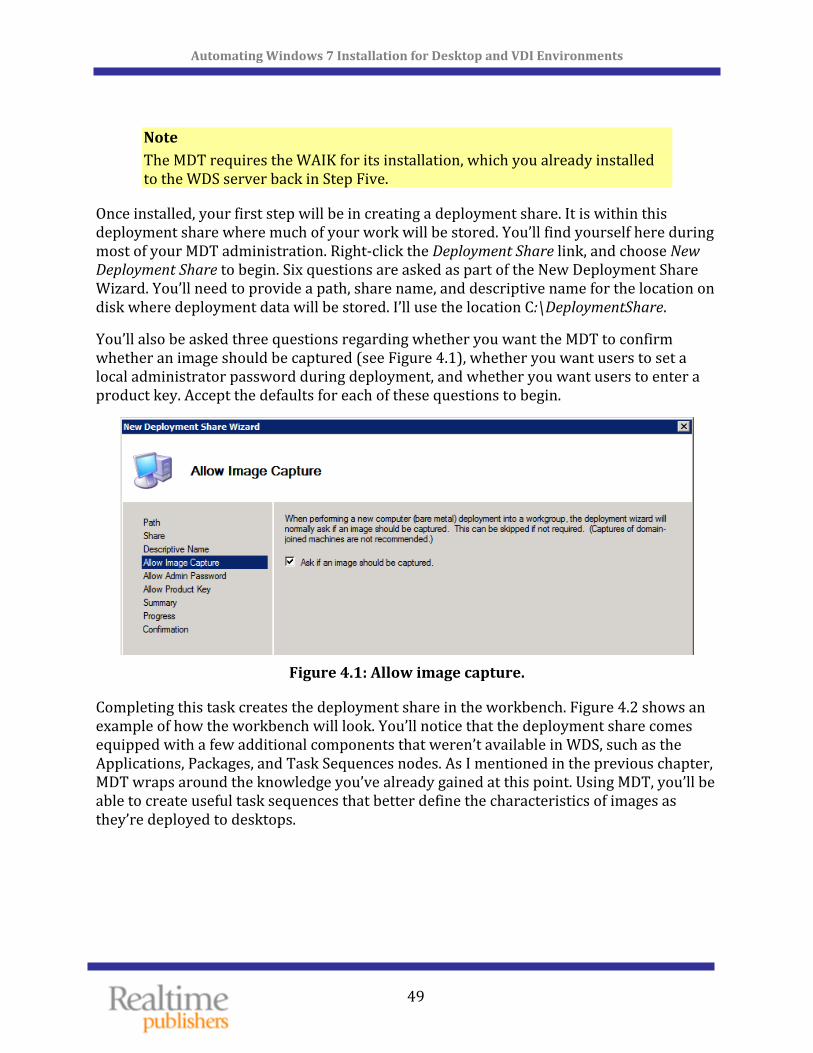
You’ll also be asked three questions regarding whether you want the MDT to confirm whether an image should be captured (see Figure 4.1), whether you want users to set a local administrator password during deployment, and whether you want users to enter a product key. Accept the defaults for each of these questions to begin.
Figure 4.1: Allow image capture.
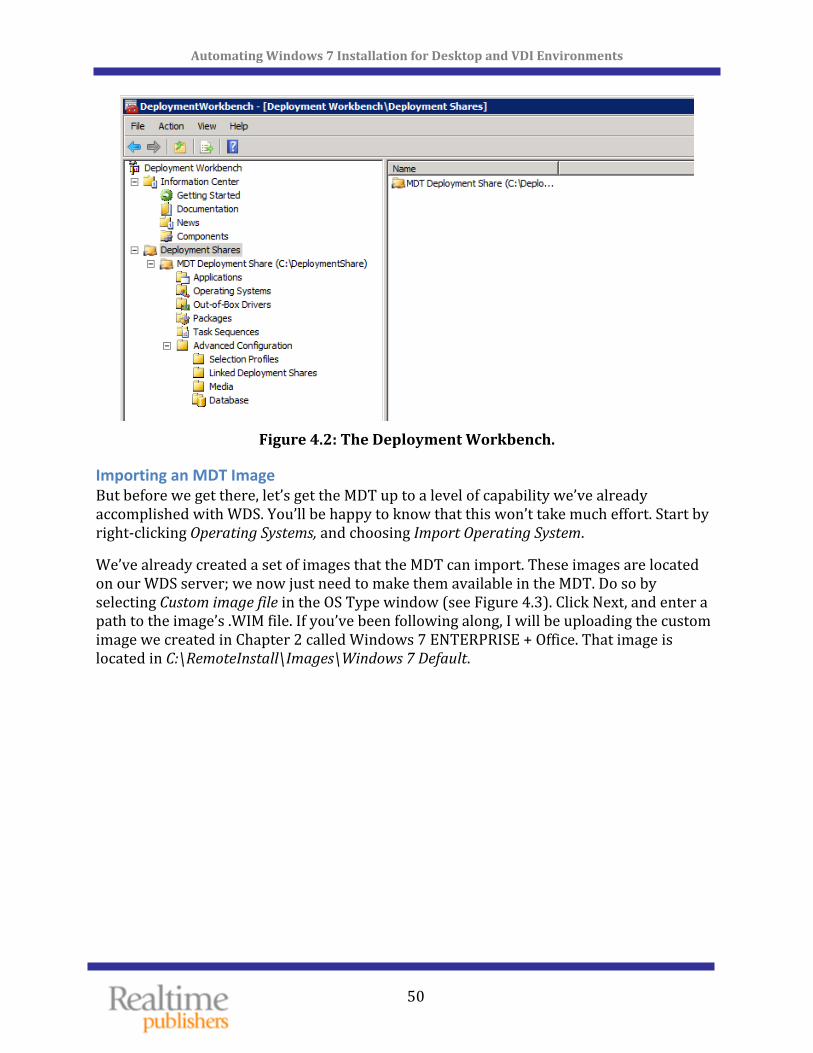
Completing this task creates the deployment share in the workbench. Figure 4.2 shows an example of how the workbench will look. You’ll notice that the deployment share comes equipped with a few additional components that weren’t available in WDS, such as the Applications, Packages, and Task Sequences nodes. As I mentioned in the previous chapter, MDT wraps around the knowledge you’ve already gained at this point. Using MDT, you’ll be able to create useful task sequences that better define the characteristics of images as hey’re deployed to desktops. t
Automating Windows 7 Installation for Desktop and VDI Environments
50
Figure 4.2: The Deployment Workbench.
Importing an MDT Image But before we get there, let’s get the MDT up to a level of capability we’ve already accomplished with WDS. You’ll be happy to know that this won’t take much effort. Start by right‐clicking Operating Systems, and choosing Import Operating System.
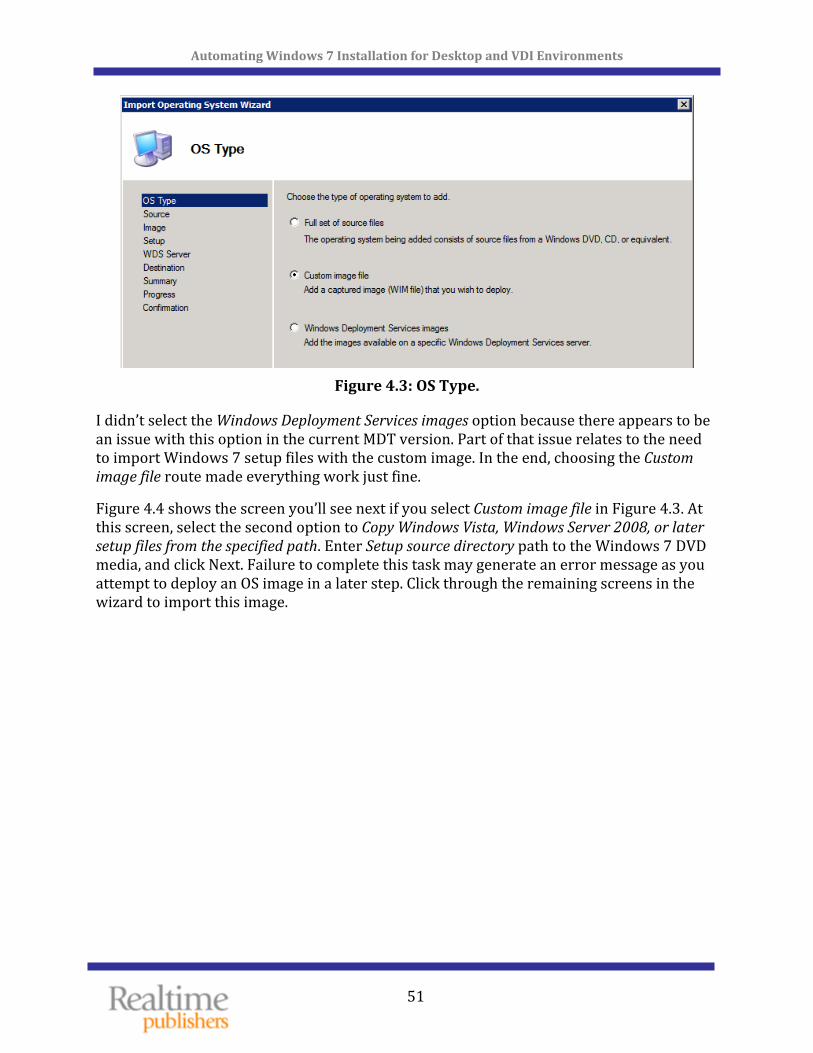
We’ve already created a set of images that the MDT can import. These images are located on our WDS server; we now just need to make them available in the MDT. Do so by selecting Custom image file in the OS Type window (see Figure 4.3). Click Next, and enter a path to the image’s .WIM file. If you’ve been following along, I will be uploading the custom image we created in Chapter 2 called Windows 7 ENTERPRISE + Office. That image is ocated in C:\RemoteInstall\Images\Windows 7 Default. l
Automating Windows 7 Installation for Desktop and VDI Environments
51
Figure 4.3: OS Type.
I didn’t select the Windows Deployment Services images option because there appears to be an issue with this option in the current MDT version. Part of that issue relates to the need to import Windows 7 setup files with the custom image. In the end, choosing the Custom image file route made everything work just fine.
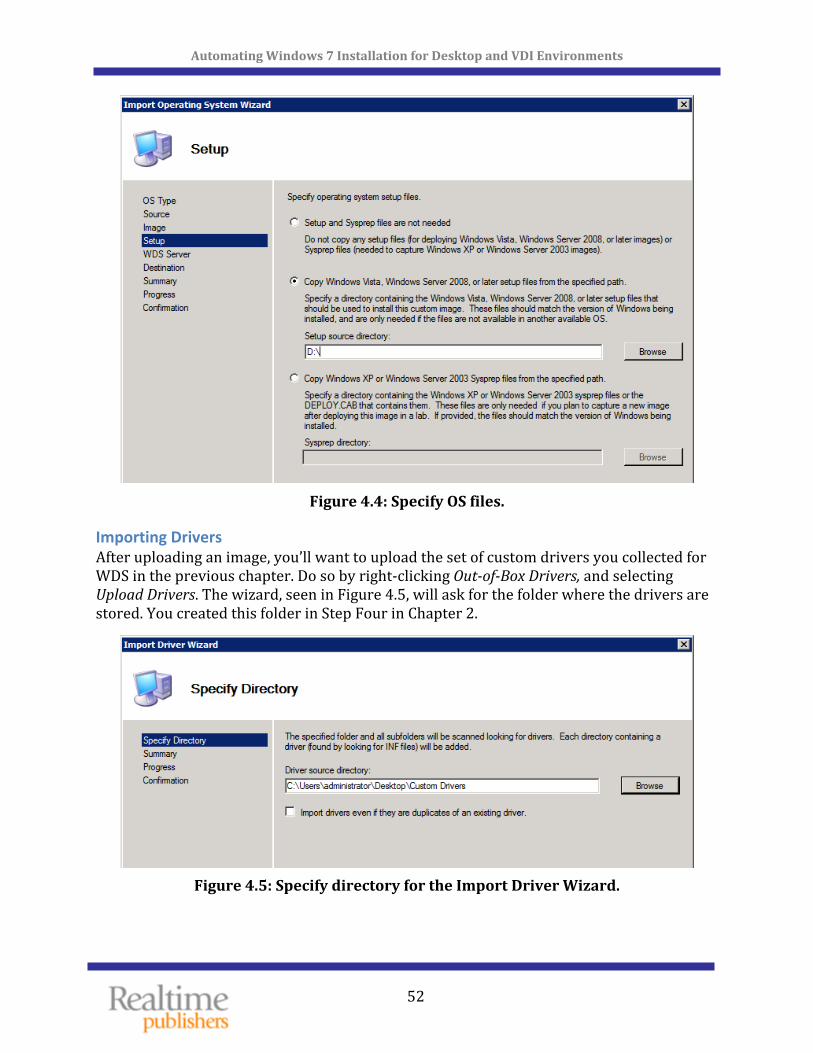
Figure 4.4 shows the screen you’ll see next if you select Custom image file in Figure 4.3. At this screen, select the second option to Copy Windows Vista, Windows Server 2008, or later setup files from the specified path. Enter Setup source directory path to the Windows 7 DVD media, and click Next. Failure to complete this task may generate an error message as you attempt to deploy an OS image in a later step. Click through the remaining screens in the wizard to import this image.
Automating Windows 7 Installation for Desktop and VDI Environments
52
Figure 4.4: Specify OS files.
Importing Drivers After uploading an image, you’ll want to upload the set of custom drivers you collected for WDS in the previous chapter. Do so by right‐clicking OutofBox Drivers, and selecting Upload Drivers. The wizard, seen in Figure 4.5, will ask for the folder where the drivers are stored. You created this folder in Step Four in Chapter 2.
Figure 4.5: Specify directory for the Import Driver Wizard.

Automating Windows 7 Installation for Desktop and VDI Environments
53
Note If you’re following along at home and using VMware Tools device drivers, be aware that these drivers don’t function in WinPE. There is a way around this, however: View the properties of your deployment share and look at the Windows PE x86/x64 Components tabs. For now, set their selection profiles to Nothing to prevent a WinPE boot failure.
Pay attention to the WinPE configurations in this screen. It is here where drivers from your Out‐of‐Box Drivers node are injected into WinPE. Even if you’re not using VMware Workstation, you’ll want to specifically tailor your driver selections here so that inappropriate drivers aren’t injected into WinPE.
Creating a Task Sequence Next, you need to create a task sequence for deploying a Windows image. This task sequence adds the MDT’s useful workflow components into a deployment. You will create a
equence at this to it in a later step. basic task s point and add
Right‐Click Task Sequences, and choose a New Task Sequence to start the New Task Sequence wizard. This wizard starts the creation of a task sequence by asking six questions: The task sequence’s name, the template, OS, and product key to use, the name and organization of the user as well as the Internet Explorer home page, and finally the local administrator password.
Most of these settings should be self‐explanatory with the exception of the Select Template page (see Figure 4.6). There, you’ll find seven task sequence templates to choose from. The sequence you’ll want to create is a standard OS deployment. What we’re doing is not performing a capture. We’re not replacing a client. We don’t intend to upgrade, but instead deploy a fresh OS that assumes no existing user data. Therefore, select the Standard Client Task Sequence, and complete the rest of the screens in the wizard.
Figure 4.6: Selecting a Task Sequence template.
Automating Windows 7 Installation for Desktop and VDI Environments
54
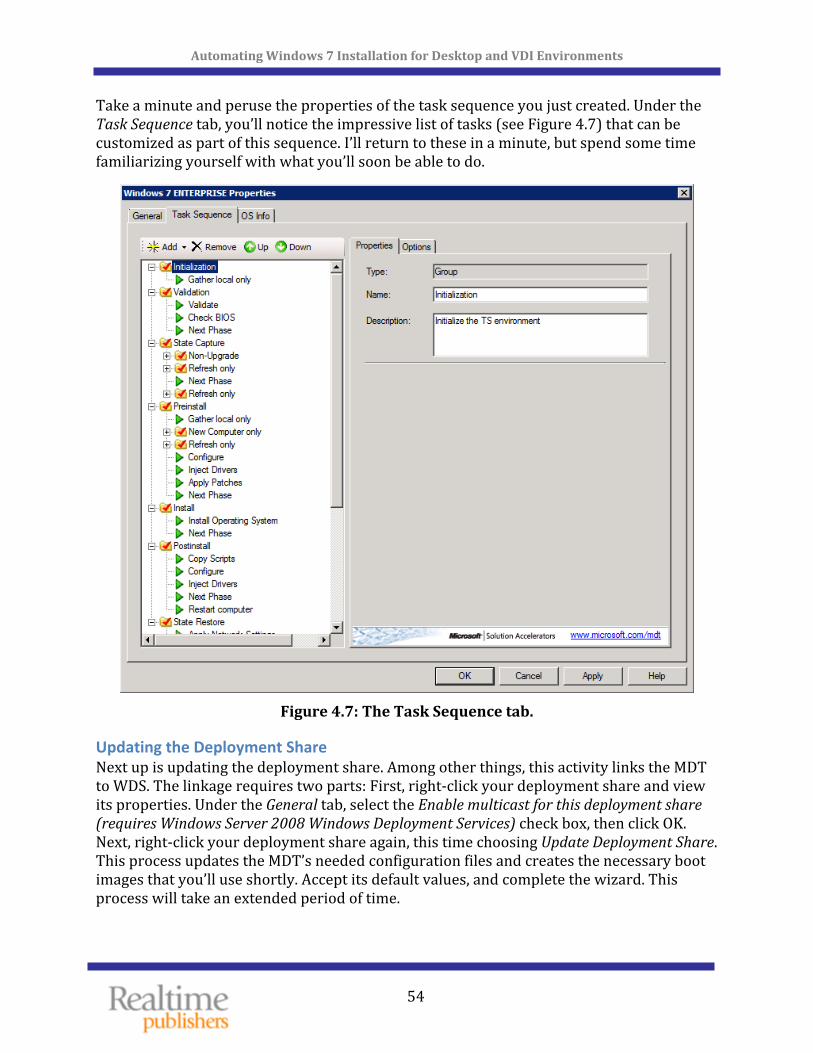
Take a minute and peruse the properties of the task sequence you just created. Under the Task Sequence tab, you’ll notice the impressive list of tasks (see Figure 4.7) that can be customized as part of this sequence. I’ll return to these in a minute, but spend some time familiarizing yourself with what you’ll soon be able to do.
Figure 4.7: The Task Sequence tab.
Updating the Deployment Share Next up is updating the deployment share. Among other things, this activity links the MDT to WDS. The linkage requires two parts: First, right‐click your deployment share and view its properties. Under the General tab, select the Enable multicast for this deployment share (requires Windows Server 2008 Windows Deployment Services) check box, then click OK. Next, right‐click your deployment share again, this time choosing Update Deployment Share. This process updates the MDT’s needed configuration files and creates the necessary boot images that you’ll use shortly. Accept its default values, and complete the wizard. This process will take an extended period of time.

Automating Windows 7 Installation for Desktop and VDI Environments
55
The section action is to replace WDS’ original boot images with those that the MDT just created. Don’t worry; they’re much nicer than the boot.wim that we’ve been using! Disable any boot images currently on your WDS server by right‐clicking the image, and selecting Disable. Then right‐click Boot Images, and choose Add Boot Image. The boot image can be found in C:\DeploymentShare\Boot\LiteTouchPE_x64.wim if your deployment share is in the same location.
Note If in Chapter 2’s Step Five you configured your WinPE unattend file to point towards a specific Filename, ImageGroup, and ImageName, now would be a good time to remove those settings.
Deploying a Basic Desktop with MDT After completing the previous steps, you’re ready to deploy your first desktop with the MDT. PXE boot that desktop just like you’ve been doing up until this point. Notice as its booting that you are now booting from the MDT’s LiteTouchPE_x64.wim rather than WDS’ boot.wim file.
Once booted, you’ll be greeted with a very different desktop and a welcome screen than what you saw with WDS. This new welcome screen comes equipped with quite a few more options than in WDS (see Figure 4.8). Click the very large button marked Run the Deployment Wizard to install a new Operating System, then enter appropriate credentials in the resulting screen.
Figure 4.8: The Welcome Windows Deployment screen.
Automating Windows 7 Installation for Desktop and VDI Environments
56
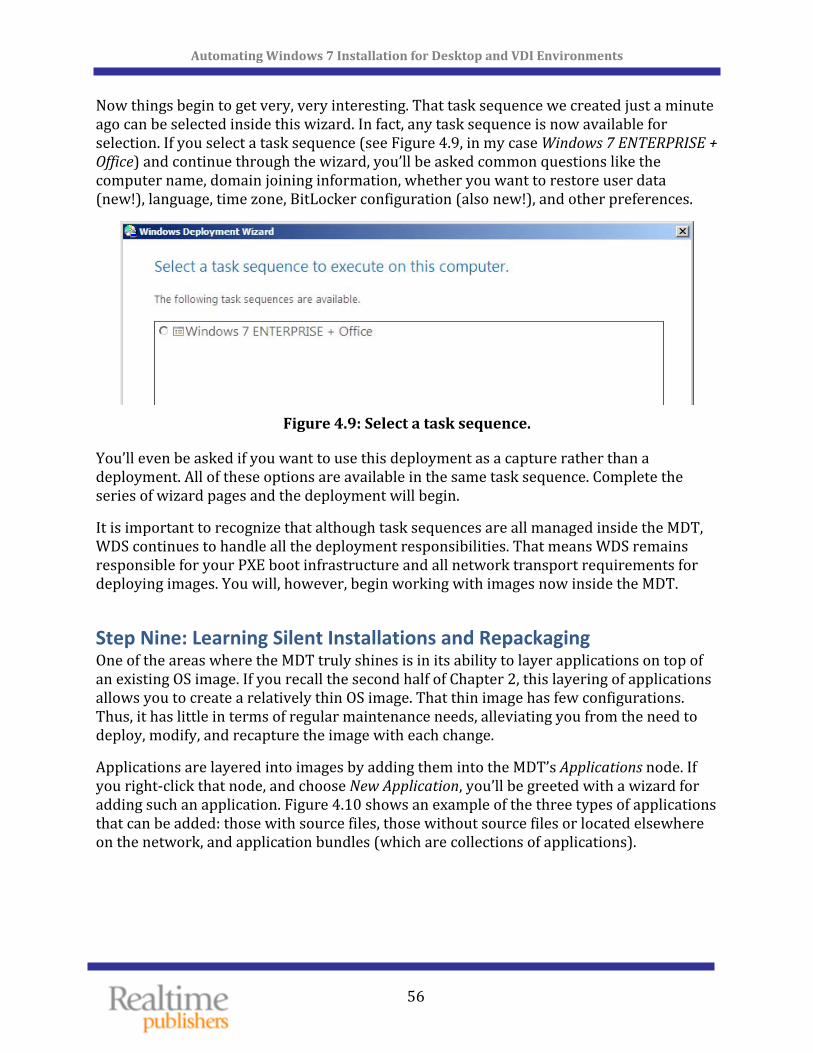
Now things begin to get very, very interesting. That task sequence we created just a minute ago can be selected inside this wizard. In fact, any task sequence is now available for selection. If you select a task sequence (see Figure 4.9, in my case Windows 7 ENTERPRISE + Office) and continue through the wizard, you’ll be asked common questions like the computer name, domain joining information, whether you want to restore user data (new!), language, time zone, BitLocker configuration (also new!), and other preferences.
Figure 4.9: Select a task sequence.
You’ll even be asked if you want to use this deployment as a capture rather than a deployment. All of these options are available in the same task sequence. Complete the series of wizard pages and the deployment will begin.
It is important to recognize that although task sequences are all managed inside the MDT, WDS continues to handle all the deployment responsibilities. That means WDS remains responsible for your PXE boot infrastructure and all network transport requirements for deploying images. You will, however, begin working with images now inside the MDT.
Step Nine: Learning Silent Installations and Repackaging One of the areas where the MDT truly shines is in its ability to layer applications on top of an existing OS image. If you recall the second half of Chapter 2, this layering of applications allows you to create a relatively thin OS image. That thin image has few configurations. Thus, it has little in terms of regular maintenance needs, alleviating you from the need to deploy, modify, and recapture the image with each change.
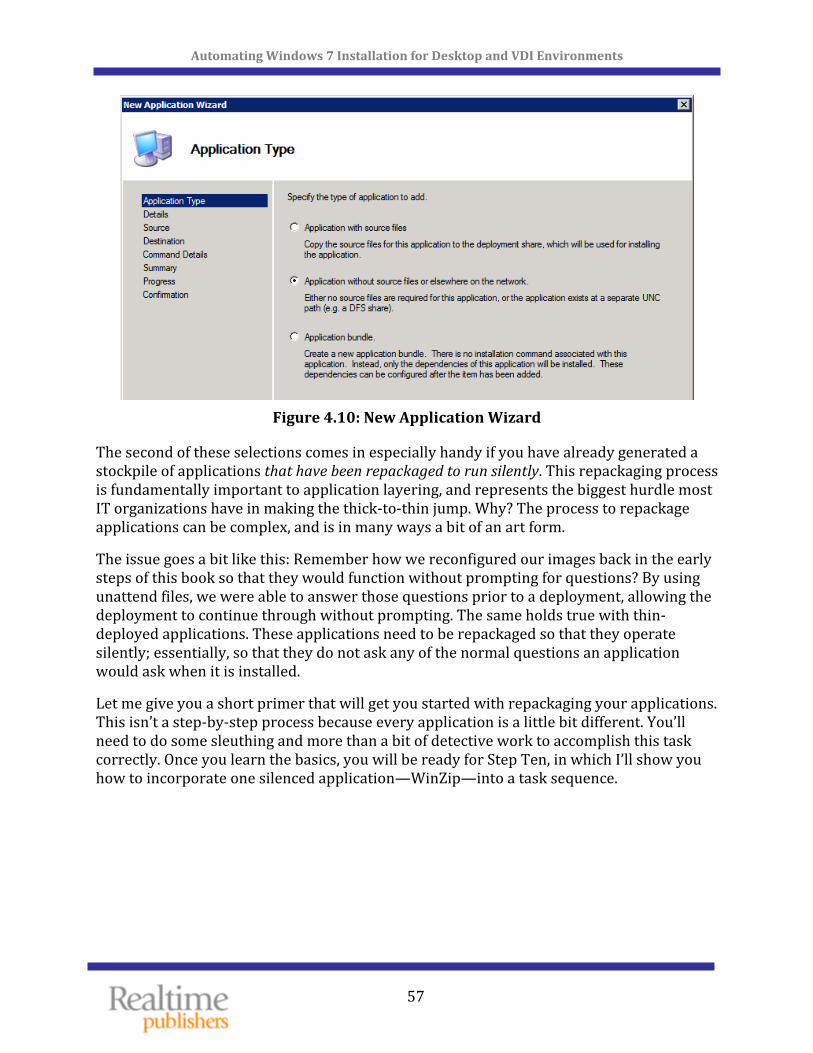
Applications are layered into images by adding them into the MDT’s Applications node. If you right‐click that node, and choose New Application, you’ll be greeted with a wizard for adding such an application. Figure 4.10 shows an example of the three types of applications that can be added: those with source files, those without source files or located elsewhere on the network, and application bundles (which are collections of applications).
Automating Windows 7 Installation for Desktop and VDI Environments
57
Figure 4.10: New Application Wizard
The second of these selections comes in especially handy if you have already generated a stockpile of applications that have been repackaged to run silently. This repackaging process is fundamentally important to application layering, and represents the biggest hurdle most IT organizations have in making the thick‐to‐thin jump. Why? The process to repackage applications can be complex, and is in many ways a bit of an art form.
The issue goes a bit like this: Remember how we reconfigured our images back in the early steps of this book so that they would function without prompting for questions? By using unattend files, we were able to answer those questions prior to a deployment, allowing the deployment to continue through without prompting. The same holds true with thin‐deployed applications. These applications need to be repackaged so that they operate silently; essentially, so that they do not ask any of the normal questions an application would ask when it is installed.
Let me give you a short primer that will get you started with repackaging your applications. This isn’t a step‐by‐step process because every application is a little bit different. You’ll need to do some sleuthing and more than a bit of detective work to accomplish this task correctly. Once you learn the basics, you will be ready for Step Ten, in which I’ll show you how to incorporate one silenced application—WinZip—into a task sequence.
Automating Windows 7 Installation for Desktop and VDI Environments
58
Three Ways to Silence Applications Let me help you with the science behind the art. There are three common ways in which software is typically installed to a computer:
• MSIbased installations. These installations, all of which have an .MSI extension, leverage the built‐in Windows Installer Service to complete their task. They share this commonality, so they tend to be the easiest to repackage.
• EXEbased installations. A software installation with an .EXE extension typically uses its own built‐in mechanism for installing itself. With a set of potential tools to create these files, there are an equal set of ways to silence them. With these, you’ll find yourself needing a little sleuthing to discover their secrets for silence.
• Differentialbased installations. When neither of the other two mechanisms work for an installation, tools are available that can snapshot the configuration of a
stry keys computer before and after an installation to determine which files and regichanged.
For the first two installation types, the solution for repackaging is in finding their silent switches. These switches, such as /silent, /s, or /v /qn for example, instruct either the built‐in installation code or the Windows Installer Service to install the package without prompting the user. For the third mechanism, special tools are required. We’ll discuss all three in the following sections.
MSI‐Based Installations MSI installations are generally the easiest to repackage to run silently. Every MSI installation uses the Windows Installer Service. Thus, every MSI installation tends to have
silently. similar silent switches that install the package
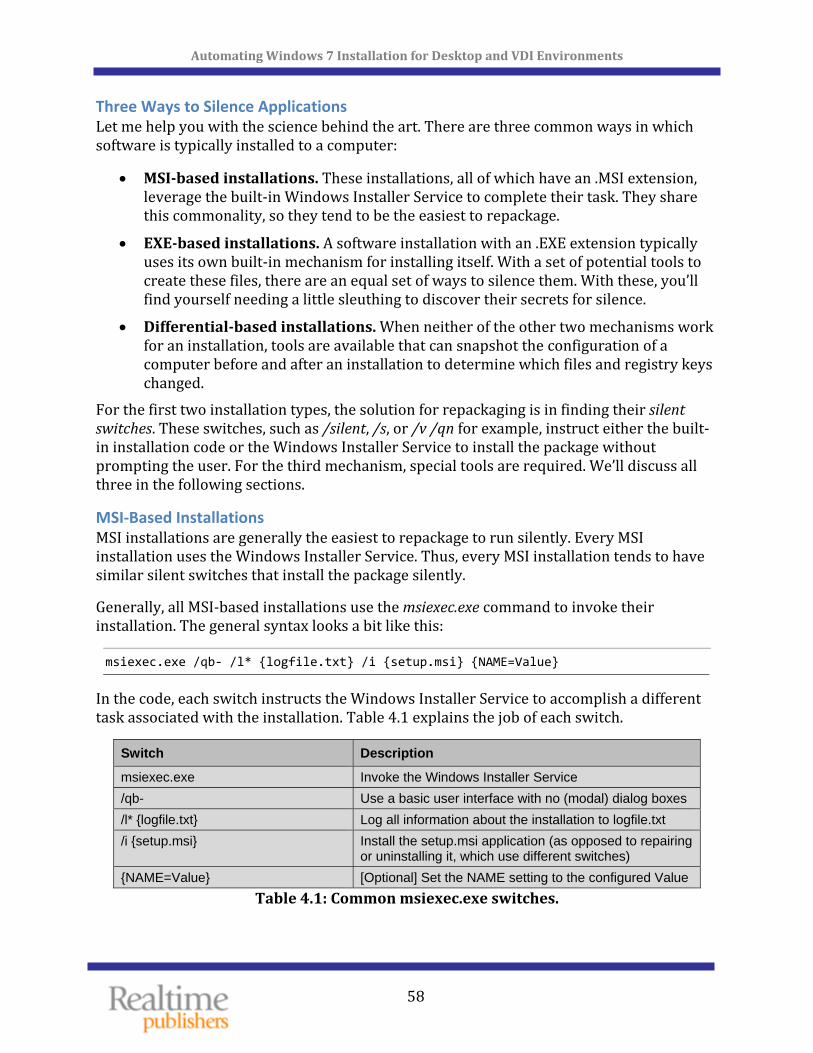
Generally, all MSI‐based installations use the msiexec.exe command to invoke their installation. The general syntax looks a bit like this:
msiexec.exe /qb‐ /l* {logfile.txt} /i {setup.msi} {NAME=Value}
In the code, each switch instructs the Windows Installer Service to accomplish a different task associated with the installation. Table 4.1 explains the job of each switch.
Switch Description
msiexec.exe Invoke the Windows Installer Service /qb- Use a basic user interface with no (modal) dialog boxes /l* {logfile.txt} Log all information about the installation to logfile.txt /i {setup.msi} Install the setup.msi application (as opposed to repairing
or uninstalling it, which use different switches) {NAME=Value} [Optional] Set the NAME setting to the configured Value
Table 4.1: Common msiexec.exe switches.
Automating Windows 7 Installation for Desktop and VDI Environments
59
{NAME=Value] at the bottom of Table 4.1 requires additional explanation. Customizations for MSI‐based installations are stored in a database‐like format. Thus, settings that customize the installation for your environment—such as installation location, post‐
n. installation reboot suppressing, or other elements—can be set at the time of installatio
With MSI installs, these are typically completed in one of two ways—either by setting individual values at the command line or by using a transform file. Transform files are used when the number of customizations is large, as it allows individual customizations to be wrapped into a single file. For example to install a version WinZip, you might use a command similar to:
msiexec /qb‐ /l* l /i WinZip.msi SERIALNUMBER={value} REBOOT=SUPRESS ogfile.txt
In this example, the WinZip.msi file is launched with two customizations. The first inputs the serial number as it installs the software. The second instructs the installer not to reboot the machine after the installation.
If a transform file were available for this same installation, it would change the installation to resemble the following:
msiexec /qb‐ /l* logfile.txt /i WinZip.msi TRANSFORMS={transform.mst}
The hardest part about repackaging MSI files can be in finding the right customization settings for the command line. MSI interrogation tools are available to do this, and some application vendors provide tools for generating your own transform files. The “art” in this process is in determining what they are and how to use them.
Note One very good way to find this information is to check out the Web site www.appdeploy.com. This location includes a clearinghouse of many common installations and their customization options.
EXE‐Based Installations EXE‐based installs can be more difficult than MSI‐based installations because each EXE‐based install has its own built‐in mechanisms for repackaging for silent installation. Sleuthing to find the appropriate switches is much of the “art” of software packaging.
The easiest place to start is by simply attempting to run the software installation with the /? switch. This switch—as well as /help, help, and others—can often display a dialog box that presents the proper switches to be used for silent installation. Other common switches that are known to work are /s and /s /v/qb. These switches are used by some of the common enterprise packaging solutions for silent installation.

Automating Windows 7 Installation for Desktop and VDI Environments
60
Note There is no common schema among EXE‐based installations, so other switches can also be configured to run the package silently, such as /q:a /r:n, /silent, /passive, /quiet. The clearinghouse at www.appdeploy.com as well as on the Web site of the application’s vendor can provide information about EXE packages.
Another commonly used tactic is wrapping an EXE installation around an MSI file. Here, when double‐clicked, the EXE file actually launches an MSI installation inside itself. With these sorts of installations, the use of the /a switch can sometimes assist with extracting the MSI file from its host EXE.
Try this process with the /a switch: From a command prompt, run
setup.exe /a
This launches what is called an administrative installation of the software. Often, this administrative installation can prompt you through the installation as if you were installing it on a computer. Instead of actually installing the package, it results in an unpacked MSI file that has been preconfigured with your stated customizations. That MSI file can then be launched silently using the techniques discussed earlier.
A second tactic to unpack the MSI file is to double‐click the EXE file and allow it to unpack itself. When the first screen of the installation presents itself, leave the screen open and look in the computer’s %TEMP% folder. Often, you’ll find the MSI file you’re looking for in that location.
Differential‐Based Installations Last is the situation where no matter of sleuthing can determine how to directly convert the software’s installation to silent mode. Such is often the case when the software’s developer didn’t include the necessary code to make it run silent. In these cases, the optimal solution for repackaging this software is through what I’ll call a differentialbased installation or diff.
In a diff, a special piece of software is used that snapshots a computer. The computer used for these snapshots should be relatively free of configurations. It should include the same OS on which you eventually intend to deploy the software. It should also contain the minimum amount of software necessary to install the piece of software you intend to repackage.
Automating Windows 7 Installation for Desktop and VDI Environments
61
Two snapshots are created. The first captures each file, folder, and registry key present on that system. Once the first snapshot has completed, the software to be repackaged is then installed to the computer. After installing the software, a second snapshot is taken. The diff tool then scans the two snapshots to look for changes to files, folders, and the registry. Changes are presented to the administrator through a tree‐like interface that allows you to selectively remove any extraneous findings (these can be common). Once removed, the remainder is then repackaged into a new MSI file that automatically runs silently.
Software Is Really Just Files and Registry Keys At its core, a software installation is little more than a process that copies a set of files and folders to a target system, adds, updates, or removes a set of registry keys. Sometimes drivers are registered, but at the end of the day, a software installation isn’t much more than a file copy and a registry change. Professional installers may include additional functionality that streamlines this process, but in the background, these are the main two steps used to install virtually all pieces of software. Thus, if you merely watch to see which files and registry keys have changed, you’re probably going to capture what the software installation program actually accomplished. Just repackage those changes, and you’ve got your silent installation.
Many diff tools are exceptionally expensive and are parts of enterprise‐class software distribution platforms. These expensive software packages can be too costly for the small IT shop. One long‐standing and no‐cost solution still available today is the software tool called WinINSTALL LE (found at http://www.scalable.com/wininstall‐le). This tool should be installed onto a clean reference computer. Once installed, run WinINSTALL LE’s Discover menu item to begin the snapshot/installation/re‐snapshot process.
Step Ten: Laying Applications Atop a Windows Image Though the information in Step Nine only scrapes the surface of the dark art of software packaging, it serves as a starting point moving towards the thin approach to application installations. Out of each of the steps in this book so far, Step Nine will probably take you the longest to comprehend. So don’t get too discouraged if you don’t understand its processes at first. I didn’t.
In Step Ten, I want to show you the step‐by‐step processes you can use to layer an application—once silenced—into a Windows image. Be aware that you may not want to do this with every application. Those applications that you anticipate every user needing, such as Microsoft Office and/or other common applications, may be better managed by being directly installed (using the thick approach) onto the image. The decision about how to deliver an application will depend on your environment’s individual needs.
Automating Windows 7 Installation for Desktop and VDI Environments
62
Let’s assume that for Step Ten, I have already repackaged the WinZip application using the diff method from Step Nine. Using that method, I have an installation that runs silently. When invoked, its MSI installation automatically installs the WinZip application onto a Windows desktop. Rather than applying it directly to the image, I want to layer WinZip only for those users who need it. This application currently resides in my IT share found at \\wdsserver\ITApplications\WinZip.
Adding the Application to the MDT Back in the MDT, right‐click the Applications node, and choose New Application. Just like in Figure 4.10, I’ll choose Application without source files or elsewhere on the network because I don’t want to import the application directly into the MDT.
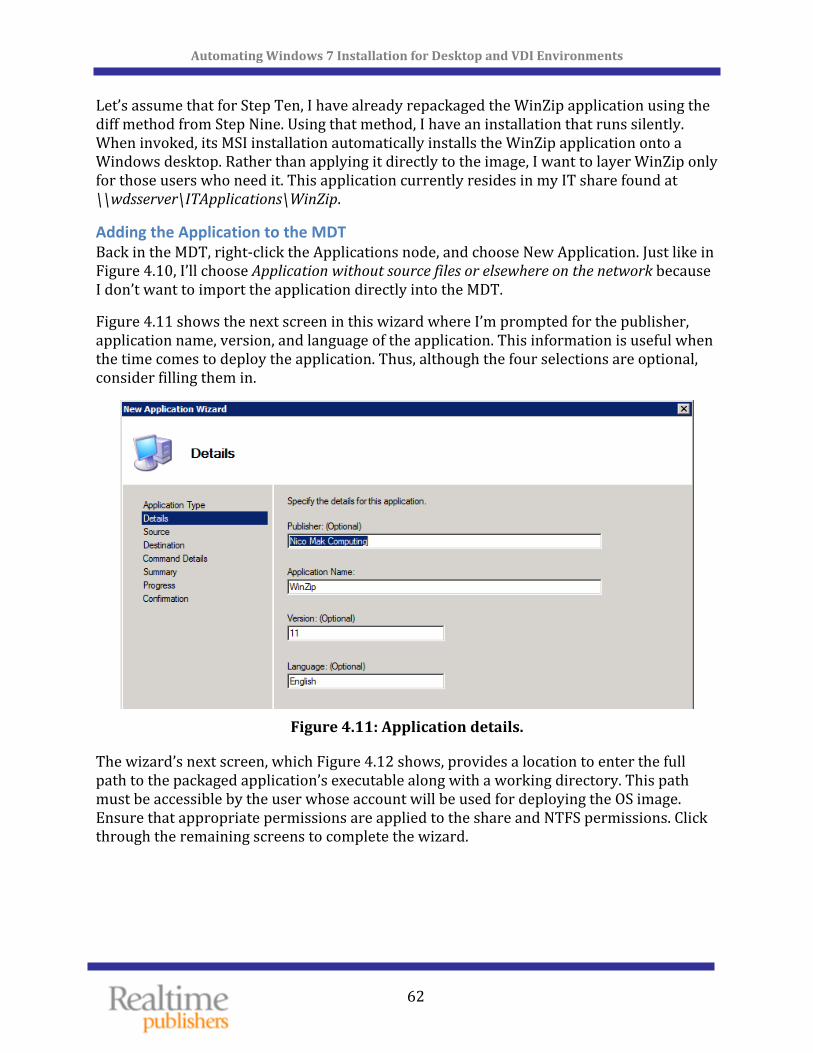
Figure 4.11 shows the next screen in this wizard where I’m prompted for the publisher, application name, version, and language of the application. This information is useful when the time comes to deploy the application. Thus, although the four selections are optional, consider filling them in.
Figure 4.11: Application details.
The wizard’s next screen, which Figure 4.12 shows, provides a location to enter the full path to the packaged application’s executable along with a working directory. This path must be accessible by the user whose account will be used for deploying the OS image. Ensure that appropriate permissions are applied to the share and NTFS permissions. Click hrough the remaining screens to complete the wizard. t

Automating Windows 7 Installation for Desktop and VDI Environments
63
Figure 4.12: Command details.
Configuring the Application for Deployment Two methods are available for adding the application to the OS deployment. It is possible to select one or more applications during the deployment activity. This occurs while you answer the questions inside the MDT task sequence. Every application that has been added
en. to the MDT server’s Application’s node will be available for installation in this scre
You can see in Figure 4.13 that check boxes are available for installing the WinZip application. Other applications that have been added to the MDT, such as Company App ABC, are also available for installation in this wizard page. Select the check box next to the applications to be installed, and continue through the wizard. Applications are installed in the State Restore phase of the MDT task sequence.
Figure 4.13: Select one or more applications to install.
Applications needn’t necessarily be optional activities inside a task sequence. In fact, full automation means not making these options inside the deployment. As with many customizations inside the MDT, you can direct those actions right inside the MDT task sequence.
Automating Windows 7 Installation for Desktop and VDI Environments
64
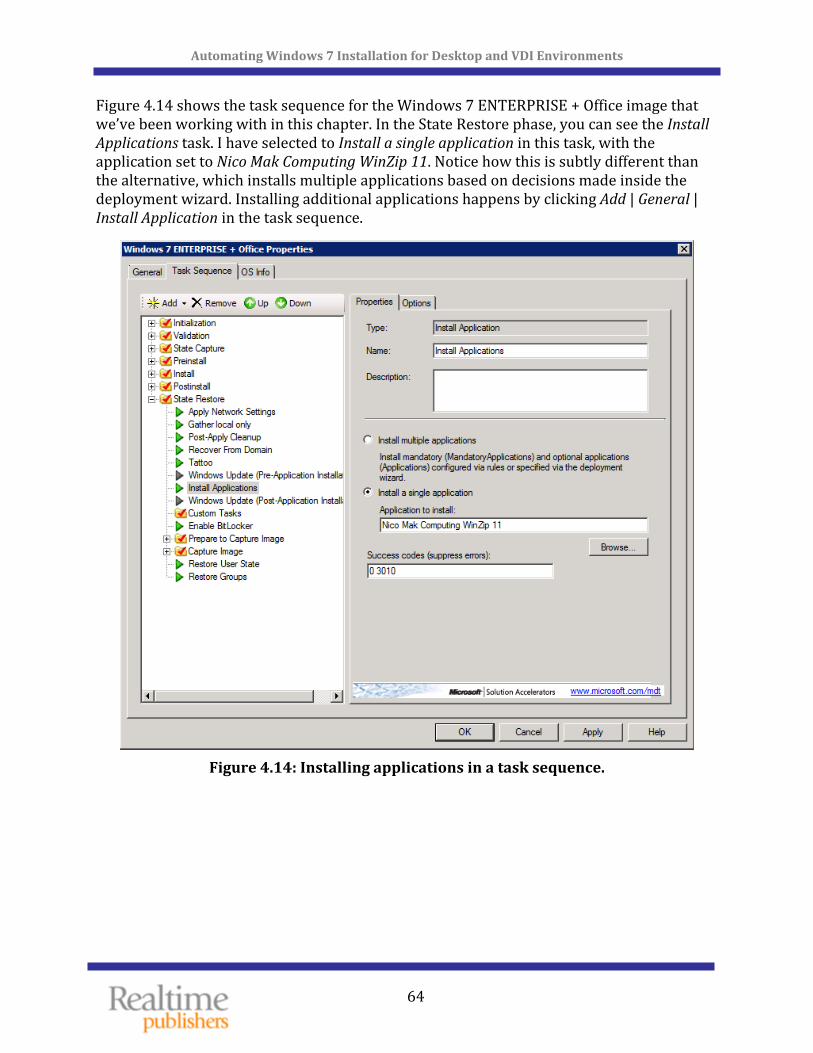
Figure 4.14 shows the task sequence for the Windows 7 ENTERPRISE + Office image that we’ve been working with in this chapter. In the State Restore phase, you can see the Install Applications task. I have selected to Install a single application in this task, with the application set to Nico Mak Computing WinZip 11. Notice how this is subtly different than the alternative, which installs multiple applications based on decisions made inside the deployment wizard. Installing additional applications happens by clicking Add | General | Install Application in the task sequence.
Figure 4.14: Installing applications in a task sequence.

Automating Windows 7 Installation for Desktop and VDI Environments
65
Note Although not to the level of a dedicated application deployment solution, the MDT’s granular management of applications is fairly rich. For example, you can define collections of applications to be deployed together by creating an application bundle.
You can also ensure that strings of applications that have dependencies on each other—such as when a line‐of‐business application requires Microsoft office—are installed in order. This is accomplished through the Dependencies tab inside the properties of the application.
More detail about accomplishing these tasks is out of scope of this chapter, but you can learn more by exploring the options under the Applications tab to familiarize yourself with what capabilities the MDT provides.
Thin Is Most Definitely In! Chapters 3 and 4 have hopefully expanded your knowledge and your expectations in terms of what an automated Windows 7 installation solution should look like. Such a solution should absolutely be able to deploy Windows 7 images. But a smart solution—one that really and truly augments the business process of IT—should also be able to layer in those extra bits.
And yet applications aren’t the only thing that such a solution needs to handle. We haven’t even gotten to the arguably more important scenarios surrounding the protection of user data. The only way your Windows 7 upgrade project will be considered a success is if you can protect that data and ensure it arrives back on users’ upgraded computers. Even the smallest amount of missing data creates stress and negative attitudes that cause upgrade projects to failure.
That’s why the next chapter is all about user data. You’ll find that the thin approach works very well here. The MDT in combination with Microsoft User State Migration Tool (USMT—yet another acronym!) will enable you to layer user state data over the top of a deployed OS.
You’ll also probably recognize that our shift from WDS to the MDT has removed a few of the automations that we so carefully built in the previous three chapters. That’s OK. We gain critical granularity in the process, but a holistic solution needs to include those automations to be fully complete. Over the next few chapters, we’ll be adding those automations back in. The final chapter will then be a wrap‐up, consolidating everything into a final and fully‐workable solution.

Automating Windows 7 Installation for Desktop and VDI Environments
66
Download Additional eBooks from Realtime Nexus! Realtime Nexus—The Digital Library provides world‐class expert resources that IT professionals depend on to learn about the newest technologies. If you found this eBook to be informative, we encourage you to download more of our industry‐leading technology eBooks and video guides at Realtime Nexus. Please visit ttp://nexus.realtimepublishers.comh .