PackFish7™ - SeaEagle.com
14
PackFish7™ Instructions & Owner’s Manual For video instructions visit, SeaEagle.com/Instructions Sea Eagle Boats, Inc. 19 N. Columbia Street, Suite 1 Port Jefferson, NY 11777 1-800-748-8066 October 2019
Transcript of PackFish7™ - SeaEagle.com

PackFish7™
Instructions & Owner’s ManualFor video instructions visit, SeaEagle.com/Instructions
Sea Eagle Boats, Inc.19 N. Columbia Street, Suite 1
Port Jefferson, NY 11777 1-800-748-8066
October 2019

1
Manufacturer’s Certifications
NMMA (for USA only) certification means that the boat, sold in the United States, has been judged by the National Marine Manufacturer’s Association to be in compliance with the U.S. Coast Guard Regulations and American Boat and Yacht Council (ABYC) standards and recommended practices.
Sea Eagle Warranty All Sea Eagle products come standard with a 3 year warranty against manufacturing defects The warranty begins the date that your product is delivered. If you receive a damaged item, please call the shipping carrier to report the issue. Do not return damaged merchandise until it has been inspected by the carrier. Sea Eagle will be notified by the carrier when they have completed their inspection and if necessary, Sea Eagle will arrange for the repair or replacement of damaged merchandise. See complete warranty details at SeaEagle.com/Warranty.
Congratulations on purchasing a Sea Eagle!With over 50 years of experience in designing, selling and using these quality
inflatables, we’re confident that you are going to love your Sea Eagle and we’re ready to proudly stand behind them.

2
Decals, Stickers & RegistrationAlways contact your state boating authorities for information on boating registration and regulations. Most states require you to register your boat if you are using a motor. (Please note, the Sea Eagle PackFish7™ is rated for use with a 1 hp motor by the NMMA. However, there is currently no provision for a motor mount.) Upon registration it may be required to provide the Manufacturer’s Statement of Origin. Purchases made through an authorized dealer or reseller may require for you to contact them directly in order to obtain this. You may be charged your own state sales tax if you were not charged sales tax at the time of purchase. Registered boats generally require the registration number to be applied to the boat. We do not recommend the use of decals or stickers as they tend to crack and peel over time with the repeated inflation and deflation of your Sea Eagle. Instead we suggest applying these numbers to a small piece of hard plastic or marine plywood and hanging it from your boat like a license plate if permitted by your state. Contact Us Unlike many other companies today we pride ourselves on answering the phone and helping you with any concerns, questions or special ordering needs that you may have! Feel free to give us a call at 1-800-748-8066 and we will be happy to talk with you! Our business hours are Monday to Friday from 9AM to 5PM, EST.
Sea Eagle Boats Inc. 19 N. Columbia Street, Suite 1
Port Jefferson, NY 117771-800-748-8066
3
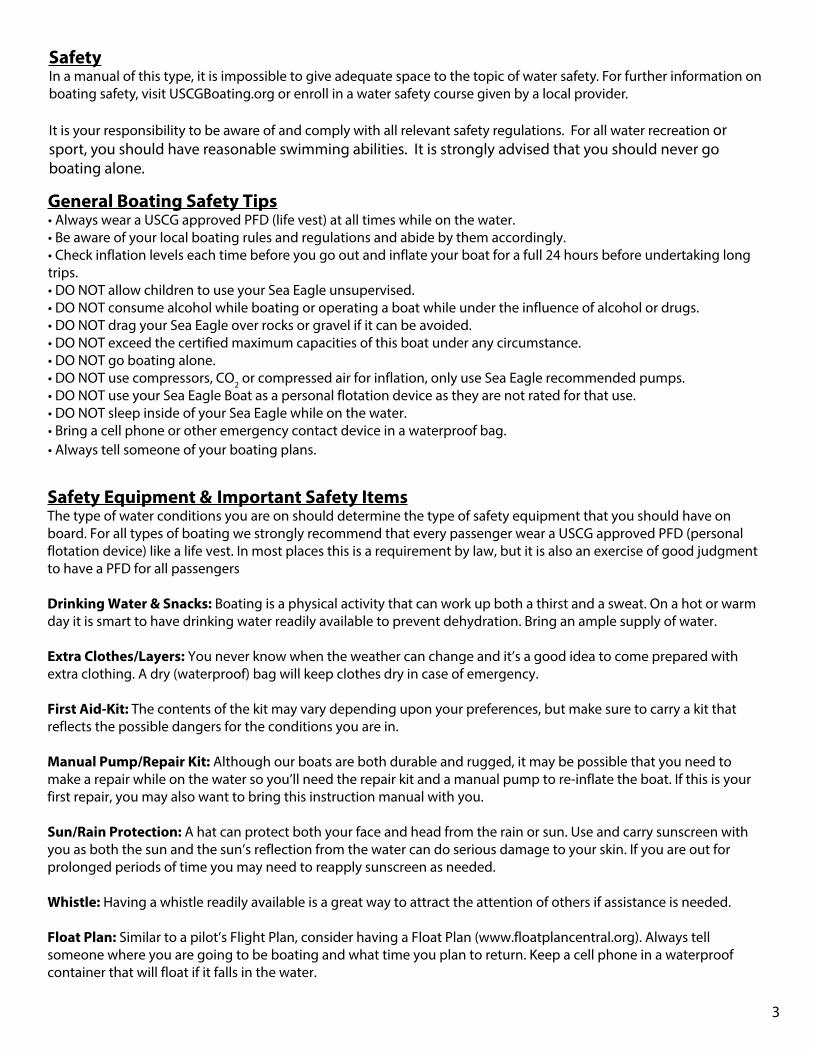
Safety In a manual of this type, it is impossible to give adequate space to the topic of water safety. For further information on boating safety, visit USCGBoating.org or enroll in a water safety course given by a local provider. It is your responsibility to be aware of and comply with all relevant safety regulations. For all water recreation or sport, you should have reasonable swimming abilities. It is strongly advised that you should never go boating alone.
General Boating Safety Tips• Always wear a USCG approved PFD (life vest) at all times while on the water.• Be aware of your local boating rules and regulations and abide by them accordingly.• Check inflation levels each time before you go out and inflate your boat for a full 24 hours before undertaking long trips.• DO NOT allow children to use your Sea Eagle unsupervised. • DO NOT consume alcohol while boating or operating a boat while under the influence of alcohol or drugs.• DO NOT drag your Sea Eagle over rocks or gravel if it can be avoided.• DO NOT exceed the certified maximum capacities of this boat under any circumstance.• DO NOT go boating alone.• DO NOT use compressors, CO2 or compressed air for inflation, only use Sea Eagle recommended pumps.• DO NOT use your Sea Eagle Boat as a personal flotation device as they are not rated for that use.• DO NOT sleep inside of your Sea Eagle while on the water. • Bring a cell phone or other emergency contact device in a waterproof bag. • Always tell someone of your boating plans.
Safety Equipment & Important Safety ItemsThe type of water conditions you are on should determine the type of safety equipment that you should have on board. For all types of boating we strongly recommend that every passenger wear a USCG approved PFD (personal flotation device) like a life vest. In most places this is a requirement by law, but it is also an exercise of good judgment to have a PFD for all passengers Drinking Water & Snacks: Boating is a physical activity that can work up both a thirst and a sweat. On a hot or warm day it is smart to have drinking water readily available to prevent dehydration. Bring an ample supply of water.
Extra Clothes/Layers: You never know when the weather can change and it’s a good idea to come prepared with extra clothing. A dry (waterproof) bag will keep clothes dry in case of emergency. First Aid-Kit: The contents of the kit may vary depending upon your preferences, but make sure to carry a kit that reflects the possible dangers for the conditions you are in. Manual Pump/Repair Kit: Although our boats are both durable and rugged, it may be possible that you need to make a repair while on the water so you’ll need the repair kit and a manual pump to re-inflate the boat. If this is your first repair, you may also want to bring this instruction manual with you. Sun/Rain Protection: A hat can protect both your face and head from the rain or sun. Use and carry sunscreen with you as both the sun and the sun’s reflection from the water can do serious damage to your skin. If you are out for prolonged periods of time you may need to reapply sunscreen as needed. Whistle: Having a whistle readily available is a great way to attract the attention of others if assistance is needed. Float Plan: Similar to a pilot’s Flight Plan, consider having a Float Plan (www.floatplancentral.org). Always tell someone where you are going to be boating and what time you plan to return. Keep a cell phone in a waterproof container that will float if it falls in the water.
4

5
Boat valve adapter is hook-in style which is called Recessed Valve Adapter.
The A42 foot pump comes with a hose and several adapters. A hook-in style adapter is needed for valves on the boat. The push-in or the screw-in adapter is used for seat valves.
To open pump, release pump clip by squeezing the top and bottom halves together. Unwind hose.
PackFish7™ | Foot Pump Set Up
Look for the inflation port which is marked “INFLATE” with an arrow. Screw hose into port tightly. Note: Use the “DEFLATE” port when you need to pack your boat down as compact as possible.
To inflate boat, insert recessed valve adapter into hose. Push adapter in hose and twist to lock.
To inflate seat, insert either the wide end or screw-on adapter into the hose. Push adapter in hose and twist to lock.
PF7 is a low pressure boat, electric pumps are not recommended. High pressure pumps will not automatically shut off, and low pressure pumps are not compatible with the valve type.
Warning: Air compressors that are designed for other uses, like tire inflation (usually around 32 PSI) can easily harm your Sea Eagle which works at a much lower pressure. For this reason we recommend only using Sea Eagle pumps.

6
Press and turn stem counterclockwise so it can pop UP. When the stem is up, valve is closed and will hold air. To let air escape for deflation, press and turn stem clockwise until locked open.
Inflate safety chamber first (front valve) with recessed valve adapter in hose. Push and turn adapter clockwise into valve opening. Pump air until chamber is almost full, but not firm. Twist hose counterclockwise and pull out. No air should escape. Replace cap in opening.
Valve has three parts, a cap, valve body with stem and a base which is inside the air chamber. Twist the valve cap counterclockwise and pull it out of opening.
PackFish7™ | Assembly & Inflation
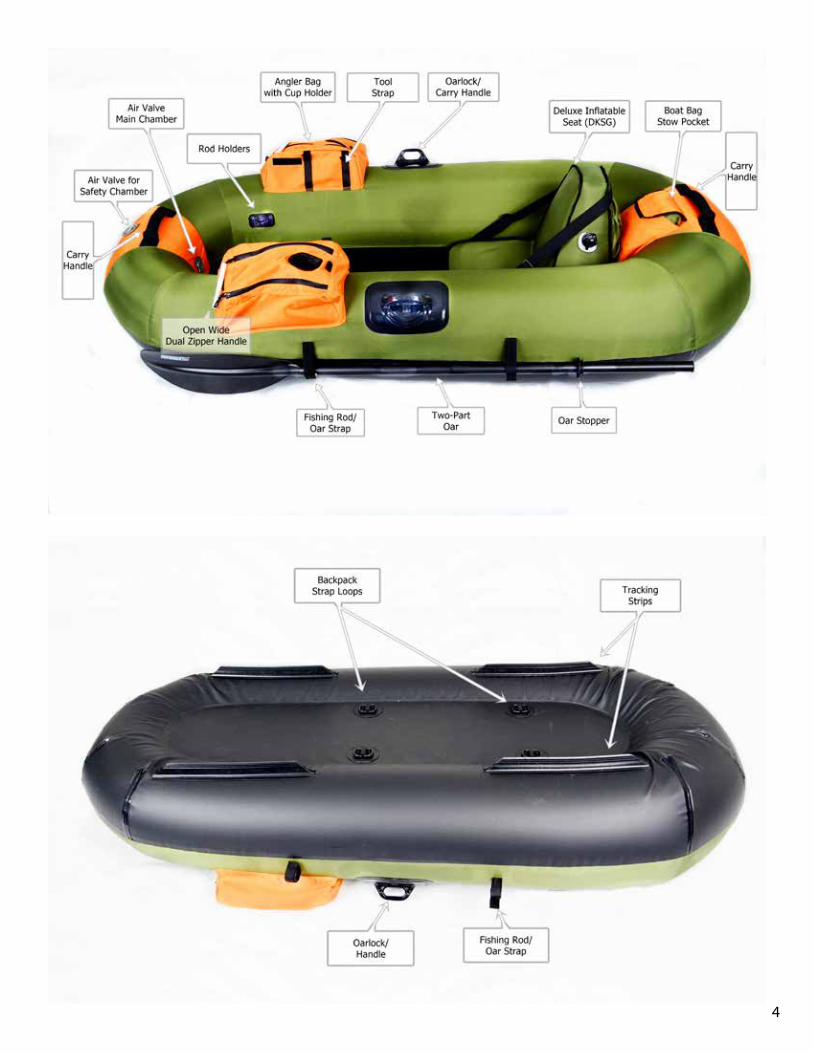
Select a flat, hazard free area to unfold the boat. PF7 kit: boat, backpack bag, pump, oars and inflatable seat with black valves and a repair kit.
PF7 has two air chambers. Outside valve is for the safety chamber, it is a ring shaped chamber above the main chamber. The inside valve inflates the main chamber.
Inflate main chamber. Pump until chamber is firm and boat rigid and mostly wrinkle-free. Please note, our foot pump can over-inflate the PackFish and this can put undo pressure on the fabric seams of the outside fabric cover. For this reason it is important that you can depress your thumb on the hull 3/4” as shown in the next picture.
Insert floorboard after inflating safety chamber. Angled corners of board go nearest rod holder bases. Holes in board are not used with PF7.

7
PackFish7™ | Inflation & Assembly
Deluxe Inflatable Seat Seat has two cushion bladders inside the cover and requires two valves. Seat straps clip to rings in seat base. Seat base has zipper for removing or adjusting bladders if needed.
Stretch retainer ring over the valve base. Retainer ring fits in a groove in valve base. If ring is too tight to fit: stretch it, or heat ring under warm water or with a hairdryer to soften it.
Unscrew the cap. Screw valve into base. Tighten valve firmly so air does not escape when sitting on seat!
Insert wide push-in or screw-in adapter into hose. Push and turn adapter to lock it into hose.
Push or screw valve adapter into valve. Inflate seat until comfortably firm. The back bladder can be fully inflated, or partially deflated to give more legroom. Tighten valve caps securely to avoid deflation.
Oars Each oar has a shaft, retainer ring, and blade. Left side oar has the Sea Eagle logo top left. Logo is top right on right side oar. Retainer ring is a 2 ¼” black rubber disk.
Slide retainer ring onto shaft approximately 18” from handle end. Insert shaft into oarlock up to retainer ring.
Pump until firm. DO NOT over inflate the tubes. Stop once you can press your thumb about 3/4” into the tubes.

8
Slide blade onto shaft and adjust until the button pops up through the hole. To remove blade, push button and pull blade out of shaft. Repeat assembly for the other oar.
Backpack Transport Straps (OPTIONAL)The PackFish can be carried backpack-style while inflated. Attach the straps to the D-rings on the bottom of the boat.
Due to bulk and weight of boat and accessories, be cautious not to lose balance or overexert yourself.
To deflate, push down on the valve stem and quarter turn it to the right. The stem will stay in the down position, allowing the air to escape
PackFish7™ | Deflation, Folding & Storage
Remove boat bag from its stow pouch behind the seat.
Fold one side over the floor. The bottom should be exposed 2-3 inches past the tracking strips.
PackFish7™ | Inflation & Assembly
Orient the curve of the blades to cup the water on the power stroke. Pulling against the oars is more efficient than pushing them. Caution!: When pulling, you’ll be going backwards, so check behind you frequently for hazards such as oncoming boats.
Two fishing rod can be carried in holders located in the front of boat. Two rods can be carried in the hook & loop closure straps on boat sides. Make straps go between the pole and line so rod cannot slip out or loop.
9
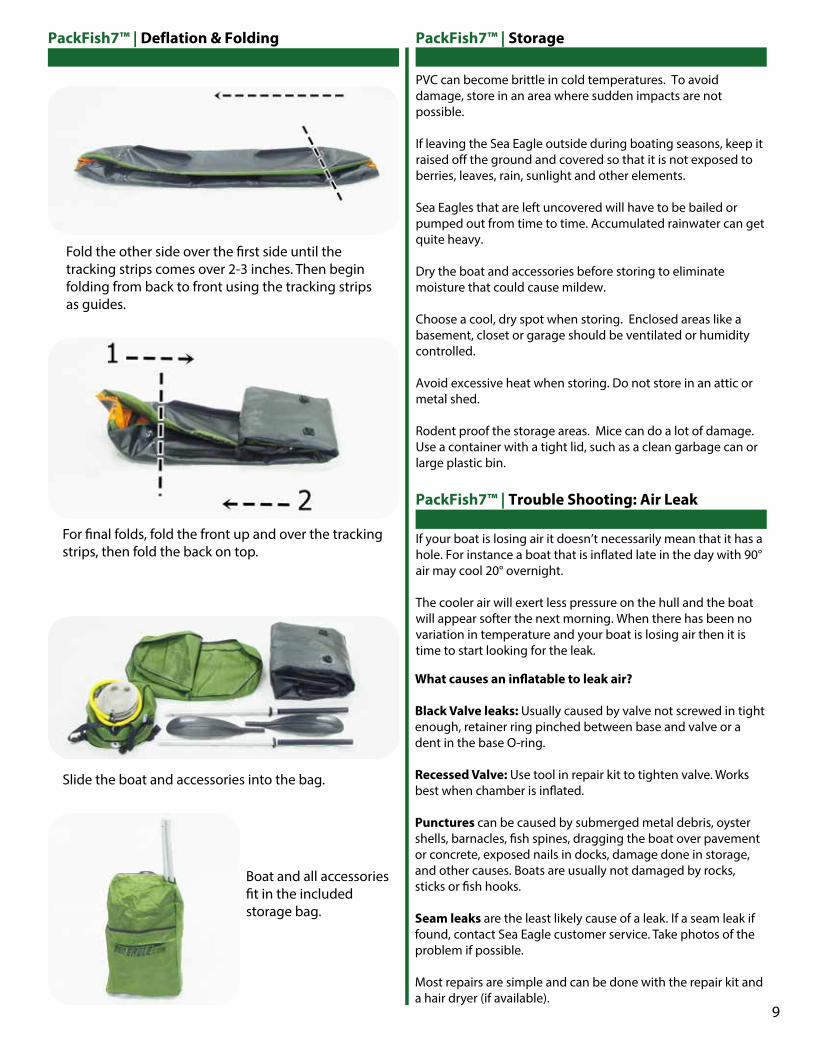
Fold the other side over the first side until the tracking strips comes over 2-3 inches. Then begin folding from back to front using the tracking strips as guides.
PackFish7™ | Deflation & Folding
For final folds, fold the front up and over the tracking strips, then fold the back on top.
Slide the boat and accessories into the bag.
Boat and all accessories fit in the included storage bag.
PackFish7™ | Storage
PVC can become brittle in cold temperatures. To avoid damage, store in an area where sudden impacts are not possible. If leaving the Sea Eagle outside during boating seasons, keep it raised off the ground and covered so that it is not exposed to berries, leaves, rain, sunlight and other elements. Sea Eagles that are left uncovered will have to be bailed or pumped out from time to time. Accumulated rainwater can get quite heavy. Dry the boat and accessories before storing to eliminate moisture that could cause mildew. Choose a cool, dry spot when storing. Enclosed areas like a basement, closet or garage should be ventilated or humidity controlled. Avoid excessive heat when storing. Do not store in an attic or metal shed. Rodent proof the storage areas. Mice can do a lot of damage. Use a container with a tight lid, such as a clean garbage can or large plastic bin.
PackFish7™ | Trouble Shooting: Air Leak
If your boat is losing air it doesn’t necessarily mean that it has a hole. For instance a boat that is inflated late in the day with 90° air may cool 20° overnight. The cooler air will exert less pressure on the hull and the boat will appear softer the next morning. When there has been no variation in temperature and your boat is losing air then it is time to start looking for the leak.
What causes an inflatable to leak air? Black Valve leaks: Usually caused by valve not screwed in tight enough, retainer ring pinched between base and valve or a dent in the base O-ring. Recessed Valve: Use tool in repair kit to tighten valve. Works best when chamber is inflated.
Punctures can be caused by submerged metal debris, oyster shells, barnacles, fish spines, dragging the boat over pavement or concrete, exposed nails in docks, damage done in storage, and other causes. Boats are usually not damaged by rocks, sticks or fish hooks.
Seam leaks are the least likely cause of a leak. If a seam leak if found, contact Sea Eagle customer service. Take photos of the problem if possible.
Most repairs are simple and can be done with the repair kit and a hair dryer (if available).
10
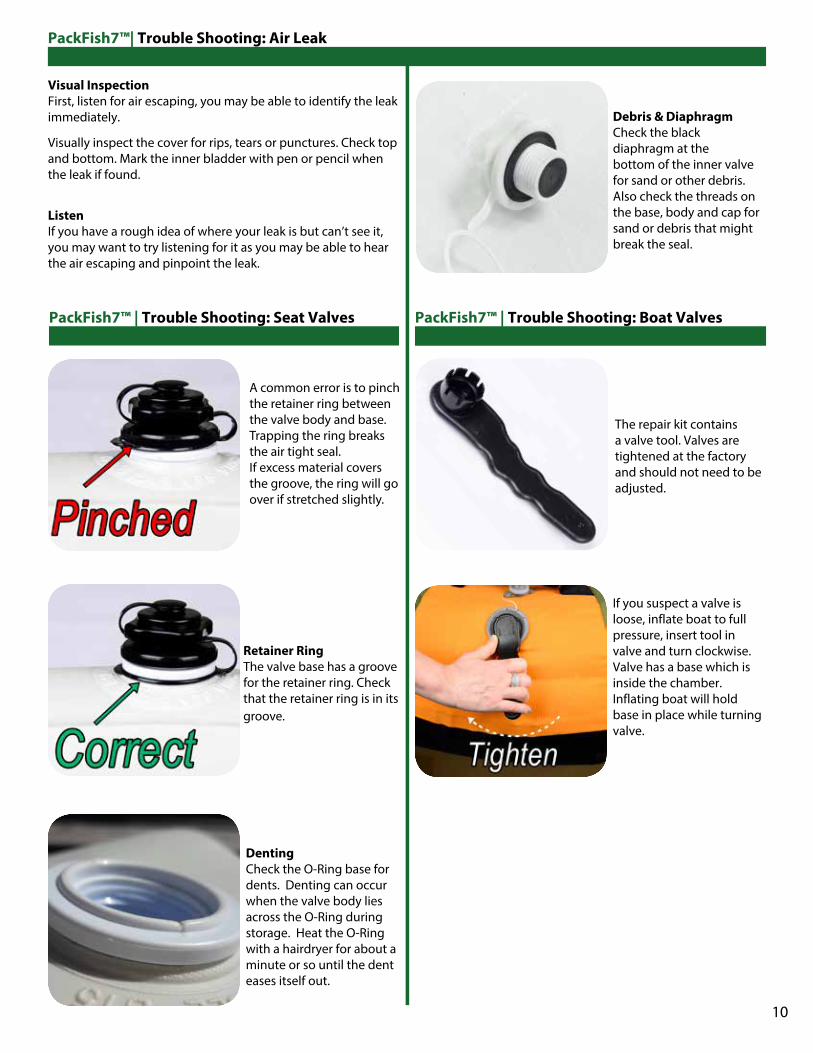
Visual Inspection First, listen for air escaping, you may be able to identify the leak immediately.
Visually inspect the cover for rips, tears or punctures. Check top and bottom. Mark the inner bladder with pen or pencil when the leak if found.
Listen If you have a rough idea of where your leak is but can’t see it, you may want to try listening for it as you may be able to hear the air escaping and pinpoint the leak.
PackFish7™| Trouble Shooting: Air Leak
Retainer RingThe valve base has a groove for the retainer ring. Check that the retainer ring is in its groove.
PackFish7™ | Trouble Shooting: Seat Valves
A common error is to pinch the retainer ring between the valve body and base. Trapping the ring breaks the air tight seal. If excess material covers the groove, the ring will go over if stretched slightly.
Denting Check the O-Ring base for dents. Denting can occur when the valve body lies across the O-Ring during storage. Heat the O-Ring with a hairdryer for about a minute or so until the dent eases itself out.
Debris & Diaphragm Check the black diaphragm at the bottom of the inner valve for sand or other debris. Also check the threads on the base, body and cap for sand or debris that might break the seal.
The repair kit contains a valve tool. Valves are tightened at the factory and should not need to be adjusted.
If you suspect a valve is loose, inflate boat to full pressure, insert tool in valve and turn clockwise. Valve has a base which is inside the chamber. Inflating boat will hold base in place while turning valve.
PackFish7™ | Trouble Shooting: Boat Valves

11
There are four tracking strips on the bottom of the boat which help to maintain course. The tracking strips are very flexible but if they become deformed, heat with a hairdryer until they return to their original shape (1-3 minutes).
PackFish7™ | Trouble Shooting: Tracking Strips
For a demonstration of good patching technique, please view our How to Repair video on the instruction page of our web site. There is a link at the bottom of every page at SeaEagle.com or type “instructions” into the search box.
Even though your Sea Eagle is very rugged and tough, you may still experience the occasional puncture. Fortunately most repairs are fairly easy and only take a few minutes. For an extensive repair please contact us directly for assistance or a quote to have it sent back and repaired at our facility. Repair fees start at $75.00 and do not include return shipping charges.
Repair Kit All Sea Eagles come with a repair kit which includes patching material, PVC glue and a valve tool
Pinholes Deflate your boat and thoroughly clean and dry the area that be repaired. For small punctures, less than 1/8”, apply a small drop of glue and allow 24 hours to dry.
Patching The most common repairs are a puncture or small cut. A penny size patch is sufficient for repairs of this type. Patch should be as small as reasonably possible.
PackFish7™ | Trouble Shooting: RepairsPackFish7™ | Trouble Shooting: Air Bladder
Soapy Water Test Inflate the bladder to full pressure. Mix a couple of tablespoons of dish washing liquid in a bucket of water. Spread the soapy water on the leaking chamber with a large sponge or hand towel. The leak may produce bubbles or make whistling or sputtering noises. Often, spray bottles don’t work.
To inspect the air bladder, deflate the boat and pull the bladder out the zipper opening.

12
Apply patch to the boat. Smooth with finger or a smoothing tool such as a spoon, handle of a utility knife, or screwdriver. For best results, heat patch with a hair dryer 10-20 seconds and smooth with tool.
Patching Tips:
• For immediate use, allow 30 minutes to cure and inflate ¾ full
• Chamber must be deflated or air will make a path through the glue
• Do not apply the patch while glue is wet• For larger repairs, overlap the damaged area by about
½” on each side• Trim the patch material to size, the larger the patch
the harder it is to seal• Covering a leaking patch with a larger patch does not
work. Remove old patch with hairdryer.• Covering a seam with a patch will not work• Internal sealants and spray-on waterproofing are not
recommended• Alcohol, acetone (nail polish remover), toluene and
MEK solvents can be used• Sanding is not recommended• Clamps and weights are not needed
PackFish7™ | Trouble Shooting: Repairs
Cut patch along the outline with scissors.
Pro Tip: Trace the outline of the penny on masking tape and cut with a utility knife. Apply tape to the boat instead of tracing on the boat.
Trace the outline of a penny on the patch material and on the boat. If a larger patch is needed, use a larger item as a template.

13
Personal Flotation Devices (OPTIONAL) U.S.C.G. approved. Life jackets, paddling vest, PFD Belts available in various sizes.
Waterproof Blanket Super plush Polartec® Classic 200 Fleece inside keeps you warm on chilly days. Completely waterproof nylon shell keeps you dry and shelters you from the wind. Packs down to just 18” x 6” x 3” and weighs only 18 oz for easy portage.
Squid Anchor The Squid Anchor gets its heft from up to 14 lbs. of river sand, stones, rocks or gravel provided by nature. Triple flukes add sticking power. When you’re done, just dump, rinse, stow and go! Weighs under 8oz. when empty. Comes with 25’ of rope. Stored anchor dimensions 12”x2.5”x2.5”.
Backpack Transport Straps (OPTIONAL)The PackFish can be carried backpack-style while inflated. Attach the straps to the D-rings on the bottom of the boat.
PackFish7™| Optional Accessories
We offer a wide variety of accessories to use with your Sea Eagle.
Sea Eagle Boats Inc. 19 N. Columbia Street, Suite 1
Port Jefferson, NY 117771-800-748-8066