P2000 Alarm Manager User Guidecgproducts.johnsoncontrols.com/MET_PDF/24107861.pdf · P2000 Alarm...
27
24-10786-1 Revision A March, 2016 alarm manager user guide P2000 Security Management System version 3.13
Transcript of P2000 Alarm Manager User Guidecgproducts.johnsoncontrols.com/MET_PDF/24107861.pdf · P2000 Alarm...
24-10786-1 Revision AMarch, 2016
alarm manager
user guide
P2000Security Management System
version 3.13
Copyright 2016Johnson Controls, Inc.
All Rights Reserved
No part of this document may be reproduced without the prior permission of Johnson Controls, Inc.
If this document is translated from the original English version by Johnson Controls, Inc., all reasonable endeavors will be used to ensure the accuracy of translation. Johnson Controls, Inc. shall not be liable for any translation errors contained herein or for incidental or consequential damages in connection with the furnishing or use of this translated material.
Due to continuous development of our products, the information in this document is subject to change without notice. Johnson Controls, Inc. shall not be liable for errors contained herein or for incidental or consequential damages in connection with furnishing or use of this material. Contents of this publication may be preliminary and/or may be changed at any time without any obligation to notify anyone of such revision or change, and shall not be regarded as a warranty.
Other Manufacturers’ Documentation
Johnson Controls does not duplicate documentation of other equipment manufacturers. When necessary, Johnson Controls provides documentation that supplements that of other manufacturers. When unpacking your equipment, keep all original manufacturer documentation for reference.
Technical Support
For factory technical support, Johnson Controls authorized field technicians or authorized dealer representatives can contact Global Security Solutions Technical Support by phone at (866) 893-0423 or (414) 524-1214, or by email at [email protected]. They can also call the Field Support Center at (800) 524-1330 or (414) 524-5000 and use options 6, 1, 7.
End users and customers should contact their local Johnson Controls branch or authorized dealer for any of their support needs (technical support, maintenance contracts, on-site field support, P2000 Software Service Agreements, Service Partnerships, and so on). Visit http://www.johnsoncontrols.com/location-finder to find your local Johnson Controls office.
For material returns contact the branch if the material was purchased through a Johnson Controls branch or through the Product Sales Operations Team, if ordered through the Advanced Order Management System (AOMS) and follow the RMA process; or contact the authorized dealer representative where the material was purchased directly.
Acknowledgments
Metasys® and Johnson Controls® are trademarks of Johnson Controls, Inc. All other company and product names are trademarks or registered trademarks of their respective owners.
P2000 Alarm Manager Table of Contents24-10786-1 Rev. A
TABLE OF CONTENTS
Chapter 1: Introduction
About the P2000 Alarm Manager 1-1
Audience 1-1
Important Terms 1-1
Guide Summary 1-3
Chapter 2: Using the P2000 Alarm Manager
The Alarm Manager Interface 2-1
Working with Alarms 2-4
Chapter 3: Configuring the P2000 Alarm Manager
Configuring Alarm Display Options 3-1
The Time Zone Setting 3-2
Appendix A: Understanding the P2000 Alarm Manager
About P2000 Alarms A-1
Alarm Life Cycle A-1
Alarm Life Cycle Scenario A-4
Alarm Types A-4
i

P2000 Alarm Manager Table of Contents24-10786-1 Rev. A
ii

P2000 Alarm Manager Introduction24-10786-1 Rev. A
1. INTRODUCTION
This guide describes how to configure and control the P2000 Alarm Manager, an application that is part of a P2000 Security Management System (SMS).
This section includes:
• About the P2000 Alarm Manager on page 1-1
• Audience on page 1-1
• Important Terms on page 1-1
• Guide Summary on page 1-3
ABOUT THE P2000 ALARM MANAGER
The P2000 Alarm Manager allows authorized users to monitor and manage P2000 alarm activity in real time.
AUDIENCE
This guide is intended for the following user types:
• P2000 administrators, such as security directors and IT personnel, who configure P2000 alarm manager settings
• P2000 operators, such as guards, who monitor and take action on alarms
IMPORTANT TERMS
This guide uses the following important terms:
• P2000 Security Management System (SMS) – A general term that refers to a combination of the P2000 host, controllers, readers, input/output devices, and other peripherals collectively used to provide access control at a building or facility.
• P2000 Web UI – Web-based software used to access and use P2000 Web UI applications via a web browser.
• Access Control – Security method that controls the traffic of individuals between an unsecured area and a secured area. Access may also be controlled between secured areas. An access control system, such as the P2000 Security Management System (SMS), grants or denies someone access based on his security settings. These settings determine, for
1-1
P2000 Alarm Manager Introduction24-10786-1 Rev. A
example, the facility or area where the occupant has access privileges, the portals (doors) within the protected area that unlock, and the days and times (that is, the schedule) during which the occupant can access the area (use the door or portal).
• Access Point – A point of entry (door, gate, barrier, turnstile) controlled and monitored by the access control system.
• Alarm – The state of a system that generates a visible or audible warning signal when abnormal conditions exist.
• Badge (or Card) – Objects typically the size of a credit card administered to individuals for the purposes of gaining access to secured areas of a building or facility. Badges are programmed to activate a system reader, typically used at access points, and are assigned to occupants of a facility. Each badge is unique. When an occupant presents a badge to a reader, the reader transmits the card’s information to a controlling device, such as the S321-IP, or centralized computer, such as the P2000 host.
• Cardholder (or Badgeholder) – Person assigned a badge or other credential for the purposes of gaining access to secured areas of a building or facility.
• Controller – Devices, such as the CK721-A and S321-IP network controllers, that interface with a host, such as the P2000 in an integrated application, and peripheral devices, such as readers and input/output devices.
• Credential – Something presented or held by an occupant as proof of identity (for example, badges and Personal Identification Numbers [PINs]).
• Inputs – Signals received by the controller from a peripheral device, such as a sensor. A security controller contains input points for receiving signals from input devices. Inputs are typically 2- or 4-state sensors that identify the state of a component to the device.
• Outputs – Used to trigger external devices. These devices might include warning indicators for alarm situations or non-alarm related functions, such as lighting or environmental control.
• Reader – An access point device at which cardholders present access badges. The reader receives the badge’s information and transmits the data to a controlling device (controller or host computer, depending on the system configuration). Some readers may also have an alphanumeric keypad for cardholders to enter a PIN as a requirement for access.
1-2
P2000 Alarm Manager Introduction24-10786-1 Rev. A
GUIDE SUMMARY
This guide covers the following information:
• Chapter 1: Introduction defines the key terms and conventions used here and provides an introduction to the P2000 Alarm Manager.
• Chapter 2: Using the P2000 Alarm Manager contains step-by-step instructions on configuring the P2000 Alarm Manager settings.
• Chapter 3: Configuring the P2000 Alarm Manager provides information and step-by-step instructions on using the P2000 Alarm Manager features and functions.
• Appendix A: Understanding the P2000 Alarm Manager provides additional information for understanding P2000 alarms.
1-3

P2000 Alarm Manager Introduction24-10786-1 Rev. A
1-4
P2000 Alarm Manager Using the P2000 Alarm Manager24-10786-1 Rev. A
2. USING THE P2000 ALARM MANAGER
This section describes the P2000 Alarm Manager interface and tells you how to perform various actions on alarms.
This section includes:
• The Alarm Manager Interface on page 2-1
• Working with Alarms on page 2-4
THE ALARM MANAGER INTERFACE
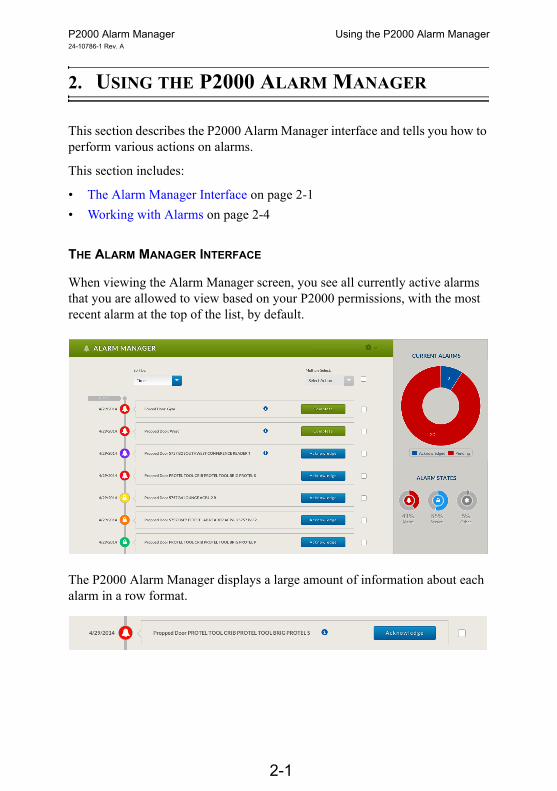
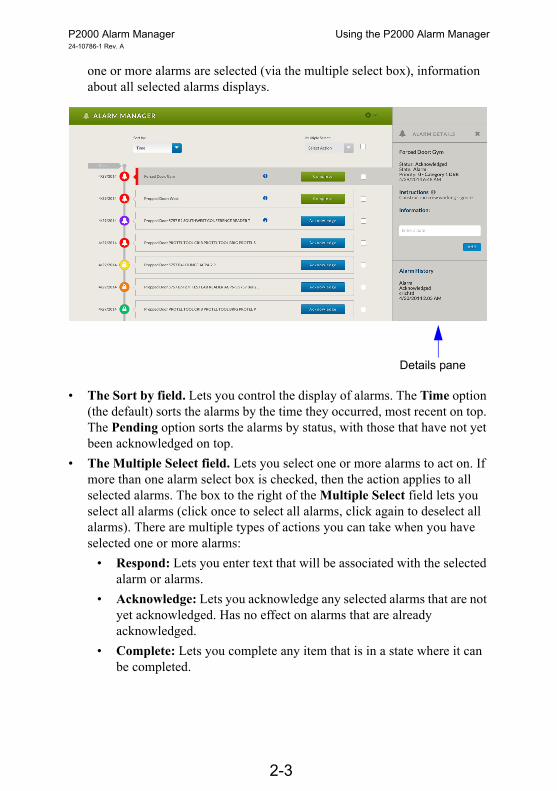
When viewing the Alarm Manager screen, you see all currently active alarms that you are allowed to view based on your P2000 permissions, with the most recent alarm at the top of the list, by default.
The P2000 Alarm Manager displays a large amount of information about each alarm in a row format.
2-1
P2000 Alarm Manager Using the P2000 Alarm Manager24-10786-1 Rev. A
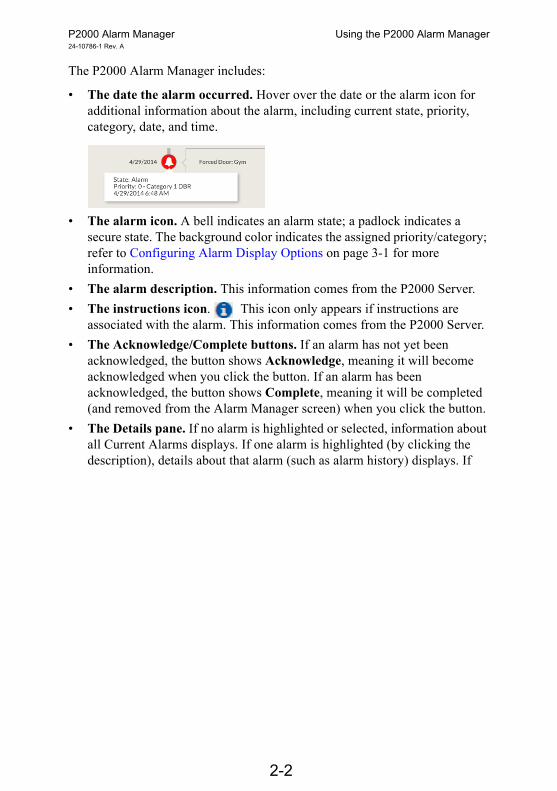
The P2000 Alarm Manager includes:
• The date the alarm occurred. Hover over the date or the alarm icon for additional information about the alarm, including current state, priority, category, date, and time.
• The alarm icon. A bell indicates an alarm state; a padlock indicates a secure state. The background color indicates the assigned priority/category; refer to Configuring Alarm Display Options on page 3-1 for more information.
• The alarm description. This information comes from the P2000 Server.
• The instructions icon. This icon only appears if instructions are associated with the alarm. This information comes from the P2000 Server.
• The Acknowledge/Complete buttons. If an alarm has not yet been acknowledged, the button shows Acknowledge, meaning it will become acknowledged when you click the button. If an alarm has been acknowledged, the button shows Complete, meaning it will be completed (and removed from the Alarm Manager screen) when you click the button.
• The Details pane. If no alarm is highlighted or selected, information about all Current Alarms displays. If one alarm is highlighted (by clicking the description), details about that alarm (such as alarm history) displays. If
2-2
P2000 Alarm Manager Using the P2000 Alarm Manager24-10786-1 Rev. A
one or more alarms are selected (via the multiple select box), information about all selected alarms displays.
• The Sort by field. Lets you control the display of alarms. The Time option (the default) sorts the alarms by the time they occurred, most recent on top. The Pending option sorts the alarms by status, with those that have not yet been acknowledged on top.
• The Multiple Select field. Lets you select one or more alarms to act on. If more than one alarm select box is checked, then the action applies to all selected alarms. The box to the right of the Multiple Select field lets you select all alarms (click once to select all alarms, click again to deselect all alarms). There are multiple types of actions you can take when you have selected one or more alarms:
• Respond: Lets you enter text that will be associated with the selected alarm or alarms.
• Acknowledge: Lets you acknowledge any selected alarms that are not yet acknowledged. Has no effect on alarms that are already acknowledged.
• Complete: Lets you complete any item that is in a state where it can be completed.
Details pane
2-3
P2000 Alarm Manager Using the P2000 Alarm Manager24-10786-1 Rev. A
WORKING WITH ALARMS
The P2000 Alarm Manager interface was designed to be easy to use:
• To acknowledge an alarm, then click the Acknowledge button.
• To acknowledge more than one alarm, put a check mark in the multiple select box for each alarm you want to acknowledge, then pull down the Select Action menu and select Acknowledge.
• To complete an alarm, then click the Complete button.
NOTE: Completing an alarm removes it from the Alarm Manager screen.
• To complete more than one alarm, put a check mark in the multiple select box for each alarm you want to complete, then pull down the Select Action menu and select Complete.
• To see the state, priority, category, time, and date of an alarm, hover over the alarm’s icon.
• To see instructions for an alarm, for those that have them, hover over the blue i icon.
• To add a history entry to an alarm, select it, enter it in the text box, then click Add.
• To add information to more than one alarm, select the desired alarms using the multiple select box, pull down the Select Action menu, select Respond, enter the history entry in the text box, then click OK.
2-4
P2000 Alarm Manager Configuring the P2000 Alarm Manager24-10786-1 Rev. A
3. CONFIGURING THE P2000 ALARM MANAGER
This section describes how to configure alarm display options and how to set the desired time zone.
This section includes:
• Configuring Alarm Display Options on page 3-1
• The Time Zone Setting on page 3-2
CONFIGURING ALARM DISPLAY OPTIONS
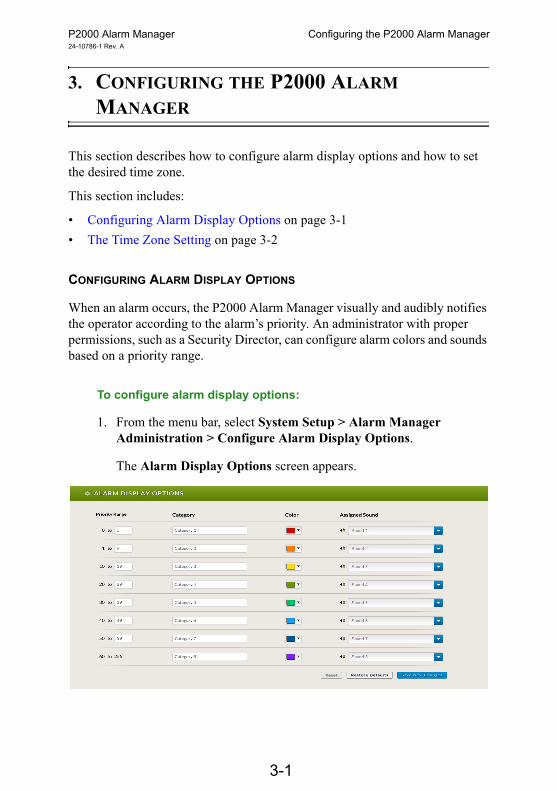
When an alarm occurs, the P2000 Alarm Manager visually and audibly notifies the operator according to the alarm’s priority. An administrator with proper permissions, such as a Security Director, can configure alarm colors and sounds based on a priority range.
To configure alarm display options:
1. From the menu bar, select System Setup > Alarm Manager Administration > Configure Alarm Display Options.
The Alarm Display Options screen appears.
3-1
P2000 Alarm Manager Configuring the P2000 Alarm Manager24-10786-1 Rev. A
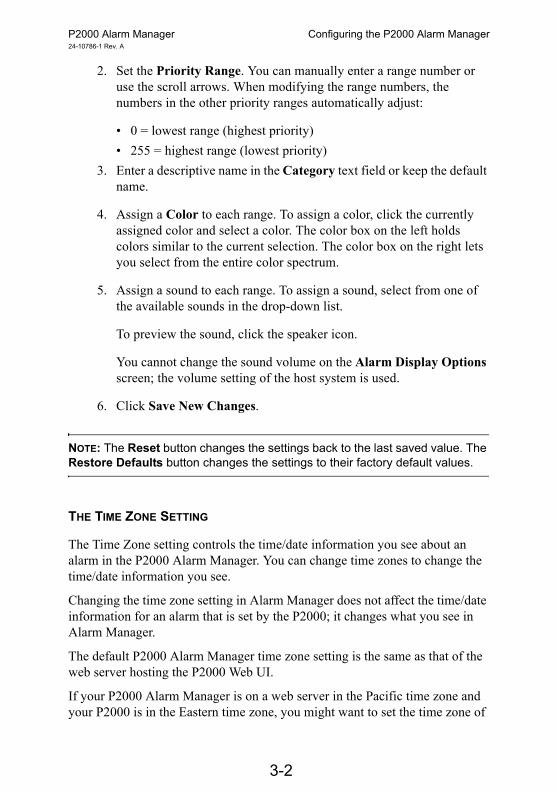
2. Set the Priority Range. You can manually enter a range number or use the scroll arrows. When modifying the range numbers, the numbers in the other priority ranges automatically adjust:
• 0 = lowest range (highest priority)
• 255 = highest range (lowest priority)
3. Enter a descriptive name in the Category text field or keep the default name.
4. Assign a Color to each range. To assign a color, click the currently assigned color and select a color. The color box on the left holds colors similar to the current selection. The color box on the right lets you select from the entire color spectrum.
5. Assign a sound to each range. To assign a sound, select from one of the available sounds in the drop-down list.
To preview the sound, click the speaker icon.
You cannot change the sound volume on the Alarm Display Options screen; the volume setting of the host system is used.
6. Click Save New Changes.
NOTE: The Reset button changes the settings back to the last saved value. The Restore Defaults button changes the settings to their factory default values.
THE TIME ZONE SETTING
The Time Zone setting controls the time/date information you see about an alarm in the P2000 Alarm Manager. You can change time zones to change the time/date information you see.
Changing the time zone setting in Alarm Manager does not affect the time/date information for an alarm that is set by the P2000; it changes what you see in Alarm Manager.
The default P2000 Alarm Manager time zone setting is the same as that of the web server hosting the P2000 Web UI.
If your P2000 Alarm Manager is on a web server in the Pacific time zone and your P2000 is in the Eastern time zone, you might want to set the time zone of
3-2
P2000 Alarm Manager Configuring the P2000 Alarm Manager24-10786-1 Rev. A
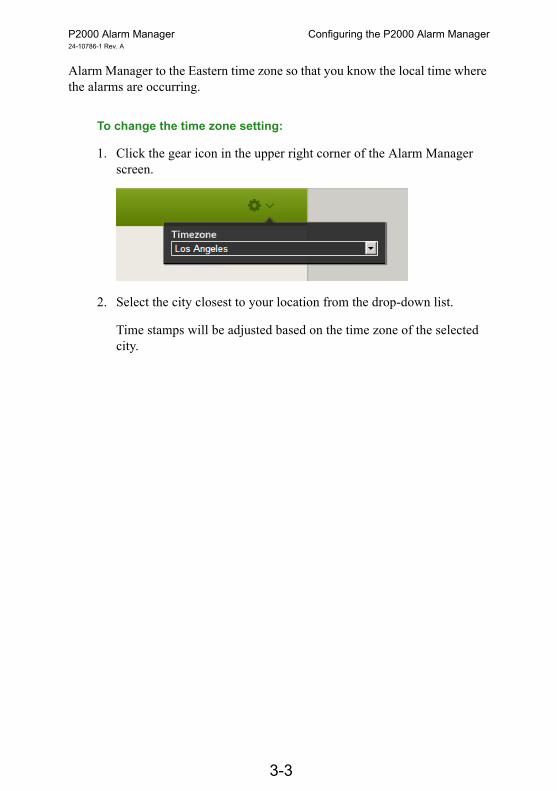
Alarm Manager to the Eastern time zone so that you know the local time where the alarms are occurring.
To change the time zone setting:
1. Click the gear icon in the upper right corner of the Alarm Manager screen.
2. Select the city closest to your location from the drop-down list.
Time stamps will be adjusted based on the time zone of the selected city.
3-3

P2000 Alarm Manager Configuring the P2000 Alarm Manager24-10786-1 Rev. A
3-4
P2000 Alarm Manager Understanding the P2000 Alarm Manager24-10786-1 Rev. A
A. UNDERSTANDING THE P2000 ALARM MANAGER
This section provides additional information for understanding P2000 alarms.
This section includes:
• About P2000 Alarms on page A-1
• Alarm Life Cycle on page A-1
• Alarm Life Cycle Scenario on page A-4
• Alarm Types on page A-4
ABOUT P2000 ALARMS
P2000 alarms inform P2000 operators and administrators of security issues reported by the P2000 Security Management System (SMS), such as a possible security breach (door forced alarm), a hardware failure (panel down), and many other alarm possibilities tracked by the P2000 SMS.
P2000 operators can view the alarms in real time on the Alarm Manager page and act accordingly. The operator can investigate the alarm and initiate actions, such as acknowledging it, and enter a response tracked by the P2000 Alarm Manager.
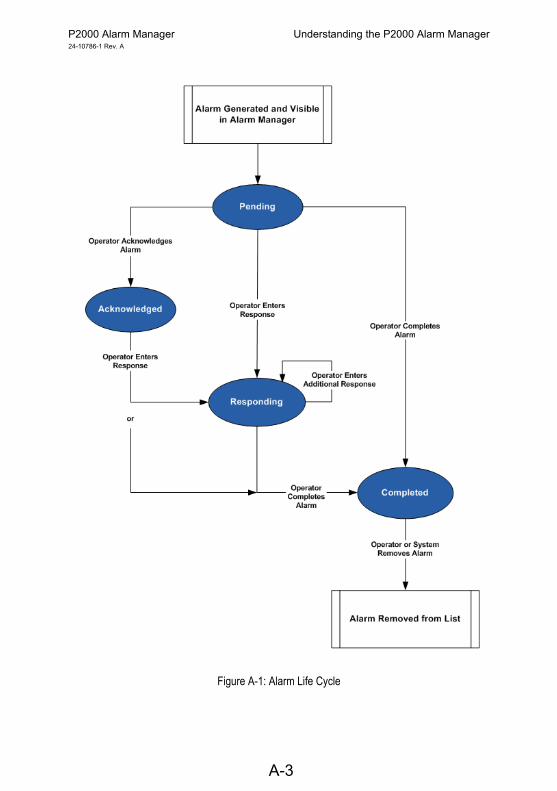
ALARM LIFE CYCLE
Alarms display in P2000 Alarm Manager as they occur (in real time). The life cycle of each alarm can vary, and operators may have differing permission levels to perform certain actions, but the path an alarm takes follows this general sequence:
• Alarm Generation and Visibility – With proper permissions, as defined in P2000, Security Operators can view alarms in the Alarm Manager and immediately identify the source of the alarm and the date and time the incident occurred.
• Alarm Acknowledgement and Investigation – Security Operators can acknowledge an alarm so that they can investigate the cause and later respond to the alarm.
• Alarm Response – Security Operators can record one or more responses describing how they have responded to the alarm. Operators can enter free
A-1

P2000 Alarm Manager Understanding the P2000 Alarm Manager24-10786-1 Rev. A
text or enter text and then select from a list that matches the text they have entered.
• Alarm Removal – Security Operators can manually remove an alarm under certain conditions, so that they are not distracted by completed alarms in the alarm queue. In addition, the P2000 Alarm Manager automatically removes alarms with a status of Completed whenever the Alarm Manager page is refreshed.
To perform some alarm actions, note the following conditions:
• Acknowledgement may be required for the alarm, as defined in P2000.
• A response may be required for the alarm, as defined in P2000.
• To complete an alarm, it must be in a completion state (for example, Secure, N/A, or an alarm from a remote site).
• You must have proper permissions configured in P2000 to perform a particular action on an alarm.
A-2
P2000 Alarm Manager Understanding the P2000 Alarm Manager24-10786-1 Rev. A
Figure A-1: Alarm Life Cycle
A-3
P2000 Alarm Manager Understanding the P2000 Alarm Manager24-10786-1 Rev. A
ALARM LIFE CYCLE SCENARIO
The following scenario illustrates the alarm life cycle using a possible real-world event.
Table A-1: Alarm Life Cycle Scenario
ALARM TYPES
A P2000 alarm can be one of many types, as described in this section. Although the P2000 Alarm Manager does not specify the alarm type when displaying alarm information, understanding these types of alarms can be helpful.
P2000 alarm types consist of the following:
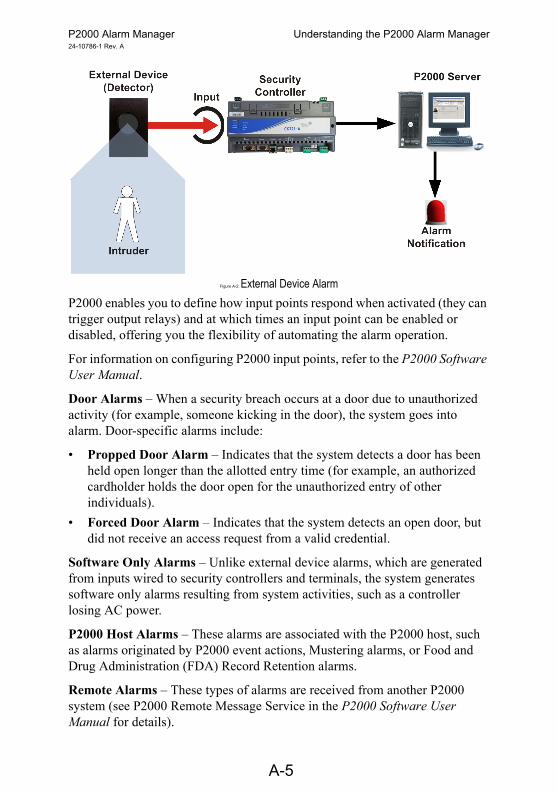
External Device Alarms – External devices, such as motion or glass break sensors, can be wired to P2000 input points. When the devices go into an alarm state (for example, when a motion sensor detects movement), they trigger the input point in the security controller, which produces an alarm in the P2000 system. See Figure A-2.
Time Stamp Action Result
8/12/2012 10:50:33 PM
Security breach occurs (door propped open)
P2000 system generates propped door alarm (Status: Pending)
8/12/2012 10:51:23 PM
Guard sees alarm in P2000 Alarm Manager and acknowledges it.
Alarm status changes from Pending to Acknowledged.
8/12/2012 10:52:12 PM
Guard begins his investigation. He identifies intruder and detains him until the police arrive.
8/12/2012 11:30:43 PM
Police remove intruder and guard enters response in the P2000 Alarm Manager that explains his actions, when the police arrived, and so on.
P2000 system records response for tracking purposes in the alarm history.
Alarm status changes from Acknowledged to Responding.
8/12/2012 11:44:26 PM
Guard closes propped-open door. The door is no longer in an alarm state (Secure).
8/12/2012 11:51:43 PM
Guard completes alarm in the P2000 Alarm Manager.
Alarm removed from list.
A-4
P2000 Alarm Manager Understanding the P2000 Alarm Manager24-10786-1 Rev. A
Figure A-2: External Device Alarm
P2000 enables you to define how input points respond when activated (they can trigger output relays) and at which times an input point can be enabled or disabled, offering you the flexibility of automating the alarm operation.
For information on configuring P2000 input points, refer to the P2000 Software User Manual.
Door Alarms – When a security breach occurs at a door due to unauthorized activity (for example, someone kicking in the door), the system goes into alarm. Door-specific alarms include:
• Propped Door Alarm – Indicates that the system detects a door has been held open longer than the allotted entry time (for example, an authorized cardholder holds the door open for the unauthorized entry of other individuals).
• Forced Door Alarm – Indicates that the system detects an open door, but did not receive an access request from a valid credential.
Software Only Alarms – Unlike external device alarms, which are generated from inputs wired to security controllers and terminals, the system generates software only alarms resulting from system activities, such as a controller losing AC power.
P2000 Host Alarms – These alarms are associated with the P2000 host, such as alarms originated by P2000 event actions, Mustering alarms, or Food and Drug Administration (FDA) Record Retention alarms.
Remote Alarms – These types of alarms are received from another P2000 system (see P2000 Remote Message Service in the P2000 Software User Manual for details).
A-5

P2000 Alarm Manager Understanding the P2000 Alarm Manager24-10786-1 Rev. A
A-6
P2000 Alarm Manager Index24-10786-1 Rev. A
INDEX
A
About
access control 1-1access points 1-2alarms 1-2badges (cards) 1-2cardholders (badgeholders) 1-2controllers 1-2credentials 1-2inputs 1-2outputs 1-2P2000 alarms A-1readers 1-2Security Management System
(SMS) 1-1the P2000 Alarm Manager 1-1
Access Control
defined 1-1
Access Points
defined 1-2
Access Privileges 1-2
acknowledge alarm 2-4
Acknowledge button 2-2
add information to an alarm 2-4
alarm
acknowledg 2-4complete 2-4date 2-2description 2-2icon 2-2information 2-4instructions 2-4
Ind
Alarm Display Options 3-1
Alarm Life Cycle A-1
scenario A-4
Alarm Types A-4
Alarms
about P2000 A-1defined 1-2
Audience Types 1-1
B
Badgeholders
defined 1-2
Badges
defined 1-2
C
Cardholders
defined 1-2
Cards
defined 1-2
Changing
alarm colors 3-1alarm sounds 3-1
Colors
changing alarm 3-1
complete alarm 2-4
Complete button 2-2
Conceptual Information A-1
ex-1
P2000 Alarm Manager Index24-10786-1 Rev. A
Configuring
alarm display options 3-1P2000 Alarm Manager 3-1
Controllers
defined 1-2
Credentials
defined 1-2
D
Details pane 2-2
Door Alarms A-5
E
External Device Alarms A-4
F
Forced Door Alarm A-5
G
Glossary 1-1
I
Important Terms 1-1
information 2-4
Inputs
defined 1-2
instructions 2-4
instructions icon 2-2
Introduction 1-1
L
Life Cycle (Alarms) A-1
Ind
scenario A-4
M
Multiple Select field 2-3
O
Outputs
defined 1-2
P
P2000 Alarm Manager
about 1-1configuring 3-1understanding A-1using 2-1
P2000 Alarms
about A-1
P2000 Host Alarms A-5
Propped Door Alarm A-5
R
Readers
defined 1-2
Remote Alarms A-5
S
Secured Area 1-1
Security Management System (SMS)
defined 1-1
Sequence of Alarm Actions A-1
scenario A-4
Software Only Alarms A-5
Sort by field 2-3
ex-2
P2000 Alarm Manager Index24-10786-1 Rev. A
Sounds
changing alarm 3-1
T
Terms Defined 1-1
Types of Alarms A-4
U
Understanding
P2000 Alarm Manager A-1
Unsecured Area 1-1
Using
P2000 Alarm Manager 2-1
Ind
ex-3
P2000 Alarm Manager Index24-10786-1 Rev. A
Ind
ex-4
We welcome your comments at [email protected].
Security Solutions(805) 522-5555
www.johnsoncontrols.com