OTM 6.3.x New Features and - otmsig.com · Setting OTM glog.properties via UI This feature is one...
20
Transcript of OTM 6.3.x New Features and - otmsig.com · Setting OTM glog.properties via UI This feature is one...


OTM 6.3.x New Features and
Functionality
Dilip Mirajkar August 11, 2015
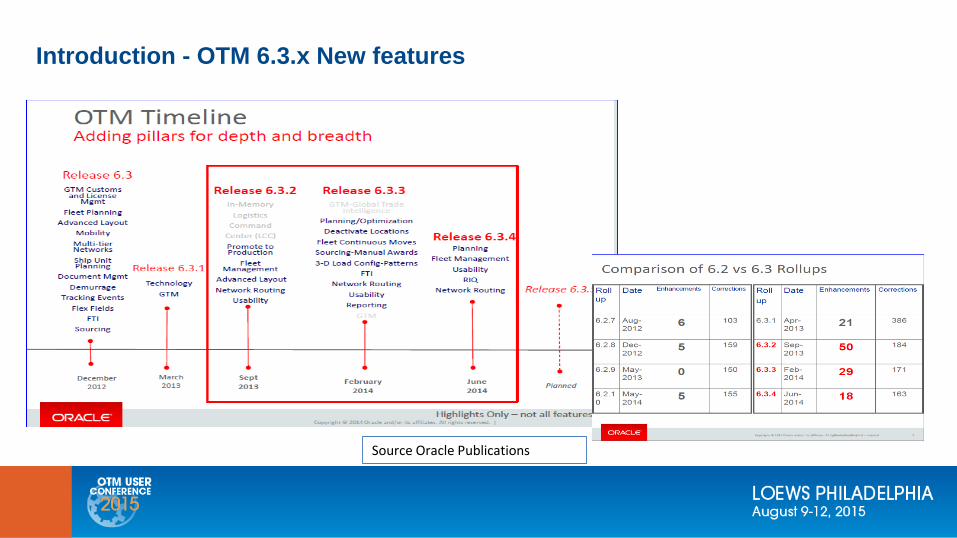
Introduction - OTM 6.3.x New features
Source Oracle Publications

Introduction - OTM 6.3.x New features
New features to be reviewed :
1. OTM Configuration/Data Migration
2. Setting glog.properties via UI
3. BI Publisher Reports – Creating parameters without PL/SQL code
4. UI - Advanced Layouts, Rapid Order Entry screen, RIQ
5. Network Routing
6. Sourcing
7. Multiple browser support - safari, chrome , Mobile screens for Tender and Shipment search
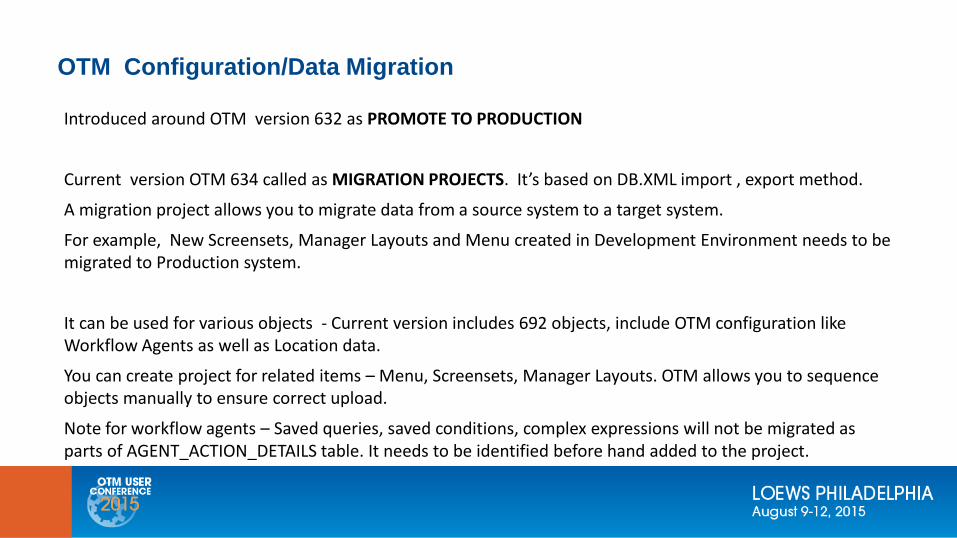
OTM Configuration/Data Migration
Introduced around OTM version 632 as PROMOTE TO PRODUCTION
Current version OTM 634 called as MIGRATION PROJECTS. It’s based on DB.XML import , export method.
A migration project allows you to migrate data from a source system to a target system.
For example, New Screensets, Manager Layouts and Menu created in Development Environment needs to be migrated to Production system.
It can be used for various objects - Current version includes 692 objects, include OTM configuration like Workflow Agents as well as Location data.
You can create project for related items – Menu, Screensets, Manager Layouts. OTM allows you to sequence objects manually to ensure correct upload.
Note for workflow agents – Saved queries, saved conditions, complex expressions will not be migrated as parts of AGENT_ACTION_DETAILS table. It needs to be identified before hand added to the project.
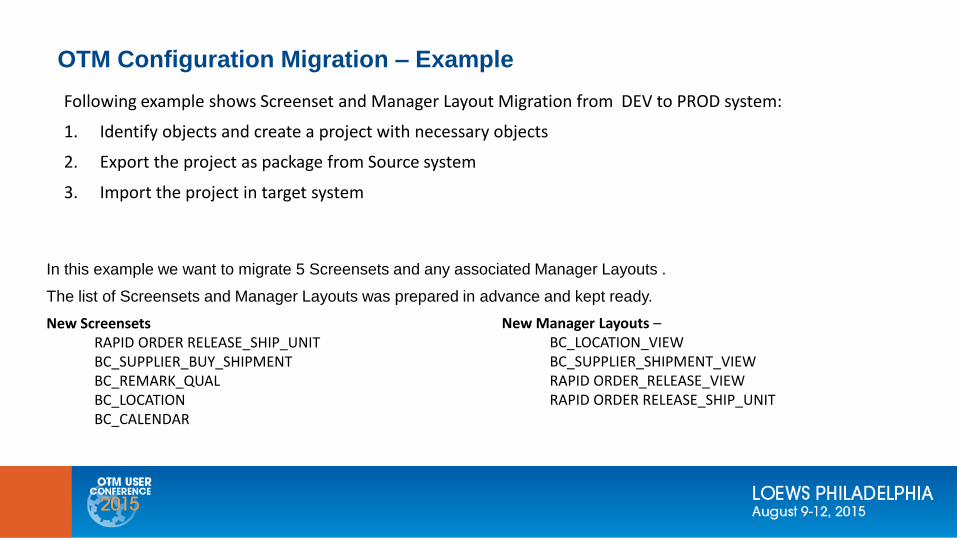
OTM Configuration Migration – Example
Following example shows Screenset and Manager Layout Migration from DEV to PROD system:
1. Identify objects and create a project with necessary objects
2. Export the project as package from Source system
3. Import the project in target system
In this example we want to migrate 5 Screensets and any associated Manager Layouts .
The list of Screensets and Manager Layouts was prepared in advance and kept ready.
New ScreensetsRAPID ORDER RELEASE_SHIP_UNITBC_SUPPLIER_BUY_SHIPMENTBC_REMARK_QUALBC_LOCATIONBC_CALENDAR
New Manager Layouts –BC_LOCATION_VIEWBC_SUPPLIER_SHIPMENT_VIEWRAPID ORDER_RELEASE_VIEWRAPID ORDER RELEASE_SHIP_UNIT
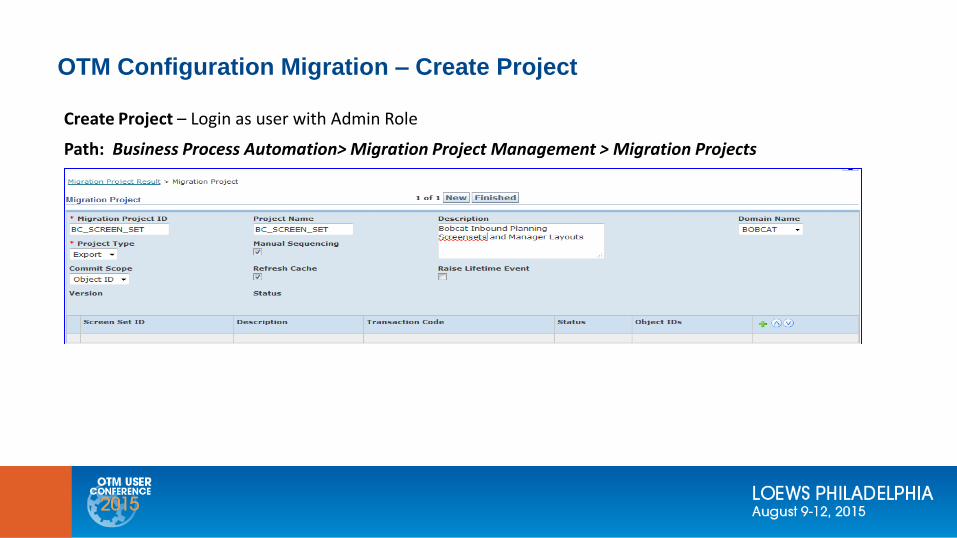
OTM Configuration Migration – Create Project
Create Project – Login as user with Admin Role
Path: Business Process Automation> Migration Project Management > Migration Projects

OTM Configuration Migration – Create Project
Create Project – Object group for Manager Layout
Note - You will need to save the record first and then edit it again as it appears to be a bug.
Note - Screenset ID label is used for all objects
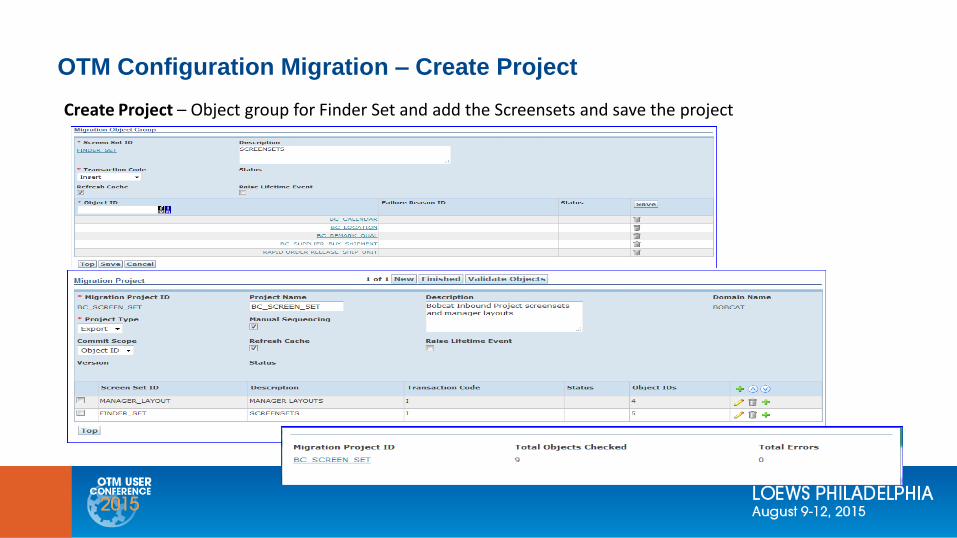
OTM Configuration Migration – Create Project
Create Project – Object group for Finder Set and add the Screensets and save the project
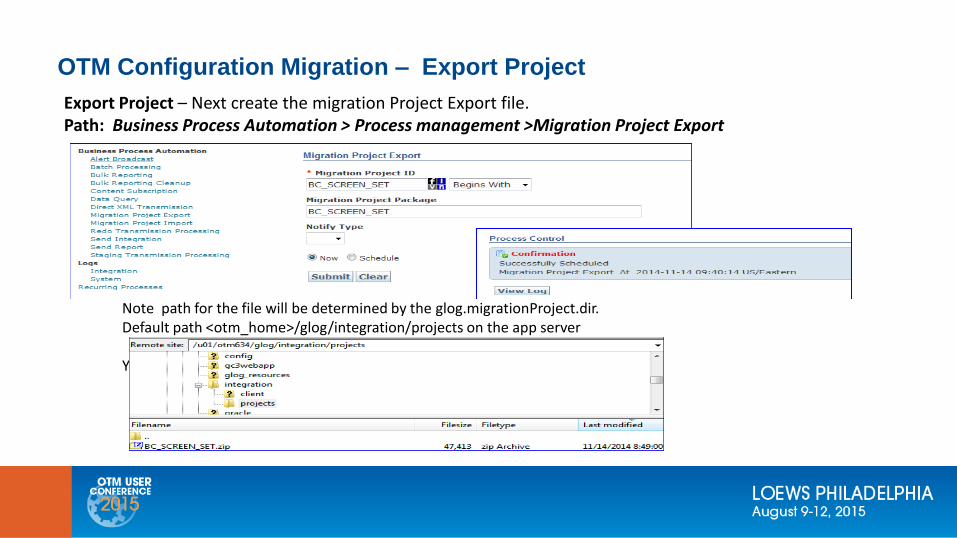
OTM Configuration Migration – Export Project
Export Project – Next create the migration Project Export file.Path: Business Process Automation > Process management >Migration Project Export
Note path for the file will be determined by the glog.migrationProject.dir.Default path <otm_home>/glog/integration/projects on the app server
You can send file by email or FTP to the other system OTM external system.
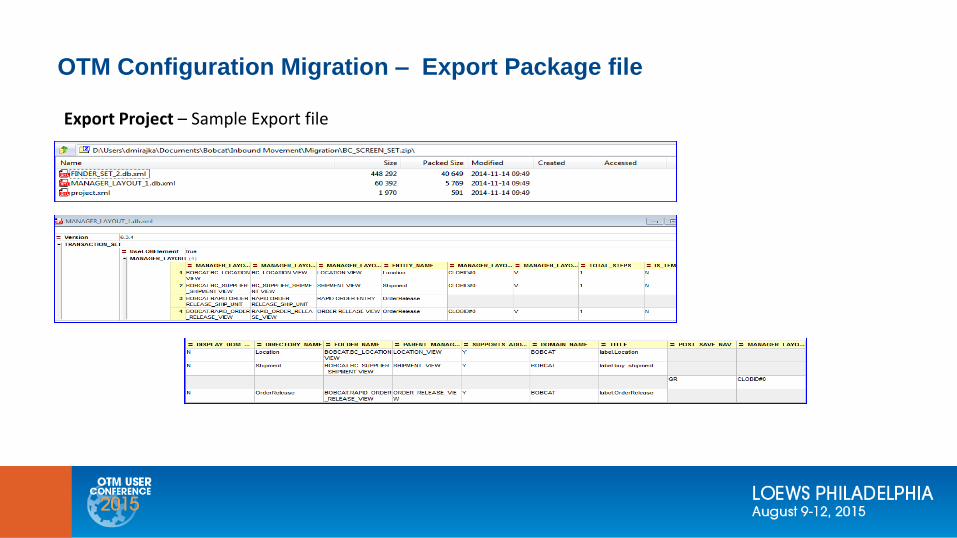
OTM Configuration Migration – Export Package file
Export Project – Sample Export file

OTM Configuration Migration – Import Package file
Import Project – Import the project packagePath: Business Process Automation > Process management >Migration Project Export
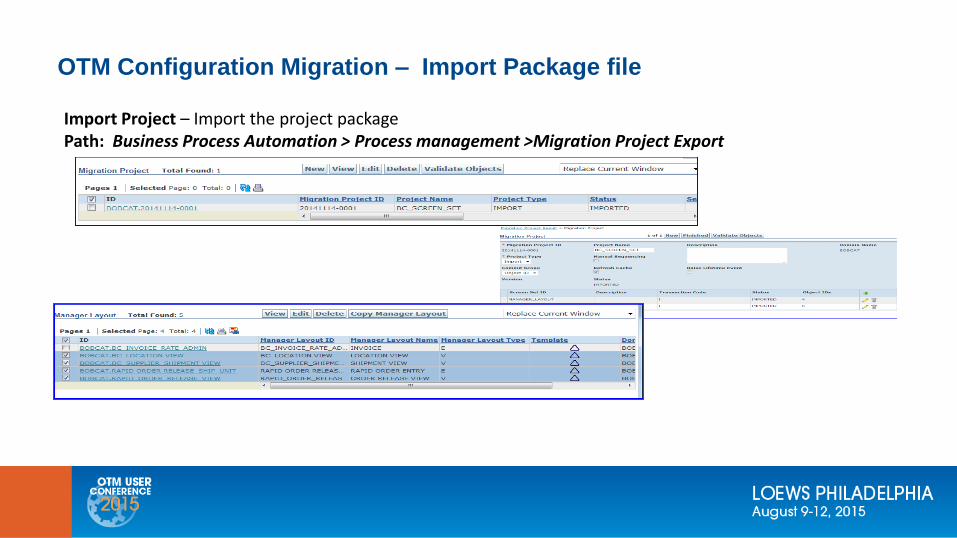
OTM Configuration Migration – Import Package file
Import Project – Import the project packagePath: Business Process Automation > Process management >Migration Project Export
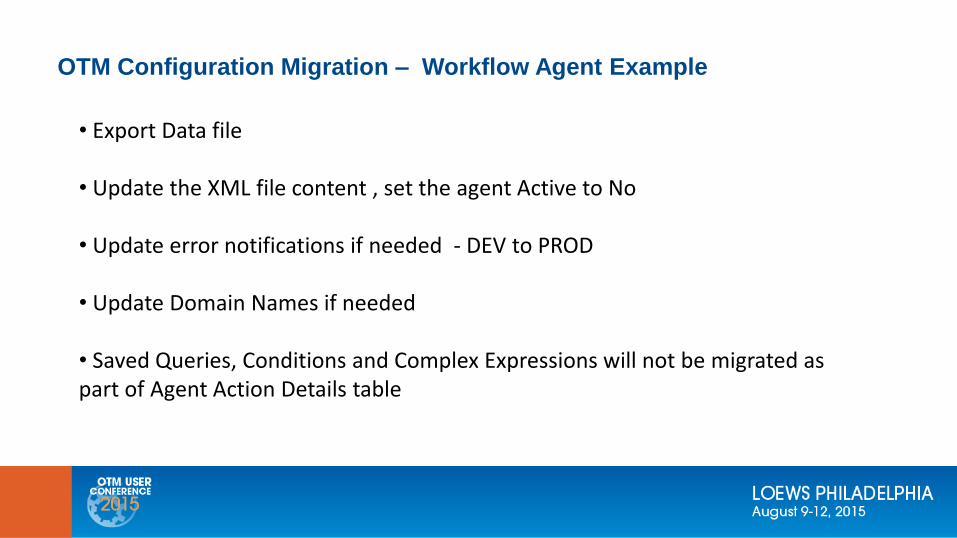
OTM Configuration Migration – Workflow Agent Example
• Export Data file
• Update the XML file content , set the agent Active to No
• Update error notifications if needed - DEV to PROD
• Update Domain Names if needed
• Saved Queries, Conditions and Complex Expressions will not be migrated as part of Agent Action Details table
Setting OTM glog.properties via UI
This feature is one step towards getting Cloud ready!
It allows to set most of the custom properties using OTM UI.
Earlier we could set the temporary properties using servlets but it’s lost after system restart
Most properties used by OTM can be customized using Property Sets, instead of property files.
A property set is a collection of property instructions residing in the database rather than in a file.
Property sets can be modified via the Property Set Manager.
By default, this is available only to the DBA.ADMIN user via Configuration and Administration >
Property Management > Property Sets.
Setting OTM glog.properties via UI
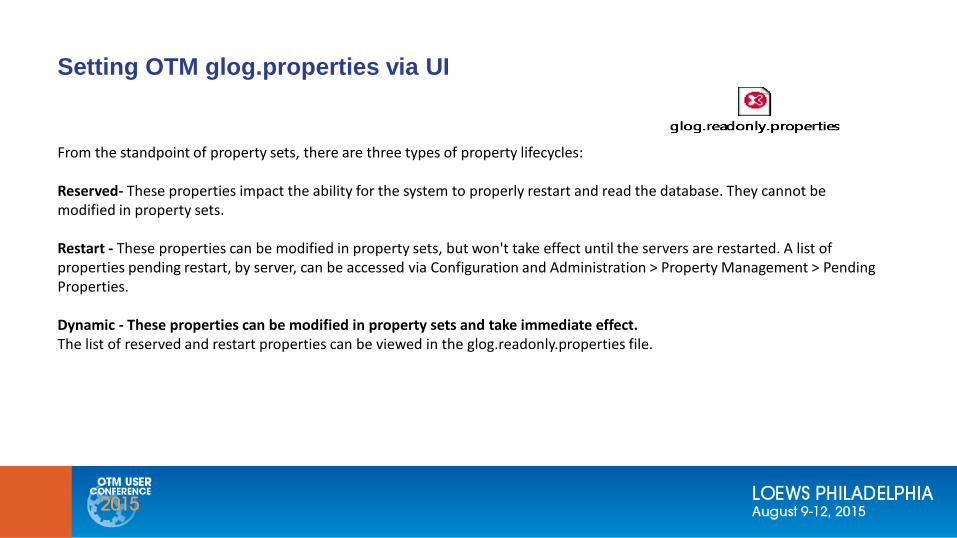
From the standpoint of property sets, there are three types of property lifecycles:
Reserved- These properties impact the ability for the system to properly restart and read the database. They cannot be modified in property sets.
Restart - These properties can be modified in property sets, but won't take effect until the servers are restarted. A list of properties pending restart, by server, can be accessed via Configuration and Administration > Property Management > Pending Properties.
Dynamic - These properties can be modified in property sets and take immediate effect. The list of reserved and restart properties can be viewed in the glog.readonly.properties file.
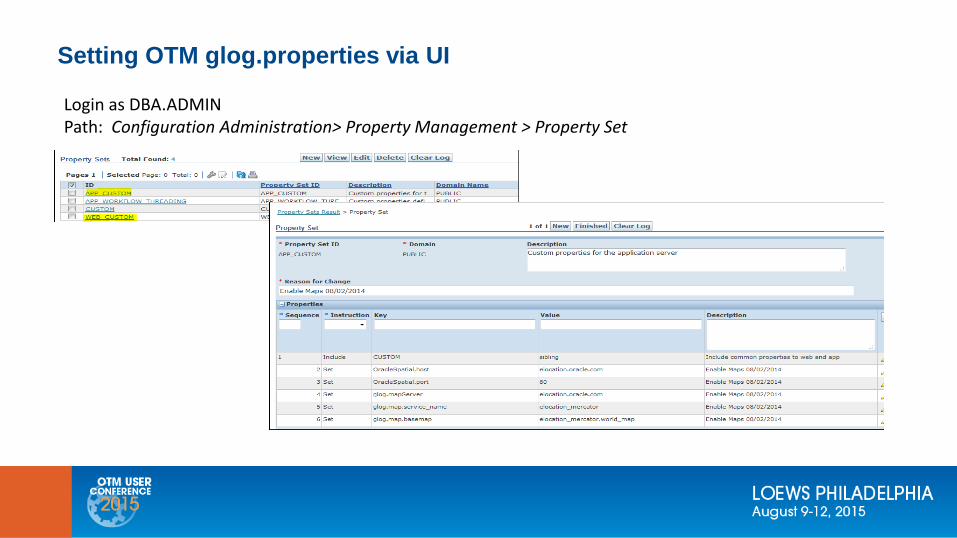
Setting OTM glog.properties via UI
Login as DBA.ADMINPath: Configuration Administration> Property Management > Property Set
OTM Reports without PL/SQL
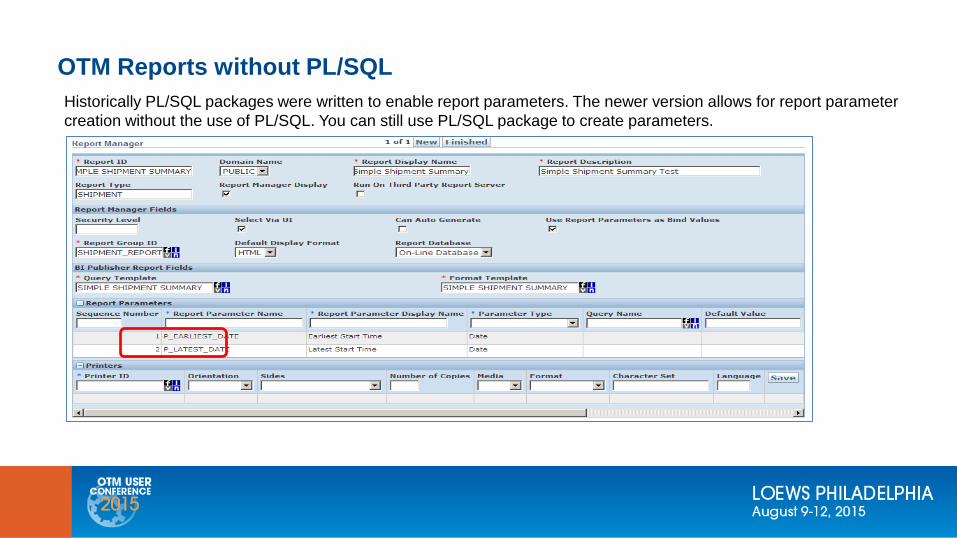
Historically PL/SQL packages were written to enable report parameters. The newer version allows for report parameter
creation without the use of PL/SQL. You can still use PL/SQL package to create parameters.
OTM Reports without PL/SQL
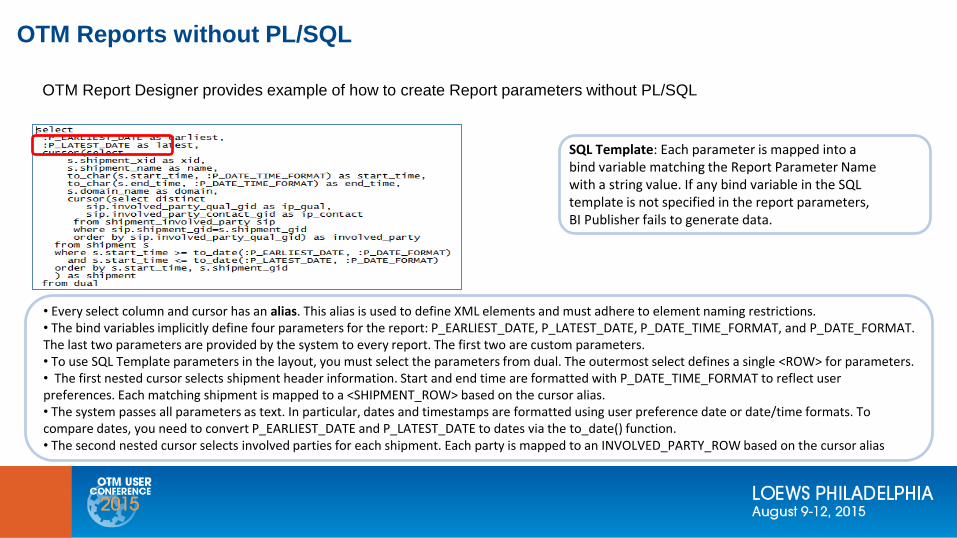
OTM Report Designer provides example of how to create Report parameters without PL/SQL
SQL Template: Each parameter is mapped into a bind variable matching the Report Parameter Name with a string value. If any bind variable in the SQL template is not specified in the report parameters, BI Publisher fails to generate data.
• Every select column and cursor has an alias. This alias is used to define XML elements and must adhere to element naming restrictions.• The bind variables implicitly define four parameters for the report: P_EARLIEST_DATE, P_LATEST_DATE, P_DATE_TIME_FORMAT, and P_DATE_FORMAT. The last two parameters are provided by the system to every report. The first two are custom parameters.• To use SQL Template parameters in the layout, you must select the parameters from dual. The outermost select defines a single <ROW> for parameters.• The first nested cursor selects shipment header information. Start and end time are formatted with P_DATE_TIME_FORMAT to reflect user preferences. Each matching shipment is mapped to a <SHIPMENT_ROW> based on the cursor alias.• The system passes all parameters as text. In particular, dates and timestamps are formatted using user preference date or date/time formats. To compare dates, you need to convert P_EARLIEST_DATE and P_LATEST_DATE to dates via the to_date() function.• The second nested cursor selects involved parties for each shipment. Each party is mapped to an INVOLVED_PARTY_ROW based on the cursor alias
OTM 6.3.x New Features and Functionality
20
Questions?