Open Terminal Management (OTM) VIP7800 Terminal...
89
Bull DPX/20 Open Terminal Management (OTM) VIP7800 Terminal Emulation User’s Guide AIX 86 A2 34PE 04 ORDER REFERENCE
Transcript of Open Terminal Management (OTM) VIP7800 Terminal...
Bull DPX/20Open Terminal Management (OTM)
VIP7800 Terminal Emulation User’s Guide
AIX
86 A2 34PE 04
ORDER REFERENCE

Bull DPX/20Open Terminal Management (OTM)
VIP7800 Terminal Emulation User’s Guide
AIX
Software
July 1995
BULL S.A. CEDOC
Atelier de Reproduction
FRAN–231
331 Avenue Patton BP 428
49005 ANGERS CEDEX
FRANCE
86 A2 34PE 04
ORDER REFERENCE

The following copyright notice protects this book under the Copyright laws of the United States and other
countries which prohibit such actions as, but not limited to, copying, distributing, modifying, and making
derivative works.
Copyright Bull S.A. 1992, 1995
Printed in France
Suggestions and criticisms concerning the form, content, and presentation of
this book are invited. A form is provided at the end of this book for this purpose.
Trademarks and Acknowledgements
We acknowledge the right of proprietors of trademarks mentioned in this book.
AIX� is a registered trademark of International Business Machines Corporation, and is being used under
licence.
UNIX is a registered trademark in the USA and other countries licensed exclusively through X/Open.
The information in this document is subject to change without notice. Groupe Bull will not be liable for errors
contained herein, or for incidental or consequential damages in connection with the use of this material.
Preface iii
About this Book
This guide contains the information for configuring, administering and using VIP7800Terminal Emulation running under the Open Terminal Manager (OTM) product.
This book is for the users of the OTM product running with VIP7800 emulation.
The OTM ProductThe OTM product covers the emulations necessary to connect DPX/20, Unix machines toother Bull machines using the different GCOS operating systems as well as to IBMmachines through the Bull/IBM gateway.
This present manual complements the OTM Administrator and User’s Guide by providingdetailed instructions for implementation of the VIP7800 emulation. Additional emulationsand other connections provided through OTM are described in manuals listed below.
The OTM Manual Set1. The OTM Administrator and User’s Guide, ref: 86 A2 31PE.
2. The OTM TWS2107 Terminal Emulation User’s Guide, ref: 86 A2 33PE.
3. The OTM VIP7800 Terminal Emulation User’s Guide, ref: 86 A2 34PE.
4. The various manuals for the Bull Affinity product for connection to PCs, refer to Affinitydocumentation.
5. The CPI–Css for Bull Systems User’s Guide (emulation tailoring for applications), ref: 86A2 32PE.
6. The various Software Release Bulletins (SRB) delivered with each software release.
Software RequirementsOSI Stack layers.
The AIX Version 4.1 of UNIX.
Organization of this BookChapter 1. Introduction
provides VIP7800 emulation concepts and architecture.Chapter 2. Startup and Configuration
describes initialization and configuration of VIP7800.Chapter 3. Using the Terminal Emulator
explains the procedures for using the VIP7800 terminal emulator.Chapter 4. The Script Utility
describes the use of the Script Utility.Appendix A Messages
lists error messages and return codes.Appendix B VIP7800 Commands
provides a summary of the VIP7800 commands.Appendix C Printer Commands
provides a summary of printer commands.Appendix D Keyboards
lists functions and keyboard layout for the different emulations available.
iv OTM – VIP7800 Emulator User’s Guide
ConventionsThe generic term DPX is used throughout this guide, meaning by this DPX/20.
As OTM is available also on Bull DPX/2 systems, whenever the use of the generic termDPX could be misleading or not precise enough, the complete name is used (DPX/20 orDPX/2).
The name Qxxx is used to designate the Bull Questar family of terminals.
Related PublicationsVIP7800 Family Display Terminals User’s Reference Manual
Contents v
Table of Contents
Chapter 1. Introduction 1-1. . . . . . . . . . . . . . . . . . . . . . . . . . . . . . . . . . . . . . . . . . . . . . . . . .
VIP7800 Emulation Summary 1-1. . . . . . . . . . . . . . . . . . . . . . . . . . . . . . . . . . . . . . . . . . . . .
VIP7800 Emulation Overview 1-1. . . . . . . . . . . . . . . . . . . . . . . . . . . . . . . . . . . . . . . . . . . . . .
Additional Functions Offered by the Emulation 1-3. . . . . . . . . . . . . . . . . . . . . . . . . . . . . .
Printer Emulation 1-3. . . . . . . . . . . . . . . . . . . . . . . . . . . . . . . . . . . . . . . . . . . . . . . . . . . . . .
Programmability 1-3. . . . . . . . . . . . . . . . . . . . . . . . . . . . . . . . . . . . . . . . . . . . . . . . . . . . . . .
Script Function 1-3. . . . . . . . . . . . . . . . . . . . . . . . . . . . . . . . . . . . . . . . . . . . . . . . . . . . . . . .
UNIX Cooperation 1-3. . . . . . . . . . . . . . . . . . . . . . . . . . . . . . . . . . . . . . . . . . . . . . . . . . . . .
Soft Keys 1-3. . . . . . . . . . . . . . . . . . . . . . . . . . . . . . . . . . . . . . . . . . . . . . . . . . . . . . . . . . . . .
The VIPEMU Software Modules 1-4. . . . . . . . . . . . . . . . . . . . . . . . . . . . . . . . . . . . . . . . . . .
System Configuration 1-5. . . . . . . . . . . . . . . . . . . . . . . . . . . . . . . . . . . . . . . . . . . . . . . . . . . .
Printer Configuration 1-6. . . . . . . . . . . . . . . . . . . . . . . . . . . . . . . . . . . . . . . . . . . . . . . . . . .
Work Station Configuration 1-6. . . . . . . . . . . . . . . . . . . . . . . . . . . . . . . . . . . . . . . . . . . . .
Chapter 2. Configuration 2–1. . . . . . . . . . . . . . . . . . . . . . . . . . . . . . . . . . . . . . . . . . . . . . . .
Configuration Summary 2–1. . . . . . . . . . . . . . . . . . . . . . . . . . . . . . . . . . . . . . . . . . . . . . . . . . .
Introduction 2–1. . . . . . . . . . . . . . . . . . . . . . . . . . . . . . . . . . . . . . . . . . . . . . . . . . . . . . . . . . . . .
Setup Program Menus 2–1. . . . . . . . . . . . . . . . . . . . . . . . . . . . . . . . . . . . . . . . . . . . . . . . . . . .
Vertical Selection 2–1. . . . . . . . . . . . . . . . . . . . . . . . . . . . . . . . . . . . . . . . . . . . . . . . . . . . . .
Horizontal Selection 2–1. . . . . . . . . . . . . . . . . . . . . . . . . . . . . . . . . . . . . . . . . . . . . . . . . . .
Value Selection 2–2. . . . . . . . . . . . . . . . . . . . . . . . . . . . . . . . . . . . . . . . . . . . . . . . . . . . . . .
Activating the Configuration 2–2. . . . . . . . . . . . . . . . . . . . . . . . . . . . . . . . . . . . . . . . . . . . . . .
Terminal Setup 2–3. . . . . . . . . . . . . . . . . . . . . . . . . . . . . . . . . . . . . . . . . . . . . . . . . . . . . . . . . .
VIP Family Emulation 2–3. . . . . . . . . . . . . . . . . . . . . . . . . . . . . . . . . . . . . . . . . . . . . . . . . .
Communication Mode 2–3. . . . . . . . . . . . . . . . . . . . . . . . . . . . . . . . . . . . . . . . . . . . . . . . . .
Terminator Character 2–3. . . . . . . . . . . . . . . . . . . . . . . . . . . . . . . . . . . . . . . . . . . . . . . . . .
CR+LF in Text 2–3. . . . . . . . . . . . . . . . . . . . . . . . . . . . . . . . . . . . . . . . . . . . . . . . . . . . . . . .
Space Suppress 2–3. . . . . . . . . . . . . . . . . . . . . . . . . . . . . . . . . . . . . . . . . . . . . . . . . . . . . . .
Roll Mode 2–3. . . . . . . . . . . . . . . . . . . . . . . . . . . . . . . . . . . . . . . . . . . . . . . . . . . . . . . . . . . .
Terminal Mode 2–3. . . . . . . . . . . . . . . . . . . . . . . . . . . . . . . . . . . . . . . . . . . . . . . . . . . . . . . .
Transmit Mode 2–4. . . . . . . . . . . . . . . . . . . . . . . . . . . . . . . . . . . . . . . . . . . . . . . . . . . . . . . .
Auto_lf 2–4. . . . . . . . . . . . . . . . . . . . . . . . . . . . . . . . . . . . . . . . . . . . . . . . . . . . . . . . . . . . . . .
Data Space 72 Lines 2–4. . . . . . . . . . . . . . . . . . . . . . . . . . . . . . . . . . . . . . . . . . . . . . . . . . .
Tabulation Mode 2–4. . . . . . . . . . . . . . . . . . . . . . . . . . . . . . . . . . . . . . . . . . . . . . . . . . . . . . .
Drop DTR in Local 2–4. . . . . . . . . . . . . . . . . . . . . . . . . . . . . . . . . . . . . . . . . . . . . . . . . . . . .
Cursor Mode 2–4. . . . . . . . . . . . . . . . . . . . . . . . . . . . . . . . . . . . . . . . . . . . . . . . . . . . . . . . . .
Target Video Size 2–4. . . . . . . . . . . . . . . . . . . . . . . . . . . . . . . . . . . . . . . . . . . . . . . . . . . . . .
Graphic Characters Set 2–5. . . . . . . . . . . . . . . . . . . . . . . . . . . . . . . . . . . . . . . . . . . . . . . .
Customized Keys 2–5. . . . . . . . . . . . . . . . . . . . . . . . . . . . . . . . . . . . . . . . . . . . . . . . . . . . . . . .
Printer Adapter Setup 2–6. . . . . . . . . . . . . . . . . . . . . . . . . . . . . . . . . . . . . . . . . . . . . . . . . . . .
Printer Device Service 2–6. . . . . . . . . . . . . . . . . . . . . . . . . . . . . . . . . . . . . . . . . . . . . . . . .
File Oriented Pathname 2–6. . . . . . . . . . . . . . . . . . . . . . . . . . . . . . . . . . . . . . . . . . . . . . . .
Start Message Code 2–6. . . . . . . . . . . . . . . . . . . . . . . . . . . . . . . . . . . . . . . . . . . . . . . . . .
End of Message Code 2–6. . . . . . . . . . . . . . . . . . . . . . . . . . . . . . . . . . . . . . . . . . . . . . . . .
Print Mode 2–6. . . . . . . . . . . . . . . . . . . . . . . . . . . . . . . . . . . . . . . . . . . . . . . . . . . . . . . . . . . .
Device Type 2–6. . . . . . . . . . . . . . . . . . . . . . . . . . . . . . . . . . . . . . . . . . . . . . . . . . . . . . . . . .
Updating Setup 2–7. . . . . . . . . . . . . . . . . . . . . . . . . . . . . . . . . . . . . . . . . . . . . . . . . . . . . . . . . .
Exit Setup 2–7. . . . . . . . . . . . . . . . . . . . . . . . . . . . . . . . . . . . . . . . . . . . . . . . . . . . . . . . . . . . . .
vi OTM – VIP7800 Emulation User’s Guide
Chapter 3. Using the Terminal Emulator 3–1. . . . . . . . . . . . . . . . . . . . . . . . . . . . . . . . . .
Using the Terminal Emulator Summary 3–1. . . . . . . . . . . . . . . . . . . . . . . . . . . . . . . . . . . . .
The Keyboard 3–1. . . . . . . . . . . . . . . . . . . . . . . . . . . . . . . . . . . . . . . . . . . . . . . . . . . . . . . . . . .
Magic Keys 3–2. . . . . . . . . . . . . . . . . . . . . . . . . . . . . . . . . . . . . . . . . . . . . . . . . . . . . . . . . . . . .
Command Sequences 3–2. . . . . . . . . . . . . . . . . . . . . . . . . . . . . . . . . . . . . . . . . . . . . . . . . . . .
Help Function 3–2. . . . . . . . . . . . . . . . . . . . . . . . . . . . . . . . . . . . . . . . . . . . . . . . . . . . . . . . . . .
Handling Special Differences 3–3. . . . . . . . . . . . . . . . . . . . . . . . . . . . . . . . . . . . . . . . . . . . .
Video Attributes 3–3. . . . . . . . . . . . . . . . . . . . . . . . . . . . . . . . . . . . . . . . . . . . . . . . . . . . . . .
Graphics 3–3. . . . . . . . . . . . . . . . . . . . . . . . . . . . . . . . . . . . . . . . . . . . . . . . . . . . . . . . . . . . .
Local Keys 3–3. . . . . . . . . . . . . . . . . . . . . . . . . . . . . . . . . . . . . . . . . . . . . . . . . . . . . . . . . . .
Status Line 3–4. . . . . . . . . . . . . . . . . . . . . . . . . . . . . . . . . . . . . . . . . . . . . . . . . . . . . . . . . . .
Emulator Activation 3–5. . . . . . . . . . . . . . . . . . . . . . . . . . . . . . . . . . . . . . . . . . . . . . . . . . . . . .
Chapter 4. The Script Utility 4-1. . . . . . . . . . . . . . . . . . . . . . . . . . . . . . . . . . . . . . . . . . . . .
Script Utility Summary 4-1. . . . . . . . . . . . . . . . . . . . . . . . . . . . . . . . . . . . . . . . . . . . . . . . . . . .
Introduction 4-1. . . . . . . . . . . . . . . . . . . . . . . . . . . . . . . . . . . . . . . . . . . . . . . . . . . . . . . . . . . . .
Script Activation 4-1. . . . . . . . . . . . . . . . . . . . . . . . . . . . . . . . . . . . . . . . . . . . . . . . . . . . . . . . .
Background Execution 4-2. . . . . . . . . . . . . . . . . . . . . . . . . . . . . . . . . . . . . . . . . . . . . . . . . . . .
Logic 4-2. . . . . . . . . . . . . . . . . . . . . . . . . . . . . . . . . . . . . . . . . . . . . . . . . . . . . . . . . . . . . . . . . . .
Syntax 4-3. . . . . . . . . . . . . . . . . . . . . . . . . . . . . . . . . . . . . . . . . . . . . . . . . . . . . . . . . . . . . . . . .
Labels 4-4. . . . . . . . . . . . . . . . . . . . . . . . . . . . . . . . . . . . . . . . . . . . . . . . . . . . . . . . . . . . . . . . . .
Text to be Transmitted 4-4. . . . . . . . . . . . . . . . . . . . . . . . . . . . . . . . . . . . . . . . . . . . . . . . . . . .
Control Characters and Script Sequences 4-5. . . . . . . . . . . . . . . . . . . . . . . . . . . . . . . .
Reserved Words 4-5. . . . . . . . . . . . . . . . . . . . . . . . . . . . . . . . . . . . . . . . . . . . . . . . . . . . . .
Function Key Transmission 4-6. . . . . . . . . . . . . . . . . . . . . . . . . . . . . . . . . . . . . . . . . . . . . . . .
Syntax and Line Errors 4-7. . . . . . . . . . . . . . . . . . . . . . . . . . . . . . . . . . . . . . . . . . . . . . . . . . .
Script File Example 4-8. . . . . . . . . . . . . . . . . . . . . . . . . . . . . . . . . . . . . . . . . . . . . . . . . . . . . .
Appendix A. Messages A-1. . . . . . . . . . . . . . . . . . . . . . . . . . . . . . . . . . . . . . . . . . . . . . . . . .
Messages Summary A-1. . . . . . . . . . . . . . . . . . . . . . . . . . . . . . . . . . . . . . . . . . . . . . . . . . . . .
Configuration Messages A-1. . . . . . . . . . . . . . . . . . . . . . . . . . . . . . . . . . . . . . . . . . . . . . . . . .
/etc/vipemutab not found A-1. . . . . . . . . . . . . . . . . . . . . . . . . . . . . . . . . . . . . . . . . . . . . . .
/etc/vipemutab, line NNN syntax error A-1. . . . . . . . . . . . . . . . . . . . . . . . . . . . . . . . . . .
tty <name> type conflict A-1. . . . . . . . . . . . . . . . . . . . . . . . . . . . . . . . . . . . . . . . . . . . . . . .
tty type <name> not supported A-1. . . . . . . . . . . . . . . . . . . . . . . . . . . . . . . . . . . . . . . . .
/etc/vipemutab: tty name <name> not configured A-1. . . . . . . . . . . . . . . . . . . . . . . . . .
/etc/inittab, line NNN: pseudo <name> not found A-1. . . . . . . . . . . . . . . . . . . . . . . . . .
/etc/inittab, line NNN: gettyemu command not found A-1. . . . . . . . . . . . . . . . . . . . . . .
/etc/inittab, line NNN: pseudo–tty name not found A-2. . . . . . . . . . . . . . . . . . . . . . . . .
/etc/ttytype: pseudo–tty name <name> not found A-2. . . . . . . . . . . . . . . . . . . . . . . . . .
/etc/ttytype: tty <name> not yet supported A-2. . . . . . . . . . . . . . . . . . . . . . . . . . . . . . . .
<configuration file> open error A-2. . . . . . . . . . . . . . . . . . . . . . . . . . . . . . . . . . . . . . . . . .
<configuration file> read error A-2. . . . . . . . . . . . . . . . . . . . . . . . . . . . . . . . . . . . . . . . . . .
Printer handler fork error A-2. . . . . . . . . . . . . . . . . . . . . . . . . . . . . . . . . . . . . . . . . . . . . . .
Emulator Messages A-3. . . . . . . . . . . . . . . . . . . . . . . . . . . . . . . . . . . . . . . . . . . . . . . . . . . . . .
Alpha Field A-3. . . . . . . . . . . . . . . . . . . . . . . . . . . . . . . . . . . . . . . . . . . . . . . . . . . . . . . . . . .
Alpha/Digit Field A-3. . . . . . . . . . . . . . . . . . . . . . . . . . . . . . . . . . . . . . . . . . . . . . . . . . . . . . .
Alpha/Numeric Field A-3. . . . . . . . . . . . . . . . . . . . . . . . . . . . . . . . . . . . . . . . . . . . . . . . . . .
Data Overflow A-3. . . . . . . . . . . . . . . . . . . . . . . . . . . . . . . . . . . . . . . . . . . . . . . . . . . . . . . . .
Digit Field A-3. . . . . . . . . . . . . . . . . . . . . . . . . . . . . . . . . . . . . . . . . . . . . . . . . . . . . . . . . . . .
Entry Required A-3. . . . . . . . . . . . . . . . . . . . . . . . . . . . . . . . . . . . . . . . . . . . . . . . . . . . . . . .
Fill Required A-3. . . . . . . . . . . . . . . . . . . . . . . . . . . . . . . . . . . . . . . . . . . . . . . . . . . . . . . . . .
Invalid Command A-4. . . . . . . . . . . . . . . . . . . . . . . . . . . . . . . . . . . . . . . . . . . . . . . . . . . . . .
Numeric Field A-5. . . . . . . . . . . . . . . . . . . . . . . . . . . . . . . . . . . . . . . . . . . . . . . . . . . . . . . . .
Contents vii
Printer Messages A-6. . . . . . . . . . . . . . . . . . . . . . . . . . . . . . . . . . . . . . . . . . . . . . . . . . . . . . . .
Printer Buffer Ovf A-6. . . . . . . . . . . . . . . . . . . . . . . . . . . . . . . . . . . . . . . . . . . . . . . . . . . . . .
Printer Busy A-6. . . . . . . . . . . . . . . . . . . . . . . . . . . . . . . . . . . . . . . . . . . . . . . . . . . . . . . . . .
Printer Busy/Fault A-6. . . . . . . . . . . . . . . . . . . . . . . . . . . . . . . . . . . . . . . . . . . . . . . . . . . . .
Printer Fault A-6. . . . . . . . . . . . . . . . . . . . . . . . . . . . . . . . . . . . . . . . . . . . . . . . . . . . . . . . . .
Printer Off Line A-6. . . . . . . . . . . . . . . . . . . . . . . . . . . . . . . . . . . . . . . . . . . . . . . . . . . . . . . .
Printer Invalid Cmd A-6. . . . . . . . . . . . . . . . . . . . . . . . . . . . . . . . . . . . . . . . . . . . . . . . . . . .
Script Utility Error Messages A-7. . . . . . . . . . . . . . . . . . . . . . . . . . . . . . . . . . . . . . . . . . . . . .
Answer Option Too Long A-7. . . . . . . . . . . . . . . . . . . . . . . . . . . . . . . . . . . . . . . . . . . . . . .
Control Char Not Allowed A-7. . . . . . . . . . . . . . . . . . . . . . . . . . . . . . . . . . . . . . . . . . . . . . .
Label Not Found A-7. . . . . . . . . . . . . . . . . . . . . . . . . . . . . . . . . . . . . . . . . . . . . . . . . . . . . .
Label Too Long A-7. . . . . . . . . . . . . . . . . . . . . . . . . . . . . . . . . . . . . . . . . . . . . . . . . . . . . . . .
No Answer Options Listed A-7. . . . . . . . . . . . . . . . . . . . . . . . . . . . . . . . . . . . . . . . . . . . . .
No More FCCS Allowed A-7. . . . . . . . . . . . . . . . . . . . . . . . . . . . . . . . . . . . . . . . . . . . . . . .
Receiver Buffer Overflow A-7. . . . . . . . . . . . . . . . . . . . . . . . . . . . . . . . . . . . . . . . . . . . . . .
Time–Out Expired A-7. . . . . . . . . . . . . . . . . . . . . . . . . . . . . . . . . . . . . . . . . . . . . . . . . . . . .
Unmatched Label Delimiter A-7. . . . . . . . . . . . . . . . . . . . . . . . . . . . . . . . . . . . . . . . . . . . .
Appendix B. VIP7800 Commands B-1. . . . . . . . . . . . . . . . . . . . . . . . . . . . . . . . . . . . . . . .
VIP7800 Commands Summary B-1. . . . . . . . . . . . . . . . . . . . . . . . . . . . . . . . . . . . . . . . . . . .
VIP7800 Standard Commands B-1. . . . . . . . . . . . . . . . . . . . . . . . . . . . . . . . . . . . . . . . . . . .
Commands not Emulated B-17. . . . . . . . . . . . . . . . . . . . . . . . . . . . . . . . . . . . . . . . . . . . . . . . .
Non–Standard VIP Commands B-18. . . . . . . . . . . . . . . . . . . . . . . . . . . . . . . . . . . . . . . . . . . .
DISPLAY ALL B-18. . . . . . . . . . . . . . . . . . . . . . . . . . . . . . . . . . . . . . . . . . . . . . . . . . . . . . . . .
EMULATION END B-18. . . . . . . . . . . . . . . . . . . . . . . . . . . . . . . . . . . . . . . . . . . . . . . . . . . . .
HELP B-18. . . . . . . . . . . . . . . . . . . . . . . . . . . . . . . . . . . . . . . . . . . . . . . . . . . . . . . . . . . . . . . .
PROGRAMMABLE FUNCTION KEYS B-19. . . . . . . . . . . . . . . . . . . . . . . . . . . . . . . . . . .
SCRIPT B-19. . . . . . . . . . . . . . . . . . . . . . . . . . . . . . . . . . . . . . . . . . . . . . . . . . . . . . . . . . . . . .
STATUS LINE B-19. . . . . . . . . . . . . . . . . . . . . . . . . . . . . . . . . . . . . . . . . . . . . . . . . . . . . . . . .
UNIX SHELL B-19. . . . . . . . . . . . . . . . . . . . . . . . . . . . . . . . . . . . . . . . . . . . . . . . . . . . . . . . . .
VIP SETUP B-20. . . . . . . . . . . . . . . . . . . . . . . . . . . . . . . . . . . . . . . . . . . . . . . . . . . . . . . . . . .
Appendix C. Printer Commands C-1. . . . . . . . . . . . . . . . . . . . . . . . . . . . . . . . . . . . . . . . .
Printer Commands Summary C-1. . . . . . . . . . . . . . . . . . . . . . . . . . . . . . . . . . . . . . . . . . . . . .
Standard Printer Commands C-1. . . . . . . . . . . . . . . . . . . . . . . . . . . . . . . . . . . . . . . . . . . . . .
Standard Printer Commands Not Present C-5. . . . . . . . . . . . . . . . . . . . . . . . . . . . . . . . . . .
Non–Standard Printer Command C-6. . . . . . . . . . . . . . . . . . . . . . . . . . . . . . . . . . . . . . . . . .
Appendix D. Keyboards D-1. . . . . . . . . . . . . . . . . . . . . . . . . . . . . . . . . . . . . . . . . . . . . . . . .
Keyboards Summary D-1. . . . . . . . . . . . . . . . . . . . . . . . . . . . . . . . . . . . . . . . . . . . . . . . . . . . .
Keyboard Layout for the BDS74XX D-1. . . . . . . . . . . . . . . . . . . . . . . . . . . . . . . . . . . . . . . . .
Keyboard Layout for the BDS71XX D-3. . . . . . . . . . . . . . . . . . . . . . . . . . . . . . . . . . . . . . . . .
Keyboard Layout for the VT100 Emulation D-5. . . . . . . . . . . . . . . . . . . . . . . . . . . . . . . . . .
Keyboard Layout for Q306 (PC Keyboard) Terminals vt320 Emulation D-7. . . . . . . . . .
Keyboard Layout for Q310 Terminals vt320 Emulation D-9. . . . . . . . . . . . . . . . . . . . . . . .
Index X-1. . . . . . . . . . . . . . . . . . . . . . . . . . . . . . . . . . . . . . . . . . . . . . . . . . . . . . . . . . . . . . . . . .

viii OTM – VIP7800 Emulation User’s Guide
1-1Introduction
Chapter 1. Introduction
VIP7800 Emulation SummaryThis chapter covers the following topics:
• VIP7800 Emulation Overview, on page 1-1.
• Additional Functions Offered by the Emulation, on page 1-3.
• The VIPEMU Software Modules, on page 1-4.
• System Configuration, on page 1-5.
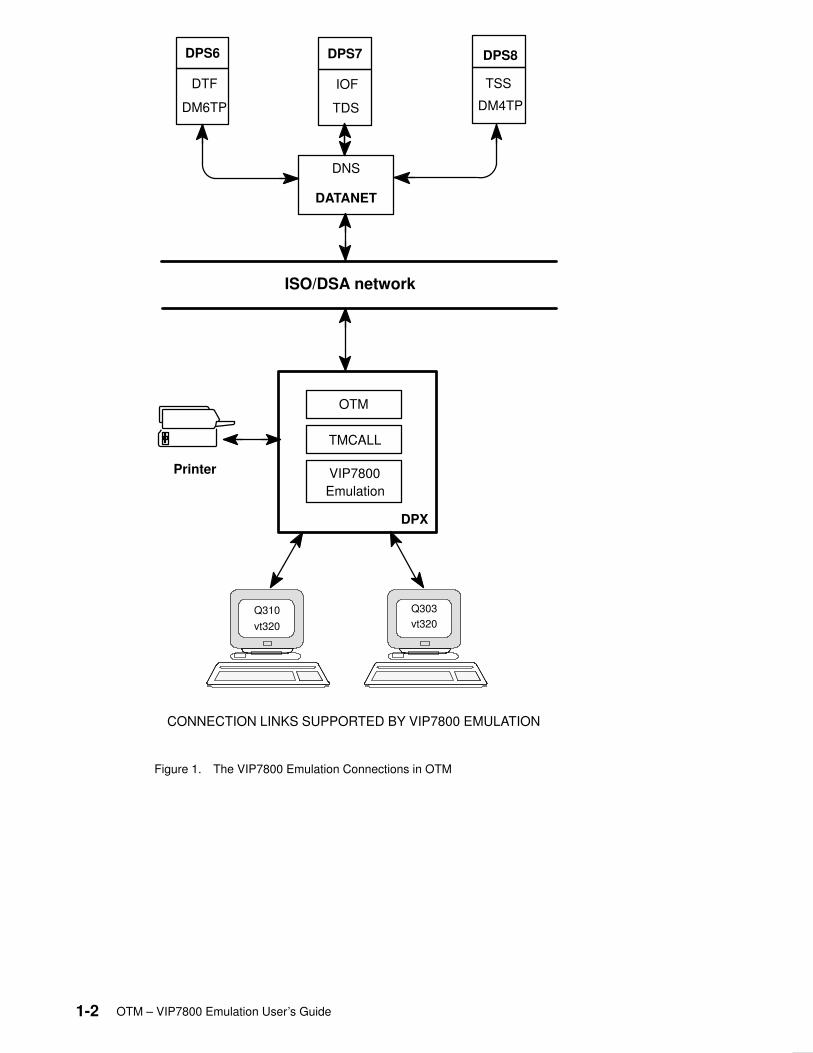
VIP7800 Emulation OverviewVIP7800 Emulation is a part of the Open Terminal Management (OTM) product. OTMenables DPX/20 users to communicate with Bull GCOS applications. In the case whereVIP7800 emulation is needed, this VIP7800 emulation module must be used as a part ofOTM.
1-2 OTM – VIP7800 Emulation User’s Guide
� �� �
DPS7 DPS8
IOF
TDS
TSS
DM4TP
DNS
DATANET
ISO/DSA network
VIP7800
DPX
Q310 Q303
vt320 vt320
DPS6
DTF
DM6TP
CONNECTION LINKS SUPPORTED BY VIP7800 EMULATION
OTM
Emulation
Printer
TMCALL
Figure 1. The VIP7800 Emulation Connections in OTM
1-3Introduction
Additional Functions Offered by the EmulationThe VIP7800 terminal emulator, in addition to supporting all standard features of theemulated VIP terminal, offers additional capabilities which will increase the number of itspotential users.
Printer EmulationThe PC–VIP program completely emulates the printer access in VIP78xx mode. It is alsopossible to redirect the printer output or the screen hardcopy to a disk file for further localprocessing.
ProgrammabilityThe separation between the line protocol module and the one which executes the functionof the terminal emulator is more profitable since it provides openings for further applicationswithout altering the package structure.
In this way the product is more easily expandable. In particular, it is open to specific userimplementations that can be inserted at any level.
Script FunctionTo let the user simplify some operations, for example, the login procedure, an effectiveautomatic control of the message exchanges, between Host and terminal, we haveintroduced.
The user must create a file detailing any necessary replies to all possible messages fromthe Host. The emulator may be requested to initiate this automatic dialogue.
When this batch file is launched, the unique linked path will be automatically executed.
UNIX CooperationTo facilitate the cooperation between the emulator and the UNIX applications, a means ofmoving between the emulator environment and UNIX has been developed. The user mayopen a shell, passing control to the UNIX command interpreter while holding the emulatorfrozen in memory.
Soft KeysIn the configuration phase, it is possible to personalize ten function keys. Each may beassociated with a string of characters to be sent down the line, or an automatic scriptsession, or the request of execution of a program or a command file in UNIX environment.
The possibility of activating UNIX programs facilitates complex procedures in which theterminal emulator is used to enter the environment and a UNIX program is used ”to capture”the data.
1-4 OTM – VIP7800 Emulation User’s Guide
The VIPEMU Software ModulesThe vipemu product is composed of the following software modules:
vipemu Vip Terminal Emulator;
lpdrv Printer Interface;
vipemutab System configuration file;
***.cfg Vipemu configuration files;
***.spt Script batch files;
***.hlp Help files.
vipemu This module causes the video and keyboard to behave as if they belongedto a native VIP terminal.
lpdrv This is the driver that the emulator uses to send printouts, received fromthe line and keyboard, to the system spooler.
vipemutab This is the system configuration file. It must be present in the ”/etc”directory. The file vipemutab creates correspondences between thephysical terminal name and the logical name used by vipemu. See OTMAdministrator and User’s Guide, Appendix ”C”, for a description of vipemutab.
ttytype This file contains correspondences between logical names used byVIPEMU and emulation modes to consider.
***.cfg The different configurations are stored in these files. The default name is”vip.cfg”. Each time that a new configuration is stored by Vip Setup, the file”vipttyNN.cfg” is either created, for the first time only, or else subsequentlyupdated. The characters ”NN” correspond to the number of the terminal onwhich vipemu is running.
***.spt These files contain the user–written dialogues, between the Bull host andthe emulator, used by the script utility.
***.hlp These files contain help information that may be used during the emulation.
1-5Introduction
System ConfigurationNo matter which protocol is used to connect vipemu to the system, the only information inthe system about the external environment is contained in the file /etc/vipemutab. vipemurequires the following information:
The following definitions must be contained in the /etc/vipemutab file:
• Names of the terminals from which the emulator will be launched.
• Types of the terminals from which the emulator will be launched, can be one of:
• hds3• hds220• pc100• vt100• vt200• vt220• vt320• vtu010
• Name of the pseudo–driver through which the emulator is connected to the requestedserver. The name is of the form etyXX, where XX refers to the pseudo tty which is foundin the system file /etc/inittab. For example:
ttye0 where XX=0 ;
ttye13 where XX=13.
All usable tty(s) ttyeXX are stored in the /etc/inittab file but only 8 will be activated(”respawn”) at installation time (ttye0 –> ttye7).
The following example, of an entry in /etc/vipemutab, associates a work station on the tty1line, of terminal type vt320, and the pseudo–driver ety0.
..
tty1|vt320|ety0
..
The default contents of the /etc/vipemutab supplied on the diskette are only intended as aguide. It must be modified to represent the disposition of your terminals.
The information which connects the pseudo tty to the terminals described below must beinserted in the /etc/ttytype file.
• Pseudo tty name (ttyeXX).
• Terminal type of emulation, either hw40 or hw78. It must be configured in the file/etc/ttytype. There is a free choice between hw40 and hw78. It is recommended to selecthw78 in cases when the emulator will be used with applications written for VIP7874terminals that cannot handle UNIX_mode. Otherwise, select hw40.
The following example of an entry in /etc/ttytype, associates a pseudo work station ttye0,with the emulation terminal type hw40.
..
ttye0|hw40
According to /etc/vipemutab example, here is described vt320 compliant terminal releveantwith tty1 for which hw40 emulation must be considered using ety0 pseudo-driver.
1-6 OTM – VIP7800 Emulation User’s Guide
Notes:
1. Unlike the host, vipemu can distinguish between a native VT200 terminal and aBull BDS74XX. If you wish to use the ”enhancements”, offered by the BDS74XX,you need only replace the entry for vt200 with hds3 in the vipemutab file.
2. Similarly, unlike the host, vipemu can distinguish between a native VT100 terminaland a PC running the Locus VT100 emulator. To have an exact correspondencebetween the commands and the PC keyboard, you must replace the entry forvt100 with pc100 in the vipemutab file.
Printer Configuration If you wish to use the vipemu printer emulation to its full extent, the host system must beconfigured with a printer spooler.
Work Station ConfigurationWhen the emulation is activated, vipemu reconfigures the terminal in such a way as toexploit to the full the capabilities offered by the terminal. However, some parameters cannotbe modified from software. The user must configure these by means of the local setup.
The following is a list of manual modifications necessary for each terminal type supportedby the emulation.
• VT200 native or compatible
• VT320 native or compatible
• PC emulating a VT100 by means of the Locus PC–Interface
• None
BDS74XXThe BDS74XX terminal emulates all the effects of a VT200. Additionally, it can handle a”user line” situated on the 25th row of the video. It is possible to utilize the ”user line” as the”status line” of the VIP7874.
In order to use the 25th row of the BDS74XX as ”status line”, execute the followingoperations.
• Press the setup key.
• Select the terminal menu.
• In the entry status line, select the option on.
BDS71XXThere are two modifications necessary for this type of terminal. The first makes thecharacter CR move the cursor to the start of the same row, (CR), and not to the start of thesucceeding row, (CR+LF). The second disables ”wraparound” at the end of a row.
To perform the modifications, execute the following operations:
• Enter ”setup” mode by pressing the keys [shift][setup],
• Select the menu named ”General”,
• Select the option CR from the CR entry,
• Select the option OFF from the Auto NL entry,
• Select the menu named Keyboard,
• Select the option REMOTE from the Fkey entry.
Once the system has been configured, the user can execute the vipemu command.

2–1Setup and Configuration
Chapter 2. Configuration
Configuration SummaryThe information in this chapter is organized as follows:
• Setup Program Menus, on page 2–1.
• Activating the Configuration, on page 2–2.
• Terminal Setup, on page 2–3.
• Customized Keys, on page 2–5.
• Printer Adapter Setup, on page 2–6.
• Updating Setup, on page 2–7.
• Exit Setup, on page 2–7.
IntroductionBefore using vipemu, the user must configure the emulator. This is done using the SetupProgram. Press the <Vip Setup> function key. A series of menus will be activated throughwhich the appropriate parameters can be selected.
Setup Program MenusVip Setup uses three different types of menu: vertical selection, horizontal selection andvalue selection.
Vertical SelectionIn this type of menu, a series of options is displayed, and one option is chosen by movingthe cursor vertically.
Use the cursor arrows to highlight, in inverse video, the option you wish to select:
Press ENTER to select the option,
Press TAB to return to the previous menu,
Press the <Vip Setup> key to exit from the configurator program without changing theconfiguration file.
Horizontal SelectionUsually Vip Setup menus have more than one function. Alternative options are displayed onthe same line beside the selection description.
The cursor motion arrow keys are used as follows:
• LEFT or RIGHT highlights the selected option;
• UP or DOWN confirms the choice and moves the ”cursor” to the previous or to the nextoption.
Other function keys provided are:
• ENTER to display the next menu,
• TAB to return to the previous menu,
2–2 OTM – VIP7800 Emulation User’s Guide
• Vip Setup to exit from the Vip Setup program without changing the configuration file.
In this type of menu, the inverse video fields are used to highlight the choices alreadymade. The reverse blinking video is used to show the ”cursor” position.
This type of selection is used when the input will be a numeric value or a sequence ofcharacters (e.g. a file name).
Value SelectionIf numeric input is requested, the first character typed clears the field. If the user moves toanother field, the input value is checked and if it is outside the range, the value is reset tothe nearest limit.
If character input is requested, the user may press any of the alphanumeric keys, and theBACKSPACE, which moves the cursor one position back.
Activating the ConfigurationAfter having entered the emulation, press the key associated to the Vip Setup function. Theconfigurator reads and displays the configuration contained in the file vipttyNN.cfg, or in thefile vip.cfg if it is the first access.
This is a ”vertical” selection menu. It is used to select one of the following configurationoptions:
• terminal setup,
• customized keys,
• printer adapter,
• script file.
Terminal setup Selects all the presentation video parameters for the VIP terminalemulation.
Customized keys Selects the VIP emulation action for each of the ten programmablefunction keys.
Printer adapter Selects the kind of printer to be used in the emulation.
Script file Selects the SCRIPT utility parameters.
Updating Setup Updates the options selected in the configuration file.
Exit Setup Exits from the configuration program.
2–3Setup and Configuration
Terminal SetupSelects the configuration of the terminal setup parameters.
VIP Family EmulationSelects the terminal emulation mode. It can work both strictly in VIP78XX mode and in”chameleon” mode:
7800 selects the single VIP78XX mode. The emulation will discard any commandsequence not included in this terminal family;
7800 + 7700 enables the terminal emulation to recognize and process the principalescape sequences of the VIP77XX family, even if it is mainly used as aVIP78XX terminal;
7700 +7800 enables the terminal emulation to recognize and process the principalescape sequences of the VIP78XX family, even if it is mainly used as aVIP77XX terminal.
The 7800 option must be selected.
Communication ModeSelects the type of emulated terminal:
asynchronous Select this option, and vipemu will emulate VIP78XX family inasynchronous mode;
synchronous Select this option, and vipemu will emulate VIP78XX family in synchronousmode.
The asynchronous option must be selected.
Terminator CharacterSelects the terminator character for all messages transmitted by the terminal when it is in’TEXT’ and ’FORM’ mode.
CR+LF in TextSelects the CR+LF characters at the end of each screen line.
Space SuppressSuppresses the transmission of spaces at the end of each screen line.
Roll ModeSelects automatic scrolling of the screen when an LF is found at the end of the last line.
Terminal Mode Selects the terminal mode of the emulation:
CHAR (asynchronous mode only) when a key is pressed, it is immediatelytransmitted and displayed on the screen;
ECHO (asynchronous mode only) when a key is pressed, it is immediatelytransmitted. Its display on the screen is a host task;
TEXT the key is buffered, but data transmission begins only after pressing one oftransmission keys;
TX_RET the key is buffered, but the data transmission begins only after pressing atransmission key or the <RET> key.
2–4 OTM – VIP7800 Emulation User’s Guide
Transmit ModeSelects the data transmission mode of the emulation:
BLOCK selects the data transmission in blocks of predetermined length. A block istransmitted when it is full;
NON_BLOCK selects the data transmission in single character or in blocks of variablelength, depending on the TERMINAL MODE selected.
Auto_lfThis selection causes an LF to be inserted after each CR generated from the keyboard(<RET> key).
Data Space 72 LinesSelects the dimension of the internal data buffer of the VIP emulator. The standard value isa normal display: 24 rows by 80 columns.
By selecting this option, the dimension of the buffer is enlarged to 72 rows by 80 columns.This option is equivalent to the installation on the native VIP terminal of the followingfirmware:
VDF7811 72–Line Scroll Option
and the support of the following commands:
• scroll up (SU)
• scroll down (SD)
• next segment (NS)
• previous segment (PS)
that are otherwise disabled.
Tabulation Mode If immediate is selected, the cursor will move to the next unprotected field when the currentone is filled and the terminal is in mask mode.
If delay is selected, the cursor moves to the next field even if it is protected.
Drop DTR in LocalWhen this option is selected, putting the terminal in LOCAL mode will cause the line to bedisconnected.
Cursor ModeSelects the mode in which the cursor will be visualized on the screen: UNDERLINE orBLOCK.
Target Video SizeThis option selects the size of terminal video on which the VIP7800 EMU is running. It mayonly be used with VT200 native or compatible terminals. If the terminal is a BDS3, it is notsufficient to select the ”25x80” option. The user must also select ”25th line : ON” in the localsetup to access to the 25th user line.
2–5Setup and Configuration
Graphic Characters SetTo use the graphic set of the terminal on which vipemu is running, select the option ”able”.
To use the graphic set composed of the ascii characters + , – and ! select the disableoption. This option is valid for the following terminals:
• VT200
• VT320
• BDS74XX
• BDS71XX
• PC with VT100 Locus Emulator
Customized KeysThis menu allows the user to program the numeric keys of the first row of the alphanumerickeyboard like function keys. The function is executed by the sequence [MAGIC] [N], whereN is a numeric key. See Chapter 3 for an explanation of the MAGIC keys. For each key, themenu shows any pre–existing value. Otherwise, the key must be configured to the type offunction to be used, as follows:
SHL for a UNIX command;
VIP for a standard VIP command;
SPT for a script batch file. For a more complete explanation, refer to the scriptutility section.
Each function key can be associated with a string up to twenty characters in length. Eachcontrol character, from 0 to 1F hexadecimal, is displayed with the character ’^’ followed bythe corresponding ASCII code.
Note: Insert the UNIX commands with the <CR> character included, as you would type iton the command line. Insert the standard VIP commands, bearing in mind that theemulator will execute these commands as if the TRANSMIT key were pressed atthe end of the commands.
2–6 OTM – VIP7800 Emulation User’s Guide
Printer Adapter SetupThis is a ”horizontal” selection menu used to configure the parameters of the printer.
Printer Device ServiceSelects the channel to which a printout is redirected:
NUL If this option is selected, the printout is lost;
LPT If this option is selected, the printout is sent to the system printer spooler;
FILE If this option is selected, the printout is written to a file.
File Oriented PathnameThis may be used only after FILE has been selected. It is the full pathname of the file towhich the printout will be written.
Start Message CodeSelects, before each printing operation, the insertion of:
cr carriage return;
cr/lf carriage return and line feed;
cr/ff carriage return and form feed;
cr/vt carriage return and vertical tabulation.
End of Message CodeSelects, after each printing operation, the insertion of:
cr carriage return;
cr/lf carriage return and line feed;
cr/ff carriage return and form feed;
cr/vt carriage return and vertical tabulation.
Print ModeSelects the printing of all the screen characters or only the unprotected ones.
Device TypeSelects the printer model. This selection does not affect the printer functioning: it is onlyused to compile PENQ and PDENQ messages to be sent to the host.

2–7Setup and Configuration
Updating Setup This menu gives the user the possibility of recording all the data, inserted in the previousmenus, in the configuration file, vipttyNN.cfg, where NN is the number corresponding to theterminal on which the emulator is running.
During this operation the terminal executes a general reset, clearing all the information onthe screen.
Exit SetupSelect this option to exit from the SETUP without saving any changes. The terminal statewill not be modified.

2–8 OTM – VIP7800 Emulation User’s Guide
3–1Using the Terminal Emulator
Chapter 3. Using the Terminal Emulator
Using the Terminal Emulator SummaryThis chapter describes the terminal emulator software and its use on different terminals:
• The Keyboards, on page 3–1.
• Magic Keys, on page 3–2.
• Command Sequences, on page 3–2.
• Help Function, on page 3–2.
• Handling Special Differences, on page 3–3.
• Emulator Activation, on page 3–5.
The KeyboardThe following paragraphs briefly describe the keyboard functions.
The emulator software uses its own keyboard driver which allows combinations of keys notused on standard keyboards. Often there are fewer keys on the target host terminals thanon the keyboards being emulated.
As it is not possible to have a one–to–one mapping between each VIP function and a hostkey, in some cases a sequence of two host keys has been assigned to one VIP function.Note that the keys must be pressed sequentially, not simultaneously.
The first of these two keys will be referred to as the MAGIC key, in the following sections ofthis document.
Furthermore, with certain keyboards, it was necessary to use two different MAGIC keys.
Where possible, a one–to–one correspondence was maintained between the host keynames and the VIP emulator sequences.
Otherwise, the assignment criteria, in descending order of priority, were the following:
• One–to–one assignment, or the most convenient mode remaining, for the mostcommonly used keys. For example:
– Clear
– Break
– Transmit
• Free use will be made of the small, data–entry numerical keypad, if there is one.
• Where possible, a key will be chosen because its physical position on the keyboard isclose to the key being emulated on the native VIP terminal.
Based on the rules, the VIP functions are assigned to the same keys on the host keyboard,where such keys exist. If the keys are not present, the MAGIC key is used in conjunctionwith a key from the numerical keypad, or a function key.
The CUSTOM functions of the emulator are invoked by using the MAGIC key and a letterkey. For example:
Help [MAGIC]+[ ”H” ]
Quit [MAGIC]+[ ”Q” ]
3–2 OTM – VIP7800 Emulation User’s Guide
Magic KeysThe Magic keys on different terminals are:
– VT200 MAGIC = Do
– VT320 MAGIC = Do
– BDS74XX MAGIC = Do
– BDS71XX MAGIC = PF3
– PC emul. VT100 MAGIC1 = F1
MAGIC2 = F2
Command Sequences The terminal emulator accepts and executes all command sequences of the VIP7800terminals, described in the following manual:
• ”VIP7800 FAMILY DISPLAY TERMINALS USER’S REFERENCE MANUAL”
If a VIP escape sequence is entered from a host keyboard, and it is completely identical to ahost sequence, it is interpreted as that host sequence. Otherwise, the sequence isinterpreted as a VIP sequence.
The function [MAGIC]+[ E ] was created to resolve this problem. This function generates theASCII ESC character and passes it transparently to the emulator.
Help FunctionTo facilitate the use of the terminal emulator a keyboard function, [Help] or [Magic]+[ H ],was developed.
This displays the table of assignments between the original VIP functions and the keyboardsequences used to obtain them.
This table is divided into pages in which the functions are grouped according to theirfunctionality.
The help information is contained in files in the directory /usr/emu. If these files do not exist,or if they are not found, the emulator will not signal an error, but the <help> function will bedisabled.
3–3Using the Terminal Emulator
Handling Special Differences
Video AttributesDifferences, between the hardware of VIP terminals and the host terminals, mean that somevideo attributes must be handled differently.
The terminals, VT200, VT320, BDS74XX, and PC, have the following limitations:
• the VIP attribute ”low intensity” is changed to ”normal intensity”;
• the VIP attribute ”normal intensity” is changed to ”highlight”;
• the ”underline” attribute is not visible when it occurs with the ”reverse” attribute;
The BDS71XX terminal has the following limitation:
• attributes are not handled because the attribute marker occupies one physical position.
GraphicsDifferences, between the firmware of VIP terminals and the host terminals, mean thatgraphics characters must be handled differently.
• On a PC with VT100 Locus emulation, the graphic set is not the same as VIP7874graphic sets.
The graphic set, on any terminal, must be activated with <Vip Setup> before it can beused.
Local Keys vipemu redefines the keys of its host terminal, to exploit the host keyboard to the full. Somehost keys may not be redefined, because they cause a ”local” effect, without producing acontrol sequence. Avoid using the following keys, on the particular terminals:
VT200 native or compatible
BDS74XX keys: Hold Screen
Compose Character
BDS71XX keys : Ctrl Home
Ctrl down arrow
Ctrl left arrow
Ctrl backspace
PC with VT100 Locus emulator
keys : Scroll Lock
Cntl PgDn
Cntl PgUp
3–4 OTM – VIP7800 Emulation User’s Guide
Status LineThe vipemu emulates VIP terminals which have 25 rows. To run on a host terminal with 24rows, the 25th row, the Status Line, must be handled differently. Except for the BDS74XXterminal, which does have 25 rows, vipemu displays the contents of the Status Line on thefirst row of the terminal, when the <status line> key is pressed. Pressing the <status line>key again, causes the previous first line to be redisplayed. When the Status line is visible itwill disappear automatically in the following situations:
• when the cursor must go to the first row;
• when the following commands are used, whether from line or from keyboard:
RES Reset;
CLR clear;
RIS reset to initial state;
PS previous segment;
NS next segment.
If the status line is not visible, it will be displayed in the following situations:
• when an error is signalled that changes the status line;
• when the following commands are used, whether from line or from keyboard:
SLL status line lock
SLS status line set
If the host terminal has 25 rows, this option must be configured in VIP–SETUP, as explainedbeginning on page 2–1.
3–5Using the Terminal Emulator
Emulator Activation The following is the syntax of the command used to launch vipemu:
vipemu –[chpt]
Each option used has an associated directory:
–c<config_dir>
–h<help_dir>
–p<lpdrv_path>
–t<config_dir>
Each option given changes the default pathname used by vipemu, in the following way:
c the directory where, vip.cfg or vipttyNN.cfg resides, which contains theparameters for the terminal videos. If nothing is specified, the defaultpathname is /usr/emu.
h directory of the help file. If nothing is specified, the default directory is/usr/emu.
p pathname of the printer driver. If nothing is specified, the default pathnameis /usr/bin/lpdrv.
t directory of the configuration system file, vipemutab. If nothing is specified,the default directory is /etc.
The default values are the following:
c /usr/emu
h /usr/emu
p /usr/bin/lpdrv
t /etc

3–6 OTM – VIP7800 Emulation User’s Guide
4-1Script Utility
Chapter 4. The Script Utility
Script Utility SummaryThis chapter is organized as follows:
Script Activation, on page 4-1.
Background Execution, on page 4-2.
Logic, on page 4-2.
Syntax, on page 4-3.
Labels, on page 4-4.
Messages, on page 4-4.
Function Keys Transmission, on page 4-6.
Error Messages, on page 4-7.
Example Script File, on page 4-8.
IntroductionThis chapter describes the script utility that automatically controls message exchangesbetween the terminal and the host. The script utility may be used in several ways. It is abatch program which may execute any command while the terminal emulator is running.The user must create a file, containing all the possible messages, and their replies, as if thesame characters were typed at the keyboard. The syntax of a script command is describedin this chapter.
Script ActivationThe user has to prepare a source file named script–pathname with the ”.spt” suffix. Whenthis is done, the script utility can be executed in one of the four following ways:
• at the launch of the terminal emulator, by typing the command:
vipemu –s<script–pathname>
Press Return
• at the launch of the terminal emulator, if a script file has been configured. (See VIPEMUSoftware Modules, on page 1-4.)
• during the execution of the terminal emulator, by typing one of the ten programmablekeys to which a script file has been configured. (See Customized Keys, on page 2–5.)
• during the execution of the terminal emulator, by typing the command [MAGIC]+[V]. Amenu is displayed which requests the name of a script file to be executed.
In each case, if the script file name does not exist or it does not have the ”.spt” file type, theterminal emulator will display the following messages:
file not found in current directory
strike any key to continue
and the program will end.
4-2 OTM – VIP7800 Emulation User’s Guide
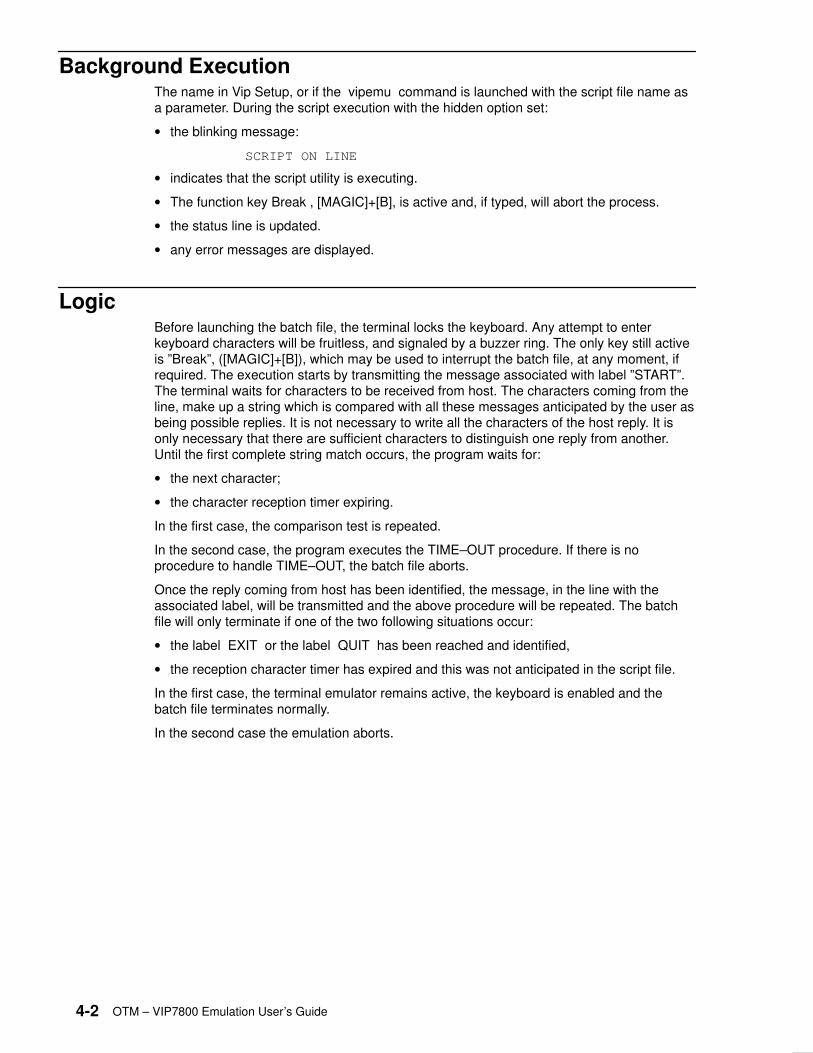
Background ExecutionThe name in Vip Setup, or if the vipemu command is launched with the script file name asa parameter. During the script execution with the hidden option set:
• the blinking message:
SCRIPT ON LINE
• indicates that the script utility is executing.
• The function key Break , [MAGIC]+[B], is active and, if typed, will abort the process.
• the status line is updated.
• any error messages are displayed.
LogicBefore launching the batch file, the terminal locks the keyboard. Any attempt to enterkeyboard characters will be fruitless, and signaled by a buzzer ring. The only key still activeis ”Break”, ([MAGIC]+[B]), which may be used to interrupt the batch file, at any moment, ifrequired. The execution starts by transmitting the message associated with label ”START”.The terminal waits for characters to be received from host. The characters coming from theline, make up a string which is compared with all these messages anticipated by the user asbeing possible replies. It is not necessary to write all the characters of the host reply. It isonly necessary that there are sufficient characters to distinguish one reply from another.Until the first complete string match occurs, the program waits for:
• the next character;
• the character reception timer expiring.
In the first case, the comparison test is repeated.
In the second case, the program executes the TIME–OUT procedure. If there is noprocedure to handle TIME–OUT, the batch file aborts.
Once the reply coming from host has been identified, the message, in the line with theassociated label, will be transmitted and the above procedure will be repeated. The batchfile will only terminate if one of the two following situations occur:
• the label EXIT or the label QUIT has been reached and identified,
• the reception character timer has expired and this was not anticipated in the script file.
In the first case, the terminal emulator remains active, the keyboard is enabled and thebatch file terminates normally.
In the second case the emulation aborts.
4-3Script Utility
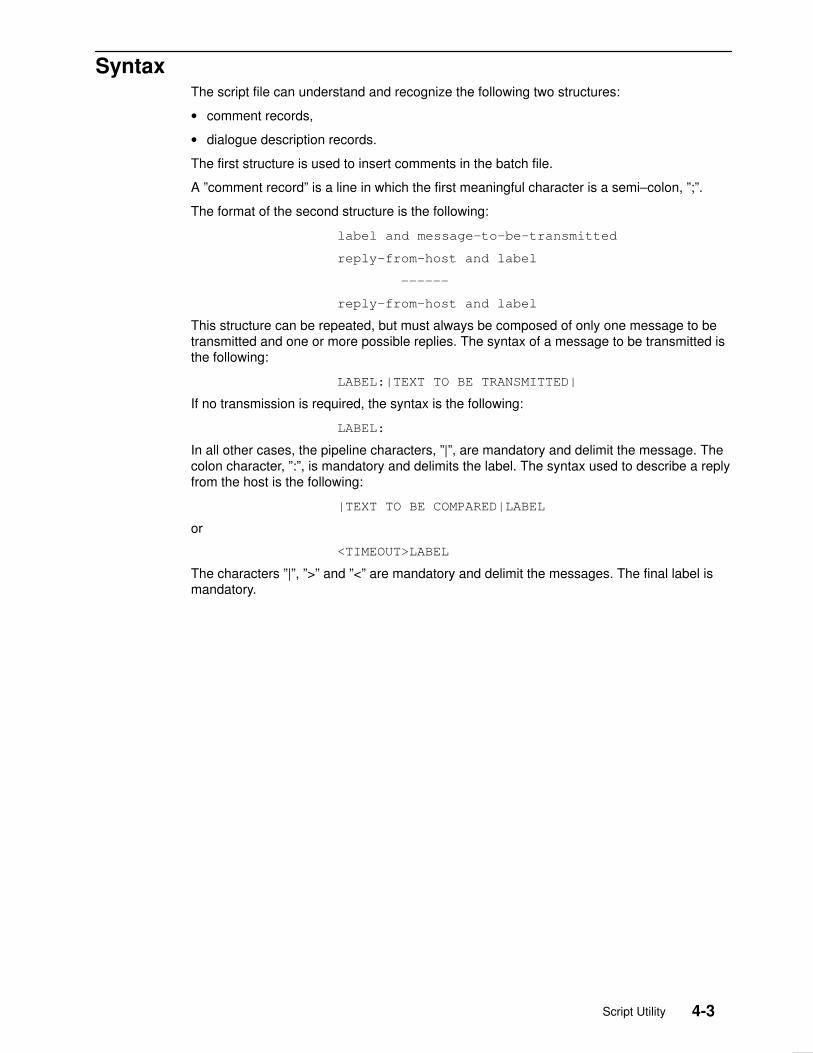
SyntaxThe script file can understand and recognize the following two structures:
• comment records,
• dialogue description records.
The first structure is used to insert comments in the batch file.
A ”comment record” is a line in which the first meaningful character is a semi–colon, ”;”.
The format of the second structure is the following:
label and message–to–be–transmitted
reply–from–host and label
––––––
reply–from–host and label
This structure can be repeated, but must always be composed of only one message to betransmitted and one or more possible replies. The syntax of a message to be transmitted isthe following:
LABEL:|TEXT TO BE TRANSMITTED|
If no transmission is required, the syntax is the following:
LABEL:
In all other cases, the pipeline characters, ”|”, are mandatory and delimit the message. Thecolon character, ”:”, is mandatory and delimits the label. The syntax used to describe a replyfrom the host is the following:
|TEXT TO BE COMPARED|LABEL
or
<TIMEOUT>LABEL
The characters ”|”, ”>” and ”<” are mandatory and delimit the messages. The final label ismandatory.

4-4 OTM – VIP7800 Emulation User’s Guide
Labels Inside the batch file, there are the following types of label:
• a link to the next record to be transmitted. For example:
|text to be transmitted|REPEAT
–––
–––
REPEAT:|text to be transmitted
The batch file scanning is strictly sequential. If, while looking for a label, the program findsthe end of the file, scanning restarts from the head of the file.
• A reserved label ”QUIT”, which defines end of the script dialogue.
• A reserved label ”EXIT”, which defines the end of the script dialogue and of theemulation.
• A mandatory reserved label ”START”, which defines the beginning of the script dialogue.
There must be at least one ”EXIT” or ”QUIT” label in the file. The maximum length allowedfor a label is 8 characters.
Text to be TransmittedThe text to be transmitted or received can contain any ASCII between 0 and 7Fhexadecimal. The control characters between 0 and 1f hexadecimal must be describedusing the form:
CONTROL + character
In the table below, the tilde character ”~” is the CONTROL character.
Note: The character NUL is not accepted, because it indicates the end of the string andcan cause comparison errors between messages. If the messages contain the ASCIIcharacter ”~”, this must be doubled.
4-5Script Utility
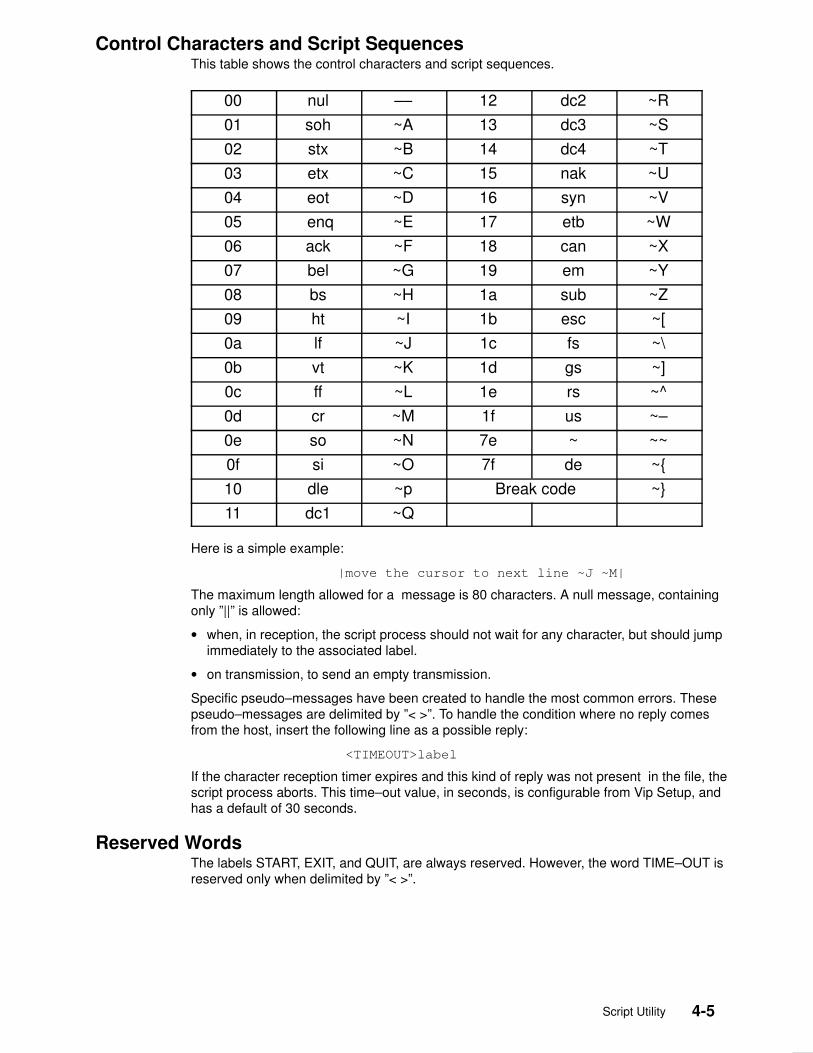
Control Characters and Script Sequences This table shows the control characters and script sequences.
00 nul –– 12 dc2 ~R
01 soh ~A 13 dc3 ~S
02 stx ~B 14 dc4 ~T
03 etx ~C 15 nak ~U
04 eot ~D 16 syn ~V
05 enq ~E 17 etb ~W
06 ack ~F 18 can ~X
07 bel ~G 19 em ~Y
08 bs ~H 1a sub ~Z
09 ht ~I 1b esc ~[
0a lf ~J 1c fs ~\
0b vt ~K 1d gs ~]
0c ff ~L 1e rs ~^
0d cr ~M 1f us ~–
0e so ~N 7e ~ ~~
0f si ~O 7f de ~{
10 dle ~p Break code ~}
11 dc1 ~Q
Here is a simple example:
|move the cursor to next line ~J ~M|
The maximum length allowed for a message is 80 characters. A null message, containingonly ”||” is allowed:
• when, in reception, the script process should not wait for any character, but should jumpimmediately to the associated label.
• on transmission, to send an empty transmission.
Specific pseudo–messages have been created to handle the most common errors. Thesepseudo–messages are delimited by ”< >”. To handle the condition where no reply comesfrom the host, insert the following line as a possible reply:
<TIMEOUT>label
If the character reception timer expires and this kind of reply was not present in the file, thescript process aborts. This time–out value, in seconds, is configurable from Vip Setup, andhas a default of 30 seconds.
Reserved WordsThe labels START, EXIT, and QUIT, are always reserved. However, the word TIME–OUT isreserved only when delimited by ”< >”.
4-6 OTM – VIP7800 Emulation User’s Guide
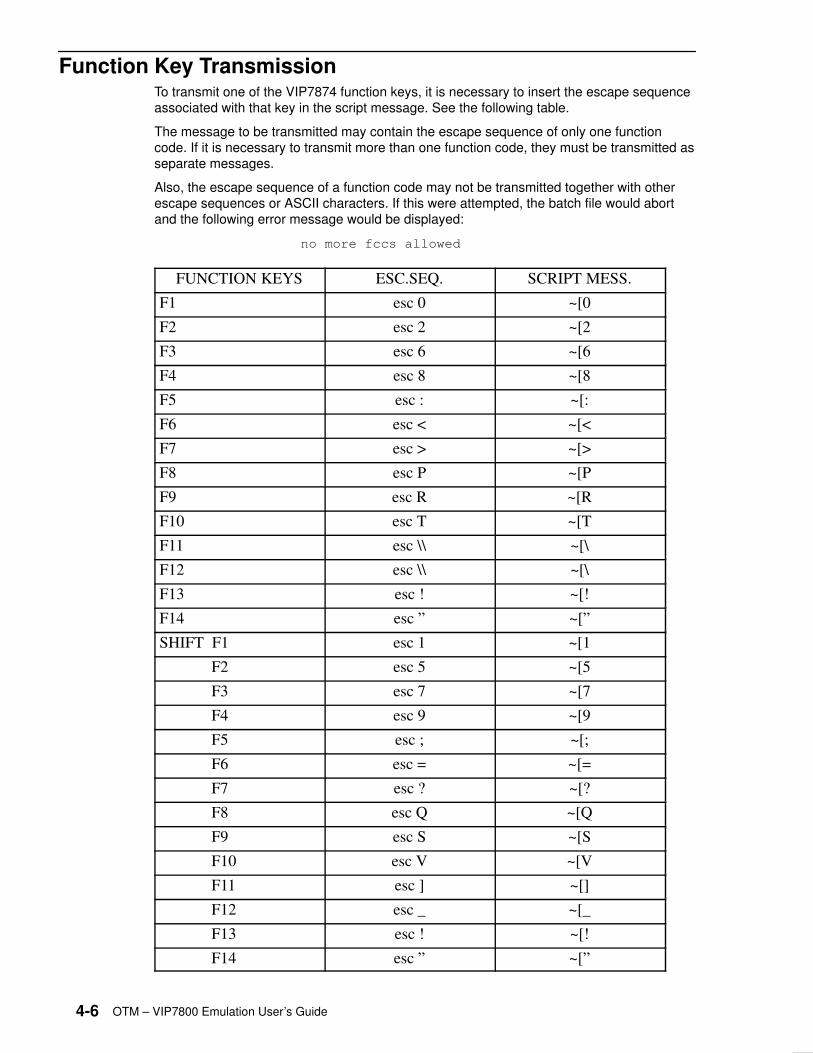
Function Key TransmissionTo transmit one of the VIP7874 function keys, it is necessary to insert the escape sequenceassociated with that key in the script message. See the following table.
The message to be transmitted may contain the escape sequence of only one functioncode. If it is necessary to transmit more than one function code, they must be transmitted asseparate messages.
Also, the escape sequence of a function code may not be transmitted together with otherescape sequences or ASCII characters. If this were attempted, the batch file would abortand the following error message would be displayed:
no more fccs allowed
FUNCTION KEYS ESC.SEQ. SCRIPT MESS.
F1 esc 0 ~[0
F2 esc 2 ~[2
F3 esc 6 ~[6
F4 esc 8 ~[8
F5 esc : ~[:
F6 esc < ~[<
F7 esc > ~[>
F8 esc P ~[P
F9 esc R ~[R
F10 esc T ~[T
F11 esc \\ ~[\
F12 esc \\ ~[\
F13 esc ! ~[!
F14 esc ” ~[”
SHIFT F1 esc 1 ~[1
F2 esc 5 ~[5
F3 esc 7 ~[7
F4 esc 9 ~[9
F5 esc ; ~[;
F6 esc = ~[=
F7 esc ? ~[?
F8 esc Q ~[Q
F9 esc S ~[S
F10 esc V ~[V
F11 esc ] ~[]
F12 esc _ ~[_
F13 esc ! ~[!
F14 esc ” ~[”
4-7Script Utility
Syntax and Line ErrorsDuring the execution of the script file, these kinds of error may occur:
• SYNTAX errors;
• LINE errors:
TIME–OUT
RECEPTION OVERFLOW.
In the case of syntax errors, the batch file contains phrases which are not coherent with thegrammar required. In this case, the script program aborts. In case of line errors, thebehaviour of the batch file depends on its logical flow. If the management of such errors hasbeen foreseen, they are handled accordingly. Otherwise, the script file aborts.
The errors are signalled as follows:
script–file:nnn––message
where:
script–file indicates the file name, with ”.spt” file type, that the utility is using.
nnn is the line number of the script file on which the error has been found.
message is a description of the error
The complete explanation of these error messages is found in Appendix A.

4-8 OTM – VIP7800 Emulation User’s Guide
Script File ExampleThe following is the script file of a hypothetical dialogue.
; This is an example which describes
; the syntax of the batch script file
;
;
; The dialogue starts at the label START
;
START:|HELLO TAXI?|
; the anticipated answers are
|YES|ADDRESS
|NO,YOU GOT THE WRONG NUMBER|SORRY
; no answer
<TIMEOUT>TRYAGAIN
;
; first recall
;
TRYAGAIN:|HELLO TAXI?|
|YES|ADDRESS
; I give up
<TIMEOUT>EXIT
; successful link
ADDRESS:|COME TO 21, ROME STREET|
|ALL RIGHT|EXIT
;
; line fallen down
<TIMEOUT>EXIT
;
; wrong link management
SORRY:|I AM SORRY|
; no answer foreseen
||EXIT
A-1Messages
Appendix A. Messages
This chapter lists all the error and alarm messages of the vipemu emulation.
A distinction has been made between error messages related to the emulation environmentand the ones occurring during the configuration for the VIP7800 emulator.
The messages are listed in alphabetical order.
A short hypothesis, about the probable cause, is given.
Messages Summary• Configuration Messages, on page A-1.
• Emulator Messages, on page A-3.
• Printer Messages, on page A-6.
• Script Utility Error Messages, on page A-7.
Configuration Messages
/etc/vipemutab not foundvipemu did not find the system configuration file. The default directory is /etc.
Check the vipemu installation or use the ”–t” option.
/etc/vipemutab, line NNN syntax errorCheck the contents of the vipemutab file at line NNN. The syntax for a line in this file isdescribed in System Configuration, on page 1-5.
tty <name> type conflictCheck the contents of the vipemutab file. The terminal type associated with the TTY onwhich the user was working was not coherent.
tty type <name> not supportedvipemu was launched on a terminal type not supported by the emulator.
Check the system configuration or change the work station.
/etc/vipemutab: tty name <name> not configuredCheck the contents of the vipemutab file. The name of the terminal, on which the user wasworking, was not in the vipemutab file.
/etc/inittab, line NNN: pseudo <name> not foundCheck the contents of the inittab file. There was no line that configures the pseudo–tty withthe terminal on which vipemu runs.
/etc/inittab, line NNN: gettyemu command not foundCheck the contents of the inittab file. The gettyemu command, that configures thepseudo–tty, was missing at line NNN.

A-2 OTM – VIP7800 Emulation User’s Guide
/etc/inittab, line NNN: pseudo–tty name not foundCheck the contents of the inittab file. The name of the pseudo–tty, that must follow thegettyemu command, was not configured at line NNN.
/etc/ttytype: pseudo–tty name <name> not foundCheck the contents of the ttytype file. The name of the pseudo–tty associated with theterminal was not configured.
/etc/ttytype: tty <name> not yet supportedCheck the contents of the ttytype file. The type of terminal, associated with the pseudo–tty,was neither hw40 nor hw78.
<configuration file> open errorvipemu did not find either the default configuration file vip.cfg, or the specific configurationfile associated with the terminal on which the user was working.
<configuration file> read errorvipemu could not read either the default configuration file vip.cfg, or the specificconfiguration file associated with the terminal on which the user was working.
Printer handler fork errorvipemu cannot create the specified process.
A-3Messages
Emulator Messages
Alpha FieldIn FORM mode, the user tried to insert a non–alphabetic character in an unprotectedALPHA–ONLY field or in a MODIFY–TRANSMIT field.
Alpha/Digit FieldIn FORM mode, the user tried to enter a non–alphabetic or a non–digit character in anunprotected or MODIFY–TRANSMIT field, with both the ALPHA–ONLY and DIGIT–ONLYattributes set.
Alpha/Numeric FieldIn FORM mode, the user tried to enter a non–alphabetic or non–numeric character in anunprotected or MODIFY–TRANSMIT field, with both the ALPHA–ONLY andNUMERIC–ONLY attributes set.
Data Overflow• The user tried to enter an ASCII or graphic character, or an attribute in column 81, or a
CR/LF on the last line, 24 or 72, of the data buffer, without having set the ROLL MODEoption.
• An LF was received when the cursor was in the last line, 24 or 72, of the data buffer andthe terminal had not the ROLL MODE option set.
• The command INSERT LINE was received but the last data buffer line was not empty.
Digit FieldIn FORM mode, the user tried to enter a NON–DIGIT character in an unprotected orMODIFY–TRANSMIT field, with the attribute DIGIT–ONLY set.
Entry Required• While in FORM mode, the user tried to enter a TAB (HT), when the cursor was in an
unprotected or MODIFY–TRANSMIT field containing only spaces, and the field had theENTRY–REQUIRED attribute set.
• While in FORM mode, the user tried to enter a space in the last position of anunprotected or a MODIFY–TRANSMIT field containing only spaces, and theENTRY–REQUIRED attribute was set.
• While in FORM mode, the user tried to execute the command TRANSMIT (TXD), whenone or more unprotected or MODIFY–TRANSMIT fields contained only spaces, and theENTRY–REQUIRED attribute was set. The cursor was positioned on the first wrong field.
Fill Required• While in FORM mode, the user tried to enter a TAB (HT) when the cursor was in an
unprotected or MODIFY–TRANSMIT and FILL–REQUIRED field containing some, butnot all, characters different from space.
• While in FORM mode, the user tried to enter a space in the last position of anunprotected or MODIFY–TRANSMIT and FILL–REQUIRED field containing some, butnot all, characters different from space.
• While in FORM mode, the user tried to enter the command TRANSMIT (TXD), when oneor more unprotected or MODIFY–TRANSMIT and FILL–REQUIRED fields containedsome, but not all, characters different from space. The cursor moved to the first wrongfield.

A-4 OTM – VIP7800 Emulation User’s Guide
Invalid Command• The user attempted to use commands not recognized by the terminal when it was in
RESTRICTED OPERATION MODE.
• attempt to use commands valid only for SYNCHRONOUS emulation when the terminalwas configured in ASYNCHRONOUS.
• The user attempted to use commands valid only for the ASYNCHRONOUS emulationwhen the terminal was configured in SYNCHRONOUS.
• While in INSERT MODE, the user tried to enter data, ASCII or graphic, when the cursorwas either in column 81, or in a protected field when the terminal was in FORM MODE.
• Erroneous entry of parameters or of the number of parameters of a command.
• When using the command ATTRIBUTE (ATR), the attribute character was not one ofthose allowed, or the terminal was set to FORM MODE.
• When, while the terminal was set to RESTRICTED OPERATION MODE, the user tried touse the CLEAR key.
• When, while the terminal was set to RESTRICTED OPERATION MODE, the user tried touse the RESET key.
• When using the command CURSOR POSITION BINARY (CPB), the parameters for rowand column were wrong or missing, or the cursor was in the status line.
• When using the command CURSOR POSITION DECIMAL (CPD), the parameters forrow and column were wrong or missing, or the cursor was in the status line.
• When, while the cursor was in the status line, the user tried to enter the commandCURSOR REQUEST BINARY (CRB).
• When, while the cursor was in the status line, the user tried to enter the commandCURSOR REQUEST DECIMAL (CRD).
• When, while the cursor was in the status line, the user tried to enter CURSOR DOWN(CUD), CURSOR HOME (CUH) or CURSOR UP (CUU).
• When using the command DELETE ATTRIBUTE (DAT), the cursor was in column 1 or81, or the terminal was set to FORM MODE, or the keyboard was set to RESTRICTEDOPERATION MODE.
• When using the command DELETE CHARACTER (DCH), either the cursor was incolumn 81, or the terminal was set to FORM MODE and the cursor was in a protectedfield.
• When using the command DELETE LINE (DL), either the cursor was in the status line, orthe terminal was set to FORM MODE.
• When, while the cursor was in the status line, the user tried to enter the command DATASPACE HOME (DSH).
• When, while the terminal was set to RESTRICTED OPERATION MODE, the user tried touse the ESCAPE key.
• When, while the cursor was in a protected field or the terminal is set to FORM MODE, theuser tried to enter the command ERASE TO END OF FIELD (EOF).
• When, while the cursor was in the status line, the user tried to enter the commandERASE TO END OF PAGE (EOP).
• When using the command ECHOPLEX (EP), the terminal was in local, or the terminalwas set to TEXT MODE, or FORM MODE.
• When, while the terminal was set to RESTRICTED OPERATION MODE, the user tried toset FORM MODE with the sequence ([MAGIC]+[F]).
A-5Messages
• When using the command INSERT LINE (IL), either the cursor was in the status line, orthe terminal was set to FORM MODE.
• When using the commands NEXT SEGMENT (NS) or PREVIOUS SEGMENT (PS),either the cursor was in the status line, or the option to set the internal data buffer to 72rows was not selected.
• When, while the terminal was set to FORM MODE, the user tried to enter the commandROLL MODE SET (RMS).
• When using the command SET BLOCK TRANSMIT (SBT), either the parameters werewrong or missing, or the terminal was set to CHAR MODE.
• When, while the terminal was set to CHAR MODE or FORM MODE, the user tried toenter the command SET TRANSMISSION POINTER (STP).
• When using the command SCROLL UP (SU) or SCROLL DOWN (SD), either the cursorwas in the status line, or the option to set the internal data buffer to 72 rows was notselected.
• When using the command TAB CLEAR (TBC), either the cursor was in column 81, or theterminal was set to FORM MODE.
• When, while the terminal was set to FORM MODE, the user tried to enter the commandTAB INITIALIZE (TBI).
• When using the command TAB SET (TBS), either the cursor was in column 81, or theterminal was set to FORM MODE.
• When, while the terminal was set to BLOCK TRANSMIT MODE, the user tried to enterthe command TRANSMIT NEXT BLOCK (TNB).
• When, while the cursor was in the status line, the user tried to enter the command TEXTRESULT DISPLAY (TRD).
• When, while the terminal was set to CHAR MODE or FORM MODE, the user tried toenter the command TRANSMIT ON RETURN SET (TRS).
• When, while the terminal was set to CHAR MODE, the user tried to enter the commandTRANSMIT ALL (TXA).
Numeric FieldWhen, while the terminal was set to FORM MODE, the user tried to insert a non–numericcharacter in an unprotected or MODIFY–TRANSMIT field.
A-6 OTM – VIP7800 Emulation User’s Guide
Printer Messages
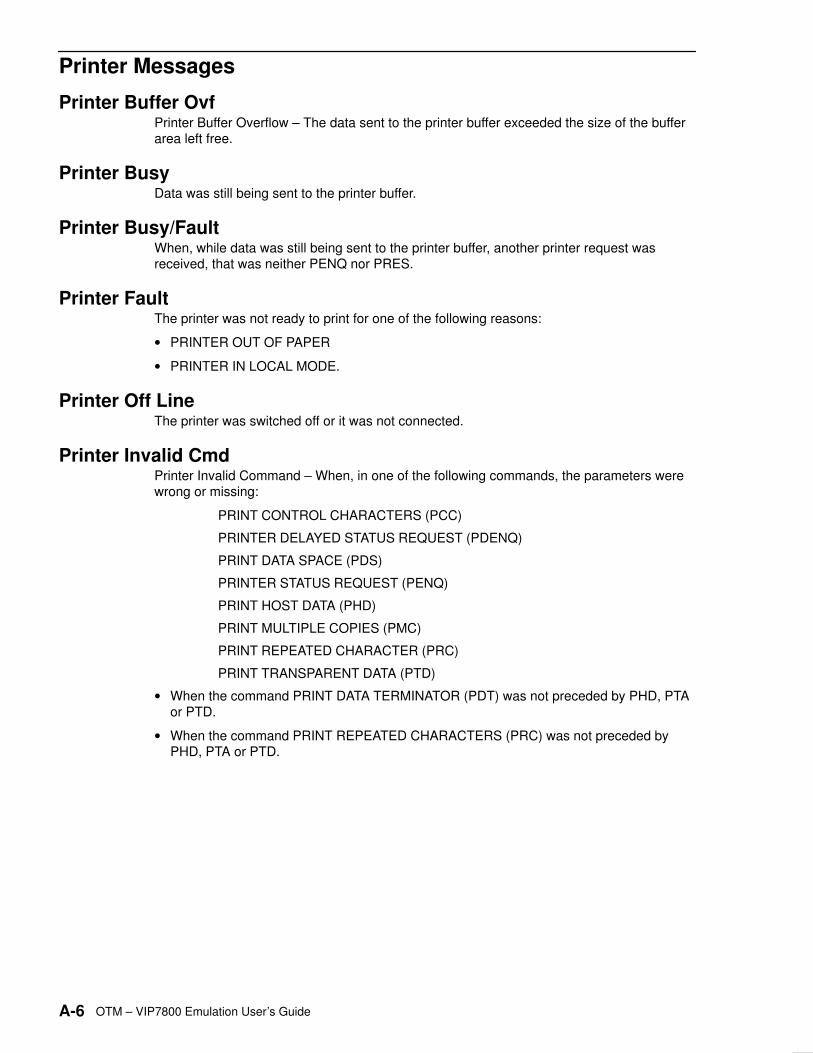
Printer Buffer OvfPrinter Buffer Overflow – The data sent to the printer buffer exceeded the size of the bufferarea left free.
Printer BusyData was still being sent to the printer buffer.
Printer Busy/FaultWhen, while data was still being sent to the printer buffer, another printer request wasreceived, that was neither PENQ nor PRES.
Printer FaultThe printer was not ready to print for one of the following reasons:
• PRINTER OUT OF PAPER
• PRINTER IN LOCAL MODE.
Printer Off LineThe printer was switched off or it was not connected.
Printer Invalid CmdPrinter Invalid Command – When, in one of the following commands, the parameters werewrong or missing:
PRINT CONTROL CHARACTERS (PCC)
PRINTER DELAYED STATUS REQUEST (PDENQ)
PRINT DATA SPACE (PDS)
PRINTER STATUS REQUEST (PENQ)
PRINT HOST DATA (PHD)
PRINT MULTIPLE COPIES (PMC)
PRINT REPEATED CHARACTER (PRC)
PRINT TRANSPARENT DATA (PTD)
• When the command PRINT DATA TERMINATOR (PDT) was not preceded by PHD, PTAor PTD.
• When the command PRINT REPEATED CHARACTERS (PRC) was not preceded byPHD, PTA or PTD.
A-7Messages
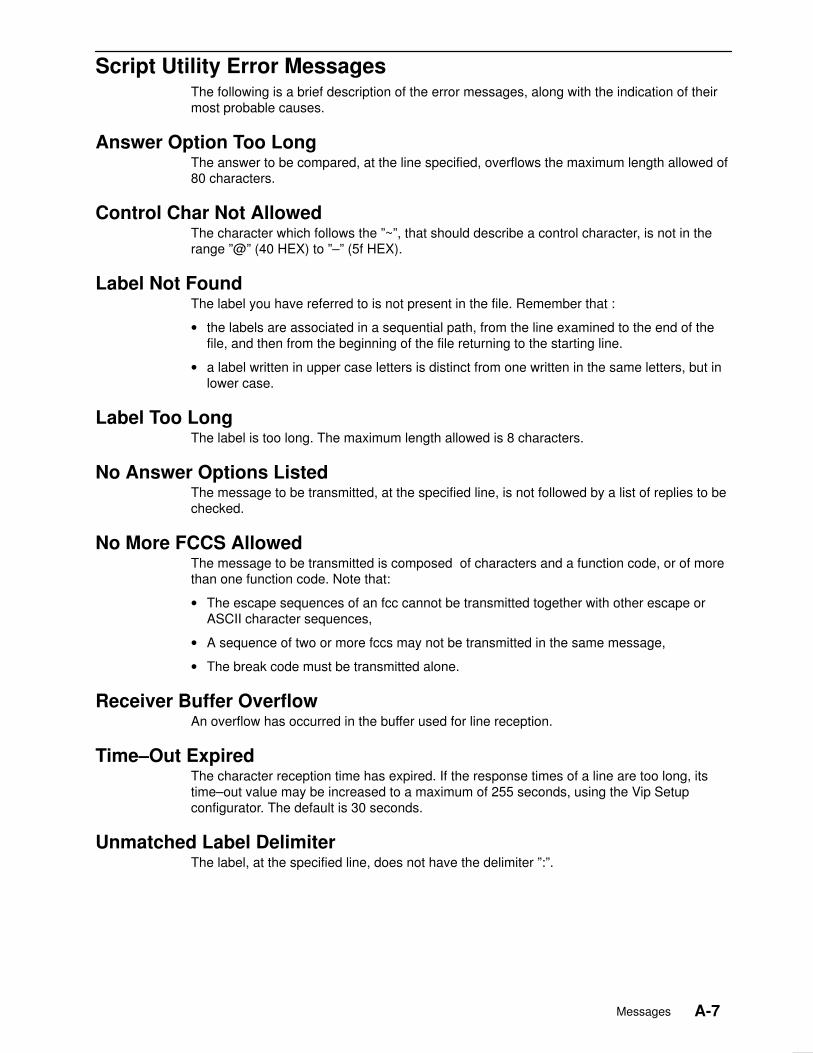
Script Utility Error MessagesThe following is a brief description of the error messages, along with the indication of theirmost probable causes.
Answer Option Too LongThe answer to be compared, at the line specified, overflows the maximum length allowed of80 characters.
Control Char Not AllowedThe character which follows the ”~”, that should describe a control character, is not in therange ”@” (40 HEX) to ”–” (5f HEX).
Label Not FoundThe label you have referred to is not present in the file. Remember that :
• the labels are associated in a sequential path, from the line examined to the end of thefile, and then from the beginning of the file returning to the starting line.
• a label written in upper case letters is distinct from one written in the same letters, but inlower case.
Label Too LongThe label is too long. The maximum length allowed is 8 characters.
No Answer Options ListedThe message to be transmitted, at the specified line, is not followed by a list of replies to bechecked.
No More FCCS AllowedThe message to be transmitted is composed of characters and a function code, or of morethan one function code. Note that:
• The escape sequences of an fcc cannot be transmitted together with other escape orASCII character sequences,
• A sequence of two or more fccs may not be transmitted in the same message,
• The break code must be transmitted alone.
Receiver Buffer OverflowAn overflow has occurred in the buffer used for line reception.
Time–Out ExpiredThe character reception time has expired. If the response times of a line are too long, itstime–out value may be increased to a maximum of 255 seconds, using the Vip Setupconfigurator. The default is 30 seconds.
Unmatched Label DelimiterThe label, at the specified line, does not have the delimiter ”:”.

A-8 OTM – VIP7800 Emulation User’s Guide
B-1VIP Commands
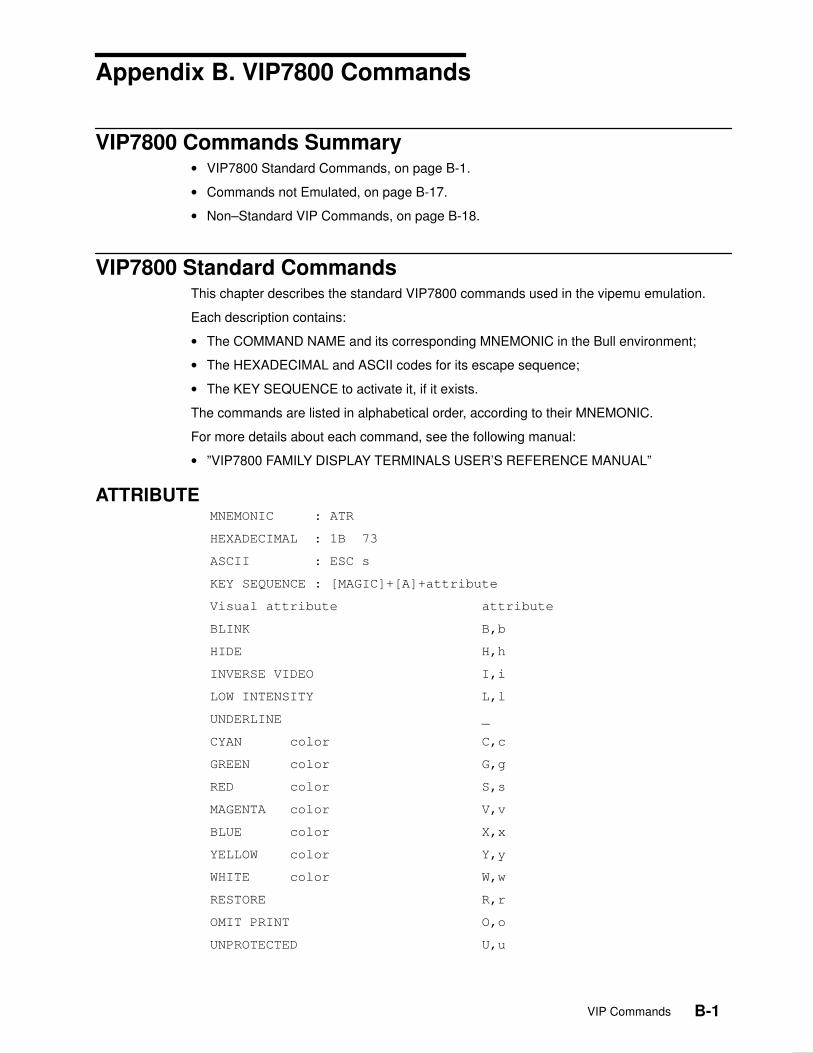
Appendix B. VIP7800 Commands
VIP7800 Commands Summary• VIP7800 Standard Commands, on page B-1.
• Commands not Emulated, on page B-17.
• Non–Standard VIP Commands, on page B-18.
VIP7800 Standard CommandsThis chapter describes the standard VIP7800 commands used in the vipemu emulation.
Each description contains:
• The COMMAND NAME and its corresponding MNEMONIC in the Bull environment;
• The HEXADECIMAL and ASCII codes for its escape sequence;
• The KEY SEQUENCE to activate it, if it exists.
The commands are listed in alphabetical order, according to their MNEMONIC.
For more details about each command, see the following manual:
• ”VIP7800 FAMILY DISPLAY TERMINALS USER’S REFERENCE MANUAL”
ATTRIBUTEMNEMONIC : ATR
HEXADECIMAL : 1B 73
ASCII : ESC s
KEY SEQUENCE : [MAGIC]+[A]+attribute
Visual attribute attribute
BLINK B,b
HIDE H,h
INVERSE VIDEO I,i
LOW INTENSITY L,l
UNDERLINE _
CYAN color C,c
GREEN color G,g
RED color S,s
MAGENTA color V,v
BLUE color X,x
YELLOW color Y,y
WHITE color W,w
RESTORE R,r
OMIT PRINT O,o
UNPROTECTED U,u

B-2 OTM – VIP7800 Emulation User’s Guide
DIGIT ONLY D,d
NUMERIC ONLY N,n
ALPHA ONLY A,a
ENTRY REQUIRED E,e
FILL REQUIRED F,f
JUSTIFY RIGHT J,j
TRANSMIT ALWAYS T,t
MODIFIED TRANSMIT M,m
PROTECTED P,p
AUTO LFMNEMONIC : ALF
HEXADECIMAL :
ASCII :
KEY SEQUENCE :
VT200 [ MAGIC ]+[ CR ]
BDS74XX [ MAGIC ]+[ CR ]
BDS71XX [ MAGIC ]+[ CR ]
PC–VT100 [ MAGIC1]+[ CR ]
BACK SPACEMNEMONIC : BS
HEXADECIMAL : 08
ASCII : BS
KEY SEQUENCE : [CNTL][H] or [BACKSPACE]
BELLMNEMONIC : BEL
HEXADECIMAL : 07
ASCII : BEL
KEY SEQUENCE : [CNTL][G]
BELL DISABLEMNEMONIC : BLD
HEXADECIMAL : 1B 67
ASCII : ESC g
KEY SEQUENCE : [MAGIC]+[E] + [G]
BELL ENABLEMNEMONIC : BLE
HEXADECIMAL : 1B 68
ASCII : ESC h
KEY SEQUENCE : [MAGIC]+[E]+[H]
B-3VIP Commands
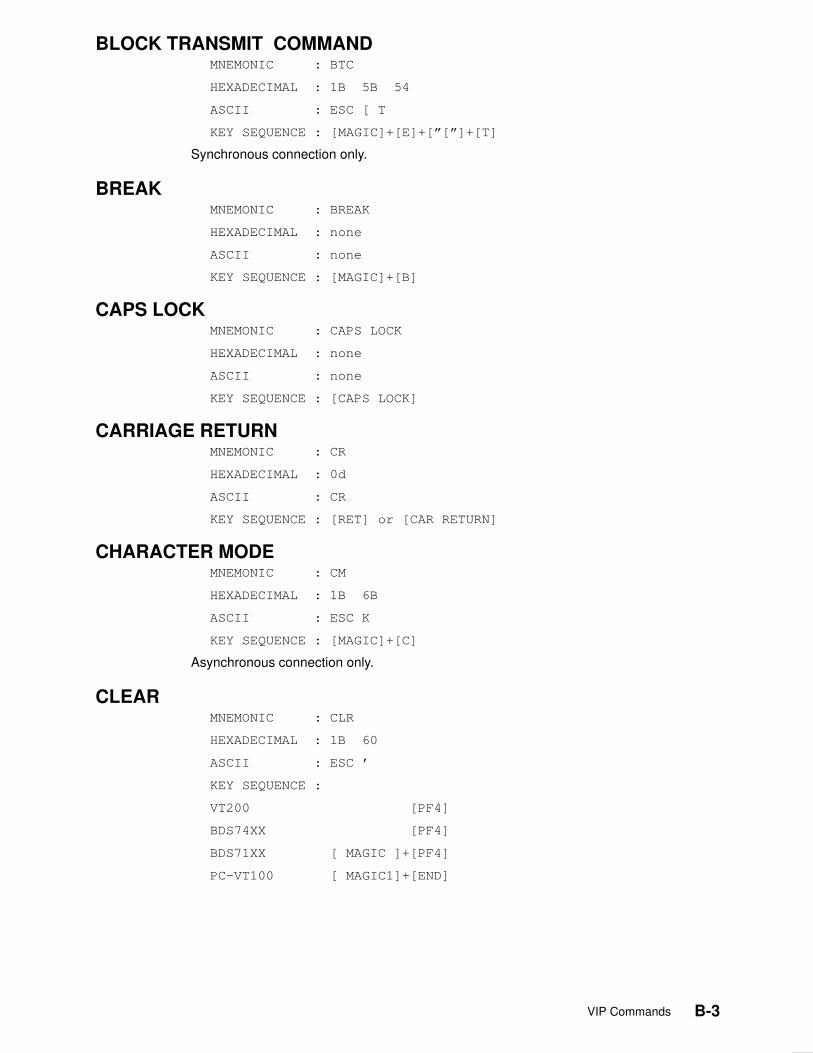
BLOCK TRANSMIT COMMANDMNEMONIC : BTC
HEXADECIMAL : 1B 5B 54
ASCII : ESC [ T
KEY SEQUENCE : [MAGIC]+[E]+[”[”]+[T]
Synchronous connection only.
BREAKMNEMONIC : BREAK
HEXADECIMAL : none
ASCII : none
KEY SEQUENCE : [MAGIC]+[B]
CAPS LOCKMNEMONIC : CAPS LOCK
HEXADECIMAL : none
ASCII : none
KEY SEQUENCE : [CAPS LOCK]
CARRIAGE RETURNMNEMONIC : CR
HEXADECIMAL : 0d
ASCII : CR
KEY SEQUENCE : [RET] or [CAR RETURN]
CHARACTER MODEMNEMONIC : CM
HEXADECIMAL : 1B 6B
ASCII : ESC K
KEY SEQUENCE : [MAGIC]+[C]
Asynchronous connection only.
CLEARMNEMONIC : CLR
HEXADECIMAL : 1B 60
ASCII : ESC ’
KEY SEQUENCE :
VT200 [PF4]
BDS74XX [PF4]
BDS71XX [ MAGIC ]+[PF4]
PC–VT100 [ MAGIC1]+[END]

B-4 OTM – VIP7800 Emulation User’s Guide
CONTROLMNEMONIC : CTL
HEXADECIMAL : none
ASCII : none
KEY SEQUENCE : [CNTL]
CURSOR BACK TABMNEMONIC : CBT
HEXADECIMAL : 1B 5B 5A
ASCII : ESC [ Z
KEY SEQUENCE :
VT200 [FIND]
BDS74XX [FIND]
BDS71XX [ SHF ] [TAB]
PC–VT100 [ MAGIC1]+[TAB]
CURSOR BACKWARDMNEMONIC : CUB
HEXADECIMAL : 1B 44
ASCII : ESC D
KEY SEQUENCE : [Left arrow]
CURSOR DOWNMNEMONIC : CUD
HEXADECIMAL : 1B 42
ASCII : ESC B
KEY SEQUENCE : [Down arrow]
CURSOR FORWARDMNEMONIC : CUF
HEXADECIMAL : 1B 43
ASCII : ESC C
KEY SEQUENCE : [Right arrow]
CURSOR HOMEMNEMONIC : CUH
HEXADECIMAL : 1B 48
ASCII : ESC H
KEY SEQUENCE :
VT200 [ MAGIC ]+[FIND]
BDS74XX [ MAGIC ]+[FIND]
BDS71XX [HOME]
PC–VT100 [HOME]
B-5VIP Commands
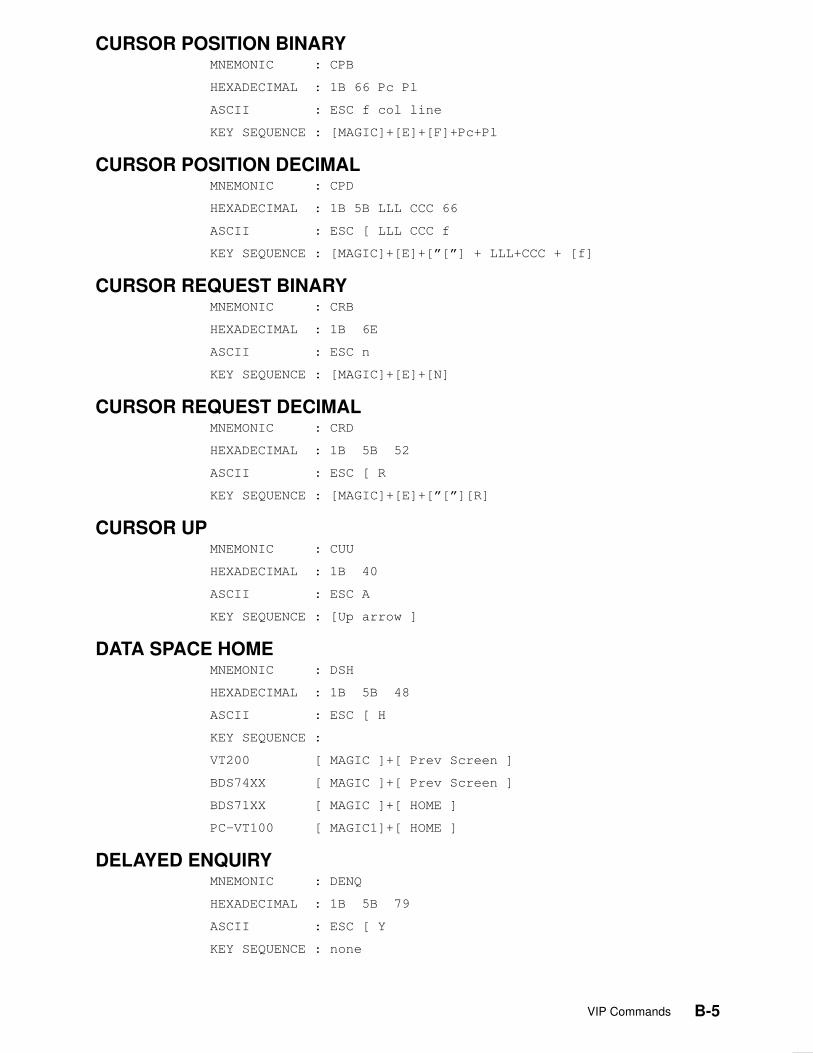
CURSOR POSITION BINARYMNEMONIC : CPB
HEXADECIMAL : 1B 66 Pc Pl
ASCII : ESC f col line
KEY SEQUENCE : [MAGIC]+[E]+[F]+Pc+Pl
CURSOR POSITION DECIMALMNEMONIC : CPD
HEXADECIMAL : 1B 5B LLL CCC 66
ASCII : ESC [ LLL CCC f
KEY SEQUENCE : [MAGIC]+[E]+[”[”] + LLL+CCC + [f]
CURSOR REQUEST BINARYMNEMONIC : CRB
HEXADECIMAL : 1B 6E
ASCII : ESC n
KEY SEQUENCE : [MAGIC]+[E]+[N]
CURSOR REQUEST DECIMALMNEMONIC : CRD
HEXADECIMAL : 1B 5B 52
ASCII : ESC [ R
KEY SEQUENCE : [MAGIC]+[E]+[”[”][R]
CURSOR UPMNEMONIC : CUU
HEXADECIMAL : 1B 40
ASCII : ESC A
KEY SEQUENCE : [Up arrow ]
DATA SPACE HOMEMNEMONIC : DSH
HEXADECIMAL : 1B 5B 48
ASCII : ESC [ H
KEY SEQUENCE :
VT200 [ MAGIC ]+[ Prev Screen ]
BDS74XX [ MAGIC ]+[ Prev Screen ]
BDS71XX [ MAGIC ]+[ HOME ]
PC–VT100 [ MAGIC1]+[ HOME ]
DELAYED ENQUIRYMNEMONIC : DENQ
HEXADECIMAL : 1B 5B 79
ASCII : ESC [ Y
KEY SEQUENCE : none
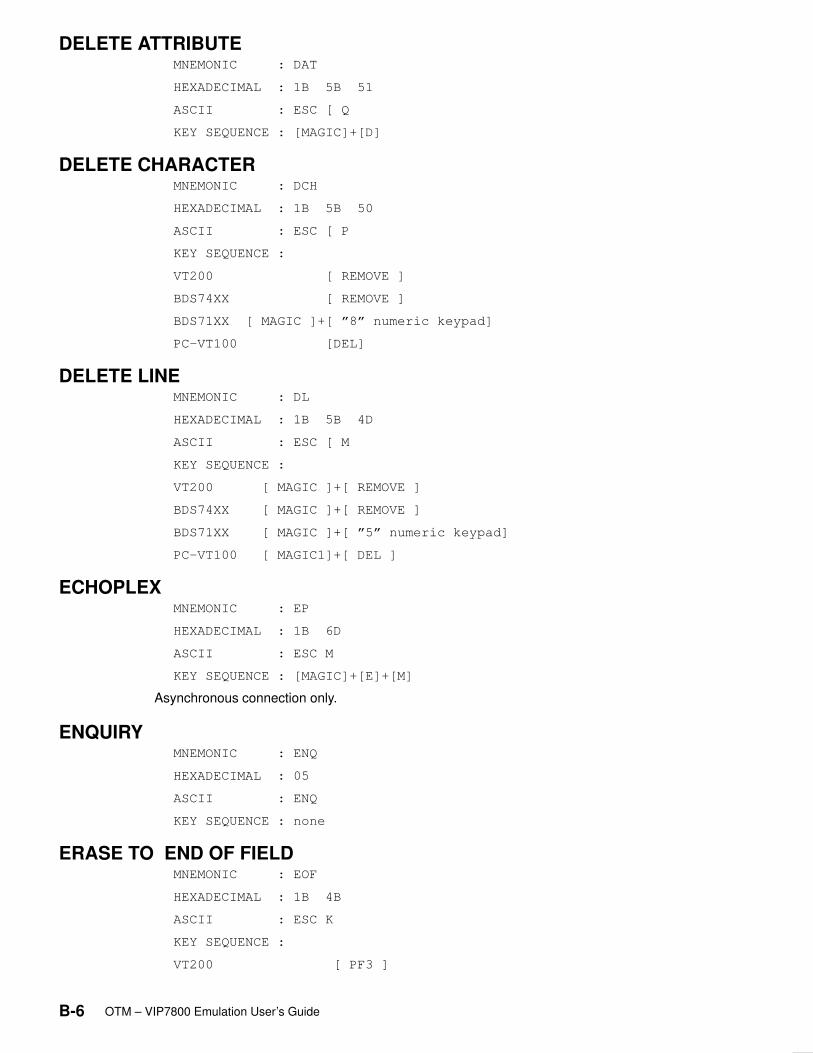
B-6 OTM – VIP7800 Emulation User’s Guide
DELETE ATTRIBUTEMNEMONIC : DAT
HEXADECIMAL : 1B 5B 51
ASCII : ESC [ Q
KEY SEQUENCE : [MAGIC]+[D]
DELETE CHARACTERMNEMONIC : DCH
HEXADECIMAL : 1B 5B 50
ASCII : ESC [ P
KEY SEQUENCE :
VT200 [ REMOVE ]
BDS74XX [ REMOVE ]
BDS71XX [ MAGIC ]+[ ”8” numeric keypad]
PC–VT100 [DEL]
DELETE LINEMNEMONIC : DL
HEXADECIMAL : 1B 5B 4D
ASCII : ESC [ M
KEY SEQUENCE :
VT200 [ MAGIC ]+[ REMOVE ]
BDS74XX [ MAGIC ]+[ REMOVE ]
BDS71XX [ MAGIC ]+[ ”5” numeric keypad]
PC–VT100 [ MAGIC1]+[ DEL ]
ECHOPLEXMNEMONIC : EP
HEXADECIMAL : 1B 6D
ASCII : ESC M
KEY SEQUENCE : [MAGIC]+[E]+[M]
Asynchronous connection only.
ENQUIRYMNEMONIC : ENQ
HEXADECIMAL : 05
ASCII : ENQ
KEY SEQUENCE : none
ERASE TO END OF FIELDMNEMONIC : EOF
HEXADECIMAL : 1B 4B
ASCII : ESC K
KEY SEQUENCE :
VT200 [ PF3 ]
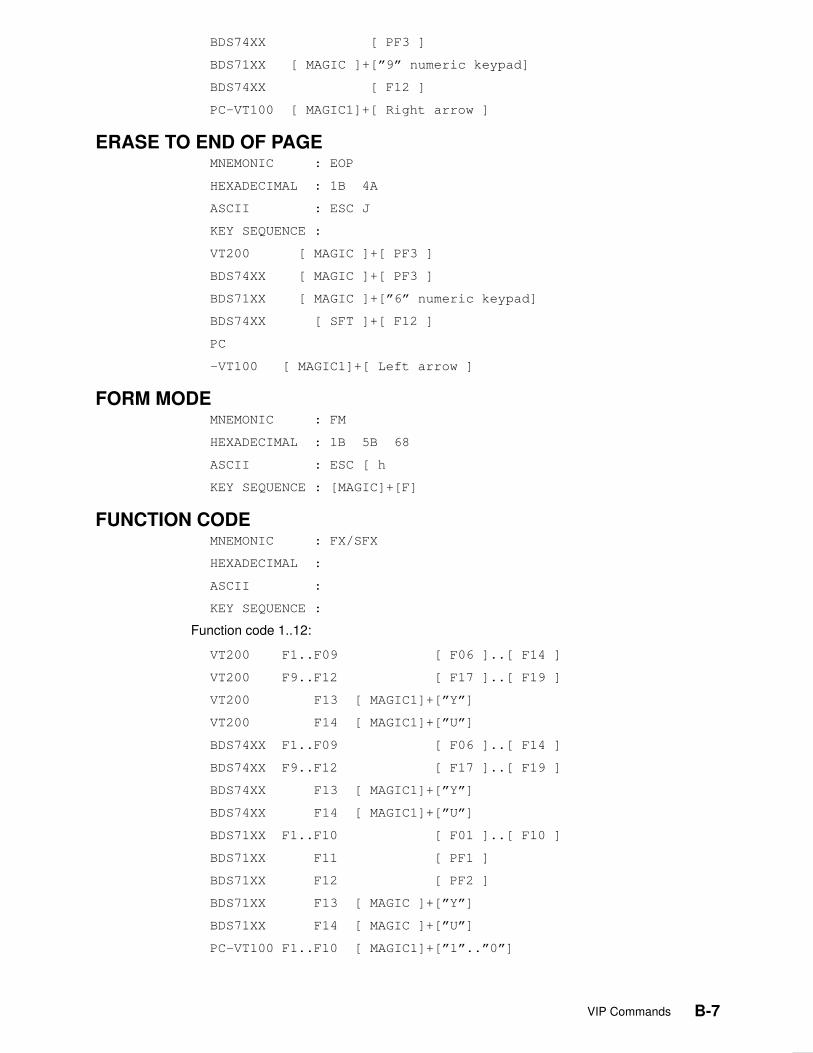
B-7VIP Commands
BDS74XX [ PF3 ]
BDS71XX [ MAGIC ]+[”9” numeric keypad]
BDS74XX [ F12 ]
PC–VT100 [ MAGIC1]+[ Right arrow ]
ERASE TO END OF PAGEMNEMONIC : EOP
HEXADECIMAL : 1B 4A
ASCII : ESC J
KEY SEQUENCE :
VT200 [ MAGIC ]+[ PF3 ]
BDS74XX [ MAGIC ]+[ PF3 ]
BDS71XX [ MAGIC ]+[”6” numeric keypad]
BDS74XX [ SFT ]+[ F12 ]
PC
–VT100 [ MAGIC1]+[ Left arrow ]
FORM MODEMNEMONIC : FM
HEXADECIMAL : 1B 5B 68
ASCII : ESC [ h
KEY SEQUENCE : [MAGIC]+[F]
FUNCTION CODEMNEMONIC : FX/SFX
HEXADECIMAL :
ASCII :
KEY SEQUENCE :
Function code 1..12:
VT200 F1..F09 [ F06 ]..[ F14 ]
VT200 F9..F12 [ F17 ]..[ F19 ]
VT200 F13 [ MAGIC1]+[”Y”]
VT200 F14 [ MAGIC1]+[”U”]
BDS74XX F1..F09 [ F06 ]..[ F14 ]
BDS74XX F9..F12 [ F17 ]..[ F19 ]
BDS74XX F13 [ MAGIC1]+[”Y”]
BDS74XX F14 [ MAGIC1]+[”U”]
BDS71XX F1..F10 [ F01 ]..[ F10 ]
BDS71XX F11 [ PF1 ]
BDS71XX F12 [ PF2 ]
BDS71XX F13 [ MAGIC ]+[”Y”]
BDS71XX F14 [ MAGIC ]+[”U”]
PC–VT100 F1..F10 [ MAGIC1]+[”1”..”0”]
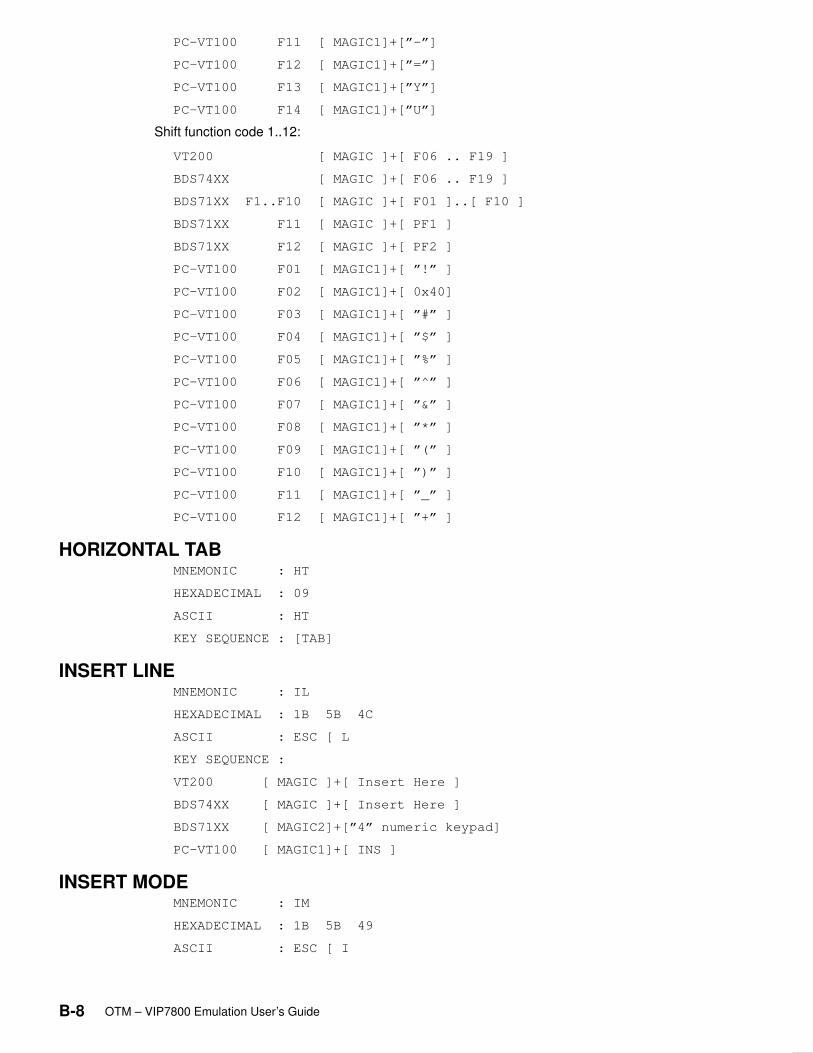
B-8 OTM – VIP7800 Emulation User’s Guide
PC–VT100 F11 [ MAGIC1]+[”–”]
PC–VT100 F12 [ MAGIC1]+[”=”]
PC–VT100 F13 [ MAGIC1]+[”Y”]
PC–VT100 F14 [ MAGIC1]+[”U”]
Shift function code 1..12:
VT200 [ MAGIC ]+[ F06 .. F19 ]
BDS74XX [ MAGIC ]+[ F06 .. F19 ]
BDS71XX F1..F10 [ MAGIC ]+[ F01 ]..[ F10 ]
BDS71XX F11 [ MAGIC ]+[ PF1 ]
BDS71XX F12 [ MAGIC ]+[ PF2 ]
PC–VT100 F01 [ MAGIC1]+[ ”!” ]
PC–VT100 F02 [ MAGIC1]+[ 0x40]
PC–VT100 F03 [ MAGIC1]+[ ”#” ]
PC–VT100 F04 [ MAGIC1]+[ ”$” ]
PC–VT100 F05 [ MAGIC1]+[ ”%” ]
PC–VT100 F06 [ MAGIC1]+[ ”^” ]
PC–VT100 F07 [ MAGIC1]+[ ”&” ]
PC–VT100 F08 [ MAGIC1]+[ ”*” ]
PC–VT100 F09 [ MAGIC1]+[ ”(” ]
PC–VT100 F10 [ MAGIC1]+[ ”)” ]
PC–VT100 F11 [ MAGIC1]+[ ”_” ]
PC–VT100 F12 [ MAGIC1]+[ ”+” ]
HORIZONTAL TABMNEMONIC : HT
HEXADECIMAL : 09
ASCII : HT
KEY SEQUENCE : [TAB]
INSERT LINEMNEMONIC : IL
HEXADECIMAL : 1B 5B 4C
ASCII : ESC [ L
KEY SEQUENCE :
VT200 [ MAGIC ]+[ Insert Here ]
BDS74XX [ MAGIC ]+[ Insert Here ]
BDS71XX [ MAGIC2]+[”4” numeric keypad]
PC–VT100 [ MAGIC1]+[ INS ]
INSERT MODEMNEMONIC : IM
HEXADECIMAL : 1B 5B 49
ASCII : ESC [ I
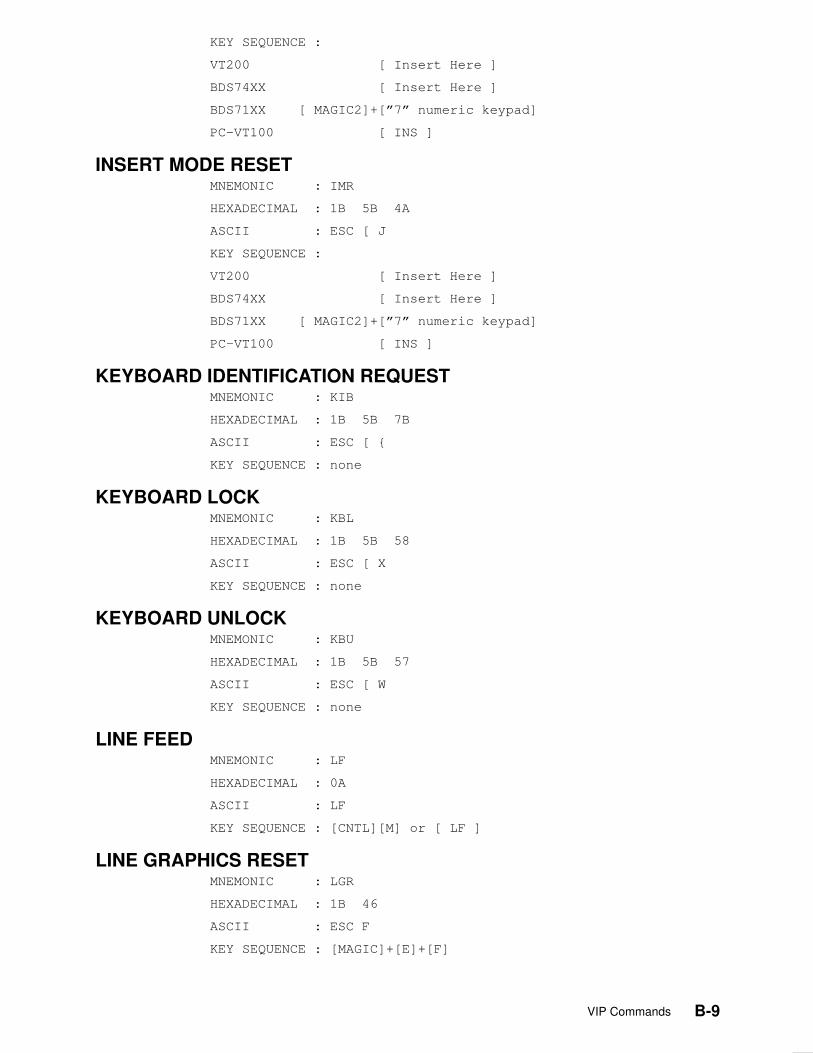
B-9VIP Commands
KEY SEQUENCE :
VT200 [ Insert Here ]
BDS74XX [ Insert Here ]
BDS71XX [ MAGIC2]+[”7” numeric keypad]
PC–VT100 [ INS ]
INSERT MODE RESETMNEMONIC : IMR
HEXADECIMAL : 1B 5B 4A
ASCII : ESC [ J
KEY SEQUENCE :
VT200 [ Insert Here ]
BDS74XX [ Insert Here ]
BDS71XX [ MAGIC2]+[”7” numeric keypad]
PC–VT100 [ INS ]
KEYBOARD IDENTIFICATION REQUESTMNEMONIC : KIB
HEXADECIMAL : 1B 5B 7B
ASCII : ESC [ {
KEY SEQUENCE : none
KEYBOARD LOCKMNEMONIC : KBL
HEXADECIMAL : 1B 5B 58
ASCII : ESC [ X
KEY SEQUENCE : none
KEYBOARD UNLOCKMNEMONIC : KBU
HEXADECIMAL : 1B 5B 57
ASCII : ESC [ W
KEY SEQUENCE : none
LINE FEEDMNEMONIC : LF
HEXADECIMAL : 0A
ASCII : LF
KEY SEQUENCE : [CNTL][M] or [ LF ]
LINE GRAPHICS RESETMNEMONIC : LGR
HEXADECIMAL : 1B 46
ASCII : ESC F
KEY SEQUENCE : [MAGIC]+[E]+[F]

B-10 OTM – VIP7800 Emulation User’s Guide
LINE GRAPHICS SETMNEMONIC : LGS
HEXADECIMAL : 1B 47
ASCII : ESC G
KEY SEQUENCE : [MAGIC]+[E]+[G]
LOCALMNEMONIC : LCL
HEXADECIMAL : none
ASCII : none
KEY SEQUENCE : [MAGIC]+[L]
NEXT SEGMENTMNEMONIC : NS
HEXADECIMAL : 1B 5B 32 73
ASCII : ESC [ 2 s
KEY SEQUENCE :
VT200 [ Next Screen ]
BDS74XX [ Next Screen ]
BDS71XX [ MAGIC ]+[”.” numeric keypad]
PC–VT100 [ MAGIC1]+[ PgDn ]
Valid with 72 line option only.
NO OPERATIONMNEMONIC : NOP
HEXADECIMAL : 1B 5B 78
ASCII : ESC [ x
KEY SEQUENCE : [MAGIC]+[E]+[”[”]+[x]
NON–ECHOPLEXMNEMONIC : NEP
HEXADECIMAL : 1B 6C
ASCII : ESC l
KEY SEQUENCE : [MAGIC]+[E]+[L]
Asynchronous connection only.
PREVIOUS SEGMENTMNEMONIC : PS
HEXADECIMAL : 1B 5B 33 73
ASCII : ESC [ 3 s
KEY SEQUENCE :
VT200 [ Prv Screen ]
BDS74XX [ Prv Screen ]
BDS71XX [ MAGIC ]+[”3” numeric keypad]
PC–VT100 [ MAGIC1]+[ PgUp ]
Valid with 72 line option only.
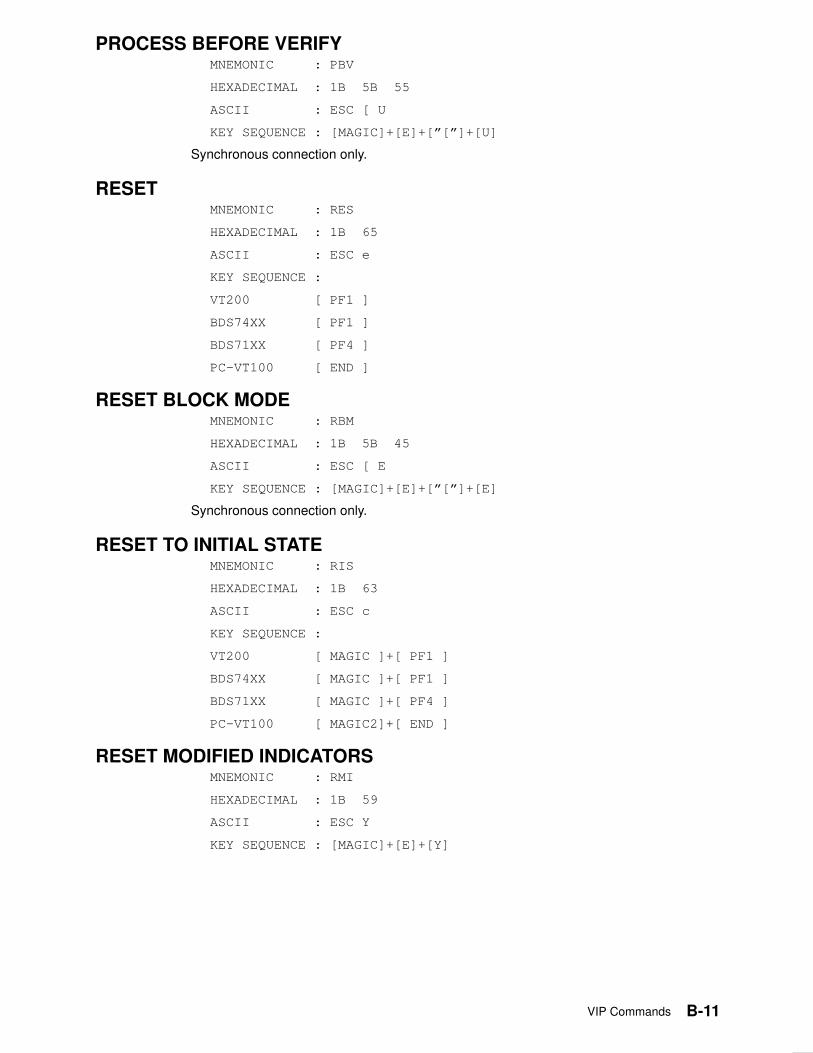
B-11VIP Commands
PROCESS BEFORE VERIFYMNEMONIC : PBV
HEXADECIMAL : 1B 5B 55
ASCII : ESC [ U
KEY SEQUENCE : [MAGIC]+[E]+[”[”]+[U]
Synchronous connection only.
RESETMNEMONIC : RES
HEXADECIMAL : 1B 65
ASCII : ESC e
KEY SEQUENCE :
VT200 [ PF1 ]
BDS74XX [ PF1 ]
BDS71XX [ PF4 ]
PC–VT100 [ END ]
RESET BLOCK MODEMNEMONIC : RBM
HEXADECIMAL : 1B 5B 45
ASCII : ESC [ E
KEY SEQUENCE : [MAGIC]+[E]+[”[”]+[E]
Synchronous connection only.
RESET TO INITIAL STATEMNEMONIC : RIS
HEXADECIMAL : 1B 63
ASCII : ESC c
KEY SEQUENCE :
VT200 [ MAGIC ]+[ PF1 ]
BDS74XX [ MAGIC ]+[ PF1 ]
BDS71XX [ MAGIC ]+[ PF4 ]
PC–VT100 [ MAGIC2]+[ END ]
RESET MODIFIED INDICATORSMNEMONIC : RMI
HEXADECIMAL : 1B 59
ASCII : ESC Y
KEY SEQUENCE : [MAGIC]+[E]+[Y]
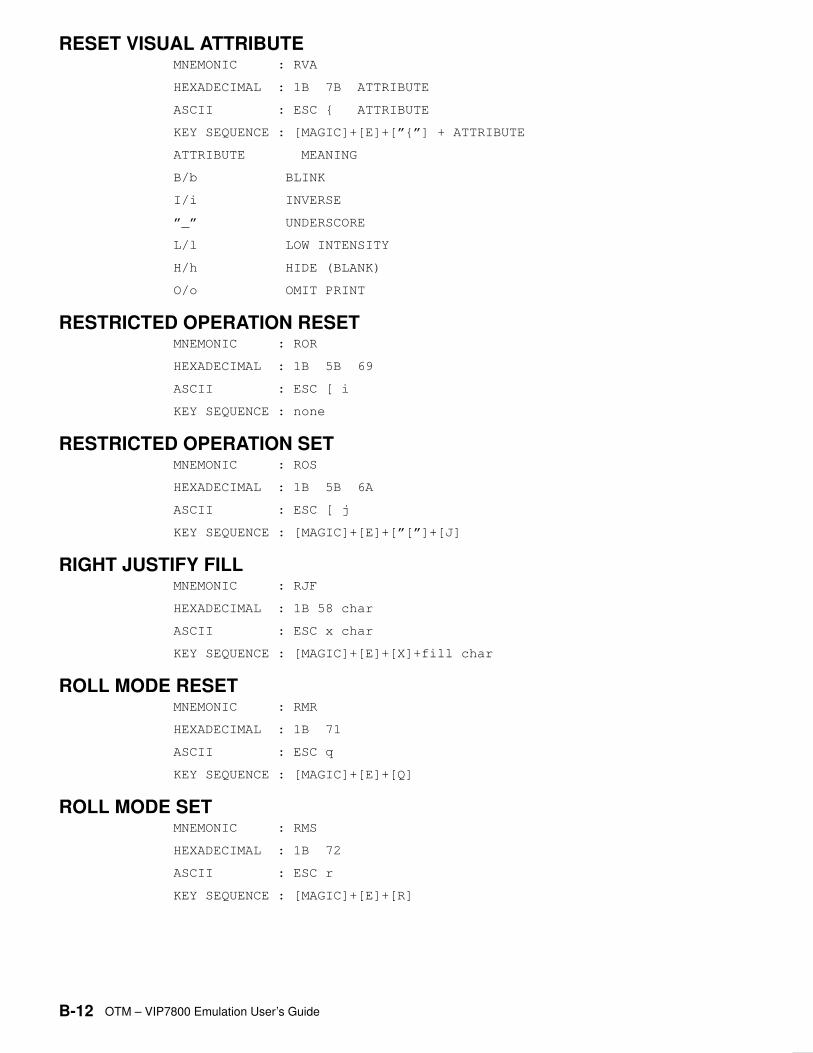
B-12 OTM – VIP7800 Emulation User’s Guide
RESET VISUAL ATTRIBUTEMNEMONIC : RVA
HEXADECIMAL : 1B 7B ATTRIBUTE
ASCII : ESC { ATTRIBUTE
KEY SEQUENCE : [MAGIC]+[E]+[”{”] + ATTRIBUTE
ATTRIBUTE MEANING
B/b BLINK
I/i INVERSE
”_” UNDERSCORE
L/l LOW INTENSITY
H/h HIDE (BLANK)
O/o OMIT PRINT
RESTRICTED OPERATION RESETMNEMONIC : ROR
HEXADECIMAL : 1B 5B 69
ASCII : ESC [ i
KEY SEQUENCE : none
RESTRICTED OPERATION SETMNEMONIC : ROS
HEXADECIMAL : 1B 5B 6A
ASCII : ESC [ j
KEY SEQUENCE : [MAGIC]+[E]+[”[”]+[J]
RIGHT JUSTIFY FILLMNEMONIC : RJF
HEXADECIMAL : 1B 58 char
ASCII : ESC x char
KEY SEQUENCE : [MAGIC]+[E]+[X]+fill char
ROLL MODE RESETMNEMONIC : RMR
HEXADECIMAL : 1B 71
ASCII : ESC q
KEY SEQUENCE : [MAGIC]+[E]+[Q]
ROLL MODE SETMNEMONIC : RMS
HEXADECIMAL : 1B 72
ASCII : ESC r
KEY SEQUENCE : [MAGIC]+[E]+[R]

B-13VIP Commands
SCROLL DOWNMNEMONIC : SD
HEXADECIMAL : 1B 5B 31 73
ASCII : ESC [ 1 s
KEY SEQUENCE :
VT200 [ MAGIC ]+[ Down arrow ]
BDS74XX [ MAGIC ]+[ Down arrow ]
BDS71XX [ MAGIC ]+[ Down arrow ]
PC–VT100 [ PgDn ]
Valid with 72 line option only.
SCROLL UPMNEMONIC : SU
HEXADECIMAL : 1B 5B 30 73
ASCII : ESC [ 0 s
KEY SEQUENCE :
VT200 [ MAGIC ]+[ Up arrow ]
BDS74XX [ MAGIC ]+[ Up arrow ]
BDS71XX [ MAGIC ]+[ Up arrow ]
PC–VT100 [ PgUp ]
Valid with 72 line option only.
SET BLOCK TRANSMITMNEMONIC : SBT
HEXADECIMAL : 1B 5B nnnn 46
ASCII : ESC [ nnnn F
KEY SEQUENCE : [MAGIC]+[E]+[”[”]+[n]+[n]+[n]+[n]+[F]
Synchronous connection only.
SET COLOR ATTRIBUTEMNEMONIC : CAT
HEXADECIMAL : 1B 5F CCC 76
ASCII : ESC [ CCC v
KEY SEQUENCE : [MAGIC]+[E]+[”[”]+CCC+[v]
CCC Visual color
000 default color
001 Blue
002 Green
003 Cyan
004 Red
005 Magenta
006 Yellow
007 White
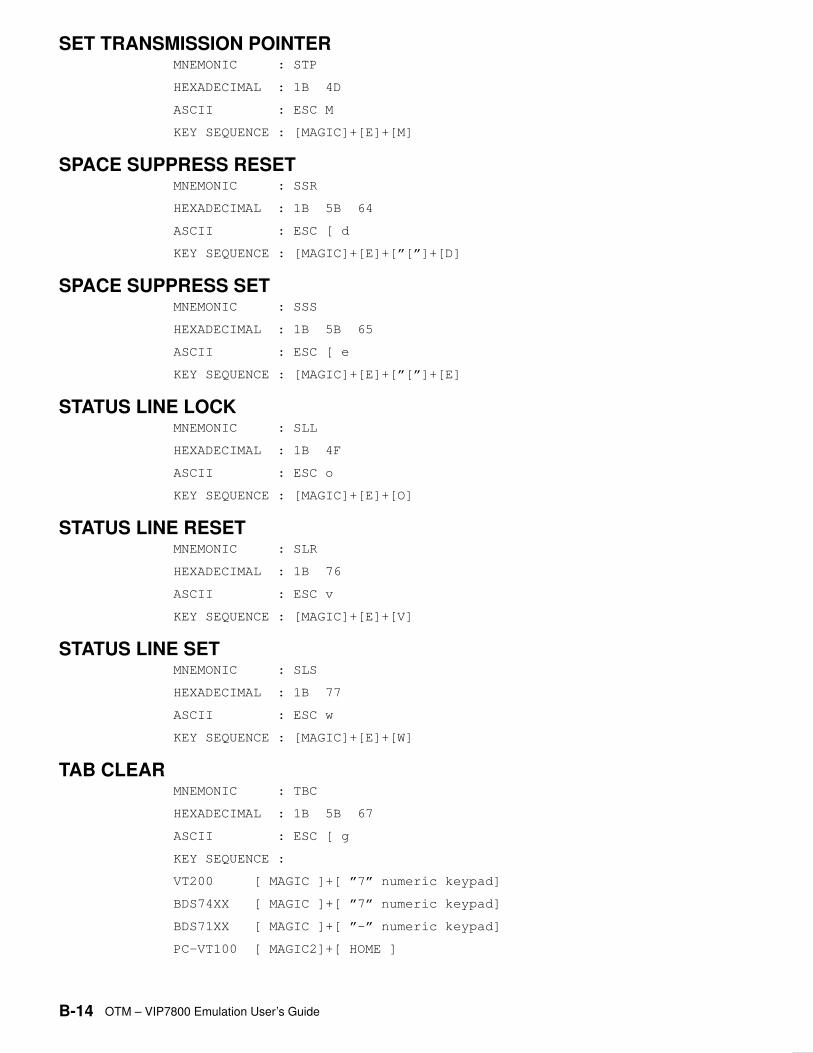
B-14 OTM – VIP7800 Emulation User’s Guide
SET TRANSMISSION POINTERMNEMONIC : STP
HEXADECIMAL : 1B 4D
ASCII : ESC M
KEY SEQUENCE : [MAGIC]+[E]+[M]
SPACE SUPPRESS RESETMNEMONIC : SSR
HEXADECIMAL : 1B 5B 64
ASCII : ESC [ d
KEY SEQUENCE : [MAGIC]+[E]+[”[”]+[D]
SPACE SUPPRESS SETMNEMONIC : SSS
HEXADECIMAL : 1B 5B 65
ASCII : ESC [ e
KEY SEQUENCE : [MAGIC]+[E]+[”[”]+[E]
STATUS LINE LOCKMNEMONIC : SLL
HEXADECIMAL : 1B 4F
ASCII : ESC o
KEY SEQUENCE : [MAGIC]+[E]+[O]
STATUS LINE RESETMNEMONIC : SLR
HEXADECIMAL : 1B 76
ASCII : ESC v
KEY SEQUENCE : [MAGIC]+[E]+[V]
STATUS LINE SETMNEMONIC : SLS
HEXADECIMAL : 1B 77
ASCII : ESC w
KEY SEQUENCE : [MAGIC]+[E]+[W]
TAB CLEARMNEMONIC : TBC
HEXADECIMAL : 1B 5B 67
ASCII : ESC [ g
KEY SEQUENCE :
VT200 [ MAGIC ]+[ ”7” numeric keypad]
BDS74XX [ MAGIC ]+[ ”7” numeric keypad]
BDS71XX [ MAGIC ]+[ ”–” numeric keypad]
PC–VT100 [ MAGIC2]+[ HOME ]
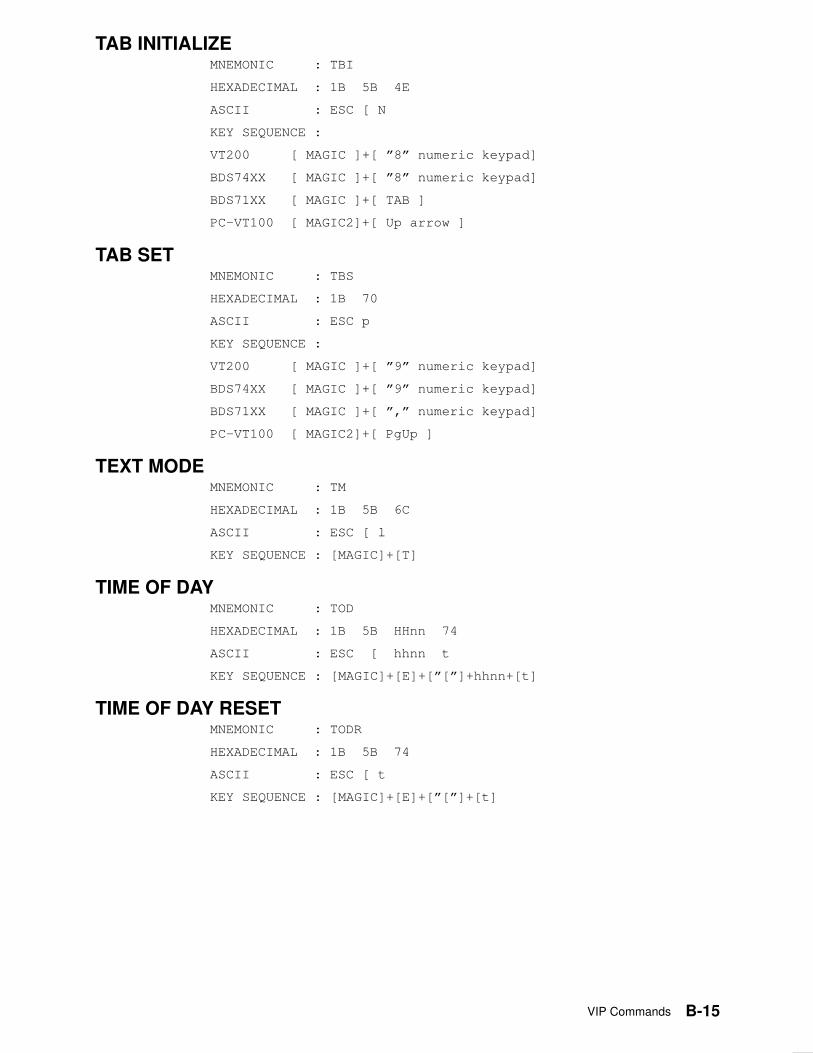
B-15VIP Commands
TAB INITIALIZEMNEMONIC : TBI
HEXADECIMAL : 1B 5B 4E
ASCII : ESC [ N
KEY SEQUENCE :
VT200 [ MAGIC ]+[ ”8” numeric keypad]
BDS74XX [ MAGIC ]+[ ”8” numeric keypad]
BDS71XX [ MAGIC ]+[ TAB ]
PC–VT100 [ MAGIC2]+[ Up arrow ]
TAB SETMNEMONIC : TBS
HEXADECIMAL : 1B 70
ASCII : ESC p
KEY SEQUENCE :
VT200 [ MAGIC ]+[ ”9” numeric keypad]
BDS74XX [ MAGIC ]+[ ”9” numeric keypad]
BDS71XX [ MAGIC ]+[ ”,” numeric keypad]
PC–VT100 [ MAGIC2]+[ PgUp ]
TEXT MODEMNEMONIC : TM
HEXADECIMAL : 1B 5B 6C
ASCII : ESC [ l
KEY SEQUENCE : [MAGIC]+[T]
TIME OF DAYMNEMONIC : TOD
HEXADECIMAL : 1B 5B HHnn 74
ASCII : ESC [ hhnn t
KEY SEQUENCE : [MAGIC]+[E]+[”[”]+hhnn+[t]
TIME OF DAY RESETMNEMONIC : TODR
HEXADECIMAL : 1B 5B 74
ASCII : ESC [ t
KEY SEQUENCE : [MAGIC]+[E]+[”[”]+[t]
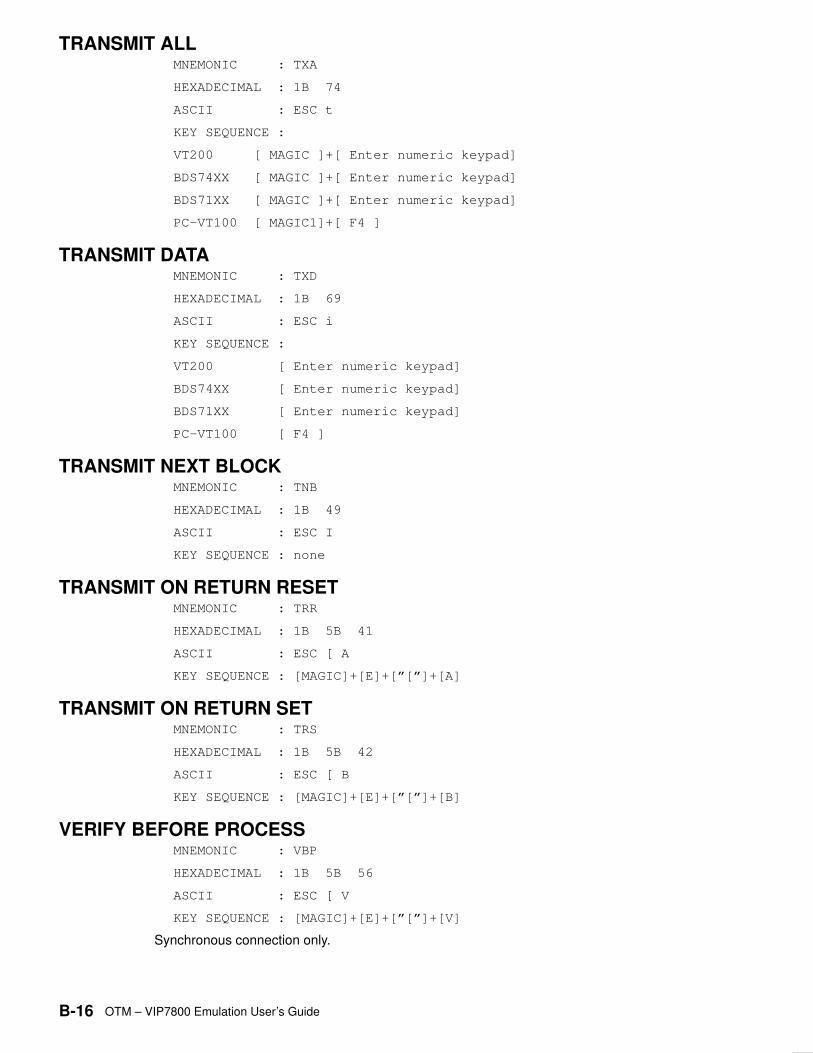
B-16 OTM – VIP7800 Emulation User’s Guide
TRANSMIT ALLMNEMONIC : TXA
HEXADECIMAL : 1B 74
ASCII : ESC t
KEY SEQUENCE :
VT200 [ MAGIC ]+[ Enter numeric keypad]
BDS74XX [ MAGIC ]+[ Enter numeric keypad]
BDS71XX [ MAGIC ]+[ Enter numeric keypad]
PC–VT100 [ MAGIC1]+[ F4 ]
TRANSMIT DATAMNEMONIC : TXD
HEXADECIMAL : 1B 69
ASCII : ESC i
KEY SEQUENCE :
VT200 [ Enter numeric keypad]
BDS74XX [ Enter numeric keypad]
BDS71XX [ Enter numeric keypad]
PC–VT100 [ F4 ]
TRANSMIT NEXT BLOCKMNEMONIC : TNB
HEXADECIMAL : 1B 49
ASCII : ESC I
KEY SEQUENCE : none
TRANSMIT ON RETURN RESETMNEMONIC : TRR
HEXADECIMAL : 1B 5B 41
ASCII : ESC [ A
KEY SEQUENCE : [MAGIC]+[E]+[”[”]+[A]
TRANSMIT ON RETURN SETMNEMONIC : TRS
HEXADECIMAL : 1B 5B 42
ASCII : ESC [ B
KEY SEQUENCE : [MAGIC]+[E]+[”[”]+[B]
VERIFY BEFORE PROCESSMNEMONIC : VBP
HEXADECIMAL : 1B 5B 56
ASCII : ESC [ V
KEY SEQUENCE : [MAGIC]+[E]+[”[”]+[V]
Synchronous connection only.

B-17VIP Commands
Commands not EmulatedBLOCK TRANSMIT AUTOMATICALLY [BTA]
DISCONNECT [DEOT]
FIRMWARE VERSION DISPLAY [FVD]
TEST RESULT DISPLAY [TRD]
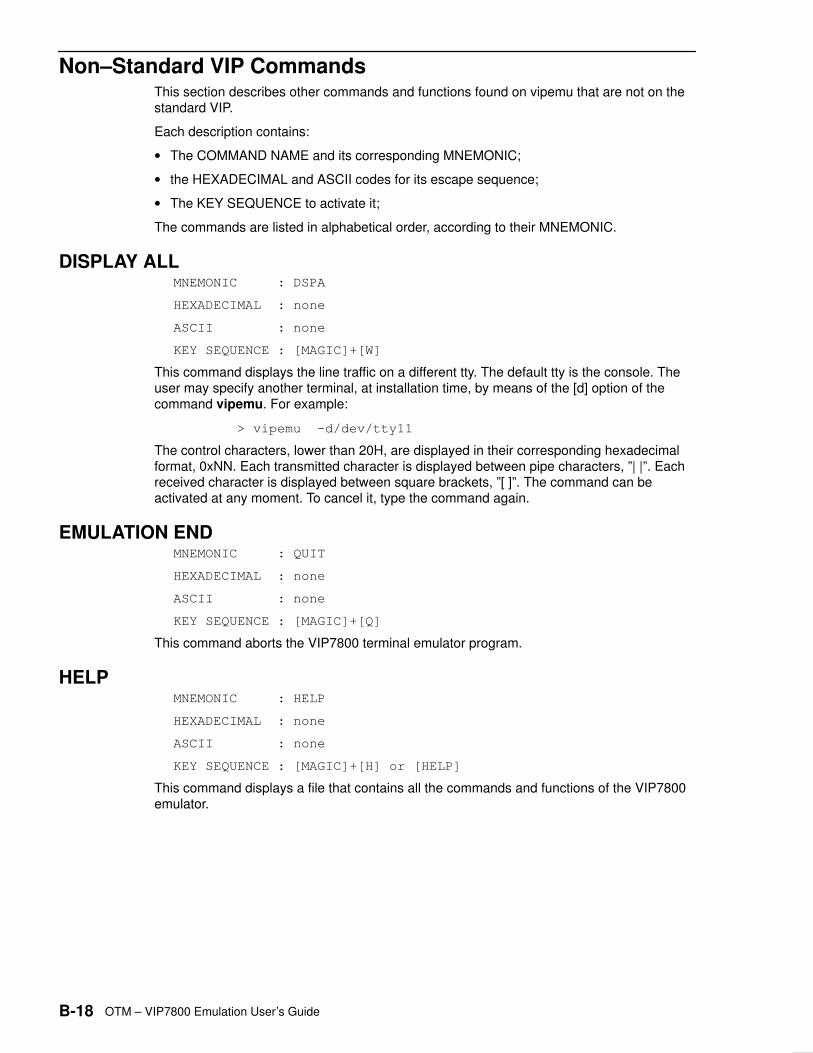
B-18 OTM – VIP7800 Emulation User’s Guide
Non–Standard VIP CommandsThis section describes other commands and functions found on vipemu that are not on thestandard VIP.
Each description contains:
• The COMMAND NAME and its corresponding MNEMONIC;
• the HEXADECIMAL and ASCII codes for its escape sequence;
• The KEY SEQUENCE to activate it;
The commands are listed in alphabetical order, according to their MNEMONIC.
DISPLAY ALLMNEMONIC : DSPA
HEXADECIMAL : none
ASCII : none
KEY SEQUENCE : [MAGIC]+[W]
This command displays the line traffic on a different tty. The default tty is the console. Theuser may specify another terminal, at installation time, by means of the [d] option of thecommand vipemu. For example:
> vipemu –d/dev/tty11
The control characters, lower than 20H, are displayed in their corresponding hexadecimalformat, 0xNN. Each transmitted character is displayed between pipe characters, ”| |”. Eachreceived character is displayed between square brackets, ”[ ]”. The command can beactivated at any moment. To cancel it, type the command again.
EMULATION ENDMNEMONIC : QUIT
HEXADECIMAL : none
ASCII : none
KEY SEQUENCE : [MAGIC]+[Q]
This command aborts the VIP7800 terminal emulator program.
HELPMNEMONIC : HELP
HEXADECIMAL : none
ASCII : none
KEY SEQUENCE : [MAGIC]+[H] or [HELP]
This command displays a file that contains all the commands and functions of the VIP7800emulator.
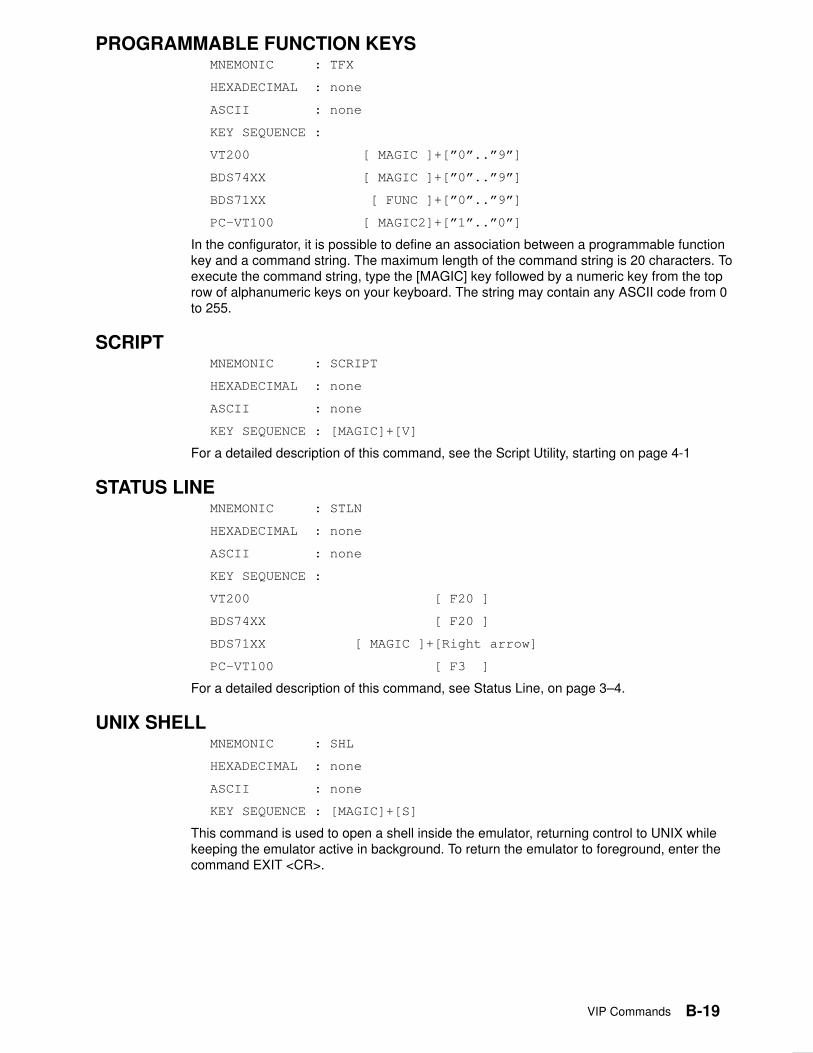
B-19VIP Commands
PROGRAMMABLE FUNCTION KEYSMNEMONIC : TFX
HEXADECIMAL : none
ASCII : none
KEY SEQUENCE :
VT200 [ MAGIC ]+[”0”..”9”]
BDS74XX [ MAGIC ]+[”0”..”9”]
BDS71XX [ FUNC ]+[”0”..”9”]
PC–VT100 [ MAGIC2]+[”1”..”0”]
In the configurator, it is possible to define an association between a programmable functionkey and a command string. The maximum length of the command string is 20 characters. Toexecute the command string, type the [MAGIC] key followed by a numeric key from the toprow of alphanumeric keys on your keyboard. The string may contain any ASCII code from 0to 255.
SCRIPTMNEMONIC : SCRIPT
HEXADECIMAL : none
ASCII : none
KEY SEQUENCE : [MAGIC]+[V]
For a detailed description of this command, see the Script Utility, starting on page 4-1
STATUS LINEMNEMONIC : STLN
HEXADECIMAL : none
ASCII : none
KEY SEQUENCE :
VT200 [ F20 ]
BDS74XX [ F20 ]
BDS71XX [ MAGIC ]+[Right arrow]
PC–VT100 [ F3 ]
For a detailed description of this command, see Status Line, on page 3–4.
UNIX SHELLMNEMONIC : SHL
HEXADECIMAL : none
ASCII : none
KEY SEQUENCE : [MAGIC]+[S]
This command is used to open a shell inside the emulator, returning control to UNIX whilekeeping the emulator active in background. To return the emulator to foreground, enter thecommand EXIT <CR>.
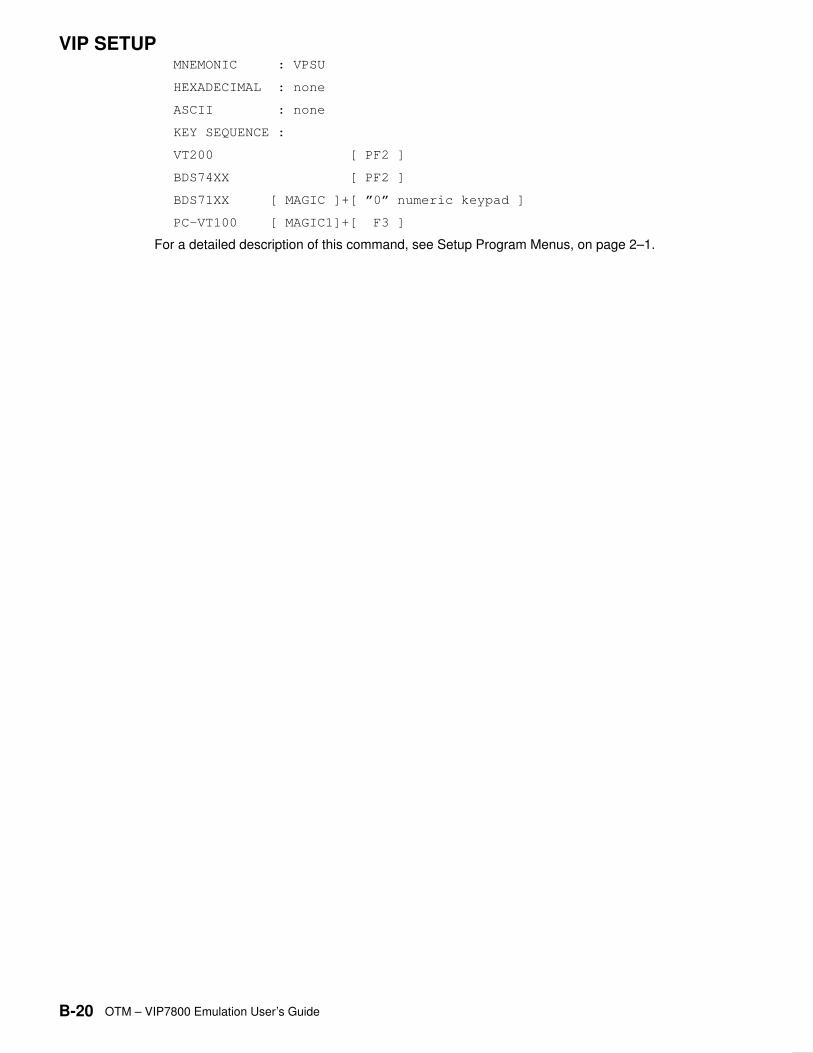
B-20 OTM – VIP7800 Emulation User’s Guide
VIP SETUPMNEMONIC : VPSU
HEXADECIMAL : none
ASCII : none
KEY SEQUENCE :
VT200 [ PF2 ]
BDS74XX [ PF2 ]
BDS71XX [ MAGIC ]+[ ”0” numeric keypad ]
PC–VT100 [ MAGIC1]+[ F3 ]
For a detailed description of this command, see Setup Program Menus, on page 2–1.
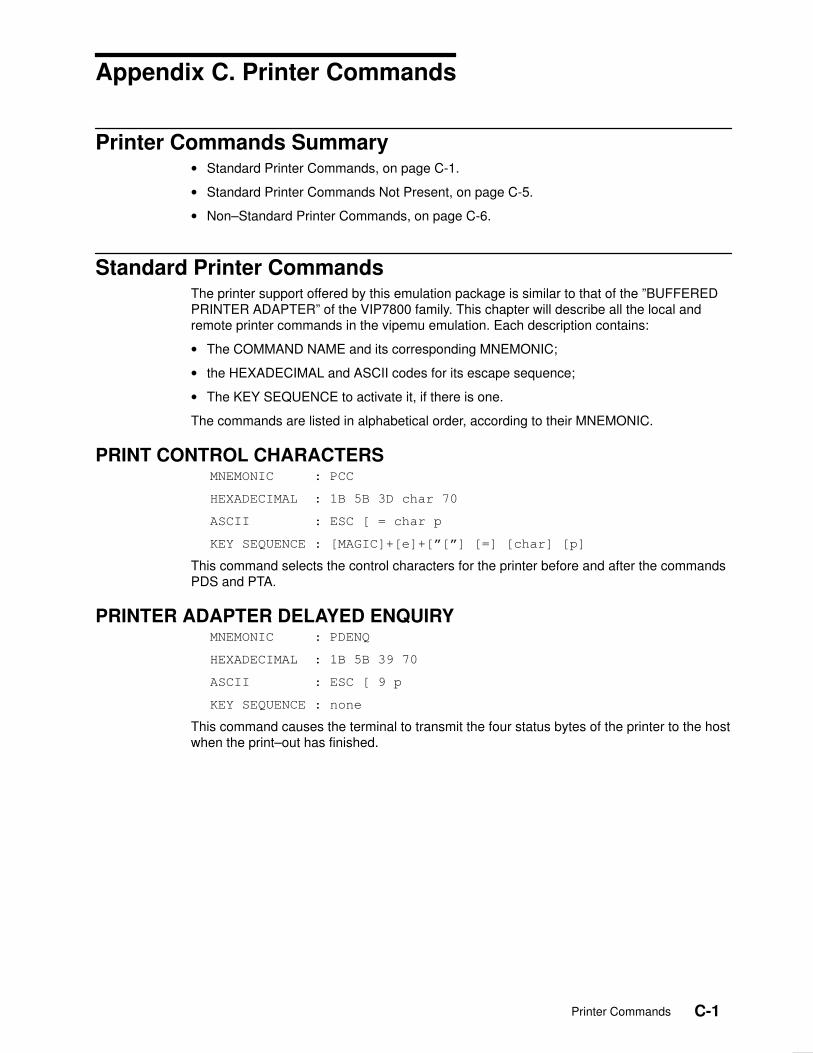
C-1Printer Commands
Appendix C. Printer Commands
Printer Commands Summary• Standard Printer Commands, on page C-1.
• Standard Printer Commands Not Present, on page C-5.
• Non–Standard Printer Commands, on page C-6.
Standard Printer CommandsThe printer support offered by this emulation package is similar to that of the ”BUFFEREDPRINTER ADAPTER” of the VIP7800 family. This chapter will describe all the local andremote printer commands in the vipemu emulation. Each description contains:
• The COMMAND NAME and its corresponding MNEMONIC;
• the HEXADECIMAL and ASCII codes for its escape sequence;
• The KEY SEQUENCE to activate it, if there is one.
The commands are listed in alphabetical order, according to their MNEMONIC.
PRINT CONTROL CHARACTERSMNEMONIC : PCC
HEXADECIMAL : 1B 5B 3D char 70
ASCII : ESC [ = char p
KEY SEQUENCE : [MAGIC]+[e]+[”[”] [=] [char] [p]
This command selects the control characters for the printer before and after the commandsPDS and PTA.
PRINTER ADAPTER DELAYED ENQUIRYMNEMONIC : PDENQ
HEXADECIMAL : 1B 5B 39 70
ASCII : ESC [ 9 p
KEY SEQUENCE : none
This command causes the terminal to transmit the four status bytes of the printer to the hostwhen the print–out has finished.
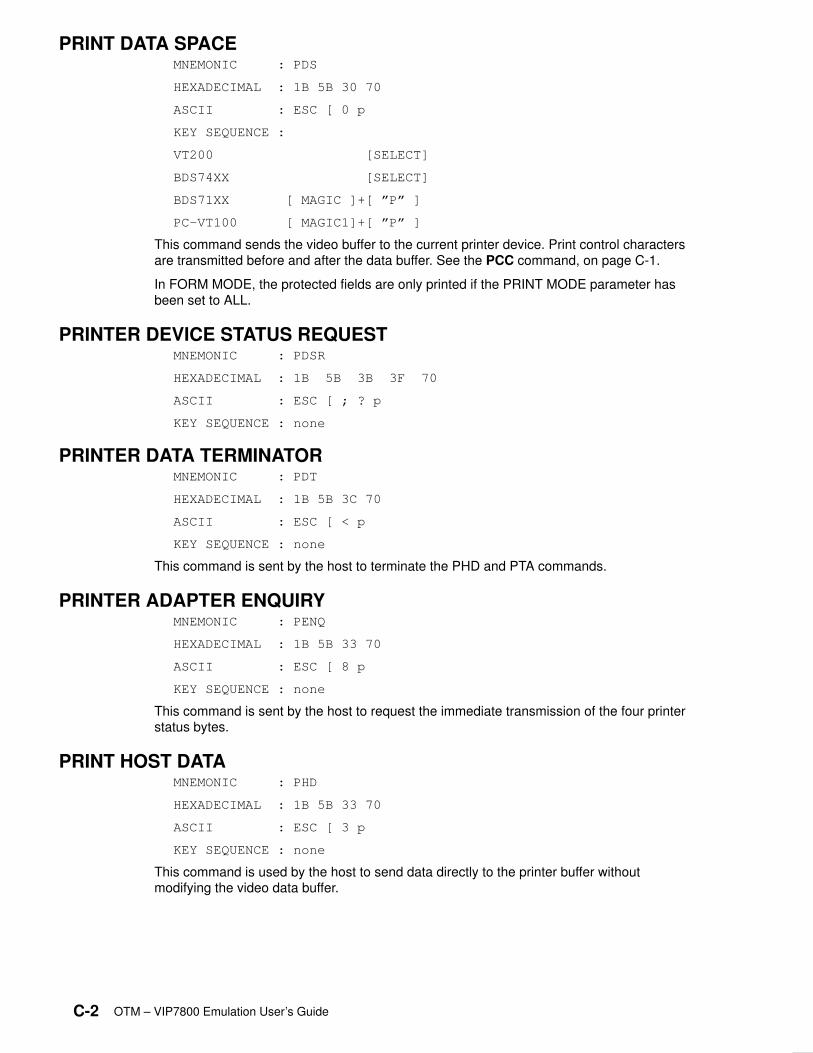
C-2 OTM – VIP7800 Emulation User’s Guide
PRINT DATA SPACEMNEMONIC : PDS
HEXADECIMAL : 1B 5B 30 70
ASCII : ESC [ 0 p
KEY SEQUENCE :
VT200 [SELECT]
BDS74XX [SELECT]
BDS71XX [ MAGIC ]+[ ”P” ]
PC–VT100 [ MAGIC1]+[ ”P” ]
This command sends the video buffer to the current printer device. Print control charactersare transmitted before and after the data buffer. See the PCC command, on page C-1.
In FORM MODE, the protected fields are only printed if the PRINT MODE parameter hasbeen set to ALL.
PRINTER DEVICE STATUS REQUESTMNEMONIC : PDSR
HEXADECIMAL : 1B 5B 3B 3F 70
ASCII : ESC [ ; ? p
KEY SEQUENCE : none
PRINTER DATA TERMINATORMNEMONIC : PDT
HEXADECIMAL : 1B 5B 3C 70
ASCII : ESC [ < p
KEY SEQUENCE : none
This command is sent by the host to terminate the PHD and PTA commands.
PRINTER ADAPTER ENQUIRYMNEMONIC : PENQ
HEXADECIMAL : 1B 5B 33 70
ASCII : ESC [ 8 p
KEY SEQUENCE : none
This command is sent by the host to request the immediate transmission of the four printerstatus bytes.
PRINT HOST DATAMNEMONIC : PHD
HEXADECIMAL : 1B 5B 33 70
ASCII : ESC [ 3 p
KEY SEQUENCE : none
This command is used by the host to send data directly to the printer buffer withoutmodifying the video data buffer.
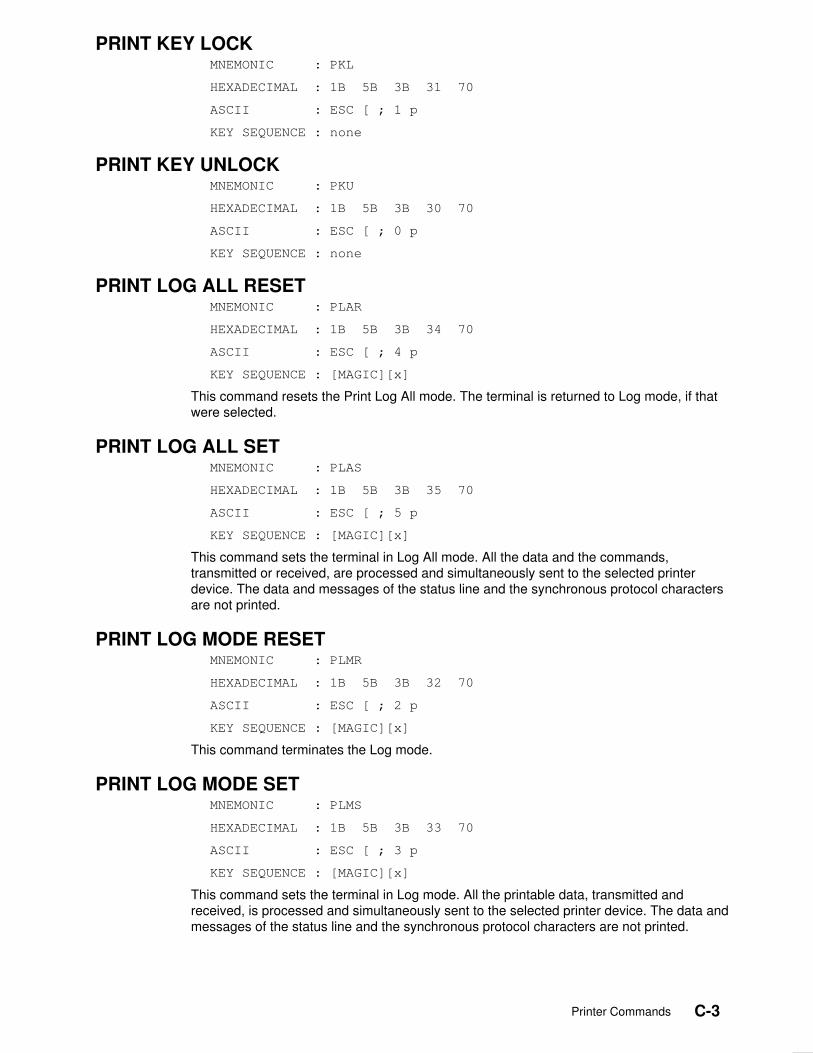
C-3Printer Commands
PRINT KEY LOCKMNEMONIC : PKL
HEXADECIMAL : 1B 5B 3B 31 70
ASCII : ESC [ ; 1 p
KEY SEQUENCE : none
PRINT KEY UNLOCKMNEMONIC : PKU
HEXADECIMAL : 1B 5B 3B 30 70
ASCII : ESC [ ; 0 p
KEY SEQUENCE : none
PRINT LOG ALL RESETMNEMONIC : PLAR
HEXADECIMAL : 1B 5B 3B 34 70
ASCII : ESC [ ; 4 p
KEY SEQUENCE : [MAGIC][x]
This command resets the Print Log All mode. The terminal is returned to Log mode, if thatwere selected.
PRINT LOG ALL SETMNEMONIC : PLAS
HEXADECIMAL : 1B 5B 3B 35 70
ASCII : ESC [ ; 5 p
KEY SEQUENCE : [MAGIC][x]
This command sets the terminal in Log All mode. All the data and the commands,transmitted or received, are processed and simultaneously sent to the selected printerdevice. The data and messages of the status line and the synchronous protocol charactersare not printed.
PRINT LOG MODE RESETMNEMONIC : PLMR
HEXADECIMAL : 1B 5B 3B 32 70
ASCII : ESC [ ; 2 p
KEY SEQUENCE : [MAGIC][x]
This command terminates the Log mode.
PRINT LOG MODE SETMNEMONIC : PLMS
HEXADECIMAL : 1B 5B 3B 33 70
ASCII : ESC [ ; 3 p
KEY SEQUENCE : [MAGIC][x]
This command sets the terminal in Log mode. All the printable data, transmitted andreceived, is processed and simultaneously sent to the selected printer device. The data andmessages of the status line and the synchronous protocol characters are not printed.
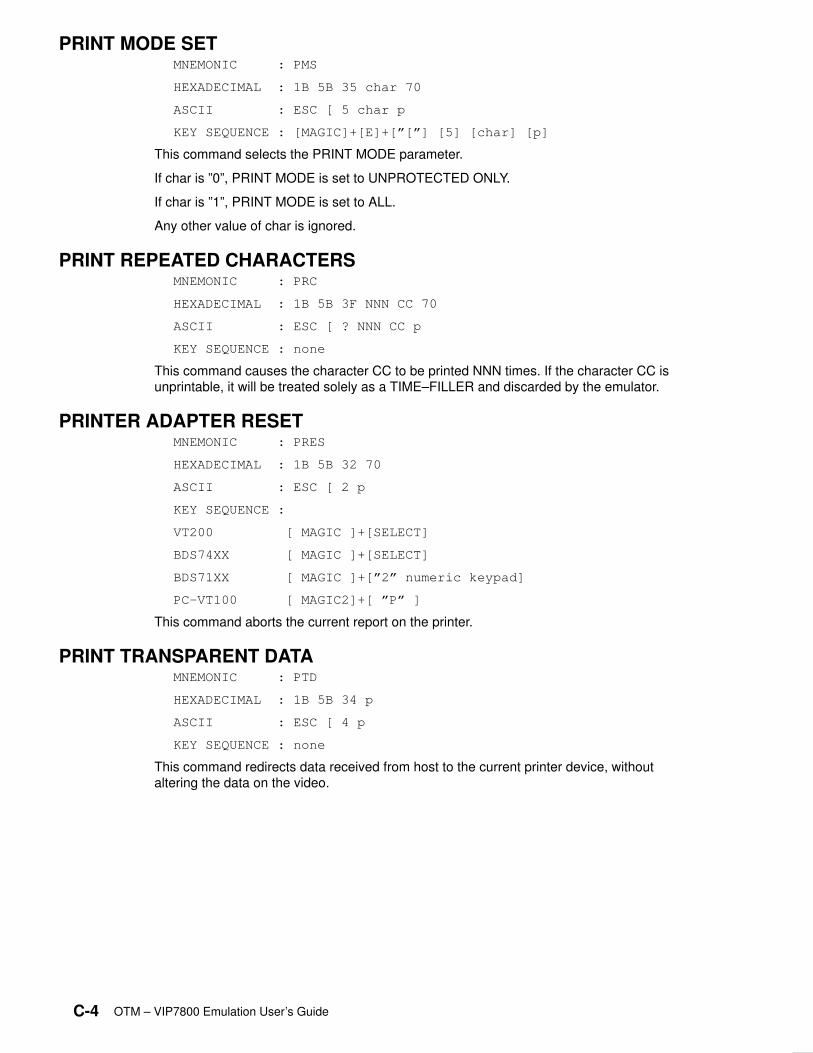
C-4 OTM – VIP7800 Emulation User’s Guide
PRINT MODE SETMNEMONIC : PMS
HEXADECIMAL : 1B 5B 35 char 70
ASCII : ESC [ 5 char p
KEY SEQUENCE : [MAGIC]+[E]+[”[”] [5] [char] [p]
This command selects the PRINT MODE parameter.
If char is ”0”, PRINT MODE is set to UNPROTECTED ONLY.
If char is ”1”, PRINT MODE is set to ALL.
Any other value of char is ignored.
PRINT REPEATED CHARACTERSMNEMONIC : PRC
HEXADECIMAL : 1B 5B 3F NNN CC 70
ASCII : ESC [ ? NNN CC p
KEY SEQUENCE : none
This command causes the character CC to be printed NNN times. If the character CC isunprintable, it will be treated solely as a TIME–FILLER and discarded by the emulator.
PRINTER ADAPTER RESETMNEMONIC : PRES
HEXADECIMAL : 1B 5B 32 70
ASCII : ESC [ 2 p
KEY SEQUENCE :
VT200 [ MAGIC ]+[SELECT]
BDS74XX [ MAGIC ]+[SELECT]
BDS71XX [ MAGIC ]+[”2” numeric keypad]
PC–VT100 [ MAGIC2]+[ ”P” ]
This command aborts the current report on the printer.
PRINT TRANSPARENT DATAMNEMONIC : PTD
HEXADECIMAL : 1B 5B 34 p
ASCII : ESC [ 4 p
KEY SEQUENCE : none
This command redirects data received from host to the current printer device, withoutaltering the data on the video.

C-5Printer Commands
Standard Printer Commands Not PresentThe following VIP7800 commands are not emulated in the vipemu. These commands arerecognized by vipemu but are ignored.
AUXILIARY PORT CONNECTMNEMONIC : APC
HEXADECIMAL : 1B 61
ASCII : ESC a
KEY SEQUENCE : [MAGIC]+[E]+[A]
AUXILIARY PORT DISCONNECTMNEMONIC : APD
HEXADECIMAL : 1B 62
ASCII : ESC b
KEY SEQUENCE : [MAGIC]+[E]+[B]
AUXILIARY PORT PARALLELMNEMONIC : APP
HEXADECIMAL : 1B 64
ASCII : ESC d
KEY SEQUENCE : [MAGIC]+[E]+[D]
PRINT MULTIPLE COPIESMNEMONIC : MPC
HEXADECIMAL : 1B 5B 37 char 70
ASCII : ESC [ 7 char p
KEY SEQUENCE : [MAGIC]+ [E]+[”[”]+[7]+[char]+[P]
PRINTER TRANSMIT ALLMNEMONIC : PTA
HEXADECIMAL : 1B 5B 36 70
ASCII : ESC [ 6 char p
KEY SEQUENCE : none
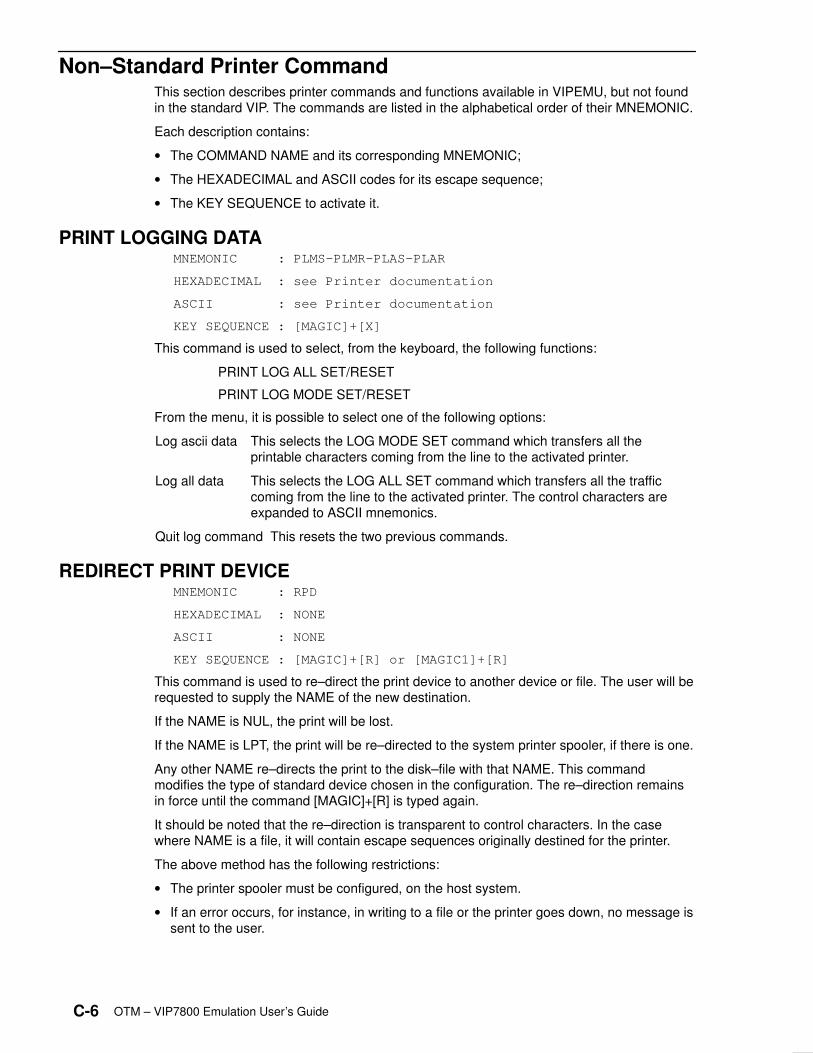
C-6 OTM – VIP7800 Emulation User’s Guide
Non–Standard Printer CommandThis section describes printer commands and functions available in VIPEMU, but not foundin the standard VIP. The commands are listed in the alphabetical order of their MNEMONIC.
Each description contains:
• The COMMAND NAME and its corresponding MNEMONIC;
• The HEXADECIMAL and ASCII codes for its escape sequence;
• The KEY SEQUENCE to activate it.
PRINT LOGGING DATAMNEMONIC : PLMS–PLMR–PLAS–PLAR
HEXADECIMAL : see Printer documentation
ASCII : see Printer documentation
KEY SEQUENCE : [MAGIC]+[X]
This command is used to select, from the keyboard, the following functions:
PRINT LOG ALL SET/RESET
PRINT LOG MODE SET/RESET
From the menu, it is possible to select one of the following options:
Log ascii data This selects the LOG MODE SET command which transfers all theprintable characters coming from the line to the activated printer.
Log all data This selects the LOG ALL SET command which transfers all the trafficcoming from the line to the activated printer. The control characters areexpanded to ASCII mnemonics.
Quit log command This resets the two previous commands.
REDIRECT PRINT DEVICEMNEMONIC : RPD
HEXADECIMAL : NONE
ASCII : NONE
KEY SEQUENCE : [MAGIC]+[R] or [MAGIC1]+[R]
This command is used to re–direct the print device to another device or file. The user will berequested to supply the NAME of the new destination.
If the NAME is NUL, the print will be lost.
If the NAME is LPT, the print will be re–directed to the system printer spooler, if there is one.
Any other NAME re–directs the print to the disk–file with that NAME. This commandmodifies the type of standard device chosen in the configuration. The re–direction remainsin force until the command [MAGIC]+[R] is typed again.
It should be noted that the re–direction is transparent to control characters. In the casewhere NAME is a file, it will contain escape sequences originally destined for the printer.
The above method has the following restrictions:
• The printer spooler must be configured, on the host system.
• If an error occurs, for instance, in writing to a file or the printer goes down, no message issent to the user.
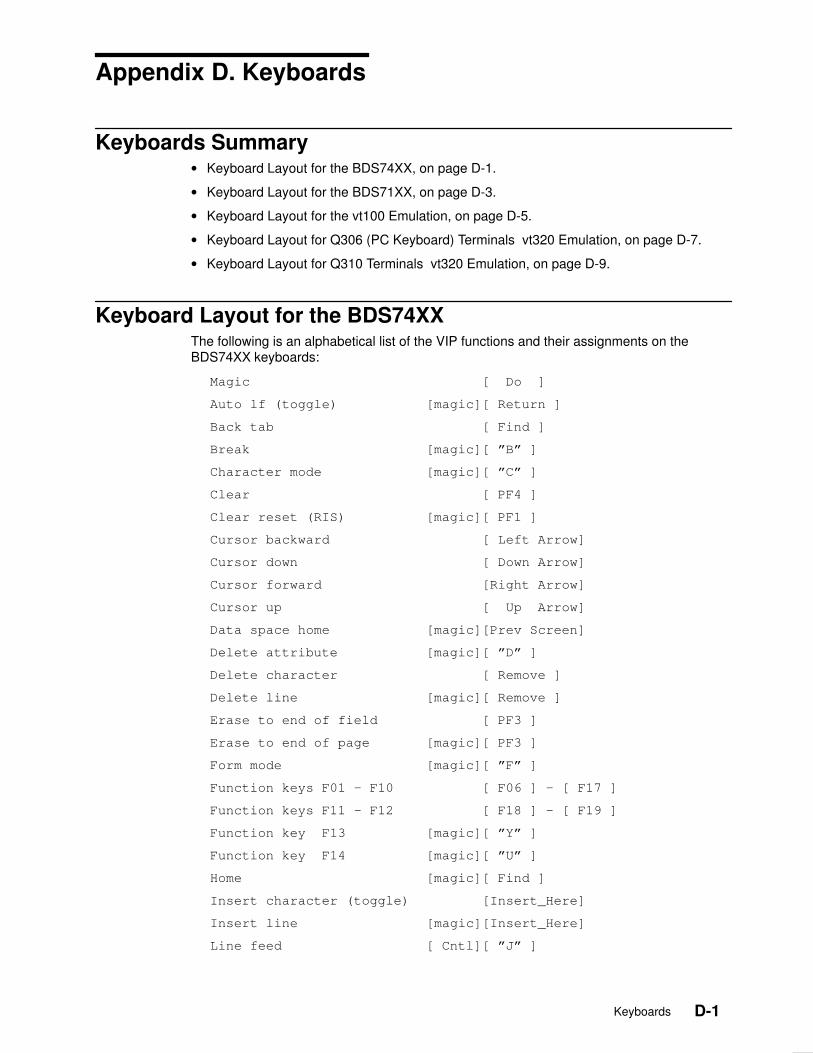
D-1Keyboards
Appendix D. Keyboards
Keyboards Summary• Keyboard Layout for the BDS74XX, on page D-1.
• Keyboard Layout for the BDS71XX, on page D-3.
• Keyboard Layout for the vt100 Emulation, on page D-5.
• Keyboard Layout for Q306 (PC Keyboard) Terminals vt320 Emulation, on page D-7.
• Keyboard Layout for Q310 Terminals vt320 Emulation, on page D-9.
Keyboard Layout for the BDS74XXThe following is an alphabetical list of the VIP functions and their assignments on theBDS74XX keyboards:
Magic [ Do ]
Auto lf (toggle) [magic][ Return ]
Back tab [ Find ]
Break [magic][ ”B” ]
Character mode [magic][ ”C” ]
Clear [ PF4 ]
Clear reset (RIS) [magic][ PF1 ]
Cursor backward [ Left Arrow]
Cursor down [ Down Arrow]
Cursor forward [Right Arrow]
Cursor up [ Up Arrow]
Data space home [magic][Prev Screen]
Delete attribute [magic][ ”D” ]
Delete character [ Remove ]
Delete line [magic][ Remove ]
Erase to end of field [ PF3 ]
Erase to end of page [magic][ PF3 ]
Form mode [magic][ ”F” ]
Function keys F01 – F10 [ F06 ] – [ F17 ]
Function keys F11 – F12 [ F18 ] – [ F19 ]
Function key F13 [magic][ ”Y” ]
Function key F14 [magic][ ”U” ]
Home [magic][ Find ]
Insert character (toggle) [Insert_Here]
Insert line [magic][Insert_Here]
Line feed [ Cntl][ ”J” ]
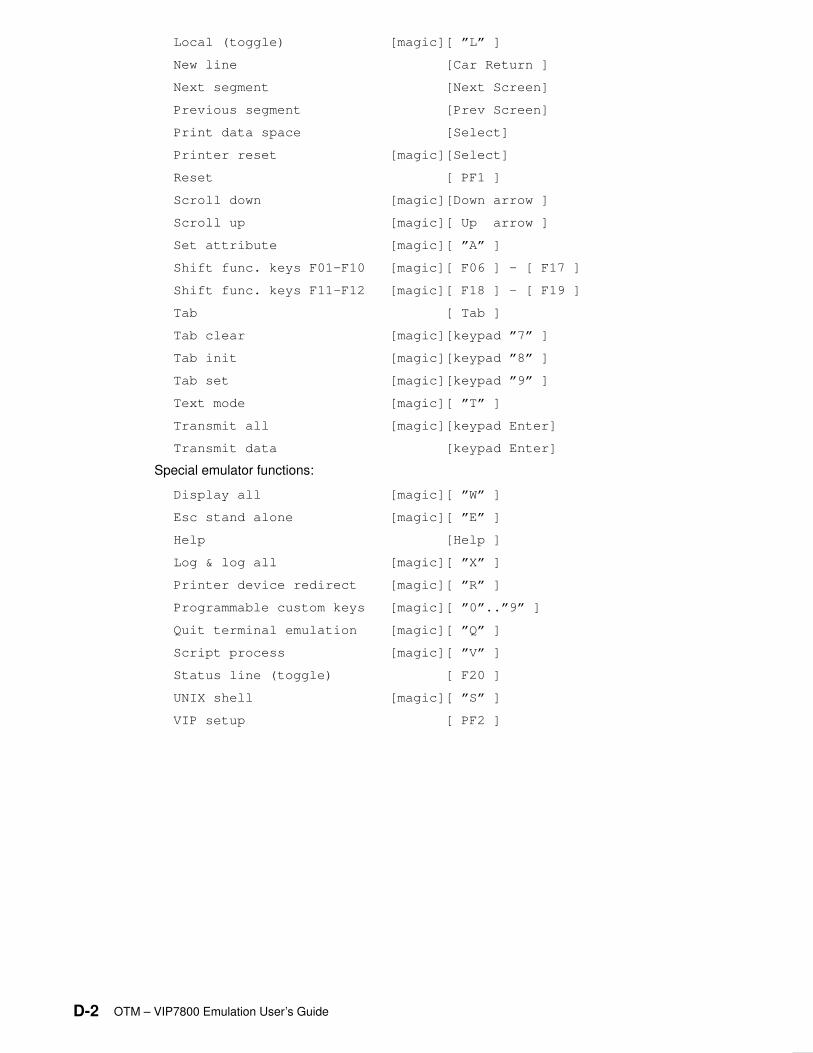
D-2 OTM – VIP7800 Emulation User’s Guide
Local (toggle) [magic][ ”L” ]
New line [Car Return ]
Next segment [Next Screen]
Previous segment [Prev Screen]
Print data space [Select]
Printer reset [magic][Select]
Reset [ PF1 ]
Scroll down [magic][Down arrow ]
Scroll up [magic][ Up arrow ]
Set attribute [magic][ ”A” ]
Shift func. keys F01–F10 [magic][ F06 ] – [ F17 ]
Shift func. keys F11–F12 [magic][ F18 ] – [ F19 ]
Tab [ Tab ]
Tab clear [magic][keypad ”7” ]
Tab init [magic][keypad ”8” ]
Tab set [magic][keypad ”9” ]
Text mode [magic][ ”T” ]
Transmit all [magic][keypad Enter]
Transmit data [keypad Enter]
Special emulator functions:
Display all [magic][ ”W” ]
Esc stand alone [magic][ ”E” ]
Help [Help ]
Log & log all [magic][ ”X” ]
Printer device redirect [magic][ ”R” ]
Programmable custom keys [magic][ ”0”..”9” ]
Quit terminal emulation [magic][ ”Q” ]
Script process [magic][ ”V” ]
Status line (toggle) [ F20 ]
UNIX shell [magic][ ”S” ]
VIP setup [ PF2 ]
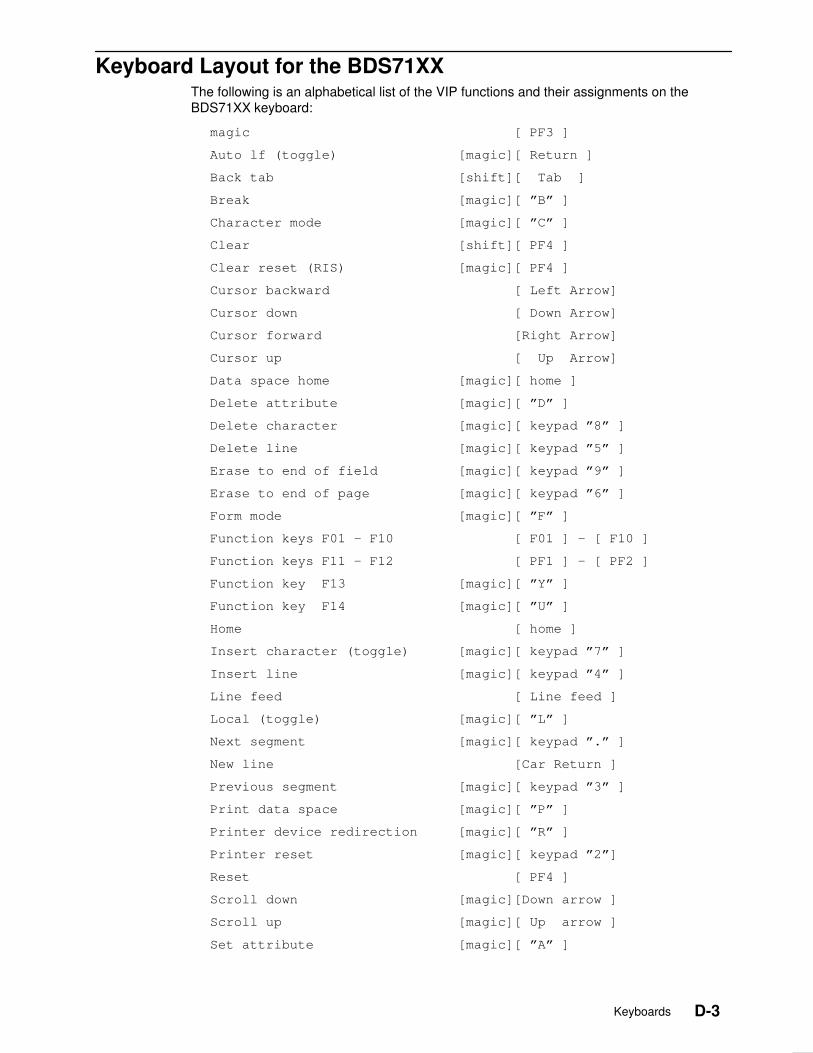
D-3Keyboards
Keyboard Layout for the BDS71XX The following is an alphabetical list of the VIP functions and their assignments on theBDS71XX keyboard:
magic [ PF3 ]
Auto lf (toggle) [magic][ Return ]
Back tab [shift][ Tab ]
Break [magic][ ”B” ]
Character mode [magic][ ”C” ]
Clear [shift][ PF4 ]
Clear reset (RIS) [magic][ PF4 ]
Cursor backward [ Left Arrow]
Cursor down [ Down Arrow]
Cursor forward [Right Arrow]
Cursor up [ Up Arrow]
Data space home [magic][ home ]
Delete attribute [magic][ ”D” ]
Delete character [magic][ keypad ”8” ]
Delete line [magic][ keypad ”5” ]
Erase to end of field [magic][ keypad ”9” ]
Erase to end of page [magic][ keypad ”6” ]
Form mode [magic][ ”F” ]
Function keys F01 – F10 [ F01 ] – [ F10 ]
Function keys F11 – F12 [ PF1 ] – [ PF2 ]
Function key F13 [magic][ ”Y” ]
Function key F14 [magic][ ”U” ]
Home [ home ]
Insert character (toggle) [magic][ keypad ”7” ]
Insert line [magic][ keypad ”4” ]
Line feed [ Line feed ]
Local (toggle) [magic][ ”L” ]
Next segment [magic][ keypad ”.” ]
New line [Car Return ]
Previous segment [magic][ keypad ”3” ]
Print data space [magic][ ”P” ]
Printer device redirection [magic][ ”R” ]
Printer reset [magic][ keypad ”2”]
Reset [ PF4 ]
Scroll down [magic][Down arrow ]
Scroll up [magic][ Up arrow ]
Set attribute [magic][ ”A” ]
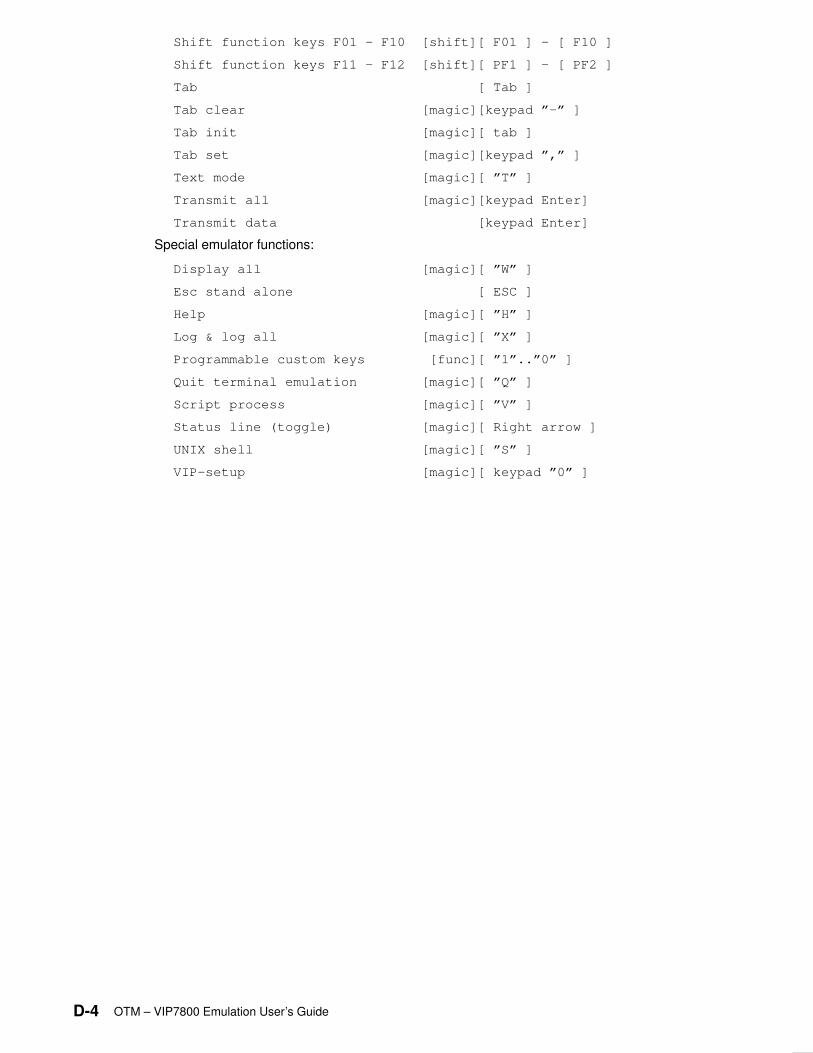
D-4 OTM – VIP7800 Emulation User’s Guide
Shift function keys F01 – F10 [shift][ F01 ] – [ F10 ]
Shift function keys F11 – F12 [shift][ PF1 ] – [ PF2 ]
Tab [ Tab ]
Tab clear [magic][keypad ”–” ]
Tab init [magic][ tab ]
Tab set [magic][keypad ”,” ]
Text mode [magic][ ”T” ]
Transmit all [magic][keypad Enter]
Transmit data [keypad Enter]
Special emulator functions:
Display all [magic][ ”W” ]
Esc stand alone [ ESC ]
Help [magic][ ”H” ]
Log & log all [magic][ ”X” ]
Programmable custom keys [func][ ”1”..”0” ]
Quit terminal emulation [magic][ ”Q” ]
Script process [magic][ ”V” ]
Status line (toggle) [magic][ Right arrow ]
UNIX shell [magic][ ”S” ]
VIP–setup [magic][ keypad ”0” ]
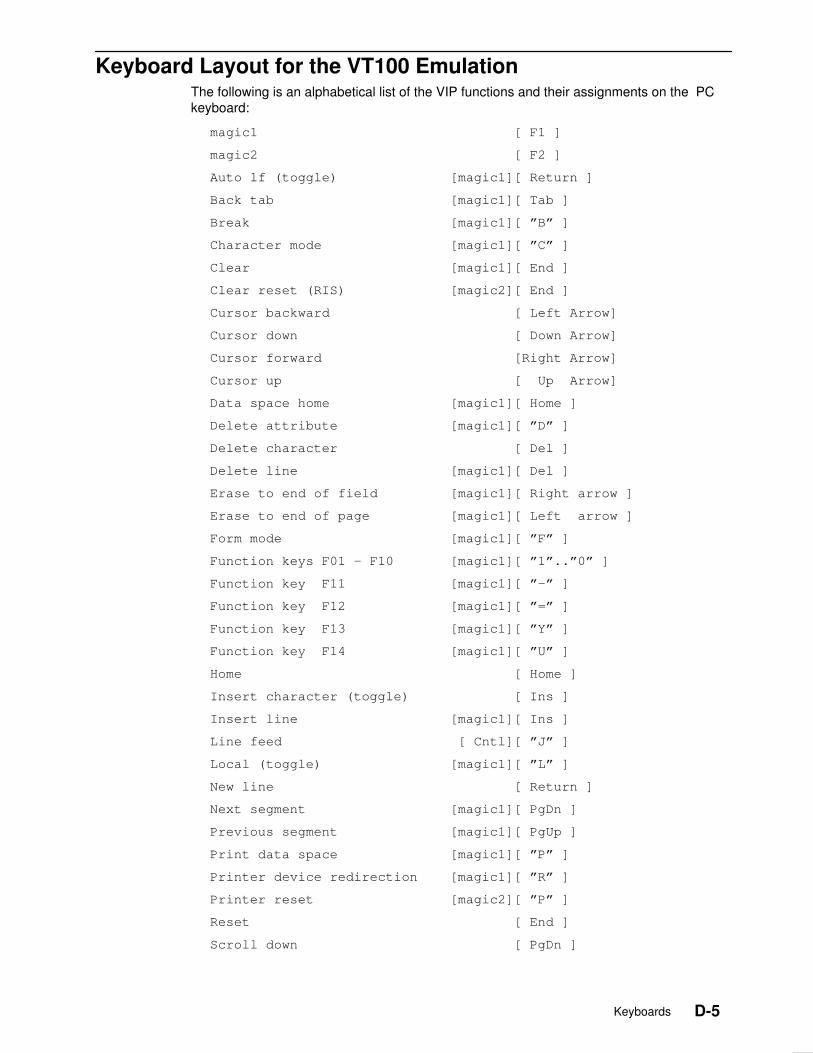
D-5Keyboards
Keyboard Layout for the VT100 Emulation The following is an alphabetical list of the VIP functions and their assignments on the PCkeyboard:
magic1 [ F1 ]
magic2 [ F2 ]
Auto lf (toggle) [magic1][ Return ]
Back tab [magic1][ Tab ]
Break [magic1][ ”B” ]
Character mode [magic1][ ”C” ]
Clear [magic1][ End ]
Clear reset (RIS) [magic2][ End ]
Cursor backward [ Left Arrow]
Cursor down [ Down Arrow]
Cursor forward [Right Arrow]
Cursor up [ Up Arrow]
Data space home [magic1][ Home ]
Delete attribute [magic1][ ”D” ]
Delete character [ Del ]
Delete line [magic1][ Del ]
Erase to end of field [magic1][ Right arrow ]
Erase to end of page [magic1][ Left arrow ]
Form mode [magic1][ ”F” ]
Function keys F01 – F10 [magic1][ ”1”..”0” ]
Function key F11 [magic1][ ”–” ]
Function key F12 [magic1][ ”=” ]
Function key F13 [magic1][ ”Y” ]
Function key F14 [magic1][ ”U” ]
Home [ Home ]
Insert character (toggle) [ Ins ]
Insert line [magic1][ Ins ]
Line feed [ Cntl][ ”J” ]
Local (toggle) [magic1][ ”L” ]
New line [ Return ]
Next segment [magic1][ PgDn ]
Previous segment [magic1][ PgUp ]
Print data space [magic1][ ”P” ]
Printer device redirection [magic1][ ”R” ]
Printer reset [magic2][ ”P” ]
Reset [ End ]
Scroll down [ PgDn ]
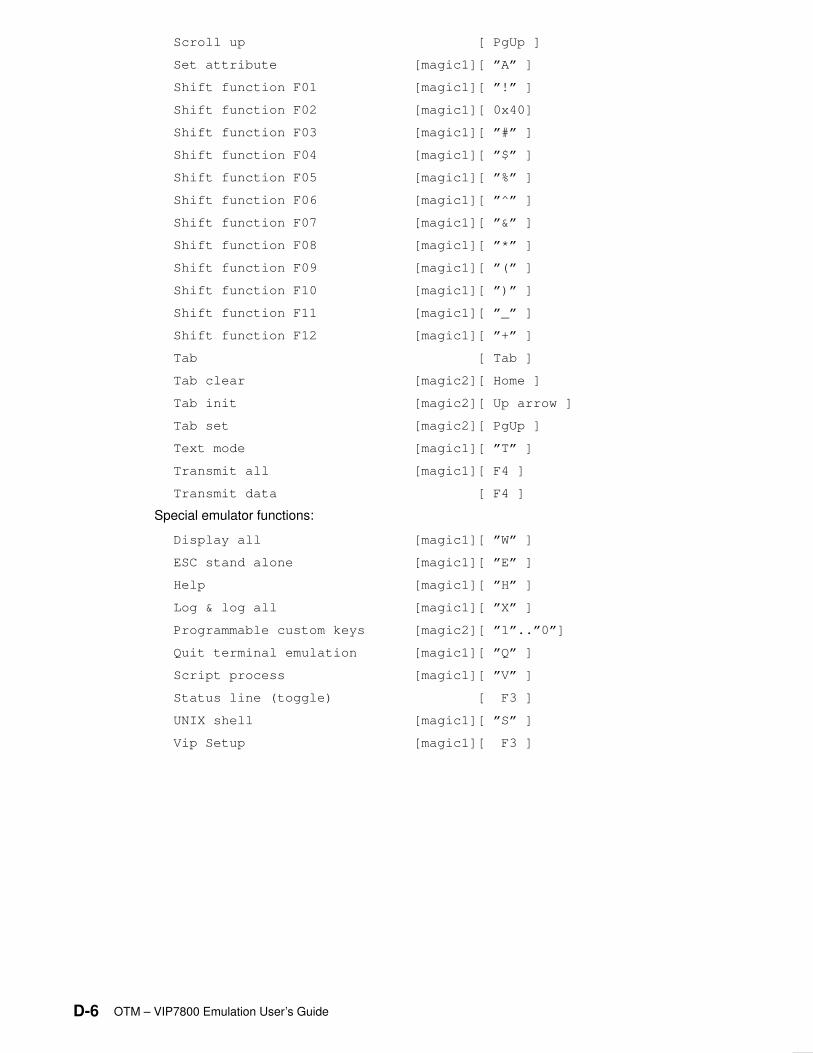
D-6 OTM – VIP7800 Emulation User’s Guide
Scroll up [ PgUp ]
Set attribute [magic1][ ”A” ]
Shift function F01 [magic1][ ”!” ]
Shift function F02 [magic1][ 0x40]
Shift function F03 [magic1][ ”#” ]
Shift function F04 [magic1][ ”$” ]
Shift function F05 [magic1][ ”%” ]
Shift function F06 [magic1][ ”^” ]
Shift function F07 [magic1][ ”&” ]
Shift function F08 [magic1][ ”*” ]
Shift function F09 [magic1][ ”(” ]
Shift function F10 [magic1][ ”)” ]
Shift function F11 [magic1][ ”_” ]
Shift function F12 [magic1][ ”+” ]
Tab [ Tab ]
Tab clear [magic2][ Home ]
Tab init [magic2][ Up arrow ]
Tab set [magic2][ PgUp ]
Text mode [magic1][ ”T” ]
Transmit all [magic1][ F4 ]
Transmit data [ F4 ]
Special emulator functions:
Display all [magic1][ ”W” ]
ESC stand alone [magic1][ ”E” ]
Help [magic1][ ”H” ]
Log & log all [magic1][ ”X” ]
Programmable custom keys [magic2][ ”1”..”0”]
Quit terminal emulation [magic1][ ”Q” ]
Script process [magic1][ ”V” ]
Status line (toggle) [ F3 ]
UNIX shell [magic1][ ”S” ]
Vip Setup [magic1][ F3 ]
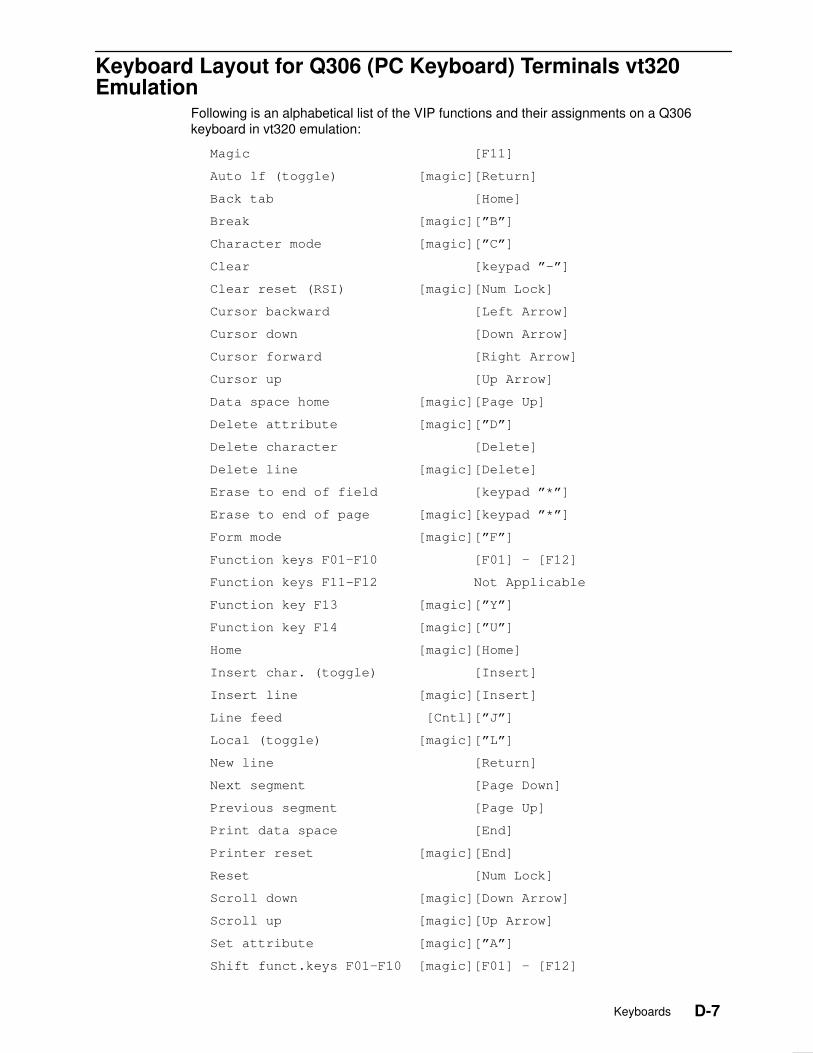
D-7Keyboards
Keyboard Layout for Q306 (PC Keyboard) Terminals vt320Emulation
Following is an alphabetical list of the VIP functions and their assignments on a Q306keyboard in vt320 emulation:
Magic [F11]
Auto lf (toggle) [magic][Return]
Back tab [Home]
Break [magic][”B”]
Character mode [magic][”C”]
Clear [keypad ”–”]
Clear reset (RSI) [magic][Num Lock]
Cursor backward [Left Arrow]
Cursor down [Down Arrow]
Cursor forward [Right Arrow]
Cursor up [Up Arrow]
Data space home [magic][Page Up]
Delete attribute [magic][”D”]
Delete character [Delete]
Delete line [magic][Delete]
Erase to end of field [keypad ”*”]
Erase to end of page [magic][keypad ”*”]
Form mode [magic][”F”]
Function keys F01–F10 [F01] – [F12]
Function keys F11–F12 Not Applicable
Function key F13 [magic][”Y”]
Function key F14 [magic][”U”]
Home [magic][Home]
Insert char. (toggle) [Insert]
Insert line [magic][Insert]
Line feed [Cntl][”J”]
Local (toggle) [magic][”L”]
New line [Return]
Next segment [Page Down]
Previous segment [Page Up]
Print data space [End]
Printer reset [magic][End]
Reset [Num Lock]
Scroll down [magic][Down Arrow]
Scroll up [magic][Up Arrow]
Set attribute [magic][”A”]
Shift funct.keys F01–F10 [magic][F01] – [F12]
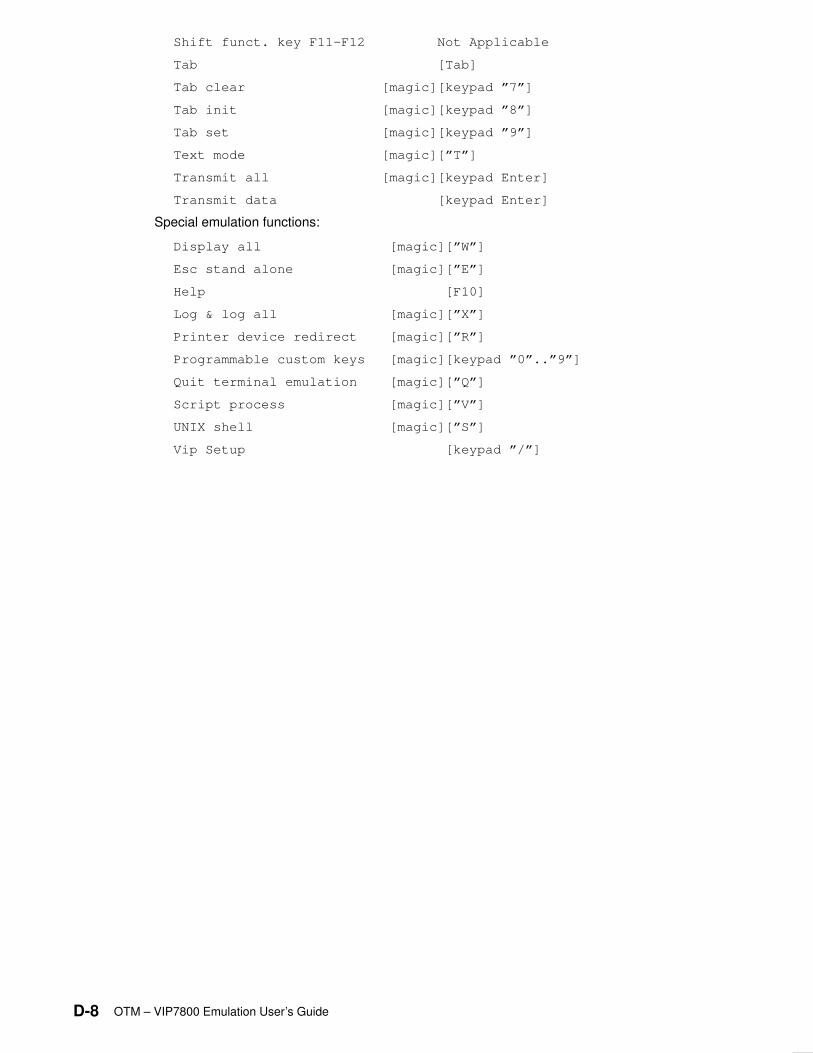
D-8 OTM – VIP7800 Emulation User’s Guide
Shift funct. key F11–F12 Not Applicable
Tab [Tab]
Tab clear [magic][keypad ”7”]
Tab init [magic][keypad ”8”]
Tab set [magic][keypad ”9”]
Text mode [magic][”T”]
Transmit all [magic][keypad Enter]
Transmit data [keypad Enter]
Special emulation functions:
Display all [magic][”W”]
Esc stand alone [magic][”E”]
Help [F10]
Log & log all [magic][”X”]
Printer device redirect [magic][”R”]
Programmable custom keys [magic][keypad ”0”..”9”]
Quit terminal emulation [magic][”Q”]
Script process [magic][”V”]
UNIX shell [magic][”S”]
Vip Setup [keypad ”/”]
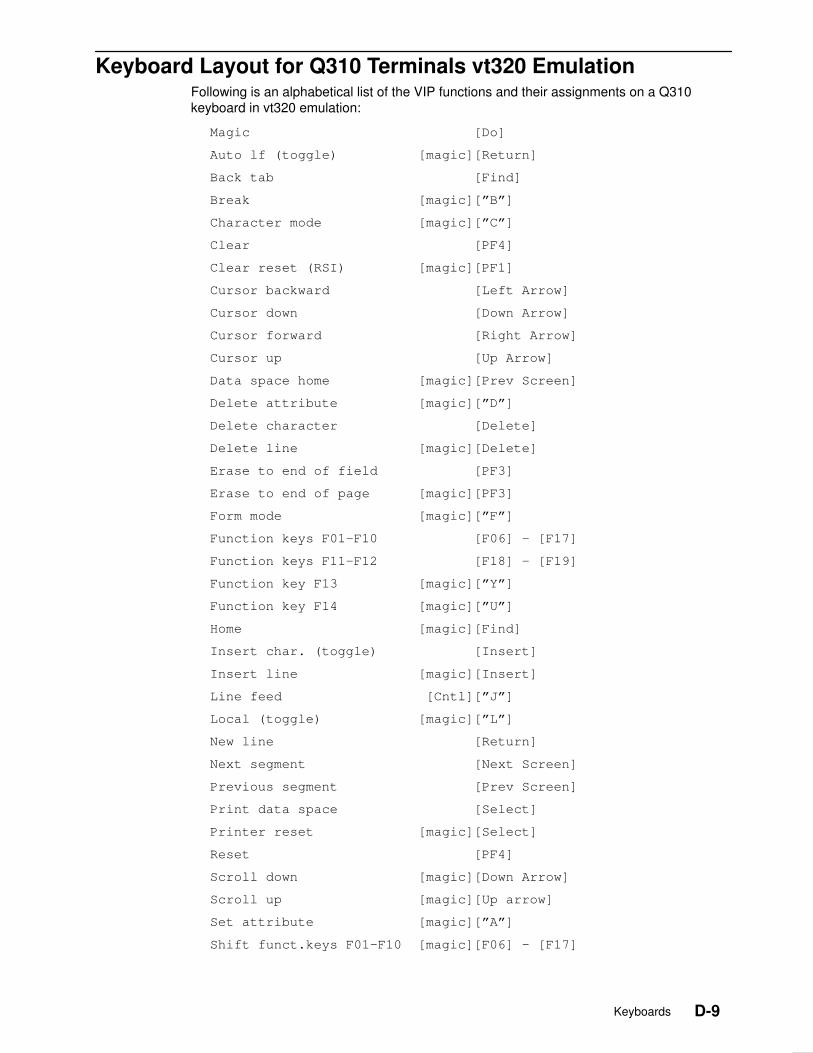
D-9Keyboards
Keyboard Layout for Q310 Terminals vt320 Emulation Following is an alphabetical list of the VIP functions and their assignments on a Q310keyboard in vt320 emulation:
Magic [Do]
Auto lf (toggle) [magic][Return]
Back tab [Find]
Break [magic][”B”]
Character mode [magic][”C”]
Clear [PF4]
Clear reset (RSI) [magic][PF1]
Cursor backward [Left Arrow]
Cursor down [Down Arrow]
Cursor forward [Right Arrow]
Cursor up [Up Arrow]
Data space home [magic][Prev Screen]
Delete attribute [magic][”D”]
Delete character [Delete]
Delete line [magic][Delete]
Erase to end of field [PF3]
Erase to end of page [magic][PF3]
Form mode [magic][”F”]
Function keys F01–F10 [F06] – [F17]
Function keys F11–F12 [F18] – [F19]
Function key F13 [magic][”Y”]
Function key F14 [magic][”U”]
Home [magic][Find]
Insert char. (toggle) [Insert]
Insert line [magic][Insert]
Line feed [Cntl][”J”]
Local (toggle) [magic][”L”]
New line [Return]
Next segment [Next Screen]
Previous segment [Prev Screen]
Print data space [Select]
Printer reset [magic][Select]
Reset [PF4]
Scroll down [magic][Down Arrow]
Scroll up [magic][Up arrow]
Set attribute [magic][”A”]
Shift funct.keys F01–F10 [magic][F06] – [F17]
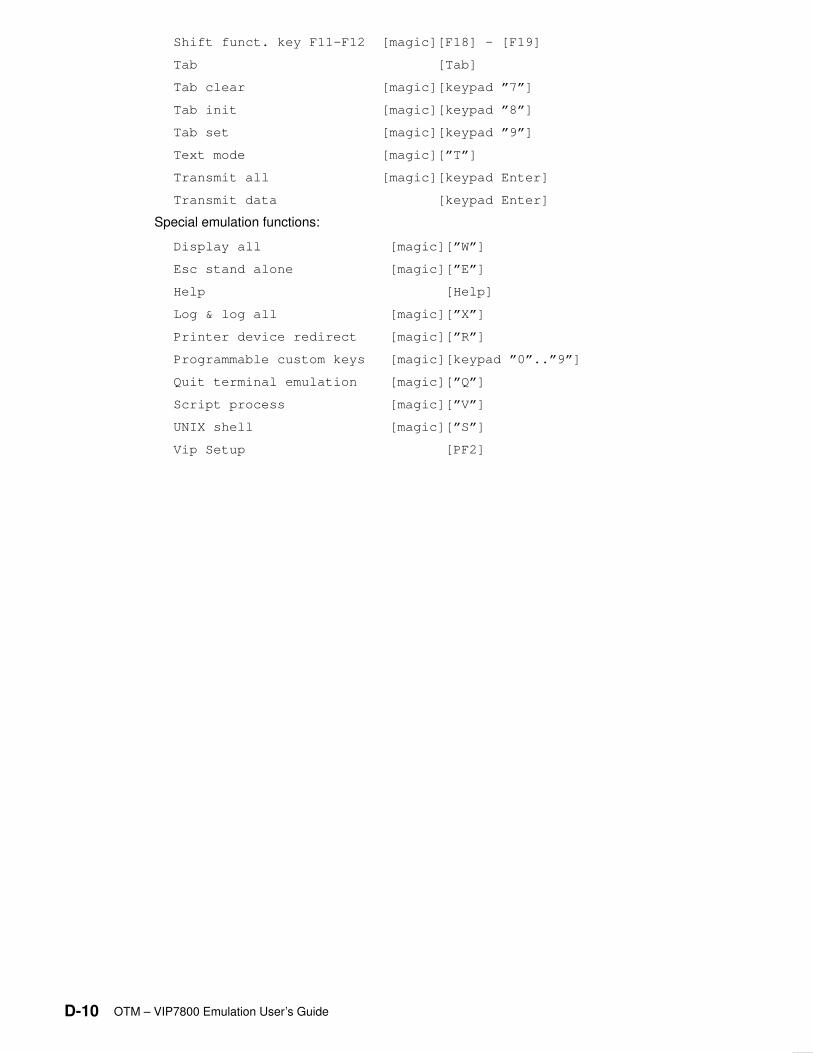
D-10 OTM – VIP7800 Emulation User’s Guide
Shift funct. key F11–F12 [magic][F18] – [F19]
Tab [Tab]
Tab clear [magic][keypad ”7”]
Tab init [magic][keypad ”8”]
Tab set [magic][keypad ”9”]
Text mode [magic][”T”]
Transmit all [magic][keypad Enter]
Transmit data [keypad Enter]
Special emulation functions:
Display all [magic][”W”]
Esc stand alone [magic][”E”]
Help [Help]
Log & log all [magic][”X”]
Printer device redirect [magic][”R”]
Programmable custom keys [magic][keypad ”0”..”9”]
Quit terminal emulation [magic][”Q”]
Script process [magic][”V”]
UNIX shell [magic][”S”]
Vip Setup [PF2]
Index X-1
Index
Symbols.cfg, 1-4.hlp, 1-4.spt, 1-4.spt File, 4-7/usr/bin/pdrf, 3–5/usr/emu, 3–2, 3–5
Numbers25th Row, 2–4, 3–4
AAlarm Messages, A-1ALL, C-2ASCII ESC Character, 3–2
BBatch File, 1-3, 4-2, 4-4BDS3, 2–4BDS71xx, 2–5, 3–2, 3–3BDS71xx Keyboard, D-3BDS74xx, 1-6, 2–5, 3–2, 3–3, 3–4BDS74xx Keyboard, D-1BLOCK, 2–4Break, 3–1, 4-2
CCHAR, 2–3Character Input, 2–2Clear, 3–1Clear (CLR), 3–4Colon Character, 4-3Command Sequences, 3–2Comment Records, 4-3Configuration, 2–1Configuration File, 2–7Configuration Messages, A-1Control Characters, 4-5cr, 2–6cr/ff, 2–6cr/lf, 2–6cr/vt, 2–6Cursor Mode, 2–4Customized Keys, 2–5
DDescription Records, 4-3
EECHO, 2–3Emulator Messages, A-3Error Messages, A-1Escape Sequence, 3–2, 4-6etc Directory, 3–5Exit, 4-5
FFILE, 2–6Form Mode, 2–3, C-2Function Code, 4-6Function Keys, 4-6
GGraphics, 3–3
HHelp, 3–1, 3–2hw40, 1-5hw78, 1-5
Iinittab file, 1-5
KKeyboard Functions, 3–1Keyboards, D-1
LLine Errors, 4-7Local Keys, 3–3Local Mode, 2–4Locus vt100, 1-6Locus–PC, 1-6Log All, C-3Log All Data, C-6Log ASCII Data, C-6lpdrv, 1-4LPT, 2–6, C-6
MMagic Key, 2–5, 3–1, 4-2Messages, A-1
NNext Segment (NS), 2–4, 3–4Non Standard Printer Commands, C-6Non Standard VIP Commands, B-18NON_BLOCK, 2–4NUL, 2–6, C-6Null Character, 4-4Null Message, 4-5Numeric Keys, 2–5Numeric Value, 2–2
OOSI Stack, iii
PPC, 3–3PC emul. vt100, 3–2
OTM – VIP7800 Terminal Emulation User’s GuideX-2
PC–VIP Program, 1-3PC–vt100 Locus, 2–5PDENQ Message, 2–6PDH, C-2PDS, C-1PENQ Message, 2–6Pipeline, 4-3Previous Segment (PS), 2–4, 3–4Print Log, C-3Print Mode, C-2Printer
Adapter, 2–6Buffered Adapter, C-1Commands, C-1Configuration, 1-6Emulation, 1-3Messages, A-6Spooler, C-6
Programmability, 1-3Pseudo Message, 4-5PTA, C-1, C-2
QQ306 (PC) Keyboard, D-7Q310 – vt320 Keyboard, D-9Quit, 3–1, 4-5
RReserved Words, 4-5Reset (RES), 3–4Reset to Initial State (RIS), 3–4Roll Mode, 2–3
SScript
Activation, 4-1Command, 4-1File, 4-1, 4-7Function, 1-3Labels, 4-4Logic, 4-2Message, 4-6Pathname, 4-1Sequences, 4-5Syntax, 4-3
Script File, 4-7Script Utility, 2–2, 4-1Script Utility Error Messages, A-7Scroll Down (SD), 2–4Scroll Up (SU), 2–4Setup Program, 2–1, 2–7Shell, 1-3SHL, 2–5SLS, 3–4Soft Keys, 1-3SPT, 2–5spt File, 4-1Start, 4-5
Status Line, 1-6, 3–4Status Line Lock (SLL), 3–4Syntax and Line Errors, 4-7Syntax Errors, 4-7System Configuration, 1-5
TTabulation Mode, 2–4Terminal, 1-5Terminal Mode, 2–3Terminal Setup, 2–3TEXT, 2–3Text Mode, 2–3Tilde Character, 4-4Time Filler, C-4Time–Out, 4-2, 4-5Transmit, 3–1Transmit Key, 2–5Transmit Mode, 2–4ttytype, 1-4ttytype file, 1-5TX_RET, 2–3
UUnderline Mode, 2–4UNIX Cooperation, 1-3
VVideo Attributes, 3–3Video Data Buffer, C-2VIP, 2–5VIP 77xx, 2–3VIP 78xx Mode, 2–3VIP Commands not Emulated, B-17Vip Setup, 2–1, 2–2, 3–3, 4-5vip.cfg, 2–2, 3–5VIP7800 Commands, B-1VIP7800 Emulation, 1-1VIP7800 Standard Commands, B-1VIP7874, 1-5, 1-6, 3–3, 4-6vipemu, 1-4, 2–5, 3–3, 3–5vipemu command, 1-6vipemutab, 1-4vipmu, 2–1vipmutab, 1-4viptty, 3–5vipttyNN.cfg, 2–2vipttyNN.cfg File, 2–7vt100 Keyboard, D-5vt100 Locus, 3–3vt200, 2–4, 2–5, 3–2, 3–3vt300, 2–5vt320, 3–2vt320 Keyboard, D-7
WWork Station Configuration, 1-6

Vos remarques sur ce document / Technical publication remark form
Titre / Title : Bull DPX/20 Open Terminal Management (OTM) VIP7800 Terminal Emulation
User’s Guide
Nº Reférence / Reference Nº : 86 A2 34PE 04 Daté / Dated : July 1995
ERREURS DETECTEES / ERRORS IN PUBLICATION
AMELIORATIONS SUGGEREES / SUGGESTIONS FOR IMPROVEMENT TO PUBLICATION
Vos remarques et suggestions seront examinées attentivement
Si vous désirez une réponse écrite, veuillez indiquer ci-après votre adresse postale complète.
Your comments will be promptly investigated by qualified technical personnel and action will be taken as required.
If you require a written reply, please furnish your complete mailing address below.
NOM / NAME : Date :
SOCIETE / COMPANY :
ADRESSE / ADDRESS :
Remettez cet imprimé à un responsable BULL ou envoyez-le directement à :
Please give this technical publication remark form to your BULL representative or mail to:
BULL S.A. CEDOC
Atelier de Reproduction
FRAN–231
331 Avenue Patton BP 428
49005 ANGERS CEDEX
FRANCE


BULL S.A. CEDOC
Atelier de Reproduction
FRAN–231
331 Avenue Patton BP 428
49005 ANGERS CEDEX
FRANCE
86 A2 34PE 04
ORDER REFERENCE
PLA
CE
BA
R C
OD
E I
N L
OW
ER
LE
FT
CO
RN
ER

Utiliser les marques de découpe pour obtenir les étiquettes.
Use the cut marks to get the labels.
AIX
86 A2 34PE 04
OTMVIP7800 TerminalEmulation User’s
Guide
DPX/20
AIX
86 A2 34PE 04
OTMVIP7800 TerminalEmulation User’s
Guide
DPX/20
AIX
86 A2 34PE 04
OTMVIP7800 TerminalEmulation User’s
Guide
DPX/20