Online Administrative Student Information System (OASIS) · Online Administrative Student...
17
Office of the Chief Technology Officer Online Administrative Student Information System (OASIS) Elementary Subject Assignment Quick Reference Guide Version 2.5 August 2017
Transcript of Online Administrative Student Information System (OASIS) · Online Administrative Student...

Office of the Chief Technology Officer
Online Administrative Student Information System (OASIS) Elementary Subject Assignment Quick Reference Guide
Version 2.5 August 2017

Elementary Subject Assignment Quick Reference Guide ii
Contents About This Guide ........................................................... 1
Get Started .................................................................... 1 Understand K–5 Subject Requirements ................................... 1 Open the Elementary Subject Assignment Module ................. 1
View Teacher, Section, and Student Lists ........................ 2 View the Teacher List ............................................................... 2 View Sections By Teacher ........................................................ 2 View Sections By Course .......................................................... 2 View Students in a Course Section .......................................... 2 View Homeroom Students....................................................... 3
Work with Course Sections ............................................ 4 Add Sections ............................................................................ 4 Update Sections ....................................................................... 4 Change the Teacher for a Section ............................................ 4 Delete a Section for a Teacher ................................................. 5 Mass Schedule ......................................................................... 5
Work with Student Schedules ........................................ 7 View a Student’s Schedule ....................................................... 7 Assign Subjects to Students ..................................................... 7 Assign a Subject Missing from a Student’s Schedule ............... 8 Assign a Report Card Subject Missing from a Student’s Schedule .................................................................................. 9 Assign Students for Course Advancement in Math ................. 9 Update Student Schedules ...................................................... 9 Delete a Course on a Student’s Schedule .............................. 10
Use the Manage Sections Interface............................... 11 Open the Manage Sections Interface .................................... 11 View Course Sections ............................................................. 11 View Students in a Course Section ........................................ 11 Assign Subjects to Students ................................................... 11 View Section Details .............................................................. 11 Update Sections ..................................................................... 11 Delete Sections ...................................................................... 12 Add Students to a Section ...................................................... 12 Add Sections .......................................................................... 13

Elementary Subject Assignment Quick Reference Guide 1
About This Guide The Online Administrative Student Information System (OASIS) provides a central location for viewing and updating student ad-ministrative data online. Using the Elementary Subject Assign-ment module, you can view lists of teachers, course sections, and students at your school. You also can manage course sections and student schedules for your school.
Get Started This section provides general information for working in the OASIS Elementary Subject Assignment module. For detailed in-formation about performing basic functions in OASIS such as log-ging in and logging out, searching for student records, and managing search results, refer to the Online Administrative Stu-dent Information System (OASIS) Basics Quick Reference Guide, which is posted on the MCPS Technical Help Desk website.
Understand K–5 Subject Requirements To work in the Elementary Subject Assignment module, you must be familiar with the subject requirements for MCPS prekinder-garten and elementary school students, as summarized below.
Subject*
Grade Level
Pre-K (14/16)
K (15)
1–3
4–5
Art R R R
English for Speakers of Other Languages (ESOL)
• Course (e.g., ESOL Grade 1)
E E E
• ESOL Instructional Groups (e.g., ESOL A01)
E E E E
• English Language Proficiency Assessment Screening and Placement
S S S S
Homeroom R R R R
Instrumental Music M
Language
Learning Skills R R R R
Mathematics R R R R
Music R R R
Physical Education R R R
Reading R R R R
Science R R R
Subject*
Grade Level
Pre-K (14/16)
K (15)
1–3
4–5
Social Studies R R R
Writing R R R
*Information about Art, ESOL Instructional Groups, Homeroom, Instrumental Music, and Music classes is reported to the Mary-land State Department of Education each year and is used to determine highly qualified teachers and possibly class size. Therefore, you must add sections for these classes in OASIS us-ing the teacher who is actually teaching that subject and add a separate section for each group being taught at one time. Do not use section 00.
Table Legend:
R = Required for all students
E = Required only for ESOL students
S = Required only for specific students needing ESOL screening
M = Required only for Instrumental Music students
= Not applicable
Open the Elementary Subject Assignment Module Follow the steps below to open the Elementary Subject Assign-ment module.
To open the Elementary Subject Assignment module: 1. Log in to OASIS.
2. At the top of the page in the tab bar, hover your mouse over
SCHEDULING to display a menu.
3. On the menu, select Elementary Subject Assignment.
Elementary Subject Assignment menu options are displayed as links on the left of the page. On the right is a list of teach-ers at your school who have been assigned to a course sec-tion.
Elementary Subject Assignment Quick Reference Guide 2
View Teacher, Section, and Student Lists In the Elementary Subject Assignment module, you can view lists of teachers, course sections, and students to help you manage course sections and student schedules. You view these lists by selecting from the Elementary Subject Assignment menu, which is on the left of the pages in the module:
View the Teacher List The Teacher List is the first page that is displayed when you open the Elementary Subject Assignment module. It shows a list of teachers at your school who have been assigned to a course sec-tion and provides a link to each teacher’s sections.
You also can view the Teacher List by selecting View Teacher List on the Elementary Subject Assignment menu.
View Sections By Teacher Follow the instructions below to view course sections for a teacher.
To view sections by teacher: 1. On the Elementary Subject Assignment menu, select View
Sections By Teacher.
2. On the Section List page, select a teacher. Only teachers who
have been assigned to sections are available for selection. Sections for that teacher will be displayed.
View Sections By Course Follow the instructions below to view either all sections for a course or a specific section for a course.
To view sections by course: 1. On the Elementary Subject Assignment menu, select View
Sections By Course.
2. On the Sections By Course page, select a course.
3. Either select a section, or select All Sections.
4. Click the Get Sections button to display the selected section or sections.
View Students in a Course Section Follow the instructions below to view a list of students who have been assigned to a course section.
To view students in a course section: 1. Follow the instructions in View Sections By Course to find and
list the desired section.
2. On the Sections By Course page, click the View Students link.
Displayed will be a list of only active students in the section.

View Teacher, Section, and Student Lists View Homeroom Students
Elementary Subject Assignment Quick Reference Guide 3
3. To display a list all students in the section—both active and inactive—click the Show All button. The name of the button will change to Show Active Only, so clicking the button again will redisplay the list of only active students.
View Homeroom Students Follow the instructions below to view a list of students in a par-ticular homeroom.
To view homeroom students: 1. On the Elementary Subject Assignment menu, select View
Homeroom Students.
2. On the Student List page, select a homeroom teacher. A list of students in that teacher’s homeroom will be displayed.

Elementary Subject Assignment Quick Reference Guide 4
Work with Course Sections This part of the guide explains how to maintain course sections and assign teachers and students to them.
Add Sections You can add course sections to your school’s master schedule, following the instructions below, or you can add sections using the Manage Sections interface.
To add sections:
1. On the left of the page on the Elementary Subject Assign-
ment menu, select Add New Section.
2. On the Add New Section page, provide the information re-
quested, keeping in mind the following:
• The selection list for the Teacher field includes any MCPS employees in the school who have a teacher position code in the Human Resources database. This list may be differ-ent from the list of MCPS employees shown by selecting View Teacher List on the Elementary Subject Assignment menu. In that list are only teachers in a school who have been assigned to a section.
• In the Begin Date field, you must select a date within the current school year. The begin date for sections created between July and the first full week of school each year defaults to the first day of school.
3. To save the new section, click the Save button. To save and continue adding sections, click the Save & Add Another but-ton.
Update Sections You can update only the begin and end dates and comments for a section. The end date must be a valid school day between the first day of the current marking period and the current date, not a future date. If you enter an end date that is the last day of the first, second, or third marking period, that date is automatically
changed to the first day of the next marking period. The end date cannot be the last day of the fourth marking period.
You can update sections by following the instructions below, or you can update sections using the Manage Sections interface.
To update sections: 1. Follow the instructions in View Sections By Course to find and
list the section you want to update.
2. On the Sections By Course page, click the Update link.
3. On the Update Section page, make the desired changes.
Make sure that you enter end dates correctly. After you save, you will not be able to edit them. To remove an end date, you must contact the Help Desk.
Also, after you add an end date and save, you no longer will be able to update or add students to the section or change the teacher for the section.
4. To save the changes, click the Save button.
Change the Teacher for a Section You can change teachers only for sections without an end date.
To change the teacher for a section: 1. Follow the instructions in View Sections By Course to find and
list the section to change teachers.
2. On the Sections By Course page, click the Change Teacher
link.

Work with Course Sections Delete a Section for a Teacher
Elementary Subject Assignment Quick Reference Guide 5
3. On the Change Teacher page in the New Teacher field, select
the name of the replacement teacher.
4. In the As of Date field, select the effective date of the change.
5. To save the changes, click the Save button.
Delete a Section for a Teacher You can delete a course section only if there were never any stu-dents in the section and the section does not have an end date. For example, you can delete a section if the section was never taught or was mistakenly added. Otherwise, as long as the sec-tion does not have an end date, you can change the teacher for the section, thereby moving the students to a different teacher. If the class met but is now ended, you also can update the sec-tion to add the end date. Deleting a section removes it not only from the teacher’s schedule but also from your school’s master schedule.
To delete a section for a teacher: 1. Follow the instructions in View Sections By Teacher to open
the Section List page.
2. On the Section List page, select a teacher. Only teachers who
have been assigned to sections are available for selection. A list of sections for that teacher will be displayed.
3. For the section you want to delete, click the Delete link. A
warning message will be displayed.
4. On the message, click the OK button.
Mass Schedule With mass scheduling, you can assign some or all elementary school students in a grade to a homeroom or to a course section. The section must have been added before students can be as-signed to it. Also, the sections must not have an end date. The begin date for sections created between July and the first full week of school each year defaults to the first day of school.
To mass schedule:
1. On the left of the page on the Elementary Subject Assign-
ment menu, select Mass Scheduling.
2. On the Mass Schedule Select page, begin to specify the sec-
tion to assign students to by selecting the teacher assigned to the section. The course sections for that teacher will be dis-played.
3. If you want to confirm the students already assigned to the
section, click the View Students button for that section. If not, proceed to the step 5.
From here, you also can click the Assign Students button to assign subjects to a student by following the steps in Assign Subjects to Students, beginning with step 2; and click View Class Demographics to display gender, race, and IEP totals for the selected class.

Work with Course Sections Mass Schedule
Elementary Subject Assignment Quick Reference Guide 6
4. Click the Back button to return to the previous page and con-tinue mass scheduling.
5. Select the check box beside the section to assign students to, then click the Next button.
6. At the top of the Mass Schedule page in the Grade Level field,
select the grade level of the students you want to assign to a section. Students not yet assigned to a section of the selected course will be listed first in regular type, followed by a list of students in dimmed type who have already been assigned to a section of the selected course. Only names in regular type can be assigned to the section.
7. If your school chose to set up articulation groups in the Artic-ulation application, which is separate from OASIS, you can narrow the selection list of students to assign to the section by optionally selecting from the Articulation Groups Type and Articulation Groups fields.
8. Do the following with the students who can be assigned to the section:
To Do this
Add some students to the section.
In the From list, select the stu-dents’ name and move them to the To list by double-clicking.
Remove some students from the section, which you can do only until you save the changes.
In the To list, select the students’ name and move them back to the From list by double-clicking.
Move all students to the section.
In the From list, select the stu-dents’ name and click the Move All button to move them to the To list.
Remove all students from the section, which you can do only until you save the changes.
In the To list, select the students’ name and click the Back All button to move them back to the From list.
Select a group of adja-cent names in the list.
Click to select the first name in the group then, while pressing and holding the Shift key, click to select the last name in the group.
Select non-adjacent names in the list.
Hold the Ctrl key while selecting each name.
9. To save the changes, click the Save button.

Elementary Subject Assignment Quick Reference Guide 7
Work with Student Schedules In the OASIS Elementary Subject Assignment module, you can view a student’s schedule, assign a course to a student, update the begin and end date for course assignments, and delete a course from a student’s schedule. You perform these tasks by selecting from the Elementary Subject Assignment menu, which is on the left of the pages in the module:
View a Student’s Schedule You can view a student’s schedule after searching for it or while viewing teacher and section lists.
View a Student’s Schedule via a Student Search The instructions below explain the most common and straight-forward way to view a student’s schedule, which is to search for it.
To view a student’s schedule via a student search: 1. On the Elementary Subject Assignment menu, select Student
Subject Assignment.
2. Search for and retrieve a student’s schedule using either a
basic search or an advanced search.
Basic search—enter a student ID on the Student Detail tab on the left of OASIS pages.
Advanced search—enter a student ID or other search criteria on the Student Search page.
The schedule will open showing all of the student’s active classes.
View a Student’s Schedule via Teacher and Section Lists Explained below are other ways to view a student’s schedule while working with teacher and course section lists.
To view a student’s schedule via teacher and section lists: 1. On the Elementary Subject Assignment menu, select either
View Teacher List, View Sections by Teacher, View Sections by Course, or View Homeroom Students.
2. Make the appropriate selections to display the Student List page, as explained in View Teacher, Section, and Student Lists.
3. On the Student List page, click an Assign Subjects link to open
a schedule showing all of a student’s active classes.
Assign Subjects to Students Follow the instructions below to assign subjects to students, thereby adding the subjects to the students’ schedule. Refer to Assign Students for Course Advancement in Math to add to a
Advanced search
Basic search

Work with Student Schedules Assign a Subject Missing from a Student’s Schedule
Elementary Subject Assignment Quick Reference Guide 8
student’s schedule a math course beyond the student’s grade level.
To assign subjects to students: 1. View a student’s schedule via a student search.
2. On the Student Schedule, click the New button.
3. On the Add Student Schedule page, provide the information
requested, keeping in mind the following:
• The selection list for the Teacher-Section field includes any MCPS employees in the school who have a teacher position code in the Human Resources database. This list may be different from the list of MCPS employees shown by selecting View Teacher List on the Elementary Subject Assignment menu. In that list are only teachers in a school who have been assigned to a section.
• In the Begin Date field, you must select a date within the current school year. The begin date for sections created between July and the first full week of school each year defaults to the first day of school.
• Leave the End Date field blank.
4. To save the schedule change, click the Save button. To save and continue adding subjects to the student’s schedule, click the Save & Add Another button.
Assign a Subject Missing from a Student’s Schedule Below are instructions for easily determining students who have not been assigned a particular subject then adding that subject to their schedule.
To assign a subject missing from a student’s schedule: 1. On the Elementary Subject Assignment menu, select Stu-
dents with Missing Subject.
2. On the Students with Missing Subject page, select a grade
and a course.
3. Click the button. A list of students in the selected grade who have not been assigned the selected course will be displayed.
You can view the list of students in an Excel spreadsheet by clicking the button.
4. If a long list of students results, do either of the following to find a particular student:
• In the Find Student selection list, select a student.
• At the bottom of the student list, use the page navigation to advance forward or backward through the list.
5. To add the missing subject to a student’s schedule, click the button next to the student’s name.
Go to a specific page number.
Go to the first page. Go to the previous page.
Go to the next page. Go to the last page.

Work with Student Schedules Assign a Report Card Subject Missing from a Student’s Schedule
Elementary Subject Assignment Quick Reference Guide 9
6. On the Add Student To Section dialog box, select the section
you want to add to the student’s schedule.
7. In the Begin Date field, you must select a date within the cur-rent school year. The begin date for sections created between July and the first full week of school each year defaults to the first day of school.
8. Click the button. The section will be added to the student’s schedule and will be listed on the right of the dialog box under Student Schedule & Artic Groups.
9. To close the dialog box, click the x to the right of the dialog box title.
Assign a Report Card Subject Missing from a Stu-dent’s Schedule Below are instructions for easily determining students who have not been assigned a particular required subject shown on report cards then adding that subject to their schedule.
To assign a report card subject missing from a student’s schedule:
1. On the Elementary Subject Assignment menu, select Stu-dents with Missing Subject for Report Card.
2. On the Students with Missing Subject for Report Card page,
select a grade and a course. Only courses shown on report cards will be available for selection.
3. Follow the instructions in Assign a Subject Missing from a Student’s Schedule, beginning with step 3.
Assign Students for Course Advancement in Math While in elementary school, students can advance beyond the regular grade level math course. They may attend classes either at their school or at a middle school.
To assign students for course advancement in math: 1. Do one of the following:
• If the math course is taught at a middle school, proceed to step 2 to add a section for the course.
• If the math course is taught at your school and the course section has been added to your school’s master schedule, proceed to step 3.
2. Add a section for the math course taught at a middle school, making sure to do the following:
• Teacher—Select the student’s homeroom teacher.
• Comments—Add the name of the middle school where the course will be taken and the name of the teacher for that course. Middle school teachers are not included in the Teacher List nor will they be added to the list. The list includes only teachers at your school.
Be sure to complete this step before proceeding so that there is a middle school course section to which students can be added.
3. Have the principal submit a Help Desk ticket requesting the approval and sectioning of one or more students into the course section. The request must include the following:
• Student name
• Student ID
• Student’s last math course of record
• Name and section number of the math course
Trying to add students to the course section yourself will generate a COURSENOTVALIDFORGRADE error, and you will not be able to save the course assignment.
4. In a few days, follow up to make sure that the Help Desk re-quest has been resolved.
You can follow up either by viewing a student’s schedule to confirm that the math course is listed or by checking with the principal or administrative secretary to confirm that the Help Desk ticket was closed.
Update Student Schedules Follow the instructions below to change the begin date or end date for a course on a student’s schedule. Removing the end date will reactivate the course on the student’s schedule.
To update student schedules: 1. View a student’s schedule via a student search.
Click here to close.

Work with Student Schedules Delete a Course on a Student’s Schedule
Elementary Subject Assignment Quick Reference Guide 10
2. On the student’s schedule, click the Update link for the
course whose begin or end date you want to change.
3. On the Update Student Schedule page, make the desired
change.
4. To save the change, click the Save button.
Delete a Course on a Student’s Schedule Follow the instructions below to delete a course on a student’s schedule, but only if the student never attended it.
To delete a course on a student’s schedule: 1. View a student’s schedule via a student search.
2. On the student’s schedule, click the Delete link for the course
you want to delete. A message will be displayed prompting you to confirm the deletion.
3. On the message, click the OK button.
Elementary Subject Assignment Quick Reference Guide 11
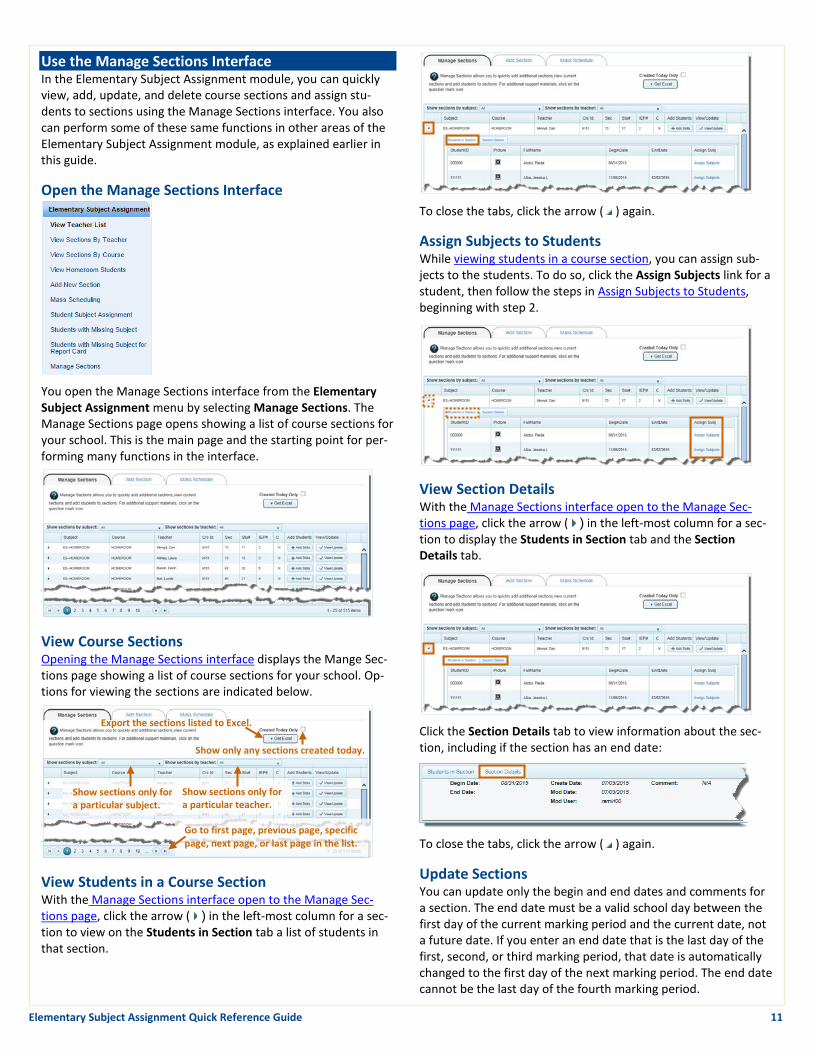
Use the Manage Sections Interface In the Elementary Subject Assignment module, you can quickly view, add, update, and delete course sections and assign stu-dents to sections using the Manage Sections interface. You also can perform some of these same functions in other areas of the Elementary Subject Assignment module, as explained earlier in this guide.
Open the Manage Sections Interface
You open the Manage Sections interface from the Elementary Subject Assignment menu by selecting Manage Sections. The Manage Sections page opens showing a list of course sections for your school. This is the main page and the starting point for per-forming many functions in the interface.
View Course Sections Opening the Manage Sections interface displays the Mange Sec-tions page showing a list of course sections for your school. Op-tions for viewing the sections are indicated below.
View Students in a Course Section With the Manage Sections interface open to the Manage Sec-tions page, click the arrow ( ) in the left-most column for a sec-tion to view on the Students in Section tab a list of students in that section.
To close the tabs, click the arrow ( ) again.
Assign Subjects to Students While viewing students in a course section, you can assign sub-jects to the students. To do so, click the Assign Subjects link for a student, then follow the steps in Assign Subjects to Students, beginning with step 2.
View Section Details With the Manage Sections interface open to the Manage Sec-tions page, click the arrow ( ) in the left-most column for a sec-tion to display the Students in Section tab and the Section Details tab.
Click the Section Details tab to view information about the sec-tion, including if the section has an end date:
To close the tabs, click the arrow ( ) again.
Update Sections You can update only the begin and end dates and comments for a section. The end date must be a valid school day between the first day of the current marking period and the current date, not a future date. If you enter an end date that is the last day of the first, second, or third marking period, that date is automatically changed to the first day of the next marking period. The end date cannot be the last day of the fourth marking period.
Export the sections listed to Excel.
Show sections only for a particular subject.
Show sections only for a particular teacher.
Go to first page, previous page, specific page, next page, or last page in the list.
Show only any sections created today.

Use the Manage Sections Interface Delete Sections
Elementary Subject Assignment Quick Reference Guide 12
To update sections: 1. Open the Manage Sections interface.
2. On the Manage Sections page, click the button for
the section to update.
3. Make the desired changes.
To change the begin date or end date, you must click and select it from the calendar icon ( ). Make sure that you enter end dates correctly. After you save, you will not be able to edit them. To remove an end date, you must con-tact the Help Desk.
Also, after you add an end date and save, you no longer will be able to update or add students to the section or change the teacher for the section.
4. To save the changes, click the button.
Delete Sections You can delete a course section only if there were never any stu-dents in the section. For example, you can delete a section if the section was never taught or was mistakenly added. Otherwise, as long as the section does not have an end date, you can change the teacher for the section, thereby moving the students to a different teacher. If the class met but is now ended, you also can update the section to add the end date. Deleting a section re-moves it not only from the teacher’s schedule but also from your school’s master schedule.
To delete sections: 1. Open the Manage Sections interface.
2. Find the section you want to delete.
3. On the Manage Sections page, click the button for the sec-
tion to delete. A message will be displayed prompting you to confirm the deletion.
4. On the message, click the OK button.
Add Students to a Section You can add students to a course section only for your school. The section must not have an end date.
To add students to a section: 1. Open the Manage Sections interface.
2. On the Manage Sections page, click the button for
the section to add students. The Add students to section page opens, with students already in the section listed in the To list.
3. For Choose Source, select the group of students to choose
from to add to the section. You can choose students from ei-ther a homeroom, as maintained in OASIS, or from an option-al articulation group your school may have set up in the Articulation application, which is separate from OASIS.
4. Do one of the following:

Use the Manage Sections Interface Add Sections
Elementary Subject Assignment Quick Reference Guide 13
If Then
You selected Home-room as the source.
1. Select a homeroom teacher.
2. Optionally, narrow the choice of students by selecting the appropriate options: ESOL, Spec Ed, Male, Female, All. You can select one or both check boxes but only one gender option at a time.
3. In the Move Date field, select the effective date for the stu-dents to be added to the sec-tion.
4. Click the Go button.
You selected Articula-tion Groups as the source.
1. In the Group Type and Group fields, select the appropriate options.
2. In the Move Date field, select the effective date for the stu-dents to be added to the sec-tion.
5. Do the following with the students who can be assigned to
the section:
To Do this
Add some students to the section.
In the From list, select the stu-dents’ name and move them to the To list by double-clicking.
Remove some students from the section, which you can do only until you save the changes.
In the To list, select the students’ name and move them back to the From list by double-clicking.
Move all students to the section.
In the From list, select the stu-dents’ name and click the Move All button to move them to the To list.
To Do this
Remove all students from the section, which you can do only until you save the changes.
In the To list, select the students’ name and click the Back All button to move them back to the From list.
Select a group of adja-cent names in the list.
Click to select the first name in the group then, while pressing and holding the Shift key, click to select the last name in the group.
Select non-adjacent names in the list.
Hold the Ctrl key while selecting each name.
6. To save the changes, click the Save button.
Add Sections You can quickly and easily add course sections to your master schedule, following the instructions below:
To add sections: 1. Open the Manage Sections interface.
2. Click the Add Section tab to select it.
3. Provide the information requested, keeping in mind the fol-
lowing:
• The selection list for the Teachers field includes any MCPS employees in the school who have a teacher position code in the Human Resources database. This list may be differ-ent from the list of MCPS employees shown by selecting View Teacher List on the Elementary Subject Assignment menu. In that list are only teachers in a school who have been assigned to a section.
• The selection list for the Sections field includes only sec-tion numbers that have not yet been used for the course.
• In the Begin Date field, you must select a date within the current school year. The begin date for sections created between July and the first full week of school each year defaults to the first day of school.

Use the Manage Sections Interface Add Sections
Elementary Subject Assignment Quick Reference Guide 14
• If students will be leaving the building to go to a middle school, add in the Comments field the name of the middle school and the teacher.
4. To add the new section, click the button.
5. A message will be displayed indicating that you successfully added the section, and the section will be listed on the right of the page under Added Sections.
Montgomery County Public Schools 850 Hungerford Drive, Rockville, Maryland 20850