Online Administrative Student Information System (OASIS) Enrollment...
15
Contents Next Page Previous Page Online Administrative Student Information System (OASIS) Enrollment Quick Reference Guide—RIA Procedures Version 1 March 2011
Transcript of Online Administrative Student Information System (OASIS) Enrollment...
Contents Next Page Previous Page
Online Administrative Student Information System (OASIS) Enrollment Quick Reference Guide—RIA Procedures
Version 1 March 2011

2 OASIS Enrollment Quick Reference Guide—RIA Procedures
Contents
Managing Residency and International Admissions Data Adding an RIA Application Updating an RIA Application Deleting an RIA Application Generating an Intake Form
Contents Next Page Previous Page
Introduction The Online Administrative Student Information System (OASIS) provides a central location for view-ing and updating student administrative data online. Using the OASIS Enrollment module, you can manage residency and international admission data used to clear students for enrollment.
The OASIS Web pages represented in this document might vary slightly from those on your screen. Some OASIS functions are available only during specific times of the year and are shown and accessi-ble only during those times.
For readability, you can press Ctrl+L to view this document in Full Screen Mode. Press the Esc key to return to normal viewing mode.
3 OASIS Enrollment Quick Reference Guide—RIA Procedures Contents Next Page Previous Page
Managing Residency and International Admis-sions Data Some students must start their enrollment at the Residency and International Admissions (RIA) office in the Department of Student Services:
International students whose parents have established a bona fide resi-dence in Montgomery County
International students who are
residing in Montgomery County without parents and requesting a waiver of tuition
residing with parents who live in housing with a short-term lease
residing with a non-custodial parent
over that age of 18 and self supporting
residing with parents and awaiting completion of permanent housing within 60 days
Foreign students
MCPS regulation JEA-RC, Enrollment and Placement of International and For-eign Students includes definitions of international and foreign students:
International students are
Students from other countries with bona fide residency in Montgom-ery County who have not attended school in the United States at any time during the prior 2 years
United States citizens who attended a foreign school outside of the United States, and interpretation of documentation, including educa-tional records, is needed by the school for placement
Foreign students are persons of school age who are not United States citi-zens, maintain an official residence in another country, and come to the United States with visa status to visit or study.
An exchange student holds a J–1 Visa and is under an approved ex-change student program.
A non-immigrant student holds an F–1 Visa and must be approved by the Immigration and Naturalization Service.
A visitor holds a B–1 or B–2 Visa and comes for the sole purpose of visiting the United States.
RIA is the only unit in MCPS authorized to start and monitor compliance with procedures and regulations for the admission of non-immigrant visitor status students (F–1) and exchange students (J–1).
Adding an RIA Application To add an RIA application for a student, you must do the following:
1. Verify or generate a student ID.
2. Update or enter the student’s address and phone number.
3. Input RIA data for the student.
To verify or generate a student ID: 1. Log in to OASIS.
2. At the top of the page in the tab bar, hover your mouse over the ENROLL-MENT tab to display a menu.
3. On the menu, select Enrollment Search\ID Gen to begin the process of determining if the student already has an MCPS student ID or to generate one.
4 OASIS Enrollment Quick Reference Guide—RIA Procedures
Managing Residency and International Admissions Data
Contents Next Page Previous Page
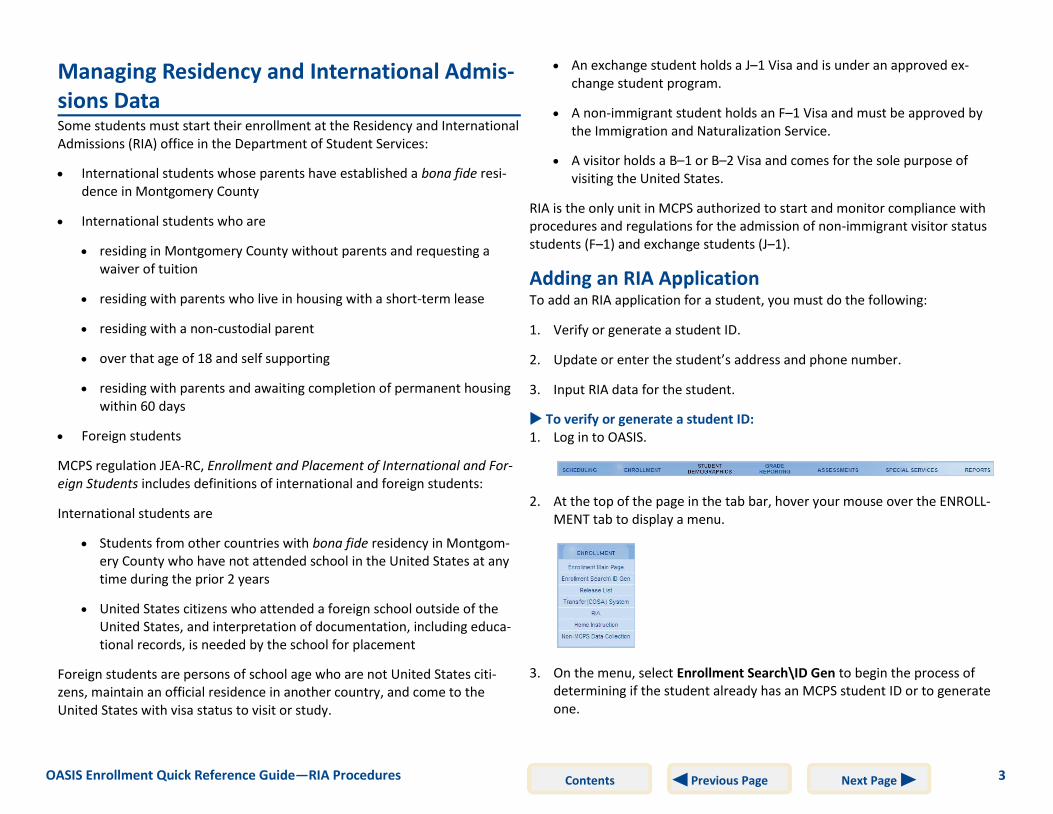
4. In the Enrollment Search section of the Enrollment Main Page, enter all of the information you have about the student, but at least the first and last name, gender, and birth date.
In the Enrollment Search section, you cannot use a wildcard (%) to en-ter part of a name or number.
5. Click the Search button. Results are displayed below your search parame-ters.
Green highlighting indicates the part of the student record that matches your search parameters. The right-most column is a rough indicator of the strength of the matches on a scale of 1 to 6, with the lower number indicating the closest match. If an exact or very close match is found, ver-ify if it is the student. If it is, proceed with the instructions for updating or entering the student’s address and phone number, which begin in the next column. If it is not the same student, proceed to the next step to generate an ID.
6. Click the Gen ID button to generate a unique ID for the student.
7. In the Generate New Student ID section of the Enrollment Main Page, complete the information for the student, including the student’s social security number if known.
8. Click the Generate Id button. The Enrollment Main Page will open.
If you have not entered a social security number, you will be prompted to enter one. Click OK to clear the message, and click the Generate Id button again to proceed. The student ID will be displayed on the En-rollment Main Page at the top of the Student Enrollment List.
To update or enter the student’s address and phone number: 1. On the left of the page in the Enrollment Main Page menu, select Update
Address/Phone.
5 OASIS Enrollment Quick Reference Guide—RIA Procedures
Managing Residency and International Admissions Data
Contents Next Page Previous Page
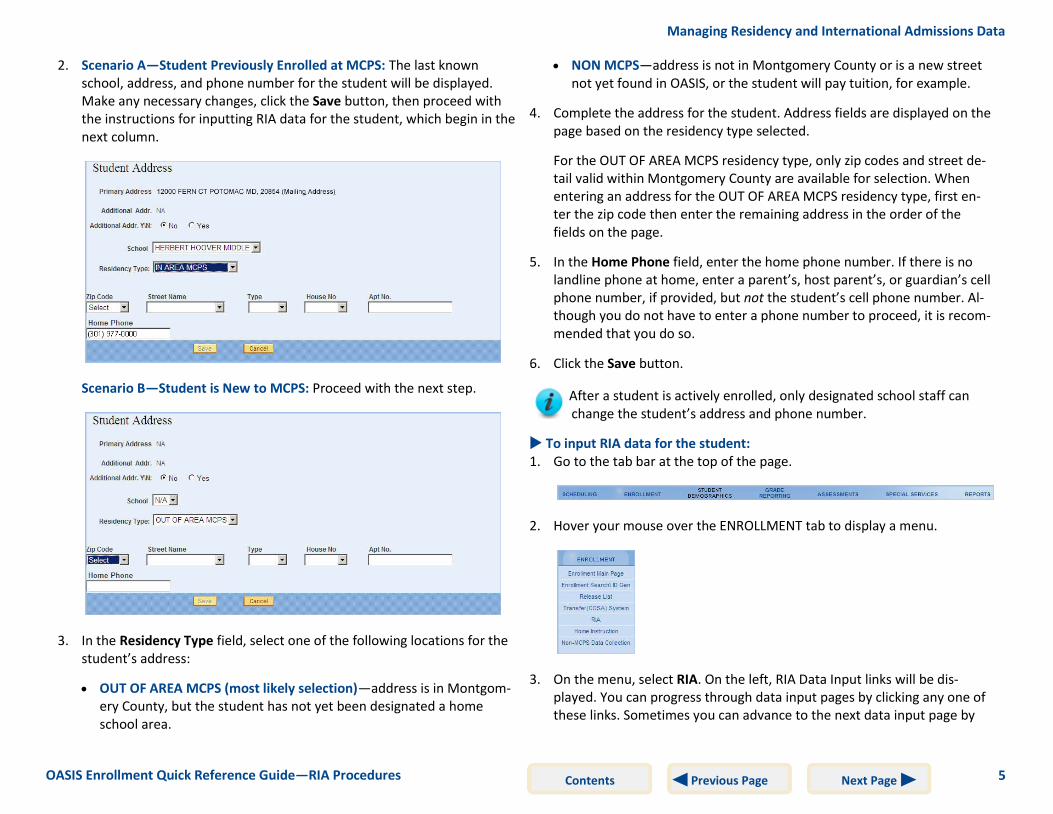
2. Scenario A—Student Previously Enrolled at MCPS: The last known school, address, and phone number for the student will be displayed. Make any necessary changes, click the Save button, then proceed with the instructions for inputting RIA data for the student, which begin in the next column.
Scenario B—Student is New to MCPS: Proceed with the next step.
3. In the Residency Type field, select one of the following locations for the student’s address:
OUT OF AREA MCPS (most likely selection)—address is in Montgom-ery County, but the student has not yet been designated a home school area.
NON MCPS—address is not in Montgomery County or is a new street not yet found in OASIS, or the student will pay tuition, for example.
4. Complete the address for the student. Address fields are displayed on the page based on the residency type selected.
For the OUT OF AREA MCPS residency type, only zip codes and street de-tail valid within Montgomery County are available for selection. When entering an address for the OUT OF AREA MCPS residency type, first en-ter the zip code then enter the remaining address in the order of the fields on the page.
5. In the Home Phone field, enter the home phone number. If there is no landline phone at home, enter a parent’s, host parent’s, or guardian’s cell phone number, if provided, but not the student’s cell phone number. Al-though you do not have to enter a phone number to proceed, it is recom-mended that you do so.
6. Click the Save button.
After a student is actively enrolled, only designated school staff can change the student’s address and phone number.
To input RIA data for the student: 1. Go to the tab bar at the top of the page.
2. Hover your mouse over the ENROLLMENT tab to display a menu.
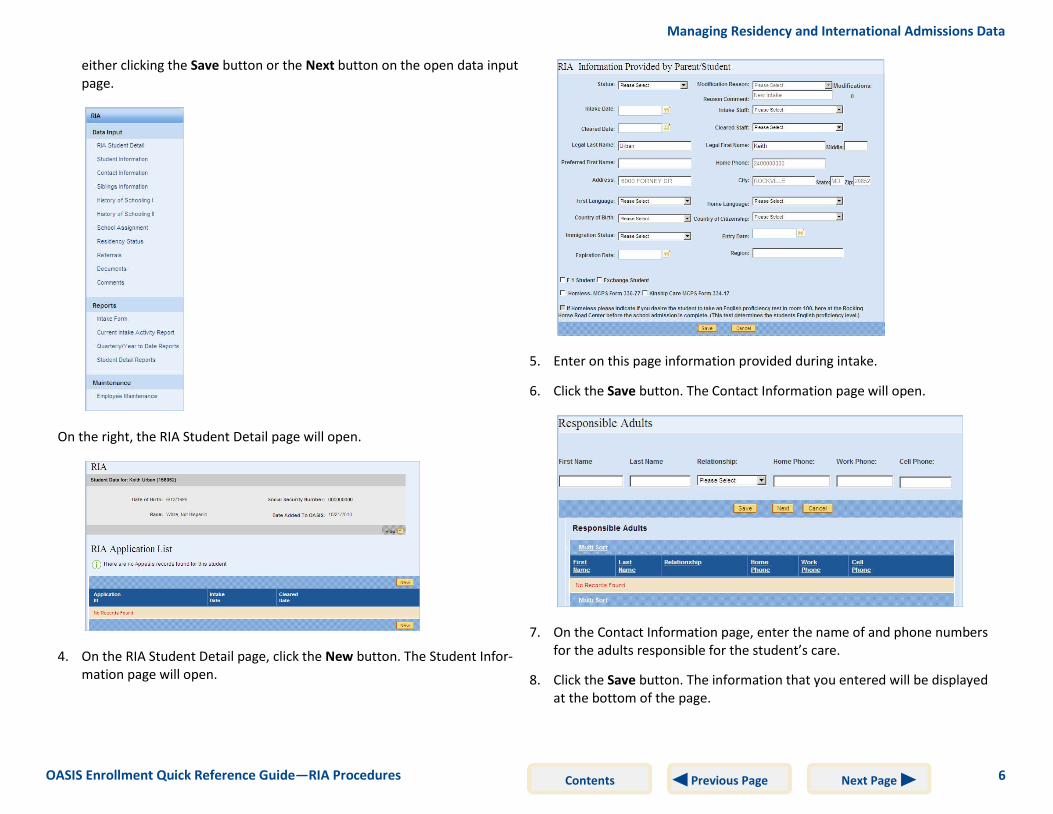
3. On the menu, select RIA. On the left, RIA Data Input links will be dis-played. You can progress through data input pages by clicking any one of these links. Sometimes you can advance to the next data input page by
6 OASIS Enrollment Quick Reference Guide—RIA Procedures
Managing Residency and International Admissions Data
Contents Next Page Previous Page
either clicking the Save button or the Next button on the open data input page.
On the right, the RIA Student Detail page will open.
4. On the RIA Student Detail page, click the New button. The Student Infor-mation page will open.
5. Enter on this page information provided during intake.
6. Click the Save button. The Contact Information page will open.
7. On the Contact Information page, enter the name of and phone numbers for the adults responsible for the student’s care.
8. Click the Save button. The information that you entered will be displayed at the bottom of the page.
7 OASIS Enrollment Quick Reference Guide—RIA Procedures
Managing Residency and International Admissions Data
Contents Next Page Previous Page
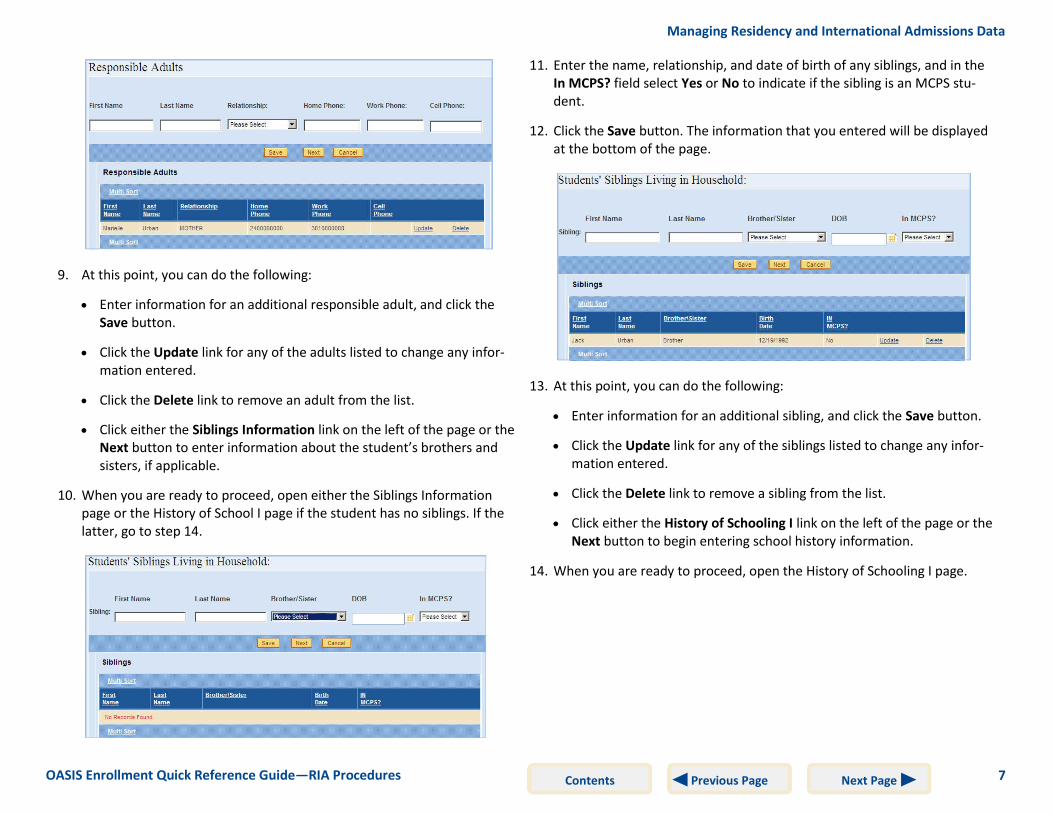
9. At this point, you can do the following:
Enter information for an additional responsible adult, and click the Save button.
Click the Update link for any of the adults listed to change any infor-mation entered.
Click the Delete link to remove an adult from the list.
Click either the Siblings Information link on the left of the page or the Next button to enter information about the student’s brothers and sisters, if applicable.
10. When you are ready to proceed, open either the Siblings Information page or the History of School I page if the student has no siblings. If the latter, go to step 14.
11. Enter the name, relationship, and date of birth of any siblings, and in the In MCPS? field select Yes or No to indicate if the sibling is an MCPS stu-dent.
12. Click the Save button. The information that you entered will be displayed at the bottom of the page.
13. At this point, you can do the following:
Enter information for an additional sibling, and click the Save button.
Click the Update link for any of the siblings listed to change any infor-mation entered.
Click the Delete link to remove a sibling from the list.
Click either the History of Schooling I link on the left of the page or the Next button to begin entering school history information.
14. When you are ready to proceed, open the History of Schooling I page.
8 OASIS Enrollment Quick Reference Guide—RIA Procedures
Managing Residency and International Admissions Data
Contents Next Page Previous Page
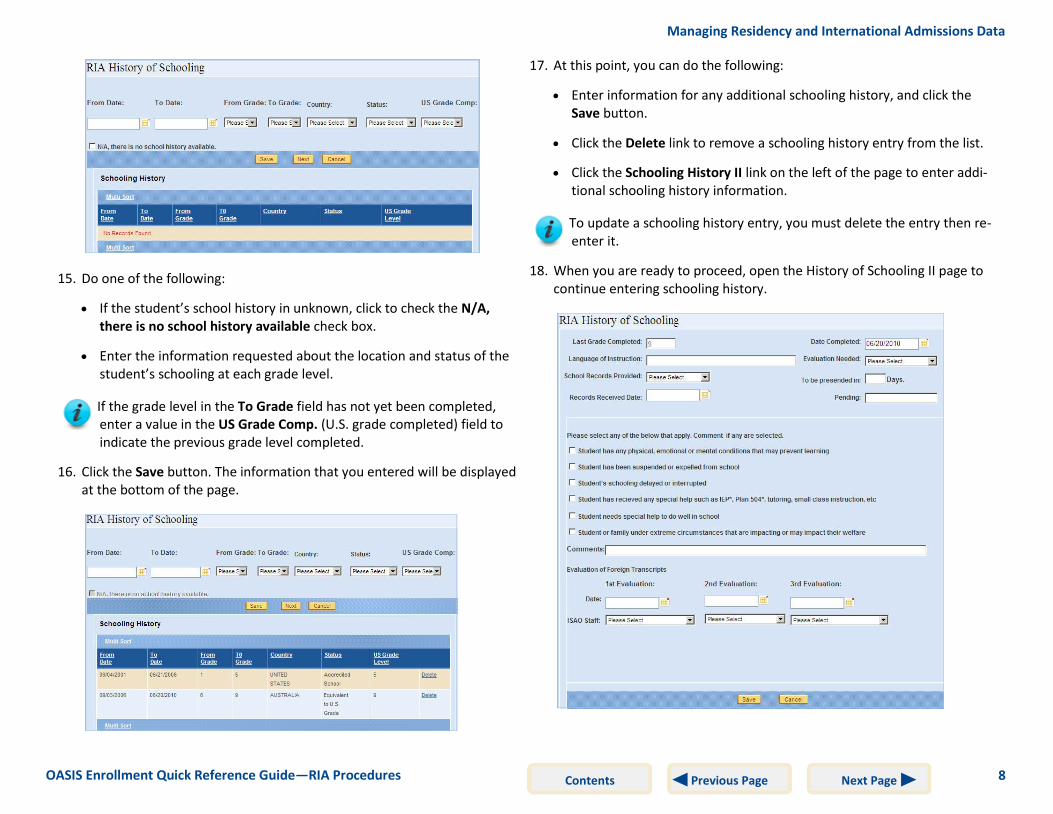
15. Do one of the following:
If the student’s school history in unknown, click to check the N/A, there is no school history available check box.
Enter the information requested about the location and status of the student’s schooling at each grade level.
If the grade level in the To Grade field has not yet been completed, enter a value in the US Grade Comp. (U.S. grade completed) field to indicate the previous grade level completed.
16. Click the Save button. The information that you entered will be displayed at the bottom of the page.
17. At this point, you can do the following:
Enter information for any additional schooling history, and click the Save button.
Click the Delete link to remove a schooling history entry from the list.
Click the Schooling History II link on the left of the page to enter addi-tional schooling history information.
To update a schooling history entry, you must delete the entry then re-enter it.
18. When you are ready to proceed, open the History of Schooling II page to continue entering schooling history.
9 OASIS Enrollment Quick Reference Guide—RIA Procedures
Managing Residency and International Admissions Data
Contents Next Page Previous Page
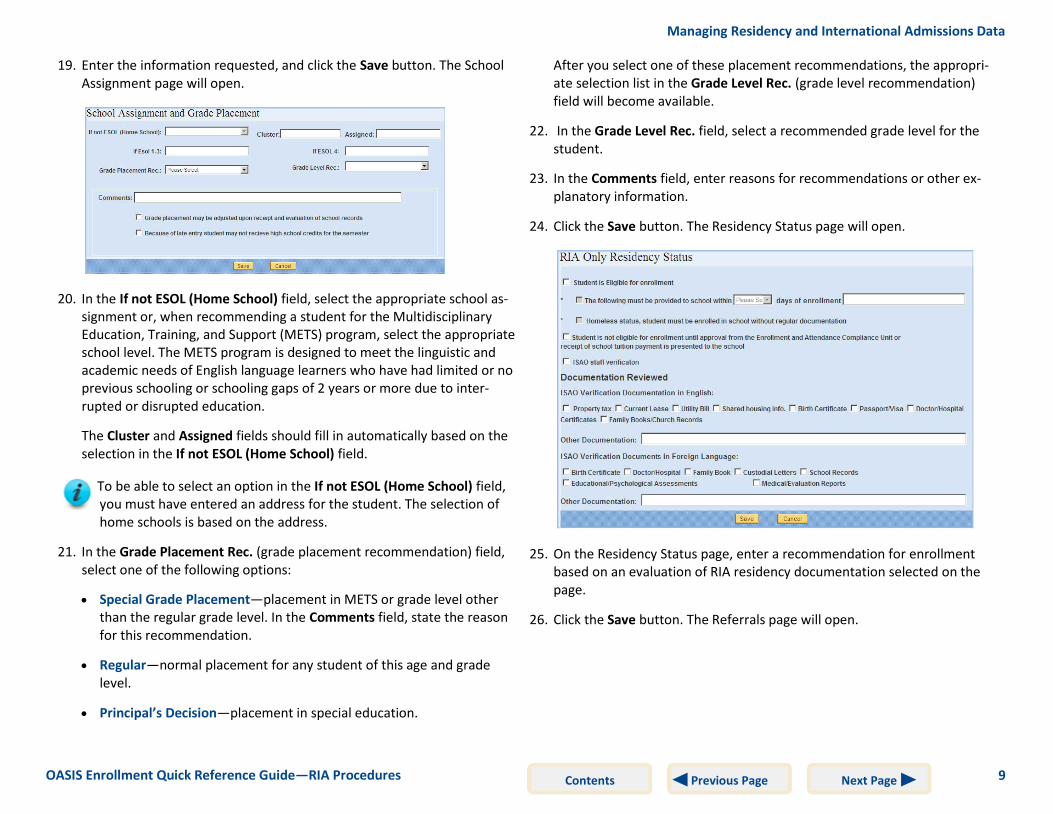
19. Enter the information requested, and click the Save button. The School Assignment page will open.
20. In the If not ESOL (Home School) field, select the appropriate school as-signment or, when recommending a student for the Multidisciplinary Education, Training, and Support (METS) program, select the appropriate school level. The METS program is designed to meet the linguistic and academic needs of English language learners who have had limited or no previous schooling or schooling gaps of 2 years or more due to inter-rupted or disrupted education.
The Cluster and Assigned fields should fill in automatically based on the selection in the If not ESOL (Home School) field.
To be able to select an option in the If not ESOL (Home School) field, you must have entered an address for the student. The selection of home schools is based on the address.
21. In the Grade Placement Rec. (grade placement recommendation) field, select one of the following options:
Special Grade Placement—placement in METS or grade level other than the regular grade level. In the Comments field, state the reason for this recommendation.
Regular—normal placement for any student of this age and grade level.
Principal’s Decision—placement in special education.
After you select one of these placement recommendations, the appropri-ate selection list in the Grade Level Rec. (grade level recommendation) field will become available.
22. In the Grade Level Rec. field, select a recommended grade level for the student.
23. In the Comments field, enter reasons for recommendations or other ex-planatory information.
24. Click the Save button. The Residency Status page will open.
25. On the Residency Status page, enter a recommendation for enrollment based on an evaluation of RIA residency documentation selected on the page.
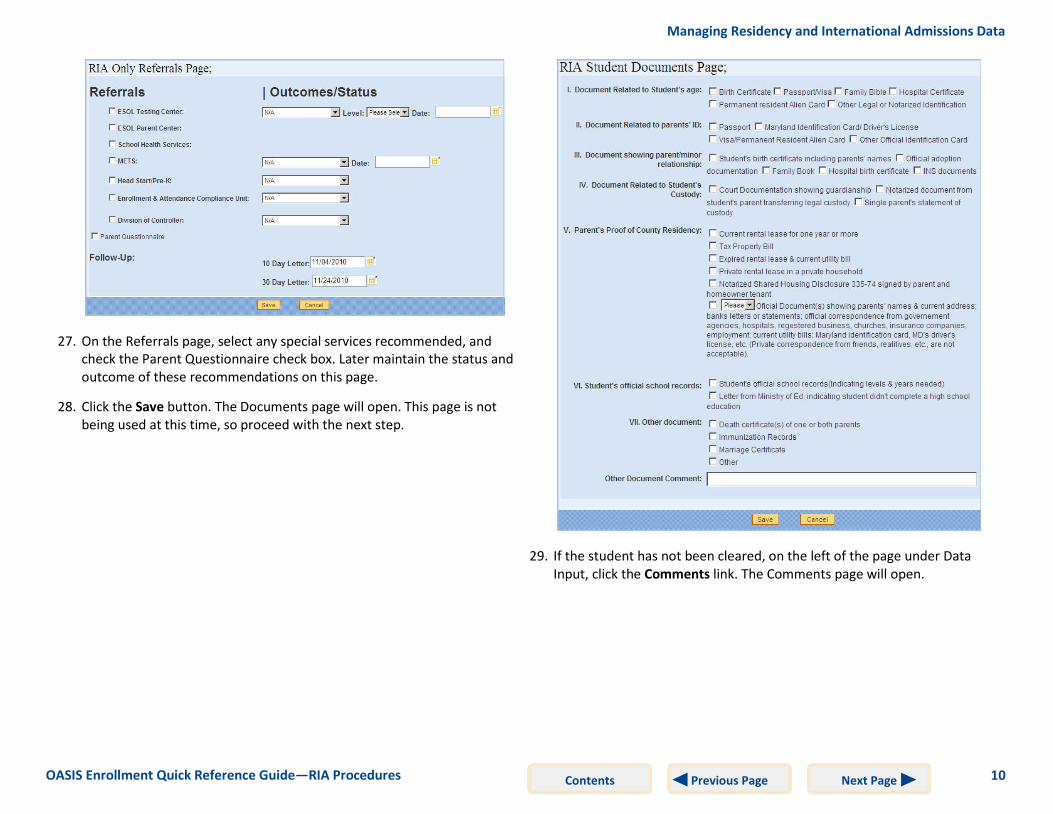
26. Click the Save button. The Referrals page will open.
10 OASIS Enrollment Quick Reference Guide—RIA Procedures
Managing Residency and International Admissions Data
Contents Next Page Previous Page
27. On the Referrals page, select any special services recommended, and check the Parent Questionnaire check box. Later maintain the status and outcome of these recommendations on this page.
28. Click the Save button. The Documents page will open. This page is not being used at this time, so proceed with the next step.
29. If the student has not been cleared, on the left of the page under Data Input, click the Comments link. The Comments page will open.
11 OASIS Enrollment Quick Reference Guide—RIA Procedures
Managing Residency and International Admissions Data
Contents Next Page Previous Page
30. On the Comments page, enter any comments you have about the student not being cleared.
31. Click the Save button to save the comments and enter another comment if desired.
Updating an RIA Application While updating an RIA application, if you repeatedly click an RIA Data Input link and the RIA Student Detail page continues to display, then on the RIA Student Detail page in the RIA Application List, click the Edit/View Application link for the application you are updating. You should then be able to open another data input page by clicking the appropriate RIA Data Input link.
1. Log in to OASIS.
2. Search for the desired student record.
3. At the top of the page in the tab bar, hover your mouse over the ENROLL-MENT tab to display a menu.
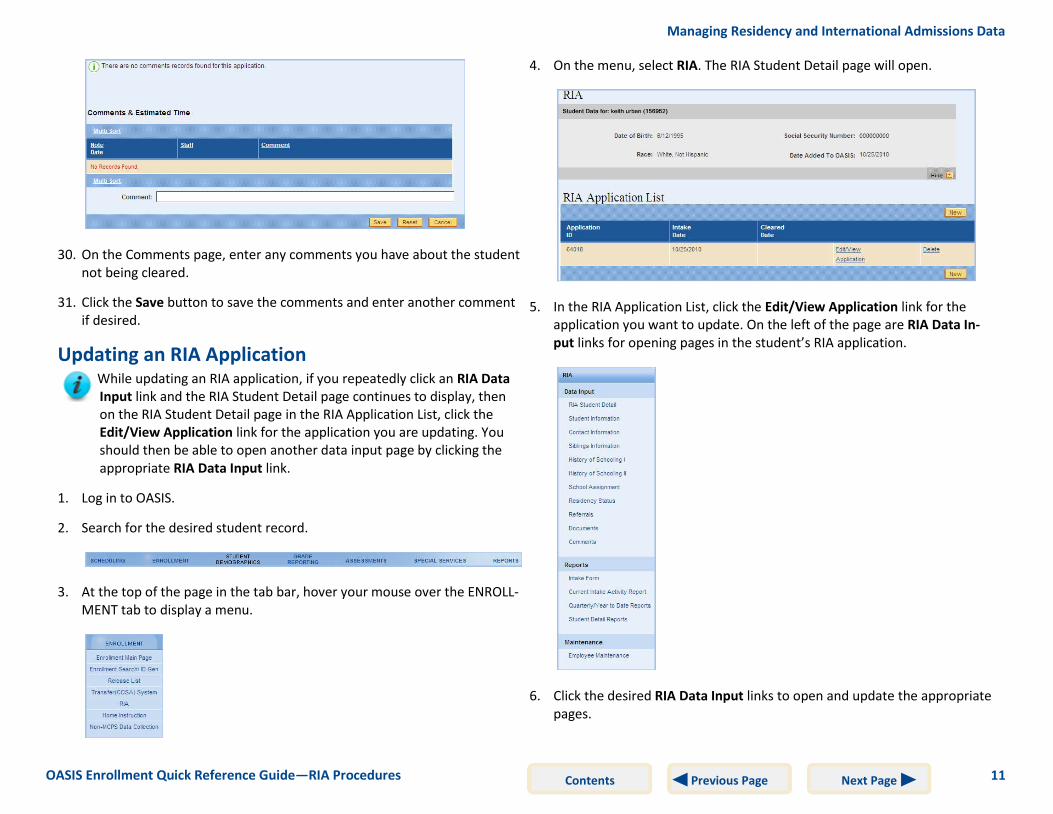
4. On the menu, select RIA. The RIA Student Detail page will open.
5. In the RIA Application List, click the Edit/View Application link for the application you want to update. On the left of the page are RIA Data In-put links for opening pages in the student’s RIA application.
6. Click the desired RIA Data Input links to open and update the appropriate pages.

12 OASIS Enrollment Quick Reference Guide—RIA Procedures
Managing Residency and International Admissions Data
Contents Next Page Previous Page
7. Click the Save button on each page that you update.
Deleting an RIA Application 1. Log in to OASIS.
2. Search for the desired student record.
3. At the top of the page in the tab bar, hover your mouse over the ENROLL-MENT tab to display a menu.
4. On the menu, select RIA. The RIA Student Detail page will open.
5. On the RIA Student Detail page in the RIA Application List, click the Delete link for the application you want to delete.
6. A message will be displayed prompting you to confirm that you want to delete the application and everything attached to it as well.
7. On the message, click the OK button to confirm deletion.
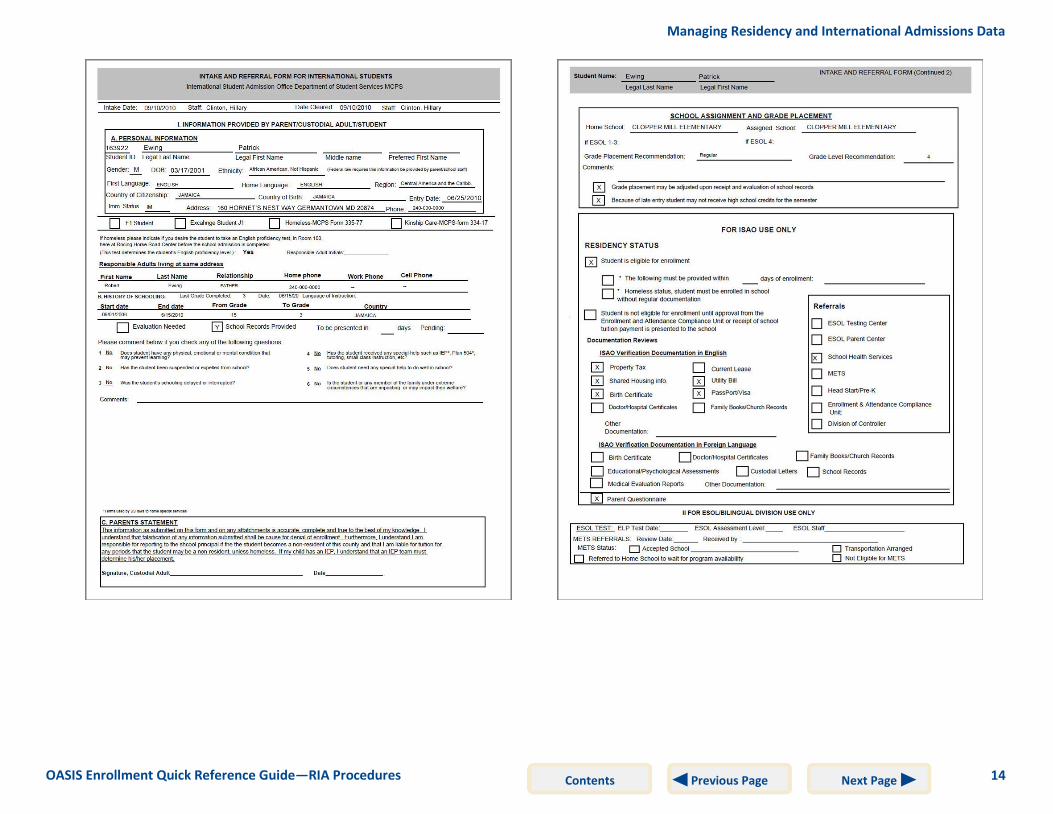
Generating an Intake Form The Intake Form is a formatted, printable, portable document format (PDF) version of information entered on a student’s RIA application in OASIS. Fol-lowing are instructions for generating the Intake Form.
1. Log in to OASIS.
2. Search for the desired student record.
3. At the top of the page in the tab bar, hover your mouse over the ENROLL-MENT tab to display a menu.
4. On the menu, select RIA. The RIA Student Detail page will open.
5. In the RIA Application List, click the Edit/View Application link for the application for which you want to generate the form. On the left of the page are links for performing various RIA functions.
13 OASIS Enrollment Quick Reference Guide—RIA Procedures
Managing Residency and International Admissions Data
Contents Next Page Previous Page
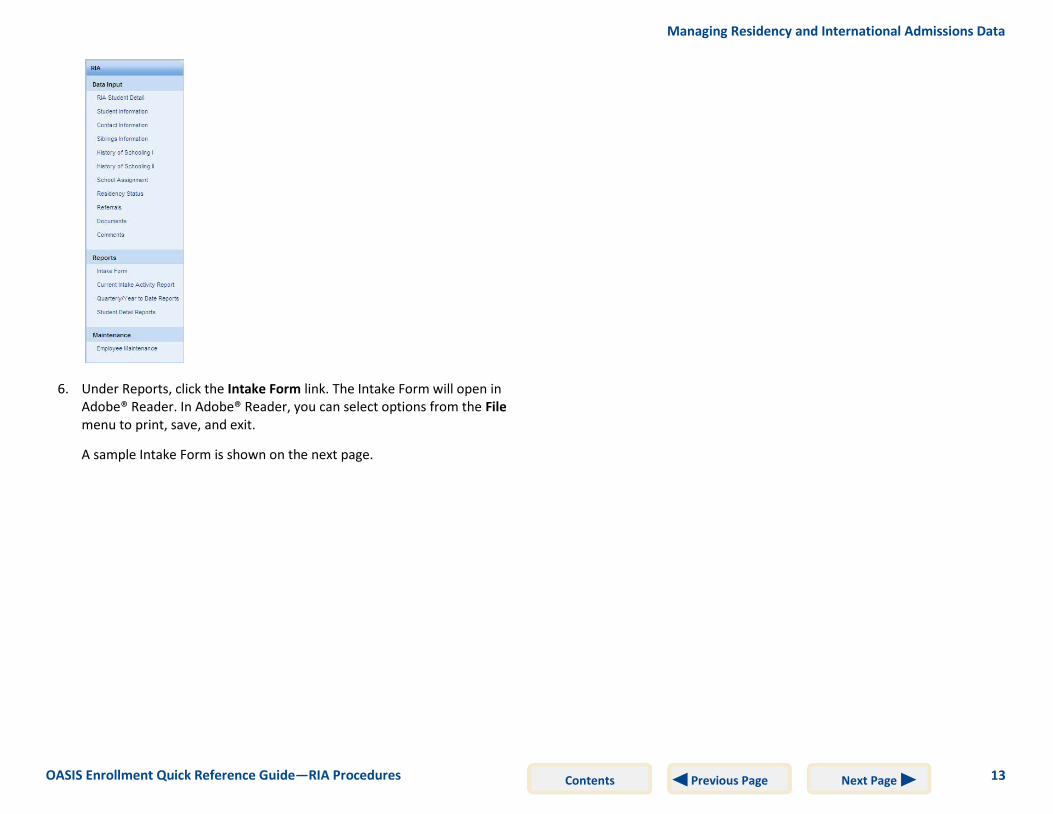
6. Under Reports, click the Intake Form link. The Intake Form will open in Adobe® Reader. In Adobe® Reader, you can select options from the File menu to print, save, and exit.
A sample Intake Form is shown on the next page.
14 OASIS Enrollment Quick Reference Guide—RIA Procedures
Managing Residency and International Admissions Data
Contents Next Page Previous Page
Montgomery County Public Schools 850 Hungerford Drive, Rockville, Maryland 20850
Contents Next Page Previous Page