
OLI Tips #55
23
OLI Tips - 1 - OLI Tips #55 Getting started with Aspen OLI Overview......................................................................................................................... 1 Assumptions.................................................................................................................... 1 Creating the Chemistry ................................................................................................... 2 Starting Aspen OLI Chemistry Wizard....................................................................... 2 Starting Aspen Plus ................................................................................................... 16 Overview The Aspen Plus OLI interface greatly enhances Aspen Plus’s capability to model electrolyte systems. A rigorous and self-consistent thermodynamic framework is employed to tame the mathematically stiff equations commonly found in electrolyte systems. Also a database of over 10,000 components are available. The OLI model is available as a property set within Aspen Plus. This “Getting Started” guide will show you how to create the electrolyte chemistry for a simple case and then use that chemistry in Aspen Plus. Assumptions The following assumptions are made for this guide: 1. Aspen Plus is currently installed and running on your computer 2. The license manager for Aspen Plus is currently set up for you to run Aspen. 3. The Aspen OLI Alliance product has been installed. 4. The OLI security model is running 5. Aspen Plus version 12.1 is used 6. The user is expected to know how to run Aspen Plus. The Right Chemistry
Transcript of OLI Tips #55

OLI Tips - 1 -
OLI Tips #55 Getting started with Aspen OLI
Overview......................................................................................................................... 1 Assumptions.................................................................................................................... 1 Creating the Chemistry ................................................................................................... 2
Starting Aspen OLI Chemistry Wizard....................................................................... 2 Starting Aspen Plus................................................................................................... 16
Overview
The Aspen Plus OLI interface greatly enhances Aspen Plus’s capability to model electrolyte systems. A rigorous and self-consistent thermodynamic framework is employed to tame the mathematically stiff equations commonly found in electrolyte systems. Also a database of over 10,000 components are available. The OLI model is available as a property set within Aspen Plus. This “Getting Started” guide will show you how to create the electrolyte chemistry for a simple case and then use that chemistry in Aspen Plus.
Assumptions
The following assumptions are made for this guide:
1. Aspen Plus is currently installed and running on your computer 2. The license manager for Aspen Plus is currently set up for you
to run Aspen. 3. The Aspen OLI Alliance product has been installed. 4. The OLI security model is running 5. Aspen Plus version 12.1 is used 6. The user is expected to know how to run Aspen Plus.
The Right Chemistry

OLI Tips - 2 -
Creating the Chemistry
We will now begin to create a simple chemistry model for Aspen OLI. The chemistry model is created outside of Aspen Plus but is part of the Aspen Engineering Suite.
Starting Aspen OLI Chemistry Wizard We will now start the Aspen OLI Chemistry Wizard. This can be found by using the Start button. Start > Program Files > Aspentech > Aspen Engineering Suite > Aspen OLI 12.1 > Chemistry Wizard The following splash screen should appear.
Figure 1 Aspen OLI Chemistry Wizard
After a few moments, the following screen should appear.

OLI Tips - 3 -
Figure 2 The start of the OLI Chemistry Wizard
OLI Chemistry models can be created for use with Aspen and for other OLI supported products including its own ESP program. A user may have created and ESP model that now needs to be incorporated into Aspen Plus. In this case the user would click the Open Existing Model button and search for the appropriate model. In this case we are going to create a new model named “SALTER”. The name is limited to 8 characters. We are also working in a default folder. When the Aspen OLI Alliance product is installed, a new folder is created: \My Documents\My OLI Cases\Aspen OLI 12.1 You may switch to this folder (or any other folder) by using the Browse… button.
Figure 3 Entering the name of the chemistry Model
Click the Next button to continue.

OLI Tips - 4 -
Figure 4 Databank usage
Private databases may have been provided by OLI Systems, Inc. You can select them by using the Databank Preferences button. We will not do so now. Three databases (in addition to the public database) are also provided. These are:
Corrosion This supports oxidation and reduction chemistry phenomena in OLI
Geochemical The minerals in this databank tend to form over
very long time frames. Low Temperature These minerals form below 0 oC.
We will select the Geochemical database for this example. There are also three possible thermodynamic frameworks available. For Aspen Plus only the Aqueous model can be selected.

OLI Tips - 5 -
Figure 5 Selecting the Geochemical databank
Highlight the Geochemical databank and then click the Right-Arrow button.
Figure 6 The Geochemical databank has been selected
If more than one databank has been selected, the relative priority of each databank can be assigned by using the up and down arrows on the right-hand side of the dialog. Click the Next button.

OLI Tips - 6 -
Figure 7 Component Selection
A component selection dialog appears with the currently selected components. For a new chemistry model the only species selected is water. Click the Add button.

OLI Tips - 7 -
Figure 8 Searching for Components
A list of the available components are displayed. This is a large list. You may search for a component by entering it in the Search by ID box. Just begin typing and the list automatically updates. Begin to Enter the component NaCl
OLI Tips - 8 -
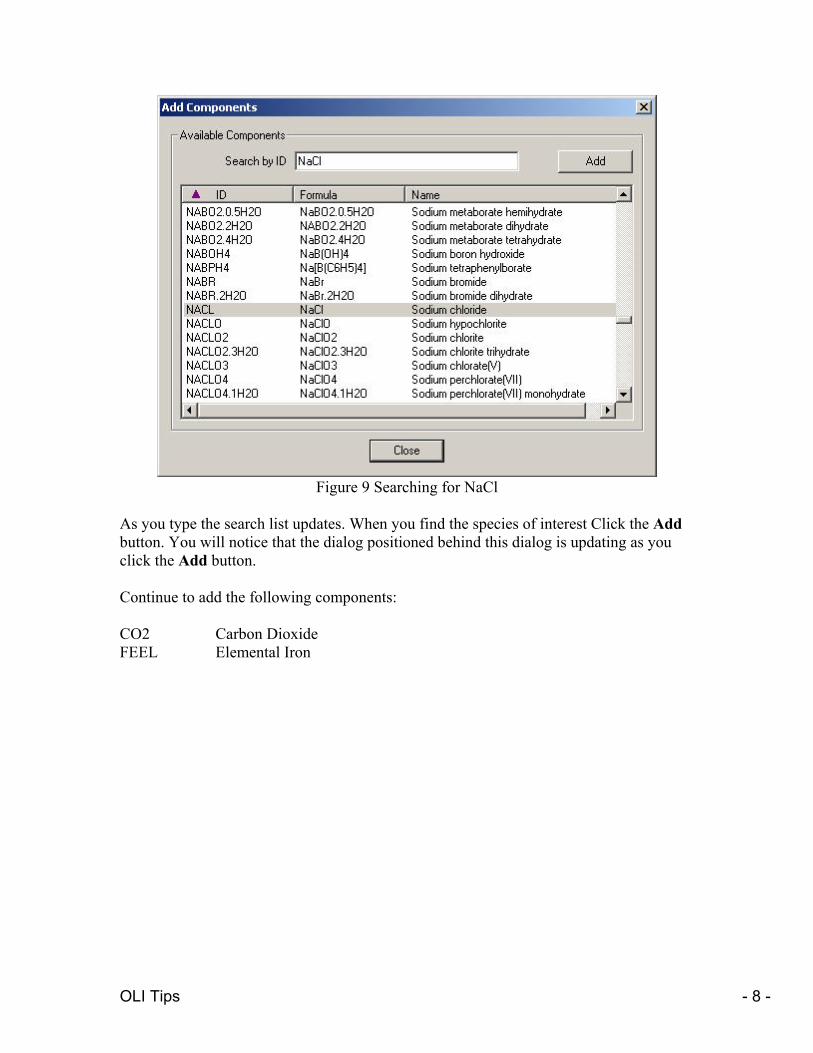
Figure 9 Searching for NaCl
As you type the search list updates. When you find the species of interest Click the Add button. You will notice that the dialog positioned behind this dialog is updating as you click the Add button. Continue to add the following components: CO2 Carbon Dioxide FEEL Elemental Iron
OLI Tips - 9 -
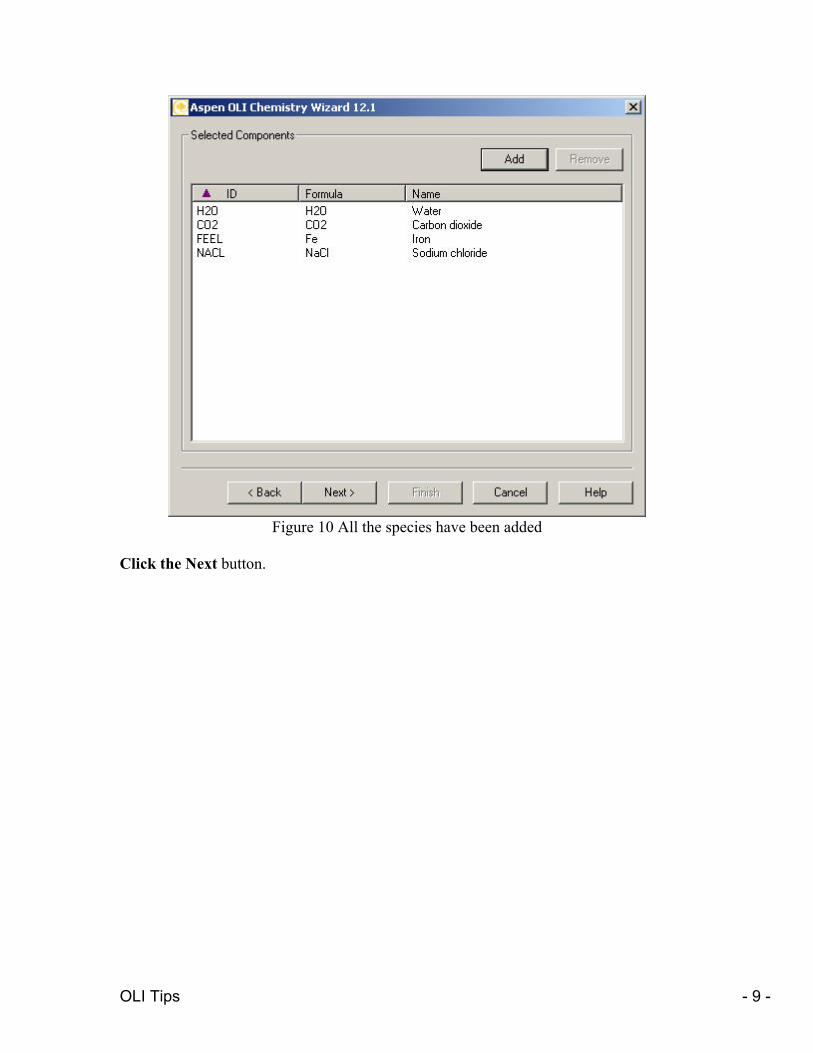
Figure 10 All the species have been added
Click the Next button.

OLI Tips - 10 -
Figure 11 Adding redox
We can now add oxidation and reduction to our model. This is not always done and can add significant amounts of run-time to the simulation. For our example we need to add oxidation and reduction. Click the Enable Redox Chemistry box.
OLI Tips - 11 -
Figure 12 Selecting subsystems
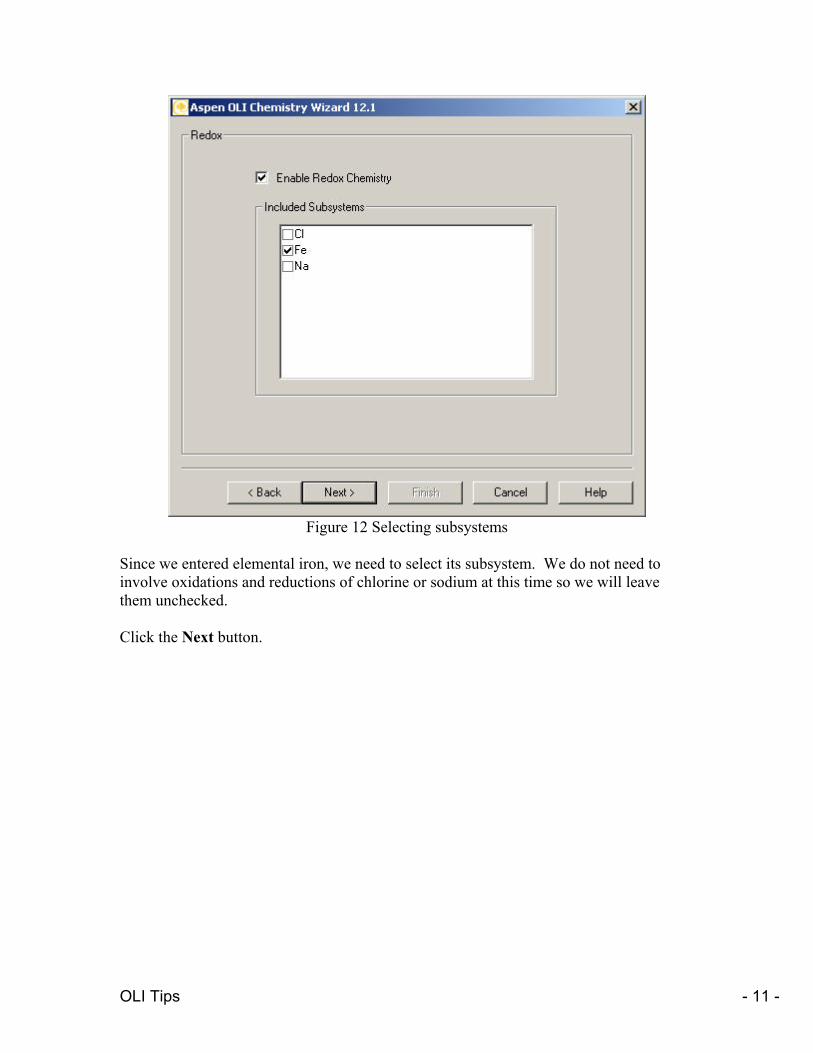
Since we entered elemental iron, we need to select its subsystem. We do not need to involve oxidations and reductions of chlorine or sodium at this time so we will leave them unchecked. Click the Next button.

OLI Tips - 12 -
Figure 13 Phase selection
The relatively small number of components that were selected have generated a lot of possible solids. In general we leave this list unmodified. The are some exceptions:
1. Long run times may require the removal of some solid species. Removing species speeds up the simulation (but you may miss an important species)
2. The RADFRAC unit operation, if you decide to use it, only supports one solid of a particular type of salt. Notice in the list that there are 4 solids for FEIICL2 (FECL2PPT, FECL2.2H2O, FECL2.4H2O, and FECL2.6H2O). Only one solid is permitted with RADFRAC for this salt.
Click the Next button.

OLI Tips - 13 -
Figure 14 AspenPlus components
Aspen Plus required a name for all components. It is highly possible that OLI has components that Aspen does not. A translation table is provided. You will be required to fill in any blanks before proceeding. In this case we are fortunate that Aspen and OLI agree on the names. Click the Next button.

OLI Tips - 14 -
Figure 15 Setting Aspen Plus options
OLI communicates with Aspen Plus via the BKP file. You can create a name of a file that is different from the OLI chemistry model if you desire. The default option is to use the same name. You can also allow the solids to precipitate (as mentioned above) in a column (RADFRAC). The limitation of one solid per salt is required. Otherwise you can mathematically allow the salts to dissociate. We will not do so now. Click the Next button.

OLI Tips - 15 -
Figure 16 Generating the OLI chemistry
A summary of the generation is displayed. You should review this text to ensure you have set up the chemistry correctly. Click the Generate Files Now button.
Figure 17 Files done!
A message will be displayed when the generate is complete. Click OK. Click Finish.

OLI Tips - 16 -
Starting Aspen Plus We have now finished creating the OLI Chemistry files. You can now start Aspen Plus in the normal manner.
Figure 18 Looking for the new BKP file.
You can now search to the working folder for the BKP file we created.
Figure 19 Finding the Salter files.
Find the file SALTER.BKP and open it.

OLI Tips - 17 -
Figure 20 Starting Aspen Plus
Allow Aspen Plus to start up.

OLI Tips - 18 -
Figure 21 Model Manager
In this application, we have simply used a FLASH2 block and provided some information.
Figure 22 Flash2
OLI Tips - 19 -
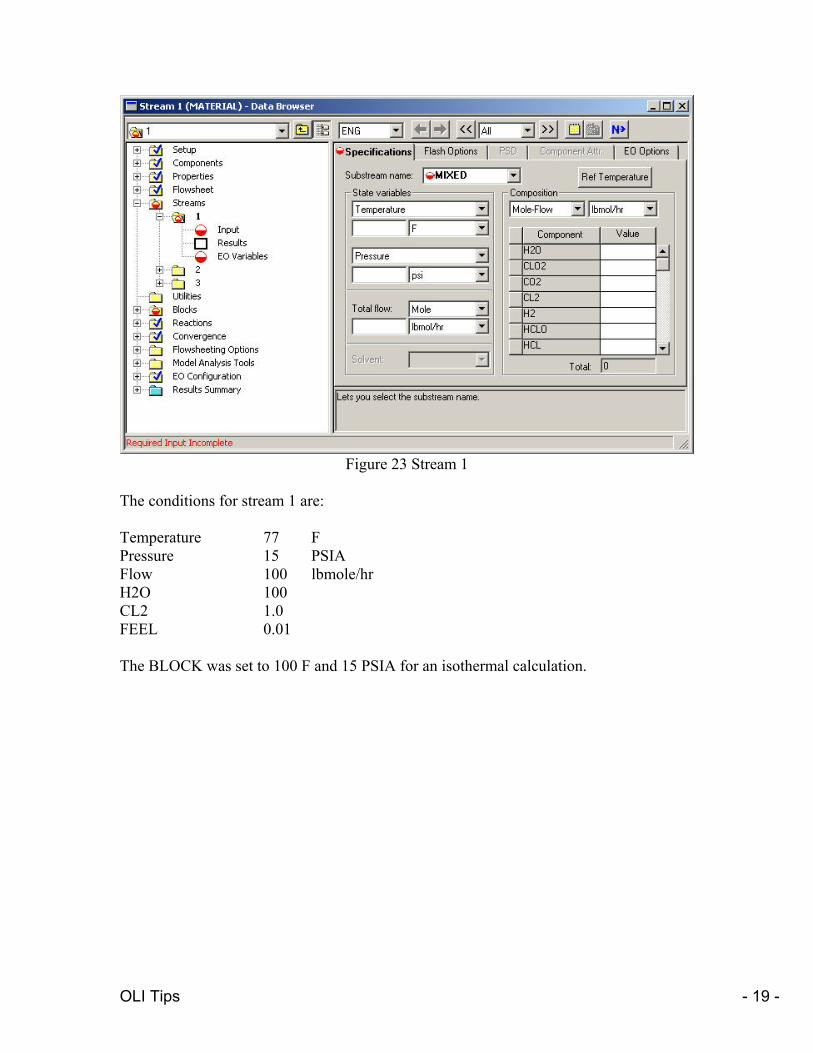
Figure 23 Stream 1
The conditions for stream 1 are: Temperature 77 F Pressure 15 PSIA Flow 100 lbmole/hr H2O 100 CL2 1.0 FEEL 0.01 The BLOCK was set to 100 F and 15 PSIA for an isothermal calculation.

OLI Tips - 20 -
Figure 24 Stream 1 input If expand the Properties section of the specifications you can see that the property method is set to OLI and our chemistry name is set to SALTER. You may use multiple models in Aspen Plus including multiple OLI models.
Figure 25 Showing the property set

OLI Tips - 21 -
The flowsheet was executed and the results shown below in several images.
Figure 26

OLI Tips - 22 -
Figure 27

OLI Tips - 23 -
Figure 28
The Aspen OLI default report is for true species. We do not recommend Apparent species when using Aspen OLI. This concludes the Getting Started guide.