
Netop Mobile and Embedded Host User’s Guide
27
NETOP MOBILE AND EMBEDDED HOST USER’S GUIDE 31 January 2017
Transcript of Netop Mobile and Embedded Host User’s Guide

NETOP MOBILE AND EMBEDDED HOST USER’S GUIDE
31 January 2017

Netop Mobile and Embedded Host User’s Guide
31.01.2017 1
Contents
1 Introduction .................................................................................................................................. 2
1.1 Document Scope .................................................................................................................. 2
1.2 Technical Specifications ....................................................................................................... 2
2 Using the Netop Host ................................................................................................................... 3
2.1 Loading the Netop Host for the first time............................................................................... 3
2.2 Setting up the Dial-up connection ......................................................................................... 3
2.3 Changing the connection type .............................................................................................. 4
2.4 Netop Host Display ............................................................................................................... 5
2.5 Netop Host Default Connectivity Configuration ..................................................................... 6
2.6 Requesting help from a Guest offering help services ............................................................ 7
2.7 Controlling sessions ............................................................................................................. 7
2.7.1 Remote Control ...................................................................................................... 7
2.7.2 File Transfer ........................................................................................................... 7
2.7.3 Chat ........................................................................................................................ 7
2.8 Configuring the Netop Host .................................................................................................. 8
2.9 Reconfiguring the Netop Host ............................................................................................... 8
2.9.1 Modifing the Netop Host user interface text ............................................................ 8
2.9.2 Controlling Netop Host by WM_COPYDATA messages ......................................... 9
3 Using the Netop Mobile Host Manager ....................................................................................... 14
3.1.1 Netop Mobile Host Manager Display ..................................................................... 14
3.1.2 Creating Address Lists .......................................................................................... 16
3.1.3 Configuring Netop Host except authentication parameters ................................... 16
3.1.4 Configuring Netop Host authentication parameters ............................................... 23
3.1.5 Changing the Netop Host configuration using the configuration wizard ................. 23
3.1.6 Changing the Netop Host configuration using the configuration panel .................. 25
4 FAQ ............................................................................................................................................ 26
4.1 What actions can a Guest perform on the Netop Host? ...................................................... 26

Netop Mobile and Embedded Host User’s Guide
31.01.2017 2
1 Introduction
Netop Mobile & Embedded comprises Netop's solutions for mobile computers and mobile technology
computers embedded in equipment.
Netop Mobile includes two modules:
Netop Host: Enables the mobile device to be remote controlled and interacted with in other
ways from a computer or device running Netop Mobile Guest.
Netop Guest: Enables the mobile device to remote control and interact with a computer running
a Netop Host or extended Host or Netop Host .
1.1 Document Scope
This guide provides information on how to use the Netop Host app for use on mobile and embedded
devices to be remote controlled and interacted with in other ways from a computer running Netop
Guest.
1.2 Technical Specifications
For information on the supported operating system and technical specification, see the Netop
Knowledgebase.

Netop Mobile and Embedded Host User’s Guide
31.01.2017 3
2 Using the Netop Host
A newly installed Netop Host will use the default configuration. If Netop Host Manager is available on a
desktop computer, the mobile device user can change the Host configuration.
The mobile device user will have access to the options on the Netop Host display.
However, the Netop Host can also be run in stealth mode. The mobile device user will then have no
access to the options. The user of a stealth mode Netop Host can request help by a help request
hotkey.
With regards to security, the Netop Host has two options:
Guest Access Security. You can configure the Netop Host to locally authenticate connecting
Netop Guests by a mobile device system password or a configured Netop password and assign
a locally stored role specifying which actions will be allowed to all connecting Netop Guests.
If Netop Security Management is available on the network, you can configure the Netop Host to
use it to centrally authenticate and assign individual roles to connecting Netop Guests.
Logging. You can configure the Netop Host to log selected Netop events locally, in Netop
Security Management and by Window Message.
Note: Netop Security Management belongs to the Netop Remote Control product family.
2.1 Loading the Netop Host for the first time
To open the Netop Host on the mobile device, tap Start > Programs > Netop Host.
When opening the Netop Host for the first time, you will be asked to enter the license key:
Specify your Netop Host license number and tap OK. The Netop Host will display. Before the mobile device can communicate via MS Connection Manager, you need to configure how it should connect. See Setting up the Dial-up connection.
2.2 Setting up the Dial-up connection
The dial-up feature of Netop Mobile uses the built-in Connection Manager to establish a dial-up
connection. However, the Connection Manager also handles WIFI and VPN connections.

Netop Mobile and Embedded Host User’s Guide
31.01.2017 4
To display the Connection Manager, tap Start and select Settings. In Settings, choose the Connections tab and then tap the Connections icon. Every Windows Mobile device uses two standard connections called My ISP and My Work Network by default. Each of these can be, in principle at least, any type of connection to an IP network – modem, Wi-Fi, IR, Bluetooth or VPN. In practice, however, the My ISP usually connects to the Internet via a modem, Wi-Fi, and so on, and the My Work Network is usually a VPN connection. The reason for this is that a VPN connection does not include any specification for a physical way of connecting to anything. It assumes that there is already a routable Internet connection to the VPN server that you specify and simply uses this to construct a secure "pipe" through the Internet to your private network.
To configure the Connection Manager for dial-up connection, please refer to the documentation that
came with your device or consult your ISP or Tech Support depending on whether you are setting up an
Internet connection or a VPN connection.
To configure the Netop Host for dial-up connection, use the Netop Mobile Host Manager. For
information on how to perform this, see Configure Netop Host dial-up.
2.3 Changing the connection type
If you would like Netop Host to use another connection, set the dial-up setting Name to the preferred
name, for example orange.

Netop Mobile and Embedded Host User’s Guide
31.01.2017 5
2.4 Netop Host Display
This is the mobile device Netop Host display:
If the Netop Host is loaded, this display will typically open when you start the mobile device. In these cases, the Netop Host display will not be open:
If it has been hidden.
If the General branch Startup parameter Load at
Boot attribute has been disabled in the Netop Host
Manager.
To display the Netop Host in these cases, tap Start
> Netop Host or Start > Programs > Netop Host.
If the Netop Host has been configured to run in
stealth mode. See Reconfiguring the Netop Host.
The Host is organized into tabs, shown at the top.
Indicates the Host communication status. If Host communication is enabled, the bulb is yellow with the label Running.
If Host communication is disabled, the bulb is gray with the label Paused or in transition Opening or Closing.
If a Netop Guest is connected, the bulb is yellow with a green dot with a white + (plus) and the label Connected.
Enables/disables the Host communication. If Host communication is enabled, the icon shows two vertical blue bars and the label Pause.
If Host communication is disabled, the icon shows a blue triangle pointing to the right and the label Run.
Note: Disabling Host communication will disconnect the Netop Guest.
Allows you to request help from a Netop Guest. By default, one life belt icon with the label Request Help is displayed.
If multiple help request options have been configured in the Help request parameters in the Netop Mobile Host Manager, multiple life belt icons with different labels will be displayed. Tap a life belt icon to request help. While connecting to the help provider Netop Guest, the label will be Opening.
When the help request has been delivered, the life belt icon will display a red X and the label Cancel Help. Tap this icon to cancel the help request.
When the help provider Netop Guest connects in response to the help request, the life belt icon will become disabled. On disconnect, the help request icon will be enabled again

Netop Mobile and Embedded Host User’s Guide
31.01.2017 6
Shows the list of Netop Guest connected / disconnected events since the Netop Host was last started. To return to the Home display, tap the Home icon at the top of the display or the Home button on the menu bar.
Displays Netop Host information: the name, IP address, regional settings language and possibly other details. To return to the Home display, tap the Home icon at the top of the display or the Home button on the menu bar.
Note: The displayed Netop Host name and IP address will be enabled only if the Host communication status is Running or Connected.
This is the Netop Host display menu bar:
If the History or Info display is open, tap Home to return to the Home display.
Tap Menu to display the Host menu, which provides access to exiting and restarting the Host, viewing
About information and tracing.
You must typically restart Netop Host to apply Netop Host Manager configuration changes.
You can save a debug trace by tapping the Trace command. Recent communication events will be
saved to the netophost.txt in the mobile device root directory in plain text. The file may be requested
by Netop support to diagnose communication problems. Its interpretation requires Netop expertise.
2.5 Netop Host Default Connectivity Configuration
In the default configuration, these communication profiles will be enabled:
WebConnect. A configuration based on a Netop proprietary communication device that enables
Netop modules to connect easily over the Internet through a Netop connection service called
WebConnect without the need to open firewalls for incoming traffic.
TCP/IP. A standard configuration of the TCP/IP communication device.
TCP. A standard configuration of the TCP/IP (TCP) communication device.
The following other communication profiles will be available but disabled:
HTTP. An "HTTP encapsulated" configuration of the TCP/IP (TCP) communication device to
facilitate communication through firewalls.
Note: You may want to modify these standard communication profiles and/or add communication profiles customized to your network environment in Netop Host Manager.
If the mobile device is connected to an IP network, the Netop Guest can connect to the Netop Host
directly or alternatively, the end user can request help to initiate a session with the Netop Guest.
Remote sessions can also be initiated and established through ActiveSync when the mobile device is
docked.

Netop Mobile and Embedded Host User’s Guide
31.01.2017 7
2.6 Requesting help from a Guest offering help services
If configured in a the Help request parameters in Netop Mobile Host Manager, the Netop Host user can
request help from a Netop Guest that offers help services by:
tapping the icon panel Request Help icon.
keying the Request parameter specified hotkey.
The Netop Guest user will typically respond by starting a remote control session.
You can configure a Request parameter for these alternative functionalities:
On ActiveSync connection to a desktop computer, Netop Host will request help from a specified
Netop Guest help service to enable this Netop Guest only to connect.
On ActiveSync connection to a desktop computer, Netop Host will connect to a specified Netop
Gateway to enable different Netop Guests to connect to it.
Warning: Enabling multiple Guests to connect to Netop Host entails security hazards.
2.7 Controlling sessions
A Netop Guest can connect to the Netop Host to run the following types of sessions:
2.7.1 Remote Control
Netop Guest will display a skin, i.e. an image of the mobile device display, to typically enable the Netop
Guest user to work in it with keyboard and mouse. See also the Netop Remote Control User's Guide for
further information on skins. The Netop Host user can control a remote control session only by
configuring selected actions to be denied. See Configure security roles.
2.7.2 File Transfer
Netop Guest will display mobile device directories and files to transfer directories and files between the
mobile device and the Netop Guest computer. Netop Host can control a file transfer session only by
configuring selected actions to be denied. See Configure security roles.
2.7.3 Chat
When a Netop Guest initiates a chat session with the Netop Host the Chat display will be shown:
In the field at the top, enter your message. To send the message tap Send on the menu bar.
The pane below the field at the top will display the chat dialog with later contributions above earlier contributions.
Your messages will be preceded by the Netop Host name. Netop Guest user messages will be preceded by root if System Authentication is applied or by the Netop Guest name if Netop Authentication or Security Server Authentication is applied.
To end a chat session, tap OK on the title bar at the top or Close on the menu. The Netop Guest user can also end the chat session.

Netop Mobile and Embedded Host User’s Guide
31.01.2017 8
2.8 Configuring the Netop Host
A newly installed Netop Host will use the default configuration.
You can customize the configuration from Netop Mobile Host Manager on a desktop computer. You can
install a customized configuration by connecting the mobile device to the desktop computer by
Microsoft ActiveSync. Alternatively, you can copy the netophost.xml file created by Netop Mobile Host
Manager to the Netop Host directory of the mobile device.
Note: To apply configuration changes, you must restart the Netop Host.
For detailed information on how to configure teh Netop Host using the Netop Mobile Host Manager, see
Using the Netop Mobile Host Manager.
2.9 Reconfiguring the Netop Host
This section addresses to administrators who have extensive C++ knowledge.
Administrators will typically install and configure Netop Host s to ensure protection of organizational
resources.
You can reconfigure Netop Host by creating a configuration .xml file in Netop Mobile Host Manager and
install it on a mobile device connected by ActiveSync or copy it to the Netop Host files on the mobile
device. To apply configuration changes, restart Netop Host by tapping Restart on the Netop Host
display Menu.
Windows mobile technology does not enable full configuration protection. To discourage configuration
changes by the mobile device user, run Netop Host in stealth mode to disable displaying the Netop
Host display.
To run Netop Host in stealth mode, add this key to the mobile device registry:
Local Device\HKEY_CURRENT_USER\Software\Netop\NetopHost\View\Stealth=1
Note: Windows mobile registry editor utilities are available for download from the Internet.
2.9.1 Modifing the Netop Host user interface text
You can modify Netop Host user interface text, typically translate it into another language, by adding
stringtable files to the Netop Host directory of the mobile device.
Netop Host stringtable files specify modifications by contents in the following format:
<?xml version="1.0" encoding="utf-8"?>
<stringtable>
<string hint="<Original string 1>" value="<New string 1>"/>
<string hint="<Original string 2>" value="<New string 2>"/>
<string hint="<Original string 3>" value="<New string 3>"/>
.
.
<string hint="<Original string n>" value="<New string n>"/>
</stringtable>

Netop Mobile and Embedded Host User’s Guide
31.01.2017 9
<Original string x> represents an original string of characters.
<New string x> represents the modified string of characters.
Name a Netop Host stringtable file STHOST_<Language code>.XML using a Windows three- or two-
letter language code, e.g. STHOST_GER.XML, to apply it by the regional settings of the mobile device
which are indicated in the Language detail of the Info display.
Name a Netop Host stringtable file STHOSTCE.XML to apply it regardless of the regional settings of
the mobile device.
Note: An applicable three-letter language code stringtable file will have priority over an Netop Host applicable two-letter language code stringtable file which will have priority over a CE stringtable file.
2.9.2 Controlling Netop Host by WM_COPYDATA messages
The Logging to window messaging parameter from the Netop Mobile Host Manager > Logging
branch enables data exchange with other mobile device applications by WM_COPYDATA messages.
For more information on WM_COPYDATA messages, see Microsoft documentation.
WM_COPYDATA messages enable controlling the Netop Host user interface from the user interface of
another mobile device application, e.g. your own mobile device application.
This is the COPYDATASTRUCT structure of Netop Host WM_COPYDATA messages:
typedef struct _ExtMess
{
char pass[32]; (Max 31 UTF-8 characters that identify the message as a Netop
Host WM_COPYDATA message - NULL terminated)
int cmd; (4 bytes outgoing command or event number)
char text[1]; (Unlimited number of optional encoding characters that provide
arguments to the command or event - NULL terminated)
}
ExtMess;
Note: To enable Netop Host to exchange WM_COPYDATA messages, you must set up the Logging branch.
You can send WM_COPYDATA messages to Netop Host to execute these commands:
Number Command Effect
0 WP_TEST The Netop Host will return a ChatMessage event if this command is received successfully.
1 WP_EXIT Exit the Netop Host as specified in a command argument (no argument: immediately).
2 WP_EXIT_NOW Exit the Netop Host immediately.
3 WP_EXIT_ON_IDLE Exit the Netop Host when unconnected.
4 WP_PAUSE Disable Netop Host communication.

Netop Mobile and Embedded Host User’s Guide
31.01.2017 10
Number Command Effect
5 WP_START Enable Netop Host communication.
6 WP_RESTART Disable and enable Netop Host communication.
7 WP_SEND_CHATMSG Send the chat contribution specified in a command argument from the Netop Host.
8 WP_HIDE Hide the Netop Host user interface.
9 WP_SHOW Display the Netop Host user interface if hidden.
10 WP_REQUEST_HELP Request help from the Netop Host.
11 WP_CANCEL_HELP Cancel a pending Netop Host help request.
Example
This code example is provided without guarantee or support to assist you in creating your own code:
void CDialogSubclass::OnBnClickedButtonSend()
{
HWND hWnd = ::FindWindow(NULL, L"NetopHost");
COPYDATASTRUCT copydata;
ExtMess *extmess;
BOOL used;
int n;
if (!hWnd)
{
AfxMessageBox(L"No NetopHost running");
return;
}
UpdateData(TRUE);
n = 256; (32 bytes pass, 4 bytes command, 220 bytes left for text)
extmess = (ExtMess*)malloc(n);
if (!extmess)
{
AfxMessageBox(L"Out of memory");
return;
}
memset(extmess, 0, n);
This code fills in the CMD field with the selection from the combo box:
DWORD wparam = m_combo_cmd_ctrl.GetCurSel();
extmess->cmd = wparam;
Netop Mobile and Embedded Host User’s Guide
31.01.2017 11
This code converts the text from the upper edit field to ANSI and sends it as pass:
WideCharToMultiByte(CP_ACP, 0, m_edit_pass.GetBuffer(1), -1, extmess->pass,
32, "?", &used);
This code converts the text from the lower edit field to ANSI and sends it as text:
WideCharToMultiByte(CP_ACP, 0, m_edit_txt.GetBuffer(1), -1, extmess->text,
220, "?", &used);
This code fills in the COPYDATASTRUCT and sends the command to the Netop Mobile Host. The
same value is also stored in the ((ExtMess*)copydata.lpData)->cmd member:
copydata.dwData = wparam;
copydata.cbData = n;
copydata.lpData = extmess;
::SendMessage(hWnd, WM_COPYDATA, (WPARAM)this->m_hWnd, (LPARAM)©data);
free(extmess);
}
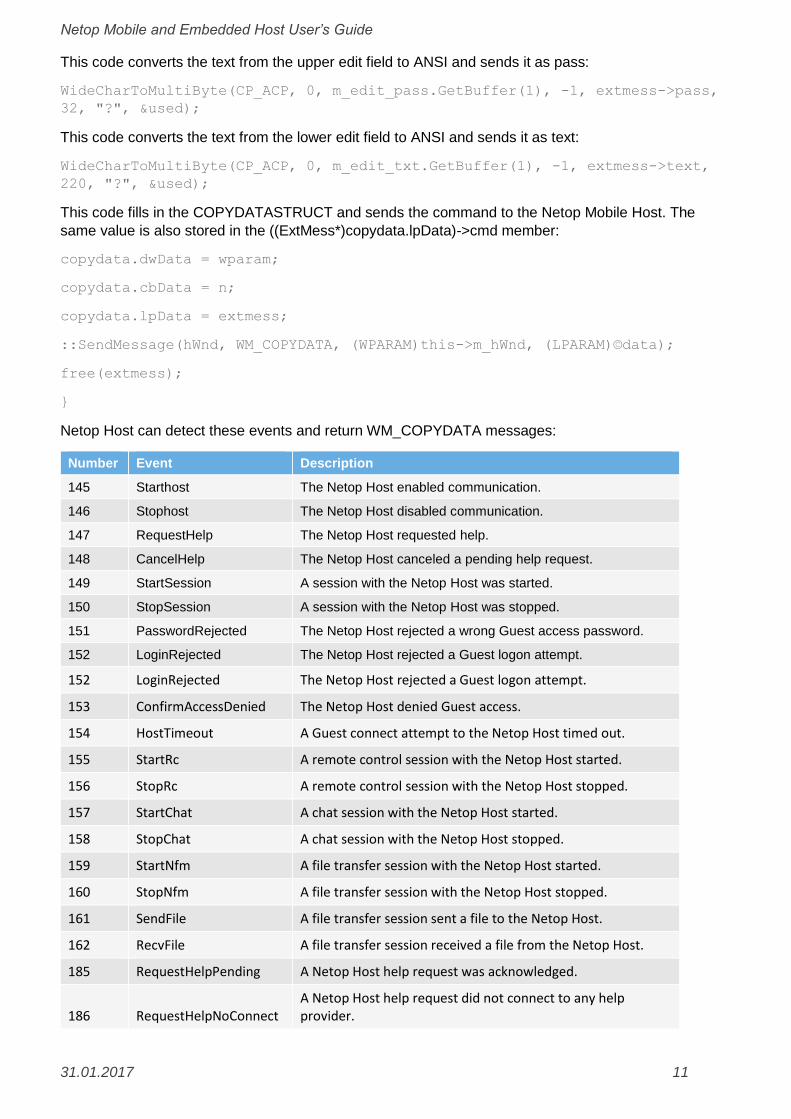
Netop Host can detect these events and return WM_COPYDATA messages:
Number Event Description
145 Starthost The Netop Host enabled communication.
146 Stophost The Netop Host disabled communication.
147 RequestHelp The Netop Host requested help.
148 CancelHelp The Netop Host canceled a pending help request.
149 StartSession A session with the Netop Host was started.
150 StopSession A session with the Netop Host was stopped.
151 PasswordRejected The Netop Host rejected a wrong Guest access password.
152 LoginRejected The Netop Host rejected a Guest logon attempt.
152 LoginRejected The Netop Host rejected a Guest logon attempt.
153 ConfirmAccessDenied The Netop Host denied Guest access.
154 HostTimeout A Guest connect attempt to the Netop Host timed out.
155 StartRc A remote control session with the Netop Host started.
156 StopRc A remote control session with the Netop Host stopped.
157 StartChat A chat session with the Netop Host started.
158 StopChat A chat session with the Netop Host stopped.
159 StartNfm A file transfer session with the Netop Host started.
160 StopNfm A file transfer session with the Netop Host stopped.
161 SendFile A file transfer session sent a file to the Netop Host.
162 RecvFile A file transfer session received a file from the Netop Host.
185 RequestHelpPending A Netop Host help request was acknowledged.
186 RequestHelpNoConnect A Netop Host help request did not connect to any help provider.

Netop Mobile and Embedded Host User’s Guide
31.01.2017 12
Number Event Description
187 RequestHelpNoAnswer A Netop Host help request help connected to a help provider that did not acknowledge.
188 ChatMessage The Netop Host received or sent a chat message specified in an argument.
189 Message_Displayed The Netop Host displayed a Netop message specified in an argument.
Example:
This code example is provided without guarantee or support to assist you in creating your own code:
LRESULT CDialogSubclass::WindowProc(UINT message, WPARAM wParam,
LPARAMlParam)
{
switch(message)
{
case WM_COPYDATA:
{
COPYDATASTRUCT *pcds = (COPYDATASTRUCT*)lParam;
ExtMess* extmess = pcds ? (ExtMess*)pcds->lpData : NULL;
bool passok = false;
char *text = NULL;
if (!extmess)
{
m_list_in_ctrl.InsertString(0, L"NULL message");
}
else
{
char ctxt[256];
WCHAR wtxt[256];
This code is not a strong password check but only a filter for mistakes if (!strcmp(extmess->pass,
"mypass")):
{
passok = true;
}
This code is a very simple buffer overflow guard which assumes that the rest takes max. 64 bytes of
ctxt:
text = extmess->text;
if (strlen(text) > 256 - 64) text = "overflow";

Netop Mobile and Embedded Host User’s Guide
31.01.2017 13
sprintf(ctxt, "%s %d %s %s", passok ? "Ok": "!!", extmess->cmd,
extmess->pass, extmess->text);
MultiByteToWideChar(CP_ACP, 0, ctxt, -1, wtxt, 256);
m_list_in_ctrl.InsertString(0, wtxt);
}
}
return TRUE;
default: break;
}
return CDialog::WindowProc(message, wParam, lParam);
}
Note: Example C++ code for Windows Mobile 5 is included in the exevent2.zip file which is included with Netop Host installation files.

Netop Mobile and Embedded Host User’s Guide
31.01.2017 14
3 Using the Netop Mobile Host Manager
Open the Netop Mobile Host Manager by clicking Start > All Programs > Netop Mobile Host
Manager. The Intro window will be displayed:
If you do not want to see the Intro window again, you can hide it using the Intro option on the View
menu or by selecting Don't show this dialog again check box at the bottom of the Intro window.
Select one of these options:
New Wizard: Customize a few essential configuration parameters in the configuration wizard
before displaying the configuration in the configuration panel of the Netop Mobile Host Manager
window (default selection).
New: Start a new default configuration in the configuration panel of the Netop Mobile Host
Manager window.
Open from Mobile Device: Display any customized configuration of Netop Host on a mobile
device connected to the desktop computer by ActiveSync in the configuration panel of the Netop
Mobile Host Manager window.
Note: For initial configuration, we recommend selecting the New Wizard option.
3.1.1 Netop Mobile Host Manager Display
The Netop Mobile Host Manger display is organized in a menu bar, toolbar and a configuration panel.
3.1.1.1 Menu bar
The menu bar contains menus that provide access to various commands that you can use to create
and customize Host configurations.
When you open a menu and point to a command, an explanation of the command will be displayed in
the status bar at the bottom of the window.

Netop Mobile and Embedded Host User’s Guide
31.01.2017 15
From the File menu you can open, save and close configurations or start the configuration wizard to be
guided through modific ation of the default configuration. Most of the File menu commands are also
available from the toolbar.
From the Edit menu you can create new configuration panel elements or delete them. The same
commands are available from the context menus of configuration panel elements.
The commands of the rest of the menus are standard menu commands that users will be familiar with.
3.1.1.2 Toolbar
Create a new default configuration: Click this button to open the Default Configuration window the configuration panel or make it the active window if already open.
Alternatively, select the New command on the File menu or press CTRL+N.
Create a new configuration using a wizard dialog: Click this button to display the configuration wizard.
Alternatively, select the New Wizard command on the File menu or press CTRL+W.
Open the configuration in effect on the mobile device: Click this button to open a Mobile Device window in the configuration panel, if a mobile device using a customized Netop Mobile Host configuration is connected to the desktop computer by ActiveSync.
Alternatively, select the Open from Mobile Device command on the File menu.
Open a configuration from an existing local disk file: Click this button to open a customized configuration file (.xml) in the configuration panel.
Alternatively, select the Open command on the File menu or press CTRL+O.
Make the configuration effective on the mobile device: Click this button to save the active configuration displayed in the configuration panel as a NetopHost.xml configuration file in the Netop Host directory of a mobile device connected to the desktop computer by ActiveSync.
Alternatively, select the Save to Mobile Device command on the File menu.
Save the active configuration to a file with a new name: Click this button to save the active configuration in the configuration panel if the configuration has previously been saved in a desktop computer configuration file.
Alternatively, select the Save command on the File menu or press CTRL+S.
Otherwise select the Save As command on the File menu to save with a specified file name in a selected desktop computer directory.
The toolbar will be displayed unless hidden from the Toolbar command on the View menu.
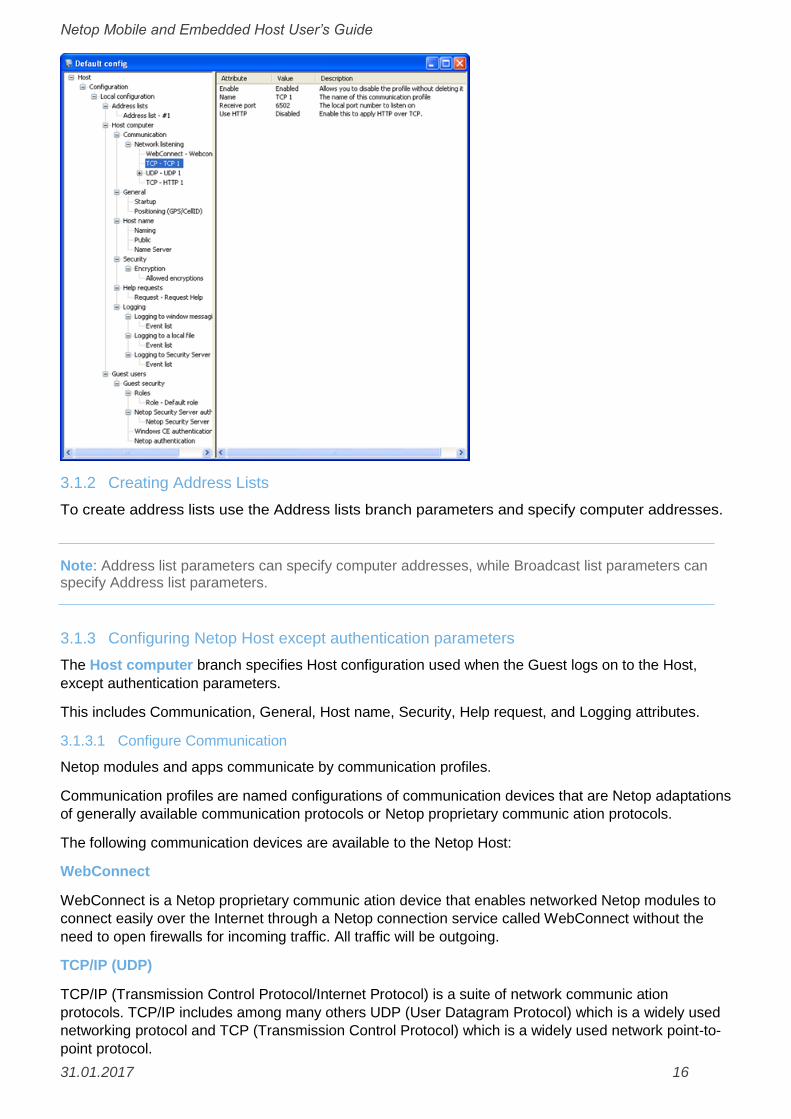
3.1.1.3 Configuration panel
The configuration panel of the Netop Mobile Host Manager window displays configurations that you
have opened from the Netop Mobile Host Manager Intro window, the File menu, or the toolbar.
Each window specifies a Host configuration in a parameter tree structure in the left pane. Parameters
are organized in branches. This image shows the configuration panel with a fully expanded parameter
tree structure:
Netop Mobile and Embedded Host User’s Guide
31.01.2017 16
3.1.2 Creating Address Lists
To create address lists use the Address lists branch parameters and specify computer addresses.
Note: Address list parameters can specify computer addresses, while Broadcast list parameters can specify Address list parameters.
3.1.3 Configuring Netop Host except authentication parameters
The Host computer branch specifies Host configuration used when the Guest logs on to the Host,
except authentication parameters.
This includes Communication, General, Host name, Security, Help request, and Logging attributes.
3.1.3.1 Configure Communication
Netop modules and apps communicate by communication profiles.
Communication profiles are named configurations of communication devices that are Netop adaptations
of generally available communication protocols or Netop proprietary communic ation protocols.
The following communication devices are available to the Netop Host:
WebConnect
WebConnect is a Netop proprietary communic ation device that enables networked Netop modules to
connect easily over the Internet through a Netop connection service called WebConnect without the
need to open firewalls for incoming traffic. All traffic will be outgoing.
TCP/IP (UDP)
TCP/IP (Transmission Control Protocol/Internet Protocol) is a suite of network communic ation
protocols. TCP/IP includes among many others UDP (User Datagram Protocol) which is a widely used
networking protocol and TCP (Transmission Control Protocol) which is a widely used network point-to-
point protocol.

Netop Mobile and Embedded Host User’s Guide
31.01.2017 17
The Netop communic ation device TCP/IP will connect by TCP/IP (UDP) and optionally switch to
TCP/IP (TCP) when a session has been established to increase data transfer speed.
TCP/IP offers three connect options:
IP Address
Name response
Name resolution
IP address. You can connect by IP address across segmented IP networks including the Internet. The
source module send port number must matc h the destination module receive port number.
If you connect from outside a network protected by a network address translation (NAT) firewall or
proxy server to a network computer Netop module, specify the firewall or proxy server public IP address
with the port number assigned to the network computer, e.g. 192.168.1.1:1234. Ask the firewall or proxy
server administrator which port number is assigned to a specific network computer.
Name response. Name response broadcasts a name, the first characters of a name or without a name
requesting Netop modules with a corresponding enabled name to respond. These name response
options are available:
If a Guest connects or browses using the Host name qualifier H::, the Host will respond only if its
Public host name attribute is Enabled.
If a Guest connects or browses using the Host name qualifier U::, the Host will respond only if its
Public user name attribute is Enabled
If a Host sends a help request, the Guest will respond only if it offers the specified Help Service
or issued the specified Service Ticket.
Note: TCP/IP broadcast will reach only computers on the local network segment and computers whose IP address or DNS name is specified in the communication profile Broadcast list.
Name resolution
Name resolution resolves a specified name into its corresponding IP address to connect by it. These
name resolution options are available:
Enable Use Netop Name Server(s), specify the addresses of the Primary Netop Name Server and/or
Secondary Netop Name Server and specify the NNS namespace ID used by the Netop modules you
want to connect to. Connect by any enabled destination module name, for a Host help request a Guest
Help Service name.
If a Guest connects by a name using the Host name qualifier DNS::, a domain name server will attempt
to resolve it into a corresponding IP address for the Guest to connect by it.
Connect problems
In case of connect problems, first verify that an IP connection is available by PING.
Note: PING utilities for Windows Mobile are available for download from the Internet.
If an IP connection is available and connectivity problems persist, consult with your network/system
administrator. As a last resort, submit a support request to Netop Customer & Product Support.

Netop Mobile and Embedded Host User’s Guide
31.01.2017 18
Resources
TCP/IP uses one port for sending and one port for receiving communic ation.
By default, Netop Mobile and Netop Remote Control use port 6502 for sending and receiving.
You can use other port numbers, but remember that the source module send port number must always
matc h the destination module receive port number.
MTU size
Range is 512 to 5146 Bytes. A high MTU size will increase communic ation speed and a low MTU
(Maximum Transmission Unit) size may contribute to solving communic ation problems.
Use TCP for sessions
Enable to switch to TCP/IP (TCP) communic ation when a session has been established for maximum
data transmission speed.
TCP/IP (TCP)
TCP/IP (Transmission Control Protocol/Internet Protocol) is a suite of network communic ation
protocols.
TCP/IP includes among many others TCP (Transmission Control Protocol) which is a widely used
network point-to-point protocol.
TCP/IP (TCP) can connect only by IP address.
If a Host sends a help request, a Guest connected to directly or on a remote Netop Gateway network
can respond by its enabled Help Service names.
By default, TCP/IP (TCP) specifies the receive port number 0 to enable the computer system to allocate
any available port number to return communication.
Some firewalls allow incoming communication only through a very limited selection of port numbers that
typically includes port number 80 that is used for HTTP communication. Using the send port number 80
and adding a HTTP header to each data packet, such firewalls will identify the communication as HTTP
traffic to allow incoming communication.
3.1.3.2 Configure the Netop Host protection
To specify the Netop Host protection configuration, use the Security branch.
Netop Host can communicate with any of the allowed encryption settings listed below. The different
encryption types are listed according to their level of security. By default all is enabled.
Note: The default setting allows all connection types - even the insecure. To ensure, at least, some encryption, disable No encryption and Netop 6.x/5.x Compatible.
Netop 6.x/5.x Compatible Netop Remote Control version 6.5- compatible encryption.
Description: Compatibility mode for communication with Netop version 6.x,
5.x and 4.x.
Scope: Use for communication in environments where speed and
backwards compability are important.
Encryption: Keyboard and mouse: Proprietary algorithm. Screen and other
data: None

Netop Mobile and Embedded Host User’s Guide
31.01.2017 19
Logon and password: Proprietary algorithm.
Integrity check: None.
Key exchange: Proprietary algorithm.
No encryption Does not encrypt data and verify data integrity but verifies session uniqueness.
Description: No encryption at all.
Scope: Use for communication in environments where maximum
transfer speed is important and security is no issue.
Encryption: None.
Integrity check: None.
Key exchange: 160 bit SHA for session uniqueness.
Data
integrity Verifies data integrity.
Description: Data is protected from being changed in transit.
Scope:
Use for communication in environments where
encryption is prohibited except for authentication.
Encryption: None
Integrity check:
Keyboard and mouse: 256 bit SHA HMACs Screen and other
data: 160 bit SHA HMACs Logon and password: 256 bit SHA
HMACs
Key exchange: Combination of 1024 bits Diffie-Hellman and 256 bit SHA
hashes
Keyboard Encrypts and verifies keyboard, mouse, logon and password data.
Description: Only keystrokes, logon and password details are encrypted.
Scope:
Use for communication in environments where speed is
important, but keystrokes and password details must be
encrypted.
Encryption: Keyboard and mouse: 256 bit AES Screen and other data: None
Logon and password: 256 bit AES
Integrity check:
Keyboard and mouse: 256 bit SHA HMACs Screen and other
data: None
Logon and password: 256 bit SHA HMACs
Key exchange: Combination of 1024 bits Diffie-Hellman, 256 bit AES and 256
bit SHA.
Data integrity and keyboard Encrypts keyboard, mouse, logon and password data and
verifies data integrity.
Description: Data is protected from being changed in transit and only
keystrokes, logon and password details are encrypted.
Scope:
Use for communication in environments where speed is
important, but you require data integrity check and
keystrokes / password details must be

Netop Mobile and Embedded Host User’s Guide
31.01.2017 20
encrypted.
Encryption: Keyboard and mouse: 256 bit AES Screen and other data: None
Logon and password: 256 bit AES
Integrity control:
Keyboard and mouse: 256 bit SHA HMACs Screen and other
data: 160 bit SHA HMACs Logon and password: 256 bit SHA
HMACs
Key exchange: Combination of 1024 bits Diffie-Hellman, 256 bit AES and 256
bit SHA.
High Encrypts and verifies integrity of all data on a high security level.
Description:
All transmitted data is encrypted with 128 bit keys.
Keystrokes, mouse clicks and password details are
encrypted with 256 bit keys.
Scope:
Use for communication in environments where
security is important, but speed cannot be ignored.
Encryption: Keyboard and mouse: 256 bit AES Screen and other data:
128 bit AES Logon and password: 256 bit AES
Integrity Keyboard and mouse: 256 bit SHA HMACs
control: Screen and other data: 160 bit SHA HMACs Logon and
password: 256 bit SHA HMACs
Key exchange: Combination of 1024 bits Diffie-Hellman, 256 bit AES and 256
bit SHA.
Very
high Encrypts and verifies integrity of all data on a very high security level.
Description: Everything is encrypted with 256 bit keys.
Scope: Use for communication where security is important and
speed is not a major issue.
Encryption: Keyboard and mouse: 256 bit AES Screen and other data:
256 bit AES Logon and password: 256 bit AES
Integrity control:
Keyboard and mouse: 256 bit SHA HMACs Screen and other
data: 256 bit SHA HMACs Logon and password: 256 bit SHA
HMACs
Key exchange: Combination of 2048 bits Diffie-Hellman, 256 bit AES and 512
bit SHA.
3.1.3.3 Configure help requests
To specify the Netop Host help request configurations, use the Help requests branch.
You can configure Request parameters to:
Request help from a network connected mobile device by providing the following attributes:
o Help provider
o Port number (Send Port)
o Request mode
o Description (optional)
Request help from an ActiveSync connected mobile device by providing the following attributes:
o Help provider (always uses TCP/IP (TCP))
o Port number (Send Port)

Netop Mobile and Embedded Host User’s Guide
31.01.2017 21
o Request mode Description (optional)
o ActiveSync - force (Enabled)
Enable Netop Guests to connect to an ActiveSync connected mobile device by providing the
following attributes:
o Help provider (Netop Gateway)
o Port number (Send Port)
o ActiveSync - force (Enabled)
o Silent (Enabled)
Request help from a dial-up connected mobile device by providing the following attributes:
o Dial-up (Enabled)
o Dial-up mode (Change connection type)
o Dial-up settings names Help provider
o Port number Request name
In some cases, you may need additional configurations to:
Connect incoming through a Netop Gateway that applies Gateway security by providing the
following attributes:
o Netop Gateway - user name
o Netop Gateway – password
o Netop Gateway - domain
Enable help request by a hotkey (keystroke combination) by providing the following attributes:
o Hotkey - Alt
o Hotkey - Ctrl
o Hotkey - Shift
o Hotkey - number
Note: Search for virtual key codes (hexadecimal) on http://msdn2.microsoft.com.
Limit the search for help provider Netop Guests by providing the following attributes:
o Max help providers
o Timeout (Seconds)
Encapsulate a help request in HTTP to facilitate firewall passage by providing the following
attributes:
o Use HTTP (Enabled)
o Port number (80)
To request help when a mobile device becomes connected by ActiveSync by providing the
following attributes:
o ActiveSync - on connect (Enabled)
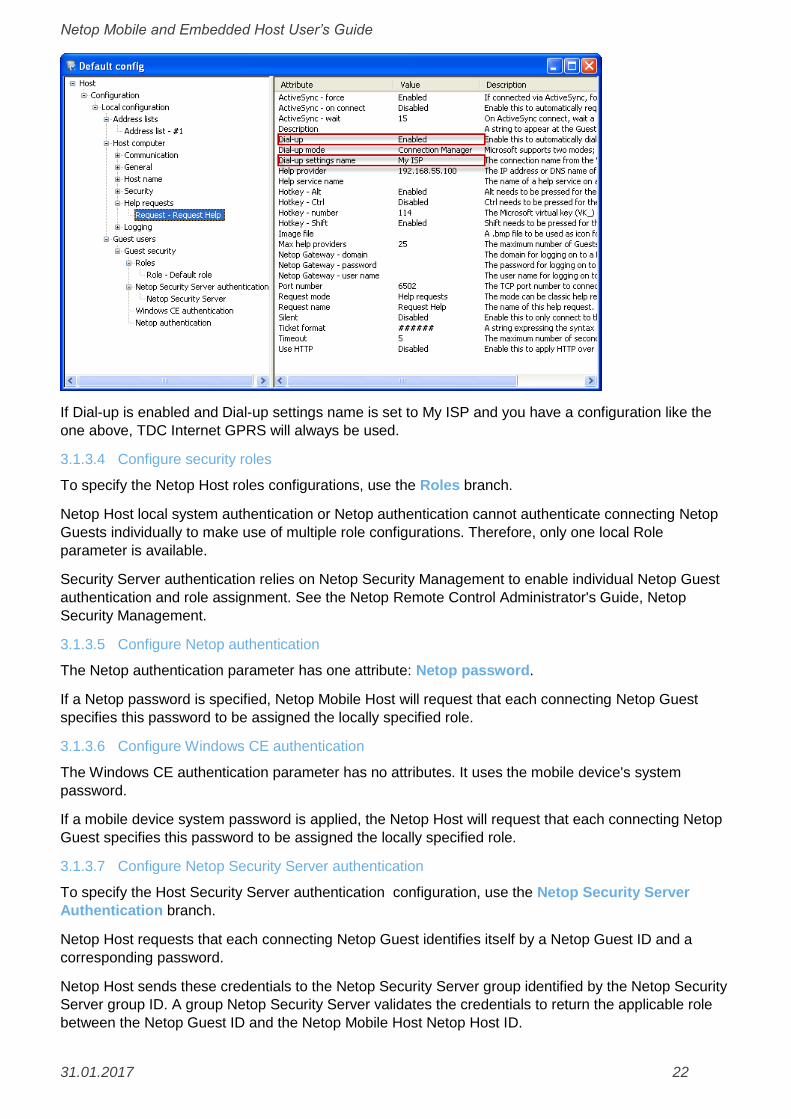
Configure Netop Host dial-up
In Netop Mobile Host Manager, configure the Host for dial-up. The two settings framed in red below are
the relevant settings:
Dial-up: If enabled, Netop Host will establish a network connection through the Connection
Manager when using the issuing of a Help Request. If disabled, dial-up will be prohibited.
Dial-up settings name: Usually My ISP or My Work Network, but it can also be the name of a
specific connection defined in the Connection Manager if you have defined multiple connections.
Netop Mobile and Embedded Host User’s Guide
31.01.2017 22
If Dial-up is enabled and Dial-up settings name is set to My ISP and you have a configuration like the
one above, TDC Internet GPRS will always be used.
3.1.3.4 Configure security roles
To specify the Netop Host roles configurations, use the Roles branch.
Netop Host local system authentication or Netop authentication cannot authenticate connecting Netop
Guests individually to make use of multiple role configurations. Therefore, only one local Role
parameter is available.
Security Server authentication relies on Netop Security Management to enable individual Netop Guest
authentication and role assignment. See the Netop Remote Control Administrator's Guide, Netop
Security Management.
3.1.3.5 Configure Netop authentication
The Netop authentication parameter has one attribute: Netop password.
If a Netop password is specified, Netop Mobile Host will request that each connecting Netop Guest
specifies this password to be assigned the locally specified role.
3.1.3.6 Configure Windows CE authentication
The Windows CE authentication parameter has no attributes. It uses the mobile device's system
password.
If a mobile device system password is applied, the Netop Host will request that each connecting Netop
Guest specifies this password to be assigned the locally specified role.
3.1.3.7 Configure Netop Security Server authentication
To specify the Host Security Server authentication configuration, use the Netop Security Server
Authentication branch.
Netop Host requests that each connecting Netop Guest identifies itself by a Netop Guest ID and a
corresponding password.
Netop Host sends these credentials to the Netop Security Server group identified by the Netop Security
Server group ID. A group Netop Security Server validates the credentials to return the applicable role
between the Netop Guest ID and the Netop Mobile Host Netop Host ID.

Netop Mobile and Embedded Host User’s Guide
31.01.2017 23
Netop Host applies this role to the connecting Netop Guest. See the Netop Remote Control
Administrator's Guide, Netop Security Management, or the Netop Security Manager Help system.
3.1.4 Configuring Netop Host authentication parameters
To specify all authentication parameters used when a Guest logs on to the Host, use the Guest users
branch.
When you select a parameter in the left pane, a description of the parameter is displayed at the bottom
of the configuration panel. You can add or delete parameters using the Edit menu or the context menu.
Attributes for the selected parameter are displayed in the right pane along with a description of the
individual attribute. You can change attributes by double-clicking them.
3.1.5 Changing the Netop Host configuration using the configuration wizard
Use the configuration wizard to customize a few essential configuration parameters before displaying
the configuration in the configuration panel of the Netop Mobile Host Manager window.
In the Intro window, select New Wizard to display the first configuration wizard page.
Alternatively, in the Netop Mobile Host Manager window, click Create a new configuration using a
wizard dialog button on the toolbar, from the File menu select New Wizard, or press CTRL+W.
The Authentication page allows you to configure a Guest Access Security password. The password will
be used by Guests to connect to the Neto Host. Specify the password in the upper field and re-specify it
in the lower field for confirmation. Characters will display as dots or asterisks.
Click Next. The Authorization page will be displayed:

Netop Mobile and Embedded Host User’s Guide
31.01.2017 24
Configure the role that will initially apply to connecting Netop Guests:
Limited remote control: A connecting Guest will be allowed to view the mobile device display,
receive files from the mobile device and start a chat session with the mobile device user.
Full remote control: A connecting Guest will be allowed all available actions.
Click Next. The Network Listening page will be displayed:
Configure communication profiles by which to communicate with the Netop Guest:
Listen on UDP port: Leave this check box selected to enable a communication profile that uses
the TCP/IP communic ation device with the receive port number specified in the field (default:
selected, 6502).
Listen on TCP port: Leave this check box selected to enable a communication profile that uses
the TCP/IP (TCP) communic ation device with the receive port number specified in the field
(default: selected, 6502).
Listen on HTTP port: Select this check box to enable a communication profile that uses the
TCP/IP (TCP) communic ation device encapsulated in HTTP with the receive port number
specified in the field (default: cleared, 80).
Listen using WebConnect (with trial settings): Select this check box to enable a
communication profile that uses the WebConnect communic ation device.
Click Next. The Help Request page will be displayed:
Configure the key attributes of the default Request Help parameter:
Help provider address: Specify in this field an IP address to connect by TCP/IP (TCP) or
empty the field to broadcast by TCP/IP to send help requests (default: 192.186.1.1).

Netop Mobile and Embedded Host User’s Guide
31.01.2017 25
Help service name: Specify in this field a help service name to enable a Netop Guest that
offers help by this service name to respond (default: Help Service 1).
Automatically send a help request when ActiveSync connects: Select this check box to
automatically send a help request on ActiveSync connect to a desktop computer (default:
cleared).
To return to previous configuration wizard pages to change your settings, use the Back button.
To end the configuration wizard, click the Finish button. A NetopHost1 configuration window will be
displayed according to your specifications in the configuration panel of the Netop Mobile Host Manager
window.
3.1.6 Changing the Netop Host configuration using the configuration panel
Netop Mobile Host Manager includes a basic configuration named Default config. To view it, from the
File menu select New, or on the toolbar click Create a new default configuration.
You cannot change the basic default configuration, but you can create and save customized
configurations from it.
Saving a customized configuration will create an xml file the contents of which specify deviations from
the default configuration. You can open a customized configuration xml file in the configuration panel to
view and optionally modify its contents.
Click a parameter to display its attributes in the right pane as a table of attribute names, values, and
attribute descriptions.
To change a configuration attribute value:
1. Double-click the attribute in the right pane to display its attribute window:
The window may contain an explanation clarifying attribute value implic ations. The active
element of the window will depend on the attribute value type:
Boolean (check box)
String (text field)
Numeric (number only field)
Enumerate (drop-down box)
2. Change the attribute value. If the specified attribute value is valid, the OK button will be enabled.
3. Click OK to confirm the change and close the attribute window.

Netop Mobile and Embedded Host User’s Guide
31.01.2017 26
4 FAQ
4.1 What actions can a Guest perform on the Netop Host?
If allowed by the assigned role, a connected Netop Guest can execute the following actions:
Run Program: Run an exe program installed on the mobile device.
Send Message: Compose a message and send it to Netop Host to display a message window
on top of the Netop Host display. Tap OK to close the message window.
Get Inventory: Get mobile device hardware and software information.
Netop Script: Run a Netop Script with the Netop Host . A Netop Script will execute a specified
File Transfer, Run Program, Send Message, Get Inventory and other actions.
Note: Run Program, Send Message and Get Inventory are in fact based on Netop Script. See the Netop Script section of the Netop Remote Control User's Guide or the corresponding Netop Guest Help system section.


![Netop Pack'n Deploy User's Guide - SystemSoftware.at€¦ · 1 Netop Pack'n Deploy Netop Pack'n Deploy User's Guide 31 January 2017 3 Folder: []: Will show the destination directory](https://static.fdocuments.in/doc/165x107/6013ebb2d8d272188838bc8f/netop-packn-deploy-users-guide-1-netop-packn-deploy-netop-packn-deploy-users.jpg)