Musician's Manual
118
1
Transcript of Musician's Manual

1


ESQ-M — Musician's Manual
ESQ-M Musician's Manual:
Written, Designed,and Illustrated by: Bill McCutcheon
Cover Design by: Gilligan Designs, Inc.
Copyright © 1987ENSONIQ® Corp155 Great Valley ParkwayMalvern, PA 19355
All Rights Reserved
This Manual is copyrighted and all rights are reserved by ENSONIQ Corp. This document may not, in whole or in part, becopied, photocopied, reproduced, translated or reduced to any electronic medium or machine readable form without priorwritten consent from ENSONIQ Corp. The ESQ-M software/firmware is copyrighted and all rights are reserved byENSONIQ Corp.
Although every effort has been made to ensure the accuracy of the text and illustrations in this Manual, no guarantee ismade or implied in this regard. Software/firmware are sold as is and are not covered by warranty.
IMPORTANT:"This equipment generates and uses radio frequency energy and if not installed and used properly, that is, in strictaccordance with the manufacturer's instructions, may cause interference to radio and television reception. It has been testedand found to comply with the limits for a Class B computing device in accordance with the specifications in Subpart J ofPart 15 of FCC rules, which are designed to provide reasonable protection against such interference in a residentialinstallation. However, there is no guarantee that interference will not occur in a particular installation. If this equipmentdoes cause interference to radio or television reception, which can be determined by turning the equipment off and on, theuser is encouraged to try to correct the interference by one or more of the following measures."
* reorient the receiving antenna* relocate the instrument with respect to the receiver* move the instrument away from the receiver* plug the instrument into a different outlet so that the instrument and receiver are on different branch circuits
"If necessary, the user should consult the dealer or an experienced radio/television technician for additional suggestions.The user may find the following booklet prepared by the Federal Communications Commission helpful: 'How to Identifyand Resolve Radio-TV Interference Problems.' This booklet is available from the U.S. Government printing Office,Washington, D.C. 20402 Stock No. 004-000-00345-4."
I n o r d e r t o f u l f i l l w a r r a n t y . r e q u i r e m e n t s t h e E S Q - M s h o u l d b e s e r v i c e d o n l y b y a n a u t h o r i z e dENSONIQ Repair Station.
Th e E N S O N I Q s e r i a l n u m b e r l a b e l m u s t a p p e a r o n t h e o u t s i d e o f t h e U n i t o r t h e E N S O N I Q w a r r a n t y isvoid.
*ENSONIQ, ESQ-M, ESQ-1, and Mirage are trademarks of ENSONIQ Corp.
Part # 9310001301 Model MM-11

3 Table of Contents
ESQ-M – Musician's Manual
ESQ-M Musician's Manual — Table of Contents 7
Introduction
9 Section 1– Getting Started
10 Basic Connections10 Power10 MIDI10 Amplification11 Rear Panel Connections12 Front Panel Controls
15 Making Noise15 Turn it on15 The Sounds16 Internal Memory16 Cartridge Memory17 Selecting a Program17 Changing Programs Remotely17 A Note About Program Numbers18 When You Remove the Cartridge
18 Battery Maintenance
18 Rack-mounting the ESQ-M
19 Section 2 - Getting in Deeper
20 PROGRAM Mode - Changing Programs & Tracks20 Changing Programs20 Track 021 Changing Tracks21 More About Tracks22 Diagram — The ESQ-M as Nine "Virtual" Synthesizers
23 PARAMETER Mode23 About Parametric Programming23 Pages23 The Param button24 The Control Keypad24 Selecting a Page24 Selecting a Parameter25 Parameter Chart26 Changing a Parameter26 The Compare light/*C* Prompt27 The Edit Buffer & the Edit Program

4 Table of Contents
ESQ-M – Musician's Manual
29 Section 3 - "Global" Functions
30 MASTER PageControls Master Tuning, Velocity Sensitivity, Pedal Function & Pitch Bend 32
MIDI PageControls The ESQ-M's MIDI Configuration
39 Section 4 - Programming the ESQ-M
40 Waveforms40 Digital Waveform Memory40 What's a Waveform?40 Synthetic Waveforms40 Sampled & Multi-sampled Waveforms41 Names41 Selecting a Waveform41 Check Them Out42 The Waveforms45 Modulators45 About Modulation45 Selecting a Modulator46 Modulation Depth46 Modulation Sources46 LFO's (1-3)47 Envelopes (1-4)47 Velocity (VEL & VEL 2)48 Keyboard Tracking (KYBD & KYBD 2)48 Mod Wheel (WHEEL)49 Foot Pedal (PEDAL)49 External Controller (XCTRL)49 After-touch (PRESSR)50 Using Modulators50 Modulating Oscillator Volume51 Negative Modulation51 Modulating Filter Cutoff Frequency52 Limits of Modulation
53 Voice Diagram - ESQ-M Voice Architecture
55 Programming Pages56 OSC (1-3) Pages58 DCA (1-3) Pages60 DCA 4 Page62 FILTER Page64 LFO (1-3) Pages66 Understanding the Envelopes72 ENV (1-4) Pages74 MODES Page77 Split/Layer Page

5 Table of Contents
ESQ-M – Musician's Manual
81 Programming Conventions
83 Section 5 - Saving and Storing Programs (& "Hidden" Functions)
84 Write Page84 Saving a New or Edited Program85 Bailing Out85 Copying an Existing Program to Another Location
86 Storage Page — Data Transfer86 MIDI Transfer of Programs86 MIDI Connections86 PROG TO MIDI - Sending One Program via MIDI to another ESQ87 BANK TO MIDI - Sending All Internal Programs to another ESQ87 Cartridge - Bank Copy87 Transferring Cartridge Programs to the Internal Memory87 CART A TO INT88 CART B TO INT88 Transferring Internal Programs to a Cartridge88 INT TO CART A99 INT TO CART B
89 Hidden Functions89 How to Find them89 Functions:89 Soft Reset89 Software Version90 Memory Reset90 Filter Tune90 Analog Tests
91 Section 6 - Applications
93 Using the ESQ-M with a sequencer93 Connections93 The ESQ-M as one synthesizer94 The ESQ-M as nine synthesizers94 Some important points about MULTI Mode
95 Using the ESQ-M with a MIDI Guitar Controller
97 The ESQ-M in conjunction with an ESQ-197 Programming the ESQ-M from an ESQ-1: System Exclusive Messages97 Sequencing the ESQ-M from an ESQ-198 MIDI Overflow Mode - the ESQ-M as a voice expander for an ESQ-1

Introduction 6
ESQ-M — Musician's Manual
101 Section 7 - Appendices
102 About the Program Sheet102 ESQ-1 to ESQ-M Parameter Reference103 Blank Program Sheet
104 Program Control Block Structure
107 ESQ-M MIDI Implementation Chart
108 ESQ-M MIDI Implementation Specifications
111 ESQ-M MIDI Parameter List
116 ESQ-M Specifications

Introduction 7
ESQ-M – Musician's Manual
CONGRATULATIONSYour new ESQ-M Digital Wave Synthesizer Module gives you all the great sounds and true multi-timbral capabilities of ENSONIQ'S ESQ-1 Digital Wave Synthesizer in a compact, rack-mountablepackage.
If all you want to do is play one sound at a time from a remote keyboard (as you would with mostMIDI voice modules), you'll find the ESQ-M to be a versatile synth with a wide variety of sounds tochoose from. If, however, you are one of those who li kes to explore every capabil i ty of aninstrument, and tends to push things to the limit, you are in for a treat. The ESQ-M is just the kind ofmachine you've been waiting for.
The voice architecture of the ESQ-M is exactly the same as that of the ESQ-1 – all ESQ-1 soundsplay just fine on the ESQ-M, and vice versa. The ESQ-M gives you full access to all the sameprogramming pages and parameters that have made the ESQ-1 a favorite among programmers andplayers alike.
Like the ESQ-1, it has: forty Internal Programs a cartridge slot for an STC-8 Program cartridge for 80 more programs true stereo output (Left/Mono and Right audio outs) a CV/Pedal input eight dynamically assigned voices true poly-timbral operation, able to receive polyphonically on nine MIDI Channels at once
Unlike the ESQ-1, the ESQ-M does not have the built-in sequencer.
TRACKS?The ESQ-M does, however, have Tracks. Since there is no sequencer, you may ask, what doTracks have to do with anything? Well, a Track on the ESQ-M functions the way a Track of anESQ-1 sequence does when you send it MIDI information from a remote instrument. The Tracks arethe mechanism by which we are able to play multi-timbrally (using different sounds simultaneously)into the ESQ-M. Each Track can "listen to" a different MIDI Channel, and respond polyphonically toinformation coming in on that Channel.Each Track is a separate MIDI target with its own:
Program (patch) Program number MIDI Channel Volume (mix) level
There are nine Tracks, numbered 0-8. Conceptually, Tracks 1 through 8 correspond to the Tracks ofthe ESQ-1 sequencer, and Track 0 corresponds to the "straight synth" section of the ESQ-1. Inmost ways Track 0 is identical to the other eight Tracks.
When the ESQ-M is in MULTI Mode, each track will receive independently on its own MIDIChannel, each with its own Program and mix level. This makes the ESQ-M ideal for use with asequencer, or with a controller keyboard capable of sending different "zones" of the keyboard ondifferent MIDI Channels. You can address up to nine different sounds on the ESQ-M without eversending it a Program Change, just by playing into the unit on different MIDI Channels.The ESQ-M, in effect, can act like nine separate synths set to receive on nine different MIDIChannels. The only catch is that those nine synths share the same eight voices, so no more than eightvoices can be playing at any one instant. You'll find that this usually isn't much of a limitation. Mostof the time you won't be using all eight voices, and the ESQ-M's ability to play lots of differentsounds at once can make eight voices sound like a whole band.

8
ESQ-M – Musician's Manual
Also, the ESQ-M's MONO Mode implementation makes it excellent for use with the new generation ofMIDI guitar controllers, allowing one, for example, to play a different sound on each string.
FEATURESWith three Digital Wave Oscillators per voice, thirty-two sampled and synthetic Waveforms to choosefrom, and 15 routable Modulation sources, the ESQ-M is capable of producing a wide variety of rich,complex sounds. You can program Splits (for different sounds on each half of the keyboard), Layers(for two sounds playing together), or even a Split/Layer mode, in which two totally different pairs ofsounds play on each keyboard half.
Forty Programs, or 'patches', are stored in the Internal Memory, with another eighty available on anexternal, plug-in Cartridge, giving you 120 sounds to select from instantly. These Programs can beplayed as is, or they can be modified to suit your taste and then renamed and stored, either in theInternal or the Cartridge Memory.
Editing of all programs, and 'global' functions (such as Master Tuning, Bend Range, MIDI Channels,etc.) can be done easily from the front panel, using the 16 character fluorescent display. Or, you canprogram the ESQ-M remotely from an ESQ-1 or a computer (with the right software), by enablingthe ESQ-M to receive System Exclusive messages.
Audio outputs are provided for true stereo as well as a mono output. Programs can be pannedcontinuously between the left and right channels. The ESQ-M also has an Amplitude Modulation(AM) mode which can produce bell and ring-modulator type effects, and a Sync mode for hard synceffects.
ENJOYGetting great sounds out of the ESQ-M is simple – just read the section entitled Getting Started,then plug it in and play. Learning to take full advantage of its enormous flexibility will take a bitlonger–it will do a lot. However, if you can open your mind to a few new concepts (like Track 0),allow yourself to experiment a little, and when all else fails read the Manual, you'll find the ESQ-Mbecoming one of the most-used, and most useful, instruments in your entire rig.

9
ESQ-M — Musician's Manual
Section 1 — Getting Started

AMPLIFICATIONMake sure your Audio system is turned off (or down) when making connections, to avoid damagingspeakers or other components.
Connect the Audio Outputs of the ESQ-M to a mixer, instrument amplifier, stereo, or any other soundsystem, using 1/4 inch audio cables. If your system is stereo, connect the Left/Mono and RightOutputs to two channels of your mixer, stereo, etc. If not, use the ESQ-M's Left/Mono Output only.
If you're running the ESQ-M througha mixer, in stereo, be sure to pan theLeft input fully left, and the Rightinput fully right.Move the Volume S l ide r o f theESQ–M up about half way. Switchthe audio system On. While playingthe master keyboard , ad just theamplifier volume for normal listeninglevels. If you hear no sound from theESQ-M while playing the masterkeyboard, switch the audio system Offand check your audio and MIDIconnections.
I f you want to dr ive add i t iona linstruments from the same masterkeyboard, connect the MIDI THRUjack of the ESQ-M to the MIDI INjack of the next instrument in line.This jack simply "passes along" thesignal received at the MIDI IN jack,w i t h o u t t r a n sm i t t i n g a n y d a t agenerated by the ESQ-M itself.
ESQ-M – Musician's Manual
BASIC CONNECTIONS
POWERInsert the Power Cable into the receptacle on the back of the ESQ-M. Plug the other end of the cableinto a grounded AC outlet. (The proper voltage for your ESQ-M is listed on the Serial Number Labelon the Rear Panel.) Turn on the ESQ-M and make sure the Display lights up. If not, check yourconnections and power source.
MIDIOf course, you'll need to connect the ESQ-M to a MIDI keyboard or other controller before it willmake any noise at all. Any instrument which has a MIDI OUT jack can be used to drive the ESQ-M.
Connect the MIDI OUT jack of the master instrument to the MIDI IN jack of theESQ–M as shown below, using a standard 5-pin MIDI cable.

Rear Panel Connections 11
ESQ-M – Musician's Manual
AUDIO OUTPUTS:1. RIGHT -- To operate the ESQ-M inStereo, connect this Output to a channel of yourMixer and pan that channel Right. If nothingis connected to this jack, both channels ofthe ESQ-M's Output will be combined andsent out the Left/Mono Output.
2. LEFT/MONO -- When operating the ESQ-M in Stereo, connect this Output to a channel ofyour Mixer and pan that channel Left. Tooperate the ESQ-M in Mono, use this jackonly. Again, if nothing has been connected tothe Right Output jack, the Left/Mono jack willproduce a Mono signal that is the sum of the twochannels of the E S Q - M ' s O u t p u t . S p e c s :( B o t h A u d i o Outputs): 1 KOhm outputimpedance, DC coupled. Line level output into10 KOhms or higher (one voice=1 Vp-ptypical; all voices= 15 Vp-p)
3. CV/PEDALThis jack is for connect ing an opt ionalENSONIQ Model SW-10 Control VoltageF o o t P e d a l , w h i c h i s a s s i g n a b l e a s aModulator in the Program Section of theESQ–M. (Note that incoming MIDI FootPedal information (MIDI Controller #4) will havethe same effect.) Or, the CV Pedal can serve as aVolume Pedal when PEDAL=VOL is selected onthe MASTER Page.Specs: [Pedal Input]: 3-conductor
(Tip=control voltage input, Ring=2KOhmresistor to +12 Volts, Sleeve= ground). 500KOhm input impedance, DC coupled. Inputvoltage range=0 to 10 volts DC. Scanrate=5mS (maximum recommendedmodulation input= 25 Hz). For use with an
external control
voltage, use a 2-conductor cable with the voltageon the tip and the sleeve grounded.
4. MIDI INReceives MIDI information from otherinstruments or computers. The MIDI Output of aMIDI keyboard or other controller must beconnected to this input with a standard SpinMIDI cable in order for the ESQ-M to make anysound.
5. MIDI OUTThis jack sends out MIDI (Musical InstrumentDigita l Interface) information to otherins t ruments and computers . S ince theESQ–M is primarily a receiving unit, much ofthe time there won't be a reason to plug anythinginto this jack. It is important mainly for sendingdata, such as Program Banks, to other ESQ productsand computers.
6. MIDI THRUThis jack "passes along" all informationreceived at the ESQ-M's MIDI In jack. It is usedfor chaining MIDI devices together when drivingmultiple instruments from a master keyboard orsequencer.
7. FUSE 1 amp fast-blow fuse socket.
8. AC LINE INThe supplied line cord should be connectedhere. The correct voltage for the ESQ-M is listedon the Serial Number label on the rear panel . Ifyou travel , remember that the ESQ–M willonly operate on this voltage.

ESQ-M – Musician's Manual
FRONT PANEL CONTROLS
All the programming, performance and data transfer functions of the ESQ-M are handled from thesixteen Front Panel buttons, the Volume and Data Entry Sliders, and the 16-character fluorescentDisplay. Many of the controls perform multiple functions depending on what mode the ESQ-M is inYou should read the following descriptions carefully in order to get the most out of your ESQ-M.
1. POWERRocker switch to turn the unit's power onand off. Press the switch at the top to turnthe ESQ-M on; at the bottom to turn it off.You should always make sure the volume isturned down on your mixer or amplifierbefore turning the ESQ-M's power on oroff.
2. VOLUMESlider control to adjust the output volume ofthe ESQ-M.
3. Write buttonThis button is used to put the ESQ-M ontothe WRITE Page, where new or editedPrograms can be saved to Interna l orCartridge memory locations. The button isalso used to initiate the actual Write (or save)procedure once you have decided on a newname and memory location for the newProgram. See Section 5 for complete details.
4. Compare lightThis LED lights when you change any of theparameters of the current Program. What theCompare light is actually telling you whenit's lit is that the Program you are listening tois the Edit Program — the contents of theEdit buffer. Pressing the Param buttonagain will cause the ESQ-M to switch backto the current Program, causing the Comparelight to go out. For more information aboutthe Edit buffer and using the Comparefunction, see pp. 26-27.
5. Param buttonPressing this button puts the ESQ-M into
Parameter mode. In Parameter mode thevarious parameters (or variables) that makeup the ESQ-M's Programs and its "Global"settings can be selected and modified.
In Parameter mode the display shows:1) the name of the current Page2) the currently selected parameter on thatPage, and3) the current value of that parameter.
Once the ESQ-M is in Parameter mode,pressing the Param button toggles back andforth between the Edit Program and thecurrently selected Program in the ESQ-M'smemory, causing the Compare light to go onor off (see above). See pp. 23-27 for moreon Parameter mode.
Pressing the Param button also allowsaccess to the Storage Page, which is nottechnically a parameter page, but which has aformat similar to the parameter pages. TheStorage Page handles all the data transferfunctions of the ESQ-M (sending Programsover MIDI, transferring Program banksbetween the Cartridge and the InternalMemory, etc.) From the Storage Page youcan also execute a number of "hidden"functions, such as tuning the filters, re-ini t ia l iz ing the memory, checking thesof tware vers ion number , e tc . These"hidden" functions are covered in Section 5.

13 Front Panel Controls
ESQ-M – Musician's Manual
6. Program buttonPressing this button puts the ESQ-M intoP r o g r a m m o d e . T h i s i s t h e n o r m a lperformance mode, the one your ESQ-Mwill probably be in most of the time.In Program mode the display shows:1) the number of the current Track
(ex.— TRK 0),2) the name of the Program (or "patch")currently selected on that Track
(ex.— PIANO1), and3) the Program number of that Program inthe Internal or Cartridge memory
(ex.— 001) .
You can always press the Program buttonto quickly find out what Program is selectedon the current Track. See Section 2 for anexplanation of Program mode.
7. CONTROL KEYPADThe ten buttons of the Control Keypad areeach labeled with a number (as on a standardnumeric keypad) and a Page Name. Thesebut tons per form a number of di f fe rentfunct ions, depending on what mode theESQ-M is in, and what you did immediatelybefore pressing the button. Each of thesefunctions is described in more detail in therelevant section of this manual.In P rogram mode , t he bu t tons o f theControl Keypad can be used to directlykey in the number of the Program you wantto select. The full 3 digit number, includingzeroes, must be entered. (For example, enter0-0-2 to select Program # 2; enter 0-3-5 toselect Program # 35.)In Parameter mode, these ten but tonsselect the Pages which contain the variousp a r a me t e r s a v a i l a b l e o n t h e E S Q -M .Where there are more than one of a certainkind of Page, (such as OSC 1, OSC 2, andOSC 3) you are asked, after pressing OSC,to enter the number of the Oscillator youwant. You have approx. 2 seconds to enter avalid number.The buttons of the Control Keypad alsoallow you to take a short cut to any particularparameter (bypassing the Scroll button), byentering the parameter number immediatelyafter you select the Page. Again, you haveapprox. 2 seconds to enter a valid numberafter selecting a Page.
On the Write Page , you can use thesebuttons to directly enter the Program numberof the memory location to which you want tosave a new or edited Program.IMPORTANT: In all the above functionsthe but tons of the Control Keypad aresubject to a timing cycle. That is, when youse l ec t OSC, the ESQ-M wai t s about 2seconds for you to tell it which OSC youmean (1, 2 or 3). If you don't respond inthat time, the Display goes back to whereverit was previously. Once you select a Page,the ESQ-M again waits about 2 seconds foryou to directly enter a parameter number,after which it assumes that a new button-press is meant to select a different Page. Ifyou find yourself furiously pressing lots ofbut tons and not get t ing the resul ts youexpect, slow down, let a few seconds passso that all timing cycles are out of the wayand then select your page, parameter, etc.
8. Scroll buttonThe Scroll button has various functionsdepending on what mode the ESQ-M is in:
In Program mode, pressing the Scrol lbutton will advance to the next higher Track.At Track 8 the ESQ-M will "wrap" aroundto Track 0 when Scroll is pressed.
I n P a r a me t er mo d e , p r e s s i n g S c r o l ladvances to the next Parameter on the currentPage. Again, the Display will "wrap" aftert he l a s t pa r a me te r on a Pa ge , c yc l i n gendlessly through the available parameters asthe Scroll button is repeatedly pressed.
O n t h e W r i t e P a g e , p r e s s i n g S c r o l ladvances the cursor to the next character, orto the destination Program number, as youselect a name and a new location for anedited sound.
O n t he St or age P age , on ce yo u ha vese lec ted the Storage (or da ta t ransfer )function you want, you press the Storagebutton while holding down the Scroll buttonto initiate the transfer.
NOTE that pressing the Scrol l but ton onlyscrolls the Display forward, to the nexthigher Track, parameter, character, etc. You

14 Front Panel Controls
ESQ-M – Musician's Manual
can , however , sc ro l l backwards , to theprevious Track or parameter by holdingdown the Scrol l button and pressing theD o w n A r r o w / N o b u t t o n . I n f a c t ,whenever you are holding down the Scrollbutton, the Data Entry Slider and the Up and DownArrow buttons will perform the Scroll functioninstead of their usual functions.As for the Scro l l button i tself , you wil lnotice that any actions performed by thisbutton actually occur when you release thebutton, not when you first press it. So when wesay "press the Scro l l button" in thismanual, what we really mean is "press andrelease the Scroll button."
9. Up Arrow/Yes and Down Arrow/NobuttonsAlso called INC and DEC (for increment anddecremen t ) bu t tons , the se two bu t tonsperform various funct ions depending onwhat mode the ESQ-M i s in . In a lmostevery case, these buttons perform the samefunc t ion as the Da ta Entr y S l ider . Thedifference is that pressing the Up and DownArrow buttons changes things one value at atime, while moving the Data Entry Slidersweeps quickly through all the availablevalues.In Program mode, pressing the Up orDown Arrow button wil l se lect the nexthigher (or lower) Program to be the currentProgram on the Track. So, where pressingScroll selects a new Track, pressing the Up o rD o w n A r r o w b u t t o n s c h a n g e s t h eProgram that will play on that Track.In Parameter mode, pressing the Up or
Down Arrow button will change the value of thecurrent Parameter (the one showing on theDisplay) . So, where pressing Scrol l selectsa different parameter, pressing the Up or DownArrow buttons changes the value of thatparameter.On the Write Page, pressing the Up or
Down Arrow button will change the flashingcharacter one character, or one digit, at atime, as you edit the name and select a newlocation for an edited sound.
Yes/No Functions: Occasionally, whenperforming a function which will alter thecon ten t s o f the E SQ -M's me mor y,you will be asked a question before proceeding,such as "RESET ALL MEMORY?" In suchcases you will use these buttons to either
answer "YES" and proceed, or answer "NO" andcancel the procedure.Scroll Functions: As mentioned above,when the Scroll button is being held down,the Up and Down Arrow buttons (and theD a ta E n t r y S l ide r ) p e r fo r m the S c ro l lfunctions instead of their normal ones. Themost common application of this is to pressthe Down Arrow/No button while holdingdown the Scroll button, in order to scrollback to the previous parameter.
10. Data Entry SliderThe Data Entry Slider generally performs thesame function as the Up and Down Arrowbuttons. However, it sweeps through theentire range of available values, whereas thebuttons adjust values one step at a time It isoften most effective to use the Data EntrySlider to "get in the neighborhood" of theProgram or value you want, and then use the Upand Down Arrow buttons to zero in on theexact value.The same descriptions given above for the Upand Down Arrow buttons apply for the functioningof the Data Entry Slider, with a few exceptions:
Yes/No Functions: When the ESQ-Mexpects a YES or NO answer to a question,the Data Entry Slider will be ignored, andonly the Up Ariow/Yes or Down Arrow/Nobutton may be used to respond.
Write Page: On the Write Page you canpress the Down Arrow/No button whileholding down the Scroll button to scrollbackwards, but moving the Data Entry Sliderwith the Scroll button held down will have noeffect.
11. DisplayThe 16-character vacuum fluorescent displayprovides all the necessary info about Track,Program and Global settings, as well as data transferand other procedures.
12. Program Cartridge SlotI n s e r t a n E N S O N I Q S T C - 8 o r o t h e rProgram cartridge into this slot to expand thenumber of available Programs to 120.

ESQ-M - Musician's Manual
Programs 041 through 120 are the CartridgePrograms. When no cartridge is inserted here,only Programs 001 through 040 (the fortyinternal Programs) can be selected. The contents
of an ENSONIQ Program cartridge are dividedinto Banks of forty Programs each:Bank A contains Programs 041 through 080;Bank B contains Programs 081 through 120.
MAKING NOISE
TURN IT ONWhen you turn the ESQ-M on,the Display will show a wake-up message ...........................
ENSON IQ ESQ-M
After about three seconds the ESQ-M will put itselfinto Program mode, and should default to 'TRACK 0,Program #1. The Display should now show ....................
TRK 0 PIANO 1 0 0 1
If you've been playing with the controls, and the Display doesn't appear as shown above, do this:1. Press the Program button2. Move the Data Entry Slider up and then all the way downWhat you have just done is to 1) put the ESQ-M into Program mode, and then 2) select Program #1(by moving the Data Entry Slider all the way down). The ESQ-M is now on Track 0 with Program#1 selected. This is a good starting point for exploring the sounds.
THE SOUNDSEach of the three Program Banks, (Internal, Cart A and Cart B) designates a large area of memorywhich contains forty Programs. If no cartridge is inserted in the Cartridge port, only the forty InternalPrograms are available. Once a Cartridge is inserted, all 120 Programs are instantly available.

16 Internal and Cartridge Memory
ESQ-M – Musician's ManualINTERNAL MEMORY (001-040)The ESQ-M holds 40 different Sounds, or "patches" in its Internal Memory. We refer to theseSounds as Programs. You can change Programs simply be moving the Data Entry Slider or bypressing the Up and Down Arrow buttons. You can also change Programs on the ESQ-M bysending it a Program Change from your Master keyboard. For most MIDI keyboards, this is simply amatter of selecting a new Program from the front panel of the master keyboard.
The Internal Memory consists of Programs 001 through 040. (Note that the ProgramNumber of the current Program on a given Track is always shown on the right side of the Display.)The Internal Memory retains its data even when the power is Off.
CARTRIDGE MEMORY (041-120)Before you can select Programs 041 through 120, an ENSONIQ E2 PROM or Voice-80 StorageCartridge must be inserted in the Cartridge slot on the right side of the front panel.
Be sure to insert the Cartridge as shown below, with the label side facing down and the writing on theend of the Cartridge facing right-side-up. /
The Cartridge Memory consists of Programs 041 through 120.The contents of an ENSONIQ Program cartridge are divided into two Banks of forty Programs each. Bank Acontains Programs 041 through 080. Bank B contains Programs 081 through 120.
The procedures for selecting, editing and saving sounds are identical to those for Internal sounds. When aCartridge has been inserted, all three Master Banks (that is, Programs 001 through 120) are instantly available.
There is one important difference between the STC-8 E2 PROM Storage Cartridge and the Voice-80 Program Cartridges — you cannot "write to" or alter the contents of the Voice-80 Cartridges. Theyare read-only devices and the sounds on them cannot be changed (though you can edit a sound from theVoice-80 Cartridge and then save it somewhere else). The E2 PROM Cartridge, on the other hand, isfor storing the Programs that you create or get from your friends. You can write to it just like the Internalmemory.
The E2 PROM Cartridge also retains its data when the power is Off, whether or not it is plugged into the ESQ-M Cartridge slot. When there is no Cartridge in the slot, only Programs 001 through 040 can be selected.

ESQ-M – Musician's Manual
SELECTING A PROGRAMTo select a different Program, move the Data Entry Slider or press the Up and Down Arrow buttons. Asyou do so, the name and the Program Number showing on the Display will change to reflect those of the newsound that you have selected.
Note that Cartridge sounds are not treated any differently from Internal sounds. When a Cartridge isinserted, the Data Entry Slider and the Up and Down Arrow buttons will continuously move through all120 Programs without differentiating between the Internal and Cartridge sounds
Another way to select a Program on the ESQ-M is to enter its Program Number directly from theControl Keypad. You must enter all three digits of the number, including the leading zeroes innumbers below 100. For example:
to select Program # 3, enter 0-0-3 to select Program # 42, enter 0-4-2 to select Program # 105, enter 1-0-5
and so on. There is a timer function at work when you enter Program Numbers directly — after you entera valid digit, the ESQ-M waits two seconds for you to enter another valid digit. If you don't, it goes backto the original program. If this happens to you, don't get flustered— just enter the Program Number again.
CHANGING PROGRAMS REMOTELYTo select a new ESQ-M sound from your master keyboard simply select a new patch from its frontpanel. This will send a MIDI Program Change command, instructing the ESQ-M to change to thedesignated sound. Different instruments have different methods for numbering their Programs — see thenote below.
Some instruments have access to less than 120 Programs, and therefore cannot send the full 120Program changes that the ESQ-M will recognize. You can only send the ESQ-M Program Changenumbers as high as your master keyboard is capable of transmitting. So with some instruments as amaster, you will not be able to remotely select all of the ESQ-M's Programs.
Some instruments, on the other hand, send the full 128 Program Changes available through MIDI. TheESQ-M will ignore Program Changes over 120.
A NOTE ABOUT PROGRAM NUMBERSMIDI Program Numbers can be a little confusing. On the ESQ-M (and the ESQ-1) you will find thePrograms numbered from 1 to 120. Several other synths, including the DX-7, also begin numbering fromProgram Number 1.
True MIDI Program Numbers, the numbers actually sent and received by MIDI instruments, begin atProgram Number 0. (Computers, unlike people, tend to number things starting from zero instead ofone.) So ESQ-M Program Number 001 actually corresponds to True MIDI Program Number zero (0).ESQ-M Program Number 120 corresponds to True MIDI Program Number 119. And so on. TheProgram Number shown on the ESQ-M is the True MIDI Program Number plus one. Some instrumentsreference their Programs starting from #0, some starting from #1. Hence the confusion.
The trick to keeping things straight is this: if the instrument you use with the ESQ-M lists ProgramNumbers beginning from #0, you will have to add 1 to the Program Numbers on that instrument to comeup with the corresponding ESQ-M Program Number. If the instrument lists Program Numbers beginningfrom #1, any Program Number on that instrument will be the same as the corresponding ESQ-M ProgramNumber.

18 General Information
ESQ-M – Musician's Manual
WHEN YOU REMOVE THE CARTRIDGEThe ESQ-M remembers which sound you had selected for each Track, even if it's a Cartridge soundand you remove the Cartridge. If you remove the Cartridge when a Cartridge sound (# 041 to 120) isselected, the Program Name on the Program Page is replaced by the word *CART*, indicating that aCartridge Program is selected but no Cartridge is present. The Program Number will still reflect theCartridge location. If you reinsert the Cartridge, the proper Program name will reappear, and all willbe as it was.The sound you hear while the Cartridge is removed will be that of the Internal sound which occupiesthe same relative memory location in the Internal memory that the selected sound does in the absentCartridge. Subtract 40 (for CART A sounds) or 80 (for CART B sounds) from the Program Numbershowing on the Display to arrive at the number of the Internal Program that you will hear. Forexample, if Program # 042 is selected, and you remove the Program Cartridge, the Display will read:
T R K 0 * C A R T * 0 4 2
The Program that you will actually hear playing (until you re-insert the Cartridge or change Programs)will be Program # 002.
BATTERY MAINTENANCEThe reason that the ESQ-M "remembers" Programs and other parameters when the power is OFF isthat all of its Internal RAM (Random Access Memory) is "Battery Backed-up". The battery that keepsthe ESQ-M's Memory intact is located inside the ESQ-M, and when it becomes discharged, it mustbe replaced by an authorized ENSONIQ Repair Station.
The battery that came in your ESQ-M is good for up to ten years of life. You will know when itneeds replacing, because the ESQ-M will tell you so. One day you will switch the Power ON, andinstead of its usual wake-up message, the Display will read:
BATTERY VOLT LOW
meaning, of course that the Battery voltage is low. When this message appears, you should make surethat all Programs are saved to a Cartridge or computer librarian, and then take the ESQ-M to anauthorized ENSONIQ Repair Station as soon as possible to have the battery replaced.
You can check the status of the battery on the Analog Test Page, which is one of the "hidden"functions on the Storage Page (see p. 90). When the battery is in good shape the Display will read"B=00" on the Analog Test Page. Any reading above 00 indicates a battery that is on the way out,and will need replacing very soon.
RACK MOUNTING THE ESQ-MThe ESQ-M can be rack mounted in a standard 19" audio rack by installing the rack mount hardwareincluded with the unit. To mount the ESQ-M in a rack:
1. Fasten the rack mount "ears" to the sides of the front panel with the supplied screws, making surethat the oval mounting holes face the front of the unit.
2. The ESQ-M occupies two standard rack spaces (3 1/2"). We recommend the use of nylonwashers when rack mounting any unit.
3. If you are installing another piece of equipment directly below the ESQ-M in your rack, it may benecessary to remove the rubber feet from the underside of the cabinet.

ESQ-M — Musician's Manual
Section 3 — Getting In Deeper

20 Program Mode
ESQ-M – Musician's Manual
PROGRAM MODE — Changing Programs and Tracks
The ESQ-M is always in one of two modes – Program Mode or Parameter Mode. These modesare entered by pressing either the Program or the Param button on the front panel.
When you press the Program button, the display will show :1) which of the nine Tracks is currently selected,2) the name of the Program currently playing on that Track, and3) the Number of that Program
In Program Mode, there are only two things you can do:1) change the Program which is playing on the Track, or2) select a different Track.
CHANGING PROGRAMSTo change to a new Program, first press the Program button to make sure the ESQ-M is in Programmode. You now have a number of ways to select a new Program.
Press the Up Arrow/Yes or Down Arrow/No buttons to step through the Programs inmemory one at a time.
Move the Data Entry Slider to zip through the programs more quickly. If you know the number of the Program you want, you can enter it directly from the
Control Keypad. You must enter all three numbers, including the zero for numbers smallerthan 100 (such as "0-3-5" for Program #35, etc.) If a Program Cartridge is inserted, Programs# 001 through 120 are available to be selected. If no cartridge is inserted, ONLYPrograms #001 through 040 are available.
TRACK 0In most cases, when using the ESQ-M like a normal synthesizer, it's just as well to leave it on Track0, and ignore the other eight. (By "normal" we mean a unit that is simply played from some mastercontroller, one patch at a time.) The other eight Tracks are there primarily as a way to get at differentsounds simultaneously when using the ESQ-M with a sequencer, guitar controller, "smart" keyboardcontroller, or any other device which is capable of sending on several MIDI Channels at once.
If you use the ESQ-M in OMNI or POLY modes, there is little reason to stray from Track 0 — inOMNI or POLY modes only one Track (the selected Track) responds to MIDI data at any time. Sochanging Tracks doesn't make much difference, since in OMNI or POLY mode Track 1 will behaveexactly like Track 0, as will Track 2, Track 3, and so on.
As it comes out of the box, your ESQ-M will be in OMNI mode — that is, it will respond to allenabled data coming in on any MIDI Channel. This is fine if it's the only remote MIDI instrumentyou'll be using. If there are others, you will probably want to go to the MIDI Page and select POLYmode. In POLY mode the ESQ-M will respond only to data coming in on the Base MIDI Channel(which you also select on the MIDI Page). See the section "MIDI Page" for details on selectingMIDI mode and MIDI Channel.

ESQ-M – Musician's ManualCHANGING TRACKSTo select a different Track, press the Scroll button, and the ESQ-M will advance to the nexthigher Track. The display will now show the number of the new Track, along with the Program onthat Track and it's Program Number. If the ESQ-M is in OMNI or POLY Mode, the sound you hearwill change to that of the new Track (this is not the case in MULTI or MONO Modes).
To scroll backwards, that is to go back to the next lowest Track, press the Scroll button andhold i t down while pressing the Dow n Arrow/No button. (This works when using theScroll button in any mode – pressing Scroll scrolls forward, and pressing Down Arrow/No whileholding down the Scroll button scrolls backward.)
If you continue pressing Scroll, the ESQ-M will continue advancing to the next Track. When itreaches Track 8 (the highest numbered Track), pressing Scroll brings you back to Track 0.
MORE ABOUT TRACKSWhen things really get interesting is when you put the ESQ-M into MULTI mode. MULTI mode isan ENSONIQ innovation which allows the ESQ-M to respond to nine different MIDI Channels atone time. This is where the Tracks come in. More detail on using the ESQ-M's multi-timbralcapabilities in specific applications is available in other sections of this manual. Here we'll just coversome of the basics.
Imagine This:Imagine nine synthesizers, each receiving on a different MIDI Channel, each totally independent,capable of receiving key information, Program Changes and controllers (pitch bend, MOD wheel,etc.). Now here's the tricky part: these nine synthesizers share a pool of eight voices.
The eight voices are dynamically assigned. That means that when one of the nine synths needs one, ortwo, or five (or even all eight) voices, it gets them. When it's through with a voice, it puts it back inthe pool, where the voice is again available for any of the nine synths. If one of the synths needs toplay a note when all eight voices are already in use, it will "steal" the voice that has been playing thelongest — the oldest note.
Obviously, all nine synths cannot be playing at one instant in time. At any one instant, only eightvoices can be playing, but those eight voices can be playing any combination of sounds from any ofthe nine synths.
The scenario above exactly describes the behavior of the nine Tracks of the ESQ-M in MULTI mode.In MULTI mode each Track acts like a separate synthesizer, with its own:
Program Program number MIDI Channel Mix level
Each track will receive independently on its own MIDI Channel. So you can send into the ESQ-M onMIDI Channel 1 and the Program on Track 0; send on MIDI Channel 2 and get the Program on Track1; send on MIDI Channel 3 and get the Program on Track 2, and so on. All at the same time. See thediagram on the next page.

22 The ESQ-M as nine "virtual" synthesizers
ESQ-M – Musician's Manual
The above picture illustrates the concept of the ESQ-M as nine "virtual" synthesizers: each Track as aseparate, independent synth, receiving on its own MIDI Channel, with all nine Tracks sharing a poolof eight dynamically assigned voices. This illustration shows Track 0 receiving on MIDI Channel 1,Track 1 receiving on MIDI Channel 2, Track 2 receiving on MIDI Channel 3, and so on. These arethe default values — how the MIDI Channels are assigned as the ESQ-M comes out of the box. Youcan, of course change the MIDI Channel of each Track, and whatever values you select will beremembered by the ESQ-M, even when the power is Off. See the Section on the MIDI Page (p.32) for more details.

ESQ-M – Musician's Manual
PARAMETER MODE
ABOUT PARAMETRIC PROGRAMMINGTo modify or "edit" Programs, the ESQ-M uses a method known as parametric programming.You may well have already encountered some form of parametric programming on other synthesizers.What this means is that instead of having a separate knob or Slider for each function, you have onemaster Data Entry Slider and two buttons which adjust the value of whichever parameter youselect.
The 16 character display shows you one parameter, or variable, at a time. Oscillator Pitch, MasterTuning, MIDI Channel and Filter Cutoff Frequency are all examples of parameters which can beselected and modified. Whichever parameter is showing on the display at any given time is consideredthe current parameter, the one whose value will be modified if you move the Data Entry Slider or pressthe Up and Down Arrow buttons.
This approach has many advantages, the most obvious of which is that it greatly reduces the amount ofhardware-- knobs, switches, sliders, etc.-- needed to control a wide variety of functions. (If theESQ–M had a separate control for each function, it would literally have hundreds of knobs, buttons,switches and such.)
PAGESParameters on the ESQ-M are organized into Pages. Each Page is really just a collection ofparameters related to some function, such as the pitch of each oscillator, the volume of eachoscillator,the filter frequency, etc. On the ESQ-1 with its larger display, all the parameters on a givenPage are displayed at once when you select that Page. On the ESQ-M when you select a Page yousee one parameter at a time and use the Scroll button to advance to the next parameter on the Page.
You can think of the ESQ-M in relation to a book -- when the ESQ-M is in Parameter mode, eachtime you press one of the buttons on the Control Keypad, you are in effect "turning to" that function'sPage. The name of the Page appears in the left side of the display. Once you have turned to the Pageyou want, the Display shows you the parameter which was last selected on that Page. You can nowScroll to the Parameter you want to adjust, and change its value using the Data Entry Slider and the Upand Down Arrow buttons.
THE PARAM BUTTONPressing the Param Button puts the ESQ-M into Parameter Mode. In Parameter Mode,the ESQ-M displays, and lets you adjust, one parameter at a time. When you press the Parameterbutton, the display will show:
1) the name of the current Page2) the name of the current parameter, and3) the value of the current parameter
24 Selecting Pages and Parameters
ESQ-M – Musician's Manual
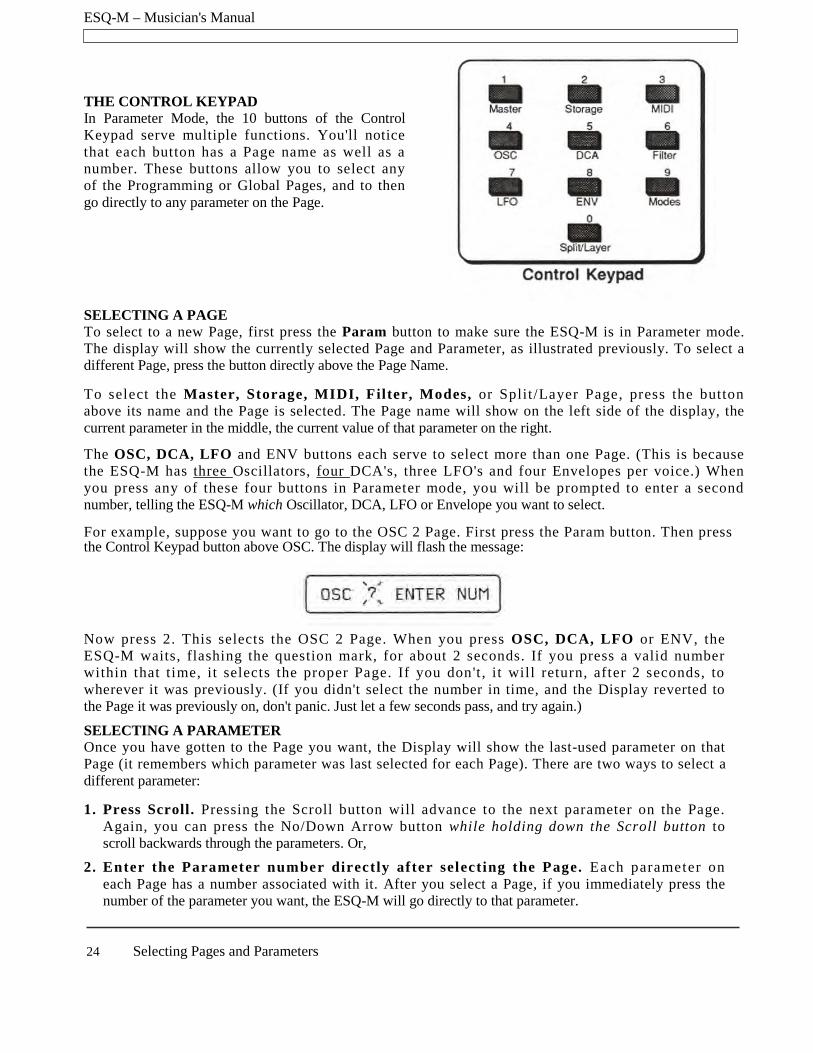
THE CONTROL KEYPADIn Parameter Mode, the 10 buttons of the ControlKeypad serve multiple functions. You'll noticethat each button has a Page name as well as anumber. These buttons allow you to select anyof the Programming or Global Pages, and to thengo directly to any parameter on the Page.
SELECTING A PAGETo select to a new Page, first press the Param button to make sure the ESQ-M is in Parameter mode.The display will show the currently selected Page and Parameter, as illustrated previously. To select adifferent Page, press the button directly above the Page Name.
To select the Master, Storage, MIDI, Filter, Modes, or Split /Layer Page, press the buttonabove its name and the Page is selected. The Page name will show on the left side of the display, thecurrent parameter in the middle, the current value of that parameter on the right.
The OSC, DCA, LFO and ENV buttons each serve to select more than one Page. (This is becausethe ESQ-M has three Oscillators, four DCA's, three LFO's and four Envelopes per voice.) Whenyou press any of these four buttons in Parameter mode, you will be prompted to enter a secondnumber, telling the ESQ-M which Oscillator, DCA, LFO or Envelope you want to select.
For example, suppose you want to go to the OSC 2 Page. First press the Param button. Then pressthe Control Keypad button above OSC. The display will flash the message:
Now press 2. This selects the OSC 2 Page. When you press OSC, DCA, LFO or ENV, theESQ-M waits, flashing the question mark, for about 2 seconds. If you press a valid numberwithin that time, it selects the proper Page. If you don't , it will return, after 2 seconds, towherever it was previously. (If you didn't select the number in time, and the Display reverted tothe Page it was previously on, don't panic. Just let a few seconds pass, and try again.)
SELECTING A PARAMETEROnce you have gotten to the Page you want, the Display will show the last-used parameter on thatPage (it remembers which parameter was last selected for each Page). There are two ways to select adifferent parameter:
1. Press Scroll. Pressing the Scroll button will advance to the next parameter on the Page.Again, you can press the No/Down Arrow button while holding down the Scroll button toscroll backwards through the parameters. Or,
2. Enter the Parameter number directly after selecting the Page. Each parameter oneach Page has a number associated with it. After you select a Page, if you immediately press thenumber of the parameter you want, the ESQ-M will go directly to that parameter.

2
PageMissing

26
PageMissing

ESQ-M – Musician's Manual
THE EDIT BUFFER & THE EDIT PROGRAMYou can edit a Program, while keeping the original Program intact, because the edited version is keptin a special area of Memory called the Edit Buffer. Whenever you change any parameter of aProgram, the altered Program is put in the Edit Buffer, replacing whatever was previously there. Onlyone Program at a time can reside there — the Edit Buffer always contains the results of your last edit.
If you like the results of the changes you have made to a Program, you should rename it and save thenew Program permanently, to another Location. The procedure for this is covered in Section 5.
When you press the Param Button to toggle the Compare light on and off, what you are doing isalternating between the Program in the original Memory Location and the Program in the Edit Buffer.We refer to the Program in the Edit Buffer as the Edit Program.
You can return to the Edit Program, even after selecting another Program (as long as you don't changeany parameters there) by pressing the Compare Button. This puts you back in the Edit Buffer, andany changes you make will affect the Edit Program.
The rule of thumb is this: Whatever Sound you hear, that's what you're editing.

PageIntentionallyLeft Blank
ESQ-M – Musician's Manual
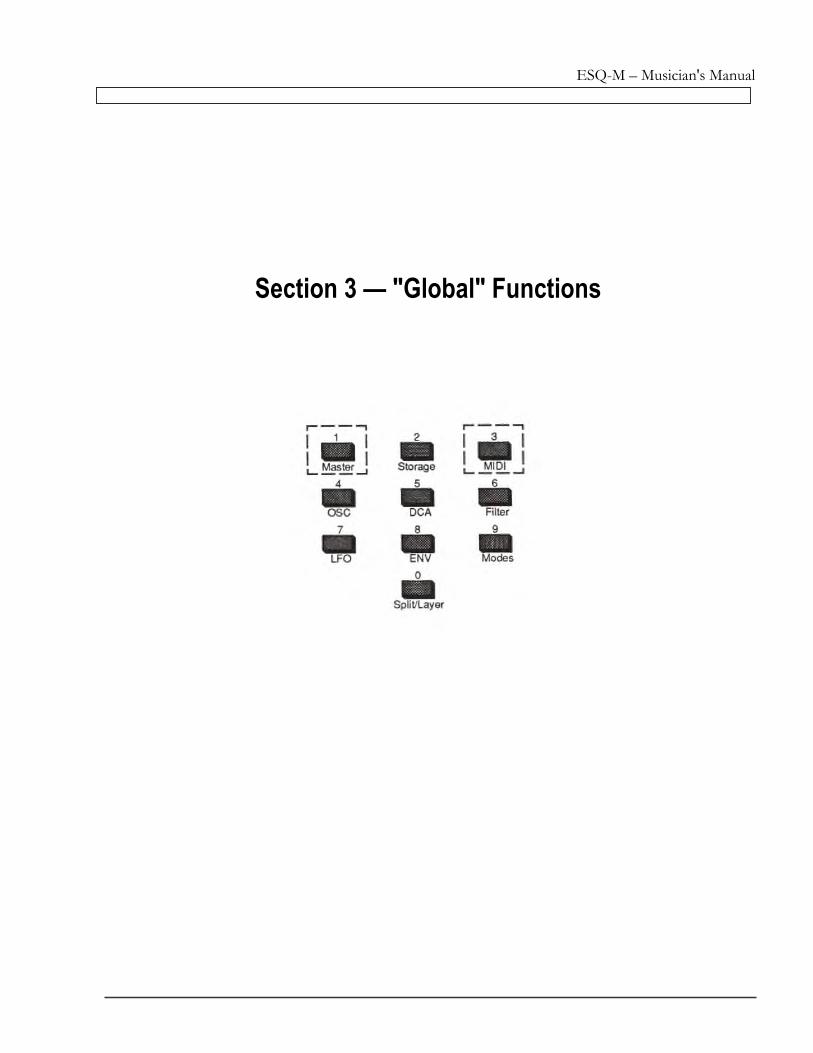
Section 3 — "Global" Functions

30 Master Page
ESQ-M – Musician's Manual
[MSTR] MASTER PAGE
Controls Master Tuning, Velocity Sensitivity, Pedal Function and Pitch BendThe parameters on this page are keyboard-wide, or "Global." The settings here will not change withdifferent Programs selected, but will remain in effect for whatever Program you are playing.
Aside from Master Tuning and overall Velocity Sensitivity, this page also contains a control forselecting between Pitch Bend Modes — normal operation, where the Bend Wheel affects all notes; and aspecial "Held" mode in which the Pitch bends only affect those keys which are being held down.
Use this Page to: Adjust the Master Tuning of the keyboard; Adjust the overall Velocity Sensitivity of the Instrument; Select whether the Foot Pedal will act as a Modulator or a Volume Pedal; Set the range of the Pitch Bend Wheel; and Select a Pitch Bend Type.
0. TUNE — Master Tune AdjustTunes the Keyboard to the desired Pitch. A setting of TUNE= +00 will yield Concert A=440tuning. The total range of this control is about a half step (semitone) up or down.Range: -31 To +31.
1. VELSEN — Velocity Sensitivity AdjustThis parameter determines the responsiveness of all Velocity-related parameters on the ESQ-M. Youcan adjust it to suit your own touch — that is, how hard you play — as well as adjusting forthe response of the master keyboard you are using. Of course, if you play the ESQ-M froma controller which does not transmit key velocity, this parameter will have no effect.
The three available settings are:
----> SOFT — This is for someone with a light touch. On this setting, a minimum of force isrequired to reach the maximum level of any Velocity-controlled parameter.
----> MED — Medium sensitivity. This setting should be right for the player with an average touch.
----> HARD — This setting is for the player who really digs in. It provides the widest possiblerange of velocity sensitivity.
2. PEDAL — Pedal Function SelectThe setting of this parameter determines whether a SW-10 Foot Pedal plugged into thePEDAL/CV jack in the ESQ-M's rear panel will act as a Modulator or as a Volume Pedal.Note that this only affects a Pedal plugged into the ESQ-M itself. The setting of this controlhas no effect on incoming MIDI Foot Pedal (controller #4) or Volume (controller #7)information. There are two possible states:
----> PEDAL=MOD — This is the default value. When PEDAL=MOD, the Foot Pedal will act asa Modulator in the Voice section of the ESQ-M and will have an effect on the sound whenPEDAL is selected as a Modulator.

31 MIDI Page
ESQ-M – Musician's Manual
----> PEDAL=VOL — When PEDAL=VOL the Foot Pedal will adjust the volume of the currentTrack. Moving the Pedal will have the same effect as adjusting the MIX Level on the MIDIPage. Only the current Track will be affected — only one Tracks volume can be adjusted at atime.
3. BEND RANGE — Pitch Bend Wheel RangeAdjusts how far incoming Pitch Bend information (transmitted by the Pitch Bend Wheel onmost keyboards) will bend a note Up or Down. Each increment represents a Semitone. Totalrange is one octave up an down.Range: 0 To 12.
4. BNDTYP — Pitch Bend Type (or mode) Selects between two modes of operationfor the Pitch Bend Wheel. There are two Modes:
ALL — Moving the Pitch Bend Wheel will affect the pitch of all notes that are being played.This is how most Pitch Wheels usually operate.
HELD — In this Mode, only those keys that are being held down when you move the PitchWheel will be affected by the wheel. Keys that have been released will not bend, even if theyare being sustained by holding down the Sustain Foot Switch. This enables you to bend certainnotes while others remain unchanged in pitch. With a little practice you can simulate guitar andpedal steel-type techniques, and many other interesting effects.
Note that the ESQ-M must be enabled (on the MIDI Page) to receive Controllers, or elseparameters 3 and 4 will have no effect, as Pitch Bend information will not be recognized. Seethe following section for details on the MIDI Page.
32 MIDI Page
ESQ-M – Musician's Manual
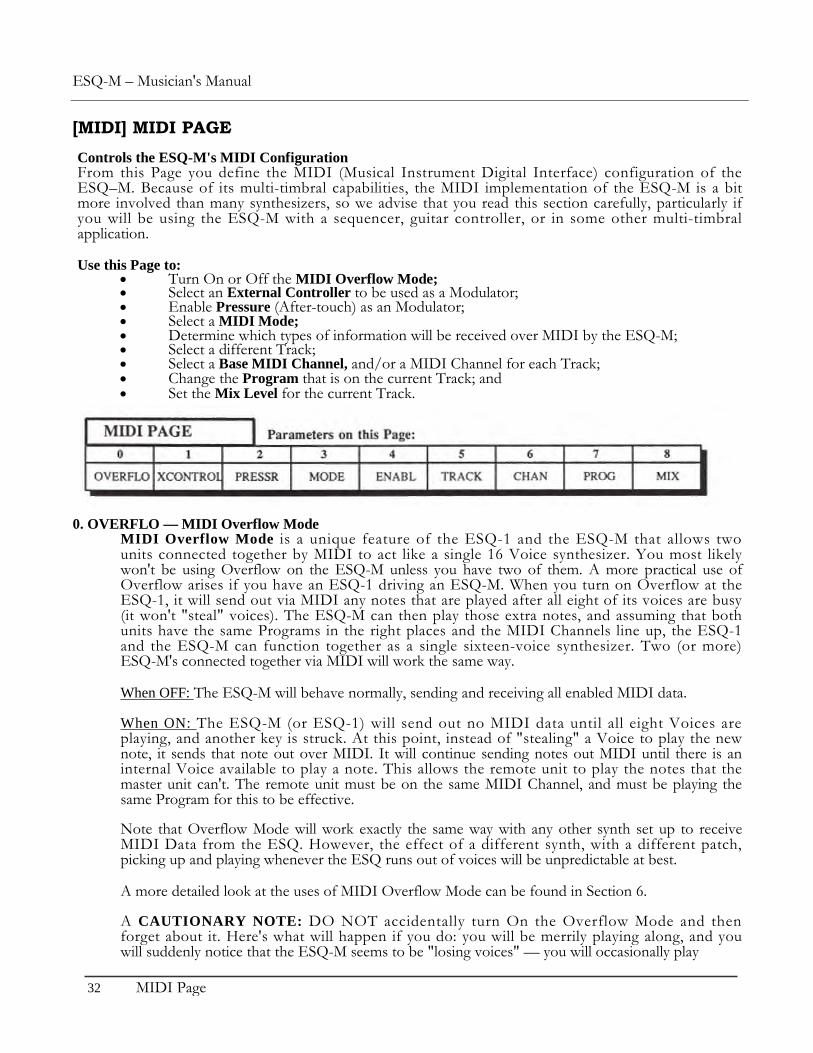
[MIDI] MIDI PAGE
Controls the ESQ-M's MIDI ConfigurationFrom this Page you define the MIDI (Musical Instrument Digital Interface) configuration of theESQ–M. Because of its multi-timbral capabilities, the MIDI implementation of the ESQ-M is a bitmore involved than many synthesizers, so we advise that you read this section carefully, particularly ifyou will be using the ESQ-M with a sequencer, guitar controller, or in some other multi-timbralapplication.
Use this Page to: Turn On or Off the MIDI Overflow Mode; Select an External Controller to be used as a Modulator; Enable Pressure (After-touch) as an Modulator; Select a MIDI Mode; Determine which types of information will be received over MIDI by the ESQ-M; Select a different Track; Select a Base MIDI Channel, and/or a MIDI Channel for each Track; Change the Program that is on the current Track; and Set the Mix Level for the current Track.
0. OVERFLO — MIDI Overflow ModeMIDI Overflow Mode is a unique feature of the ESQ-1 and the ESQ-M that allows twounits connected together by MIDI to act like a single 16 Voice synthesizer. You most likelywon't be using Overflow on the ESQ-M unless you have two of them. A more practical use ofOverflow arises if you have an ESQ-1 driving an ESQ-M. When you turn on Overflow at theESQ-1, it will send out via MIDI any notes that are played after all eight of its voices are busy(it won't "steal" voices). The ESQ-M can then play those extra notes, and assuming that bothunits have the same Programs in the right places and the MIDI Channels line up, the ESQ-1and the ESQ-M can function together as a single sixteen-voice synthesizer. Two (or more)ESQ-M's connected together via MIDI will work the same way.
When OFF: The ESQ-M will behave normally, sending and receiving all enabled MIDI data.
When ON: The ESQ-M (or ESQ-1) will send out no MIDI data until all eight Voices areplaying, and another key is struck. At this point, instead of "stealing" a Voice to play the newnote, it sends that note out over MIDI. It will continue sending notes out MIDI until there is aninternal Voice available to play a note. This allows the remote unit to play the notes that themaster unit can't. The remote unit must be on the same MIDI Channel, and must be playing thesame Program for this to be effective.
Note that Overflow Mode will work exactly the same way with any other synth set up to receiveMIDI Data from the ESQ. However, the effect of a different synth, with a different patch,picking up and playing whenever the ESQ runs out of voices will be unpredictable at best.
A more detailed look at the uses of MIDI Overflow Mode can be found in Section 6.
A CAUTIONARY NOTE: DO NOT accidentally turn On the Overflow Mode and thenforget about it. Here's what will happen if you do: you will be merrily playing along, and youwill suddenly notice that the ESQ-M seems to be "losing voices" — you will occasionally play
ESQ-M – Musician's Manual
notes and they simply won't sound. You won't know why this is happening, and will assumeyour ESQ-M is broken. The problem is that if Overflow mode is left on, the ESQ–M willsend excess notes out via MIDI instead of playing them. The solution is to turn Overflow Off.So save yourself some aggravation. Be sure not to leave MIDI Overflow On after you arethrough exploring the parameters on this Page.
1. XCONTROL — Select External ControllerOne of the Modulators that can be selected in the Programming section of the ESQ-M isXCTRL — External Controller. Each Controller on a Synthesizer (Breath Controller, MODWheel, or Data Entry Slider, for example) has a standardized MIDI Controller number, which isthe number you select here to make a particular Controller a Modulator in any of your Programs.
Note that this parameter is "Global" — that is, only one controller can be active here at a time.However, you don't have to use this parameter to enable the ESQ-M to receive the Foot Pedal,MOD Wheel, or Pressure (After-touch). Those three controllers are available separately asmodulators. Also MIDI Volume (MIDI Controller #7) is received by the ESQ-M without yourhaving to enable it here. This parameter is to allow you to program an additional controller,such as Breath Controller or Data Entry Slider, into your sounds.
Let's say that you are driving the ESQ-M from a keyboard with a Breath Controller. You canset up a Program on the ESQ-M where the Filter Cutoff Frequency, or some other ManualLevel, is modulated by XCTRL. Then assign this parameter a value of XCONTROL. 02.The Breath Controller will now modulate the Filter, or whatever, on this Program. The chartbelow lists the accepted MIDI Controller numbers. The following Controller Numbers havebeen agreed upon:
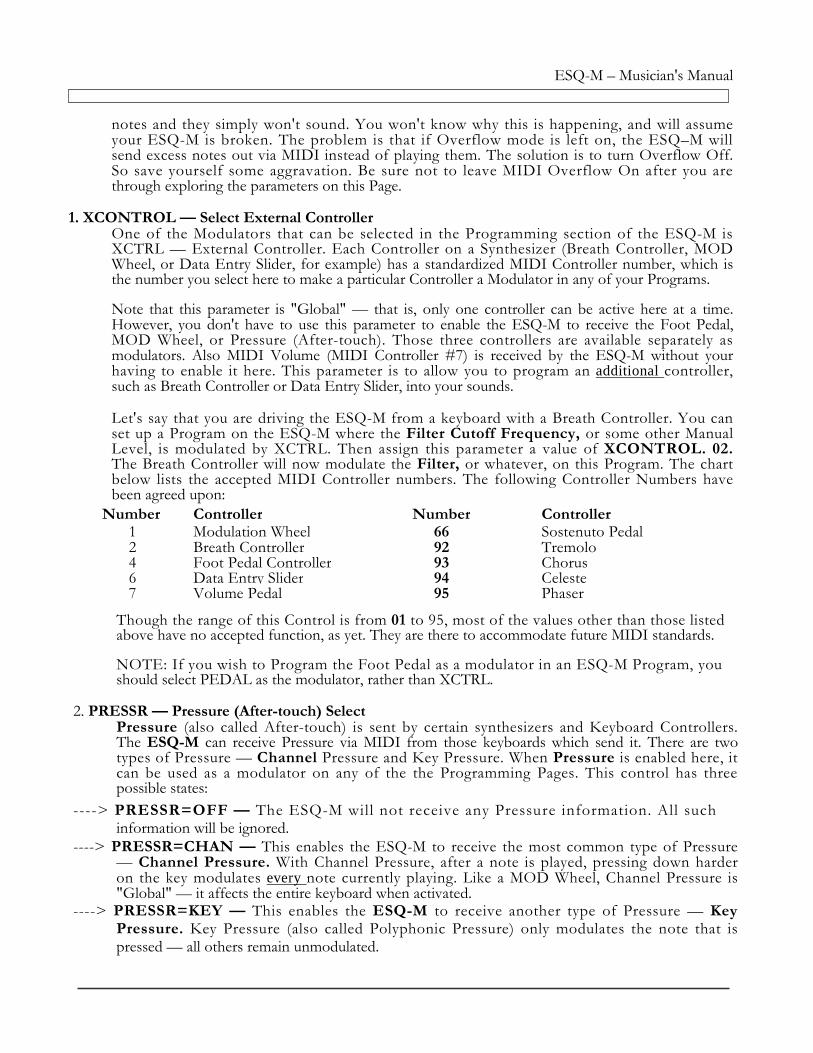
Number Controller Number Controller1 Modulation Wheel 66 Sostenuto Pedal2 Breath Controller 92 Tremolo4 Foot Pedal Controller 93 Chorus6 Data Entry Slider 94 Celeste7 Volume Pedal 95 Phaser
Though the range of this Control is from 01 to 95, most of the values other than those listedabove have no accepted function, as yet. They are there to accommodate future MIDI standards.
NOTE: If you wish to Program the Foot Pedal as a modulator in an ESQ-M Program, youshould select PEDAL as the modulator, rather than XCTRL.
2. PRESSR — Pressure (After-touch) SelectPressure (also called After-touch) is sent by certain synthesizers and Keyboard Controllers.The ESQ-M can receive Pressure via MIDI from those keyboards which send it. There are twotypes of Pressure — Channel Pressure and Key Pressure. When Pressure is enabled here, itcan be used as a modulator on any of the the Programming Pages. This control has threepossible states:
----> PRESSR=OFF — The ESQ-M will not receive any Pressure information. All suchinformation will be ignored.
----> PRESSR=CHAN — This enables the ESQ-M to receive the most common type of Pressure— Channel Pressure. With Channel Pressure, after a note is played, pressing down harderon the key modulates every note currently playing. Like a MOD Wheel, Channel Pressure is"Global" — it affects the entire keyboard when activated.
----> PRESSR=KEY — This enables the ESQ-M to receive another type of Pressure — KeyPressure. Key Pressure (also called Polyphonic Pressure) only modulates the note that ispressed — all others remain unmodulated.
ESQ-M – Musician's Manual
You should consult the Manual of the MIDI instrument you will be using in conjunction with theESQ-M to see which, if any, type of Pressure it sends.
3. MODE — Select MIDI ModeThe MIDI Mode determines how MIDI information will be received by the nine Tracks of the
ESQ-M. It is very important to understand these four modes — they are the key to unlockingthe multi-timbral possibilities of the ESQ-M. Note that the behavior of the MIDI Channelparameter (BASECHAN or CHAN) changes depending on which MIDI Mode the ESQ-M is in.There are four MIDI Modes that can be selected here:
OMNI — In OMNI Mode whichever Track is selected responds to information (keys,controllers, Program Changes, etc.) received on any of the sixteen MIDI channels. (Remember,the selected Track is the one whose number appears to the left of the Display when you press theProgram button.) OMNI mode is a good choice if the ESQ-M is the only MIDI instrumentyou will be driving, and you only need one sound at a time.
OMNI is the default mode: when it first comes out of the box, or after the memory is re-initialized, the ESQ-M will be in OMNI mode. You'll have to select a different mode to use theESQ-M in any but the simplest set-ups. Once you change the mode, the ESQ-M remains inthe new mode until you change it again, even when you turn it off.
POLY — In POLY Mode whichever Track is selected responds to information (keys,controllers, Program Changes, etc.) received only on the Base MIDI Channel (see #6 below).Midi information on all other channels will be ignored.
POLY Mode is a good choice if you are using the ESQ-M with other MIDI instruments andwant to assign it its own MIDI Channel, but you only need one sound at a time out of theESQ–M.
MULTI — MULTI Mode is an ENSONIQ innovation which was specially designed to makeoptimal use of the multi-timbral capabilities of the ESQ-1 and the ESQ-M. MULTI Mode isthe mode in which the ESQ-M becomes nine "virtual synthesizers." In MULTI Mode each ofthe nine Tracks can receive MIDI information independently on a different MIDI Channel.
Track 0 will always receive (and send) on the Base MIDI Channel. Tracks 1 through 8 willeach receive (and send) on their own selected Channels. (See BASECHAN/CHAN below.)
Di f f erent MIDI Channels should be se lected for each Track! If the same MIDIChannel is selected for two Tracks, priority is given first to the lowest numbered Track thatshares the Channel. Higher-numbered Tracks that share the same Channel will not receiveanything. For example:
If MIDI Channel 1 is selected as the Base Channel for Track 0, and Channel 1 is also selectedfor Tracks 1 and 3, Track 0 will respond to information on Channel 1, and Tracks 1 and 3 willreceive nothing. Or;
If MIDI Channel 6 is selected for Tracks 2, 4, and 7, then Track 2 will receive on Channel 6,and Tracks 4 and 7 will receive nothing.
You can use this fact to your advantage. Suppose you only want to use four Tracks on fourMIDI Channels, and have the rest of the Tracks ignore all MIDI information. Set Tracks 0through 3 to receive on the desired Channels, and then set Tracks 4 through eight to the sameChannel you selected for the Base Channel. All information received on the base Channel willbe "intercepted" by Track 0. Tracks 4 through 8 will not play.
35 MIDI Page
ESQ-M – Musician's Manual
----> MONO — Before MULTI Mode was developed, MONO Mode was about the only way tohave a poly-timbral synthesizer. It is particularly useful for driving the ESQ-M from a GuitarController, or any other application where having up to eight independent, monophonic,Channels is desirable. MONO Mode assigns one voice per Track per MIDI Channel.
When MONO Mode is selected:
a) Track 0 does not receive any MIDI information at all. It "ceases to exist" as a MIDI receiver.b) Track 1 will receive on the Base MIDI Channel selected on this Page (see #6 below). Track 2
will receive on the next higher Channel, Track 3 on the next, and so on. The Base Channel cannothave a value greater than nine.
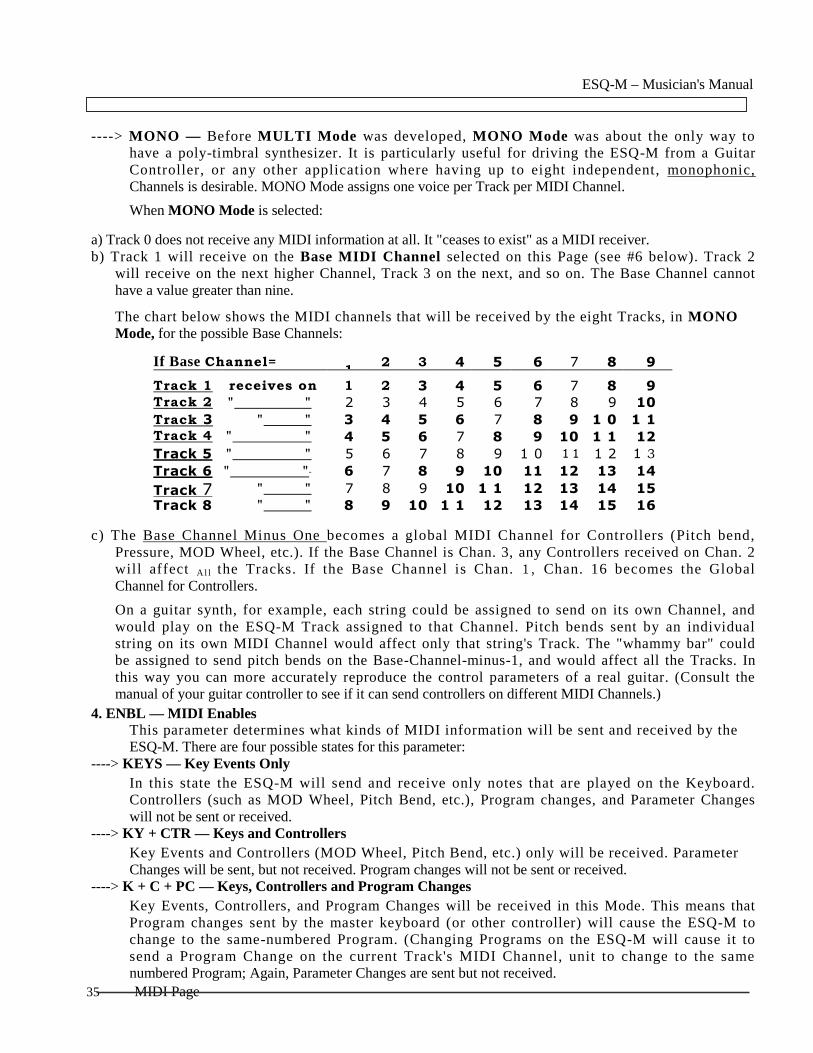
The chart below shows the MIDI channels that will be received by the eight Tracks, in MONOMode, for the possible Base Channels:
If Base Channel= 1 2 3 4 5 6 7 8 9
Track 1 receives on 1 2 3 4 5 6 7 8 9Track 2 " " 2 3 4 5 6 7 8 9 10Track 3 " " 3 4 5 6 7 8 9 1 0 1 1Track 4"
" " 4 5 6 7 8 9 10 1 1 12Track 5 " " 5 6 7 8 9 1 0 1 1 1 2 1 3Track 6 " " " 6 7 8 9 10 11 12 13 14Track 7 " " 7 8 9 10 1 1 12 13 14 15Track 8 " " 8 9 10 1 1 12 13 14 15 16
c) The Base Channel Minus One becomes a global MIDI Channel for Controllers (Pitch bend,Pressure, MOD Wheel, etc.). If the Base Channel is Chan. 3, any Controllers received on Chan. 2will affect Al l the Tracks. If the Base Channel is Chan. 1, Chan. 16 becomes the GlobalChannel for Controllers.
On a guitar synth, for example, each string could be assigned to send on its own Channel, andwould play on the ESQ-M Track assigned to that Channel. Pitch bends sent by an individualstring on its own MIDI Channel would affect only that string's Track. The "whammy bar" couldbe assigned to send pitch bends on the Base-Channel-minus-1, and would affect all the Tracks. Inthis way you can more accurately reproduce the control parameters of a real guitar. (Consult themanual of your guitar controller to see if it can send controllers on different MIDI Channels.)
4. ENBL — MIDI EnablesThis parameter determines what kinds of MIDI information will be sent and received by theESQ-M. There are four possible states for this parameter:
----> KEYS — Key Events OnlyIn this state the ESQ-M will send and receive only notes that are played on the Keyboard.Controllers (such as MOD Wheel, Pitch Bend, etc.), Program changes, and Parameter Changeswill not be sent or received.
----> KY + CTR — Keys and ControllersKey Events and Controllers (MOD Wheel, Pitch Bend, etc.) only will be received. ParameterChanges will be sent, but not received. Program changes will not be sent or received.
----> K + C + PC — Keys, Controllers and Program ChangesKey Events, Controllers, and Program Changes will be received in this Mode. This means thatProgram changes sent by the master keyboard (or other controller) will cause the ESQ-M tochange to the same-numbered Program. (Changing Programs on the ESQ-M will cause it tosend a Program Change on the current Track's MIDI Channel, unit to change to the samenumbered Program; Again, Parameter Changes are sent but not received.

36 MIDI Page
ESQ-M – Musician's Manual
KCPSYS — Keys, Controllers, Program Changes and System ExclusivesKey Events, Controllers, Program Changes and System Exclusive messages will all be receivedvia MIDI in this Mode. This enables the ESQ-M to receive System Exclusive messages, such asParameter selects, Parameter Changes, Program Dumps, etc. In this state the ESQ-M can beprogrammed from an ESQ-1 — any parameter you select and modify on the ESQ-1 will beselected and modified on the ESQ-M (except for those on the MIDI Page).In this State you can also program the ESQ-M from a computer (with the proper software) orsend and receive Programs between the ESQ-M and a computer using any of the LibrarianPrograms available. Patch Librarian programs designed for the ESQ-1 are fully compatiblewith the ESQ-M (at least those distributed by ENSONIQ are).A few notes about System Exclusives: After performing a Program Dump or doing some remote programming, you should takecare not to leave System Exclusive messages enabled when returning to normal operation.Change the setting of this parameter back to [ENBL=K + C + PC]. Otherwise you may findthat the ESQ-M is still responding to the Data Entry Slider and the Inc/Dec buttons of yourmaster keyboard by more or less randomly changing Programs, parameter values, etc. This canbe bad for one's mental health and should be avoided. For the same reason, this parameter is one of the very few on the ESQ-M whose value isnot preserved exactly when the ESQ-M is turned Off and then On again. If SystemExclusive messages are enabled [ENBL=KCPSYS] when the unit is turned Off, when younext turn it bac k on th i s p a ra me te r wi l l b e r e se t t o K e ys , C on t ro l l e r s an d Pro gra mC h an ges [ENBL=K+C+ PC]. If you want to enable System Exclusives after powering up,you must select and change this parameter accordingly.
5. TRACK — Current TrackThis parameter allows you to change the current Track from within the MIDI Page. Changingthe Track here has exactly the same effect as changing Tracks on the Program Page (bypressing Scroll). A Track change made here will be reflected on the Program Page, and viceversa.
This parameter is very useful when you are setting up MIDI Channels, Programs and Mix levelsfor several Tracks. You can use this parameter to change to a new Track without having to exitthe MIDI Page.
6. BASECHAN (or CHAN) — MIDI ChannelThis parameter determines which MIDI Channel (or MIDI Channels) the ESQ-M will receive(and send) on. The appearance of this parameter can change depending on which MIDI Mode isselected (see #3 above) and which Track is the current Track.In OMNI or POLY Mode: This parameter wil l a lways read "BASECHAN= ", nomatter which Track is the current Track. This indicates that the MIDI Channel showing on theDisplay is the Base Channel. In OMNI Mode the current Track (whichever Track is selected) will receive on anyChannel; any data sent by the ESQ-M (Program Changes, Controllers, etc.) will be sent onthe Base Channel. In POLY Mode the current Track (whichever Track is selected) will receive only on theBase Channel; any data sent by the ESQ-M will be sent on the Base Channel. Any of the sixteen MIDI Channels may be selected to be the Base Channel.Range: 01 To 16.
----> In MULTI Mode: When Track 0 is selected, the Display will show "BASECHAN= ". Track 0 willalways send and receive MIDI information on the Base Channel, except in MONO Mode. InMULTI Mode, Track 0 gets priority on the Base Channel — any other Track set to the same Channel as

37 MIDI Page
ESQ-M – Musician's Manual
the Base Channel will receive nothing. • When any of the other Tracks (1-8) is selected, the Display will show the current Track(indicated as T1, T2, T3, etc.) and the Channel assigned to that Track (indicated asCHAN._ ) Thus if Track 2 is the current Track, and it is set to MIDI Channel 3, the Display forthis parameter would look like this:
MIDI T2 CHAN =03
You can set any Track to receive on any Channel, but bear in mind that only one Track canreceive on any one Channel. If more than one Track is set to the same Channel, the lowest-numbered Track will receive on that Channel and higher-numbered Tracks will receive nothing. Anyof the sixteen MIDI Channels may be selected for any Track. Range: 01 To 16.
Once you assign a MIDI Channel to each Track in MULTI mode, these Channel assignments areremembered by the ESQ-M, even though they are not visible when a different Mode isselected. So even though the Tracks are automatically re-assigned new channel numbers when youselect MONO Mode, once you go back to MULTI mode the channel assignments will be just asyou left them. The only exception is the Base Channel, which can be changed in any of the fourmodes, though it performs a slightly different role in each mode. See the "note about the BaseChannel" below.
Note that in MULTI mode any System Exclusive messages (Program Dumps, etc.) will be sent andreceived on the Base Channel (Track 0's Channel).
In MONO Mode: As noted earlier (see #3 above), in MONO mode Track 0 ceases to function as a MIDIreceiver. If Track 0 is selected, the Display will read "CHAN=UNUSED." Track 1 receives on the Base Channel. Accordingly, when Track 1 is the current Track, theDisplay will show "BASECHAN= ." In MONO Mode you can only adjust the MIDIChannel when Track 1 is selected — the MIDI Channels for Tracks 2-8 are set automaticallybased on what the Base Channel is set to. (See #3 above for a chart of MIDI Channelassignments in MONO Mode. Only MIDI Channels 1 through 9 may be selected for the BaseChannel. Range: 01 To 09. When Tracks 2 through 8 are selected, the Display for this parameter will appear the same aswhen the ESQ-M is in MULTI Mode — it will show the current Track (indicated as T2 T3 T4,etc.) and the Channel assigned to that Track (indicated as CHAN._ ). The difference is that inMONO Mode you cannot change that Channel from here. It i s displayed for informationalpurposes only.
A NOTE ABOUT THE BASE CHANNEL: Despite the way it sort of bounces aroundfrom Mode to Mode, once the Base Channel is set to a certain number it stays there, even after youselect a different MIDI Mode. It's just that in different MIDI Modes, the Base Channel issometimes associated with a different Track (or Tracks).
Suppose, for instance, the ESQ-M is in POLY Mode and you set the Base Channel to 4. AnyTrack you select will now receive on Channel 4. Now you switch to MULTI Mode. Channel 4 isstill the Base Channel. Track 0 will now receive on Channel 4 (since in MULTI Mode the BaseChannel is associated with Track 0). Now you switch to MONO Mode. Channel 4 is still the BaseChannel. Track 1 will now receive on Channel 4 (since in MONO Mode the Base Channel isassociated with Track 1). And so on.
38 MIDI Page
ESQ-M – Musician's Manual7. PROG — Current Program on the Track
This parameter shows, and lets you change, the number of the Program that is on the selectedTrack. Changing the Program here has exactly the same effect as changing the Program on theProgram Page (with the Data Entry Slider or the Up and Down Arrow buttons). A Programchange made here will be reflected on the Program Page, and vice versa.
The Display shows the current Track (indicated as TO, Tl, T2, etc.) and the Program numberassigned to that Track (indicated as PROG= ). It is the same three-digit Program Numberthat appears on the Program Page. As is the case on the Program Page, you can select ProgramNumbers 001 through 040 when no Cartridge is inserted, and Numbers 001 through 120 when aCartridge is inserted.
This parameter is useful when you are setting up MIDI Channels, Programs and Mix levels forseveral Tracks. You can use this parameter to select a new Program for the current Trackwithout having to exit the MIDI Page.
8. MIX — Track Mix LevelTRACK MIX determines the relative volume of each Track. You can think of this control asthe "mixdown" section of the ESQ-M. The Display shows the current Track (indicated as TO,Tl, T2, etc.) and the Mix Level assigned to that Track (indicated as MIX=_ ). The MixLevel is adjustable from OFF to 63. When set to OFF, the Track will not sound.
The mix for a particular Track can be set from the front panel with this control, or remotely bysending MIDI Volume (MIDI Controller #7) to a Track.. (Not all instruments send MIDIVolume, but each of the ESQ-M's Tracks will respond to it from those who do.)
Also, when the PEDAL Function switch on the MASTER Page is set to PEDAL=VOL,moving the Foot Pedal will change the Mix Level of the current Track, and you will see thatchange reflected here in real time.

ESQ-M - Musician's Manual
Section 4 — Programming the ESQ-M

40 Waveforms
ESQ-M – Musician's Manual
WAVEFORMS
DIGITAL WAVEFORM MEMORYThe same Digital technology that allowed the ENSONIQ Mirage to make Digital Sampling affordablegives the ESQ-M its ability to play complex sounds from "the real world". Rather than justproducing simple sawtooth or square waves, the ESQ-M's three Digital Oscillators "read" frommemory whichever Waveforms they are instructed to play.
The ESQ-M has 32 different Waveforms stored in its Digital Waveform Memory. Some ofthese Waveforms have been sampled (digitally recorded) from musical instruments; others have beencreated synthetically.
WHAT'S A WAVEFORM?The Waveforms are the "raw material" of the sounds that the ESQ-M makes. A waveform is a singlecycle of a sound wave. It is Digitized, or converted into a series of numbers, and stored in theESQ–M's Digital Waveform Memory. When you play a note, each of the ESQ-M's three Oscillators"reads" the proper Waveform from the Memory, similar to the way a Compact Disc player reads themusic on the disc when you play a CD.
By rapidly repeating this single cycle over and over, the Oscillator can produce a pitched sound whichbecomes a continuous Sound wave:
Unlike the sounds generated by analog oscillators, Digital Waveforms can be very complex, and can containany combination of harmonics — frequencies that are multiples of the wave's fundamental frequency. EveryWaveform has its own unique Spectrum, which is the number and amplitude of harmonics present in theWave. It is this Spectrum which gives every sound its own identifiable characteristics.
SYNTHETIC WAVEFORMSMost of the Waveforms in ESQ-M's Digital Waveform Memory have been generated synthetically, using anumber of different techniques, to create a variety of Waves which contain specific harmonics in specificamounts. By assigning different combinations of these synthetic Waveforms to the three Oscillators, it is possible tocreate sounds with almost any timbral characteristics.
SAMPLED AND MULTI-SAMPLED WAVEFORMSOther Waveforms are sampled — a single cycle of a sound wave from some real musical source has beenisolated and stored in Memory. By playing back these Waveforms in the manner described above, it ispossible to synthesize sounds that capture the character of the Source instrument in a way that no ordinarysynthesizer can.

41 Waveforms
ESQ-M – Musician's ManualSome of the ESQ-M's Waveforms (such as the Piano Waveform) have been Multisampled — that is,different waves play in different ranges of the instrument. This is because many sounds lose their realismif they are transposed too far from their source. The lowest note on a piano, if transposed up three octaves,doesn't sound like a piano any more. Neither does the highest note transposed down three octaves. Or touse another example — take a recording of a human voice and play it back twice as fast. Does it sound like ahuman voice? No. What does it sound like? Chipmunks.
Multisampling means that the low notes of the Piano Waveform were sampled from a low note on the piano,the middle notes were sampled from a middle note, and so on. So really you get more than 32 Waveforms,since some of them are actually made up of several Waveforms. You don't have to do anything specialto use these Multisampled Waveforms. The ESQ-M treats each one as a single Waveform, and they areselected just like the others.
The Synthetic Waveforms can be combined with the Sampled ones, to add harmonic content whichenhances the sound in some way. Any combination of Waveforms is possible, and each will have its ownunique sound.
NAMESThe ESQ-M's 32 Waveforms are identified by their Names. In the case of the Sampled Wavefounsespecially, you should neither take them too literally, nor let yourself be limited by those Names. Don't,for example, expect the VOICE Waveform to always sound like Vocals — everything depends on theProgram (the Envelopes, the Filter settings, etc.). On the other hand, don't let the Names alone limit whatyou try in terms of being creative. For example, if you find that within a certain Program the BASSWaveform sounds like a harpsichord, or a kazoo, or whatever, go with it. Your ears are the only validjudge of what works.
SELECTING A WAVEFORMEach of the three Oscillators can play a different Waveform within a Program. The Waveforms areselected from the Oscillator Pitch Pages [OSC1, OSC2 and OSC3]. The Waveform parameter isselected like any other parameter on the ESQ-M.
To select a Waveform for Oscillator 1:1. Press the Param button to put the ESQ-M into Parameter mode.2. Press the OSC button on the Control Keypad, then within 2 seconds (while the question mark is
flashing) immediately press 1, to select Oscillator l's Page.3. Press Scroll until the Display reads "WAVE=_________
Now you can use the Data Entry Slider and the Up and Down Arrow buttons to change the Waveform thatOSC1 will play. There are 32 available choices, each with its own Name. Follow the same procedureto select a Waveform for OSC2 and OSC3. Later in this section each Waveform is detailed by Name.
CHECK THEM OUTThe best way to understand the Waveforms is not to read about them, but to hear them. Select theProgram called BASIC (it's Program # 112 in the ENSONIQ Voice-80 Cartridge, Volume 1). ThisProgram has only one Oscillator playing, and all the Envelopes wide open. Select the OSC1 Page as shownabove, and Scroll to the WAVE parameter. The Sawtooth Wave is selected (WAVE= SAW).
While repeatedly playing a note or chord on your master keyboard, press the Up Arrow/Yes button to stepto the next Waveform. Press it again to hear the next one, and so on. In this way you can listen toeach Waveform in succession, compare them to each other, and compare the timbral characteristicsyou hear in various ones to their text descriptions below. When you are looking for the right Waveform for aparticular application, let your ears be the guide.

42 Waveforms
ESQ-M – Musician's Manual
THE WAVEFORMS
1) CLASSIC SYNTH WAVEFORMSThese Waveforms collectively form the bases of almost all classic Analog synthesizer sounds.Their inclusion here gives the ESQ-M its ability to make those sounds with the best of them.SAW — SAWTOOTH. The Sawtooth Wave needs no introduction. It contains all theharmonics, and is extremely bright. The Sawtooth is the basis for many Analog sounds,notably Strings and Brass.
BELL. The Bell Waveform contains many widely spaced harmonics, many of them oddharmonics. It makes bright, Bell sounds.
SINE. The Sine Wave contains only the Fundamental, with no higher harmonics. It has verypure tone, good for flutes, organs, etc.
SQUARE. The Square Wave contains the Fundamental and all its odd-numbered harmonics ata fixed ratio. The level of the harmonics is the same as the Sawtooth, except that there are no even-numbered harmonics. The Square Wave has a hollow sound, and is also the basis for manyclassic synth sounds.
PULSE. This Pulse Wave contains the Fundamental and all its integral harmonics at equalamplitude. This is a very bright Waveform.
NOISE 1. This is a Waveform taken from filtered Noise. It works best when tuned downlow (OCT= -3). (Note that the Noise Waveforms here differ from analog Noise generators, inthat Waveforms are by definition repeating patterns, and Noise is random.)
NOISE 2. This is very close to White Noise. It has almost no pitch, but modulating theOscillator playing this Waveform with a fast LFO or an Envelope, will eliminate what pitchtracking there is.
NOISE 3. This Waveform is good for putting random frequency components into a sound(the attack "ping" of a mallet instrument, for example). It has a clangorous, metallic quality, andits pitch tends to be unpredictable.
2) SAMPLED WAVEFORMSThe Sampled Waveforms contain harmonics that simply cannot be generated by an ordinarysynthesizer, since every musical source produces its own unique waveshapes and FrequencySpectrum.
BASS. This is a bright Bass Waveform, full of interesting harmonics, which, depending onthe Program, makes a great regular or synth-type Bass. Higher up it takes on a Clay-likecharacter,
PIANO. A multisampled acoustic Piano wave.
EL PNO — ELECTRIC PIANO. A Waveform taken from a popular Electric Piano —allows you to recreate this instrument with tremendous realism.
VOICE 1. A multisampled Vocal wave, saying "Ah".
VOICE 2. A multisampled Vocal wave, using the same waveforms as VOICE 1, but with ahigher split point for each Wave
KICK. This Waveform is optimized for one application. Tuned to OCT= -3, properlyenveloped, and played on the lowest key of the Keyboard, it reproduces a Kick drum.

ESQ-M - Musician's Manual
----> REED. One cycle from an Alto saxophone wave. With different Programs it can sound likedifferent Reed Instruments.
----> ORGAN. This Waveform contains the fundamental and four Octaves (2nd, 4th, 8th, 16th and 32ndharmonics). Instant Pipe Organ. Also good for Bells.
3) ADDITIVE SYNTHESIS WAVEFORMSThese three Waveforms were created through Digital Additive Synthesis. Each contains theFundamental and certain specific harmonics in equal amounts.
SYNTH 1. Contains the fundamental, and every third harmonic-, starting from the 2nd, up to the26th , in equal amounts:Harmonics: 1, 2, 5, 8, 11, 14, 17, 20, 23, 26.
SYNTH 2. Contains the fundamental, and every third harmonic, starting from the 4th, up to the25th , in equal amounts:Harmonics: 1, 4, 7, 10, 13, 16, 19, 22, 25.
SYNTH 3. Contains the fundamental, and the prime-numbered harmonics, up to the 23rd, in equalamounts:Harmonics: 1, 2, 3, 5, 7, 11, 13, 17, 19, 23.
4) FORMANTSThese five Waveforms were created through a process called Time-Domain Formant-Wave-Function Synthesis. Each one has a sharp peak in its frequency spectrum - like pushing one bandof a graphic equalizer all the way up. These Waves are multisampled in such a way that thefrequency peak remains relatively constant up and down the keyboard, rather than tracking the pitchof the note. Each has its peak centered around a different frequency. They tend to have a nasalquality, and make excellent component waveforms for Vocals, Strings etc.FORMT 1. Has a frequency peak centered around 750 hz. FORMT 2.
Has a frequency peak centered around 1 khz. FORMT 3. Has a
frequency peak centered around 1.4 khz. FORMT 4. Has a frequency
peak centered around 1.75 khz. FORMT 5. Has a frequency peak
centered around 2.25 khz.
5) BAND LIMITED WAVEFORMSThese Waveforms are Band Limited - that is, their harmonic content has been restricted alongcertain specific lines. They are good for adding controlled harmonics to a sound, or forcombining to achieve various timbres. Some are other Waves with some harmonics pulled out; somewere built "from scratch" to contain only certain harmonics.
PULSE2. Originally a Pulse Wave, like the Pulse Wave above, but with only the first 11harmonics left in.
SQR 2. Originally a Square Wave, but with only the first 7 harmonics left in.
4 OC T S . C on t a in s , in eq ua l a mo un t s , on l y f o u r h a r mon i c s - 1 s t , 2 nd , 4 th , 8 th .Fundamental and three Octaves; again, good for Organ sounds.
PRIME. Contains, in equal amounts, only the first five prime-numbered harmonics: 1st, 3rd, 5th,7th, and 11th.

44 Waveforms
ESQ-M – Musician's Manual
BASS 2. Originally the Bass Wave, but with only the first eighteen harmonics left in.
E PNO2. Originally an Electric Piano Wave, but with only the first nine harmonics left in. AnElectric Piano without the "ping."
OCTAVE. Contains only the 1st and 2nd harmonics in equal amounts — the Fundamental andone Octave.
OCT+5. Contains only the 1st, 2nd, and 3rd harmonics in equal amounts — the Fundamental,one Octave and the Fifth above the octave.

ESQ-M – Musician's Manual
MODULATORS
ABOUT MODULATIONTo modulate something is simply to cause it to change. Within the Voice architecture of the ESQ-M we beginby setting basic, or Manual, levels for Volume, Pitch, Brightness, etc., and we then modulate thoselevels in various ways in order to create movement and dynamics within the Sound.
Suppose you switch on your stereo, and turn the volume half way up. We can call this the Manual Volumesetting. It will stay at that level until it's changed. Now suppose that you take the Volume knob and beginquickly turning it up and down, so the volume gets continuously louder and softer, louder and softer. Whatyou would be doing is modulating the volume of your stereo. If you were to take the Treble control,and do the same to that knob, you would be modulating the brightness of your stereo.
In much the same way we modulate various levels within the ESQ-M (though generally the approach is lesshaphazard). There are 15 different Modulation Sources available, and they can each be independentlyassigned to vary the Manual levels for:
----> The Pitch of each Oscillator [OSC 1, OSC 2 and OSC 3]----> The Volume of each Oscillator [DCA 1, DCA 2 and DCA 3]----> The Filter Cutoff Frequency, or the Brightness of the Program [FILTER]----> The Depth of the Low Frequency Oscillators [LFO 1, LFO 2 and LFO 3] and ---->Panning the Program within the stereo mix [DCA 4] Page
The Final Volume of the Program [DCA 4] is a special case — it is always controlled by Envelope 4 (ENV 4),which is fixed as its Modulator.
SELECTING A MODULATOROn each of the Oscillator Pitch Pages, [OSC 1, OSC 2 and OSC 3], the Oscillator Volume Pages,[DCA 1, DCA 2 and DCA 3], and the FILTER Page, you can select two different Modulators. Theformat is similar for all these Pages — the effect of any modulators you select will be added to (or subtractedfrom) the Manual Levels that are set elsewhere on the Page.
Take for example the OSC 1 Page. To select a Modulator (or Modulators) for the pitch ofOscillator 1, first select the OSC 1 Page. Now Scroll to the parameter MOD 1:
O S C I M O D 1
LFO 1
Use the Data Entry Slider and the Up and Down Arrow Buttons to select from among the 15 available ModulationSources. Follow the same procedure to select Modulators on the other Pages listed above.
For modulating Program Pan (PNMOD on the DCA 4 Page) and LFO depth [LFO 1,LFO 2 and LFO 3Pages] only one Modulator can be selected.
Helpful Hint:: Moving the Data Entry Slider all the way up selects *OFF*, which is handy if you don't wanta Modulator applied in a particular location.

46 Modulators
ESQ-M - Musician's Manual
MODULATION DEPTHOnce you have selected a Modulator, [MOD1] for instance), Scroll to the next parameter[MODAMT1] and use this control to adjust the Modulation Amount (also referred to as ModulationDepth). The Modulation Amount is the amount by which the Modulator will affect the Manual Level.
Once the [MODAMT1] is selected, use the Data Entry Slider and the Up and Down Arrow Buttons to adjust theModulation Depth. Modulation Depth can be Positive or Negative. A Modulation Depth of +00 has the same effect asturning the Modulator *OFF*.
To select a second Modulator (on those Pages where two are available) simply Scroll to the parameter [MOD2], andselect a Modulator from among the 15 available sources. Then Scroll to the next parameter [MODAMT2], anduse the Data Entry Slider and the Up and Down Arrow buttons to set the Modulation depth or amount.
Helpful Hint: With Modulation Depth, as with all Parameter values that have a center value (in this case, +00),there is an easy way to reach that value. With the Modulation Depth selected, press the Down Arrow Button, andwhile holding it down, press the Up Arrow Button. This automatically sets the Modulation Depth to +00. Thistechnique can be used to quickly "center out" almost any parameter, such as Master Tuning, Envelope Levels, etc.
MODULATION SOURCESThe 15 Modulation Sources available on the ESQ-M are as follows:
----> LFO 1, LFO 2 and LFO 3The three Low Frequency Oscillators generate only very low frequency waves, which can produceVibrato, Tremolo, and many other effects, depending on the LFO wave selected, and where it is applied asa Modulator. There are four possible waveshapes for each LFO. The Square wave only goes in a positivedirection; the Triangle, Sawtooth and Noise Waves go positive and negative. (Though negativeModulation depth will reverse the effect.) The Diagrams below show the maximum levels for each LFOwaveshape.
The Triangle Wave goes from The Square Wave only goes- 6 3 to +63 Posit ive. . . 00 to +63
See the LFO Page (p. 64) for a more complete discussion of the LFO's.

ESQ-M - Musician's Manual
ENV 1, ENV 2, ENV 3 and ENV 4The ESQ-M has four complex Envelopes which can be applied as Modulators. Any of thesefour Envelopes can be routed to anywhere a Modulator can be selected. Note that ENV 4always modulates DCA 4 (the Final Volume of the Program). However, ENV 4 can berouted elsewhere to modulate other things in addition to DCA 4. Envelope Levels can bepositive or negative.
Envelope Levels can gofrom -63 to +63
A comprehensive discussion of the ESQ-M Envelopes follows in the Section entitledUnderstanding the Envelopes, p. 66.
----> VEL — VelocityVelocity means how hard you strike a key. Selecting VEL as a Modulator allows you tomodulate any Manual Level with Velocity. Velocity as a Modulation Source only goes positive(though assigning a negative Modulation depth will make the net result be to decrease a ManualLevel with Velocity). VEL is velocity with a straight linear curve. Note that if you drive theESQ-M from a controller which does not send key velocity, this parameter will have no effect.
----> VEL 2This is Velocity with a different Curve. Where the effect of VEL is linear, VEL 2 reaches thetop end of the Modulation range quicker, with less velocity, and after that the curve levels off.(Again, if you drive the ESQ-M from a controller which does not send key velocity, thisparameter will have no effect.) The illustration below shows the difference between VEL andVEL 2.

48 Modulators
ESQ-M – Musician's Manual
----> KYBD — Keyboard TrackingUses the position of a note on the Keyboard as a Modulator. The scaling effect of this Modulator isfigured from MIDI key 0 to MIDI key 127.
As the above illustration shows, the effect of KYBD is only positive-going (though a negative Modulation depthwill reverse the effect). Since scaling starts from MIDI key 0, there will always be some effect on anykeyboard, even on the lowest note. Manual Levels should be adjusted accordingly.
KYBD 2Another way to modulate any Manual Level with the position of a note on the Keyboard, KYBD 2employs a different curve. KYBD 2 goes negative as well as positive and, unlike KYBD, has its full effectover the range of a 5-octave keyboard, such as that of the ESQ-1.
As the above illustration shows, the effect of KYBD 2 is to reduce the Manual Level on notes below thebreak point (E above Middle C), and increase levels above that point. Negative Modulation depths willdo the opposite.
WHEEL — Modulation WheelThe MOD Wheel (MIDI Controller #1) is assignable wherever a Modulator is selected. To use the MODWheel for Vibrato (one common application) WHEEL must be assigned to modulate the LFO that ismodulating Oscillator Pitch. The effect of WHEEL as a modulator is positive-going only , from 0 (Wheeltowards you) to +63 (Wheel away from you) . Negat ive Modulation depths will reverse the effect.

49 Using Modulators
ESQ-M – Musician's Manual
PEDAL — Voltage Control Foot PedalThis selects the Foot Pedal, with which many synthesizers are equipped, as a Modulator. (Itwill also respond to the optional SW-10 Foot Pedal, which can be plugged directly into thePEDAL/CV Jack on the ESQ-M's rear panel) Its effect will be the same as that of the MODWheel. The Pedal makes an excellent alternative to the MOD Wheel when you wish to applyModulation and both hands are full. It can be applied wherever a Modulator is selected.
Note that the PEDAL Function Select parameter on the MASTER Page must be set toPEDAL=MOD, or an SW-10 Foot Pedal plugged into the ESQ-M's PEDAL/CV Jack willnot work as a modulator. When the Pedal Function Select parameter is set to PEDAL=VOL,the Pedal becomes a Volume Pedal.
Foot Pedal (not the Volume Pedal — that's a separate controller) is MIDI Controller #4. Notethat if you drive the ESQ-M from a keyboard equipped with a Foot Pedal, and wish to use thePedal as a Modulator in your ESQ-M Programs, you should select this modulator, notXCTRL (see below).
XCTRL — External ControllerAny MIDI Controller — such as a Breath Controller, Data Entry Slider, etc. — which isreceived via MIDI from the master synth or sequencer can be assigned as a Modulator withinyour ESQ-M Programs. On the MIDI Page, you select the number of the External Controllerthat will be received by the ESQ-M (only one can be selected at a time).
For example, if you have a Keyboard with a Breath Controller:1. Make sure both instruments have Controllers Enabled (MIDI Page);2. Select Breath Controller as the External Controller that will be received by the ESQ-M (XCONTRL=02, also on the MIDI Page);3. Assign XCTRL as a Modulator for Oscillator Volume, Filter Cutoff Frequency, orsome other Manual level within a Program, as shown in the following Section. Now when youplay, blowing into the Breath Controller will affect whatever Level(s) you assignedXCTRL to modulate.
PRESS — Pressure (After-touch)Pressure, also called After-touch, is recognoized by the ESQ-M, and can be Programmed as amodulator anywhere a modulator is selected. A Control on the MIDI Page enables Pressure tobe received, as well as determining which type will be received — Key or Channel Pressure.(See MIDI Page, p. 33.)
If you will be driving the ESQ-M from a synth which sends Pressure, you can assign Pressureas a Modulator within your ESQ-M Programs, just as you would the MOD Wheel, or the CVPedal. Just remember that for it to be received by the ESQ-M, the correct type of Pressuremust be enabled on the MIDI Page.

50 Using Modulators
ESQ-M – Musician's Manual
USING MODULATORS
Following are some examples of ways in which modulators are used within the voice architecture ofthe ESQ-M.
Modulating Oscillator VolumeThe Volume of each of the three Oscillators within a Program depends on a combination of two things:
1. the setting of the base, or Manual Level (the parameter "LEVEL=_" on the DCA1, DCA2 andDCA3 Pages), and
2. the effect of any Modulators applied on any of those Pages.
The Manual, Level can be thought of as a Volume Floor :
----> If this Level is set to some value greater than Zero for a given DCA, and no Modulators areapplied, The Oscillator will play at that level as long as a key is held down.
If the Manual Level is set to some value greater than Zero, and a Modulator (in this case anEnvelope) is selected and assigned a depth other than Zero, the effect of the Modulator will beadded to (or subtracted from) the Manual Level.
----> If the Manual Level is set to Zero, and a Modulator (the same Envelope) is selected and assigned adepth other than Zero, the depth of the Modulator alone will determine the Volume of theOscillator.

51 Using Modulators
ESQ-M – Musician's Manual
Bear in mind that when you use an Envelope or an LFO (Low Frequency Oscillator) as aModulator, the final effect will depend on the Modulation Depth and the Levels that are set forthe Envelope or LFO on their respective Pages.
Negative ModulationModulation Depth can be Positive or Negative (ranging from -63 to +63), making a great manyinteresting effects possible. If, for example, the Manual Level is set to 48, and the same Envelopeused in the previous examples is selected and assigned a Negative Modulation depth, the resultingVolume curve looks like this:
Modulating the Filter Cutoff FrequencyLike Oscillator Volume, the Filter Cutoff Frequency, or the Brightness contour of a Program,depends on a combination of two things:
1. the setting of the base, or Manual Level (the Control FREQ._ on the FILTER Page), and2. the effect of any Modulators applied on that Page.
----> If we set the Filter Cutoff Frequency manually (by adjusting the parameter FREQ onthe FILTER Page ) to a level of 64, and turn all Modulators OFF, the Filter will open up tothat level when a key is pressed, allowing frequencies below the Cutoff point to pass, and closedown to Zero when the key is released.
If we select an Envelope as a Modulator on the FILTER Page and assign it a value greater thanZero, its effect will be added to the the Manual Level.

52 Using Modulators
ESQ-M – Musician's Manual
----> If, instead, we generate a Triangle-shape wave with one of the LFOs (Low FrequencyOscillators), and apply that LFO wave as a Modulator on the FILTER Page, its effect will beadded to the Manual Level, and the Filter Cutoff Frequency will rise and fall with the cyclesof the LFO.
Of course, since two Modulators can be selected, you could apply both of these Modulators (or anyother combination) to the Filter Cutoff Frequency, and their effect would be added together, and thenadded to the Manual Level.
As with Oscillator Volume, if the Manual Level on the FILTER Page is set to FREQ. 00, theFilter Cutoff Frequency will depend entirely on the depth and settings of any Modulators appliedthere.
Limits Of ModulationFor all Modulation effects there is a maximum and a minimum range that cannot be exceeded. Forexample, if the Filter Cutoff Frequency is manually set to its maximum value [127], you will not beable to modulate the Frequency any higher, with an Envelope, LFO or other Modulator.
You cannot modulate an Oscillator's Output Level lower than Zero (silence). If a Modulator doesn't seemto be having any effect, check that the other Modulators and manual settings are at appropriate levels.

ESQ-M — Musician's Manual
A n y o f t h e s e 1 5 M o d u l a t i o n S o u r c e s c a n b e i n d e p e n d e n t l yassigned wherever a MOD is indicated above.
For each of the ESQ-M's 8 voices:
--> Each Oscillator plays a Waveform from the Digital Waveform Memory;
--> The output of each Oscillator passes through the same-numbered DCA (Digitally Controlled
Amplifier);
--> The output of the 3 DCA's passes through the Four-Pole Low Pass Filter;
--> The output of the Filter goes to the final DCA — DCA 4.--> The output of DCA 4 goes to the Panner, which pans the Program
between the Left and Right Audio Outputs.--> Wherever a "Mod" is indicated in the above diagram, any of the 15
available Modulators may be assigned to vary the "Manual" setting.

54
page intentionallyleft blank

ESQ-M – Musician's Manual
PROGRAMMING PAGES

56 OSC (1-3) Page
ESQ-M – Musician's Manual
[OSC1] OSCILLATOR PITCH PAGE[OSC2][OSC3]
Controls Oscillator pitch and selects the waveform to be played.
The format of the Oscillator Pitch Page is the same for [OSC 1], [OSC 2] and [OSC 3],although each of these Pages is entirely independent.
The Parameters on this Page can be selected by pressing Scroll until the desired parameter is showingor by entering the Parameter Number immediately selecting the Page.Use these pages to:
Adjust the pitch of each Oscillator by octave, semitone, and fine increments; Modulate the pitch of each Oscillator using any of the 15 available Modulation
sources; and Select the Waveform to be played by each Oscillator.
OSC (1-3) PAGE Parameters on this Page:
0 1 2 3 4 5 6 7OCTAVE SEMITONE FINETUNE WAVE MOD 1 MODAMT 1 MOD 2 MODAMT 2
0. OCTAVEAdjusts the pitch of the Oscillator by octaves.Range: -3 To +3.
1. SEMITONEAdjusts the pitch of the Oscillator up by semitones (halfstep). Adjusting this control upwardsbeyond 11 automatically increases the OCTAVE by one.Range: 0 To 11.
2. FINETUNEAdjusts the pitch of the Oscillator up by fine steps (detunes). Each step here is about 3 Cents(hundredths of a semitone).Range: 0 To 31.

57 DCA (1-3) Page
ESQ-M – Musician's Manual
3. WAVESelects the Waveform that the Oscillator will play from among the 32 available Waveforms.(See WAVEFORMS, p. 40.)
4. MOD1 — Modulator #1Selects the first source of Modulation. The Modulators selected on this page affect only thepitch of the Oscillator.
5. MODAMT1 — Modulator #1 DepthSets the depth, or amount, by which Modulator #1 will affect the pitch of the Oscillator. TheModulation amount can be positive or negative.Range: -63 To + 63.
6. MOD2 — Modulator #2Selects the second source of Modulation. The effects of Modulator #1 and Modulator #2 areadded together. You can thus double the maximum Modulation depth of a given modulator byselecting the same source for Modulator #1 and Modulator #2. The Modulators selected on thispage affect only the pitch of the Oscillator.
7. MODAMT2 — Modulator #2 DepthSets the depth, or amount, by which Modulator #2 will affect the pitch of the Oscillator. TheModulation amount can be positive or negative.Range: -63 To + 63.

58 DCA (1-3) Page
ESQ-M – Musician's Manual
[DCA1] OSCILLATOR VOLUME PAGE[DCA2][DCA3]
Controls The Volume of Oscillators 1 through 3.
The format of the Oscillator Volume Page is the same for DCA1, DCA2 and DCA3, althougheach of these Pages is entirely independent.
Each of these three DCA's (Digitally Controlled Amplifiers) controls the Volume (or amplitude) of thesame-numbered Oscillator (OSC).
The Parameters on this Page can be selected by pressing Scroll until the desired parameter is showing orby entering the Parameter Number immediately selecting the Page.
Use these pages to: Set the Manual Output levels of the three Oscillators; Modulate those levels using any of the 15 available Modulation Sources; and Turn each Oscillator ON or OFF.
DCA (1-3) PAGE Parameters on this Page:
0 1 3 4 5
LEVEL OUTPUT MOD 1 MODAMT 1 MOD 2
MODAMT 2
0. LEVELDetermines the Manual, or base, volume (amplitude) of the Oscillator. This Level can bethought of as a 'Volume floor' -- the effect of any Modulator(s) is added to the Level set by thisparameter. So even if LEVEL = 0, the Oscillator will still have some amplitude if there is aModulator (an Envelope for instance,) selected and assigned a Depth greater than Zero.Negative modulation depths bring the volume lower that the LEVEL setting. Large amountsof negative Modulation can silence the Oscillator, regardless of the setting of this control.DCA's 1, 2, and 3 have been set up so that it is possible to get full volume from just oneOscillator. This means, however, that it is possible to clip (overload) the output stage when allthree Oscillators are at full level. Different Waveforms contain different amounts of fundamentalenergy, so the effect will vary. a conservative rule of thumb for Oscillator Volume is asfollows:With 1 Oscillator playing -- set that Oscillator to 63.With 2 Oscillators playing -- set both Oscillators to 56.With 3 Oscillators playing -- set all three Oscillators to 52.

59 DCA 4 Page
ESQ-M – Musician's Manual
1. OUTPUT — Oscillator MuteTurns the Output of the Oscillator ON or OFF. This control is very helpful when setting upcomplex Programs, as it allows you to silence any Oscillator, and listen to the others, without disturbingyour settings.
2. MOD1 — Modulator #1Selects the first source of modulation. The modulators selected on this page affect only theamplitude of the Oscillator.
3. MODAMT1 — Modulator #1 DepthSets the depth, or amount, by which Modulator #1 will affect the amplitude of the Oscillator. TheModulation amount can be positive or negative.Range: -63 To +63.
4. MOD2 — Modulator #2Selects the second source of modulation. Again, a Modulator's maximum depth can bedoubled, by assigning the same Modulator to MOD #1 and MOD #2 . The Modulatorsselected on this page affect only the amplitude of the Oscillator.
5. MODAMT2 — Modulator #2 DepthSets the depth, or amount, by which Modulator #2 will affect the amplitude of the Oscillator. TheModulation amount can be positive or negative.Range: -63 To +63.

60 DCA 4 Page
ESQ-M – Musician's Manual
[DCA 4] FINAL VOLUME PAGE
Controls Program Volume and Panning.
Note: The Modulation Source for [DCA 4] is always [ENV 4].
The outputs of the three Oscillators, after passing through the Filter, go to [DCA4]. This Final DCA (DigitallyControlled Amplifier), together with [ENV4], which is fixed as its Modulator, determines the overallvolume envelope of the Program.
The Parameters on this Page can be selected by pressing Scroll until the desired parameter is showing or byentering the Parameter Number immediately selecting the Page.
Use this page to:Adjust the amplitude of the entire Program;Pan the Program left, right or center; andModulate the Program Pan using any of the 15 available Modulation Sources.
DCA 4 PAGE [Parameters on this Page:0 1 2 3
ENV4MOD_________
PANLOC PaNMOD PanMODAMT
0. ENV 4 MOD — Final VolumeDetermines the amount by which DCA 4 will be Modulated by ENV 4, which is fixed as its Modulator.The net effect of this parameter is to increase or decrease the Volume of the entire Program. This isuseful for matching the levels of different Programs, to avoid radical volume changes when switchingbetween them. Also it is useful for balancing the relative levels of Split and/or Layered Programs (seeSPLIT/LAYER Page, p. 77).Range: 00 to 63.
Bear in mind that the overall Volume of the Program will depend on the setting of this parameter andthe settings on the ENV 4 Page.

61 Filter Page
ESQ-M – Musician's Manual
1. PANLOC — Pan Location, Manual LevelPans the Program the between the Left and Right Outputs. Possible Values range from 00 (allthe way to the Left), to 15 (all the way Right). A value of 08 will pan the Program to Center.Note that the ESQ-M's audio outputs must be connected in Stereo for this parameter to haveany effect.Range: 00 to 15.
2. PNMOD — Pan ModulatorThis control selects a Modulator for the PAN Setting. Modulators applied here will add to, orsubtract from, the Manual Level, just as they do elsewhere. Thus an LFO used as a Modulatorhere will make the Program Pan back and forth with Time. Applying Velocity [VEL] herewould make a note's placement in the stereo mix depend on how hard you strike a key. And soon.
Or you can apply the Keyboard (KYBD 2) as a Modulator to make the low keys play on theleft side, the middle keys in the middle, and the high keys on the right side of the stereo mix.(See the Internal Factory Sound PIANO1 for an example of this effect.)
3. PMODAMT — Pan Modulator Amount (or Depth)Sets the amount by which the PAN Modulator will affect the Manual Pan Setting. Highervalues will cause more dramatic Pan Modulation. Negative Modulation Depths are particularlyuseful here. Any Negative value here (-32 for instance) will have exactly the opposite effect ofthe same, Positive, value (+32) in terms of how it affects the Pan of the Program (assuming aManual Level of 08).Range: -63 to +63.

62 Filter Page
ESQ-M – Musician's Manual
[FILT ] FILT ER PA GE
Controls the Four-Pole Low Pass Filter
The outputs of the three Oscillators pass through the Filter before going to the Final Volume stage, [DCA4].The Filter settings determine what frequencies will be allowed pass through to the output.
A Low Pass Filter allows only those frequencies below the Filter Cutoff Frequency to pass.Higher frequencies are filtered out. The Filter Cutoff Frequency is set to a certain level, and then it canbe continually varied by modulating the Filter (with an Envelope, an LFO, Velocity, etc.).
The Parameters on this Page can be selected by pressing Scroll until the desired parameter is showing or byentering the Parameter Number immediately selecting the Page.
Use this page to: Set the Manual Level for the Filter Cutoff Frequency; Set the amount of Filter Resonance (or Q); andModulate the Filter Cutoff Frequency, using the Keyboard "Control
Voltage" and any of the 15 available Modulation Sources.
FILTER PAGE Parameters on this Page:
0 1 3 4 5 6
FREQ RES (Q) KBD TRAC MOD 1 MODAMT 1 MOD 2 MODAMT 2___________
0. CT FREQ — Filter Cutoff FrequencySets the initial, or Manual Level of the Filter Cutoff Frequency. A higher setting willresult in a brighter sound. This setting represents the "Filter Floor" -- the effect of any selectedModulators will be added to (or subtracted from) this level.Range: 0 To 127.
1. RES (Q) — Filter ResonanceSets the amount of Filter Resonance, or Q. This controls the amplitude of the resonant peak ofthe filter. When the Q is raised, the Filter Cutoff Frequency is emphasized over all otherfrequencies. By then modulating the Filter Cutoff Frequency with an Envelope, LFO, ModWheel etc., you can create Filter Sweeps, Wah and Growl effects.Range: 0 To 31.
63 LFO (1-3) Page
ESQ-M – Musician's Manual
2. KBD TRAC — Keyboard Filter TrackingThis parameter sets the amount by which the location of a note on the keyboard will modulatethe Filter Cutoff Frequency. (This is comparable to the Keyboard Control Voltage ofmost Analog synths.)
Higher values of this parameter will cause the Filter to open up more (get brighter ) as you playhigher up the keyboard. The maximum value (63) will raise the Filter Cutoff Frequencyroughly one octave for each octave you go up the Keyboard.Range: 0 To 63.
2 . M O D 1 — M o d u l a t o r # 1 Selects the first source of Modulation forthe Filter Cutoff Frequency.
3. MODAMT1 — Modulator #1 DepthSets the depth, or amount, by which Modulator #1 will affect the Filter Cutoff Frequency.Modulation amounts can be positive or negative.Range: -63 To + 63.
4 . M OD 2 — Mo d ula to r # 2 Selects the second source of Modulation for theFilter Cutoff Frequency.
5. MODAMT2 — Modulator #2 DepthSets the depth, or amount, by which Modulator #2 will affect the Filter Cutoff Frequency.Modulation amounts can be positive or negative.Range: -63 To + 63.

64 LFO (1-3) Page
ESQ-M – Musician's Manual[LFO 1] LOW-FREQUENCY OSCILLATOR PAGE[LFO 2][LFO 3]
Controls the three Low-Frequency Oscillators (LFO's)
The format of the LFO Page is the same for [LFO 1], [LFO 2], and [LFO 3], although each ofthese Pages is independent. The Low Frequency Oscillators are used as Modulators, and may beapplied wherever a Modulation Source is to be selected.
Note that the LFO Delay (which normally allows the effect to enter gradually) is set using a Rampwhich goes from LEVEL 1 to LEVEL 2. Since LEVEL 1 can have a higher value thanLEVEL 2, the Ramp can actually be a decreasing one, causing the effect of the LFO to diminish, ordisappear, over the time the key is held down.
The Parameters on this Page can be selected by pressing Scroll until the desired parameter is showingor by entering the Parameter Number immediately selecting the Page.
Use this page to: Set the LFO Frequency (speed); Determine whether the LFO resets each time a key is struck; Select the waveform that the LFO will play; Set LFO Delay parameters; and Select a Modulator from any of the 15 available Sources to modulate the Output Level of the
LFO.
LFO (1-3) PAGE I Parameters on this Page:0 1 2 3 4 5 6 7
FREQ RESET HUMAN WAVE LEVEL 1 DELAY LEVEL 2 MOD
(PARAMETER PIC)
0. FREQ — LFO FrequencyDetermines the speed of the LFO. Range: 0 To 63.
1. RESETTurns RESET mode on or off.When ON: The LFO Waveform will return to the beginning of its cycle each time a new key isstruck. This is good for synchronizing LFO sweeps with key hits.When OFF: The LFO wave will cycle continuously, without Resetting.
2. HUMAN — Humanize functionWhen ON: This control will add a random element to the LFO Frequency, making the effectless "mechanical sounding.When OFF: The LFO Frequency will behave normally, with perfect repetition.
3. WAVE — LFO WaveformSelects the Waveform which the LFO will play. The choices are:TRI -- Triangle waveSAW -- Rising Sawtooth wave (Use negative modulation for a falling Sawtooth.)SQR -- Square wave (positive-going only)NOISE -- Random

ESQ-M – Musician's Manual
NOTE: Controls # 4, 5, and 6 combine to form a linear Ramp which defines the LFODelay. The Ramp goes from LEVEL 1, which is the starting Level, to LEVEL 2, which isthe sustain Level, and it can be an increasing or a decreasing Ramp.
4. LEVEL 1This is starting level, the Level at which the LFO will play when the key is first struck.Range: 0 To 63.
5. DELAYDetermines the Rate at which the LFO's amplitude will go from LEVEL 1 to LEVEL 2.Range: 0 To 63.
Note that here it is the Rate of Change (or the Slope of the Ramp) which is set, not a fixedTime. Therefore, lower values of this parameter will cause a longer Delay; higher valueswill result in a shorter Delay. The amount of Time it takes for the LFO to reach LEVEL 2thus depends on both the Rate and the Level.A value of Zero will cause the LFO to remain at LEVEL 1.
6. LEVEL 2This is final level, the Level that the LFO will reach at the end of the Ramp defined by theDELAY. It will remain at this Level until the key is released.Range: 0 To 63.
7. MOD — LFO Depth ModulatorSelects the Modulation Source for LFO depth. The effect of this Modulator is added to theamount of LFO depth provided by the Ramp defined by Controls # 6., 7. and 8.
Note that the LFO itself can be used to modulate its own Output, or that of another LFO,producing unusual LFO waveforms.
The final, modulated, LFO Output is then available as a Modulation Source, whose depth can beadjusted precisely using the Modulation Depth controls on the other Pages.
Note: To use the MOD Wheel for Vibrato within a Program, perhaps the most commonapplication for an LFO:1) assign WHEEL as the Modulator for an LFO,2) set L1 and DELAY to Zero for that LFO, and3) assign that LFO to modulate the Pitch of the Oscillators (OSC Pages).Within the Factory Sounds that came with your ESQ-M, LFO 1 is always used for WheelVibrato (where it is applicable).

66 Understanding the Envelopes
ESQ-M – Musician's Manual
UNDERSTANDING THE ENVELOPES
An Envelope is a shape, or "contour" that we apply to some signal source to make it change through time. Naturallyoccurring sounds have their own Envelopes. They don't just start and stop — they might start loud and fade tosilence, or slowly swell from silence to a huge crescendo; they might start out very bright and grow duller; they mighthave subtle variations in pitch, and so on.
In a synthesizer we imitate these effects, and create wholly new ones, by generating Envelopes and then usingthem to modulate pitch, volume, brightness, etc. The ESQ-M has four Envelopes which can be independentlyassigned as modulation sources to the various OSC's, DCA's, LFO's, PAN and the FILTER.
The ADSR Connection -Let's start by taking a look at the commonly used ADSR (Attack, Decay, Sustain, Release) type Envelopesfound on many synthesizers. With the ADSR Envelope, the name says it all. You have four parameters tocontrol:
Attack — The Time it takes to go from zero, when a key is struck, to peak level Decay — TheTime it takes to go from the peak level to the Sustain Level Sustain — The Level atwhich the signal remains as long as the key is held down Release — The Time it takes to returnto zero after the key is released
ADSR Envelope
Notice that an Envelope is really just a series of Levels that change through Time. With the fourparameters of the ADSR Envelope, we can control three Times (Attack, Decay and Release) and one Level(Sustain). This is fine for many basic volume and brightness Envelopes, but for more complex sounds — forsubtle pitch Envelopes and other cool effects — it becomes necessary to have more specific control over moreTimes and Levels. Which brings us back to the ESQ-M.
Times and LevelsThe four Envelopes on the ESQ-M are defined in terms of Time and Level. For each Envelope, you havecontrol over four Time segments (TIME 1, TIME 2, TIME 3, and TIME 4) and three Levels (LEVEL 1,LEVEL 2 and LEVEL 3).
When a key is struck, the Envelope level, starting at Zero, takes a fixed amount of time, defined by TIME 1, toreach LEVEL 1. It then takes TIME 2 to reach LEVEL 2. Next, at the end of TIME 3 it reaches LEVEL 3,where it will remain as long as the key is held down. After the key is released the signal takes TIME 4 toreturn to Zero.
The three Level parameters appear on each Envelope Page as [LEVEL 1], [LEVEL 2] and [LEVEL3]; the four TIME parameters as [TIME 1], [TIME 2], [TIME 3] and [TIME 4]. The figure on the nextpage shows a typical Envelope as defined by the ESQ-M Envelope parameters:
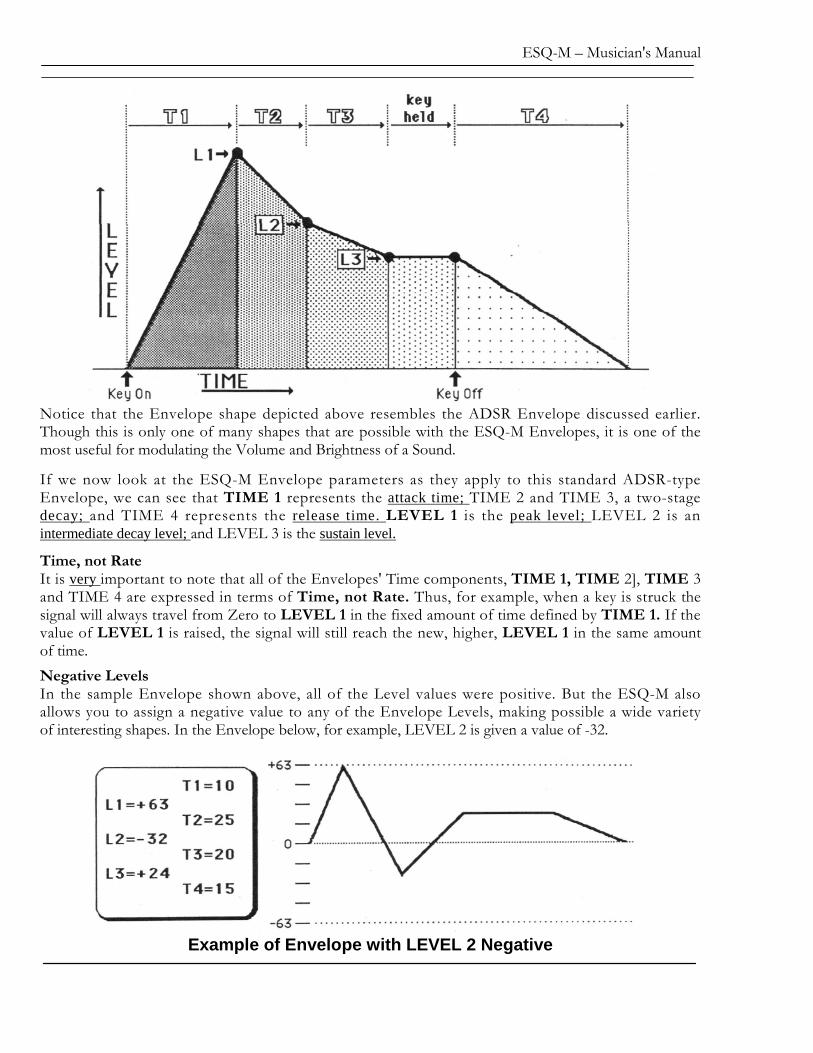
ESQ-M – Musician's Manual
Notice that the Envelope shape depicted above resembles the ADSR Envelope discussed earlier.Though this is only one of many shapes that are possible with the ESQ-M Envelopes, it is one of themost useful for modulating the Volume and Brightness of a Sound.
If we now look at the ESQ-M Envelope parameters as they apply to this standard ADSR-typeEnvelope, we can see that TIME 1 represents the attack time; TIME 2 and TIME 3, a two-stagedecay; and TIME 4 represents the release time. LEVEL 1 is the peak level; LEVEL 2 is anintermediate decay level; and LEVEL 3 is the sustain level.
Time, not RateIt is very important to note that all of the Envelopes' Time components, TIME 1, TIME 2], TIME 3and TIME 4 are expressed in terms of Time, not Rate. Thus, for example, when a key is struck thesignal will always travel from Zero to LEVEL 1 in the fixed amount of time defined by TIME 1. If thevalue of LEVEL 1 is raised, the signal will still reach the new, higher, LEVEL 1 in the same amountof time.Negative LevelsIn the sample Envelope shown above, all of the Level values were positive. But the ESQ-M alsoallows you to assign a negative value to any of the Envelope Levels, making possible a wide varietyof interesting shapes. In the Envelope below, for example, LEVEL 2 is given a value of -32.
Example of Envelope with LEVEL 2 Negative

68 Understanding the Envelopes
ESQ-M – Musician's Manual
Such an Envelope allows you to modulate a signal to levels below the Manual settings, as well asabove them. Say you apply the Envelope shown above as a modulator to the Filter CutoffFrequency. If the Manual setting on the FILTER Page, (FREQ=_) is set for about 2 khz.,modulating the Filter Cutoff Frequency with this Envelope would cause the Filter to behave likethis:
The extent ofthe effect in the example above would vary depending on the Modulation depth. Bear in mind thatModulation depth can also have a negative value. The combination of negative EnvelopeLevels and negative Modulation depths makes for almost infinite possibilities for controllingPitch, Volume, Brightness, LFO depth, etc.
Other Envelope ShapesThere are many possibilities for creating interesting Envelopes — here are just a few. If LEVEL 1 isset to Zero, then TIME 1 becomes a delay, TIME 2 the attack time, LEVEL 2 the peak level, and soon. Such an Envelope, applied to one of the DCA's, would cause that Oscillator to "wait" beforebeginning to play.
If LEVEL 1=0, TIME 1 Acts as a Delay
Another useful shape is a simple pitch Envelope. You can, for example, imitate the way Horns often"slide" into a note, rather than beginning right on pitch. By setting TIME 1 to Zero, LEVEL 1 tosome negative value, and LEVEL 2 and LEVEL 3 to Zero, you now have an Envelope which,when used to modulate Oscillator Pitch, will cause the pitch to "slide" up to the proper note in theamount of time defined by TIME 2. The picture on the next page illustrates such a pitch envelope.

ESQ-M – Musician's Manual
This could be a rather long, dramatic "slide", or an almost imperceptibly short one, depending on thevalue you assign to TIME 2. How much the Pitch is altered will depend on the value of LEVEL 1and the Modulation depth.
VELOCITY CONTROL OF ENVELOPES
There are two parameters on the Envelope Page allow you to alter an Envelope depending onkeyboard velocity, or how hard you strike a key.
[VEL LVL] — Velocity Level controlThe first of these, VEL LVL or Velocity Level Control, will lower all three levels (LEVEL 1,LEVEL 2 and LEVEL 3) with a softer keystrike. This means that the settings you assign toLEVEL 1, LEVEL 2, and LEVEL 3 are maximum Levels, the Levels that will be reached with thehardest keystrike. The amount of VEL LVL determines how much those Levels will be reduced asyou play softer.
With this parameter you can have continuous dynamic control over the three levels by varying howhard you play. The most common uses of the Velocity Level Control have to do with varying thevolume and brightness of a Program, though in the previous example VEL LVL could be used toalter the depth of the Pitch Envelope with velocity.

70 Understanding the Envelopes
ESQ-M – Musician's Manual
[VEL Tl] — Velocity Attack controlThe second velocity-related parameter is VEL T1 — Velocity Attack Control. As the nameimplies this parameter makes TIME 1, the Envelope attack time, respond to keyboard velocity. Whenthe value of VEL T1 is increased, a harder keystrike will decrease TIME 1, resulting in a fasterattack.
This allows for great expression on String sounds and the like, making it possible to have a long,smooth Attack or a sharp, crisp Attack simply by varying how hard you play. The greater the value ofVEL T1, the more TIME 1 will be decreased with velocity. If TIME 1 already equals Zero, thisparameter will have no effect.
[KBD SCAL] — Keyboard Decay ScalingThe final Envelope parameter is KBD SCAL — Keyboard Decay Scaling. Raising the value ofKBD SCAL has the effect of decreasing TIME 2 and TIME 3 as you play higher up the Keyboard.Higher notes will therefore decay faster than lower ones. The higher the value assigned to KBDSCAL, the greater the difference in Decay Time between the highest and lowest notes. This is usefulfor simulating the Decay patterns of many acoustic instruments (piano, for instance) whose lowernotes tend to ring much longer than the higher ones.
Note that if TIME 2 and TIME 3 both have a value of Zero, this parameter will have no effect.
Limits of ModulationNote that for all Modulation effects there is a maximum and a minimum range that cannot be exceeded.For example, if the Filter Cutoff Frequency is manually set to its maximum value [127], you willnot be able to modulate the Frequency any higher with an Envelope or other Modulator. You cannotmodulate an Oscillator's Output Level lower than Zero (silence). If an Envelope or other Modulatordoesn't seem to be having any effect, check that the other Modulators and manual settings are atappropriate levels.

71 Understanding the Envelopes
ESQ-M - Musician's Manual
ENVELOPE TIMESThe chart below gives the approximate amount of Time, in seconds, that corresponds to eachpossible value of the Time components of the Envelopes (TIME 1, TIME 2, TIME 3 andTIME 4). The numbers in bold type are the values that can be assigned to TIME 1, TIME 2,TIME 3 or TIME 4; the numbers in plain type show how long a Time each of those values willyield.
T=: Time(sec.) T=: Time(sec. T=: Time(sec.) T=: Time(sec.)
0 .00 16 .09 32 .57 48 3.621 .01 17 .10 33 .64 49 4.062 .01 18 .11 34 .72 50 4.563 .02 19 .13 35 .81 51 5.124 .02 20 .14 36 .91 52 5.755 .03 21 .16 37 1.02 53 6.456 .03 22 .18 38 1.14 54 7.247 .03 23 .20 39 1.28 55 8.138 .04 24 .23 40 1.44 56 9.129 .04 25 .25 41 1.61 57 10.2410 .04 26 .29 42 1.81 58 11.4911 .05 27 .32 43 2.03 59 12.9012 .06 28 .36 44 2.28 60 14.4813 .06 29 .40 45 2.56 61 16.2514 .07 30 .45 46 2.87 62 18.2515 .08 31 .51 47 3.23 63 20.48
Note: Envelope Times will be as shown above only when KBD SCAL=00, and VEL T1=0.These two parameters have the effect of decreasing Envelope Times (KBD SCAL based a note'sposition on the keyboard, and VEL T1 based on Velocity.) If either has a value greater than Zero,TIME 1, TIME 2 or TIME 3 could be shorter than indicated by the chart, depending on whereand how hard you play.

ESQ-M – Musician's Manual
[ENV 1] ENVELOPE PAGE[ENV 2][ENV 3][ENV 4]
Controls the parameters of the four Envelopes.
The format of the Envelope Page is the same for ENV 1, ENV 2, ENV 3 and ENV 4,although each Page is independent. The Envelopes are used as Modulators, and may be appliedwherever a Modulation Source is selected.
All Envelope parameters are expressed in terms of TIME and LEVEL. It is important to note thatthe Time components of the Envelopes (TIME 1, TIME 2, TIME 3, and TIME 4) each define afixed Time , not a Rate. Thus, if you raise the value of LEVEL 1 but leave TIME 1 the same, theEnvelope will still take the same amount of Time to reach the new, higher, LEVEL 1.
Also note that the Level parameters can be positive or negative. This allows for a wide variety ofEnvelope shapes, especially useful for modulating the Filter Frequency, Oscillator pitch, etc.
The Parameters on this Page can be selected by pressing Scroll until the desired parameter is showingor by entering the Parameter Number immediately selecting the Page.
ENV (1-4) PAGE Parameters on this Page:
0 1 2 3 4 5 6 7 8
LEVEL 1 LEVEL 2LEVEL 3 VEL LVL VEL T1 TIME 1 TIME 2 TIME 3 TIME 4 KBD9SCAL
0. LEVEL 1This is the LEVEL that the Envelope will reach at the end of the Time defined by TIME 1.All Envelopes start at a level of Zero and proceed toward LEVEL 1 when a key is pressed. Range:-63 To +63.
1. LEVEL 2The LEVEL that the Envelope will reach at the end of TIME 2.Range: -63 To +63.
2. LEVEL 3The LEVEL that the Envelope will reach at the end of TIME 3. This is the SustainLevel.The Envelope will remain at this level until the key is released. After the Key isreleased, the Envelope will return to Zero.Range: -63 To +63.
3. VEL LVL — Velocity Level ControlThis parameter makes all three Levels, LEVEL 1, LEVEL 2 and LEVEL 3, respond toKeyboard Velocity, or how hard you strike the key. When the value of VEL LVL is raised, asofter keystrike will decrease all three Levels. The greater the value, the more the Levels willdecrease as you play softer. Thus the Levels set by LEVEL 1, LEVEL 2 and LEVEL 3define the maximum Levels, and parameter [VEL LVL] subtracts from those Levels.Range: 0 To 63.

Envelope (1-4) Page 73
ESQ-M – Musician's Manual
4. VEL T1 — Velocity Attack ControlThis control makes TIME 1 respond to Keyboard Velocity. Raising its value will cause adecrease in the value of TIME 1 as a key is struck harder, shortening the Attack Time. Thegreater the value, the faster LEVEL 1 will be reached with a hard keystrike. (This Parameterwill have no effect if TIME 1 = 0.)Range: 0 To 63.
5. TIME 1The amount of Time between when the key is struck and when the Envelope reaches LEVEL 1.In most applications this is the Attack Time. The higher the value the longer the TIME. Range: 0To 63.
6. TIME 2The Time it takes the Envelope to go from LEVEL 1 to LEVEL 2. In most applicationsthis is the first of two Decay stages.Range: 0 To 63.
7. TIME 3The Time it takes the Envelope to go from LEVEL 2 to LEVEL 3. In most applicationsthis is second Decay stage. At the end of TIME 3, the Envelope will remain at LEVEL 3until the key is released.Range: 0 To 63.
8. TIME 4Release Time. Defines the amount of Time it will take the Envelope to return to Zero fromLEVEL 3 (or from whatever it currently is, if LEVEL 3 has not yet been reached) after thekey is released.Range: 0 To 63.
9. KBD SCAL — Keyboard Decay ScalingRaising the value of this parameter will cause the value of both TIME 2 and TIME 3 todecrease as you go higher up the keyboard. Thus higher notes will decay faster than lowerones. This is true of many acoustic instruments. The greater the value of KBD SCAL, themore the decay time will decrease as you play higher up the keyboard. KBD SCAL willhave no effect if TIME 2 and TIME 3 are Zero.Range: 0 To 63.

ESQ-M – Musician's Manual
[MODES] MODES PAGE
Contro l s Gl ide , Sync , AM, and Mono Modes, as wel l as Voice , Envelope andOscillator Restart Modes.
All of the Parameters on this Page are part of the Program (or patch), and will apply only to the selectedProgram.
The Parameters on this Page can be selected by pressing Scroll until the desired parameter is showingor by entering the Parameter Number immediately selecting the Page.
MODES PAGE I Parameters on this Page:
0 1 2 3 4 5 6 7AM GLIDE MONO SYNC RST
VCRSTENV
RSTOSC
ENVCYC
O. AMAmplitude Modulation. When ON, the Amplitude of Oscillator 1 modulates theAmplitude of Oscillator 2. OSC 2's Amplitude Envelope will be ignored. This results in the creationof "Sideband" frequencies at the sum and difference of the frequencies being played by the twoOscillators.
When OSC 1 and OSC 2 are tuned to simple intervals of each other (such as octaves or fifths,etc.), AM Mode can produce FM-like enharmonics, for bell sounds, etc. When the Oscillators aretuned to more complex intervals, the effect is more extreme.
Since the Amplitude of Oscillator 2 is no longer being controlled by DCA 2, you must use DCA 4and ENV 4 to control the volume of the Sound.
1. GLIDEAlso called Portamento. This causes the pitch of the Oscillators to "glide" between notes instead ofthe usual abrupt transition. The higher the value, the longer it will take to get from the pitch of the first noteplayed to that of the second. Range: 0 To 63.
NOTE: The GLIDE function behaves in one of two ways, depending on whether or not MONOmode is engaged:
With MONO mode OFF: The pitch of any note played will 'glide' to its proper pitch from that of thenote played immediately before it, at the rate that has been set. In this mode the GLIDE is polyphonic,and whole chords can be made to swoop up and down together. (Very dramatic.)
With MONO mode ON: You have what is called Fingered Portamento. If a key is pressedwith no other keys held down, there is no GLIDE. If you then play a second key while holdingdown the first, the note will glide from the pitch of the first key to that of the second. Release thesecond key (still holding the first one down) and it glides back. In other words, the effect is onlypresent when a note is played while another key is held down. You can thus play Staccatofor runs without GLIDE, and Legato for runs with GLIDE.

75 Modes Page
ESQ-M – Musician's Manual2. MONO
In MONO mode the ESQ 1 behaves like a classic one-voice Monophonic synth. It is usefulwith lead-type sounds where chords are not necessary or desirable. With MONO mode ON,only one note can be played at a time. Priority is given to the last note played -- even ifanother note is being held down, the most recent note you play will sound. However, theenvelope will not be re-triggered by striking a key as long as any other key is held down.Mono mode on the ESQ 1 does not stack all eight voices on one key -- only one voice plays.
3. SYNCSyncs the phase of Oscillator 2 to that of Oscillator 1. In other words, whenever OSC 1finishes playing one complete cycle of its waveform and begins another, OSC 2 will reset tothe beginning of its cycle, whether the previous cycle is complete or not.
This produces the popular "Hard Sync" effect, which can be similar to a Filter sweep. Theeffect is most noticeable when the Frequency of Oscillator 2 is varied, or modulated.
NOTE: The next two Parameters (#4, [RST VC] VOICE Restart, and #5, [RST ENV]ENVELOPE Restart) affect only what happens when you play the same note twice insuccession.
4. RST VC --VOICE RestartWhen ON: If the same key is restruck before the note has died away, it will be assigned thesame Voice that was previously playing it. That Voice will be 'stolen' to play the new note.This is fine for many sounds, such as piano, but it can be annoying with others, especiallysounds with long Attack or Release times, like strings, where you don't necessarily want a noteto abruptly disappear just because you have played the same note again.When OFF: If a key is restruck before the note has died away, a new Voice will be assigned toit, and the first Voice will continue to play. If there are already two Voices playing that note, theolder of the two is 'stolen'. (Two Voices will alternate playing the note if it is struckrepeatedly.) As mentioned above, for sounds with long Attack or Release times (such as longfilter sweeps, etc.) this is often better.
5. RST ENV --ENVELOPE Restart.When ON: If the same key is restruck, all four Envelopes will reset, and start their cycles atZero level.When 01-1-: Each Envelope will start its cycle at its present level, regardless of what that levelis, when the same note is played again. It will then take TIME 1 to reach LEVEL 1,whether the new ramp is in the same direction (up or down) as the original attack segment ornot. In other words, each Envelope behaves normally, except that its Starting Level,normally Zero, becomes whatever Level it was at when the key was restruck.
6. RST OSC --Oscillator (Waveform) RestartWhen ON: All three Oscillators are halted before the start of a sound, and are restarted togetherwhen a key is struck, so that they will start out playing in phase with each other. Any phasing,or "beating" between the oscillators (due to detuning, etc.) will be the same each time a key isstruck.When OFF: The Oscillators are not stopped before a new note is played, but continue to play.Therefore the relative phase of the Oscillators will be unpredictable. This will tend to randomlyvary the phase shift and tonal characteristics of the sound.

76 Modes Page
ESQ-M – Musician's Manual
7. ENV CYC --Envelope Full Cycle ModeWhen ON: The Envelopes will pass through their full cycles every time a key is struck. In thisMode the ESQ 1 pays no attention to whether you hold the key down or let it go immediately— each Envelope simply 'runs' through all its stages (ignoring the sustain stage after TIME 3)with each keystrike. This can be useful for many percussion-type sounds, bell sounds, filtersweeps and other sounds where you want consistently repeatable Envelopes that are notdependent on keyboard technique.When OFF: This is the Normal Mode of operation. All Envelopes will reset and begin theircycles from Zero whenever a new key is struck.

ESQ-M – Musician's Manual
[SPLIT/LAYER] Split/Layer PAGE
Controls Splitting the Keyboard and Layering Different Sounds together
Programs on the ESQ-M can be Layered (so that two Programs play at once over the wholekeyboard), Split (so that each half of the keyboard plays a different Program), and Split/Layered(so that the Split Program is layered with yet another Program).
It is important to note that the parameters on this Page are all part of the Program — that is, anySplit and/or Layer configurations you set up here must be Saved as part of a new Program in order tobe retained. For example, if you start with a Piano Program, and then Layer that with a StringProgram, you can now save the new Layered combination in a new Location — the original String andPiano Sounds will remain intact in their original locations. You can select this Layered combinationwhenever you want it, just as you would any other Program.
Also bear in mind that wherever two Programs are Layered, the ESQ-M becomes a four-voiceSynthesizer — it will start "stealing" voices after four have been played, rather than the usual eight. ASplit, on the other hand, doesn't cause any loss of voices.
The Parameters on this Page can be selected by pressing Scroll until the desired parameter is showingor by entering the Parameter Number immediately selecting the Page.Use this Page to:
Activate the Layer function; Choose the Layer Program; Split the Keyboard (Upper or Lower) between two different Programs; Choose the Split Program; Choose the Split Key; Layer a second Sound with the Split Program (Split/Layer mode); and Choose the Split/Layer Program.
SPLIT/LAYER PAGE I Parameters on this Page:
0 1 2 3 4 5SP/LA sw
SP/LA progLAYER sw
LAYER progSPLIT sw
SPLIT prog SPLIT KEY
0. SP/LA (switch) — SPLIT/LAYER ON/OFFThis activates the Split/Layer mode. In order for this control to have any effect, the Keyboardmust first be Split, either Upper or Lower (see #4 below).
When ON: The Split Program will be Layered (will play simultaneously) with the Programselected by the next parameter (#1). This will result in a reduction to four Voices only on theSPLIT/LAYERED half of the Keyboard.
1. SP/LA (prog) — Select SPLIT/LAYER ProgramThe Program whose name appears here will be Layered with the Split Program when anUpper or Lower Keyboard Split has been selected. It is possible to have a Split/Layerwithout Layer mode being on. The Program shown here is Layered only with the SplitProgram. There will always be a Program name in this Location, whether the Layer mode isengaged or not.

78 Split/Layer Page
ESQ-M – Musician's ManualWhen this control is selected, you can choose a new SPLIT/LAYER Program by using theData Entry Slider and the Up and Down Arrow Buttons to browse through the variousPrograms in Memory until you find the one you want.
2. LAYER (switch) — Layer On/Off This acts as aswitch to turn On or Off the Layer mode.When ON: The Current Program (the one you are editing) will be Layered (combined) with theProgram selected by the next parameter (#3), and both Programs will play simultaneously.Activating the Layer mode reduces the number of available Voices to four (from eight)wherever a layer is selected.
3. LAYER (prog) — Select LAYER ProgramThe Program whose name appears here will be Layered with the Current Program when the,Layer mode is switched On. There will always be a Program name in this Location, whetherthe Layer mode is engaged or not.
When this control is selected, you can choose a new LAYER Program by using the DataEntry Slider and the Up and Down Arrow Buttons to scroll through the various Programs inMemory until you find the one you want.
4. SPLIT (switch) — SPLIT ON/OFFThis control is used to Split the Keyboard between two Programs, as well as to determinewhich Keyboard half each will occupy. There are three possible states:
----> OFF — Normal Keyboard assignment; no Split.
----> UPPER — When SPLIT=UPPER is selected, the Split Program (see #5) will play onthe Upper Keyboard (that is, above the Split Key), and the Current Program will play on theLower Keyboard (below the Split Key).
----> LOWER — When SPLIT=LOWER is selected, the Split Program will play on the LowerKeyboard (that is, below the Split Key), and the Current Program will play on the UpperKeyboard (above the Split Key).
79 Split/Layer Page
ESQ-M – Musician's Manual
So when you select UPPER or LOWER here, you are selecting which area of the Keyboardthe Split Program will occupy. The Current Program (the one you started from) will alwaysoccupy the the opposite Keyboard half.
5. SPLIT (prog) — Select SPLIT ProgramThe Program whose name appears here will occupy the half of the Keyboard as designatedabove (#6), if SPLIT=UPPER or SPLIT=LOWER has been selected. There will always be aProgram name in this Location, whether the Split mode is engaged or not.When this control is selected, you can choose a new SPLIT Program by
using the Data EntrySlider and the Up and Down Arrow Buttons to browse through the various Programs inMemory until you find the one you want.
AN IMPORTANT NOTE ABOUT SPLITS AND LAYERS:
Whenever you select a Layer Program, a Split Program, or a Split/Layer Program, theESQ-M only "remembers" the Location of that Program in Internal or Cartridge Memory — notthe Program itself. If you move a Program, put another in its place, or transfer an entire Bank ofPrograms, the Layer, Split, or Split/Layer Program on this Page might still be "pointing to" aLocation that no longer contains the sound you had in mind.
For example, if you create and save a Program where a Brass sound is Layered with a Stringsound, and you then Write over the String Program (or insert a different Cartridge in the case ofLayering with a Cartridge Program,) a different Layer Program will play — whatever is now inthe Location originally occupied by the String sound.
If your Layer, Split, or Split/Layer Program is a Cartridge Program, and you remove theCartridge, the word *CART* will appear instead of the Program name, and the Program thatwill play will be the Internal Program with the same relative Memory Location (until you replacethe Cartridge).
This also means that if you transfer an entire Bank of Programs from a Cartridge to the InternalMemory (or vice versa), any Layer, Split, and Split/Layer Programs will still be "pointingto" their previous Locations, and may not work once the Cartridge is removed, or you insert adifferent Cartridge. In this case, you should go through the transferred Programs and edit themso that the Layer, Split, and Split/Layer Programs are in the new Bank, and then Save(Write) the Programs back into their current LocationsNote also that if you select a Program for your Layer, Split, or Split/Layer Program thatitself contains a Layer, or Split, only the main part of that Program will play — not any Layersor Splits that are programmed into it. It is only possible for one Layer, Split, or Split/Layerto be active at any time. So you can't, for example, make a Triple Layer by selecting an already-Layered Program as the Layer Program.

80 Split/Layer Page
ESQ-M – Musician's Manual
6. SPLITKEY — Select SPLIT KeyT h i s d e s i g n a t e s t h e n o t e o n t h e k e y b o a r d a t w h i c h t h e P r o g r a ms w i l l S p l i t , i fSPLIT=UPPER or SPLIT=LOWER has been selected (#4 above).Range: 21 To 108.
Key Numbers given here are MIDI key Numbers — they reflect the MIDI standard fornumbering keys, rather than just counting up from the lowest note on a keyboard. Thus theLow C on a 5-octave (61-note) keyboard is MIDI Key # 36; Middle C is MIDI Key # 60; theHigh C is MIDI key # 96.
The available range of values (21 To 108) corresponds to the the 88 key range of a grandpiano. This allows the Split Key to actually be out of the range of a 61-note keyboard such asthe ESQ-1. Splits with a Split Key lower than 37 will only be effective if the ESQ-M isplayed via MIDI from an instrument with more than a 61-note keyboard. The Split Key itselfalways plays whichever Program is on the Upper half.

81
ESQ-M – Musician's ManualPROGRAMMING CONVENTIONS
There are a number of Programming conventions that have been followed within the ESQ 1 factoryPrograms. They will help you to know where to begin when editing factory Programs. You may alsofind them to be handy rules of thumb to follow when creating your own Programs.
LFO's----> LFO 1 is used for Wheel Vibrato, when it is part of the Program.
LFO 2 and LFO 3 are available for other purposes.
Envelopes----> ENV 1 is used for Pitch Envelopes (modulating OSC 1, 2 or 3.)
ENV 2 is used for individual volume Envelopes (modulating DCA 1, 2 or 3.) ENV3 is used for Filter Envelopes (modulating the Filter Cutoff Frequency.) ENV 4is always fixed as the overall volume Envelope ( DCA 4.)
Of course these do not all apply for every Program. Any Envelope can be routed anywhere you want itto go (except to DCA 4), and some Programs will call for different applications. But whereapplicable, the factory Programs follow these conventions.
Program Names----> (/) Where a Program is Layered, a slash (/) is incorporated into the Name.----> (+) Where a Program contains a Split, a plus sign (+) is incorporated into the Name.

82
PageIntentionallyLeft Blank

ESQ-M — Musician's Manual
Section 5 — Saving and Storing Programs(and "Hidden" Functions)

84 Write Page
ESQ-M – Musician's Manual
[WRI TE ] WRIT E PA GE
To Save a New or Edited Program into Memory, or Copy an Existing Program toanother Location.
SAVING A NEW PROGRAM INTO MEMORYOnce you have modified an existing Program, or created an entirely new one, you can Write, orsave, that Program to any Internal or Cartridge Memory Location using the WRITE Page. This Page isalso used to rename the Program with the name of your choice.
Before you start the Write procedure, you should determine which Internal or Cartridge Program youwant to replace with the new Program. Find the Program you want to overwrite, and make a note of its
Program Number.
Next, decide on a Name of up to six letters for your new Program. Then:
1. Make sure the yellow Compare light is lit. If it isn't, press the Param button until itlights. This ensures that the Program you are saving is the modified version (the Edit Program).
2. Press the white button labeled WRITE on the front Panel to select the WRITEPage. The Page will come up as shown below, with the current Program Name showing. Youwill notice that the first letter of that Name is flashing. This means that it is ready to be changed.
WRITE :2LOUD 005
3. Edit the Program Name using the Data Entry Slider and the Scroll button. You can movethe Data Entry Slider up and down to browse through the available characters, or step throughthem one at a time with the Up and Down Arrow buttons. Experiment until you find the firstletter you want. Then press the Scroll button. The next location in the name begins flashing,meaning that it is ready to be edited. Again, move through the characters until you find the correctone. Repeat this procedure until the display shows the name you have chosen.
You can select the letter to the right by pressing Scroll, the one to the left by pressing the DownArrow button while holding down the Scroll button. Repeat this procedure, changing letters asoften as you like, until you're satisfied with the name. There are some pretty weird characters inthere, along with the usual letters and numbers, to choose from. Be creative.
Helpful Hint: Moving the Data Entry Slider all the way down gives you a blank space. Note alsothat when there is a blank space in a Program name, and the blank space is selected, it isrepresented by a flashing underline character. (A flashing blank space, while perhaps interesting as aZen exercise, would not be an easy concept to represent.) When you press Scroll to move to thenext character, the flashing underline will indeed appear as a blank space.
4. Press the Scroll button until the Program number is flashing. In order to write the newProgram into memory, the three digit Program number on the right side of the display must beselected (flashing).
5. Adjust the Data Entry Slider and/or the Up and Down Arrow buttons until thedisp lay shows the Program number you want to save the new Program to.(Remember that you will be replacing whatever is already there, so be sure you have the one youwant.)
Or,Type in the Program number directly from the numeric keypad. You can enter a three-digit Program number (from 001 to 040 for the Internal memory locations, and from 041 to 120 for

ESQ-M – Musician's Manualthe Cartridge locations) any time you are on the Write Page. The number doesn't have to be flashingfor you to do this. Remember that you must enter all three digits, including the initial zero (0) in Programnumbers below 100. (Example: to enter Program # 030, press "zero, three, zero.")
6. Press the Write button to write the Program into Memory. Once you have the proper Programnumber showing, and while that number is flashing, press the Write button. This writes the new Program,with its new Name, into that Memory Location. The Display will show amessage:
WRITING PROGRAM
which will remain for about two seconds. It will then return to the Program Page. The new Program isselected as the Current Program:
TRK 0 22LOUD 005
BAILING OUTIf you need to exit the Write Page, either to check through the Programs in memory in order to find one tooverwrite, or because you pressed Write by mistake, simply press the Program or Param button.This returns the ESQ-M to normal operation.
COPYING AN EXISTING PROGRAM TO ANOTHER LOCATIONSometimes you'll want to take an existing Program, one that you haven't been editing, and simply copy it toanother Memory Location. For example, you might want to put your ten most commonly used Programs in thefirst ten memory locations, for easy access during performance. Normally, the WRITE Page "looks" at the EditBuffer. But you have the option of Writing an existing, unedited Program.
1. First select the Program you want to copy. Press the Program Button to put the ESQ-M inProgram mode. The name of the Program you want to copy should be showing on the display. The yellowCompare light should not be lit. If it is, press the Param/Compare button until it goes out.
2. Press the WRITE Button. Pressing the WRITE Button when the yellow Compare light is not litcauses the ESQ-M to ask you if you want to replace the Edit Program with the Current Program:
REPLACE EDIT PRG
3_ Press the Up Arrow/Yes button to place the Current Program onto theWRITE
Page. You can now use the WRITE Page exactly as before to copy that Program to any other MemoryLocation. Again, remember that you will erase whatever Program you write over -- it's not a bad idea tosave all Internal Programs to a Cartridge (or to another ESQ or a computer via MIDI) before doing anymajor Memory reshuffling, because once a Program is gone, it's gone.
Pressing the Down Arrow/No button in response to the question "REPLACE EDIT PRG" will put youon the WRITE Page with the Edit Program selected.
Pressing the Program button in response to the question "REPLACE EDIT PRG" will put you back inProgram mode, and will not affect what is in the Edit Buffer.
86 Storage Page
ESQ-M – Musician's Manual
[STORAGE] STORAGE PAGE — DATA TRANSFER
For Saving and Loading Programs to Cartridge or Over MIDI.
The Storage Page is used to send and load Programs to various media for saving and storage. TheStorage Page handles two basic types of Program Data transfer:
1. MIDI -- All 40 Internal Programs, or any single Internal or Cartridge Program, can be sent viaMIDI to another ESQ-M, an ESQ-1, or a Computer which is running the proper librariansoftware.
2. CARTRIDGE -- An entire Master Bank (all 40 Programs) can be transferred from the InternalMemory to CART A or CART B. Or the 40 Programs in CART A or CART B can be transferredto the Internal Memory.
All the commands on the Storage Page are initiated in the same way:1. Select the Storage Page,2. Press Scroll until the function you want is showing on the Display, and then3. Press the Storage button while holding down the Scroll button to execute the function
MIDI TRANSFER OF PROGRAMS
The ESQ-M can be instructed to send Program Data over MIDI to another ESQ-M or ESQ-1. ThisData could also be received by a Computer which has been programmed to receive such Data. Herewe are concerned with sending Programs from one ESQ (the Sending Unit) to another (the ReceivingUnit).
MIDI ConnectionsIn the case of Sending Program Data via MIDI, it is only necessary that the MIDI Out jack of theSending ESQ be connected to the MIDI In jack of the Receiving Unit. Three other conditions mustbe met:
1. Both Units must be set to the same Base MIDI Channel. (MIDI Page) MIDI Mode doesn'tmatter.
2. The Receiving Unit must have System Exclusive messages Enabled. (On the MIDI Page, set MIDIEnables to ENBL=KCPSYS.)
3. The Receiving Unit must be on a Program Page when receiving the Programs. Just press theProgram button to put the receiving ESQ-M in Program mode before initiating the procedure.
PROG TO MIDI — Sending One Program via MIDI to another ESQ-M or ESQ-1This will Send the current Program of the Sending Unit to the Edit Buffer of the Receiving Unit,replacing whatever is there.
----> Connect the MIDI cable, and set up the units as described above.----> On the Sending Unit, press the Param button to put the ESQ-M in Parameter mode. ----> Select the Storage Page. The Display reads:
S T P R O G T O M I D I
"ST" means Storage Page. "PROG TO MIDI" means "send the current Program via MIDI."(This function always comes up first when you select the Storage Page.)To initiate the procedure press the Storage button while holding down the Scroll button.The Display will flash "MIDI DATA XFER" (You may not even notice it — oneProgram doesn't take long)

ESQ-M – Musician's Manual--
--> The Display will say "DATA XFER DONE," and then return to the Storage Page. Thenew Program is now on the Write Page of the Receiving Unit. Edit its Name if you wish, andthen Write it into Memory as described earlier (Write Page, p. 84).
----> If the Receiving Unit does not respond, check 1) your MIDI connections, 2) the MIDIChannel on both units, and 3) the MIDI Enables on the Receiving Unit, and try again.
BANK TO MIDI — Sending All Internal Programs to another ESQ-M or ESQ-1This will Send the Internal Memory (all 40 Programs) of the Sending Unit to the InternalMemory of the Receiving Unit, replacing whatever is there.
Connect the MIDI cable, and set up the units as described earlier.On the Sending Unit, press the Param button to put the ESQ-M in Parameter mode.Select the Storage Page.Press the Scroll button until the Display reads:
ST BANK TO MI D I
To initiate the procedure press the Storage button while holding down the Scroll button.While the transfer is in progress (about 3 seconds), the Display will read "MIDI DATAXFER."When the transfer is complete the Display will say "DATA XFER DONE," and then return to theStorage Page. The 40 Internal Programs from the Sending unit are now in the Internal Memoryof the Receiving Unit. Remember, this wipes out any Programs that were in the memory of theReceiving unit.If the Receiving Unit does not respond, check 1) your MIDI connections, 2) the MIDI Channel onboth units, and 3) the MIDI Enables on the Receiving Unit, and try again.
CARTRIDGE -- Bank CopyThe four Bank Copy functions let you transfer entire Master Banks (Internal, CART A, or CART B) betweenthe ESQ-M and an ENSONIQ E2 PROM Storage Cartridge.
TRANSFERRING CARTRIDGE PROGRAMS TO INTERNAL MEMORY
To Transfer all 40 CART A Programs to the INTERNAL Memory:----> Insert an ENSONIQ E2 PROM Storage Cartridge in the Program Cartridge Slot. ---->Press the Param button to put the ESQ-M in Parameter mode.----> Select the Storage Page.----> Press the Scroll button until the Display reads:
ST CART A TO INT
To initiate the procedure press the Storage button while holding down the Scroll button.While the transfer is in progress, the Display will read "COPYING PROGRAMS."Copying an entire Bank from a Cartridge to the Internal Memory takes only about two seconds. Whenthe transfer is complete the ESQ-M will return to the Storage Page. The 40 Cart A Programsare now in the Internal Memory of the ESQ-M.

88 Storage Page
ESQ-M – Musician's Manual
To Transfer all 40 CART B Programs to the INTERNAL Memory:----> Insert an ENSONIQ E2 PROM Storage Cartridge in the Program Cartridge Slot. Press the
Param button to put the ESQ-M in Parameter mode.Select the Storage Page.Press the Scroll button until the Display reads:
ST CART B TO INT
To initiate the procedure press the Storage button while holding down the Scroll button.While the transfer is in progress, the Display will read "COPYING PROGRAMS." Copying anentire Bank from a Cartridge to the Internal Memory takes only about two seconds. When the transfer iscomplete the ESQ-M will return to the Storage Page. The 40 Cart B Programs are now in the InternalMemory of the ESQ-M.
TRANSFERRING INTERNAL PROGRAMS TO A CARTRIDGE
To Transfer all 40 INTERNAL Programs to CART A:Insert an ENSONIQ E2 PROM Storage Cartridge in the Program Cartridge Slot with the label facing down,and the writing on the end right-side-up.Press the Param button to put the ESQ-M in Parameter mode.Select the Storage Page.Press the Scroll button until the Display reads:
ST I NT TO CART A
To initiate the procedure press the Storage button while holding down the Scroll button.While the transfer is in progress, the Display will read "COPYING PROGRAMS." Copying anentire Bank to the Cartridge takes about two minutes.When the transfer is complete the ESQ-M will return to the Storage Page. The 40 Internal Programsfrom the Internal Memory are now in Bank A of the Cartridge.
To Transfer all 40 INTERNAL Programs to CART B:Insert an ENSONIQ E2 PROM Storage Cartridge in the Program Cartridge Slot. Press theParam button to put the ESQ-M in Parameter mode.Select the Storage Page.Press the Scroll button until the Display reads:
ST I NT TO CART B
To initiate the procedure press the Storage button while holding down the Scroll button.While the transfer is in progress, the Display will read "COPYING PROGRAMS." Copying anentire Bank to the Cartridge takes about two minutes.When the transfer is complete the ESQ-M will return to the Storage Page. The 40 Internal Programsfrom the Internal Memory are now in Bank B of the Cartridge.

ESQ-M – Musician's Manual
"HIDDEN" FUNCTIONS
There are five "hidden" functions on the ESQ-M which are accessed through the Storage Page. Thesefunctions are buried because they aren't really necessary for everyday operation of the ESQ-M and one of them,the MEMORY RESET function, will wipe out the contents of the ESQ-M's memory. These parameters arenot for the timid. Each, however, is useful in certain situations.
HOW TO FIND THEMThe Hidden functions are activated from the Storage Page. To make them appear:
1. Press the Param button to put the ESQ-M in Parameter mode.2. Press the Storage button go to the Storage Page.3. Press and hold down the Scroll button. While holding down the Scroll button, press the
Master button.
This puts the five hidden functions, starting with Soft Reset, into the parameter loop along with with the sixfunctions normally available on the Storage Page. In other words, pressing Scroll will now scroll continuouslythrough the usual Storage Page controls in addition to the five hidden functions. These functions are executedin the same way as other Storage Page functions — by pressing Storage while holding down the Scroll button.
The extra functions will remain visible until you exit the Storage Page, either by pressing the Programbutton or by selecting another parameter Page. To get them back into the loop once you have exited the StoragePage you must repeat the above procedure.
FUNCTIONSThe five "Hidden" Functions are as follows:
SOFT RESETSoft Reset has the same effect as turning the ESQ-M's power off and then on again. Let's face it — thereare those rare occasions when MIDI gets totally out of control and notes mysteriously hang, or somemodulation effect just won't go away. You can cure many of those problems by turning an instrument off andthen back on. Soft Reset does the same thing without your having to switch the ESQ-M off. It doesn'taffect the ESQ-M's Program memory or change any parameter values, except that if System Exclusiveswere enabled (on the MIDI Page) when you reset, they won't be enabled when the ESQ-M comes back on(this is also the case when you switch the power off).
To execute the Soft Reset:With SOFT RESET showing on the Display, Press the Storage button while holding down the Scroll button.. The ESQ-M will act just
like it does when you turn it on, displaying its customary wake-up screen for several seconds and thenreturning to Program mode.
SOFTWARE VERSIONThis control simply shows you which version of the ESQ-M software you have in your machine. Aswith any computer device, the ESQ-M's software is subject to being updated from time to time to inorder to enhance the product.
To see what software version you have: With SOFTWARE VER showing on the Display, Press the Storage button while holding down the Scroll button.. The Display will show theversion number (as "ESQ-M VER X.YZ") for about two seconds and then return to the Storage Page.

90 Hidden Functions
ESQ-M – Musician's ManualMEMORY RESET
Also referred to as re-initializing the ESQ-M. This is one function you do not want to treatlightly. Memory Reset will erase all the Internal Programs, and reset all "Global" parameters totheir default, fresh-out-of-the-box, values. It is primarily used by service personnel afterperforming operations which can scramble the unit's memory, such as replacing the O.S. ROM.
Memory Reset should only be used as a last resort in case the ESQ-M's software shouldbecome hopelessly confused, and a Soft Reset (or turning the unit off and on again) won't solvethe problem. Remember that this will wipe out all your Internal Programs andreset all Global parameters. Because of this, an extra Are-You-Sure step has been addedto the procedure for initiating the function.
To Reset all Memory:With MEMORY RESET showing on the Display, Press the Storage button while holding down the Scroll button.. The Display will ask:
RESET ALL MEMORY
Press the Up Arrow/Yes button to Reset the Memory. The ESQ-M will display its wake-up screen for several seconds and then return to Program mode. All 40 Internal Programs willbe reset to the default Program, BRASS1. All Global parameters will be reset to their defaultvalues. Or: Press the Down Arrow/No button to abort the procedure and return to the Storage Pagewith the ESQ-M's Internal Memory intact.After re-initializing the ESQ-M in this way, you should then tune the Filters (see below).
FILTER TUNEThe ESQ-M has eight Filters (one for each voice). They are tuned at the Factory and don'tneed to be bothered with unless you have re-initialized the unit. This procedure lets the softwaretest the filters one at a time and then set the Cutoff Frequency for each one so that they will allbehave the same.To Tune the Filters:With FILTER TUNE showing on the Display, Press the Storage button while holding down the Scroll button.. You will see the ESQ-Mtest the eight filters in succession, displaying a number for each. The whole procedure takesabout 18 seconds. If all is well, when it is finished the Display will read "8 FILTERSTUNED" and then return to the Storage Page. If any of the Filters cannot be tuned, the Display will "get stuck" on that Filter and neverproceed to the next one. This would indicate a hardware problem. If this happens, turn theESQ-M's power Off and take the unit to an authorized ENSONIQ Repair Station for service.
ANALOG TESTSThis Page is used be service personnel to test certain analog signals and MIDI functions withinthe ESQ-M and to check the Battery voltage. To activate the Analog Test Page:With ANALOG TESTS showing on the Display, Press the Storage button while holding down the Scroll button.. The Display will showthe values for the Data Entry Slider (D=nnn), the Foot Pedal Input (P=nnn), and the Battery(B=nn) The ESQ-M's software will "read" the value of each 4 times per second. Also,theESQ–M will play notes in an ascending chromatic scale out MIDI.The only reading here that is of real concern to you is the Battery reading on the right-handside. It should read "B=00." Any reading above zero indicated that the Battery is getting lowand the ESQ-M should be taken to an authorized ENSONIQ Repair Station to have it replaced. Press any button (except Scroll) to exit this mode.

ESQ-M — Musician's Manual
Section 6 — Applications

9
PageIntentionallyLeft Blank

ESQ-M – Musician's Manual
USING THE ESQ-M WITH A SEQUENCER
Because of its multi-timbral capabilities, the ESQ-M is an ideal instrument for use with a MIDI sequencer. Itsability to "listen to" nine MIDI Channels at once means that the ESQ-M can take the place of several synthesizers inyour rig. If you haven't already done so, you should read the sections in this manual entitled "More About Tracks" (pp. 21-22) and "MIDI Page" (pp. 32 -38) for a fuller understanding of the ESQ-M's MIDI controls and how to configure them toyour particular needs.
CONNECTIONSThe illustration to the right shows a typicalsequenc ing set -up . Of course the ESQ-M doesn'thave to be first in the chain after the sequencer — you canchain MIDI instruments in any order, with oneexception. If any of the units doesn't have a MIDI Thrujack, you must place that unit last in the chain. (Or youcould get a MIDI Thru Box, available from a number ofmanufacturers, which will split up the MIDI signaland send it to several devices at once.)
Also, some instruments (particularly those with aswitchable MIDI Out/Thru jack) can impart a smallamount of delay when passing along the MIDI signal.This usually poses a problem only if you are using agreat many devices at once. Again, placing suchinstruments last in the chain or using a MIDI Thru boxwill minimize the effect.
THE ESQ-M AS ONE SYNTHESIZERWe'll start with the most basic sequencing situation, inwhich you will use the ESQ-M as if it were an ordinarysynth, capable of playing only one sound at a time.This is how it will act in POLY mode. In POLY Mode the ESQ-M will respond only to information received onthe Base MIDI Channel, and will play only the sound which is on the current Track. On the MIDI Page, set the MIDI Mode parameter to MODE=POLY. Also on the MIDI Page, set the MIDI Channel (BASECHAN= ) to whichever of the 16 MIDI
Channels you want the ESQ-M to receive on. (It's already set to BASECHAN=1 unless you've changed it.) TheESQ-M will respond only to data received on this MIDI Channel.
In the example above we have a sequencer connected to an ESQ-M, a Mirage Digital Multisampler and a SPM-1Sampled Piano module. With the ESQ-M in POLY Mode and set to BASECHAN=1, it will play information received onMIDI Channel 1. The SPM-1 will respond to information on MIDI

94 Using the ESQ-M with a Sequencer
ESQ-M – Musician's Manual
Channel 2, the Mirage to information on MIDI Channel 3. With this set-up you can send Keys, Controllers andProgram Changes independently to each unit by sending on the proper MIDI Channel.
THE ESQ-M AS NINE SYNTHESIZERSAs we have discussed earlier, when you select MULTI Mode on the MIDI Page the ESQ-M becomes nine"virtual synthesizers," each receiving on its own MIDI Channel, but all sharing the same eight voices
On the MIDI Page, set the MIDI Mode parameter to MODE=MULTI. Also on the MIDI Page, set the MIDI Channel for each Track to whichever of the 16 MIDI
Channels you want. (See pp. 36-37 for instructions as to changing Tracks and MIDI Channels.)
The illustration below shows a typical configuration with the ESQ-M in MULTI Mode:
As you can see, the set-up is similar to the earlier POLY Mode example, except that now the ESQ-M is responding tonine MIDI Channels rather than one. The SPM-1 and the Mirage have been set to receive on MIDI Channels 10 and11 respectively.
SOME IMPORTANT POINTS ABOUT MULTI MODE Each of the nine Tracks is completely independent and polyphonic. The ESQ-M's Dynamic Voice
Assignment means that each Track can have up to all eight voices if it needs them. If all eight voices are in useand a Track needs a voice, it will "steal" the voice from the oldest note playing.
In MULTI Mode Track 0 receives on the Base MIDI Channel. Each of the other eight Tracks will receive on theChannel it is set to. Each Track will respond independently to Controller and Program Changes on its MIDIChannel.
The channel assignments shown in the illustration above are the default values. These are the Channels thenine Tracks are set to as the ESQ-M comes from the factory, or after its memory has been re-initialized. You mayfind it handy to use these channel assignments as is, or you can change any of these values. Any changes you makewill be remembered.
Only one Track can receive on a given MIDI Channel. If two (or more) Tracks are set to the same MIDI Channel,the lower-numbered Track will receive on that Channel and the higher-numbered Track(s) will not receive at all.
You may not want all nine Tracks to receive. The sure way to "turn off' a Track is to set it's MIDIChannel to the same number that is selected for the Base Channel (Track 0's Channel). Only Track 0 will everreceive on the Base Channel in MULTI Mode. Let's say you want only four Tracks — Tracks 0, 1, 2 and 3 — toplay, and you want the other four Tracks not to receive

ESQ-M – Musician's Manual
at all. Set the Tracks to receive as follows:Track MIDI Channel0 (Base Channel) 11 22 33 44-8 1
The ESQ-M will respond only to information on MIDI Channels 1-4. Any information received onMIDI Channel 1 will be "intercepted" and played by Track 0. Tracks 4-8 will not respond to anyMIDI data.
When using a MIDI sequencer it's generally a good practice to assign a certain MIDI Channel (orchannels) to each instrument in your rig and always leave it set to that Channel. You can avoid a lotof confusion if you know, for example, that the ESQ-M always responds to Channels 1 through9, the Mirage always responds to Channel 10, the SPM-1 to Channel 11, etc.
USING THE ESQ-M WITH A MIDI GUITAR CONTROLLER
The ESQ-M is an ideal voice module to use with any MIDI Guitar Controller which is capable ofsending in MONO Mode. MONO Mode (MIDI Mode 4) allows a guitar controller to send the notes playedon each string on a different MIDI Channel. This has the advantage of letting each string send Pitch Bendsindependently, which is the only way to truly recreate guitar technique on a synthesizer.
Some earlier guitar synths do not support MONO mode. You will have to consult the manual of yourparticular model to see if it does. If you have a guitar synth which only sends in POLY Mode (i.e.sends all six strings on the same MIDI Channel) you should use the ESQ-M in POLY Mode (orOMNI Mode) and leave it on Track 0 when playing it from your guitar controller.
For MIDI Guitar Controllers which do support MONO Mode you should set up the ESQ-M and the guitarsynth as follows: Select Track 1 on the ESQ-M On the MIDI Page, set the MODE parameter to MODE=MONO. This sets up Tracks 1-8 as
independent, monophonic receivers. (Consult p.35 for a more complete description of MONOMode.)
Also on the MIDI Page, set the Base MIDI Channel to BASECHAN=1. Now Track 1 willreceive on Channel 1, Track 2 will receive on Channel 2, Track 3 will receive on Channel 3, etc.
Set your guitar controller to send in MONO Mode on Channels 1-6. (Some models have an easyshortcut for getting into this state.)
Connect the MIDI Out of the guitar controller's converter to the MIDI In of the ESQ-M.
Now you're ready to play. The picture om the next page shows the optimal settings for both theESQ-M and the guitar synth. You will notice that since the guitar has only six strings it only sends tosix of the ESQ-M's Tracks. Tracks 7 and 8 won't be used in this set-up. They would,however, respond to MIDI information on MIDI Channel 7 or 8 if any were to come in. (When the eight-string MIDI Guitar Controller is developed, the ESQ-M is ready)

96 Using the ESQ-M with a Guitar Controller
ESQ-M – Musician's Manual
A few things to bear in mind: Notes played on each string will play only the corresponding Track. Each String/Track combination
is totally independent. You can change the Program for each Track manually from the ESQ-M's front panel or by sending
Program Changes from the controller via MIDI. Each Track will accept Program Changes independently. In many cases you will want to have
the guitar controller send the same-numbered Program Change on all six channels so that all six stringsplay the same sound. You can, however, send the ESQ-M a different Program Change for eachTrack. You could use this effect to have, for example, a bass sound play on the bottom two strings anda piano sound on the top four. Or if you are feeling experimental you could play a different soundon each string.
The Base Channel doesn't have to be set to Channel 1. It can be set to any channel from 1 to 9,and the channels for the Tracks will be adjusted accordingly (see p. 35). In most cases, though, settingthings up as shown above will provide the most straight-forward and intuitive arrangement.
The Base MIDI Channel can only be changed on the MIDI Page with Track 1 the currentTrack. When any other Track is selected the Display will show what MIDI Channel it is receiving on butthe channel cannot be adjusted.
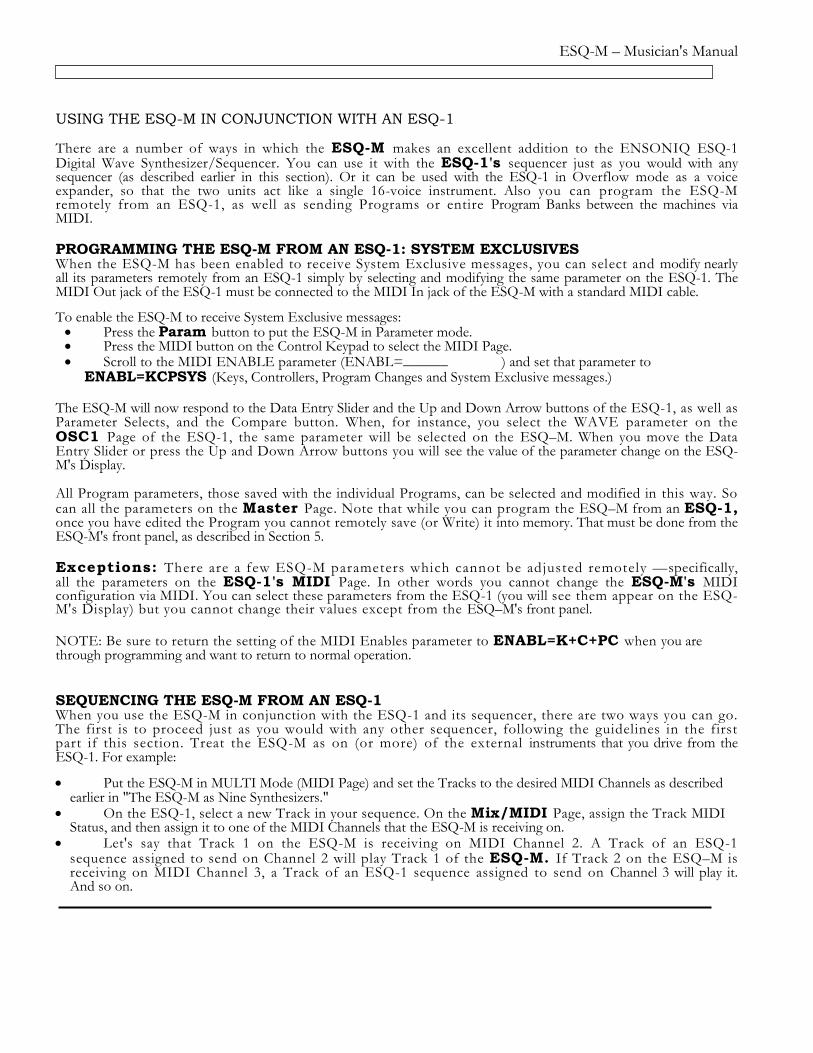
ESQ-M – Musician's Manual
USING THE ESQ-M IN CONJUNCTION WITH AN ESQ-1
There are a number of ways in which the ESQ-M makes an excellent addition to the ENSONIQ ESQ-1Digital Wave Synthesizer/Sequencer. You can use it with the ESQ-1's sequencer just as you would with anysequencer (as described earlier in this section). Or it can be used with the ESQ-1 in Overflow mode as a voiceexpander, so that the two units act like a single 16-voice instrument. Also you can program the ESQ-Mremotely from an ESQ-1, as well as sending Programs or entire Program Banks between the machines viaMIDI.
PROGRAMMING THE ESQ-M FROM AN ESQ-1: SYSTEM EXCLUSIVESWhen the ESQ-M has been enabled to receive System Exclusive messages, you can select and modify nearlyall its parameters remotely from an ESQ-1 simply by selecting and modifying the same parameter on the ESQ-1. TheMIDI Out jack of the ESQ-1 must be connected to the MIDI In jack of the ESQ-M with a standard MIDI cable.
To enable the ESQ-M to receive System Exclusive messages: Press the Param button to put the ESQ-M in Parameter mode. Press the MIDI button on the Control Keypad to select the MIDI Page. Scroll to the MIDI ENABLE parameter (ENABL=______ ) and set that parameter to
ENABL=KCPSYS (Keys, Controllers, Program Changes and System Exclusive messages.)
The ESQ-M will now respond to the Data Entry Slider and the Up and Down Arrow buttons of the ESQ-1, as well asParameter Selects, and the Compare button. When, for instance, you select the WAVE parameter on theOSC1 Page of the ESQ-1, the same parameter will be selected on the ESQ–M. When you move the DataEntry Slider or press the Up and Down Arrow buttons you will see the value of the parameter change on the ESQ-M's Display.
All Program parameters, those saved with the individual Programs, can be selected and modified in this way. Socan all the parameters on the Master Page. Note that while you can program the ESQ–M from an ESQ-1,once you have edited the Program you cannot remotely save (or Write) it into memory. That must be done from theESQ-M's front panel, as described in Section 5.
Exceptions: There are a few ESQ-M parameters which cannot be adjusted remotely —specifically,all the parameters on the ESQ-1's MIDI Page. In other words you cannot change the ESQ-M's MIDIconfiguration via MIDI. You can select these parameters from the ESQ-1 (you will see them appear on the ESQ-M's Display) but you cannot change their values except from the ESQ–M's front panel.
NOTE: Be sure to return the setting of the MIDI Enables parameter to ENABL=K+C+PC when you arethrough programming and want to return to normal operation.
SEQUENCING THE ESQ-M FROM AN ESQ-1When you use the ESQ-M in conjunction with the ESQ-1 and its sequencer, there are two ways you can go.The first is to proceed just as you would with any other sequencer, following the guidelines in the firstpart if this section. Treat the ESQ-M as on (or more) of the external instruments that you drive from theESQ-1. For example:
Put the ESQ-M in MULTI Mode (MIDI Page) and set the Tracks to the desired MIDI Channels as describedearlier in "The ESQ-M as Nine Synthesizers."
On the ESQ-1, select a new Track in your sequence. On the Mix/MIDI Page, assign the Track MIDIStatus, and then assign it to one of the MIDI Channels that the ESQ-M is receiving on.
Let's say that Track 1 on the ESQ-M is receiving on MIDI Channel 2. A Track of an ESQ-1sequence assigned to send on Channel 2 will play Track 1 of the ESQ-M. If Track 2 on the ESQ–M isreceiving on MIDI Channel 3, a Track of an ESQ-1 sequence assigned to send on Channel 3 will play it.And so on.

98 MIDI Overflow Mode
ESQ-M_________________ – Musician's Manual
All you really need to do to use the two instruments in this way is to follow the instructions onrecording Sequences in Section 6 of the ESQ-1 Musician's Manual, and treat each Track of theESQ–M as a separate remote instrument.
MIDI OVERFLOW MODE: THE ESQ-M AS A VOICE EXPANDER FOR AN ESQ-1The second way to use the ESQ-M with an ESQ-1 is to turn on the ESQ-1's Overflow Mode and letthe ESQ-M play when the ESQ-1 runs out of voices. This has the advantage of allowing the two instrumentsto function as a single synthesizer with 16 dynamically assigned voices.
We highly recommend that the ESQ-1 be running Software Version 2.1 (or higher) if you will beusing it in Overflow Mode with an ESQ-M. Version 2.1 contains a number of refinements addedspecifically to make this combination work better. The ESQ-1 tells you its Software Version eachtime you turn it on. If you have a Software Version below 2.1 you can contact your authorizedENSONIQ Repair Station for details about an update.Overflow Mode on the ESQ-1 works like this: The first eight notes, whether played from the keyboard or by the sequencer, will play locally on the
ESQ-1 and will not be sent out via MIDI. When all eight voices are in use, any notes the ESQ-1 is called upon to play will be sent out MIDI.
It will not "steal" voices. Whenever a local voice is available, it will play the note. When one is not availablethe note will be sent out MIDI.
The "Straight Synth" section of the ESQ-1 will overflow on the Base MIDI Channel (selectedon the MIDI Page).
Each sequencer Track which has LOCAL or BOTH status will overflow independently onits assigned MIDI Channel, selected on the Tracks Mix/MIDI Page. This is important to bear inmind because you must match up the Track MIDI Channels of the two instruments so that eachLOCAL or BOTH Track of your ESQ-1 sequence overflows to a Track on the ESQ-M which is setto the same Channel. (The ESQ-M must be in MULTI Mode for this to work.)
ESQ-1 Tracks with BOTH status will behave the same as LOCAL Tracks when Overflow is on—they will send nothing over MIDI until all voices are busy, then will send everything over MIDI until avoice is again available. This means that with Overflow on you lose the ability to do what a BOTH Tracknormally does, which is to layer a local sound with a remote instrument. This is one of the trade-offswith Overflow Mode. When using Overflow mode it is best not to use BOTH status at all — Trackswith BOTH status will behave differently once you switch Overflow off, which could produce undesirableresults.
ESQ-1 Tracks with LOCAL status will send Program Changes over MIDI when the Sequence isselected or comes around as a Song step (Ver. 2.1 or higher only). This allows the correspondingESQ-M Track to always have the same Program.
Both the "Straight Synth" and any LOCAL or BOTH Tracks on the ESQ-1 will "echo" anyincoming MIDI Program Changes they receive (Ver. 2.1 or higher only). This allows the ESQ-M toreceive the same Program Change and thus have the right Programs on the Tracks which arereceiving the overflow.
ESQ-1 Tracks with MIDI or SEQ status are not affected by Overflow Mode. They will behave asthey usually do, sending all data out MIDI, not playing locally.

99 MIDI Overflow Mode
ESQ-M – Musician's Manual
Setting Things UpThe first thing you need to do is to establish a standard for the relationship between the Tracks of the two units,and set each Track of the ESQ-M to the same MIDI Channel as the corresponding Track on the ESQ-1. The mostlogical and least confusing set-up is as follows:
ESQ-1. Overflows to ESQ-M MIDI ChannelStraight Synth ----> Track 0 1 (Base Channel )Track 1 ----> Track 1 2Track 2 ----> Track 2 3Track 3 ----> Track 3 4Track 4 ----> Track 4 5Track 5 ----> Track 5 6Track 6 ----> Track 6 7Track 7 ----> Track 7 8Track 8 ----> Track 8 9
To prepare the ESQ-M to receive Overflow from the ESQ-1 and its sequencer: Connect the MIDI Out of the ESQ-1 to the MIDI In of the ESQ-M with a standard MIDI cable. Put the ESQ-M in MULTI Mode (MIDI Page.)
For each Track of the ESQ-M, set the MIDI Channel as shown above. (Or you can select adifferent set of Channels, but you must remember to assign the same channels to the corresponding ESQ-1 Tracksand the "Straight Synth.") See pp. 36-37 for information on Track MIDI Channels.
The ESQ-M must have the same Programs in its Internal Memory as the ESQ-1. You can easily sendthe ESQ-1's Internal Program Bank to the ESQ-M via MIDI (see Section 3 of the ESQ-1 Musician's Manualfor details). And if cartridge sounds are used the ESQ-M must have the identical cartridge inserted. (Forthis reason it is recommended that all sounds in the sequence be Internal sounds. Transfer sounds from thecartridge to the Internal Memory if necessary)
On the ESQ-1: Set the Base Channel (on the MIDI Page) to Channel 1. (Or any other Channel you prefer, but it should
be the same Channel assigned to Track 0 on the ESQ-M.) Whenever you define a new LOCAL Track of a sequence, go the Mix/MIDI Page and set its MIDI Channel
according to the table above. That will allow it to overflow notes to, and send the proper Program Change and Mixlevel to, the corresponding ESQ-M Track.
On the ESQ-1, turn Overflow Mode On (OVFL=ON on the MIDI Page). Do not turn On the ESQ-M's Overflow Mode.
The rest will take care of itself. Whenever the "Straight Synth" or one of the LOCAL (or BOTH) Tracks of anESQ-1 sequence runs out of voices, it will send the note out via MIDI on its designated Channel, and the note will beplayed by corresponding Track of the ESQ-M.Try ThisOnce things are set up, make sure the ESQ-1's Overflow Mode is on and then try this. Select a "StraightSynth" sound in the usual way on the ESQ-1. If you have your Channel assignments right this should send aProgram Change to Track 0 of the ESQ-M, assuring that it has the same sound. Now turn the ESQ-1'svolume down, and the ESQ-M's volume up. Play eight notes, and hold them down. You shouldn't hearanything from the ESQ-M. Now play a ninth note. That note and subsequent ones should sound on the ESQ-M,until you release some keys and the ESQ-1 again has voices available.
Now turn the ESQ-1's volume back up, matching as closely as possible the levels of the two instruments.It is very important that the volume, EQ and effects settings of the ESQ-M and the ESQ-1 at your mixer oramp be the same — remember, they are acting together as a single unit, and any major differences in their soundsettings will spoil the effect.

100 MIDI Overflow Mode
ESQ-M – Musician's ManualAls
o,if you are operating the ESQ-M and the ESQ-1 in stereo you should be sure to Pan the right outputs ofboth instruments right, and the left outputs of both instruments left, to avoid differences in the panlocations between the two instruments.Adapting Existing ESQ-1 Sequences for OverflowIf you want to use Overflow Mode with ESQ-1 sequences that you had previously created without Overflow,you must do the following: In each sequence, for each Track with LOCAL Status, go to the Mix/MIDI Page and assign it
the proper MIDI Channel according to the table shown above. (Or assign it a Channel based onwhatever alternative scheme you have decided on. But above all, be consistent. Always use thesame MIDI Channel for the same Track on both instruments.)
As mentioned earlier, Tracks with BOTH status will act like LOCAL Tracks with Overflow on.If you have BOTH Tracks in your sequence, you will have to decide whether you want to 1) leavethem that way and have them play only on the ESQ's, or 2) change the status to MIDI, so that they willplay only on the remote instrument(s).
If there are MIDI only Tracks in your sequence which are playing remote instruments, they willbehave just as they always did. But check to see none of them is set to the a MIDI Channel that isbeing used for Overflow. If they are, change the MIDI Channel of one or the other.
Overflow Mode and two ESQ-M'sTwo ESQ-M's can be made to act as a single 16-voice instrument by turning on Overflow on the first unit.The concept is basically the same as described above. You will need to do the following:
Connect the MIDI Out of your master controller to the MIDI In of the first ESQ-M. Connect the MIDI Out (not the Thru) of the first ESQ-M to the MIDI In of the second ESQ-M.
Put both units in MULTI Mode (for use with a sequencer or other poly-timbral application) or POLYMode (for using one sound at a time). In either case, both units should be in the same MIDI Mode.
Each Track on the second ESQ-M should be set to the same MIDI Channel as the same track on thefirst ESQ-M. For example (in MULTI Mode):
ESO-M #1Track 0Track 1Track 2Track 3Track 4Track 5Track 6Track 7Track 8
Overflows to ESO-M #2, MIDI ChannelTrack 0 1 (Base Channel )Track 1 2Track 2 3Track 3 4Track 4 5Track 5 6Track 6 7Track 7 8Track 8 9
Again these are recommendations. You can use any channel assignments you want as long as they arethe same for both units.
Turn On MIDI Overflow Mode on the first ESO-M only. (See p. 32) Now when the first ESQ-M runs out of voices it will send the overflow to the second ESQ-M instead of stealing voices.

ESQ-M — Musician's Manual
Section 7 — Appendices

102 ESQ-1 to ESQ-M Parameter Reference
ESQ-M – Musician's Manual
ABOUT THE PROGRAM SHEETThe Program Sheet on the following Page can be used to transcribe the parameters of ESQ sounds you create. This is aneffective way to trade sounds with people in other areas. Also, writing out a sound in this way can sometimes help you tounderstand why a Program sounds like it does, by letting you see all the parameter settings at a glance.
Feel free to photocopy this form and use the copies to document your ESQ-M sounds.
ESQ-1 TO ESQ-M PARAMETER REFERENCEEach Program parameter on the ESQ-M has an exact counterpart on the ESQ-1. All ESQ-1 and ESQ-M Programs andparameters are fully compatible with each other. However, because the ESQ–M has a fundamentally different userinterface, some of the parameter names appear slightly different from the same parameter on the ESQ-1.
It is our desire to promote one standard for all ESQ parameter listings in order to avoid confusion when people exchangesounds in this form. So the Program Sheet on the opposite page is the same one that appears in the ESQ-1 Musician's Manual— it refers to parameter names as they appear on the ESQ-1. In most cases it will be obvious to you which parameter name onthe Program Sheet corresponds to which ESQ-M parameter. But in a few cases you may not be sure. For this reason the tablebelow has been provided as a reference to help you in using the Program Sheet to transcribe your own sounds or to programsounds which you have obtained in parameter sheet form..
PAGE: Prop Sheet/ESQ-1: ESQ-M Param: PAGE prop Sheet/ESQ-1: ESQ-M Param:
OSC (1-3): OCT OCTAVE LFO (1-3): WAV WAVESEMI SEMITONE L1 LEVEL 1FINE FINETUNE DELAY DELAYWAVE WAVE L2 LEVEL 2MOD#1 MOD1 MOD MODDEPTH MODAMTIMOD#2 MOD2 ENV (1-4): Li LEVEL 1DEPTH MODAMT2 L2 LEVEL 2
L3 LEVEL 3DCA (1-3): LEVEL LEVEL LV VEL LVL
OUTPUT OUTPUT T1 V VEL T1MOD# 1 MOD1 T1 TIME 1DEPTH MODAMT1 T2 TIME 2MOD#2 MOD2 T3 TIME 3DEPTH MODAMT2 T4 TIME 4
TK KBD SCALFILT: FREQ CT FREQ
Q RES (Q) MODES: SYNC SYNCKEYBD KBD TRAC AM AMMOD#1 MOD1 MONO MONODEPTH MODAMTI GLIDE GLIDEMOD#2 MOD2 VC RST VCDEPTH MODAMT2 ENV RST ENV
OSC RST OSCDCA 4: Final Vol (ENV4) ENV4 MOD CYC ENV CYC
PAN PAN LOCPAN MODULATOR PNMOD Split/Layer SPLIT/LAYER SP/LA (sw)DEPTH PMODAMT SPLIT/LAYER Program SP/LA (prog)
LAYER LAYER (sw)LFO (1-3): FREQ FREQ LAYER Program LAYER (prog)
RESET RESET SPLIT SPLIT (sw)HUMAN HUMAN SPLIT Program SPLIT (prog)
SPLITKEY SPLITKEY

PROGRAM SHEET PROGRAM:
OCT= SEMI= FINE = WAVE= MOD#1 DEPTH MOD#2 DEPTH-->OSC 1 _
OSC 2OSC 3
I LEVEL= OUTPUT= MOD#1 . DEPTH MOD#2 DEPTHDCA 1 On Off
DCA 2 On Off
DCA 3 On Off
FREQ= Q= KEYBD= MOD#1 DEPTH MOD#2 I DEPTHI Filter
Fin& Vol.(ENV 4)) PAN= PAN DEPTHDCA 4
FREQ= RESET=HUMAN= WAV=
L1= DELAY= L2=MOD=LFO 1 On Off On Off
LFO 2 On Off On OffLEO 3 On Off On Off
L1= L2= L3= LV= T1V= T l = T2= T3= T4= TK=ENV 1
ENV 2
ENV 3ENV 4
SYNC= AM= MONO= GLIDE= VC= ENV= OSC= CYC=Modes On Off On Off On Off On Off On Off On Off On Off
Sp l i t /Layer=Spl i t /Layer
Program Layer=Layer
Program Spl i t=Split
ProgramSplit
Key=Split/Layer On Off On Off Off Lower Upper


PCB Structure, Part Two

106
PageIntentionallyLeft Blank

ESQ-M – Musician's Manual
at
e: 3/16/87 M O D E L : E S Q - M MIDIImplementation Chart Version: 1.0
Function... Transmitted Recognized Remarks
Basic DefaultChannel Channel
11- 16
11- 16
DefaultMode Messages
Altered
1, 3, 4, Multi memorized
NoteNumber True Voice
21 - 108 21 - 108
Velocity Note ONNote OFF
0 * 00
After Key'sTouch Ch's
0* 00
Pitch Bender0 0
Control
Change
1 - 951 Mod Wheel2 Breath4 Foot6 Data7 Volume96 Inc97 Dec98 Param99 Param
1 - 951 Mod Wheel
2 Breath4 Foot6 Data7 Volume96 Inc97 Dec98 Param99 Param
programmable
ProgChange True #
0 - 119
0 - 119
System Exclusive 0 0
System : Song PosCommon : Song Sel
: Tune
XXX
XXX
System : ClockReal Time : Commands
XX
XX
Aux : Local On/OffMes- : All Notes Offsages : Active Sense
: Reset
XXXX
XXXX
Notes *Transmitted in OverflowMode only
Mode 1: OMNI ON, POLYMode 3: OMNI OFF, POLY
Mode 2: OMNI ON, MONOMode 4: OMNI OFF MONO
: YESX : NO

108 MIDI Implementation Specifications
ESQ-M – Musician's ManualESQ-M MIDI Implementation Specifications (Software ver.1.0)
1.0 ESQ-M System Exclusive Format
1.1 ESQ-M System Exclusive Header
All ESQ-M System Exclusive messages start with the following header. The receiving ESQ-M will onlyrecognize system exclusive messages if the MIDI channel number in the message is the same as the MIDI basechannel selected on its MIDI page and its MIDI enable parameter is set to recognize system exclusive messages (i.ethe display should show ENABL=KCPSYS).
11110000 System Exclusive status byte00001111 ENSONIQ I.D. code00000010 ESQ Product I.D. code0000nnnn MIDI channel number
1.2 Program Dumps
To be able to receive this data, the ESQ-M must be in program select mode (i.e. the program page must bedisplayed) and the MIDI enable parameter on the MIDI page must be set to receive system exclusive messages.
1.2.1 Single Program Dump
This transmits the program currently selected on the current Track. Refer to Table 1 for details on the structure of theprogram.
xxxxxxxx ESQ System Exclusive header
00000001 Single Program Dump code
00001111 2 nybbles per byte of program data0000nnnn 102 data bytes (204 nybble-ized MIDI bytes) 1= low
nybble, h = high nybble
11110111 End of exclusive 1.2.2
All Program Dump
This message transmits the 40 internal programs.
xxxxxxxx ESQ System Exclusive header
00000010 All Program Dump code
00001111 2 nybbles per byte of program data0000nnnn 102 * 40 data bytes (9160 nybble-ized MIDI bytes) 1= low
nybble, h = high nybble
11110111 End of exclusive

109 MIDI Implementation Specifications
ESQ-M – Musician's Manual
1.3 Received Virtual Keypad Events
This system exclusive message allows an external device to simulate the pressing of the ESQ-M's frontpanel buttons. The format of the message is an ESQ System Exclusive Header, followed by the KeypadCommand Code, and then a stream of button down and button up codes which is terminated by an End ofExclusive.
NOTE: Each Button Down keypad event should be followed by a Button Up event for the same button toprevent the inbound keypad event processor from becoming "hung up" while waiting for a button to bereleased. This should usually be done within one system exclusive message. It should also be possibleto follow up with separate messages, but be careful not to leave dangling button downs !
xxxxxxxx ESQ System Exclusive header
00001111 Keypad Command code (Data
stream...)
Onnnnnnn Any number of keypad events (button down/up codes) Onebutton down or button up event per byte. (button codesare specified in the table below)
11110111 End of exclusive
B u t t o n C o d e sDown Up
Dec Hex Hex Front Panel Button Name
00 00 16 10 0 (Split/Layer)01 01 17 11 1 (Master)02 02 18 12 2 (Storage)03 03 19 13 3 (MIDI)04 04 20 14 4 (OSC)05 05 21 15 5 (DCA)06 06 22 16 6 (Filter)07 07 23 17 7 (LFO)08 08 24 18 8 (ENV)09 09 25 19 9 (Modes)10 OA 26 lA Up Arrow/Yes11 OB 27 1B Down Arrow/No12 OC 28 1C Scroll13 OD 29 1D Program14 OE 30 lE Param15 OF 31 1F Write
As you may have observed, the button up codes are differentiated from the button down codes by apositive offset of 16 decimal or $10 hex. Unlike the ESQ-1 the Button Code 00 is a legal key eventwithin the system. Also, button codes out of the range specified in the above table should not be sent to theESQ-M.

110 MIDI Implementation Specifications
ESQ-M – Musician's Manual1.4 Compare Button Status Message
This message is both sent and received by the ESQ-M. It is sent whenever the Compare status of the ESQ-Mis changed by pressing the Param/Compare button. The same message format is recognized when it isreceived from another ESQ product if recognition of system exclusive messages is enabled (MIDIENABL=KCPSYS).
xxxxxxxx
00010000
0000000n
11110111
ESQ System Exclusive header
Compare Status Command code
Status of the Compare buttonn=1, Compare Onn=0, Compare Off
End of exclusive
1.5 Device Inquiry Message
The ESQ-M supports the MIDI Device Inquiry message which allows instruments and computers to ascertainthe identity of the unit(s) to which they are connected. The ESQ-M will respond to the followingDevice Inquiry Message with the Device ID Message detailed below. The ESQ-M will respond to theinquiry if the channel information in the message contains either the base MIDI channel number of the ESQ-M or the all channel broadcast code ($7F).
11110000 System Exclusive status byte
01111110 Non real time message
0000nnnn nnnn=MIDI Channel number or01111111 All channel broadcast code
00000110 General Information message code
00000001 Device Inquiry Message message code
11111110 End of Exclusive

ESQ-M – Musician's Manual
1.6 Device ID MessageWhen the ESQ-M receives a correctly formatted MIDI Device Inquiry message it will respond with the following Device IDMessage. This message follows the MMA recommendations for device ID messages, and contains information about theresponding device including manufacturer, product family and software revision.
11110000 System Exclusive Status byte
01111110 Non real time message
0000nnnn nnnn=Base MIDI Channel
00000110 General Information message code
00000010 Device ID Message code
00001111 ENSONIQ System Exclusive manufacturer's code
00000010 ESQ Product Family code (lsb)00000000 ESQ Product Family code (msb)
00000010 ESQ-M Family Member code (lsb)00000000 ESQ-M Family Member code (msb)
00000000 Software revision information 000000000nnnnnnn Major Version number (integer portion)0nnnnnnn Minor version number (decimal fraction)
11111110 End of Exclusive
ESQ-M MIDI Parameter Number List
The numbers below are the numbers that are 'sent in the Parameter Select controllers (MIDI Controller #'s 98 and 99). Note thatthe ESQ-M will recognize MIDI Parameter Selects only if System Exclusive messages are enabled (ENABL=KPCSYS on theMIDI Page.)
Page Param # Parameterdec hex
ENV10 00 ENV1 L1 parameter1 01 ENV1 L2 parameter2 02 ENV1 L3 parameter3 03 ENV1 LV parameter4 04 ENV1 TIV parameter5 05 ENV1 TI parameter6 06 ENV1 T2 parameter7 07 ENV1 T3 parameter8 08 ENV1 T4 parameter9 09 ENV1 TK parameter

ESQ-M – Musician's ManualPage Param #
dec hexENV2
10 0A ENV2 L1 parameter
11 0B ENV2 L2 parameter
12 0C ENV2 L3 parameter
13 0D ENV2 LV parameter
14 0E ENV2 T1V parameter
15 0F ENV2 T1 parameter
16 10 ENV2 T2 parameter
17 11 ENV2 T3 parameter
18 12 ENV2 T4 parameter19 13 ENV2 TK parameter
ENV320 14 ENV3 Ll parameter
21 15 ENV3 L2 parameter
22 16 ENV3 L3 parameter
23 17 ENV3 LV parameter
24 18 ENV3 T1V parameter
25 19 ENV3 Ti parameter
26 1A ENV3 T2 parameter
27 1B ENV3 T3 parameter
28 1C ENV3 T4 parameter29 1D ENV3 TK parameter
ENV430 lE ENV4 L1 parameter
31 1F ENV4 L2 parameter
32 20 ENV4 L3 parameter
33 21 ENV4 LV parameter
34 22 ENV4 T1V parameter
35 23 ENV4 T1 parameter
36 24 ENV4 T2 parameter
37 25 ENV4 T3 parameter
38 26 ENV4 T4 parameter39 27 ENV4 TK parameter
LFO140 28 LFO1 frequency parameter
41 29 LFO1 reset parameter
42 2A LFO1 humanize switch parameter
43 2B LFO1 modulation waveform parameter
44 2C LFO1 Ll parameter
45 2D LFO1 delay parameter
46 2E LFO1 L2 parameter47 2F LFO1 modulation source parameter
LFO248 30 LFO2 frequency parameter
49 31 LFO2 reset parameter
50 32 LFO2 humanize switch parameter
51 33 LFO2 modulation waveform parameter
52 34 LFO2 L1 parameter
53 35 LFO2 delay parameter
54 36 LFO2 L2 parameter
55 37 LFO2 modulation source parameter
112 MIDI Parameter Numbers

PageLFO3
OSC1
ESQ-M – Musician's Manual
Param # Parameterdec hex56 38 LFO3 frequency parameter57 39 LFO3 reset parameter58 3A LFO3 humanize switch parameter59 3B LFO3 modulation waveform parameter60 3C LFO3 Ll parameter61 3D LFO3 delay parameter62 3E LFO3 L2 parameter63 3F LFO3 modulation source parameter
64 40 OSC1 octave parameter65 41 OSC1 semitone parameter66 42 OSC1 finetune parameter67 43 OSC1 waveform parameter68 44 OSC1 modulation source 1 parameter69 45 OSC1 modulation amount 1 parameter70 46 OSC1 modulation source 2 parameter71 47 OSC1 modulation amount 2 parameter
OSC272 48 OSC2 octave parameter73 49 OSC2 semitone parameter74 4A OSC2 finetune parameter75 4B OSC2 waveform parameter76 4C OSC2 modulation source 1 parameter77 4D OSC2 modulation amount 1 parameter78 4E OSC2 modulation source 2 parameter79 4F OSC2 modulation amount 2 parameter
OSC380 50 OSC3 octave parameter81 51 OSC3 semitone parameter82 52 OSC3 finetune parameter83 53 OSC3 waveform parameter84 54 OSC3 modulation source 1 parameter85 55 OSC3 modulation amount 1 parameter86 56 OSC3 modulation source 2 parameter87 57 OSC3 modulation amount 2 parameter
DCA188 58 DCA1 level parameter89 59 DCA1 output enable parameter90 5A DCA1 modulation source 1 parameter91 5B DCA1 modulation amount 1 parameter92 5C DCA1 modulation source 2 parameter93 5D DCA1 modulation amount 2 parameter
DCA294 5E DCA2 level parameter95 5F DCA2 output enable parameter96 60 DCA2 modulation source 1 parameter97 61 DCA2 modulation amount 1 parameter98 62 DCA2 modulation source 2 parameter99 63 DCA2 modulation amount 2 parameter

114 MIDI Parameter Numbers
ESQ-M – Musician's Manual
Page Parameter
DCA3
Param # dechex
100 64 DCA3 level parameter101 65 DCA3 output enable parameter102 66 DCA3 modulation source 1 parameter103 67 DCA3 modulation amount 1 parameter104 68 DCA3 modulation source 2 parameter105 69 DCA3 modulation amount 2 parameter
DCA4
FILTER
106 6A107 6B108 6C109 6D
DCA4 modamt parameterPAN position parameterPAN modulation source parameter PANmodulation amount parameter
110 6E FILTER ER Fc (cutoff) parameter111 6F FILTER Q (resonance) parameter112 70 FILTER modulation amount 3 parameter113 71 FILTER modulation source 1 parameter114 72 FILTER modulation amount 1 parameter115 73 FILTER modulation source 2 parameter116 74 FILTER modulation amount 2 parameter
MODES117 75 MODES AM switch parameter118 76 MODES glide parameter119 77 MODES mono switch parameter120 78 MODES sync switch parameter121 79 MODES voice reassign switch parameter122 7A MODES envelope reset switch parameter123 7B MODES wave reset switch parameter124 7C MODES cycle switch parameter
SPLIT/LAYER125 7D S/L split layer switch parameter126 7E S/L split layer program parameter127 7F S/L layer switch parameter128 80 S/L layer program parameter129 81 S/L split direction parameter130 82 S/L split program parameter131 83 S/L split point parameter
* the following parameter numbers (132-143) are used for the non-pcb systemparameters
System parameters:
MASTER132 84133 85134 86135 87
136 88
MASTER tuning parameterMASTER velocity parameter MASTER pedal switchparameter MASTER pitch bend range parameterMASTER pitch bend mode parameter

115 MIDI Parameter Numbers
ESQ-M — Musician's Manual
Page
MIDI
Param #dec hex
137 89138 8A139 8B140 8C141 8D142 8E
Parameter
MIDI base channel parameterMIDI overflow switch parameterMIDI xcontrol parameter MIDIpressure parameter MIDI modeparameter MIDI enable parameter
* The parameters on the MIDI Page (137-142) can beselected but not modified via MIDI.

ESQ-M – Musician's Manual
ESQ-M SPECIFICATIONS
CONTROLLER RESPONSE FEATURES Responds to polyphonic velocity and pressuresensitivity Programmable split point Sound layering Polyphonic glide, fingered mono glide
VOICE ARCHITECTURE 8-voice polytimbral 3 digital waveform oscillators per voice Amplitude modulation on each oscillator 32 multi-sampled and synthetic waveforms 15 routable voice modulation sources 3 multi-waveform LFO's per voice withhumanized random variation 4 complex envelope generators per voice,velocity controlled Programmable panning and level Hard sync and ring modulation (AM) Analog filters, 4-pole low-pass with variableresonance
PROGRAM PARAMETERS 16-character fluorescent display, readable in alllighting conditions 40 internal programs, direct access 80 external cartridge programs, direct accesswith cartridge installed Compare mode for comparing programs
MIDI Poly, Omni, Multi and Mono modes "MIDI Overflow Mode" permits slaving otherESQ-M's for 16 or more voices (each ESQ-Madds 8 voices)
9 simultaneous polyphonic channels withseparate programs Global controllers in mono mode for use withMIDI guitar controllers, etc. MIDI standard remote programming
INPUTS/OUTPUTS Left/Mono and Right channel audio outputsallow voices to be panned. Pedal/Control Voltage Input (allowsmodulation of voices from an external source) MIDI In, MIDI Out, MIDI Thru
STANDARD ACCESSORIES Standard accessories include: Owner's/Pro-gramming Guide, detachable power cord, rack-mount hardware
OPTIONAL ACCESSORIES ENSONIQ E-EPROM Cartridge - for storingup to 80 player-created programs CV pedal - for voice modulation and volumecontrol
DIMENSIONS 17 1/4" (44cm) wide (19" with rack hardwareinstalled) x 3 1/2" (9cm) high x 12" (30cm) deep Weight: 13 pounds (5.7 kilograms)
WARRANTYOne year, parts and laborRefer to Warranty card enclosed
Specifications subject to change without notice.