Mobile App Guide - Telus
52
TELUS Business Connect TM Mobile App Guide
Transcript of Mobile App Guide - Telus
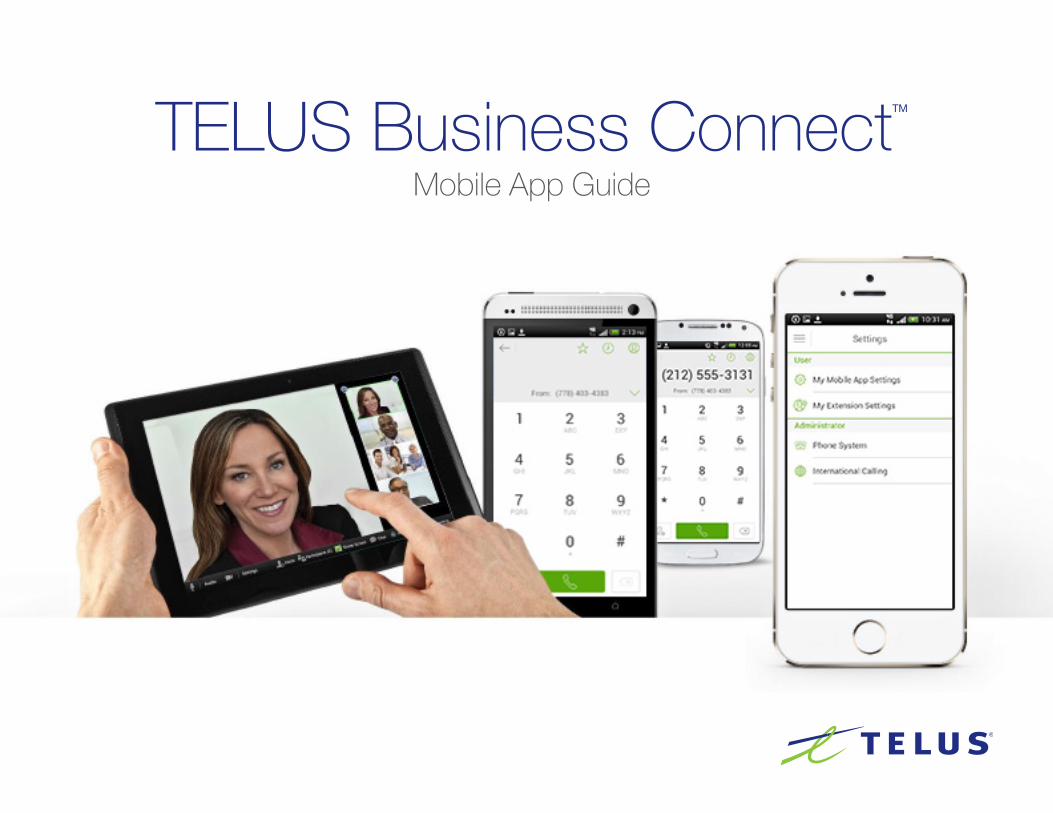
TELUS Business ConnectTM
Mobile App Guide
Table of Contents
4 Overview5 How to Start5 If you already have a TELUS Business Connect Office account6 Setup for Managers11 The Main Menu15 Making a Phone Call15 RingOut16 RingOut Mode16 VoIP Calls17 Conferencing: Conference Calling17 Faxing17 Receiving and Viewing Faxes17 FaxOut from Mobile App18 Choosing a Default Fax Cover Sheet18 Email Addresses That Can Send Faxes19 Send a Fax from Your TELUS Business Connect Online Account20 Call Recording20 On-Demand Call Recording22 Do Not Disturb (DND)22 Call Log23 Presence
25 Managing Your User Settings25 My Extension Settings25 User Info26 User Hours26 Phones & Numbers27 Call Screening, Greeting & Hold Music29 Call Handling & Forwarding29 User Hours Call Handling & Forwarding29 After-Hours Call Handling & Forwarding30 Incoming Call Information31 Call Flip31 To use Call Flip31 To add numbers to your Call Flip list32 Call Handling – Advanced Rules32 To create an Advanced Rule33 Messages & Notifications33 Voicemail Greeting33 Notifications35 My Mobile App Settings35 VoIP Calling36 Caller ID
36 RingOut Mode36 To make a RingOut call37 Default Launching37 Cloud Storage37 Logout38 Admin Phone System Settings39 Company Numbers and Info39 Direct Extension Numbers40 Using an Existing Number (Porting and Forwarding)40 To Transfer an Existing Number40 To Forward your Calls41 Auto-Receptionist Settings41 Company Business Hours41 How to Handle Incoming Calls: Greetings & Company Calls42 Company Greeting42 Recording your Company Greeting over the Phone42 The Company Operator Extension43 Company Dial-by-Name Directory44 Groups44 Benefits44 Call Queues
45 Add a Call Queue Group45 Call Queue Info47 Create an Announcement-Only Extension48 To record a custom announcement49 Create a Group Messages-Only Extension52 To record a custom greeting55 Other Administrator Settings
4
OverviewNew Look, New Functionality—Improved Usability and Security
Extend your TELUS Business Connect business phone system beyond your office, take and make calls, access voicemail, manage group settings, view faxes, monitor call
logs, and more.
The TELUS Business Connect Mobile App provides you and your employees with easy and convenient integrated communications—anytime, anywhere. Now they can easily
connect and collaborate through voice, and fax.
The mobile app is fully integrated with company directories. It allows individuals to see their contacts’ availability and eliminate phone tag or on-hold time. This new “Presence”
feature shows the real-time status of co-workers’ extensions (busy or not) across all devices, including their smartphones and tablets.
The new TELUS Business Connect mobile app also enables administrators to partition business and personal call logs separately for easy call tracking and phone expense
control.
The TELUS Business Connect Mobile App supports Bring Your Own Device (BYOD) initiatives, and empowers you and your employees with solutions such as company directory
and a single business identity for voice, text and fax— all while reducing your costs on devices, improving employee productivity, and safeguarding your business data.
NOTE: This document discusses managing and using the Mobile App with screen illustrations from an Android smartphone; the iPhone platform operates the same and look almost identical.
5
Express Setup for AdministratorsHow to Start
Configure and set up your system by logging in to your TELUS Business Connect online account from a Web browser. Follow the steps to activate Express Setup
and configure your account.
Next, from your smartphone, go to your device’s App store, search for TELUS Business Connect mobile app, download and install. Launch the App and log in with
your TELUS Business Connect number, extension, and password.
Or from your TELUS Business Connect online Web account, click the Tools dropdown menu on the far right of the menu bar, and select Mobile Apps.
Select the appropriate app to install on your smartphone. It will start your app store interface so you can download the app. Follow your usual procedure for
synchronizing the download to your mobile device.
NOTE: The TELUS Business Connect mobile app requires the account owner to have a Business Connect Office plan.
6
Setup for Managers
Download and install the TELUS Business Connect mobile app onto your smartphone,
if you haven’t already done so. Go to the App Store of your smartphone, search for
TELUS Business Connect, and follow the instructions to install the mobile app.
Managers are Users who are designated by the Administrator to manage Groups,
such as Call Queues and Paging Groups.
Once your organization’s TELUS Business Connect Administrator sets you up as a
manager on TELUS Business Connect, you’ll receive an email with a link giving your
manager extension, and creating a password.
NOTE: You must use the link provided in the email and create a password before you can
begin using TELUS Business Connect mobile app as a Group Manager.
Follow the on-screen instructions to create your password. You may use your existing
TELUS Business Connect password as your Group Manager password, if you wish.
Select and answer one of the questions from the Security Question dropdown menu.
Launch the TELUS Business Connect mobile app, and log in with your TELUS
Business Connect phone number, the Group extension number (rather than your
User extension number), and your password. This will log you in as Group Manager.
From the mobile app you can now set up your group details and add members or
devices, as appropriate—see details for Call Queues and Paging Groups described
elsewhere in this document.
You can make changes and update the group info at any time from your TELUS
Business Connect online account, or right from your smartphone app, by logging in
as Group Manager.
7
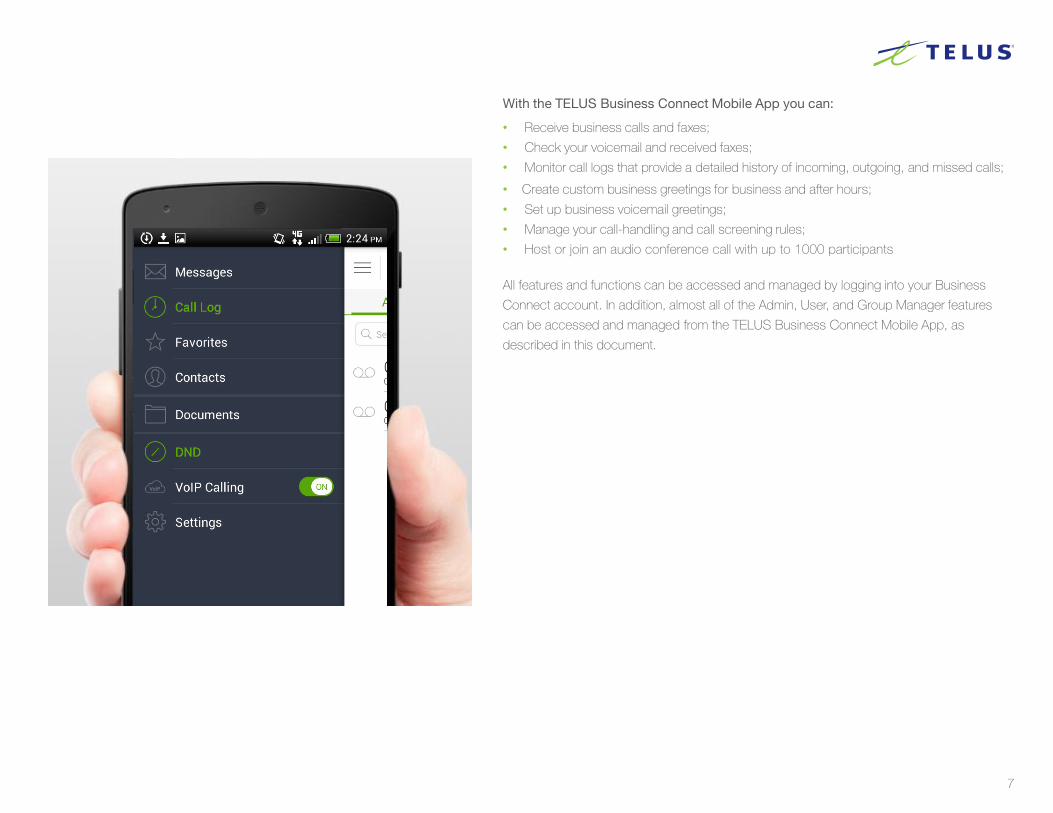
With the TELUS Business Connect Mobile App you can:
• Receive business calls and faxes;• Check your voicemail and received faxes;• Monitor call logs that provide a detailed history of incoming, outgoing, and missed calls;
• Create custom business greetings for business and after hours;• Set up business voicemail greetings;• Manage your call-handling and call screening rules;• Host or join an audio conference call with up to 1000 participants
All features and functions can be accessed and managed by logging into your Business
Connect account. In addition, almost all of the Admin, User, and Group Manager features
can be accessed and managed from the TELUS Business Connect Mobile App, as
described in this document.
8
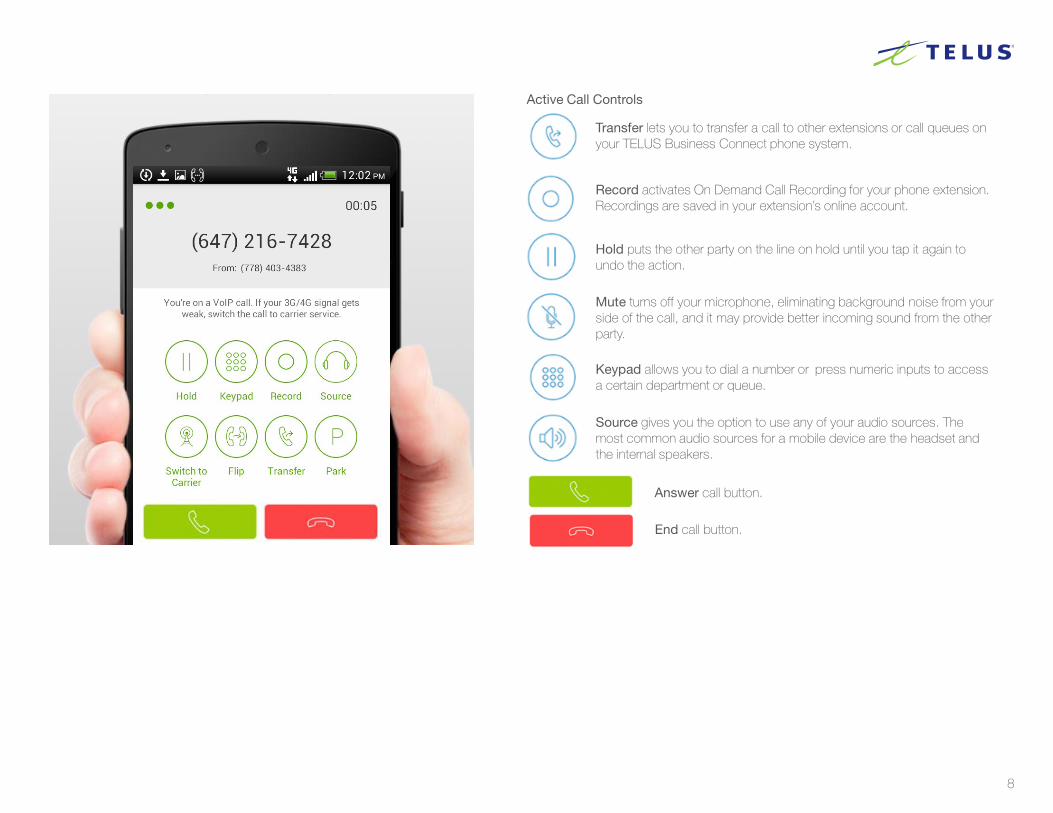
Transfer lets you to transfer a call to other extensions or call queues on your TELUS Business Connect phone system.
Record activates On Demand Call Recording for your phone extension. Recordings are saved in your extension’s online account.
Hold puts the other party on the line on hold until you tap it again to undo the action.
Mute turns off your microphone, eliminating background noise from your side of the call, and it may provide better incoming sound from the other party.
Keypad allows you to dial a number or press numeric inputs to access a certain department or queue.
Source gives you the option to use any of your audio sources. The most common audio sources for a mobile device are the headset and the internal speakers.
Answer call button.
End call button.
Active Call Controls

9
The Main Menu
On most of the App screens, click the three-line icon in the upper left of the
screen to slide out the App menu. (See left-facing red arrow in figure below.)
This gives you access to most of the App features including Messages,
Contacts, Documents, and Settings. You can also “swipe” left-to-right across
most screens to reveal this menu.
Messages
To see your voicemail and fax messages, tap the Menu icon, then tap Messages.
Tap the appropriate tab to see All, Voice, Fax, or Text messages. In the Search box,
search for messages by sender name or number.
Tap a message to listen, view, or read it. Tap the circled caret to the right of the
message to view information about it, and respond with:
• call back
• send a text or a fax to the number
• create a new contact
• add the number to an existing contact, or
• block the number
10
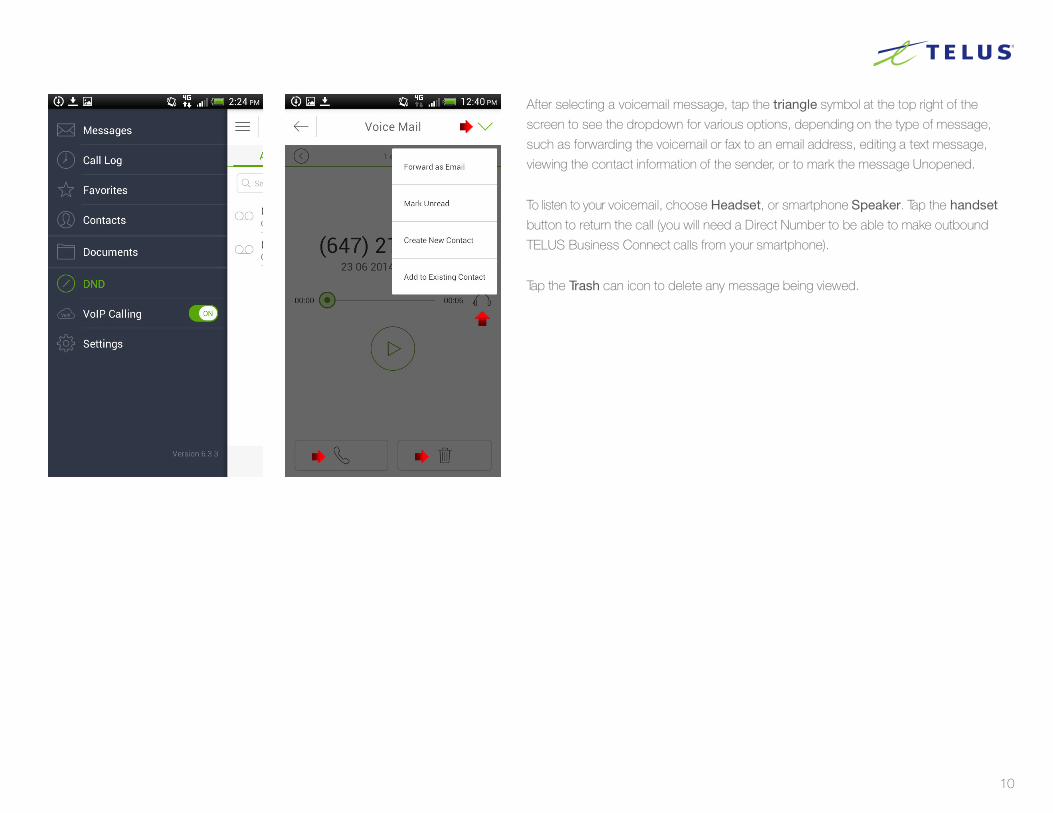
After selecting a voicemail message, tap the triangle symbol at the top right of the
screen to see the dropdown for various options, depending on the type of message,
such as forwarding the voicemail or fax to an email address, editing a text message,
viewing the contact information of the sender, or to mark the message Unopened.
To listen to your voicemail, choose Headset, or smartphone Speaker. Tap the handset
button to return the call (you will need a Direct Number to be able to make outbound
TELUS Business Connect calls from your smartphone).
Tap the Trash can icon to delete any message being viewed.
11
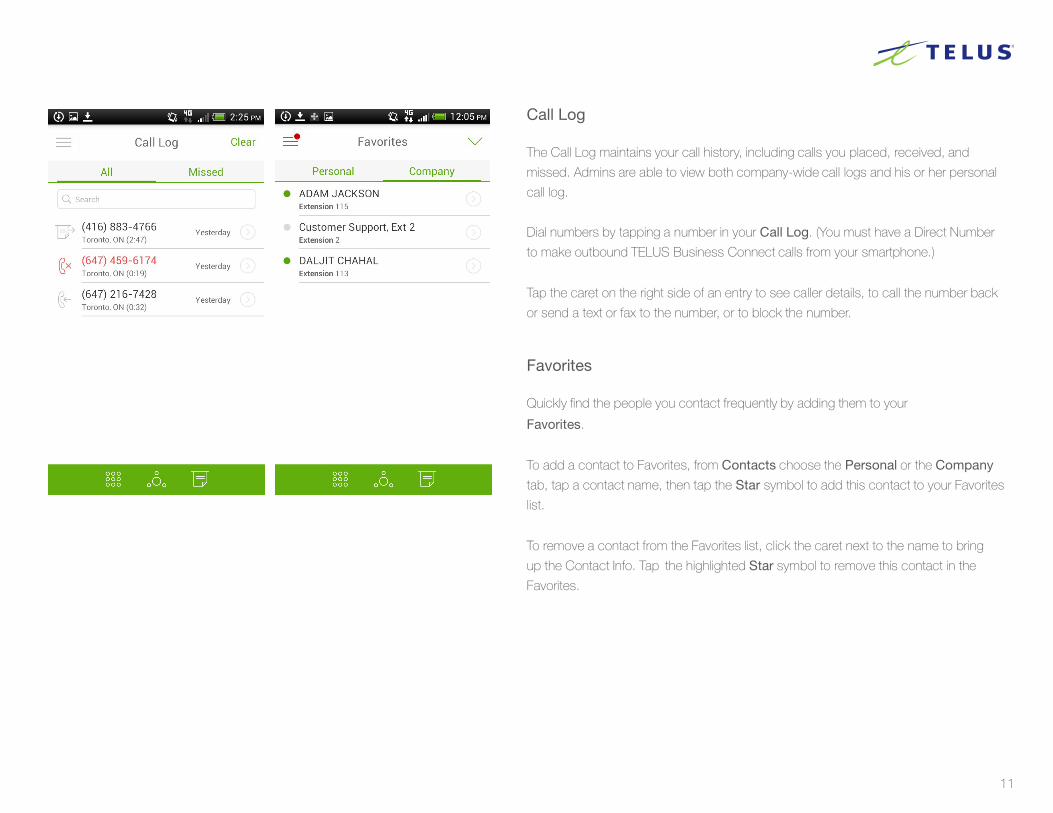
Call Log
The Call Log maintains your call history, including calls you placed, received, and
missed. Admins are able to view both company-wide call logs and his or her personal
call log.
Dial numbers by tapping a number in your Call Log. (You must have a Direct Number
to make outbound TELUS Business Connect calls from your smartphone.)
Tap the caret on the right side of an entry to see caller details, to call the number back
or send a text or fax to the number, or to block the number.
Favorites
Quickly find the people you contact frequently by adding them to your
Favorites.
To add a contact to Favorites, from Contacts choose the Personal or the Company
tab, tap a contact name, then tap the Star symbol to add this contact to your Favorites
list.
To remove a contact from the Favorites list, click the caret next to the name to bring
up the Contact Info. Tap the highlighted Star symbol to remove this contact in the
Favorites.
12
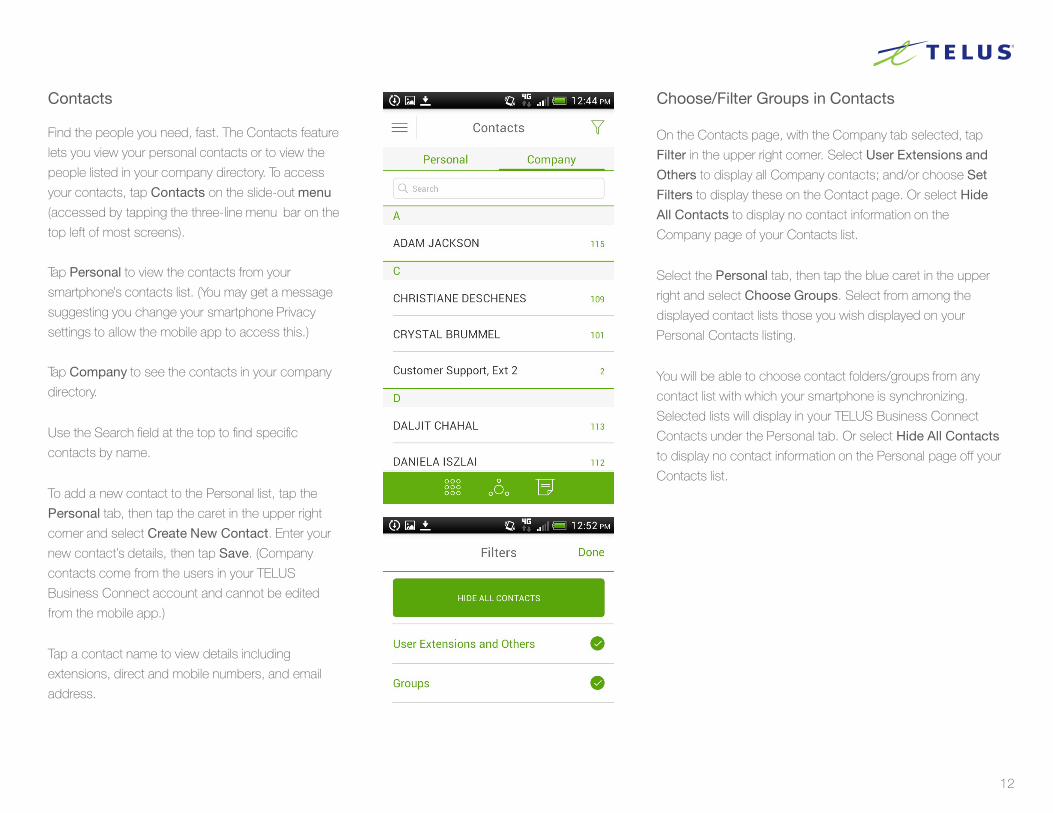
Contacts
Find the people you need, fast. The Contacts feature
lets you view your personal contacts or to view the
people listed in your company directory. To access
your contacts, tap Contacts on the slide-out menu
(accessed by tapping the three-line menu bar on the
top left of most screens).
Tap Personal to view the contacts from your
smartphone’s contacts list. (You may get a message
suggesting you change your smartphone Privacy
settings to allow the mobile app to access this.)
Tap Company to see the contacts in your company
directory.
Use the Search field at the top to find specific
contacts by name.
To add a new contact to the Personal list, tap the
Personal tab, then tap the caret in the upper right
corner and select Create New Contact. Enter your
new contact’s details, then tap Save. (Company
contacts come from the users in your TELUS
Business Connect account and cannot be edited
from the mobile app.)
Tap a contact name to view details including
extensions, direct and mobile numbers, and email
address.
Choose/Filter Groups in Contacts
On the Contacts page, with the Company tab selected, tap
Filter in the upper right corner. Select User Extensions and
Others to display all Company contacts; and/or choose Set
Filters to display these on the Contact page. Or select Hide
All Contacts to display no contact information on the
Company page of your Contacts list.
Select the Personal tab, then tap the blue caret in the upper
right and select Choose Groups. Select from among the
displayed contact lists those you wish displayed on your
Personal Contacts listing.
You will be able to choose contact folders/groups from any
contact list with which your smartphone is synchronizing.
Selected lists will display in your TELUS Business Connect
Contacts under the Personal tab. Or select Hide All Contacts
to display no contact information on the Personal page off your
Contacts list.
13
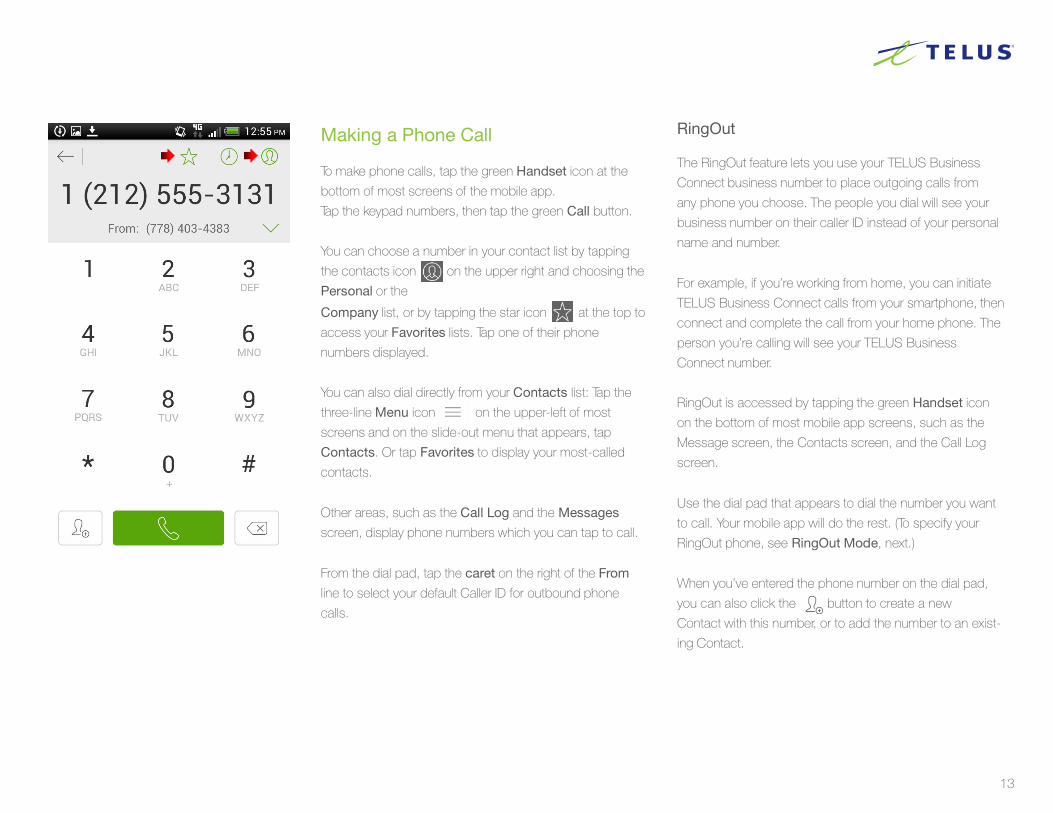
Making a Phone Call
To make phone calls, tap the green Handset icon at the
bottom of most screens of the mobile app.
Tap the keypad numbers, then tap the green Call button.
You can choose a number in your contact list by tapping
the contacts icon on the upper right and choosing the
Personal or the
Company list, or by tapping the star icon at the top to
access your Favorites lists. Tap one of their phone
numbers displayed.
You can also dial directly from your Contacts list: Tap the
three-line Menu icon on the upper-left of most
screens and on the slide-out menu that appears, tap
Contacts. Or tap Favorites to display your most-called
contacts.
Other areas, such as the Call Log and the Messages
screen, display phone numbers which you can tap to call.
From the dial pad, tap the caret on the right of the From
line to select your default Caller ID for outbound phone
calls.
RingOut
The RingOut feature lets you use your TELUS Business
Connect business number to place outgoing calls from
any phone you choose. The people you dial will see your
business number on their caller ID instead of your personal
name and number.
For example, if you’re working from home, you can initiate
TELUS Business Connect calls from your smartphone, then
connect and complete the call from your home phone. The
person you’re calling will see your TELUS Business
Connect number.
RingOut is accessed by tapping the green Handset icon
on the bottom of most mobile app screens, such as the
Message screen, the Contacts screen, and the Call Log
screen.
Use the dial pad that appears to dial the number you want
to call. Your mobile app will do the rest. (To specify your
RingOut phone, see RingOut Mode, next.)
When you’ve entered the phone number on the dial pad,
you can also click the button to create a new
Contact with this number, or to add the number to an exist-
ing Contact.
14
RingOut Mode
To make outbound calls, the mobile app uses your cellphone’s native calling
system through your cellphone carrier. Use RingOut Mode to maintain
your presentation on such calls, including such features as Caller ID and call
logging. You keep your personal cellphone number private. RingOut calls use
carrier voice minutes rather than your carrier data plan.
RingOut lets you use your TELUS Business Connect business number from
any phone you choose, including your smartphone. To configure, from
Settings >My Mobile App Settings, tap RingOut Mode.
Choose a TELUS Business Connect device to set as your RingOut Mode
phone. Or tap Another Phone to add phone numbers, then tap one of them
to be your RingOut device.
To avoid accidentally sending calls to your personal voicemail (if you don’t pick
up when your phone rings, or if you misdialed), turn on Confirm Connection
so the mobile app will prompt you to press 1 before it dials the number and
connects your call.
VoIP Calls
The TELUS Business Connect mobile app can make and receive calls using
VoIP (Voice over IP) which uses the Cloud (Internet) instead of your wireless
carrier’s 3G or 4G network. This can save carrier voice and data charges,
especially when traveling internationally.
15
Conferencing: Conference Calling
A single conference bridge phone number is provided for each account, shared
by all users—no need for your users to keep track of multiple bridge lines.
Each user gets their own individual host and participant access code, so they
can hold conference calls whenever they want, wherever they are.
Each user can host a conference with up to 1000 attendees, using their IP desk
phone while in the office, or their Softphone on their desktop computer, or the Busi-
ness Connect mobile app while on the go. Conferences are reservationless—you
send an invite to participants, and the conference starts as soon as you join as host.
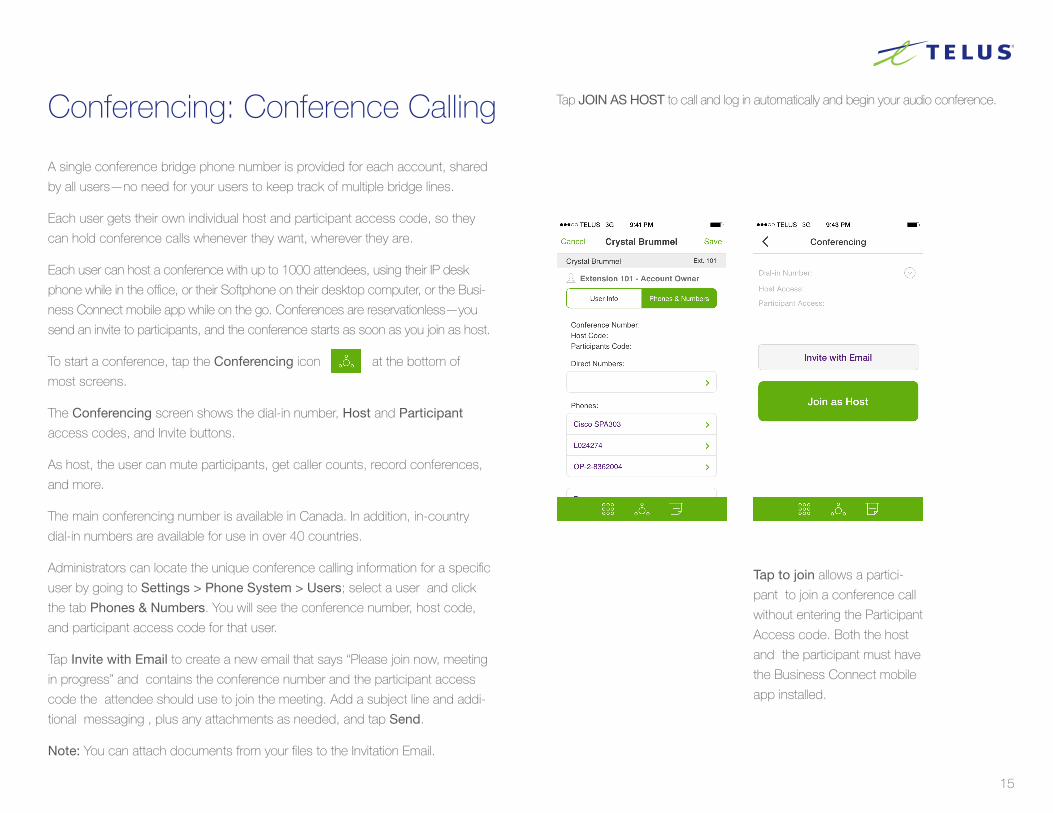
To start a conference, tap the Conferencing icon at the bottom of
most screens.
The Conferencing screen shows the dial-in number, Host and Participant
access codes, and Invite buttons.
As host, the user can mute participants, get caller counts, record conferences,
and more.
The main conferencing number is available in Canada. In addition, in-country
dial-in numbers are available for use in over 40 countries.
Administrators can locate the unique conference calling information for a specific
user by going to Settings > Phone System > Users; select a user and click
the tab Phones & Numbers. You will see the conference number, host code,
and participant access code for that user.
Tap Invite with Email to create a new email that says “Please join now, meeting
in progress” and contains the conference number and the participant access
code the attendee should use to join the meeting. Add a subject line and addi-
tional messaging , plus any attachments as needed, and tap Send.
Note: You can attach documents from your files to the Invitation Email.
Tap JOIN AS HOST to call and log in automatically and begin your audio conference.
Tap to join allows a partici-
pant to join a conference call
without entering the Participant
Access code. Both the host
and the participant must have
the Business Connect mobile
app installed.
16
FaxingYou can send, receive, and view faxes using the TELUS Business Connect mobile
app. If you have an iPhone, you can use that device’s AirPrint function to directly
print any fax.
First, we’ll cover viewing received faxes in the mobile app. Then we’ll set
up outbound faxing, and explain how to send faxes.
Receiving and Viewing Faxes
Your TELUS Business Connect phone number by default receives both voice calls
and faxes. (Optionally, you can set up specific extensions to receive only voice
calls or only faxes.)
View the faxes you’ve received in the Messages section of the TELUS Business
Connect mobile app. You can also arrange to receive faxes as PDF attachments in
your email account.
To access faxes on your smartphone:
1. Tap the Menu icon, then tap Messages.
2. For convenience, tap the Fax tab to see just your faxes.
3. Tap the Fax icon next to the fax message you want to view.
4. The fax will be displayed on screen.
FaxOut from Mobile App
FaxOut is available to all users with the latest TELUS Business Connect mobile
app. You can send or forward documents as fax messages to any contact
anywhere from your iOS and Android-powered devices.
1. Launch the TELUS Business Connect mobile app from your mobile device.
2. Tap the Fax tab.
3. Enter recipient’s name (with associated number) in the To: field. Note: You can also click the icon to choose a contact from your phone.
4. Select your Cover Page (optional) and fill it in.
5. Tap to attach a document.
6. Attach files from Dropbox, Box, Google Drive or your phone or tablet.
7. Authorize TELUS Business Connect to access your files (required only once).
8. Tap Send.
Note: Documents can be added to your Documents folder from email
attachments. From your smartphone’s email app, open an email and tap and hold
the attachment name until the grey screen of app icons displays; tap the icon
Open. The document will be added to the Documents folder, from which it can
be selected for faxing.
17
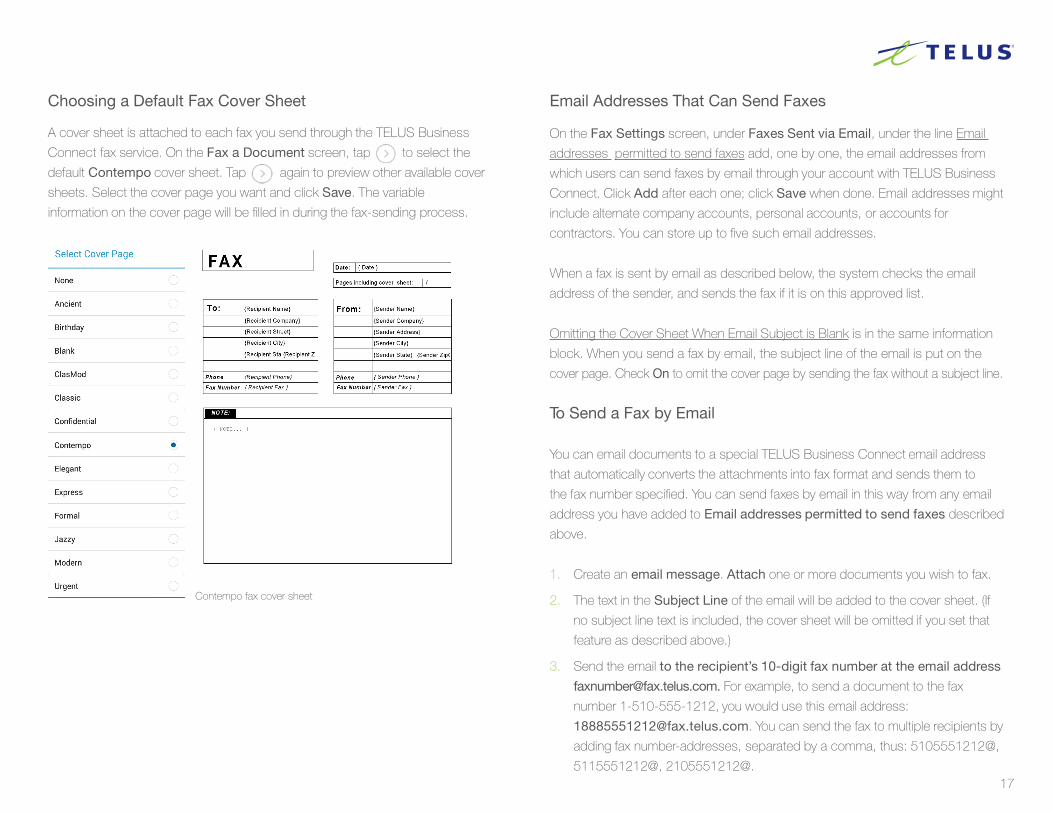
Choosing a Default Fax Cover Sheet
A cover sheet is attached to each fax you send through the TELUS Business
Connect fax service. On the Fax a Document screen, tap to select the
default Contempo cover sheet. Tap again to preview other available cover
sheets. Select the cover page you want and click Save. The variable
information on the cover page will be filled in during the fax-sending process.
Contempo fax cover sheet
Email Addresses That Can Send Faxes
On the Fax Settings screen, under Faxes Sent via Email, under the line Email
addresses permitted to send faxes add, one by one, the email addresses from
which users can send faxes by email through your account with TELUS Business
Connect. Click Add after each one; click Save when done. Email addresses might
include alternate company accounts, personal accounts, or accounts for
contractors. You can store up to five such email addresses.
When a fax is sent by email as described below, the system checks the email
address of the sender, and sends the fax if it is on this approved list.
Omitting the Cover Sheet When Email Subject is Blank is in the same information
block. When you send a fax by email, the subject line of the email is put on the
cover page. Check On to omit the cover page by sending the fax without a subject line.
To Send a Fax by Email
You can email documents to a special TELUS Business Connect email address
that automatically converts the attachments into fax format and sends them to
the fax number specified. You can send faxes by email in this way from any email
address you have added to Email addresses permitted to send faxes described
above.
1. Create an email message. Attach one or more documents you wish to fax.
2. The text in the Subject Line of the email will be added to the cover sheet. (If
no subject line text is included, the cover sheet will be omitted if you set that
feature as described above.)
3. Send the email to the recipient’s 10-digit fax number at the email address
[email protected]. For example, to send a document to the fax
number 1-510-555-1212, you would use this email address:
[email protected]. You can send the fax to multiple recipients by
adding fax number-addresses, separated by a comma, thus: 5105551212@,
5115551212@, 2105551212@.
18
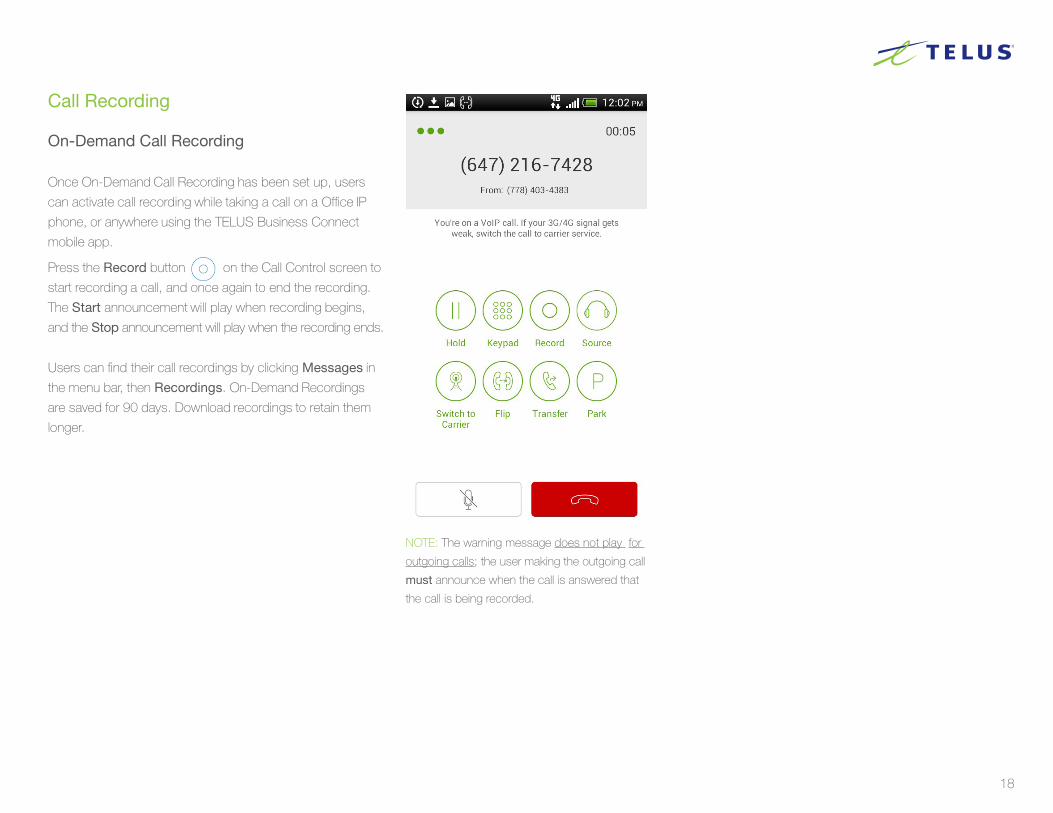
Call Recording
On-Demand Call Recording
Once On-Demand Call Recording has been set up, users
can activate call recording while taking a call on a Office IP
phone, or anywhere using the TELUS Business Connect
mobile app.
Press the Record button on the Call Control screen to
start recording a call, and once again to end the recording.
The Start announcement will play when recording begins,
and the Stop announcement will play when the recording ends.
Users can find their call recordings by clicking Messages in
the menu bar, then Recordings. On-Demand Recordings
are saved for 90 days. Download recordings to retain them
longer.
NOTE: The warning message does not play for
outgoing calls; the user making the outgoing call
must announce when the call is answered that
the call is being recorded.
19
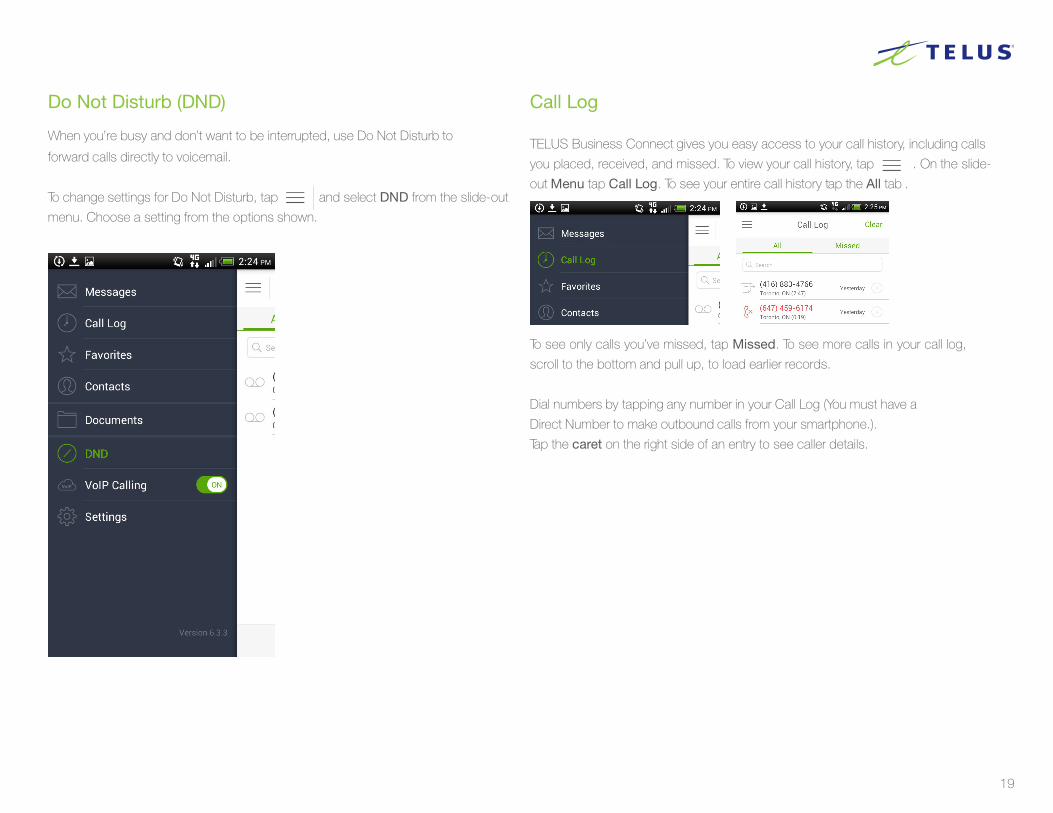
Do Not Disturb (DND)
When you’re busy and don’t want to be interrupted, use Do Not Disturb to
forward calls directly to voicemail.
To change settings for Do Not Disturb, tap and select DND from the slide-out
menu. Choose a setting from the options shown.
Call Log
TELUS Business Connect gives you easy access to your call history, including calls
you placed, received, and missed. To view your call history, tap . On the slide-
out Menu tap Call Log. To see your entire call history tap the All tab .
To see only calls you’ve missed, tap Missed. To see more calls in your call log,
scroll to the bottom and pull up, to load earlier records.
Dial numbers by tapping any number in your Call Log (You must have a
Direct Number to make outbound calls from your smartphone.).
Tap the caret on the right side of an entry to see caller details.
20
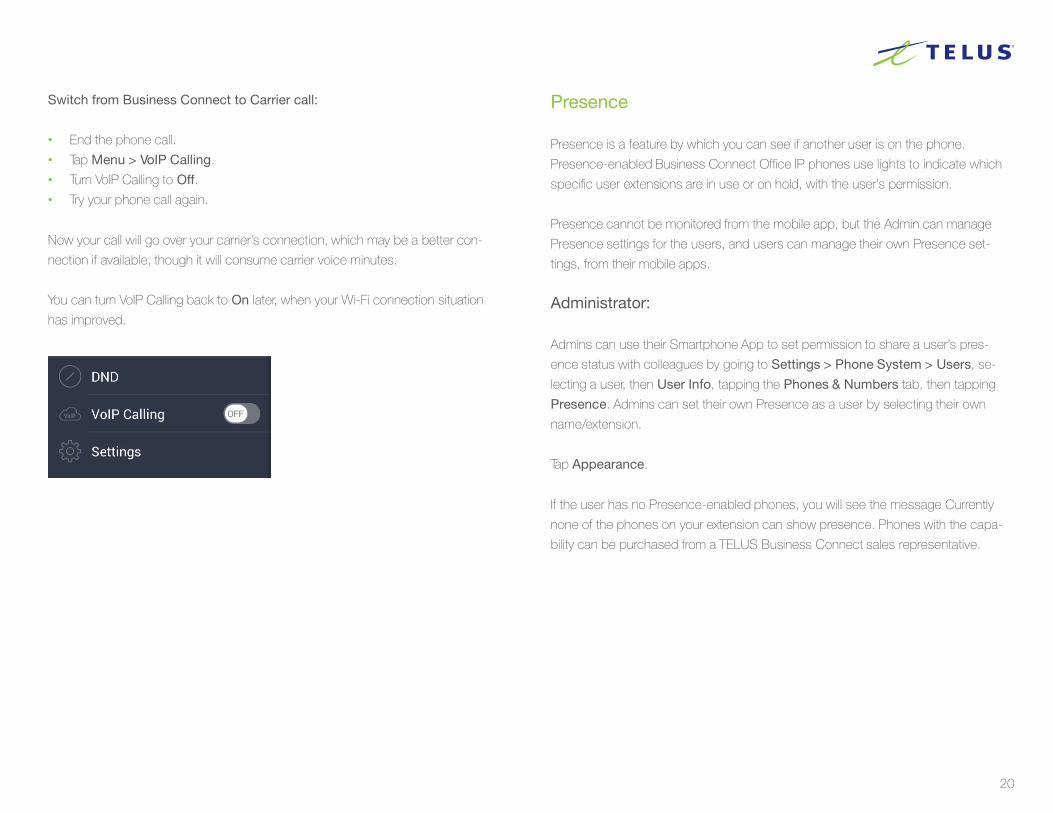
Switch from Business Connect to Carrier call:
• End the phone call.• Tap Menu > VoIP Calling.• Turn VoIP Calling to Off.• Try your phone call again.
Now your call will go over your carrier’s connection, which may be a better con-
nection if available, though it will consume carrier voice minutes.
You can turn VoIP Calling back to On later, when your Wi-Fi connection situation
has improved.
Presence
Presence is a feature by which you can see if another user is on the phone.
Presence-enabled Business Connect Office IP phones use lights to indicate which
specific user extensions are in use or on hold, with the user’s permission.
Presence cannot be monitored from the mobile app, but the Admin can manage
Presence settings for the users, and users can manage their own Presence set-
tings, from their mobile apps.
Administrator:
Admins can use their Smartphone App to set permission to share a user’s pres-
ence status with colleagues by going to Settings > Phone System > Users, se-
lecting a user, then User Info, tapping the Phones & Numbers tab, then tapping
Presence. Admins can set their own Presence as a user by selecting their own
name/extension.
Tap Appearance.
If the user has no Presence-enabled phones, you will see the message Currently
none of the phones on your extension can show presence. Phones with the capa-
bility can be purchased from a TELUS Business Connect sales representative.
21
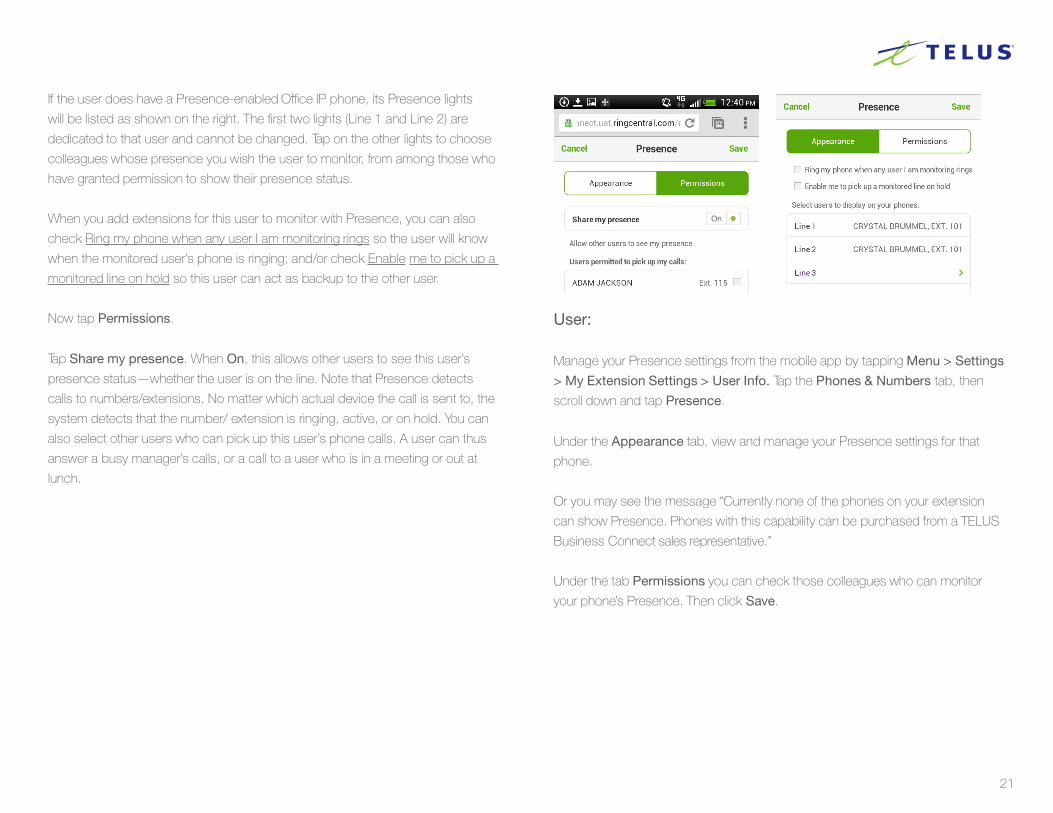
If the user does have a Presence-enabled Office IP phone, its Presence lights
will be listed as shown on the right. The first two lights (Line 1 and Line 2) are
dedicated to that user and cannot be changed. Tap on the other lights to choose
colleagues whose presence you wish the user to monitor, from among those who
have granted permission to show their presence status.
When you add extensions for this user to monitor with Presence, you can also
check Ring my phone when any user I am monitoring rings so the user will know
when the monitored user’s phone is ringing; and/or check Enable me to pick up a
monitored line on hold so this user can act as backup to the other user.
Now tap Permissions.
Tap Share my presence. When On, this allows other users to see this user’s
presence status—whether the user is on the line. Note that Presence detects
calls to numbers/extensions. No matter which actual device the call is sent to, the
system detects that the number/ extension is ringing, active, or on hold. You can
also select other users who can pick up this user’s phone calls. A user can thus
answer a busy manager’s calls, or a call to a user who is in a meeting or out at
lunch.
User:
Manage your Presence settings from the mobile app by tapping Menu > Settings
> My Extension Settings > User Info. Tap the Phones & Numbers tab, then
scroll down and tap Presence.
Under the Appearance tab, view and manage your Presence settings for that
phone.
Or you may see the message “Currently none of the phones on your extension
can show Presence. Phones with this capability can be purchased from a TELUS
Business Connect sales representative.”
Under the tab Permissions you can check those colleagues who can monitor
your phone’s Presence. Then click Save.
22
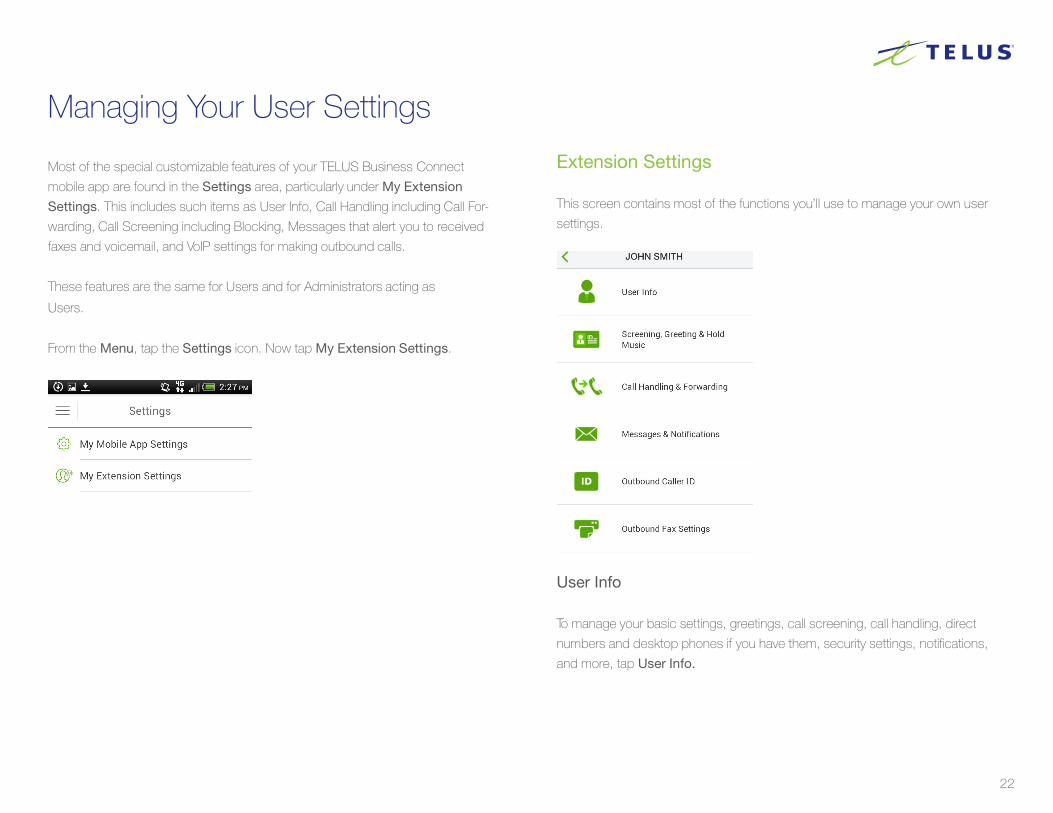
Managing Your User Settings
Most of the special customizable features of your TELUS Business Connect
mobile app are found in the Settings area, particularly under My Extension
Settings. This includes such items as User Info, Call Handling including Call For-
warding, Call Screening including Blocking, Messages that alert you to received
faxes and voicemail, and VoIP settings for making outbound calls.
These features are the same for Users and for Administrators acting as
Users.
From the Menu, tap the Settings icon. Now tap My Extension Settings.
Extension Settings
This screen contains most of the functions you’ll use to manage your own user
settings.
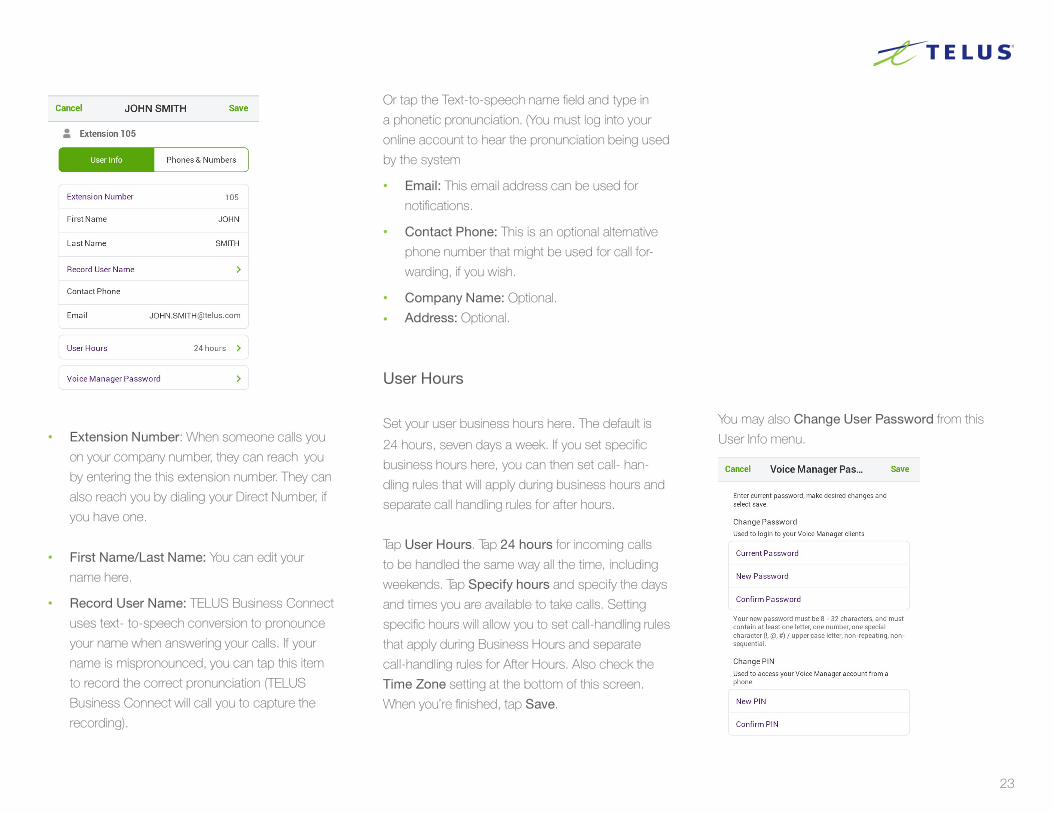
User Info
To manage your basic settings, greetings, call screening, call handling, direct
numbers and desktop phones if you have them, security settings, notifications,
and more, tap User Info.
23
• Extension Number: When someone calls you
on your company number, they can reach you
by entering the this extension number. They can
also reach you by dialing your Direct Number, if
you have one.
• First Name/Last Name: You can edit your
name here.
• Record User Name: TELUS Business Connect
uses text- to-speech conversion to pronounce
your name when answering your calls. If your
name is mispronounced, you can tap this item
to record the correct pronunciation (TELUS
Business Connect will call you to capture the
recording).
Or tap the Text-to-speech name field and type in
a phonetic pronunciation. (You must log into your
online account to hear the pronunciation being used
by the system
• Email: This email address can be used for
notifications.
• Contact Phone: This is an optional alternative
phone number that might be used for call for-
warding, if you wish.
• Company Name: Optional.
• Address: Optional.
User Hours
Set your user business hours here. The default is
24 hours, seven days a week. If you set specific
business hours here, you can then set call- han-
dling rules that will apply during business hours and
separate call handling rules for after hours.
Tap User Hours. Tap 24 hours for incoming calls
to be handled the same way all the time, including
weekends. Tap Specify hours and specify the days
and times you are available to take calls. Setting
specific hours will allow you to set call-handling rules
that apply during Business Hours and separate
call-handling rules for After Hours. Also check the
Time Zone setting at the bottom of this screen.
When you’re finished, tap Save.
You may also Change User Password from this
User Info menu.
24
Phones & Numbers
At the top of the User Info screen, tap Phones & Numbers. Here you will see the direct-dial numbers, if any, assigned to you.
• Conference Number: On this screen you will also see your company Conference Number, Host Code, and Participant Code. You can use this information to start or join a conference; or you can simply tap the slideout Menu and tap Conference to set up and manage your Conferences.
• Direct Numbers allow customers to contact you directly without having to go through the company receptionist or phone tree.
If you have direct numbers, you can tap each number to select the number type—voice and fax, voice only, or fax only—for each.
Tap Add a Direct Number—if you are not an Administrator, you will receive a message to contact your Administrator to request direct numbers.
If you do have Administrator privileges, you can add a Direct Number yourself. To add one or more numbers, tap Add Number and follow the screens to choose a Local, a Toll-Free, or a Vanity (custom) number. Additional charges for extra numbers will be provided on the Order Confirmation screen.
• Add Phone: This is an Administrator function and must be done through the RingCentral online account. Administrators can add, remove, or reassign phones.
Presence
See “Presence” above for information on managing Presence settings.
25
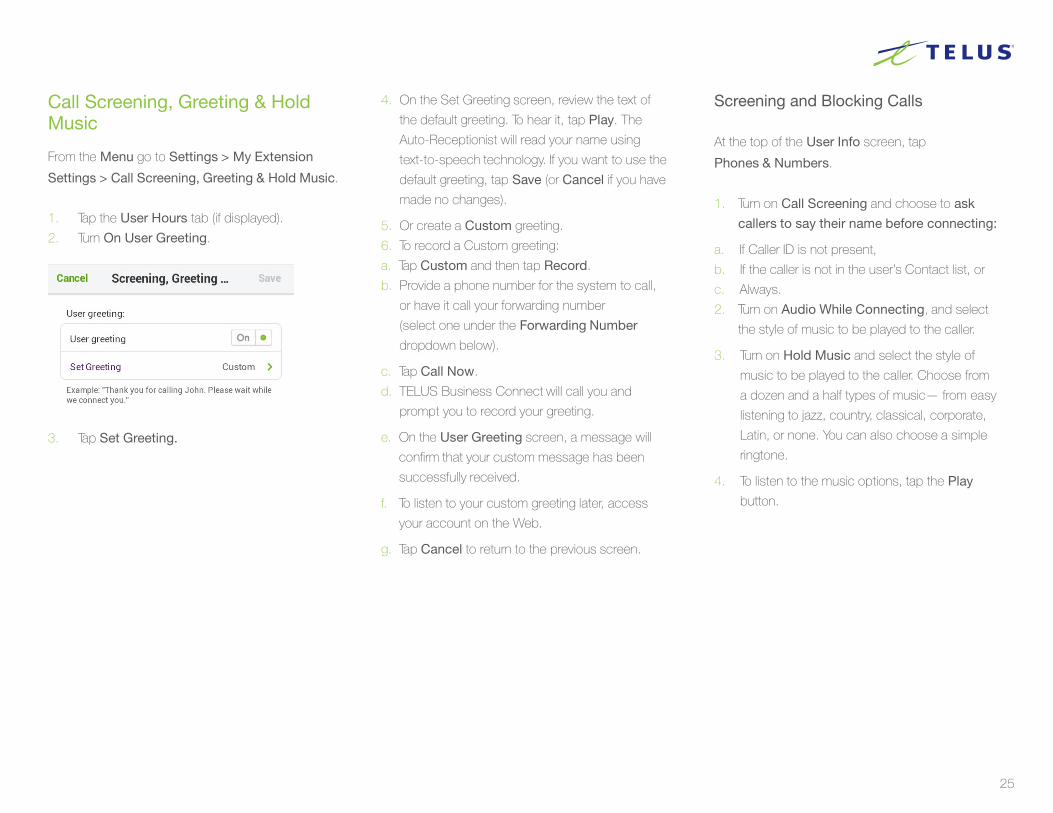
Call Screening, Greeting & Hold Music
From the Menu go to Settings > My Extension
Settings > Call Screening, Greeting & Hold Music.
1. Tap the User Hours tab (if displayed).
2. Turn On User Greeting.
3. Tap Set Greeting.
4. On the Set Greeting screen, review the text of
the default greeting. To hear it, tap Play. The
Auto-Receptionist will read your name using
text-to-speech technology. If you want to use the
default greeting, tap Save (or Cancel if you have
made no changes).
5. Or create a Custom greeting.
6. To record a Custom greeting:
a. Tap Custom and then tap Record.
b. Provide a phone number for the system to call,
or have it call your forwarding number
(select one under the Forwarding Number
dropdown below).
c. Tap Call Now.
d. TELUS Business Connect will call you and
prompt you to record your greeting.
e. On the User Greeting screen, a message will
confirm that your custom message has been
successfully received.
f. To listen to your custom greeting later, access
your account on the Web.
g. Tap Cancel to return to the previous screen.
Screening and Blocking Calls
At the top of the User Info screen, tap
Phones & Numbers.
1. Turn on Call Screening and choose to ask
callers to say their name before connecting:
a. If Caller ID is not present,
b. If the caller is not in the user’s Contact list, or
c. Always.
2. Turn on Audio While Connecting, and select
the style of music to be played to the caller.
3. Turn on Hold Music and select the style of
music to be played to the caller. Choose from
a dozen and a half types of music— from easy
listening to jazz, country, classical, corporate,
Latin, or none. You can also choose a simple
ringtone.
4. To listen to the music options, tap the Play
button.

26
5. Tap Blocked Numbers and select from the
options for blocking calls.
a. All Calls—If selected, you will not receive any
calls or faxes made to this number, unless you
select Allowed Numbers, below, and enter
specific numbers or area codes.
b. Specific calls will block all calls and faxes from
specific numbers or area codes you enter, or will
block calls and faxes with no Caller ID.
c. You can also Block calls from Pay Phones.
Each choice also lets you set the message callers
will hear, such as “This number is not available from
your calling area” or “Mailbox Full.”
6. Tap Save.
Repeat this process with the After Hours tab.
After Hours Greeting
NOTE: If in Call Handling/After Hours you choose Only
Play Greeting and Disconnect, you will now have the
opportunity to choose a Default message or a Custom
message.
If in Call Handling/After Hours you instead chose
to Unconditionally forward after-hours calls, or to
send after-hours callers directly to voicemail, your
After-Hours greeting will not be played. You can still
set Blocked Numbers handling.
27
Call Handling & Forwarding
Go to Settings > My Extension Settings > Call Handling & Forwarding.
Review Business Hours and After Hours settings, and create Advanced
call-handling rules.
User Hours Call Handling & Forwarding
Choose from among the many options for determining which phones will ring, in
what order, when calls come in during User business hours.
• Your TELUS Business Connect Direct Numbers, if you have any, are listed
first. Tap On for the ones you want to ring your during business hours. If you
have no direct numbers, but only extensions, no numbers will be displayed
here.
• Tap Ring my existing numbers to add non-TELUS Business Connect
numbers you may have, such as your home phone. Tap the space next to the
label, such as Home, and type in a phone number, then tap On to activate it.
• To call outside numbers with extensions, put an asterisk between them, thus:
[number] * [extension]. The system will dial the number, pause, then dial the
extension.
• Tap Forward calls to other user’s phone to select other users on your-
TELUS Business Connect account to add to your forwarding list.
• Tap Change Ring Order to decide in which order phones will ring when using
Ring Sequentially. Tap Back when done.
• Tap Edit Ring Groups to check phones you want to be treated as a group.
For example, if you use Ring Sequentially, then your Ring Order can include
groups of numbers that will ring as a group (that is, simultaneously when it is
their turn). Click Back when done.
• Tap Number of Rings to set how many times a given phone will ring before
the call is forwarded to the next number, or sent to voicemail. (Keep in mind
how many total rings callers will be subject to if the call is not answered.)
• Tap Sequentially or Simultaneously to have the phones to ring one after the
other in the order given in Ring Order, or all at once.
• Tap Smartphone and Softphone to have your TELUS Business Connect
Softphone call controller, if you have downloaded and installed it on your
desktop computer, display incoming calls as soon as they come in. This
gives you the opportunity to pick up the call on your Softphone, or send it to
voicemail, or otherwise manage the call before other call-handling rules begin.
Select the number of rings to Wait before forwarding begins.
After-Hours Call Handling & Forwarding
Tap After Hours, then select:
• Send callers to voicemail—You will be able to create a custom voicemail
message or accept the default message.
• Play announcement and disconnect—You will be able to create a custom
announcement or accept the default message.
• Forward Calls—Turn On phones listed under Ring these phones during after
hours.
• Unconditional Forwarding sends calls directly to a specified number without
applying any call-handling or call-screening rules.
28
Incoming Call Information
At the bottom of the User Call Handling screen, tap Incoming Call Information to
set how inbound calls will be displayed to you on your device—helpful for distin-
guishing business calls from personal calls. (Settings for Incoming Call Information
are the same for both Business Hours and After Hours screens, not separate.)
• Incoming number displayed to me – Typically you will see the Caller ID of an
incoming call. You can tap Caller’s Phone Number Options, just below, and
choose, for callers whose Caller ID is blocked or unknown, to have displayed
the number being called.
You can also have a numeric prefix or suffix added to the Caller ID being dis-
played, which can be useful for immediately identifying calls from your TELUS
Business Connect system, to distinguish them from incoming personal calls.
Under Display this call information you can tap On TELUS Business Connect
phones only or display the call information on All Phones.
Alternately, tap Called Number to have the number being called displayed instead
of the Caller ID. Again, this is useful for recognizing business calls.
• Play announcement before connecting. When you receive a call from the
TELUS Business Connect system, whether directly or by call forwarding,
you will hear “You have a call; press 1 to accept.” This tells you the call is a
business call, rather than a personal call. You can set this feature so that you
always get such an announcement, never get such an announcement, or
only get such an announcement when the call is coming in to a non-TELUS
Business Connect device—such as when calls are forwarded to your home
phone.
• Include Mailbox Name in announcement. The mailbox name being called is
played as part of the incoming call information announcement—for example,
“Mary, you have a call,” or “Sales, you have a call.”
• Require my password to answer protects your business calls when on the
road or at home by requiring your TELUS Business Connect login password
for any calls coming through TELUS Business Connect, even calls forwarded
to your home phone, for example.
29
Call Flip
TELUS Business Connect Call Flip lets you transfer live conversations from one
device to another quickly and easily. For example, when you are on a call and
arrive home after your commute, you can flip the call to your home phone. Simply
dial two numbers and Flip.
To manage your Flip numbers, go to Settings > My Extension Settings > Call
Handling & Forwarding. Towards the bottom of Call Handling, click the Call Flip
bar. (You will find a Call Flip bar on both Business Hours and After Hours screens;
settings are the same on both, not separate.)
You will see a list of numbers/devices assigned to you, including desk phones,
smartphones, and the Softphone, as well as numbers and extensions from your
Company Contact list. The first eight positions are your Call Flip number posi-
tions. Use the up-and-down arrows to move entries up and down until you have
populated your eight Flip positions to your satisfaction.
To use Call Flip
When you are on a phone call, press the asterisk key (*) and a number corre-
sponding to the device to which it is assigned, and the call is transferred immedi-
ately to that device. For example, if you have the number 2 assigned to your home
phone, tapping *2 while you are on a call will instantly transfer the call to your
home phone. Call Flip makes it easy and convenient to flip calls from device to
device as you move about.
To add numbers to your Call Flip list
Back on the main Call Handling & Forwarding screen, tap Ring my existing
phone numbers, turn on other devices listed, and also to enter additional phone
numbers such as your home phone, and tap them On.
Tap Save.
Tap Call Flip. You should see the phones you selected added to the Call Flip list.
You can change the order (and thus the assigned Flip numbers) to suit. (If you
don’t see the numbers you added, go back to the previous step and remember
to Save before moving on to Call Flip.) The numbered entries not being used are
labeled “Unused”.
30
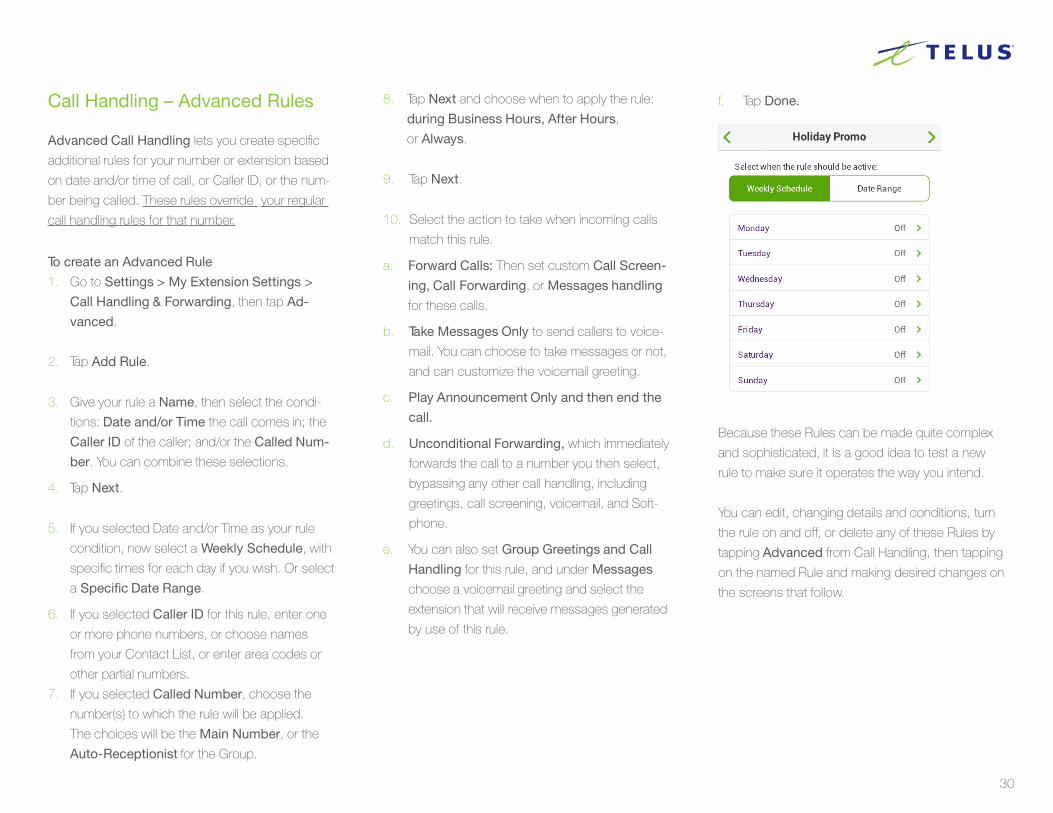
Call Handling – Advanced Rules
Advanced Call Handling lets you create specific
additional rules for your number or extension based
on date and/or time of call, or Caller ID, or the num-
ber being called. These rules override your regular
call handling rules for that number.
To create an Advanced Rule
1. Go to Settings > My Extension Settings >
Call Handling & Forwarding, then tap Ad-
vanced.
2. Tap Add Rule.
3. Give your rule a Name, then select the condi-
tions: Date and/or Time the call comes in; the
Caller ID of the caller; and/or the Called Num-
ber. You can combine these selections.
4. Tap Next.
5. If you selected Date and/or Time as your rule
condition, now select a Weekly Schedule, with
specific times for each day if you wish. Or select
a Specific Date Range.
6. If you selected Caller ID for this rule, enter one
or more phone numbers, or choose names
from your Contact List, or enter area codes or
other partial numbers.
7. If you selected Called Number, choose the
number(s) to which the rule will be applied.
The choices will be the Main Number, or the
Auto-Receptionist for the Group.
8. Tap Next and choose when to apply the rule:
during Business Hours, After Hours,
or Always.
9. Tap Next.
10. Select the action to take when incoming calls
match this rule.
a. Forward Calls: Then set custom Call Screen-
ing, Call Forwarding, or Messages handling
for these calls.
b. Take Messages Only to send callers to voice-
mail. You can choose to take messages or not,
and can customize the voicemail greeting.
c. Play Announcement Only and then end the
call.
d. Unconditional Forwarding, which immediately
forwards the call to a number you then select,
bypassing any other call handling, including
greetings, call screening, voicemail, and Soft-
phone.
e. You can also set Group Greetings and Call
Handling for this rule, and under Messages
choose a voicemail greeting and select the
extension that will receive messages generated
by use of this rule.
f. Tap Done.
Because these Rules can be made quite complex
and sophisticated, it is a good idea to test a new
rule to make sure it operates the way you intend.
You can edit, changing details and conditions, turn
the rule on and off, or delete any of these Rules by
tapping Advanced from Call Handling, then tapping
on the named Rule and making desired changes on
the screens that follow.
31
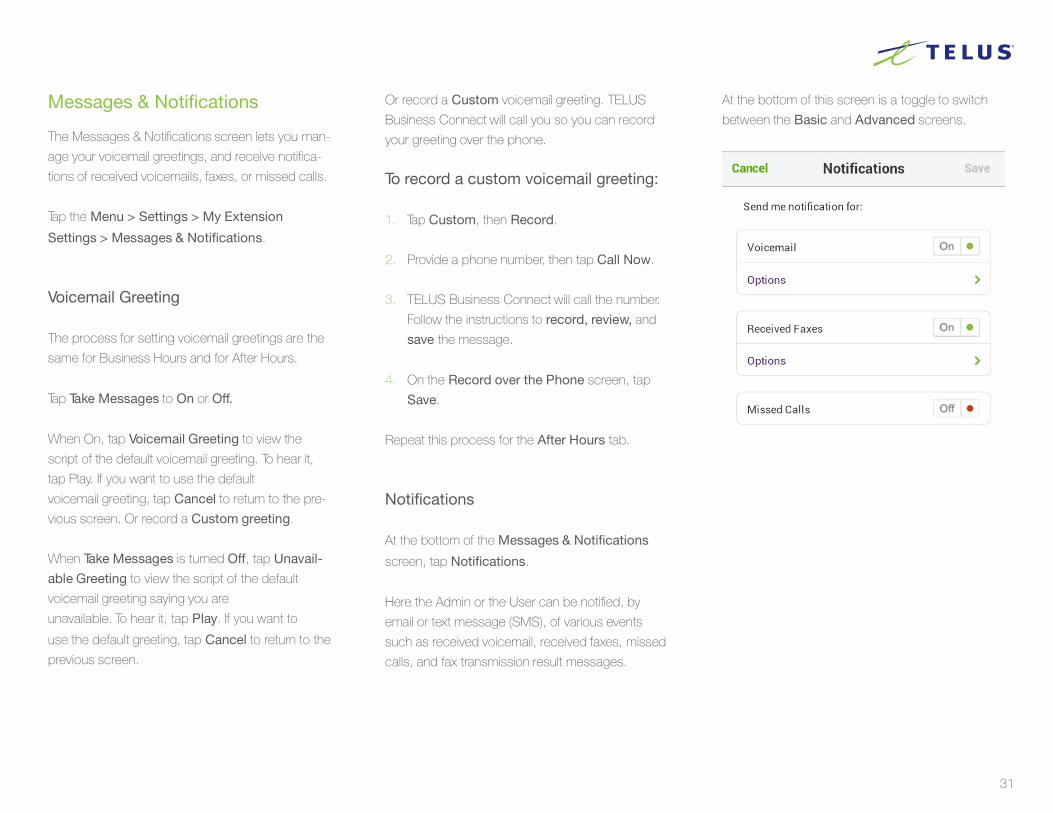
Messages & Notifications
The Messages & Notifications screen lets you man-
age your voicemail greetings, and receive notifica-
tions of received voicemails, faxes, or missed calls.
Tap the Menu > Settings > My Extension
Settings > Messages & Notifications.
Voicemail Greeting
The process for setting voicemail greetings are the
same for Business Hours and for After Hours.
Tap Take Messages to On or Off.
When On, tap Voicemail Greeting to view the
script of the default voicemail greeting. To hear it,
tap Play. If you want to use the default
voicemail greeting, tap Cancel to return to the pre-
vious screen. Or record a Custom greeting.
When Take Messages is turned Off, tap Unavail-
able Greeting to view the script of the default
voicemail greeting saying you are
unavailable. To hear it, tap Play. If you want to
use the default greeting, tap Cancel to return to the
previous screen.
Or record a Custom voicemail greeting. TELUS
Business Connect will call you so you can record
your greeting over the phone.
To record a custom voicemail greeting:
1. Tap Custom, then Record.
2. Provide a phone number, then tap Call Now.
3. TELUS Business Connect will call the number.
Follow the instructions to record, review, and
save the message.
4. On the Record over the Phone screen, tap
Save.
Repeat this process for the After Hours tab.
Notifications
At the bottom of the Messages & Notifications
screen, tap Notifications.
Here the Admin or the User can be notified, by
email or text message (SMS), of various events
such as received voicemail, received faxes, missed
calls, and fax transmission result messages.
At the bottom of this screen is a toggle to switch
between the Basic and Advanced screens.
32
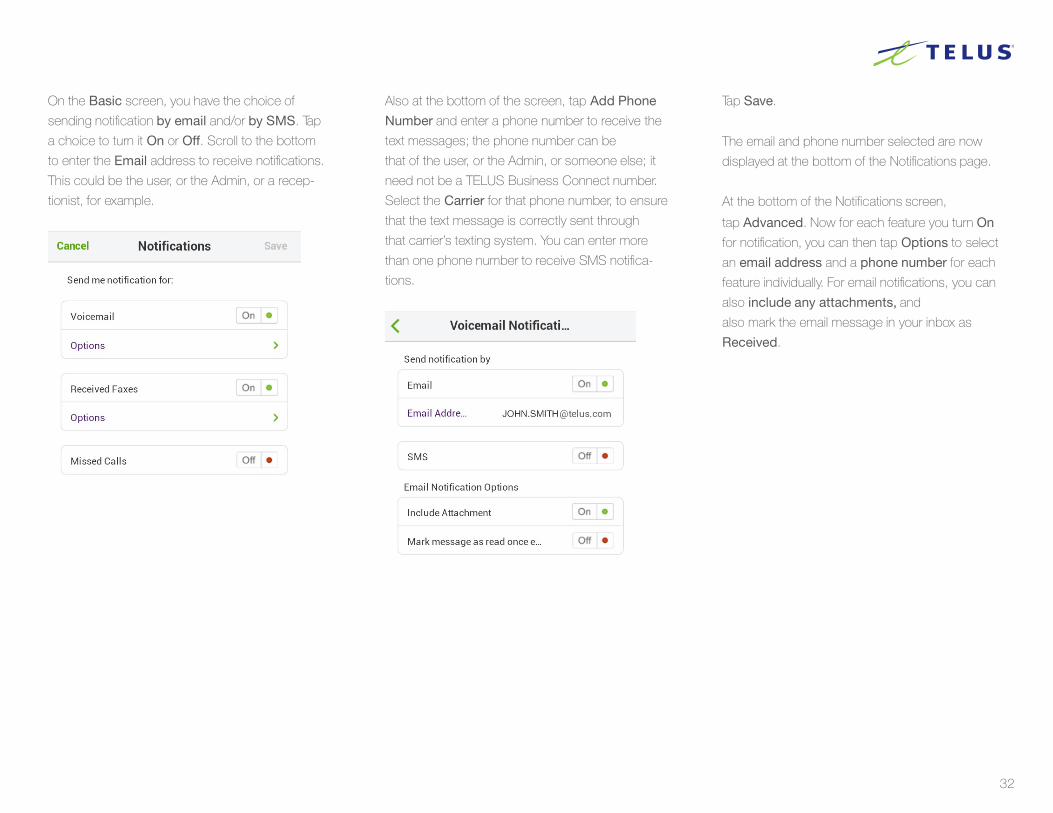
On the Basic screen, you have the choice of
sending notification by email and/or by SMS. Tap
a choice to turn it On or Off. Scroll to the bottom
to enter the Email address to receive notifications.
This could be the user, or the Admin, or a recep-
tionist, for example.
Also at the bottom of the screen, tap Add Phone
Number and enter a phone number to receive the
text messages; the phone number can be
that of the user, or the Admin, or someone else; it
need not be a TELUS Business Connect number.
Select the Carrier for that phone number, to ensure
that the text message is correctly sent through
that carrier’s texting system. You can enter more
than one phone number to receive SMS notifica-
tions.
Tap Save.
The email and phone number selected are now
displayed at the bottom of the Notifications page.
At the bottom of the Notifications screen,
tap Advanced. Now for each feature you turn On
for notification, you can then tap Options to select
an email address and a phone number for each
feature individually. For email notifications, you can
also include any attachments, and
also mark the email message in your inbox as
Received.
33
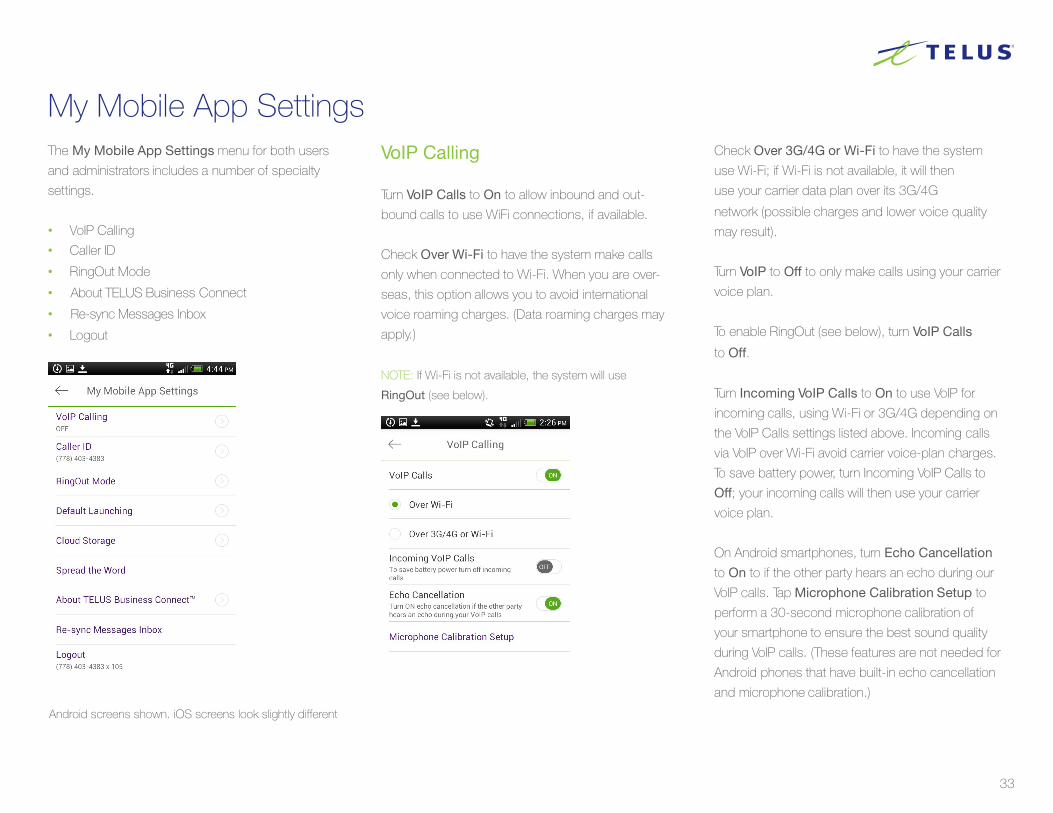
The My Mobile App Settings menu for both users
and administrators includes a number of specialty
settings.
• VoIP Calling• Caller ID
• RingOut Mode
• About TELUS Business Connect
• Re-sync Messages Inbox
• Logout
VoIP Calling
Turn VoIP Calls to On to allow inbound and out-
bound calls to use WiFi connections, if available.
Check Over Wi-Fi to have the system make calls
only when connected to Wi-Fi. When you are over-
seas, this option allows you to avoid international
voice roaming charges. (Data roaming charges may
apply.)
NOTE: If Wi-Fi is not available, the system will use
RingOut (see below).
Check Over 3G/4G or Wi-Fi to have the system
use Wi-Fi; if Wi-Fi is not available, it will then
use your carrier data plan over its 3G/4G
network (possible charges and lower voice quality
may result).
Turn VoIP to Off to only make calls using your carrier
voice plan.
To enable RingOut (see below), turn VoIP Calls
to Off.
Turn Incoming VoIP Calls to On to use VoIP for
incoming calls, using Wi-Fi or 3G/4G depending on
the VoIP Calls settings listed above. Incoming calls
via VoIP over Wi-Fi avoid carrier voice-plan charges.
To save battery power, turn Incoming VoIP Calls to
Off; your incoming calls will then use your carrier
voice plan.
On Android smartphones, turn Echo Cancellation
to On to if the other party hears an echo during our
VoIP calls. Tap Microphone Calibration Setup to
perform a 30-second microphone calibration of
your smartphone to ensure the best sound quality
during VoIP calls. (These features are not needed for
Android phones that have built-in echo cancellation
and microphone calibration.)
Android screens shown. iOS screens look slightly different
My Mobile App Settings
34
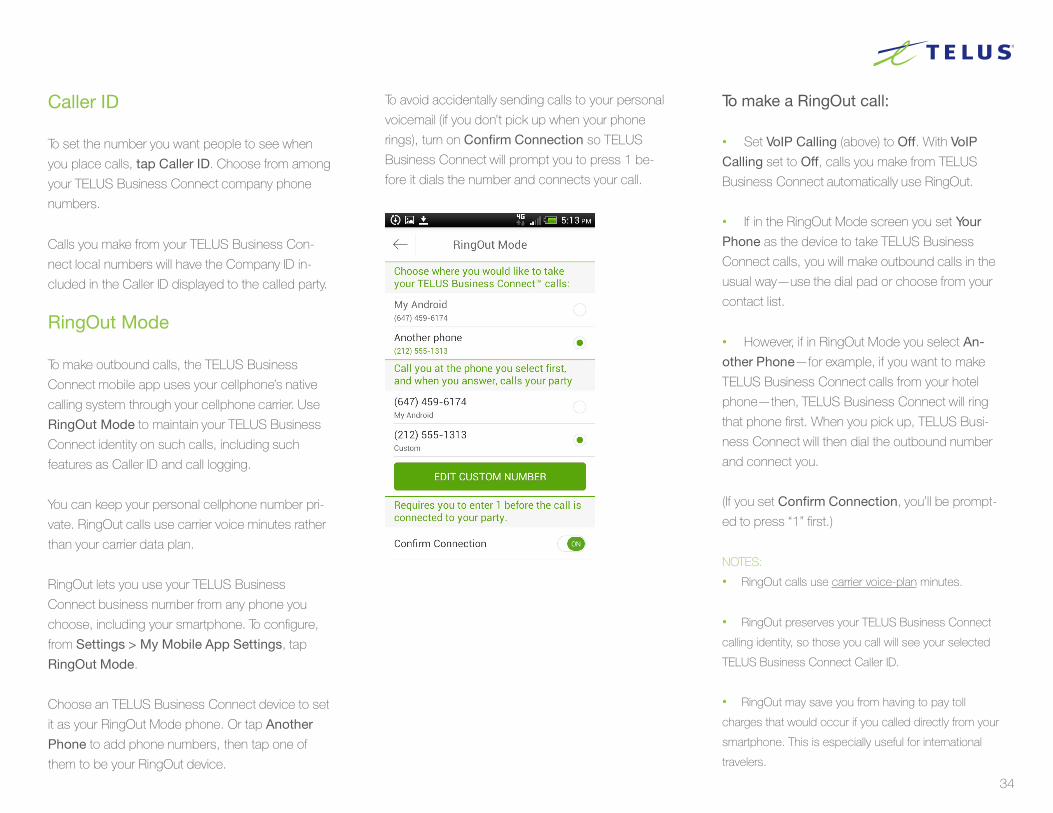
Caller ID
To set the number you want people to see when
you place calls, tap Caller ID. Choose from among
your TELUS Business Connect company phone
numbers.
Calls you make from your TELUS Business Con-
nect local numbers will have the Company ID in-
cluded in the Caller ID displayed to the called party.
RingOut Mode
To make outbound calls, the TELUS Business
Connect mobile app uses your cellphone’s native
calling system through your cellphone carrier. Use
RingOut Mode to maintain your TELUS Business
Connect identity on such calls, including such
features as Caller ID and call logging.
You can keep your personal cellphone number pri-
vate. RingOut calls use carrier voice minutes rather
than your carrier data plan.
RingOut lets you use your TELUS Business
Connect business number from any phone you
choose, including your smartphone. To configure,
from Settings > My Mobile App Settings, tap
RingOut Mode.
Choose an TELUS Business Connect device to set
it as your RingOut Mode phone. Or tap Another
Phone to add phone numbers, then tap one of
them to be your RingOut device.
To avoid accidentally sending calls to your personal
voicemail (if you don’t pick up when your phone
rings), turn on Confirm Connection so TELUS
Business Connect will prompt you to press 1 be-
fore it dials the number and connects your call.
To make a RingOut call:
• Set VoIP Calling (above) to Off. With VoIP
Calling set to Off, calls you make from TELUS
Business Connect automatically use RingOut.
• If in the RingOut Mode screen you set Your
Phone as the device to take TELUS Business
Connect calls, you will make outbound calls in the
usual way—use the dial pad or choose from your
contact list.
• However, if in RingOut Mode you select An-
other Phone—for example, if you want to make
TELUS Business Connect calls from your hotel
phone—then, TELUS Business Connect will ring
that phone first. When you pick up, TELUS Busi-
ness Connect will then dial the outbound number
and connect you.
(If you set Confirm Connection, you’ll be prompt-
ed to press “1” first.)
NOTES:
• RingOut calls use carrier voice-plan minutes.
• RingOut preserves your TELUS Business Connect
calling identity, so those you call will see your selected
TELUS Business Connect Caller ID.
• RingOut may save you from having to pay toll
charges that would occur if you called directly from your
smartphone. This is especially useful for international
travelers.
35
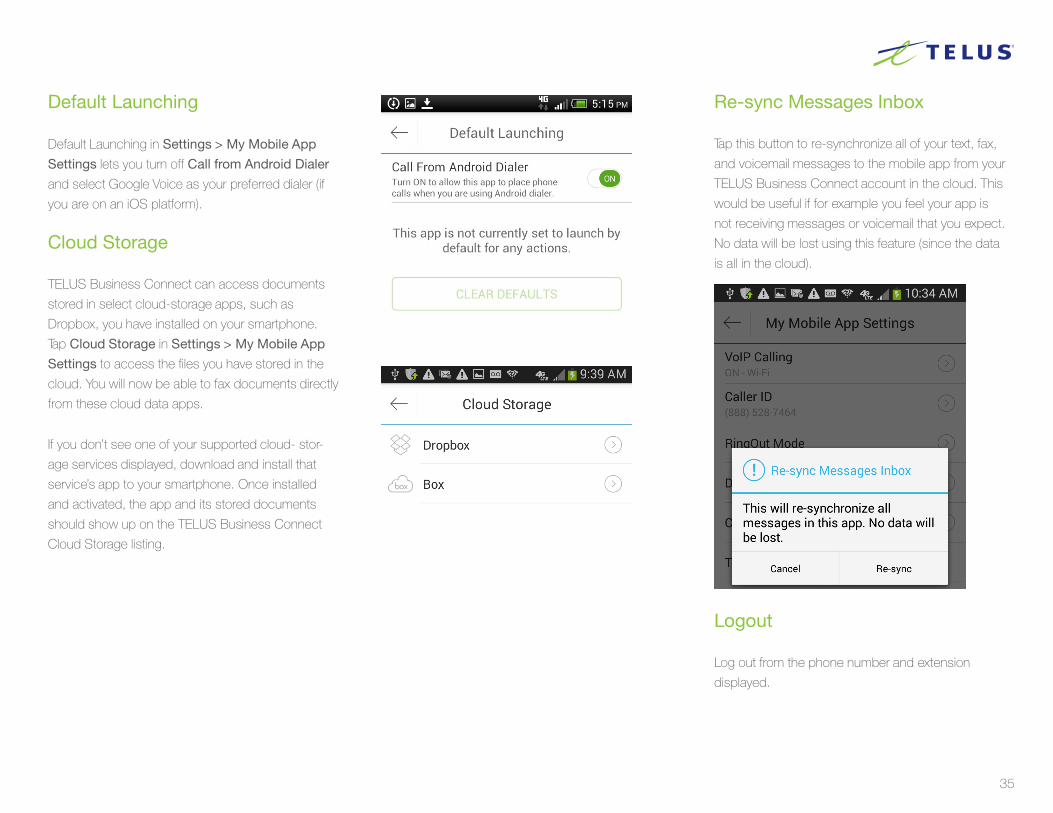
Default Launching
Default Launching in Settings > My Mobile App
Settings lets you turn off Call from Android Dialer
and select Google Voice as your preferred dialer (if
you are on an iOS platform).
Cloud Storage
TELUS Business Connect can access documents
stored in select cloud-storage apps, such as
Dropbox, you have installed on your smartphone.
Tap Cloud Storage in Settings > My Mobile App
Settings to access the files you have stored in the
cloud. You will now be able to fax documents directly
from these cloud data apps.
If you don’t see one of your supported cloud- stor-
age services displayed, download and install that
service’s app to your smartphone. Once installed
and activated, the app and its stored documents
should show up on the TELUS Business Connect
Cloud Storage listing.
Re-sync Messages Inbox
Tap this button to re-synchronize all of your text, fax,
and voicemail messages to the mobile app from your
TELUS Business Connect account in the cloud. This
would be useful if for example you feel your app is
not receiving messages or voicemail that you expect.
No data will be lost using this feature (since the data
is all in the cloud).
Logout
Log out from the phone number and extension
displayed.
36
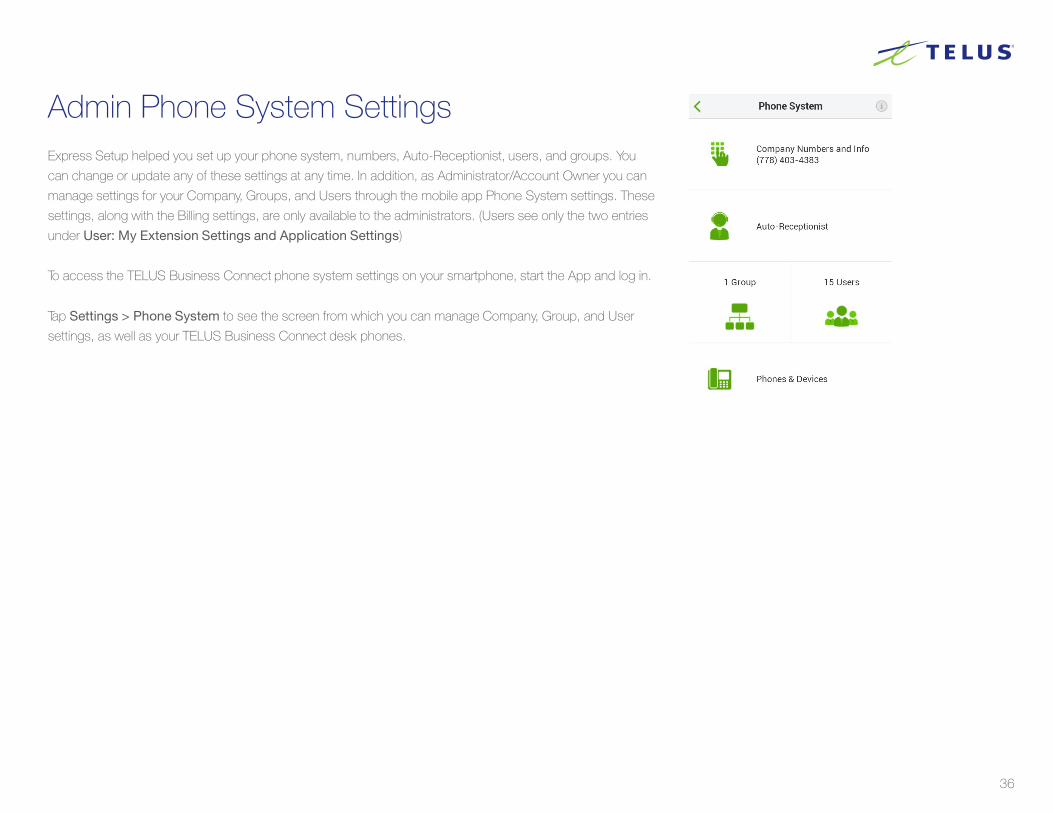
Admin Phone System SettingsExpress Setup helped you set up your phone system, numbers, Auto-Receptionist, users, and groups. You
can change or update any of these settings at any time. In addition, as Administrator/Account Owner you can
manage settings for your Company, Groups, and Users through the mobile app Phone System settings. These
settings, along with the Billing settings, are only available to the administrators. (Users see only the two entries
under User: My Extension Settings and Application Settings)
To access the TELUS Business Connect phone system settings on your smartphone, start the App and log in.
Tap Settings > Phone System to see the screen from which you can manage Company, Group, and User
settings, as well as your TELUS Business Connect desk phones.
37
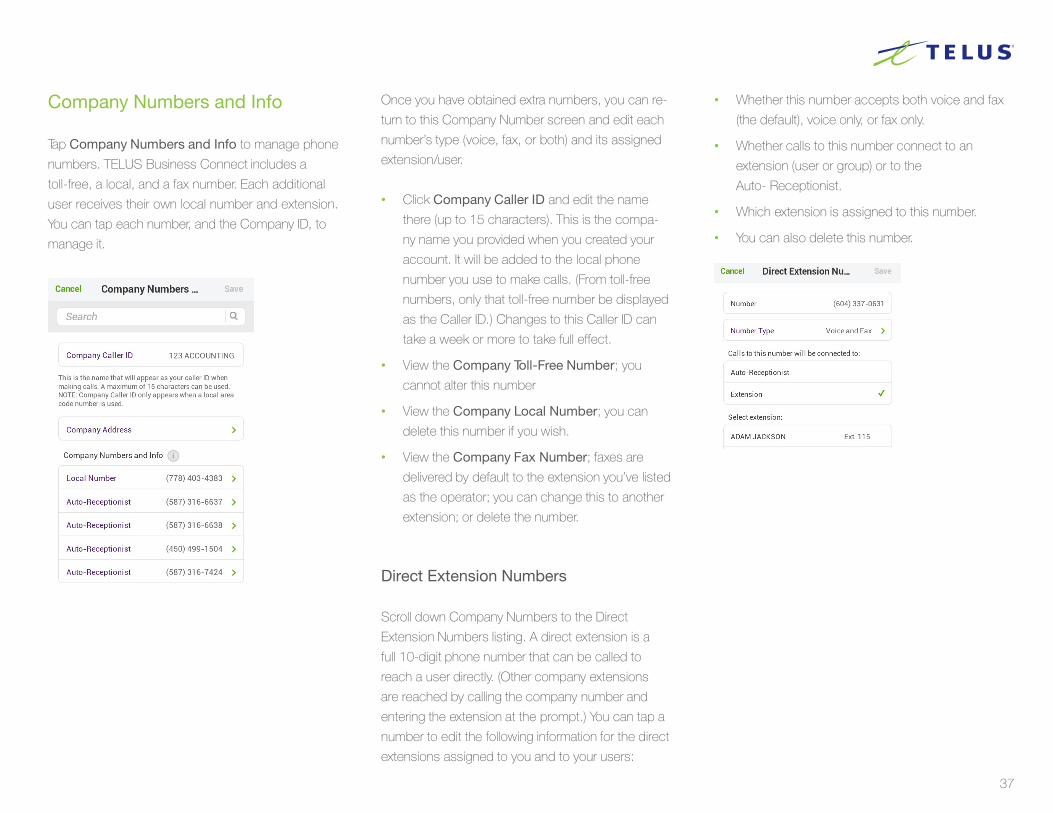
Company Numbers and Info
Tap Company Numbers and Info to manage phone
numbers. TELUS Business Connect includes a
toll-free, a local, and a fax number. Each additional
user receives their own local number and extension.
You can tap each number, and the Company ID, to
manage it.
Once you have obtained extra numbers, you can re-
turn to this Company Number screen and edit each
number’s type (voice, fax, or both) and its assigned
extension/user.
• Click Company Caller ID and edit the name
there (up to 15 characters). This is the compa-
ny name you provided when you created your
account. It will be added to the local phone
number you use to make calls. (From toll-free
numbers, only that toll-free number be displayed
as the Caller ID.) Changes to this Caller ID can
take a week or more to take full effect.
• View the Company Toll-Free Number; you
cannot alter this number
• View the Company Local Number; you can
delete this number if you wish.
• View the Company Fax Number; faxes are
delivered by default to the extension you’ve listed
as the operator; you can change this to another
extension; or delete the number.
Direct Extension Numbers
Scroll down Company Numbers to the Direct
Extension Numbers listing. A direct extension is a
full 10-digit phone number that can be called to
reach a user directly. (Other company extensions
are reached by calling the company number and
entering the extension at the prompt.) You can tap a
number to edit the following information for the direct
extensions assigned to you and to your users:
• Whether this number accepts both voice and fax
(the default), voice only, or fax only.
• Whether calls to this number connect to an
extension (user or group) or to the
Auto- Receptionist.
• Which extension is assigned to this number.
• You can also delete this number.
38
Using an Existing Number (Porting and Forwarding)
You can transfer (port) eligible existing phone numbers from your current provider to your TELUS Business Con-
nect service, and you can forward calls to an existing number to your TELUS Business Connect number.
To Transfer an Existing Number
To transfer a number or set of numbers to your TELUS Business Connect account, log into your account and
go to Settings > Phone System > Company Numbers and Info and click on the Use My Existing Number
button at the bottom of the center column, and follow the instructions.
To Forward your Calls
Forward calls to an existing number to your new TELUS Business Connect number. From Settings > Phone
System > Company Numbers and Info scroll to the bottom and tap the Use My Existing Number button. Tap
Forward my calls to TELUS Business Connect. Fill in the existing number you wish to transfer, and follow the
detailed instructions.
39
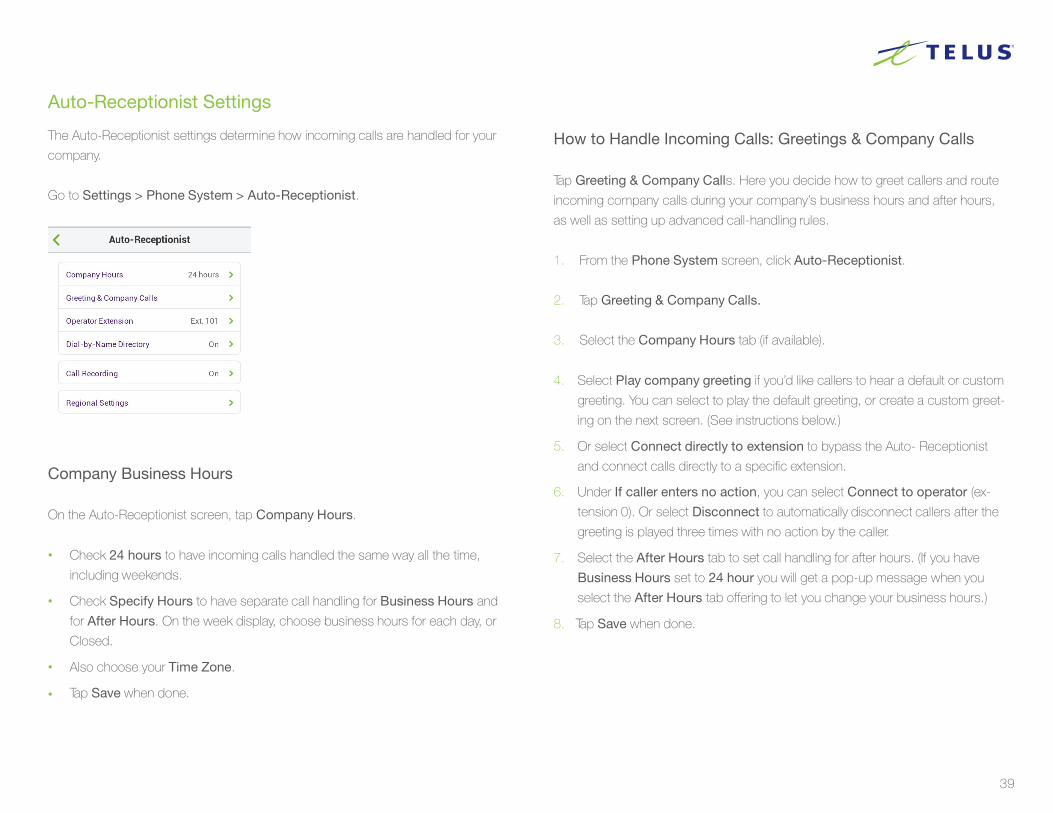
Auto-Receptionist Settings
The Auto-Receptionist settings determine how incoming calls are handled for your
company.
Go to Settings > Phone System > Auto-Receptionist.
Company Business Hours
On the Auto-Receptionist screen, tap Company Hours.
• Check 24 hours to have incoming calls handled the same way all the time,
including weekends.
• Check Specify Hours to have separate call handling for Business Hours and
for After Hours. On the week display, choose business hours for each day, or
Closed.
• Also choose your Time Zone.
• Tap Save when done.
How to Handle Incoming Calls: Greetings & Company Calls
Tap Greeting & Company Calls. Here you decide how to greet callers and route
incoming company calls during your company’s business hours and after hours,
as well as setting up advanced call-handling rules.
1. From the Phone System screen, click Auto-Receptionist.
2. Tap Greeting & Company Calls.
3. Select the Company Hours tab (if available).
4. Select Play company greeting if you’d like callers to hear a default or custom
greeting. You can select to play the default greeting, or create a custom greet-
ing on the next screen. (See instructions below.)
5. Or select Connect directly to extension to bypass the Auto- Receptionist
and connect calls directly to a specific extension.
6. Under If caller enters no action, you can select Connect to operator (ex-
tension 0). Or select Disconnect to automatically disconnect callers after the
greeting is played three times with no action by the caller.
7. Select the After Hours tab to set call handling for after hours. (If you have
Business Hours set to 24 hour you will get a pop-up message when you
select the After Hours tab offering to let you change your business hours.)
8. Tap Save when done.

40
Company Greeting
The Auto-Receptionist greets callers with a recorded message when they call your
company. Your Auto-Receptionist is initially set to play a default greeting with your
company name using text-to-speech technology (you can review the script of this
default greeting from the
Call Handling screen).
Follow these instructions to create a custom company greeting, using your phone
or uploading a prerecorded greeting file from your computer.
Recording your Company Greeting over the Phone
1. From the Phone System screen, select Auto-Receptionist.
2. Select Greeting & Company Calls.
3. Select the Company Hours or After Hours tab.
4. Tap Greeting. 5. Select Default or select Custom.
6. If you selected Custom, click the Record button. 7. In Call me at, select Forwarding Number and choose one from the dropdown.
8. Or select Custom number, tap the field, then type in a phone number.
9. TELUS Business Connect will call you and prompt you to record your greeting.
10. Repeat this process for the After Hours tab.
11. Tap Done.
The Company Operator Extension
Choose an extension to receive calls intended for the operator (extension 0). When
callers press 0 or don’t enter an extension number, the system will connect the call
to the designated employee.
1. From the Settings screen tap Phone System, then Auto-Receptionist.
2. Tap Operator Extension.
3. Choose a name/extension of the user who will receive operator calls.
4. Tap Save.
41
Company Dial-by-Name Directory
The Dial-by-Name Directory allows callers to find user and group extensions by spell-
ing out the name on their phone keypads. Follow these steps.
1. From the Settings screen tap Phone System, then Auto-Receptionist.
2. Tap Dial-by-Name Directory.
3. Tap Dial-by-Name Directory to On.
4. Select as the Directory Extension a number that is not already in use as an
extension. This will become the number callers will tap to get to the dial-by-name
directory.
5. Tap Extensions in Directory.
6. Deselect any extensions to be excluded from your company’s Dial-by-Name
Directory. This list includes both user extensions and group extensions.
7. Select to search by First Name or by Last Name.
8. Tap Done.
When Dial-by-Name Directory is On, callers will hear a recording that, in addition to
telling them to dial an extension, also suggests they can dial the Directory Extension
number in order to locate a user by name. When callers tap the Directly Extension,
they are instructed to use their phone keypad to spell out the first three letters of the
first name, or of the last name, of the person or group they wish to call. The system
will connect them, or offer additional options if there is more than one choice.
42
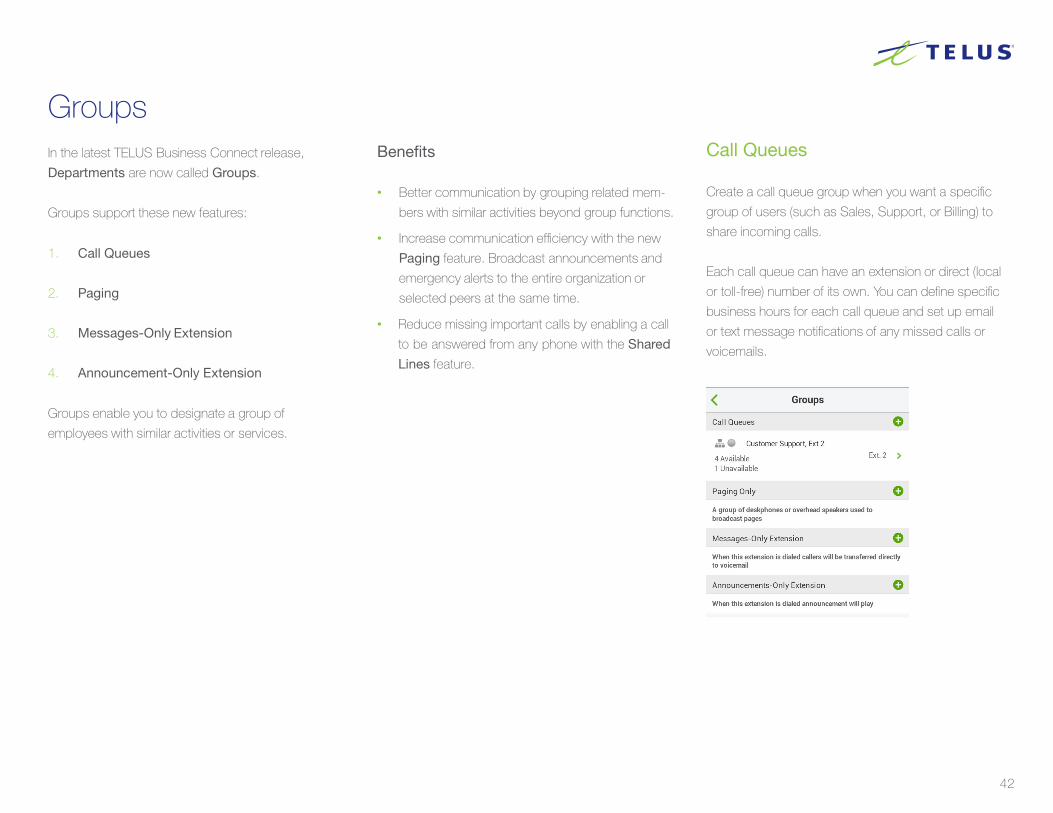
GroupsIn the latest TELUS Business Connect release,
Departments are now called Groups.
Groups support these new features:
1. Call Queues
2. Paging
3. Messages-Only Extension
4. Announcement-Only Extension
Groups enable you to designate a group of
employees with similar activities or services.
Benefits
• Better communication by grouping related mem-
bers with similar activities beyond group functions.
• Increase communication efficiency with the new
Paging feature. Broadcast announcements and
emergency alerts to the entire organization or
selected peers at the same time.
• Reduce missing important calls by enabling a call
to be answered from any phone with the Shared
Lines feature.
Call Queues
Create a call queue group when you want a specific
group of users (such as Sales, Support, or Billing) to
share incoming calls.
Each call queue can have an extension or direct (local
or toll-free) number of its own. You can define specific
business hours for each call queue and set up email
or text message notifications of any missed calls or
voicemails.
43
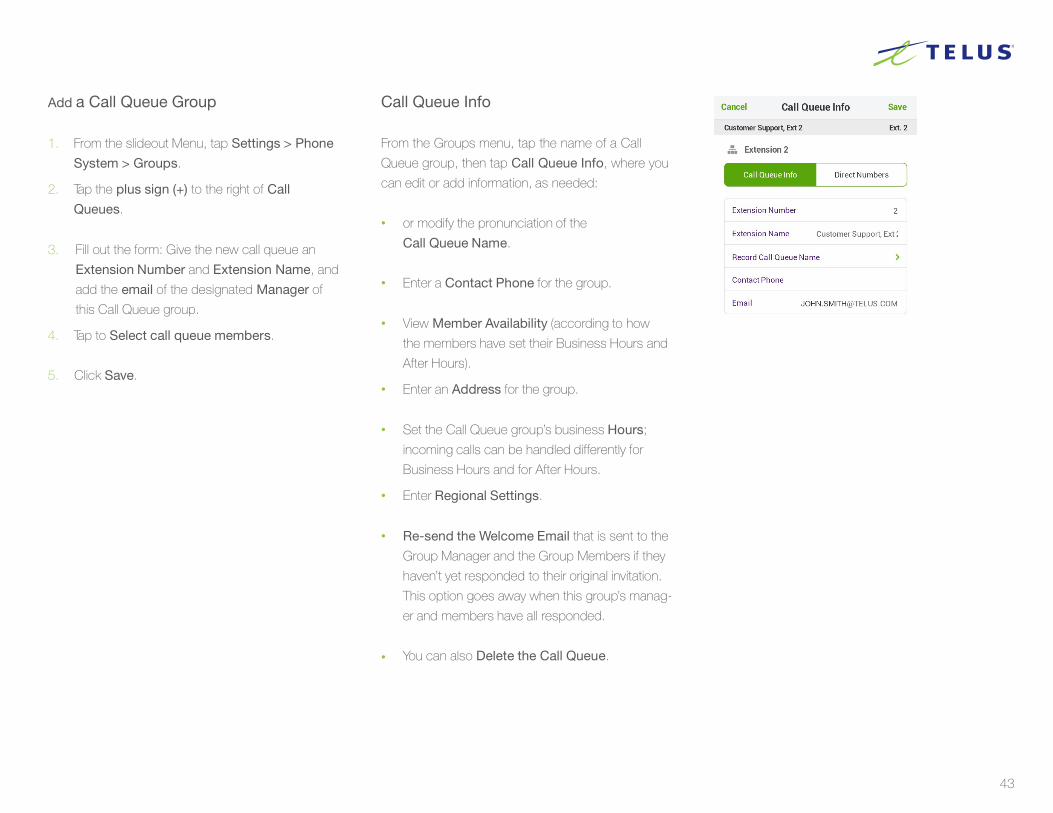
Add a Call Queue Group
1. From the slideout Menu, tap Settings > Phone
System > Groups.
2. Tap the plus sign (+) to the right of Call
Queues.
3. Fill out the form: Give the new call queue an
Extension Number and Extension Name, and
add the email of the designated Manager of
this Call Queue group.
4. Tap to Select call queue members.
5. Click Save.
Call Queue Info
From the Groups menu, tap the name of a Call
Queue group, then tap Call Queue Info, where you
can edit or add information, as needed:
• or modify the pronunciation of the
Call Queue Name.
• Enter a Contact Phone for the group.
• View Member Availability (according to how
the members have set their Business Hours and
After Hours).
• Enter an Address for the group.
• Set the Call Queue group’s business Hours;
incoming calls can be handled differently for
Business Hours and for After Hours.
• Enter Regional Settings.
• Re-send the Welcome Email that is sent to the
Group Manager and the Group Members if they
haven’t yet responded to their original invitation.
This option goes away when this group’s manag-
er and members have all responded.
• You can also Delete the Call Queue.
44
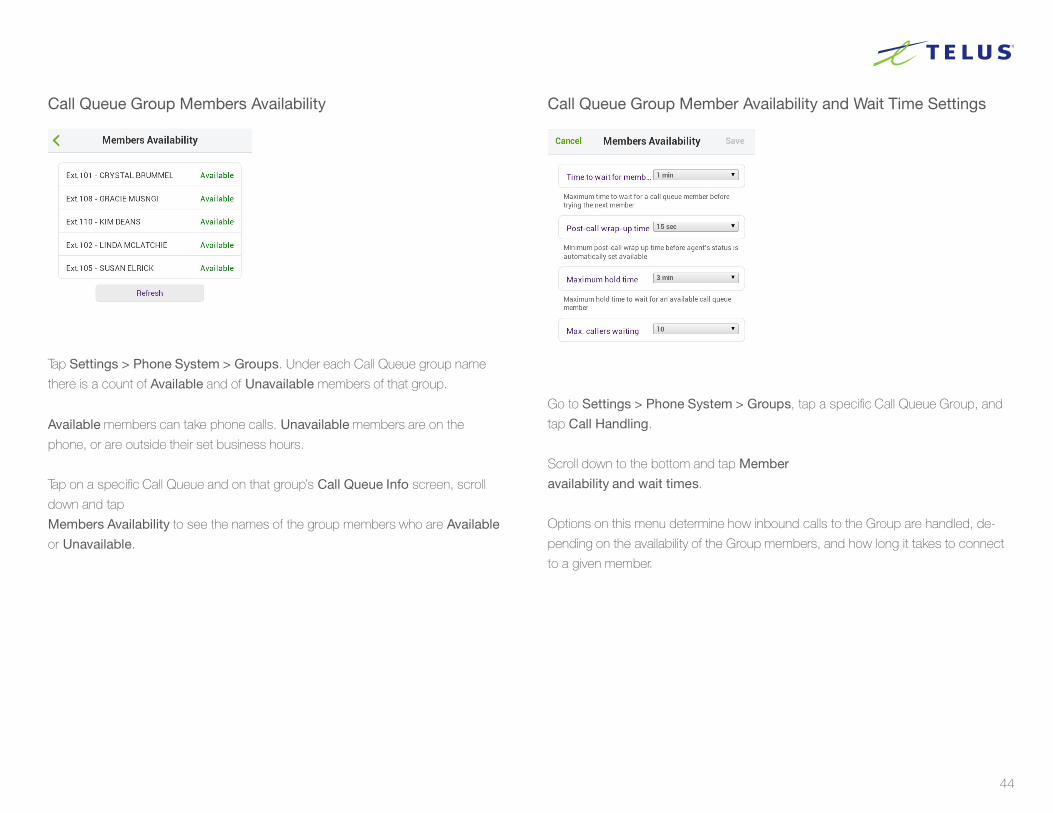
Call Queue Group Members Availability
Tap Settings > Phone System > Groups. Under each Call Queue group name
there is a count of Available and of Unavailable members of that group.
Available members can take phone calls. Unavailable members are on the
phone, or are outside their set business hours.
Tap on a specific Call Queue and on that group’s Call Queue Info screen, scroll
down and tap
Members Availability to see the names of the group members who are Available
or Unavailable.
Call Queue Group Member Availability and Wait Time Settings
Go to Settings > Phone System > Groups, tap a specific Call Queue Group, and
tap Call Handling.
Scroll down to the bottom and tap Member
availability and wait times.
Options on this menu determine how inbound calls to the Group are handled, de-
pending on the availability of the Group members, and how long it takes to connect
to a given member.
45
Options are:
• Maximum time to wait for a Group member to answer a call before trying the
next member in the Group rotation order, in minutes.
• Minimum post-call wrap-up time before agent’s status is automatically set to
available, in seconds. You can give the Group member some time to handle the
results of the call, such as making notes.
• Maximum hold time to wait for an available Group member, in minutes, before
transferring the on-hold call to the next member.
• Maximum Callers Waiting—If the number of callers waiting exceeds (number),
you can either send the next callers directly to voicemail, or disconnect after
telling new callers of the heavy call volume.
Call Queue Business Hours
Your Call Queue’s business hours determine when calls will be routed to
Group members and when after-hours rules will apply.
On the Group Info screen, tap Group Hours to access your current
settings. Select 24 hours for Groups that handle all incoming calls the same at
all times. Tap Specify hours to set the specific days and times the Group will be
available to take calls. When you’re finished, tap Save.
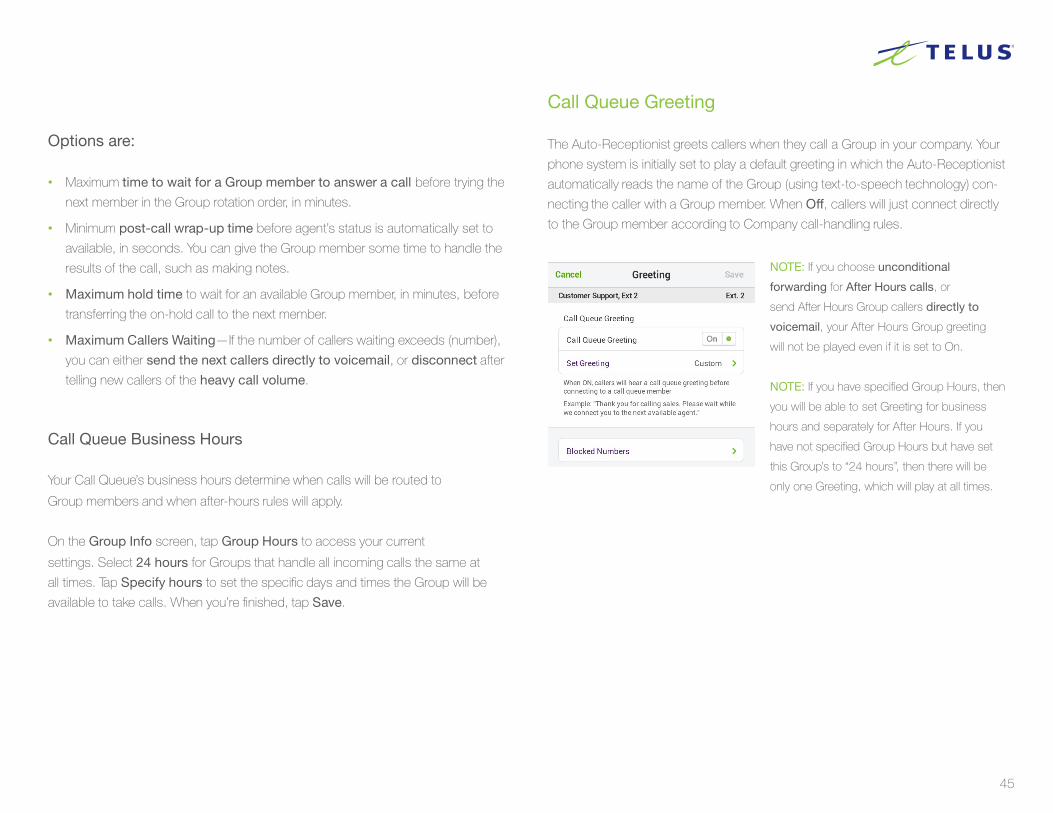
Call Queue Greeting
The Auto-Receptionist greets callers when they call a Group in your company. Your
phone system is initially set to play a default greeting in which the Auto-Receptionist
automatically reads the name of the Group (using text-to-speech technology) con-
necting the caller with a Group member. When Off, callers will just connect directly
to the Group member according to Company call-handling rules.
NOTE: If you choose unconditional
forwarding for After Hours calls, or
send After Hours Group callers directly to
voicemail, your After Hours Group greeting
will not be played even if it is set to On.
NOTE: If you have specified Group Hours, then
you will be able to set Greeting for business
hours and separately for After Hours. If you
have not specified Group Hours but have set
this Group’s to “24 hours”, then there will be
only one Greeting, which will play at all times.
46
Go to Setup > Phone System > Groups, select a Call Queue group, then tap
Greeting.
Turn Call Queue Greeting to On. Tap Set Greeting, then Play to listen
to the Default greeting. You can use this Default greeting (simply select
Cancel to back out), or create a Custom greeting.
To record a Custom greeting:
1. Tap Set Greeting, then tap Custom and then Record.
2. Provide a phone number for the system to call, or have it call your forwarding
number (select one under the Forwarding Number dropdown below).
3. Tap Call Now.
4. TELUS Business Connect will call you and prompt you to record
your greeting.
5. On the User Greeting screen, a message will confirm that your custom mes-
sage has been successfully received.
6. To listen to your custom greeting later, access your account on the Web.
7. Tap Cancel to return to the previous screen.
From this screen you can also tap Blocked Numbers. Select from the options.
• You can block All calls.
• You can tap Specific calls and select
- Specific numbers;
- Calls and/or faxes from callers with no Caller ID;
- Calls from Pay Phones.
In each case you can choose what message the blocked callers will hear.
When done, tap Save.
Tap Cancel to exit from Greetings.

47
Group Call Handling
Group call handling includes deciding the order in
which calls are transferring to Group members; the
music that is played while connecting the call; and
Group member availability and wait times.
To access and edit these settings, tap Settings >
Phone System > Groups and select a Group.
Tap Call Handling.
Group Call Handling during Business Hours
To manage the order in which calls are answered by
Group members, tap Group Hours at the top of the
Call Handling screen.
• Tap Rotating to set calls to rotate among avail-
able Group members.
• Tap Simultaneously to set calls to ring all avail-
able Group extensions at the same time.
• Tap In fixed order, then tap Specify fixed order
and decide the order by taping the up and down
arrows to move Group member names up and
down the list.
• Tap Back.
• Tap Audio While Connecting to On to select
the music that will keep Group callers enter-
tained while connecting, You can choose from
among more than a dozen types of music. Tap
the type of music you want, then tap Save.
Group Call Handling After Hours
Now tap After Hours tab at the top of the Call Han-
dling screen. Choose from the following settings for
how to handle calls during your defined after-hours
times, when no one is available to take calls:
• Play a greeting and disconnect
• Send callers to Group voicemail
• Unconditional call forwarding
If you select Unconditional call forwarding, you will
be prompted to enter a phone number. Uncondition-
al call forwarding will forward all calls to the number
you specify and override all After Hours settings,
such as voicemail and greetings.
NOTE: The After Hours setting becomes available only
after you change Group business hours from the default
24 hours setting.
48
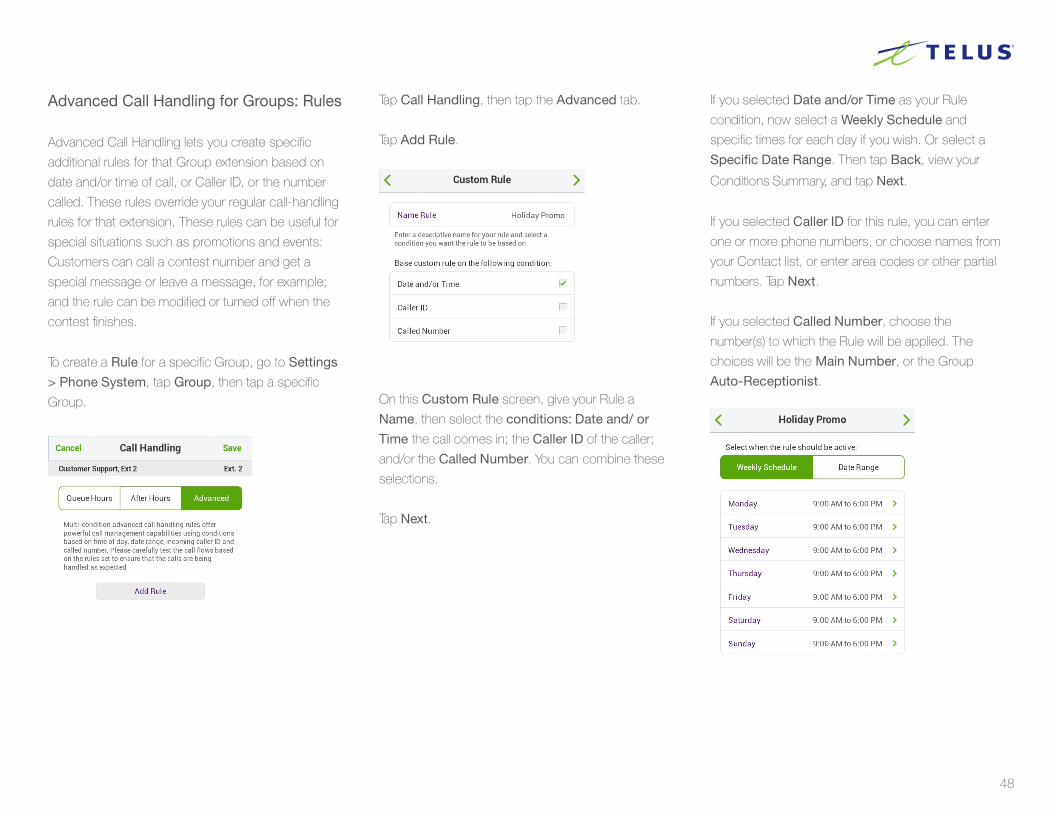
Advanced Call Handling for Groups: Rules
Advanced Call Handling lets you create specific
additional rules for that Group extension based on
date and/or time of call, or Caller ID, or the number
called. These rules override your regular call-handling
rules for that extension. These rules can be useful for
special situations such as promotions and events:
Customers can call a contest number and get a
special message or leave a message, for example;
and the rule can be modified or turned off when the
contest finishes.
To create a Rule for a specific Group, go to Settings
> Phone System, tap Group, then tap a specific
Group.
Tap Call Handling, then tap the Advanced tab.
Tap Add Rule.
On this Custom Rule screen, give your Rule a
Name, then select the conditions: Date and/ or
Time the call comes in; the Caller ID of the caller;
and/or the Called Number. You can combine these
selections.
Tap Next.
If you selected Date and/or Time as your Rule
condition, now select a Weekly Schedule and
specific times for each day if you wish. Or select a
Specific Date Range. Then tap Back, view your
Conditions Summary, and tap Next.
If you selected Caller ID for this rule, you can enter
one or more phone numbers, or choose names from
your Contact list, or enter area codes or other partial
numbers. Tap Next.
If you selected Called Number, choose the
number(s) to which the Rule will be applied. The
choices will be the Main Number, or the Group
Auto-Receptionist.
49
Tap Next and choose when to apply the Rule: during Business Hours, After
Hours, or Always.
Now select the action to take when incoming calls match this rule:
• Forward Calls: Then set custom Call Screening, Call Forwarding, or Messag-
es handling for these calls.
• Take Messages Only to send callers to voicemail. You can choose to take
messages or not, and can customize the voicemail greeting.
• Play Announcement Only and then end the call.
• Unconditional Forwarding, which immediately forwards the call to a number
you then select, bypassing any other call handling, including greetings, call
screening, voicemail, and Softphone.
You can also set Group Greetings and Call Handling for this Rule, and under
Messages choose a voicemail greeting and select the extension that will receive
messages generated by use of this Rule. As you can see, there are rich program-
matic possibilities with this Advance Rule feature.
Tap Done.
You can go back to edit the Rule, turn the rule on and off, change details and con-
ditions, add more Rules, or delete a Rule.
Group Messages/Voicemail Greetings
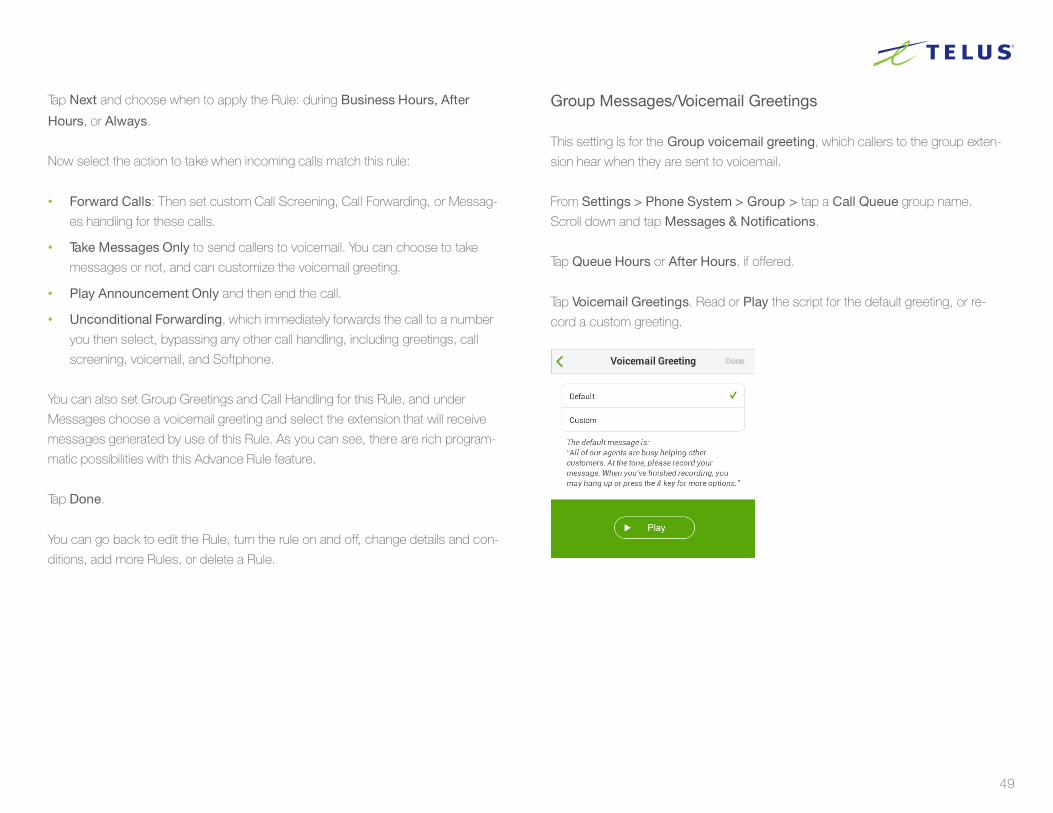
This setting is for the Group voicemail greeting, which callers to the group exten-
sion hear when they are sent to voicemail.
From Settings > Phone System > Group > tap a Call Queue group name.
Scroll down and tap Messages & Notifications.
Tap Queue Hours or After Hours, if offered.
Tap Voicemail Greetings. Read or Play the script for the default greeting, or re-
cord a custom greeting.
50
To record a custom Group voicemail greeting
1. Tap Custom and then tap Record.
2. Provide a phone number for the system to call,
or have it call your forwarding number (select
one under the Forwarding Number drop-
down).
3. Tap Call Now.
4. TELUS Business Connect will call you and
prompt you to record your greeting.
You can designate a Group member to receive
voicemail messages. By default, TELUS Business
Connect saves voicemail messages to a Group
voicemail box.
To designate a specific employee as the message
recipient, tap Message Recipient and then
tap the name of the employee. When you’re
finished, tap Save.
NOTE: If you designate a Group member as the mes-
sage recipient, Group messages will no longer be saved
to the Group voicemail box.
Call Queue Notifications
Back at the Messages & Notifications screen, tap
Notifications. Here the Administrator or the User
can be notified, by email or text message (SMS), of
various events such as received voicemail, received
faxes, missed calls, and fax transmission result
messages.
At the bottom of this screen is a toggle to switch
between the Basic and Advanced screens.

51
On the Basic screen, you have the choice of
sending notification by email and/or by SMS. Tap
a choice to turn it On or Off. Scroll to the bottom
to enter the Email address to receive notifications.
This could be the user, or the Admin, or a
receptionist, for example.
Also at the bottom of the screen, tap Add Phone
Number and enter a phone number to receive the
text messages; the phone number can be that of
the user, or the Administrator, or someone else; it
need not be a TELUS Business Connect number.
Select the Carrier for that phone number, to ensure
that the text message is correctly sent through that
carrier’s texting system. You can enter more than
one phone number to receive SMS notifications.
Tap Save.
The email and phone number selected are now
displayed at the bottom of the Notifications page.
Tap Advanced at the bottom of the Notifications
screen for an alternative set of options for notifica-
tions. Now for each feature you turn On for notifica-
tion, you can then tap Options to select an email
address and a phone number for each feature
individually. For email notifications, you can also
include any attachments, and also mark the email
message in your inbox as Received.
Paging Only Groups
Paging is a commonly required function in many lo-
cations such as warehouse/shipping centers, retail
stores, schools, hospitals, etc.
Business Connect Paging supports broadcasting
through multiple desk phones (groups) and through
overhead paging devices.
Your mobile devices cannot receive pages; the
Paging feature is available only on desk phones and
supported paging devices.
How to Page from a Mobile App Device
Mobile app users with paging permission can page
a known paging group by dialing *84 followed by #
and the number of the paging group, then # again.
Note: The user must first enable VoIP calling on the
mobile app device.
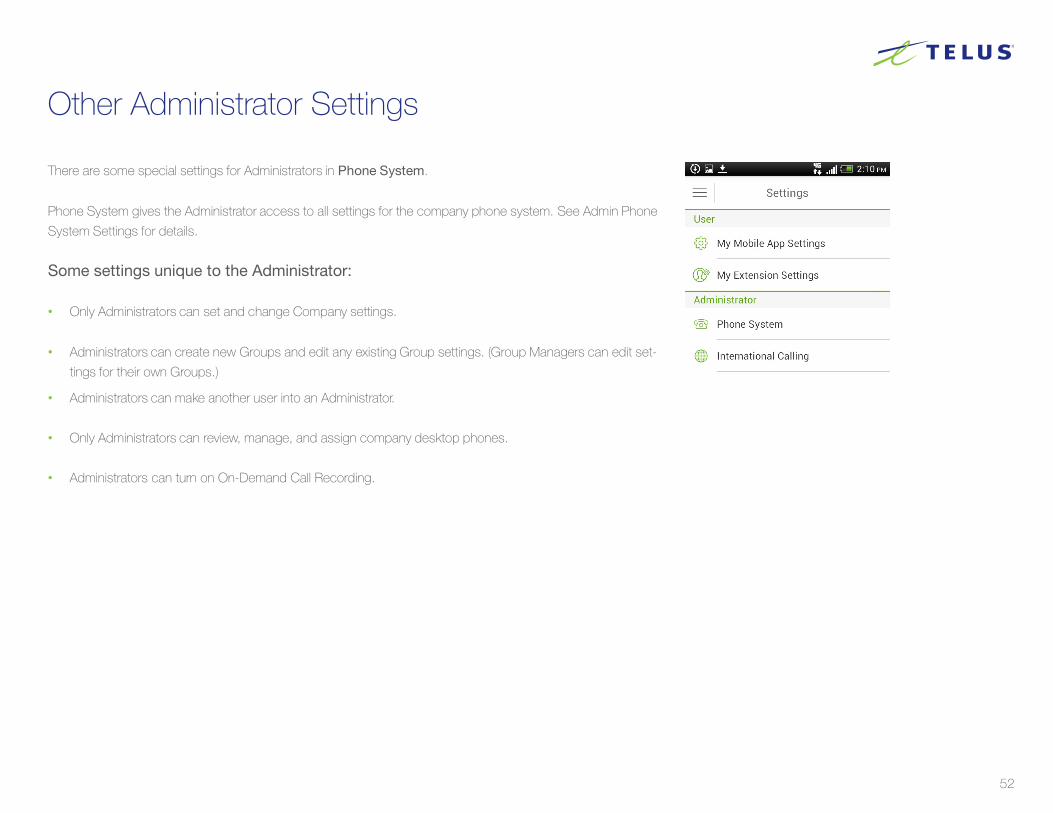
52
Other Administrator Settings
There are some special settings for Administrators in Phone System.
Phone System gives the Administrator access to all settings for the company phone system. See Admin Phone
System Settings for details.
Some settings unique to the Administrator:
• Only Administrators can set and change Company settings.
• Administrators can create new Groups and edit any existing Group settings. (Group Managers can edit set-
tings for their own Groups.)
• Administrators can make another user into an Administrator.
• Only Administrators can review, manage, and assign company desktop phones.
• Administrators can turn on On-Demand Call Recording.