MANUALE UTENTE - USER GUIDE - mynav.com · MANUALE UTENTE - USER GUIDE Si prega di leggere...
40
MANUALE UTENTE - USER GUIDE Si prega di leggere attentamente l’intera guida prima di usare il navigatore MyNav * Please carefully read this guide before starting to use MyNav navigator.
Transcript of MANUALE UTENTE - USER GUIDE - mynav.com · MANUALE UTENTE - USER GUIDE Si prega di leggere...
MANUALE UTENTE - USER GUIDE
Si prega di leggere attentamente l’intera guida prima di usare il navigatore MyNav * Please carefully read this guide before starting to use MyNav navigator.

2
INDICE
Avvertenze- Prodotto ...................................... 3- Alimentazione ............................... 4 - Guida e uso nel veicolo ............... 4 - GPS ............................................. 5 - Batterie ........................................ 5- Altro ............................................ 6
Contenuto della confezione ........7
Dispositivo .................................... 8
Installazione- Supporto da Bici........................... 9- Supporto da Auto........................ 10 Accensione/spegnimento del dispositivo ............................ 11
Blocco del dispositivo ............... 12
Copiare/eliminare dati nella SD card................................ 13
Impostazioni del dispositivo- Regolare il volume ...................... 14 - Regolare la luminosità................. 14- Calibrazione del display ............. 14 - Rotazione del display ................. 14
Caratteristiche tecniche ..............15
Trouble shooting ........................ 16

3
AVVERTENZE Attenzione! per un uso corretto e sicuro di questo prodotto, leggere at-tentamente ed attenersi a quanto segue:
1. Utilizzare il prodotto a temperature appropriate. Il dispositivo funziona correttamente fra -20 ~ 60 . Non utilizzarlo a temperature differenti rispetto a quanto indicato.
2. Non lasciare il prodotto esposto alla luce solare per lungo tempo. Lunghe esposizioni al sole possono far aumentare di molto la temperatura, creando possibili malfunzionamenti di prodotto. Non dimenticare il prodotto nell’auto, specialmente d’estate: lasciare il dispositivo abbandonato in auto a temperature troppo basse o troppo elevate può causare danni permanenti allo stesso.
3. Tenere il dispositivo distante da sostanze potenzialmente dannose.
4. Non disassemblare il dispositivo. Alterazioni non autorizzate del dispositivo possono creare danni materiali, anche gravi. In caso di malfunzionamenti affidare tutte le operazioni di manutenzione a personale qualificato. Operazioni non autorizzate sul dispositivo possono far decadere la relativa garanzia.
5. Installare il dispositivo in modo sicuro. Installare il dispositivo in luogo salubre, prestare attenzione ad installarlo nel veicolo in modo che non ostruisca la visuale del guidatore.
6. Non esercitare pressione eccessiva o utilizzare oggetti appuntiti sullo schermo touch screen ed in generale sui tasti del dispositivo. Evitare di far cadere volontariamente il prodotto.
7. Non lavare il dispositivo con prodotti chimici o detergenti industriali. Usare un panno morbido in tessuto naturale per pulire il dispositivo. 8. Tenere il dispositivo fuori dalla portata dei bambini o di animali domestici.

4
AVVERTENZE
Avvertenze sull’alimentazione del prodotto:
1. Il prodotto utilizza batterie ricaricabili, esse possono essere mantenute nel dispositivo e ricaricate tramite l’alimentatore da auto o cavo USB nella confezione. In alternativa esse possono essere estratte dal dispositivo e caricate con un caricatore com-
patibile reperibile in commercio.
E’ POSSIBILE UTILIZZARE ANCHE BATTERIE “USA E GETTA”, IN TAL CASO NON ALIMENTARE IL PRODOTTO CON FONTI ESTERNE, CIÒ POTREBBE COMPORTARE DANNI ANCHE GRAVI.
In generale si raccomanda di utilizzare alimentatori con capacità, resistenza termica e durata richieste dal sistema. Un’alimentazione impropria rispetto a quella indicata dal produttore può causare malfunzionamenti del dispositivo.
2. Non toccare la spina di connessione con le mani bagnate. 3. Connettere le spine agli alimentatori in maniera ferma e corretta. 4. Connettere il dispositivo alla presa accendisigari per l’alimentazione solo dopo aver avviato l’auto. 5. Spegnere il dispositivo prima di procedere/interrompere la carica.
Avvertenze sull’uso del prodotto durante la guida:
1. Non interagire con il dispositivo in fase di guida, ciò può essere causa di incidenti. 2. Interagire con il dispositivo solo quando l’auto non è in movimento. 3. In ogni caso attenersi a tutte le disposizioni di legge relativamente alla guida e all’uso della vettura. 4. Non regolare un volume troppo elevato del dispositivo e del software di navigazione, ciò potrebbe causare incidenti.
5
AVVERTENZE
Avvertenze sul GPS:
1. Il GPS potrebbe non funzionare correttamente in aree con cielo coperto, palazzi molto elevati, tunnels, parcheggi interrati ed in generale spazi chiusi. 2. Evitare di installare prodotti che emettano forti onde elettromagnetiche, come ad esempio trasmettitori radio, vicino al GPS, potrebbero creare interferenze alla ricezione (installare tali prodotti ad una distanza minima di 30 cm). 3. I vetri schermati di cui sono dotate alcune automobili possono creare problemi nella ricezione GPS.
Avvertenze sulle batterie:
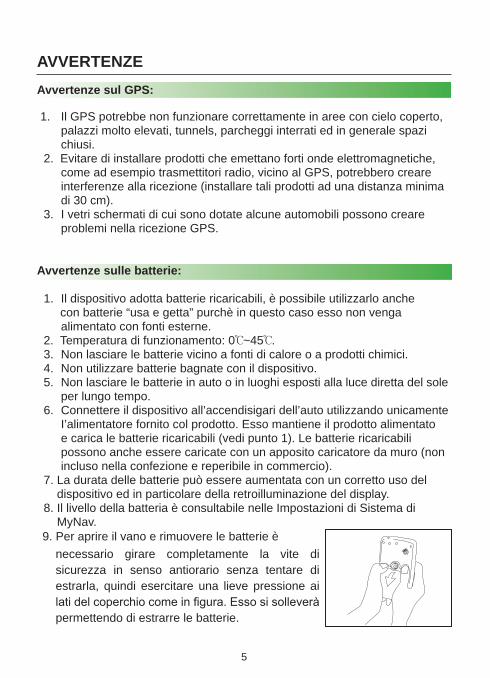
1. Il dispositivo adotta batterie ricaricabili, è possibile utilizzarlo anche con batterie “usa e getta” purchè in questo caso esso non venga alimentato con fonti esterne. 2. Temperatura di funzionamento: 0 ~45 . 3. Non lasciare le batterie vicino a fonti di calore o a prodotti chimici. 4. Non utilizzare batterie bagnate con il dispositivo. 5. Non lasciare le batterie in auto o in luoghi esposti alla luce diretta del sole per lungo tempo. 6. Connettere il dispositivo all’accendisigari dell’auto utilizzando unicamente I’alimentatore fornito col prodotto. Esso mantiene il prodotto alimentato e carica le batterie ricaricabili (vedi punto 1). Le batterie ricaricabili possono anche essere caricate con un apposito caricatore da muro (non incluso nella confezione e reperibile in commercio). 7. La durata delle batterie può essere aumentata con un corretto uso del dispositivo ed in particolare della retroilluminazione del display. 8. Il livello della batteria è consultabile nelle Impostazioni di Sistema di MyNav.9. Per aprire il vano e rimuovere le batterie è
necessario girare completamente la vite di sicurezza in senso antiorario senza tentare di estrarla, quindi esercitare una lieve pressione ai lati del coperchio come in figura. Esso si solleverà permettendo di estrarre le batterie.
6
AVVERTENZE
1. Le informazioni fornite dal navigatore possono risultare inesatte, gli utenti devono primariamente attenersi alle segnalazioni stradali vigenti per una corretta guida ed alle regole di normale prudenza in montagna.
2. MyNav è un ottimo supporto alla navigazione stradale, alla localizzazione ed all’orientamento per le escursioni. Il suo utilizzo deve avvenire nel rispetto delle elementari regole di comportamento. In auto, non programmare o regolare il sistema di navigazione durante la guida. Qualsiasi indicazione fornita dal software deve considerarsi non valida se incoerente con la segnaletica, le leggi vigenti o più in generale se contraria alle elementari norme di prudenza. Si declina ogni responsabilità causata da un utilizzo non conforme. Consigliamo di leggere attentamente le condizione di licenza incluse nella confezione.
3. Non danneggiare o perdere la scheda SD, essa non verrà sostituita.4. Fare attenzione a non perdere il codice prodotto presente sul DVD di
ripristino del software di navigazione incluso nella confezione, esso non verrà in ogni caso riemesso.
5. La scheda micro SD presente nella confezione è precaricata con software di navigazione e mappe. Utilizzare il DVD di ripristino per il software di navigazione solo su indicazione dell’assistenza tecnica.
6. Pulire bene il parabrezza prima di attaccare la ventosa del supporto per favorire una perfetta adesione. L’utilizzo di sostanze detergenti e l’umidità possono favorire il distacco della ventosa, ciò può risultare pericoloso per cui si consiglia particolare attenzione. Le vibrazioni eccessive dell’auto e la riduzione dell’aderenza della ventosa (causata da utilizzo prolungato) possono determinare la caduta del supporto. Per aumentare la durata della ventosa si consiglia di staccare il supporto dal parabrezza, quando esso non venga utilizzato.
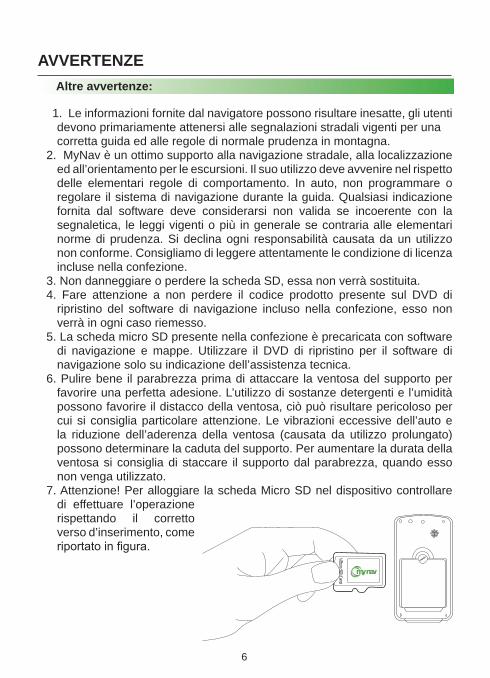
7. Attenzione! Per alloggiare la scheda Micro SD nel dispositivo controllare di effettuare l’operazione rispettando il corretto verso d’inserimento, come riportato in figura.
Altre avvertenze:
7
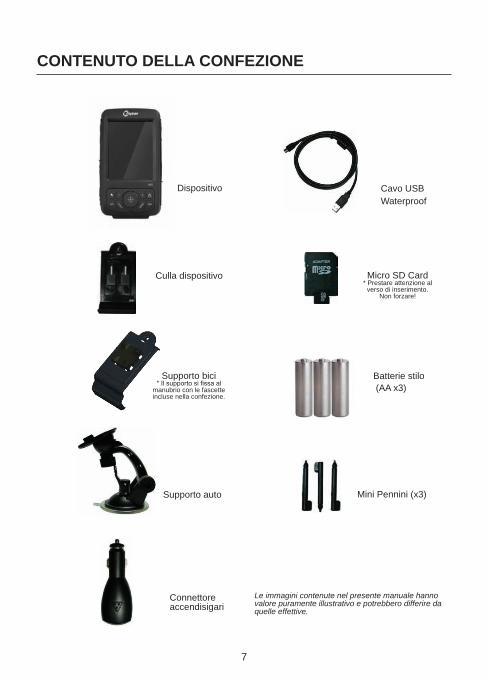
CONTENUTO DELLA CONFEZIONE
Le immagini contenute nel presente manuale hanno valore puramente illustrativo e potrebbero differire da quelle effettive.
Dispositivo Cavo USBWaterproof
Culla dispositivo
Supporto auto Mini Pennini (x3)
Connettore accendisigari
Supporto bici* Il supporto si fissa al
manubrio con le fascette incluse nella confezione.
Batterie stilo (AA x3)
Micro SD Card* Prestare attenzione al
verso di inserimento. Non forzare!

8
DISPOSITIVO
1
2
3
4
5
6
7
813
12
1110
1415
18 17
19
20
2116
22
9
1 Chip GPS Sirf III 7 Impostazioni (Set) 13 Pulsantiera direzionale “Su/Giu” – “Destra/Sinistra”
19 Altoparlante
2 Pulsante retroillumi-nazione
8 Mappa 14 Display touchscreen 20 Vite vano batteria
3 Pulsante “blocca/sblocca” dispositivo
9 Zoom “+” 15 Tasto ON/OFF (premere per 3-5 sec per accen-dere/spegnere)
21 Alloggiamento batterie stilo (x3)
4 Cuffie,/USB (PC) 10 Profili altimetrici 16 Micro SD 22 Stilo
5 Zoom “–” 11 Trip computer 17 Sensore barometro
6 Salva Geoappunto 12 Enter/conferma 18 Foro per laccetto
9
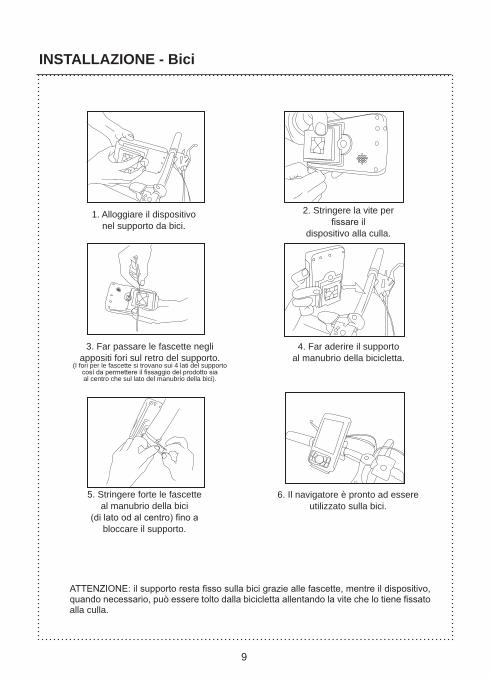
INSTALLAZIONE - Bici
1. Alloggiare il dispositivo nel supporto da bici.
3. Far passare le fascette negli appositi fori sul retro del supporto.
(I fori per le fascette si trovano sui 4 lati del supporto così da permettere il fissaggio del prodotto sia al centro che sul lato del manubrio della bici).
2. Stringere la vite per fissare il
dispositivo alla culla.
4. Far aderire il supportoal manubrio della bicicletta.
5. Stringere forte le fascette al manubrio della bici
(di lato od al centro) fino a bloccare il supporto.
6. Il navigatore è pronto ad essere utilizzato sulla bici.
ATTENZIONE: il supporto resta fisso sulla bici grazie alle fascette, mentre il dispositivo, quando necessario, può essere tolto dalla bicicletta allentando la vite che lo tiene fissato alla culla.
10
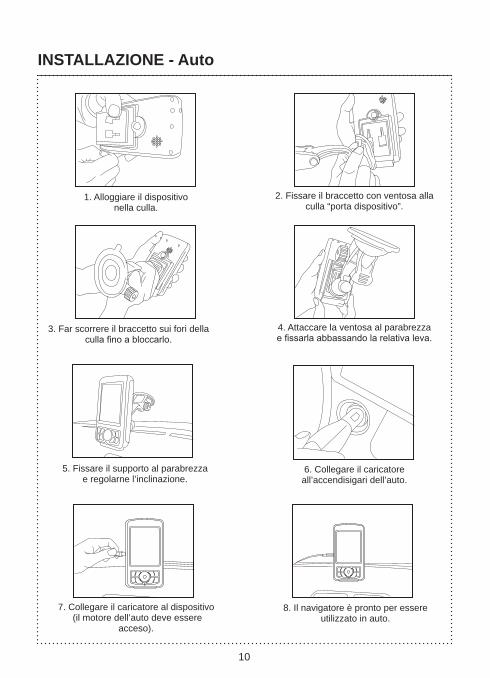
INSTALLAZIONE - Auto
1. Alloggiare il dispositivo nella culla.
5. Fissare il supporto al parabrezza e regolarne l’inclinazione.
2. Fissare il braccetto con ventosa alla culla “porta dispositivo”.
6. Collegare il caricatore all’accendisigari dell’auto.
3. Far scorrere il braccetto sui fori della culla fino a bloccarlo.
7. Collegare il caricatore al dispositivo (il motore dell’auto deve essere
acceso).
4. Attaccare la ventosa al parabrezza e fissarla abbassando la relativa leva.
8. Il navigatore è pronto per essere utilizzato in auto.
11
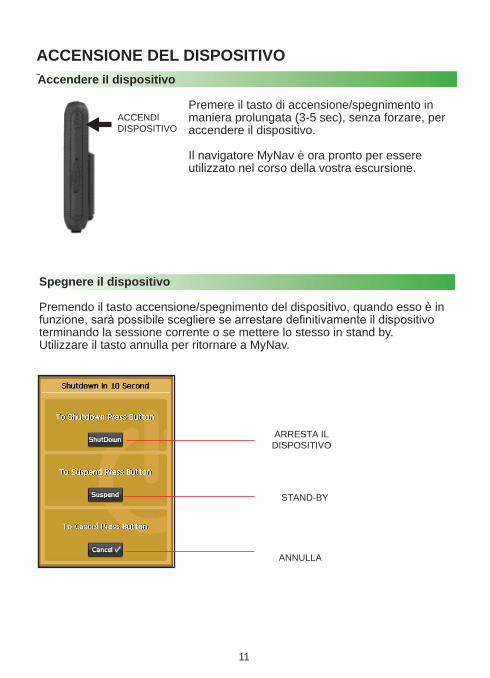
ACCENSIONE DEL DISPOSITIVO
ACCENDI DISPOSITIVO
Accendere il dispositivo
Premere il tasto di accensione/spegnimento in maniera prolungata (3-5 sec), senza forzare, per accendere il dispositivo.
Il navigatore MyNav è ora pronto per essere utilizzato nel corso della vostra escursione.
ARRESTA IL DISPOSITIVO
STAND-BY
ANNULLA
Spegnere il dispositivo
Premendo il tasto accensione/spegnimento del dispositivo, quando esso è in funzione, sarà possibile scegliere se arrestare definitivamente il dispositivo terminando la sessione corrente o se mettere lo stesso in stand by.Utilizzare il tasto annulla per ritornare a MyNav.
12
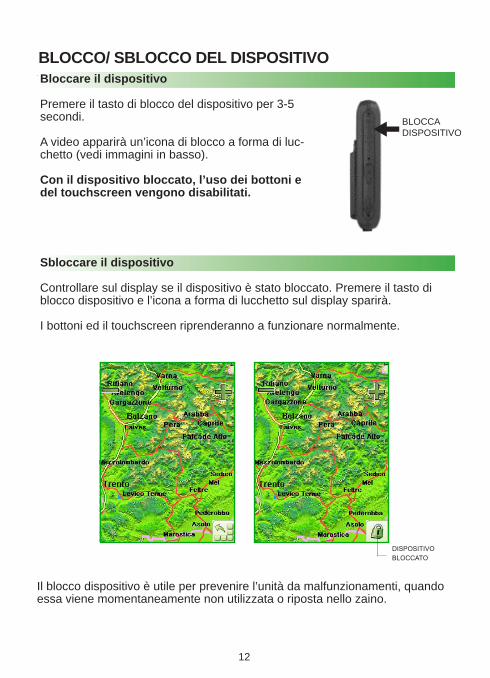
BLOCCO/ SBLOCCO DEL DISPOSITIVO Bloccare il dispositivo
Premere il tasto di blocco del dispositivo per 3-5 secondi.
A video apparirà un’icona di blocco a forma di luc-chetto (vedi immagini in basso).
Con il dispositivo bloccato, l’uso dei bottoni e del touchscreen vengono disabilitati.
Sbloccare il dispositivo
Controllare sul display se il dispositivo è stato bloccato. Premere il tasto di blocco dispositivo e l’icona a forma di lucchetto sul display sparirà.
I bottoni ed il touchscreen riprenderanno a funzionare normalmente.
BLOCCADISPOSITIVO
DISPOSITIVO BLOCCATO
Il blocco dispositivo è utile per prevenire l’unità da malfunzionamenti, quando essa viene momentaneamente non utilizzata o riposta nello zaino.
13
COPIARE ED ELIMINARE DATI NELLA MICRO-SD CARD
La scheda di memoria contenuta nella confezione è precaricata con software di navigazione e mappe, per cui si consiglia di effettuare con attenzione le operazioni di copia ed eliminazione delle informazioni contenute nella scheda, per evitarne l’involontaria cancellazione.
L’azienda non si ritiene responsabile in caso di perdita di dati dovuta ad erronee operazioni sulla scheda.
Copiare i dati:
1. Inserire la micro SD card nell’adattatore. 2. Mettere l’adattatore nel lettore SD. 3. Connettere il lettore SD al computer (se non si possiede un lettore SD, collegare direttamente il dispositivo contenente la scheda di memoria al proprio PC, utilizzando il cavo USB in dotazione). 4. Avviare Risorse del computer dal proprio PC. 5. La scheda SD è ora visualizzata come disco removibile. 6. Selezionare i files da copiare sul PC e trascinarli per copiarli nella scheda di memoria, con il tasto destro del mouse scegliere Copia quindi Incolla sulla Scheda SD.
Eliminare i dati:
1. Inserire la micro SD card nell’adattatore. 2. Mettere l’adattatore nel lettore SD. 3. Connettere il lettore SD al computer (se non si possiede un lettore SD, collegare direttamente il dispositivo contenente la scheda di memoria al proprio PC, utilizzando il cavo USB in dotazione). 4. Avviare Risorse del computer dal proprio PC. 5. La SD è ora leggibile come disco removibile. 6. Scegliere il file che si desidera eliminare ed usare “Elimina” con il tasto destro del mouse.

14
IMPOSTAZIONI DEL DISPOSITIVO
Volume/LuminositàLa regolazione del volume del dispositivo, della luminosità possono essere effettuate direttamente dal Menù Impostazioni di sistema una volta che il dispositivo MyNav è stato acceso ed avviato.
CalibrazioneQualora fosse necessaria una ri-calibrazione del display è possibile effettuarla dal menù impostazioni seguendo la relativa procedura guidata.
Rotazione displayLo schermo può essere ruotato secondo le preferenze individuali (portrait o landscape) sempre da impostazioni, scegliendo il relativo comando, i tasti direzionali seguiranno l’orientamento dello schermo.
Per maggiori informazioni vedere il manuale software contenuto in formato pdf nel DVD di installazione presente nella confezione o reperibile sul sito www.mynav.it.
Avvertenze ulteriori sulla scheda
La scheda può venire danneggiata se l’alimentazione al PC viene interrotta o se il copiatore viene staccato mentre i files vengono copiati, spostati od eliminati.
I dati non possono essere copiati o cancellati se la levetta di protezione della scheda non è stata correttamente posizionata in scrittura.
Si raccomanda di togliere la SD dal PC utilizzando l’apposita procedura di rimozione (click con il tasto destro del mouse).
15
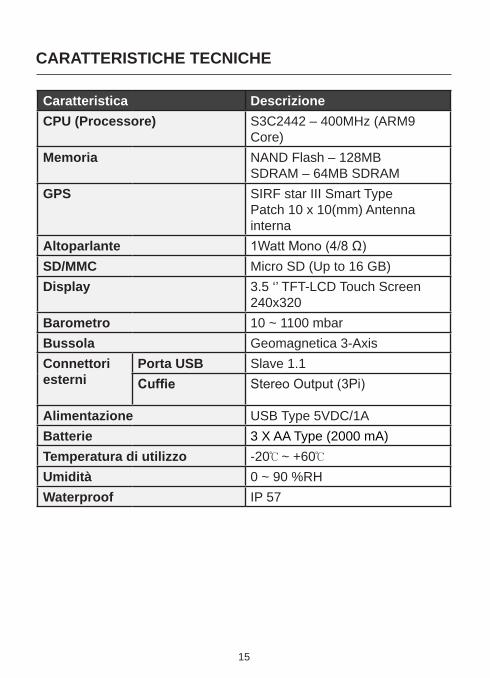
CARATTERISTICHE TECNICHE
Caratteristica DescrizioneCPU (Processore) S3C2442 – 400MHz (ARM9
Core)Memoria NAND Flash – 128MB
SDRAM – 64MB SDRAMGPS SIRF star III Smart Type
Patch 10 x 10(mm) Antenna interna
Altoparlante 1Watt Mono (4/8 Ω)SD/MMC Micro SD (Up to 16 GB)Display 3.5 ‘’ TFT-LCD Touch Screen
240x320Barometro 10 ~ 1100 mbarBussola Geomagnetica 3-AxisConnettori esterni
Porta USB Slave 1.1Cuffie Stereo Output (3Pi)
Alimentazione USB Type 5VDC/1ABatterie 3 X AA Type (2000 mA)Temperatura di utilizzo -20 ~ +60Umidità 0 ~ 90 %RHWaterproof IP 57

16
TROUBLE SHOOTING RISOLUZIONE DI PROBLEMI FREqUENTI1. Il dispositivo non legge la scheda SD.Pulire la parte metallica della scheda con un panno di cotone, solo su segnalazione dell’assistenza MyNav ripristinarne il contentuo utilizzando il DVD nella confezione.
2. Il display e i tasti hardware non rispondono.Verificare che il “blocco dispositivo” non sia inserito, viceversa procedere con un riavvio del dispositivo (se necessario rimuovere temporaneamente le batterie).
3. Il dispositivo non funziona.Il dispositivo potrebbe essere scarico, sostituire o ricaricare le batterie (ATTENZIONE a non ricaricare le batterie “usa e getta”).
4. Il dispositivo si spegne durante l’uso.Controllare lo stato di carica del dispositivo. Utilizzare l’alimentatore in dotazione o sostituire le batterie.
5. Le informazioni sul display non sono leggibili.Controllare le regolazioni di retroilluminazione impostate per il dispositivo.
6. I dati non vengono copiati nella scheda SD.Controllare che la scheda non sia protetta in scrittura o danneggiata. Nel caso in cui la scheda sia piena, i files non potranno essere copiati, procedere ad eliminare alcuni file da quella esistente (ATTENZIONE a non rimuovere inavvertitamente il software di navigazione).
7. Il GPS non riceve correttamente la posizione.La ricezione GPS può essere ostacolata dai vetri schermati in dotazione ad alcune automobili, dalle avverse condizioni atmosferiche (cielo molto coperto), dal trovarsi in luoghi circondati da palazzi elevati od in parcheggi sotterranei, etc. La corretta ricezione satellitare, specialmente la prima volta che si utilizza il dispositivo, può richiedere da un minimo di 30 secondi ad un massimo di 5 minuti. Si consiglia quindi di stare fermi nel medesimo punto attendendo che il dispositivo effettui il fixing GPS.
8. Attivazione e calibrazione della bussola.Per visualizzare la bussola sovrapposta alla mappa, cliccare sull’indicatore di direzione presente in mappa. Per calibrare la bussola è necessario eseguire una rotazione del dispositivo sui tre assi: orizzontale, verticale e laterale.

17
18
USER GUIDE
Si prega di leggere attentamente l’intera guida prima di usare il navigatore MyNav * Please carefully read this guide before starting to use MyNav navigator.

20
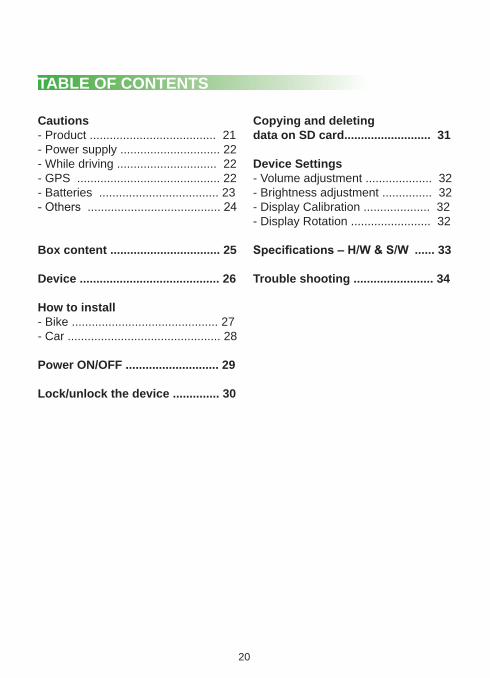
TABLE OF CONTENTS
Cautions- Product ...................................... 21- Power supply .............................. 22- While driving .............................. 22 - GPS ........................................... 22 - Batteries .................................... 23- Others ........................................ 24
Box content ................................. 25
Device .......................................... 26
How to install - Bike ............................................ 27- Car .............................................. 28 Power ON/OFF ............................ 29
Lock/unlock the device .............. 30
Copying and deletingdata on SD card.......................... 31
Device Settings- Volume adjustment .................... 32- Brightness adjustment ............... 32- Display Calibration .................... 32 - Display Rotation ........................ 32
Specifications – H/W & S/W ...... 33
Trouble shooting ........................ 34
21
CAUTIONS
Warning!For correct and safe use of this product, users should be fully aware of the followings.
1. Use the product at the proper temperature. This device works properly at -20 ~60 . Do not use it above or below the proper temperature.
2. Do not leave the product exposed to direct sunlight for a long time. Long exposure to direct sunlight causes temperature rise, possibly resulting in malfunctioning of the device. Do not leave the device in the car particularly in summer!
3. Keep the device away from unfavourable substances.
4. Do not disassemble or alter the device. Do not disassemble or add impact to the device. Also, every wiring of this device requires technical expertise or experience, so never try any arbitrary alteration. Arbitrary alteration or modification can cause malfunction, fire and other accidents and may impact on warranty.
5. Install the device in a safe place. Do not install the device in a place inside the car obstructing your vision or where the airbag is installed. It can cause accidents, fire, electric shock and malfunction.
6. Do not apply excessive force or pressure with a sharp object to the screen and on other buttons on the device. Also, do not drop the main unit or give it a shock.
7. Do not scrub the main unit with chemicals or detergents. Use a soft piece of fabric or cloth to clean the device.
8. Keep the device out of reach of children or pets.
22
Cautions on power supply:
1. The product works with rechargeable batteries, they may be kept inside the device during charging, using the car charger or the USB cable included in the box. Otherwise they can be removed from the device and charged using a common external compatible battery charger.
THE DEVICE CAN WORK ALSO WITH DISPOSABLE BATTERIES, IN THIS LATTER CASE WE RECOMMEND NOT TO SUPPLY THE DEVICE WITH EXTERNAL SOURCES/CHARGERS, AS THEY MAY CAUSE SERIOUS DAMAGES.
Use the power supply with capacity, thermal resistance and durability required for the system. Improper power sources other than pre-defined one can cause fire or malfunction of the device.
2. Do not touch the electric plug with wet hands. 3. Put the plug into the socket fully and firmly. 4. Connect the device to the power supply after starting the car. 5. Turn the power off first before attaching or detaching the device.
Cautions on driving:
1. Do not operate the device, It can cause accidents. 2. Operate the device while the car is stopped. 3. Please drive safely and follow actual road rules and law when driving. 4. Do not keep the voice info too loud. It can cause accidents.
CAUTIONS

23
Cautions on GPS:
1. GPS may not work properly in CBD area, tunnels, underground parking lots and closed spaces. Install the GPS antenna from a place with a good view of sky on the outer part of the car. 2. Avoid installing products emitting strong electronic waves such as radio wave transmitter around the GPS antenna. It can cause trouble in receiving radio waves (install such products at least more than 30 cm away). 3. Car windows coated with metal-containing substances can cause trouble in GPS reception.
Cautions on battery:
1. The device works with rechargeable batteries and it can be used also with disposable batteries as long as it isn’t supplied with external chargers or similar. 2. Battery works at 0 ~45 . 3. Do not leave any heat-generating equipment or chemicals around the battery. 4. Do not attach any wet and soaked battery to the product. 5 Do not keep the battery in the car or in the place which is exposed to the sunlight for a long time. 6. Connect the device to the cigar jack cable provided with this product for recharge. It supplies the device and charges the batteries (see point 1). Rechargeable batteries may be also charged with a charger (not included in the box and available on the market). 7. Average battery life may vary according to use and settings such as the brightness and programs selected. 8. The battery charge status can be checked at any time in MyNav Settings. 9. To open battery case, turn the screw anticlock-wise and press firmly the battery cover as in figure. Press on the two sides of the cover to open it easily and remove the bat- teries.
CAUTIONS
24
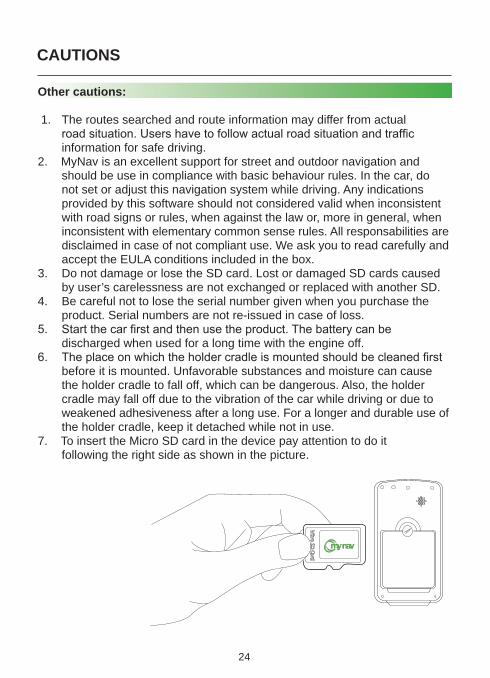
Other cautions:
1. The routes searched and route information may differ from actual road situation. Users have to follow actual road situation and traffic information for safe driving. 2. MyNav is an excellent support for street and outdoor navigation and should be use in compliance with basic behaviour rules. In the car, do not set or adjust this navigation system while driving. Any indications provided by this software should not considered valid when inconsistent with road signs or rules, when against the law or, more in general, when inconsistent with elementary common sense rules. All responsabilities are disclaimed in case of not compliant use. We ask you to read carefully and accept the EULA conditions included in the box.3. Do not damage or lose the SD card. Lost or damaged SD cards caused by user’s carelessness are not exchanged or replaced with another SD.4. Be careful not to lose the serial number given when you purchase the product. Serial numbers are not re-issued in case of loss.5. Start the car first and then use the product. The battery can be discharged when used for a long time with the engine off.6. The place on which the holder cradle is mounted should be cleaned first before it is mounted. Unfavorable substances and moisture can cause the holder cradle to fall off, which can be dangerous. Also, the holder cradle may fall off due to the vibration of the car while driving or due to weakened adhesiveness after a long use. For a longer and durable use of the holder cradle, keep it detached while not in use.7. To insert the Micro SD card in the device pay attention to do it following the right side as shown in the picture.
CAUTIONS
25
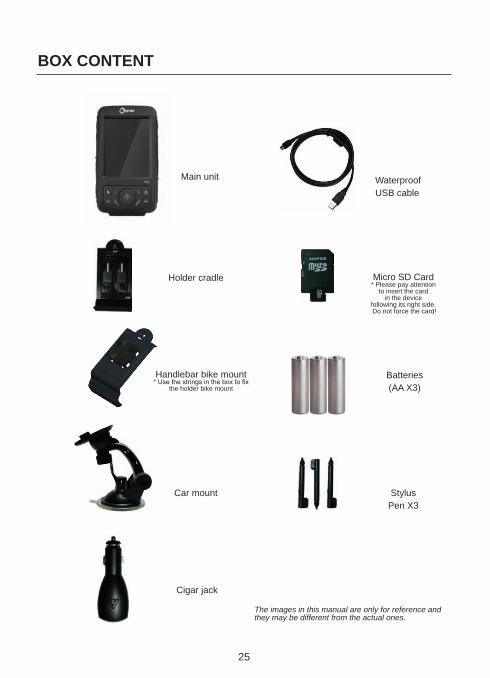
BOX CONTENT
The images in this manual are only for reference and they may be different from the actual ones.
Main unit WaterproofUSB cable
Holder cradle
Car mount Stylus Pen X3
Cigar jack
Batteries(AA X3)
Handlebar bike mount* Use the strings in the box to fix
the holder bike mount
Micro SD Card* Please pay attention
to insert the card in the device
following its right side. Do not force the card!
26
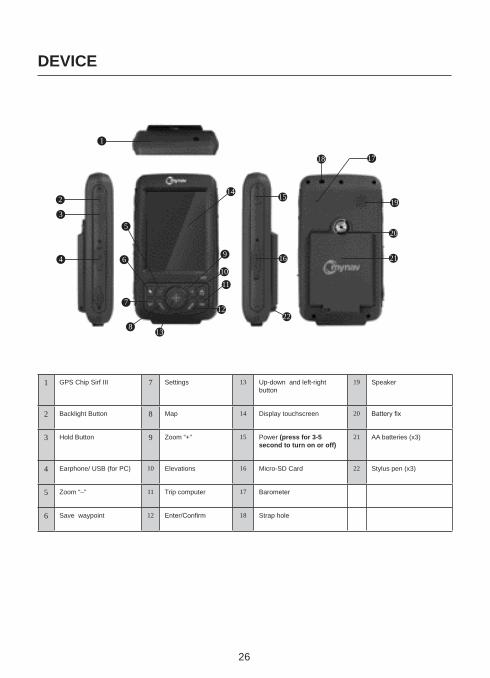
DEVICE
1
2
3
4
5
6
7
813
12
1110
1415
18 17
19
20
2116
22
9
1 GPS Chip Sirf III 7 Settings 13 Up-down and left-right button
19 Speaker
2 Backlight Button 8 Map 14 Display touchscreen 20 Battery fix
3 Hold Button 9 Zoom “+” 15 Power (press for 3-5 second to turn on or off)
21 AA batteries (x3)
4 Earphone/ USB (for PC) 10 Elevations 16 Micro-SD Card 22 Stylus pen (x3)
5 Zoom “–” 11 Trip computer 17 Barometer
6 Save waypoint 12 Enter/Confirm 18 Strap hole
27
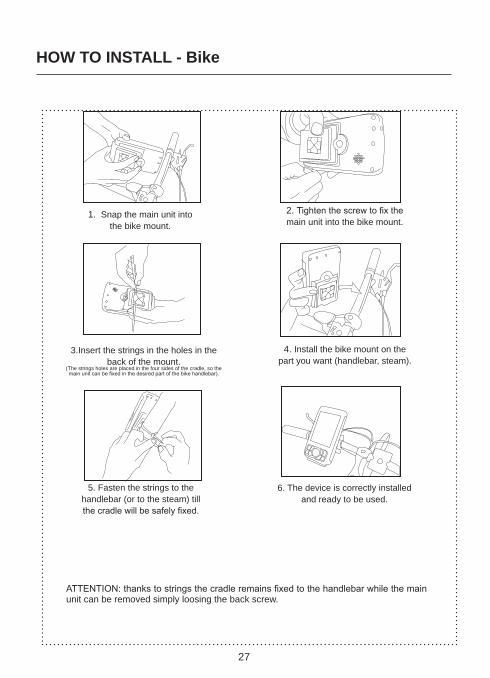
HOW TO INSTALL - Bike
1. Snap the main unit into the bike mount.
3.Insert the strings in the holes in the back of the mount.
(The strings holes are placed in the four sides of the cradle, so the main unit can be fixed in the desired part of the bike handlebar).
2. Tighten the screw to fix the main unit into the bike mount.
4. Install the bike mount on the part you want (handlebar, steam).
5. Fasten the strings to the handlebar (or to the steam) till the cradle will be safely fixed.
6. The device is correctly installed and ready to be used.
ATTENTION: thanks to strings the cradle remains fixed to the handlebar while the main unit can be removed simply loosing the back screw.
28
HOW TO INSTALL - Car
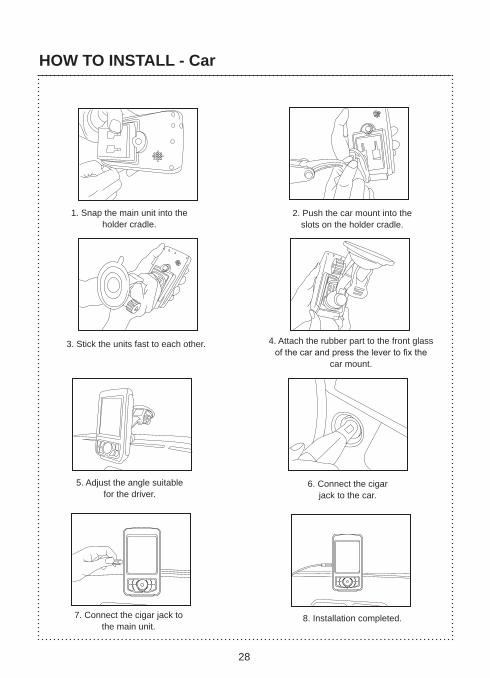
1. Snap the main unit into the holder cradle.
5. Adjust the angle suitable for the driver.
2. Push the car mount into the slots on the holder cradle.
6. Connect the cigar jack to the car.
3. Stick the units fast to each other.
7. Connect the cigar jack to the main unit.
4. Attach the rubber part to the front glass of the car and press the lever to fix the
car mount.
8. Installation completed.
29
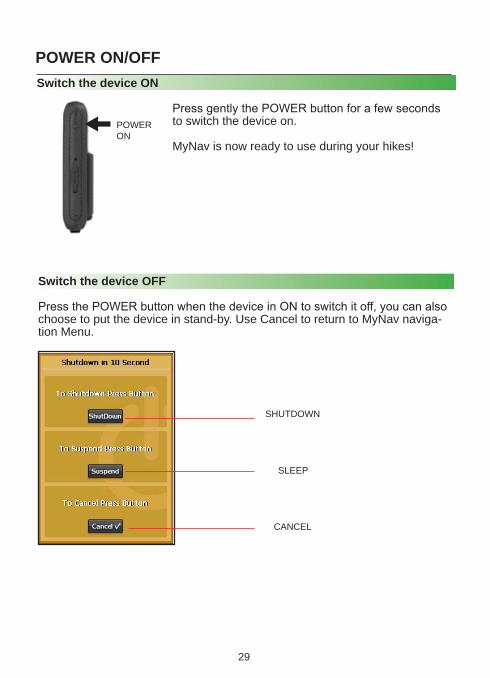
POWER ON/OFF
POWERON
Switch the device ON
Press gently the POWER button for a few seconds to switch the device on.
MyNav is now ready to use during your hikes!
SHUTDOWN
SLEEP
CANCEL
Switch the device OFF
Press the POWER button when the device in ON to switch it off, you can also choose to put the device in stand-by. Use Cancel to return to MyNav naviga-tion Menu.
30
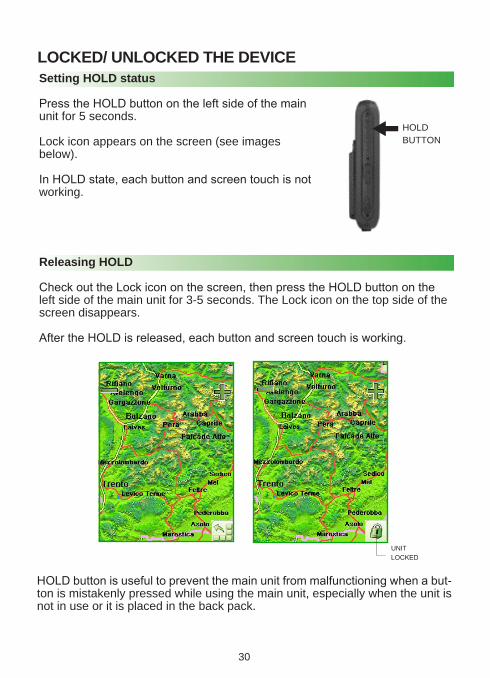
LOCKED/ UNLOCKED THE DEVICE Setting HOLD status
Press the HOLD button on the left side of the main unit for 5 seconds.
Lock icon appears on the screen (see images below).
In HOLD state, each button and screen touch is not working.
Releasing HOLD
Check out the Lock icon on the screen, then press the HOLD button on the left side of the main unit for 3-5 seconds. The Lock icon on the top side of the screen disappears.
After the HOLD is released, each button and screen touch is working.
HOLD BUTTON
UNITLOCKED
HOLD button is useful to prevent the main unit from malfunctioning when a but-ton is mistakenly pressed while using the main unit, especially when the unit is not in use or it is placed in the back pack.

31
COPYING AND DELETING DATA ON SD CARDThe micro SD card in the box is pre-charged with software and maps, please pay attention while copying and deleting the information contained to avoid an unwanted data loss.
The company is not responsible in case of data loss due to wrong operations on micro SD card.
Copying data:
1. Put the micro SD card into the micro SD adapter. 2. Put the adapter into the SD card reader. 3. Connect the SD card reader to the computer (the card reader is available separately). 4. Run My Computer in your PC (alternatively, run Windows Search). 5. The micro SD card is read as a removable disk. 6. Select the file to copy and drag and drop it to the portable disk. (Alternatively, choose the file and press the right-side button on the mouse and choose Copy and move to the portable disk to paste it).
Deleting data:
1. Put the micro SD card into the micro SD adapter. 2. Put the SD adapter into the SD card reader. 3. Connect the SD card reader to the computer (the card reader is available separately). 4. Run My Computer in your PC (alternatively, run Windows Search). 5. The SD card is read as a removable disk. 6. Select the file to delete and use the Delete key, or click the right button on the mouse.
32
DEVICE SETTINGS
Volume/BrightnessDevice Volume adjustment can be done directly from the SETTINGS, once the device is on.
CalibrationIn case a display calibration is needed, choose SETTINGS and follow the relating instructions.
Display rotationThe display can be rotated according to user’s preferences (portrait or landscape), device directional buttons will follow display orientation.
For further information on device settings see also the newest software manual (.pdf format) included in the installation DVD or available for the download on MyNav website (www.mynav.com).
Further cautions on copying and deleting data on SD Card
The micro SD card can be damaged if the computer power supply is off or the SD card reader is separated while data is being copied, moved and deleted.
Data cannot be copied or deleted if the stick on the upper left corner of the micro SD card is set to Lock.
It is recommended to remove the micro SD card from the computer by clicking on the portable disk, clicking the right-side button on the mouse.
33
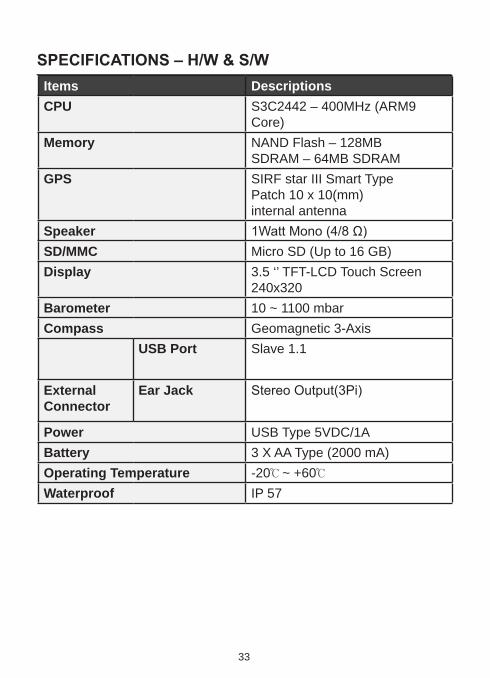
SPECIFICATIONS – H/W & S/WItems DescriptionsCPU S3C2442 – 400MHz (ARM9
Core)Memory NAND Flash – 128MB
SDRAM – 64MB SDRAMGPS SIRF star III Smart Type
Patch 10 x 10(mm) internal antenna
Speaker 1Watt Mono (4/8 Ω)SD/MMC Micro SD (Up to 16 GB)Display 3.5 ‘’ TFT-LCD Touch Screen
240x320Barometer 10 ~ 1100 mbarCompass Geomagnetic 3-Axis
USB Port Slave 1.1
External Connector
Ear Jack Stereo Output(3Pi)
Power USB Type 5VDC/1ABattery 3 X AA Type (2000 mA)Operating Temperature -20 ~ +60Waterproof IP 57
34
TROUBLE SHOOTING1. SD card is not read. Rub the metal part of SD card with soft cloth and insert it again; only under MyNav support directions use the installation DVD to restore the SD content.
2. Pressing buttons will not return any response. Press the Hold button or if it does not work even after pressing the Hold button, restart the device or try to remove the batteries.
3. The device does not work at all. Battery power of the car sometimes falls down lower than the available level for the device. In this case deal with the power supply problems of the car first.
4. The power of the device turns off while using it. Check out the battery charge status. If not enough battery capacity is left, connect the main unit to the power supply immediately. If the main unit goes off with all the power connection, check out whether the main unit is properly connected to the power.
5. Screen is not readable. Check out the brightness of backlight on the menu set.
6. Data are not copied onto the SD card. Check out if the SD card is locked or if the SD card capability is overused. In case of the SD card capability is over-used and data cannot be copied, try deleting the files not in use and try copying again (pay attention not to delete navigation software!).
7. GPS reception is not available. GPS satellite waves can reduce due to the coating materials on the car windows (especially metal - containing substances) or other obstacles in the car, or weather conditions (rain, snow, cloud etc) can hamper flawless reception of signals. Also, in such places as surrounded by tall buildings, high-level roads and under ground parking lots, GPS reception is not possibly seamless. The first time ou used the device, It can take a minimum of 30 seconds to a maximum of 5 minutes for the satellite to check out the location after the device is turned on depending on the places where you are or other local conditions. So just wait for a moment and then try using the device.
8. Compass calibration To display compass over MyNav map, click on the “Direction indicator” in MyNav map menu. Compass re-calibration consists in a consecutively 360 degrees rotation of the device on the three axis.

35
36
INFORMAZIONE AGLI UTENTI/ INFORMATION TO USERS
SMALTIMENTO DEL DISPOSITIVO/ DEVICE DISPOSAL
Ai sensi dell’art. 13 del Decreto Legislativo 25 Luglio 2005, n.151 ”Attuazione delle Direttive 2002/95/CE, 2002/96/CE E 2003 /108/CE, relative alla riduzione dell’uso di sostanze pericolose nelle apparecchiature elettriche ed elettroniche, nonché allo smaltimento dei rifiuti”. Il simbolo del casson-etto barrato riportato sull’apparecchiature o sulla sua confezione indica che il prodotto alla fine della propria vita utile deve essere raccolto separatamente dagli altri rifiuti. L’utente dovrà, pertanto, con-ferire l’apparecchiatura giunta a fine vita agli idonei centri di raccolta differenziata dei rifiuti elettronici ed elettrotecnici, oppure riconsegnarla al rivenditore al momento dell’acquisto di una nuova apparecchia-tura di tipo equivalente, in ragione di una a uno. L’adeguata raccolta differenziata per l’avvio successivo dell’apparecchiatura dimessa al riciclaggio, al trattamento e allo smaltimento ambientale compatibile contribuisce ad evitare possibili effetti negativi sull’ambiente e sulla salute favorisce il reimpiego e/o riciclo dei materiali di cui è composta l’apparecchiatura. Lo smaltimento abusivo del prodotto da parte dell’utente comporta l’applicazione delle sanzioni amministrative previste della normativa vigente.
In respect to the EU Directives 2002/95/EC, 2002/96/EC e 2003/108/EC, concerning the disposal of waste of electric and electronic equipments. The trash crossed-out wheeled bin, visible on the equipment or on its package, shows that the product, at the end of its life, will have to be disposed of separately from the other waste. Therefore the user will have to bring the equipment to the appropriate waste of electric and electronic equipment collection centers, or give it back to the seller when buying a new equivalent device, on a one-to-one basis. The appropriate collection, in order to recycle, treat and dispose of the equipment in a way compatible with the environment, contributes to avoid possible negative effects on the environment and on the health, and helps to reuse and/or recycle the materials composing the equipment. The abusive disposal of the product by the user implies the application of the administrative penalties adopted by the law in force.
37
COPYRIGHT
Il presente materiale appartiene a GIOVE Srl; esso nella sua interezza o anche in parte, non può quindi essere duplicato od utilizzato in qualsiasi forma senza preventivo consenso di GIOVE Srl.Il contenuto del manuale potrà variare senza preventiva comunicazione per migliorie apportate al prodotto, allo stesso modo esso può contenere errori ed omissioni.Ogni tentativo di copiare, modificare, distribuire il programma, senza consenso scritto di GIOVE sarà punito secondo le leggi vigenti in tema di copyright.
Microsoft Windows CE è un marchio registrato di Microsoft Corporation.
Perdita dei dati:i dati contenuti nel navigatore possono andare persi, a causa di un uso improprio da parte dell’utente, errori sconosciuti, aggiornamenti del prodotto, etc, quindi è sempre consigliato mantenerne una copia di back up.
GIOVE Srl non è in ogni caso responsabile per eventuali danni derivanti dalle cause sovraindicate.
All right reserved. No part of the content in this manual can be duplicated or used in any forms or means without prior consent GIOVE Srl.This instruction manual can be altered without prior notice for product improvement.This instruction manual is currently made and it may contain technical and editorial errors or omissions.Any attempts to copy, modify and distribute this program without obtaining a written consent from GIOVE Srl will be punished according to the law on software copyright.
Microsoft Windows CE is the officially registered trademark of Microsoft Corporation.
Data loss:data can be deleted by user’s improper use, unknown errors, AS and upgrades of the product, so data backup is recommended. GIOVE Srl does not take any responsibility for any damage resulting from the causes aforesaid.

MyNav 600 Professional - Especially designed for outdoor use – User guideAll rights reserved 2009, GIOVE Srl, Treviso, Italy.
MyNav è un marchio registrato di GIOVE Srl. Tutti gli altri marchi sono di proprietà dei legittimi titolari.
MyNav is a trademark registered by GIOVE Srl. All other trademarks belong to their legitimate owners.
Visit www.mynav.com, further info: [email protected]