M130 Manual 0812 - Kurzweil Music Systemskurzweil.com/.../M130/Documentation/M130_Users_Manual.pdf3....
20
MANUAL
Transcript of M130 Manual 0812 - Kurzweil Music Systemskurzweil.com/.../M130/Documentation/M130_Users_Manual.pdf3....

MANUAL


The lightning flash with the arrowhead symbol, within an equilateraltriangle is intended to alert the user to the presence of uninsulated"dangerous voltage" within the product's enclosure that may be ofsufficient magnitude to constitute a risk of electric shock to persons.
The exclamation point within an equilateral triangle is intended to alert the user to the presence of important operating and maintenance (servicing) instructions in the literatureaccompanying the product.
CAUTIONRISK OF ELECTRIC SHOCK
DO NOT OPEN
REFER SERVICING TO QUALIFIED SERVICE PERSONNEL.NO USER SERVICEABLE PARTS INSIDE.
DO NOT REMOVE THE COVER.CAUTION: TO REDUCE THE RISK OF ELECTRIC SHOCK,
IMPORTANT SAFETY & INSTALLATION INSTRUCTIONSINSTRUCTIONS PERTAINING TO THE RISK OF FIRE ELECTRIC SHOCK , OR INJURY TO PERSONS
WARNING: When using electric products, basic precautions should always be followed, including the following:
1. Read all the Safety and Installation Instructions and Explanation of Graphic Symbols before using the product.
2. This product must be grounded. If it should malfunction or break down, grounding provides a path of least resistance for electric current to reduce the risk of electric shock. This product is equipped with a power supply cord having an equipment-grounding conductor and a grounding plug. The plug must be plugged into an appropriate outlet which is properly installed and grounded in accordance with all local codes and ordinances.DANGER: Improper connection of the equipment-grounding conductor can result in a risk of electric shock. Do not modify the
adaptor which defeats the function of the equipment-grounding conductor. If you are in doubt as to whether the product is properly
3. Do not use this product near water Ð for example, near a bathtub, washbowl, kitchen sink, in a wet basement, or near a swimming pool, or the like.
4. This product should only be used with a stand or cart that is recommended by the manufacturer.
5. speakers or headphones, may be capable of producing sound levels that could cause permanent hearing loss. Do not operate for a long period of time at a high volume level or a level that is uncomfortable. If you experience any hearing loss or ringing in the ears, you should consult an audiologist.
6. This product should be located so that its location or position does not interfere with its proper ventilation.
7. The product should be located away from heat sources such as radiators, heat registers, or other products that produce heat.
8. The product should be connected to a power supply only of the type described in the operating instructions or as marked on the product.
9. This product may be equipped with a polarized line plug (one blade wider than the other). This is a safety feature. If you are unable to insert the plug into the outlet, contact an electrician to replace your obsolete outlet. Do not defeat the safety purpose of the plug.
10. The power supply cord of the product should be unplugged from the outlet when left unused for a long period of time. When unplugging the power supply cord, do not pull on the cord, but grasp it by the plug.
11. Care should be taken so that objects do not fall and liquids are not spilled into the enclosure through openings.
12. when:A. The power supply cord or the plug has been damaged;B. Objects have fallen, or liquid has been spilled into the
product;C. The product has been exposed to rain;D. The product does not appear to be operating normally or
exhibits a marked change in performance;E. The product has been dropped, or the enclosure damaged.
13. Do not attempt to service the product beyond that described in the user maintenance instructions. All other servicing should be
14. WARNING: Do not place objects on the product’s power supply cord, or place the product in a position where anyone could trip over, walk on, or roll anything over cords of any type. Do not allow the product to rest on or be installed over cords of any type.
hazard and/or personal injury.
RADIO AND TELEVISION INTERFERENCEWARNING:approved by Young Chang could void your authority to operate the instrument.
IMPORTANT: When connecting this product to accessories and/or other equipment use only high quality shielded cables.
NOTE: This instrument has been tested and found to comply with the limits for a Class B digital device, pursuant to Part 15 of the FCC Rules. These limits are designed to provide reasonable protection against harmful interference in a residential installation. This instrument generates, uses, and can radiate radio frequency energy and, if not installed and used in accordance with the instructions, may cause harmful interference to radio communications. However, there is no guarantee that interference will not occur in a particular installation. If this instrument does cause harmful interference to radio or television reception, which can be determined by turning the instrument off and on, the user is encouraged to try to correct the interference by one or more of the following measures:
• Reorient or relocate the receiving antenna.• Increase the separation between the instrument and the receiver.• Connect the instrument into an outlet on a circuit other than the
one to which the receiver is connected.• If necessary consult your dealer or an experienced radio/television
technician for additional suggestions.The normal function of this product may be disturbed by strong electro magnetic interference. If so, simply reset the product to resume normal operation by following the instruction manual. In case the function could not resume, please use the product in another location.
NOTICEThis apparatus does not exceed the Class B limits for radio noise emissions from digital apparatus set out in the Radio Interference Regulations of the Canadian Department of Communications.
AVISLe present appareil numerique n’emet pas de bruits radioelectriques depassant les limites applicables aux appareils numeriques de la class B prescrites dans le Reglement sur le brouillage radioelectrique edicte par le ministere des Communications du Canada.
SAVE THESE INSTRUCTIONS

IMPORTANT SAFETY INSTRUCTIONS1) Read these instructions.
2) Keep these instructions.
3) Heed all warnings.
4) Follow all instructions.
5) Do not use this apparatus near water.
6) Clean only with dry cloth.
7) Do not block any of the ventilation openings. Install in accordance with the manufacturer’s instructions.
8) Do not install near any heat sources such as radiators, heat registers, stoves, or other apparatus Allow adequate ventilation for the power adapter. Do not
hide it under a carpet or behind a curtain or place it in an enclosed space where heat buildup can occur. Do not defeat the safety purpose of the polarized or grounding-type plug. A polarized plug has two blades with one wider than the other. A grounding type plug has two blades and a third grounding prong. The wide blade or the third prong are provided for your safety. If the provided
9) Protect the power cord from being walked on or pinched, particularly at plugs, convenience receptacles, and the point where they exit from the apparatus.
10)
11) or sold with the apparatus. When a cart is used, use caution when moving the cart/apparatus combination to avoid injury from tip-over.
12) Unplug this apparatus during lightning storms or when unused for long periods of time.
13) damaged in any way, such as power-supply cord or plug is damaged, liquid has been spilled or objects have fallen into the apparatus, the apparatus has been exposed to rain or moisture, does not operate normally, or has been dropped.
Warning:
such as vases, are placed on the equipment.
To completely disconnect this equipment from the AC Mains, disconnect the power supply cord plug from the AC receptacle.
4
6
7
10
13
14
1. Power supply and Precautions
2. Feature of the M130
3. Components & Assembly Instruction
4. Selecting Operations
5. The Rear Panel
6. Troubleshooting
7. Specification 14
Congratulations on your purchase of a M130.You’ll find it easy to learn, but it is equipped with sensitive components inside of it. Be sure to real the manual carefully as you continue to familiarize your-self with the features and functions of the M130. Thank you.
Contents

1. Power supply and Precautions Power supply
M130 runs on AC 220 Volts 60 Hz.If your power outlet is not the standard above, it is recommended you use an appropriate adaptor.
Warning For perfect operation and security, please read the manual careful-ly and keep it for future reference.
1) To reduce the risk of fire or electric shock, do not expose this apparatus to rain or moisture.2) Please connect the designated AC adaptor to an AC outlet of the correct voltage. 3) This product should only be used with a standard voltage, if not, please use an appropriate adaptor that is recommended by the manufacturer. 4) When you replace a fuse, only use a proper one.5) Please open and close the keyboard cover carefully not to catch/trap hands or fingers.
1) Avoid a severe shock to reduce the risk of a trouble2) Protect the keyboard and switches when they are moved3) Ensure the volume to the minimum level before turn on the keyboard4) Do not open inside. This product contains precision parts inside, so unnecessary touch could cause a breakdown or an accident.5) Turn off the power after use6) Unplug this apparatus when unused for long periods of time.7) Do not apply excess force to the buttons and switches
Caution

Installation Site and Precautions
• Avoid direct sunlight• Avoid extreme temperature or humidity.• Avoid excessive dusty or dirty location. • Do not place near any heat sources such as radiators, heat registers, stoves, or other apparatus (including amplifiers) that produce heat.
• Do not place objects, such as vases, glass es, and coffee cups, on the product.
• Do not let paper, metallic, or other objects into the instrument.
• Do not open inside personally. When repair is needed, please contact the Kurzweil A/S center.
• Clean only with a soft, dry cloth. Do not use paint thinners, solvents, clean ing fluids, or chemical-impregnated wiping cloths

2. Feature of the M130Instrument Description
Music stand
Upper Cover
Arms
Pedal Pedal Box
Feet
Stand Leg
Switch, Volume, Headphone
Back Panel
3. Components & Assembly Instruction
Piano Body
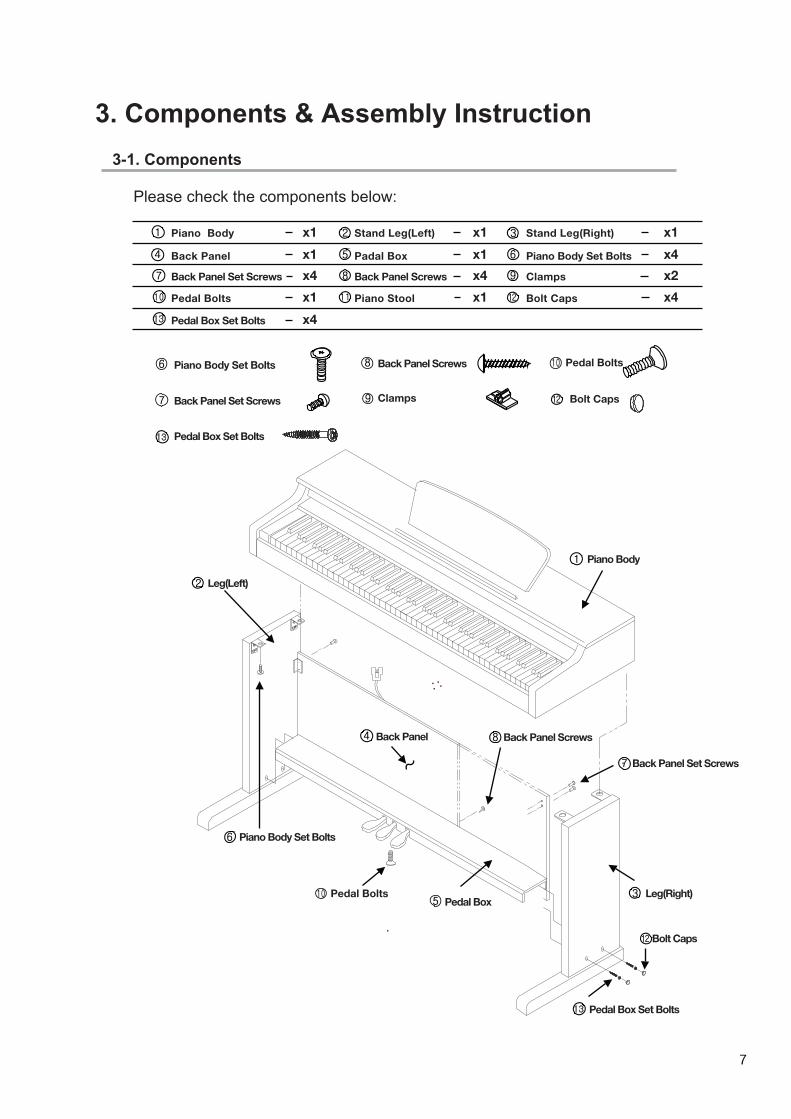
3-1. Components
Please check the components below:
x1 Stand Leg(Left) x1 Stand Leg(Right) x1
Back Panel x1 Padal Box x1 Piano Body Set Bolts
Piano Body Set Bolts
x4
Back Panel Set Screws
Back Panel Set Screws
x4 Back Panel Screws
Back Panel Screws
x4 Clamps
Clamps
x2
Pedal Bolts
Pedal Bolts
x1 Piano Stool
Bolt Caps
x1 Bolt Caps x4
Pedal Box Set Bolts
Pedal Box Set Bolts
x4
Piano Body
Leg(Left)
Piano Body Set Bolts
Pedal BoxLeg(Right)
Back Panel ScrewsBack Panel
Pedal Box Set Bolts
Bolt Caps
Back Panel Set Screws
Pedal Bolts
13
13
13
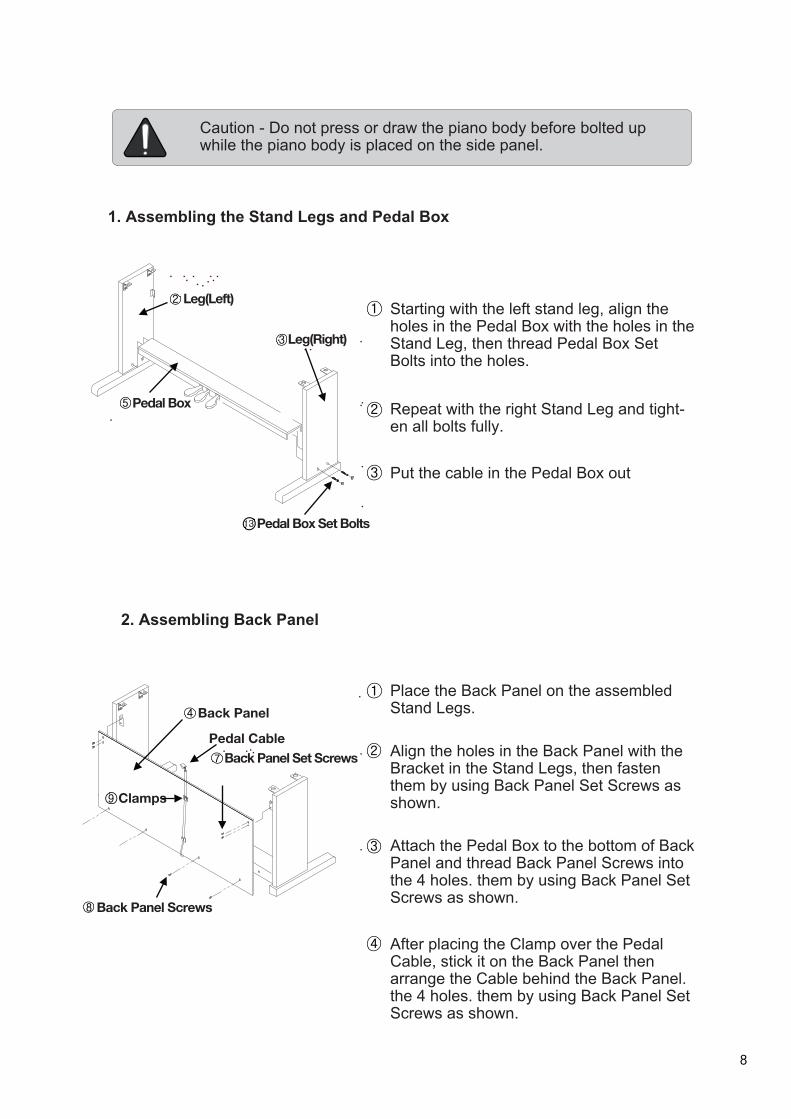
1. Assembling the Stand Legs and Pedal Box
2. Assembling Back Panel
Leg(Left)
Pedal Box
Leg(Right)
Pedal Box Set Bolts13
Caution - Do not press or draw the piano body before bolted up while the piano body is placed on the side panel.
Starting with the left stand leg, align the holes in the Pedal Box with the holes in the Stand Leg, then thread Pedal Box Set Bolts into the holes.
Place the Back Panel on the assembled Stand Legs.
Align the holes in the Back Panel with the Bracket in the Stand Legs, then fasten them by using Back Panel Set Screws as shown.
Attach the Pedal Box to the bottom of Back Panel and thread Back Panel Screws into the 4 holes. them by using Back Panel Set Screws as shown.
After placing the Clamp over the Pedal Cable, stick it on the Back Panel then arrange the Cable behind the Back Panel. the 4 holes. them by using Back Panel Set Screws as shown.
Repeat with the right Stand Leg and tight-en all bolts fully.
Put the cable in the Pedal Box out
Back Panel
Clamps
Pedal Cable
Back Panel Screws
Back Panel Set Screws

How to connect Pedal Cable
3. Assembling Stand Legs and Piano Body
Insert the pin until it sounds like “Tick”. If the pin is bent or is not completely connected, the Pedal will not work.
Pedal Bolts
Piano Body
Caution
After putting the Piano Body on each side of the Stand Leg, align the 4 Bracket holes in the Stand Leg with the holes in the bottom of the Piano Body, then fix them by using the Piano Body Set Bolt.
Thread the Set Bolt into the oval hole in the connecting Bracket (front Stand Leg).
Connect the Pedal Cable with the Pedal termi-nal in the Piano Body
Unless you loose the Pedal Bolt, it can be damaged.
After decide the place for the piano, loose the Pedal Bolt when it goes to the ground to avoid damaging the Pedal Box with playing the piano.
PedalCable
Piano Body Set Bolts

Headphone Jack
Master Volume
Power Switch
1. Selecting a Voice (20 Voices)
2. Reverb - Resonance Effect, Chorus- Stereo Effect, Demo Song
The bottom left of keyboard
Headphone
MasterVolume
Off
OnPower
Selecting Operations: Press and hold the “Soft Pedal” and “Sustain Pedal” simultaneously, then select a Voice or a function key you desire.
4. Selecting Operations
The headphone jack is located on the bottom left of keyboard. You will need a 1/4-inch stereo jack in order to use headphones and can use two headphones simultaneously. The internal speaker system is automatically shut off when the headphone is plugged into Headphone jacks.Two sets of standard stereo headphones can be plugged in here for private practice or late-night playing. You can control the volume by using the Volume slider.
Rotate the Volume slider clockwise, the volume increases and vice versa.
M130 runs on AC 220 Volts 60 Hz.If your power outlet is not the standard above, it is recommended you use an appropriate adaptor.
Press and hold the “Soft Pedal” and “Sustain Pedal” simultaneously, then press the key, on the left of your instrument, labeled the name of instrument you want to play. Now you are able to play the Voice with metronome sound.
Press and hold the “Soft Pedal” and “Sustain Pedal” simultaneously, then press the key, on the right of your instrument, labeled Reverb On/Off. This function will be turned “On” with metronome sound or turned “Off” by pressing the keys. You can also select “Chorus” or “Demo Song” In the same way.
Caution To avoid the risk of hearing loss when using headphones, please do not play the piano with a high volume level for a long time.
Piano2
Piano1 Harpsichord Vibraphone Accordion Guitar Bass Cello Choir Brass Flute PercussionSaxophone
Organ Violin String Trumpet Clarinet OcarinaElectricPiano

Demo 1~ 50
Demo Song List
Chorus On Chorus Off Reverb On Reverb Off

Percussion Placement

1.USB MIDI (Input, Output)
2. AUX IN / OUT
3. MIC Jack, MIC Volume
4. Power Cord
5. Pedal
MIC JackMIC Volume
4. Selecting Operations
Use the USB ports to connect the M130 to a product for compatibility with MIDI: Computer, Piano, Synthesizer, Sequencer, and Drum Machine
Connect your MIC into MIC port.This can control MIC Volume
Connect the AC adaptor to the power supply cord.
M130 contains three functional pedals: Sustain, Sostenuto, Soft. It also works the same way with Grand Piano.
Soft Pedal
Sostenuto Pedal
Sustain Pedal
When the soft pedal is pressed, all notes played on the keyboard will have a softer effect.
When the sostenuto pedal is pressed, the notes played before you step on the pedal would have a sustain effect.
When the sustain pedal is pressed, notes sustain longer. Releasing the pedal immediately stops any sustained notes.
Soft Pedal Sostenuto Pedal Sustain Pedal
AUDIO IN
AUDIO OUT
Connect the audio output of an MP3/CD player or other audio Source to the stereo AUDIO IN jack on the rear panel. You will be able to hear the music through the speaker of your keyboard.
AUDIO OUT jack delivers the output of the instrument for connection to a keyboard amplifier, audio system.
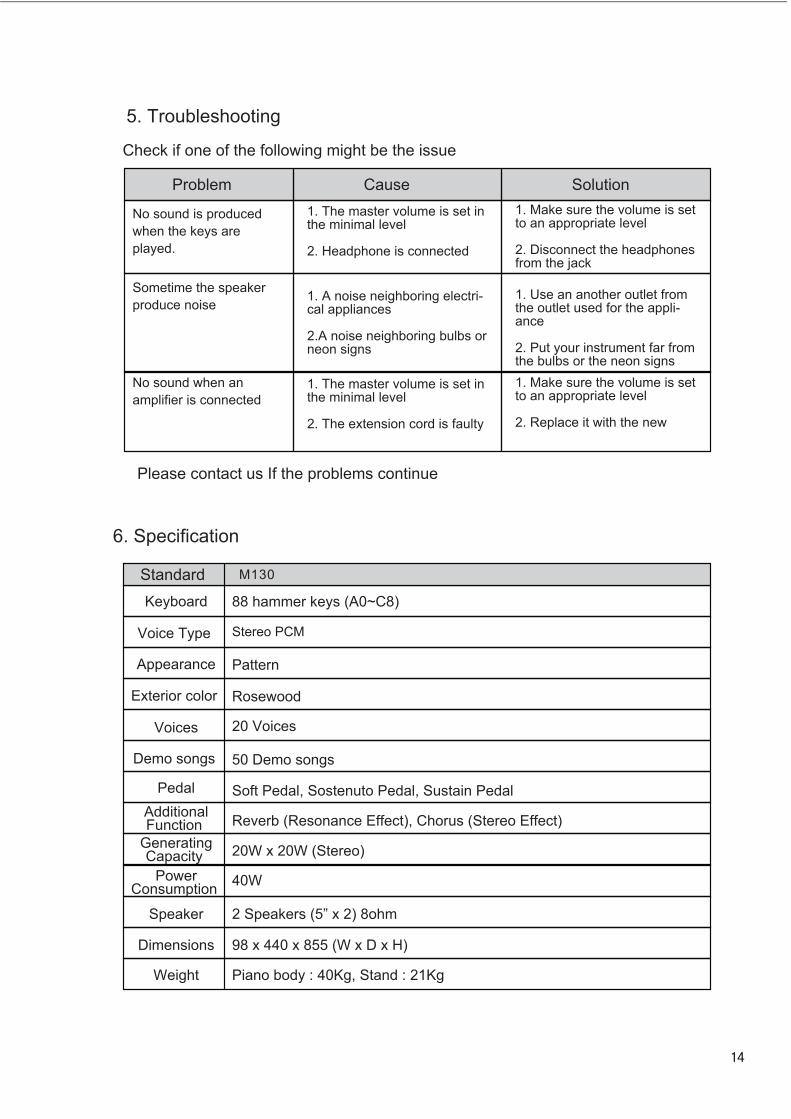
5. Troubleshooting
6. Specification
Check if one of the following might be the issue
Please contact us If the problems continue
M130
Problem Cause Solution
No sound is produced when the keys are played.
1. The master volume is set in the minimal level
2. Headphone is connected
1. Make sure the volume is set to an appropriate level
2. Disconnect the headphones from the jack
1. A noise neighboring electri-cal appliances
2.A noise neighboring bulbs or neon signs
1. Use an another outlet from the outlet used for the appli-ance
2. Put your instrument far from the bulbs or the neon signs
1. The master volume is set in the minimal level
2. The extension cord is faulty
1. Make sure the volume is set to an appropriate level
2. Replace it with the new
Sometime the speaker produce noise
No sound when an amplifier is connected
StandardKeyboard
Voice Type
Appearance
Exterior color
Voices
Demo songs
PedalAdditionalFunction
GeneratingCapacity
PowerConsumption
Speaker
Dimensions
Weight Piano body : 40Kg, Stand : 21Kg
98 x 440 x 855 (W x D x H)
2 Speakers (5” x 2) 8ohm
40W
20W x 20W (Stereo)
Reverb (Resonance Effect), Chorus (Stereo Effect)
Soft Pedal, Sostenuto Pedal, Sustain Pedal
50 Demo songs
20 Voices
Rosewood
Pattern
Stereo PCM
88 hammer keys (A0~C8)


196, Bongsu-daero, Seo-gu, Incheon, Korea