LiveNX 5.3 Quick Start Guide - LiveAction 5.3 Quick Start Guide ... PALO ALTO, CA 94303 LiveNX 5.3...
65
LiveAction, Inc. 3500 WEST BAYSHORE ROAD PALO ALTO, CA 94303 LiveNX 5.3 Quick Start Guide CONFIGURATION LIVEACTION, INC.
Transcript of LiveNX 5.3 Quick Start Guide - LiveAction 5.3 Quick Start Guide ... PALO ALTO, CA 94303 LiveNX 5.3...

LiveNX 5.3 Quick Start Guide
LiveAction, Inc. 3500 WEST BAYSHORE ROAD PALO ALTO, CA 94303
LiveNX 5.3 Quick Start Guide
CONFIGURATION
LIVEACTION, INC.

LiveNX 5.3 Quick Start Guide
The purpose for this Quick Start Guide is to provide quick and detailed instructions setting up LiveNX for the first time. In addition, the guide will navigate through LiveNX’s user interface and configuration of LiveNX’s Server, Client and Platform.

1| LiveNX 5.3 Quick Start Guide
Deployment Options
Single Server
Single server deployment of LiveNX consists of installing the server on a 64-bit Linux or Windows Server or VM. Since the LiveNX server has a built in collection node, it is fully useable without any additional installations.
Distributed Deployment
In distributed deployments, a single server is deployed as usual but additional collection nodes can be deployed and associated to the single server.
Virtual Machine
Servers and nodes can be deployed on VM as long as the performance requirements for compute, store and network are met.
Deployment Decision
The use and location of additional nodes are based on 3 criteria
Performance o Off load performance to another node.
Location o Place node near devices being polled. o Place at a branch site so data is not polled across the WAN to the DC where the server exists.
Security o Place node for different security zone, DMZ. o Node will initiate communication from security zone to server o In case of loss of communication, server of node may initiate communicates to reestablish
2| LiveNX 5.3 Quick Start Guide
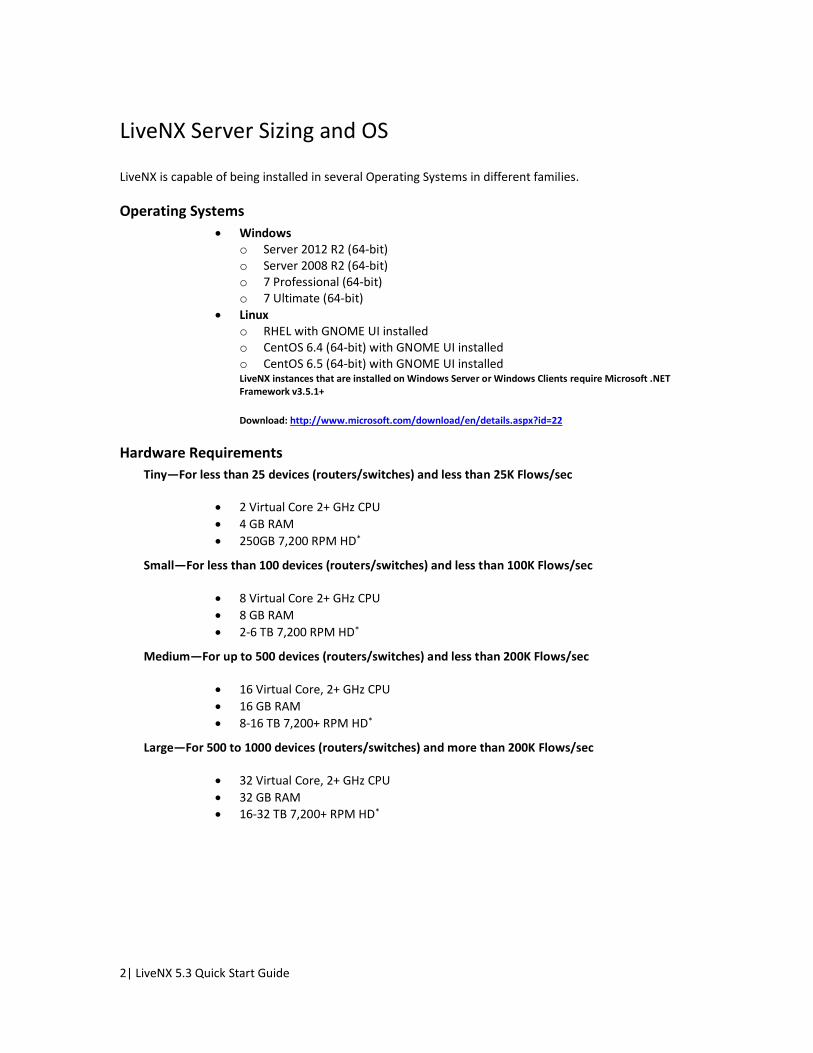
LiveNX Server Sizing and OS
LiveNX is capable of being installed in several Operating Systems in different families.
Operating Systems
Windows o Server 2012 R2 (64-bit) o Server 2008 R2 (64-bit) o 7 Professional (64-bit) o 7 Ultimate (64-bit)
Linux o RHEL with GNOME UI installed o CentOS 6.4 (64-bit) with GNOME UI installed o CentOS 6.5 (64-bit) with GNOME UI installed LiveNX instances that are installed on Windows Server or Windows Clients require Microsoft .NET Framework v3.5.1+
Download: http://www.microsoft.com/download/en/details.aspx?id=22
Hardware Requirements
Tiny—For less than 25 devices (routers/switches) and less than 25K Flows/sec
2 Virtual Core 2+ GHz CPU
4 GB RAM
250GB 7,200 RPM HD*
Small—For less than 100 devices (routers/switches) and less than 100K Flows/sec
8 Virtual Core 2+ GHz CPU
8 GB RAM
2-6 TB 7,200 RPM HD*
Medium—For up to 500 devices (routers/switches) and less than 200K Flows/sec
16 Virtual Core, 2+ GHz CPU
16 GB RAM
8-16 TB 7,200+ RPM HD*
Large—For 500 to 1000 devices (routers/switches) and more than 200K Flows/sec
32 Virtual Core, 2+ GHz CPU
32 GB RAM 16-32 TB 7,200+ RPM HD*
3| LiveNX 5.3 Quick Start Guide
VM Features and Guidelines
V-Motion is not supported
Local Datastore preferred o Thick Deployment
Hypervisor Options o VMware ESX(i) o Oracle Virtual Box o Microsoft Hyper-V o Xen
NOTE: Please reference The 5.3 User Guide for further installation details.
*Depends on flow rate from devices and retention time.
*For higher performance use RAID 10 or RAID 0 if redundancy is not required.
Client Sizing and OS
The LiveNX client runs on a standard Windows 64-bit based PC and Windows 7, 8, 32-bit Windows for webstart. LiveNX’s Mac client runs on OSX 10.9+ utilizing LiveNX client 3.14+ with similar memory and processor requirements as the Windows client requirements in the table below.
Windows Client Requirements Small Install Medium Install Large Install
Number of network devices Up to 25 25-500 500+
OS Type Win 7 Pro or greater
Win 7 Pro or greater
Win 7 Pro / Win Server 2012 R2
OS Size 32 bit 64 bit 64 bit
Processor Type Intel i3 type Intel i5 type Intel i7 type
Minimum Memory 4GB 8GB 16GB
4| LiveNX 5.3 Quick Start Guide
Router and Switch Compatibility
Cisco Series Routers
ASR 1000, 800, 1700, 1800, 1900, 2600, 2600XM, 2800, 2900, 3600, 3700, 3800, 3900, 7200, 7600
ASR 1000 Zone-Based Firewall High-Speed Logging
This device may work with LiveNX since they support Netflow, IPFIX or sFlow data formats
ISR 4451-X
IOS versions 12.3, 12.4, 15.0 and 15.1 have been tested and are recommended for use with the software (IOS XE 2.6.0 for ASR 1000 series). Earlier IOS versions may also work but are not officially supported.
General-release IOS versions are recommended, although early- and limited-release versions will also work with the software.
High-End Cisco Routers
Limited compatibility tests have been done with the 10000 series and 12000 series routers. Unfortunately they are not supported at this time.
Cisco Series Switches
Catalyst 3000, 4500, and 6500 series switches
Some aspects of QoS can be set up on Layer 3-routable interfaces and VLANs
NetFlow can be set up to work with Catalyst 6500 and 4500 switches
Cisco Security Devices
ASA 5500 Series running 8.3 (limited to NetFlow support only)
Non-Cisco Devices (Flow analysis only)
These are non-Cisco vendors that have gone through limited flow analysis testing with LiveNX
Alcatel
Extreme
Foundry
Hewlett-Packard
Juniper
NetVanta
Riverbed Steelhead
Nortel

5| LiveNX 5.3 Quick Start Guide
Installing the LiveNX Components
To download LiveNX, please refer to the download instructions sent via email when you request the LiveNX software and download the LiveNX Server (Required) in order to begin the deployment process.
Installer Components
LiveNX Server [required]
LiveNX Platform OVA [optional]
LiveNX Node [optional]
LiveNX Node OVA [optional]
LiveNX Client [optional]
All-In-One Components
LiveNX All-In-One OVA [required]
LiveNX Node OVA [optional]
Installing the LiveNX Server Software
Installation of the LiveNX Node and Server are very similar. Since the node is not required, please reference the LiveNX User Guide for further detailed information on the node installation.
A. Start B. Accept License Agreement C. Select Server Location
D. Select Data Directory E. Select Server IP Address F. Select Memory Allocation

6| LiveNX 5.3 Quick Start Guide
G. Select Start Menu Folder H. Select Service Options I. Finish
Installing LiveNX Platform OVA [Optional]
As of the release of 5.2, LiveNX includes a platform component. This step will eventually simplify installation and allow administrators to install and manage smaller versions of the appliance from their laptops. Here are the specifications.
1. Log into Vsphere

7| LiveNX 5.3 Quick Start Guide
2. Deploy the OVA
Click on File > Deploy OVF Template > Browse to the OVA
Review the image description and click Next
8| LiveNX 5.3 Quick Start Guide
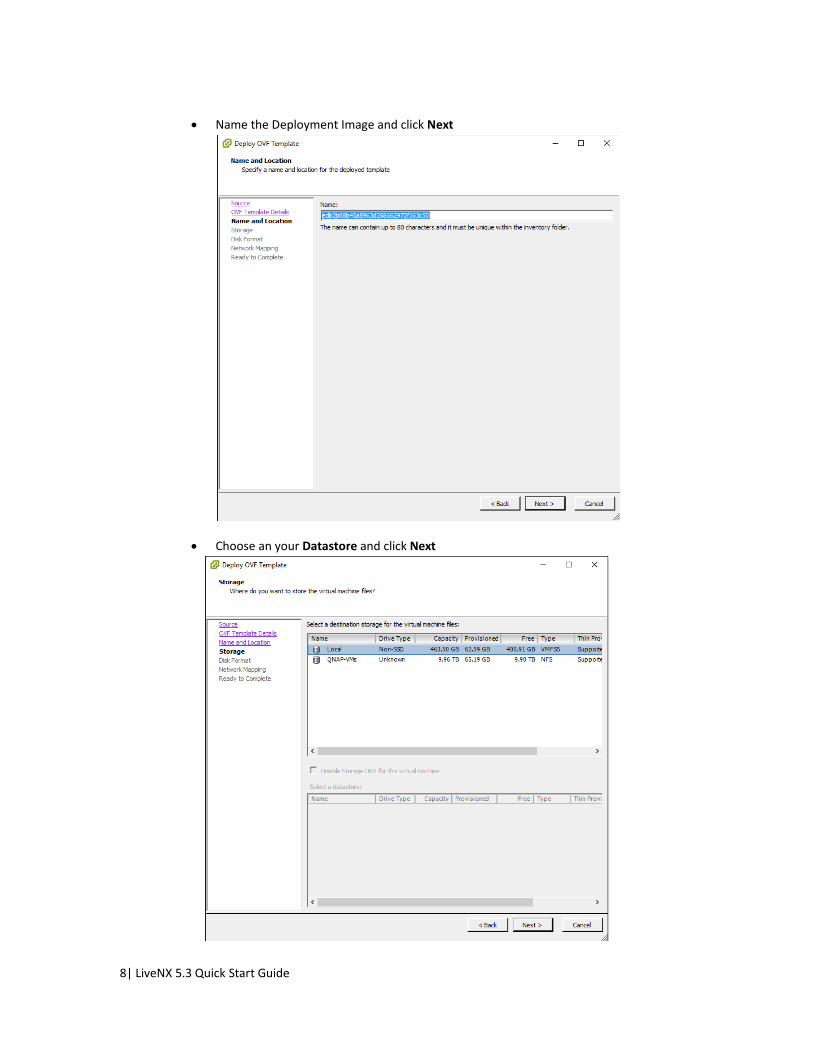
Name the Deployment Image and click Next
Choose an your Datastore and click Next

9| LiveNX 5.3 Quick Start Guide
Review and make changes to the Datastore options and click Next
NOTE: Thick and Thin Deployments have different drive-space behavior
Choose your Network Mapping and click Next

10| LiveNX 5.3 Quick Start Guide
Review all your previous choices and click Finish
11| LiveNX 5.3 Quick Start Guide
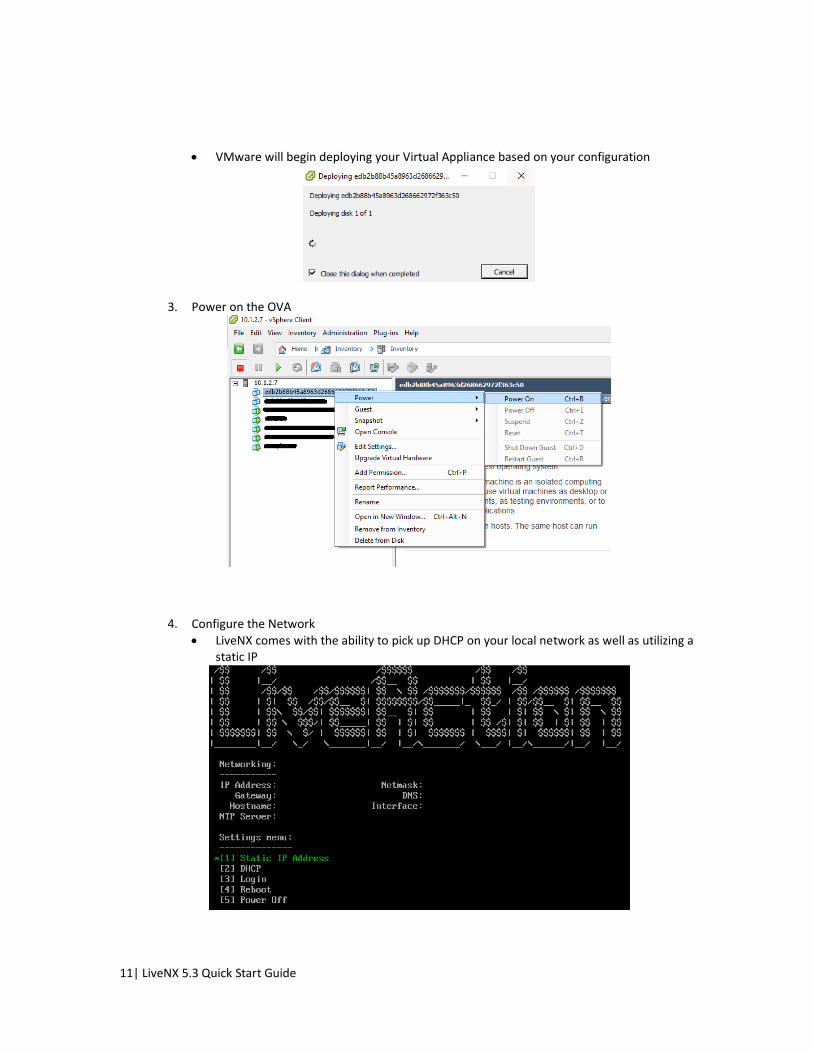
VMware will begin deploying your Virtual Appliance based on your configuration
3. Power on the OVA
4. Configure the Network LiveNX comes with the ability to pick up DHCP on your local network as well as utilizing a
static IP

12| LiveNX 5.3 Quick Start Guide
a. Static IP Option Configure Static IP and Select “y”
b. DHCP Option Configure DHCP Option
NOTE: DHCP Option will have the above fields filled in if there is a DHCP server to distribute IPs
Once the network configuration portion is completed your LiveNX Appliance will be reachable. The next steps would be to log into the appliance and launch the LiveNX Server Management Console.
Starting Up The LiveNX Server
Windows: Start > All Programs/All Apps > LiveAction Server [Version] > Management Console
Linux: /opt/LiveActionServer/[Version]/LAManagementconsole
Ran under Gnome Desktop
Click Manage > Start Service

13| LiveNX 5.3 Quick Start Guide
LiveNX’s installation will be complete when the message [The server is currently running] appears on the bottom left as indicated below.

14| LiveNX 5.3 Quick Start Guide
LiveNX All-In-One Server
Types and Requirements
Here are specifications to LiveNX All-In-One Server types and its OVA requirements.
Deployment of the LiveNX Node OVA and AIO are very similar. Since the node is not required, please reference the LiveNX User Guide for further detailed information on the node deployment.
Tiny-Server
o Used for less than 25 devices, or less than 25k flows/sec
o Deployment is targeted towards non-server installation (Laptops, Desktops, etc.)
o Packaged for both VMware Hypervisors and Oracle VirtualBox
o Specifications:
2vCPU Xeon or i7
4GB RAM
LiveNX Server Max Heap Size 2GB
250GB Data Disk
Small-Server
o Used for less than 100 Devices, or less than 100k flows/sec
o Installation for server environments with VMware Hypervisors / ESX(i)
o Specifications:
8vCPU Xeon or i7
16GB RAM
LiveNX Server Max Heap Size 8GB
4TB Data Disk
Storage can be expanded by adding additional disks
Medium-Server
o Used for 100 – 500 Devices or less than 200k flows/sec
o Installation for server environments with VMware Hypervisors / ESX(i)
o Specifications:
16vCPU Xeon or i7
32GB RAM
LiveNX Server Max Heap Size 16GB
6TB Data Disk
Storage can be expanded by adding additional disks
Large-Server
o Used for 500 – 1000 Devices or greater than 200k flows/sec
o Installation for server environments with VMware Hypervisors / ESX(i)
o Specifications:
32vCPU Xeon or i7
32GB RAM
LiveNX Server Max Heap Size 16GB
8TB Data Disk
Storage can be expanded by adding additional disks

15| LiveNX 5.3 Quick Start Guide
LiveNX All-In-One Deployment
The LiveNX All-in-One installation is deployed onESX(i). Please follow the steps below to deploy the All-In-One.
NOTE: The OVA installation has LiveNX integrated, there will NOT be a software installation step.
A. Download the OVA from http://liveaction.com
B. Deploy the OVA onto ESX(i)
Example is an ESX(i) installation.
Tiny-Servers can be installed on laptops with VMplayer and/or VMWorkstation
1. Log into Vsphere

16| LiveNX 5.3 Quick Start Guide
2. Deploy the OVA
a. Click on File > Deploy OVF Template > Browse to the OVA file
b. Review the image description and click Next
17| LiveNX 5.3 Quick Start Guide
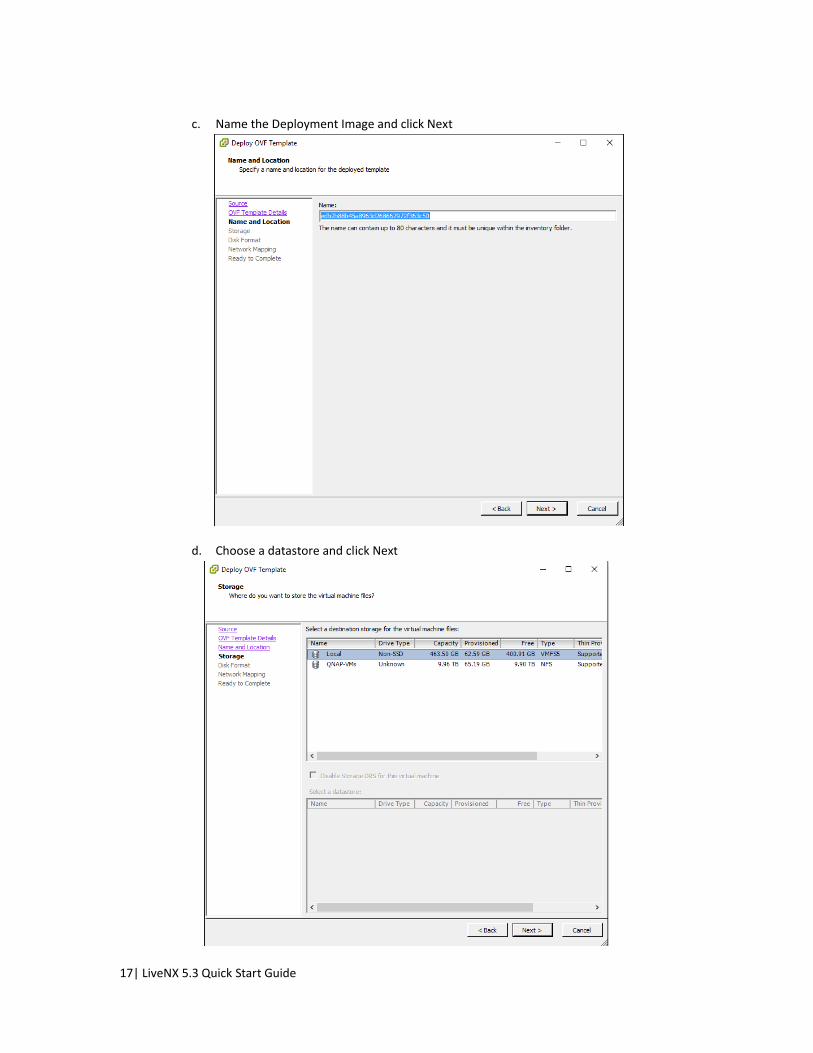
c. Name the Deployment Image and click Next
d. Choose a datastore and click Next

18| LiveNX 5.3 Quick Start Guide
e. Review and Select Changes to the Disk Format
i. Thick Provision Lazy Zeroed
1. Recommended if the physical disk space is available
ii. Thick Provision Eager Zeroed
1. Recommended if the physical disk space is available
iii. Thin Provision
1. Recommended if in a test environment where data storage is not as important
iv. Explanation of Thick Provision vs Thin Provision
http://blogs.vmware.com/vsphere/2014/05/thick-vs-thin-disks-flash-arrays.html

19| LiveNX 5.3 Quick Start Guide
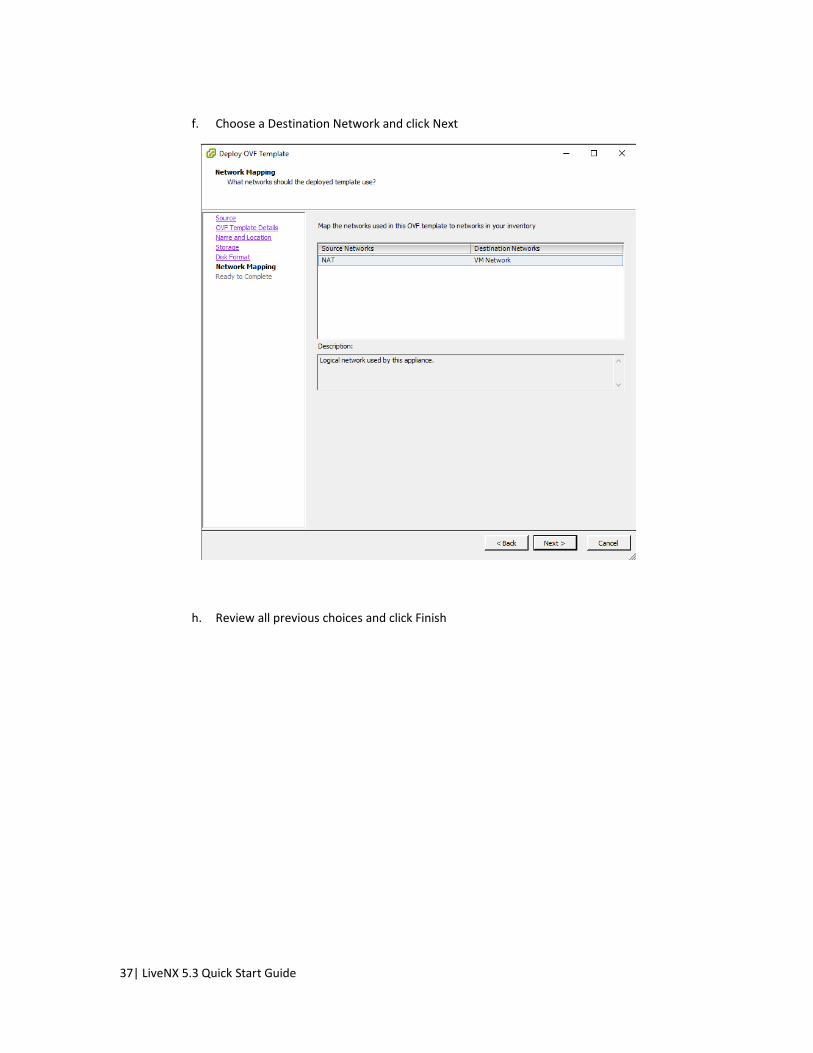
f. Choose a Destination Network and click Next
f. Review all previous choices and click Finish

20| LiveNX 5.3 Quick Start Guide
g. VMware will begin deploying the Virtual Appliance based on the configuration
3. Power on the OVA
4. Configure the Network NOTE: LiveNX comes with the ability to pick up DHCP on a local network as well as utilizing a static IP

21| LiveNX 5.3 Quick Start Guide
4a. Static IP Option
1. Recommended for Production Environments
2. Configure Static IP and Select “y”
4b. DHCP Option NOTE: DHCP Option will have the above fields filled in if there is a DHCP server to distribute IPs
1. Recommended for Test Environments
2. Configure DHCP Option

22| LiveNX 5.3 Quick Start Guide
Once the network configuration portion is completed, the LiveNX Appliance will be reachable. The next steps would be to log into the appliance and launch the LiveNX Server Management Console.
Uploading the License to LiveNX on the All-In-One Platform
Out-of-the-box, LiveNX allows users to scp / ssh / sftp files onto the platform in order to easily integrate. The following shows an example of using an ftp client as well as commands on linux platform
Windows
1. Use an FTP/SFTP/SCP client
a. Common flavors for windows: filezilla, winscp
2. Connect to the platform through the file transfer clients
a. Username and password
Username: admin
Password: changeme

23| LiveNX 5.3 Quick Start Guide
b. Port: 22
c. Upload location: /opt/jidoteki/tinyadmin/home/
3. Upload the License
Linux
1. Open a terminal
2. scp <license file> admin@<ip-of-All-In-One>:/opt/jidoteki/tinyadmin/home/
a. Example: scp license.txt [email protected]:/opt/jidoteki/admin/home/
3. Type in the password
4. License will automatically upload
Starting up the All-In-One OVA
The All-In-One OVA was designed to quickly startup LiveNX on the OVA platform as quick and as easy as possible. The user must first launch the LiveNX Server console through the OVA’s console local to ESX(i). By launching the LiveNX Server Management Console, the user will be able configure LiveNX in order to start the appliance up.
From All-In-One OVA Login Screen

24| LiveNX 5.3 Quick Start Guide
A. Use Option 3 to Log into the Appliance
B. There will be 2 icons at the bottom of the screen, select the Management Console
NOTE: Since the platform will already have the LiveNX installed, there will not be a need to run an installer.
1. Launch the LiveNX Server Management Console
A. LiveNX’s All-In-One has both the new HTML5 web-UI available as well as the java client.
2. Licensing the LiveNX Server Management Console
A. Once the LiveNX Server Management Console is open there are two options
1. Utilize a Temporary License
a. There will be a pop-up once the Server Management Console opens.
b. Click > Yes
1) This Temporary License is only good for 2 weeks
2. Utilize a Permanent License (Provided from the purchase of LiveNX)
1) All-In-One OVA utilizes scp(secure copy)/sftp.
I. Username: admin
II. Password: changeme
2) Upload Location for the All-In-One: /opt/jidoteki/tinyadmin/home/
3) There will be a pop-up ocne the Server Management Console opens. Click > No
4) Click I have a valid license file > Next
5) Click … > find /opt/jidoteki/tinyadmin/home/ > Click Finish
6) The Permanent License has been installed

25| LiveNX 5.3 Quick Start Guide
3. Verify that the minimal changes to the OVA has been made to connect to both web UI and the
java client
1) Properties Tab > httpserver.api.enabled = True
2) Properties Tab > httpserver.secure = True
3) Click > Apply

26| LiveNX 5.3 Quick Start Guide
4. Turn on LiveNX
1) Click > Manage
2) Click > Start Service
5. Change Administrative Password (Recommended)
a. Click on the Terminal icon that is next to the LiveNX Server Management Console icon
b. In the terminal type > passwd
c. Type the old Password: changeme
d. Change the Password to a new Password
e. Type backup
1) NOTE: backup should be used any time a system level change is made to the instance
in order to keep the changes persistent.
6. To exit from the OVA desktop
a. Click an empty space on the desktop
b. Click > exit to prompt
Connecting to LiveNX All-In-One OVA
A. Web Start Java Client installation
1. Open a browser to > Error! Hyperlink reference not valid.
i. NOTE: https and the port number of 8092
2. Click > Launch LiveNX Client
27| LiveNX 5.3 Quick Start Guide
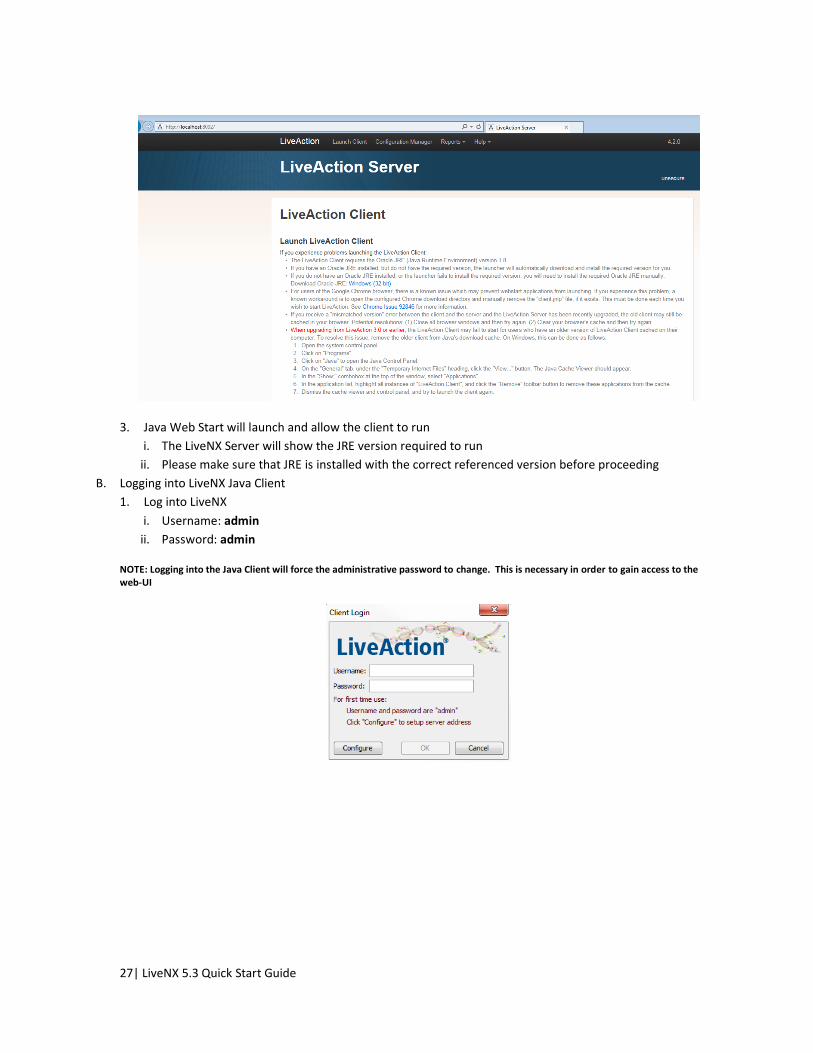
3. Java Web Start will launch and allow the client to run
i. The LiveNX Server will show the JRE version required to run
ii. Please make sure that JRE is installed with the correct referenced version before proceeding
B. Logging into LiveNX Java Client
1. Log into LiveNX
i. Username: admin
ii. Password: admin
NOTE: Logging into the Java Client will force the administrative password to change. This is necessary in order to gain access to the web-UI

28| LiveNX 5.3 Quick Start Guide
C. Logging into LiveNX Web-UI
1. Open a browser to Error! Hyperlink reference not valid.
i. NOTE: the https and no port
2. Fill in the IP Address of the LiveNX server
3. Leave the Port number as 8093
When the connection is made the session will be redirected and an accept to the local certificate will have to be done. Once through this process a login page will be presented.
D. Log in
NOTE: The credentials now have been changed from the previous steps on the java client. These logins are tied together
1. Username: admin
2. Password: <User defined>

29| LiveNX 5.3 Quick Start Guide
The screen below represents an example of what LiveNX’s HTML5 web-UI will display if there are devices that have been configured in LiveNX.

30| LiveNX 5.3 Quick Start Guide
LiveNX Node
Types and Requirements
Here are specifications to LiveNX Node Server types and its OVA requirements.
Small-Server
o Used for less than 100 Devices, or less than 100k flows/sec
o Installation for server environments with VMware Hypervisors / ESX(i)
o Specifications:
8vCPU Xeon or i7
16GB RAM
LiveNX Server Max Heap Size 8GB
4TB Data Disk
Storage can be expanded by adding additional disks
Medium-Server
o Used for 100 – 500 Devices or less than 200k flows/sec
o Installation for server environments with VMware Hypervisors / ESX(i)
o Specifications:
16vCPU Xeon or i7
32GB RAM
LiveNX Server Max Heap Size 16GB
6TB Data Disk
Storage can be expanded by adding additional disks
Large-Server
o Used for 500 – 1000 Devices or greater than 200k flows/sec
o Installation for server environments with VMware Hypervisors / ESX(i)
o Specifications:
32vCPU Xeon or i7
32GB RAM
LiveNX Server Max Heap Size 16GB
8TB Data Disk
Storage can be expanded by adding additional disks

31| LiveNX 5.3 Quick Start Guide
LiveNX Node Deployment
The LiveNX Node installation is deployed onESX(i). Please follow the steps below to deploy the Node.
NOTE: The OVA installation has LiveNX integrated, there will NOT be a software installation step.
C. Download the OVA from http://liveaction.com
D. Deploy the OVA onto ESX(i)
Example is an ESX(i) installation.
5. Log into Vsphere

32| LiveNX 5.3 Quick Start Guide
6. Deploy the OVA
a. Click on File > Deploy OVF Template > Browse to the OVA file
b. Review the image description and click Next

33| LiveNX 5.3 Quick Start Guide
c. Name the Deployment Image and click Next

34| LiveNX 5.3 Quick Start Guide
d. Choose a datastore and click Next

35| LiveNX 5.3 Quick Start Guide
e. Review and Select Changes to the Disk Format
i. Thick Provision Lazy Zeroed
1. Recommended if the physical disk space is available
ii. Thick Provision Eager Zeroed
1. Recommended if the physical disk space is available
iii. Thin Provision
1. Recommended if in a test environment where data storage is not as important
iv. Explanation of Thick Provision vs Thin Provision
http://blogs.vmware.com/vsphere/2014/05/thick-vs-thin-disks-flash-arrays.html

36| LiveNX 5.3 Quick Start Guide
37| LiveNX 5.3 Quick Start Guide
f. Choose a Destination Network and click Next
h. Review all previous choices and click Finish

38| LiveNX 5.3 Quick Start Guide
i. VMware will begin deploying the Virtual Appliance based on the configuration
7. Power on the OVA

39| LiveNX 5.3 Quick Start Guide
8. Configure the Network NOTE: LiveNX comes with the ability to pick up DHCP on a local network as well as utilizing a static IP

40| LiveNX 5.3 Quick Start Guide
4a. Static IP Option
1. Recommended for Production Environments
2. Configure Static IP and Select “y”
4b. DHCP Option NOTE: DHCP Option will have the above fields filled in if there is a DHCP server to distribute IPs
1. Recommended for Test Environments
2. Configure DHCP Option

41| LiveNX 5.3 Quick Start Guide
Once the network configuration portion is completed, the LiveNX Appliance will be reachable. The next steps would be to log into the appliance and launch the LiveNX Server Management Console.
Export Node Connection File From LiveNX Server
In order to utilize the LiveNX Node, a connection file must be exported from the LiveNX Server before the node knows which server to connect to.
1. Connect to the LiveNX Server and Export the Node
a. Open the LiveNX Server Management Console
b. Click > Nodes

42| LiveNX 5.3 Quick Start Guide
c. Click > Add Node
d. Fill in the remote node information
i. Node Name
1. Could be any name corresponding to the node
ii. IP address of the node
iii. Connection File Name
iv. Choice of encrypting the connection file with a password
e. Export the connection file
i. NOTE AIO location: /opt/jidoteki/tinyadmin/home/

43| LiveNX 5.3 Quick Start Guide
f. Download the Connection file and save it onto your desktop
i. Depending on the server you may have to use scp or filezilla to pull the file from your
LiveNX Server deployment
Uploading the Node Connection File to LiveNX Node OVA
Out-of-the-box, LiveNX allows users to scp / ssh / sftp files onto the platform in order to easily integrate. The following shows an example of using an ftp client as well as commands on linux platform
Windows

44| LiveNX 5.3 Quick Start Guide
4. Use an FTP/SFTP/SCP client
a. Common flavors for windows: filezilla, winscp
5. Connect to the platform through the file transfer clients
a. Username and password
Username: admin
Password: changeme
b. Port: 22
c. Upload location: /opt/jidoteki/tinyadmin/home/
6. Upload the Node file
Linux
5. Open a terminal

45| LiveNX 5.3 Quick Start Guide
6. scp <license file> admin@<ip-of-Node>:/opt/jidoteki/tinyadmin/home/
a. Example: scp license.txt [email protected]:/opt/jidoteki/admin/home/
7. Type in the password
8. License will automatically upload
Starting up the Node OVA
The Node OVA was designed to quickly startup LiveNX on the OVA platform as quick and as easy as possible. The user must first launch the LiveNX Server console through the OVA’s console local to ESX(i). By launching the LiveNX Node Console, the user will be able configure LiveNX in order to start the appliance up.
From Node OVA Login Screen

46| LiveNX 5.3 Quick Start Guide
C. Use Option 3 to Log into the Appliance
D. There will be 2 icons at the bottom of the screen, select the Node Console
3. Launch the LiveNX Console
4. The console will request for a connection file
1. Find the connection file under /opt/jidoteki/tinyadmin/home
2. If there is a password associated with the connection file, fill it in
3. Click > Import
5. The console will then import the file and automatically connect to the LiveNX Server

47| LiveNX 5.3 Quick Start Guide
Installing the LiveNX Client [Optional]
Client Installation
NOTE: Installation steps on OSX is very similar to the Windows installer. OSX uses dmg packages as executables
A. Start B. Accept License Agreement C. Select Client Location
D. Select Client Start Menu Folder E. Select Additional Tasks G. Finish

48| LiveNX 5.3 Quick Start Guide
Client Webstart Optional
LiveNX offers an optional step for webstart by utilizing an automatic java client install through web.
1. Go to: http://<IP_OF_LIVENX:8092>/ 2. Click Launch LiveNX Client
a. Caveats for Chrome: Issue 92846 3. The java client will launch automatically
a. Based off of your browser configuration to auto launch java clients.

49| LiveNX 5.3 Quick Start Guide
Starting the LiveNX Client
Start the client by clicking on the desktop shortcut. The user login prompt will appear. Click Configure to enter the server IP address and application port number. The default port number to use is 7000. The first time username and password are “admin” and “admin.” After the initial login completes you will be prompted to create a stronger password.
Note: Forgetting the passwords for all administrative accounts will require resetting all LiveNX settings and rebuilding your configuration. Refer to the LiveNX User Guide Chapter 3.12 Lost Passwords for more information on recovery.
Add Devices to your Topology
To discover devices: File > Discover Devices.
The image below shows how to specify how LiveNX will discover your devices. Scan by a range of IP addressed from lowest to highest separated by a hyphen (no CIDR notation) or include a list of individual IP addresses (per line). There are options to specify the IP of the seed device to scan. Then specify the connected devices to be included by indicating the number of hops those devices are from the seed device. Click OK. LiveNX will begin searching the network based on the list specified and show results.

50| LiveNX 5.3 Quick Start Guide
In the Device Discovery windows, select the Devices that were discovered > Click Add Devices to add them to LiveNX. Select or deselect all devices by right clicking inside the Select column.

51| LiveNX 5.3 Quick Start Guide
Enable/Configure Cisco Devices for QoS, Flow and IP SLA
After any supported Cisco devices are added to the topology they need to be configured for advanced monitoring and control of technologies such as QoS, NetFlow, IP SLA and NBAR. The Device Discovery wizard will prompt to configure the devices that were just added. Click Yes to configure them with the device setup wizard. Please refer to Basic Setup and Operations, Chapter 4.2 of LiveNX User Guide for step-by-step instructions on how to Configure Cisco Devices for QoS, Flow and IP SLA.
Set up Your LiveNX User Accounts
The administrator account has full access to device configuration and monitoring, as well as user management. For day-to-day use of LiveNX it’s recommended to create and use accounts with Full Config or Partial Config roles.
Go to Users > User Management to create user accounts with the appropriate roles. See LiveNX User Guide, Chapter 3 Role-Based Access for information on creating user accounts.
If the administrator account password has been lost, a reset and rebuild of the configuration of LiveNX will be required. Refer to Chapter 3.12 of the user guide for information on Lost Passwords.
NOTE: A fully operational trial version of the software will operate on your PC for up to 14 days until you load and activate your permanent license.
52| LiveNX 5.3 Quick Start Guide
Appendix A: Enable HTTPS API on LiveNX
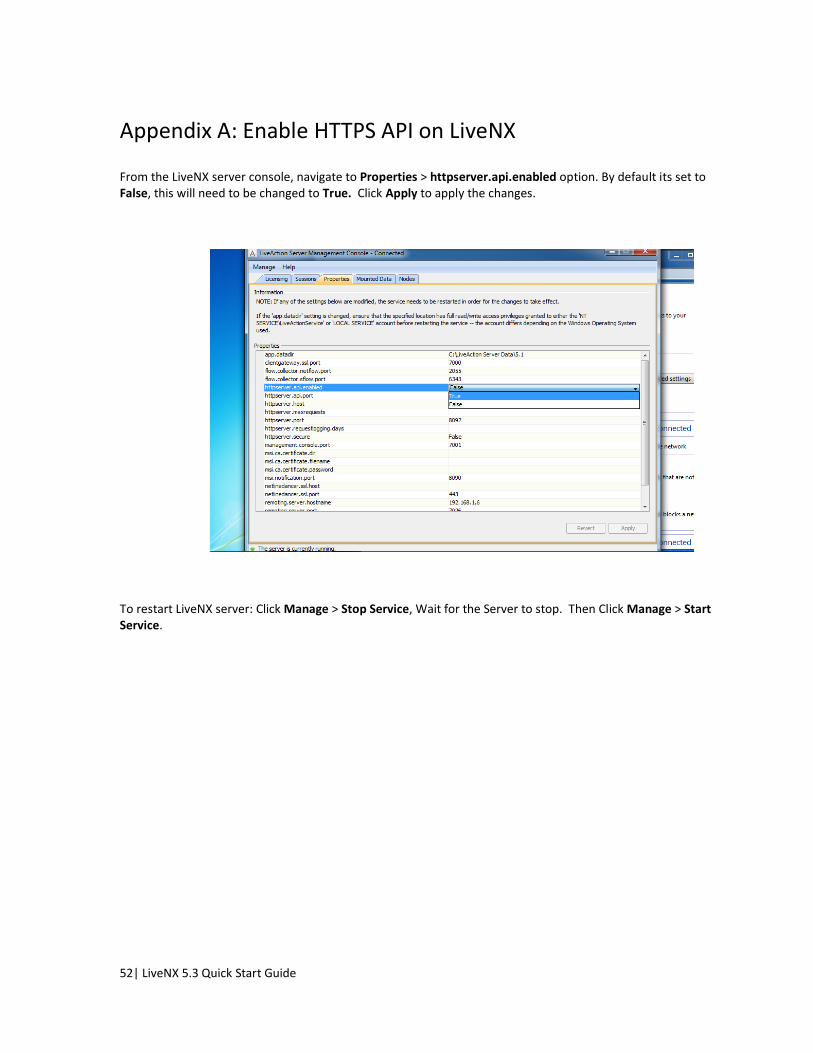
From the LiveNX server console, navigate to Properties > httpserver.api.enabled option. By default its set to False, this will need to be changed to True. Click Apply to apply the changes.
To restart LiveNX server: Click Manage > Stop Service, Wait for the Server to stop. Then Click Manage > Start Service.

53| LiveNX 5.3 Quick Start Guide
Now connect to the LiveNX User interface and enter the IP address of the LiveNX server and utilize port 8093.
When the connection is made the LiveNX session will be reloaded and a connection will have to be accepted. Once through this process you will be at the Login page

54| LiveNX 5.3 Quick Start Guide
Log in with any active username, and the Platform is now active.

55| LiveNX 5.3 Quick Start Guide
Appendix B: How to Navigate the User Interface
QoS Tab: This LiveNX feature allows you to gain a detailed understanding of pre- and post-QoS application performance and traffic patterns as well as have the ability to manage and adjust QoS settings. With the monitor privilege, you will be able gain this understanding through viewing even though you are not able to make QoS configuration changes.

56| LiveNX 5.3 Quick Start Guide
Flow Tab: This LiveNX feature provides advanced end-to-end system level flow visualization as well as detailed internal router and interface views and graphs. It enables IT engineers to observe the effect of QoS changes on network traffic in real time, and perform faster troubleshooting and root cause analysis through color-coded flows, point and click filters, visual path tracing and historical playback.
Click button (Top Left)
Click tab (Top Left)
Click
The arrows represent the Netflow data that is flowing over the network
Click on the button (Top Left). Move middle button to enlarge or reduce map. Grab white space to move map up/down.
Click the tab (Top Left)
The larger circles are the managed devices
Amber devices indicate drops/congestion
The little circles on the devices are their interfaces
Amber interface indicate drops/congestion
Double-click an amber interface to view its QoS statistics
The top of this page is the real-time NBAR statistics
The bottom of this page is the real-time QoS policies’ statistics
Amber classes listed to the bottom right are queues with Congestion
Click [Top Left]
Click [Top left below “File” button] to see the various dashboards [System, QoS, Flow, IP SLA]
Click QoS to see QoS dashboard. Click on QoS Audit
From here, click on QoS System Audit to generate a QoS Audit report that provides info on all the QoS policies.
Click Issues Tab to see possible issues with this networks QoS policies
57| LiveNX 5.3 Quick Start Guide
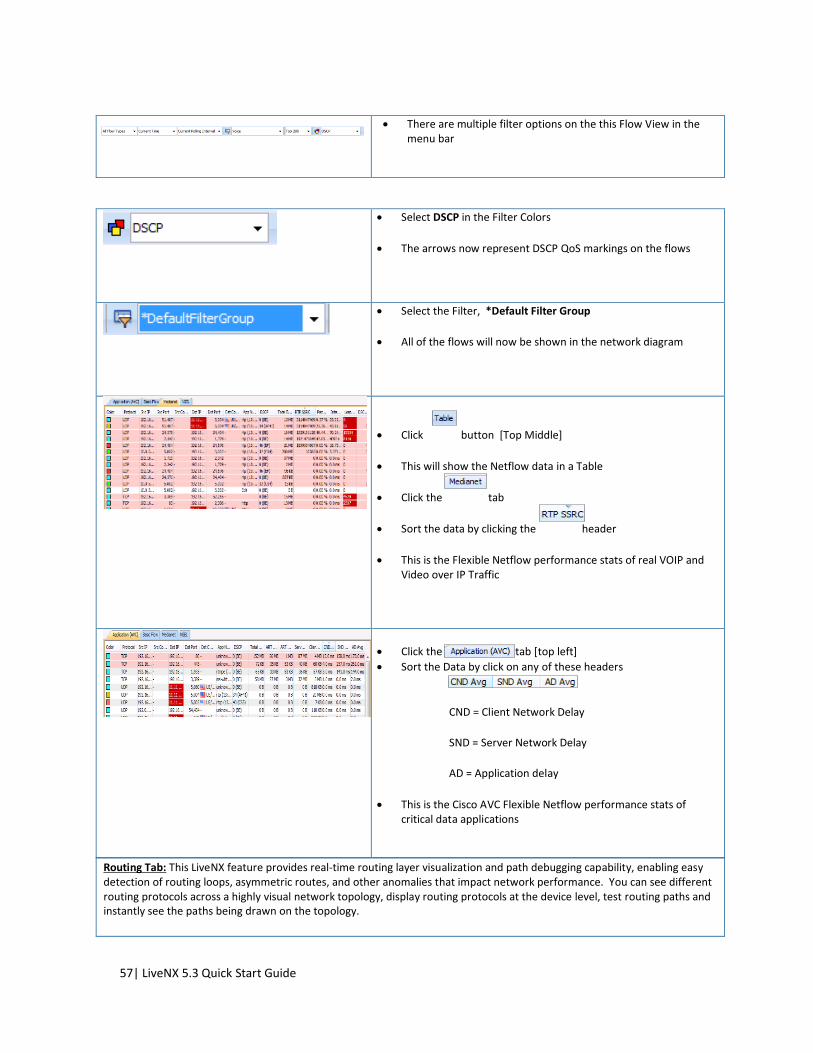
There are multiple filter options on the this Flow View in the menu bar
Routing Tab: This LiveNX feature provides real-time routing layer visualization and path debugging capability, enabling easy detection of routing loops, asymmetric routes, and other anomalies that impact network performance. You can see different routing protocols across a highly visual network topology, display routing protocols at the device level, test routing paths and instantly see the paths being drawn on the topology.
Select DSCP in the Filter Colors
The arrows now represent DSCP QoS markings on the flows
Select the Filter, *Default Filter Group
All of the flows will now be shown in the network diagram
Click button [Top Middle]
This will show the Netflow data in a Table
Click the tab
Sort the data by clicking the header
This is the Flexible Netflow performance stats of real VOIP and Video over IP Traffic
Click the tab [top left]
Sort the Data by click on any of these headers
CND = Client Network Delay
SND = Server Network Delay
AD = Application delay
This is the Cisco AVC Flexible Netflow performance stats of critical data applications

58| LiveNX 5.3 Quick Start Guide
Click the button (Top Left)
Click the tab (Top Left, after Flow tab). Select “Protocol” tab
The arrows represent the routing table data that is being collected from the devices
The larger green arrows show the state of the routing protocol adjacencies
Click the to see the real-time hello messages
Double click on a device (Cisco_1941) to see the Routing Table of that device
IP SLA Tab: This LiveNX feature allows IT engineers to generate IP SLA tests from router to router for measuring network performance, through a highly interactive graphical interface. It shows data paths of IP SLA test traffic (such as latency, loss, jitter and Mean Opinion Score (MOS) for VoIP) in a live topology view and provides various reports for the overall health of the network and detailed performance indicators.
Click on the button (Top Left)
Click the tab (Top Left)

59| LiveNX 5.3 Quick Start Guide
The arrows represent the active IP SLA test
The larger green arrows show the state of the routing protocol adjacencies
o
Click the button to see the results in tabular format for various IP SLA tests. Close view.
Click , Top Left below “File”, Select “IPSLA” tab to see the various IP SLA dashboard such as overall health, last 100 IP SLA alerts, and other trending, test type information.
LAN Tab: This LiveNX feature provides real-time Layer 2 visualization for networks, including trunk interfaces, port channels, VLAN associations, spanning tree topologies, and bandwidth usage. The topology shows per-VLAN spanning tree settings, simply identifies the root bridge and draws forwarding, and blocking port state links intuitively. LiveNX’s cross correlation capability greatly simplifies troubleshooting and managing of Layer 2 network issues as traditional methods using CLI can be very time consuming.
Click on the button (Top Left)
Click the Tab (Top Left)
From The Dropdown,
Select Show VLAN Paths to see the VLAN’s path through the network
Select Show Spanning Tree to see the spanning tree Topology
60| LiveNX 5.3 Quick Start Guide
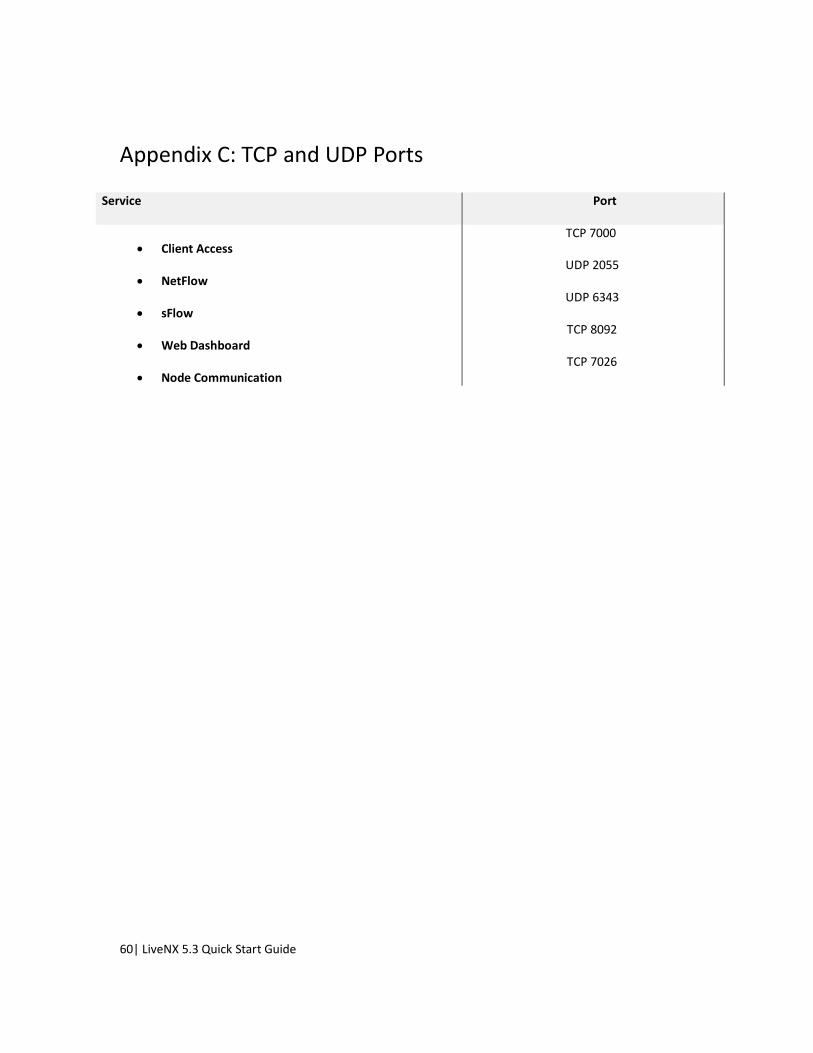
Appendix C: TCP and UDP Ports
Service Port
Client Access TCP 7000
NetFlow UDP 2055
sFlow UDP 6343
Web Dashboard TCP 8092
Node Communication TCP 7026

61| LiveNX 5.3 Quick Start Guide
Appendix D: NetFlow Deployment Considerations
NetFlow data is sent by network infrastructure devices (routers/switches/etc.) across the network to LiveNX collector Nodes. This important technology does consume a minimal amount of network bandwidth in order to deliver the management data it provides. The purpose of this document is provide examples of NetFlow bandwidth consumption rates from real networks that LiveNX is managing to assist network architects with data points for capacity planning.
LiveNX can be used to track both the Flow rate per second and the actual bandwidth consumption of NetFlow by using its own NetFlow Reports.
The volume of NetFlow data that is placed on the wire by a devices is proportional to two main factors.
Number of interfaces enabled for NetFlow
Volume of end user data (voice/video/web/etc.) on the network.
LiveNX recommends enabling Flow on the fewest interfaces possible that still provides the fullest view of network traffic. Most Cisco devices support NetFlow being configured bi-directionally on an interface – in both the input and output directions. If Flow is configured by-directionally on two interfaces, for example, on the LAN and WAN interface of a WAN router, then two Flow records will be created and sent to LiveNX for each minute that a conversation is active. One record will be created as the conversation enters the LAN interface and a second record will be created as the conversation leaves the WAN interface. This means that Flow will consume twice the bandwidth required to report on that one event. To limit the bandwidth utilization of NetFlow, LiveNX recommends enabling Flow bi-directionally on only the WAN interface(s) of WAN devices.
Some Cisco devices only support Flow configured in the input direction. For these devices, the same principles apply, configured Flow on the fewest number of interfaces that still provide the fullest view of the network traffic.
The second main factor for determining the volume of bandwidth consumed by NetFlow is bandwidth usage is proportional to the volume of user data that is traversing the network. For example, NetFlow has the capability to consume less bandwidth on a low T1/E1 WAN links than a 100Mb WAN link. But if there is only a T1/E1s volume of end user data on a 100Mb link, its NetFlow consumption would similar to that of a physical T1/E1.
Example Flow Bandwidths
The following table contains data taken from LiveNX running in production networks. The values represent sample utilizations from actual WAN environments.
Each of these examples has Flow configured bi-directionally on only the WAN interface.
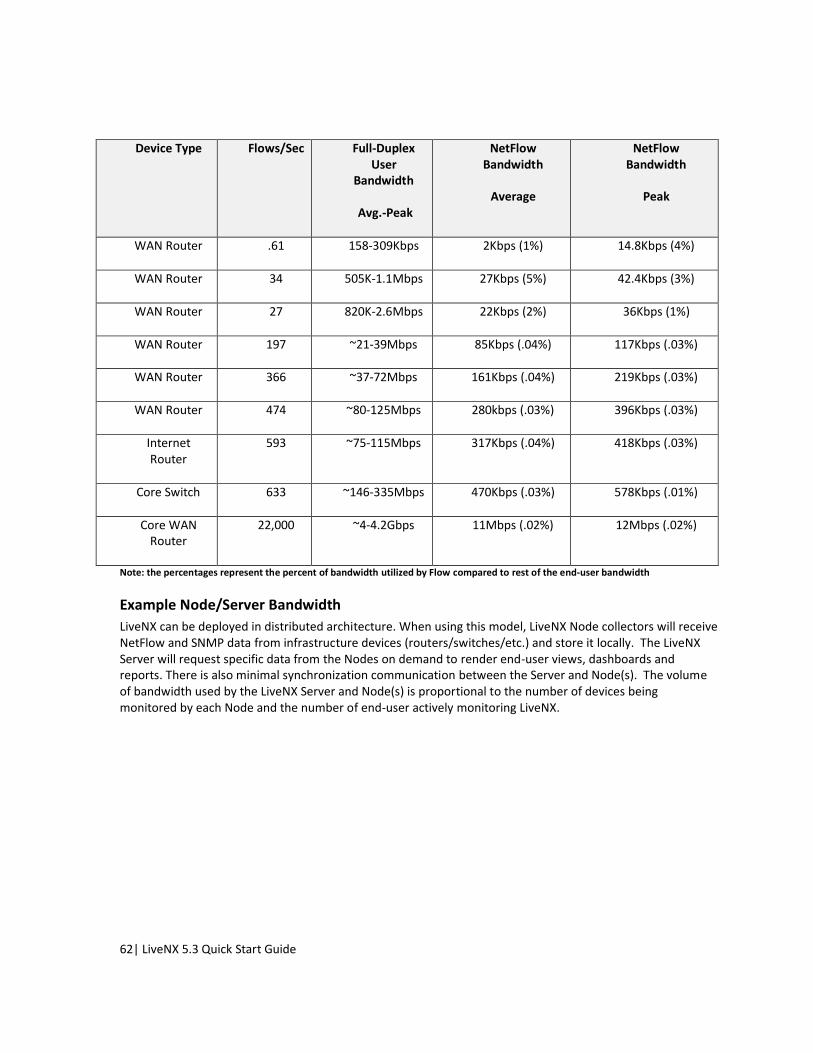
62| LiveNX 5.3 Quick Start Guide
Device Type Flows/Sec Full-Duplex User
Bandwidth
Avg.-Peak
NetFlow Bandwidth
Average
NetFlow Bandwidth
Peak
WAN Router .61 158-309Kbps 2Kbps (1%) 14.8Kbps (4%)
WAN Router 34 505K-1.1Mbps 27Kbps (5%) 42.4Kbps (3%)
WAN Router 27 820K-2.6Mbps 22Kbps (2%) 36Kbps (1%)
WAN Router 197 ~21-39Mbps 85Kbps (.04%) 117Kbps (.03%)
WAN Router 366 ~37-72Mbps 161Kbps (.04%) 219Kbps (.03%)
WAN Router 474 ~80-125Mbps 280kbps (.03%) 396Kbps (.03%)
Internet Router
593 ~75-115Mbps 317Kbps (.04%) 418Kbps (.03%)
Core Switch 633 ~146-335Mbps 470Kbps (.03%) 578Kbps (.01%)
Core WAN Router
22,000 ~4-4.2Gbps 11Mbps (.02%) 12Mbps (.02%)
Note: the percentages represent the percent of bandwidth utilized by Flow compared to rest of the end-user bandwidth
Example Node/Server Bandwidth
LiveNX can be deployed in distributed architecture. When using this model, LiveNX Node collectors will receive NetFlow and SNMP data from infrastructure devices (routers/switches/etc.) and store it locally. The LiveNX Server will request specific data from the Nodes on demand to render end-user views, dashboards and reports. There is also minimal synchronization communication between the Server and Node(s). The volume of bandwidth used by the LiveNX Server and Node(s) is proportional to the number of devices being monitored by each Node and the number of end-user actively monitoring LiveNX.

63| LiveNX 5.3 Quick Start Guide
The following table provides example bandwidths of this communication.
Devices Per
Node
Node to Server
Traffic
(Avg./Peak)
Server to Node
Traffic
(Avg./Peak)
100 125Kbps/1.2Mbps 5Kbps-25Kbps
500 625Kbps/ 1.75Mbps 25Kbps-125Kbps
1000 1.25Mbps/ 2.25Mbps 50Kbps/ 250Kbps
Note: These are typical bandwidth estimates that LiveNX would expect to see. Each network is different so results may vary.