Jot It Down! - Amazon S3s3.amazonaws.com/.../177/Jot_it_Down__-_Finished_-_Sample.pdf · the Ugly...
14
Year-Long Language Arts Plan and 10 Monthly Writing Projects Ages 5–8 Jot It Down!
Transcript of Jot It Down! - Amazon S3s3.amazonaws.com/.../177/Jot_it_Down__-_Finished_-_Sample.pdf · the Ugly...

Year-Long Language Arts Planand 10 Monthly Writing Projects
Ages 5–8
Jot It Down!

Contents
Introduction 6
The Jot It Down! Year-Long Program 10
Part One: Language Arts 10Part Two: Oral Language 10Part Three: Writing Projects 11Setting the Context 12Idea! 13
Part one:Language Arts 14
The Brave Writer Lifestyle 14Poetry Teatimes 15Weekly Movies 16Nature Study 17Art Appreciation 18Music Appreciation 21
Routine versus Schedule 23
Sample Routine 25
Part two:Oral Practices 28
1 Recitation 282 Memorization 303 Word Play 314 Narration, aka Big juicy conversations 325 Story-telling 336 One-on-one time 33The Oral Program can be summed up this way: 34

Part tHree:The Writing Program 36
1 Fairy Tale Project 37rapunzel 38the Frog Prince 39Goldilocks and the three Bears 40Princess and the Pea 41the Ugly Ducking 42the three Little Pigs 42Cinderella 43Little red riding Hood 44Hansel and Gretel 45
2 Art Appreciation 473 Photo journal 50
Photo journal month-long guide 524 Animal Mini-book 545 Posters 586 Lists 607 Letter Box 638 Big Wonderful Numbers 689 Body Art 7010 Plan a “Good Enough” party! 74
Celestial teatime: 77Japanese teatime: 77the “who are You?” Party: 78
Completion Rewards 79

10 © Julie (Bogart) Sweeney | www.bravewriter.com
Jot It Down!
Part One: Language arts
In Brave writer, we use the term “language arts” to refer to all the pieces of writing that are unrelated to original thought. Language arts include literature, spelling, handwriting, punctuation, grammar, literary elements, copywork, dictation, word origins, and vocabulary development (to name most of them). original writing is the language we use to indicate the original thought life of your child that gets transcribed either by hand or on the computer. original writing instruction includes categories like narration, genre, format, writing voice, freewriting, revision techniques, research methods, sentence complexity, and so on.
In the language arts component of this guide, you’ll find a routine of graduated practices to use with your child over the course of a ten-month (school year) period. You may start any time (doesn’t have to be September in the northern hemisphere or February in the southern). Just know that these practices operate best when the difficulty gradually increases over time. Don’t rush.
Brave writer offers two products
Jot it Down5–8 year olds
PartnershipWriting
9–10 year olds
FalteringOwnership
11–12 year olds
Transition toOwnership
13–14 year olds
The GreatConversation15–18 year olds
FluencyCompetent Adults,
College Students, Academics, Professional Writers
tHe natUraL StaGeS oF GrowtH In wrItInG
that support this phase of development. The Wand is designed for children 7-8 years old, who are learning to read.
The Arrow is designed for children who are already reading. each of these products will provide you with passages for copywork and dictation, or you may pick your own passages from the books you are reading.
In addition to these practices, we have a suggested plan for how to incorporate the Brave writer Lifestyle (BwL). the BwL is a model for how to incorporate word play, film, art, Shakespeare, poetry, nature, and theater into your writing life. the suggested weekly routine is meant to offer some structure to those parents who feel the need to see how these disparate parts work together to create a language-rich environment.
Part twO: OraL Language
to write well, it helps to speak well. Fortunately, kids this age rarely shut up! we parents love that about them, and tell everyone we know the cute things our kids say. Kids in the Jot It Down! phase of development are still learning
to read and handwrite. the primary way they
The Jot It Down! Year-Long Program

11www.bravewriter.com | © Julie (Bogart) Sweeney
the JOt It DOwn! Year-LOng PrOgram
express original writing is through talking. the suggested practices in Part two are a part of your writing curriculum. Don’t skip them! (Hint: you’re most likely already doing many of them.) There’s no need to feel pressure to schedule these practices rigidly. rather, have fun with them. the list included in this program is meant to give you reminders or to enhance the categories of recitation that you might otherwise overlook. as you play with your kids, stimulating their minds with interesting content they will enjoy mastering, your children will become more and more verbally adept which in turn will help them write.
Part three: wrItIng PrOJects
the writing project component comprises ten month-long “writing” projects. You will help your child to complete projects in writing that capitalize on your child’s evolving thought life and verbal skill.
Do one project per month, even if you get it completed in a week or a few days. Quality experiences are more important than quantity, particularly at these tender ages. Feel free to either take your time (using the whole month) or to delve deeply and intensely in a burst. then give yourself a break.
these projects can and should be customized to suit the interests, hobbies, experiences, and homeschool studies that are specific to your child or family. If you find that you complete six out of ten and have done them thoroughly, you are doing very well! Your goal should be to attempt as many of them as interest you, and to complete several. Don’t beat yourself up if life gets in the way or a certain project falls flat. You’re at home. You get to decide what is life-giving and what’s not. Focus instead on your successes and you’ll all learn plenty.
the next phase of development after this one is called Partnership Writing, for the 9-10 year old child.
Jot it Down! These are writing projects in the Jot It Down! phase of development. That means you, the parent, will be transcribing while your young writer narrates to you.
Remember

14 © Julie (Bogart) Sweeney | www.bravewriter.com
Jot It Down!
Part 1:
Language Arts
In the Jot It Down! phase, language arts practices are low-key. You want your child to learn to handwrite and to read. Basic punctuation is introduced. we use the practices of copywork and dictation to teach mechanics.
Copywork is the soothing, repetitive process of copying the writing of others into your own hand. There’s a direct one-to-one correspondence between what you read and what you transcribe to your own page. Copywork can be lengthy (and in the upper grades, should be) or brief (even as brief as a single word). again, quality over quantity is to be emphasized. Make sure your child aims for full concentration and excellence. If all he or she can manage is a single letter with maximum concentration and beauty in depiction, then start there. the goal is to be able to recreate the passage with attention to accuracy in detail (spelling, punctuation, capitalization, word spacing, letter shape) and craftsmanship (beauty of execution, steady hand, finished product). Feel free to use an entire week to finish one passage. these are young kids.
the Brave wrIter LIfestYLe
the key to successful writing growth is to create a context that makes language playful, available, and meaningful. In addition to copywork, Brave writer promotes supplementary practices that enrich the language arts atmosphere of the home. these practices are what I like to call: The Brave Writer Lifestyle.
the Brave writer Lifestyle is the daily, weekly, monthly, seasonal rhythm in your homeschool that explores music, the arts, film, nature, literature, poetry, and various writing practices in a natural,
predictable flow. If providing these experiences doesn’t come naturally to you, you can use the routine offered in this program as a guide for your family until you’ve found the rhythm that works best for you.
Writing is not a school subject. It’s a tool used to convey insight, information, opinion, narrative, review, personal information, and more. all of life is worthy of writing. However, most of us feel more compelled to write when we have have something to say. when you provide your children with a wide array of experiences that stimulate the imagination and trigger connections between subjects, you’ll find that it is easier for them to want to write because they’ll have interesting things to think about and share.
the components of the Brave writer Lifestyle discussed in this product include these subject areas:
■■ Poetry Teatimes■■ Weekly Movies (or television shows)■■ Nature Study■■ Art Appreciation■■ Music Discovery■■ Reading Aloud■■ Word Play (such as Magnetic Poetry,
Alphabet Game)
a discussion of how to incorporate each of these follows.

15www.bravewriter.com | © Julie (Bogart) Sweeney
Part 1: Language arts
Poetry Teatimes
Poetry is the candy of language for young children. It feels good in the mouth—rolling off the tongue, clicking against the teeth, popping through the lips. tongue twisters, jokes, limericks, songs, and traditional poetic stanzas give young children power over language. they master rhythm, rhyme, meter, and oration, as they discover the joys of similes, plays on words, puns, metaphors, onomatopoeia, imagery and more. You’ll find poetry less intimidating if you start with children’s poems, which are packed with humor and familiar images.
once per week (typically we suggest tuesdays for the alliterative value of “tuesday teatime”), take time to enjoy poetry in a relaxed, festive setting.
■ Prepare ahead of time for the day you plan to have your teatime.
• Check out poetry books from the library.
• Collect poetry books from your bookcases.
• Purchase or prepare cookies, muffins or brownies (or cut up toast into lady fingers and add jam, or slice apples and oranges with cinnamon sugar).
• Choose a beverage (tea is just one option; hot chocolate, coffee, lemonade, Kool-aid, ovaltine, juice – these work just as well for non-tea drinkers).
■ Lay the table with teacups, mugs, or glasses.
■ a tablecloth (or placemats) is nice, though optional.
■ Include a centerpiece taken from your backyard (flowers, pinecone, driftwood, sprig of holly, fall leaves, moss on a piece of bark).
■ Light a candle or two if your kids can handle it (if they are so interested in the candle that it takes away from reading poetry, forget the candle).
■ Stack poetry books on the table.
Once you’ve set the stage for the teatime, it’s time to select poems to read aloud. this age group is not likely to be reading fluently yet. To help them participate in poem selection, read titles and let your child pick the one that is most appealing. or your student can pick a poem based on the illustrations in the book. You can read the selected poem and then show the page it comes from. If it’s short, you can memorize a stanza or a pair of rhyming lines to say together out loud.
enjoy the poem; laugh at it, if appropriate. You might comment on rhyme or alliteration (repetition of initial consonant sound), you might note the images or the comparisons. But don’t be heavy-handed. the poetry magically teaches these things by itself. If you’re intimidated by poetry, simply read the poem and enjoy it.
Don’t forget the power of song lyrics as poetry, too. a good CD with singsong melodies and cheery rhyming lyrics is perfectly wonderful and an acceptable way to teach poetry to the young. Rafi is a great source for good lyrics and happy tunes.
More information can be found about poetry teatimes on the Brave writer website. Click on the Brave writer Program on the top right of the home page. then click on the Brave writer Lifestyle and you’ll see a list of practices to incorporate into your weekly routine, including poetry teatimes.
28 © Julie (Bogart) Sweeney | www.bravewriter.com
Jot It Down!
Part 2:
Oral Practices
In the Jot it Down! stage of development, children benefit from lots of opportunities to narrate what they are learning. a deliberate attentiveness to vocabulary development, opportunities to recite or narrate, and intentional conversations build a child’s internal writing voice. This portion of the program is critical to the development of a competent writer in the years to come. Most of the practices happen naturally in the course of involved parenting. Sometimes, though, it helps to have the practices itemized to spur on your own creativity. the following practices are suggestions, therefore, and are meant to be used in a routine that works for you.
1 recItatIOn
Little kids need to know some stuff so well that they can recite it when asked. A five-year-old ought to know her address and a parent’s cell phone number at minimum for safety’s sake. So we start with name, address, and phone number. these can be mastered by repeating them daily together, over breakfast, until they are rote.
recitation works best when kids use a sing-song voice, knowing an ending is coming. I assembled a flip book of facts for my children when they were small. It included basic fact
The Oral Program PracticesEach of these oral practices is aimed at developing the verbal part of the brain’s language center. Many of the routines here are most effectively practiced in natural, daily conversation (not contrived “at the kitchen table” kinds of discussion). Still, if your family is not naturally verbal, it helps to know what kinds of conversation and oral practices enhance a writer’s development.
As always, modify to suit the mood, personality, pace, and context of your individual family.
groups (detailed in the coming section) that an young reader should know automatically.
one way to create enthusiasm around recitation is to turn it into a game. Bring chairs to an open area of your home. Have each child stand on a chair. Begin with the first fact group: counting up from 1 to 20. once your kids hit 20, have them count backwards from 20 down to 1. when they get to 1, have them yell “Blast off!” and suggest they jump high into the air from their chairs, landing on the ground in a clump. the “Blast off!” leap can be added to any accurately recited fact group. Simply have your kids scramble back onto their chairs for the next batch of facts and prepare to jump into the air again.
31www.bravewriter.com | © Julie (Bogart) Sweeney
Part 2: OraL PractIces
word play is the equivalent of verbal gymnastics. You’ll push and pull language to discover its flexibility, versatility, and capacity for creative expression while playing games.
■ rhyming:say a word; rhyme it. the person who rhymes the word goes next: selecting a new word to rhyme. the rhyming word can be a “real” word or it can be a “nonsense” word, or allow for either. See which is hardest. Don’t worry about making sense—rhyming is about phonemic awareness. Just rhyme.
rhyming word pairs:
• square chair;
• hot pot;
• blue glue;
• bright light.
can you rhyme two-syllable words?
• Maybe-baby;
• yummy-tummy;
• rattle-battle;
• bumper-jumper;
• candle-handle.
rhyme a pair (say a pair and then someone else says a pair back):
• tall wall —mall hall.
3 wOrD PLaY
■ alphabetical play: List words that start with the same letter. List words that start with the same sound.
Play the alphabet game in the car (look for the alphabet together on billboards, license plates, bumper stickers). Call out the letters as you find them in order. Make sure each child sees the letter. once everyone is good at it, this game can be played competitively, each child keeping track of their own progress. Be prepared to defend finding the letters “j” and “q.”
Play the game where the first person says, “aunt abby buys apples in atlanta” followed by the next person who says, “Brother Billy buys bananas in Boston.” the third child says, “Cousin Catherine buys custard in Cupertino” followed by the next family member who might say, “Ditzy Douglas buys doorknobs in Downtown Dallas.” each person adds to the string until you get to the letter “Z.”

36 © Julie (Bogart) Sweeney | www.bravewriter.com
Jot It Down!
Week 1: topic selection, research, gathering materials
Week 2:: Content development—transcribing, collecting photos, drawing illustrations, etc.
Week 3:: expansion of detail, any revision (if needed), and compiling content
Week 4:: Publishing (binding, printing, assembling) the final version and sharing with an interested audience
Part 3:
The Writing Program
For the Jot it Down! stage of development, most of your child’s writing will be transcribed by the parent (child talks, parent writes). That’s okay. Your kids will advance to the next stage of development (Partnership writing) when they are ready to do a little more of the handwriting themselves.
Be sure your children continue to work on reading and handwriting during this stage of development. these skills will aid the natural transition to the next developmental phase.
the writing Program features ten projects. They vary in difficulty. Feel free to simplify the instructions for a younger child or to add complexity for an advanced writer. Brave writer suggests a pace of one writing project per month. each project will go through a four-week process:
The Ten Writing Projects
Project 1 Fairy Tale Project
Project 2 Art Appreciation
Project 3 Photo Journal
Project 4 Animal Mini-book
Project 5 Posters
Project 6 Lists
Project 7 Letter Box
Project 8 Big Wonderful Numbers
Project 9 Body Art
Project 10 Plan A Party!
The writing projects may be done in any order!Talk with your children and see which project entices them first. Stat there.
Remember

37www.bravewriter.com | © Julie (Bogart) Sweeney
Part 3: the wrItIng PrOgram
ProJeCt one
Fairy Tale Project
Description: Your children will produce a 9-10 page booklet that is both a visual and written narration of famous fairy tales.
Objective: these stories hold cultural cachet and serve as touchstones in so many movies, novels, and cultural commentary that it’s important to include them in your kids’ lives now. when I did this project with my kids, we did nine fairy tales, one each month. Use this project in an on-going way, if that suits your style better.
Process: In most writing projects, the steps will be broken into four-week increments. this project is not designed that way. You could easily do one fairy tale per month and make this project last all year. or you might like to tackle two fairytales per month. If your kids are eager to do them all, then scheduling two per week will be the most appealing. Do them all, or do only the tales your kids like best. Plan according to the energy level of your family.
Project: the idea here is simple.
1. read a fairy tale2. retell it in two ways * Visually (create a pictorial representation) * orally (transcribed narration)
Both re-tellings are represented on cardstock (one page per tale). at the end of the project, combine all the tales into one “booklet” by punching a hole in the upper left corner and loosely holding them together with a metal ring.
after reading the fairy tale (one or two versions, perhaps also watching a movie), ask the child to create a visual representation of the tale (suggestions for each one follow). then once that process is complete, ask your child to look at the picture and retell the story. You, the parent, will jot down the narration either on the front of the page or on the back (wherever there is space). the retelling doesn’t need to be long or even complete. a few sentences to a paragraph is ample, though some kids love to narrate longer. accept what your children offer, affirm them for their work, and then move on to the next tale when you all feel ready.
each tale included here is accompanied by a fact about the tale itself, questions to prompt oral narration (if you need them), and ideas for a visual representation of the tale. naturally, feel free to use your own creativity to enhance these ideas.

38 © Julie (Bogart) Sweeney | www.bravewriter.com
Jot It Down!
raPunzeL
Rapunzel is one of the tales in the Brothers’ Grimm collection and can be found in The Red Fairy Book.
Oral Narration
■■ Who is Rapunzel and why is she locked in a tower?
■■ Who comes to see her?■■ What is unique about Rapunzel?■■ Could someone actually climb up or
down a tower using a person’s hair?■■ What happens when Rapunzel’s mother
finds out she is seeing the prince?■■ Where does the witch send Rapunzel
and what happens when the prince meets the witch?
■■ How is the couple eventually reunited?■■ The Disney version of the story,
“Tangled,” retains some of the key features of the original but changes some of the plot elements. See if your kids can name them.
Cut out a tower made from black construction paper with an opening for a window at the top. Glue it to the card stock. Draw rapunzel in the window and then attach a length of yellow yarn braided that extends all the way to the bottom of the page where a handsome prince is drawn to climb up the hair. Glue the yarn to the page.
Supplies:
■ Cardstock (oak tag, old manila folders)
■ Markers ■ Pens ■ animal stickers ■ Glue stick ■ aluminum foil ■ Pipe cleaners ■ old clothing/furniture catalogs
(like IKea, Hanna andersson) ■ Yarn ■ Colored Paper ■ Scissors ■ Metal ring ■ Hole punch
My family: When my kids did this project, the younger one narrated paragraphs for each tale while the older one narrated a couple of sentences. I didn’t judge them or compare them. I allowed their narrations to rep-resent their skills at the time. Both enjoyed having their original words read back to them and others.
Johanna drew this “Princess in the Woods” who resembled Rapunzel in her little story book, 1996.
63www.bravewriter.com | © Julie (Bogart) Sweeney
Part 3: the wrItIng PrOgram
ProJeCt SeVen
Letter Box
Description: In the age of email and texting, letter writing seems superfluous as a skill to cultivate. However, letters continue to have some value in our world of business and particularly, in intimate family relationships. the “thank you” note is the usual standard for educating our young in the art of writing letters. However, most kids find them tedious to write (particularly if they feel cajoled into a canned response!). this project gives kids a direct experience of the power of the hand-written letter.
Objective: the goal of this project is to create the delight that comes from sending and receiving mail. this project requires your involvement and that of your spouse or other children who already know how to write. each person will have a mailbox (mounted on his or her bedroom door, or safely stored on the top of a dresser in easy reach of the child). Family letter writing will follow for four weeks (or for however long you enjoy it).
Process: The first three weeks will make use of the “in-home” mailboxes. week 4 will use the USPS—so be sure you’ve got stamps, envelopes, return address labels, and stationary. You’ve got three weeks to stock up!
week 1: create a LetterBOx
There are two types of mailboxes that work well.
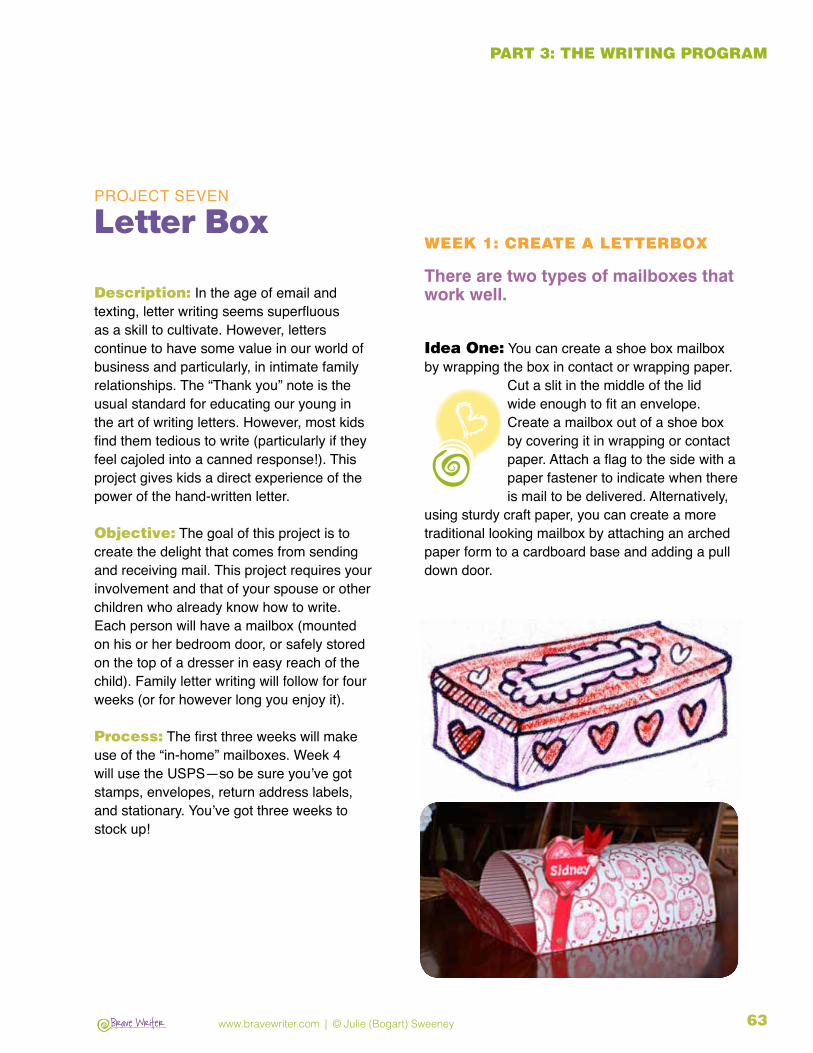
Idea One: You can create a shoe box mailbox by wrapping the box in contact or wrapping paper.
Cut a slit in the middle of the lid wide enough to fit an envelope. Create a mailbox out of a shoe box by covering it in wrapping or contact paper. Attach a flag to the side with a paper fastener to indicate when there is mail to be delivered. alternatively,
using sturdy craft paper, you can create a more traditional looking mailbox by attaching an arched paper form to a cardboard base and adding a pull down door.