SelectSurvey.NET IT Power User Training - ClassApps.com€¦ · SelectSurvey.NET IT Power User...
78
Page 1 of 78 SelectSurvey.NET IT Power User Training 3 hour course Updated for V4.162.000 3/2017
Transcript of SelectSurvey.NET IT Power User Training - ClassApps.com€¦ · SelectSurvey.NET IT Power User...

Page 1 of 78
SelectSurvey.NET IT Power User Training 3 hour course
Updated for V4.162.000 3/2017

Page 2 of 78
SelectSurvey.NET IT Power User Training Agenda
In this video course, students will learn all of the important information related to maintaining the SelectSurvey application.
Contents SelectSurvey.NET IT Power User Training ............................................................................... 1
Course Outline ..................................................................................................................... 4
Advanced Survey Design: ..................................................................................................... 6
Database Dropdown Question – Database Option .................................................................. 6
Database Dropdown Question – Web Service Option .............................................................. 7
Database Checkbox Question ............................................................................................ 11
Database Options Question .............................................................................................. 11
Matrix Database Query Capability ...................................................................................... 12
Matrix Rating Scale Slider Question Type ........................................................................... 14
Choice – One Answer Per Row (Icons) ............................................................................... 15
Calculated Question Type ................................................................................................. 16
Adding HTML in question text .............................................................................................. 20
How to add links to your question text ............................................................................... 20
How to add html to your question text ............................................................................... 21
How to add images to question answer options ................................................................... 23
Timed and Scored Survey Design ......................................................................................... 24
Timed Survey ................................................................................................................. 24
Scored Survey ................................................................................................................ 25
Multiple Language Survey Design ......................................................................................... 27
Language selector survey ................................................................................................. 27
Advanced Piping Tokens: .................................................................................................... 28

Page 3 of 78
Pre-populating a survey with email list tokens .................................................................... 28
Pre-populating a survey with user tokens ........................................................................... 29
Template Design ................................................................................................................ 30
Deploying survey ............................................................................................................... 43
Short URL Rerouting ........................................................................................................ 43
Email List ....................................................................................................................... 43
Email List containing survey login/password ....................................................................... 47
3rd party email deployment such as Constant Contact .......................................................... 49
Email Message Formatting ................................................................................................ 50
Hidden Fields ..................................................................................................................... 52
Dynamic Tokens ................................................................................................................ 53
Advanced Reporting ........................................................................................................... 55
Free Form Auto-PDF Population mapping into Acro Fields ..................................................... 57
Application Wide Settings Options ........................................................................................ 61
Admin Tools ...................................................................................................................... 62
User Reviewers for User Workspace and Approve/Review ........................................................ 66
User Workspace ................................................................................................................. 68
3rd Party API Integration: .................................................................................................... 71
Workfront Project API – Push Survey Data into new Project Issues ........................................ 71
SalesForce API ................................................................................................................ 75
SugarCRM API ................................................................................................................ 75
Obtaining Technical Support Resources ................................................................................. 76
General Technical Support Requests .................................................................................. 76
Installation Service/Upgrade Service/Consulting Request ..................................................... 76

Page 4 of 78
Support Knowledgebase ................................................................................................... 77
Support Documentation/Videos ......................................................................................... 77
Product Updates / Critical Security Warnings ...................................................................... 77
Course Outline
• Advanced Survey Design:
o Database Dropdown Question – Populated from Database
o Database Dropdown Question – Populated from Web Service
o Calculated Question Type
o Adding HTML in question text
How to add images to question answer options
How to add tooltips to question text
o Timed and Scored Survey Design
• Advanced Piping Tokens:
o Pre-populating a survey with email list tokens
o Pre-populating a survey with user tokens
• Deploying survey with Email List containing survey login/password
• Deploying a survey with 3rd party email deployment such as Constant Contact
• Hidden Fields
• Dynamic Tokens
• Advanced Reporting
• Application Wide Settings Options
• Admin Tools
• Kiosk Admin

Page 5 of 78
• Obtaining Technical Support Resources

Page 6 of 78
Advanced Survey Design:
Database Dropdown Question – Database Option Choice – Database Dropdown
The database dropdown question serves as a direct database query to a lookup table to fill a drop down box.
To add a database dropdown question you will need to format a T SQL Query that returns results that can populate the dropdown box.
The query needs to be formatted specifically with “ItemValue” and “ItemDisplay”.
The “ItemValue” is the value that gets stored in the database when the respondent chooses this answer, typically the ID or identifier of the display value. The “ItemDisplay” is the value that shows in the drop down box to the respondent.
You can use any token in the query as shown in the example, or no tokens at all.
An example with a hidden field token is:
SELECT full_state AS ItemDisplay, state_abbr AS ItemValue FROM _state where full_state='###HD=LocationState###'
An example without a token is:
SELECT full_state AS ItemDisplay, state_abbr AS ItemValue FROM _state order by full_state

Page 7 of 78
Database Dropdown Question – Web Service Option Choice – Database Dropdown
Below is an example of how to populate a “Database Dropdown” question type from a public or third party Soap 1.2 web service.
In order to populate a dropdown from web service you must first create a “Web Service Token” the same way you create a “Database Token”. Token creation pages can be accessed from “Admin Tools” or from the link “Manage Tokens” on the “Create/Edit Item” page in modify survey page.
Below is

Page 8 of 78
Click the link “Web Service/API Tokens used in Dynamic Tokens and Database Question Types” as shown in the image above.
Click “Create Web Service Token” to create a new token.

Page 9 of 78
Below is an example of a public Soap 1.2 web service that you can use to fill a “Country” drop down box with all of the available countries in it.
With the settings above in the screenshot, you should be able to use this token to populate a Database Dropdown question.
On the edit item page access from the modify survey page, select the Country Token as the data source for this question. Select the radio button next to “External Web Service/API” and ignore everything under “External Database”.
Your screen should look identical to the below:

Page 10 of 78
So the below dropdown question is now populating with countries:

Page 11 of 78
Database Checkbox Question Choice - Database Checkboxes Entering your dynamic database query returns rows for checkbox list.
Database Options Question Choice – Database Options Entering your dynamic database query returns rows for radio buttons.

Page 12 of 78
Matrix Database Query Capability What if you want to prepopulate the matrix row text from prior answers or custom data or 3rd party database? You can! You can populate matrix row text the same way you can populate a “Database Dropdown” question type. You can type in a query that populates the matrix row text and only adds the exact number of matrix rows as returned by your custom query.
Applies To Only the Below Matrix Question Types:
• Matrix – Multiple Answers Per Row (Checkboxes)
• Matrix – Multiple Answers Per Row (Text/Dropdown)
Then type in the query into the box per the example and screenshot below. Your query will be dependent on what data you are wanting to populate with. The example below populates the row text with the top 5 survey names in your survey table. Note that there are additional query examples if you click the “Help” link to view the in app help.

Page 13 of 78
Enter your columns as you would normally.
When the survey is launched it will run the custom query in real time populating the matrix row text accordingly.

Page 14 of 78
Matrix Rating Scale Slider Question Type Matrix - Rating Scale Slider (Numeric)
Html5 slider will show for all devices that support it, for older versions of IE browser, it will render a legacy html javascript slider.

Page 15 of 78
Choice – One Answer Per Row (Icons) For any of the “Icons” question types, you can specify font awesome icons instead of checkboxes or option buttons and you can set them to highlight on rollover with your survey stylesheet.
A reference for all of the icons that you can use is here: http://fontawesome.github.io/Font-Awesome/icons/

Page 16 of 78
Calculated Question Type A Calculated Question type is a question that is calculated from another question, or from tokens, or from a combination of both.
For example, a question that calculates body mass index:
Weight divided by height times height * 703.
(###133###/(###145###*###145###))*703
Click in the left blue panel “Token Reference” to see what the tokens are for the height and weight questions (or questions that you are using to calculate).

Page 17 of 78
Then use those values in your calculation:

Page 18 of 78

Page 19 of 78
The calculation shows on the calculated question type from the prior question answers:

Page 20 of 78
Adding HTML in question text
How to add links to your question text You can add links which open new windows or open/download reference documents that you have uploaded via the upload file tool.

Page 21 of 78
How to add html to your question text Click “Tools” > “Source Code” to view and edit the html source code.
Things you can do with this:
• Copy in video links from youtube or other sources to be viewed for answering a survey question.
• Adding paypal donate buttons/links
• Adding google maps code

Page 22 of 78

Page 23 of 78
How to add images to question answer options You can enter html into any question text or answer text boxes. For example if you want the text to be bold you can do:
<b>Your text</b>
If you want one word to be colored red you can do:
<span style=”color:red”>This is RED text</span> and this is not.
You can also include images in answer options by putting html image tags in the answer option text.
You can also add height and alignment to your html.

Page 24 of 78
Timed and Scored Survey Design
Timed Survey Click “Survey Options” then click “Access” then click “Timed” and enter the maximum time for taking the survey.

Page 25 of 78
On each page of the survey the top will show the time elapsed, total time, and time remaining.
When the time has been reached, the user is forwarded to the “Thank you for taking the survey” completion page.
Scored Survey You can add points to any question type that has a point field.
That includes most question types, all “choice” question types, and matrix question types.

Page 26 of 78
The points are stored with the responses, and are calculated on the Results Overview Report, and other reports.
You can display the points to the user using any of the points tokens available:

Page 27 of 78
You can display a certificate of completion at the end of the survey by pasting in the certificate html/rich text into the survey options – completion message.
Multiple Language Survey Design
Language selector survey To create a survey in multiple languages:
1) Create a survey with one page that contains a language selection drop down box (or any single select question type).
2) Create an ActiveLogic workflow with “Redirect” option for each language in the drop down. Each language would be a separate workflow with the “operator” of that question answer. Each workflow would have a “redirect” action which you would place in the survey deployment URL of the survey with that language. (see ActiveLogic guide for further instructions on how to use ActiveLogic workflows)

Page 28 of 78
3) Create the English version of the survey. Make sure it is finished and exactly how you want it, for the exports to all match up, it is important not to add or remove questions after making the other language copies.
4) Create the other language surveys by clicking “Create survey” > “From Existing” then select the original English version of the survey. Copy as many times as needed, naming the survey with the language you want it to be.
5) Edit the other language surveys by going to “Survey Options” > “General” and selecting the language from the drop down box.
6) Make sure the translated text has been saved in “admin tools” > “globalization/translations” for the languages that you are using. This text will show after you set the language on the survey and is used for any “rendered” text.
7) Exporting the data: Export each survey and check the checkbox next to “Response ID” and “Survey ID” so that you can combine the responses of all surveys into one spreadsheet. Make sure the export settings are the same for every export so all of the columns will line up.
8) Make sure the start and end date of all surveys are correct and the same.
Advanced Piping Tokens:
Pre-populating a survey with email list tokens When deploying a survey to an email list through SelectSurvey.NET you have access to all of the email list data for each recipient. Each piece of data has a token that you can put as the default value or populate the survey with. Each recipient email link has a unique URL that identifies that recipient, so you can prepopulate any of the data related to that email list.

Page 29 of 78
Pre-populating a survey with user tokens When deploying a survey with the access type “Login Required” on the survey options page, you have access to all of the user data for each recipient. Each piece of data has a token that you can put as the default value or populate the survey with. When the user logs in to take the survey the recipient is identified and that user data can prepopulate the survey.

Page 30 of 78
Template Design You can create as many look and feel survey templates as you like. You can use the built in template edit menus, or paste in your own custom style sheet like the below example:

Page 31 of 78
Stylesheet for the above template:
<style type="text/css">
/*
* Survey Stylesheet
*/
/* CUSTOM CLASSES
----------------------------------------------- */
#head-top {
background: #373737;
height: 40px;
padding-left: 3000px;
margin-left: -3000px;

Page 32 of 78
padding-right: 3000px;
margin-right: -3000px;
position: absolute;
top: 0;
border-bottom: solid 4px #f5f2ed;
}
#head-main {
position: absolute;
top: 0;
left: 0;
display: table;
width: 760px;
height: 119px;
}
#head-main {
display: table-cell;
vertical-align: bottom;
margin-right: 0;
}
#head-main img {
border-style: none;
vertical-align: top;
float: left;
margin-left: 15px;
}
#head-main h1 {
color: #c34500;
font-family:'EksjaExtremesRegular';
-webkit-font-smoothing: antialiased;

Page 33 of 78
font-size: 20px;
font-weight: bold;
margin-left: 125px;
margin-right: 30px;
margin-top: 90px;
text-align: right;
}
#head-main .ir-top {
position: absolute;
height: 119px;
width: 100%;
float: left;
z-index: -1;
padding-bottom: 10px;
background-color: rgba(245, 242, 237, .5);
border: solid 1px #fff;
/* Rounded Corners */
-moz-border-radius: 15px;
border-radius: 15px;
/* Box Shadow */
-moz-box-shadow: 1px 1px 10px 5px #444;
-webkit-box-shadow: 1px 1px 10px 5px #444;
box-shadow: 1px 1px 10px 5px #444;
}
#footer {
padding-top: 20px;
background: #373737;
height: 30px;
border-top: solid 4px #f5f2ed;

Page 34 of 78
padding-left: 3000px;
margin-left: -3000px;
padding-right: 3000px;
margin-right: -3000px;
position: fixed;
bottom: 0;
}
#footer span {
color: #f5f2ed;
font-size: 13px;
width: 760px;
display: block;
text-align: center;
}
#push {
padding: 80px;
}
/* STANDARD CLASSES
----------------------------------------------- */
.SurveyName /*style of survey name/title that is outside of outline border*/{
font-family:'EksjaExtremesRegular';
-webkit-font-smoothing: antialiased;
font-size: 28px;
font-weight: bold;
position: relative;
top: 193px;
left: 80px;
z-index:100;
}

Page 35 of 78
.SurveyBodyStyle /*style on survey body tag*/{
margin: 0;
overflow-x: hidden;
font-family: 'Gudea', sans-serif;
-webkit-font-smoothing: antialiased;
background:url(/uploads/images/mushroom.jpg) fixed;
}
.SurveyAlignmentStyle /*outer alignment table style*/{
position: relative;
margin-top: 0;
border-spacing: 0;
}
.SurveyAlignmentRowStyle /*first row in outer alignment table*/{}
.SurveyLogoBlockStyle /*outer table that contains logo*/{}
.SurveyBorder,
table[style$="#ffffff"] /*border width and style of box that goes around survey page*/{
position: relative;
top: 130px;
border: solid 1px #fff;
padding:10px;
margin-bottom: 80px;
height: 100%;
background-color: rgba(245, 242, 237, .5);
overflow-x: hidden;
/* Rounded Corners */
-moz-border-radius: 15px;
border-radius: 15px;
/* Box Shadow */
-moz-box-shadow: 1px 1px 10px 5px #444;

Page 36 of 78
-webkit-box-shadow: 1px 1px 10px 5px #444;
box-shadow: 1px 1px 10px 5px #444;
}
table[style$="#ffffff"] {background:url(/uploads/images/mushroom.jpg);}
.SurveyColor /*color of background box of survey within the survey border*/{
background: #f3d08e;
overflow: hidden;
-moz-border-radius: 15px;
border-radius: 15px;
}
table[style$="#f5f2ed"] {
overflow: hidden;
border: solid #f5f2ed 1px;
-moz-border-radius: 15px;
-webkit-border-radius: 15px;
border-radius: 15px;
}
table[style$="#f5f2ed"] span, table[style$="#f5f2ed"] p {
font-family: 'Gudea', sans-serif;
-webkit-font-smoothing: antialiased;
font-size: 140%;
}
.SurveyOuterProgressBarTable /*table that contains progress bar*/{background: #f3d08e;}
.SurveyTimerTable /*table that contains survey timer feature*/{}
.SurveyProgressBarTextTable /*contains height and style of progress bar table*/{}
.PageNumberFontStyle /*the style of the text of page numbers in progress bar and elsewhere*/{}
.SurveyProgressBarTable {}
.ProgressFirstColor /*the color of the first progress bar color*/{background: #c34500;}
.ProgressSecondColor /*the color of the second progress bar color*/{background: #f5f2ed;}

Page 37 of 78
.SurveyMatrixHeadingRowText {}
.SurveyPageTitleTable /*the style of text in page title text*/{display: none;}
.SurveyPageIntroTable /*the style of table width/size for page introduction text*/{
position: absolute;
top: 20px;
left: -10px;
}
.SurveyPageIntroduction /*the style of text in page introduction text*/{display: block; text-align: left;}
.QuestionHolderTable /*height and width of table that contains the questions for the survey*/{
background: #f5f2ed;
width: 103%;
margin-left: -10px;
padding-top: 15px;
}
.QuestionHolderTable tbody {width: 100%;}
/*input[type="radio"] {position: relative; margin-top: 50px; margin-bottom: 20px;}*/
.Normal {
/*position: absolute;
left: 20px;
z-index: 50;
width: 400px;*/
}
.Required {}
.H1HeadingStyle {}
.PageNumberFontStyle {}
.InlineHelpSpanStyle {}
.SurveyPageTitle /*the survey page title that is inside the outline border*/{display: none;}
.SurveyNavigationLink A {}
.ConstantSum {}

Page 38 of 78
.DatabaseDropdownTable {}
.MatrixMultiselectCheckboxes {}
.MatrixMultiselectCheckboxes th[id]{background: #a7c4c9;}
.MatrixMultiselectCheckboxes th[width]{background: #a7c4c9;}
.MatrixMultiselectCheckboxes th[bgcolor="#f5f2ed"]{background: #a7c4c9;}
.MatrixMultiselectCheckboxes td[bgcolor="#f5f2ed"]{background: #a7c4c9;}
.MatrixRatingScale {}
.MatrixSingleSelectOptions {}
.MatrixSingleSelectOptions th[id]{background: #a7c4c9;}
.MatrixSingleSelectOptions th[width]{background: #a7c4c9;}
.MatrixSingleSelectOptions td[bgcolor="#f5f2ed"]{background: #a7c4c9;}
.MatrixSingleSelectOptions th[id="Not sure"]{background: #a7c4c9; width: 20%;}
.MatrixSingleSelectOptions td[axis="Not sure"]{background: #f5f2ed;}
.MatrixSingleSelectOptions td[align="right"]{background: #f5f2ed;}
.MatrixTextboxes {}
.MatrixTextDropdown {}
.MultiSelectCheckboxesTable {}
.OpenEndedNumberTable {}
.OpenEndedCommentsBoxTable {}
.OpenEndedDateTable {}
.OpenEndedNumberTable {}
.OpenEndedOneLineTable {}
.OpenEndedOneOrMoreLinesTable {}
.PresentationHeadingTable {}
.PresentationHorizontalRuleTable {}
.RankingTable {}
.SingleSelectDropdownTable {}
.SingleSelectOptionButtonsTable {}
.TrueFalse {}

Page 39 of 78
.YesNo {}
.tabNavigationDiv /*style used for the optional page tab navigation on top of surveys*/{}
.TouchNumberSliderTable {}
/* BUTTON STYLE
----------------------------------------------- */
.button {
background:-webkit-gradient( linear, left top, left bottom, color-stop(0.05, #db723d), color-stop(1, #c34400) );
background:-moz-linear-gradient( center top, #db723d 5%, #c34400 100% );
filter:progid:DXImageTransform.Microsoft.gradient(startColorstr='#db723d', endColorstr='#c34400');
background-color:#db723d;
-moz-border-radius:6px;
-webkit-border-radius:6px;
border-radius:6px;
border:1px solid #373737;
display:inline-block;
color:#ffffff;
font-family: 'Gudea', sans-serif;
-webkit-font-smoothing: antialiased;
font-size:15px;
font-weight:bold;
padding:6px 6px;
text-decoration:none;
text-shadow:1px 1px 0px #878787;
}.button:hover {
background:-webkit-gradient( linear, left top, left bottom, color-stop(0.05, #c34400), color-stop(1, #db723d) );
background:-moz-linear-gradient( center top, #c34400 5%, #db723d 100% );
filter:progid:DXImageTransform.Microsoft.gradient(startColorstr='#c34400', endColorstr='#db723d');
background-color:#c34400;
}.button:active {

Page 40 of 78
position:relative;
top:1px;
}
/* EKSJA FONT
----------------------------------------------- */
@font-face{font-family:'EksjaExtremesRegular';
src:url(http://oregonstate.edu/osuhomepage/css/fonts/Eksja/Eksja-regular-webfont.eot);
src:local('?'),url(http://oregonstate.edu/osuhomepage/css/fonts/Eksja/Eksja-regular-webfont.woff) format('woff'),url(http://oregonstate.edu/osuhomepage/css/fonts/Eksja/Eksja-regular-webfont.ttf) format('truetype'),url(http://oregonstate.edu/osuhomepage/css/fonts/Eksja/Eksja-regular-webfont.svg#webfont) format('svg');font-weight:normal;font-style:normal;
}
/* SURVEY-SPECIFIC FIELDS
----------------------------------------------- */
/* Education Abroad */
th[id="I would like to learn this language"] {width: 30%;}
th[id="I have studied this language before"] {width: 30%;}
.icon-idea {
display: block; height: 51px; padding-top: 35px; padding-left: 60px;
background: url(/uploads/images/idea/globe.png) no-repeat left top;
}
/* Exit Survey */
.icon-exit {
display: block; height: 51px; padding-top: 35px; padding-left: 60px;
background: url(/uploads/images/exit/cap.png) no-repeat left top;
}
#Answer3371 element.style {height: 20px;}
</style>

Page 41 of 78

Page 42 of 78

Page 43 of 78
Deploying survey
Short URL Rerouting For a shortened URL there is a built in URL rewriter on the deploy survey page:
So a URL such as http://yoururl.com/ClientName would automatically be rerouted to your longer URL http://yoururl.com/TakeSurvey.aspx?SurveyID=HHHHHH so that it would look cleaner and shorter.
Email List For regular email list deployment, click “Email Lists” and create a new email list.
Enter an email list name, then click “Save”

Page 44 of 78
On the following page you have the option of importing from a file or copy/paste into the comments box provided in the format specified. After this step you can continue to add or remove email addresses from this list from the manage email list page at any time.

Page 45 of 78
To add, edit or remove addresses click the icons in the manage email list page.
You can also export the email list to excel by clicking the “Export” icon.

Page 46 of 78
To view sent messages, click “Messages” icon in the manage email list page.
Below is an example of the message details page:

Page 47 of 78
If you are using ResponseLogic, you can view scheduled emails to be sent at a future date and cancel scheduled emails.
To schedule a message, simply select a send date in the future as shown below.
Email List containing survey login/password You can populate any of the email address custom fields with the survey username and login you pre-assign to the user and populate that in the survey deployment email.

Page 48 of 78
You can pre-assign those in excel in bulk and import them along with the email addresses all at one time.

Page 49 of 78
3rd party email deployment such as Constant Contact Generic Link: (no individual email list tracking)
If you are using a 3rd party email system, simply copy the survey deploy link from the deploy page and put that link in the email message in the 3rd party system.
Unique Individual Link: (with email list tracking)
Alternatively if you want to use unique URLs for each recipient on the email list page choose “Export to Excel” option, then import that list into your 3rd party email program.

Page 50 of 78
Email Message Formatting When changing the default email message that appears in the box, make note of the below tokens which are updated when the email sends with their associated values from the email list.
The Default message looks like this:
Dear #FirstName#, We are conducting a survey, and would appreciate your response. The link to the survey is: #SurveyLink# If you do not wish to respond to this survey, please click on the link below to decline: #DeclineLink# Thanks in advance for responding to the survey, Scott
Below are the tokens specific to email messages and opt outs: #SurveyLink# - The location of the link to the survey (required) (this is formatted with an anchor tag around it) #SurveyLinkUnformatted# - No anchor tags around the link, so you can put it in an image or tag with your own click link text. #EIDToken# - Just the EID with nothing around it. Usage Example: yoururl/TakeSurvey.aspx?EID=#EIDToken# #QSStart# - Survey Link query string add on values starting marker.

Page 51 of 78
#QSEnd# - Survey Link query strign add on values ending marker. Example: #SurveyLink##QSStart#&product=apple&office=#CustomData1#&country=US#QSEnd# The above example will automatically attached the extra query string values on to the end of the #SurveyLink# URL anchor tag. #DeclineLink# - The location of the link a user can click to decline responding to the survey #DeclineLinkUnformatted# - No anchor tags around the link so you can put it in an image. #FirstName# - The first name of the email recipient #LastName# - The last name of the recipient #CustomData1# - The first custom data field #CustomData2# - The second custom data field #CustomData3# - The third custom data field #OptOutLink# - A link for the user to opt-out of further emails (this is just the link put your own text around it such as "click #OptOutLink# if you no longer wish to receive emails"...)

Page 52 of 78
Hidden Fields
To populate the response with the hidden field in the above case, you must add it to the query string deploy URL like so:
http://localhost/SelectSurveyNET-TRUNK/src/TakeSurvey.aspx?SurveyID=94L1976&test=123
Adding the “&test=123” will store “test” variable to equal “123” for the person that clicks this link.

Page 53 of 78
Dynamic Tokens You can use dynamic tokens to insert custom data, delete custom data, retrieve custom data, retrieve single values, rows, or data sets, even XML or chart data directly from the database to display in a survey, email or custom report.
To add a dynamic token to a survey, click “Survey Options” then the “Advanced” tab:

Page 54 of 78
DYNAMIC TOKEN PIPING QUERY EXAMPLES:
###DT=DynamicTokenID click the "configure dynamic tokens" button on the survey options page to add dynamic tokens, then type in or use the menu to place the token where ever you want the text replacement to occur. You can use dynamic tokens in insert custom data, delete custom data, retreive custom data, retreive single values, rows, or data sets, even XML or chart data directly from the database.
Dynamic Token Query Example 1: select title AS results from sur_survey where survey_id = ###100###
Just place the dynamic token in the survey by pasting the token that is generated in the application i.e. ###DT=yourtokenname### into the location in the survey, such as in the question text, subtext, or question itself. You can also place dynamic tokens in custom reports and emails and they will get replaced out with the resulting data when rendered. If the token returns no results and just updates, inserts or deletes data, then it will not display in the survey at all but will process when the quesiton is rendered.
Dynamic Token Query Example 2: (update data wiht a dynamic token in a survey) IF EXISTS (SELECT * FROM Acustom_report2 where ResponseID = #ResponseID# and SurveyID = #SURVEYID# and ProductNum = 3) UPDATE Acustom_report2 set ResponseID = #ResponseID#, SurveyID = #SURVEYID#, ResponseDate = GETDATE(), ProductNum = 3,[Product Sold] ='###445###' ,[FIber Type] = '###446###' ,Backing ='###447###'

Page 55 of 78
,[Square Yards Sold] =###449### ,[Square Yards Returned] =###450### ,[Exempt Assessment Adj] =###451### ,[Write off Assessment NC] =###452### ,[Write off Assessment Bankrupt] =###448### output '' as results where ResponseID = #ResponseID# and SurveyID = #SURVEYID# and ProductNum = 3 ELSE insert into Acustom_report2 (ResponseID, SurveyID, ResponseDate, [Product Sold],[FIber Type],Backing,[Square Yards Sold],[Square Yards Returned],[Exempt Assessment Adj],[Write off Assessment NC], [Write off Assessment Bankrupt],ProductNum) output '' as results values (#ResponseID#,#SURVEYID#,GETDATE(),isnull('###445###','none selected'),isnull('###446###','none selected'),isnull('###447###','none selected'),isnull(###449###,0),isnull(###450###,0),isnull(###451###,0),isnull(###452###,0),isnull(###448###,0),3)
Dynamic Token Query Example 3: (delete data with a dynamic token in a survey) delete from Acustom_report2 output '' as results where ResponseID NOT IN (select response_id from sur_response)
Dynamic Token Query Example 4: (generate a chart with a dynamic token in a custom report) select [Product Sold], [Fiber Type], [Backing], SUM([Square Yards Sold]) AS [Square Yards Sold], '$'+convert(varchar(50),cast(round(SUM([Square Yards Sold]*.05),2) as numeric(36,2)),-1) AS [Stewardship Assessment Invoiced], SUM([Square Yards Returned]) AS [Square Yards Returned], '$'+convert(varchar(50),cast(round(SUM([Square Yards Returned]*.05),2) as numeric(36,2)),-1) AS [Stewardship Assessment Returned], SUM([Exempt Assessment Adj]) AS [Exempt Assessment Adjustment - Square Yards], '$'+convert(varchar(50),cast(round(SUM([Exempt Assessment Adj]*.05),2) as numeric(36,2)),-1) AS [Exempt Assessment Adjustment Amount], SUM([Write Off Assessment NC]) AS [Write Off Assessment Non Compliance - Square Yards], '$'+convert(varchar(50),cast(round(SUM([Write Off Assessment NC]*.05),2) as numeric(36,2)),-1) AS [Write off Assessment Non Compliance Amount], SUM([Write off Assessment Bankrupt]) AS [Write off Assessment Bankrupt - Square Yards], '$'+convert(varchar(50),cast(round(SUM([Write off Assessment Bankrupt]*.05),2) as numeric(36,2)),-1) AS [Write off Assessment Bankrupt Amount], SUM([Square Yards Sold])-(SUM([Square Yards Returned]) + SUM([Exempt Assessment Adj]) + SUM([Write Off Assessment NC]) + SUM([Write off Assessment Bankrupt])) AS [Net Sq Yds], '$'+convert(varchar(50),cast(round(SUM([Square Yards Sold]*.05) - (SUM([Square Yards Returned]) + SUM([Exempt Assessment Adj]) + SUM([Write Off Assessment NC]) + SUM([Write off Assessment Bankrupt]))*.05,2) as numeric(36,2)),-1) AS [Stewardship Assessment Due Care] from Acustom_report2 where SurveyID=134 group by [Product Sold], [Fiber Type],[Backing]
Dynamic Token Query Example 5: (generate a chart for custom report) Select round(sum(CAST((cast(answer_text as nvarchar(max))) as float))- (Select sum(CAST((cast(answer_text as nvarchar(max))) as float)) from sur_response_answer where item_id in (625,626,627,623,616,617,618,614,607,608,609,605,598,599,600,596,589,590,591,587,580,581,582,578, 571,572,573,569,562,563,564,560,553,554,555,551,544,545,546,542,535,536,537,533,526,527,528,524,517,518,519,515,508,509,510,504)),2) as [Total Sq. Yards] from sur_response_answer where item_id in (633,624,615,606,597,588,579,570,561,552,543,534,525,516,505)
Advanced Reporting The dynamic token above was used in a free form report:

Page 56 of 78

Page 57 of 78
Free Form Auto-PDF Population mapping into Acro Fields Individual responses can be exported into PDF’s where each answer is mapped to a PDF acro field. Just upload your PDF using the upload utility provided, then use the mapping menu to map each survey question to the PDF Acro field. When the responses come in, each response will have a PDF link, clicking the PDF link will populate the PDF with that response.
First click “Create Free Form Report”,

Page 58 of 78
Select or upload the pre-existing PDF into SelectSurvey.NET using the upload button, or select from prior uploaded PDF’s in the drop down box.

Page 59 of 78
To view individual responses populated into each PDF, click the “View” or “PDF” icons below.

Page 60 of 78
After clicking “PDF”, the individual response is populated into the PDF form, similar to the below example:
Images and digital signature question types in survey are mapped to acro text boxes:

Page 61 of 78
Application Wide Settings Options Click “Admin Tools” link in upper right corner, then “Application Wide Settings” link. Here you will find the application wide settings such as “Default Survey Template”, “Default Days Survey is Open”, which when set are the defaults for all new surveys created from scratch.

Page 62 of 78
Admin Tools
First, login using and admin account.
Second, click “Admin Tools” link.
Below are the various tools you will have access to:

Page 63 of 78
• Account Usage
• General Configuration
• Application Wide Settings
• Database Tokens (Nicknames) used in Dynamic Tokens and Database Question Types
• Web Service/ API Tokens used in Dynamic Tokens and Database Question Types
• Debug Database Connection
• Database Version
• View Logs, Clear Logs
• Database Validation Tool for Surveys
• Database Validation Tool for Libraries
• Data Copy Utility
• User Data Copy Utility
• Delete Report Filters
• Debug Install SMTP Settings – Send Test Email
• Decrypt EID Link or SurveyID
• Specify Company Logo and Copyright Text
• Globalization and Custom Text
• Translate / Edit Global Text
• Translate / Edit Admin Area Text
• Debug International Date Formats
• Unlock Surveys
• Kiosk Admin
• XML Generator Admin
• View Uploaded Images/ Files – Upload Image/File

Page 64 of 78
• Activate / De-Activate Question Types
• Active Directory User Field Synchronization Mapping
Kiosk Admin Kiosk Mode is a mode which activates a Kiosk page, which is mostly useful in a kiosk/touchscreen – such as a computer/laptop/touchscreen located in a public place, or used by a sales person in a convention. In this situation, there typically would be a full screen survey page with a button to take the survey. When the respondent walks up to the kiosk they click the button – to start the survey. If configured for a sales person – the sales person can enter the users info, or look up the users info and click a button to login as them and answer the questions as the respondent. In this case you would activate the user lookup/registration feature to display on the Kiosk Home page so the sales person could look up/add respondent information. Alternatively this functionality can be hidden and just have a single anonymous take survey button for each survey activated.
Kiosk Mode is activated on a “per survey” basis, where each survey must be added to the kiosk from the “admin tools” (for security).
To activate Kiosk Admin Home Page, go to “admin tools” > (scroll down to) “Kiosk Admin” > then you will be on the Kiosk Admin page.
From the Kiosk Admin Page, follow the below steps to activate and setup a survey to show on the Kiosk Home page:

Page 65 of 78
1. Copy the Kiosk home page URL for your reference where it says “Activate Kiosk Home Page at:”
2. Click the “Activate Kiosk Home page” checkbox 3. Change the Logo path to your logo on the Kiosk Admin page. 4. Select the survey from the drop down box “Kiosk Surveys” 5. Click the button “add survey to kiosk” 6. Click “save” at bottom of page. 7. Test the URL that you copied from #1 above.
After you configure the Kiosk home pag you go to the URL – make the browser full screen, such as below:

Page 66 of 78
You can change the logo, and look and feel of the page. The search portion will not display if you have not activated the “Display User Registration” box.
When checking the “Display User Registration” box, you must create your desired user registration survey using the “user registration” question type, and copy the deploy URL into the box on the Kiosk Admin page.
User Reviewers for User Workspace and Approve/Review Reviewer to User Mapping
Apply to:
• User Workspace
• Analyze > Approve/Review

Page 67 of 78
Users can be mapped into roles of reviewers for the review/approval process features built into the User Workspace of SelectSurvey.NET. Once a user is set as a reviewer, they can approve or reject survey responses in the user workspace for those they review for, and can approve/review via the analysis pages as well and submit comments below each question on the survey that can only be hidden for admin, or comments back to the respondent for further response updates.
Click “Users” > “Reviewer Map” to view the list of existing user reviewers.
Then click “Create User to Reviewer Mapping” to map a user or user group to a reviewer role.
Below is the screen to map a reviewer to a user. That means the reviewer has permission to see, comment on and approve/reject any response for that user in the user workspace, or in the approve/review screens.
The built in review levels for a three tier review are below:
• Level 1 Reviewer
• Level 2 Reviewer
• Level 3 - Legal Reviewer
Level 2 and 3 are not required. You can use a single review tier for simplicity.
After you add a reviewer they will show in the list:

Page 68 of 78
User Workspace
The user workspace is a portal for respondents, that shows a list of surveys that the user has been “invited” to take.
Reviewers are NOT required for the user workspace, but if reviewers are set up, they will see the user’s survey list for those users that they are mapped to “review” for.
How to Enable the User Workspace Feature:
If you do not see the user workspace tab in the SelectSurvey.NET interface, then you need to enable the feature in admin tools by following the below steps:
• Login as an admin user
• Go to “Admin Tools” > “Application Wide Settings”
• Scroll down to “Feature Defaults” section > “Activate User Workspace” > change drop down to yes, click save:
How to Enable a survey to show in the User Workspace:
On the survey options page for the survey, click the checkbox that says “Show in User Workspace” as shown in the screen below:

Page 69 of 78
How to Enable a specific user or user group to see a survey in their User Workspace:
By default, if a survey is enabled for user workspace, all users with a login will see it in their user workspace. If the survey has a user group restriction, then only the users in the user group will see the survey in the user workspace.
On the survey options > Access tab, add specific users to the user group restrictions, or AD user group restrictions for the survey.
What the User Sees:

Page 70 of 78
How to White Label/Brand the User Workspace:
You can change the look and feel of the User Workspace page that respondents see.
To customize the look and feel of the page follow the below steps:
• Login as an admin user
• Click “admin tools” > “White Label Branding” > “Specify Company Logo, Footer Text, Login Stylesheet, User Workspace Template”

Page 71 of 78
3rd Party API Integration:
Workfront Project API – Push Survey Data into new Project Issues When someone completes a survey, it can automatically push the survey answer data into Workfront Project creating a new “Issue” in an existing “Project” in Workfront Project.
You can accomplish this with the built in interface inside SelectSurvey with no programming!
Below are the steps and screenshots to accomplish a data push of survey data to Workfront.
The first step is to setup a Web Service Token in “admin tools” that contains the URL, username and password to access the web service or 3rd party API.
Add web service token:
Click “Admin Tools” > “Web Service/API Tokens used in Dynamic Tokens and Database Question Types”.
Click “Create Web Service Token” as shown in above screenshot.
Enter the username, password and URL in the screen shown below, then click “Save”.

Page 72 of 78
Now you can setup the Workfront Project Mapping Integration:
1) On the Survey List page, click “Survey Options” icon next to the survey that you want to push data to Workfront Project:
2) Click the “API” tab on the Survey Options page.
3) Click the “Workfront Project API Configuration” link
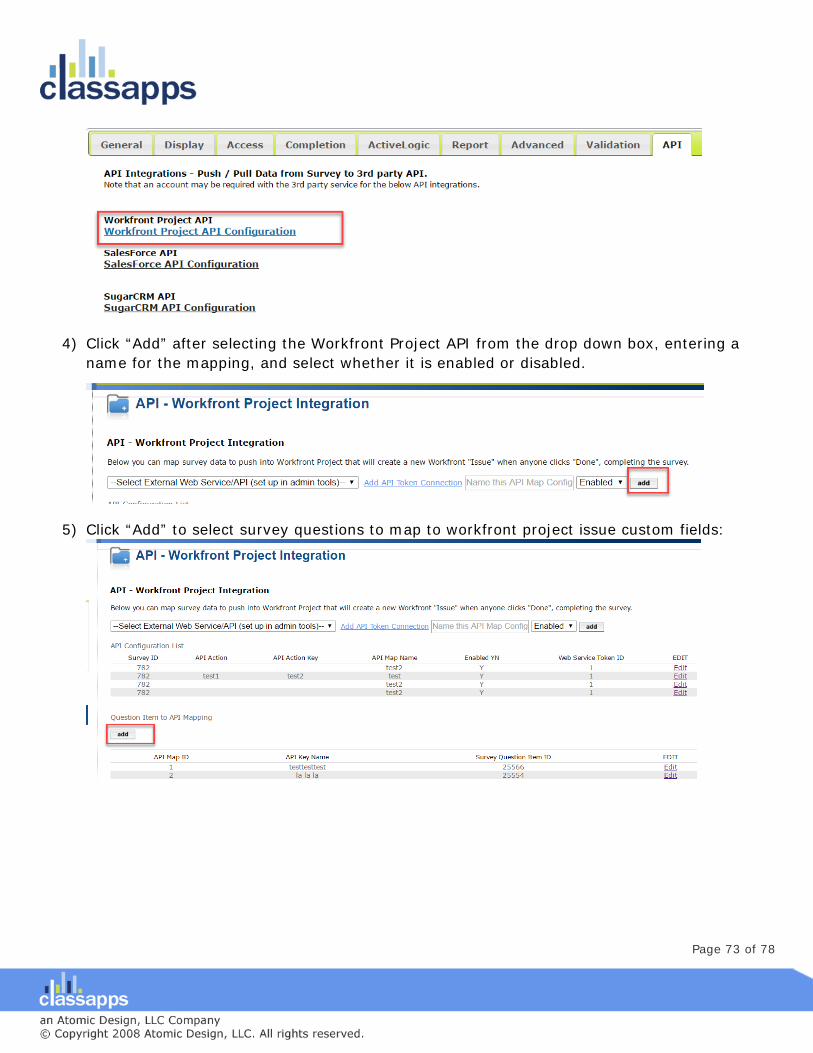
Page 73 of 78
4) Click “Add” after selecting the Workfront Project API from the drop down box, entering a name for the mapping, and select whether it is enabled or disabled.
5) Click “Add” to select survey questions to map to workfront project issue custom fields:

Page 74 of 78
6) Click “Save” on the pop up after selecting the question and entering the custom field into the
text box
7) Test the mapping.
To Edit the mapping:
1) Click the “Edit” button to the right of the mapping and a pop up will display to edit that rows information.

Page 75 of 78
SalesForce API SalesForce API Integration is coming soon.
SugarCRM API SugarCRM API Integration is coming soon.

Page 76 of 78
Obtaining Technical Support Resources
General Technical Support Requests General Technical Support can be obtained by any of the below methods:
• By Email to [email protected]
• By filling in a Trouble Ticket: http://www.classapps.com/SupportTicket.asp
• By calling 800-774-4876 (Press 2 to go directly to technical support). Note that if all tech support people are on the phone, that your voice mail will be transcribed and emailed to all tech support staff, and can be answered while they are on other calls, so please leave a message for the fastest response. Also note that only “Level 2” support includes phone support. All other levels include email support only.
When contacting technical support, you will need to provide the below:
• Customer ID Number (Login): _ _ _ _ _ _
The customer ID number and password is assigned and emailed to client upon purchase. The customer ID and password above is used to access product updates, product downloads, renew support, print receipts, print estimates, access to license keys.
Other information on the technical support ticket might include:
• SelectSurvey.NET Version Number: v_ . _ _ _ . _ _ _
The database version number is found in the footer of every page in SelectSurvey.NET application.
• Database Type: _ _ _ _ _ _ _ _ _
Supported database types are MS SQL (2005 or later), Oracle (10 or later), or MySQL (6 or later).
• IIS Version: _ _
Supported IIS Versions are iis 6, iis 7, iis 7.5 or greater.
Installation Service/Upgrade Service/Consulting Request To obtain an estimate for installation service, upgrade service or consulting by the hour for survey design, custom reports or programming custom features, contact [email protected] or call 800-774-4876 (press 1 for sales).

Page 77 of 78
Installation Service and Upgrade Service are available for a per instance fee. Currently that fee is $150 USD. That covers a technical support person that would RDP into the server to update the files in IIS, set permissions on survey folder, and run a database script. The installation service only covers installing the application, and does not include DNS setup, MS SQL install, IIS install or general server setup or network setup.
Consulting is available by the hour, programming and survey design consulting is available, as well as anything above and beyond a normal installation/upgrade service.
Support Knowledgebase SelectSurvey.NET has a public helpdesk that you can search for common issues. You can access the knowledgebase from here: http://www.classapps.com/helpdesk/categorized.asp Click “Search” to search for a keyword.
Support Documentation/Videos All documentation is linked from the ClassApps.com website as well as included in the product download zip file in the “documentation” folder.
http://www.classapps.com/SelectSurveyDocumentation.asp
Videos demonstrating features and installation are located here:
http://www.classapps.com/Videos.asp
The general support page that links all support related links is located here:
http://www.classapps.com/Support.asp
Product Updates / Critical Security Warnings Product updates occur each month due to new features, and updates required from new browser releases, or new mobile device releases. Some updates are also required due to security issues that might arise due to vulnerabilities in windows servers, browsers, or other related technology issues.
It is very important to stay aware of any critical security issues or product updates. The way to do this is to sign up for the SelectSurvey.NET RSS feed, or follow the SelectSurvey Twitter or Facebook page. All of these 3 communication channels update automatically any time we make a release. The release summary is posted to each of these sites simultaneously. The full release notes are included in the product download zip, and critical security concerns are only visible from the client login area after logging in. If there is a critical security issue, we post that there is a

Page 78 of 78
critical security issue, and the details of the risk and instructions will be posted in the client login area to minimize risks to client installs.
Product updates can be obtained from any of the following methods:
• RSS Feed: (http://classapps.com/rss/SelectSurveyupdates.asp) to add the RSS feed click the RSS Feed button here: http://www.classapps.com/Support.asp
• Twitter: http://twitter.com/SelectSurveyNET
• Facebook: http://www.facebook.com/SelectSurvey.NET