
Introduction to Dialog Control Language (DCL) - G-W · PDF fileChapter 29 Introduction to...
12
Chapter 29 Introduction to Dialog Control Language (DCL) AutoCAD and Its Applications—Advanced 733 Copyright by Goodheart-Willcox Co., Inc. Chapter Chapter Introduction to Dialog Control Language (DCL) Learning Objectives After completing this chapter, you will be able to: ✓ Describe the types of files that control dialog boxes. ✓ Define the components of a dialog box. ✓ Write a DCL file for a basic dialog box. ✓ Write an AutoLISP file to control a dialog box. ✓ Associate an action with a dialog box tile. Programmable dialog boxes can be used to completely customize the interface of AutoLISP programs. These dialog boxes allow LISP programs to work like many of AutoCAD’s built-in functions. Using dialog boxes improves efficiency and reduces data-entry errors. Dialog boxes minimize the amount of typing required by the user. Rather than answering a series of text prompts on the command line, the user selects options from the dialog box. Dialog box fields can be filled in by the user in any order. While the dialog box is still active, the user can revise values as necessary. AutoLISP provides basic tools for controlling dialog boxes, but the dialog box itself must be defined using the Dialog Control Language (DCL). The definition is written to an ASCII file with a .dcl file extension. When creating and editing DCL files, the Visual LISP Editor provides many helpful tools, including color coding. This chapter is only an introduction to DCL. It covers basic DCL file construction and a few common tile types. For more information, refer to the online help documentation. DCL File Formats A DCL file is formatted as an ASCII text file with a .dcl file extension. These files can have any valid file name, but a file name with 1 to 8 characters is recommended. Writing DCL is easy. Many of the components of a DCL file are normal English words. The components of a dialog box—such as edit boxes, images, and drop-down lists— are referred to as tiles. Tiles are defined by specifying various attribute values. Each attribute controls a specific property of the tile, such as size, location, and default values. D DCL F Fil l e F Fo or m mats s
Transcript of Introduction to Dialog Control Language (DCL) - G-W · PDF fileChapter 29 Introduction to...

Chapter 29 Introduction to Dialog Control Language (DCL) AutoCAD and Its Applications—Advanced 733Copyright by Goodheart-Willcox Co., Inc.
Chapter Chapter
Introduction to Dialog Control
Language (DCL)
Learning ObjectivesAfter completing this chapter, you will be able to:
✓ Describe the types of fi les that control dialog boxes. ✓ Defi ne the components of a dialog box. ✓ Write a DCL fi le for a basic dialog box. ✓ Write an AutoLISP fi le to control a dialog box. ✓ Associate an action with a dialog box tile.
Programmable dialog boxes can be used to completely customize the interface of AutoLISP programs. These dialog boxes allow LISP programs to work like many of AutoCAD’s built-in functions. Using dialog boxes improves effi ciency and reduces data-entry errors.
Dialog boxes minimize the amount of typing required by the user. Rather than answering a series of text prompts on the command line, the user selects options from the dialog box. Dialog box fi elds can be fi lled in by the user in any order. While the dialog box is still active, the user can revise values as necessary.
AutoLISP provides basic tools for controlling dialog boxes, but the dialog box itself must be defi ned using the Dialog Control Language (DCL). The defi nition is written to an ASCII fi le with a .dcl fi le extension. When creating and editing DCL fi les, the Visual LISP Editor provides many helpful tools, including color coding.
This chapter is only an introduction to DCL. It covers basic DCL fi le construction and a few common tile types. For more information, refer to the online help documentation.
DCL File Formats
A DCL fi le is formatted as an ASCII text fi le with a .dcl fi le extension. These fi les can have any valid fi le name, but a fi le name with 1 to 8 characters is recommended. Writing DCL is easy. Many of the components of a DCL fi le are normal English words.
The components of a dialog box—such as edit boxes, images, and drop-down lists—are referred to as tiles. Tiles are defi ned by specifying various attribute values. Each attribute controls a specifi c property of the tile, such as size, location, and default values.
DDCL FFille FFoormmatss

Chapter 29 Introduction to Dialog Control Language (DCL) AutoCAD and Its Applications—Advanced 734Copyright by Goodheart-Willcox Co., Inc.
When writing a DCL fi le, you do not use parentheses as you do with AutoLISP. When defi ning a dialog box or tile, all of the required attributes are placed within {braces}. As with AutoLISP programs, indentation helps to separate individual elements, making the fi le more readable. Comments are preceded by two forward slashes (//). Semicolons are used at the end of an attribute defi nition line.
To view an example of DCL code, open the acad.dcl and base.dcl fi les in a text editor. These two fi les are found in the user’s \Support folder, not the AutoCAD \Supportfolder. A portion of the acad.dcl fi le is shown in Figure 29-1.
CAUTION
The base.dcl fi le contains standard prototype defi nitions. The acad.dclfi le contains defi nitions for dialog boxes used by AutoCAD. Do notedit either one of these fi les! Altering them can cause AutoCAD’s built-in dialog boxes to crash.
AutoLISP and DCL
A DCL fi le simply defi nes a dialog box. The dialog box cannot actually do anything without a controlling application. AutoLISP is frequently used to control dialog sessions. This section shows examples using the AutoLISP dialog-handling functions.
In order to display a dialog box, the controlling AutoLISP application must fi rst load the dialog defi nition. The AutoLISP (load_dialog) function loads the specifi ed dialog defi nition fi le:
(load_dialog "file name.dcl")
The fi le name is enclosed in quotation marks. The (load_dialog) function returns a positive integer that identifi es the loaded DCL fi le. If the attempted load was unsuc-cessful, a negative integer is returned.
The next step is to activate a specifi c dialog box defi nition contained within the DCL fi le. The AutoLISP (new_dialog) function activates the dialog box specifi ed, where dlgname is the name of the dialog box:
(new_dialog dlgname dcl_id)
This function is case sensitive. Suppose the dialog defi nition is named main. Specifying Main or MAIN will not activate this dialog box since the text string does not exactly match. The dcl_id argument represents the integer value returned by (load_dialog).
AAAutooLISP aannd DDCCLL
Figure 29-1.A portion of the acad.dcl file.
acad_snap : dialog { label = "Drawing Aids"; : row { : column { : boxed_column { label = "Modes"; : toggle { label = "&Ortho"; key = "ortho"; } : toggle { label = "Solid &Fill"; key = "fill"; }
Dialog definition
Label attributeadds a text string
Key attributeidentifies a text string
that associates the dialogtile with an AutoLISP
function
Chapter 29 Introduction to Dialog Control Language (DCL) AutoCAD and Its Applications—Advanced 735Copyright by Goodheart-Willcox Co., Inc.
This value is often assigned to a variable, as you will see later. The (new_dialog) func-tion also supports additional, optional arguments, which are not discussed here.
To actually begin accepting input from the user, the AutoLISP (start_dialog) func-tion must be used:
(start_dialog)
This function has no arguments. It allows input to be received from the dialog box initialized by the previous (new_dialog) expression.
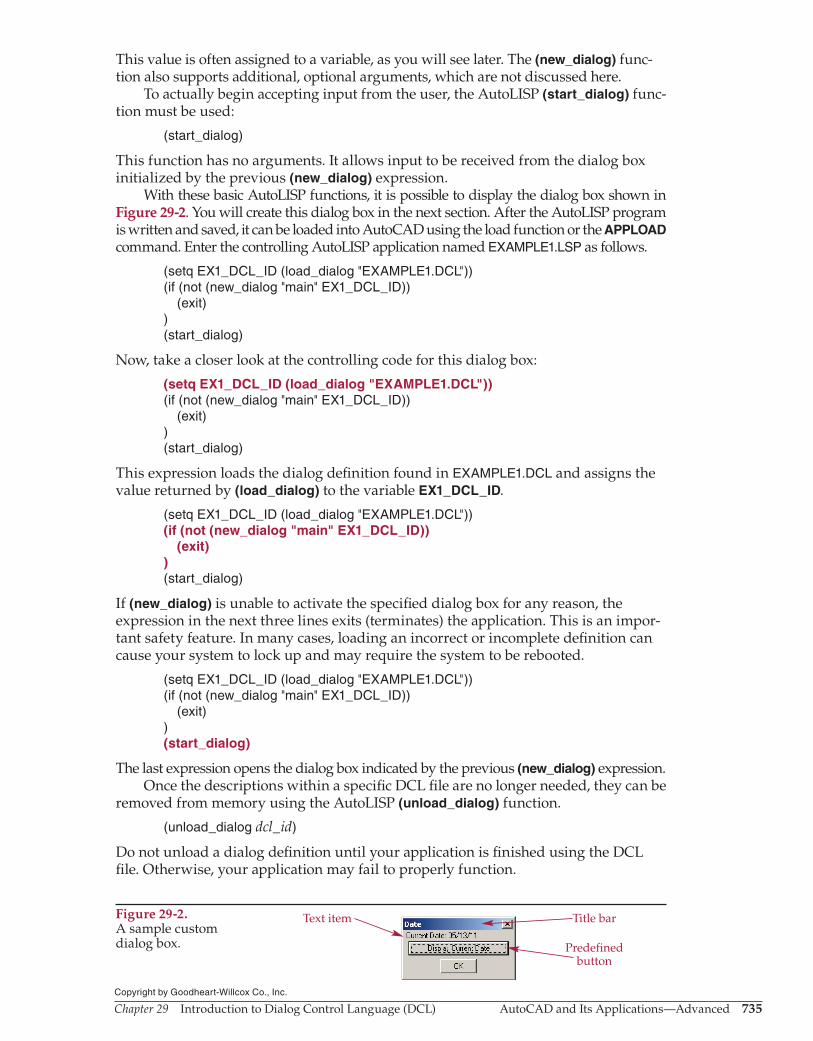
With these basic AutoLISP functions, it is possible to display the dialog box shown in Figure 29-2. You will create this dialog box in the next section. After the AutoLISP program is written and saved, it can be loaded into AutoCAD using the load function or the APPLOAD command. Enter the controlling AutoLISP application named EXAMPLE1.LSP as follows.
(setq EX1_DCL_ID (load_dialog "EXAMPLE1.DCL"))(if (not (new_dialog "main" EX1_DCL_ID)) (exit))(start_dialog)
Now, take a closer look at the controlling code for this dialog box:
(setq EX1_DCL_ID (load_dialog "EXAMPLE1.DCL"))(if (not (new_dialog "main" EX1_DCL_ID)) (exit))(start_dialog)
This expression loads the dialog defi nition found in EXAMPLE1.DCL and assigns the value returned by (load_dialog) to the variable EX1_DCL_ID.
(setq EX1_DCL_ID (load_dialog "EXAMPLE1.DCL"))(if (not (new_dialog "main" EX1_DCL_ID)) (exit))(start_dialog)
If (new_dialog) is unable to activate the specifi ed dialog box for any reason, the expression in the next three lines exits (terminates) the application. This is an impor-tant safety feature. In many cases, loading an incorrect or incomplete defi nition can cause your system to lock up and may require the system to be rebooted.
(setq EX1_DCL_ID (load_dialog "EXAMPLE1.DCL"))(if (not (new_dialog "main" EX1_DCL_ID)) (exit))(start_dialog)
The last expression opens the dialog box indicated by the previous (new_dialog) expression.Once the descriptions within a specifi c DCL fi le are no longer needed, they can be
removed from memory using the AutoLISP (unload_dialog) function.
(unload_dialog dcl_id)
Do not unload a dialog defi nition until your application is fi nished using the DCL fi le. Otherwise, your application may fail to properly function.
Figure 29-2.A sample custom dialog box.
Text item Title bar
Predefinedbutton

Chapter 29 Introduction to Dialog Control Language (DCL) AutoCAD and Its Applications—Advanced 736Copyright by Goodheart-Willcox Co., Inc.
DCL Tiles
Your work in AutoCAD has provided you with a good background in how dialog boxes function. By now, you should be familiar with the use of buttons, edit boxes, radio buttons, and list boxes. This will be helpful as you design dialog interfaces for your AutoLISP programs.
DCL tiles are used individually or combined into structures called clusters. For example, a series of button tiles can be placed in a column tile to control the arrange-ment of the buttons in the dialog box. The primary tile is the dialog box itself.
The best way to begin understanding the format of a DCL fi le is to study a simple dialog box defi nition. The following DCL code defi nes the dialog box shown in Figure 29-2.
main : dialog { label = "Dialog Box Example 1"; : text_part { value = "This is an example."; } ok_only;}
Now, take a closer look at the defi nition of this dialog box. The dialog defi nitionis always the fi rst tile defi nition.
main : dialog { label = "Dialog Box Example 1"; : text_part { value = "This is an example."; } ok_only;}
Everything within the braces defi nes the features of the dialog box. The word “main” indicates the name of the dialog box within the code. This name is referenced by the controlling AutoLISP application. A colon (:) precedes all tile callouts. In the case of a dialog tile, the colon separates the name from the tile callout.
main : dialog { label = "Dialog Box Example 1"; : text_part { value = "This is an example."; } ok_only;}
The label attribute of the dialog tile controls the text that appears in the title bar of the dialog box. The line is terminated with a semicolon. All attribute lines must be terminated with a semicolon.
main : dialog { label = "Dialog Box Example 1"; : text_part { value = "This is an example."; } ok_only;}
DCCLL TTilles

Chapter 29 Introduction to Dialog Control Language (DCL) AutoCAD and Its Applications—Advanced 737Copyright by Goodheart-Willcox Co., Inc.
The text_part tile allows placement of text items in a dialog box. The value attri-bute is used to specify the text that is displayed. Just as with the dialog tile, all of the attributes are defi ned between braces.
main : dialog { label = "Dialog Box Example 1"; : text_part { value = "This is an example."; } ok_only;}
There are many predefi ned tiles and subassemblies in the base.dcl fi le. A subas-sembly is a cluster of predefi ned tiles, such as ok_cancel and ok_help. The ok_only tile places an OK button at the bottom of the dialog box, as shown in Figure 29-2. The statement is not preceded by a colon because it is not a specifi c defi nition. This line is terminated with a semicolon, just like an attribute. Braces are not required because the statement is a reference to a predefi ned tile, rather than a tile defi nition.
Once you have defi ned a dialog box, the defi nition must then be saved in a DCL fi le. For this example, the dialog defi nition above should be saved in the fi le EXAMPLE1.DCL. This is treated as any other support fi le and should be saved in the AutoCAD support path.
For examples of other DCL functions, look at the Viewpoint Presets dialog box shown in Figure 29-3. Various tiles of this dialog box are identifi ed with the corresponding
Figure 29-3.Some of the tile definitions and attributes associated with the Viewpoint Presets dialog box (this dialog box is no longer defined by a DCL file).
ddvpoint : dialog { aspect_ratio = 0; label = "Viewpoint Presets"; fixed_height = true; fixed_width = true; : column { : row { : text { label = "Set Viewing Angles"; key = "ddvp_header"; } }
: row { : radio_row { : radio_button { label = "Absolute to WCS"; key = "ddvp_abs_wcs"; mnemonic = "W"; value = "1"; } : radio_button { label = "Relative to UCS"; key = "ddvp_rel_ucs"; mnemonic = "U"; } } }
: row { fixed_width = true; fixed_height = true; : image_button { alignment = top; fixed_width = true; fixed_height = true; key = "ddvp_image"; width = 39; height = 12; color = 0; is_tab_stop = false; } }
: row { : edit_box { label = "From: X Axis:"; mnemonic = "A"; key = "ddvp_val_x"; fixed_width = true; edit_width = 6; } : edit_box { label = "XY Plane:"; mnemonic = "P"; key = "ddvp_val_xyp"; fixed_width = true; edit_width = 6; } }
: row { : button { label = "Set to Plan View"; key = "ddvp_set_plan"; mnemonic = "V"; } } }
spacer_1; ok_cancel_help_errtile;}

Chapter 29 Introduction to Dialog Control Language (DCL) AutoCAD and Its Applications—Advanced 738Copyright by Goodheart-Willcox Co., Inc.
DCL code needed to defi ne the tile. In older releases of AutoCAD, this dialog box was defi ned by a stand-alone DCL fi le named ddvpoint.dcl. However, this DCL fi le no longer exists as the dialog box is now defi ned by a different method.
Exercise 29-1 1. Use the examples in the text to create EXAMPLE1.DCL and EXAMPLE1.LSP. Create
each file in the Visual LISP Editor. 2. Load the AutoLISP program file to test the files. The dialog box should automati-
cally open and remain displayed until you pick the OK button.
Associating Functions with Tiles
Most tiles can be associated with actions. These actions vary from run-time error checking to performing tasks outside of the dialog box session. The (action_tile) AutoLISP function provides the basic means of associating tiles with actions.
(action_tile "key" "action-expression")
The key references the attribute assigned in the DCL fi le. The action-expression is the AutoLISP expression performed when the action is called. When the desired action requires a large amount of AutoLISP code, it is best to defi ne a function to perform the required tasks. This function is then called within the action-expression. Both the key and action-expression arguments are supplied as text strings.
In order to access a specifi c tile from AutoLISP, the key of the tile must be refer-enced. The key is specifi ed as an attribute in the DCL fi le. Tiles that are static (no associated action) do not require keys. Any tile that must be referenced in any way—such as setting or retrieving a value, associating an action, or enabling/disabling the tile—requires a key.
The next example changes the previous dialog box by adding a button that displays the current time when picked. The new or changed DCL code is shown in color. Save this fi le as EXAMPLE2.DCL.
main : dialog { label = "Dialog Box Example 2"; : text_part { value = ""; key = "time"; } : button { key = "update"; label = "Display Current Time"; mnemonic = "C"; } ok_only;}
Notice the addition of a key attribute to the text_part tile. This allows access by the AutoLISP application while the dialog box is open. Another addition is the button tile. A key attribute is provided in the button tile so an association can be created in the AutoLISP program with an action-expression argument. The label attribute provides the text displayed on the button. The mnemonic attribute
AAssssociaattingg Fuunncttioonss witthh Tiiiless

Chapter 29 Introduction to Dialog Control Language (DCL) AutoCAD and Its Applications—Advanced 739Copyright by Goodheart-Willcox Co., Inc.
underlines the specifi ed letter within the label to allow keyboard access. The AutoLISP application used to manage this dialog session is as follows. Save the program as EXAMPLE2.LSP.
(setq EX2_DCL_ID (load_dialog "EXAMPLE2.DCL"))(if (not (new_dialog "main" EX2_DCL_ID)) (exit))(defun UPDTILE () (setq CDVAR (rtos (getvar "CDATE") 2 16) CDTXT (strcat "Current Time: " (substr CDVAR 10 2) ":" (substr CDVAR 12 2) ":" (substr CDVAR 14 2) ) ) (set_tile "time" CDTXT))(UPDTILE)(action_tile "update" "(UPDTILE)")(start_dialog)
The dialog box displayed by this code is shown in Figure 29-4. The “time” button displays the current time when the button is picked. The mnemonic char-acter is displayed once the [Alt] key is pressed. Note: Some AutoLISP functions not covered in this text are used in the above programming to retrieve and display the current time.
Commands that change the display or require user input (outside of the dialog box interface) cannot be used while a dialog box is active. These AutoLISP functions cannot be used with DCL:
command getangle getpoint grread promptentdel getcorner getreal grtext redrawentmake getdist getstring grvecs ssget (interactive)entmod getint graphscr menucmd textpageentsel getkword grclear nentsel textscrentupd getorient grdraw osnap
Exercise 29-2 1. Use the examples in the text to create EXAMPLE2.DCL and EXAMPLE2.LSP. Load
and run the AutoLISP program. What happens when the “time” button is picked?
Figure 29-4.The dialog box defined by EXAMPLE2.DCL and controlled by EXAMPLE2.LSP. Mnemonic attribute
is underlined
Label attributefrom button tile

Chapter 29 Introduction to Dialog Control Language (DCL) AutoCAD and Its Applications—Advanced 740Copyright by Goodheart-Willcox Co., Inc.
Working with DCL
There are many types of DCL tiles available. You can provide edit boxes for users to directly enter information, such as numeric or text information. You can create lists and drop-down lists to allow users to choose from preset selections. You can also add buttons to provide a simple means of initiating an action.
Images can be used to enhance dialog boxes. For example, you can place company or personal logos in your dialog boxes. An interactive image, such as the one that appears in the Viewpoint Presets dialog box shown in Figure 29-3, can also be used. Tools such as text tiles, sliders, and clusters are used to control the layout of tiles in a dialog box.
A wide variety of attributes are available for controlling the appearance and function of a dialog session. In addition, several AutoLISP functions are provided to control your dialog session. You can disable or enable tiles and change the active tile. It is even possible to change the value or state of a tile based on an entry in another tile.
You have already seen two examples of dialog boxes created using DCL and AutoLISP. The following sections provide two additional applications that use various dialog boxes. Study these examples for additional insight into the creation of dialog boxes. Be sure to have an appropriate reference handy, such as the online documenta-tion, to look up DCL and AutoLISP terms. You can adapt or modify these programs to produce dialog sessions of your own.
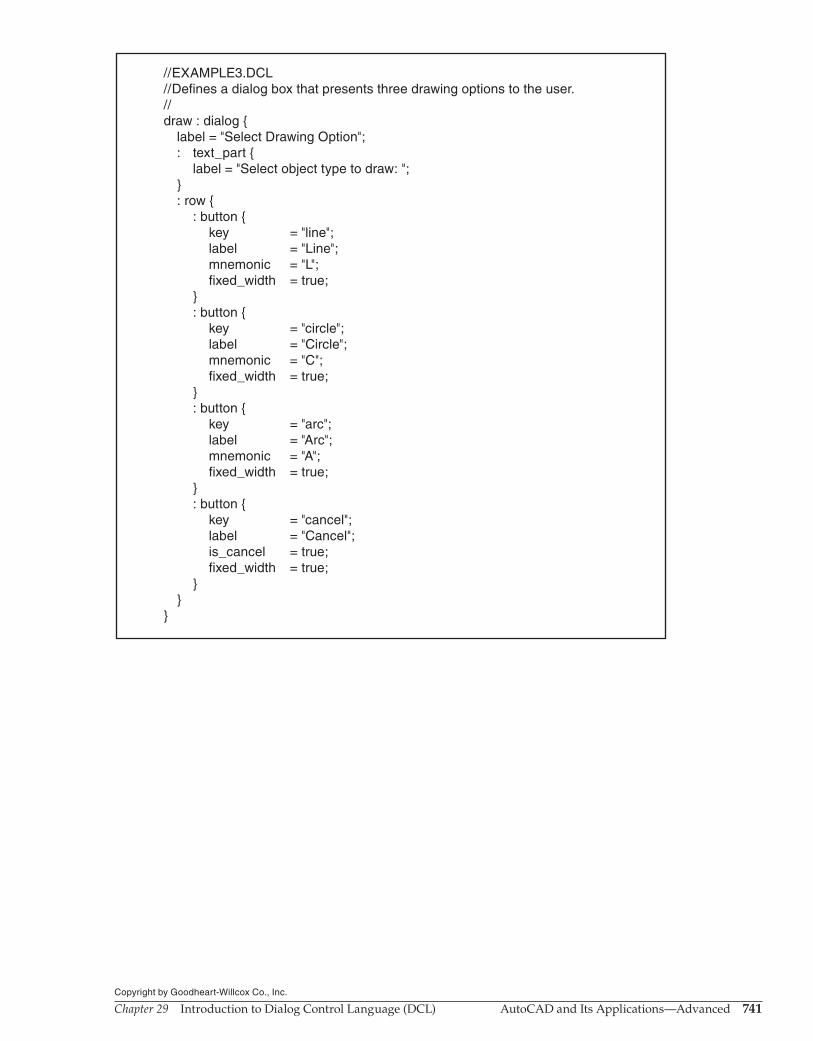
Dialog Example 3Create the following DCL and AutoLISP programs. Save the programs as
EXAMPLE3.DCL and EXAMPLE3.LSP. Then, load the AutoLISP program fi le. To open the dialog box, type DRAW. The dialog box is shown in Figure 29-5.
;EXAMPLE3.LSP;This file displays the dialog box defined in EXAMPLE3.DCL and begins the; selected drawing command as specified by the user.;(defun C:DRAW (/ EX3_DCL_ID) (setq EX3_DCL_ID (load_dialog "EXAMPLE3.DCL")) (if (not (new_dialog "draw" EX3_DCL_ID)) (exit) ) (action_tile "line" "(setq CMD $key) (done_dialog)") (action_tile "circle" "(setq CMD $key) (done_dialog)") (action_tile "arc" "(setq CMD $key) (done_dialog)") (action_tile "cancel" "(setq CMD nil) (done_dialog)") (start_dialog) (unload_dialog EX3_DCL_ID) (command CMD))
WWWorkkinngg wwitth DDCCLL
Figure 29-5.The dialog box displayed using the EXAMPLE3.DCL and LSP files.
Chapter 29 Introduction to Dialog Control Language (DCL) AutoCAD and Its Applications—Advanced 741Copyright by Goodheart-Willcox Co., Inc.
//EXAMPLE3.DCL//Defines a dialog box that presents three drawing options to the user.//draw : dialog { label = "Select Drawing Option"; : text_part { label = "Select object type to draw: "; } : row { : button { key = "line"; label = "Line"; mnemonic = "L"; fixed_width = true; } : button { key = "circle"; label = "Circle"; mnemonic = "C"; fixed_width = true; } : button { key = "arc"; label = "Arc"; mnemonic = "A"; fixed_width = true; } : button { key = "cancel"; label = "Cancel"; is_cancel = true; fixed_width = true; } }}
Chapter 29 Introduction to Dialog Control Language (DCL) AutoCAD and Its Applications—Advanced 742Copyright by Goodheart-Willcox Co., Inc.
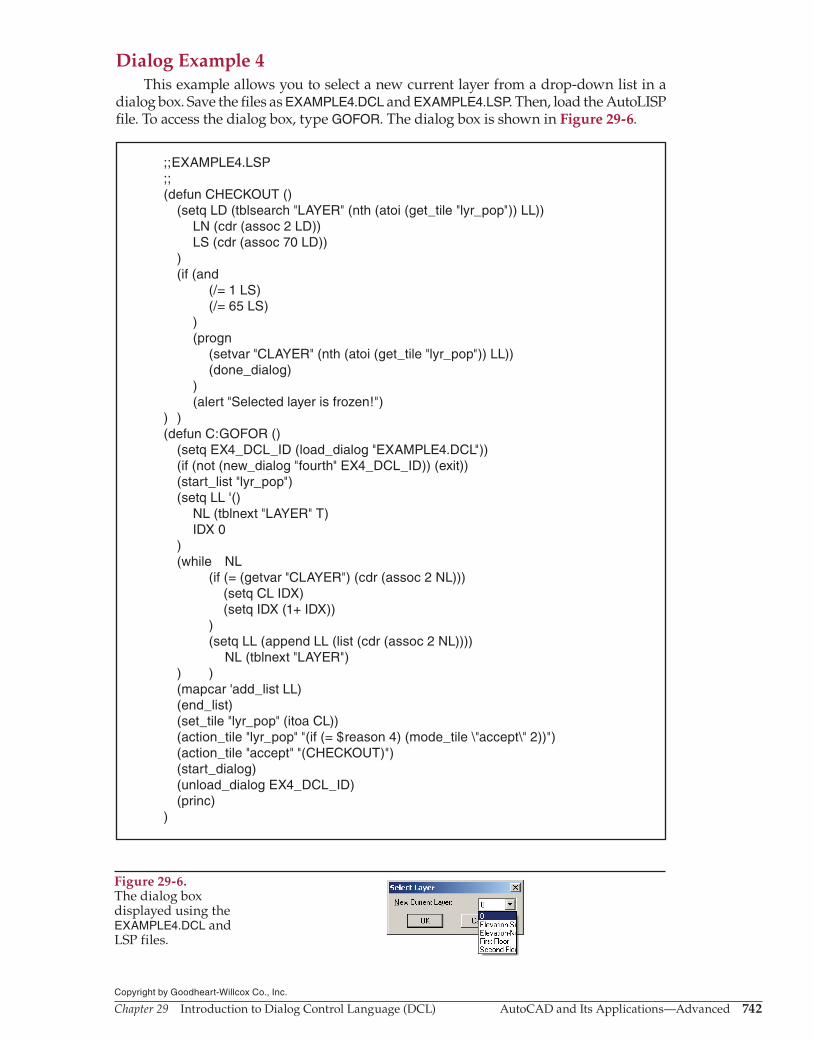
Dialog Example 4This example allows you to select a new current layer from a drop-down list in a
dialog box. Save the fi les as EXAMPLE4.DCL and EXAMPLE4.LSP. Then, load the AutoLISP fi le. To access the dialog box, type GOFOR. The dialog box is shown in Figure 29-6.
;;EXAMPLE4.LSP;;(defun CHECKOUT () (setq LD (tblsearch "LAYER" (nth (atoi (get_tile "lyr_pop")) LL)) LN (cdr (assoc 2 LD)) LS (cdr (assoc 70 LD)) ) (if (and (/= 1 LS) (/= 65 LS) ) (progn (setvar "CLAYER" (nth (atoi (get_tile "lyr_pop")) LL)) (done_dialog) ) (alert "Selected layer is frozen!")) )(defun C:GOFOR () (setq EX4_DCL_ID (load_dialog "EXAMPLE4.DCL")) (if (not (new_dialog "fourth" EX4_DCL_ID)) (exit)) (start_list "lyr_pop") (setq LL '() NL (tblnext "LAYER" T) IDX 0 ) (while NL (if (= (getvar "CLAYER") (cdr (assoc 2 NL))) (setq CL IDX) (setq IDX (1+ IDX)) ) (setq LL (append LL (list (cdr (assoc 2 NL)))) NL (tblnext "LAYER") ) ) (mapcar 'add_list LL) (end_list) (set_tile "lyr_pop" (itoa CL)) (action_tile "lyr_pop" "(if (= $reason 4) (mode_tile \"accept\" 2))") (action_tile "accept" "(CHECKOUT)") (start_dialog) (unload_dialog EX4_DCL_ID) (princ))
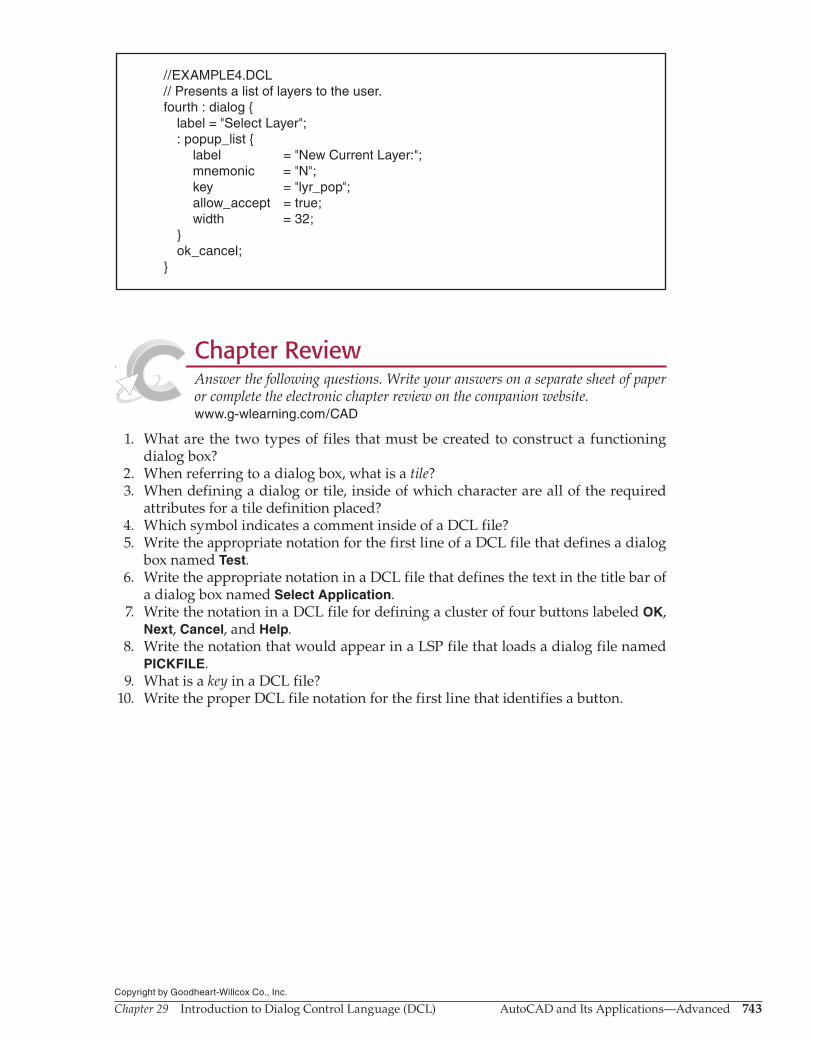
Figure 29-6.The dialog box displayed using the EXAMPLE4.DCL and LSP files.
Chapter 29 Introduction to Dialog Control Language (DCL) AutoCAD and Its Applications—Advanced 743Copyright by Goodheart-Willcox Co., Inc.
//EXAMPLE4.DCL// Presents a list of layers to the user.fourth : dialog { label = "Select Layer"; : popup_list { label = "New Current Layer:"; mnemonic = "N"; key = "lyr_pop"; allow_accept = true; width = 32; } ok_cancel;}
Chapter ReviewAnswer the following questions. Write your answers on a separate sheet of paper or complete the electronic chapter review on the companion website.www.g-wlearning.com/CAD
1. What are the two types of files that must be created to construct a functioning dialog box?
2. When referring to a dialog box, what is a tile? 3. When defining a dialog or tile, inside of which character are all of the required
attributes for a tile definition placed? 4. Which symbol indicates a comment inside of a DCL file? 5. Write the appropriate notation for the first line of a DCL file that defines a dialog
box named Test. 6. Write the appropriate notation in a DCL file that defines the text in the title bar of
a dialog box named Select Application. 7. Write the notation in a DCL file for defining a cluster of four buttons labeled OK,
Next, Cancel, and Help. 8. Write the notation that would appear in a LSP file that loads a dialog file named
PICKFILE. 9. What is a key in a DCL file? 10. Write the proper DCL file notation for the first line that identifies a button.

Dra
win
g P
rob
lem
s -
Chap
ter
29
Chapter 29 Introduction to Dialog Control Language (DCL) AutoCAD and Its Applications—Advanced 744Copyright by Goodheart-Willcox Co., Inc.
Drawing Problems 1. Create a dialog box that contains the following items. Write the required DCL and
AutoLISP files.A. Title bar—Dialog Box TestB. Label—This is a test.C. Contains an OK button.
2. Create a dialog box that contains the following items. Write the required DCL and AutoLISP files.A. Title bar—DateB. Label—Current Date:C. Action button—Display Current DateD. Contains an OK button.
3. Create a dialog box that performs the following tasks. Write the required DCL and AutoLISP files.A. Displays the current date.B. Displays the current time.C. Contains buttons to display and update the current date and time.D. Displays the current drawing name.E. Contains an OK button.