Intro To The Online Grappling Concepts Course -...
13
Intro To The Online Grappling Concepts Course Hi there, I’m Stephan Kesting, and welcome to the online 'Grappling Concepts' course. Thank you for signing up. I’m really looking forward to working with you and coaching you. Every week for the next 26 weeks, I’ll send you an email with a link in it. That link will take you to a page, with your online video lesson Each lesson will be available to you in several formats so you’ll be able to absorb and study the material in the way that works best for you. Here are the formats of the lessons: 1. Streaming video on the site, 2. Downloadable iPod video format so you can put it on your portable video player, 3. Downloadable mp3 audio file, 4. Downloadable PDF (like the document you're reading now). The goal of these lessons is to show you and to help you understand and figure out how to use grappling concepts and grappling principles. You can look at grappling as a whole bunch of isolated techniques. In fact, that’s how most people start out, and a lot of people never actually get beyond that. They just have a technique for doing this, and a technique for doing that... But, if you start looking at the underlying concepts it helps you a lot. This is Lesson 1 from the Online Grappling Concepts Course: www.grapplearts.tv
Transcript of Intro To The Online Grappling Concepts Course -...

Intro To The Online Grappling Concepts Course
Hi there,
I’m Stephan Kesting, and welcome to the online 'Grappling Concepts' course. Thank you for signing up. I’m really looking forward to working with you and coaching you.
Every week for the next 26 weeks, I’ll send you an email with a link in it. That link will take you to a page, with your online video lesson
Each lesson will be available to you in several formats so you’ll be able to absorb and study the material in the way that works best for you.
Here are the formats of the lessons:
1. Streaming video on the site,2. Downloadable iPod video format so you can put it on your portable
video player,3. Downloadable mp3 audio file,4. Downloadable PDF (like the document you're reading now).
The goal of these lessons is to show you and to help you understand and figure out how to use grappling concepts and grappling principles.
You can look at grappling as a whole bunch of isolated techniques. In fact, that’s how most people start out, and a lot of people never actually get beyond that. They just have a technique for doing this, and a technique for doing that...
But, if you start looking at the underlying concepts it helps you a lot.
This is Lesson 1 from the Online Grappling Concepts Course: www.grapplearts.tv

First of all it will help you tune and tweak your techniques to be more effective.
And secondly, it will make it much, much easier to remember the techniques.
If a photo is worth a thousand words, then I think that a concept is worth a thousand techniques.
A long time ago, I read a book about kung fu (I think I was about 12 years old). I can’t remember the exact title and it doesn’t really matter anyway. But I DO remember that the author said something like “don’t show me any more techniques, show me the principles, and I’ll invent my own damn techniques.”
At the time, I was impressed by the wisdom of this advice. It seemed like a really good way to approach martial arts. In reality I didn’t have any idea of how to actualize it or how to make it concrete.
But, now after 30 years of training, I can show you how to apply these concepts directly to your grappling and I can show you how to use these concepts to organize your knowledge and it will make you a more effective grappler on the mat.
I'd like to thank you again for signing up. I'm very excited about sharing this material with you!
Stephan KestingGrapplearts.tv
This is Lesson 1 from the Online Grappling Concepts Course: www.grapplearts.tv
Technical and Administrative Details
If you have problems with the technical aspect of the website
• if your email changes,• if you’re having difficulty watching the videos,• if you want to change the terms of your subscription,• if you don't receive your 13 Techniques DVD and your Advanced
Techniques and Tactics DVDs.
Then PLEASE shoot me email via [email protected]
Grappling Concepts - Lesson 1Choking the Diaphragm
In our first concept we’re going to cover choking people by compressing the diaphragm. Cutting off the blood, and cutting off the air, to make someone submit is a bread and butter tactic in submission grappling and in most other grappling systems. But, you can also choke somebody from the diaphragm.
To understand how that works, we have to first look at a little bit of anatomy. Your lungs are up in your thoracic cavity, protected by your ribs. When you breathe in your lungs expand, your rib cage expands a bit, and air gets sucked in, but the main action is down here.
You have this big muscle called your diaphragm which is a slightly domed sheet of muscle; basically it comes through your solar plexus and goes from side to side.
The diaphragm separates all the stuff up here, your heart, lungs and so on, from basically your guts which are in your abdominal cavity.
This is Lesson 1 from the Online Grappling Concepts Course: www.grapplearts.tv
As this muscle contracts, it goes down, and it sucks air into your lungs,and that's about as far as we need to go anatomy-wise. The bottom line is that, if this area here gets compressed, then it's much harder to breathe.
If you restrict a person’s ability to breathe by contracting the rib cage or driving in on the diaphragm, you can begin to choke them.
It may only be a bit uncomfortable for your training partner if you're playing around with it NOT in sparring.
But when you’re sparring and they’re breathing very hard and you start contracting the diaphragm or the rib cage it takes its toll much faster, and they get into oxygen deficit much faster. This can very quickly bring the person to brink of exhaustion and beyond it.
How To Get Your Positioning Right
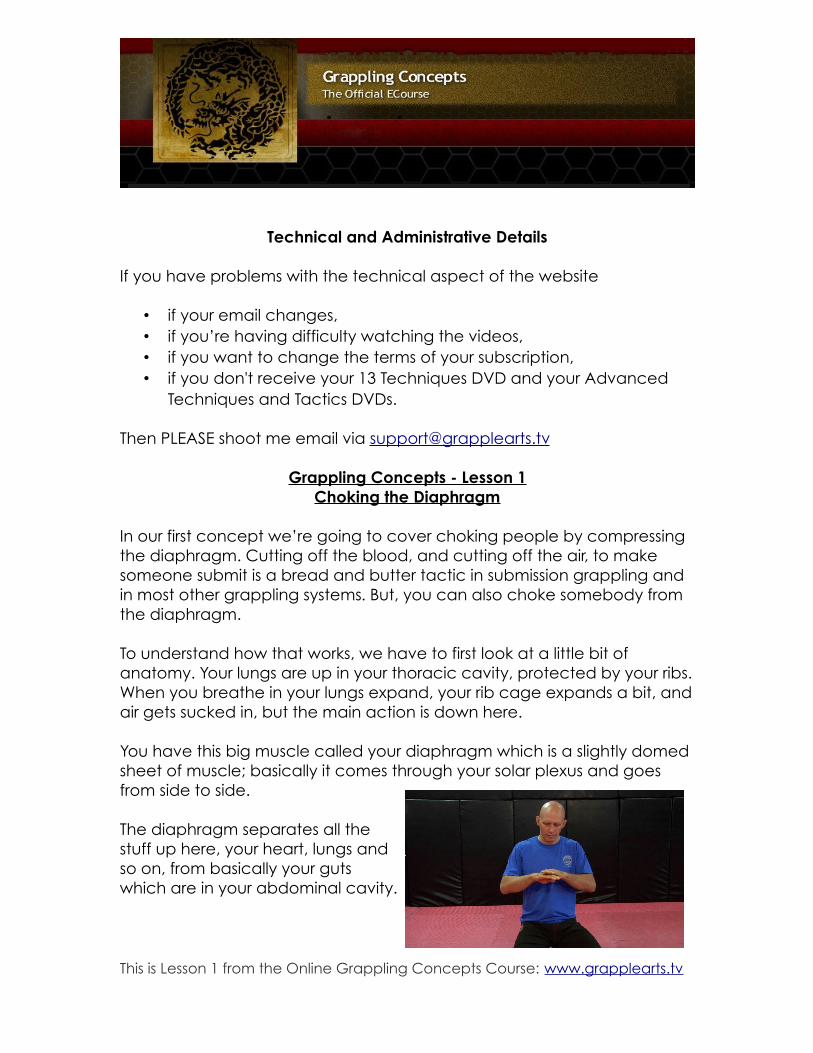
So at this point, I want to bring in a volunteer, this is Justin, he’s a friend of mine, training partner, a good guy, he’s agreed to come out and help us today.
With regards to choking somebody, at the diaphragm or the chest as opposed to the neck, here’s a simple way to figure out if your weight is being affective.
I'm going to ask Justin to go through the alphabet out loud: “A, B, C, D, etc.” When I put my weight on his belly, I hear a little bit of impeding of his talking- I can hear his voice change a little bit.
If I move my weight up onto the diaphragm (basically on his solar plexus) or his chest, then it works even better.
If I put the weight on the shoulder, or low on the stomach, then the
This is Lesson 1 from the Online Grappling Concepts Course: www.grapplearts.tv

effect of it isn't nearly as much as when I put it right on his diaphragm or solar plexus area.
So this is where I want to concentrate on - the diaphragm/solar plexus area. Any way that I can get more weight on there, the better.
Side Mount
With your basic Side Mount, I want my chest to be right on his breathing apparatus (lungs, ribs, diaphragm).
I’ll cover making yourself heavier in next week’s lesson, but for now just be aware of where you’re putting your weight.
If I want to attack his diaphragm specifically I can turn in a little bit, compressing the diaphragm with my ribcage, making it harder for his lungs to expand.
Kuzure Kesa Gatame
If I carry on the rotation further, I’m in “Kuzure Kesa Gatame”.
The key points of this position are the underhook on the far side, controlling the nearside arm, and switching your hips - the leg that was closest to his legs, has come through and is now closest to his head.
This is Lesson 1 from the Online Grappling Concepts Course: www.grapplearts.tv

Your head is slightly forward, you don’t want to have your head too far back where he can push you back. Take the sharp edge of your ribs, and use that to push down on his diaphragm.
Kuzure Kesa Gatame with Papercutter
Here's a trick that I learned from Erik Paulson, and I'm not sure where he got it from – Rigan Machado maybe.
Pick your opponent up a bit, and put the far arm around his back. and on the floor, right under his diaphragm.
Then you put the edge of your ribs on top of his body, just over his diaphragm, and drop your weight on down.
What I’m doing with the papercutter is putting a solid object (my arm) against the centre of his back applying pressure to his diaphragm and compressing it from both sides.
This does trap your farside arm in place sometimes, and if your weight is too far back it can get me rolled over, so don’t have your weight too far over your opponent's body.
When he's fresh like this it's a bit uncomfortable, but when he's really tired the papercutter position can be a submission in and of itself.
This is Lesson 1 from the Online Grappling Concepts Course: www.grapplearts.tv
If I'm sparring with someone and he's gasping for breath, especially if I smell cigarette smoke (because there are still grapplers who smoke) then I'm going to try this.
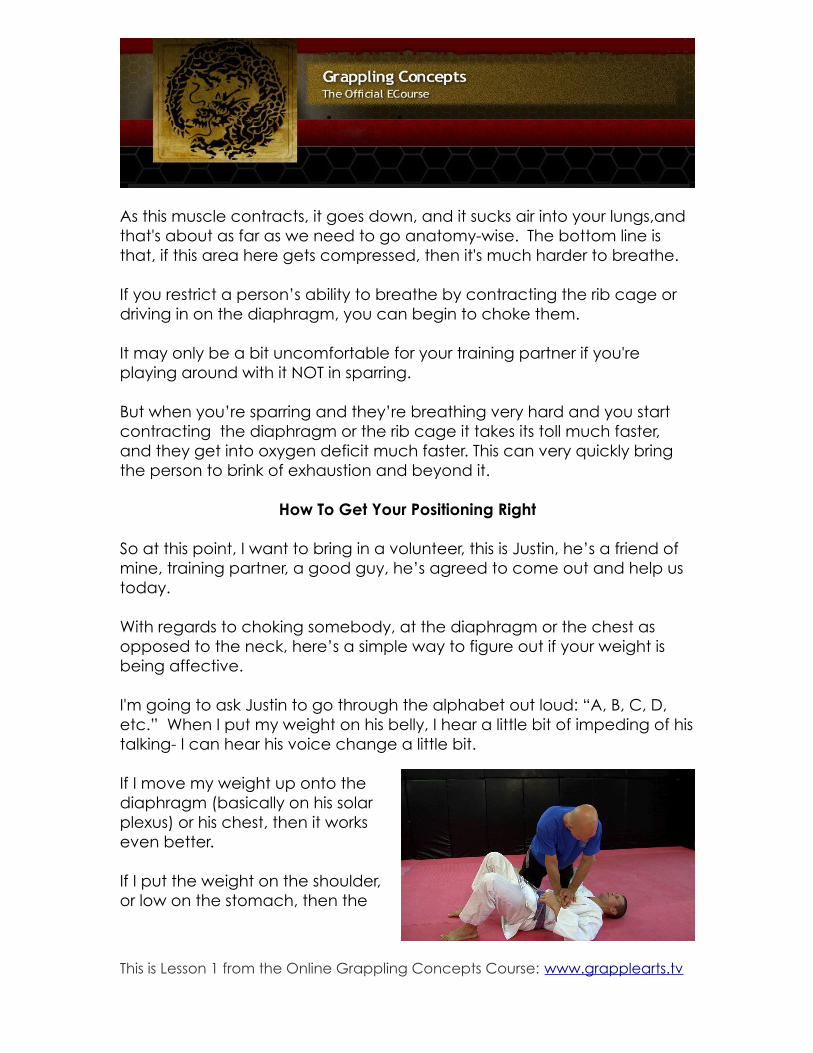
Kesa Gatame
If you take your farside arm out from being an underhook to around his head, now you're in Kesa Gatame.
From here I can put a lot of weight on the chest or the diaphragm, depending on where I am. You can tap someone just from weight on the chest. I know because it’s been done to me!
You can read more about Kesa Gatame online at the following url:http://www.grapplearts.com/unorthodox-bjj-positions.html
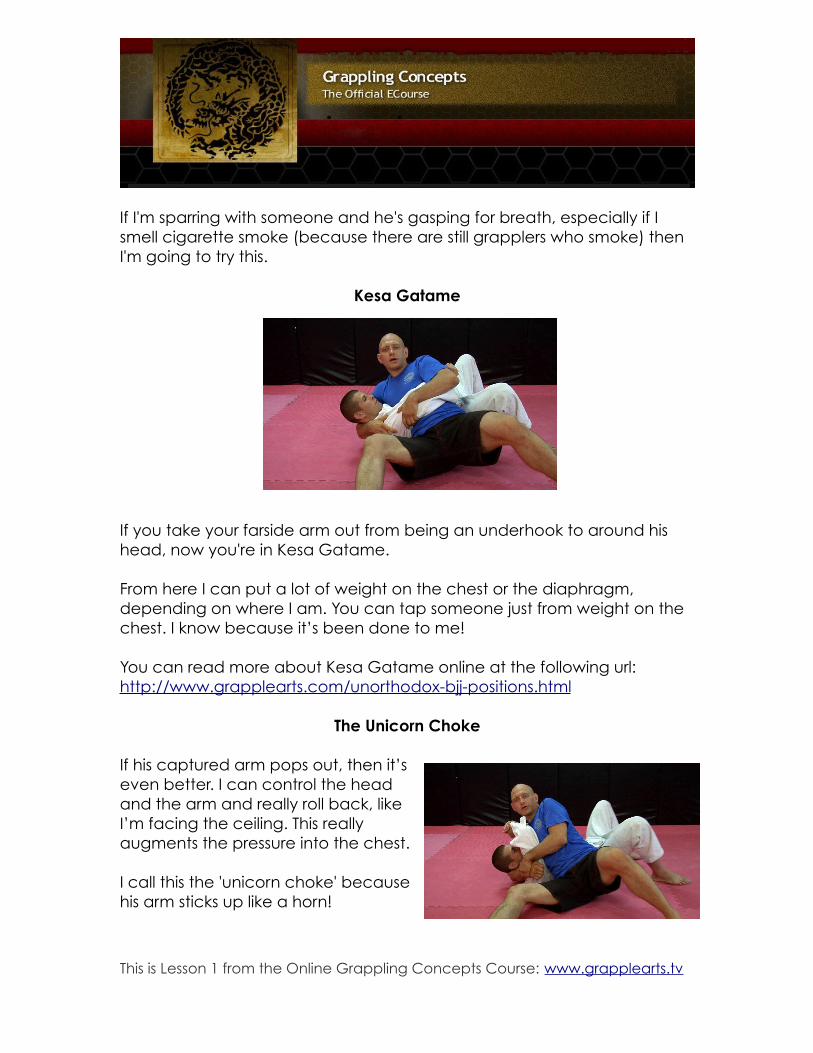
The Unicorn Choke
If his captured arm pops out, then it’s even better. I can control the head and the arm and really roll back, like I’m facing the ceiling. This really augments the pressure into the chest.
I call this the 'unicorn choke' because his arm sticks up like a horn!
This is Lesson 1 from the Online Grappling Concepts Course: www.grapplearts.tv

Knee Mount
This is the classic position for putting pressure on your opponent if he’s super defensive, and you can’t attack the neck and can’t attack the arms.
You can do this with or without the gi: it’s the same principle.
You’re putting one knee on his body and the other foot on the ground, and this puts enough pressure on him to force him to move. You’ve got a variety of options on where to place the knee.
If your opponent has super-long gumby legs that he wants to bring into play and entangle me then I definitely want to avoid any chance of that. In this case I may put my whole shin low on his belly, at his belt level, limiting his lower body movement, and keeps his legs away from me. The only negative is that this doesn’t put too much pressure on his breathing apparatus.
Leg position options:• low across his hips, • across his belly, • on his solar plex (basically his diaphragm)• even his chest (although that becomes quite dangerous and you
can crack his sternum, break ribs, etc.)
So if you want to put maximum pressure on him breathing wise, then consider putting your knee right into his solar plex cause that will really affect the diaphragm, plus it’s very painful.
This is Lesson 1 from the Online Grappling Concepts Course: www.grapplearts.tv

Especially if he’s breathing hard, the Knee Mount is really going to cut into his ability to breathe. When this happens he might do something stupid and give you a submission.
Here’s a couple of tricks/techniques that you can do to focus your weight on the diaphragm.
Side Mount with Forearm Pressure
If you have the farside underhook with your hand cupping his far deltoid, you can drop your forearm across the solar plexus right along the line of the diaphragm and shift your weight back while supporting yourself entirely on his chest.
In order to be clear, I'm showing it here on my knees, but in real life you'd want to be sprawling your legs back and putting a ton of pressure onto him with your arm.
You're putting all your weight onto him, and it's the forearm that pins him and compresses the diaphragm.
Double Forearm Mount
Another thing that both my jiu-jitsu coach Marcus Soares AND my friend the UFC fighter Denis Kang like to do, is press with one forearm into the chest while the other forearm is controlling the head and turning it away.
From here both hands cup the far shoulder, and you can drop a lot of weight down on your opponent! It’s uncomfortable because of the weight on the diaphragm, but also
This is Lesson 1 from the Online Grappling Concepts Course: www.grapplearts.tv

because you’re putting a lot of pressure on his face and neck.
In an MMA application you can also drop elbows/forearms on his face from here! In BJJ you can't hit him, but it still gets him to react fast!
S Mount
Another top position that really cuts into your opponent's ability to breathe is the S Mount.
If I’m in Full Mount and want to go to S Mount, I bring up one knee, and get it level with the top of his head. I pick up his other elbow, and my heel comes up towards my knee. I come under the head, and grab my own shin or instep.
Different people set it up different ways – but this is the way I like to do S Mount. I'm putting all of my weight onto his diaphragm with my thigh.
He’s in a bad position and it hurts, so he might do something stupid like trying to get out by pushing you away, and giving you an arm. So in this case, you can use the diaphragm choke to set up the arm bar.
Rear Mount
Another way that you can think of this is that if I’ve got him in Rear Mount, it’s almost always better if he’s face down because then I can put all of my weight on to him.
One way that I can get him face down is to control the cross wrist or cross sleeve. Then I use my other hand to push his arm across.
This is Lesson 1 from the Online Grappling Concepts Course: www.grapplearts.tv

Now take the opposite hook out, and roll him towards his trapped arm. And before we hit the ground, I put that hook back in.
And now, his arm still stays trapped in front of him, which makes it easier to get my hands in to choke, but also, if I drive my hips down it’s going to make it even more difficult for him to breathe.
It’s bad enough for him to be Rear Mounted and having a guy put his weight down on you, but if you put a solid object in his solar plexus, in this case, it's the elbow of his own arm, then it's REALLY uncomfortable!
For the choke, I’m going to come in on the side of his free arm. If I come the other way, he can still use his one free arm to block it. You can finish with the RNC, or the short choke. The important component of this is once again, pressure on the diaphragm.
Body Triangle from Rear Mount
In you're in Rear Mount in a belly up orientation, then here's another option for the guy who has long, flexible legs. He can use his legs to apply a body triangle.
If he squeezes with his legs, then it cuts into my ability to breathe.
This is Lesson 1 from the Online Grappling Concepts Course: www.grapplearts.tv

His leg is technically below my diaphragm, not on my diaphragm, but his legs are so powerful that if he squeezes in it really begins to affect my breathing.
I have to give you a warning about the body triangle: only do this if you have long and flexible legs.
About 5 yeas ago I was putting this on someone, I got it locked in and it was pretty tight I was attacking his neck but then we rolled towards my feet, and he bridged, my triangled leg got rolled outward into an outward heel hook and damaged my knee for quite some time.
So really! Don’t use the body triangle from Rear Mount unless your opponent’s torso is really small or your legs are really long. But, if it fits your body type, it’s a great way to choke the diaphragm.
Summary
To recap• We started with the concept you can choke someone at the neck
or the diaphragm. • We looked at the anatomy of the diaphragm, and how that moves
in and out of your lungs. • We looked at some specific ways to cut into that ability to breath
by attacking the diaphragm.
To get this right requires a bit of sensitivity on your part because you have to feel where to put your weight.
Listening to your opponents' breathing is important because as he breathes in and out you can hear how labored it is and that will help you to make the small minute adjustments to get your arm, ribs or knee into the right place for you and the wrong place for him.
This is Lesson 1 from the Online Grappling Concepts Course: www.grapplearts.tv
And as soon as you get it right, your opponent will instantly start feeling miserable and will probably do something stupid to get out of it. Some guys will even have such difficulty breathing that they’ll just give you the arm, neck or leg and you can finish the fight that way.
Thank you very much and I’ll see you in the next lesson.
Lesson 2 Preview: If you liked today’s lesson on where to put your weight, then our next lesson will help you even more.
Next week I'll show you the techniques, concepts and principles that literally make yourself heavier on your opponent. Combine this with what you've learned today and you'll crush your opposition, even if you don’t have a lot of body weight to start with.
This is some really cool stuff and I think it will be very useful to you!
See you then.
Stephan Kestingwww.grapplearts.tv
This is Lesson 1 from the Online Grappling Concepts Course: www.grapplearts.tv