GRAPPLING CONCEPTS LESSON 11 ABC (Attack by...
27
GRAPPLING CONCEPTS LESSON 11 ABC (Attack by Combination) Welcome to week 11 of the Grappling Concepts Course. Today we’re dealing with ABC - Attack By Combination. That was Bruce Lee’s old term for stringing together multiple attacks into a sequence. Bruce Lee used it in relation to stand-up fighting, but it applies just as well to grappling. Let’s say I catch my opponent in a submission during a scramble. To an observer, it may seem like I’m moving really, really fast and have super-quick reaction time. But the reality is that I don’t – I'm not actually very fast - so, what is it that’s making me look fast What’s actually happening in those situations is that I’ve thought about my attack and what my opponent’s response will be ahead of time. I’ll set it up so that by escaping from my first submission, he’ll run right into my second submission. It’s not that I’m super-duper fast, he’s just going where I expect him to go. This is the reason that you should string your attacks together. For every attack - whether it’s an armbar, choke, or whatever - there are a limited number of responses. For example, if you attack with an armbar, there’s probably an 80% chance that your opponent will probably do one of a few things: • link his hands together, or • use the the hitchhiker escape, or • block your leg from coming over his face, or • try to stack and crush you. This is Lesson 11 from the Online Grappling Concepts Course: www.grapplearts.tv
Transcript of GRAPPLING CONCEPTS LESSON 11 ABC (Attack by...

GRAPPLING CONCEPTS LESSON 11ABC (Attack by Combination)
Welcome to week 11 of the Grappling Concepts Course. Today we’re dealing with ABC - Attack By Combination. That was Bruce Lee’s old term for stringing together multiple attacks into a sequence. Bruce Lee used it in relation to stand-up fighting, but it applies just as well to grappling.
Let’s say I catch my opponent in a submission during a scramble. To an observer, it may seem like I’m moving really, really fast and have super-quick reaction time. But the reality is that I don’t – I'm not actually very fast - so, what is it that’s making me look fast
What’s actually happening in those situations is that I’ve thought about my attack and what my opponent’s response will be ahead of time. I’ll set it up so that by escaping from my first submission, he’ll run right into my second submission. It’s not that I’m super-duper fast, he’s just going where I expect him to go. This is the reason that you should string your attacks together.
For every attack - whether it’s an armbar, choke, or whatever - there are a limited number of responses. For example, if you attack with an armbar, there’s probably an 80% chance that your opponent will probably do one of a few things:
• link his hands together, or• use the the hitchhiker escape, or• block your leg from coming over his face, or• try to stack and crush you.
This is Lesson 11 from the Online Grappling Concepts Course: www.grapplearts.tv
If you’re aware of these things and plan your attacks in combination, then you’ll be ready to react and to respond to whatever he throws at you.
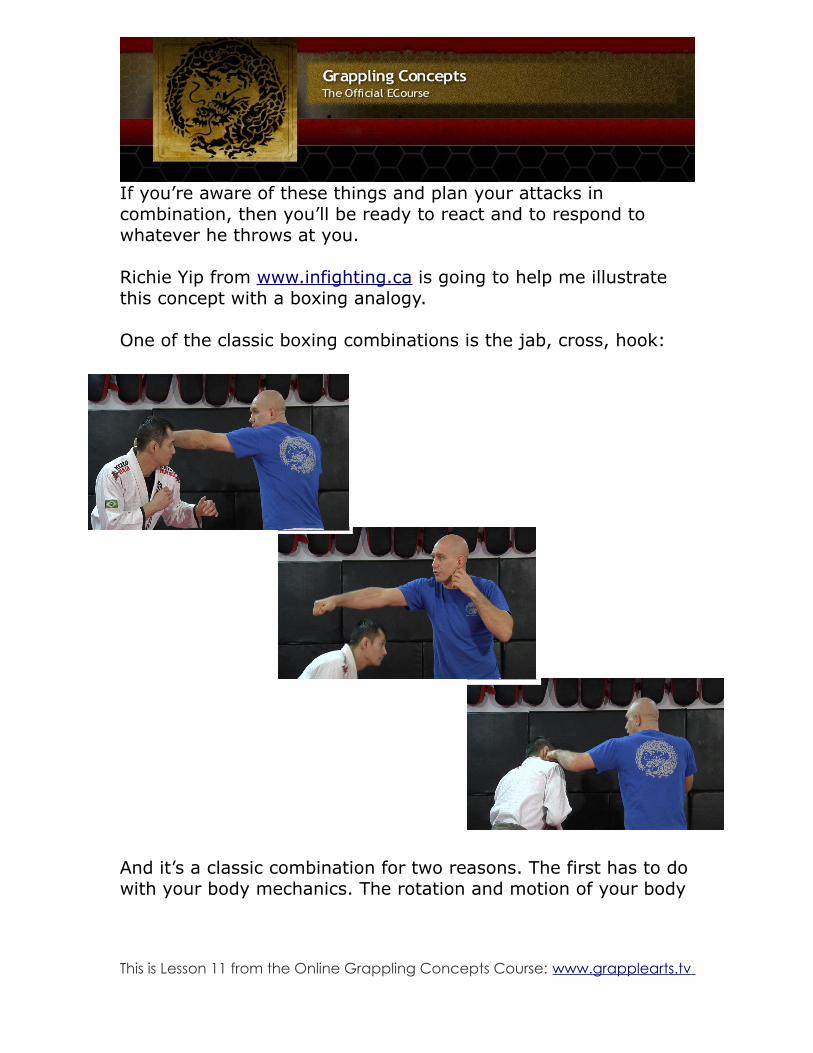
Richie Yip from www.infighting.ca is going to help me illustrate this concept with a boxing analogy.
One of the classic boxing combinations is the jab, cross, hook:
And it’s a classic combination for two reasons. The first has to do with your body mechanics. The rotation and motion of your body
This is Lesson 11 from the Online Grappling Concepts Course: www.grapplearts.tv

when you throw the jab puts your body in a strong position to throw a powerful cross, which, similarly, sets you up to throw a powerful hook. The attacks flow naturally from one to the next.
The second reason is that the combination takes advantage of your opponent’s probable reactions. A boxer will commonly respond to this combination by slipping the jab to the outside, then bobbing and weaving around the cross, which puts him right where your hook is going to land.
So you can see that by stringing your attacks together in combination, you’ll increase your chances of hitting him and landing a powerful shot.
The exact same principle applies on the ground. In a well-planned combination, the motions will feel natural and each attack will set up the next by causing your opponent to react in a way that puts him in position for that next attack.
Now I’ll demonstrate how this works by leading you through some examples and, more importantly, going over some specific training methods. Integrate these drills into your training and before you know it, you’ll be flowing from attack to attack during sparring and competition.
TRAINING METHOD NUMBER ONE:PRACTICING SUBMISSION COMBINATIONS
The simplest way to improve your combination attacks is to train your submissions in a chained-together manner. Don't do submission one, pause and reset, and then do submission number two. This would be like doing a jab......... cross......... hook. Instead you want your attacks to flow together (jab, cross, hook) so make sure you train them that way!
This is Lesson 11 from the Online Grappling Concepts Course: www.grapplearts.tv

Here’s an example attack of an attack series from the mount position – train it so that you're going from attack to attack to attack, without any lengthy pauses.
SAMPLE SUBMISSION COMBINATION NUMBER 1
From the mount I attack Richie’s left arm with a V-armlock.
Richie defends by grabbing his left wrist with his right hand.
I slide my left knee up and flip my right leg so that my foot comes near his head in a transitional 'S-mount' position.
I swing my leg across, and sit back for an armbar on his right arm. He counters by grabbing his right wrist with his left hand.
This is Lesson 11 from the Online Grappling Concepts Course: www.grapplearts.tv

I defeat his counter by attacking his right wrist with a wristlock...
…which causes him to straighten his arm allowing me to finish with the straight armlock.
These four submissions form a natural combination. His response to each attack sets me up for my next attack.
SAMPLE SUBMISSION COMBINATION NUMBER 2
Here’s another example of a classic upper-body to lower-body attack combo that works really well.
I start with Ritchie in my guard...
…and attack his right arm with the straight armbar
This is Lesson 11 from the Online Grappling Concepts Course: www.grapplearts.tv

As part of his defense against the armbar, Ritchie stands up. I underhook his left leg with my right arm...
…and as he pulls his right arm out I swivel, bring my hips up, wrap his left leg with my legs, and go for a kneebar on his left leg.
He falls down backwards but counters the kneebar by triangling his legs.
To finish the combination attack I apply a toehold on his right foot.
This is Lesson 11 from the Online Grappling Concepts Course: www.grapplearts.tv
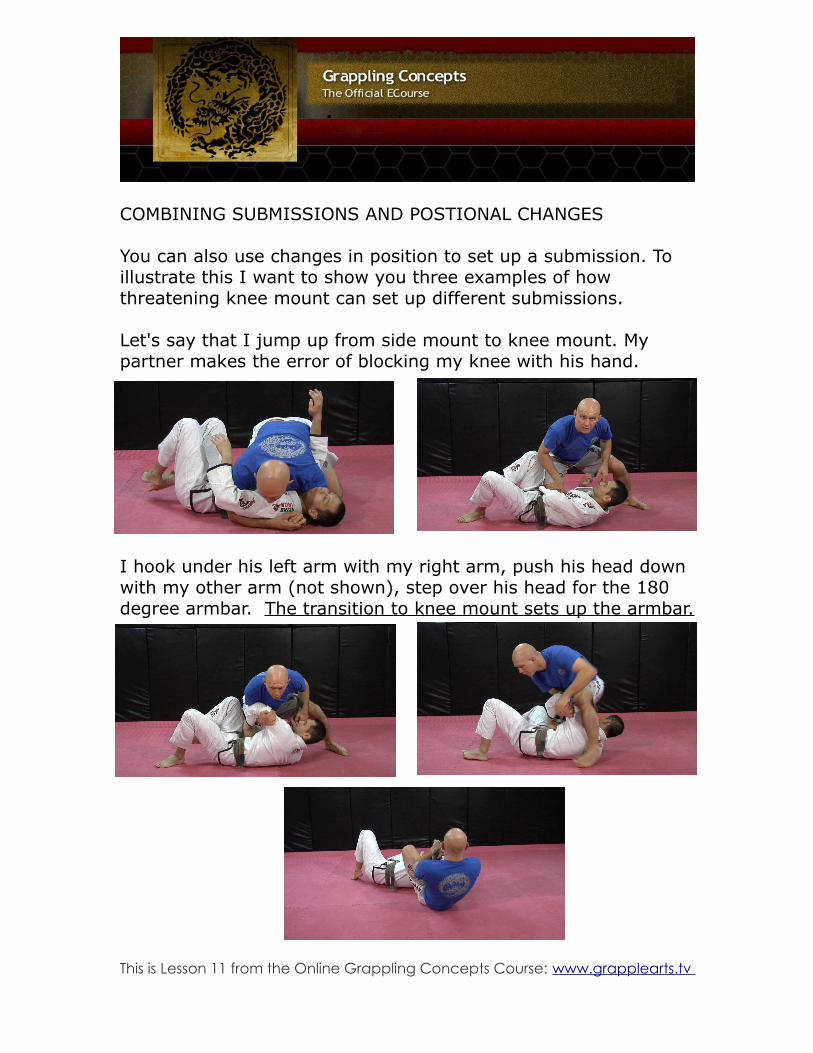
COMBINING SUBMISSIONS AND POSTIONAL CHANGES
You can also use changes in position to set up a submission. To illustrate this I want to show you three examples of how threatening knee mount can set up different submissions.
Let's say that I jump up from side mount to knee mount. My partner makes the error of blocking my knee with his hand.
I hook under his left arm with my right arm, push his head down with my other arm (not shown), step over his head for the 180 degree armbar. The transition to knee mount sets up the armbar.
This is Lesson 11 from the Online Grappling Concepts Course: www.grapplearts.tv
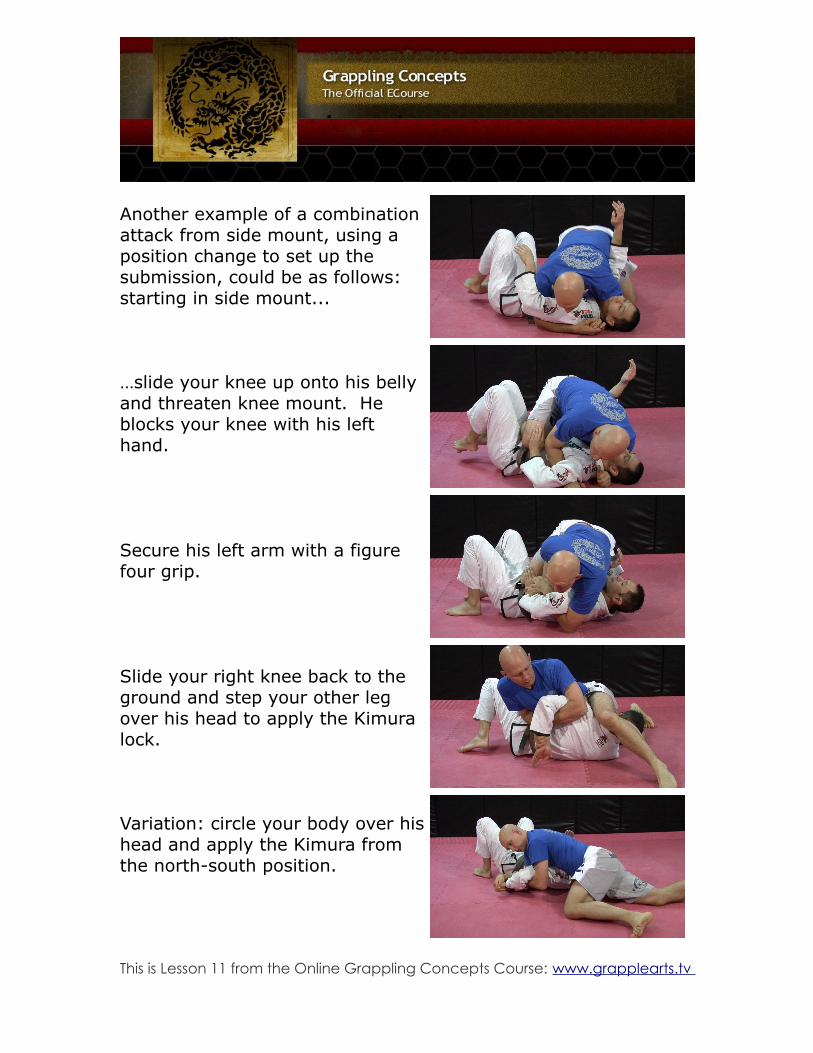
Another example of a combination attack from side mount, using a position change to set up the submission, could be as follows: starting in side mount...
…slide your knee up onto his belly and threaten knee mount. He blocks your knee with his left hand.
Secure his left arm with a figure four grip.
Slide your right knee back to the ground and step your other leg over his head to apply the Kimura lock.
Variation: circle your body over his head and apply the Kimura from the north-south position.
This is Lesson 11 from the Online Grappling Concepts Course: www.grapplearts.tv

And here's one more example of using the knee mount as part of a combination attack. Start in side mount with your left knee tight under his right shoulder and your left forearm under his head
Just as before, move your knee onto his belly, which he blocks with his left hand.
Pin his left wrist to his belly and drop your right knee back to the ground so that there’s a bit of space between your right knee and his arm
In one big motion swing your right leg over his body, bringing it to your left arm which has been waiting to catch it, still under his head.
From here you can step over his head to apply an armlock with his right arm trapped in your armpit (move very slowly – this is POWERFUL and it comes on quick), or...
This is Lesson 11 from the Online Grappling Concepts Course: www.grapplearts.tv

…or instead of the armbar, you can roll forwards, which sets you up for....
…the triangle choke (remember to adjust it to make it tighter before you try to finish with it).
So we've just covered three examples of how using the knee mount and threatening to go to full mount can get your opponent to react in a way that gives you three different submissions: the armbar, the Kimura and the triangle choke. These are all examples of ABC, or attack by combination.
TRAINING METHOD NUMBER TWO:LOCKFLOWS
The second training method we’re going to talk about today is lockflows. I was introduced to lockflows in the early ‘90s by Dan Inosanto when he started teaching shoot wrestling, an early form of MMA from Japan.
Lockflow training involves linking submissions together into something that’s almost like a two-person kata. For example, in lockflow number one, you might start in side mount, go for a
This is Lesson 11 from the Online Grappling Concepts Course: www.grapplearts.tv
Kimura, then a wrist lock, then an Americana, then another wristlock, another wristlock, a choke, etc.
This kind of training is effective for two reasons.
First it gives you an inventory of all the submissions. And secondly, it’s much easier to remember those submissions when they’re linked together than if they’re divided into a bunch of separate techniques.
Here’s an analogy for you - what’s easier to remember: a logical sentence like “Mary had a little lamb” or a random jumble of words like “lamb Mary had little a”? Having the words put together into a logical sentence makes them much easier to remember.
It’s the same with submissions. If you train them in a lockflow, you’ll have an easier time remembering them and you’ll learn some cool transitions en route.
For lockflows I also have to give credit to a guy named Bob Reish, who has trained in traditional Japanese jujitsu, shoot wrestling, Indonesian silat, and bunch of other martial arts.
The first time I met Bob, he showed me a cool lockflow of about 20 or 22 locks in a standing position that looked a lot like traditional Japanese ju-jitsu. The next time I trained with him, he’d expanded to about 60 techniques. Later he expanded it to more than 300 moves and had included a whole bunch of submissions on the ground. So, thank you Bob!
But don’t think that you have to learn these specific lock flows. Try putting the attacks you know together into your own lockflow - or ask your instructor to help you. To get you started I'll give you a couple of examples though...
This is Lesson 11 from the Online Grappling Concepts Course: www.grapplearts.tv
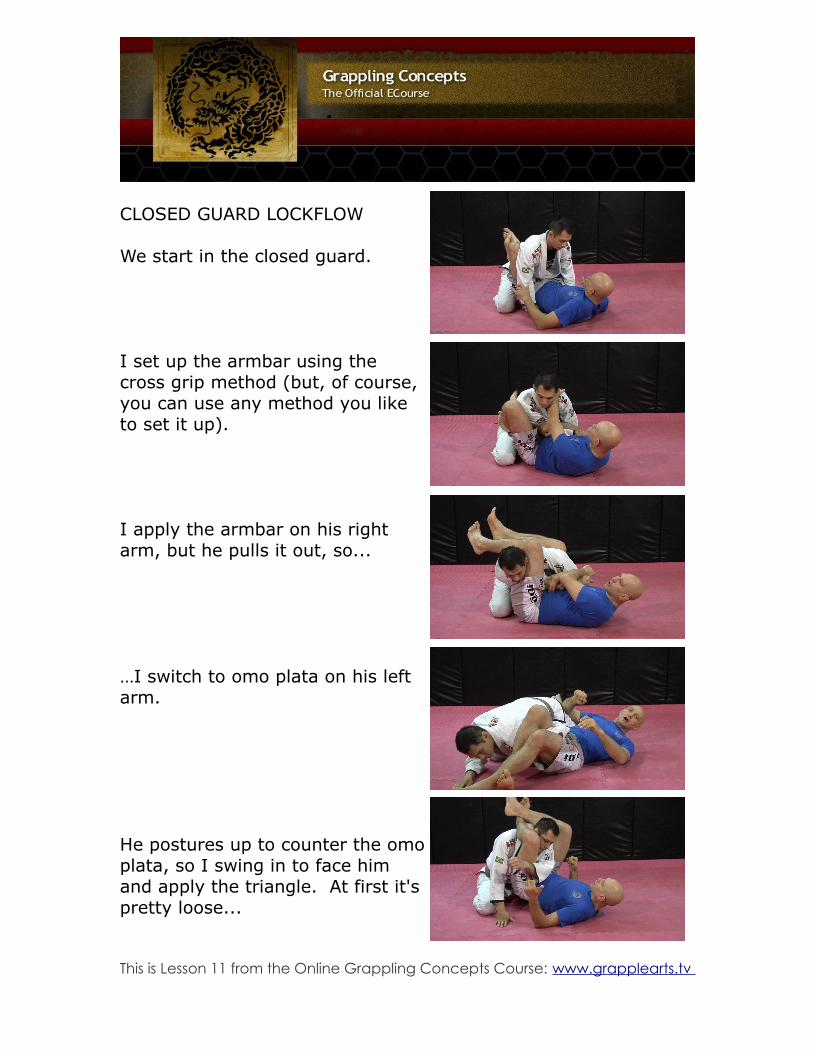
CLOSED GUARD LOCKFLOW
We start in the closed guard.
I set up the armbar using the cross grip method (but, of course, you can use any method you like to set it up).
I apply the armbar on his right arm, but he pulls it out, so...
…I switch to omo plata on his left arm.
He postures up to counter the omo plata, so I swing in to face him and apply the triangle. At first it's pretty loose...
This is Lesson 11 from the Online Grappling Concepts Course: www.grapplearts.tv

…but I tighten it by grabbing the back of his head, scooting backwards and adjusting my legs for the proper triangle choke position.
For the next submission I capture his left arm and arch my hips to apply a triangle armbar.
Next I grab his left hand with my right and apply a figure-four grip compression wristlock.
I then switch hands and apply another compressive wristlock to his left hand.
Keeping the same hand grips (and still keeping my legs triangled) I bring my arms to my right to apply the V-armlock.
This is Lesson 11 from the Online Grappling Concepts Course: www.grapplearts.tv

I then switch to a variation of the triangle choke by bringing my left arm under his right armpit, clasping my hands, and squeezing my legs.
Triangle variation, second angle.
The final move in this series is to step my right leg over his head and apply the armbar.
Final armbar, second angle.
This is Lesson 11 from the Online Grappling Concepts Course: www.grapplearts.tv

LEGLOCK LOCKFLOW
Here is another short lockflow that combines several common and effective leglocks.
Be careful with these leglocks!!! This lockflow includes several rotational leglocks, which will definitely shred your partner’s knee or ankle if you apply them hard. Rotational leglocks often cause damage before the pain kicks in, so don’t wait for pain before tapping to a leglock!
I start in Richie’s guard.
I push his left knee down with my right hand and fall to my right while popping my right knee across his left thigh...
…and end up up in the basic leglocking position with his right leg entangled by my legs.
This is Lesson 11 from the Online Grappling Concepts Course: www.grapplearts.tv

I shrimp my hips back to create room for my right arm to circle his right ankle
Then I adjust my arms and apply a straight ankle-lock. (Note: there are different grips for the ankle lock, use whichever you feel most comfortable with.)
I maintain control his ankle with my right hand, while I reposition my left arm...
…to trap his heel with my wrist, link my hands, and apply a heel hook.
I apply a second heel hook variation by cupping his heel with my right hand, holding my own forearm with my left handand twist to my right.
This is Lesson 11 from the Online Grappling Concepts Course: www.grapplearts.tv
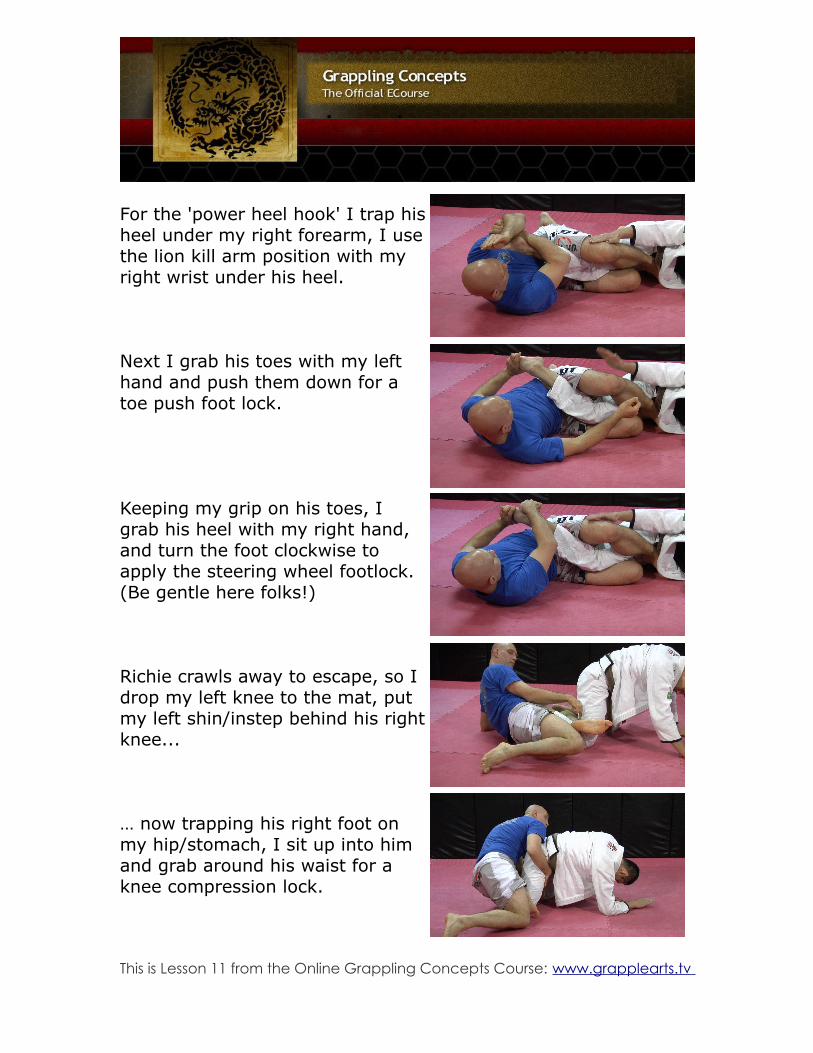
For the 'power heel hook' I trap his heel under my right forearm, I use the lion kill arm position with my right wrist under his heel.
Next I grab his toes with my left hand and push them down for a toe push foot lock.
Keeping my grip on his toes, I grab his heel with my right hand, and turn the foot clockwise to apply the steering wheel footlock. (Be gentle here folks!)
Richie crawls away to escape, so I drop my left knee to the mat, put my left shin/instep behind his right knee...
… now trapping his right foot on my hip/stomach, I sit up into him and grab around his waist for a knee compression lock.
This is Lesson 11 from the Online Grappling Concepts Course: www.grapplearts.tv

He kicks away, so I shoot my hips in under his right thigh, triangle my legs and apply a knee bar.
So that’s two examples of how you might construct a lockflow. There’s no magic number of techniques. The longest one I’ve ever seen had over 300 moves, and anything shorter than 4 or 5 moves probably means that you’re just practicing techniques in combination.
And one last note about lockflows...
Some people train lockflows and think that they’ll use all the attacks in a sparring session or in competition. That’s the wrong idea.
Lockflows are a training method - like pushups. You won’t run through a whole lockflow series during sparring any more than you’ll use a pushup-type motion to push your opponent over. You do pushups to strengthen your chest, arms and shoulders, and you practice lockflows to teach you to smoothly transition between techniques.
In real life, you won’t use all of those nine different leglocks one after another. For example, you might start with the basic ankle lock and switch to a heel hook. Or maybe your toe push isn’t working so you switch to the steering wheel.
This is Lesson 11 from the Online Grappling Concepts Course: www.grapplearts.tv

TRAINING METHOD NUMBER THREE:CYCLE DRILLS
A third method for training attacking by combination is cycle drills. I’m going to show you a couple of my favorites here (and I’ve included another favorite on the Advanced Techniques and Tactics DVDs).
Keep in mind that the goal is for you to make up your own cycle drills. It’s a really valuable process to spend time experimenting and figuring out which moves flow together nicely.
Cycle drill training can go a lot of different places. You can have:• one person doing all the attacks• one person attacking and the other countering• both people attacking and countering in turn.
V-ARMLOCK TO ARMBAR CYCLE DRILL
This is a great drill that I stole from Richie. It’s just two attacks linked together, but it really trains the transitions between the two.
First, from side mount I attack Richie’s left arm with a V-armlock.
This is Lesson 11 from the Online Grappling Concepts Course: www.grapplearts.tv
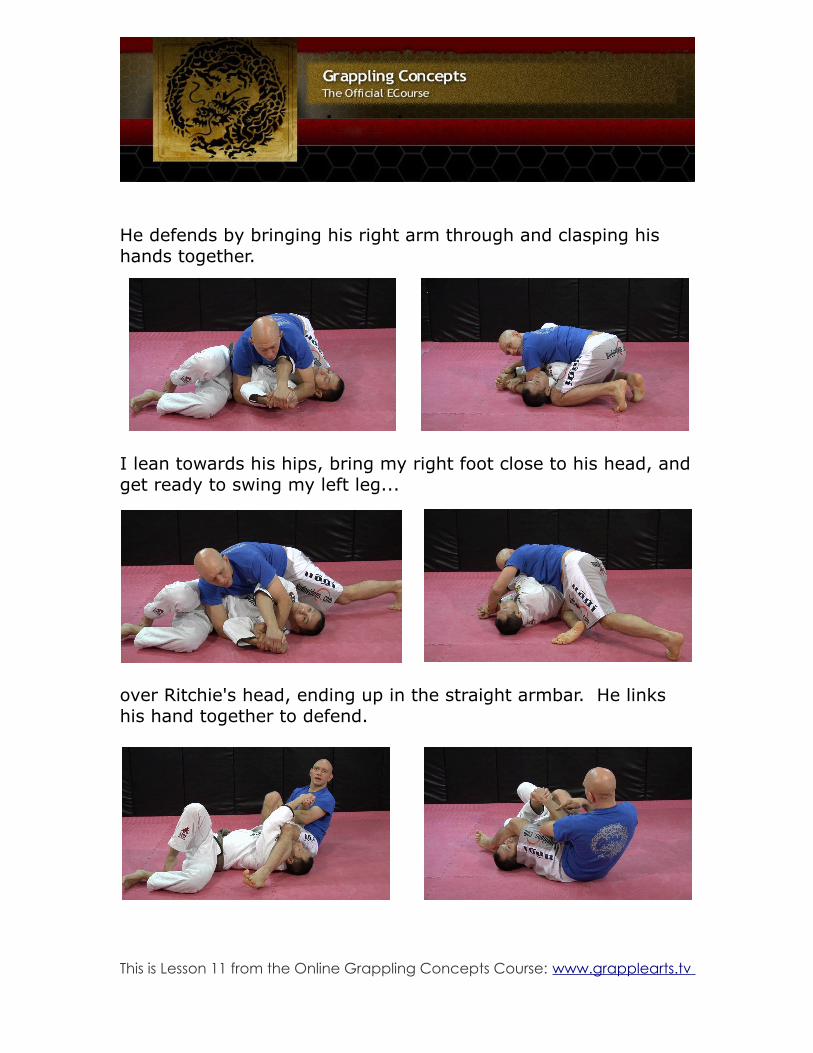
He defends by bringing his right arm through and clasping his hands together.
I lean towards his hips, bring my right foot close to his head, and get ready to swing my left leg...
over Ritchie's head, ending up in the straight armbar. He links his hand together to defend.
This is Lesson 11 from the Online Grappling Concepts Course: www.grapplearts.tv
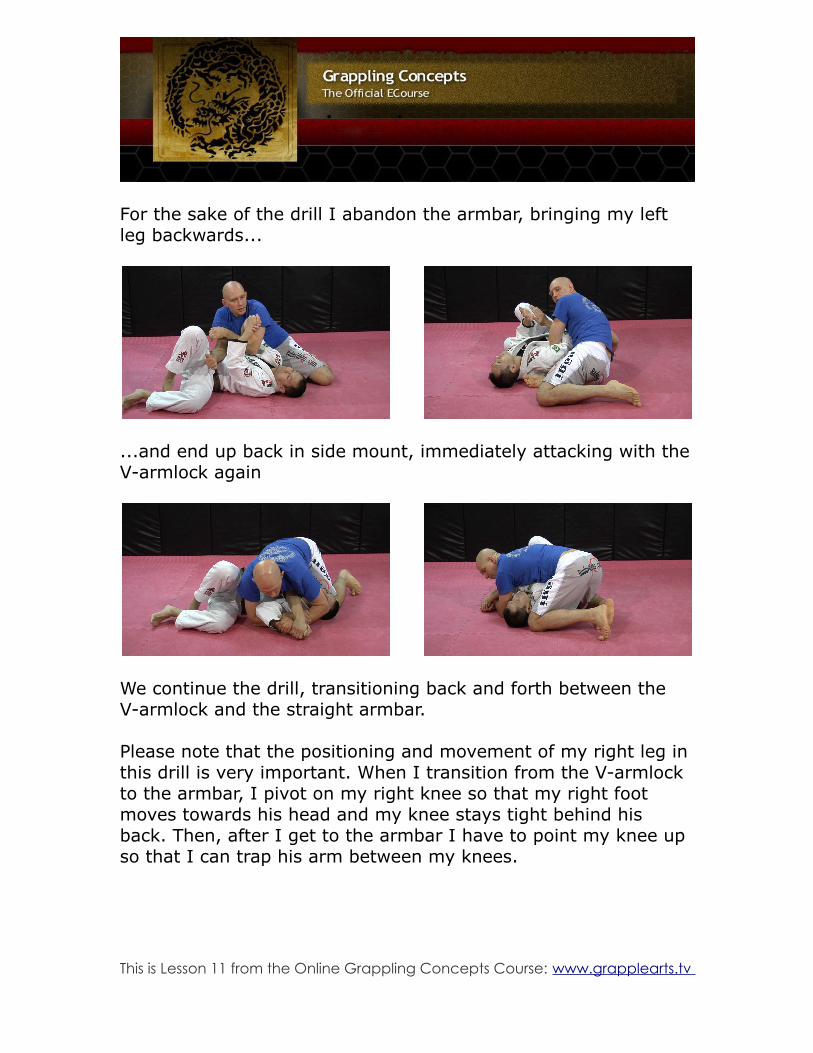
For the sake of the drill I abandon the armbar, bringing my left leg backwards...
...and end up back in side mount, immediately attacking with the V-armlock again
We continue the drill, transitioning back and forth between the V-armlock and the straight armbar.
Please note that the positioning and movement of my right leg in this drill is very important. When I transition from the V-armlock to the armbar, I pivot on my right knee so that my right foot moves towards his head and my knee stays tight behind his back. Then, after I get to the armbar I have to point my knee up so that I can trap his arm between my knees.
This is Lesson 11 from the Online Grappling Concepts Course: www.grapplearts.tv

The movements trained in the V-Armlock to Armbar Cycle Drill are very useful, in part because one of those motions can be used to abandon ship from an unsuccessful armbar attempt. If you’re trying to finish an armbar and you feel like your opponent is going to get out and crush and stack you, then swinging your leg off of him enables you to get out and regain side control.
ERIK PAULSON SIDE TRIANGLE CYCLE DRILL
The next cycle drill, like much of my best stuff, is heavily inspired by Erik Paulson.
Start in knee mount.
Underhook your partner's left (far) arm with your right, push his face down with your left arm...
...and step over his head, spinning to the armbar. He he defends by linking his hands together (for the drill you may want to fully apply the armbar, then let him link his hands).
This is Lesson 11 from the Online Grappling Concepts Course: www.grapplearts.tv
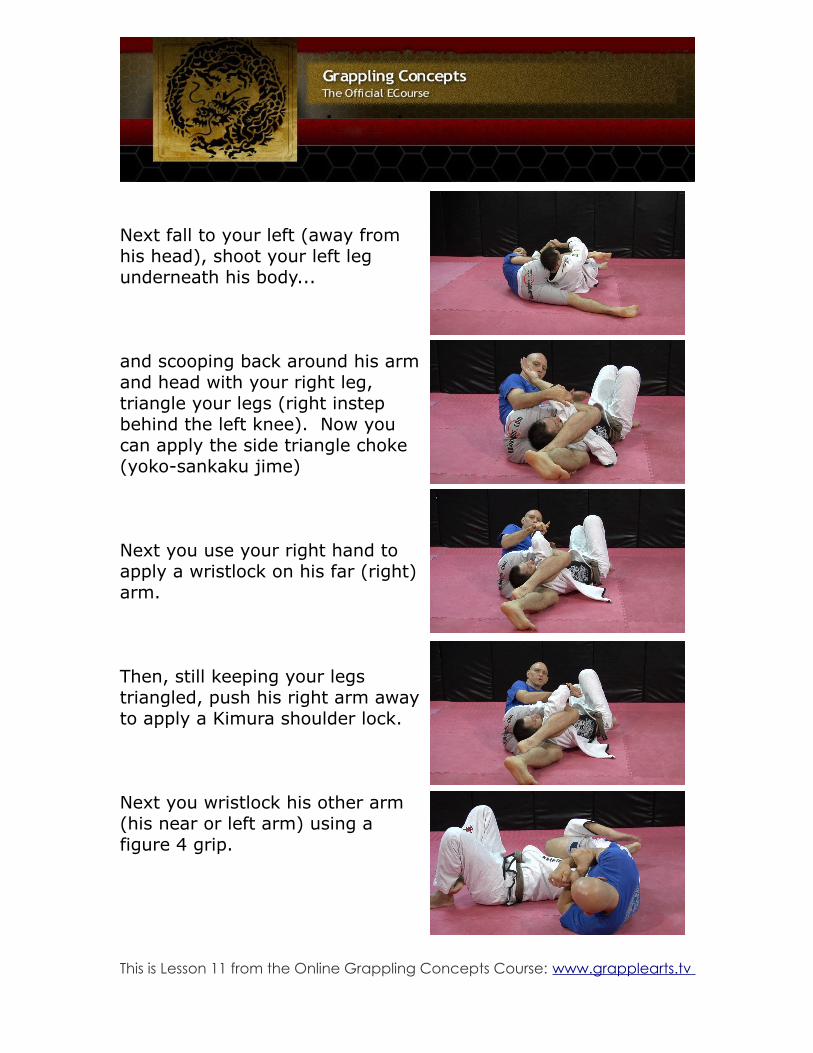
Next fall to your left (away from his head), shoot your left leg underneath his body...
and scooping back around his arm and head with your right leg, triangle your legs (right instep behind the left knee). Now you can apply the side triangle choke (yoko-sankaku jime)
Next you use your right hand to apply a wristlock on his far (right) arm.
Then, still keeping your legs triangled, push his right arm away to apply a Kimura shoulder lock.
Next you wristlock his other arm (his near or left arm) using a figure 4 grip.
This is Lesson 11 from the Online Grappling Concepts Course: www.grapplearts.tv

Finally you move up onto your knees and apply a Kimura on his left arm (uncrossing your ankles for stability)
You can repeat the drill again by stepping up with your left leg, turning clockwise, and sitting back for the armbar (which was the first move in the drill.
SIDE TRIANGLE CYCLE DRILL DETAILS
Detail 1: the armbar. For this drill, I have to do the armbar with my foot in Richie’s armpit. Otherwise the positioning for the subsequent submissions will be wrong and they won't work.
Detail 2. armbar to triangle transition: If your opponent is trying to sit up, you can switch directly to the triangle.
If he’s laying down flat, however, reach across and control his far elbow to keep everything tight during the switch and to make sure that your legs end up in the right place.
This is Lesson 11 from the Online Grappling Concepts Course: www.grapplearts.tv

Detail 3: leg positioning in yoko sankaku jime. For this choke to work your bottom leg must be across the back of your opponent's neck - sort of like a chopping block. You DON'T want your leg to come across your opponent's mid back (doing it this way is a very common mistake).
Often when you first get into the choke your leg is in the wrong place, so you have to twist your hips slightly to get my thigh in the right place.
Incorrect leg location Correct leg location
CYCLE DRILL SUMMARY
Try setting a timer for three minutes and going back and forth with your partner. If you’re moving at a good speed, you’ll probably do over one hundred submissions in those three minutes. How many other training methods get you through 100+ submissions in a few minutes and give you a good cardio burn in the process?
Also, don’t make the mistake of saying that drilling is fighting. This is a training method. Remember the pushup analogy. You don’t do cycle drills so that you can submit one guy 200 times. You do them so that you’ll be able to submit one guy once using one or two moves.
This is Lesson 11 from the Online Grappling Concepts Course: www.grapplearts.tv

ADDITIONAL RESOURCES
Just in case you're interested in getting some additional ideas for your lockflow training, here here are some additional online resources that you can have a look at. (Since I didn't produce this material myself, I can't really call it 'bonus material' but that doesn't mean that it isn'tvaluable!)
The first three lockflows are taught by two people I've actuallymet: namely Rick Young and Yori Nakamura.
In the first video, Rick Young teaches a 15 move standing lockflowthat is similar to the first lockflow I learned from Bob Reish.
There is some finger grabbing in this lockflow, so you'd have tomodify some of the locks to use them in grappling, but it shows youhow this training concept can be used in both sportive andself-defense oriented training;
http://www.dailymotion.com/video/xa1sv6_detailed-lock-flow-fifteen-steps_sport
The next two videos are by Yori Nakamura, the father of NorthAmerican Shootwrestling. I've only met him and trained with him afew times, but he was Erik Paulson's first MMA coach, and so I owehim a lot!
The first Shooto lockflow is oriented around upper body submissions:http://www.youtube.com/watch?v=hkhctp-I1wM
And Yori's second Shooto lockflow is leglock-oriented:http://www.youtube.com/watch?v=ZGw2XIr0hrA
Just to show you that other people are also using the lockflow training concept, here are two videos by people I've never personally met:
This is Lesson 11 from the Online Grappling Concepts Course: www.grapplearts.tv

First, a short lockflow that starts on the bottom of side control:http://www.youtube.com/watch?v=RVjFGlqDM38
And finally, another lockflow starting from the top of side mount:http://www.youtube.com/watch?v=JMoeh4TXZ5k
Please remember that these are only suggestions - THEY ARE NOTGOSPEL! Feel free to shorten, lengthen, or modify these lockflows. The ultimate goal should be to create your own, so that you cantrain the submissions and transitions that you most need to work on!
Lesson 12 Preview:
Next week we’re going to look at a very useful concept and strategy you can use to set up your submissions, guard sweeps, and even pin escapes.
It works really well in grappling, but it's also applicable to just about any martial art.
See you then.
Stephan Kestingwww.grapplearts.tv
This is Lesson 11 from the Online Grappling Concepts Course: www.grapplearts.tv