Grappling Concepts, Lesson 3: Pulling The...
22
Grappling Concepts, Lesson 3: Pulling The Trigger Welcome back! This week we’re going to look at the Trigger Position concept, which is a powerful concept to incorporate into your grappling. When your opponent starts a technique or does something, he's basically asking you a question: for example “I'm putting my arm into this position, what are you going to do about it? When you're new at grappling and someone presents you with a 'question' like this, it's a fairly slow process. First you might think about it and try to remember an appropriate technique to use, and then you start executing that technique. But this is a very slow way of doing things. A better approach is to frontend load your thinking. You want to have done your thinking about most positions l ong before you get into these situations in sparring. You prepare for the situation in your training and in your drilling. Then, when when it gets to the sparring, the right technique just happens naturally. WHAT IS A TRIGGER POSITION? A Trigger Position is a position that triggers a certain reaction on your part. The triggered action is almost like an automatic default reaction. Some information comes in, and your body just reacts to it automatically. This is Lesson 3 from the Online Grappling Concepts Course: www.grapplearts.tv - PAGE 1 -
Transcript of Grappling Concepts, Lesson 3: Pulling The...
Grappling Concepts, Lesson 3:Pulling The Trigger
Welcome back!
This week we’re going to look at the Trigger Position concept, which is a powerful concept to incorporate into your grappling.
When your opponent starts a technique or does something, he's basically asking you a question: for example “I'm putting my arm into this position, what are you going to do about it?
When you're new at grappling and someone presents you with a 'question' like this, it's a fairly slow process. First you might think about it and try to remember an appropriate technique to use, and then you start executing that technique.
But this is a very slow way of doing things.
A better approach is to frontend load your thinking. You want to have done your thinking about most positions long before you get into these situations in sparring. You prepare for the situation in your training and in your drilling. Then, when when it gets to the sparring, the right technique just happens naturally.
WHAT IS A TRIGGER POSITION?
A Trigger Position is a position that triggers a certain reaction on your part. The triggered action is almost like an automatic default reaction. Some information comes in, and your body just reacts to it automatically.
This is Lesson 3 from the Online Grappling Concepts Course: www.grapplearts.tv - PAGE 1 -

Let’s start with a simple example with the help of Justin, a friend and one of my training partners.
ARMBAR FROM MOUNT TRIGGER: First is the world's simplest Trigger Position – I'm mounted and he pushes on my chest with both hands. You probably learned a response to that in your first week of grappling or jiu-jitsu...
He’s pushing and his arms are straight, so I isolate the arm and spin into an arm bar.
This is Lesson 3 from the Online Grappling Concepts Course: www.grapplearts.tv - PAGE 2 -

In this case, the trigger was the double hand push to the chest from the mount position. His arms being in this position triggers you to attack the arm.
Let’s take a look at some other simple Trigger Positions to make sure that you have your concepts.
V ARMLOCK FROM SIDE MOUNT TRIGGER: If you're in side mount, and his arm is floating up by his head, then this is a Trigger Position the V arm lock.
To apply the lock I push his wrist to the ground, bring my other arm underneath his arm, grab my own wrist in a figure four, and then apply the lock.
This is Lesson 3 from the Online Grappling Concepts Course: www.grapplearts.tv - PAGE 3 -

V Armlock Key Detail: before you apply it, make sure you drag his elbow towards his hips – this takes the slack out of the system and then you only have to lift his elbow a short distance.
KIMURA ARMLOCK FROM SIDE MOUNT TRIGGER: If his arm is the other way - bent at the elbow and floating down by his hip - then it would be in the Trigger Position for the Kimura armlock.
To apply the lock, trap the arm, come under his shoulder, figure four your arms, move the elbow up towards his ear and lift it slightly to apply the lock.
This is Lesson 3 from the Online Grappling Concepts Course: www.grapplearts.tv - PAGE 4 -

His arm in the trigger position got you to launch your attack quickly, before he could adjust and move it to safety.
Now we'll move onto some other examples of trigger positions that can be combined into a great guard drill.
ARMBAR FROM GUARD TRIGGER: If I'm in his guard and my elbow comes near or crosses his centre line then he can do a lot of things. The default reaction that most grapplers have is to apply an arm bar. Elbow across = instant armbar attack.
This is Lesson 3 from the Online Grappling Concepts Course: www.grapplearts.tv - PAGE 5 -
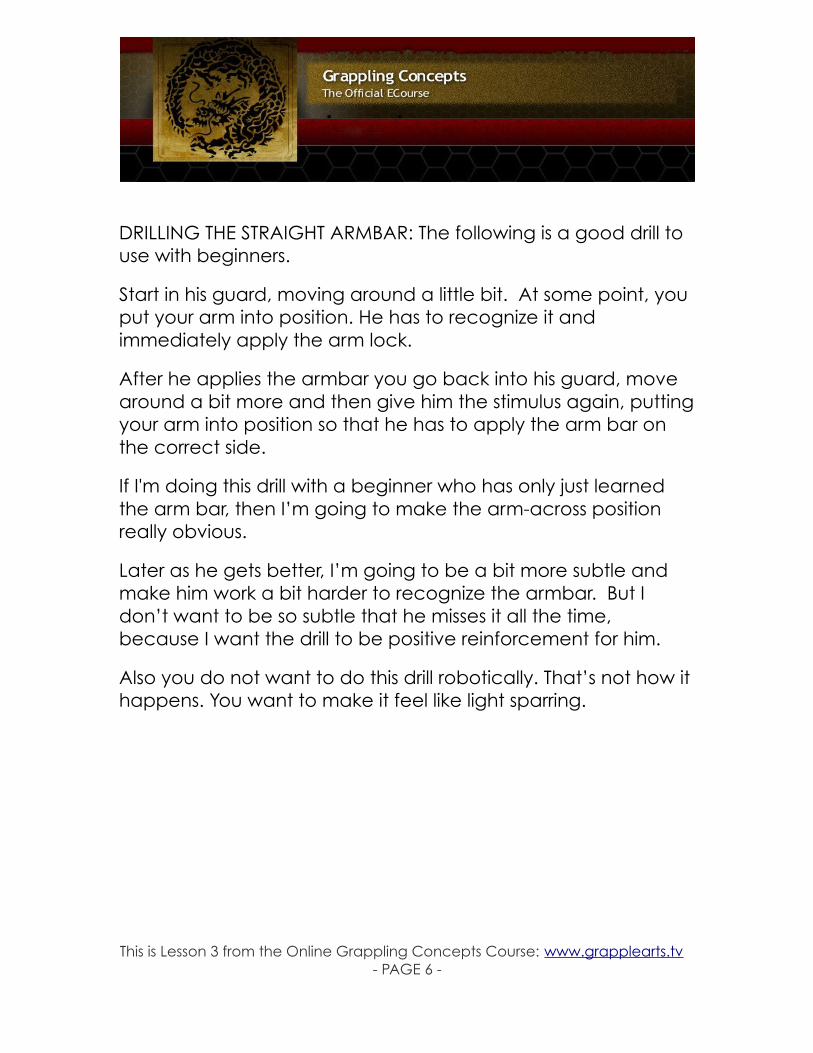
DRILLING THE STRAIGHT ARMBAR: The following is a good drill to use with beginners.
Start in his guard, moving around a little bit. At some point, you put your arm into position. He has to recognize it and immediately apply the arm lock.
After he applies the armbar you go back into his guard, move around a bit more and then give him the stimulus again, putting your arm into position so that he has to apply the arm bar on the correct side.
If I'm doing this drill with a beginner who has only just learned the arm bar, then I’m going to make the arm-across position really obvious.
Later as he gets better, I’m going to be a bit more subtle and make him work a bit harder to recognize the armbar. But I don’t want to be so subtle that he misses it all the time, because I want the drill to be positive reinforcement for him.
Also you do not want to do this drill robotically. That’s not how it happens. You want to make it feel like light sparring.
This is Lesson 3 from the Online Grappling Concepts Course: www.grapplearts.tv - PAGE 6 -

KIMURA FROM OPEN GUARD TRIGGER DRILL: you can do the same drill with the Kimura: in this case the Trigger Position is the hand being on the ground.
The hand on the ground is a Trigger Position for the bottom man to apply the Kimura right away.
So drill this attack too. One person moves around and plants either his left or his right hand on the ground. DON'T slap it down – just place it as you move, as if you know better but have forgotten in the heat of battle.
This is Lesson 3 from the Online Grappling Concepts Course: www.grapplearts.tv - PAGE 7 -

TRIANGLE CHOKE TRIGGER POSITION DRILL:
You can also do the same drill with the triangle choke. In this case the Trigger Position occurs when the top man (me) puts one arm under his partner's leg.
In the pictures, as soon as I put my hand under one of his legs he applies the triangle choke right away.
In this drill you can apply that triangle any way that you want. If you have a favorite way of applying the triangle (or if your coach wants you to do the triangle in a certain way), then feel free to apply or finish it in your particular drill.
The point of this drill is to learn to recognize the trigger position, and NOT to learn to do the triangle choke my particular way.
This is Lesson 3 from the Online Grappling Concepts Course: www.grapplearts.tv - PAGE 8 -

That being said, in case you're new to jiu-jitsu or submission grappling, here's a crash course on the basic triangle choke:
• If his arm is under one of your legs, put the OTHER foot on his hip,
• Chop your underhooked leg down on the back of the neck, at 90 degrees to his back,
• Triangle your legs – instep under your knee,
• Move your head towards his free arm to angle your body,
• Pull down on his head with both hands to finish the choke.
The point here is not to teach you the step by step mechanics of the triangle choke, it’s to teach you the Trigger Position for applying your triangle choke.
TRIPLE TRIGGER POSITION GUARD DRILL: You can link these 3 previous guard Trigger Position drills – the armbar, the Kimura and the triangle choke – together into one drill.
(I showed this on my 'Grappling Drills' DVD but it's an important drill, so I hope it's OK if I show it to you again here).
Essentially you feed your partner one of 3 Trigger Positions. It's made a little more difficult for him because he has to decide on the correct response to THREE different triggers, each of which can each be with your left OR right arm.
This is Lesson 3 from the Online Grappling Concepts Course: www.grapplearts.tv - PAGE 9 -

So in a sense he has to deal with SIX different triggers (armbar left, armbar right, Kimura left, Kimura right, triangle left, triangle right).
1. Elbow across: ARMBAR
2. Hand on ground: KIMURA
3. Arm under leg: TRIANGLE
If I'm doing this drill with someone, then it's important that I move around within his guard, going left and right. After I move a bit I give him one of the Trigger Positions. Hopefully he recognizes it right away and applies the correct submission.
For some reason people sometimes become really robotic in their movements and timing. The timing becomes predictable.
Make sure you're NOT doing it that way. You’re not trying to pass his guard or trick him, but make him work just a little bit to recognize that submission. But you should also be clear enough so that there’s no doubt in his mind when he sees it.
This is Lesson 3 from the Online Grappling Concepts Course: www.grapplearts.tv - PAGE 10 -
GOING BEYOND THIS DRILL: You can apply this concept to most of your bread and butter submissions. You just need to figure out what the feed, or energy, or position is from your opponent that tells you to pull the trigger and go to your attack right away.
BAITING TRIGGER POSITIONS: Here's a little warning about all of this: you do have to use some common sense about whether or not you go for an attack when presented with a Trigger Position.
In fact, you don't always have to act on it.
Let's say that your opponent is a high level grappler and suddenly he puts his elbow across your centerline in the guard. It's possible that maybe he’s made a mistake, OR maybe he has a cunning plan.
It is possible, for example, that he’s really good at escaping arm locks and is trying to bait you into attacking with an armbar.
Another example is that some grapplers, usually thick short necked, big torso, squat little guys, have only one way to pass the guard.
That troll-like grappler's one guard pass might be to give you the triangle. And when the bottom guy goes for the triangle, they stack him and pass the guard with a smashing type guard pass.
This is Lesson 3 from the Online Grappling Concepts Course: www.grapplearts.tv - PAGE 11 -

Baiting the triangle to set up a smashing guard pass
Of course technique is important too when doing this specific kind of guard pass, but body type has A LOT to do with it too.
So if someone who should know better seems to deliberately give you a great attack opportunity (aka. Trigger Position) then that could be a red flag: warning bells should be going off at that point.
But if you get to that same advantageous position in a scramble and he falls into the Trigger Position then I suggest going for the attack right away. Maybe in the intensity of the scramble he's giving you the opening without being aware of it.
GUARD PASS WITH KIMURA TRIGGER POSITION BAIT
To illustrate how you can use Trigger Positions as bait, here's a guard pass technique that I like to use on the unwary!
First I 'accidentally' put my hand on the ground but I also subtly change the angle on
This is Lesson 3 from the Online Grappling Concepts Course: www.grapplearts.tv - PAGE 12 -

my hand so that my fingers are pointing outwards (between 45and 90 degrees to his body).
Test this out for yourself. When the bottom man sits up for the Kimura it’s not a convenient angle for him. For him to properly apply and finish the Kimura he needs my elbow flared out, so this fingers-out position tucks my elbow in and away.
This is the exact opposite elbow direction of what he needs to apply the Kimura.
As he's fighting to apply the Kimura he usually opens his legs. At this point, I push down on his leg with my other hand and start passing towards his back.
I step over his leg, circle around him, and usually end up with one hook in. In effect I’ve passed his guard and taken his back in a single move.
This guard pass is another example of using the Trigger Position concept AGAINST someone, which is a fairly advanced thing to do. It’s a fine line. When someone gives you Trigger Position
This is Lesson 3 from the Online Grappling Concepts Course: www.grapplearts.tv - PAGE 13 -

you might have to decide whether it's a legitimate trigger or a set up. But DON'T over think it – that would undermine the whole utility of the concept.
If in doubt, go for it!
If your opponent is so good that he can give you a perfectly good opening and still escape your atack, then he’s probably going to beat you anyhow. So you may as well go for that technique 100% and try to make it work for you.
Some years ago I was wrestling 3 really strong and athletic, but guys. I'd start in a fetal position and they’d jump on top of me and basically I’d put them into my guard and armbar them, one after another. I think that I had about 9 matches that day, and finished all but one of those matches with the straight armlock.
But the mind can play funny tricks on you. At one point I was on my back with a big strong guy in my guard, and he was grinding his forearm into my neck.
I remember thinking that he was giving me a perfect position for the arm bar. But then I second-guessed myself, and started worrying that he was setting me up.
Maybe he was baiting me with the arm, offering it to me with the hope of then passing my guard. Finally I snapped out of it and realized that this guy had never done any grappling and that I was giving him way too much credit. So I just arm barred him, and that was the end of that.
This is Lesson 3 from the Online Grappling Concepts Course: www.grapplearts.tv - PAGE 14 -
So don’t over think it: if you see a Trigger Position, then go for it unless there's a really good reason to think that it's a deliberate set up. And even if it IS a setup, your attack may still work!
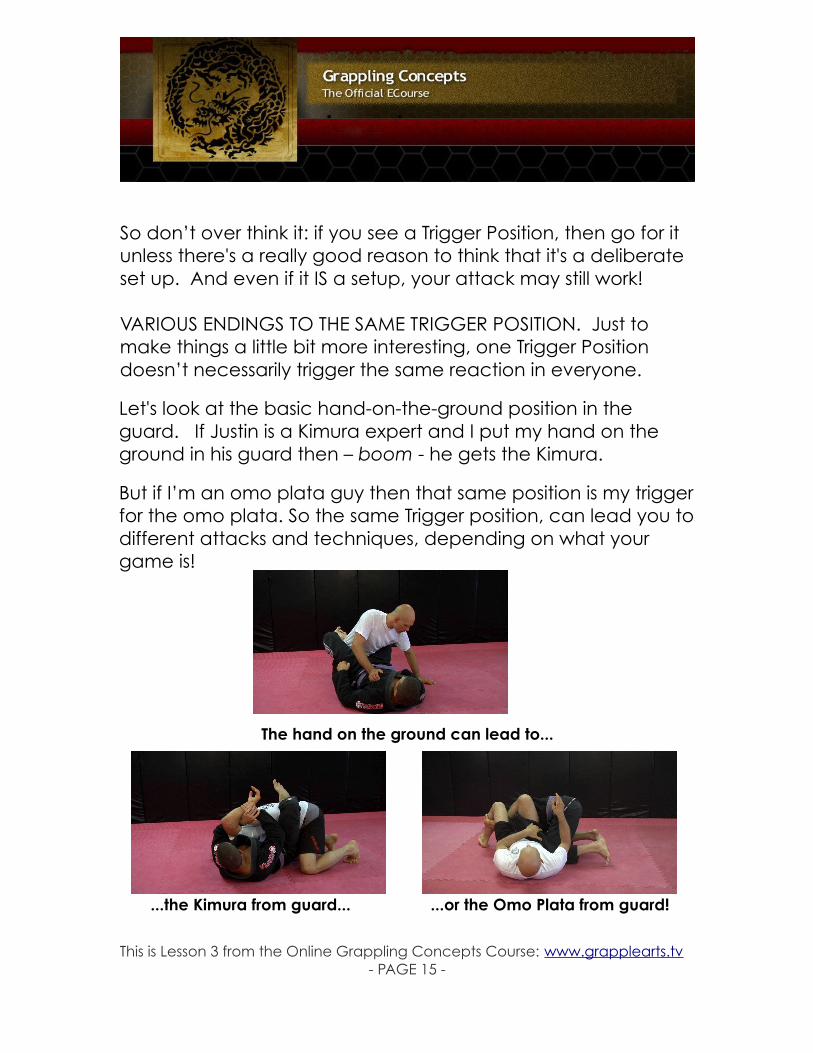
VARIOUS ENDINGS TO THE SAME TRIGGER POSITION. Just to make things a little bit more interesting, one Trigger Position doesn’t necessarily trigger the same reaction in everyone.
Let's look at the basic hand-on-the-ground position in the guard. If Justin is a Kimura expert and I put my hand on the ground in his guard then – boom - he gets the Kimura.
But if I’m an omo plata guy then that same position is my trigger for the omo plata. So the same Trigger position, can lead you to different attacks and techniques, depending on what your game is!
The hand on the ground can lead to...
...the Kimura from guard... ...or the Omo Plata from guard!
This is Lesson 3 from the Online Grappling Concepts Course: www.grapplearts.tv - PAGE 15 -

COLLAR CHOKE TRIGGER POSITIONS: Another example of a Trigger Position in BJJ is when you've got one hand deep in your opponent's collar.
My jiu-jitsu coach – Marcus Soares – is really, really good at collar chokes. If he gets one hand deep into your collar, then you’re going to get choked out. That’s his Trigger Position, with many horrible nasty collar chokes coming out of it!
The Trigger Position for many different chokes: one hand deep in opponent's collar.
SLEEVE CHOKE TRIGGER POSITION. Justin and I have a team mate – Benito Segura - who has developed his 'sleeve choke' (or Ezequiel choke) to a very high degree.
The Trigger Position for that choke is getting one arm around the back of the neck.
If you're going against a sleeve choke expert and he get's that position on you, then watch out: he’s going to sleeve choke you for sure!
This is Lesson 3 from the Online Grappling Concepts Course: www.grapplearts.tv - PAGE 16 -
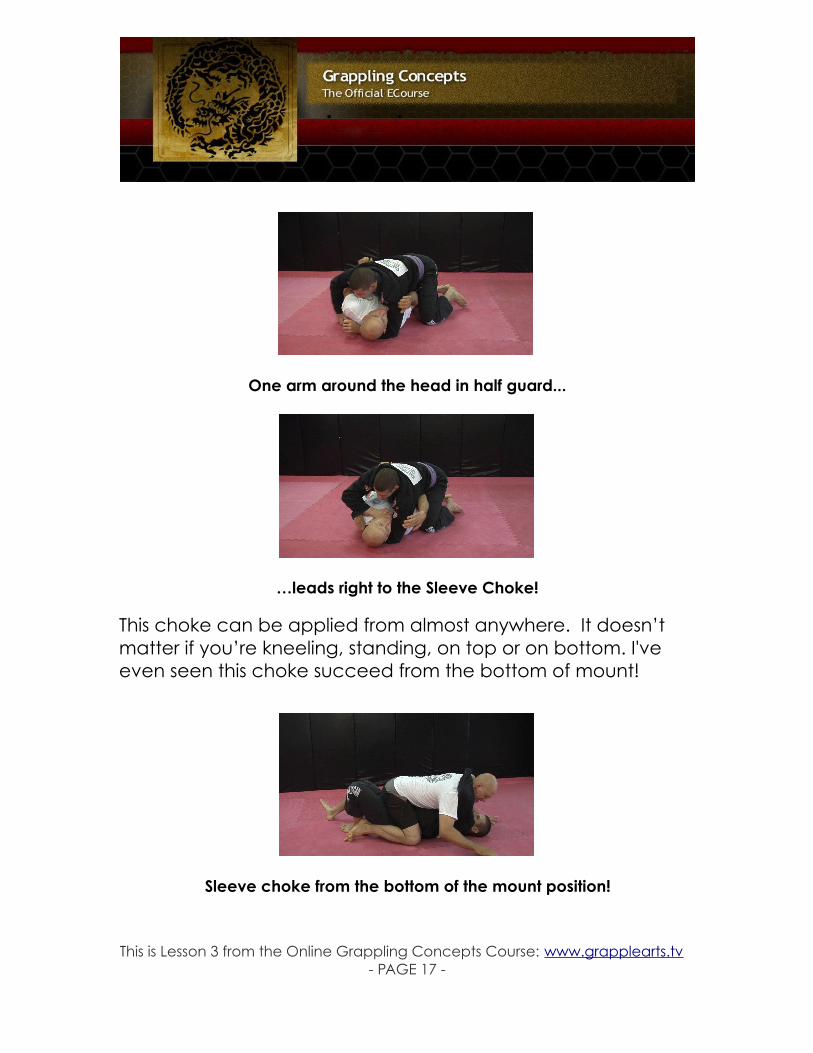
One arm around the head in half guard...
…leads right to the Sleeve Choke!
This choke can be applied from almost anywhere. It doesn’t matter if you’re kneeling, standing, on top or on bottom. I've even seen this choke succeed from the bottom of mount!
Sleeve choke from the bottom of the mount position!
This is Lesson 3 from the Online Grappling Concepts Course: www.grapplearts.tv - PAGE 17 -

TRIGGER POSITIONS, NOT JUST FOR SUBMISSIONS ANYMORE...
Hopefully you now understand the Trigger Positions as it applies to submissions. But you can ALSO use the same concept for other aspects of grappling.
Consider guard sweeps. If I’m in butterfly guard and get an under hook, and manage to control the other arm, then I’m going to try and sweep him with the basic butterfly sweep.
The trigger position for the butterfly guard sweep...
...should lead right into the sweep!
This is Lesson 3 from the Online Grappling Concepts Course: www.grapplearts.tv - PAGE 18 -

But one has to move quickly. If I get the underhook and arm control position but just sit there for long enough, then he’s going to figure out how to counter it.
LINKED TRIGGER POSITIONS.
You can cue off of multiple Trigger Positions within a single technique.
Let's say that I'm in the Trigger Position for the butterfly guard sweep, and I try to sweep him. He responds and posts his foot to prevent the sweep. You you can cue off of this position in different ways.
Some people use this position (your opponent posting his leg) as the Trigger Position to put their foot on the knee...
...and kick that leg out, taking them to the top.
This is Lesson 3 from the Online Grappling Concepts Course: www.grapplearts.tv - PAGE 19 -

But the same posted foot position could also be the trigger to scoop under the leg and go to the X guard.
From the X Guard there are lots of options (check out some of the options from here on the Advanced DVDs that are the bonus for the course).
The important thing is that as soon as I get the first butterfly guard position, I try to sweep. Then, as soon as that foot posts, that’s the trigger for going into my next technique.
CREATING YOUR OWN DRILLS: You can create a drill from any technique that has a Trigger Position. Take no more than 2-4 options (you don’t want to have too many options) and then one partner feeds the Trigger Positions and you respond.
For example, we just covered a bunch of options from the butterfly guard. So start sitting up in the butterfly guard with a bear hug and your partner gives you your trigger by posting a foot.
This is Lesson 3 from the Online Grappling Concepts Course: www.grapplearts.tv - PAGE 20 -

I don’t know which foot he’s going to post – it could be his left or it could be his right - but as soon as he does I hook it with my arm and launch myself under his leg to get to X guard.
Then we go back, move around a little bit, and he posts a foot, (maybe the same foot or maybe the other one) - as soon as he does, I hook his leg, throw myself under, grab the leg and get the X guard.
This is a way to greatly speed up your decision making ability, and you can create drills like this for most of your favorite techniques.
By doing most of your thinking and planning and drilling BEFORE you spar, then when it comes to sparring it’s just a matter of cuing off what he’s giving you.
To really drive home this message I’m also going to give you the video of a seminar I did on the topic of leg lock Trigger Positions. Leg locks are just like any other submission. There are positions that your opponent will put himself into which just beg you to leg lock him.
Lesson 3 Bonus: Leglock Trigger Position Seminar
This is Lesson 3 from the Online Grappling Concepts Course: www.grapplearts.tv - PAGE 21 -

So check out the leglock trigger position seminar, it will help you further understand the Trigger Position concept, but it will also sharpen your leg locks. You should be able to tap out a lot of people with this information!
Lesson 4 Preview:
Next week we’ll tighten up your pin escapes and submission defenses.
I'll share a universal concept that you can apply in any kind of grappling art, including Brazilian jiu-jitsu, submission grappling, MMA, judo, sambo, etc.
Keep your eye on your email inbox about 7 days from now!
Thanks.
Stephan Kestingwww.grapplearts.tv
This is Lesson 3 from the Online Grappling Concepts Course: www.grapplearts.tv - PAGE 22 -