INSTALLATION MANUAL - Florence Mailboxes
34
INSTALLATION MANUAL All Recessed-Mount Modules © 2017 Florence Corporation. All rights reserved.
Transcript of INSTALLATION MANUAL - Florence Mailboxes

INSTALLATION MANUAL
All Recessed-Mount Modules
© 2017 Florence Corporation. All rights reserved.

Page 2 of 34 versatile™ 4C Installation Manual -- 206362 -- Rev C www.florencemailboxes.com
Individual Installation 16
Hardware List 8
General Information And Advisories 3
USPS Installation Requirements 4
Collection Box Installation Guidelines 5
Suggestions for Individual Installation Wall Construction 6
Required Tools 7
Trash/Recycling-Bin Module Installation 14
Collection-Box Module Installation 12
Parcel-Only Module Installation 10
Multiple Installation Using Florence’s Exclusive Multi-Unit Connector Kit 20
Access-Door Master Lock Installation 26
Parcel-Door Master Lock Installation 28
Collection-Box Hopper-Door Handle Installation 30
Collection-Door Arrow Lock Installation 32
TABLE OF CONTENTS

www.florencemailboxes.com versatile™ 4C Installation Manual -- 206362 -- Rev C Page 3 of 34
General Information And Advisories
ATTENTION!
CAUTION -- Transportation and Handling• Florence 4C units are heavy. Use caution when lifting and carrying to avoid injury.
• Lay boxes flat. Do not stand on end as box could fall over and cause injury.
CAUTION -- Installation• Florence 4C units are heavy. Do not stand 4C units up without support to prevent tipping.
• Pinch hazard exists when placing the unit in the rough opening. Keep fingers and hands clear to avoid injury.
• Mailboxes may tip out of rough opening until secured, possibly resulting in the mailbox colliding with a person and causing serious injury.
• Florence 4C units are also front-heavy when the master doors are open. Units must be braced or held in place until secured to the framing. Installer should support unit or have assistance holding the unit in place before opening the master doors. Failure to do so could result in serious injury.
versatile™ 4C mailbox suites

Page 4 of 34 versatile™ 4C Installation Manual -- 206362 -- Rev C www.florencemailboxes.com
USPS Installation Requirementsversatile™ 4C mailbox suites
1 . At least one customer compartment shall be positioned less than 48” from the finished floor.
2 . No parcel locker compartment (interior bottom shelf) shall be positioned less than 15” from the finished floor.
3 . No patron (tenant) lock shall be located more than 67” above the finished floor.
4 . No customer compartment (interior bottom shelf) shall be positioned less than 28” from the finished floor.
5 . The USPS Arrow lock shall be located between 36” and 48” above the finished floor.
36”- 48”(ARROW LOCK)
28” MIN.(TENANT)
15” MIN.(PARCEL)
67” MAX TO TENANT LOCK
FINISHED FLOOR

www.florencemailboxes.com versatile™ 4C Installation Manual -- 206362 -- Rev C Page 5 of 34
Collection Box Installation Guidelinesversatile™ 4C mailbox suites
1 . The hopper handle height is suggested to be no more than 48” from the finished floor.
2 . The collection shelf (interior bottom shelf) shall be positioned no less than 15” from the finished floor if the collection box is to be used for U.S. mail collection.
3 . Refer to local building codes and accessibility regulations to determine proper mounting requirements.
FINISHED FLOOR
15” MIN.
48” MAX.(HANDLE)

Page 6 of 34 versatile™ 4C Installation Manual -- 206362 -- Rev C www.florencemailboxes.com
1 . Wall mounting should consist of a lamination of two wood 2”x4” studs on the outer sides of the modules.
2 . Florence versatile™ 4C mailbox suites feature trim designed to abut one another (no gap between modules) when a single stud is used between modules. (A Florence Multi-Unit Connector Kit can be used instead of the single stud between modules.)
3 . The mounting wall must have a minimum depth of 17” to allow for recessed mounting of the Florence versatile™ 4C module.
4 . Squareness and quality of wall mount opening is critical to obtain a secure and properly functioning Florence versatile™ 4C module.
NOTE: All wall frame mounting options are shown for reference only. Refer to local building codes and accessibility regulations to determine proper mounting requirements.
TM
FINISHED FLOOR
R.O. HEIGHT
TYPICAL SINGLE
COLUMN UNIT
OPENING SHOWN
R.O. WIDTH
TYPICAL DOUBLE
COLUMN UNIT
OPENING SHOWN
WALL BOARD
HEIGHT ABOVE FINISHED FLOOR
(AFF)
17” MINIMUM
R.O. WIDTH
1 2 31
Suggestions for Individual Installation Wall Constructionversatile™ 4C mailbox suites

www.florencemailboxes.com versatile™ 4C Installation Manual -- 206362 -- Rev C Page 7 of 34
Required Toolsversatile™ 4C mailbox suites
• Cordless driver/drill• 3/8” Drill bit• 1/4” Socket wrench or nut driver• 3/8” Socket wrench or nut driver
• Phillips screwdriver• Flat blade screwdriver• T20 Torx bit & bit tip holder
IMPORTANT NOTICE FOR USPS
USPS personnel must have a McGard Screwdriver to install and service the postal Arrow-lock cover on the Florence versatile™ 4C mailbox suites.
Note: Florence Corporation does not provide or sell the McGard Screwdriver.
McGard Screwdrivers can be ordered by USPS personnel on the eBuy2 ordering system.
(For #10-32 x 0.312” button head McGard security screws used on the postal Arrow-lock cover.)
NOTE: For USPS applications:
A. Arrow lock is installed by USPS personnel only. Contact your local Post Office to arrange access through the Arrow lock if service is necessary.
For Non-USPS applications:
A. Please disregard instructions related to the Arrow lock throughout this manual.
B. The master-access door and parcel-door private-lock mechanisms were installed at the factory so the property owner may need to be contacted prior to servicing the unit.
C. McGard Screwdriver and fasteners are not necessary for Non-USPS (private delivery) applications.
Page 8 of 34 versatile™ 4C Installation Manual -- 206362 -- Rev C www.florencemailboxes.com
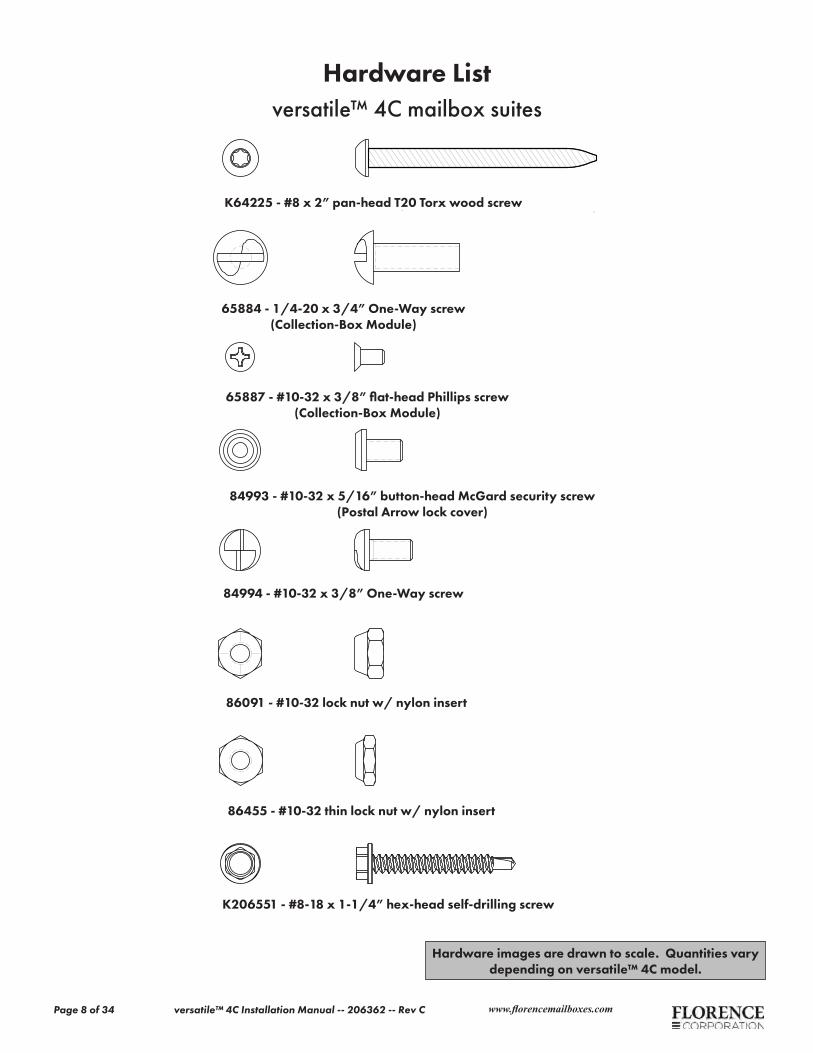
Hardware Listversatile™ 4C mailbox suites
K64225 - #8 x 2” pan-head T20 Torx wood screw
65884 - 1/4-20 x 3/4” One-Way screw (Collection-Box Module)
65887 - #10-32 x 3/8” flat-head Phillips screw (Collection-Box Module)
84993 - #10-32 x 5/16” button-head McGard security screw (Postal Arrow lock cover)
84994 - #10-32 x 3/8” One-Way screw
K206551 - #8-18 x 1-1/4” hex-head self-drilling screw
86455 - #10-32 thin lock nut w/ nylon insert
86091 - #10-32 lock nut w/ nylon insert
Hardware images are drawn to scale. Quantities vary depending on versatile™ 4C model.
www.florencemailboxes.com versatile™ 4C Installation Manual -- 206362 -- Rev C Page 9 of 34
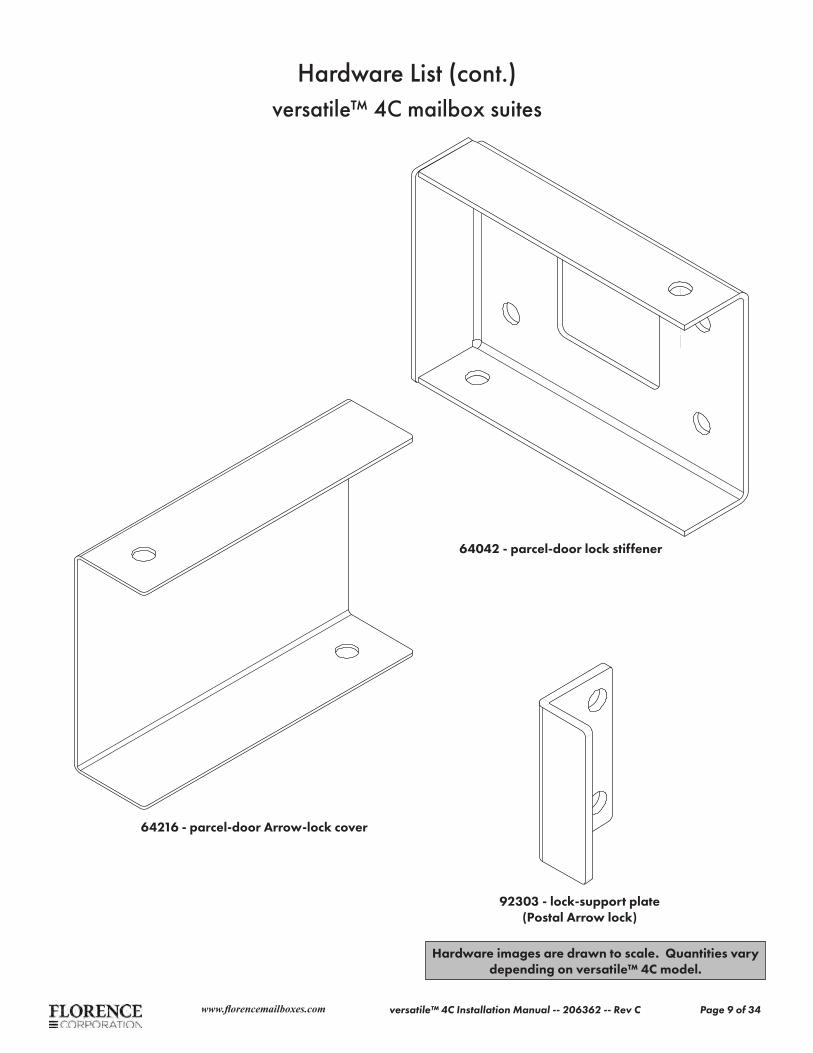
Hardware List (cont.)versatile™ 4C mailbox suites
64216 - parcel-door Arrow-lock cover
92303 - lock-support plate (Postal Arrow lock)
64042 - parcel-door lock stiffener
Hardware images are drawn to scale. Quantities vary depending on versatile™ 4C model.

Page 10 of 34 versatile™ 4C Installation Manual -- 206362 -- Rev C www.florencemailboxes.com
Parcel-Only Module Installationversatile™ 4C mailbox suites
1 . While looking at the back of the module, slide and hold the sliding latch up past the latch hook.
2 . The master door can now be opened to gain access to the mounting-screw holes/slots for installation.
3 . Remove all hardware located inside the module and set aside.
4 . Place the parcel-only module in the opening until the integrated trim is flush against the wall board.
5 . Refer to “Individual Installation”, (p. 16), or “Multiple Installation Using Florence’s Exclusive Multi-Unit Connector Kit”, (p. 20), as appropriate, and proceed with installation.
After fastening the parcel-only module into the opening:
6 . Close the master door.
7 . Open the parcel doors using the parcel-door keys included with the hardware.
8 . Install all slide lock(s) (64256) and secure with #10-32 x 3/8” one-way screw(s) (84994) in each parcel locker in the module.
IMPORTANT: When installation is complete, make sure you have removed all hardware located inside the module before closing the door(s).
ADJUSTMENT TIP: If access to mounting screws is necessary for installation adjustment, open the parcel doors and remove all #10-32 x 3/8” one-way screw(s) (84994) and all slide lock(s) (64256) in each parcel locker in the module.
• Disengage the sliding latch by placing a small allen wrench (hex key) in the slide-lock slot and sliding the sliding latch upward.
• The master door can now be opened.

www.florencemailboxes.com versatile™ 4C Installation Manual -- 206362 -- Rev C Page 11 of 34
Parcel-Only Module Installation
FRONT OF MODULE
LATCH HOOK
SLIDING LATCH
BACK OF
MODULE
8499464256
SLIDE- LOCK SLOT
SLIDING LATCH
STEP
8STEP
1

Page 12 of 34 versatile™ 4C Installation Manual -- 206362 -- Rev C www.florencemailboxes.com
Collection-Box Module Installationversatile™ 4C mailbox suites
1 . While looking at the back of the collection-box module, slide and hold the sliding latch up past the latch hook.
2 . The master door can now be opened to gain access to the mounting-screw holes/slots for installation.
3 . Remove all hardware located inside the module and set aside.
4 . Place the collection-box module in the opening until the integrated trim is flush against the wall board.
5 . Refer to “Individual Installation”, (p. 16), or “Multiple Installation Using Florence’s Exclusive Multi-Unit Connector Kit”, (p. 20), as appropriate, and proceed with installation.
NOTE: If a factory-installed private door lock was ordered, open the collection door using the keys taped to the side of the module.
IMPORTANT: When installation is complete, make sure you have removed all hardware located inside the module before closing the door(s).
ADJUSTMENT TIP: If access to the mounting screws is necessary for installation adjustment, open the collection door, and find a latch-hook location.
• The hopper handle must be removed before the master door will open.
• Insert a #1 screw driver between the master door and the module frame, and slide the sliding latch up until the master door has disengaged.

www.florencemailboxes.com versatile™ 4C Installation Manual -- 206362 -- Rev C Page 13 of 34
Collection-Box Module Installation
LATCH HOOK
SLIDING LATCH
SLIDING LATCH
BACK OF MODULE
STEP
1

Page 14 of 34 versatile™ 4C Installation Manual -- 206362 -- Rev C www.florencemailboxes.com
Trash/Recycling-Bin Module Installation
1 . Determine which master-access lock your module includes before proceeding:
• If the module has a keyed master-access lock, insert the key to open the entire front of the module to gain access to the mounting frame. (The key will be taped to the side of the module).
• If the module has a slotted keyless master-access lock, insert a slotted screwdriver or coin (quarter) to open the entire front of the module to gain access to the mounting frame.
2 . Place the trash/recycling-bin module in the opening until the integrated trim is flush against the wall board.
3 . Refer to “Individual Installation”, (p. 16), or “Multiple Installation Using Florence’s Exclusive Multi-Unit Connector Kit”, (p. 20), as appropriate, and proceed with installation.
NOTE: Trash/recycling-bin modules do not require USPS service.
IMPORTANT: When installation is complete, make sure you have removed all hardware located inside the module before closing the door(s).
versatile™ 4C mailbox suites

www.florencemailboxes.com versatile™ 4C Installation Manual -- 206362 -- Rev C Page 15 of 34
Trash/Recycling-Bin Module Installation
FRONT OF MODULE
MOUNTING FRAME
MOUNTING FRAME
MOUNTING FRAME
MOUNTING FRAME
MASTER-ACCESS LOCK

Page 16 of 34 versatile™ 4C Installation Manual -- 206362 -- Rev C www.florencemailboxes.com
Individual Installation
1 . For Double-Wide Florence 4C Modules:
A. Open the right master door until the hold-open arm engages and install the included #8 x 2” pan-head T20 Torx wood screws (K64225) along the right-hand outer frame.
B. Partially open the left master door until the right master door can be completely closed.
C. Open the left master door until the hold-open arm engages, and install the included #8 x 2” pan-head T20 Torx wood screws (K64225) along the left-hand outer frame.
D. With both the left and right master doors open and hold-open arms engaged, install the included #8 x 2” pan-head T20 Torx wood screws (K64225) along the top and bottom frame.
NOTE: Only front-loading tenant or tenant-with-parcel units have a hold-open arm.
• When installing a parcel-only module, collection-box module, or trash/recycling bin, you may ignore all references to hold-open arm(s) in the remainder of the text.
NOTE: The #8 x 2” pan-head T20 Torx wood screws (K64225) should be tightened to ensure a snug fit.
• Overtightening beyond initial contact with the frame could hinder functionality.
• If overtightening occurs, simply back out each overtightened mounting screw.
versatile™ 4C mailbox suites

www.florencemailboxes.com versatile™ 4C Installation Manual -- 206362 -- Rev C Page 17 of 34
Individual Installation
K64225
TYPICAL WALL
MOUNTING
INTEGRATED TRIM
RIGHTMASTER DOOR
INTEGRATED TRIM
OUTER FRAME
LEFT MASTER DOOR
K64225
HOLD-OPEN ARM
STEP
1A
STEP
1D
STEP
1C

Page 18 of 34 versatile™ 4C Installation Manual -- 206362 -- Rev C www.florencemailboxes.com
Individual Installation (cont.)versatile™ 4C mailbox suites
2 . For Single-Wide Florence 4C Modules:
A. Open the master door until the hold-open arm engages.
• Collection-Box module:
Remove the tape that secured the hopper for shipping, allowing the hopper to drop down out of the way to gain access to the mounting-screw locations.
B. Install the included #8 x 2” pan-head T20 Torx wood screws (K64225) along both the left- and right-hand outer frame.
C. With the master door open and hold-open arm engaged, install the included #8 x 2” pan-head T20 Torx wood screws (K64225) along the top and bottom frame.
1). Parcel-only module—Return to “Parcel-Only Module Installation”, (p. 10), Step 6 to complete the installation.
2). Collection-box module—Go to “Collection-Box Hopper-Door Handle Installation”, (p. 30), to install the hopper-door handle.
NOTE: The #8 x 2” pan-head T20 Torx wood screws (K64225) should be tightened to ensure a snug fit.
• Overtightening beyond initial contact with the frame could hinder functionality.
• If overtightening occurs, simply back out each overtightened mounting screw.

www.florencemailboxes.com versatile™ 4C Installation Manual -- 206362 -- Rev C Page 19 of 34
Individual Installation (cont.)
K64225
K64225
OUTER FRAME
BOTTOM FRAME
TAPE
TYPICAL WALL MOUNTING
HOPPER
2 X 4 WOOD STUD
INTEGRATED TRIM
INTEGRATED TRIM
STEP
1
STEP
2B
STEP
2C
STEP
2A

Page 20 of 34 versatile™ 4C Installation Manual -- 206362 -- Rev C www.florencemailboxes.com
Multiple Installation Using Florence’s Exclusive Multi-Unit Connector Kit
1 . Place the first module at the right-hand side of the rough opening until the integrated trim is flush against the wall board.
2 . Open the master door(s) until the hold-open arm(s) engage(s).
• Collection-Box module:
Remove the tape that secured the hopper for shipping, allowing the hopper to drop down out of the way to gain access to the mounting-screw locations (see p. 19).
3 . Install the included #8 x 2” pan-head T20 Torx wood screws (K64225) along the right-hand outer frame.
4 . Install the included #8 x 2” pan-head T20 Torx wood screws (K64225) along the top and bottom frame.
1). Parcel-only module—Return to “Parcel-Only Module Installation”, (p. 10), Step 6 to complete the installation before going on to Step 5.
2). Collection-box module—Go to “Collection-Box Hopper-Door Handle Installation”, (p. 30), to install the hopper-door handle before going on to Step 5.
NOTE: Only front-loading tenant or tenant-with-parcel units have a hold-open arm.
• When installing a parcel-only module, collection-box module, or trash/recycling bin, you may ignore all references to hold-open arm(s) in the remainder of the text.
NOTE: The #8 x 2” pan-head T20 Torx wood screws (K64225) should be tightened to ensure a snug fit.
• Overtightening beyond initial contact with the frame could hinder functionality.
• If overtightening occurs, simply back out each overtightened mounting screw.
versatile™ 4C mailbox suites

www.florencemailboxes.com versatile™ 4C Installation Manual -- 206362 -- Rev C Page 21 of 34
Multiple Installation Using Florence’s Exclusive Multi-Unit Connector Kit
STEP
4
STEP
3
STEPS
1&2
K64225
RIGHT-HAND OUTER FRAME
TOP FRAME
BOTTOM FRAME

Page 22 of 34 versatile™ 4C Installation Manual -- 206362 -- Rev C www.florencemailboxes.com
Multiple Installation Using Florence’s Exclusive Multi-Unit Connector Kit (cont.)
5 . Orient the multi-unit connector, as shown, and fasten it to the module with the included #8-18 x 1-1/4” hex-head self-drilling screws (K206551) using a cordless driver with a 1/4” nut driver.
• If installation and wall layout design does not require a multi-unit connector, the kit may not be included with the module.
6 . Place the next module in the opening until the integrated trim is flush against the wall board. Slide the module to the right until the trim is against the previously installed unit.
7 . Open the master door(s) until the hold-open arm(s) engage(s).
8 . Install the included #8-18 x 1-1/4” hex-head self-drilling screws (K206551) along the right- hand outer frame.
versatile™ 4C mailbox suites

www.florencemailboxes.com versatile™ 4C Installation Manual -- 206362 -- Rev C Page 23 of 34
Multiple Installation Using Florence’s Exclusive Multi-Unit Connector Kit (cont.)
K206551
RIGHT HAND OUTER FRAME
MULTI-UNIT CONNECTOR
K206551
STEP
8
STEPS
6&7
STEP
5
MULTI-UNIT CONNECTOR

Page 24 of 34 versatile™ 4C Installation Manual -- 206362 -- Rev C www.florencemailboxes.com
Multiple Installation Using Florence’s Exclusive Multi-Unit Connector Kit (cont.)
9 . Install the included #8 x 2” pan-head T20 Torx wood screws (K64225) along the top and bottom frame.
10 . Repeat Steps 4-9 for any additional modules that will be mounted to a multi-unit connector, otherwise proceed to Step 11.
11 . Install the included #8 x 2” pan-head T20 Torx wood screws (K64225) along the left-hand outer frame.
NOTE: The #8 x 2” pan-head T20 Torx wood screws (K64225) should be tightened to ensure a snug fit.
• However, overtightening beyond initial contact with the frame could hinder functionality.
• If overtightening occurs, simply back out each overtightened mounting screw.
versatile™ 4C mailbox suites

www.florencemailboxes.com versatile™ 4C Installation Manual -- 206362 -- Rev C Page 25 of 34
Multiple Installation Using Florence’s Exclusive Multi-Unit Connector Kit (cont.)
TOP FRAME
K64225
LEFT HAND OUTER FRAME
BOTTOM FRAME
STEP
11
STEP
9K64225

Page 26 of 34 versatile™ 4C Installation Manual -- 206362 -- Rev C www.florencemailboxes.com
1 . The collection-door bolster bracket (64782) and lock support plate (92303) are attached, at the factory, to the access door with #10-32 lock nuts (86091). Plastic spacers are placed between the lock support plate and the bolster bracket.
2 . Open the access door.
3 . Remove the four (4) #10-32 lock nuts (86091), lock support plate (92303), and plastic spacers from the access door. Discard the plastic spacers.
4 . Insert the Arrow lock (USPS) or private lock (206550) over the four (4) studs on the access door, into the collection-door bolster bracket (64782).
5 . Install the lock-support plate (92303) as oriented in the illustration.
6 . Install five (4) #10-32 lock nuts (86091).
• The nuts should be tightened to ensure a snug fit.
• Overtightening may keep the lock from operating correctly.
NOTE: Arrow lock is installed by USPS Postal Service Personnel ONLY.
• Contact your local Post Office to arrange acquisition and installation of the Arrow lock.
NOTE: Private master-access lock for private versatile™ 4C mailboxes is installed at the factory.
• If field installation is required, use the private lock (206550).
versatile™ 4C mailbox suitesAccess-Door Master Lock Installation

www.florencemailboxes.com versatile™ 4C Installation Manual -- 206362 -- Rev C Page 27 of 34
Master Door Arrow Lock Installation
64782
ACCESS DOOR
9230386091 STEP
3
STEP
5
STEPS
1&2
STEP
49230386091
ARROW LOCK (PROVIDED BY USPS)
orPRIVATE LOCK
(206550)
plastic spacer
STEP
6

Page 28 of 34 versatile™ 4C Installation Manual -- 206362 -- Rev C www.florencemailboxes.com
Parcel-Door Master Lock Installation
1 . Open the parcel door and turn the key to place the parcel-door customer lock in the locked position.
• The parcel-door customer lock must be in the locked position for the key to be removed.
2 . Remove and discard the two (2) temporary parcel cover clips, and remove the parcel-door Arrow-lock cover (64216).
• The two (2) #10-32 x 5/16” button-head McGard security screws (84993) for securing the Arrow-lock cover after lock installation are located behind the cover.
3 . Remove four (4) #10-32 thin lock nuts (86455) and the plastic spacer. The plastic spacer can be discarded.
4 . Leave the parcel-door-lock stiffener (64042) in place on the parcal door.
5 . Install the Arrow lock (USPS), or private lock (206550), as shown.
6 . Secure the lock in place using four (4) #10-32 thin lock nuts (86455).
• The nuts should be tightened to ensure a snug fit.
• Overtightening may keep the Arrow lock from operating correctly.
7 . Install the parcel-door Arrow-lock cover (64216).
8 . Secure the parcel-door Arrow-lock cover in place using two (2) #10-32 x 5/16” button-head McGard security screws (84993—USPS), or two (2) #10-32 x 0.375” one-way SS screws (84994—private).
NOTE: Arrow lock is installed by USPS Postal Service Personnel ONLY.
• Contact your local post office to arrange acquisition and installation of Arrow lock.
• A McGard screwdriver (see “Required Tools”, (p. 7), is required to remove the Arrow-lock cover
NOTE: Private master-access lock for private versatile™ 4C mailboxes is installed at the factory.
• If field installation is required, use the private lock (206550).
versatile™ 4C mailbox suites

www.florencemailboxes.com versatile™ 4C Installation Manual -- 206362 -- Rev C Page 29 of 34
Parcel-Door Arrow Lock Installation
PARCEL DOOR
STEP
4
STEP
3
STEP
2
STEP
1
86455
temporary parcel cover clip 64042
64216
64042
ARROW LOCK (PROVIDED BY USPS)
orPRIVATE LOCK
(206550)84993 (USPS)
or 84994 (private)
86455
64216
STEP
2
STEP
5
STEP
6
STEP
7
STEP
8

Page 30 of 34 versatile™ 4C Installation Manual -- 206362 -- Rev C www.florencemailboxes.com
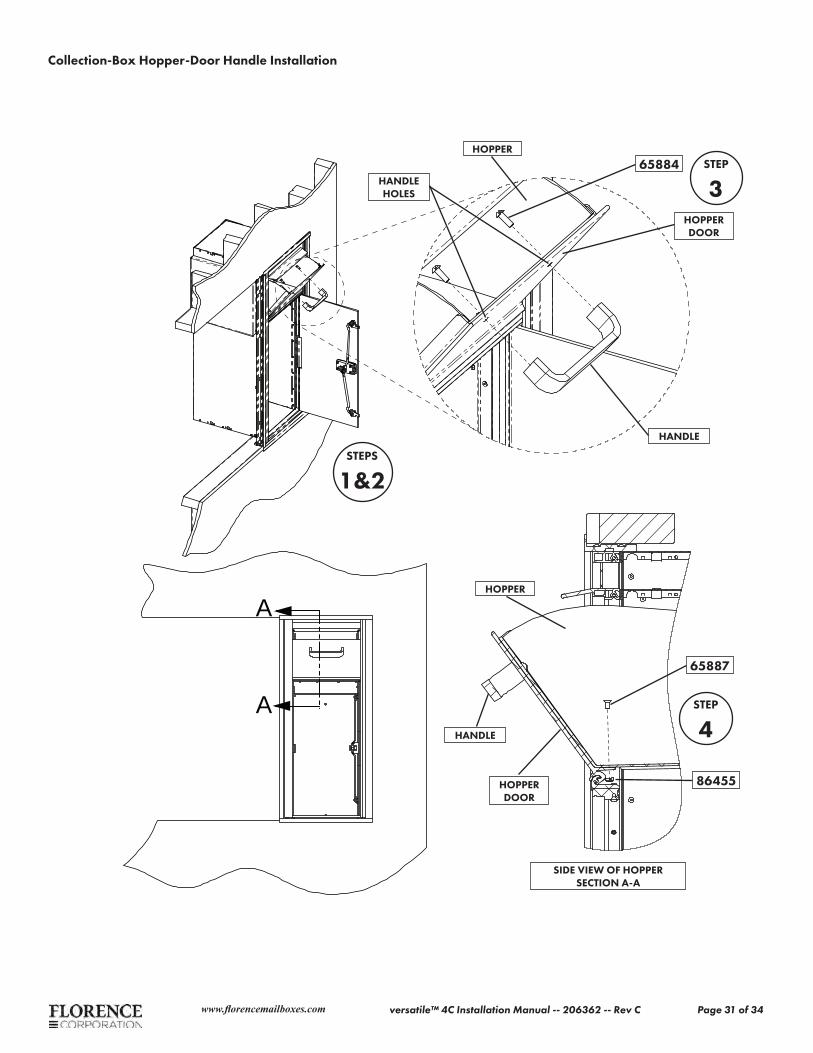
1 . Make sure the hopper door is in the upright closed position and the collection door is open. Close the master door.
2 . Push up on the hopper from underneath to lift it into the operating position, and let it rotate forward.
• Both the hopper and hopper door should open.
3 . Align the hopper handle with the handle holes through the hopper and hopper door, and install two (2) 1/4-20 x 3/4” one-way screws (65884) through the holes into the handle. (Loosely tighten only, at this time.)
4 . With the hopper open, install three (3) #10-32 x 0.375” flat-head Phillips screws (65887) through the hopper bottom and the bottom of the hopper door and secure using three (3) #10-32 thin lock nuts (86455). (Loosely tighten only, at this time.)
5 . Verify that the hopper door opens and closes freely.
• The hopper door should close by itself from the open position when the handle is released. (Adjust as necessary.)
6 . Tighten all screws and nuts from Steps 3 and 4.
Collection-Box Hopper-Door Handle Installationversatile™ 4C mailbox suites
www.florencemailboxes.com versatile™ 4C Installation Manual -- 206362 -- Rev C Page 31 of 34
Collection-Box Hopper-Door Handle Installation
A
A
86455
65884HOPPER
65887
SIDE VIEW OF HOPPERSECTION A-A
HOPPER DOOR
HANDLE
HOPPER
HANDLE
HOPPER DOOR
HANDLE HOLES
STEP
4
STEP
3
STEPS
1&2

Page 32 of 34 versatile™ 4C Installation Manual -- 206362 -- Rev C www.florencemailboxes.com
Collection-Door Arrow Lock Installation(Applicable if serviced by USPS)
1 . Insert the PSIN 1035-Y Arrow lock into the lock-support bracket (65893).
2 . With the collection door open, move the lock linkage aside and slide the lock-support bracket asembly (65893), with the PSIN 1035-Y Arrow lock, onto the collection-door bolts.
3 . Secure the Arrow lock to the collection door using four (4) #10-32 lock nuts (86091).
• These nuts should be tightened to ensure a snug fit.
• Over-tightening may keep the Arrow lock from operating correctly.
4 . Install the lock link cam onto the Arrow lock using the washer and screw supplied in the PSIN 1035-Y Arrow lock kit. (Discard the cam plate that came with the kit.)
• The screw should be tightened to ensure a snug fit.
• Overtightening may keep the Arrow lock from operating correctly.
NOTE: If the collection box is to be serviced by the USPS, the Arrow lock is installed by USPS personnel only. Contact your local Post Office to arrange acquisition and installation of “Y”-style Arrow lock. (Collection boxes require a different lock than standard 4C mailbox modules.)
SPECIAL NOTE FOR USPS PERSONNEL ONLY
A “Y”-style Arrow lock (USPS-Mail Equipment Shop Part Number PSIN 1035-Y Arrow lock) is required to install and service Florence versatile™ 4C Collection-Box Modules.
The PSIN 1035-Y Arrow lock is available only to USPS personnel via the USPS eBUY2 ordering system:
Florence can not provide the standard or “Y” style Arrow lock.
NOTE: Private master-access lock for private versatile™ 4C collection boxes is installed at the factory.
• If field installation is required, use the private lock (206550).
versatile™ 4C collection-box modules

www.florencemailboxes.com versatile™ 4C Installation Manual -- 206362 -- Rev C Page 33 of 34
Collection-Door Arrow Lock Installation
INCLUDED WITH ARROW LOCK
65893
PSIN 1035-YARROW LOCK
(PROVIDED BY USPS)
LOCK LINK CAM
INCLUDED WITH ARROW LOCK
AFTER LOCK IS INSTALLED
LOCK LINKAGE
86091
STEP
1
STEP
4STEP
1
STEP
3

Page 34 of 34 versatile™ 4C Installation Manual -- 206362 -- Rev C www.florencemailboxes.com
Service parts are available for purchase through an Authorized Florence Dealer and online at www.florencemailboxes.com/store.
Thank you for purchasing Florence products!
Replacement Parts / Maintenance
For a complete listing of all available replacement parts and/or maintenance procedures for the versatile™ 4C Mailbox Suites by Florence, please refer to the versatile™ 4C Mailbox Suites
Maintenance Manual which may be downloaded from www.florencemailboxes.com/downloads.