How to use VirtualBox to Run Our Pre-built VM Image?
7
SEED Document 1 How to use VirtualBox to Run Our Pre-built VM Image? Last Revision: May 18, 2016 The following instructions are based on VirtualBox 5.0.16. They are similar for newer versions of VirtualBox. Step 1: Create a New VM in VirtualBox Step 2: Provide a Name and Select the OS Type and Version Do NOT pick Ubuntu (64-bit), even though your machine is 64 bit. Our prebuilt VM is 32-bit Ubuntu. Click this button Choose Linux and 32-bit Ubuntu Pick any name you like
Transcript of How to use VirtualBox to Run Our Pre-built VM Image?

SEED Document 1
How to use VirtualBox to Run Our Pre-built VM Image?
Last Revision: May 18, 2016
The following instructions are based on VirtualBox 5.0.16. They are similar for newer versions of VirtualBox.
Step 1: Create a New VM in VirtualBox
Step 2: Provide a Name and Select the OS Type and Version
Do NOT pick Ubuntu (64-bit), even though your machine is 64 bit. Our prebuilt VM is 32-bit Ubuntu.
Click this button
Choose Linux and 32-bit Ubuntu
Pick any name you like

SEED Document 2
Step 3: Set the Memory Size
Step 4: Select the Pre-built VM File Provided by Us
512MB should be sufficient. If your computer has more RAM, you can increase accordingly. The more memory you give to the VM, the better the performance you will get.
Pick the SEEDUbuntu12.04.vmdk file

SEED Document 3
In the above step, you may encounter the following error:
Reason: This is because you copied the VM files from another VM, which is already loaded into VirtualBox. These two VMs have the same UUID, which is not allowed by Virtualbox. We recommend that you use the clone mechanism to create the second VM, instead of copying the files. See the appendix for details.
If you don’t see any error message, you will see that the VM is successfully created.
Successfully created

SEED Document 4
Step 6: Configure the VM
Step 6: Start the VM
Click this button
Click the “Advanced” tab
Select “Bidirectional” for both items. The first item allows users to copy and paste between the VM and the host computer. The second item allows users to transfer files between the VM and the host computer using Drag’n Drop.
Click the “Start” button

SEED Document 5
Step 7: Stop the VM or Save the VM’s State
When you are done with your VM, you can always shut it down (from inside Ubuntu). A better alternative is to “freeze” the computer, so everything is saved. When you need it again, you can “unfreeze” it, and resume from where you left off. This is much faster and convenient than shutting down and rebooting the VM. To achieve this, you can use the “Save State” option.
SEED Document 6
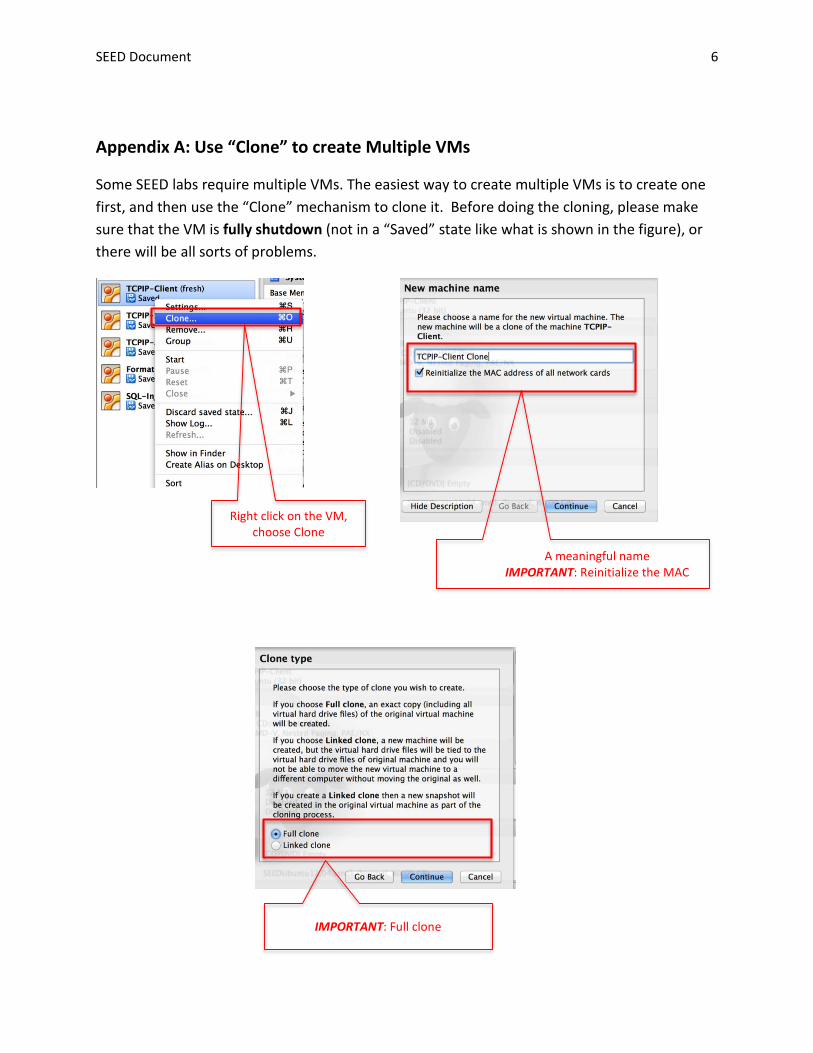
Appendix A: Use “Clone” to create Multiple VMs
Some SEED labs require multiple VMs. The easiest way to create multiple VMs is to create one first, and then use the “Clone” mechanism to clone it. Before doing the cloning, please make sure that the VM is fully shutdown (not in a “Saved” state like what is shown in the figure), or there will be all sorts of problems.
Some SEED labs require
Right click on the VM, choose Clone
1. A meaningful name 2. IMPORTANT: Reinitialize the MAC
IMPORTANT: Full clone

SEED Document 7
Appendix B: Network Configuration
If you only use one VM, the default network configuration is sufficient (it uses “NAT”). However, if you need to use multiple VMs that can communicate with each other, you cannot use the default “NAT” configuration. You need to use the “NAT Network” configuration. You can find the instructions from another document titled “Network Configuration in VirtualBox for SEED Labs”. You can find it from the SEED web site (in the “Lab Setup” page).
Appendix C: Take Snapshots and Recover from Snapshots
For some labs, you may need to make changes to the operating system. If you make a severe mistake, your VM may not be able to boot up again, and you will lost everything inside the failed VM. have done. To avoid such trouble, before doing anything dangerous to the OS, it is better to take a snapshot of your current VM. You can take as many snapshots as you want.
To restore from a snapshot that you have taken before, you can click the followings (you need to shut-down the VM first):
First click this
Then click this