Ground rules… - wasen.netwasen.net/downloads/Simple_PopUp20.pdf · popup This sets if the popup...
17
Ground rules… Ok, first off, I am glad you are willing to go for my extension Simple PopUp… I do this as a hobby and share what I build that I have found to come in handy in my own projects… I would like to ask you to keep in mind that you got this for free and that I don’t ask for anything in return. I will make modifications per request but not per demand and of course if I have the time! If you, God forbid, find a bug, let me know and I’ll try to fix it as soon as I can, ok? Please also help me out in buying new cool stuff by sending me a buck or two through PayPal: (http://wasen.net/donate.html) Table of Content How to use it… .......................................................................................................................................... 2 Joomla backend settings ........................................................................................................................... 3 SETUP - Getting it going… ......................................................................................................................... 4 * Cookie usage… ....................................................................................................................................... 5 Supported properties… ............................................................................................................................. 6 Property list:.............................................................................................................................................. 7 Advanced features… ............................................................................................................................... 11 PopUp a Login Form… ............................................................................................................................. 13 Load a PopUp from a Module ................................................................................................................. 17
Transcript of Ground rules… - wasen.netwasen.net/downloads/Simple_PopUp20.pdf · popup This sets if the popup...

Ground rules…
Ok, first off, I am glad you are willing to go for my extension Simple PopUp… I do this as a hobby and
share what I build that I have found to come in handy in my own projects…
I would like to ask you to keep in mind that you got this for free and that I don’t ask for anything in
return. I will make modifications per request but not per demand and of course if I have the time!
If you, God forbid, find a bug, let me know and I’ll try to fix it as soon as I can, ok?
Please also help me out in buying new cool stuff by sending me a buck or two through PayPal:
(http://wasen.net/donate.html)
Table of Content
How to use it… .......................................................................................................................................... 2
Joomla backend settings ........................................................................................................................... 3
SETUP - Getting it going… ......................................................................................................................... 4
* Cookie usage… ....................................................................................................................................... 5
Supported properties… ............................................................................................................................. 6
Property list: .............................................................................................................................................. 7
Advanced features… ............................................................................................................................... 11
PopUp a Login Form… ............................................................................................................................. 13
Load a PopUp from a Module ................................................................................................................. 17

How to use it… Firstly download Simple PopUp from:
http://wasen.net/index.php/projects/simple-popup
Install it like any other plugin and enable it through the Plugin manager. See picture below!
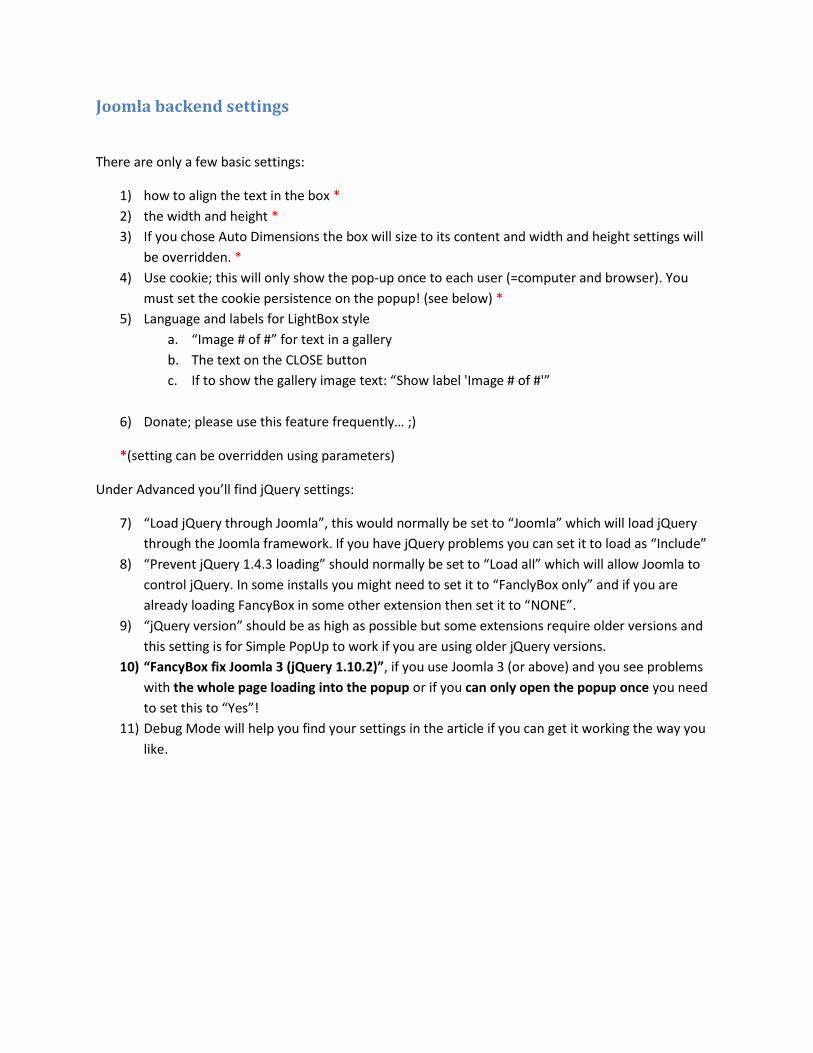
Joomla backend settings
There are only a few basic settings:
1) how to align the text in the box *
2) the width and height *
3) If you chose Auto Dimensions the box will size to its content and width and height settings will
be overridden. *
4) Use cookie; this will only show the pop-up once to each user (=computer and browser). You
must set the cookie persistence on the popup! (see below) *
5) Language and labels for LightBox style
a. “Image # of #” for text in a gallery
b. The text on the CLOSE button
c. If to show the gallery image text: “Show label 'Image # of #'”
6) Donate; please use this feature frequently… ;)
*(setting can be overridden using parameters)
Under Advanced you’ll find jQuery settings:
7) “Load jQuery through Joomla”, this would normally be set to “Joomla” which will load jQuery
through the Joomla framework. If you have jQuery problems you can set it to load as “Include”
8) “Prevent jQuery 1.4.3 loading” should normally be set to “Load all” which will allow Joomla to
control jQuery. In some installs you might need to set it to “FanclyBox only” and if you are
already loading FancyBox in some other extension then set it to “NONE”.
9) “jQuery version” should be as high as possible but some extensions require older versions and
this setting is for Simple PopUp to work if you are using older jQuery versions.
10) “FancyBox fix Joomla 3 (jQuery 1.10.2)”, if you use Joomla 3 (or above) and you see problems
with the whole page loading into the popup or if you can only open the popup once you need
to set this to “Yes”!
11) Debug Mode will help you find your settings in the article if you can get it working the way you
like.

SETUP - Getting it going… If you only want a basic simple pop-up and no extra functions:
1) Goto Article Manager and open up the Article you want to add the PopUp in edit mode.
2) Add the following code anywhere in the article text:
{simplepopup}
Ok, so here goes the text I want to display...
{/simplepopup}
This will result in a PopUp looking like this:
To be able to link to your pop-up (i.e. open it using a link) or if you are using it in “cookie mode” you
should give your pop-up a name using the name parameter. Then the above pop-up would be created
like this instead:
{simplepopup name=popUpNumber1}
Ok, so here goes the text I want to display...
{/simplepopup}
You can give it any name you want as long as you only use the letters A-Z (UPPER or lower-case is fine)
and numbers 0-9. Do NOT use any special characters or spaces!
A few samples:
1) “My Pop Up” = BAD name!
2) “MyPopUp” = Good name
3) “I’ll-get-it-going” = BAD name!
4) “IwillGetItGoing” = Good name
More on linking below in the advanced section!

* Cookie usage… If you have a message you only want to show once to a user you can enable cookie usage. “User” in the
sense of cookies is actually the same computer and browser which means that the person accessing
your site might see the message several times if he/she uses another computer or browser to access
your page.
Please note that you must give your pop-up a name and the persistence time if you want to use a
cookie!
(See more about the name parameter below!)
The cookie will be created using the name of the pop-up so if you don’t give a name to it, it won’t pop
up again until the cookie persistence time has run out.
If you give it a name and you then want to change your message you also change the name of the pop-
up and it will be shown again (once to each user).
So if you have an original text like below that you want to show once, enable cookie in settings and add:
{simplepopup name=popUp20110730 cookie=1}
Hi, welcome to my site! This will only show once a day because cookie=1
{/simplepopup}
This will show the pop-up once. If you then want to change your message and everyone should see the
new message again, just change it and also change the name, like so:
{simplepopup name=popUp20110803 cookie=1}
Hi, welcome to my site!
Please note I now support cookies!
{/simplepopup}
This will show the new pop-up once again to all users!
IMPORTANT!
The first popup in the article is the only one that can popup at page load!
If you add multiple popups in the same article you MUST move the one for auto-load (at page load) to
be first in the article (=at the top of the text) even if a cookie prevents the first popup.

Supported properties… The properties are the “settings” that you can set for each popup. Some settings are set in the backend
and will be used as default if no other setting has been set to override it for the individual popup.
E.g. if you have set the width of the popup in the Joomla Plugin Manger to 400 pixels then all popups will
be 400 pixels wide unless you “override” it using the “width” property like this:
{simplepopup name=mywidth width=600}
This popup will be 600 pixels wide instead
{/simplepopup}
Above is a sample how you can override the defaults.
NB! ALL PROPERTIES AND ENUMERATIONS MUST BE IN LOWERCASE!
VALUES CAN BE IN MIXED CASE. ENUMERATIONS (=STATIC VALUES) ARE MARKED AS UNDERLINED
BELOW.
This means that for example:
Textalign=LEFT (No good, capital “T” in textalign and LEFT is an enumeration that should be “left”
textAlign=left (No good either)
textalign=left (This is good!)
Known issues:
When adding a Youtube video you MUST provide the “true” URL for the page in the browser.
Any URL cloaking may cause a redirect instead of playing the Youtube video!
E.g. these URL’s will work:
http://www.youtube.com/v/eFysVOBriHk
http://www.youtube.com/watch?v=eFysVOBriHk
This shortened URL WON’T work:
http://www.youtu.be/eFysVOBriHk

Property list: name A unique name for the popup, this is required for several functions (cookie, links,
gallery, etc.) and recommended to always set. A name must only contain alphanumerical characters, e.g. “myName” or “thisIsMy1stPopUp”. The name must not contain any special characters or spaces!
textalign Will align the text in the popup. Default is “left”. Enumeration: - left - center - right
width The width of the box. Default is “auto”. The value “auto” will set the width automatically. Note that “auto” can’t always find the correct width of objects in the popup. Possible values:
- A positive integer, e.g. 100
height The height of the box. Default is “auto”. The value “auto” will set the height automatically. Note that “auto” can’t always find the correct height of objects in the popup. Possible values:
- A positive integer, e.g. 100
autodimensions Sets the width and height automatically.
scrolling Show scrollbars. Default is “auto”. Enumeration: - auto - yes - no
cookie Use cookie to not show the same popup more than once in a number of days. Default value “not set”. Use a negative value to delete the cookie. Set it to zero to override if the backend setting is set to create one. Possible values:
- An integer, e.g. 30 NB! If you want to delete the cookie it won’t be deleted until the user visits your site again so to make a popup appear anew just rename it instead which will create a new cookie.
popup This sets if the popup will show up at page load or not. Default is “true”. To prevent the popup from showing at page load set this to “false”. NB! There can only be one automatic popup which will be the first one found in the article where popup is set to “true” or not set at all! If you set it to “false” you must include some other means of opening the popup, like a link (see below). Enumeration:
- true - false
link This adds a clickable link to the named popup. This only creates a link and not any popup and must be linked to an existing popup. Usage: {simplepopup name=”popupFromLink” popup=”false”} Show when link is clicked {/simplepopup} Click {simplepopup link=”popupFromLink”}HERE{/simplepopup} to open a popup!

url Loads external content or Youtube (see video property) into the popup. E.g.: {simplepopup url=”http://www.google.com”}{/simplepopup} If you set “boxstyle” (see below) to “iframe” this property must be set! You can load any URL in as iframe but it is up to the browser to determine if the content is displayed correctly or not! See “mime” attribute below if your content is not displayed properly when using iframe.
mime To use external content in “iframe” style you might have to tell the browser what it is you are loading into the iframe. PDF’s and images are detected automatically by your browser (for HTML5). If the content can’t be identified you can set the mime type, e.g. “mime=application/pdf” for PDF viewer if the browser can’t detect the true content. A few common examples: PDF = application/pdf JPG = image/jpeg GIF = image/gif PNG = image/png TXT = text/plain NB! This is ONLY needed for iframe style and should not be used with boxstyle=pdf!
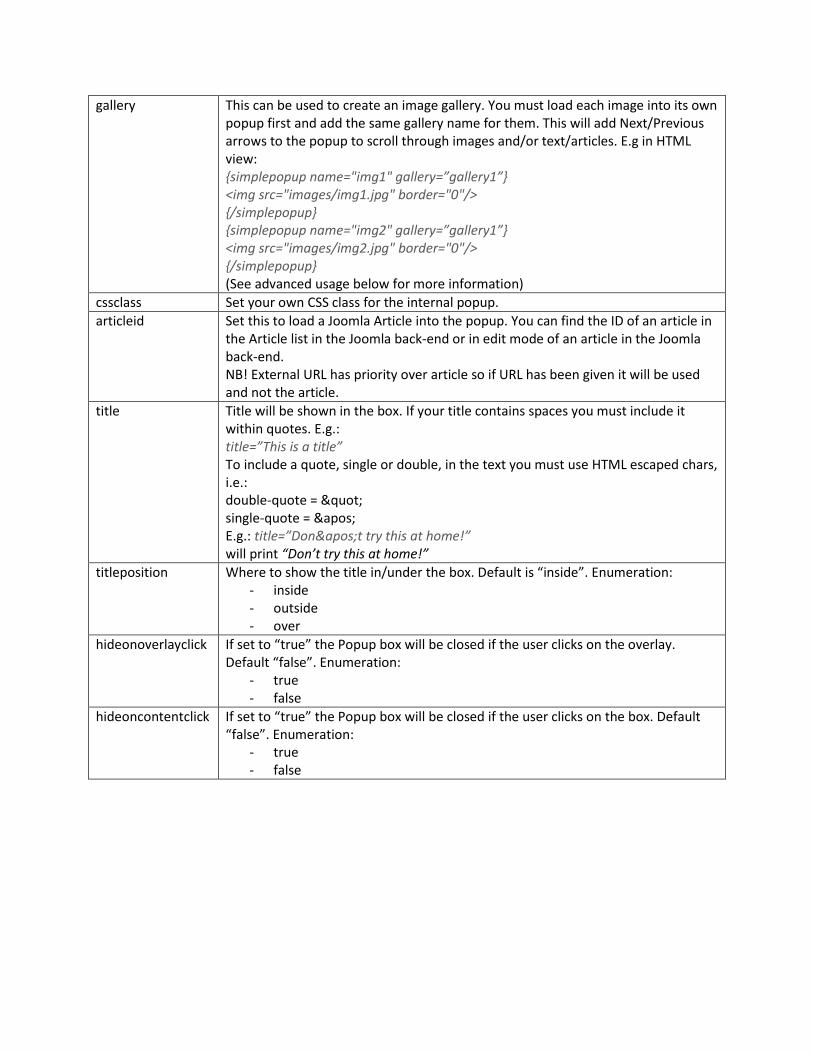
gallery This can be used to create an image gallery. You must load each image into its own popup first and add the same gallery name for them. This will add Next/Previous arrows to the popup to scroll through images and/or text/articles. E.g in HTML view: {simplepopup name="img1" gallery=”gallery1”} <img src="images/img1.jpg" border="0"/> {/simplepopup} {simplepopup name="img2" gallery=”gallery1”} <img src="images/img2.jpg" border="0"/> {/simplepopup} (See advanced usage below for more information)
cssclass Set your own CSS class for the internal popup.
articleid Set this to load a Joomla Article into the popup. You can find the ID of an article in the Article list in the Joomla back-end or in edit mode of an article in the Joomla back-end. NB! External URL has priority over article so if URL has been given it will be used and not the article.
title Title will be shown in the box. If your title contains spaces you must include it within quotes. E.g.: title=”This is a title” To include a quote, single or double, in the text you must use HTML escaped chars, i.e.: double-quote = " single-quote = ' E.g.: title=”Don't try this at home!” will print “Don’t try this at home!”
titleposition Where to show the title in/under the box. Default is “inside”. Enumeration: - inside - outside - over
hideonoverlayclick If set to “true” the Popup box will be closed if the user clicks on the overlay. Default “false”. Enumeration:
- true - false
hideoncontentclick If set to “true” the Popup box will be closed if the user clicks on the box. Default “false”. Enumeration:
- true - false

closebutton Show the close button in the upper right corner. Defult is “true”. Enumeration:
- true - false
transitionin / transitionout Show different animations on the box appearance. Default “elastic”. Enumeration:
- elastic - fade - none
speedin / speedout How fast/slow will the transition go. Default is 300 milliseconds . Value in milliseconds: A positive integer, e.g. 300
overlayshow Show or hide the overlay. Default “true”. Enumeration: - true - false
overlayopacity The opacity of the overlay. Default is 0.3. Values: - positive decimal between 0-1, e.g. 0.3
0 is transparent and 1 is completely solid.
overlaycolor The color of the overlay. Default “#666”. Values: - Any valid HTML colorcode or color, e.g. “red” or #FF0000
video Show a Youtube video. Default “true”. Enumeration: - true - false
NB! The URL to the video is given in the “url” property!
autoplay Start playback of video automatically. Default “false”. Enumeration: - true - false
boxstyle Set this to mimic a “lightbox” style of the popup, an iFrame to load external contenet or PDF viewer. Default is “fancybox”. Enumeration:
- fancybox (default box) - lightbox (mostly for image galleries) - iframe (NB! MUST be used together with a “url” property) - pdf (NB! MUST be used together with a “url” property and will
open a PDF viewer (pdfjs) to show a PDF file)
jqueryloading Use this to override the default jQuery loading settings from the back-end settings for any page that already have jQuery loaded. You must add this on the FIRST popup in the article! Default “all”. Enumeration:
- all - fancybox - none
delayopen Set a delay in milliseconds (1 sec = 1000 milliseconds) before the initial popup is opened. You can’t set a delay on popup from links, only if the popup is loaded automatically on page-load!
delayclose Set a delay in milliseconds (1 sec = 1000 milliseconds) until the popup box is automatically closed. You can set “delayclose” on any popup box, also on popups opened from links.

Advanced features…
The first instance of {simplepopup} in the Article that is not a “link” (see below) will be the one
popping up at page load!
o To prevent the pop-up at page load add the following:
{simplepopup popup=false}The PopUp text here…{/simplepopup}
For this to have any real function though you should also give it a name
and use it as “linked pop-ups” (see below). Else you will never be able to
open the pop-up.
Using a link to populate the content:
{simplepopup url=http://www.google.com}{/simplepopup}
This will open a pop-up with the content from Google.com in it.
NB! Your server (PHP) must allow to load external content else you can only load local
resources!
Using linked pop-ups, i.e. adding a link in the Article text that will open the pop-up window:
o For the link:
{simplepopup link=nameOfPopUp}Link Text{/simplepopup}
o For the pop-up box:
{simplepopup name=nameOfPopUp}The PopUp text here…{/simplepopup}
As you notice above you must use the same name in the link as in the pop-up. This will add a
clickable link in your article text and clicking on it will open the pop-up showing the text “The
PopUp text here…”.
Adding an image:
o {simplepopup name=spuImage} {/simplepopup}
Use the Article editor to add the image just like you would in a regular Article.
The HTML code would look like this:
{simplepopup name=spuImage}
<img src="tmp/avatar.jpg" border="0"/>
{/simplepopup}
o If you want to pop-up the image using a link simply add a “link” item, like:
{simplepopup link=spuImage}PopUp Image{/simplepopup}

Adding an “image gallery”:
o Add images just like above, each image must have a unique name!
o Add links for each image and use a “rel” attribute to “relate” images to each other, like
below:
{simplepopup link=spuImage1 gallery=gallery1}PopUp Image{/simplepopup}
{simplepopup link=spuImage2 gallery=gallery1}PopUp Image{/simplepopup}
o This will add a “gallery” with two linked images in it, i.e. you will have “next” and
“previous” buttons to click in the pop-up.
o If you only want to display one link for the Gallery, use “hidden” on the other links (not
the first one though):
{simplepopup link=spuImage2 gallery=gallery1 hidden=true}PopUp
Image{/simplepopup}
o You can also add a title to the images, like below:
{simplepopup link=spuImage2 gallery=gallery1 hidden=true title= ' This is the
second picture ' }PopUp Image{/simplepopup}

PopUp a Login Form…
Ok,I have gotten a lot of questions on how to get the Login Form stuffed into SPU… It is really fairly easy
and you can use the Joomla Login module straight off…
Start by making sure that the Joomla plugin “Content - Load Modules” is enabled (“loadposition” for
Joomla 1.5)!
First you need to prepear (or steal) the Joomla Login Module. Head over the Module Manager in the
back-end settings and find “Login” in the list.
Either you just use the Login Module already there or you can “duplicate” it. If you duplicate it you need
to give it a new position, do NOT select a position from the list!
Just type a custom position, e.g. “spuloginform”.
Then take note of the position, in my case it is “loginload” as I use the standard Module, as you are
going to need it in a short while…

If you use the existing one, which I did, you need to enter the settings and chose where it should be
shown, in my case the I show it only on a page called “Login”.
Save and close your Login Module.
Then head over to the Article Manager and find the article loaded on the page you need the pop-up on.
I am going to use an Article called “Login Module” from the samples pages. Open the Article for editing.
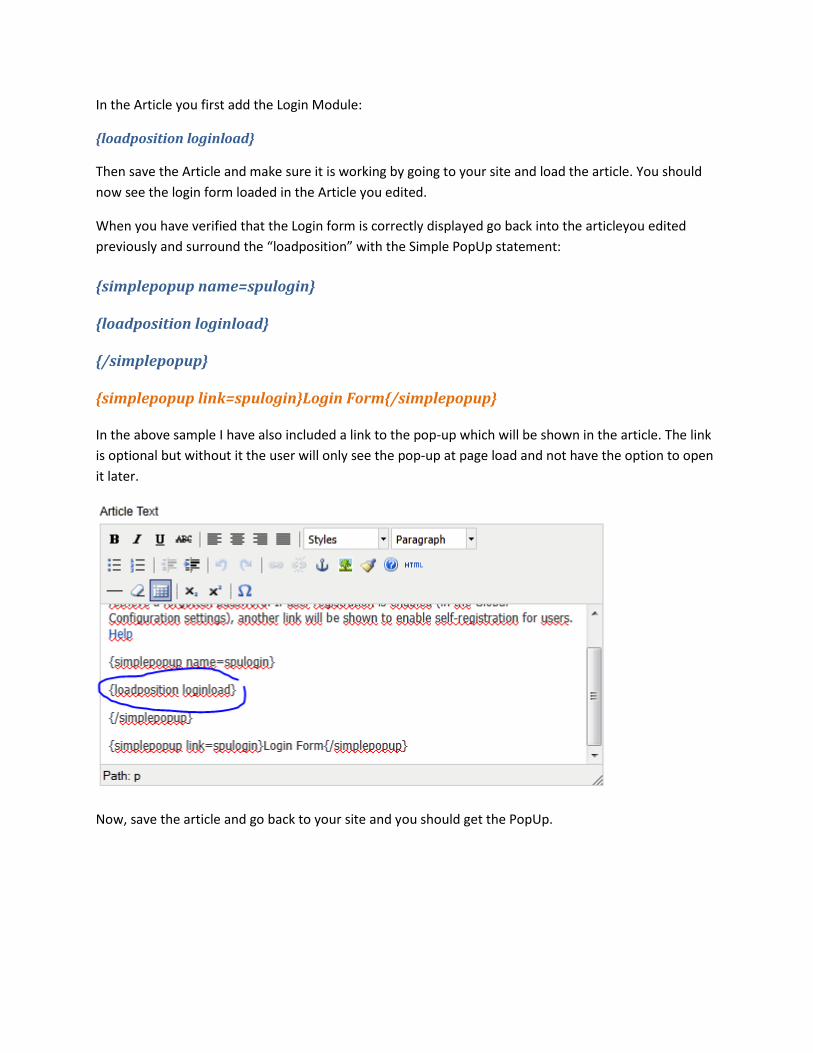
In the Article you first add the Login Module:
{loadposition loginload}
Then save the Article and make sure it is working by going to your site and load the article. You should
now see the login form loaded in the Article you edited.
When you have verified that the Login form is correctly displayed go back into the articleyou edited
previously and surround the “loadposition” with the Simple PopUp statement:
{simplepopup name=spulogin}
{loadposition loginload}
{/simplepopup}
{simplepopup link=spulogin}Login Form{/simplepopup}
In the above sample I have also included a link to the pop-up which will be shown in the article. The link
is optional but without it the user will only see the pop-up at page load and not have the option to open
it later.
Now, save the article and go back to your site and you should get the PopUp.

The Login form loaded inside the PopUp.
Here the user is already logged in. Please also note the “Login Form” link created on the page which will
open the PopUp again.

Load a PopUp from a Module
Go to Module manager and select to create a new “Custom HTML Module” and name it (don’t worry,
we’ll hide the name later on).
Next select a position for the module (it must be in a "visible" position on the page) and before moving
on, go to the page and make sure you can see the empty module (it will show the name you set for it).
If you can’t find it make sure it is enabled and that you use a position that is visible on the page, e.g.
“Left”, “Right” or “Top” is normally displayed but it depends on your Template.
Once you know it is visible set it to hide the title and it won't show any content.
Now in the source for the Custom HTML module you add the Simple PopUp tags, e.g:
{simplepopup}TEXT TO SHOW{/simplepopup}
Now set the option "Prepare Content" to "Yes" and that should be it!
Now when you reload the page with the Module you should see the popup.
To create additional popup’s on other pages just copy the Custom HTML Module into other
pages/menus.
Beware though that loading the module on different pages can mean different jQuery settings loaded so
the popup might work on some pages but not others. In that case you might have to deal with jQuery
conflicts. The easiest is then normally to get a "conflict remover" plugin and set SPU to load as "FancyBox
Only" and load as "Include".


![Leferi popup store [lancome] 2014.10.17.](https://static.fdocuments.in/doc/165x107/5590d5f51a28ab56148b47a3/leferi-popup-store-lancome-20141017.jpg)