GeoSpatial Population Estimator Software User’s … support of and in cooperation with: ......
80
G G e e o o S S p p a a t t i i a a l l P P o o p p u u l l a a t t i i o o n n E E s s t t i i m m a a t t o o r r S S o o f f t t w w a a r r e e U U s s e e r r ’ ’ s s G G u u i i d d e e Mark D Ross by Robert A DeLong Alaska Department of Fish and Game Division of Wildlife Conservation
Transcript of GeoSpatial Population Estimator Software User’s … support of and in cooperation with: ......

GGeeooSSppaattiiaall PPooppuullaattiioonn EEssttiimmaattoorr SSooffttwwaarree
UUsseerr’’ss GGuuiiddee
Mark D Ross
bbyy
RRoobbeerrtt AA DDeeLLoonngg AAllaasskkaa DDeeppaarrttmmeenntt ooff FFiisshh aanndd GGaammee
DDiivviissiioonn ooff WWiillddlliiffee CCoonnsseerrvvaattiioonn

22000066
The Alaska Department of Fish and Game administers all programs and activities free from discrimination based on race, color, national origin, age, sex, religion, marital status, pregnancy, parenthood, or disability. The department administers all programs and activities in compliance with Title VI of the Civil Rights Act of 1964, Section 504 of the Rehabilitation Act of 1973, Title II of the Americans with Disabilities Act of 1990, the Age Discrimination Act of 1975, and Title IX of the Education Amendments of 1972.
If you believe you have been discriminated against in any program, activity, or facility, or if you desire further information please write to ADF&G, PO Box 115525, Juneau, AK 99811-5525; US Fish and

Wildlife Service, 4040 N Fairfield Drive, Suite 300, Arlington, VA 22203 or OEO, US Department of the Interior, Washington DC 20240.
For information on alternative formats for this and other department publications, please contact the department ADA Coordinator at (voice) 907-465-4120, (TDD) 907-465-3646, or (FAX) 907-465-2440.


The GeoSpatial Population Estimator software and this manual were produced with the financial support of and in cooperation with:
NATIONAL PARK SERVICE Gates of the Arctic National Park and Preserve
Yukon-Charley Rivers National Preserve 201 First Avenue, Fairbanks, AK 99701, USA
US FISH AND WILDLIFE SERVICE, ALASKA REGION
101 12th Avenue, Room 264, Box 14, Fairbanks, AK 99701, USA The following refuges contributed funding: Arctic National Wildlife Refuge, Kanuti National Wildlife Refuge, Koyukuk/Nowitna Refuge Complex, Selawik National Wildlife Refuge,
Tetlin National Wildlife Refuge, Yukon Flats National Wildlife Refuge, and the Division of Natural Resources, Refuges. Alaska Regional Office
GOVERNMENT OF YUKON
DEPARTMENT OF ENVIRONMENT, FISH AND WILDLIFE BRANCH Box 2703, Whitehorse, Yukon Y1A2C6, Canada
THE GOVERNMENT OF THE NORTHWEST TERRITORIES
DEPARTMENT OF ENVIRONMENT AND NATURAL RESOURCES, WILDLIFE DIVISION 600 5102 50th Avenue, Yellowknife, NT X1A3S8, Canada
Cite this publication as:
DELONG RA. 2006. Geospatial population estimator software user’s guide. Alaska Department of Fish and Game. Fairbanks, Alaska, USA.
Electronic copies of this publication can be obtained from our website:
http://winfonet.alaska.gov/index.cfm?fuseaction=sandimoosesurveys.documentation
Note: A user account is required for access to this website. A user account can be obtained by contacting the author at e-mail: [email protected]
For a free hard copy, please contact: Laura McCarthy, Publications Technician
ADF&G/Wildlife Conservation 1300 College Road
Fairbanks, AK 99701-1599 tele: (907) 459 7241
e-mail: [email protected]


i
CONTENTS
I. GETTING STARTED .......................................................................................................1 A HOW TO ACCESS THE SOFTWARE ......................................................................................... 1 B OBTAIN DOCUMENTATION ................................................................................................... 3 C DATA STORAGE AND BACKUP ............................................................................................. 4 D HOW TO USE THIS SOFTWARE PACKAGE ............................................................................. 5
II. ENTERING AND EDITING SURVEY DATA ..............................................................6 A CREATE A NEW MOOSE SURVEY ......................................................................................... 6 B EDIT SURVEY INFORMATION ................................................................................................ 7 C ASSIGN SAMPLE UNITS TO SURVEY ................................................................................... 12 D DEFINE ANALYSIS AREAS .................................................................................................. 13 E EDIT SAMPLE UNITS .......................................................................................................... 16 F RANDOMIZE SURVEY ......................................................................................................... 18 G SELECT FOR SAMPLING ...................................................................................................... 19 H ENTER/EDIT OBSERVATION DATA ..................................................................................... 21 I EDIT GLOBAL DATA .......................................................................................................... 23
III. UPLOADING SURVEY DATA FROM OTHER DATA SOURCES ........................30 A UPLOAD FILE DESCRIPTION ............................................................................................... 30 B UPLOAD DATA TO A SURVEY ............................................................................................. 33
IV. DOWNLOADING SURVEY DATA TO YOUR COMPUTER ..................................42 V. CALCULATING POPULATION AND COMPOSITION ESTIMATES..................46
A POPULATION ESTIMATES ................................................................................................... 47 B COMPOSITION RATIO ESTIMATES ....................................................................................... 55
VI. MANAGING SECURITY FOR YOUR DATA ............................................................64 A MODIFY ACCESS RIGHTS TO YOUR DATA .......................................................................... 64 B DETERMINE WHO HAS ACCESS TO YOUR DATA ................................................................ 69
VII. ACKNOWLEDGMENTS ...............................................................................................72 VIII. REFERENCES .................................................................................................................72
ii
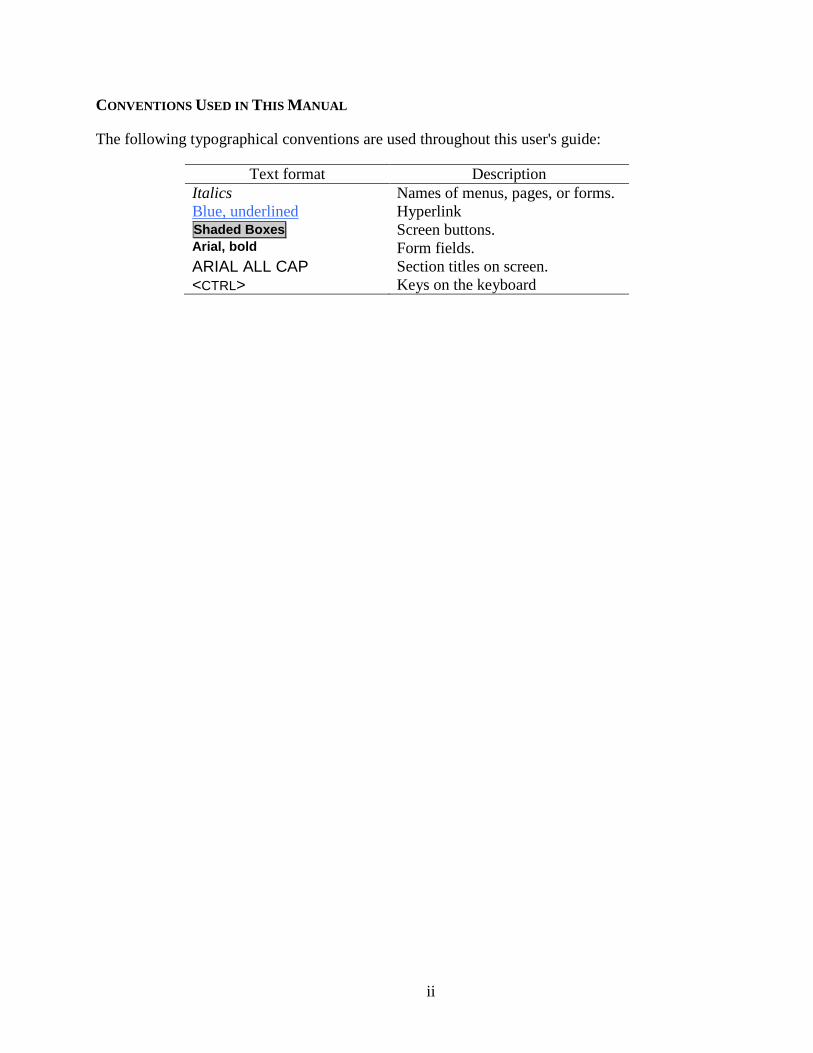
CONVENTIONS USED IN THIS MANUAL
The following typographical conventions are used throughout this user's guide:
Text format Description Italics Names of menus, pages, or forms. Blue, underlined Hyperlink Shaded Boxes Screen buttons. Arial, bold Form fields. ARIAL ALL CAP Section titles on screen. <CTRL> Keys on the keyboard

GSPE Software User's Guide 1
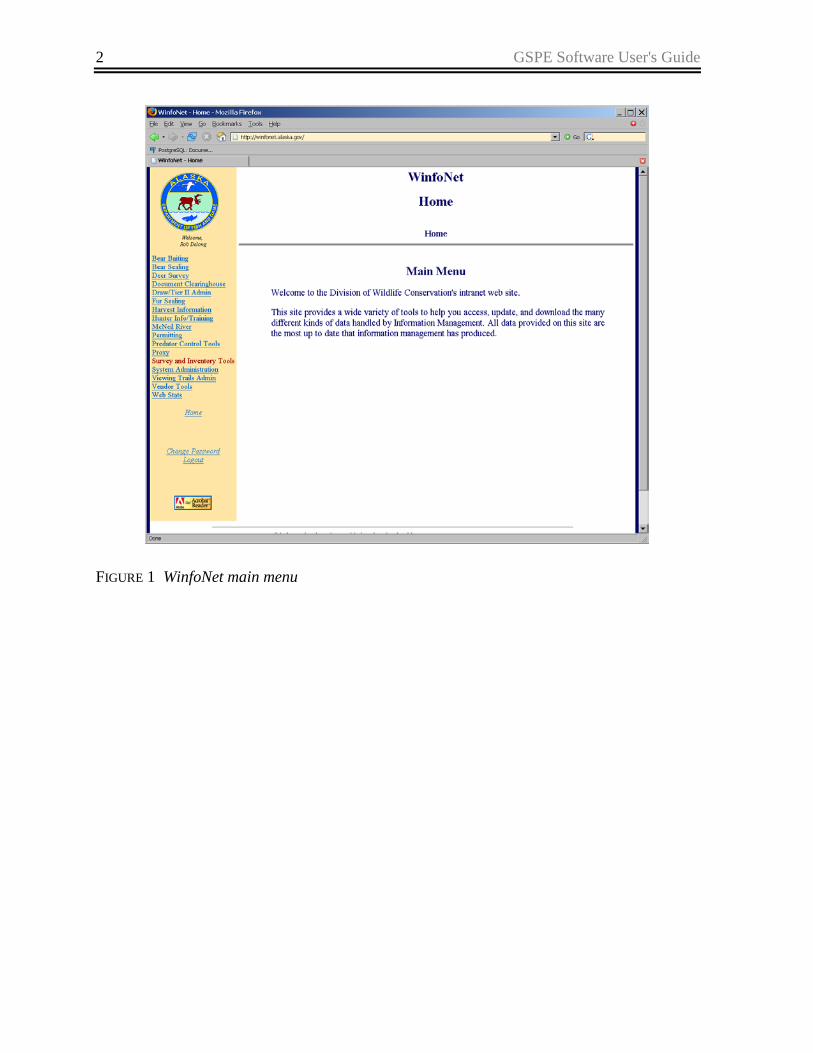
I. GETTING STARTED A HOW TO ACCESS THE SOFTWARE The GeoSpatial Population Estimator (GSPE) moose survey software provides a variety of tools for analyzing, modifying, uploading, and retrieving moose survey datasets. The software is primarily for use with moose surveys conducted using the geospatial methods described in Ver Hoef (2001, 2002) (GSPE surveys). It also supports storage and analysis of datasets collected using the stratified random sampling design described in Gasaway et al. (1986) (Gasaway surveys). The GSPE software is hosted on the Alaska Department of Fish and Game (ADF&G) Intranet at http://WinfoNet.alaska.gov (WinfoNet). Access to this website is controlled by username and password. When you access the site you will be asked to log in using the username assigned to your account. The first time you log in, you will be asked to select a new password. This password is not case sensitive. A user account can be obtained by contacting the author ([email protected]).
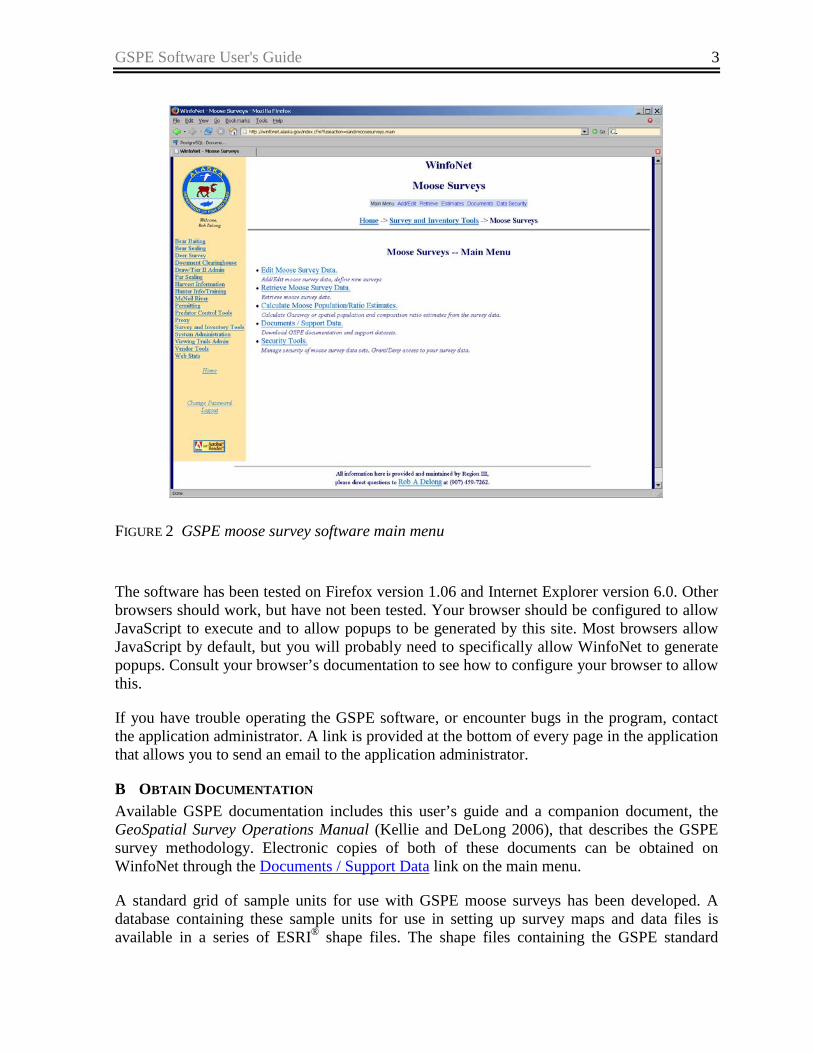
From the WinfoNet main menu (Fig 1), you can navigate to the moose survey software by following the Survey and Inventory Tools link in the gold sidebar and then choosing Moose Surveys from the menu. This will get you to the GSPE moose survey software main menu (Fig 2).
2 GSPE Software User's Guide
FIGURE 1 WinfoNet main menu
GSPE Software User's Guide 3
FIGURE 2 GSPE moose survey software main menu
The software has been tested on Firefox version 1.06 and Internet Explorer version 6.0. Other browsers should work, but have not been tested. Your browser should be configured to allow JavaScript to execute and to allow popups to be generated by this site. Most browsers allow JavaScript by default, but you will probably need to specifically allow WinfoNet to generate popups. Consult your browser’s documentation to see how to configure your browser to allow this.
If you have trouble operating the GSPE software, or encounter bugs in the program, contact the application administrator. A link is provided at the bottom of every page in the application that allows you to send an email to the application administrator.
B OBTAIN DOCUMENTATION Available GSPE documentation includes this user’s guide and a companion document, the GeoSpatial Survey Operations Manual (Kellie and DeLong 2006), that describes the GSPE survey methodology. Electronic copies of both of these documents can be obtained on WinfoNet through the Documents / Support Data link on the main menu.
A standard grid of sample units for use with GSPE moose surveys has been developed. A database containing these sample units for use in setting up survey maps and data files is available in a series of ESRI® shape files. The shape files containing the GSPE standard

4 GSPE Software User's Guide
survey grid are also available through the Documents / Support Data link on the main menu. Clicking on the GSPE Standard Sample Unit Grid link in the documents menu will take you to a FTP server hosted by the Alaska Department of Fish and Game at ftp://ftpr3.adfg.state.ak.us/moose_surveys/. Zip archives containing the grid shape files can be downloaded by right clicking the file you want and saving it to your hard drive. The standard survey grid shape files are divided by management region in Alaska, and into western and eastern Canada as depicted in Figure 3. You will need compatible decompression software to extract the shape files from the zip archives.
FIGURE 3 Geographic extents and file names of the various ESRI shape files containing the GSPE standard survey grid.
C DATA STORAGE AND BACKUP Moose survey data stored in the GSPE software system are held on a database server hosted by ADF&G and located in Anchorage, Alaska. These data are backed up every 4 hours to storage on a separate machine. While ADF&G will make every effort to ensure that servers are kept available 24/7, the possibility exists of experiencing service interruptions or software errors. If you use this software you agree to hold the State of Alaska, Department of Fish and Game harmless for any damages that might be experienced due to service interruptions, loss of data, or errors in the software.

GSPE Software User's Guide 5
D HOW TO USE THIS SOFTWARE PACKAGE This manual presents the GSPE software tools in the order in which they appear in the software menus. The order in which you make use of these tools may not follow the order in which they are presented. You will probably find it useful to use these tools in conjunction with other software packages in order to efficiently plan, conduct, and analyze your moose surveys. Datasets for a moose survey can be repeatedly uploaded and downloaded providing you with flexibility in choosing the tools that you use to accomplish data management tasks for your moose survey. For example, a GIS package can be used in conjunction with the standard survey grid shape files to efficiently lay out survey boundaries and create a data file containing the sample units in a survey. You can load that data file into the GSPE software for randomization and selection of sample units for sampling, then download it again for production of survey flight maps. Familiarize yourself with all sections of this manual to make yourself aware of the available tools in the GSPE software. This will allow you to use the software in the manner that is most efficient for your own situation and skills.

6 GSPE Software User's Guide
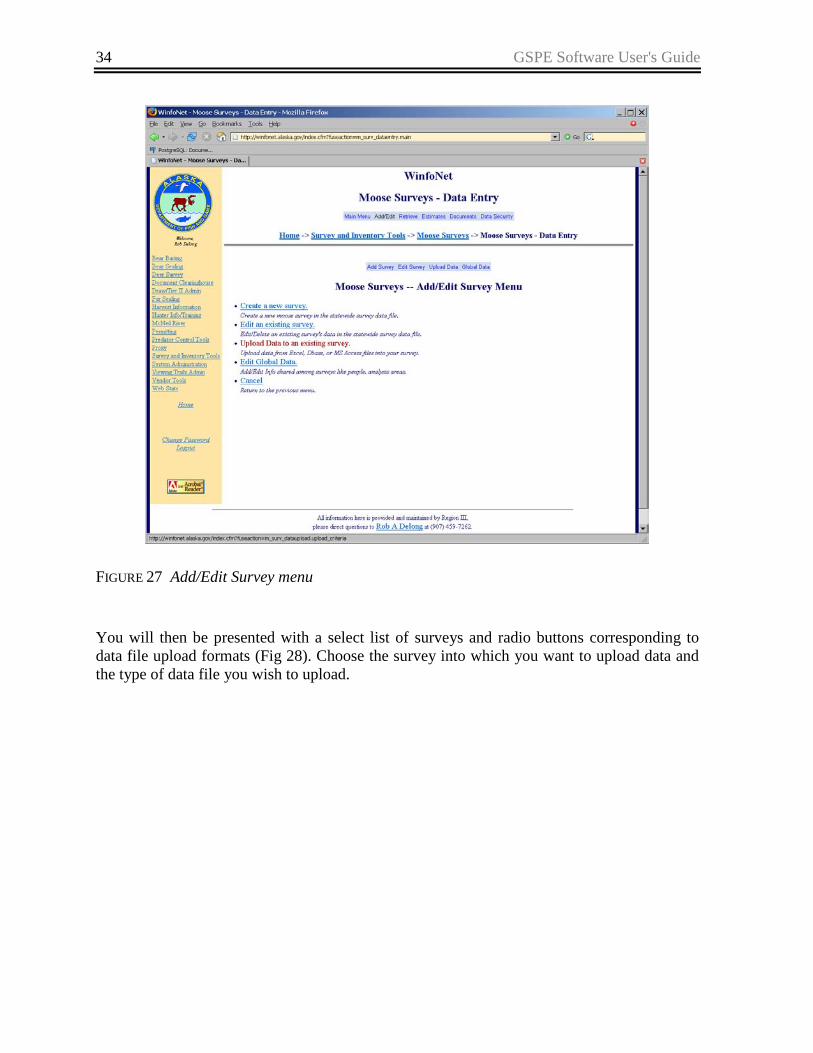
II. ENTERING AND EDITING SURVEY DATA To edit existing moose survey data and to define new moose surveys select the Edit Moose Survey Data link from the GSPE moose survey software main menu (Fig 2). This will take you to the Add/Edit Survey menu (Fig 4).
A CREATE A NEW MOOSE SURVEY To create a new moose survey, click the Create a new survey link in the Add/Edit Survey menu.
FIGURE 4 Add/Edit Survey menu
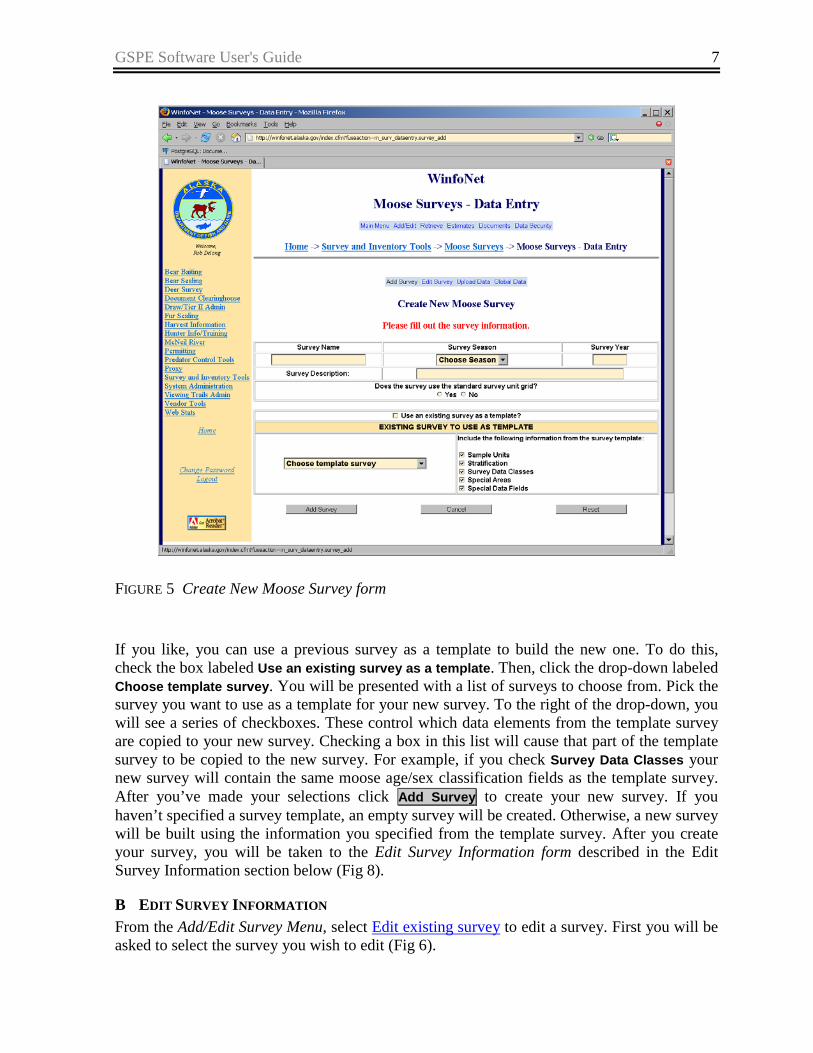
You will then be presented with the Create New Moose Survey form (Fig 5). Enter a name for your survey, and choose the season and calendar year it was conducted. You should use the same name for a survey from year-to-year to make it easier to keep track of them over time. The description field is a text field that allows you to type in a brief description of your survey. You are required to specify whether or not your survey uses the standard sample unit grid by clicking on the appropriate radio button. If the sample units in your moose survey are from the standard sample unit grid, then you should select yes, otherwise select no.
GSPE Software User's Guide 7
FIGURE 5 Create New Moose Survey form
If you like, you can use a previous survey as a template to build the new one. To do this, check the box labeled Use an existing survey as a template. Then, click the drop-down labeled Choose template survey. You will be presented with a list of surveys to choose from. Pick the survey you want to use as a template for your new survey. To the right of the drop-down, you will see a series of checkboxes. These control which data elements from the template survey are copied to your new survey. Checking a box in this list will cause that part of the template survey to be copied to the new survey. For example, if you check Survey Data Classes your new survey will contain the same moose age/sex classification fields as the template survey. After you’ve made your selections click Add Survey to create your new survey. If you haven’t specified a survey template, an empty survey will be created. Otherwise, a new survey will be built using the information you specified from the template survey. After you create your survey, you will be taken to the Edit Survey Information form described in the Edit Survey Information section below (Fig 8).
B EDIT SURVEY INFORMATION From the Add/Edit Survey Menu, select Edit existing survey to edit a survey. First you will be asked to select the survey you wish to edit (Fig 6).

8 GSPE Software User's Guide
FIGURE 6 Select a survey to edit
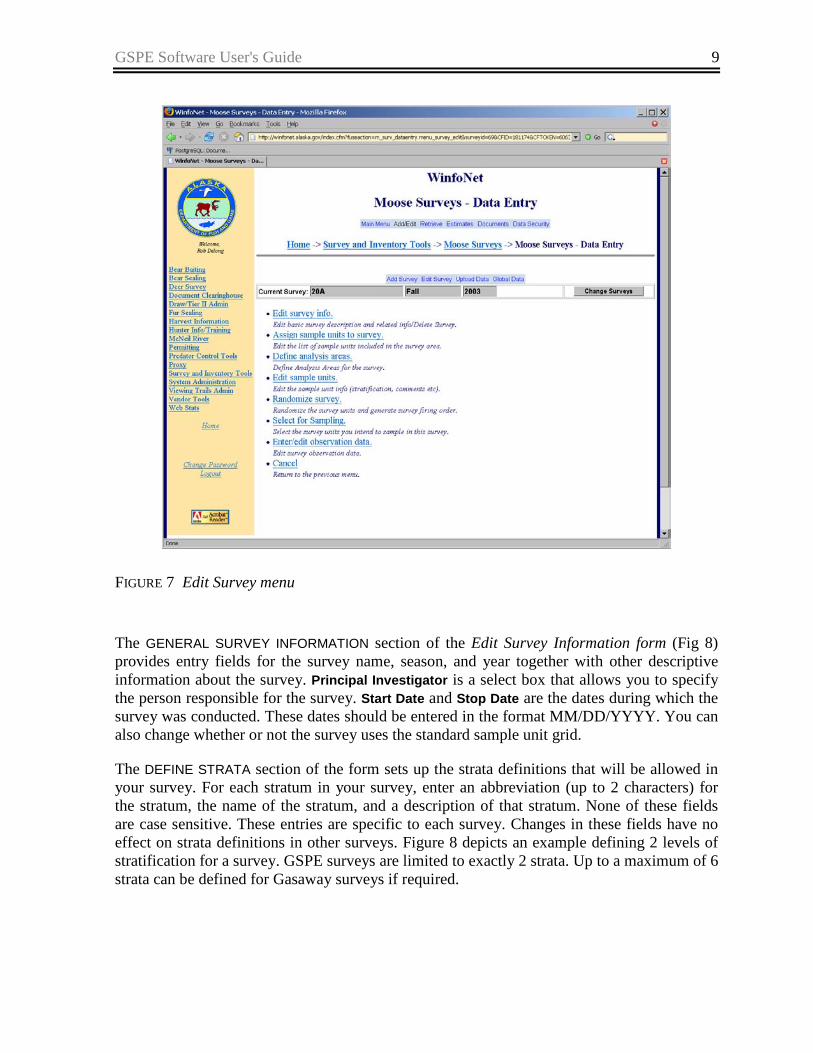
After choosing your survey, you will be taken to the Edit Survey menu (Fig 7). The first menu item, Edit survey info, allows you to edit the description, stratification, survey data classes, and special data fields associated with your survey. Selecting this link will take you to the Edit Survey Information form (Fig 8).
GSPE Software User's Guide 9
FIGURE 7 Edit Survey menu
The GENERAL SURVEY INFORMATION section of the Edit Survey Information form (Fig 8) provides entry fields for the survey name, season, and year together with other descriptive information about the survey. Principal Investigator is a select box that allows you to specify the person responsible for the survey. Start Date and Stop Date are the dates during which the survey was conducted. These dates should be entered in the format MM/DD/YYYY. You can also change whether or not the survey uses the standard sample unit grid.
The DEFINE STRATA section of the form sets up the strata definitions that will be allowed in your survey. For each stratum in your survey, enter an abbreviation (up to 2 characters) for the stratum, the name of the stratum, and a description of that stratum. None of these fields are case sensitive. These entries are specific to each survey. Changes in these fields have no effect on strata definitions in other surveys. Figure 8 depicts an example defining 2 levels of stratification for a survey. GSPE surveys are limited to exactly 2 strata. Up to a maximum of 6 strata can be defined for Gasaway surveys if required.

10 GSPE Software User's Guide
FIGURE 8 Edit Survey Information form
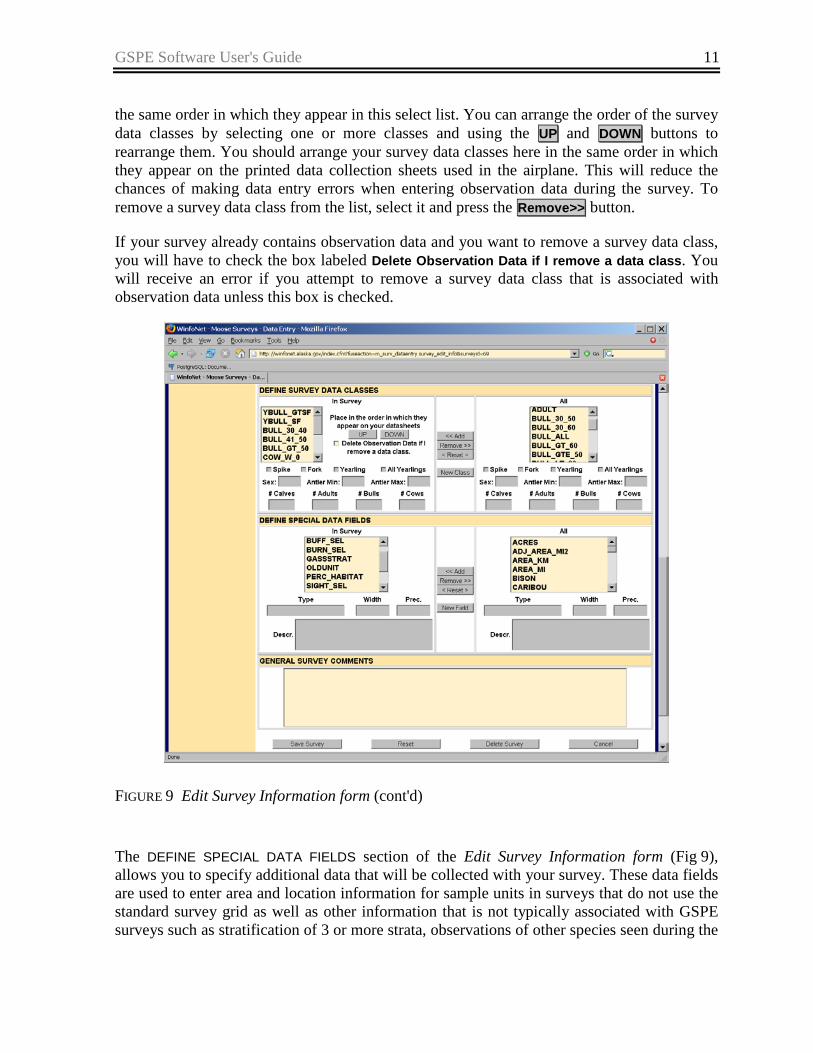
The DEFINE SURVEY DATA CLASSES section of the Edit Survey Information form (Fig 9) allows you to specify how you will organize moose observations into age and sex classifications (survey data classes). The list of possible survey data classes appears in the select list labeled All on the right side in this section. It is not possible to directly edit this list because changes to the survey data class definitions affect all surveys in the database. If you need a new survey data class defined for your survey, contact the application administrator using the email link found at the bottom of every page in the GSPE software with your request. When you click on a survey data class, the boxes below the select list will display information about what kind of moose are included in that particular classification. To add a survey data class to your survey, select the survey data class in the All select list and press the <<Add button. If you want to add multiple survey data classes simultaneously, hold the <CTRL> key down while selecting the ones you want to add. If you select one you don’t want, simply click on it again while holding the <CTRL> key to deselect it.
The select list labeled In Survey on the left in this section displays the survey data classes that will be assigned to your survey. Selecting a class will display the classification details in the boxes below the select list. The survey data classes will be collected in the data entry forms in
GSPE Software User's Guide 11
the same order in which they appear in this select list. You can arrange the order of the survey data classes by selecting one or more classes and using the UP and DOWN buttons to rearrange them. You should arrange your survey data classes here in the same order in which they appear on the printed data collection sheets used in the airplane. This will reduce the chances of making data entry errors when entering observation data during the survey. To remove a survey data class from the list, select it and press the Remove>> button.
If your survey already contains observation data and you want to remove a survey data class, you will have to check the box labeled Delete Observation Data if I remove a data class. You will receive an error if you attempt to remove a survey data class that is associated with observation data unless this box is checked.
FIGURE 9 Edit Survey Information form (cont'd)
The DEFINE SPECIAL DATA FIELDS section of the Edit Survey Information form (Fig 9), allows you to specify additional data that will be collected with your survey. These data fields are used to enter area and location information for sample units in surveys that do not use the standard survey grid as well as other information that is not typically associated with GSPE surveys such as stratification of 3 or more strata, observations of other species seen during the

12 GSPE Software User's Guide
survey, or columns to be used in place of the standard counted column when you wish to exclude observation data for some analyses. The list of available special data fields appears in the select list labeled All on the right side of this section. If you need an addition to the list of special data fields for your survey, contact the application administrator using the email link found at the bottom of every page in the GSPE software with your request. This section works in the same way as the survey data class section of this form. Clicking on a special data field displays a description of the data type and purpose of the field in the boxes below the select list. Add fields to your survey by selecting them in the select list of All fields and pressing <<Add . Remove fields from your survey by selecting them in the select list labeled In Survey and pressing Remove>> . The last field in this form is for general comments about the survey. This field should be used for recording general information about the survey, like conditions that might have affected the quality of the survey. After you have completed the form, press Save Survey to save your entries.
C ASSIGN SAMPLE UNITS TO SURVEY After defining your survey, you must assign a set of sample units to the survey in order to establish the survey area. Selecting the Assign sample units to survey link in the Edit Survey menu will take you to the Assign Sample Units form (Fig 10). This option is only available if your survey uses the standard sample unit grid. If you are conducting a survey that uses nonstandard sample units, you should review the section on uploading survey data for information on how to import data into the system.
GSPE Software User's Guide 13
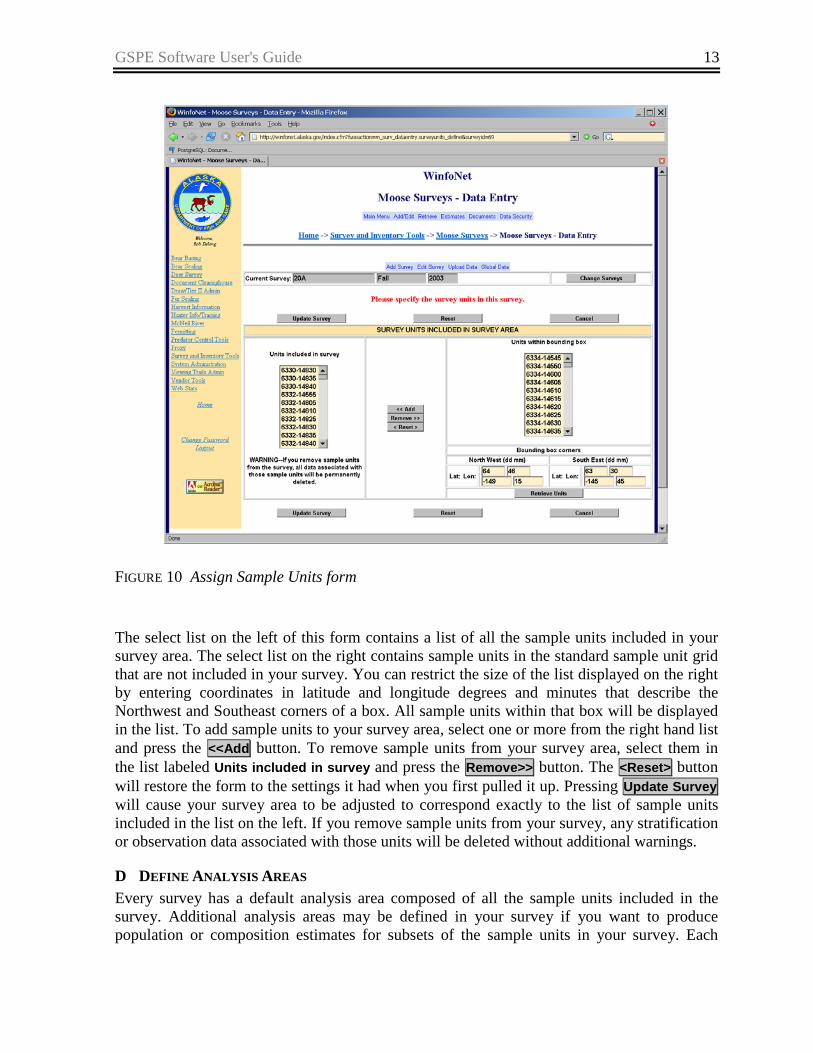
FIGURE 10 Assign Sample Units form
The select list on the left of this form contains a list of all the sample units included in your survey area. The select list on the right contains sample units in the standard sample unit grid that are not included in your survey. You can restrict the size of the list displayed on the right by entering coordinates in latitude and longitude degrees and minutes that describe the Northwest and Southeast corners of a box. All sample units within that box will be displayed in the list. To add sample units to your survey area, select one or more from the right hand list and press the <<Add button. To remove sample units from your survey area, select them in the list labeled Units included in survey and press the Remove>> button. The <Reset> button will restore the form to the settings it had when you first pulled it up. Pressing Update Survey will cause your survey area to be adjusted to correspond exactly to the list of sample units included in the list on the left. If you remove sample units from your survey, any stratification or observation data associated with those units will be deleted without additional warnings.
D DEFINE ANALYSIS AREAS Every survey has a default analysis area composed of all the sample units included in the survey. Additional analysis areas may be defined in your survey if you want to produce population or composition estimates for subsets of the sample units in your survey. Each

14 GSPE Software User's Guide
analysis area definition consists of an analysis area name and a set of sample units from your survey that belong in that analysis area. If you are uploading a data set into a survey using the process described in Section III. Uploading Survey Data from Other Data Sources, you may define your analysis areas as columns in your upload data and create the analysis area names in the software using the instructions in Section II. I Edit Global Data. You may also define analysis areas interactively using the Define analysis areas link on the Edit Survey Menu.
If you select the Define analysis areas link on the Edit Survey Menu, you will be directed to the Analysis Area menu (Fig 11).
FIGURE 11 Analysis Area menu
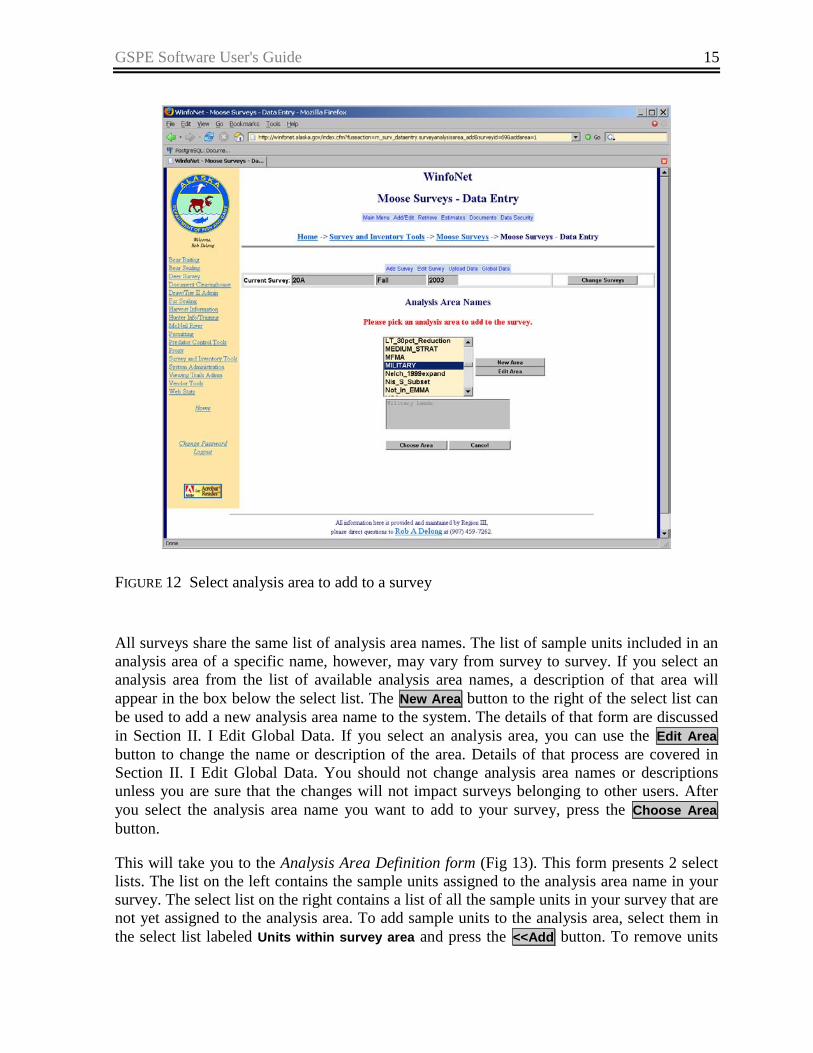
This menu allows you to define new analysis areas in your survey and to edit the list of sample units in analysis areas that are already defined for your survey. Selecting Add analysis area from the Analysis Area menu will take you to a select list of available analysis area names (Fig 12).
GSPE Software User's Guide 15
FIGURE 12 Select analysis area to add to a survey
All surveys share the same list of analysis area names. The list of sample units included in an analysis area of a specific name, however, may vary from survey to survey. If you select an analysis area from the list of available analysis area names, a description of that area will appear in the box below the select list. The New Area button to the right of the select list can be used to add a new analysis area name to the system. The details of that form are discussed in Section II. I Edit Global Data. If you select an analysis area, you can use the Edit Area button to change the name or description of the area. Details of that process are covered in Section II. I Edit Global Data. You should not change analysis area names or descriptions unless you are sure that the changes will not impact surveys belonging to other users. After you select the analysis area name you want to add to your survey, press the Choose Area button.
This will take you to the Analysis Area Definition form (Fig 13). This form presents 2 select lists. The list on the left contains the sample units assigned to the analysis area name in your survey. The select list on the right contains a list of all the sample units in your survey that are not yet assigned to the analysis area. To add sample units to the analysis area, select them in the select list labeled Units within survey area and press the <<Add button. To remove units

16 GSPE Software User's Guide
from the analysis area, select them in the list labeled Units included in analysis area and press the Remove>> button. Pressing the <Reset> button will reset both lists to the contents they had when you first entered the form. When you have the list of sample units for the analysis area completed, press the Update Area button.
FIGURE 13 Analysis Area Definition form
E EDIT SAMPLE UNITS The Edit sample units link in the Edit Survey menu allows you to edit the details of individual sample units including their stratum assignments and stratification observations.
This link will take you to the Sample Unit Selection form (Fig 14). This form has a select list containing all the sample units defined in your survey. To edit a sample unit, select it from the list and press the Edit Unit button.

GSPE Software User's Guide 17
FIGURE 14 Sample Unit Selection form
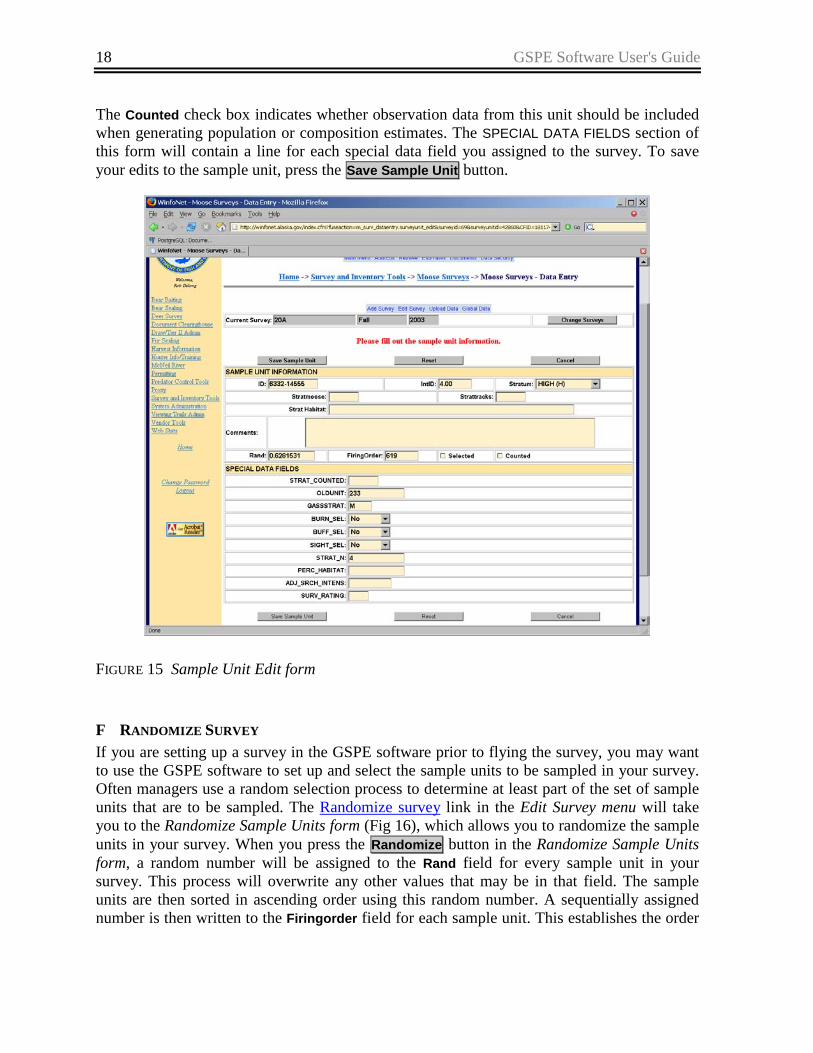
This action takes you to the Sample Unit Edit form (Fig 15). This form allows you to edit fields associated with the sample unit definition and its stratification. The ID field is the unique ID used by the system to identify the sample unit. If your survey uses the standard sample unit grid, this ID must exist in that grid. If your survey does not use the standard grid, the ID can be any numeric or character string 10 characters or less. The IntID field is a numeric ID that some managers use for printing on flight maps to make the maps easier to use while in flight. The Stratum pick list will contain a list of the strata you have defined for your survey. Selecting an item from this list will place the sample unit in the stratum selected. The Stratmoose and Strattracks fields are used to record the number of moose and the number of moose tracks seen during stratification flights over the sample unit. The Strathab field is used to record information about moose habitat in that sample unit. The Comments field holds comments specific to the sample unit. It might contain information from either stratification or sampling observations.
Rand and Firingorder are fields that are filled out when determining which sample units are to be sampled. These fields can be edited directly in this form, but typically they are filled in using an automated process rather than direct data entry (see Section II. F Randomize Survey). The Selected check box indicates whether the sample unit was selected for sampling.
18 GSPE Software User's Guide
The Counted check box indicates whether observation data from this unit should be included when generating population or composition estimates. The SPECIAL DATA FIELDS section of this form will contain a line for each special data field you assigned to the survey. To save your edits to the sample unit, press the Save Sample Unit button.
FIGURE 15 Sample Unit Edit form
F RANDOMIZE SURVEY If you are setting up a survey in the GSPE software prior to flying the survey, you may want to use the GSPE software to set up and select the sample units to be sampled in your survey. Often managers use a random selection process to determine at least part of the set of sample units that are to be sampled. The Randomize survey link in the Edit Survey menu will take you to the Randomize Sample Units form (Fig 16), which allows you to randomize the sample units in your survey. When you press the Randomize button in the Randomize Sample Units form, a random number will be assigned to the Rand field for every sample unit in your survey. This process will overwrite any other values that may be in that field. The sample units are then sorted in ascending order using this random number. A sequentially assigned number is then written to the Firingorder field for each sample unit. This establishes the order

GSPE Software User's Guide 19
in which sample units should be selected to obtain a random sample. This randomized order can then be used to select sample units for sampling.
FIGURE 16 Randomize Sample Units form
G SELECT FOR SAMPLING The select for sampling feature allows you to specify the sample units in your survey that have been selected for sampling during the survey. You can specify units for sampling manually, you can use the randomization described in the previous section to pick a random sample, or you can perform some combination of these functions.
The Select for sampling menu item on the Edit Survey menu will take you to the Select Sample Unit by Stratum form (Fig 17). The section of this form labeled SAMPLE UNITS MARKED AS SELECTED FOR SAMPLING contains a table which displays the number of sample units in each stratum that are marked as selected for sampling. The SELECT SAMPLE UNITS FOR SAMPLING IN A STRATUM section provides a select list of the strata defined in your survey. You must select sample units for sampling by stratum. To pick sample units in a particular stratum, select that stratum in this select list. If all the sample units in your survey have been assigned a random number and firing order, you will see a section below this
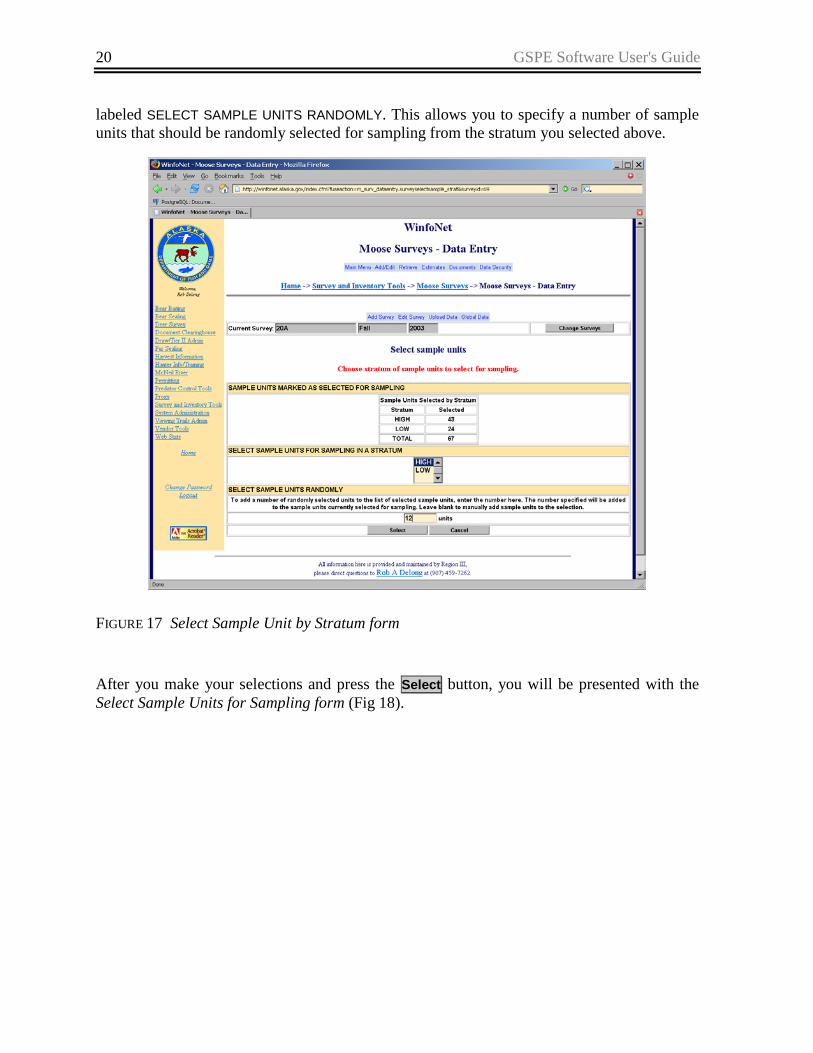
20 GSPE Software User's Guide
labeled SELECT SAMPLE UNITS RANDOMLY. This allows you to specify a number of sample units that should be randomly selected for sampling from the stratum you selected above.
FIGURE 17 Select Sample Unit by Stratum form
After you make your selections and press the Select button, you will be presented with the Select Sample Units for Sampling form (Fig 18).

GSPE Software User's Guide 21
FIGURE 18 Select Sample Units for Sampling form
This form presents you with 2 select lists. The select list on the right contains the sample units in the selected stratum of your survey that are not selected for sampling, and the select list on the left contains the sample units that are selected for sampling together with any additional randomly selected sample units you may have requested in the previous form. If you want to manually add or remove sample units from the list, select the sample unit or units you want to move. Press the <<Add button to move sample units from the list labeled Units within survey area to the list labeled Units selected for sampling. Press the Remove>> button to remove sample units from the list of units selected for sampling. When you are satisfied with the list, press the Select button to save your changes. You will then be returned to the Select Sample Unit by Stratum form so that you can select additional units in a different stratum.
H ENTER/EDIT OBSERVATION DATA In order to enter or edit survey observation data choose the Enter/edit observation data link in the Edit Survey menu. This will take you to a sample unit selection form that lists the sample units in your survey (Fig 19).

22 GSPE Software User's Guide
FIGURE 19 Select Sample Unit form
If you choose a sample unit and press the Edit Data button, you will be taken to the Observation Data Edit/Entry form (Fig 20). This form allows you to edit fields associated with sampling a sample unit. The Date counted field should contain the date the sample unit was flown. This dates should be entered in the format MM/DD/YYYY. You should enter the number of minutes spent sampling the unit in the Search Minutes field. If you did not fly the entire sample unit because a portion of the sample unit did not contain moose habitat, you should enter the percentage of the sample unit that was not flown. The Pilot and Observer pick lists allow you to record the pilot–observer team that did the sampling. The OBSERVATION INFORMATION section of the form contains a list of the survey data classes you have defined for this survey. These data classes appear in the same order in which they were defined in the Edit Survey Information form. As you enter the number of observed moose in the survey data classes, the box labeled Total Moose will update with the total number of individual moose observed in the sample unit. You can use this value to crosscheck your entries against the written data sheet to guard against data entry errors.

GSPE Software User's Guide 23
FIGURE 20 Observation Data Edit/Entry form
The Comments field can be used to enter any comments related to the sampling flight. If any special data fields are defined for your survey, you can edit their values for the sample unit on this form as well. The SPECIAL DATA FIELDS section of this form will contain a line for each special data field you assigned to the survey. When you are finished editing the observation data for this sample unit, press the Save Observation button on the form to save your entries.
I EDIT GLOBAL DATA Global data are those data that are shared among multiple surveys. The 2 forms of global data that can be edited in the software are the lists of people involved with moose survey activities and the names and descriptions of analysis areas. To access the entry and editing tools for global data, choose the Edit global data link from the Add/Edit Survey menu (Fig 21).

24 GSPE Software User's Guide
FIGURE 21 Add/Edit Survey menu
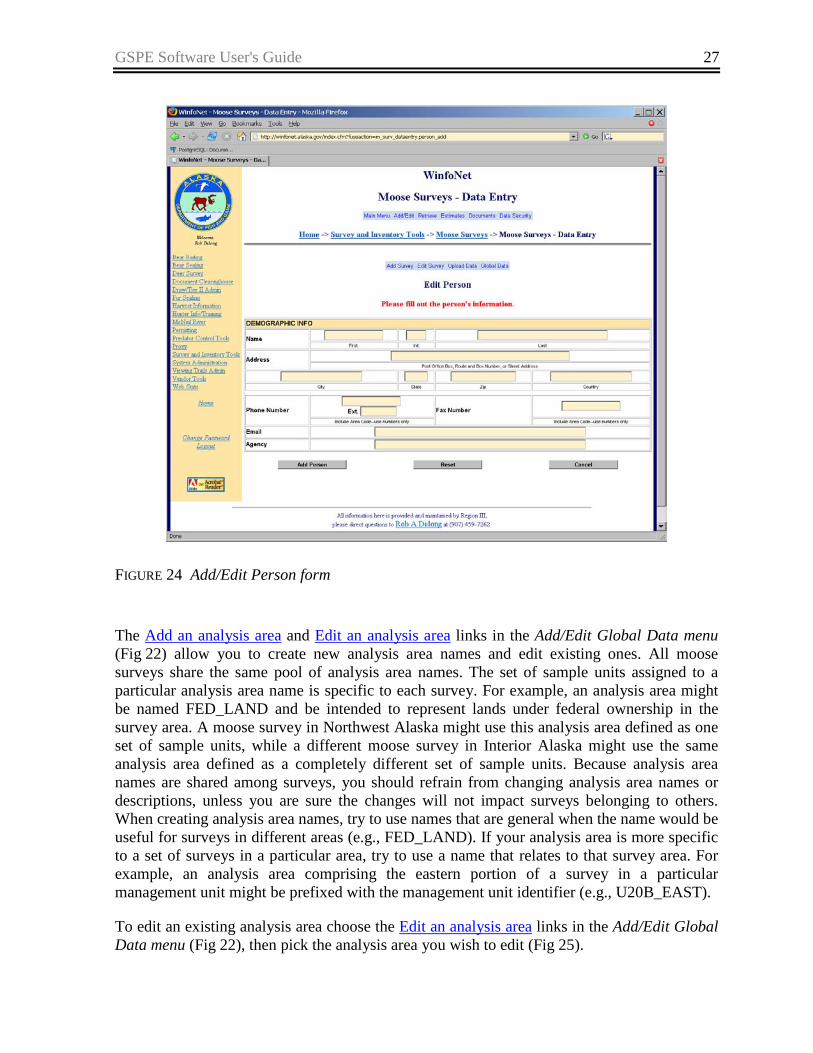
This takes you to the Add/Edit Global Data menu (Fig 22). To edit an existing person, choose the Edit a person link, then choose the person you wish to edit (Fig 23). Choose the Add a person link to add a new person to the database. The Add/Edit Person form (Fig 24) allows you to enter the demographic information associated with the person. At a minimum, you must enter a last name and an address to save a person in the system.

GSPE Software User's Guide 25
FIGURE 22 Add/Edit Global Data menu

26 GSPE Software User's Guide
FIGURE 23 Select a person for editing
GSPE Software User's Guide 27
FIGURE 24 Add/Edit Person form
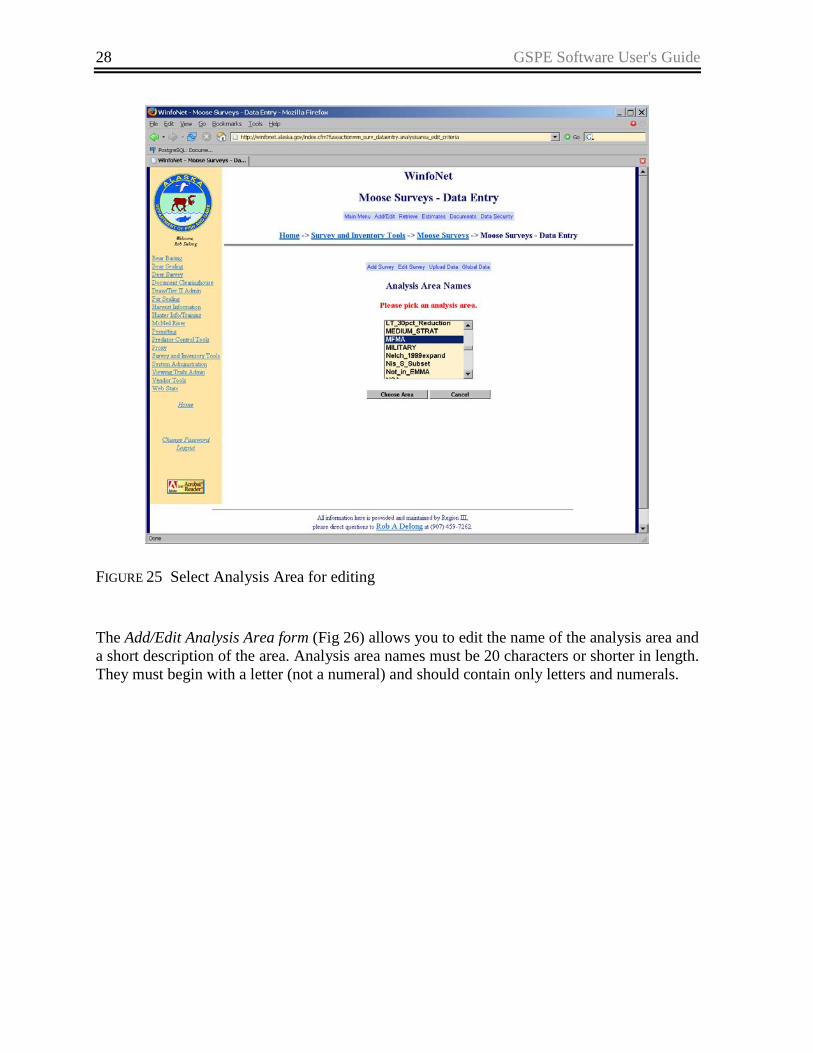
The Add an analysis area and Edit an analysis area links in the Add/Edit Global Data menu (Fig 22) allow you to create new analysis area names and edit existing ones. All moose surveys share the same pool of analysis area names. The set of sample units assigned to a particular analysis area name is specific to each survey. For example, an analysis area might be named FED_LAND and be intended to represent lands under federal ownership in the survey area. A moose survey in Northwest Alaska might use this analysis area defined as one set of sample units, while a different moose survey in Interior Alaska might use the same analysis area defined as a completely different set of sample units. Because analysis area names are shared among surveys, you should refrain from changing analysis area names or descriptions, unless you are sure the changes will not impact surveys belonging to others. When creating analysis area names, try to use names that are general when the name would be useful for surveys in different areas (e.g., FED_LAND). If your analysis area is more specific to a set of surveys in a particular area, try to use a name that relates to that survey area. For example, an analysis area comprising the eastern portion of a survey in a particular management unit might be prefixed with the management unit identifier (e.g., U20B_EAST).
To edit an existing analysis area choose the Edit an analysis area links in the Add/Edit Global Data menu (Fig 22), then pick the analysis area you wish to edit (Fig 25).
28 GSPE Software User's Guide
FIGURE 25 Select Analysis Area for editing
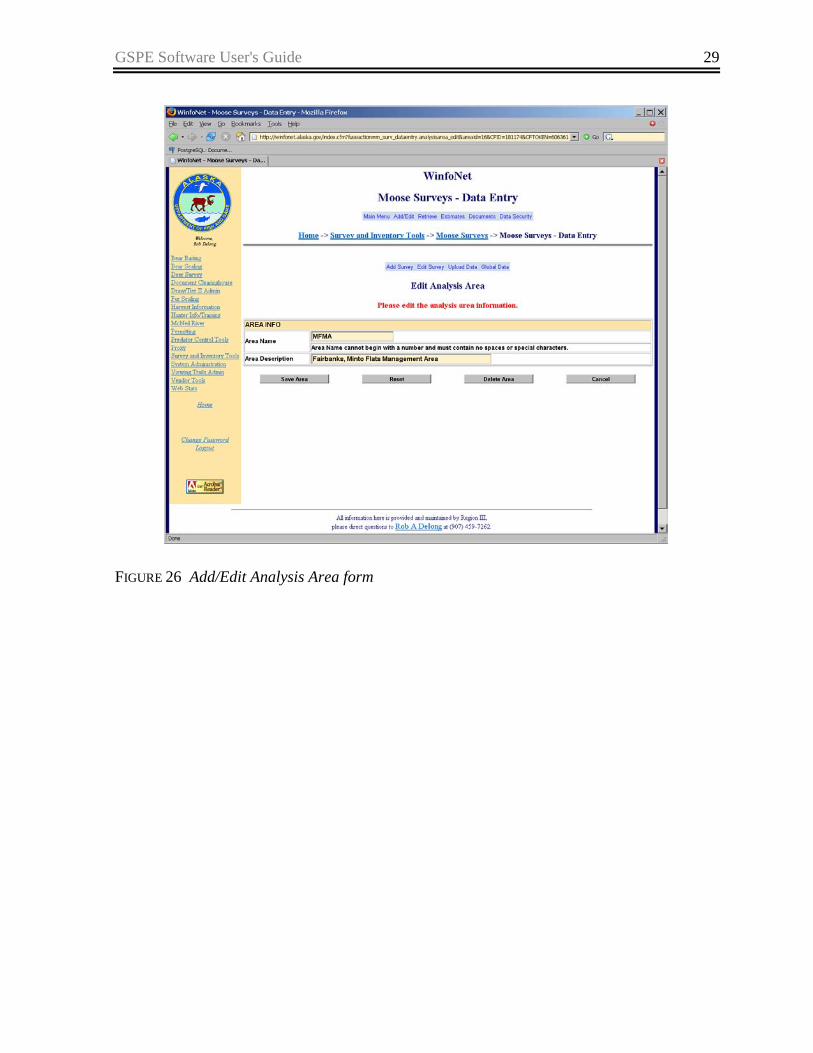
The Add/Edit Analysis Area form (Fig 26) allows you to edit the name of the analysis area and a short description of the area. Analysis area names must be 20 characters or shorter in length. They must begin with a letter (not a numeral) and should contain only letters and numerals.
GSPE Software User's Guide 29
FIGURE 26 Add/Edit Analysis Area form

30 GSPE Software User's Guide
III. UPLOADING SURVEY DATA FROM OTHER DATA SOURCES The Upload Data to an existing survey link in the Add/Edit Survey menu (Fig 27) allows you to upload data from your computer directly into an existing moose survey. The system supports uploading data from Microsoft Excel spreadsheets, Microsoft Access databases, and Dbase III files. This feature allows you to keep a data set on your computer and enter observations directly using familiar tools, then upload the dataset for analysis. Before you can upload data into a survey you must first create the survey in the database (see Section II.A Create a New Moose Survey). If you intend to upload stratification information, you must also first define the strata that will be used in the survey.
A UPLOAD FILE DESCRIPTION Data files for upload into a moose survey must be formatted with columns that correspond to recognized data fields in the survey database. Each row in the upload file must correspond to a unique sample unit in the moose survey. The upload file is required to have a column labeled ‘ID’ that corresponds to the unique sample unit ID of each sample unit. All other columns are optional.
In Microsoft Excel files, the entire dataset must be contained on a single worksheet. The first row of the worksheet must contain the names of the data columns that are to be uploaded. Each row in the worksheet must contain data from a single sample unit. Numeric columns should only contain numbers. The Excel upload process works best with a simple worksheet that has no additional formatting. Special cell or worksheet formatting, hidden rows, dataset filters or other Excel specific functions may cause your Excel data to fail to upload or to upload incorrectly.
In Dbase files, a field name must be defined for each data column that is to be uploaded. Each record must contain data from a single sample unit. In Microsoft Access databases the entire dataset must be contained in a single table. A field name must be defined in that table for each data column that is to be uploaded, and each record should contain data from a single sample unit.
The upload tool recognizes the column names and data types described in Tables 1–4. Columns whose names do not match exactly will be ignored and will not be uploaded into the survey.

GSPE Software User's Guide 31
TABLE 1 General data columns recognized in upload files
GENERAL COLUMNS Column Name Data Type Size/Restrictions Description ID character string 10 characters, no
spaces, numbers and letters only
Unique identifier for sample units. This column is REQUIRED
SURVEYNAME character string 20 characters Name of the moose survey.
SURVEYYEAR integer 4 digit year Calendar year moose survey was conducted
SEASON character string must be one of ‘spring’, ‘winter’, or ‘fall’
Season moose survey was conducted
STARTDATE date Date survey was started in MM/DD/YYYY format
STOPDATE date Date survey was completed in MM/DD/YYYY format
INTID integer Local identifier for sample units in a survey. Must be unique within the survey
RAND number between 0 and 1 random number assigned to sample unit for random selection for sampling
FIRINGORDER integer sequential number assigned to sample units after sorting by their random number
SELECTED bit or integer 0 or 1 1 if the sample unit was selected for sampling, 0 otherwise
COUNTED bit or integer 0 or 1 1 if the sample unit was sampled, 0 otherwise
STRAT character string 2 characters or less stratum abbreviation for sample unit. This MUST match a stratum abbreviation defined in the survey into which the data are being uploaded.
STRATMOOSE integer number of moose seen during stratification
STRATTRACKS integer number of moose tracks seen during stratification
STRATHAB character string 100 characters or less description of moose habitat seen during stratification
SEARCHMIN integer number of minutes spent sampling sample unit
DATECOUNTED date date sample unit was sampled in MM/DD/YYYY format

32 GSPE Software User's Guide
GENERAL COLUMNS Column Name Data Type Size/Restrictions Description PERC_NOT_FLOWN integer between 0 and 100 percentage of sample unit
that was not flown when sampling
COMMENTS character string 255 characters or less comments associated with stratifying or sampling the sample unit. This is NOT the comments field that applies to the survey as a whole.
TABLE 2 Survey data classes recognized in upload files
SURVEY DATA CLASSES Column Name Data Type Description ADULT integer Adult moose BULL_30_40 integer Bull moose ≥30" and ≤40" BULL_30_50 integer Bull moose ≥30" and ≤50" BULL_30_60 integer Bull moose ≥30" and ≤60" BULL_41_50 integer Bull moose ≥30" and ≤60" BULL_ALL integer Bull moose of any size BULL_GT_50 integer Bull moose >50" BULL_GT_60 integer Bull moose >60" BULL_GTE_50 integer Bull moose ≥50" BULL_LT_30 integer Bull moose <30" BULL_LT_50 integer Bull moose ≥50" CALF integer Lone calf moose unaccompanied by cow COW_W_0 integer Cow moose with no calves COW_W_1 integer Cow moose with 1 calf COW_W_2 integer Cow moose with 2 calves COW_W_3 integer Cow moose with 3 calves LG_BULL integer Large bull (size classification depends on
principal investigator) MED_BULL integer Medium bull (size classification depends on
principal investigator) MED_L_BULL integer Medium-Large bull (size classification depends
on principal investigator) SM_BULL integer Small bull (size classification depends on
principal investigator) UNKNOWN integer Moose of unknown age/sex YBULL_ALL integer Yearling bull of any antler configuration YBULL_GTSF integer Yearling bull with antlers larger than spike or
fork (e.g., paddles) YBULL_SF integer Yearling bull with spike or fork antler.
GSPE Software User's Guide 33
TABLE 3 Analysis areas recognized in upload files
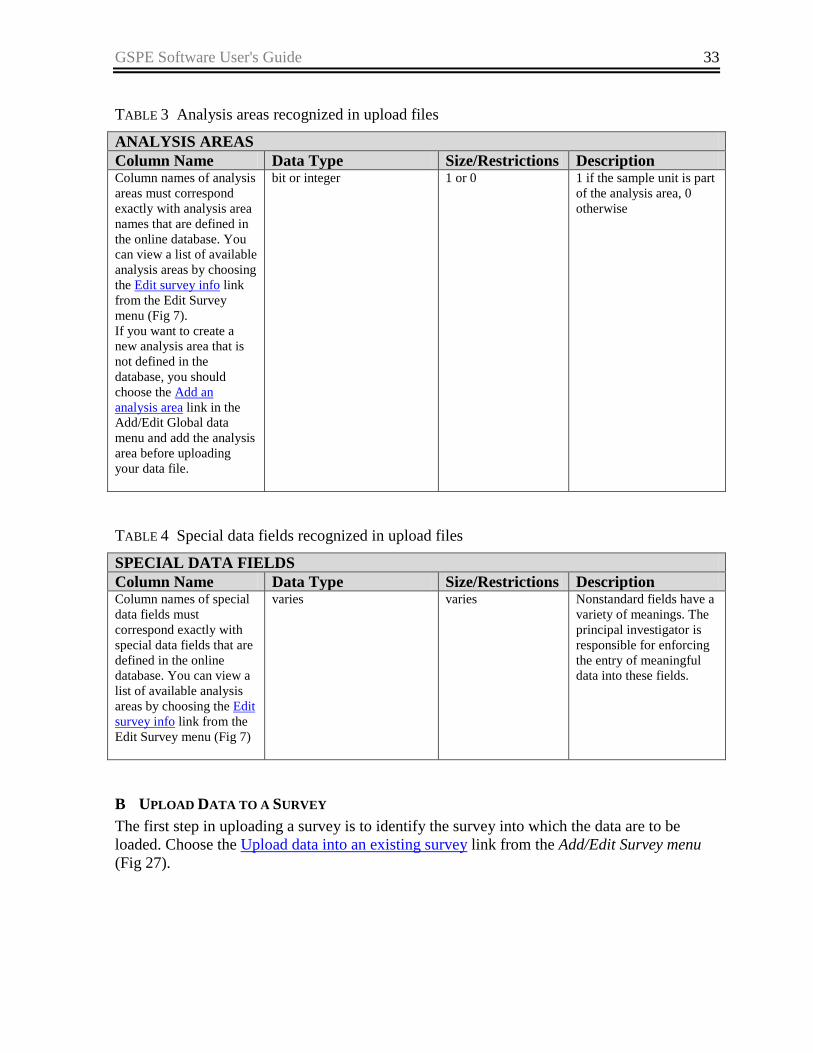
ANALYSIS AREAS Column Name Data Type Size/Restrictions Description Column names of analysis areas must correspond exactly with analysis area names that are defined in the online database. You can view a list of available analysis areas by choosing the Edit survey info link from the Edit Survey menu (Fig 7). If you want to create a new analysis area that is not defined in the database, you should choose the Add an analysis area link in the Add/Edit Global data menu and add the analysis area before uploading your data file.
bit or integer 1 or 0 1 if the sample unit is part of the analysis area, 0 otherwise
TABLE 4 Special data fields recognized in upload files
SPECIAL DATA FIELDS Column Name Data Type Size/Restrictions Description Column names of special data fields must correspond exactly with special data fields that are defined in the online database. You can view a list of available analysis areas by choosing the Edit survey info link from the Edit Survey menu (Fig 7)
varies varies Nonstandard fields have a variety of meanings. The principal investigator is responsible for enforcing the entry of meaningful data into these fields.
B UPLOAD DATA TO A SURVEY The first step in uploading a survey is to identify the survey into which the data are to be loaded. Choose the Upload data into an existing survey link from the Add/Edit Survey menu (Fig 27).
34 GSPE Software User's Guide
FIGURE 27 Add/Edit Survey menu
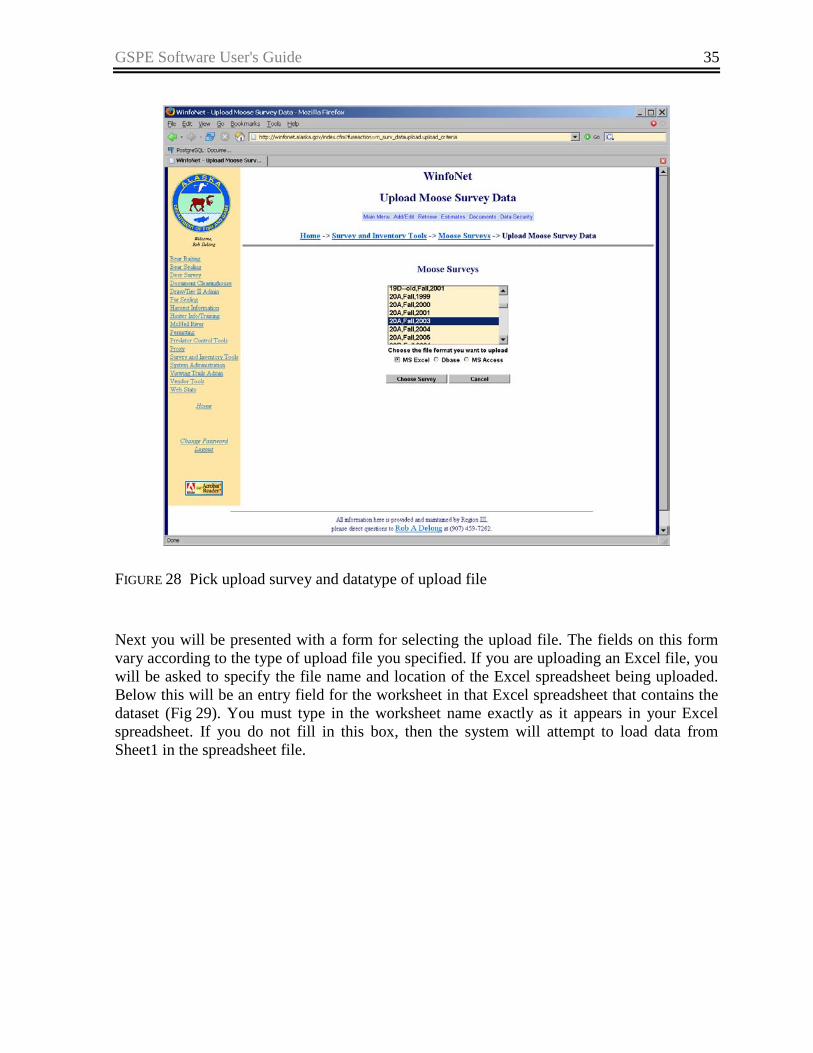
You will then be presented with a select list of surveys and radio buttons corresponding to data file upload formats (Fig 28). Choose the survey into which you want to upload data and the type of data file you wish to upload.
GSPE Software User's Guide 35
FIGURE 28 Pick upload survey and datatype of upload file
Next you will be presented with a form for selecting the upload file. The fields on this form vary according to the type of upload file you specified. If you are uploading an Excel file, you will be asked to specify the file name and location of the Excel spreadsheet being uploaded. Below this will be an entry field for the worksheet in that Excel spreadsheet that contains the dataset (Fig 29). You must type in the worksheet name exactly as it appears in your Excel spreadsheet. If you do not fill in this box, then the system will attempt to load data from Sheet1 in the spreadsheet file.

36 GSPE Software User's Guide
FIGURE 29 Excel Upload File Selection form
If you are uploading a Dbase III file, you will only be asked to specify the file name and location of the database file being uploaded (Fig 30).

GSPE Software User's Guide 37
FIGURE 30 Dbase III Upload File Selection form
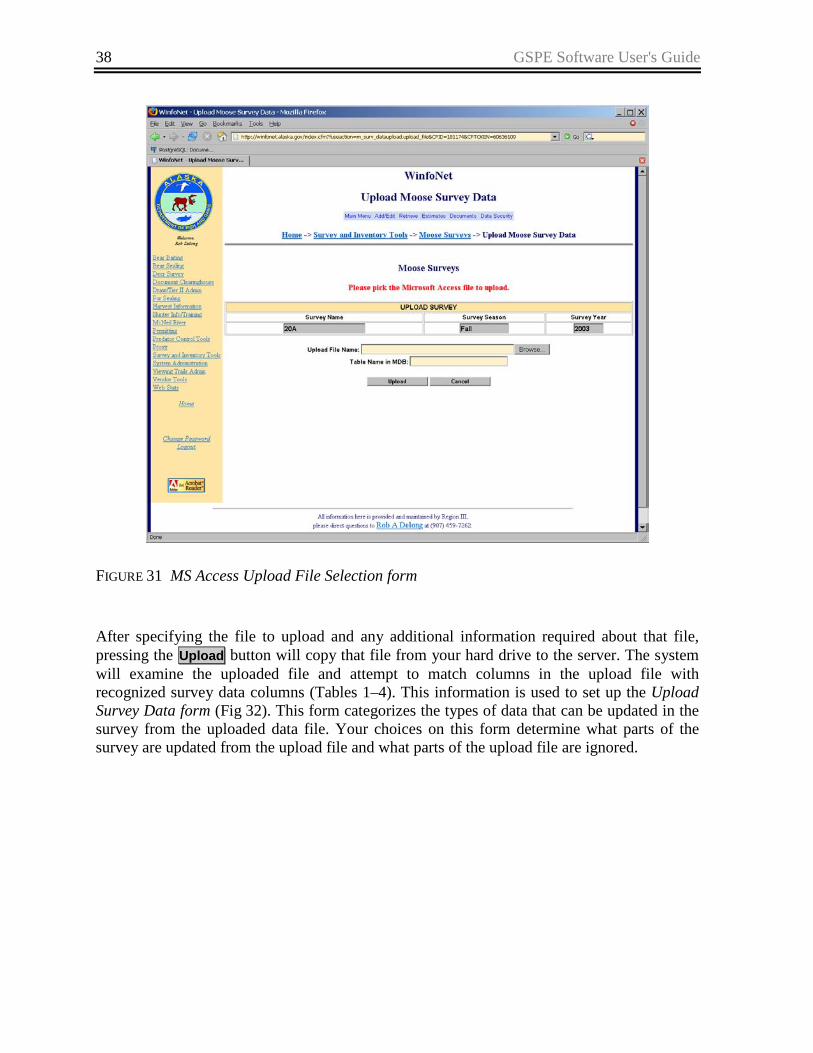
If you are uploading an MS Access file, you will be asked to specify the file name and location of the .mdb file being uploaded. Below this will be an entry field for the table in the .mdb database that contains the dataset (Fig 31). You must type in the table name exactly as it appears in your Access database.
38 GSPE Software User's Guide
FIGURE 31 MS Access Upload File Selection form
After specifying the file to upload and any additional information required about that file, pressing the Upload button will copy that file from your hard drive to the server. The system will examine the uploaded file and attempt to match columns in the upload file with recognized survey data columns (Tables 1–4). This information is used to set up the Upload Survey Data form (Fig 32). This form categorizes the types of data that can be updated in the survey from the uploaded data file. Your choices on this form determine what parts of the survey are updated from the upload file and what parts of the upload file are ignored.

GSPE Software User's Guide 39
FIGURE 32 Upload Survey Data form
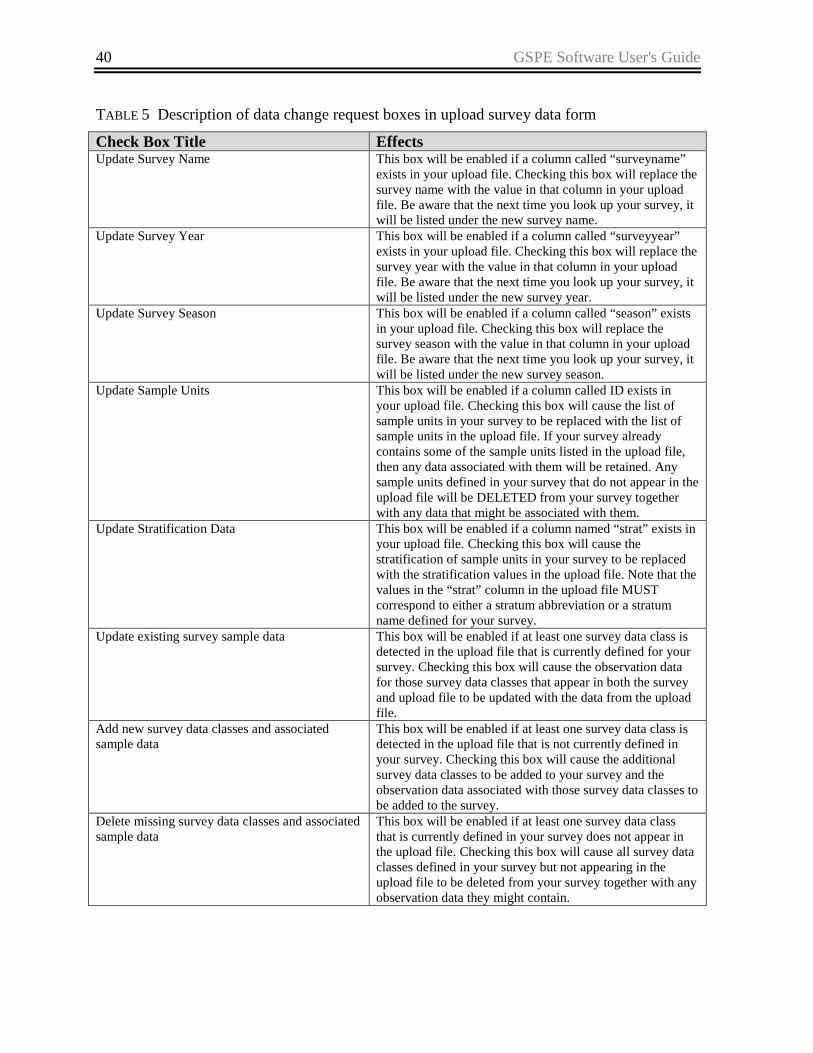
The top part of this form lists the survey that will be updated from the upload file. In the section labeled SPECIFY DATA CHANGES TO MAKE TO THE SURVEY USING DATA IN THE UPLOADED FILE, a series of check boxes are used to control updates to various portions of the survey data. Boxes that are checked will result in that portion of the survey data being updated. Unchecked boxes will cause those portions of the uploaded file to be ignored. Boxes that are disabled (dimmed and unable to be checked) represent portions of survey data that were not found in the uploaded file. The effects of the various check boxes are listed in Table 5.
40 GSPE Software User's Guide
TABLE 5 Description of data change request boxes in upload survey data form
Check Box Title Effects Update Survey Name This box will be enabled if a column called “surveyname”
exists in your upload file. Checking this box will replace the survey name with the value in that column in your upload file. Be aware that the next time you look up your survey, it will be listed under the new survey name.
Update Survey Year This box will be enabled if a column called “surveyyear” exists in your upload file. Checking this box will replace the survey year with the value in that column in your upload file. Be aware that the next time you look up your survey, it will be listed under the new survey year.
Update Survey Season This box will be enabled if a column called “season” exists in your upload file. Checking this box will replace the survey season with the value in that column in your upload file. Be aware that the next time you look up your survey, it will be listed under the new survey season.
Update Sample Units This box will be enabled if a column called ID exists in your upload file. Checking this box will cause the list of sample units in your survey to be replaced with the list of sample units in the upload file. If your survey already contains some of the sample units listed in the upload file, then any data associated with them will be retained. Any sample units defined in your survey that do not appear in the upload file will be DELETED from your survey together with any data that might be associated with them.
Update Stratification Data This box will be enabled if a column named “strat” exists in your upload file. Checking this box will cause the stratification of sample units in your survey to be replaced with the stratification values in the upload file. Note that the values in the “strat” column in the upload file MUST correspond to either a stratum abbreviation or a stratum name defined for your survey.
Update existing survey sample data This box will be enabled if at least one survey data class is detected in the upload file that is currently defined for your survey. Checking this box will cause the observation data for those survey data classes that appear in both the survey and upload file to be updated with the data from the upload file.
Add new survey data classes and associated sample data
This box will be enabled if at least one survey data class is detected in the upload file that is not currently defined in your survey. Checking this box will cause the additional survey data classes to be added to your survey and the observation data associated with those survey data classes to be added to the survey.
Delete missing survey data classes and associated sample data
This box will be enabled if at least one survey data class that is currently defined in your survey does not appear in the upload file. Checking this box will cause all survey data classes defined in your survey but not appearing in the upload file to be deleted from your survey together with any observation data they might contain.

GSPE Software User's Guide 41
Check Box Title Effects Update existing analysis areas This box will be enabled if at least one analysis area is
detected in the upload file that is currently defined in your survey. Checking this box will cause the list of sample units assigned to these analysis areas to be adjusted to correspond to the list of sample units for which the corresponding analysis area column has a value of 1 in the upload file.
Add new analysis areas This box will be enabled if at least one analysis area column exists in the upload file that is not defined in your survey. Checking this box will cause those new analysis areas to be added to your survey and the sample units that correspond to them in the upload file to be added to them in the survey.
Delete missing analysis areas This box will be enabled if at least one analysis area is defined in your survey but not in the upload file. Checking this box will cause those analysis areas to be deleted from your survey.
Update special data fields This box will be enabled if at least one special data field is detected in the upload file that is defined in your survey. Checking this box will cause those special data fields to be updated with the values found in the upload file.
Add new special data fields This box will be enabled if at least one special data field that is not defined in your survey is detected in the upload file. Checking this box will cause those special data fields to be added to your survey. They will then be updated with the data from the upload file.
Delete missing special data fields This box will be enabled if at least one special data field defined in your survey is not detected in the upload file. Checking this box will cause any special data fields in your survey that are not found in the upload file to be removed from your survey together with any data they might contain.
The final section of the Upload Survey Data form is titled THE FOLLOWING FIELDS WERE NOT RECOGNIZED IN THE UPLOAD FILE. This section contains a scrollable list of columns from the upload file that could not be matched with data columns in your survey. You can use this list to assist you in resolving problems with your upload files. If fields appear in this list that you feel should have matched a field in the survey data, go back to your upload file and be sure that those fields were properly identified (e.g., you didn’t include extra spaces in a column name).
Pressing the Modify Survey button will cause the requested updates to your survey data to be performed. Performing this bulk update of your survey data may take some time, so refrain from pressing the Modify Survey button more than once. When the update process completes, you will be redirected to the Add/Edit Survey menu with the message “Survey Updated.” If the update fails for some reason, you will be presented with an error message describing the problem encountered during the update. This process will either succeed or fail in its entirety. If you do receive any sort of error message, your survey data will not have been changed.
42 GSPE Software User's Guide
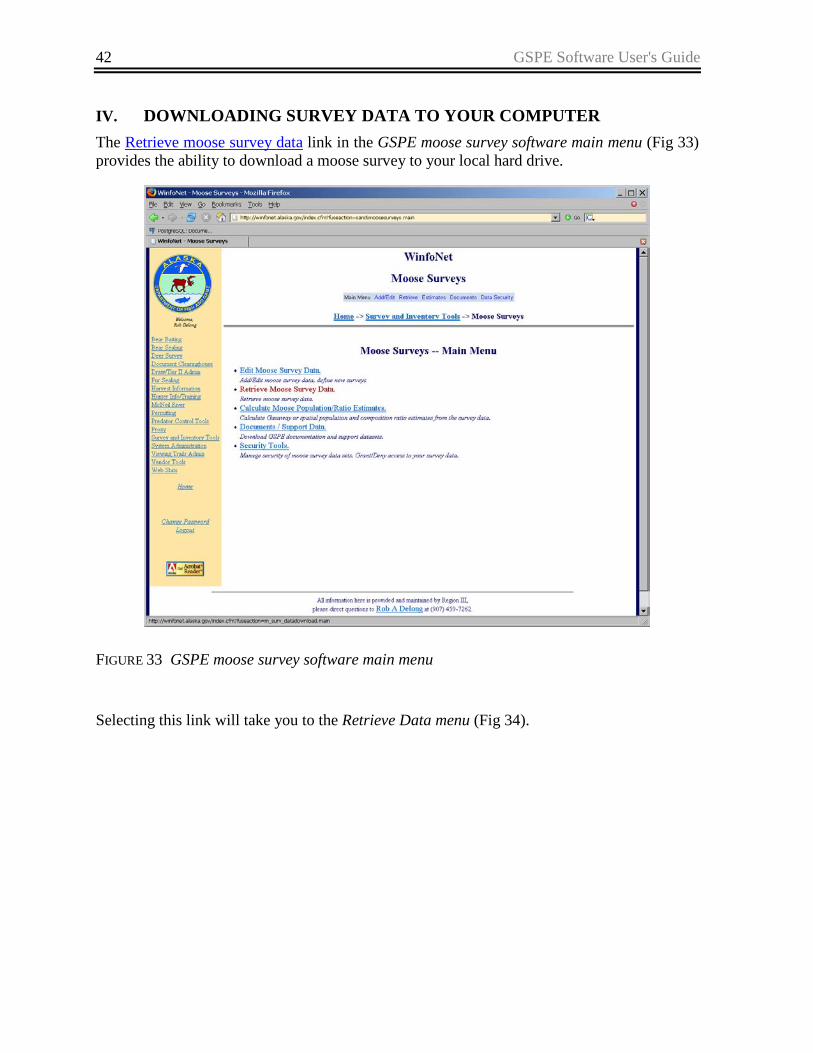
IV. DOWNLOADING SURVEY DATA TO YOUR COMPUTER The Retrieve moose survey data link in the GSPE moose survey software main menu (Fig 33) provides the ability to download a moose survey to your local hard drive.
FIGURE 33 GSPE moose survey software main menu
Selecting this link will take you to the Retrieve Data menu (Fig 34).

GSPE Software User's Guide 43
FIGURE 34 Retrieve Data menu
Selecting the Download data from a survey to your computer link will take you to the Download Survey Selection form (Fig 35). This form provides you with a select list of surveys and radio buttons listing the supported download formats. Pick the survey you wish to download and click the radio button that corresponds to the file format you desire. Click on the Choose Survey button.

44 GSPE Software User's Guide
FIGURE 35 Download Survey Selection form
A download file in the requested format will be constructed from the survey you selected, and then you will be taken to the Survey Download form (Fig 36). To download the file, right click on the here link and choose “Save Link As” (Mozilla/Firefox) or “Save Target As” (Internet Explorer).

GSPE Software User's Guide 45
FIGURE 36 Survey Download form

46 GSPE Software User's Guide
V. CALCULATING POPULATION AND COMPOSITION ESTIMATES The Calculate Moose Population/Ratio Estimates link in the GSPE moose survey software main menu (Fig 37) allows you to analyze a moose survey data set to obtain estimates of moose population and age/sex composition ratios.
FIGURE 37 GSPE moose survey software main menu
Clicking on this link takes you to a Select Survey for Analysis form that allows you to specify the survey to be analyzed (Fig 38). On this page, select the survey you wish to analyze, and then click the button that corresponds to the analysis you want to perform.

GSPE Software User's Guide 47
FIGURE 38 Select Survey for Analysis form
A POPULATION ESTIMATES Clicking on the Population Estimate button will take you to the Population Estimate Request form (Fig 39). This form allows you to specify the parameters of the population estimate you want to generate.

48 GSPE Software User's Guide
FIGURE 39 Population Estimate Request form
The top section of this form lists the current survey you are analyzing. The second section contains the population estimate parameters you can control. The first parameter on the left is the Analysis Area. All surveys have at least one analysis area defined. That is the “Entire Survey Area.” This analysis area contains all sample units defined in the survey area. If additional analysis areas have been defined for your survey, they will appear in this list. Selecting an analysis area will cause a population estimate for that analysis area to be calculated. You can combine analysis areas by holding down the <CTRL> key and clicking on each of the analysis areas (Fig 40) you wish to include in your analysis. If analysis areas overlap, sample units in the overlapping portions will only be included once in the analysis.

GSPE Software User's Guide 49
FIGURE 40 Population Estimate Request form with the FTWW and GREELY analysis areas selected
The second parameter down on the left is the Strata Column. This parameter specifies what data column in the survey data set to use to specify the stratum assignment of each sample unit. The default selection here is StratName. If you have not defined any special data fields for your survey, this will be the only selection possible for this parameter. If you have added special data fields to your survey, you will see them listed here in addition to the StratName column. If one of your special data fields contains stratification data, you may select it here if you wish to use that alternate stratification rather than the default stratification.
The third parameter down on the left is the Counted Column. This parameter specifies whether or not each sample unit was counted. If the value in the counted column is 1 for a sample unit, then the observation data for that sample unit are considered in the calculations. If the value of that column is 0, then observations for that sample unit are not included in the calculations even if there are observed moose stored in the data for that sample unit. The default selection here is Counted. If you have not defined any special data fields for your survey, this will be the only selection possible for this parameter. If you have added special data fields to your survey, you will see them listed here in addition to the Counted column. If one of your special data fields contains an alternate list of sample units counted, you may
50 GSPE Software User's Guide
select it here. This may be useful if you wish to exclude some observation data for certain analyses, but include those data in others.
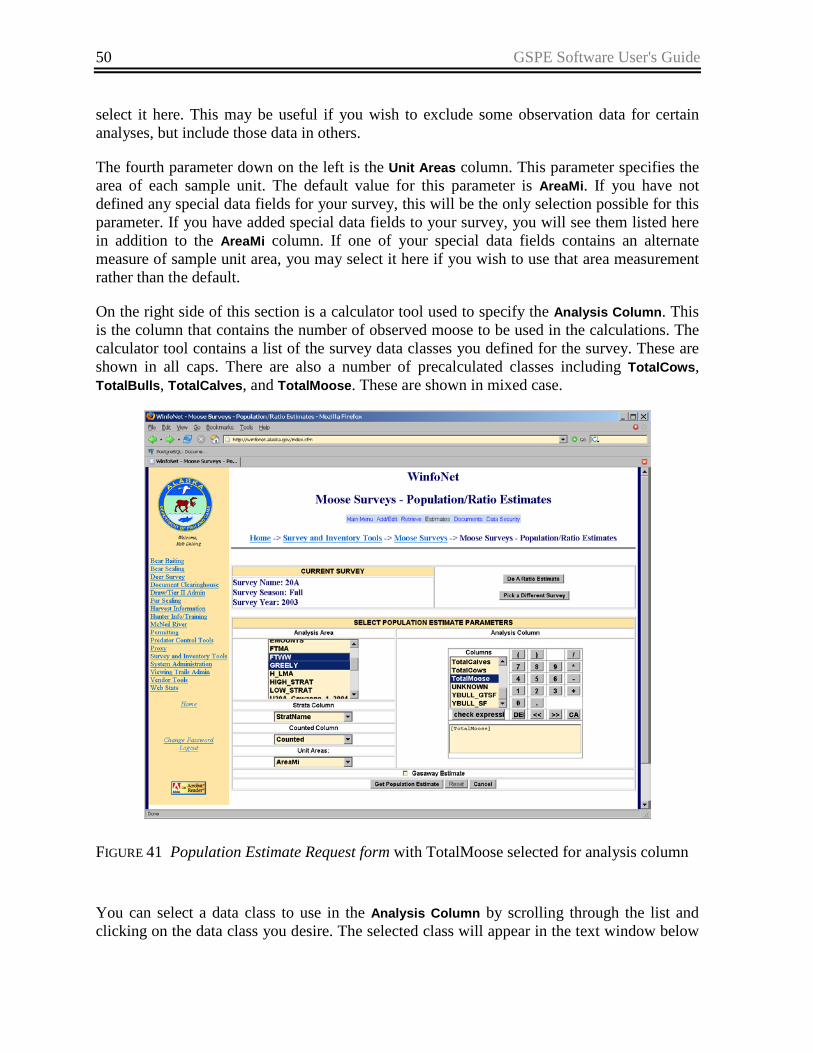
The fourth parameter down on the left is the Unit Areas column. This parameter specifies the area of each sample unit. The default value for this parameter is AreaMi. If you have not defined any special data fields for your survey, this will be the only selection possible for this parameter. If you have added special data fields to your survey, you will see them listed here in addition to the AreaMi column. If one of your special data fields contains an alternate measure of sample unit area, you may select it here if you wish to use that area measurement rather than the default.
On the right side of this section is a calculator tool used to specify the Analysis Column. This is the column that contains the number of observed moose to be used in the calculations. The calculator tool contains a list of the survey data classes you defined for the survey. These are shown in all caps. There are also a number of precalculated classes including TotalCows, TotalBulls, TotalCalves, and TotalMoose. These are shown in mixed case.
FIGURE 41 Population Estimate Request form with TotalMoose selected for analysis column
You can select a data class to use in the Analysis Column by scrolling through the list and clicking on the data class you desire. The selected class will appear in the text window below

GSPE Software User's Guide 51
the calculator. In the example in Figure 41 you can see that TotalMoose was selected as the analysis column. You can also use the calculator to request a population estimate using an arbitrary function of the provided data classes. In the example in Figure 42 you can see the analysis column has been set to estimate 2 times the number of yearling bulls. The calculator functions include parentheses to force order of precedence in the calculations ( ( , ) ), division ( / ), multiplication ( * ), subtraction ( - ), and addition ( + ). The CA button clears the analysis column formula. The Del button deletes the last term from the current analysis formula. The << button moves the last term in the current analysis formula into a buffer and removes that term from the current analysis formula. The >> button moves the last term in the buffer back into the analysis formula.
The last item on the population estimate request form is a checkbox labeled Gasaway Estimate. Checking this box will result in a population estimate calculated using the procedures described in Gasaway et al. (1986). The default is for this box to be left unchecked and the analysis to be done using the geospatial methods described in Ver Hoef (2001, 2002).
FIGURE 42 Analysis column formula for total yearlings
After you have selected your analysis parameters, press the Get Population Estimate button to submit your request for analysis. Due to the complexity of the computation involved, there
52 GSPE Software User's Guide
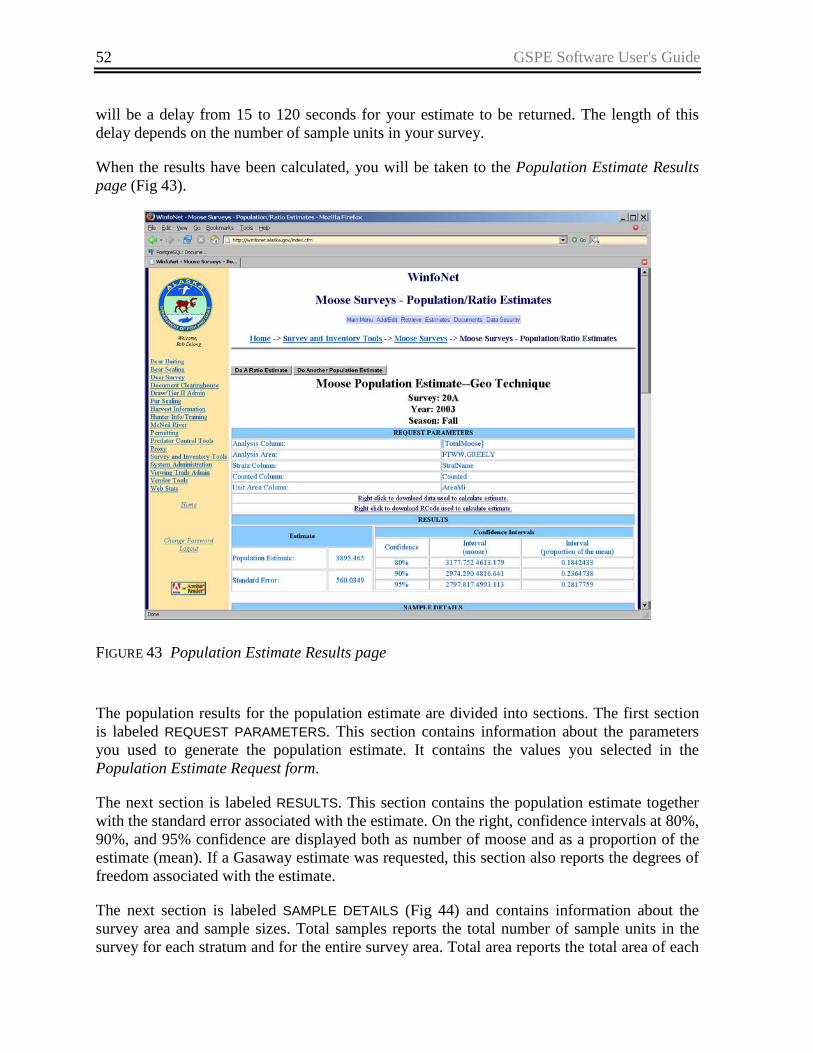
will be a delay from 15 to 120 seconds for your estimate to be returned. The length of this delay depends on the number of sample units in your survey.
When the results have been calculated, you will be taken to the Population Estimate Results page (Fig 43).
FIGURE 43 Population Estimate Results page
The population results for the population estimate are divided into sections. The first section is labeled REQUEST PARAMETERS. This section contains information about the parameters you used to generate the population estimate. It contains the values you selected in the Population Estimate Request form.
The next section is labeled RESULTS. This section contains the population estimate together with the standard error associated with the estimate. On the right, confidence intervals at 80%, 90%, and 95% confidence are displayed both as number of moose and as a proportion of the estimate (mean). If a Gasaway estimate was requested, this section also reports the degrees of freedom associated with the estimate.
The next section is labeled SAMPLE DETAILS (Fig 44) and contains information about the survey area and sample sizes. Total samples reports the total number of sample units in the survey for each stratum and for the entire survey area. Total area reports the total area of each
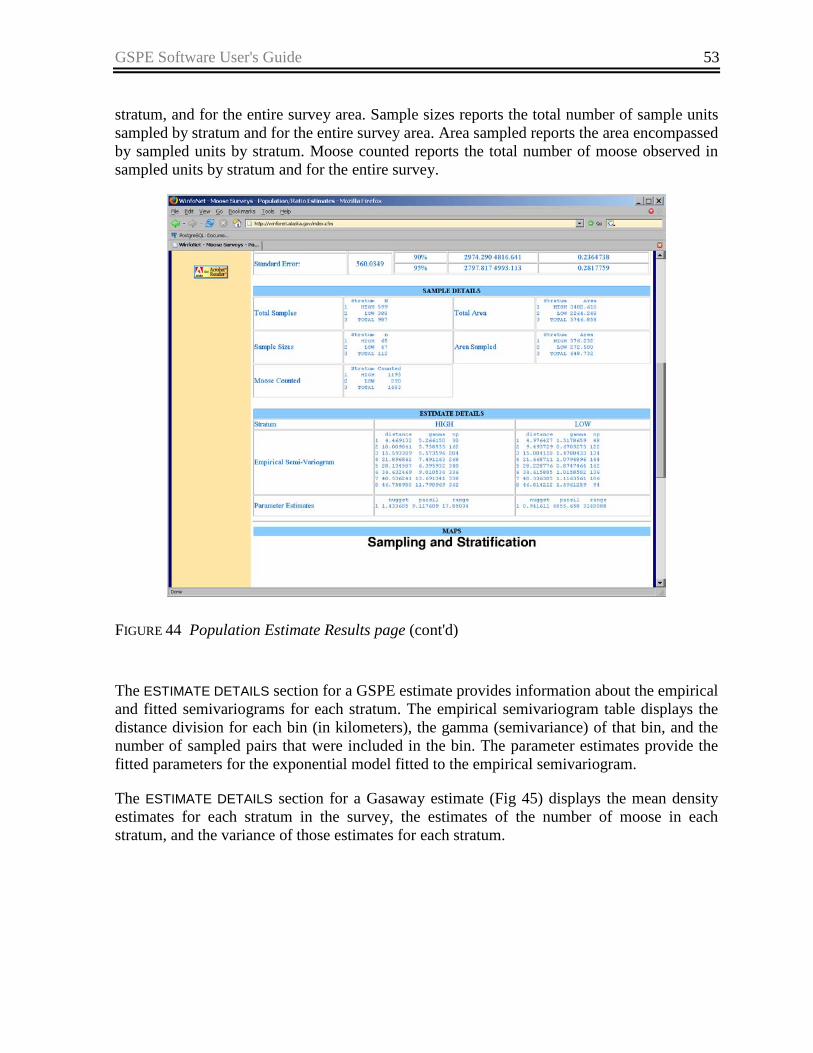
GSPE Software User's Guide 53
stratum, and for the entire survey area. Sample sizes reports the total number of sample units sampled by stratum and for the entire survey area. Area sampled reports the area encompassed by sampled units by stratum. Moose counted reports the total number of moose observed in sampled units by stratum and for the entire survey.
FIGURE 44 Population Estimate Results page (cont'd)
The ESTIMATE DETAILS section for a GSPE estimate provides information about the empirical and fitted semivariograms for each stratum. The empirical semivariogram table displays the distance division for each bin (in kilometers), the gamma (semivariance) of that bin, and the number of sampled pairs that were included in the bin. The parameter estimates provide the fitted parameters for the exponential model fitted to the empirical semivariogram.
The ESTIMATE DETAILS section for a Gasaway estimate (Fig 45) displays the mean density estimates for each stratum in the survey, the estimates of the number of moose in each stratum, and the variance of those estimates for each stratum.

54 GSPE Software User's Guide
FIGURE 45 Population Estimate Results page for a Gasaway estimate
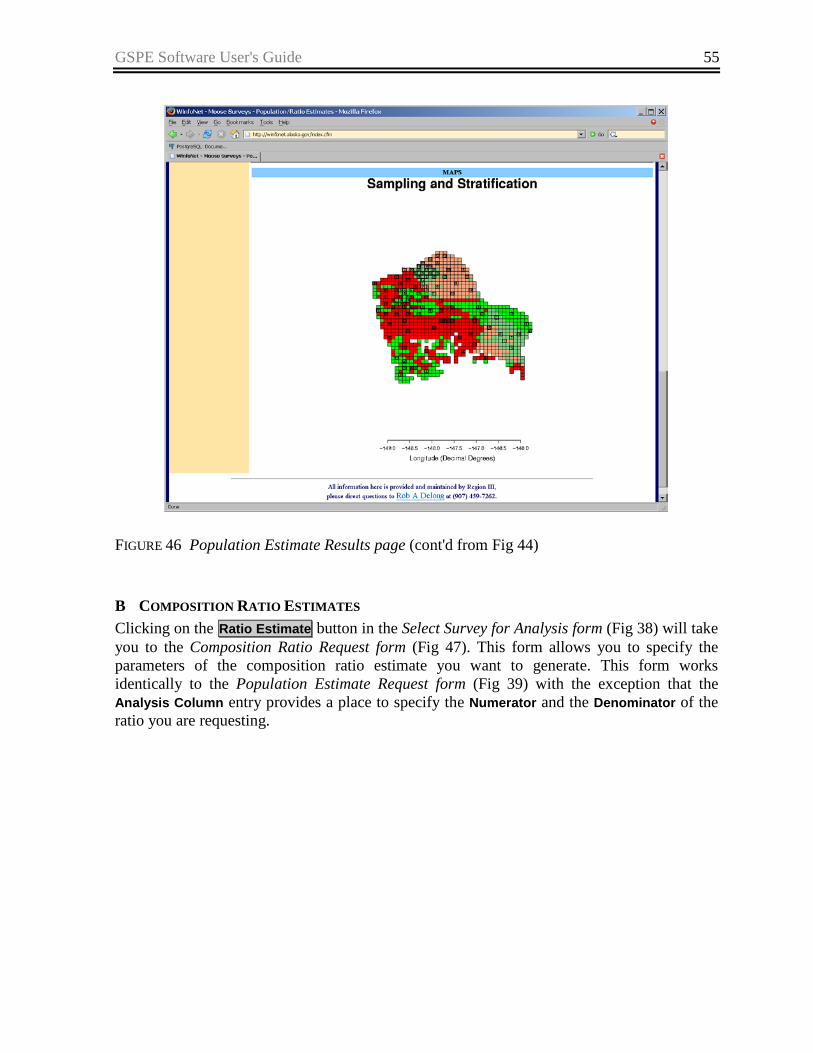
Finally, the Population Estimate Results page displays a map of the survey area in the MAPS section (Fig 46), color-coded by stratum. The stratum code that appears first alphabetically is colored red; the second stratum is colored green. Sampled units are drawn with a heavy black border and the number of moose in the analysis column for that sample unit is printed inside the boundary of the sample unit. If you request an estimate for an analysis area that is a subset of the entire survey area, the sample units within the analysis area are colored with lighter shades of green and red.
GSPE Software User's Guide 55
FIGURE 46 Population Estimate Results page (cont'd from Fig 44)
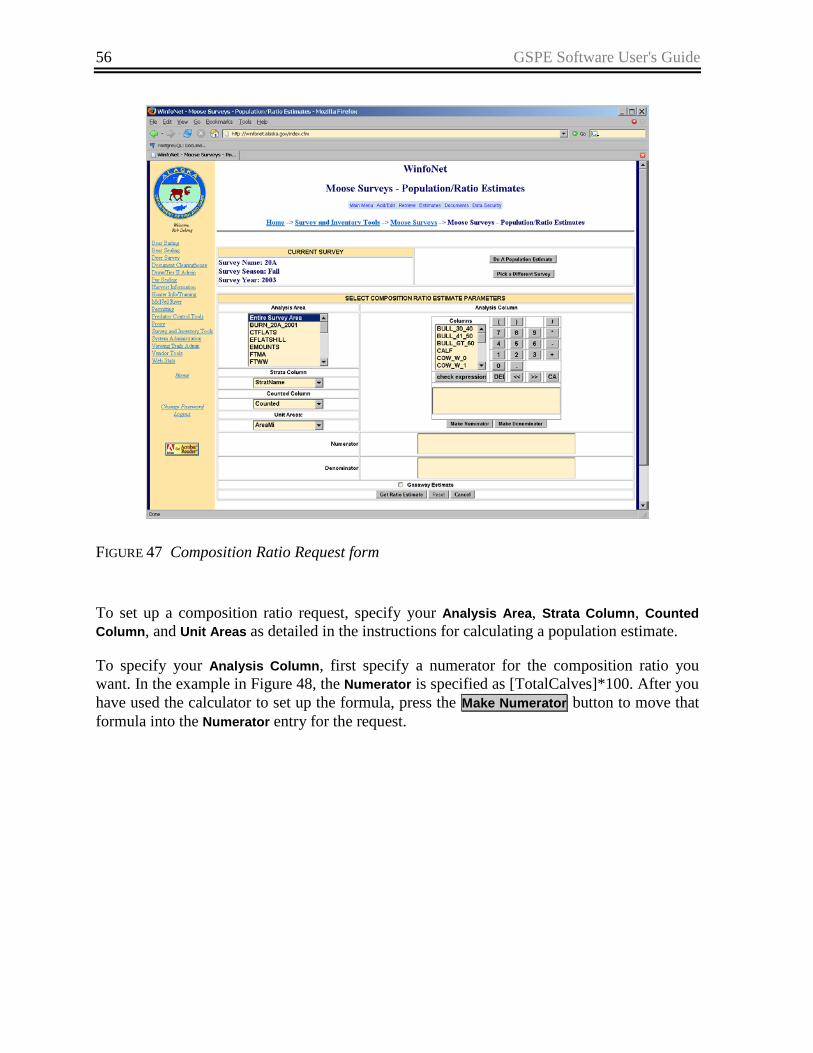
B COMPOSITION RATIO ESTIMATES Clicking on the Ratio Estimate button in the Select Survey for Analysis form (Fig 38) will take you to the Composition Ratio Request form (Fig 47). This form allows you to specify the parameters of the composition ratio estimate you want to generate. This form works identically to the Population Estimate Request form (Fig 39) with the exception that the Analysis Column entry provides a place to specify the Numerator and the Denominator of the ratio you are requesting.
56 GSPE Software User's Guide
FIGURE 47 Composition Ratio Request form
To set up a composition ratio request, specify your Analysis Area, Strata Column, Counted Column, and Unit Areas as detailed in the instructions for calculating a population estimate.
To specify your Analysis Column, first specify a numerator for the composition ratio you want. In the example in Figure 48, the Numerator is specified as [TotalCalves]*100. After you have used the calculator to set up the formula, press the Make Numerator button to move that formula into the Numerator entry for the request.
GSPE Software User's Guide 57
FIGURE 48 Composition Ratio Request form with numerator specified
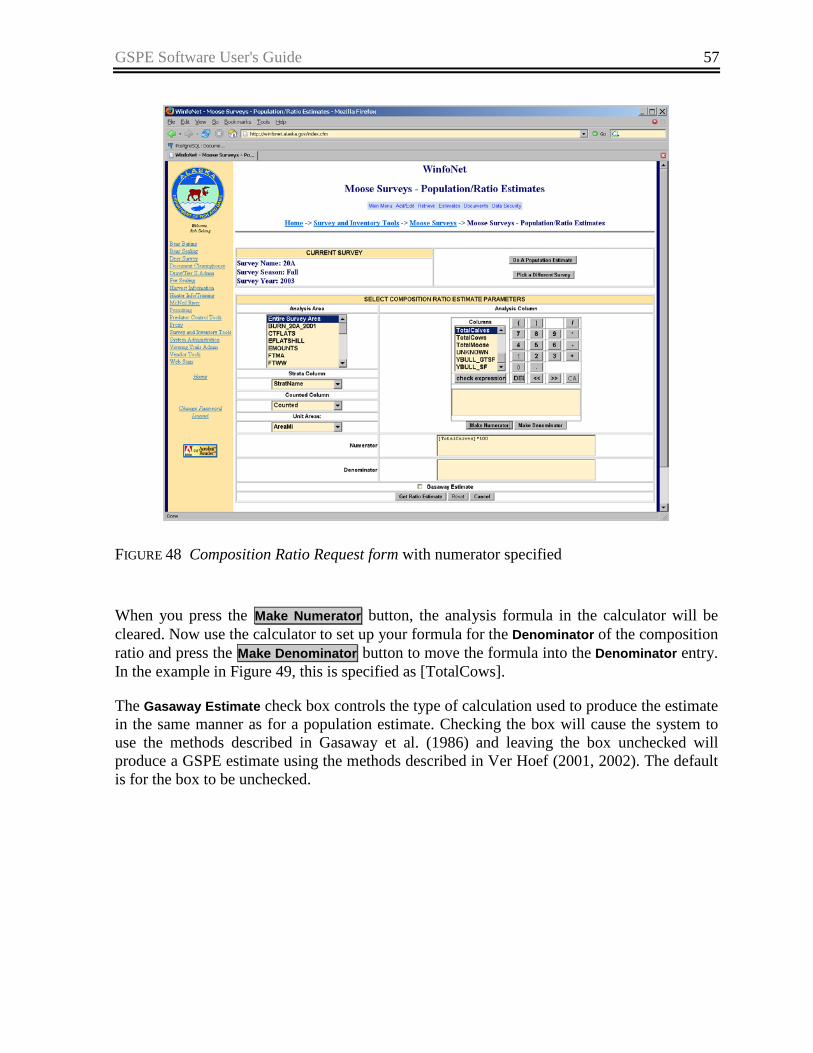
When you press the Make Numerator button, the analysis formula in the calculator will be cleared. Now use the calculator to set up your formula for the Denominator of the composition ratio and press the Make Denominator button to move the formula into the Denominator entry. In the example in Figure 49, this is specified as [TotalCows].
The Gasaway Estimate check box controls the type of calculation used to produce the estimate in the same manner as for a population estimate. Checking the box will cause the system to use the methods described in Gasaway et al. (1986) and leaving the box unchecked will produce a GSPE estimate using the methods described in Ver Hoef (2001, 2002). The default is for the box to be unchecked.

58 GSPE Software User's Guide
FIGURE 49 Composition Ratio Request form with denominator specified
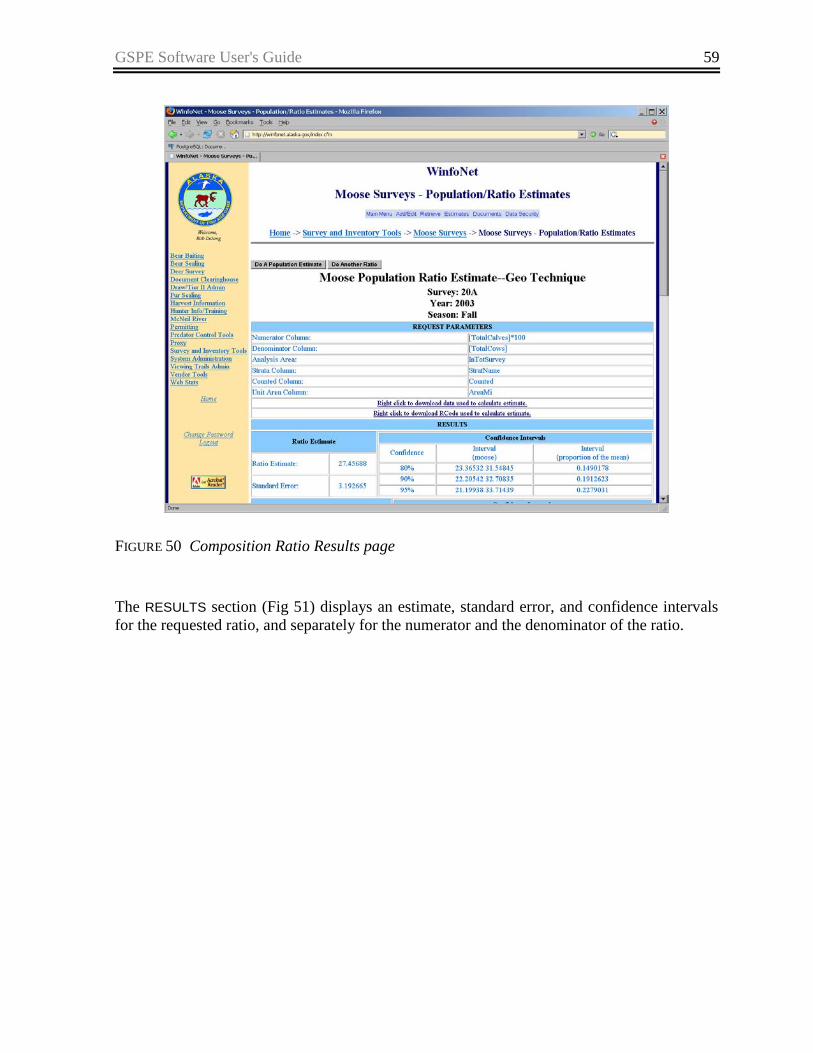
When you have set up your request, press the Get Ratio Estimate button to calculate the composition ratio. The Composition Ratio Results page (Fig 50) contains the same sections as the Population Estimate Results page. The REQUEST PARAMETERS section displays the parameters selected in the composition ratio request form.
GSPE Software User's Guide 59
FIGURE 50 Composition Ratio Results page
The RESULTS section (Fig 51) displays an estimate, standard error, and confidence intervals for the requested ratio, and separately for the numerator and the denominator of the ratio.

60 GSPE Software User's Guide
FIGURE 51 Composition Ratio Results page (cont'd)
If a Gasaway composition ratio was requested, this section also includes the degrees of freedom associated with each of these estimates (Fig 52). The SAMPLE DETAILS section reports the number of sample units, total areas, sample sizes, and area sampled for each stratum and for the entire survey. The number of moose counted in the numerator and in the denominator analysis columns are also displayed by stratum and for the entire survey.
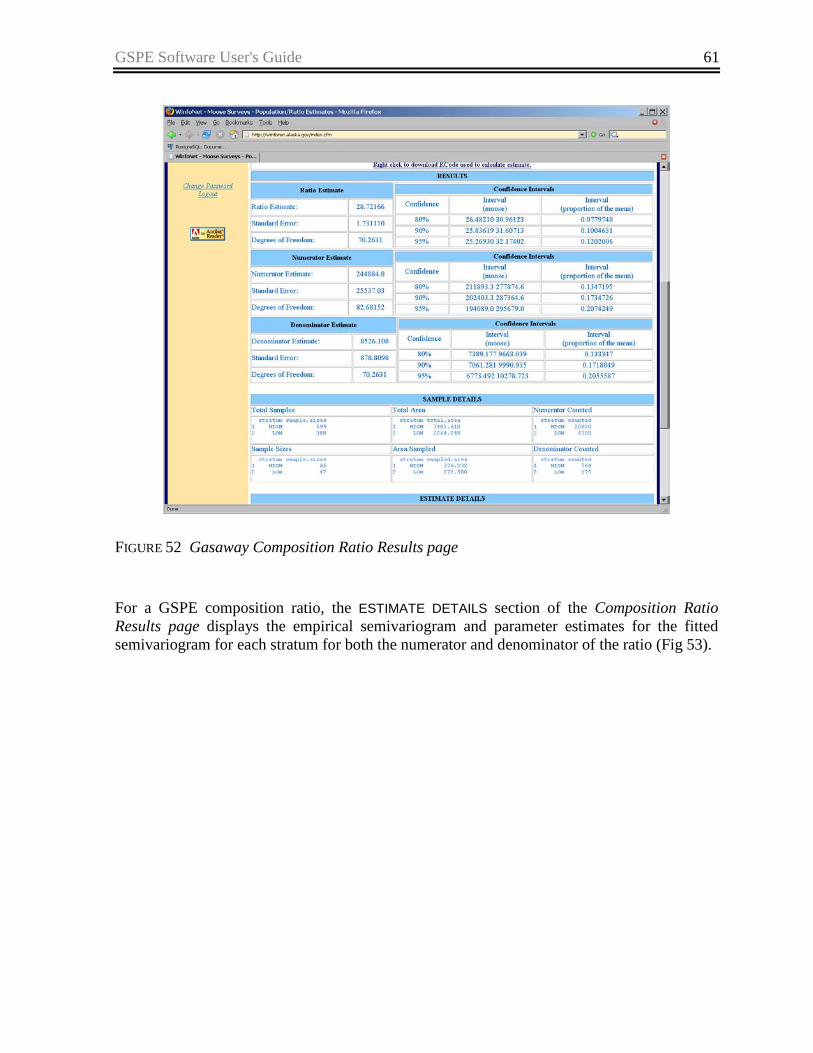
GSPE Software User's Guide 61
FIGURE 52 Gasaway Composition Ratio Results page
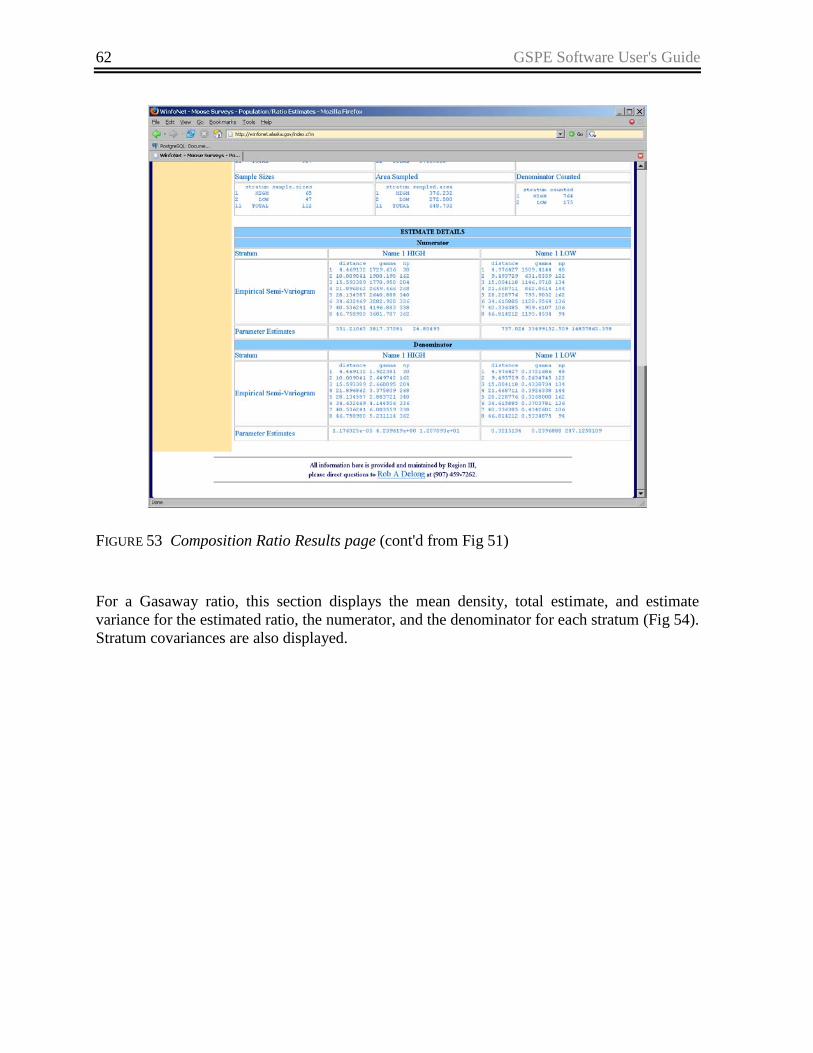
For a GSPE composition ratio, the ESTIMATE DETAILS section of the Composition Ratio Results page displays the empirical semivariogram and parameter estimates for the fitted semivariogram for each stratum for both the numerator and denominator of the ratio (Fig 53).
62 GSPE Software User's Guide
FIGURE 53 Composition Ratio Results page (cont'd from Fig 51)
For a Gasaway ratio, this section displays the mean density, total estimate, and estimate variance for the estimated ratio, the numerator, and the denominator for each stratum (Fig 54). Stratum covariances are also displayed.

GSPE Software User's Guide 63
FIGURE 54 Gasaway composition ratio estimate details

64 GSPE Software User's Guide
VI. MANAGING SECURITY FOR YOUR DATA Access rights are associated with every survey created in the system. By default, the owner of the survey is the user who created that survey. When a survey is created, the owner of the survey is granted all rights to view and edit data contained in that survey together with the right to delete the survey. In addition, the owner is given the right to control what access other users may have to that survey. By default no other users are granted any access to your surveys. If you want to allow others to view or edit your survey data, you will need to specifically grant them the right to do so.
A MODIFY ACCESS RIGHTS TO YOUR DATA Choosing the Security Tools link on the GSPE moose survey software main menu (Fig 55) will take you to the Security main menu (Fig 56), where you may grant or remove other user’s access rights to your survey.
FIGURE 55 GSPE moose survey software main menu

GSPE Software User's Guide 65
FIGURE 56 Security main menu
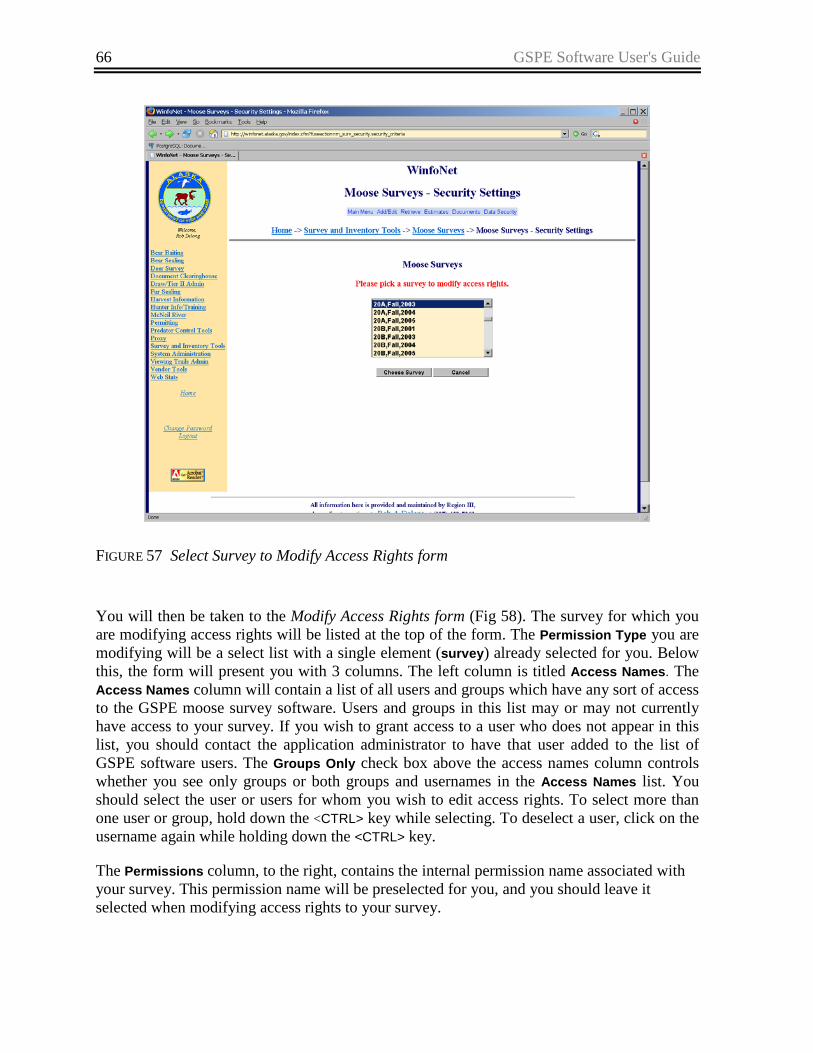
If you select the Modify security for a moose survey link in the Security Main Menu, you will be taken to the Select Survey to Modify Access Rights form (Fig 57). On this form, select the survey for which you wish to modify access rights, then click Choose survey.
66 GSPE Software User's Guide
FIGURE 57 Select Survey to Modify Access Rights form
You will then be taken to the Modify Access Rights form (Fig 58). The survey for which you are modifying access rights will be listed at the top of the form. The Permission Type you are modifying will be a select list with a single element (survey) already selected for you. Below this, the form will present you with 3 columns. The left column is titled Access Names. The Access Names column will contain a list of all users and groups which have any sort of access to the GSPE moose survey software. Users and groups in this list may or may not currently have access to your survey. If you wish to grant access to a user who does not appear in this list, you should contact the application administrator to have that user added to the list of GSPE software users. The Groups Only check box above the access names column controls whether you see only groups or both groups and usernames in the Access Names list. You should select the user or users for whom you wish to edit access rights. To select more than one user or group, hold down the <CTRL> key while selecting. To deselect a user, click on the username again while holding down the <CTRL> key.
The Permissions column, to the right, contains the internal permission name associated with your survey. This permission name will be preselected for you, and you should leave it selected when modifying access rights to your survey.
GSPE Software User's Guide 67
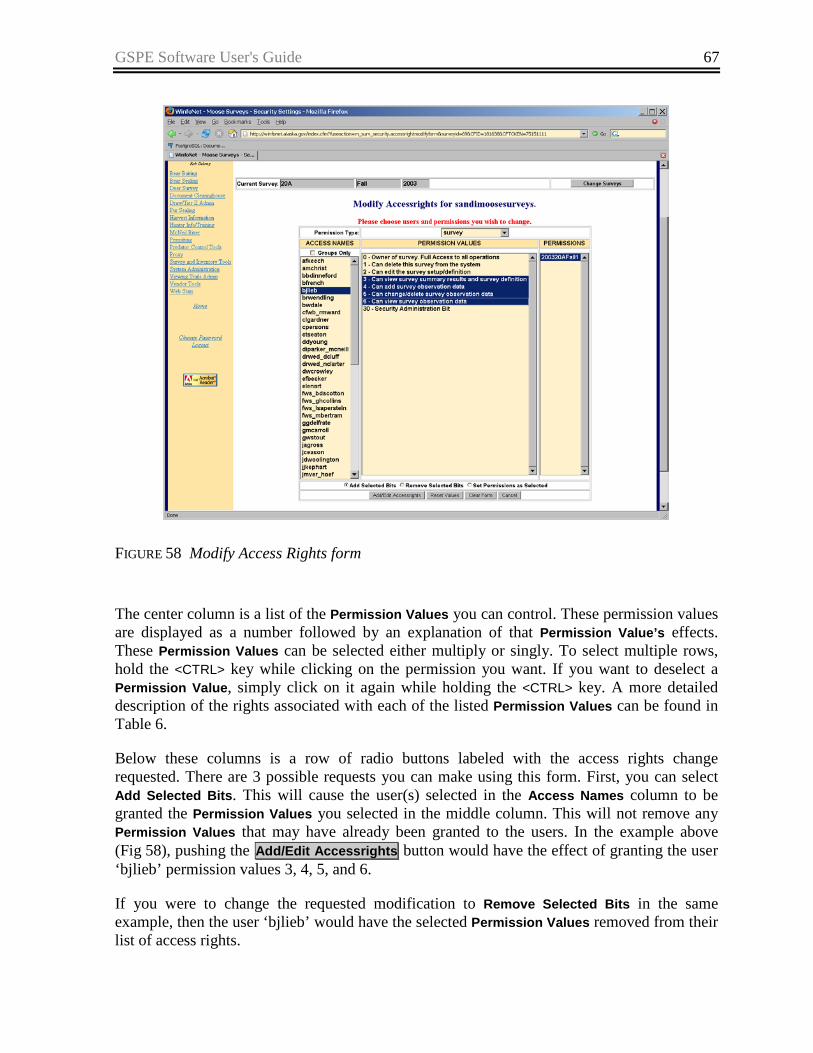
FIGURE 58 Modify Access Rights form
The center column is a list of the Permission Values you can control. These permission values are displayed as a number followed by an explanation of that Permission Value’s effects. These Permission Values can be selected either multiply or singly. To select multiple rows, hold the <CTRL> key while clicking on the permission you want. If you want to deselect a Permission Value, simply click on it again while holding the <CTRL> key. A more detailed description of the rights associated with each of the listed Permission Values can be found in Table 6.
Below these columns is a row of radio buttons labeled with the access rights change requested. There are 3 possible requests you can make using this form. First, you can select Add Selected Bits. This will cause the user(s) selected in the Access Names column to be granted the Permission Values you selected in the middle column. This will not remove any Permission Values that may have already been granted to the users. In the example above (Fig 58), pushing the Add/Edit Accessrights button would have the effect of granting the user ‘bjlieb’ permission values 3, 4, 5, and 6.
If you were to change the requested modification to Remove Selected Bits in the same example, then the user ‘bjlieb’ would have the selected Permission Values removed from their list of access rights.

68 GSPE Software User's Guide
The final access rights change request is Set Permissions as Selected. This will make the access rights of the selected user(s) match the permission values you selected exactly. The system will remove and add permission values as necessary to set the rights of the selected users. If a user has an access right that you do not have, you will receive an error message, as you cannot modify rights that have not been granted to you.
TABLE 6 Survey security permission value descriptions
Permission Value Allows a user to… 0 – Owner of survey. Full access to all operations Users with this permission can perform all operations
associated with being granted permission values 2 through 6. Granting this bit does not grant a user the right to change access rights to the survey for other users.
1 – Can delete this survey from the system Users with this permission can permanently delete the survey from the database in its entirety.
2 – Can edit the survey setup/definition Users with this permission can change survey information that applies to the survey as a whole such as survey name, year, and season. They can modify stratification levels defined, survey data classes, and special data fields, analysis area definitions, stratification assignments and associated stratification observations, as well as the contents of special data fields.
3 – Can view survey summary results and survey definition
Users with this permission can view survey information that applies to the survey as a whole such as stratification levels defined, survey data classes, and special data fields. This permission also grants the right to generate population and composition estimates for the survey. This permission does not grant the ability to make any changes to survey data.
4 – Can add survey observation data Users with this permission can add observation data from sampled sample units and can mark sample units as counted.
5 – Can change/delete survey observation data Users with this permission can edit or delete observation data from sampled units, but cannot add new sample units to the list of units counted.
6 – Can view survey observation data Users with this permission can view observation data in the survey at all levels of detail. This permission does not grant the ability to make any changes in the data or to generate population or composition estimates.
30 – Security administration bit Granting this permission value allows a user to grant or remove access rights to the survey for other users (including the survey owner!). A user can only control permission values that they are themselves granted. For example, a user who had not been granted permission value 2, could not control that permission value for other users even if granted permission value 30.
You should not grant the security administration permission value to other users except when absolutely necessary. Granting this permission value will allow other users to control your own access to the survey data. You also should not change your own access rights. It is possible to remove access to your survey from your own username using this tool. If you remove permissions from yourself, you will no longer be able to perform the functions

GSPE Software User's Guide 69
granted by those permissions. You also will not be able to restore those permissions to your username. If you inadvertently remove your rights to a survey, you will need to contact the application administrator using the email link at the bottom of any page of the GSPE software to have them restored.
B DETERMINE WHO HAS ACCESS TO YOUR DATA The Lookup access rights for a moose survey link in the Security main menu (Fig 59) takes you to a tool that allows you to determine what access rights other users have to your survey.
FIGURE 59 Security main menu
This link takes you to a form that allows you to pick the survey for which you want to view access rights (Fig 60).
70 GSPE Software User's Guide
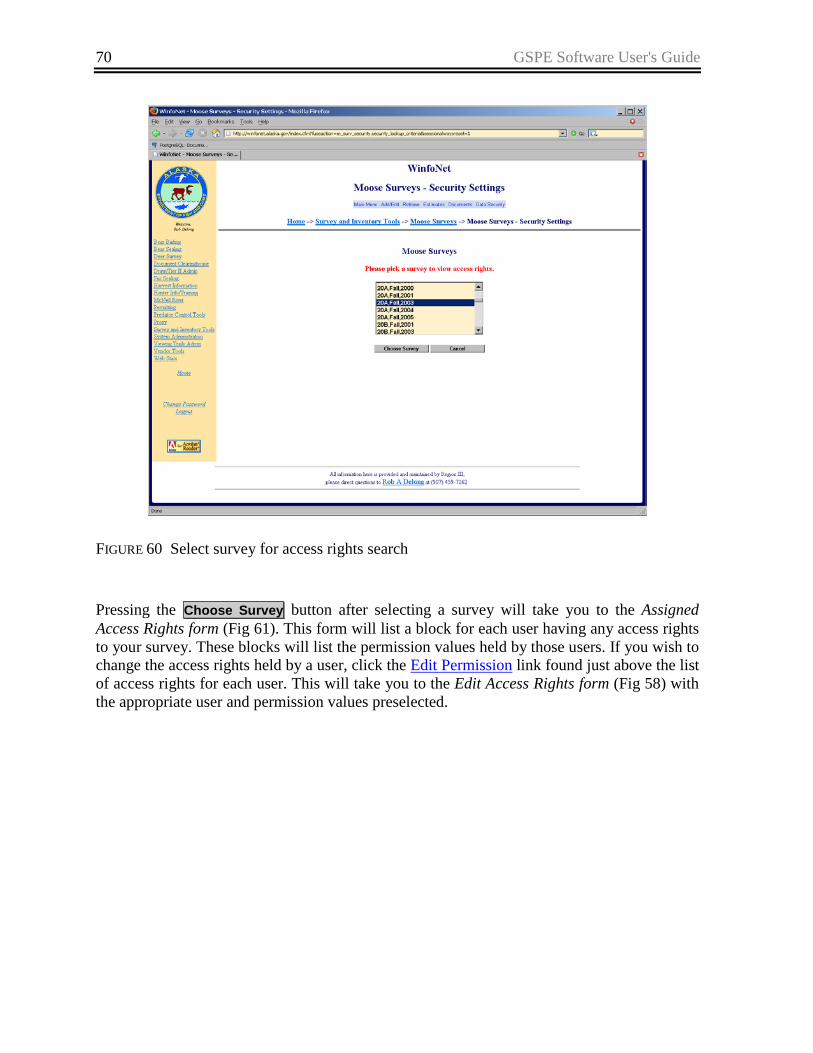
FIGURE 60 Select survey for access rights search
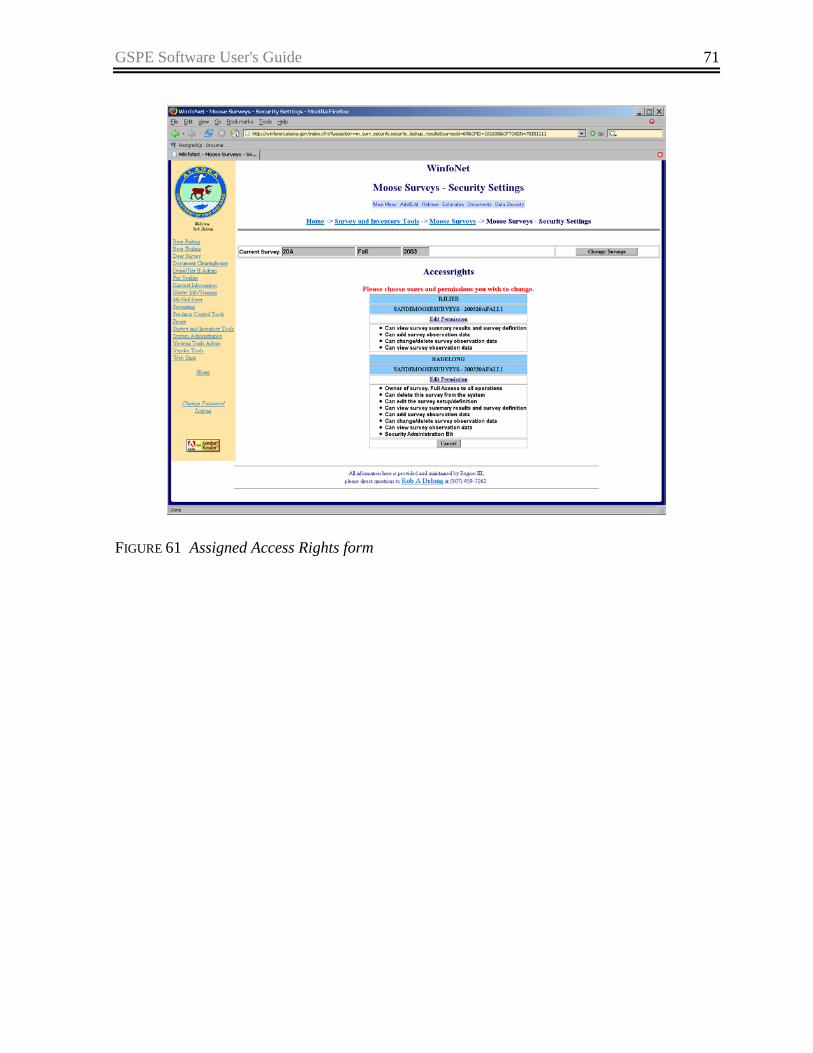
Pressing the Choose Survey button after selecting a survey will take you to the Assigned Access Rights form (Fig 61). This form will list a block for each user having any access rights to your survey. These blocks will list the permission values held by those users. If you wish to change the access rights held by a user, click the Edit Permission link found just above the list of access rights for each user. This will take you to the Edit Access Rights form (Fig 58) with the appropriate user and permission values preselected.
GSPE Software User's Guide 71
FIGURE 61 Assigned Access Rights form

72 GSPE Software User's Guide
VII. ACKNOWLEDGMENTS Thanks to JM Ver Hoef for authoring the statistical portions of the GSPE software and for his assistance with this user's guide. The reviewers who helped improve the user's guide and the software throughout the review process: LA Ayres, MR Bertram, RD Boertje, AM Christ, GH Collins, JR Dau, SD DuBois, KA Kellie, SD Kovach, BJ Lieb, EA Lenart, ME McNay, NA Olson, C Persons, BD Scotton, RO Stephenson, LK Tuori, RM Ward, SE Westover, and DD Young. LA McCarthy for her assistance with artistic design and preparation of the manual for printing.
Thanks also to the cooperators who helped arrange funding for this project: M MacCluskie, US National Park Service; MR Bertram, US Fish and Wildlife Service; RM Ward, Wildlife Branch of the Department of Environment for the Yukon, Canada; and HD Cluff, Wildlife Division of the Department of Environment and Natural Resources in the Northwest Territories, Canada.
VIII. REFERENCES GASAWAY WC, DUBOIS SD, REED DJ, AND SJ HARBO. 1986. Estimating moose population
parameters from aerial surveys. Biological Papers of the University of Alaska, Number 22.
KELLIE KA AND RA DELONG. 2006. Geospatial survey operations manual. Alaska Department of Fish and Game. Fairbanks, Alaska, USA.
VER HOEF JM. 2001. Predicting finite populations from spatially correlated data. 2000 Proceedings of the Section on Statistics and the Environment of the American Statistical Association, pp. 93–98.
VER HOEF JM. 2002. Sampling and geostatistics for spatial data. Ecoscience 9:152–161.