Generate a CSR - ssl- · PDF fileDate : April 6, 2016. ... To request a certification, the...
49
SSL Europa - 8 chemin des escargots - 18200 Orval - France - T: +33 (0)9 88 99 54 09 www.ssl-europa.com Generate a CSR Author : Service Technique Date : April 6, 2016
-
Upload
phamkhuong -
Category
Documents
-
view
214 -
download
1
Transcript of Generate a CSR - ssl- · PDF fileDate : April 6, 2016. ... To request a certification, the...

SSL Europa - 8 chemin des escargots - 18200 Orval - France - T: +33 (0)9 88 99 54 09 www.ssl-europa.com
Generate a CSR
Author : Service Technique
Date : April 6, 2016
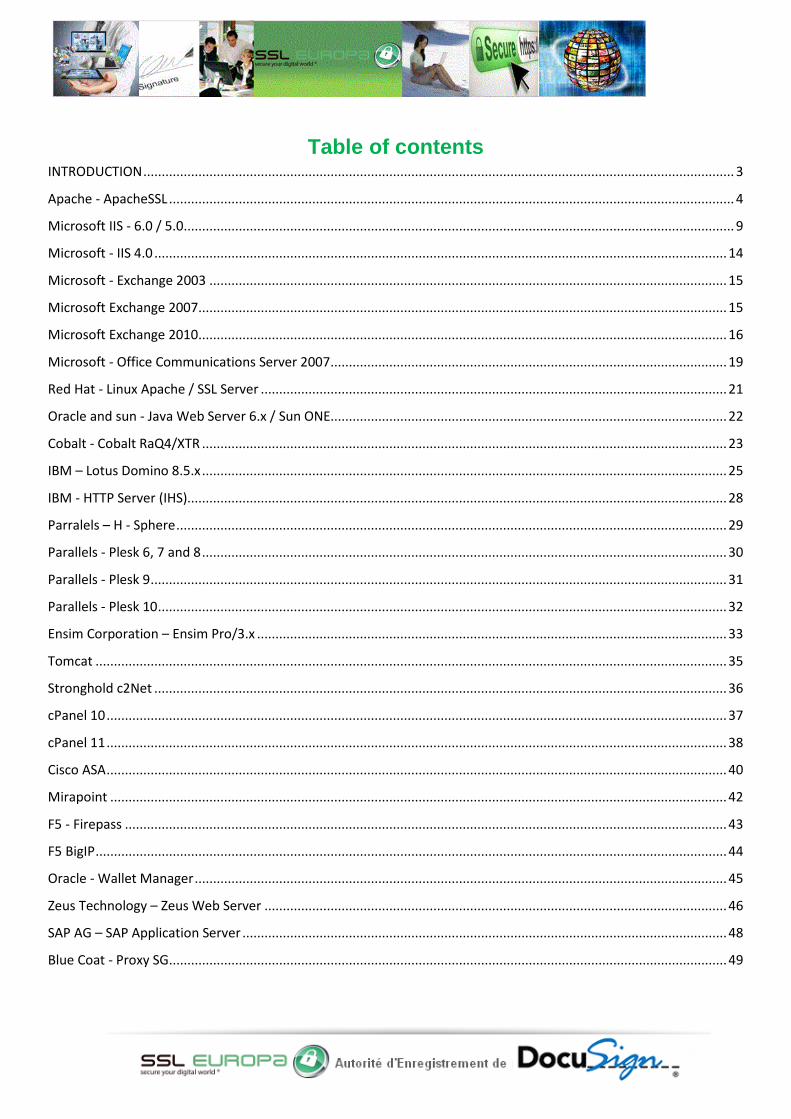
Table of contents INTRODUCTION ................................................................................................................................................................. 3
Apache - ApacheSSL .......................................................................................................................................................... 4
Microsoft IIS - 6.0 / 5.0 ...................................................................................................................................................... 9
Microsoft - IIS 4.0 ............................................................................................................................................................ 14
Microsoft - Exchange 2003 ............................................................................................................................................. 15
Microsoft Exchange 2007 ................................................................................................................................................ 15
Microsoft Exchange 2010 ................................................................................................................................................ 16
Microsoft - Office Communications Server 2007 ............................................................................................................ 19
Red Hat - Linux Apache / SSL Server ............................................................................................................................... 21
Oracle and sun - Java Web Server 6.x / Sun ONE............................................................................................................ 22
Cobalt - Cobalt RaQ4/XTR ............................................................................................................................................... 23
IBM – Lotus Domino 8.5.x ............................................................................................................................................... 25
IBM - HTTP Server (IHS)................................................................................................................................................... 28
Parralels – H - Sphere ...................................................................................................................................................... 29
Parallels - Plesk 6, 7 and 8 ............................................................................................................................................... 30
Parallels - Plesk 9 ............................................................................................................................................................. 31
Parallels - Plesk 10 ........................................................................................................................................................... 32
Ensim Corporation – Ensim Pro/3.x ................................................................................................................................ 33
Tomcat ............................................................................................................................................................................ 35
Stronghold c2Net ............................................................................................................................................................ 36
cPanel 10 ......................................................................................................................................................................... 37
cPanel 11 ......................................................................................................................................................................... 38
Cisco ASA ......................................................................................................................................................................... 40
Mirapoint ........................................................................................................................................................................ 42
F5 - Firepass .................................................................................................................................................................... 43
F5 BigIP ............................................................................................................................................................................ 44
Oracle - Wallet Manager ................................................................................................................................................. 45
Zeus Technology – Zeus Web Server .............................................................................................................................. 46
SAP AG – SAP Application Server .................................................................................................................................... 48
Blue Coat - Proxy SG ........................................................................................................................................................ 49

INTRODUCTION
To request a certification, the client must generate a CSR (Certification Signing Request), from the server on which will bear the certification. If your server does not appear in the list below, consult your server’s user’s manual or contact your technical support.
The CSR must show the following elements:
1. Domain name of the Website to be secured 2. Name of the organisation 3. Organisation department (if necessary) 4. City/Town 5. State/Province/Region 6. Country
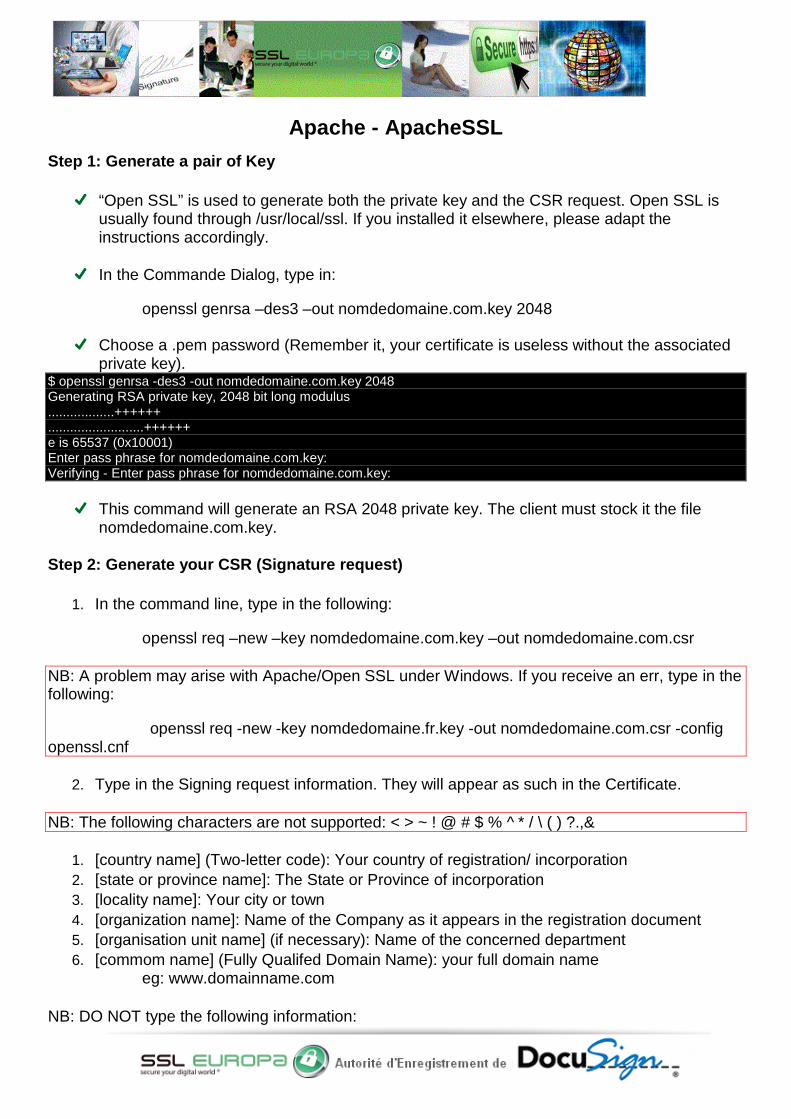
Apache - ApacheSSL Step 1: Generate a pair of Key
“Open SSL” is used to generate both the private key and the CSR request. Open SSL is usually found through /usr/local/ssl. If you installed it elsewhere, please adapt the instructions accordingly.
In the Commande Dialog, type in:
openssl genrsa –des3 –out nomdedomaine.com.key 2048
Choose a .pem password (Remember it, your certificate is useless without the associated private key).
$ openssl genrsa -des3 -out nomdedomaine.com.key 2048 Generating RSA private key, 2048 bit long modulus ..................++++++ ..........................++++++ e is 65537 (0x10001) Enter pass phrase for nomdedomaine.com.key: Verifying - Enter pass phrase for nomdedomaine.com.key:
This command will generate an RSA 2048 private key. The client must stock it the file nomdedomaine.com.key.
Step 2: Generate your CSR (Signature request)
1. In the command line, type in the following:
openssl req –new –key nomdedomaine.com.key –out nomdedomaine.com.csr NB: A problem may arise with Apache/Open SSL under Windows. If you receive an err, type in the following:
openssl req -new -key nomdedomaine.fr.key -out nomdedomaine.com.csr -config openssl.cnf
2. Type in the Signing request information. They will appear as such in the Certificate. NB: The following characters are not supported: < > ~ ! @ # $ % ^ * / \ ( ) ?.,&
1. [country name] (Two-letter code): Your country of registration/ incorporation 2. [state or province name]: The State or Province of incorporation 3. [locality name]: Your city or town 4. [organization name]: Name of the Company as it appears in the registration document 5. [organisation unit name] (if necessary): Name of the concerned department 6. [commom name] (Fully Qualifed Domain Name): your full domain name
eg: www.domainname.com NB: DO NOT type the following information:
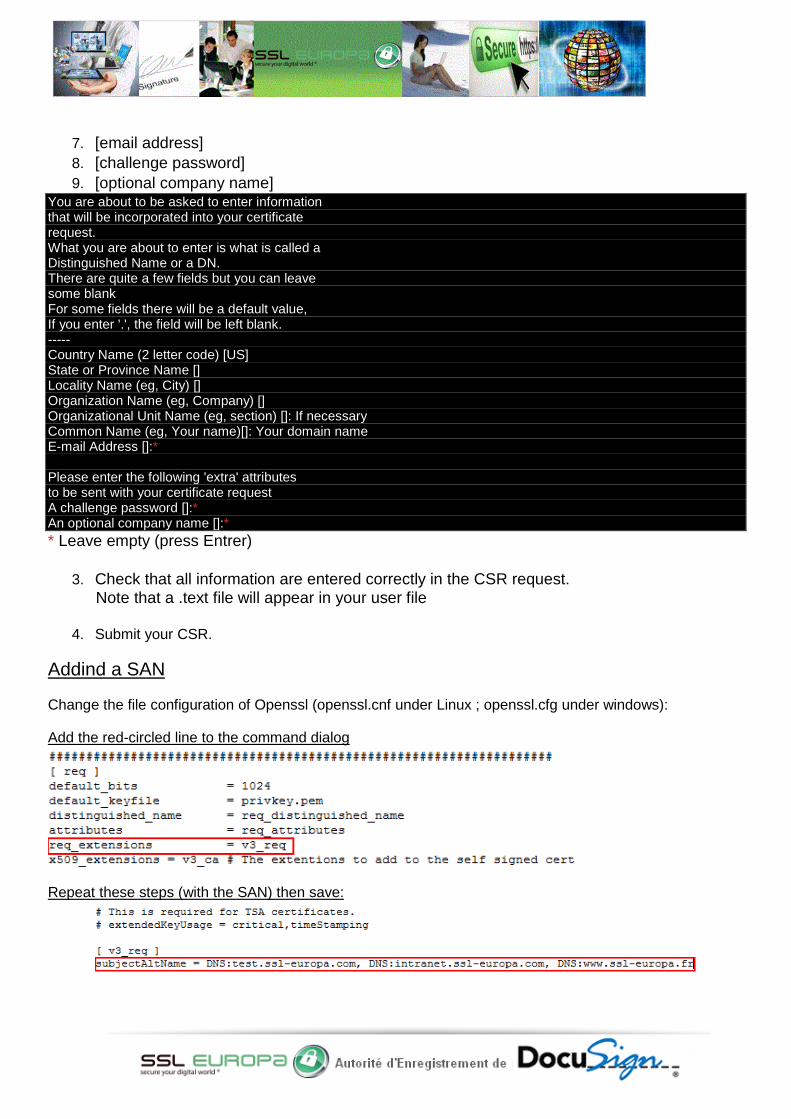
7. [email address] 8. [challenge password] 9. [optional company name]
You are about to be asked to enter information that will be incorporated into your certificate request. What you are about to enter is what is called a Distinguished Name or a DN. There are quite a few fields but you can leave some blank For some fields there will be a default value, If you enter '.', the field will be left blank. ----- Country Name (2 letter code) [US] State or Province Name [] Locality Name (eg, City) [] Organization Name (eg, Company) [] Organizational Unit Name (eg, section) []: If necessary Common Name (eg, Your name)[]: Your domain name E-mail Address []:* Please enter the following 'extra' attributes to be sent with your certificate request A challenge password []:* An optional company name []:* * Leave empty (press Entrer)
3. Check that all information are entered correctly in the CSR request. Note that a .text file will appear in your user file
4. Submit your CSR.
Addind a SAN
Change the file configuration of Openssl (openssl.cnf under Linux ; openssl.cfg under windows):
Add the red-circled line to the command dialog
Repeat these steps (with the SAN) then save:
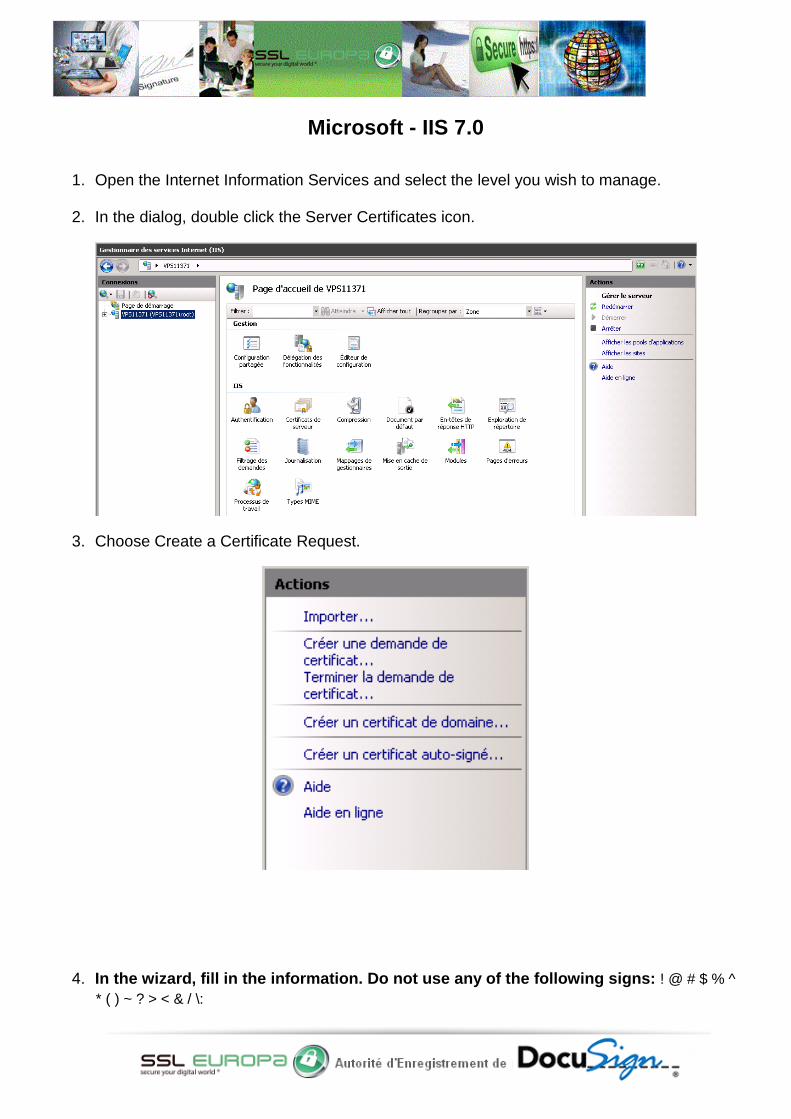
Microsoft - IIS 7.0
1. Open the Internet Information Services and select the level you wish to manage.
2. In the dialog, double click the Server Certificates icon.
3. Choose Create a Certificate Request.
4. In the wizard, fill in the information. Do not use any of the following signs: ! @ # $ % ^ * ( ) ~ ? > < & / \:

Under Common name, type in the website address to be secured, eg: “domain-name.com.”
Under Organization, type in the name of your organization.
Under Organizational Unit, type in, if necessary, the name of the department of your organization.
Under City/locality, type in the full name of your town/city.
Under State/Province, type in the name of your State/Province.
Under Country/Region, type in the name of your country or region.
5. Click next. In the next dialog, choose RSA crypto and 2048 bit lenght. Click next.

6. In the file name dialog, type in a name for your certificate (eg : ssl-europa.csr.txt), in the box, or click Browse to locate the folder and type in the name.
7. You need only submit the generated file, or copy/paste the content in our request form. Remember to open the file with Notepad or VI. Don’t forget to include from the tags ——-BEGIN CERTIFICATE to END CERTIFICATE ——--.
NB: You must not reconfigure the SSL certificate or request a new one from the moment you generated it and the moment you install the certificate. If you did so, the software may lose the previous request and refuse to install the certificate.

Microsoft IIS - 6.0 / 5.0
Open the Internet Information Services dialog and select the server you wish to secure.
Right-click on it and choose Properties.
In the dialog, choose the Directory Security tab.

Click Server certificate to launch the IIS certificate wizard. Select Create a new certificate and click Next.
Select: Prepare the request now, but send it later, and click Next.

Type in a name for the certificate and choose 2048 bit length of encryption. Click Next
Fill in the fields Organization and Organizational Unit. Click Next.

Under Commun Name, type in for example www.nomdedomain.com. Click Next.
Fill in the fields Country/Region, State/Province and City/Locality. Click Next.

Choose the path to where your file will be saved. Click Next.
The dialog sums up the information you entered, check that everything is correct.
You generated you CSR! Click End to close the dialog. You need only submit the generated file, or copy/paste the content in our request form. Remember to open the file with Notepad or VI. Don’t forget to include from the tags ——-BEGIN CERTIFICATE to END CERTIFICATE ——--.

Microsoft - IIS 4.0
1. Open the IIS manager. Under Start, click Programs, Windows NT 4.0 option Pack, Microsoft
Internet Information Server and then ISS manager. 2. Unfold the ISS folder by clicking the + sign next to the name of the Server to be secured.
3. Locate the Website which will bear the SSL certificate. It is usually the default website. Right-click on the website and click Properties.
4. In the dialog, click the Directory Security tab.
5. Under Secure Communication, click Edit.
6. In the dialog, click Key Manager.
7. Select Put the request that will send to an authority, and choose a proper name for the file or accept the default one.
8. Fill in the following dialog. The available key length vary with the version and the Service Pack installed on your machine.
NB: Type in a password and remember it. Without it, you will not be able to install the certificate.
9. You must choose a encryption key length, pick 2048 bits.
10. Type in the appropriate information concerning your organization. They will appear as such in the certificate.
Under Common name, type in the website address to be secured, eg: “domain-name.com.” Under Organization, type in the name of your organization. Under Organizational Unit, type in, if necessary, the name of the department of your
organization. Under City/locality, type in the full name of your town/city. Under State/Province, type in the name of your State/Province. Under Country/Region, type in the name of your country or region.
11. The IIS manager will show, under www icon a red-crossed key, indicating the request is not complete.
12. Select the Computers tab on the top left to commit the changes, click Exit, and click Yes to commit the changes.
You generated you CSR! Click End to close the dialog. You need only submit the generated file, or copy/paste the content in our request form. Remember to open the file with Notepad or VI. Don’t forget to include from the tags ——-BEGIN CERTIFICATE to END CERTIFICATE request——--.

Microsoft - Exchange 2003 Cf Microsoft IIS 6.0 / 5.0 procedure
Microsoft Exchange 2007
Launch Exchange Management shell and type in: New-ExchangeCertificate
Modify the command by filling the form with your information:
New-ExchangeCertificate -GenerateRequest -Path c:\Nondufichierdevotrechoix.txt -SubjectName "c=Votre Pays, l=Votre Ville, s=Votre Région, o=Votre Entreprise, cn=Votre Domaine", -DomainName SANDomaines -PrivateKeyExportable:$True
c=Country: 2-letter country code.
l=city/locality
s=State/Province
o=your organization
cn=Common name
Caution! www. is part of the domain name. type in www.domain-name.com if you wish to secure https://www.domain-name.com.
DomainName= Separate with semi-colon (;) other domains that you wish to secure.
SANDomaines (if necessary) - Separate with semi-colon (;). Microsoft recommends that you add the NetBIOS from Exchange server, the FQDN, as well as autodiscover.domain-name.com.
NB: The first domain is mentioned in "-Subject Name" after "cn=". After you hit Retur, the CSR will open in the management shell (you may have to browse yourself to find it: c:\Nondufichierdevotrechoix.txt). You need only submit the generated file, or copy/paste the content in our request form. Remember to open the file with Notepad or VI. Don’t forget to include from the tags ——-BEGIN CERTIFICATE to END CERTIFICATE ——--.

Microsoft Exchange 2010 1. Launch Exchange Organizational Health (Hit Start, Programs and, then Microsoft Exchange
2010).
2. Click Manage Databases.
3. Select Server Configuration in the left-hand menu and New Exchange certificate in the right-hand menu.
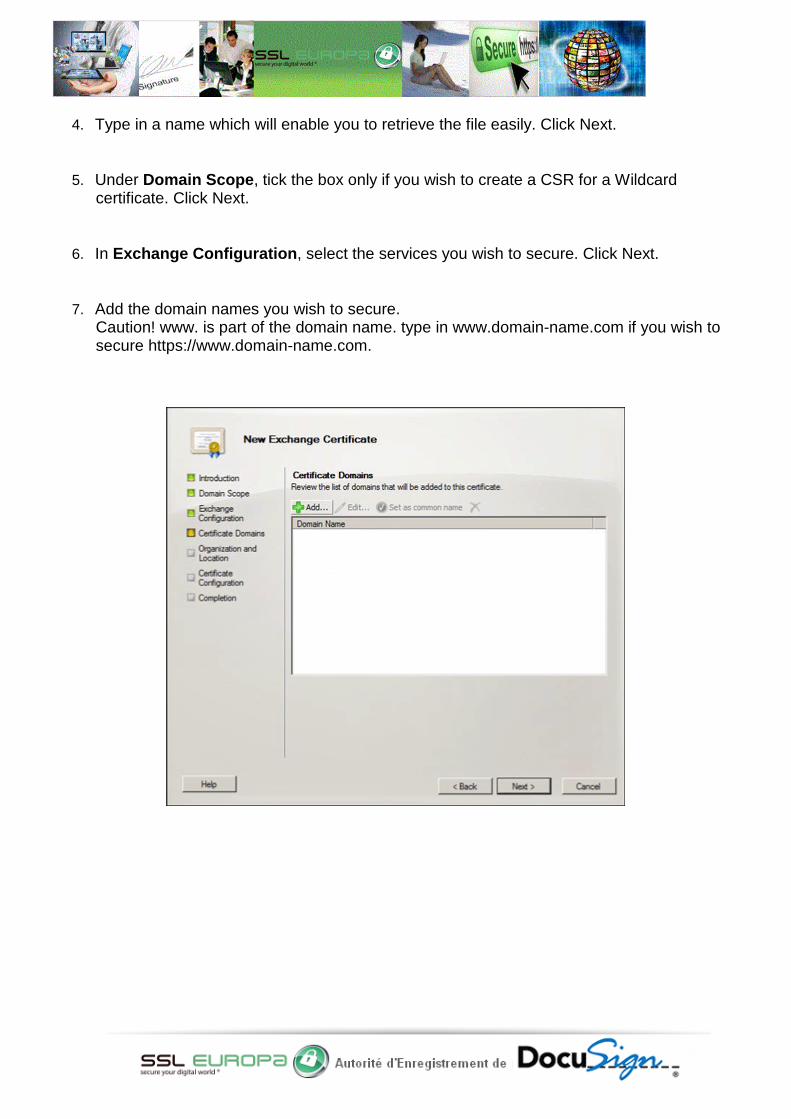
4. Type in a name which will enable you to retrieve the file easily. Click Next.
5. Under Domain Scope, tick the box only if you wish to create a CSR for a Wildcard certificate. Click Next.
6. In Exchange Configuration, select the services you wish to secure. Click Next.
7. Add the domain names you wish to secure. Caution! www. is part of the domain name. type in www.domain-name.com if you wish to secure https://www.domain-name.com.

8. Fill in the information:
1. Under Organization, type in the name of your organization. Under Organizational Unit, type in, if necessary, the name of the department of your
organization. Under Country/Region, type in the name of your country or region. Under City/locality, type in the full name of your town/city. Under State/Province, type in the name of your State/Province.
9. Click Browse to save your CSR in .req.
You need only submit the generated file, or copy/paste the content in our request form. Remember to open the file with Notepad or VI. Don’t forget to include from the tags ——-BEGIN CERTIFICATE to END CERTIFICATE request——--.
Microsoft - Office Communications Server 2007
Launch Office Communications Server 2007, (Hit Start > Programs > Admininstrative tools).
Select your Organization and expand the menu.
Right-click on your Office Communications Server and click Certificates.
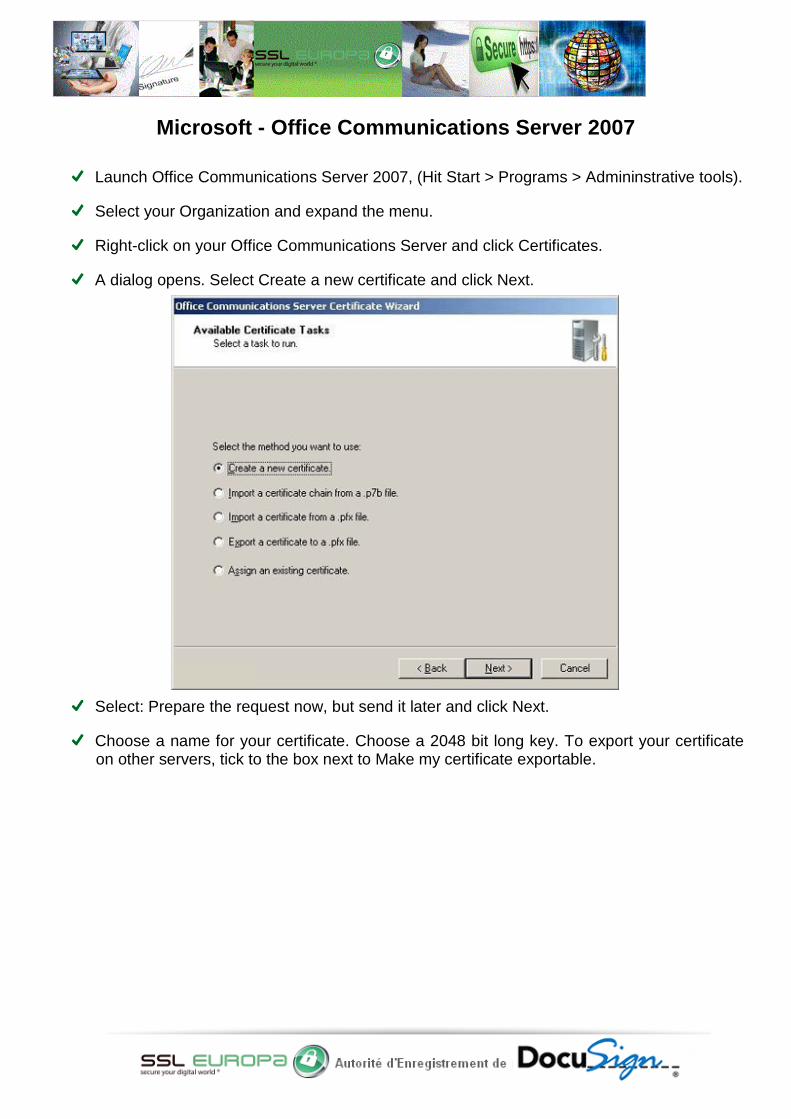
A dialog opens. Select Create a new certificate and click Next.
Select: Prepare the request now, but send it later and click Next.
Choose a name for your certificate. Choose a 2048 bit long key. To export your certificate on other servers, tick to the box next to Make my certificate exportable.

Fill in with your organization’s information. 1. Organization - The legal name of your organization 2. Organizational Unit (if necessary) - The name of the Department bearing the
certificate. 3. Server’s subject name -
Caution! www. is part of the domain name. type in www.domain-name.com if you wish to secure https://www.domain-name.com.
4. Subject Alternative Names - (optional) 5. City/Locality. 6. State/Province - Le département dans lequel se trouve votre société. 7. Country/Region - 2-letter Country code.
Choose a name for the CSR file (extension .txt).
You need only submit the generated file, or copy/paste the content in our request form. Remember to open the file with Notepad or VI. Don’t forget to include from the tag ——-BEGIN CERTIFICATE to END CERTIFICATE ——--.
Red Hat - Linux Apache / SSL Server Step 1: Generate the private key
Please use the CD command to migrate to the folder /etc/httpd/conf.
As root, enter one of the two commands to generate the keys:
When using Official Red Hat Linux Professional you can choose whether you want to protect the key by a password or not:
o If you choose password protection, type in:
make genkey
Upon generation of the key, you will be asked to enter a password. Note that you will need to enter your password each time you open your secured server.
o If you don’t choose password protection, type in:
/usr/sbin/sslgenrsa -rand /dev/urandom -out ssl.key/server.key 2048
Use the following command to set up the appropriate authorization for your key:
chmod go-rwx ssl.key/server.key
We do not recommend you use the second command, and let the key unprotected, and choose the first command and a password protected key.
Your key will be saved in a file named server.key, if you use Official Red Hat Linux Professional, /etc/httpd/conf/ssl.key. With Official Red Hat Linux Professional, International Edition, the server.key is saved in /etc/httpd/conf.
Step 2: Create the certificate request (CSR)
1. As root admin, indicate in the folder /etc/httpd/conf, type in the command appropriate to you
situation: a. Under Official Red Hat Linux Professional, type in the following:
make certreq
b. Under Official Red Hat Linux Professional, International Edition, type in the following:
/usr/bin/openssl req -new -key /etc/httpd/conf/server.key -out /etc/httpd/conf/server.csr
2. If you chose password protection, you will be asked to enter it.
3. You must then, fill in the following information:
1. (C) country: 2-letter country code
2. (S) State/Province 3. (L) City/Locality 4. (O) Organization: the exact name of your company. 5. (OU) Organizational Unit: optional. 6. (CN) Common Name: www.domaine-name.com
4. When you finish the process, a file is created and saved at /etc/httpd/conf/ssl.csr.
5. You need only submit the generated file, or copy/paste the content in our request form.
Remember to open the file with Notepad or VI. Don’t forget to include from the tag ——-BEGIN CERTIFICATE to END CERTIFICATE ——--.
Oracle and sun - Java Web Server 6.x / Sun ONE
Step 1: Create a Key Database
1)Access Sun One admin interface.
2)Under Servers, select the server that will bear the certificate and click Manage.
3)Click Security. 4)Click Create a database. 5)Type in and confirm a password to protect the database.
Step 2: Generate a CSR
1. Click Request a certificate. Type in your email address when asking the CA’s email. Even is your Sun server can use emails to send the certificate request, SSL Europa requires you paste the certificate request under .txt format Enter a password for your key pair to protect the keys, it may be the same as the database’s
1. (C) country: 2-letter country code 2. (S) State/Province 3. (L) City/Locality 4. (O) Organization: the exact name of your company. 5. (OU) Organizational Unit: optional. 6. (CN) Common Name: www.domaine-name.com
Caution! www. is part of the domain name. type in www.domain-name.com if you wish to secure https://www.domain-name.com.
2. The server will generate a CSR and open it. Copy and paste the information in Notepad ou VI.
Save this document, this is your CSR.

Cobalt - Cobalt RaQ4/XTR Step 1: Activate the SSL technology for your site
Go to Server Management.
Click the green icon next to the virtual site that will bear the certificate. A manager dialog opens.
Click Site settings on the left panel.
Select Enable SSL.
Click Save changes.
Step 2: Generate a self-signed, a private key and a CSR
You must create a self-signed certificate first which will be replaced later by the SSL Certificate. 1. Go to Server Management. 2. Click the green icon next to the site that will bear the SSL technology. 3. Click SSL Settings in the left panel. 4. Certificate Subject Information will appear. 5. Fill in the following information:
1. (C) country: 2-letter country code 2. (S) State/Province 3. (L) City/Locality 4. (O) Organization: the exact name of your company. 5. (OU) Organizational Unit: optional.
6. Select Generate self-signed certificate in the menu. 7. Click Save changes.
RaQ4/XTR will generate the certificate files.

8. Copy the whole CSR: -----BEGIN CERTIFICATE REQUEST-----
données cryptées -----END CERTIFICATE REQUEST-----
9. Paste the CSR in Notepad or VI. 10. Save the file.

IBM – Lotus Domino 8.5.x
In the main menu, select Create Key Ring.
Fill the form:
o Select 2048 bit long key.
1. (C) country: 2-letter country code 2. (S) State/Province 3. (L) City/Locality 4. (O) Organization: the exact name of your company. 5. (OU) Organizational Unit: optional. 6. (CN) Common Name: www.domaine-name.com

Click next. A dialog appears stating the pair of key was created and summarizing the
information.
Click OK. You are redirected to the main menu. Click Create a certificate request.
Your must select Paste into form on CA’s site. Click Create Certificate Request to continue. A recap opens. Copy the information before clicking OK.

Your CSR was generated.

IBM - HTTP Server (IHS) Step 1: Create a key database A key database is a file the server uses to store one or multiple key pairs. You may use one database for all key pairs, or create one database for each key. NB: If you use IKEYMAN to create a new key database, the file generated will be stored in the file where you use IKEYMAN. Type in IKEYMAN in a command line under UNIX or launch Key Manager utility in the IBM
HTTP Server folder under Windows. Select Key File database in the main user interface, then click New. In the dialog, type in a name for the database and click OK In the next dialog, type in a password, confirm it, and click OK.
Step 2: Create your Certification request
1. Type in IKEYMAN in a command line under UNIX or launch Key Manager utility in the IBM HTTP Server folder under Windows.
2. Select Key File database in the main user interface, then click Open.
3. In the dialog, select your key database name and click OK.
4. Enter your password as prompted.
5. Select Create from the main user interface and select Request a new certificate.
6. Fill in the information: 1. Key Label: A name for the key. 2. Key Size: Select 2048 bits
Organization: Name of your business Organizational Unit: Optional City/Locality: Your city State/Province ZIP code: Your zip or postal code Country: 2-letter country code (ex : FR pour France). Name of the request, you may use the default name
7. Click OK.
8. In the Information dialog, click OK. You need only submit the generated file, or copy/paste the content in our request form. Remember to open the file with Notepad or VI. Don’t forget to include from the tag ——-BEGIN CERTIFICATE to END CERTIFICATE ——--.

Parralels – H - Sphere Click SSL, then click Activate SSL for the domain you wish to secure.
Click Next, a dialog appears where you need enter the parameters for the certification request.
Click submit, a CSR will be generated:
You may copy/paste your CSR, the key, and the temporary certificate in Notepad.
NB: Create one document for each file. You must create and save 3 documents.
Then copy/past the whole CSR file in our form, including the beginning and end tags.

Parallels - Plesk 6, 7 and 8
1. Connect on Plesk control panel.
2. Click on Domain, the domain list appears.
3. Click on the domain name you wish to secure.
4. Click the certificate button.
5. Click add new certificate. A dialog appears.
6. Type in the information as requested.
7. Click on Request.
Plesk will send your CSR on the mail address you typed in. The email will part into 2 sections, an RSA private key and the certification request. You will need the RSA private key later on.
Parallels - Plesk 9
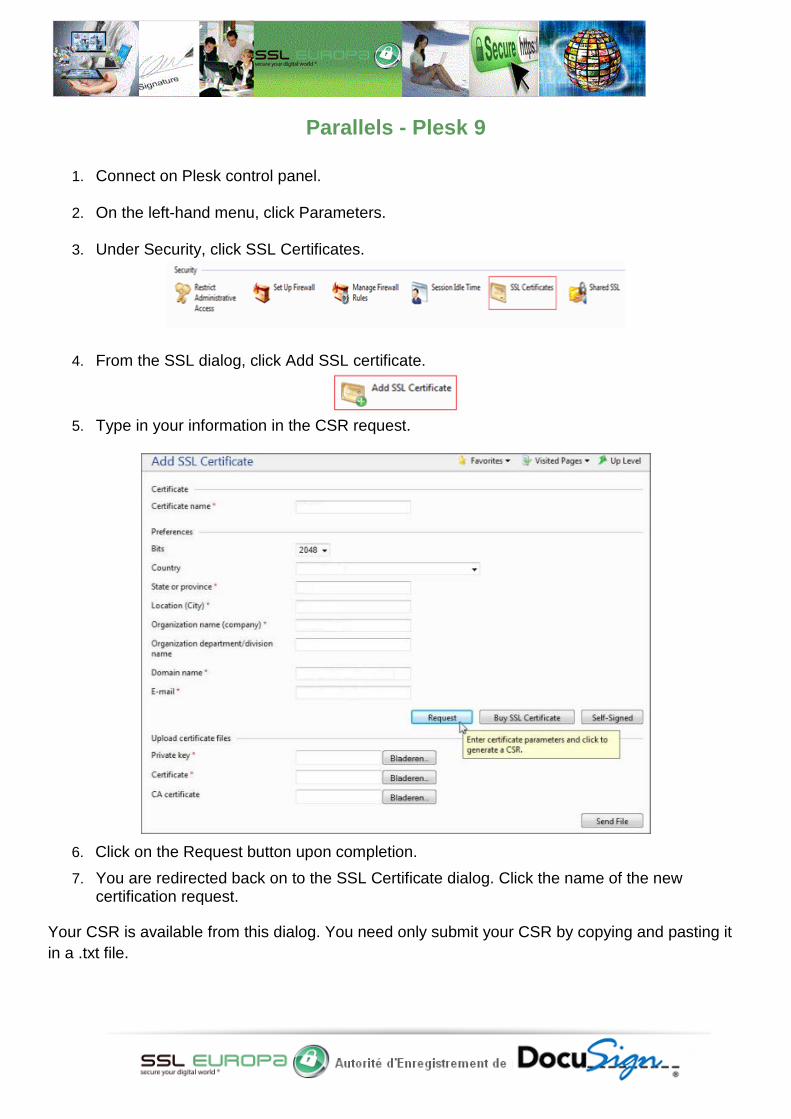
1. Connect on Plesk control panel.
2. On the left-hand menu, click Parameters.
3. Under Security, click SSL Certificates.
4. From the SSL dialog, click Add SSL certificate.
5. Type in your information in the CSR request.
6. Click on the Request button upon completion. 7. You are redirected back on to the SSL Certificate dialog. Click the name of the new
certification request. Your CSR is available from this dialog. You need only submit your CSR by copying and pasting it in a .txt file.

Parallels - Plesk 10
1. Connect on Plesk control panel.
2. Select Tools and Utilities.
3. Choose SSL Certificates.
4. To generate your CSR, select Add SSL Certificate.
5. Fill in the required fields.
6. Upon completion, Click the Request button on the bottom right corner.
7. You are redirected back on to the SSL Certificate dialog. Click the name of the new
certification request. Your CSR is available from this dialog. You need only submit your CSR by copying and pasting it in a .txt file.

Ensim Corporation – Ensim Pro/3.x
1. Ensim eases the request for Apache user. Connect on to the Administrator panel. Select the site you wish to secure and click Services.
2. Click on the Apache web server tab.
3. Then, click SSL Settings in the top box, Web Server Manager.
4. Click Generate, you will be prompted to fill in your information.
1. Country: 2-letter country code

2. State/Province 3. City 4. Company: the exact name of your company. 5. Organization (optional): name of the department of your company 6. Common Name: filled in automatically 7. Email
5. Click Save, your CSR and private RSA key will be generated. They are both necessary to
install your certificate.
6. Your CSR is available from this dialog. You need only submit your CSR by copying and
pasting it in a .txt file.

Tomcat Step 1: Generate your keystore and private key
NB: Use JDK 1.3.1 or later version:
Create a keystore certification key and a private via the following command:
$JAVA_HOME\bin>keytool -genkey -alias domain-name.com -keyalg RSA -keystore (file name) NB: Change $JAVA_HOME with your Java installation directory - If you are using Windows Server, change the folder into \Program Files\Java\ javaversionhere\bin>
Type a password. It needs to be at least 6-character long.
Then, type in the following information: 1. Common Name 2. Organizational Unit (optional): name of the department of your company 3. Organization: the exact name of your company. 4. City 5. State/Province 6. Country: 2-letter country code
Type in your password for domain.name.com, hit Return if the keystore password is the same:
Create a CSR with the following command: $JAVA_HOME\bin>keytool -certreq -keyalg RSA -alias your_alias_name -file certreq.csr -keystore your_keystore_filename NB: Change $JAVA_HOME with your Java installation directory - If you are using Windows Server, change the folder into \Program Files\Java\ javaversionhere\bin>
Type in your keystore password (nom de fichier).
A file named certreq.csr is created. You need only submit the generated file, or copy/paste the content in our request form. Remember to open the file with Notepad or VI. Don’t forget to include from the tag ——-BEGIN CERTIFICATE to END CERTIFICATE ——--.
Stronghold c2Net Stronghold C2N GUI CSR signature
Open Stronghold Certificate manager .
Select New key generation to generate a new key.
Choose a 2048 bit long key and follow the information
To generate a CSR, you must follow the instructions: The following characters are not supported: <> ~! @ # $% ^ * / \ ()?. &
The pair of keys is generated and stored under strongholdserverroot/private/hostname.key. /usr/local/stronghold/private/www.domain.name.com.key
Copy/Paste the information in our form including the tags: ----- BEGIN NEW CERTIFICATE REQUEST ----- to ----- END NEW CERTIFICATE REQUEST -----.
Stronghold C2N command CSR Certificate line
1. The keys and certificates are managed with 3 scripts in Stronghold: genkey, getca, genreq.
They are by default saved at /usr/local/ssl/private/
1. If you do not possess a key for your certificate, execute genkey and the host name for which you wish to generate a CSR (genkey hostname). This will show two files - the key file and the CSR file - and show their path.
2. If you already possessed a server key, execute genreq to create the CSR.
2. The script aks whether you are deleting a previous certification request.
3. You are then prompted to enter a key lenght, use 2048-bit long key.
4. When prompted, press random keys until the count is down and you hear the bip, those
random data generate a unique pair of keys.
5. Click y to continue. You are required to fill in the form with the information regarding your company. (For the CA, click Other '&8217;).
6. Genkey will automatically generate your CSR. We advise that you save your files (key and
CSR) and keep them in a secure area. The key is necessary to complete the installation
7. Copy/Paste in our form the CSR including the following tags:
----- BEGIN CERTIFICATE REQUEST ----- to ----- END CERTIFICATE REQUEST -----

cPanel 10 1. Connect to cPanel. 2. Locate SSL Manager.
3. The SSL Manager dialog appears.
It is used to generate SSL Certificates, CSR and private keys.
4. Click Private keys.
5. Then, click on your domain in the list and click Generate.
6. You are redirected on the Manager, click CSR.
7. Fill in the CSR form and click Generate
8. Upon completion, select your CSR in the menu and click Show. 9. Copy/Paste the CSR in a .txt document including the following tags:
----- BEGIN CERTIFICATE REQUEST ----- to ----- END CERTIFICATE REQUEST -----

cPanel 11
1. Connect to cPanel.
2. Then, click SSL/TLS Manager.
3. Click Private keys (KEY).
4. Click Generate a new key, at the bottom. Type in the address of the domain you wish to secure in the Host section or choose from the list.
5. Click Generate.
6. The private key is saved. Click Go back to Manager.
7. Click on CSR.
8. In the section Generate a new CSR, type in the following information:

1. Common Name 2. Country: 2-letter country code 3. State/Province 4. City 5. Organization: the exact name of your company. 6. Organizational Unit (optional): name of the department of your company 7. Email 8. Pass phrase
9. Click Generate, a new dialog appears with your CSR.
10. Copy/Paste the information including the following tags:
-----BEGIN CERTIFICATE REQUEST-----
To -----END CERTIFICATE REQUEST-----

Cisco ASA
In Cisco Adaptive Security Device (ASDM) manager, Select Configuration and Device Management
Expand Certificate Management and select Identity certificate, and Add.
A dialog appears, under Add a new identity certificate, Click New.
In the new dialog, select Enter new key pair name, and type in a name. Then, select from the menu the size for your keys: 2048. Check the usage is General Purpose and click Generate Now.
You will asked to define a Certificate Subject DN, the domain name for the site you wish to
secure. In The dialog, fill the information. To do so, select in the menu each component detailled below. Click OK.

1. Common Name (CN) 2. Organizational Unit (OU) (optional): name of the department of your company. 3. Organization (O): the legal name of your company. 4. Country (C): 2-letter country code 5. State/Province (St) 6. City (L)
Then, click Advanced..., in the initial dialog.
In the FQDN field, type in the domain name with which you can access the utility from the web (this can be the name that you typed in step 5).
Click OK, then Add a certificate. You are prompted to save your data in a .txt format.
Remember the path where you saved your file. You will need to open the file in .txt format, copy and paste the information in our form.

Mirapoint
From the Administrator screen, click Security and Certificates.
Then, select CSR.
You must fill in the form with the information regarding your company, including the domain name. They will appear as such in the CSR.
Click Download
You need only submit the generated file, or copy/paste the content in our request form. Remember to open the file with Notepad or text editor.
Don’t forget to include from the tags ——-BEGIN CERTIFICATE to END CERTIFICATE ——--.

F5 - Firepass
1. On the Administrator screen, click Server.
2. Click Security.
3. Then click the link Certificates.
4. Click on Generate link
1. The request form appears.
5. Fill in the fields.
NB: Remember the password you use in the field encrypted password. This will be used to install the certificate and the key. The field is not required but we strongly recommend you fill it.
6. Click the button Generate Request.
7. Click the Click here button into download your CSR (file *.zip contains your CSR and the corresponding key link).
F5 BigIP
You must create an SSL configuration file to generate a CSR. To do so, execute the command below:
# /usr/local/bin/genconf
You will be asked to fill in information about your business. 7. Country (C): 2-letter country code 8. State/Province (St) 9. City (L) 10. Organization (O): the legal name of your company. 11. Organizational Unit (OU) (optional): name of the department of your company. 12. Common Name (CN) 13. Email: Leave empty 14. Password: Leave empty 15. Password confirmation: Leave empty
Execute the following command to generate a new certification request:
# /usr/local/bin/genkey www.yourdomain.com
You should change youdomain.com into the FQDN of the site you wish to secure. You will be prompted to type in the information regarding your business:
16. Country (C): 2-letter country code 17. State/Province (St) 18. City (L) 19. Organization (O): the legal name of your company. 20. Organizational Unit (OU) (optional): name of the department of your company. 21. Common Name (CN)
The CSR is saved at /config/bigconfig/ssl.crt/www.mondomaine.com.crt You need only submit the generated file, or copy/paste the content in our request form. Remember to open the file with Notepad or text editor. Don’t forget to include from the tags ——-BEGIN CERTIFICATE to END CERTIFICATE ——--.

Oracle - Wallet Manager
1. In the menu bar, choose Operations, and Create a new certificate request.
2. Type in the information in the form 22. Common Name (CN) 23. Organizational Unit (OU) (optional): name of the department of your company. 24. Organization (O): the legal name of your company. 25. City (L) 26. State/Province (St) 27. Country (C): 2-letter country code 28. Key Size: Choose 2048 from the list 29. Advanced: leave empty
3. Click OK. A dialog appears stating your request is successful. *Export the request in a .txt file.
4. Choose OK. You are redirected to the initial dialog where the status of the certificate is changed into Requested.
*Export the CSR into a .txt file to be submitted to the CA
1. In the menu bar, Choose Operations, and Export CSR.
2. Enter the system directory of the file you wish to save the certificate request or browse to your path.
3. In the field Name of the file, choose a name for your certificate request.
4. Select OK.
5. A message at the bottom of the page confirms the CSR was successfully exported.
You are redirected to the initial Oracle Manager dialog.

Zeus Technology – Zeus Web Server 1. Connect to the server and select SSL Certificates.
2. Next to Creating a certificate Set, Select Create.
3. Select Buy a certificate from another Certifying Authority, and click OK.

4. Fill in the form with the information regarding your business. and click OK. Make sure the size of the key is 2048 bits.
Copy the CSR onto a .txt file to submit it.

SAP AG – SAP Application Server
To generate a CSR on SAP Application Server, follow these steps. The CSR is necessary to complete your certificate request.
You must generate a CSR for each application server that uses your PSE specific server. If you are using a SSL PSE scale server, you need only generate one certificate request.
From the Trust manager dialog: 1. Expand the SSL Server PSE node.
2. For each unique SSL PSE:
1. Select the application server. The application server certificate appears in the section PSE maintenance.
2. There, choose Create a certificate request. A dialog appears with the CSR. Copy/Paste the whole content (including the tags) in .txt file. Save the document.

Blue Coat - Proxy SG To create a certificate request (CSR), you must first configure a pair of keys:
Go to the manager, under Configuration tab, choose SSL and Keychain.
Click Create
Type in a name in the field Keychain name (eg: SSL-EUROPA_Cert)
Click OK and Apply (you should receive a message stating the changes were applied)
Click OK
Select the newly created Keychain.
Click Modify/See.
Make sure your new keychain is selected in the menu
Click the Create button in the section Request a CSR.
In the dialog, type in the information regarding your business. Under Common name, type in the name of the with you wish to secure including www.
Click OK,then Close and Apply (you should receive a message stating the changes were
applied)
Click OK
Then, click Modify/See
Copy/Paste the CSR onto a .txt file to submit it. NB: The firmware SGOS 5.2.2.5 may show a message stating the CSR was invalid. You must, then, update your version of SGOS to a later one to avoid such problem.