FXWS05—Sequencing on the Fantom-Xcms.rolandus.com/assets/media/pdf/FXWS05.pdf · Sequencing on...
43
Sequencing on the Fantom-X ®ÂØÒňΠ™ Workshop © 2005 Roland Corporation U.S. All rights reserved. No part of this publication may be reproduced in any form without the written permission of Roland Corporation U.S. FXWS05
Transcript of FXWS05—Sequencing on the Fantom-Xcms.rolandus.com/assets/media/pdf/FXWS05.pdf · Sequencing on...

�
Sequencing on the Fantom-X
®ÂØÒňΙ
Workshop
© 2005 Roland Corporation U.S.All rights reserved. No part of this publication may be reproduced in any form without the written permission of Roland Corporation U.S.
FXWS05
�
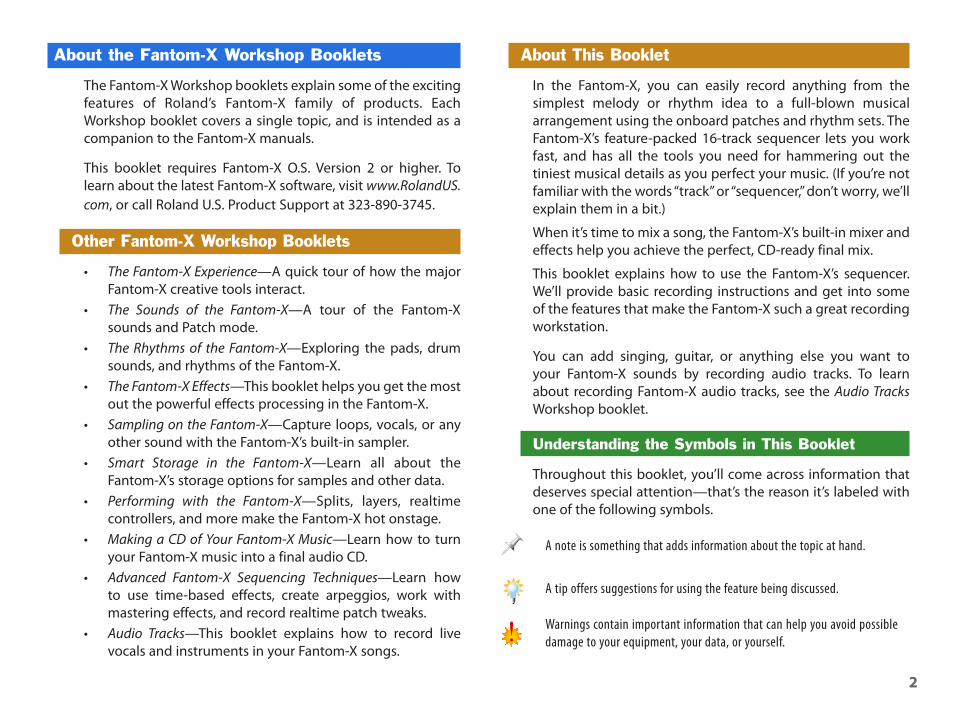
About the Fantom-X Workshop Booklets
The Fantom-X Workshop booklets explain some of the exciting features of Roland’s Fantom-X family of products. Each Workshop booklet covers a single topic, and is intended as a companion to the Fantom-X manuals.
This booklet requires Fantom-X O.S. Version 2 or higher. To learn about the latest Fantom-X software, visit www.RolandUS.com, or call Roland U.S. Product Support at 323-890-3745.
Other Fantom-X Workshop Booklets
• The Fantom-X Experience—A quick tour of how the major Fantom-X creative tools interact.
• The Sounds of the Fantom-X—A tour of the Fantom-X sounds and Patch mode.
• The Rhythms of the Fantom-X—Exploring the pads, drum sounds, and rhythms of the Fantom-X.
• The Fantom-X Effects—This booklet helps you get the most out the powerful effects processing in the Fantom-X.
• Sampling on the Fantom-X—Capture loops, vocals, or any other sound with the Fantom-X’s built-in sampler.
• Smart Storage in the Fantom-X—Learn all about the Fantom-X’s storage options for samples and other data.
• Performing with the Fantom-X—Splits, layers, realtime controllers, and more make the Fantom-X hot onstage.
• Making a CD of Your Fantom-X Music—Learn how to turn your Fantom-X music into a final audio CD.
• Advanced Fantom-X Sequencing Techniques—Learn how to use time-based effects, create arpeggios, work with mastering effects, and record realtime patch tweaks.
• Audio Tracks—This booklet explains how to record live vocals and instruments in your Fantom-X songs.
About This Booklet
In the Fantom-X, you can easily record anything from the simplest melody or rhythm idea to a full-blown musical arrangement using the onboard patches and rhythm sets. The Fantom-X’s feature-packed 16-track sequencer lets you work fast, and has all the tools you need for hammering out the tiniest musical details as you perfect your music. (If you’re not familiar with the words “track” or “sequencer,” don’t worry, we’ll explain them in a bit.)
When it’s time to mix a song, the Fantom-X’s built-in mixer and effects help you achieve the perfect, CD-ready final mix.
This booklet explains how to use the Fantom-X’s sequencer. We’ll provide basic recording instructions and get into some of the features that make the Fantom-X such a great recording workstation.
You can add singing, guitar, or anything else you want to your Fantom-X sounds by recording audio tracks. To learn about recording Fantom-X audio tracks, see the Audio Tracks Workshop booklet.
Understanding the Symbols in This Booklet
Throughout this booklet, you’ll come across information that deserves special attention—that’s the reason it’s labeled with one of the following symbols.
A note is something that adds information about the topic at hand.
A tip offers suggestions for using the feature being discussed.
Warnings contain important information that can help you avoid possible damage to your equipment, your data, or yourself.

�
Basic Things You Really Need to Know
We’ll start by explaining some things about how the Fantom-X’s recording system works. To fully understand its many options, you’ll need to know the stuff in these sections. If you’re eager to start recording, though, you can jump to:
• “Clearing the Demo Song”—on Page 8 (click here), then• “A Quickie Recording How-To”—on Page 10 (click here).
When you get the chance, do come back and read the following sections to get the most from this booklet and from the Fantom-X.
Some Key Concepts for Beginners
This section is for people who are new to MIDI sequencing. If that’s not you, skip ahead to “Performance Mode: Parts and Performances” (click here).
MIDI is the language in which the Fantom-X’s various internal components communicate. (It’s also how the Fantom-X talks to other instruments).
Every time you play something on the Fantom-X, its keyboard, pads, or realtime controllers produce MIDI data that’s sent to the Fantom-X’s sound generator, resulting in the sounds you hear. There’s a MIDI message for each of your physical actions.
Play this note. Play that note.
This note. That note.
Sound Generator
Recorder=Sequencer
When you play the Fantom-X’s keyboard and pads, manipulate its realtime controllers, or use rhythms or arpeggios during recording, the resulting MIDI messages are sent to the Fantom-X’s “sequencer” in addition to being sent to the sound generator.
Play this note. Play that note.
This note. That note. Gotcha. Ditto.
Sound GeneratorSequencer
The Fantom-X sequencer captures all of this MIDI data and can play it back in its original order. The result is that when you press the sequencer’s PLAY button, it sends the MIDI data to the Fantom-X’s sound generator, and it sounds as if you’re playing the keyboard, pads, and so on.
It’s important to understand that though it seems like you’ve recorded the sound of your playing, that’s not really what’s happened. You’ve simply recorded MIDI instructions for reproducing what you played, not the sound itself.
You can record actual sounds on the Fantom-X’s audio tracks. See the Audio Tracks Workshop booklet to learn more about this special type of track.
A chunk of music you’ve recorded using the sequencer is called a “sequence.”
Sequencing allows for incredible flexibility in refining your music, and offers some amazing advantages for arranging, re-voicing, and editing your MIDI recordings, as we’ll see.
�
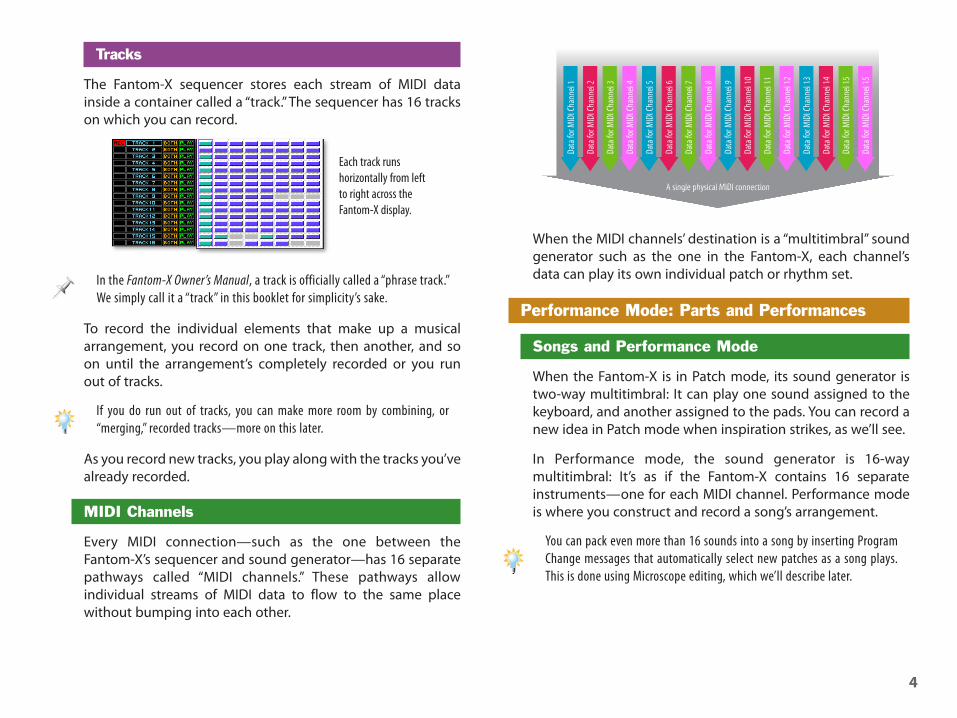
Tracks
The Fantom-X sequencer stores each stream of MIDI data inside a container called a “track.” The sequencer has 16 tracks on which you can record.
Each track runs horizontally from left to right across the Fantom-X display.
In the Fantom-X Owner’s Manual, a track is officially called a “phrase track.” We simply call it a “track” in this booklet for simplicity’s sake.
To record the individual elements that make up a musical arrangement, you record on one track, then another, and so on until the arrangement’s completely recorded or you run out of tracks.
If you do run out of tracks, you can make more room by combining, or “merging,” recorded tracks—more on this later.
As you record new tracks, you play along with the tracks you’ve already recorded.
MIDI Channels
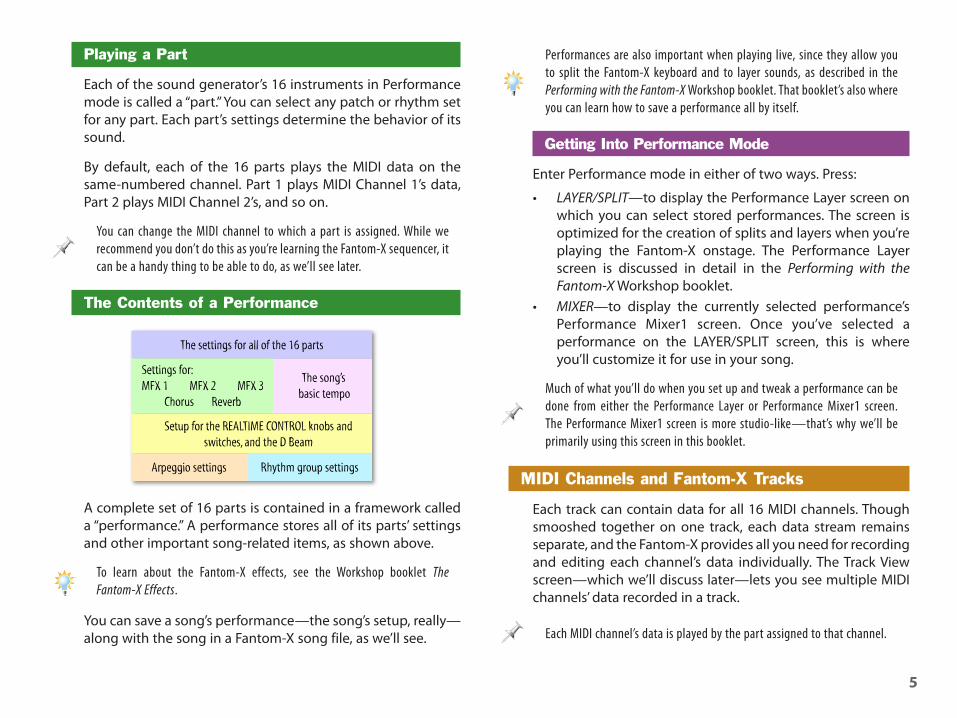
Every MIDI connection—such as the one between the Fantom-X’s sequencer and sound generator—has 16 separate pathways called “MIDI channels.” These pathways allow individual streams of MIDI data to flow to the same place without bumping into each other.
Data
for M
IDI C
hann
el 1
Data
for M
IDI C
hann
el 2
Data
for M
IDI C
hann
el 3
Data
for M
IDI C
hann
el 4
Data
for M
IDI C
hann
el 5
Data
for M
IDI C
hann
el 6
Data
for M
IDI C
hann
el 7
Data
for M
IDI C
hann
el 8
Data
for M
IDI C
hann
el 9
Data
for M
IDI C
hann
el 1
0
Data
for M
IDI C
hann
el 1
1
Data
for M
IDI C
hann
el 1
2
Data
for M
IDI C
hann
el 1
3
Data
for M
IDI C
hann
el 1
4
Data
for M
IDI C
hann
el 1
5
Data
for M
IDI C
hann
el 1
5
A single physical MIDI connection
When the MIDI channels’ destination is a “multitimbral” sound generator such as the one in the Fantom-X, each channel’s data can play its own individual patch or rhythm set.
Performance Mode: Parts and Performances
Songs and Performance Mode
When the Fantom-X is in Patch mode, its sound generator is two-way multitimbral: It can play one sound assigned to the keyboard, and another assigned to the pads. You can record a new idea in Patch mode when inspiration strikes, as we’ll see.
In Performance mode, the sound generator is 16-way multitimbral: It’s as if the Fantom-X contains 16 separate instruments—one for each MIDI channel. Performance mode is where you construct and record a song’s arrangement.
You can pack even more than 16 sounds into a song by inserting Program Change messages that automatically select new patches as a song plays. This is done using Microscope editing, which we’ll describe later.
�
Playing a Part
Each of the sound generator’s 16 instruments in Performance mode is called a “part.” You can select any patch or rhythm set for any part. Each part’s settings determine the behavior of its sound.
By default, each of the 16 parts plays the MIDI data on the same-numbered channel. Part 1 plays MIDI Channel 1’s data, Part 2 plays MIDI Channel 2’s, and so on.
You can change the MIDI channel to which a part is assigned. While we recommend you don’t do this as you’re learning the Fantom-X sequencer, it can be a handy thing to be able to do, as we’ll see later.
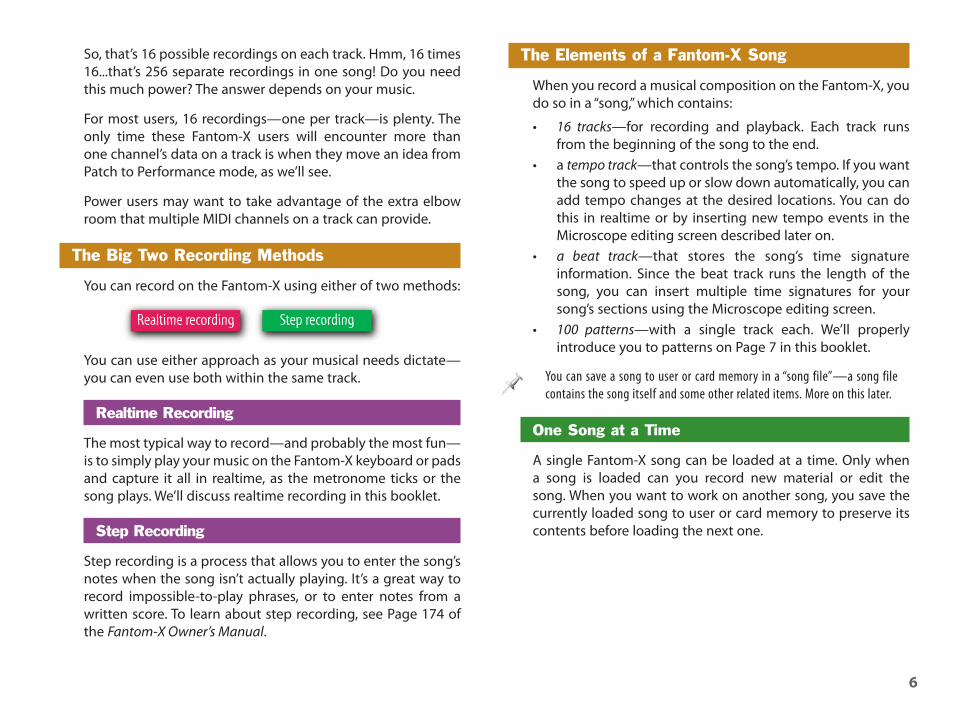
The Contents of a Performance
A complete set of 16 parts is contained in a framework called a “performance.” A performance stores all of its parts’ settings and other important song-related items, as shown above.
To learn about the Fantom-X effects, see the Workshop booklet The Fantom-X Effects.
You can save a song’s performance—the song’s setup, really—along with the song in a Fantom-X song file, as we’ll see.
Performances are also important when playing live, since they allow you to split the Fantom-X keyboard and to layer sounds, as described in the Performing with the Fantom-X Workshop booklet. That booklet’s also where you can learn how to save a performance all by itself.
Getting Into Performance Mode
Enter Performance mode in either of two ways. Press:
• LAYER/SPLIT—to display the Performance Layer screen on which you can select stored performances. The screen is optimized for the creation of splits and layers when you’re playing the Fantom-X onstage. The Performance Layer screen is discussed in detail in the Performing with the Fantom-X Workshop booklet.
• MIXER—to display the currently selected performance’s Performance Mixer1 screen. Once you’ve selected a performance on the LAYER/SPLIT screen, this is where you’ll customize it for use in your song.
Much of what you’ll do when you set up and tweak a performance can be done from either the Performance Layer or Performance Mixer1 screen. The Performance Mixer1 screen is more studio-like—that’s why we’ll be primarily using this screen in this booklet.
MIDI Channels and Fantom-X Tracks
Each track can contain data for all 16 MIDI channels. Though smooshed together on one track, each data stream remains separate, and the Fantom-X provides all you need for recording and editing each channel’s data individually. The Track View screen—which we’ll discuss later—lets you see multiple MIDI channels’ data recorded in a track.
Each MIDI channel’s data is played by the part assigned to that channel.
�
So, that’s 16 possible recordings on each track. Hmm, 16 times 16...that’s 256 separate recordings in one song! Do you need this much power? The answer depends on your music.
For most users, 16 recordings—one per track—is plenty. The only time these Fantom-X users will encounter more than one channel’s data on a track is when they move an idea from Patch to Performance mode, as we’ll see.
Power users may want to take advantage of the extra elbow room that multiple MIDI channels on a track can provide.
The Big Two Recording Methods
You can record on the Fantom-X using either of two methods:
You can use either approach as your musical needs dictate—you can even use both within the same track.
Realtime Recording
The most typical way to record—and probably the most fun—is to simply play your music on the Fantom-X keyboard or pads and capture it all in realtime, as the metronome ticks or the song plays. We’ll discuss realtime recording in this booklet.
Step Recording
Step recording is a process that allows you to enter the song’s notes when the song isn’t actually playing. It’s a great way to record impossible-to-play phrases, or to enter notes from a written score. To learn about step recording, see Page 174 of the Fantom-X Owner’s Manual.
The Elements of a Fantom-X Song
When you record a musical composition on the Fantom-X, you do so in a “song,” which contains:
• 16 tracks—for recording and playback. Each track runs from the beginning of the song to the end.
• a tempo track—that controls the song’s tempo. If you want the song to speed up or slow down automatically, you can add tempo changes at the desired locations. You can do this in realtime or by inserting new tempo events in the Microscope editing screen described later on.
• a beat track—that stores the song’s time signature information. Since the beat track runs the length of the song, you can insert multiple time signatures for your song’s sections using the Microscope editing screen.
• 100 patterns—with a single track each. We’ll properly introduce you to patterns on Page 7 in this booklet.
You can save a song to user or card memory in a “song file”—a song file contains the song itself and some other related items. More on this later.
One Song at a Time
A single Fantom-X song can be loaded at a time. Only when a song is loaded can you record new material or edit the song. When you want to work on another song, you save the currently loaded song to user or card memory to preserve its contents before loading the next one.

�
Sizing Up a Song
A song’s size is measured by the number of “MIDI events” it contains—every MIDI message captured by the sequencer counts as one MIDI event. When you play a note, that’s a MIDI event. When you spin a REALTIME CONTROL knob, a stream of MIDI events are generated for the knob’s in-between positions. As a result, a song’s length in time is pretty much irrelevant as a measure of its size. A 24-hour song with a sparse arrangement might be dinkier than a super-busy explosion of notes that lasts only a few minutes.
A Fantom-X song can contain 400,000 MIDI events. A typical song contains roughly 120,000 or less. In any case, it’s unlikely you’ll ever run out of room when you’re sequencing a song on the Fantom-X—400,000 events is a lot of events.
Patterns
The most straightforward way to record on the Fantom-X is to record each track from the start of the song to the end, perhaps copying some sections to multiple locations. This isn’t necessarily the easiest way to work, though.
In many songs, there’s lots of repetition, with some instruments playing the same thing at various song locations. You can record these repeating elements as “patterns,” single-track mini-sequences you can re-use as often as you like.
A pattern is recorded and edited the same way as a track. Once you’ve created a pattern, a track can trigger it anywhere in the song, sparing you lots of repetitive sequencing. And every pattern edit you make automatically applies to each use of the pattern in the song, a real time-saver.
We’ll explain how to program a pattern trigger—referred to as a “pattern call”—later on.
Though a pattern can hold data for all 16 MIDI channels, you may find it simpler to record each repeating element in its own pattern.
The Fantom-X’s RPS feature also uses patterns, as described in the Performing with the Fantom-X Workshop booklet.
Before You Record
When it’s shipped from the factory, the Fantom-X is set up so that it automatically loads its demo song at startup. Clear this demo song before you begin recording your own music.
Clearing the Demo Song
1. Press SONG EDIT.2. Press F4 (Song Utility) to display the Song Utility
menu.3. Press 5 until “Song Clear” is highlighted in blue.4. Press F8 (Select)—the Fantom-X asks if you’re sure.5. Press F8 (Exec) to finish clearing the demo song.
To Turn Off Automatic Loading of the Demo Song
If you don’t want to have to clear the demo song every time you record, you can turn off its automatic loading.
1. Press PATCH/RHYTHM, MIXER, or LAYER/SPLIT.2. Press MENU.3. Turn the VALUE dial to select System, and then press
ENTER.4. Press F2 (↓) and/or F1 (↑) to select the Startup tab.5. Set Load Demo Song at Startup to OFF.6. Press F8 (System Write) to save the new setting.
�
Setting the Song’s Time Signature
Most songs are recorded in 4/4 time, so by default, the Fantom-X sets the song time signature to 4/4 when you power-up without the demo song loaded, and when you clear a song from memory.
If, however, you’d like to record using another time signature:
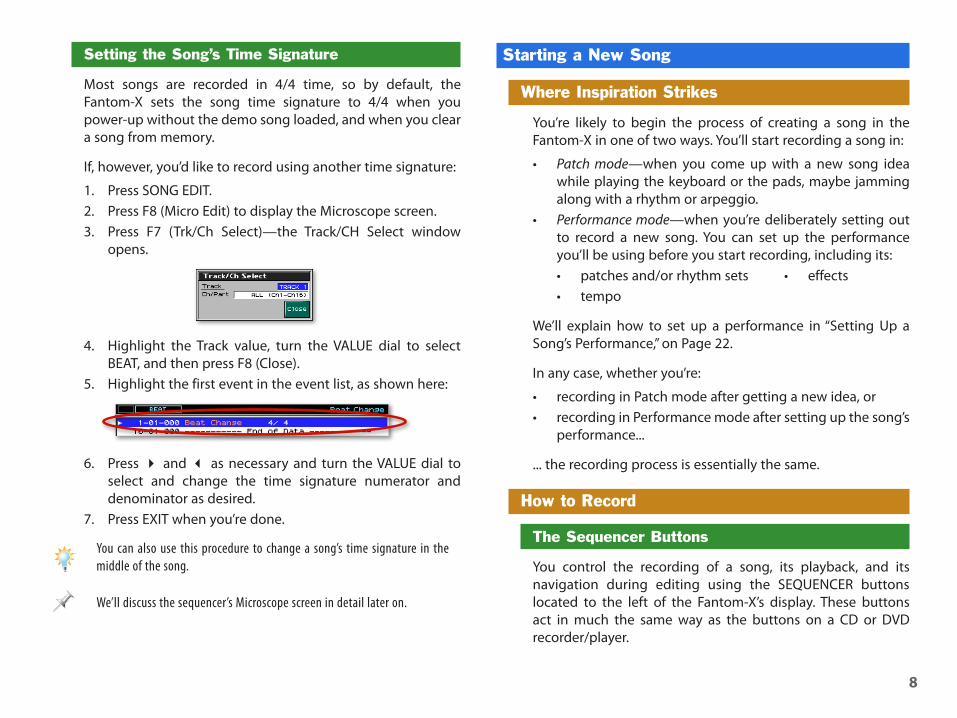
1. Press SONG EDIT.2. Press F8 (Micro Edit) to display the Microscope screen.3. Press F7 (Trk/Ch Select)—the Track/CH Select window
opens.
4. Highlight the Track value, turn the VALUE dial to select BEAT, and then press F8 (Close).
5. Highlight the first event in the event list, as shown here:
6. Press 4 and 3 as necessary and turn the VALUE dial to select and change the time signature numerator and denominator as desired.
7. Press EXIT when you’re done.
You can also use this procedure to change a song’s time signature in the middle of the song.
We’ll discuss the sequencer’s Microscope screen in detail later on.
Starting a New Song
Where Inspiration Strikes
You’re likely to begin the process of creating a song in the Fantom-X in one of two ways. You’ll start recording a song in:
• Patch mode—when you come up with a new song idea while playing the keyboard or the pads, maybe jamming along with a rhythm or arpeggio.
• Performance mode—when you’re deliberately setting out to record a new song. You can set up the performance you’ll be using before you start recording, including its:• patches and/or rhythm sets • effects• tempo
We’ll explain how to set up a performance in “Setting Up a Song’s Performance,” on Page 22.
In any case, whether you’re:
• recording in Patch mode after getting a new idea, or• recording in Performance mode after setting up the song’s
performance...
... the recording process is essentially the same.
How to Record
The Sequencer Buttons
You control the recording of a song, its playback, and its navigation during editing using the SEQUENCER buttons located to the left of the Fantom-X’s display. These buttons act in much the same way as the buttons on a CD or DVD recorder/player.
�
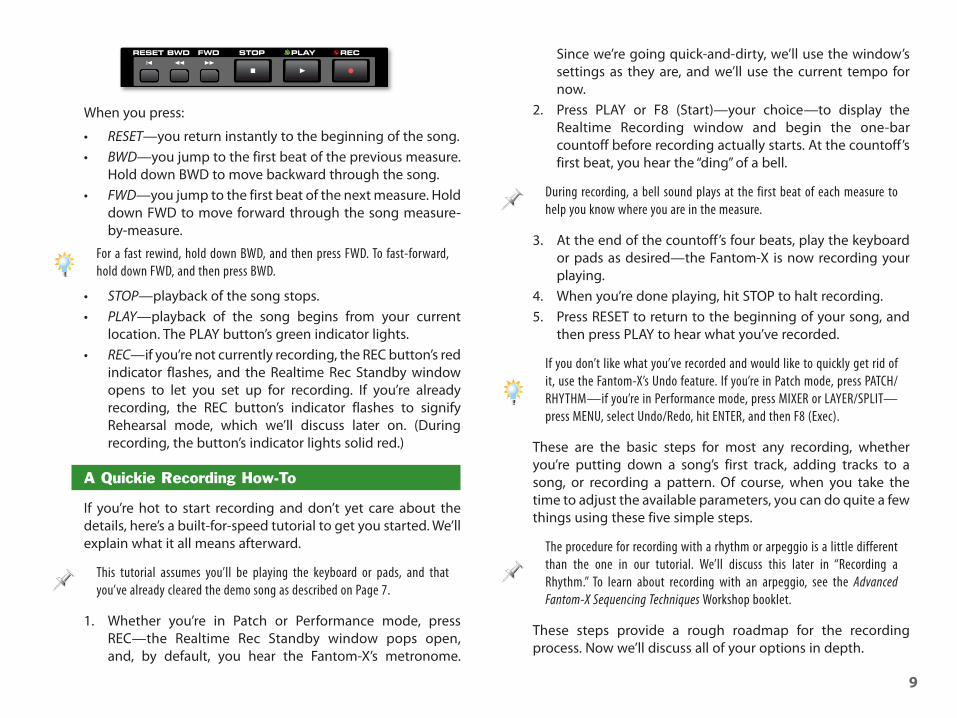
When you press:
• RESET—you return instantly to the beginning of the song.• BWD—you jump to the first beat of the previous measure.
Hold down BWD to move backward through the song.• FWD—you jump to the first beat of the next measure. Hold
down FWD to move forward through the song measure-by-measure.
For a fast rewind, hold down BWD, and then press FWD. To fast-forward, hold down FWD, and then press BWD.
• STOP—playback of the song stops.• PLAY—playback of the song begins from your current
location. The PLAY button’s green indicator lights.• REC—if you’re not currently recording, the REC button’s red
indicator flashes, and the Realtime Rec Standby window opens to let you set up for recording. If you’re already recording, the REC button’s indicator flashes to signify Rehearsal mode, which we’ll discuss later on. (During recording, the button’s indicator lights solid red.)
A Quickie Recording How-To
If you’re hot to start recording and don’t yet care about the details, here’s a built-for-speed tutorial to get you started. We’ll explain what it all means afterward.
This tutorial assumes you’ll be playing the keyboard or pads, and that you’ve already cleared the demo song as described on Page 7.
1. Whether you’re in Patch or Performance mode, press REC—the Realtime Rec Standby window pops open, and, by default, you hear the Fantom-X’s metronome.
Since we’re going quick-and-dirty, we’ll use the window’s settings as they are, and we’ll use the current tempo for now.
2. Press PLAY or F8 (Start)—your choice—to display the Realtime Recording window and begin the one-bar countoff before recording actually starts. At the countoff’s first beat, you hear the “ding” of a bell.
During recording, a bell sound plays at the first beat of each measure to help you know where you are in the measure.
3. At the end of the countoff’s four beats, play the keyboard or pads as desired—the Fantom-X is now recording your playing.
4. When you’re done playing, hit STOP to halt recording.5. Press RESET to return to the beginning of your song, and
then press PLAY to hear what you’ve recorded.
If you don’t like what you’ve recorded and would like to quickly get rid of it, use the Fantom-X’s Undo feature. If you’re in Patch mode, press PATCH/RHYTHM—if you’re in Performance mode, press MIXER or LAYER/SPLIT—press MENU, select Undo/Redo, hit ENTER, and then F8 (Exec).
These are the basic steps for most any recording, whether you’re putting down a song’s first track, adding tracks to a song, or recording a pattern. Of course, when you take the time to adjust the available parameters, you can do quite a few things using these five simple steps.
The procedure for recording with a rhythm or arpeggio is a little different than the one in our tutorial. We’ll discuss this later in “Recording a Rhythm.” To learn about recording with an arpeggio, see the Advanced Fantom-X Sequencing Techniques Workshop booklet.
These steps provide a rough roadmap for the recording process. Now we’ll discuss all of your options in depth.
�0
The Realtime Rec Standby Window
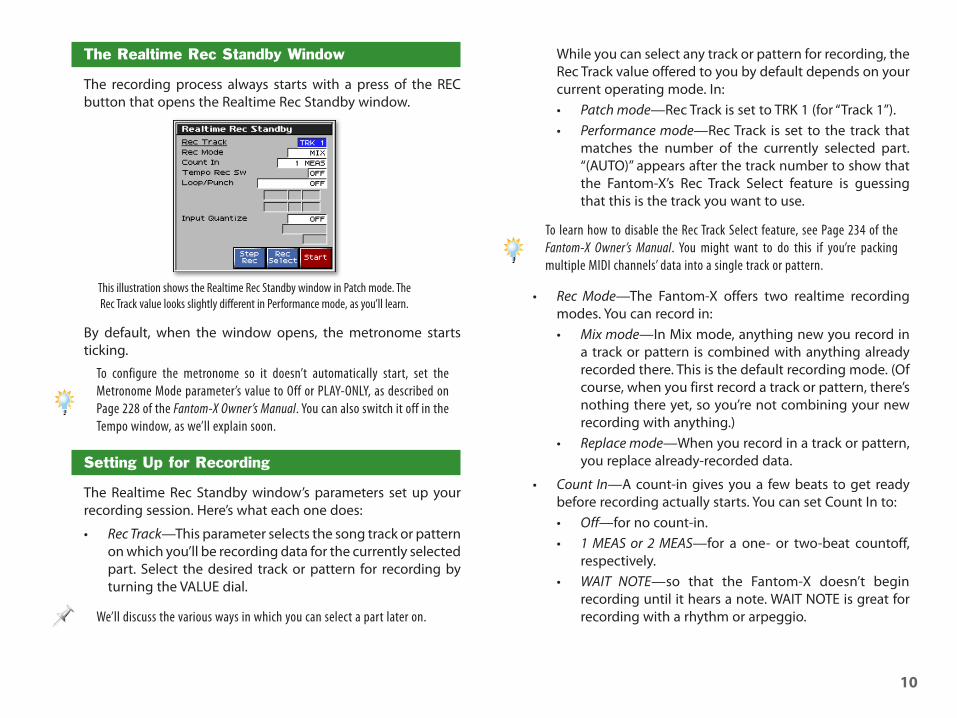
The recording process always starts with a press of the REC button that opens the Realtime Rec Standby window.
This illustration shows the Realtime Rec Standby window in Patch mode. The Rec Track value looks slightly different in Performance mode, as you’ll learn.
By default, when the window opens, the metronome starts ticking.
To configure the metronome so it doesn’t automatically start, set the Metronome Mode parameter’s value to Off or PLAY-ONLY, as described on Page 228 of the Fantom-X Owner’s Manual. You can also switch it off in the Tempo window, as we’ll explain soon.
Setting Up for Recording
The Realtime Rec Standby window’s parameters set up your recording session. Here’s what each one does:
• Rec Track—This parameter selects the song track or pattern on which you’ll be recording data for the currently selected part. Select the desired track or pattern for recording by turning the VALUE dial.
We’ll discuss the various ways in which you can select a part later on.
While you can select any track or pattern for recording, the Rec Track value offered to you by default depends on your current operating mode. In:• Patch mode—Rec Track is set to TRK 1 (for “Track 1”).• Performance mode—Rec Track is set to the track that
matches the number of the currently selected part. “(AUTO)” appears after the track number to show that the Fantom-X’s Rec Track Select feature is guessing that this is the track you want to use.
To learn how to disable the Rec Track Select feature, see Page 234 of the Fantom-X Owner’s Manual. You might want to do this if you’re packing multiple MIDI channels’ data into a single track or pattern.
• Rec Mode—The Fantom-X offers two realtime recording modes. You can record in:• Mix mode—In Mix mode, anything new you record in
a track or pattern is combined with anything already recorded there. This is the default recording mode. (Of course, when you first record a track or pattern, there’s nothing there yet, so you’re not combining your new recording with anything.)
• Replace mode—When you record in a track or pattern, you replace already-recorded data.
• Count In—A count-in gives you a few beats to get ready before recording actually starts. You can set Count In to:• Off—for no count-in.• 1 MEAS or 2 MEAS—for a one- or two-beat countoff,
respectively.• WAIT NOTE—so that the Fantom-X doesn’t begin
recording until it hears a note. WAIT NOTE is great for recording with a rhythm or arpeggio.
��
• Tempo Rec Sw—When this parameter is turned on, the Fantom-X records any changes you make to the song’s tempo as it plays when you:• press the TEMPO button—and turn the VALUE knob to
change the song’s tempo, or tap in the desired tempo using F6 (Tap).
• turn the REALTIME CONTROL TEMPO knob—to change the song’s tempo.
Record tempo changes as a separate operation in which you don’t play the keyboard or pads. If the currently selected track contains data, be sure to record using Mix mode so you don’t erase what’s on the track.
New tempo changes always replace previously recorded tempo changes.
If your song is to have a single tempo throughout—as most pop and dance songs do—you can set the song’s basic tempo and leave it. We’ll get to setting the basic tempo shortly.
• Loop/Punch—The Loop/Punch parameter configures the Fantom-X for:• loop recording—where you record over and over in a
track or pattern during the same song section, or for the entire song. We’ll discuss loop recording in the next section.
• punching—in which you re-record portions of an already-recorded track or pattern. We’ll explain punching in a few pages.
• Input Quantize—The Fantom-X can correct any timing errors you make as you play. This process is called “quantizing.” Set the Input Quantize parameters to Off, for no timing correction, or to the note value that matches the feel of what you’ll be playing.
You can quantize a recording later on if you prefer. This allows you to try different quantization values at your leisure, a good idea if you’re not sure of the Input Quantize note value to select.
About Loop Recording
You can record a selected section of your song—or the whole song—over and over in a “loop.” This allows you to:
• record multiple takes without stopping—as you perfect your playing technique. By loop recording in Replace mode, each new take replaces the one before it.
• build up a track, layer-by-layer—in Mix mode, recording more material in the track or pattern each time it loops around. This technique is ideal for constructing interesting percussion patterns.
To set up loop recording, set the Loop/Punch parameter. You can loop record:
• a pre-set number of measures—beginning at your current location in the song by setting Loop/Punch to LOOP (1-16 MEAS) as desired.
• the entire song—by setting Loop/Punch to LOOP SONG ALL.
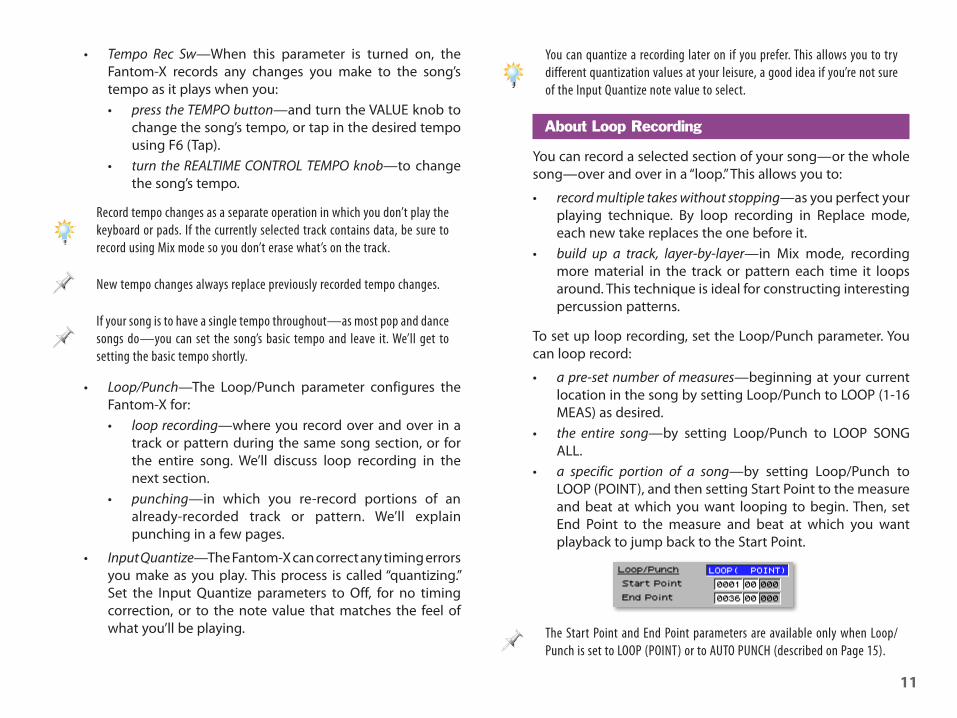
• a specific portion of a song—by setting Loop/Punch to LOOP (POINT), and then setting Start Point to the measure and beat at which you want looping to begin. Then, set End Point to the measure and beat at which you want playback to jump back to the Start Point.
The Start Point and End Point parameters are available only when Loop/Punch is set to LOOP (POINT) or to AUTO PUNCH (described on Page 15).

��
Rec Select
You can press F7 (Rec Select) to open a window in which you’re able to set the type of MIDI data the sequencer captures.
Normally, you’ll leave all of the listed MIDI message types checkmarked. If there’s a type of MIDI data you’d rather not record, though, un-check it here.
Step Rec
F6 (Step Rec) opens the Step Rec Standby window in which you can start step-recording notes, as described in the Fantom-X Owner’s Manual, or program the current track to trigger patterns, as we’ll discuss in “Using Patterns In a Song.”
Setting the Song’s Basic Tempo
If a song stays at the same tempo throughout, its basic tempo setting determines the song’s tempo. If you’ll be adding tempo changes throughout the song, the basic tempo value determines the tempo at which the song starts.
Until you save a song to user or card memory, its basic tempo setting is temporary—if you load another song or select a new performance, the current basic tempo setting is lost. We’ll describe saving a song later.
Setting a Tempo in the Tempo Window
Press TEMPO to display the Tempo window.
You can select the song’s basic tempo by:
• turning the VALUE dial—to set the tempo numerically.• tapping out quarter notes—on the F6 (Tap) button to set
the tempo by feel. The Fantom-X requires at least three taps to recognize the tempo you want.
You can also turn off the metronome from the Tempo window by pressing F7 (Click) so it’s not lit red. Press is again to light the Click button and turn the metronome back on.
Setting a Tempo with the TEMPO Knob
1. Press the button at the upper right corner of the REALTIME CONTROL area repeatedly until its middle indicator lights.
Press this button.
2. Turn the TEMPO knob—circled in red above—to set the song’s basic tempo as desired.
To see the tempo you’ve set, look at the Fantom-X display. Many of its screens have a Tempo readout where you’ll see “q =[the current tempo].”

��
The Realtime Recording Window
When you start recording by pressing the Realtime Rec Standby window’s F8 (Start) button or PLAY, your song starts playing and the Realtime Recording window appears.
After you’ve checked out the Realtime Recording options, you can hit STOP and then return to the desired song location to actually begin recording.
From the Realtime Recording window, you can:
• punch-in—re-recording portions of a track or pattern. We’ll discuss punching in a few pages.
• erase—already-recorded material in realtime.• rehearse—what you’ll be playing without recording it.
If none of these options interest you, press F8 (Close) to close the window and continue recording, or simply leave the window open as you record.
Rehearsing
You can rehearse your playing without actually recording it by entering Rehearsal mode. There are two ways to get there, and you can use the two methods interchangeably:
• From the Realtime Recording window—Press F7 (Rehearsal). Its onscreen button turns red when you’re in Rehearsal mode. To exit Rehearsal mode, press F7 (Rehearsal) again.
• Using the REC button—When REC’s red indicator is lit, and not blinking, recording is underway. To enter Rehearsal mode, press REC once so its indicator flashes. To exit Rehearsal mode, press REC again.
You can also enter Rehearsal mode by pressing REC during a count-in before recording starts.
If you rehearse your playing and press STOP without leaving Rehearsal mode, nothing is recorded.
Realtime Erasing
You can erase bits of stuff from the current track or pattern in realtime. Start by pressing the Realtime Recording window’s F6 (Erase) button to display the Realtime Erase window.
When this window’s visible, hold down:
• F3 (Kbd All)—at the desired location to scoop out everything recorded there for the keyboard part in Patch mode, or for the currently selected part in Performance mode.
• F6 (Pad All)—at the desired location to scoop out everything recorded there for the pad part in Patch or Performance mode (we’ll discuss Performance mode’s pad part later).
• a key on the keyboard or pads—at the desired location to remove any occurrences of its note there.
• a low key and high key on the keyboard—at the desired location to erase all of the notes in-between for the keyboard part in Patch mode, or the currently selected part in Performance mode.
The Note Range Min and Note Range Max readouts in the Realtime Erase window show the low and high key you’ve selected, respectively.
When you’re done, press F8 (Close) to exit the Realtime Erase window.

��
Summary: The Recording Procedure for Real
1. If you want to record in:• Patch mode—press PATCH/RHYTHM. If you want to
record from the keyboard, press F1 (Patch List) to select the desired keyboard sound. To record from the pads, press F1 (Patch List) to select your pad sound.
• Performance mode—press MIXER and use 3 or 4 to select the part you’d like to record. A light gray box encircles the number of the currently selected part at the top of the Performance Mixer1 and 2 screens. Press F1 (Patch List) to select the desired patch or rhythm set for the part.
2. Press REC to display the Realtime Rec Standby window—if the metronome is set to play during recording, it begins to click.
3. Set the parameters of the Realtime Rec Standby window as desired.
4. Set the song’s tempo and/or turn the metronome click off or on.
5. Use the RESET, BWD, or FWD buttons to move to the song location at which you want to start recording.
6. Press F8 (Start) or PLAY to display the Realtime Recording window.
7. Select from the available options or just start recording.8. Play the desired notes on the keyboard or pads.9. When you’re done, press STOP.10. Press RESET and PLAY to listen to what you’ve recorded.
If you’re in Performance mode, you can record additional tracks by repeating this procedure, selecting a different part in Step 1. Setting up parts—and selecting their sounds—is discussed later in this booklet.
Recording a Rhythm
The sequencer can capture the Fantom-X’s rhythms on a track or in a pattern, allowing you to record a rhythm pattern’s notes into a song. Create a new rhythm from pieces of multiple rhythm patterns by striking their pads at the desired locations during recording.
You can record your keyboard playing along with the rhythm, and add additional drum notes by playing along on pads that aren’t currently programmed to play rhythm patterns.
The patterns played by the Fantom-X’s rhythm generator are called ”rhythm patterns.” We use this term to differentiate them from the sequencer patterns we’ve been discussing elsewhere in this booklet.
To learn more about the Fantom-X’s rhythm capabilities and sounds, see the Workshop booklet The Rhythms of the Fantom-X.
To ensure that a rhythm you want to record is perfectly in time with the sequencer:
1. If the rhythm’s currently playing, stop the rhythm by pressing its pad. If the rhythm isn’t currently playing, press RHYTHM so its indicator is lit if it isn’t already.
2. Press REC to display the Realtime Rec Standby window.3. Select the track or pattern in which you want to record.
The track or pattern you select will capture:• the rhythm and any notes played on the pads—on the
designated pad part’s MIDI channel.• any notes played on the keyboard—on the currently
selected part’s channel.
You can use the Extract editing tool to separate the keyboard and rhythm data to two separate tracks or patterns. We’ll explain how to do this later.
��
We’ll explain how to designate a performance part as the pad part in “Assigning the Pads to a Part.”
4. Set Count In to WAIT NOTE.5. Strike the desired rhythm’s pad to begin recording. Play
along with the rhythm on the keyboard or pads if you want to.
Recording rhythms at a consistent volume can be made easier by setting their pads’ velocities to a fixed level. See the Workshop booklet The Rhythms of the Fantom-X to learn more.
6. When you’re done recording, press STOP.7. Press the appropriate pad or RHYTHM to stop the rhythm
before playing back your recording.
Punching
You can redo portions of a recording without having to re-record the whole thing. This means that if you like most of a recording you’ve done, you can go back and fix just the mistakes, or make improvements as necessary, without losing an otherwise successful attempt.
The process of re-recording bits and pieces is called “punching.” When you start re-recording, you “punch in,” and when you stop, you “punch out.”
In the Fantom-X, you can:
• pre-set the section you want to punch—to leave your hands (or feet) free for playing. This is called an “auto punch.”
• punch in and out manually—starting and stopping the punch on the fly.
Since punching is a form of recording, setting up for a punch takes place in the Realtime Rec Standby window.
Using Auto Punch
To set up and perform an auto punch:
1. Press REC to display the Realtime Rec Standby window.2. Set Rec Mode to REPLACE.3. Set the Loop/Punch parameter to AUTO PUNCH—the Start
Point and End Point parameters become active.4. Use 6, 4 and the VALUE dial to highlight the Start Point
value and select the measure and beat at which you want to punch in.
5. Use 6, 3, 4, and the VALUE dial to highlight the End Point value and select the measure and beat at which you want to punch out.
6. Move to a location in the song that provides you a few bars or beats to get mentally ready for the punch.
7. Press F8 (Start) or press the PLAY button—the REC button’s indicator flashes.
At the Start Point location, the REC indicator lights solidly and recording begins. At the End Point, the Fantom-X punches out and the REC indicator starts flashing again.
Punching Manually
When you’re punching manually, you don’t have to use your hands to do so. You can connect a pedal to the Fantom-X PEDAL CONTROL jack and punch in and out with your foot while your hands work the keyboard or pads. For more details, see Page 171 of the Fantom-X Owner’s Manual.
To punch manually:
1. Press REC to display the Realtime Rec Standby screen.2. Set Rec Mode to REPLACE.3. Set the Loop/Punch parameter to MANUAL PUNCH.4. Move to a location in the song that provides you a few bars
or beats to get comfortable before the punch.
��
5. Press F8 (Start) or press PLAY—the REC button’s indicator flashes and the Realtime Recording window opens.
6. When you reach the song location at which you want to punch in, press F5 (Punch In). The REC indicator lights solid red and recording begins. The F5 button’s onscreen label changes to “Punch Out.”
7. When you reach the song location at which you want to punch out, press F5 (Punch Out)—recording stops, and the REC indicator begins to flash again.
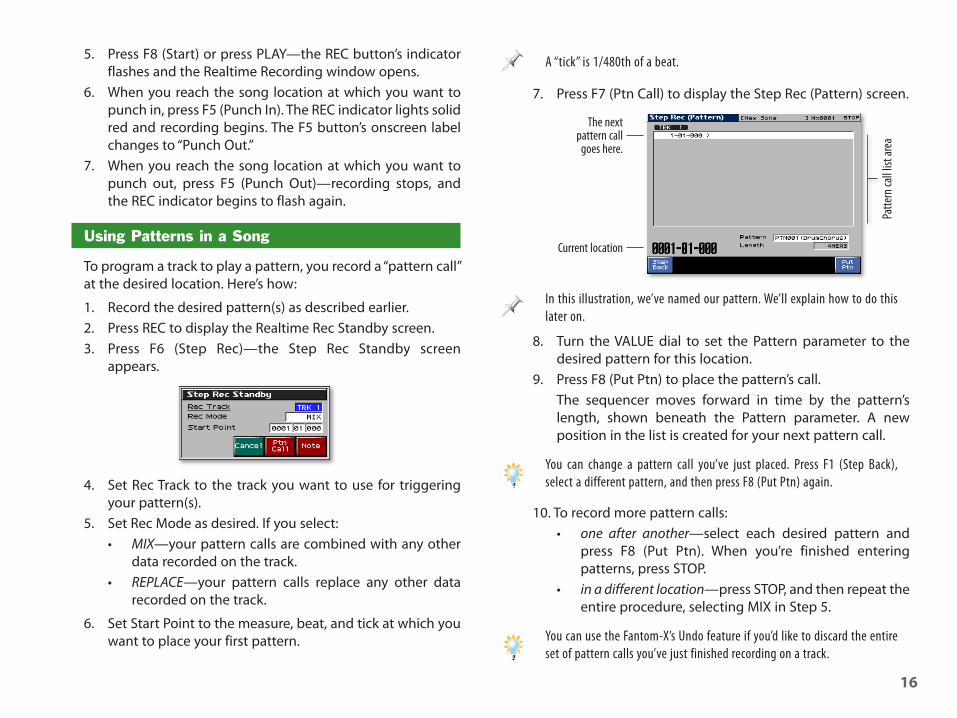
Using Patterns in a Song
To program a track to play a pattern, you record a “pattern call” at the desired location. Here’s how:
1. Record the desired pattern(s) as described earlier.2. Press REC to display the Realtime Rec Standby screen.3. Press F6 (Step Rec)—the Step Rec Standby screen
appears.
4. Set Rec Track to the track you want to use for triggering your pattern(s).
5. Set Rec Mode as desired. If you select:• MIX—your pattern calls are combined with any other
data recorded on the track.• REPLACE—your pattern calls replace any other data
recorded on the track.
6. Set Start Point to the measure, beat, and tick at which you want to place your first pattern.
A “tick” is 1/480th of a beat.
7. Press F7 (Ptn Call) to display the Step Rec (Pattern) screen.
Patte
rn ca
ll list
area
Current location
The next pattern call
goes here.
In this illustration, we’ve named our pattern. We’ll explain how to do this later on.
8. Turn the VALUE dial to set the Pattern parameter to the desired pattern for this location.
9. Press F8 (Put Ptn) to place the pattern’s call. The sequencer moves forward in time by the pattern’s
length, shown beneath the Pattern parameter. A new position in the list is created for your next pattern call.
You can change a pattern call you’ve just placed. Press F1 (Step Back), select a different pattern, and then press F8 (Put Ptn) again.
10. To record more pattern calls:• one after another—select each desired pattern and
press F8 (Put Ptn). When you’re finished entering patterns, press STOP.
• in a different location—press STOP, and then repeat the entire procedure, selecting MIX in Step 5.
You can use the Fantom-X’s Undo feature if you’d like to discard the entire set of pattern calls you’ve just finished recording on a track.
��
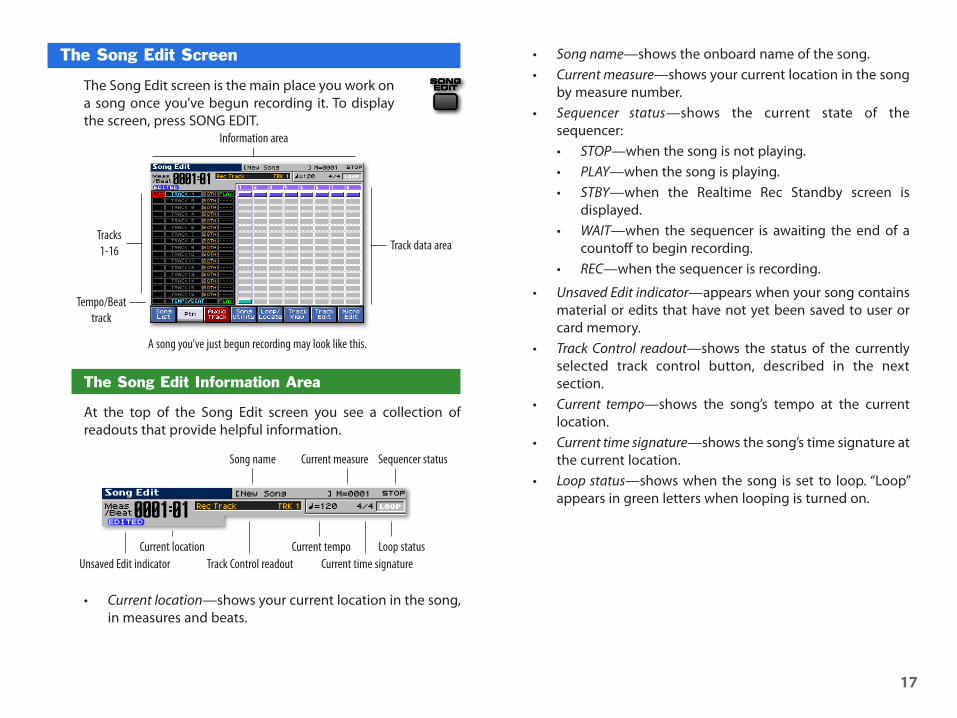
The Song Edit Screen
The Song Edit screen is the main place you work on a song once you’ve begun recording it. To display the screen, press SONG EDIT.
A song you’ve just begun recording may look like this.
Tracks 1-16
Tempo/Beattrack
Information area
Track data area
The Song Edit Information Area
At the top of the Song Edit screen you see a collection of readouts that provide helpful information.
Track Control readout
Song name Current measure Sequencer status
Current time signatureCurrent tempo Loop statusCurrent location
Unsaved Edit indicator
• Current location—shows your current location in the song, in measures and beats.
• Song name—shows the onboard name of the song.• Current measure—shows your current location in the song
by measure number.• Sequencer status—shows the current state of the
sequencer:• STOP—when the song is not playing.• PLAY—when the song is playing.• STBY—when the Realtime Rec Standby screen is
displayed.• WAIT—when the sequencer is awaiting the end of a
countoff to begin recording.• REC—when the sequencer is recording.
• Unsaved Edit indicator—appears when your song contains material or edits that have not yet been saved to user or card memory.
• Track Control readout—shows the status of the currently selected track control button, described in the next section.
• Current tempo—shows the song’s tempo at the current location.
• Current time signature—shows the song’s time signature at the current location.
• Loop status—shows when the song is set to loop. “Loop” appears in green letters when looping is turned on.
��
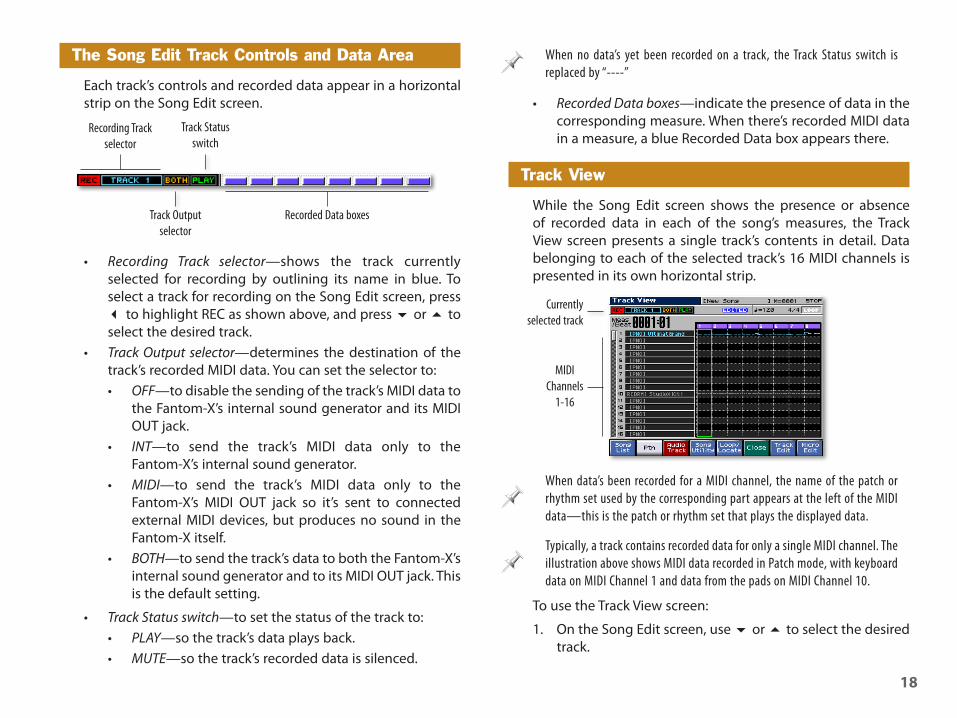
The Song Edit Track Controls and Data Area
Each track’s controls and recorded data appear in a horizontal strip on the Song Edit screen.
Recording Trackselector
Track Output selector
Track Status switch
Recorded Data boxes
• Recording Track selector—shows the track currently selected for recording by outlining its name in blue. To select a track for recording on the Song Edit screen, press 3 to highlight REC as shown above, and press 6 or 5 to select the desired track.
• Track Output selector—determines the destination of the track’s recorded MIDI data. You can set the selector to:• OFF—to disable the sending of the track’s MIDI data to
the Fantom-X’s internal sound generator and its MIDI OUT jack.
• INT—to send the track’s MIDI data only to the Fantom-X’s internal sound generator.
• MIDI—to send the track’s MIDI data only to the Fantom-X’s MIDI OUT jack so it’s sent to connected external MIDI devices, but produces no sound in the Fantom-X itself.
• BOTH—to send the track’s data to both the Fantom-X’s internal sound generator and to its MIDI OUT jack. This is the default setting.
• Track Status switch—to set the status of the track to:• PLAY—so the track’s data plays back.• MUTE—so the track’s recorded data is silenced.
When no data’s yet been recorded on a track, the Track Status switch is replaced by “----”
• Recorded Data boxes—indicate the presence of data in the corresponding measure. When there’s recorded MIDI data in a measure, a blue Recorded Data box appears there.
Track View
While the Song Edit screen shows the presence or absence of recorded data in each of the song’s measures, the Track View screen presents a single track’s contents in detail. Data belonging to each of the selected track’s 16 MIDI channels is presented in its own horizontal strip.
MIDI Channels
1-16
Currently selected track
When data’s been recorded for a MIDI channel, the name of the patch or rhythm set used by the corresponding part appears at the left of the MIDI data—this is the patch or rhythm set that plays the displayed data.
Typically, a track contains recorded data for only a single MIDI channel. The illustration above shows MIDI data recorded in Patch mode, with keyboard data on MIDI Channel 1 and data from the pads on MIDI Channel 10.
To use the Track View screen:
1. On the Song Edit screen, use 6 or 5 to select the desired track.
��
2. Press F6 (Track View) to display the track’s recorded MIDI data in separate horizontal strips.
3. View the MIDI data for other tracks by turning the VALUE dial to select the desired track.
4. To exit the Track View screen, press F6 (Close).
The Pattern Screen
View your song’s patterns—and select patterns for editing—from the Song Edit screen by pressing F2 (Ptn) so it lights red and the song’s patterns are displayed in horizontal strips instead of tracks.
In this song, there are five patterns recorded.
Select a pattern for recording or editing using the 5 and/or 6 buttons. Once you’ve selected a pattern, press:
• F3 (Ptn Clear)—to erase the pattern.• F4 (Ptn Name)—to display a screen on which you can name
the pattern.• F5 (Ptn Beat)—to change the pattern’s time signature.
The remaining F buttons operate the same way for the selected pattern as they do for a track on the Song Edit screen.
To return to the Song Edit screen, press F2 (Ptn) again.
If you ever become confused as to whether you’re viewing tracks or patterns, check out the F2 (Ptn) button onscreen—when it’s red, you’re looking a patterns, and when it’s not, you’re looking at tracks.
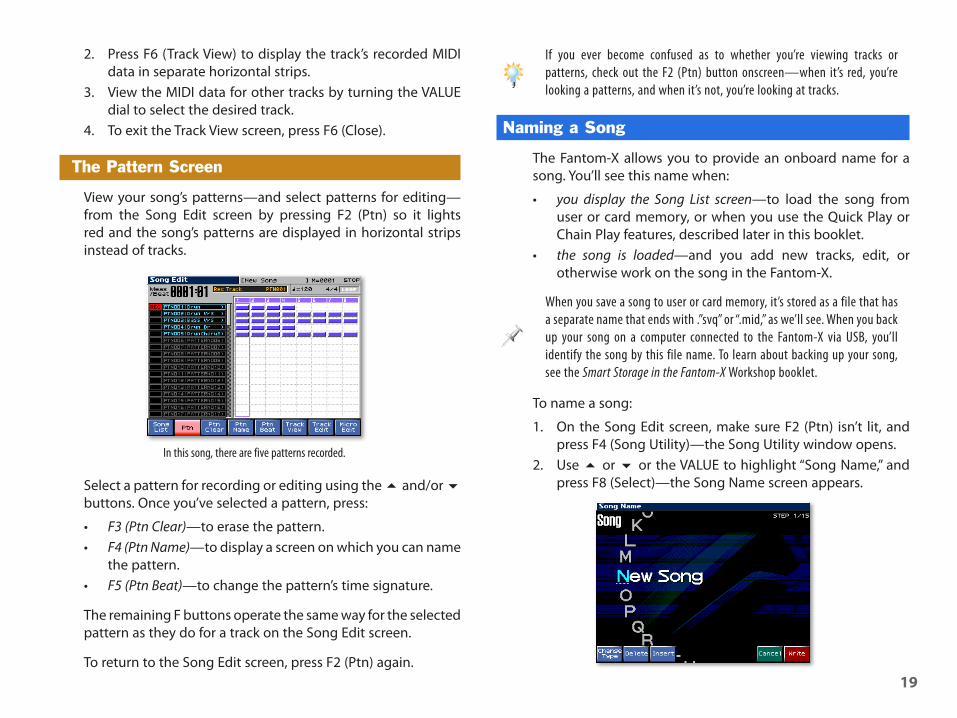
Naming a Song
The Fantom-X allows you to provide an onboard name for a song. You’ll see this name when:
• you display the Song List screen—to load the song from user or card memory, or when you use the Quick Play or Chain Play features, described later in this booklet.
• the song is loaded—and you add new tracks, edit, or otherwise work on the song in the Fantom-X.
When you save a song to user or card memory, it’s stored as a file that has a separate name that ends with .”svq” or “.mid,” as we’ll see. When you back up your song on a computer connected to the Fantom-X via USB, you’ll identify the song by this file name. To learn about backing up your song, see the Smart Storage in the Fantom-X Workshop booklet.
To name a song:
1. On the Song Edit screen, make sure F2 (Ptn) isn’t lit, and press F4 (Song Utility)—the Song Utility window opens.
2. Use 5 or 6 or the VALUE to highlight “Song Name,” and press F8 (Select)—the Song Name screen appears.
�0
3. The first character position is underlined, so turn the VALUE dial to select the first character of the desired name.
4. Press 4 to move the underline to the next character’s position, and then turn the VALUE dial to select the name’s second character.
5. Repeat Step 2 to enter the remaining characters of the song name.
As you name the song, you can press F1 (Change Type) repeatedly to jump between upper-case, lower-case, and numeric characters. Press F2 (Delete) to remove the character at the underline’s current location. Press F3 (Insert) to insert a blank space for selecting a new character at the underline’s current location.
6. When you’ve finished assigning the song an onboard name, press F8 (Write).
Navigating a Song with Locate Positions
You can use the Fantom-X’s Locate feature to bookmark four places in a song. Jump immediately to any of these four “locate positions” using sequencer button shortcuts or the Locate window’s Jump buttons.
Setting Locate Positions
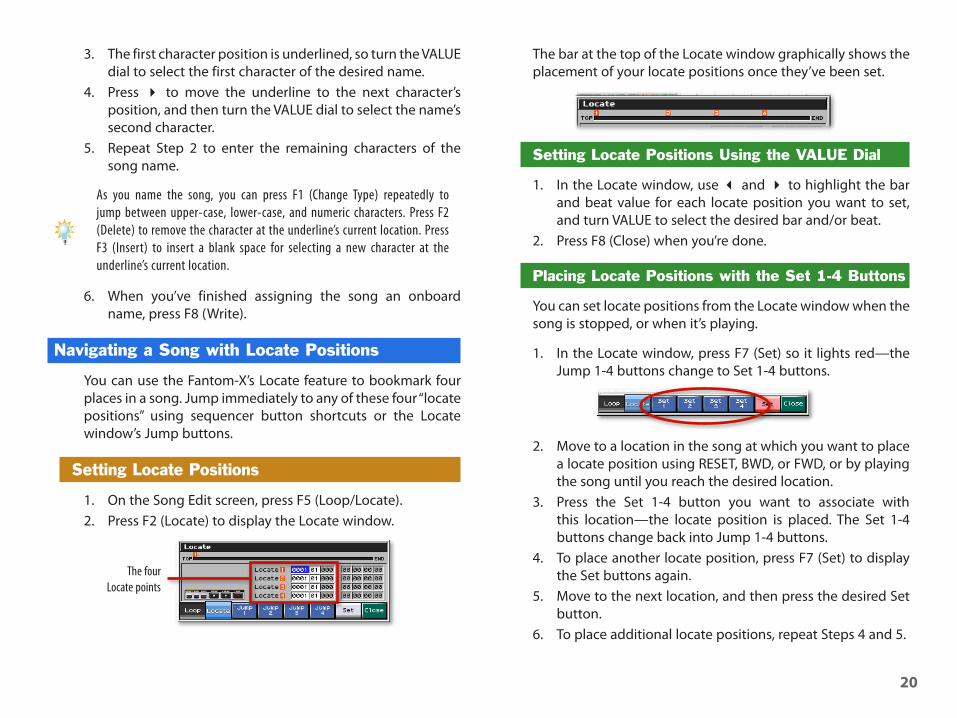
1. On the Song Edit screen, press F5 (Loop/Locate).2. Press F2 (Locate) to display the Locate window.
The four Locate points
The bar at the top of the Locate window graphically shows the placement of your locate positions once they’ve been set.
Setting Locate Positions Using the VALUE Dial
1. In the Locate window, use 3 and 4 to highlight the bar and beat value for each locate position you want to set, and turn VALUE to select the desired bar and/or beat.
2. Press F8 (Close) when you’re done.
Placing Locate Positions with the Set 1-4 Buttons
You can set locate positions from the Locate window when the song is stopped, or when it’s playing.
1. In the Locate window, press F7 (Set) so it lights red—the Jump 1-4 buttons change to Set 1-4 buttons.
2. Move to a location in the song at which you want to place a locate position using RESET, BWD, or FWD, or by playing the song until you reach the desired location.
3. Press the Set 1-4 button you want to associate with this location—the locate position is placed. The Set 1-4 buttons change back into Jump 1-4 buttons.
4. To place another locate position, press F7 (Set) to display the Set buttons again.
5. Move to the next location, and then press the desired Set button.
6. To place additional locate positions, repeat Steps 4 and 5.
��
Jumping to Locate Positions
Locating with the SEQUENCER Buttons
Hold down SHIFT and press:
• BWD—to jump backward in the song to the previous locate position.
• FWD—to jump forward in the song to the next locate position.
Jumping to Locate Positions in the Locate Window
1. In the Locate window, make sure F7 (Set) isn’t lit red. If it is, press F7 (Set).
2. Press the desired Jump 1-4 button to move immediately to Locate Positions 1-4, respectively.
Playback-Looping a Song Section
You can play a section of a song over and over as a loop. Looped playback provides a way to enjoy, or even study, a specific section of your song over and over again. It’s also handy for rehearsing.
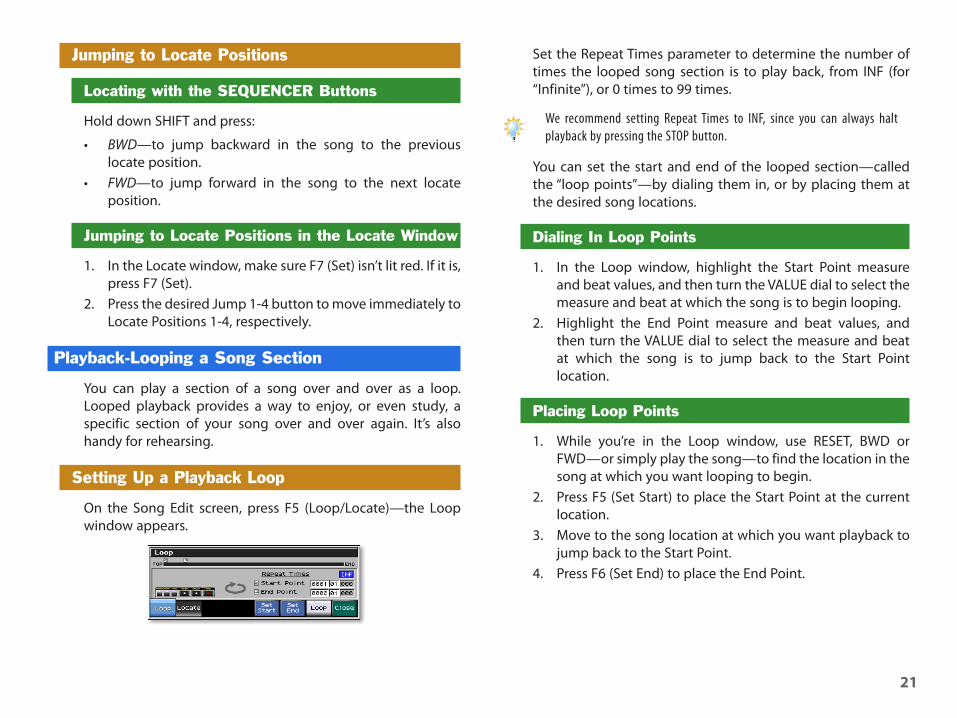
Setting Up a Playback Loop
On the Song Edit screen, press F5 (Loop/Locate)—the Loop window appears.
Set the Repeat Times parameter to determine the number of times the looped song section is to play back, from INF (for “Infinite”), or 0 times to 99 times.
We recommend setting Repeat Times to INF, since you can always halt playback by pressing the STOP button.
You can set the start and end of the looped section—called the “loop points”—by dialing them in, or by placing them at the desired song locations.
Dialing In Loop Points
1. In the Loop window, highlight the Start Point measure and beat values, and then turn the VALUE dial to select the measure and beat at which the song is to begin looping.
2. Highlight the End Point measure and beat values, and then turn the VALUE dial to select the measure and beat at which the song is to jump back to the Start Point location.
Placing Loop Points
1. While you’re in the Loop window, use RESET, BWD or FWD—or simply play the song—to find the location in the song at which you want looping to begin.
2. Press F5 (Set Start) to place the Start Point at the current location.
3. Move to the song location at which you want playback to jump back to the Start Point.
4. Press F6 (Set End) to place the End Point.

��
Activating Looped Playback
1. Once you’ve set up your loop, press F7 (Loop) so the onscreen button turns red to activate looping.
2. Move to a song location before the loop and press PLAY.3. To end looping, press F7 (Loop) again so it’s not lit.
You can turn playback looping on or off using a connected foot switch. This is great for live performance, since you can create a solo-section loop that lasts exactly as long as the soloist’s inspiration does.
Clearing a Song
The Fantom-X can hold one song at a time in its work RAM, described in detail in the Smart Storage in the Fantom-X Workshop booklet. Before you can record a new song, you’ll need to clear the current song.
Be sure to save any recording you want to keep before clearing the current song—otherwise it’s gone forever. We’ll explain how to save a song later.
To clear a song:
1. Press SONG EDIT.2. Press F4 (Song Utility) to display the Song Utility menu.3. Press 5 until “Song Clear” is highlighted in blue.4. Press F8 (Select)—the Fantom-X asks if you’re sure.5. Press F8 (Exec) to finish clearing the song.
Setting Up a Song’s Performance
Whether you’ve quickly recorded an idea in Patch mode, or you’re deliberately setting out to record a song, serious work on a song begins with the gathering of its sounds, effects, and more in a performance. Once in place, the performance’s settings evolve along with your song.
Starting with an Existing Performance
You can use an existing performance as the basis for a new song’s performance.
The Fantom-X contains a preset performance designed as a song template, PRST:01 Seq:Template. In it, Part 1 uses Ultimate Grand, Patch mode’s default patch, and Part 10 uses Studio Kit X, the default rhythm set. Also, Parts 1-16 use MIDI Channels 1-16, respectively—perfect for recording.
To select a performance:
1. Press MIXER.2. Press F5 (Perf List).
3. Press F2 (↓) and/or F1 (↑) to select the area of memory in which the desired performance is stored.
4. Turn the VALUE dial to select the desired performance. For a new song, select PRST:01 Seq:Template, or a template performance of your own that uses instruments you like to use.
5. Press F8 (Select) to confirm your selection.
You can register any of your own song-template performances as a favorite for quick access. The registration of performance favorites is described in the Performing with the Fantom-X Workshop booklet.

��
The Performance Mixer Screens
The Performance Mixer1 and 2 screens provide a studio-like setting in which to begin creating a song’s performance.
• To display the Performance Mixer1 screen, press MIXER.
The currently selected part’s sound The currently selected parameter’s name and value
• To toggle between the Performance Mixer1 and Performance Mixer2 screen, press F6.
The Performance Mixer Shortcuts
On either Performance Mixer screen, hold down SHIFT to change the F buttons into the helpful shortcuts listed in the following table.
This F button: does this:F1 (Init) displays tools for resetting performance values.F2 (Part Info) opens a window that shows MIDI controller activity.F3 (Master Level) displays the Fantom-X’s overall volume control for both
its analog and digital outputs.F4 (Voice Mon) shows the number of waveforms or samples playing. F5 (Loop/Locate) displays the Loop/Locate window described earlier.F6 (Micro Edit) displays the track Micro Edit screen we’ll discuss later.F7 (Audio Mixer) jumps to the mixer screen for audio tracks.F8 (Audio Edit) jumps to the editing screen for audio tracks.
Navigation and Selection on the Mixer Screens
The Performance Mixer1 and 2 screens present each part’s parameters arranged in a vertical part strip that looks like a channel strip on a mixing console, with the part’s number appearing at the top of the strip.
To select a:
• part—press 3 or 4 until there’s a light gray box surrounding the part’s number. (In our screenshot of Performance Mixer 1, Part 1 is selected.)
If you prefer, you can also select a part by highlighting the Part parameter value at the upper left of the screen and turning the VALUE dial.
• parameter—press 5 or 6 until there’s a light blue box around the desired parameter. (In our screenshot of Performance Mixer 1, Part 1’s Level parameter is selected.)
You can always see the full name of the currently selected parameter—along with its value—at the top of the screen, as shown in the screenshot of Performance Mixer1. (We’ll also provide an illustration that shows the abbreviations’ full parameter names on Page 27.)
��
Mixing with the REALTIME CONTROL Knobs
On the Performance Mixer1 and 2 screens, each of the four REALTIME CONTROL knobs can adjust the value of a selected parameter for one of four consecutive parts. The parameter selected for knob control is shown inside a green outline box onscreen. (In the screenshot of Performance Mixer 1, the Level parameter for Parts 1-4 is under knob control.)
When you select a different parameter using 5 or 6, the green box moves along with your selection. To adjust the same parameter in other parts, press F7(←) and/or F8 (→) to move the green box as desired.
Playing Parts
As you work out your arrangement, you may want to play the different sounds in your song on the keyboard or the pads.
To play a part on the keyboard, select the part on a Performance Mixer or Part View screen, as described a bit later in this booklet.
Assigning the Pads to a Part
The Fantom-X pads are always assigned to one of the performance’s parts—this part is referred to as the “pad part.” The pads can always play the pad part’s sound, whether the part is selected or not.
In fact, when the pad part is the currently selected part, its sound can be played by both the keyboard and pads simultaneously.
To assign the pads to a part, turn on the part’s Pad Part switch on the Performance Mixer1 screen—we’ll show you where the switch is on Page 27. You can assign the pads to any part, re-assigning them to another part whenever you need to.
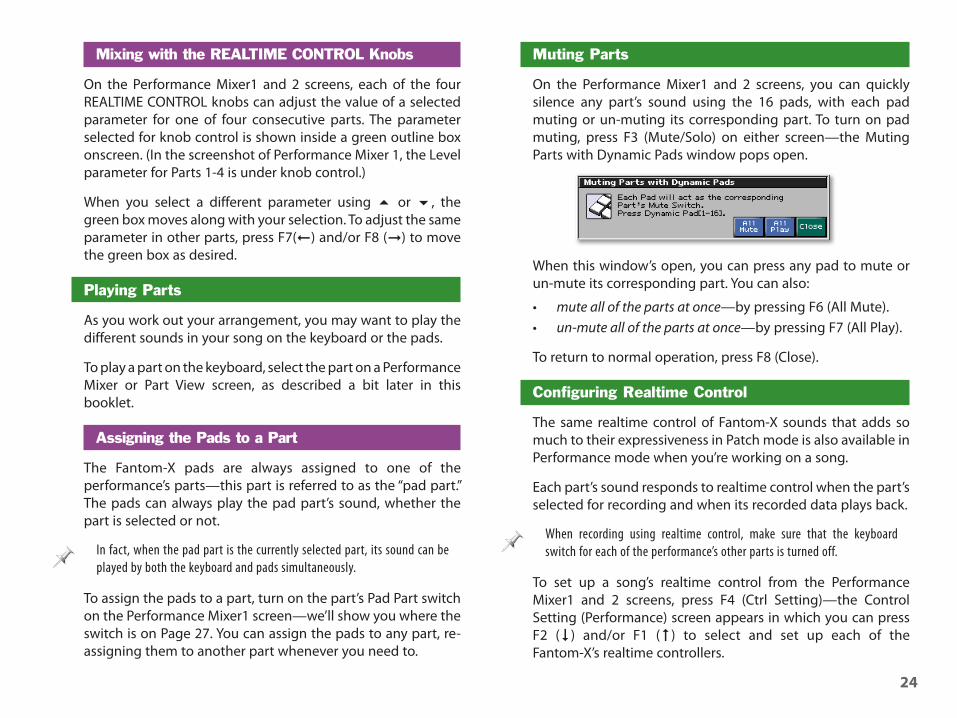
Muting Parts
On the Performance Mixer1 and 2 screens, you can quickly silence any part’s sound using the 16 pads, with each pad muting or un-muting its corresponding part. To turn on pad muting, press F3 (Mute/Solo) on either screen—the Muting Parts with Dynamic Pads window pops open.
When this window’s open, you can press any pad to mute or un-mute its corresponding part. You can also:
• mute all of the parts at once—by pressing F6 (All Mute).• un-mute all of the parts at once—by pressing F7 (All Play).
To return to normal operation, press F8 (Close).
Configuring Realtime Control
The same realtime control of Fantom-X sounds that adds so much to their expressiveness in Patch mode is also available in Performance mode when you’re working on a song.
Each part’s sound responds to realtime control when the part’s selected for recording and when its recorded data plays back.
When recording using realtime control, make sure that the keyboard switch for each of the performance’s other parts is turned off.
To set up a song’s realtime control from the Performance Mixer1 and 2 screens, press F4 (Ctrl Setting)—the Control Setting (Performance) screen appears in which you can press F2 (↓) and/or F1 (↑) to select and set up each of the Fantom-X’s realtime controllers.

��
You can enable each part’s response to any realtime controller by pressing F7 (Ctrl Switch) and setting the checkboxes on the Control Switch (Performance) screen as desired.
You can set each part to respond to or ignore the following realtime controllers:
• P.B. (Pitch Bend) • Aft (Aftertouch)• Mod (Modulation) • Hold (Hold pedal)• Ctrl (Control pedal) • Beam (D Beam)• Knob 1-4 (the four REALTIME CONTROL knobs)
When a box is checked, its part responds to the corresponding controller.
The Part View Screens
The Part View screens present the performance’s part parameters in an easy-to-read table layout.
From either Performance Mixer screen—or from the SPLIT/LAYER button’s Performance Layer screen—you can display the Part View screens by pressing F2 (Part View) and then selecting the specific Part View screen you want.
This is the Part View Level Pan screen.
The Part View screens contain certain part parameters available nowhere else, as we’ll see.
Navigation and Selection on the Part View Screens
To:
• select a part—use 5 and/or 6 to highlight one of the desired part’s parameters.
• select a Part View screen parameter—use 3, 4, 5, and/or 6 to highlight it.
To display another Part View screen, press its F button.

��
Setting Up a Song’s Parts
Selecting Patches
Any part in the song’s performance can play any patch or rhythm set.
Patches often sound different in a performance than they do in Patch mode due to differences in your performance’s effect setup. See “Moving from Patch to Performance Mode” later in this booklet (click here if you like) to fix this, and the Workshop booklet The Fantom-X Effects to learn more.
To help ensure that your sound is unlike anyone else’s, incorporate patches and/or rhythm sets based on samples you’ve captured yourself. See the Sampling on the Fantom-X Workshop booklet to learn more.
Selecting a Part’s Sound on the Mixer Screens
You can select a patch or rhythm set for the currently selected part on the Performance Mixer1 and 2 screens:
• from the patch list—by pressing F1 (Patch List) to display the list and selecting the patch or rhythm set.
On the Patch List screen, press F3 (Favorite) to display your favorite patches as described in the Workshop booklet The Sounds of the Fantom-X.
• by dialing it in—using the Patch Type, Patch Bank and Patch Number parameters at the top of the screen.
Patch Type Patch Number
To select a rhythm set, set Patch Type to R.
Patch Bank
Patch-Selecting on the Part View Level Pan Screen
Select a patch or rhythm set on a Part View screen by setting the Patch Type, Patch Bank and Patch Number parameters at the top left of the screen as desired.
Patch Type Patch Number
To select a rhythm set, set Patch Type to R.
Patch Bank
Setting Part Parameters
Though it may not seem like it at first, when you set the parameters available for each part, you’re actually mixing your song. While some part parameters affect the behavior of their parts’ patches and rhythm sets, many of them affect how they sound.
To set a parameter on the Performance Mixer1 and 2 or Part View screens, highlight the desired parameter and turn the VALUE dial.
For a complete list of the part parameters, as well as a description of each parameter, see the chapter called “Creating a Performance” in the Fantom-X Owner’s Manual.
What’s Where
On both the Performance Mixer and Part View screens, parameter names often appear in abbreviated form to save onscreen space.
��
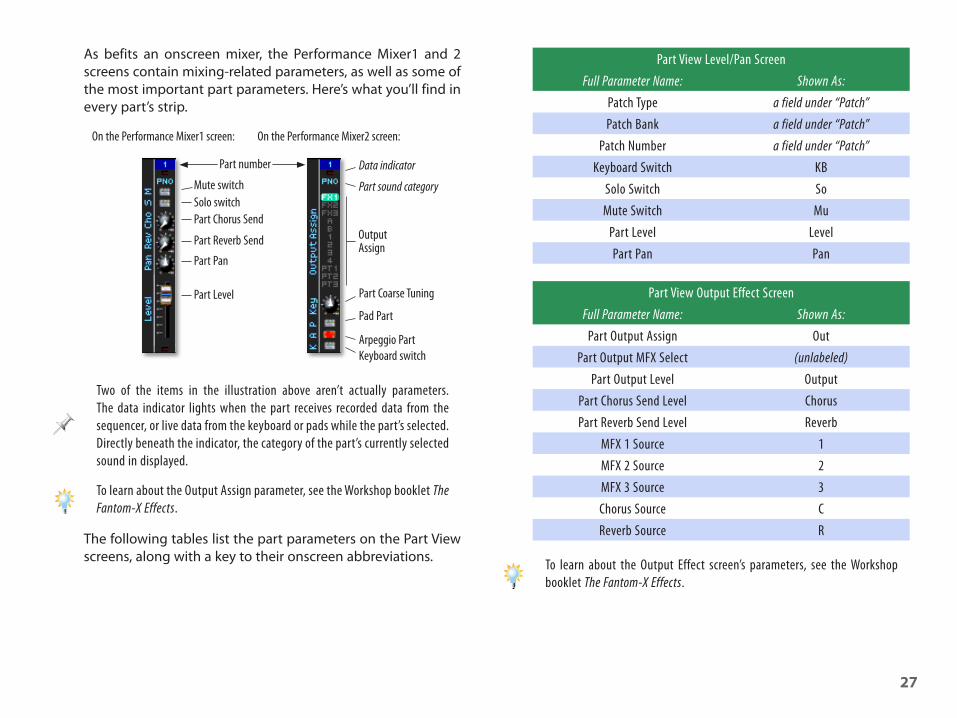
As befits an onscreen mixer, the Performance Mixer1 and 2 screens contain mixing-related parameters, as well as some of the most important part parameters. Here’s what you’ll find in every part’s strip.
Part number
OutputAssign
Part Coarse Tuning
Pad Part
Arpeggio PartKeyboard switch
Data indicator
Part sound category
Part Chorus Send
Part Reverb Send
Part Pan
Part Level
Mute switchSolo switch
On the Performance Mixer1 screen: On the Performance Mixer2 screen:
Two of the items in the illustration above aren’t actually parameters. The data indicator lights when the part receives recorded data from the sequencer, or live data from the keyboard or pads while the part’s selected. Directly beneath the indicator, the category of the part’s currently selected sound in displayed.
To learn about the Output Assign parameter, see the Workshop booklet The Fantom-X Effects.
The following tables list the part parameters on the Part View screens, along with a key to their onscreen abbreviations.
Part View Level/Pan ScreenFull Parameter Name: Shown As:
Patch Type a field under “Patch”Patch Bank a field under “Patch”
Patch Number a field under “Patch”Keyboard Switch KB
Solo Switch SoMute Switch Mu
Part Level LevelPart Pan Pan
Part View Output Effect ScreenFull Parameter Name: Shown As:
Part Output Assign OutPart Output MFX Select (unlabeled)
Part Output Level OutputPart Chorus Send Level ChorusPart Reverb Send Level Reverb
MFX 1 Source 1MFX 2 Source 2MFX 3 Source 3Chorus Source CReverb Source R
To learn about the Output Effect screen’s parameters, see the Workshop booklet The Fantom-X Effects.
��
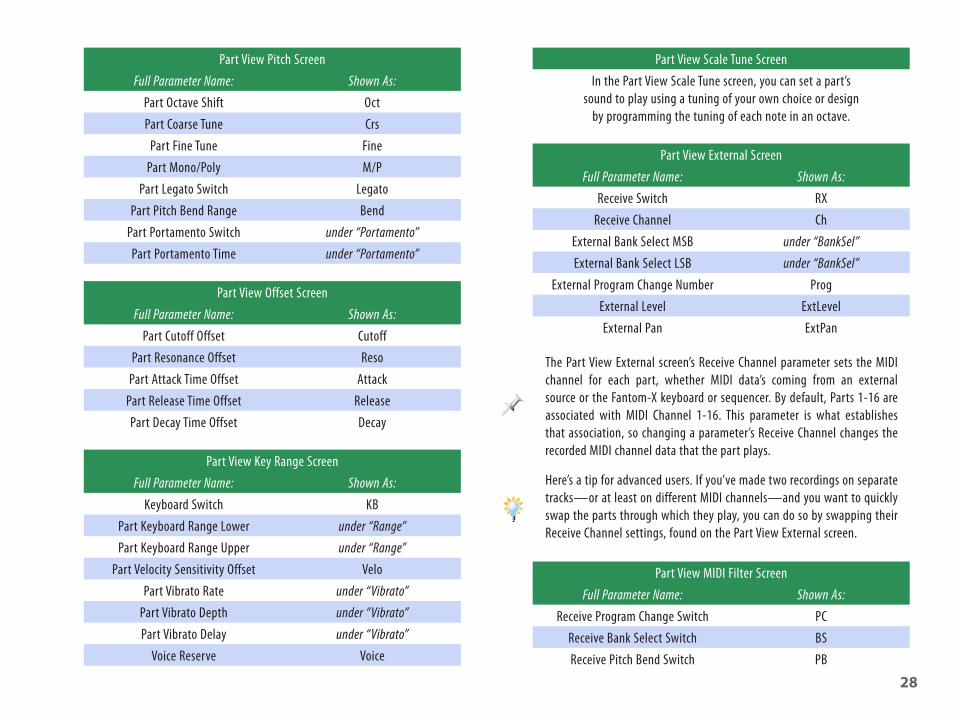
Part View Pitch ScreenFull Parameter Name: Shown As:
Part Octave Shift OctPart Coarse Tune Crs
Part Fine Tune FinePart Mono/Poly M/P
Part Legato Switch LegatoPart Pitch Bend Range Bend
Part Portamento Switch under “Portamento”Part Portamento Time under “Portamento”
Part View Offset ScreenFull Parameter Name: Shown As:
Part Cutoff Offset CutoffPart Resonance Offset Reso
Part Attack Time Offset AttackPart Release Time Offset ReleasePart Decay Time Offset Decay
Part View Key Range ScreenFull Parameter Name: Shown As:
Keyboard Switch KBPart Keyboard Range Lower under “Range”Part Keyboard Range Upper under “Range”
Part Velocity Sensitivity Offset VeloPart Vibrato Rate under “Vibrato”
Part Vibrato Depth under “Vibrato”Part Vibrato Delay under “Vibrato”
Voice Reserve Voice
Part View Scale Tune ScreenIn the Part View Scale Tune screen, you can set a part’s
sound to play using a tuning of your own choice or design by programming the tuning of each note in an octave.
Part View External ScreenFull Parameter Name: Shown As:
Receive Switch RXReceive Channel Ch
External Bank Select MSB under “BankSel”External Bank Select LSB under “BankSel”
External Program Change Number ProgExternal Level ExtLevelExternal Pan ExtPan
The Part View External screen’s Receive Channel parameter sets the MIDI channel for each part, whether MIDI data’s coming from an external source or the Fantom-X keyboard or sequencer. By default, Parts 1-16 are associated with MIDI Channel 1-16. This parameter is what establishes that association, so changing a parameter’s Receive Channel changes the recorded MIDI channel data that the part plays.
Here’s a tip for advanced users. If you’ve made two recordings on separate tracks—or at least on different MIDI channels—and you want to quickly swap the parts through which they play, you can do so by swapping their Receive Channel settings, found on the Part View External screen.
Part View MIDI Filter ScreenFull Parameter Name: Shown As:
Receive Program Change Switch PCReceive Bank Select Switch BSReceive Pitch Bend Switch PB
��
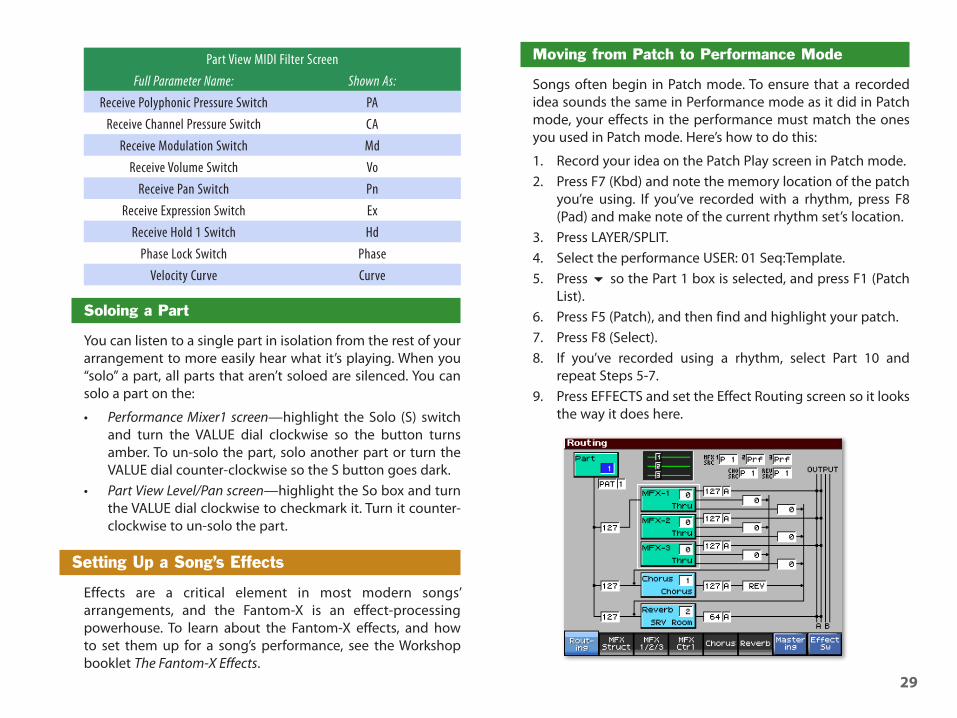
Part View MIDI Filter ScreenFull Parameter Name: Shown As:
Receive Polyphonic Pressure Switch PAReceive Channel Pressure Switch CA
Receive Modulation Switch MdReceive Volume Switch Vo
Receive Pan Switch PnReceive Expression Switch Ex
Receive Hold 1 Switch HdPhase Lock Switch Phase
Velocity Curve Curve
Soloing a Part
You can listen to a single part in isolation from the rest of your arrangement to more easily hear what it’s playing. When you “solo” a part, all parts that aren’t soloed are silenced. You can solo a part on the:
• Performance Mixer1 screen—highlight the Solo (S) switch and turn the VALUE dial clockwise so the button turns amber. To un-solo the part, solo another part or turn the VALUE dial counter-clockwise so the S button goes dark.
• Part View Level/Pan screen—highlight the So box and turn the VALUE dial clockwise to checkmark it. Turn it counter-clockwise to un-solo the part.
Setting Up a Song’s Effects
Effects are a critical element in most modern songs’ arrangements, and the Fantom-X is an effect-processing powerhouse. To learn about the Fantom-X effects, and how to set them up for a song’s performance, see the Workshop booklet The Fantom-X Effects.
Moving from Patch to Performance Mode
Songs often begin in Patch mode. To ensure that a recorded idea sounds the same in Performance mode as it did in Patch mode, your effects in the performance must match the ones you used in Patch mode. Here’s how to do this:
1. Record your idea on the Patch Play screen in Patch mode.2. Press F7 (Kbd) and note the memory location of the patch
you’re using. If you’ve recorded with a rhythm, press F8 (Pad) and make note of the current rhythm set’s location.
3. Press LAYER/SPLIT.4. Select the performance USER: 01 Seq:Template.5. Press 6 so the Part 1 box is selected, and press F1 (Patch
List).6. Press F5 (Patch), and then find and highlight your patch.7. Press F8 (Select).8. If you’ve recorded using a rhythm, select Part 10 and
repeat Steps 5-7.9. Press EFFECTS and set the Effect Routing screen so it looks
the way it does here.
�0
This procedure also appears in the Workshop booklet The Fantom-X Effects.
On your Routing screen, the processor boxes should show the name of the algorithms your patch uses.
If you recorded with a rhythm, Part 10 should be selected in the upper-left-hand corner. Set MFX 2 SRC to P10.
If you manually changed the source of your chorus and reverb settings in Patch mode, set CHO SRC and REV SRC here to match.
10. Press RESET and then PLAY—your idea should now sound the same as it did in Patch mode.
Saving Your Song
As long as your song—and its performance—exist only in the Fantom-X’s work RAM, they’re temporary. To preserve your work, store it in user or card memory.
Fantom-X Song Files
The easiest, safest and most foolproof way to store a song is to save it as a Fantom-X song file. A Fantom-X song file contains:
• all of your recorded data• the song’s performance• all of the patches and rhythm sets used in the song’s
performance• your current song-related System settings
Since a song file contains the song’s performance, there’s no need to store the performance separately, though you can if you like, as described in the Performing with the Fantom-X Workshop booklet.
For a list of the System settings stored in a song file, see Page 198 in the Fantom-X Owner’s Manual.
The primary advantage of a song file is that the song’s required materials are saved—and can then be re-loaded—in a single operation with virtually no bookkeeping required on your part.
If your song includes audio tracks—or its patches and/or rhythm sets incorporate samples—you can save both the song and all of its audio data in a single operation, and reload them the same way, using the Save Song+Samples and Load Song+Samples features.
Tech Detail: SVQ
Each Fantom-X song file bears an “.svq” file extension that’s automatically added to the end of its name during storage. When you load a song, use the Quick Play or Chain Play features, or view the file on a computer, the “.svq” extension is visible.
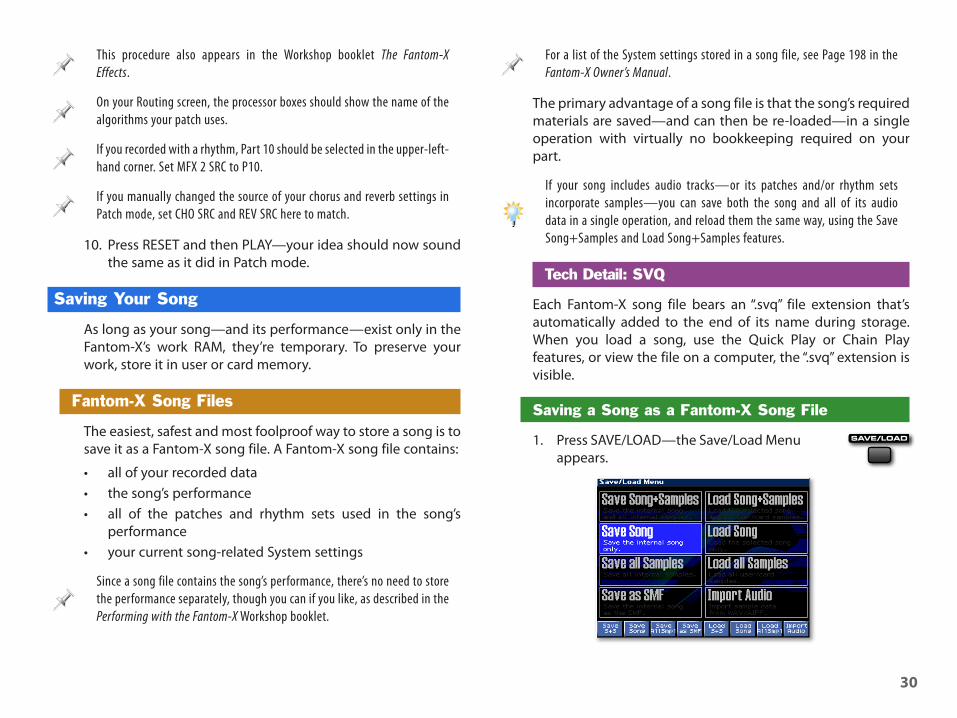
Saving a Song as a Fantom-X Song File
1. Press SAVE/LOAD—the Save/Load Menu appears.
��
2. Either:• press F2 (Save Song), or• use 3, 4, 5, and/or 6 to highlight Save Song, and
then press the ENTER button.
If you’re saving a song with audio tracks, select Save Song+Samples instead of Save Song.
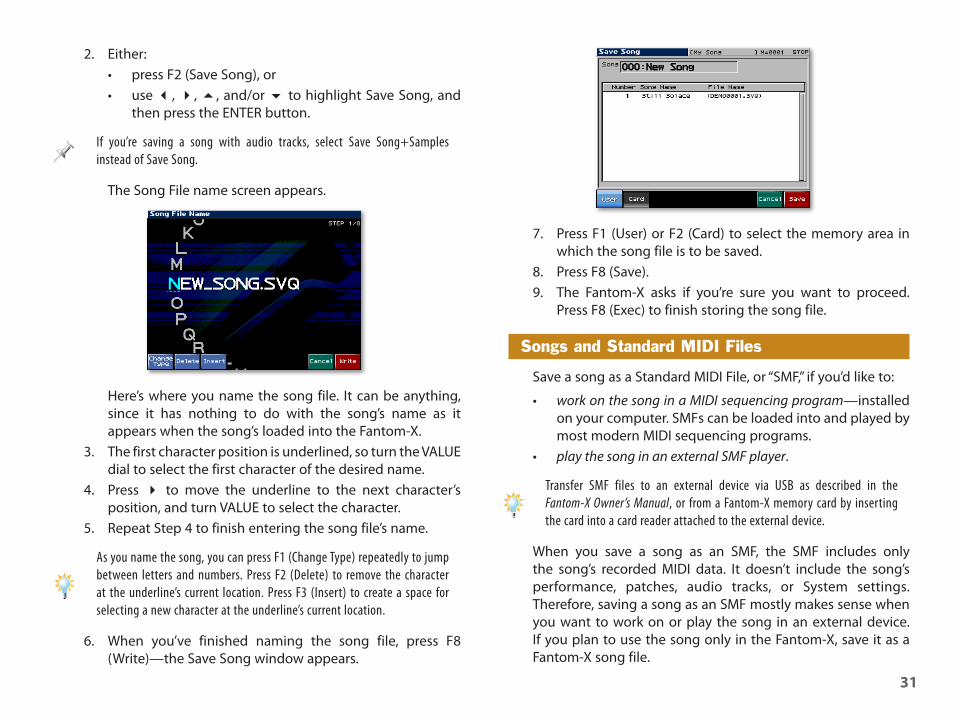
The Song File name screen appears.
Here’s where you name the song file. It can be anything, since it has nothing to do with the song’s name as it appears when the song’s loaded into the Fantom-X.
3. The first character position is underlined, so turn the VALUE dial to select the first character of the desired name.
4. Press 4 to move the underline to the next character’s position, and turn VALUE to select the character.
5. Repeat Step 4 to finish entering the song file’s name.
As you name the song, you can press F1 (Change Type) repeatedly to jump between letters and numbers. Press F2 (Delete) to remove the character at the underline’s current location. Press F3 (Insert) to create a space for selecting a new character at the underline’s current location.
6. When you’ve finished naming the song file, press F8 (Write)—the Save Song window appears.
7. Press F1 (User) or F2 (Card) to select the memory area in which the song file is to be saved.
8. Press F8 (Save).9. The Fantom-X asks if you’re sure you want to proceed.
Press F8 (Exec) to finish storing the song file.
Songs and Standard MIDI Files
Save a song as a Standard MIDI File, or “SMF,” if you’d like to:
• work on the song in a MIDI sequencing program—installed on your computer. SMFs can be loaded into and played by most modern MIDI sequencing programs.
• play the song in an external SMF player.
Transfer SMF files to an external device via USB as described in the Fantom-X Owner’s Manual, or from a Fantom-X memory card by inserting the card into a card reader attached to the external device.
When you save a song as an SMF, the SMF includes only the song’s recorded MIDI data. It doesn’t include the song’s performance, patches, audio tracks, or System settings. Therefore, saving a song as an SMF mostly makes sense when you want to work on or play the song in an external device. If you plan to use the song only in the Fantom-X, save it as a Fantom-X song file.

��
When you save a song as an SMF, you can save its performance separately, as described in the Performing with the Fantom-X Workshop booklet. It’s also a good idea to save the song again as a Fantom-X song file just for safekeeping.
SMF Flavors: Type 0 and Type 1
SMFs come in two styles:
• Type 0 SMFs—pack the data for all of the 16 MIDI channels onto a single track.
• Type 1 SMFs—place the data for each MIDI channel on its own track.
Saving a Song as an SMF
1. Press SAVE/LOAD—the Save/Load Menu appears.
2. Either:• press F4 (Save as SMF), or• use 3, 4, 5, and/or 6 to highlight Save as SMF, and
then press the ENTER button.
The Save as SMF name screen appears on which you can assign a name to the SMF.
All SMFs sport a .”mid” file extension at the end of their names.
3. The first character position is underlined, so turn the VALUE dial to select the first character of the desired name.
4. Press 4 to move the underline to the next character’s position, and then turn the VALUE dial to select the name’s second character.
5. Repeat Step 4 to enter the characters of the SMF’s name.
As you name the song, you can press F1 (Change Type) repeatedly to jump between letters and numbers. Press F2 (Delete) to remove the character at the underline’s current location. Press F3 (Insert) to create a blank space for selecting a new character at the underline’s current location.
6. When you’ve finished naming the SMF, press F8 (Write)—the Save as SMF window appears:
7. Select the type of SMF you wish to create by lighting the appropriate onscreen button in red. Press:• F5 (Format 0)—to save a Type 0 SMF.• F6 (Format 1)—to save a Type 1 SMF.
8. Press F1 (User) or F2 (Card) to select the internal Fantom-X user or card memory as the location in which the SMF is to be saved.
��
9. Press F8 (Save As SMF).10. The Fantom-X asks if you’re sure you want to proceed.
Press F8 (Exec) to finish storing the SMF.
Editing a Song
Re-Voicing a Recording
MIDI data doesn’t care what sound it plays. This is one of the great advantages to MIDI sequencing since it means you can change the patch or rhythm set a recording uses at any time. Changing a part’s sound after recording is called “re-voicing.”
As your arrangement evolves, you may change your mind about sounds you want to use, or you may stumble across even better sounds you didn’t know about.
To re-voice a part, go to the Performance Mixer1 or Part View Level/Pan screen and assign a new patch or rhythm set to the part.
Track and Pattern Editing
The Fantom-X offers a vast array of editing tools with which you can refine, twist, or mutilate a song’s recorded MIDI data until the song sounds just the way you want it to.
The process begins with the selection of the track or pattern that contains the recording you want to edit. From there, you can dig down into the separate MIDI channels of data the track or pattern may contain, and edit their data as desired.
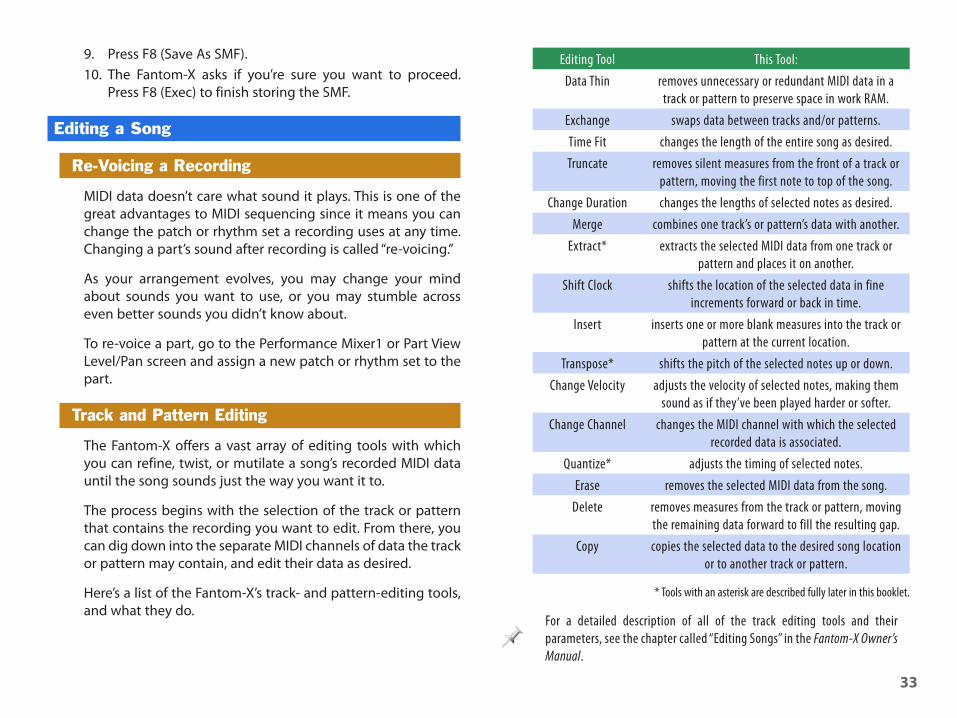
Here’s a list of the Fantom-X’s track- and pattern-editing tools, and what they do.
Editing Tool This Tool:Data Thin removes unnecessary or redundant MIDI data in a
track or pattern to preserve space in work RAM.Exchange swaps data between tracks and/or patterns.Time Fit changes the length of the entire song as desired.Truncate removes silent measures from the front of a track or
pattern, moving the first note to top of the song.Change Duration changes the lengths of selected notes as desired.
Merge combines one track’s or pattern’s data with another.Extract* extracts the selected MIDI data from one track or
pattern and places it on another.Shift Clock shifts the location of the selected data in fine
increments forward or back in time.Insert inserts one or more blank measures into the track or
pattern at the current location.Transpose* shifts the pitch of the selected notes up or down.
Change Velocity adjusts the velocity of selected notes, making them sound as if they’ve been played harder or softer.
Change Channel changes the MIDI channel with which the selected recorded data is associated.
Quantize* adjusts the timing of selected notes.Erase removes the selected MIDI data from the song.
Delete removes measures from the track or pattern, moving the remaining data forward to fill the resulting gap.
Copy copies the selected data to the desired song location or to another track or pattern.
* Tools with an asterisk are described fully later in this booklet.
For a detailed description of all of the track editing tools and their parameters, see the chapter called “Editing Songs” in the Fantom-X Owner’s Manual.
��
The Basic Track Editing Procedure
1. On the Song Edit screen, select the track or pattern that contains the recording you want to edit.
Step 1 isn’t absolutely necessary since you can also select a track or pattern during editing—still, it’s a good way to keep from getting confused.
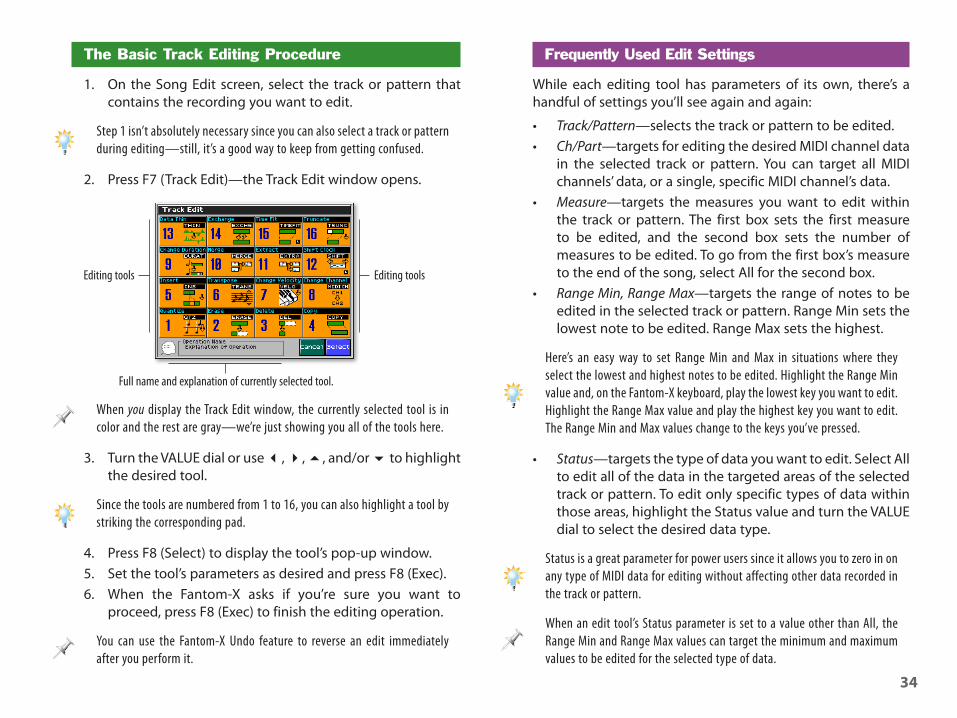
2. Press F7 (Track Edit)—the Track Edit window opens.
Editing tools Editing tools
Full name and explanation of currently selected tool.
When you display the Track Edit window, the currently selected tool is in color and the rest are gray—we’re just showing you all of the tools here.
3. Turn the VALUE dial or use 3, 4, 5, and/or 6 to highlight the desired tool.
Since the tools are numbered from 1 to 16, you can also highlight a tool by striking the corresponding pad.
4. Press F8 (Select) to display the tool’s pop-up window.5. Set the tool’s parameters as desired and press F8 (Exec).6. When the Fantom-X asks if you’re sure you want to
proceed, press F8 (Exec) to finish the editing operation.
You can use the Fantom-X Undo feature to reverse an edit immediately after you perform it.
Frequently Used Edit Settings
While each editing tool has parameters of its own, there’s a handful of settings you’ll see again and again:
• Track/Pattern—selects the track or pattern to be edited.• Ch/Part—targets for editing the desired MIDI channel data
in the selected track or pattern. You can target all MIDI channels’ data, or a single, specific MIDI channel’s data.
• Measure—targets the measures you want to edit within the track or pattern. The first box sets the first measure to be edited, and the second box sets the number of measures to be edited. To go from the first box’s measure to the end of the song, select All for the second box.
• Range Min, Range Max—targets the range of notes to be edited in the selected track or pattern. Range Min sets the lowest note to be edited. Range Max sets the highest.
Here’s an easy way to set Range Min and Max in situations where they select the lowest and highest notes to be edited. Highlight the Range Min value and, on the Fantom-X keyboard, play the lowest key you want to edit. Highlight the Range Max value and play the highest key you want to edit. The Range Min and Max values change to the keys you’ve pressed.
• Status—targets the type of data you want to edit. Select All to edit all of the data in the targeted areas of the selected track or pattern. To edit only specific types of data within those areas, highlight the Status value and turn the VALUE dial to select the desired data type.
Status is a great parameter for power users since it allows you to zero in on any type of MIDI data for editing without affecting other data recorded in the track or pattern.
When an edit tool’s Status parameter is set to a value other than All, the Range Min and Range Max values can target the minimum and maximum values to be edited for the selected type of data.
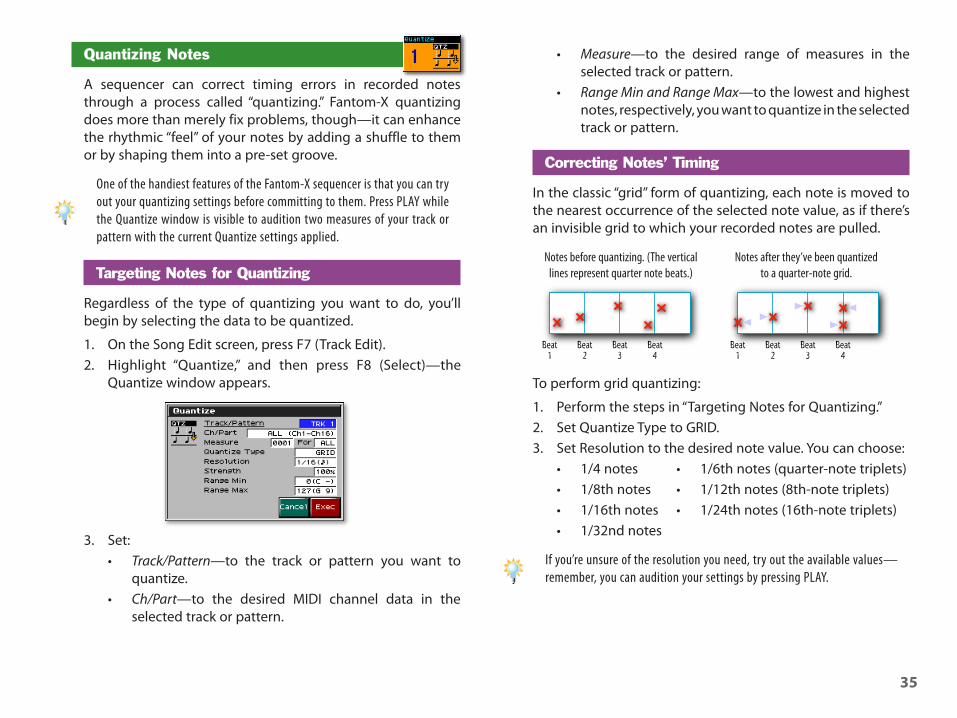
��
Quantizing Notes
A sequencer can correct timing errors in recorded notes through a process called “quantizing.” Fantom-X quantizing does more than merely fix problems, though—it can enhance the rhythmic “feel” of your notes by adding a shuffle to them or by shaping them into a pre-set groove.
One of the handiest features of the Fantom-X sequencer is that you can try out your quantizing settings before committing to them. Press PLAY while the Quantize window is visible to audition two measures of your track or pattern with the current Quantize settings applied.
Targeting Notes for Quantizing
Regardless of the type of quantizing you want to do, you’ll begin by selecting the data to be quantized.
1. On the Song Edit screen, press F7 (Track Edit).2. Highlight “Quantize,” and then press F8 (Select)—the
Quantize window appears.
3. Set:• Track/Pattern—to the track or pattern you want to
quantize.• Ch/Part—to the desired MIDI channel data in the
selected track or pattern.
• Measure—to the desired range of measures in the selected track or pattern.
• Range Min and Range Max—to the lowest and highest notes, respectively, you want to quantize in the selected track or pattern.
Correcting Notes’ Timing
In the classic “grid” form of quantizing, each note is moved to the nearest occurrence of the selected note value, as if there’s an invisible grid to which your recorded notes are pulled.
Notes before quantizing. (The vertical lines represent quarter note beats.)
Notes after they’ve been quantized to a quarter-note grid.
To perform grid quantizing:
1. Perform the steps in “Targeting Notes for Quantizing.”2. Set Quantize Type to GRID.3. Set Resolution to the desired note value. You can choose:
• 1/4 notes • 1/6th notes (quarter-note triplets)• 1/8th notes • 1/12th notes (8th-note triplets)• 1/16th notes • 1/24th notes (16th-note triplets)• 1/32nd notes
If you’re unsure of the resolution you need, try out the available values—remember, you can audition your settings by pressing PLAY.

��
It’s not uncommon to need different quantize settings for different recorded phrases. If a setting works for one section but not another, use the Measure parameter to quantize different sections separately.
4. Set Strength as desired. A value of 100% pulls notes completely into perfect time. Lesser values pull your notes toward perfect time, but leave some natural imperfections. A Strength value of 0% doesn’t move the notes at all.
The best Strength setting depends on your style of music. Dance-oriented music may sound best with a 100% Strength setting, while gentler quantizing may be in order for more organic musical styles.
5. Press F8 (Exec) to perform the quantization, and F8 (Exec) again to confirm that you wish to proceed.
Adding a Shuffle Feel
1. Perform the steps in “Targeting Notes for Quantizing.”2. Set Quantize Type to SHUFFLE—the Rate parameter
appears.
3. Set Resolution to produce an 1/8th-note shuffle or a 16th-note shuffle.
4. Set the Rate parameter to set the shuffle’s “swing” feel: the distance between each downbeat and the upbeat that follows it. Lower values bring them together, while higher values push them apart. A value of 50% sets the upbeat exactly halfway between the downbeat before it and the one after—no shuffle feel is therefore applied.
5. Press F8 (Exec) to perform the quantization, and F8 (Exec) again to confirm that you wish to proceed.
Applying a Groove Template
The Fantom-X contains 71 built-in groove templates that can nudge your recorded notes into style-based feels.
1. Perform the steps in “Targeting Notes for Quantizing.”2. Set Quantize Type to TEMPLATE—the Quantize Type and
Timing parameters appear.
3. Select the Quantize Type value and turn the VALUE dial to select the desired template.
For a list of the available Quantize groove templates, see Page 182 of the Fantom-X Owner’s Manual.
4. The Timing parameter sets the degree to which your recorded notes are forced into the template’s groove, with 100% fully imposing the template’s feel.
5. Press F8 (Exec) to perform the quantization, and F8 (Exec) again to confirm that you wish to proceed.
Transposing Recorded Notes
As you refine your song’s arrangement, you may find you want to shift recorded notes up or down an octave or more, or you may decide to shift the entire song into a different key. The Transpose tool allows you to easily make such changes by raising or lowering the pitch of selected notes in semitone steps.
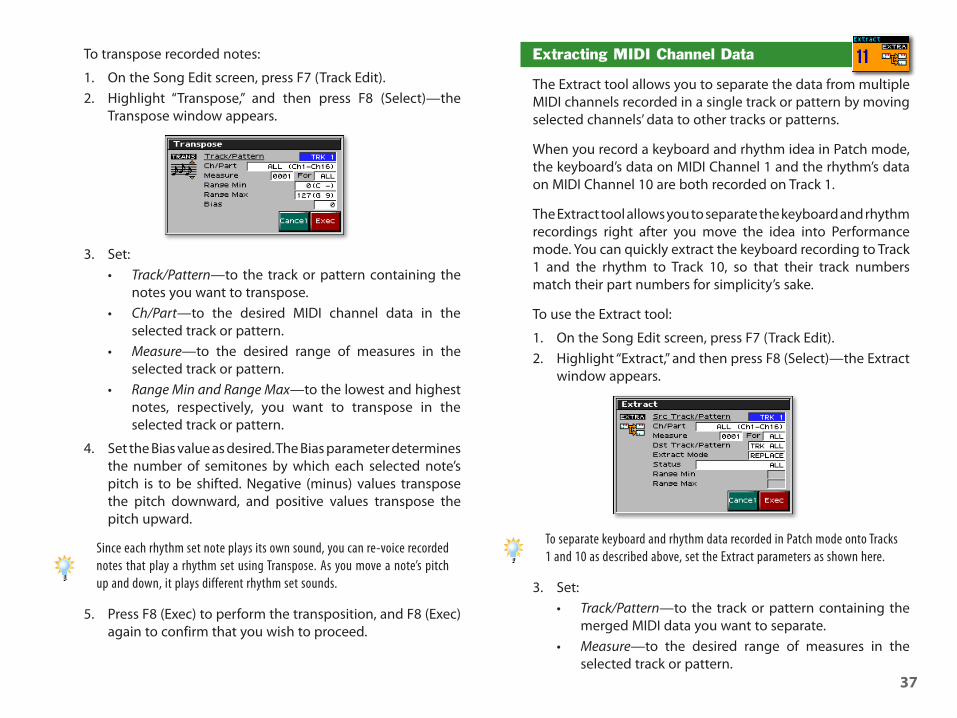
��
To transpose recorded notes:
1. On the Song Edit screen, press F7 (Track Edit).2. Highlight “Transpose,” and then press F8 (Select)—the
Transpose window appears.
3. Set:• Track/Pattern—to the track or pattern containing the
notes you want to transpose.• Ch/Part—to the desired MIDI channel data in the
selected track or pattern.• Measure—to the desired range of measures in the
selected track or pattern.• Range Min and Range Max—to the lowest and highest
notes, respectively, you want to transpose in the selected track or pattern.
4. Set the Bias value as desired. The Bias parameter determines the number of semitones by which each selected note’s pitch is to be shifted. Negative (minus) values transpose the pitch downward, and positive values transpose the pitch upward.
Since each rhythm set note plays its own sound, you can re-voice recorded notes that play a rhythm set using Transpose. As you move a note’s pitch up and down, it plays different rhythm set sounds.
5. Press F8 (Exec) to perform the transposition, and F8 (Exec) again to confirm that you wish to proceed.
Extracting MIDI Channel Data
The Extract tool allows you to separate the data from multiple MIDI channels recorded in a single track or pattern by moving selected channels’ data to other tracks or patterns.
When you record a keyboard and rhythm idea in Patch mode, the keyboard’s data on MIDI Channel 1 and the rhythm’s data on MIDI Channel 10 are both recorded on Track 1.
The Extract tool allows you to separate the keyboard and rhythm recordings right after you move the idea into Performance mode. You can quickly extract the keyboard recording to Track 1 and the rhythm to Track 10, so that their track numbers match their part numbers for simplicity’s sake.
To use the Extract tool:
1. On the Song Edit screen, press F7 (Track Edit).2. Highlight “Extract,” and then press F8 (Select)—the Extract
window appears.
To separate keyboard and rhythm data recorded in Patch mode onto Tracks 1 and 10 as described above, set the Extract parameters as shown here.
3. Set:• Track/Pattern—to the track or pattern containing the
merged MIDI data you want to separate.• Measure—to the desired range of measures in the
selected track or pattern.

��
• Status—to the type of MIDI data you wish to extract.• Range Min and Range Max—to the lowest and highest
notes you want to extract, or, if Status is set to a value other than All, to the desired lowest and highest values for the type of data to be extracted.
4. The Ch/Part parameter targets the MIDI channel of the data you want to extract. If you want to separate all of the combined MIDI channels’ data in the selected track or pattern, select All.
5. The Dst (for “Destination”) Track/Pattern selects the location to which extracted data is moved. If you’ve set Ch/Part to All in order to extract multiple channels’ data, set Dst Track/Pattern to All as well—each MIDI channel’s data will automatically be placed on its same-numbered track or pattern.
6. Set Extract Mode as desired. Mix combines extracted data with anything already in the destination track or pattern, while Replace deletes the track’s or pattern’s data when the extracted data is placed there.
7. Press F8 (Exec) to perform the extraction, and F8 (Exec) again to confirm that you wish to proceed.
Microscope Editing
As its name suggests, the Fantom-X’s Microscope editing takes you down to the finest level of detail, allowing you to work with individual MIDI events. Microscope editing is a tool of considerable power. Here’s how it works.
1. On the Song Edit screen, select the desired track or pattern.
2. Press F8 (Micro Edit) to display the Microscope screen. On the Microscope screen, the selected track or pattern’s data is presented in both list and graphic form.
Information strip
Event list
Note area
Control Change area
3. After you’re finished editing, leave the Microscope screen by pressing EXIT.
Understanding the Microscope Screen
The screen is divided into four areas, as shown above:
• Information Strip—The Information strip shows you:
The MIDI channel(s) of data being displayed
Currently selected event or parameter type
The displayed track or pattern
• Event list—This list shows the selected track or pattern’s recorded events in order, listed from top to bottom. Each event’s details are presented in a horizontal strip:
Event location
Event MIDI channel
Event type
Event-specific parameter values
The event-specific parameters vary depending on the type of event. When a parameter’s value is highlighted, the Information strip displays the parameter’s name, as shown in the Information Strip illustration above.

��
Each event is labeled as a red “Note,” a brown “Pitch Bend,” or as a blue “CC,” for MIDI “Control Change” event. MIDI Control Change events affect the behavior and sonic characteristics of patches and rhythm sets.
• Note area—The Note area graphically displays the notes just before and after the currently selected event, reading from top to bottom. The currently selected note is orange.
• Control Change area—The Control Change area shows a graphic representation of MIDI Control Change messages associated with the currently selected event. When a note is selected, velocity values that represent the force at which the note is struck are displayed.
Working in the Microscope Screen
Move through the track or pattern by selecting individual events with the 6 and 5 buttons, VALUE dial, and the RESET, BWD and FWD buttons.
When an event is first selected, it’s highlighted in blue. If it’s a note event, and you’ve selected it using 5, 6, or the VALUE dial, you hear the note.
To edit an event:
1. Select the event you want to edit.2. Press 3 and/or 4 to highlight the event value you want
to change.3. Turn the VALUE dial to set the selected value as desired.4. Repeat Steps 2 and 3 to make any additional changes to
the event.
The Microscope screen’s F buttons offer additional editing tools. Press:
• F1 (Create)—to add a new event at the current song location. When you press F1 (Create), the Create Event window opens where you can select the desired type of event to be added to the song.
• F2 (Erase)—to delete the currently selected event.• F3 (Move)—to move the currently highlighted event to
the location you select in the Move Event window that appears when you press F3 (Move).
• F4 (Copy)—to copy the currently selected event into the Fantom-X’s Microscope clipboard memory.
• F5 (Place)—to place the event currently held in the Microscope clipboard to the location you select in the Place Event window that appears when you press F5 (Place).
• F6—to spread the event list so it fills the entire display. Press F6 again to return to the default Microscope screen view.
• F7 (Trk/Ch Select)—to select the track, pattern and MIDI channels’ data to be displayed in the Microscope screen.
• F8 (View)—to select the type of MIDI data to be displayed in the Microscope screen. When a type of data is checkmarked in the View Select window, it appears in the Microscope screen.
About Adding Beat Loops to a Song
When you sample beat loops or import them—as described in the Sampling on the Fantom-X Workshop booklet—you assign the loops to pads in a rhythm set or to the keyboard keys in a patch.

�0
The pads work especially well for triggering beat loops. Set the pads to use a fixed velocity for the best results. See the Workshop booklet The Rhythms of the Fantom-X for details.
Once a beat loop is placed in a rhythm set or patch, play the pads or keyboard to trigger the beat loop at the desired song locations while recording your playing into a track or pattern.
Record your beat loop triggering into a pattern if the beat loop is to be used repeatedly in a song. This way, you can simply record pattern calls at the desired locations.
Once recorded, use the Quantize tool to position the loop perfectly in time.
Getting Your Song Onto a CD
When your song is done—all of its sequenced and audio tracks are recorded, and you’ve got the whole thing mixed—you can get your song onto a CD in a few ways. See the Making a CD of Your Fantom-X Music Workshop booklet for details.
Loading Songs
To edit a song, or add more material to a song, the song has to be loaded into the Fantom-X’s temporary work RAM.
If you’d merely like to listen to a song in user or card memory that doesn’t have audio tracks, you don’t actually have to load the song—you can use the Fantom-X’s Quick Play feature, described on the next page.
You can load a song from:
• a Fantom-X song file—that contains a song’s recorded data, its performance and the patches and rhythm sets the performance uses. If the song has audio tracks, they’re contained in an accompanying .sva file that tags along during loading.
The patches and rhythm sets in an .svq file are loaded into the Fantom-X’s temporary performance memory in work RAM. You can steal a patch or rhythm set from a song performance and save it permanently to user or card memory. Select the part that plays the patch or rhythm set, and then press WRITE to save the sound.
• an SMF file—that contains a song’s recorded data. Commercially-produced SMFs may contain setup data.
• an MRC file—that contains a song recorded in Roland’s legacy MRC file format.
You can load a song from the Song List screen, which you can display from the Save/Load menu or the Song Edit screen.
Opening the Song List from the Save/Load Menu
1. Press SAVE/LOAD—the Save/Load Menu appears.
2. Either:• press F6 (Load Song), or• use 3, 4, 5, and/or 6 to highlight Load Song, and
then press the ENTER button.
If song contains audio tracks and/or samples, select F5 (Load S+S) or highlight Load Song + Samples, and press ENTER.
The Song List screen appears.

��
Viewing the Song List from the Song Edit Screen
1. On the Song Edit screen, press F1 (Song List) to display the song list.
Loading Songs from the Song List Screen
Songs with audio tracks are identified by this symbol.
On the Song List screen, display the songs stored in:
• user memory—by pressing F1 (User)• card memory—by pressing F2 (Card).
By default, the list displays all Fantom-X .svq files, all SMF .mid files, and all MRC .mrc files. You can press 4 and/or 3 to display a single file type, as shown at the top of the list.
Loading a Song, SMF, or MRC File
1. Select the desired file in the song list using the VALUE dial, 6 or 5.
2. Press F8 (Load) to load the song into the Fantom-X—the Fantom-X asks if you’re sure you want to proceed.
When you load a song, it replaces the currently loaded song from the Fantom-X’s work RAM. Be sure to save the current song before loading a different one if you wish to preserve it.
3. Press F8 (Exec) to finish loading the song.
When you load a commercially available Type 0 SMF, the data for all of its MIDI channels is combined on Track 1. See “Extracting MIDI Channel Data” earlier in this booklet to learn how to separate the data from MIDI Channels 1-16 onto Tracks 1-16, respectively. Set your Extract parameters as shown in that section’s illustration.
Loading an Individual Track or Pattern
You can load an individual track or pattern from the song list, placing the track into the Fantom-X’s currently loaded song.
You can load sequenced tracks only—not audio tracks—from another song.
1. On the Song List screen, highlight the song that contains the track or pattern you want to load.
2. Press F7 (Load Track)—the Load Track window appears.
3. Set the Source parameter to the track or pattern you wish to load.
4. Set the Destination parameter to the track or pattern into which you want to load the source track or pattern.
5. Press F8 (Exec)—the Fantom-X asks if you’re sure you want to proceed.
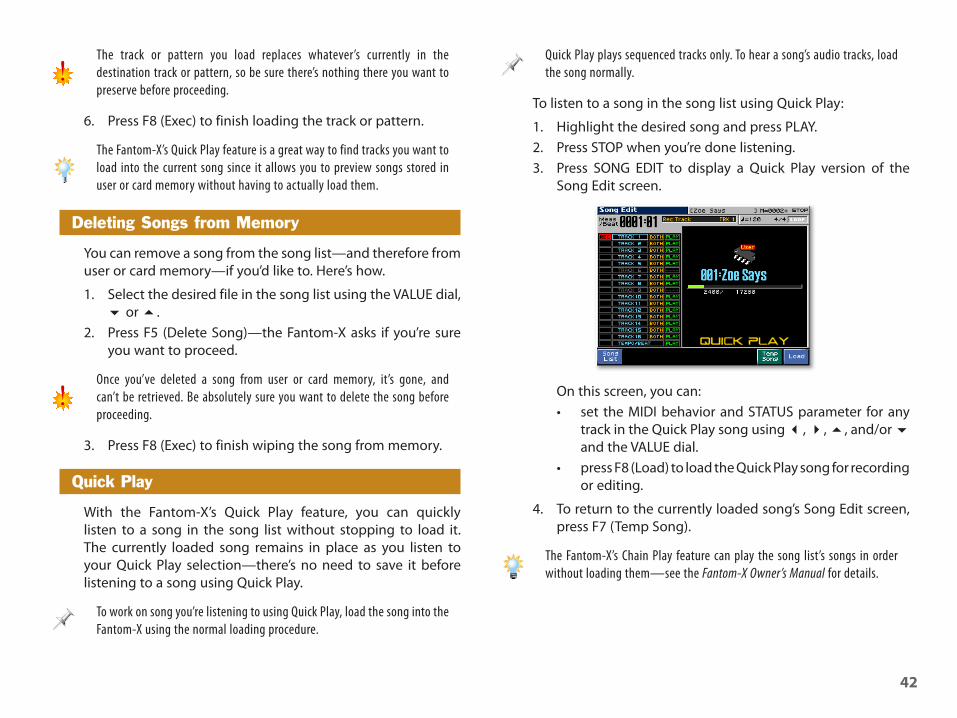
��
The track or pattern you load replaces whatever’s currently in the destination track or pattern, so be sure there’s nothing there you want to preserve before proceeding.
6. Press F8 (Exec) to finish loading the track or pattern.
The Fantom-X’s Quick Play feature is a great way to find tracks you want to load into the current song since it allows you to preview songs stored in user or card memory without having to actually load them.
Deleting Songs from Memory
You can remove a song from the song list—and therefore from user or card memory—if you’d like to. Here’s how.
1. Select the desired file in the song list using the VALUE dial, 6 or 5.
2. Press F5 (Delete Song)—the Fantom-X asks if you’re sure you want to proceed.
Once you’ve deleted a song from user or card memory, it’s gone, and can’t be retrieved. Be absolutely sure you want to delete the song before proceeding.
3. Press F8 (Exec) to finish wiping the song from memory.
Quick Play
With the Fantom-X’s Quick Play feature, you can quickly listen to a song in the song list without stopping to load it. The currently loaded song remains in place as you listen to your Quick Play selection—there’s no need to save it before listening to a song using Quick Play.
To work on song you’re listening to using Quick Play, load the song into the Fantom-X using the normal loading procedure.
Quick Play plays sequenced tracks only. To hear a song’s audio tracks, load the song normally.
To listen to a song in the song list using Quick Play:
1. Highlight the desired song and press PLAY.2. Press STOP when you’re done listening.3. Press SONG EDIT to display a Quick Play version of the
Song Edit screen.
On this screen, you can:• set the MIDI behavior and STATUS parameter for any
track in the Quick Play song using 3, 4, 5, and/or 6 and the VALUE dial.
• press F8 (Load) to load the Quick Play song for recording or editing.
4. To return to the currently loaded song’s Song Edit screen, press F7 (Temp Song).
The Fantom-X’s Chain Play feature can play the song list’s songs in order without loading them—see the Fantom-X Owner’s Manual for details.

��
The End
We hope you’ve enjoyed this tour of the Fantom-X’s built-in recording studio. Check out the other Workshop booklets, as well your Fantom-X Handbook, Owner’s Manual, and Audio Track Expansion guide. We’re confident you’ll have a great time with the exciting, inspiring Fantom-X.
For the latest Fantom-X updates and support tools, visit the Roland U.S. Web site at www.RolandUS.com. If you need personal assistance, call our amazing Product Support team at 323-890-3745.