FAMIS Web - Procedure August 2013 · FAMIS Web Procedure v1.0 Page 3 of 21 ... 1 Introduction The...
21
FAMIS Web - Procedure August 2013
Transcript of FAMIS Web - Procedure August 2013 · FAMIS Web Procedure v1.0 Page 3 of 21 ... 1 Introduction The...

FAMIS Web - Procedure
August 2013

FAMIS Web Procedure v1.0 Page 3 of 21
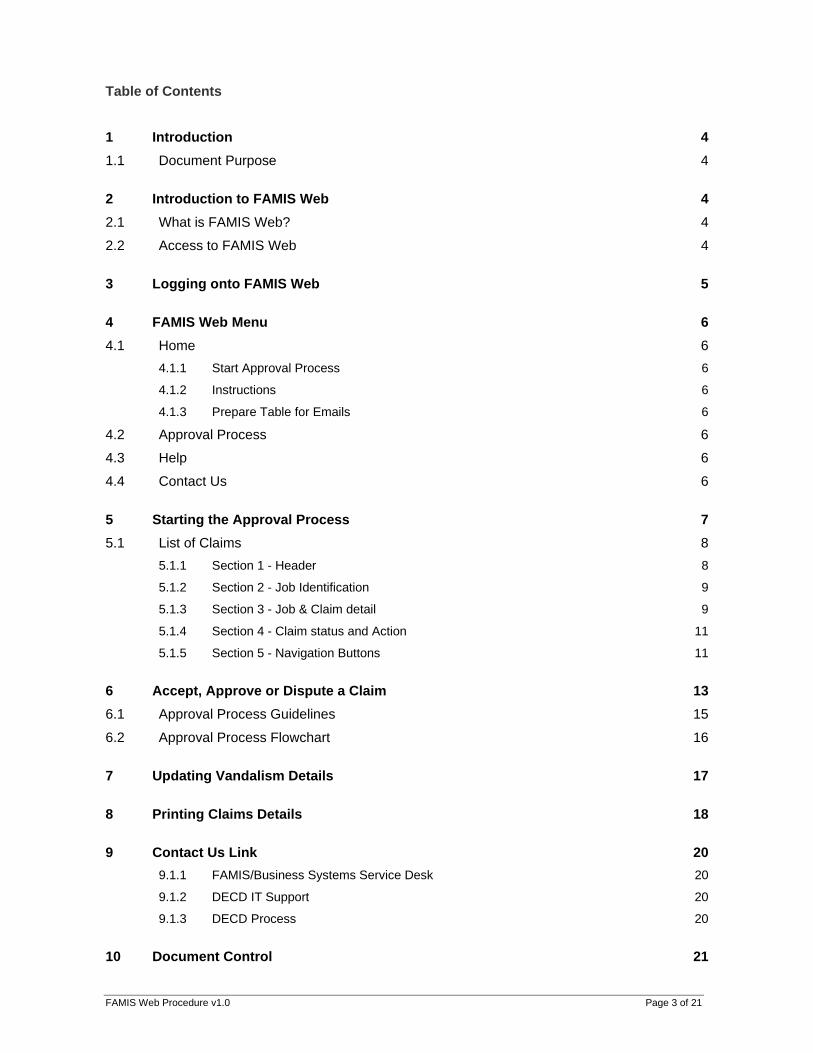
Table of Contents
1 Introduction 4 1.1 Document Purpose 4
2 Introduction to FAMIS Web 4 2.1 What is FAMIS Web? 4
2.2 Access to FAMIS Web 4
3 Logging onto FAMIS Web 5
4 FAMIS Web Menu 6 4.1 Home 6
4.1.1 Start Approval Process 6
4.1.2 Instructions 6
4.1.3 Prepare Table for Emails 6
4.2 Approval Process 6
4.3 Help 6
4.4 Contact Us 6
5 Starting the Approval Process 7 5.1 List of Claims 8
5.1.1 Section 1 - Header 8
5.1.2 Section 2 - Job Identification 9
5.1.3 Section 3 - Job & Claim detail 9
5.1.4 Section 4 - Claim status and Action 11
5.1.5 Section 5 - Navigation Buttons 11
6 Accept, Approve or Dispute a Claim 13 6.1 Approval Process Guidelines 15
6.2 Approval Process Flowchart 16
7 Updating Vandalism Details 17
8 Printing Claims Details 18
9 Contact Us Link 20 9.1.1 FAMIS/Business Systems Service Desk 20
9.1.2 DECD IT Support 20
9.1.3 DECD Process 20
10 Document Control 21

FAMIS Web Procedure v1.0 Page 4 of 21
1 Introduction
The FAMIS Web procedure introduces the concept of asset management, the reasons for its purpose as a system of tools and briefly discusses how it supports the approval process. Users will become familiar with the 4 menu options, the 5 sections of a claim, different account codes, class and job types, navigation buttons and more
1.1 Document Purpose
This document provides users with an introduction to FAMIS Web, why it exists and a justification for carrying out operational tasks.
2 Introduction to FAMIS Web
2.1 What is FAMIS Web? FAMIS Web is a system designed to assist Site Managers in the management of their assets. It enables sites to approve or dispute works initiated at their site. To ensure user's Facilities Management Provider’s (i.e. BMFS & Spotless) monthly payments are processed within the prescribed time, Site Managers are reminded that job claims must be accepted and approved within 28 calendar days of being claimed by the Contractor. Claims not actioned within this time will be assumed to be approved.
2.2 Access to FAMIS Web Access to FAMIS Web is located from the FM Contract Resources website: http://www.fm.dais.sa.gov.au. Users can add this link to their favourites.
To add FAMIS Web as a favourite, complete the following steps:
1. Go to FAMIS Web link at http://www.fm.dais.sa.gov.au
2. Click Favourites from the browser top menu.
3. Select Add to Favourites.
Note: The system uses a secure server and requires the users to login. Username and password details are emailed to users at their designated school.
FAMIS Web Procedure v1.0 Page 5 of 21
3 Logging onto FAMIS Web
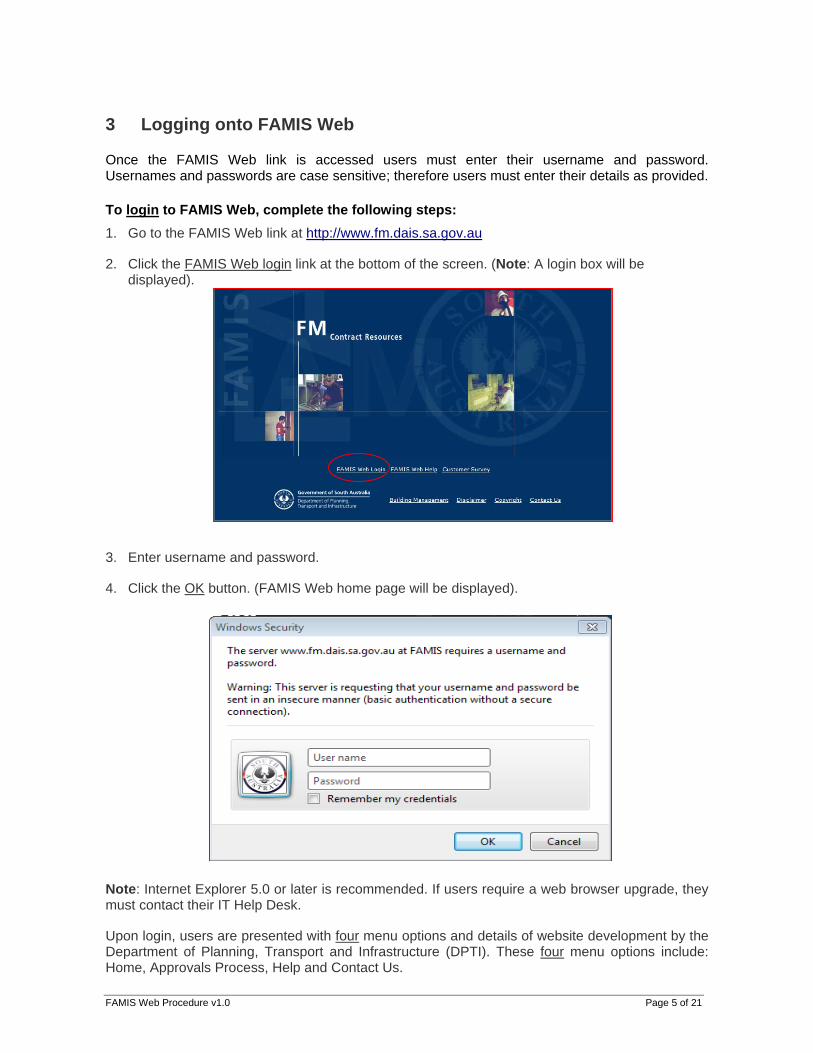
Once the FAMIS Web link is accessed users must enter their username and password. Usernames and passwords are case sensitive; therefore users must enter their details as provided. To login to FAMIS Web, complete the following steps: 1. Go to the FAMIS Web link at http://www.fm.dais.sa.gov.au
2. Click the FAMIS Web login link at the bottom of the screen. (Note: A login box will be displayed).
3. Enter username and password.
4. Click the OK button. (FAMIS Web home page will be displayed).
Note: Internet Explorer 5.0 or later is recommended. If users require a web browser upgrade, they must contact their IT Help Desk.
Upon login, users are presented with four menu options and details of website development by the Department of Planning, Transport and Infrastructure (DPTI). These four menu options include: Home, Approvals Process, Help and Contact Us.

FAMIS Web Procedure v1.0 Page 6 of 21
4 FAMIS Web Menu
4.1 Home The Home menu option allows users to view the homepage, Site Manager responsibilities and links to relevant actions within the approval process. Within the Home menu, there are two or three (Administrator access only) additional links directing users to process FAMIS Web approvals.
4.1.1 Start Approval Process
The Start Approval Process link directs users directly to the FAMIS-Approvals page listing all assets to be claimed or approvals process sessions.
4.1.2 Instructions
The Instructions link directs users to all relevant training material associated to the FAMIS Web – Approvals Process. Users may click onto or print all relevant topic links for reference.
4.1.3 Prepare Table for Emails
The Prepare Table for Emails link is used to control the sending of monthly reminders or other notifications to FAMIS Web users. A reminder email should be sent to each asset on a monthly basis with authority to approve claims via the web interface. This link is restricted to Administration access only.
4.2 Approval Process The Approvals Process menu option, similar to the Start Approvals Process link in previous section 4.1.1, directs users directly to the FAMIS-Approvals page listing all assets to be claimed or approval process sessions.
4.3 Help The Help menu option, similar to the Instructions link in previous section 4.1.2 directs users to all relevant training material associated to the FAMIS Web – Approvals Process. Users may click onto or print all PDF pages for easy reference. Users can also click the Contact Us link to request help and assistance, make enquiries, provide comments or suggestions regarding content or website structure etc.
4.4 Contact Us
The Contact Us menu option directs users to FAMIS Web system and process support. The Contact Us page includes Department of Planning, Transport and Infrastructure (DPTI) and Department of Education and Child Development (DECD) contact details in support of the approvals process, including IT support and queries.

FAMIS Web Procedure v1.0 Page 7 of 21
5 Starting the Approval Process
The FAMIS Web approvals process may be started from the FAMIS Web home page by clicking the Start Approval Process link or directly by clicking the Approvals Process menu option at the top of the page. A list of one or more assets for which users are authorised will then be displayed. To start the approval process, complete the following steps: 1. Click the Start Approvals Process link from the FAMIS Web home page OR
2. Click the Approvals Process menu option.
3. Click the Create New Session link beneath the Session Status column next to the asset.
Note: A group of claims for a particular asset will be displayed.
4. Click the Create New Session link beneath the Session Status column next to the asset.
Note: DECD Sites should only see site specific details.
a) If an existing session is currently open for an asset, the Resume Existing Session link will also be displayed. This means users have returned to the list of assets without terminating the last session.
Note: For security reasons, a session will expire after 30 minutes of inactivity.
FAMIS Web Procedure v1.0 Page 8 of 21
5.1 List of Claims
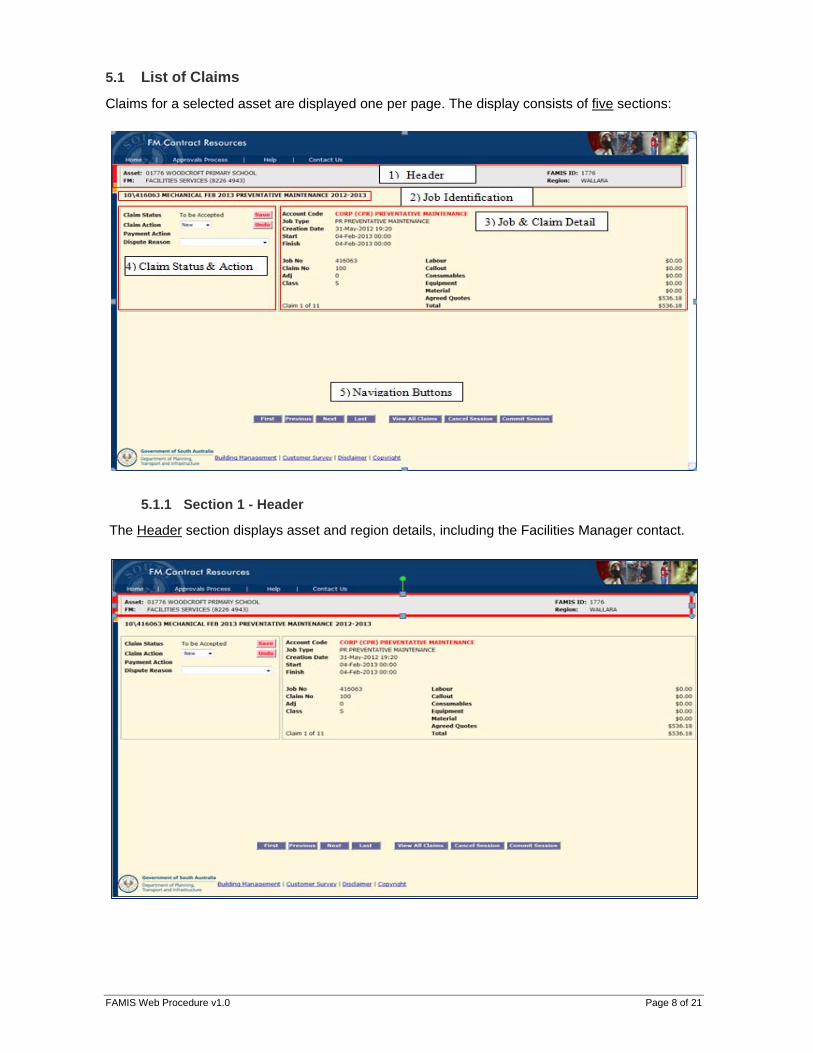
Claims for a selected asset are displayed one per page. The display consists of five sections:
5.1.1 Section 1 - Header
The Header section displays asset and region details, including the Facilities Manager contact.
FAMIS Web Procedure v1.0 Page 9 of 21
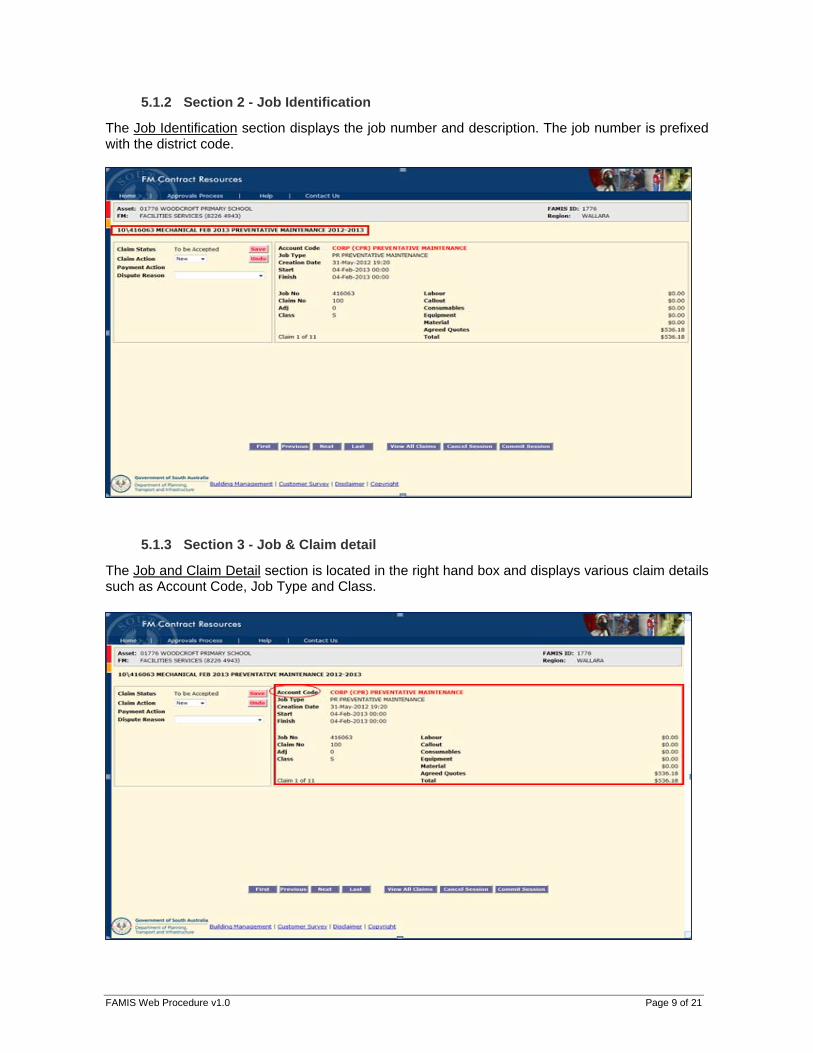
5.1.2 Section 2 - Job Identification
The Job Identification section displays the job number and description. The job number is prefixed with the district code.
5.1.3 Section 3 - Job & Claim detail
The Job and Claim Detail section is located in the right hand box and displays various claim details such as Account Code, Job Type and Class.

FAMIS Web Procedure v1.0 Page 10 of 21
Account Code
• The account code displayed in the account code field indicates who is responsible for payment of the job. This code is provided by the site when the job is initiated through the hotline or on the project commencement form.
• If the code commences with Corporate (Corp), this indicates the charge is a corporate responsibility.
• If the code commences with Site (Site), this indicates the charge is a site responsibility. • If the code commences with (RVF), this indicates the job relates to a vandalism incident
Users must ensure that the police report number is entered correctly. Providing the police report number by the due date will ensure that the cost is not charged to the site but to the Vandalism budget.
• If the job has been coded incorrectly, the result will be an overcharge or undercharge to the site. If this occurs, users must note the job number and when the financial report is received from DECD detailing the incorrect debit or credit, users must write to the DECD Asset Support Centre at [email protected], who will then follow up the enquiry.
• NOTE: A JOB CANNOT BE DISPUTED IF IT HAS BEEN UNDERTAKEN BY THE CONTRACTOR TO THE REQUIRED STANDARD AND COST. USERS CANNOT DISPUTE A JOB RESULTING IN AN INCORRECT ACCOUNT CODE, CHARGED TO THE WRONG CLIENT OR INSUFFICIENT DOCUMENTATION. (Refer to the DECD Fact Sheet SM003 – http://www.decd.sa.gov.au/assetservices/ )
Job Type The Job Type defines the type of work request:
• BD Breakdown Maintenance • CL Cleaning • GR Grounds Maintenance • HY Hygiene • MW Minor Works • PM Replacement Refurbishment • PR Preventative Maintenance • RR Waste Management • SE Security
Class The Class defines the class of work request:
• P Planned • S Scheduled • U Unplanned

FAMIS Web Procedure v1.0 Page 11 of 21
5.1.4 Section 4 - Claim status and Action
The Claim Status and Action section is located in the left hand box. These are the items users may change to accept, approve or dispute a claim. Vandalism details may also be updated where appropriate.
5.1.5 Section 5 - Navigation Buttons
The Navigation Buttons section displays various buttons used for moving between claims and saving changes.

FAMIS Web Procedure v1.0 Page 12 of 21
The blue navigation buttons have the following buttons:
• First Move to the first claim • Previous Move to the previous claim • Next Move to the next claim • Last Move to the last claim • View All Claims List all claims and their current status. Claims older than 21 days
have their invoice date highlighted in red. Users may continue to the session by selecting a claim from the list. Users may also print the full details of all claims from this screen.
• Cancel Session Cancel all changes made during this session. Users will be prompted to confirm the cancellation.
• Commit Session Make the changes permanent and end the session. Any amended claims will be sent to FAMIS for processing. Users will be prompted to confirm the commit. Claims that been approved will no longer be displayed in the list of claims. Claims will normally be processed in FAMIS within 2 hours.

FAMIS Web Procedure v1.0 Page 13 of 21
6 Accept, Approve or Dispute a Claim
The normal rules for processing claims also apply to the web version of FAMIS. A new claim must be accepted (certified) and then approved for the claim to be paid. The claim may also be disputed. Users may use the navigation buttons to move from claim to claim. Changes made to a claim are recorded when users move to another claim. If returning to the claim, it will be updated. To see the claim updated immediately or to make more than one change, users can click the save button. The two red buttons have the following functions:
a) Save – updates and re-displays the claim, reflecting any changes made. For example, if a user has accepted (certified) a claim, they may immediately approve it.
b) Undo – returns the claims to its state at the start of the session removing any changes made.
To accept, approve or dispute a claim, complete the following steps: 1. Preview and confirm all five sections of the job claim. (Refer Heading 5.1).
2. Confirm if account code is Corporate or Site responsibility. (Refer Section 5.1.3)
3. If applicable to vandalism (RVF) code, enter police report number.
4. Determine if job has been coded correctly:
a) If yes, proceed to Step 5.
b) If no, note the job number and await the financial report from DECD detailing the incorrect debit or credit, then write to the DECD Asset Support Centre, who will then follow up the enquiry.
5. Proceed to Section 5.1.4 Claim Status and Action in the left hand box.
6. Ensure job claim reads To Be Accepted from the Claim Status field.
7. From the Claim Action drop down list, select the relevant action. (e.g. Accept, Dispute)
a) If Dispute option is selected, select a reason from the Dispute Reason dropdown list.
(Note: A job cannot be disputed if it has been undertaken by the Contractor to the required standard and cost. Users cannot dispute a job resulting in an Incorrect Account Code, Charged to Wrong Client or Insufficient Documentation).
8. Click the Save button.
FAMIS Web Procedure v1.0 Page 14 of 21
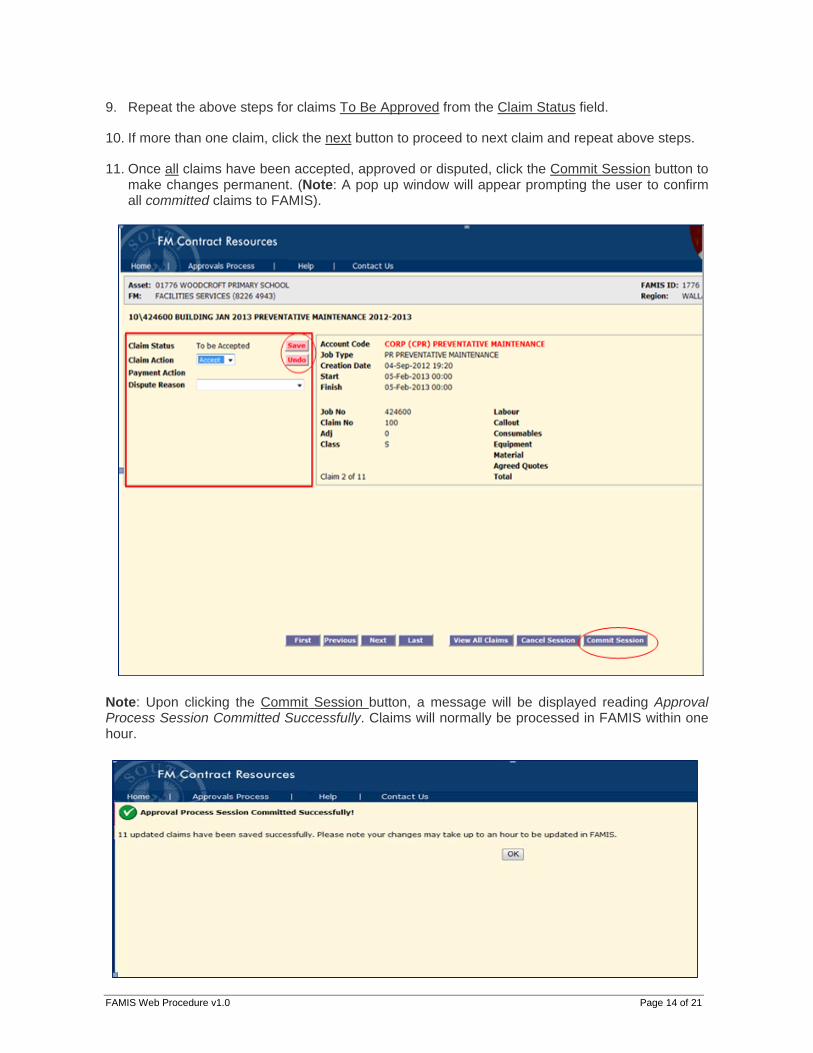
9. Repeat the above steps for claims To Be Approved from the Claim Status field.
10. If more than one claim, click the next button to proceed to next claim and repeat above steps.
11. Once all claims have been accepted, approved or disputed, click the Commit Session button to make changes permanent. (Note: A pop up window will appear prompting the user to confirm all committed claims to FAMIS).
Note: Upon clicking the Commit Session button, a message will be displayed reading Approval Process Session Committed Successfully. Claims will normally be processed in FAMIS within one hour.

FAMIS Web Procedure v1.0 Page 15 of 21
6.1 Approval Process Guidelines
• FAMIS Web is intended to assist Site Managers in the management of their assets. It enables sites to approve or dispute works initiated at their site.
• To ensure the FMP’S monthly payments are processed within the prescribed time, Site Managers are reminded that job claims must be accepted and approved within 28 calendar days of being claimed by the Contractor. Claims not actioned within this timeframe will be assumed to be approved.
• FAMIS Web displays works awaiting acceptance and approval in red 7 days prior to automatic approval.
• All works require acceptance and approval by Site Leaders (or an approved delegate) for audit/payment purposes. Works are identified in the Account Code as:
CORP – indicates corporately funded works SITE – indicates site funded works
• The FAMIS Web process allows DPTI to pay the FMP’s for all works claimed. Users are required to discuss any potential disputes relating to the cost or quality of works with their Facilities Manager prior to disputing any works. Furthermore, it is necessary that a reason for disputing works, in line with DECD approval guidelines, be provided to enable the appropriate action to be identified and acted upon promptly.
• DECD sites are advised that completed jobs can only be disputed if the work relates to a Contractor issue; such as the work has not been undertaken to the necessary standard and/or the cost is unacceptable.
• Jobs should not be disputed for Incorrect Account Code, Charged to Wrong Client or Insufficient Documentation.
• Other dispute reasons shown in FAMIS are not applicable to DECD. • If users consider a job should to be of corporate responsibility, then the job should not be
disputed through the FAMIS approval process. This must be referred to the DECD Asset Support Centre (ASC) at [email protected] prior to the automatic approval process.
• Failure to undertake these responsibilities may result in the FMP not being paid for the work undertaken. User’s assistance with this process is appreciated. Contractually, the Facilities Management Provider must be paid for all satisfactory completed works. Users must refer to the Capital Programs and Asset Services website at: http://www.decd.sa.gov.au/assetservices/pages/topiclisting/famis/ or alternatively, contact the DECD Asset Support Centre for further clarification of departmental requirements relating to this process. (Note: Approved works will generally take 1-2 months for charges to appear on their monthly Site Financial Report). For a flowchart of the approval process, refer to Section 6.2.
FAMIS Web Procedure v1.0 Page 16 of 21
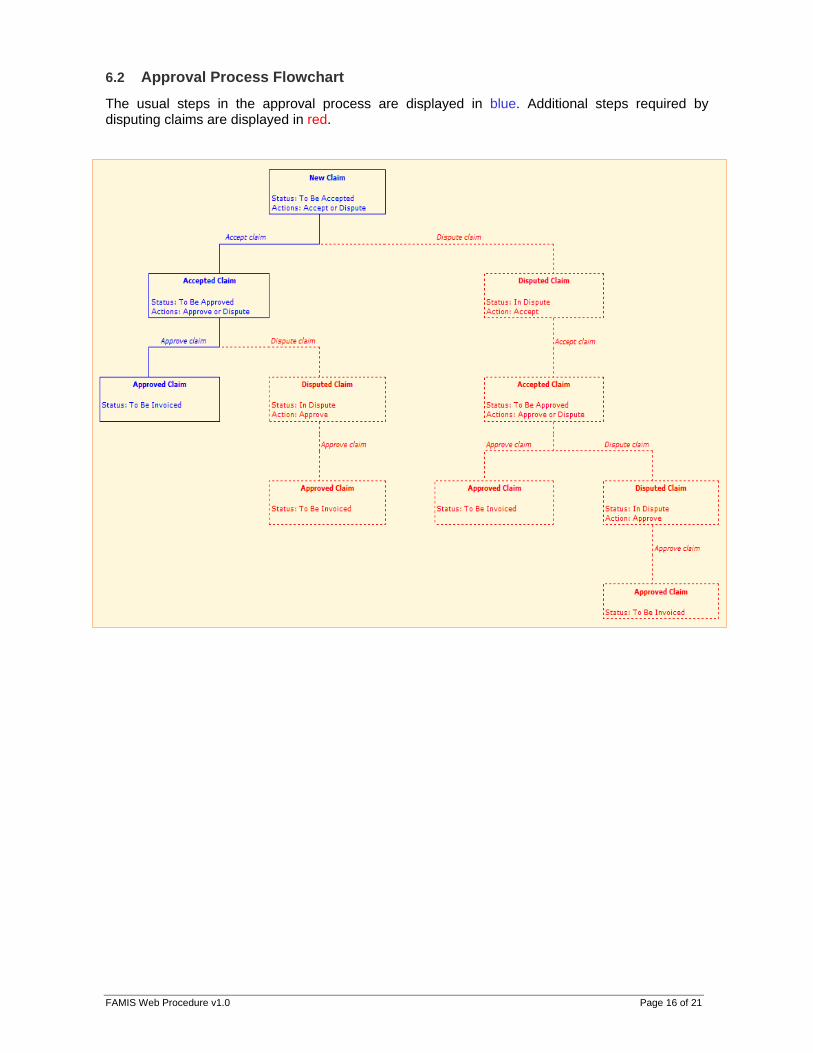
6.2 Approval Process Flowchart
The usual steps in the approval process are displayed in blue. Additional steps required by disputing claims are displayed in red.
FAMIS Web Procedure v1.0 Page 17 of 21
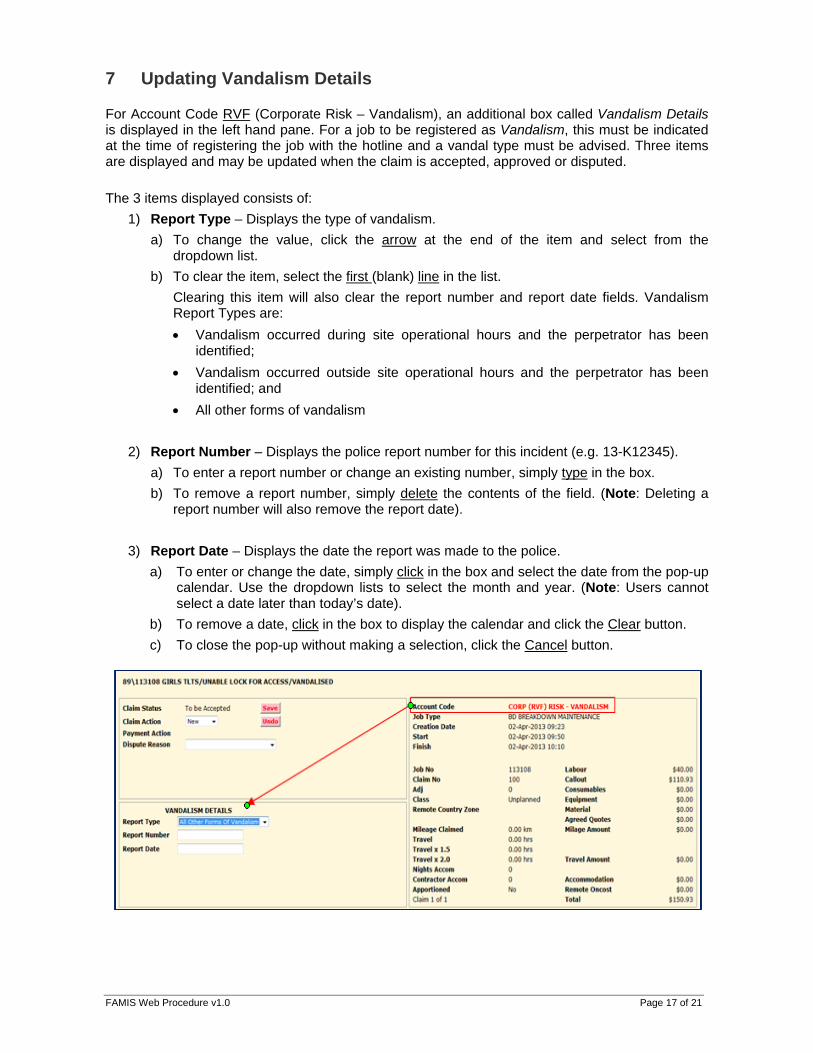
7 Updating Vandalism Details
For Account Code RVF (Corporate Risk – Vandalism), an additional box called Vandalism Details is displayed in the left hand pane. For a job to be registered as Vandalism, this must be indicated at the time of registering the job with the hotline and a vandal type must be advised. Three items are displayed and may be updated when the claim is accepted, approved or disputed. The 3 items displayed consists of:
1) Report Type – Displays the type of vandalism. a) To change the value, click the arrow at the end of the item and select from the
dropdown list. b) To clear the item, select the first (blank) line in the list.
Clearing this item will also clear the report number and report date fields. Vandalism Report Types are: • Vandalism occurred during site operational hours and the perpetrator has been
identified; • Vandalism occurred outside site operational hours and the perpetrator has been
identified; and • All other forms of vandalism
2) Report Number – Displays the police report number for this incident (e.g. 13-K12345).
a) To enter a report number or change an existing number, simply type in the box. b) To remove a report number, simply delete the contents of the field. (Note: Deleting a
report number will also remove the report date).
3) Report Date – Displays the date the report was made to the police. a) To enter or change the date, simply click in the box and select the date from the pop-up
calendar. Use the dropdown lists to select the month and year. (Note: Users cannot select a date later than today’s date).
b) To remove a date, click in the box to display the calendar and click the Clear button. c) To close the pop-up without making a selection, click the Cancel button.

FAMIS Web Procedure v1.0 Page 18 of 21
8 Printing Claims Details There are three ways to print claims details:
1. From the Approvals screen Users can click the browser's print menu icon to print the claim details as displayed on the screen. This is particularly useful for producing a quick print of a few claims.
2. From the View All Claims screen Users can click the browser's print menu icon to print the details as displayed from the View All Claims screen. This is useful to obtain a list of claims and their status.
FAMIS Web Procedure v1.0 Page 19 of 21
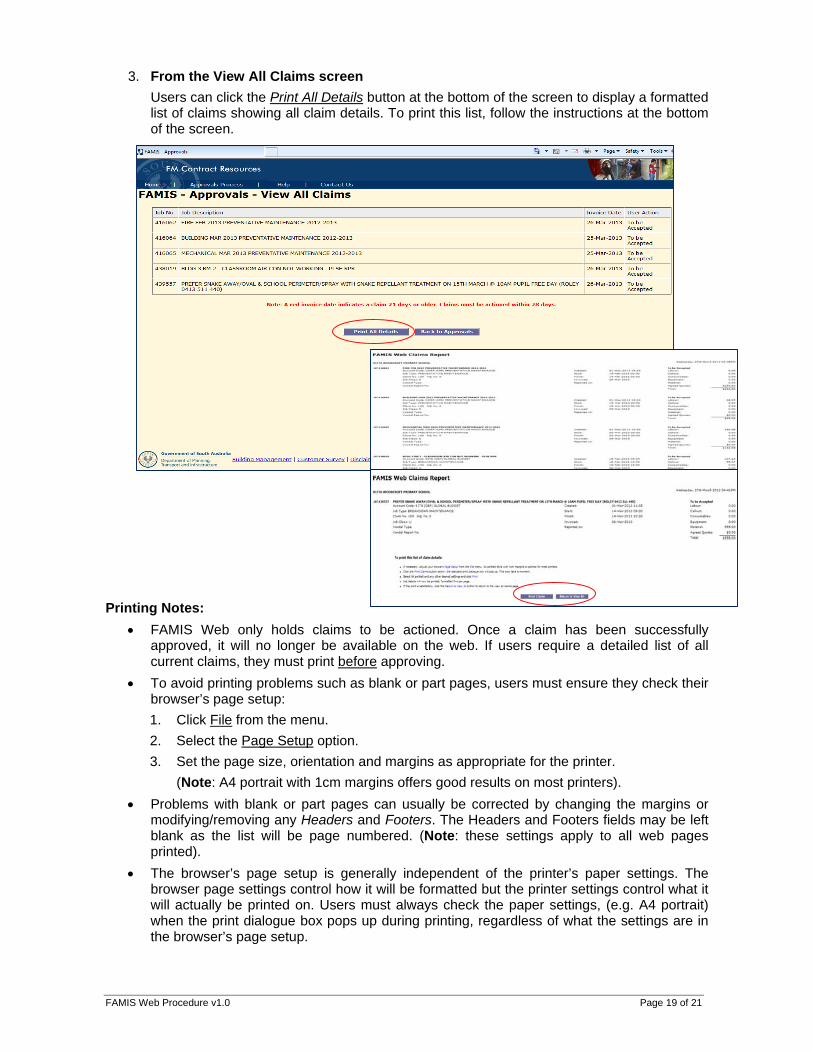
3. From the View All Claims screen Users can click the Print All Details button at the bottom of the screen to display a formatted list of claims showing all claim details. To print this list, follow the instructions at the bottom of the screen.
Printing Notes:
• FAMIS Web only holds claims to be actioned. Once a claim has been successfully approved, it will no longer be available on the web. If users require a detailed list of all current claims, they must print before approving.
• To avoid printing problems such as blank or part pages, users must ensure they check their browser’s page setup: 1. Click File from the menu. 2. Select the Page Setup option. 3. Set the page size, orientation and margins as appropriate for the printer.
(Note: A4 portrait with 1cm margins offers good results on most printers). • Problems with blank or part pages can usually be corrected by changing the margins or
modifying/removing any Headers and Footers. The Headers and Footers fields may be left blank as the list will be page numbered. (Note: these settings apply to all web pages printed).
• The browser’s page setup is generally independent of the printer’s paper settings. The browser page settings control how it will be formatted but the printer settings control what it will actually be printed on. Users must always check the paper settings, (e.g. A4 portrait) when the print dialogue box pops up during printing, regardless of what the settings are in the browser’s page setup.

FAMIS Web Procedure v1.0 Page 20 of 21
9 Contact Us Link
The Contact Us link is available to FAMIS Web users for the following support.
9.1.1 FAMIS/Business Systems Service Desk The Business Systems Service Desk provides support for any FAMIS Web system related issues, including login issues, error messages etc. They also provide basic training over the phone on how to use the website. Any other queries relating to jobs (costs, reports, vandalism etc.) are directed to the Asset Support Centre.
9.1.2 DECD IT Support The DECD Customer Support Centre provides support for over 1100 schools, preschools and children’s services sites. It offers support for over 1000 employees in DECD State and District Offices. As the first point of contact for computer support, they assist with a large variety of computer systems.
9.1.3 DECD Process
The Asset Support Centre (ASC) provides support for all schools and preschools on facilities related matters. In relation to FAMIS web, DECD sites should contact ASC with concerns with account codes or works charged to the wrong client. All other FAMIS related enquires should be directed to the local Facilities Manager (FM). The Asset Support Centre operates between 8:30am and 5pm Monday to Friday.

FAMIS Web Procedure v1.0 Page 21 of 21
10 Document Control
Document Name
FAMIS Web Procedure
Revision History
Revision Date
Version No Author Comments Changes
Marked 05/08/2013 1.0 Vivian Asadi Final Draft complete 1.0 05/04/2013 1.0 Vivian Asadi Initial draft of FAMIS Web procedure 1.0
Distribution
Organisation & Title Date of Issue Copies DPTI, Building Management
Document Endorsement and Approval
This document is endorsed for transmission: Name Signature Title Date Of Issue Version
Peter Ntafillis Manager, Business Systems & Improvement
This document is approved for transmission: Name Signature Title Date Of Issue Version
Sen Chee Director, Strategic & Business Services
Confidentiality
The information contained in this document is confidential to the Government of South Australia. It may not be disclosed, duplicated or used for any purpose in whole or in part, without the prior written consent of the South Australian Government.