
Fabric OS Encryption Administrator's Guide (DPM), 7.4 · 53-1003757-01 29 May 2015 Fabric OS...
284
53-1003757-01 29 May 2015 Fabric OS Encryption Administrator's Guide Supporting RSA Data Protection Manager (DPM) Environments Supporting Fabric OS 7.4.0a
Transcript of Fabric OS Encryption Administrator's Guide (DPM), 7.4 · 53-1003757-01 29 May 2015 Fabric OS...
53-1003757-0129 May 2015
Fabric OS EncryptionAdministrator's GuideSupporting RSA Data Protection Manager(DPM) Environments
Supporting Fabric OS 7.4.0a

© 2015, Brocade Communications Systems, Inc. All Rights Reserved.
ADX, Brocade, Brocade Assurance, the B-wing symbol, DCX, Fabric OS, HyperEdge, ICX, MLX, MyBrocade, OpenScript, The EffortlessNetwork, VCS, VDX, Vplane, and Vyatta are registered trademarks, and Fabric Vision and vADX are trademarks of BrocadeCommunications Systems, Inc., in the United States and/or in other countries. Other brands, products, or service names mentioned may betrademarks of others.
Notice: This document is for informational purposes only and does not set forth any warranty, expressed or implied, concerning anyequipment, equipment feature, or service offered or to be offered by Brocade. Brocade reserves the right to make changes to this documentat any time, without notice, and assumes no responsibility for its use. This informational document describes features that may not becurrently available. Contact a Brocade sales office for information on feature and product availability. Export of technical data contained inthis document may require an export license from the United States government.
The authors and Brocade Communications Systems, Inc. assume no liability or responsibility to any person or entity with respect to theaccuracy of this document or any loss, cost, liability, or damages arising from the information contained herein or the computer programs thataccompany it.
The product described by this document may contain open source software covered by the GNU General Public License or other opensource license agreements. To find out which open source software is included in Brocade products, view the licensing terms applicable tothe open source software, and obtain a copy of the programming source code, please visit http://www.brocade.com/support/oscd.

Contents
Preface...................................................................................................................................11Document conventions....................................................................................11
Text formatting conventions................................................................ 11Command syntax conventions............................................................ 11Notes, cautions, and warnings............................................................ 12
Brocade resources.......................................................................................... 13Contacting Brocade Technical Support...........................................................13Document feedback........................................................................................ 14
About This Document.............................................................................................................. 15Supported hardware and software.................................................................. 15What’s new in this document.......................................................................... 15
Encryption Overview................................................................................................................ 17Host and LUN considerations......................................................................... 17Terminology.................................................................................................... 17Brocade Encryption Switch............................................................................. 19FS8-18 blade...................................................................................................20FIPS mode...................................................................................................... 20Encryption performance licensing................................................................... 20Recommendations for connectivity................................................................. 21Usage limitations.............................................................................................21Brocade encryption solution overview.............................................................22
Data flow from server to storage......................................................... 23Data encryption key life cycle management....................................................23Master key management.................................................................................25
Master key generation.........................................................................25Master key backup.............................................................................. 25
Support for Virtual Fabrics.............................................................................. 26
Configuring Encryption Using the Management Application..................................................... 27Encryption Center features............................................................................. 27Encryption user privileges............................................................................... 28Smart card usage............................................................................................30
Authentication cards............................................................................30Registering authentication cards from a card reader.......................... 30Registering authentication cards from the database...........................32Deregistering an authentication card.................................................. 33Setting a quorum for authentication cards.......................................... 33Using system cards.............................................................................33Enabling or disabling the system card requirement............................ 34Registering system cards from a card reader..................................... 34Deregistering system cards.................................................................35Using smart cards............................................................................... 35Tracking smart cards...........................................................................36Editing smart cards............................................................................. 37
Network connections.......................................................................................38
Fabric OS Encryption Administrator's Guide Supporting RSA Data Protection Manager (DPM) Environments 353-1003757-01

Blade processor links....................................................................................38Configuring blade processor links.....................................................39
Encryption node initialization and certificate generation............................... 39Setting encryption node initialization.................................................40
Steps for connecting to a DPM appliance.....................................................40Exporting the KAC certificate signing request (CSR)........................40Submitting the CSR to a certificate authority.................................... 41Importing a signed KAC certificate into a switch...............................41Uploading the CA certificate onto the DPM appliance (and first-
time configurations)..................................................................... 42Uploading the KAC certificate onto the DPM appliance (manual
identity enrollment)...................................................................... 42DPM key vault high availability deployment......................................43Loading the CA certificate onto the encryption group leader............ 43
Encryption preparation..................................................................................44Creating an encryption group........................................................................45
Configuring key vault settings for RSA Data Protection Manager(DPM).......................................................................................... 48
Understanding configuration status results.......................................53Adding a switch to an encryption group........................................................ 54Replacing an encryption engine in an encryption group............................... 58High availability clusters ...............................................................................59
HA cluster configuration rules .......................................................... 60Creating HA clusters ........................................................................ 60Removing engines from an HA cluster..............................................61Swapping engines in an HA cluster.................................................. 61Failback option..................................................................................62Invoking failback................................................................................62
Configuring encryption storage targets......................................................... 62Adding an encryption target.............................................................. 63
Configuring hosts for encryption targets....................................................... 69Adding target disk LUNs for encryption........................................................ 71
Configuring storage arrays................................................................74Remote replication LUNs.................................................................. 75SRDF pairs........................................................................................75Metadata requirements and remote replication................................ 76
Adding target tape LUNs for encryption........................................................77Moving targets...............................................................................................79Enabling and disabling tape LUN write early and read ahead...................... 80Tape LUN statistics.......................................................................................81
Viewing and clearing tape container statistics.................................. 82Viewing and clearing tape LUN statistics for specific tape LUNs......83Viewing and clearing statistics for tape LUNs in a container............ 84
Encryption engine rebalancing......................................................................85Rebalancing an encryption engine....................................................85
Master keys...................................................................................................86Active master key..............................................................................87Alternate master key......................................................................... 87Master key actions............................................................................ 87Saving the master key to a file..........................................................88Saving a master key to a key vault................................................... 89Saving a master key to a smart card set...........................................91Restoring a master key from a file.................................................... 93Restoring a master key from a key vault...........................................94Restoring a master key from a smart card set.................................. 95Creating a master key.......................................................................96
Security settings ...........................................................................................96Zeroizing an encryption engine.....................................................................97
4 Fabric OS Encryption Administrator's Guide Supporting RSA Data Protection Manager (DPM) Environments53-1003757-01

Setting zeroization...............................................................................97Using the Encryption Targets dialog box........................................................ 98Redirection zones........................................................................................... 99Disk device decommissioning......................................................................... 99
Decommissioning disk LUNs............................................................ 100Displaying and deleting decommissioned key IDs............................ 101Displaying Universal IDs................................................................... 102
Rekeying all disk LUNs manually..................................................................102Setting disk LUN Re-key All.............................................................. 103Viewing disk LUN rekeying details.................................................... 104Viewing the progress of manual rekey operations............................ 105
Thin provisioned LUNs..................................................................................105Thin provisioning support.................................................................. 106
Viewing time left for auto rekey..................................................................... 106Viewing switch encryption properties ........................................................... 107
Exporting the public key certificate signing request from properties. 108Importing a signed public key certificate from properties.................. 109Enabling and disabling the encryption engine state from properties.109
Viewing encryption group properties.............................................................110Removing a switch from an encryption group............................................... 111Consequences of removing an encryption switch.........................................112Tape pools overview..................................................................................... 113
Adding tape pools............................................................................. 113Encryption-related acronyms in log messages............................................. 115
Configuring Encryption Using the CLI..................................................................................... 117Overview....................................................................................................... 117Command validation checks......................................................................... 118Command RBAC permissions and AD types................................................118Cryptocfg Help command output...................................................................121Management LAN configuration....................................................................122Configuring cluster links................................................................................ 122
Special consideration for blades....................................................... 123IP Address change of a node within an encryption group.................123
Setting encryption node initialization.............................................................124Steps for connecting to a DPM appliance..................................................... 125
Initializing the Fabric OS encryption engines.................................... 125Exporting the KAC certificate signing request (CSR)........................127Submitting the CSR to a certificate authority.................................... 127Importing the signed KAC certificate.................................................128Uploading the CA certificate onto the DPM appliance (and first-
time configurations)..................................................................... 128Uploading the KAC certificate onto the DPM appliance (manual
identity enrollment)...................................................................... 129Creating a Brocade encryption group............................................... 129Client registration for manual enrollment.......................................... 130DPM key vault high availability deployment...................................... 131Registering DPM on a Fabric OS encryption group leader............... 131
Generating and backing up the master key for DPM.................................... 132Adding a member node to an encryption group............................................ 134High availability clusters................................................................................136
HA cluster configuration rules........................................................... 137Creating an HA cluster...................................................................... 137Adding an encryption engine to an HA cluster.................................. 138Removing engines from an HA cluster..............................................138Swapping engines in an HA cluster.................................................. 139Failover/failback policy configuration................................................ 139
Fabric OS Encryption Administrator's Guide Supporting RSA Data Protection Manager (DPM) Environments 553-1003757-01

Re-exporting a master key..........................................................................141Exporting an additional key ID........................................................ 141Viewing the master key IDs.............................................................142
Enabling the encryption engine...................................................................143Checking encryption engine status................................................. 143
Zoning considerations.................................................................................144Setting default zoning to no access................................................ 144Frame redirection zoning................................................................ 144Creating an initiator - target zone....................................................145
CryptoTarget container configuration..........................................................146LUN rebalancing when hosting both disk and tape targets.............147Gathering information......................................................................148Creating a CryptoTarget container..................................................149Removing an initiator from a CryptoTarget container..................... 150Deleting a CryptoTarget container.................................................. 151Moving a CryptoTarget container....................................................151
Crypto LUN configuration............................................................................152Discovering a LUN.......................................................................... 152Configuring a Crypto LUN...............................................................153Crypto LUN parameters and policies ............................................. 155Configuring a tape LUN...................................................................157Removing a LUN from a CryptoTarget container............................159Modifying Crypto LUN parameters .................................................159LUN modification considerations.....................................................160
Impact of tape LUN configuration changes.................................................160Configuring a multi-path Crypto LUN.......................................................... 161
Multi-path LUN configuration example............................................161Decommissioning LUNs..............................................................................164Decommissioning replicated LUNs............................................................. 166
Decommissioning primary R1 LUNs only........................................166Decommissioning mirror R2 LUNs only.......................................... 167Decommissioning primary R1 and mirror R2 LUN pairs................. 167
Force-enabling a decommissioned disk LUN for encryption.......................167Force-enabling a disabled disk LUN for encryption.................................... 168Remote replication LUNs............................................................................ 168
SRDF pairs......................................................................................169Enabling and disabling remote replication mode............................ 169Adding replication LUNs..................................................................170Rekey operations for replicated LUNs............................................ 170Reading metadata after sync.......................................................... 171
Using SRDF, TimeFinder, and RecoverPoint with encryption.................... 171RecoverPoint Configuration Restrictions........................................ 171Initial configuration requirements for SRDF, TF, and RP................171SRDF/RP initial setup at the source (R1) site.................................172SRDF/RecoverPoint remote target (R2) site...................................172
Configuring LUNs for SRDF/TF or RP deployments...................................172Creating new source LUNs that can later be replicated..................173Migrating LUNs with existing data to LUNs that can be replicated. 173Synchronizing source and target LUN SRDF/RP pairs...................174Configuring TimeFinder target devices........................................... 175Configuring SRDF Gatekeeper LUNs............................................. 176
SRDF/TF/RP manual rekeying procedures.................................................176TF snapshot rekeying details.......................................................... 176TF clone/mirror rekeying details......................................................176Rekeying local site (R1) SRDF LUNs............................................. 177Rekeying LUNs for RP deployments - local site............................. 178Rekeying remote site (R2) SRDF LUNs..........................................179Rekeying LUNs for RP deployments - remote site..........................180
6 Fabric OS Encryption Administrator's Guide Supporting RSA Data Protection Manager (DPM) Environments53-1003757-01

Behavior with hosts writing beyond reported capacity...................... 181Tape pool configuration.................................................................................181
Tape pool labeling.............................................................................181Creating a tape pool..........................................................................183Deleting a tape pool.......................................................................... 183Modifying a tape pool ....................................................................... 184Impact of tape pool configuration changes....................................... 184
First-time encryption......................................................................................184Resource allocation for first-time encryption..................................... 185First-time encryption modes..............................................................185Configuring a LUN for first-time encryption....................................... 185
Thin provisioned LUNs..................................................................................185Space reclamation............................................................................ 187Supported operations on thin provisioned LUNs ..............................187
Data rekeying ............................................................................................... 188Thin provisioned LUN limitations during rekey..................................188Resource allocation for data rekeying...............................................188Rekeying modes............................................................................... 188Configuring a LUN for automatic rekeying........................................ 189Initiating a manual rekey session...................................................... 189Suspension and resumption of rekeying operations......................... 190
Deployment Scenarios.......................................................................................................... 193Single encryption switch, two paths from host to target................................ 193Single fabric deployment - HA cluster........................................................... 194Single fabric deployment - DEK cluster ........................................................195Dual fabric deployment - HA and DEK cluster.............................................. 196Multiple paths, one DEK cluster, and two HA clusters.................................. 197Multiple paths, DEK cluster, no HA cluster................................................... 198Deployment in Fibre Channel routed fabrics.................................................199Deployment as part of an edge fabric........................................................... 201Deployment with FCIP extension switches................................................... 202Data mirroring deployment............................................................................203
If metadata is not present on the LUN.............................................. 204VMware ESX server deployments................................................................ 205
Best Practices and Special Topics......................................................................................... 209Firmware upgrade and downgrade considerations....................................... 209
General guidelines............................................................................ 210Specific guidelines for HA clusters....................................................210
Configuration upload and download considerations..................................... 211Configuration upload at an encryption group leader node................ 211Configuration upload at an encryption group member node............. 211Information not included in a download.............................................212Steps before configuration download................................................212Configuration download at the encryption group leader....................212Configuration download at an encryption group member................. 213Steps after configuration download...................................................213
HP-UX considerations...................................................................................213AIX considerations........................................................................................ 214Enabling a disabled LUN...............................................................................214Decommissioning in an EG containing mixed nodes.................................... 214Decommissioning a multi-path LUN..............................................................215Disk metadata............................................................................................... 215Tape metadata.............................................................................................. 215Tape data compression.................................................................................215
Fabric OS Encryption Administrator's Guide Supporting RSA Data Protection Manager (DPM) Environments 753-1003757-01

Tape pools.................................................................................................. 216Tape block zero handling............................................................................216Tape key expiry...........................................................................................216Configuring CryptoTarget containers and LUNs......................................... 217Redirection zones....................................................................................... 218Deployment with Admin Domains (AD).......................................................218Do not use DHCP for IP interfaces............................................................. 218Ensure uniform licensing in HA clusters......................................................218Tape library media changer considerations................................................ 218Turn off host-based encryption................................................................... 219Avoid double encryption..............................................................................219PID failover .................................................................................................219Turn off compression on extension switches.............................................. 219Rekeying best practices and policies..........................................................219
Manual rekey...................................................................................220Latency in rekey operations............................................................ 220Allow rekey to complete before deleting a container...................... 220Rekey operations and firmware upgrades...................................... 220Do not change LUN configuration while rekeying........................... 220Recommendation for Host I/O traffic during online rekeying and
first- time encryption.................................................................. 220KAC certificate registration expiry...............................................................221Changing IP addresses in encryption groups............................................. 221Disabling the encryption engine..................................................................221Recommendations for Initiator Fan-Ins.......................................................222Best practices for host clusters in an encryption environment....................223HA Cluster deployment considerations and best practices.........................223Key vault best practices.............................................................................. 223Tape device LUN mapping .........................................................................224
Maintenance and Troubleshooting...................................................................................... 225Encryption group and HA cluster maintenance...........................................225
Displaying encryption group configuration or status information.... 225Removing a member node from an encryption group.....................225Deleting an encryption group.......................................................... 227Removing an HA cluster member................................................... 228Displaying the HA cluster configuration.......................................... 228Replacing an HA cluster member................................................... 229Deleting an HA cluster member...................................................... 231Performing a manual failback of an encryption engine................... 232
Encryption group merge and split use cases.............................................. 233A member node failed and is replaced........................................... 233A member node reboots and comes back up................................. 234A member node lost connection to the group leader ..................... 234A member node lost connection to all other nodes in the
encryption group........................................................................235Several member nodes split off from an encryption group............. 236Adjusting heartbeat signaling values.............................................. 236EG split possibilities requiring manual recovery..............................237Configuration impact of encryption group split or node isolation.... 241
Encryption group database manual operations.......................................... 242Manually synchronizing the encryption group database................. 242Manually synchronizing the security database............................... 242Aborting a pending database transaction....................................... 243
Key vault diagnostics.................................................................................. 243Key vault connectivity......................................................................243
Measuring encryption performance............................................................ 244
8 Fabric OS Encryption Administrator's Guide Supporting RSA Data Protection Manager (DPM) Environments53-1003757-01

General encryption troubleshooting.............................................................. 246Troubleshooting example: encryption enabled CryptoTarget LUN... 249Troubleshooting example: encryption disabled CryptoTarget LUN...250
Management application encryption wizard troubleshooting........................ 251Errors related to adding a switch to an existing group...................... 251Errors related to adding a switch to a new group..............................252General errors related to the Configure Switch Encryption wizard... 253
LUN policy troubleshooting........................................................................... 253Loss of encryption group leader after power outage.....................................254
Replacing failed group leader when group information is not lost.....255Replacing failed group leader when group information is lost...........255
MPIO and internal LUN states...................................................................... 255Suspension and resumption of rekeying operations......................... 256
FS8-18 blade removal and replacement....................................................... 257Multi-node EG replacement of FS8-18 blade....................................257Single-node EG replacement of FS8-18 blade................................. 258
Brocade Encryption Switch removal and replacement..................................259Multi-node EG replacement of Brocade Encryption Switch.............. 259Single-node EG replacement of Brocade Encryption Switch............ 261
Deregistering a DPM key vault......................................................................263Reclaiming the WWN base of a failed Brocade Encryption Switch...............264Removing stale rekey information for a LUN................................................ 264Downgrading firmware.................................................................................. 265Fabric OS and DPM compatibility matrix...................................................... 265Splitting an encryption group into two encryption groups..............................266Moving an encryption blade from one EG to another in the same fabric...... 267Moving an encryption switch from one EG to another in the same fabric..... 268
State and Status Information................................................................................................ 269Encryption engine security processor (SP) states........................................ 269Security processor KEK status......................................................................270Encrypted LUN states................................................................................... 271Tape LUN states........................................................................................... 273
Index.................................................................................................................................... 277
Fabric OS Encryption Administrator's Guide Supporting RSA Data Protection Manager (DPM) Environments 953-1003757-01

10 Fabric OS Encryption Administrator's Guide Supporting RSA Data Protection Manager (DPM) Environments53-1003757-01

Preface
● Document conventions....................................................................................................11● Brocade resources.......................................................................................................... 13● Contacting Brocade Technical Support...........................................................................13● Document feedback........................................................................................................ 14
Document conventionsThe document conventions describe text formatting conventions, command syntax conventions, andimportant notice formats used in Brocade technical documentation.
Text formatting conventionsText formatting conventions such as boldface, italic, or Courier font may be used in the flow of the textto highlight specific words or phrases.
Format Description
bold text Identifies command names
Identifies keywords and operands
Identifies the names of user-manipulated GUI elements
Identifies text to enter at the GUI
italic text Identifies emphasis
Identifies variables
Identifies document titles
Courier font Identifies CLI output
Identifies command syntax examples
Command syntax conventionsBold and italic text identify command syntax components. Delimiters and operators define groupings ofparameters and their logical relationships.
Convention Description
bold text Identifies command names, keywords, and command options.
italic text Identifies a variable.
value In Fibre Channel products, a fixed value provided as input to a commandoption is printed in plain text, for example, --show WWN.
Fabric OS Encryption Administrator's Guide Supporting RSA Data Protection Manager (DPM) Environments 1153-1003757-01

Convention Description
[ ] Syntax components displayed within square brackets are optional.
Default responses to system prompts are enclosed in square brackets.
{ x | y | z } A choice of required parameters is enclosed in curly brackets separated byvertical bars. You must select one of the options.
In Fibre Channel products, square brackets may be used instead for thispurpose.
x | y A vertical bar separates mutually exclusive elements.
< > Nonprinting characters, for example, passwords, are enclosed in anglebrackets.
... Repeat the previous element, for example, member[member...].
\ Indicates a “soft” line break in command examples. If a backslash separatestwo lines of a command input, enter the entire command at the prompt withoutthe backslash.
Notes, cautions, and warningsNotes, cautions, and warning statements may be used in this document. They are listed in the order ofincreasing severity of potential hazards.
NOTEA Note provides a tip, guidance, or advice, emphasizes important information, or provides a referenceto related information.
ATTENTIONAn Attention statement indicates a stronger note, for example, to alert you when traffic might beinterrupted or the device might reboot.
CAUTIONA Caution statement alerts you to situations that can be potentially hazardous to you or causedamage to hardware, firmware, software, or data.
DANGERA Danger statement indicates conditions or situations that can be potentially lethal orextremely hazardous to you. Safety labels are also attached directly to products to warn ofthese conditions or situations.
Notes, cautions, and warnings
12 Fabric OS Encryption Administrator's Guide Supporting RSA Data Protection Manager (DPM) Environments53-1003757-01

Brocade resourcesVisit the Brocade website to locate related documentation for your product and additional Brocaderesources.
You can download additional publications supporting your product at www.brocade.com. Select theBrocade Products tab to locate your product, then click the Brocade product name or image to open theindividual product page. The user manuals are available in the resources module at the bottom of thepage under the Documentation category.
To get up-to-the-minute information on Brocade products and resources, go to MyBrocade. You canregister at no cost to obtain a user ID and password.
Release notes are available on MyBrocade under Product Downloads.
White papers, online demonstrations, and data sheets are available through the Brocade website.
Contacting Brocade Technical SupportAs a Brocade customer, you can contact Brocade Technical Support 24x7 online, by telephone, or by e-mail. Brocade OEM customers contact their OEM/Solutions provider.
Brocade customersFor product support information and the latest information on contacting the Technical AssistanceCenter, go to http://www.brocade.com/services-support/index.html.
If you have purchased Brocade product support directly from Brocade, use one of the following methodsto contact the Brocade Technical Assistance Center 24x7.
Online Telephone E-mail
Preferred method of contact for non-urgent issues:
• My Cases through MyBrocade• Software downloads and licensing
tools• Knowledge Base
Required for Sev 1-Critical and Sev2-High issues:
• Continental US: 1-800-752-8061• Europe, Middle East, Africa, and
Asia Pacific: +800-AT FIBREE(+800 28 34 27 33)
• For areas unable to access tollfree number: +1-408-333-6061
• Toll-free numbers are available inmany countries.
Please include:
• Problem summary• Serial number• Installation details• Environment description
Brocade OEM customersIf you have purchased Brocade product support from a Brocade OEM/Solution Provider, contact yourOEM/Solution Provider for all of your product support needs.
• OEM/Solution Providers are trained and certified by Brocade to support Brocade® products.• Brocade provides backline support for issues that cannot be resolved by the OEM/Solution Provider.
Brocade resources
Fabric OS Encryption Administrator's Guide Supporting RSA Data Protection Manager (DPM) Environments 1353-1003757-01

• Brocade Supplemental Support augments your existing OEM support contract, providing directaccess to Brocade expertise. For more information, contact Brocade or your OEM.
• For questions regarding service levels and response times, contact your OEM/Solution Provider.
Document feedbackTo send feedback and report errors in the documentation you can use the feedback form posted withthe document or you can e-mail the documentation team.
Quality is our first concern at Brocade and we have made every effort to ensure the accuracy andcompleteness of this document. However, if you find an error or an omission, or you think that a topicneeds further development, we want to hear from you. You can provide feedback in two ways:
• Through the online feedback form in the HTML documents posted on www.brocade.com.• By sending your feedback to [email protected].
Provide the publication title, part number, and as much detail as possible, including the topic headingand page number if applicable, as well as your suggestions for improvement.
Document feedback
14 Fabric OS Encryption Administrator's Guide Supporting RSA Data Protection Manager (DPM) Environments53-1003757-01

About This Document
● Supported hardware and software.................................................................................. 15● What’s new in this document.......................................................................................... 15
Supported hardware and softwareThe following hardware platforms support data encryption as described in this manual.
• Brocade DCX Backbone series chassis with an FS8-18 encryption blade• Brocade Encryption Switch
What’s new in this documentThis document includes new and modified information for the Fabric OS 7.4.0a release.
• Corrected the command syntax to show two dashes instead of one, in several places throughout thedocument.
• Removed the section "Cisco fabric connectivity support". Support for Cisco SAN-OS-based switchesusing NPIV mode is no longer supported.
• Clarified that D,I zoning is not supported with Frame redirection, in Creating an initiator - target zoneon page 145.
• Added a note that all nodes in an Encryption Group must have the same Fabric OS version whendoing a commit operation, in Configuring encryption storage targets on page 62 and HA clusterconfiguration rules on page 137.
• Added a note regarding protocol end point LUNs by 3PAR, in Adding target disk LUNs for encryptionon page 71 and Configuring a Crypto LUN on page 153.
Fabric OS Encryption Administrator's Guide Supporting RSA Data Protection Manager (DPM) Environments 1553-1003757-01

What’s new in this document
16 Fabric OS Encryption Administrator's Guide Supporting RSA Data Protection Manager (DPM) Environments53-1003757-01
Encryption Overview
● Host and LUN considerations......................................................................................... 17● Terminology.................................................................................................................... 17● Brocade Encryption Switch............................................................................................. 19● FS8-18 blade...................................................................................................................20● FIPS mode...................................................................................................................... 20● Encryption performance licensing................................................................................... 20● Recommendations for connectivity................................................................................. 21● Usage limitations.............................................................................................................21● Brocade encryption solution overview.............................................................................22● Data encryption key life cycle management....................................................................23● Master key management.................................................................................................25● Support for Virtual Fabrics.............................................................................................. 26
Host and LUN considerationsEncrypting data-at-rest provides peace of mind in terms of protecting data from loss or theft, but carefulplanning must be done to ensure that encrypted data is handled correctly. Much of the planning mustcome from careful evaluation of host application and LUN resources, and of the path that the data willtake to get from one or more hosts to a LUN.
CAUTION
When implementing encryption for data-at-rest, all hosts that access a LUN that is to holdencrypted data must be configured for encryption to avoid data corruption. If a host, possibly inanother fabric, writes cleartext to an encrypted LUN, the data on the LUN will be lost. You mustensure that all hosts that can access a LUN are configured in the same manner.
TerminologyThe following are definitions of terms used extensively in this document.
Term Description
ciphertext Encrypted data.
cleartext Unencrypted data.
CryptoModule The secure part of an encryption engine that is protected to the FIPS 140-2 level 3standard. The term CryptoModule is used primarily in the context of FIPS authentication.
Fabric OS Encryption Administrator's Guide Supporting RSA Data Protection Manager (DPM) Environments 1753-1003757-01

Term Description
CryptoTargetcontainer
A configuration of virtual devices created for each target port hosted on a BrocadeEncryption Switch or FS8-18 blade.
Data Encryption Key(DEK)
An encryption key generated by the encryption engine. The DEK is used to encryptcleartext received from a host before it is sent to a target LUN, and to decrypt that datawhen it is retrieved by the host.
Data Encryption KeyCluster (DEK Cluster)
A cluster of encryption engines which can host all paths to a LUN and share the same dataencryption key (DEK) set. The encryption engines can be in the same or different fabrics.DEK clusters enable host MPIO failover.
Encryption Engine The entity within a node that performs encryption operations, including the generation ofData Encryption Keys.
Encryption Group A collection of one or more DEK clusters, HA clusters, or both, which share the same keyvault and device configuration, and is managed as a single group.
Failback In the context of this implementation of encryption, failback refers to behavior after a failedencryption switch recovers. Devices that were transferred to another switch by failoverprocessing may automatically be transferred back, or they may be manually switched back.This is determined as a configuration option.
Failover In the context of this implementation of encryption, failover refers to the automatic transferof devices hosted by one encryption switch to another encryption switch within a highavailability cluster (HA cluster).
Group Leader A group leader is a special node within an encryption group which acts as a group andcluster manager, and manages and distributes all group-wide and cluster-wideconfigurations to all members of the group or cluster.
High AvailabilityCluster (HA Cluster)
A collection of peer-level encryption engines that provide failover capabilities within a fabric.
Key Encryption Key(KEK)
A key used to encrypt and decrypt Data Encryption Keys (DEKs) within encryption devicesso that DEKs are transmitted in a secure manner outside of the encryption engines, andstored persistently inside key vaults.
Link Key A shared secret exchanged between an encryption engine and a FIPS 140-2 level 3certified key management appliance and key vault. The link key is an Key Encryption Key(KEK) that is used to encrypt Data Encryption Keys (DEKs) in transit over a secureconnection to and from the key vault. The key management appliance decrypts the DEKsand stores them encrypted with its own master key.
Logical Unit Number(LUN)
The identifier of a SCSI logical unit.
Master Key A Key Encryption Key (KEK) used to encrypt and decrypt DEKs when storing DEKs inopaque key vaults. There is one master key per encryption group. That means all nodeencryption engines within an encryption group use the same master key to encrypt anddecrypt the DEKs.
Node In terms of encryption, a Brocade Encryption Switch, Brocade DCX Backbone familychassis, or Brocade DCX 8510 Backbone family chassis through which users can managean encryption engine.
Opaque Key Vault A storage location that provides untrusted key management functionality. Its contents maybe visible to a third party. DEKs in an opaque key vault are stored encrypted in a masterkey to protect them.
Encryption Overview
18 Fabric OS Encryption Administrator's Guide Supporting RSA Data Protection Manager (DPM) Environments53-1003757-01

Term Description
Recovery cards A set of smart cards that contain a backup master key. Each recovery card holds a portionof the master key. The cards must be gathered and read together from a card readerattached to a PC running the BNA client to restore the master key. Recovery cards may bestored in different locations, making it very difficult to steal the master key. The cardsshould not be stored together, as that defeats the purpose.
Redirection zone When encryption is implemented, data traffic is routed to and from virtual initiators andvirtual targets. Redirection zones are automatically created to enable frame redirection tothe virtual initiators and virtual targets.
Rekeying Rekeying refers to decrypting data with the current Data Encryption Key (DEK), andencrypting it with a new DEK. This is done when the security of the current key iscompromised, or when a DEK is configured to expire in a specific time frame. The rekeyingoperation can be used to encrypt existing data currently stored as cleartext. In that case,there is no existing DEK, and the data does not have to be decrypted before it is encryptedusing the new DEK.
Trusted Key Vault Very secure storage on a hardware appliance that establishes a trusted link with theencryption device for secure exchange of DEKs. DEKs are encrypted with the link for transitbetween the encryption device and the hardware appliance. At the hardware appliance, theDEKs are re-encrypted, using master key created and maintained by hardware appliance,and then stored in the trusted key vault.
Virtual Initiator A logical entity that acts as a stand-in for a physical host when communicating with aphysical target LUN.
Virtual Target A logical entity that acts as a stand-in for a physical target LUN when communicating with aphysical host. A virtual target is mapped one to one to a specific physical target.
Brocade Encryption SwitchThe Brocade Encryption Switch is a high-performance, 32-port, auto-sensing 8 Gbps Fibre Channelswitch with data cryptographic (encryption/decryption) and data compression capabilities. The switch isa network-based solution that secures data-at-rest for heterogeneous tape drives, disk array LUNs, andvirtual tape libraries by encrypting the data using Advanced Encryption Standard (AES) 256-bitalgorithms. Encryption and decryption engines provide in-line encryption services with up to 96 Gbpsthroughput for disk I/O and up to 48 Gbps throughput for tape I/O, with a mix of ciphertext and cleartexttraffic.
In addition to its 32 Fibre Channel ports, the switch has one RJ-45 Gigabit Ethernet (GE) managementport, two RJ-45 GE ports for clustering interconnection and rekey synchronization, one RJ-45 Serialconsole port, and one USB port for serviceability, error logging, and firmware upgrades.
Brocade Encryption Switch
Fabric OS Encryption Administrator's Guide Supporting RSA Data Protection Manager (DPM) Environments 1953-1003757-01

1 Power LED.2 Status LED.3 RJ-45 gigabit Ethernet ports (labeled
eth0 and eth1) for clustering andcentralized management of multipleencryption switches through a groupleader.
4 Smart card reader.5 RJ-45 gigabit Ethernet port for the
management interface. This interface is
used for the secure connection to thekey vault location and to the BNA client.
6 RJ-45 serial console port.7 USB port for firmware upgrades and
other support services.8 Fibre Channel ports (0-31). 1, 2, 4, or 8
Gbps auto-sensing F, FL, E, EX, or Mports to connect host servers, SANdisks, SAN tapes, edge switches, orcore switches.
FIGURE 1 Brocade Encryption Switch
FS8-18 bladeThe FS8-18 blade provides the same features and functionality as the Brocade Encryption Switch.
The FS8-18 blade is supported on the following chassis:
• Brocade DCX Backbone family
‐ Brocade DCX‐ Brocade DCX-4S
• Brocade DCX 8510 Backbone family
‐ Brocade DCX 8510-8‐ Brocade DCX 8510-4
FIPS modeBoth the Brocade Encryption Switch and the FS8-18 blade always boot up in FIPS mode, whichcannot be disabled. In this mode, only FIPS-compliant algorithms are allowed.
Encryption performance licensingEncryption processing power is scalable, and may be increased by purchasing and installing anEncryption Performance Upgrade license.
The base unit Brocade Encryption Switch and FS8-18 Encryption Blade have a standard capacity of48 Gbps of encryption processing power. Additional encryption processing power can be added fordisk I/O by purchasing and installing an Encryption Performance Upgrade license. When the
FS8-18 blade
20 Fabric OS Encryption Administrator's Guide Supporting RSA Data Protection Manager (DPM) Environments53-1003757-01

performance upgrade license is applied, encryption processing power of up to 96 Gbps is available fordisk encryption. Note that when the license is applied to a Brocade DCX or DCX 8510 Backbonechassis, it applies to all FS8-18 blades installed on that chassis.
The encryption performance licenses are added just like any other Fabric OS feature license. After thelicense is added, the Brocade Encryption Switch and Brocade DCX or DCX 8510 Backbone chassiswith encryption blades installed must be rebooted for the license to take effect.
NOTELicenses installed on the switches and blades must have identical performance numbers when usedtogether in high availability (HA) clusters or data encryption key (DEK) clusters.
Refer to the software licensing guide for information about obtaining and adding licenses.
Recommendations for connectivityHost and target ports involved in encryption flows can be connected to any encryption engine as long asit is in a non-HA cluster environment and crisscrossing of flows is properly avoided.
Although there is considerable flexibility in connecting and configuring the containers for encryption, thefollowing guidelines are the recommended best practices.
• When you connect encryption engines to the fabric and configure CryptoTarget containers, makesure that the traffic between the host initiator and the physical storage array LUN through thecontainer flows through only one encryption engine that is hosting the container. This is to avoidcrisscrossing of flows to and from virtual entities; that is, from virtual targets and virtual initiators ontwo different encryption engines over the same path.
• Consider the following recommendations for high availability (HA):
‐ Connect only ISLs to the encryption engine. Do not connect devices (initiators and targets) to theencryption engine.
‐ Do not connect devices and ISLs directly to the encryption blades (FS8-18) in a single-pathconfiguration.
Host and storage array ports that are not involved in any encryption flow can be connected to anyencryption engine (EE).
Usage limitationsThere are usage limitations to be aware of when planning an encryption implementation:
• Special redirection zones are created to handle data that is redirected to an encryption switch orblade. Quality of Service (QoS) cannot be applied to a redirection zone.
• For frame redirection to be applied, regular zones for hosts and targets must be defined in theeffective configuration. Hosts and targets must be zoned together by worldwide port name (WWPN)rather than worldwide node name (WWNN) in configurations where frame redirection will be used. Ifhosts or targets are zoned together using worldwide node name, frame redirection will not occurproperly.
NOTEThe use of alias names in place of WWPNs is not supported.
Recommendations for connectivity
Fabric OS Encryption Administrator's Guide Supporting RSA Data Protection Manager (DPM) Environments 2153-1003757-01

• On tapes written in DataFort format, the encryption switch or blade cannot read and decrypt fileswith a block size of 1 MB or greater.
• The Top Talker feature is not compatible with redirection zones. The Top Talker feature should notbe enabled when an encryption switch or blade is present in the fabric.
Brocade encryption solution overviewThe loss of stored private data, trade secrets, intellectual properties, and other sensitive informationthrough theft, or accidental loss of disk or tape media can have widespread negative consequencesfor governments, businesses, and individuals. This threat is countered by an increasing demand fromgovernments and businesses for solutions that create and enforce policies and procedures that protectstored data. Encryption is a powerful tool for data protection. Brocade provides an encryption solutionthat resides in a Storage Area Network (SAN) fabric. This location, between computers and storage, isideal for implementing a solution that works transparently with heterogeneous servers, disk storagesubsystems, and tape libraries. Data entering the SAN from a server is encrypted before it is written tostorage. When stored data is encrypted, theft or loss of storage media does not pose a security threat.
The following figure provides a high-level view of the Brocade encryption solution. Cleartext is sentfrom the server to the encryption engine, where it is encrypted into ciphertext using one of twoencryption algorithms: one for disk storage targets, and one for tape storage targets. The encrypteddata cannot be read without first being decrypted. The key management system is required formanagement of the data encryption keys (DEKs) that are generated by the encryption engine, andused for encrypting and decrypting the data. The key management system is provided by a third-partyvendor.
FIGURE 2 Encryption overview
Brocade encryption solution overview
22 Fabric OS Encryption Administrator's Guide Supporting RSA Data Protection Manager (DPM) Environments53-1003757-01

Data flow from server to storageThe Brocade Encryption Switch can be introduced into a SAN with minimum disruption, with no need forSAN reconfiguration, and with no need to reconfigure host applications. Frames sent from a host and atarget LUN are redirected to a virtual target associated with the encryption switch. The encryption switchthen acts as a virtual initiator to forward the frames to the target LUN.
FIGURE 3 Frame redirection
Data encryption key life cycle managementData encryption keys (DEKs) are generated by the encryption engine. Data is encrypted and decryptedusing the same DEK, so a DEK must be preserved at least long enough to decrypt the ciphertext that itcreated. The length of time data is stored before it is retrieved can vary greatly, and some data may bestored for years or decades before it is accessed. To be sure the data remains accessible, DEKs mayalso need to be stored for years or decades. Key management systems provide life-cycle managementfor all DEKs created by the encryption engine. Key management systems are provided by third-partyvendors.
Data flow from server to storage
Fabric OS Encryption Administrator's Guide Supporting RSA Data Protection Manager (DPM) Environments 2353-1003757-01

FIGURE 4 LAN connections to the key vault, and between encryption nodes
Regardless of the length of the life cycle, there are four stages in the life of a DEK. A DEK is createdby an encryption engine, distributed, then stored in a key vault. The key is used to encrypt and decryptdata at least once, and possibly many times. A DEK may be configured to expire in a certain timeframe to avoid becoming compromised. Under those conditions, it must be used one more time todecrypt the data, and the resulting cleartext is encrypted with a new key (rekeyed).
Encryption Overview
24 Fabric OS Encryption Administrator's Guide Supporting RSA Data Protection Manager (DPM) Environments53-1003757-01

FIGURE 5 DEK life cycle
Master key managementCommunications with opaque key vaults are encrypted using a master key that is created by theencryption engine on the encryption switch. Currently, this includes the key vaults of all supported keymanagement systems except NetApp LKM.
Master key generationA master key must be generated by the group leader encryption engine. The master key can begenerated once by the group leader, then propagated to the other members of an encryption group.
Master key backupIt is essential to back up the master key immediately after it is generated. The master key may bebacked up to any of the following:
Master key management
Fabric OS Encryption Administrator's Guide Supporting RSA Data Protection Manager (DPM) Environments 2553-1003757-01
• A file as an encrypted key.• The key management system as an encrypted key record.• A set of recovery smart cards. This option is available only if the switch is managed by the Brocade
Network Advisor (BNA) application (also referred to as the Management application), and if a cardreader is available for attachment to the BNA workstation.
The use of smart cards provides the highest level of security. When smart cards are used, the key issplit and written on up to 10 cards. Each card may be kept and stored by a different individual. Aquorum of key holders is needed to restore the key. If five key holders exist and the quorum is set tothree, then any three of the five key holders is needed to restore the key.
Support for Virtual FabricsThe Brocade Encryption Switch does not support the logical switch partitioning capability and, thus,cannot be partitioned, but the switch can be connected to any Logical Switch partition or Logical Fabricusing an E_Port.
The FS8-18 Encryption Blades are supported only in a default switch partition. All FS8-18 blades mustbe placed in a default switch partition in a DCX Backbone chassis. The encryption resource from thedefault switch partition/fabric can be shared with other logical switch partitions/fabrics or other fabricsonly through external device sharing using FCR or EX_Ports through a base switch/fabric. A separateport blade must be used in the base switch/fabric for EX_Port connectivity from the logical switchpartition (default switch partition) of FS8-18 blades and host/target fabrics. The EX_Port can be on anyexternal FCR switch.
NOTERefer to the Fabric OS Administrator’s Guide for details on how to configure the Brocade DCXBackbones in Virtual Fabrics environments, including configuration of the default switch partition andany other logical switch partitions.
Support for Virtual Fabrics
26 Fabric OS Encryption Administrator's Guide Supporting RSA Data Protection Manager (DPM) Environments53-1003757-01

Configuring Encryption Using the Management Application
● Encryption Center features............................................................................................. 27● Encryption user privileges............................................................................................... 28● Smart card usage............................................................................................................30● Network connections.......................................................................................................38● Blade processor links...................................................................................................... 38● Encryption node initialization and certificate generation................................................. 39● Steps for connecting to a DPM appliance....................................................................... 40● Encryption preparation.................................................................................................... 44● Creating an encryption group..........................................................................................45● Adding a switch to an encryption group.......................................................................... 54● Replacing an encryption engine in an encryption group................................................. 58● High availability clusters .................................................................................................59● Configuring encryption storage targets........................................................................... 62● Configuring hosts for encryption targets......................................................................... 69● Adding target disk LUNs for encryption...........................................................................71● Adding target tape LUNs for encryption.......................................................................... 77● Moving targets.................................................................................................................79● Enabling and disabling tape LUN write early and read ahead........................................ 80● Tape LUN statistics......................................................................................................... 81● Encryption engine rebalancing........................................................................................85● Master keys.....................................................................................................................86● Security settings .............................................................................................................96● Zeroizing an encryption engine....................................................................................... 97● Using the Encryption Targets dialog box........................................................................ 98● Redirection zones........................................................................................................... 99● Disk device decommissioning......................................................................................... 99● Rekeying all disk LUNs manually..................................................................................102● Thin provisioned LUNs..................................................................................................105● Viewing time left for auto rekey..................................................................................... 106● Viewing switch encryption properties ........................................................................... 107● Viewing encryption group properties.............................................................................110● Removing a switch from an encryption group............................................................... 111● Consequences of removing an encryption switch.........................................................112● Tape pools overview..................................................................................................... 113● Encryption-related acronyms in log messages............................................................. 115
Encryption Center featuresThe Encryption Center dialog box is the single launching point for all encryption-related configurationin the Brocade Network Advisor Management application. It also provides a table that shows the
Fabric OS Encryption Administrator's Guide Supporting RSA Data Protection Manager (DPM) Environments 2753-1003757-01
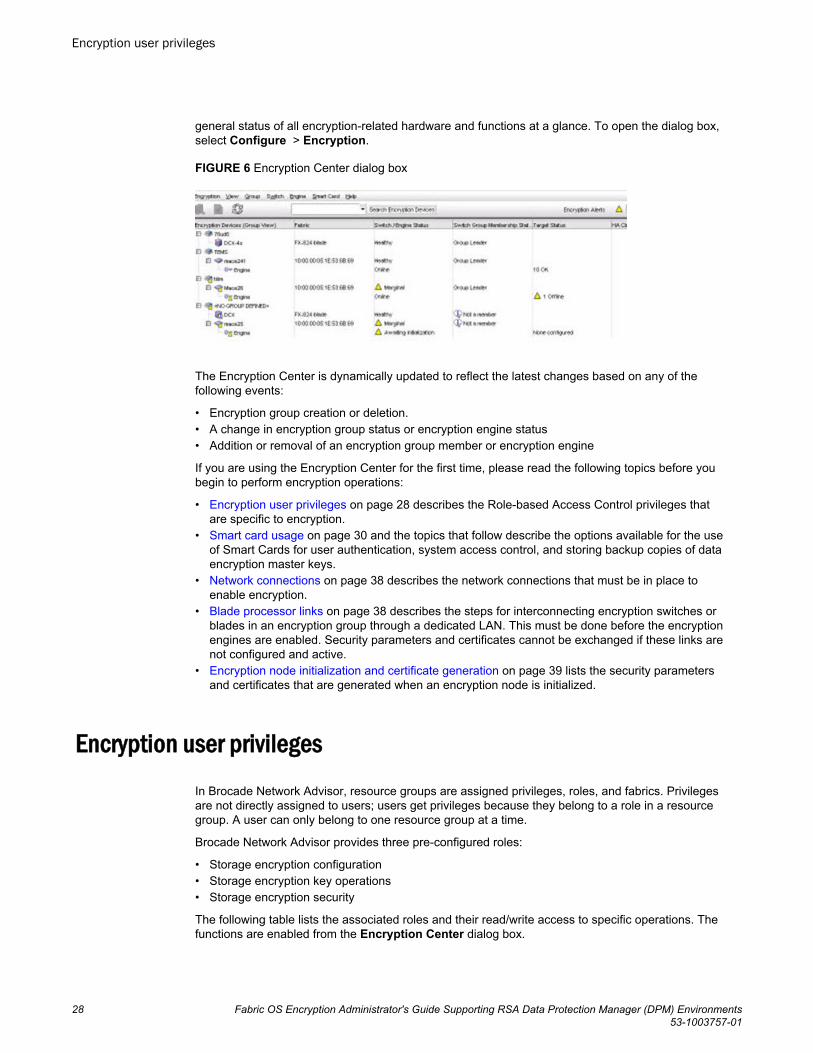
general status of all encryption-related hardware and functions at a glance. To open the dialog box,select Configure > Encryption.
FIGURE 6 Encryption Center dialog box
The Encryption Center is dynamically updated to reflect the latest changes based on any of thefollowing events:
• Encryption group creation or deletion.• A change in encryption group status or encryption engine status• Addition or removal of an encryption group member or encryption engine
If you are using the Encryption Center for the first time, please read the following topics before youbegin to perform encryption operations:
• Encryption user privileges on page 28 describes the Role-based Access Control privileges thatare specific to encryption.
• Smart card usage on page 30 and the topics that follow describe the options available for the useof Smart Cards for user authentication, system access control, and storing backup copies of dataencryption master keys.
• Network connections on page 38 describes the network connections that must be in place toenable encryption.
• Blade processor links on page 38 describes the steps for interconnecting encryption switches orblades in an encryption group through a dedicated LAN. This must be done before the encryptionengines are enabled. Security parameters and certificates cannot be exchanged if these links arenot configured and active.
• Encryption node initialization and certificate generation on page 39 lists the security parametersand certificates that are generated when an encryption node is initialized.
Encryption user privilegesIn Brocade Network Advisor, resource groups are assigned privileges, roles, and fabrics. Privilegesare not directly assigned to users; users get privileges because they belong to a role in a resourcegroup. A user can only belong to one resource group at a time.
Brocade Network Advisor provides three pre-configured roles:
• Storage encryption configuration• Storage encryption key operations• Storage encryption security
The following table lists the associated roles and their read/write access to specific operations. Thefunctions are enabled from the Encryption Center dialog box.
Encryption user privileges
28 Fabric OS Encryption Administrator's Guide Supporting RSA Data Protection Manager (DPM) Environments53-1003757-01
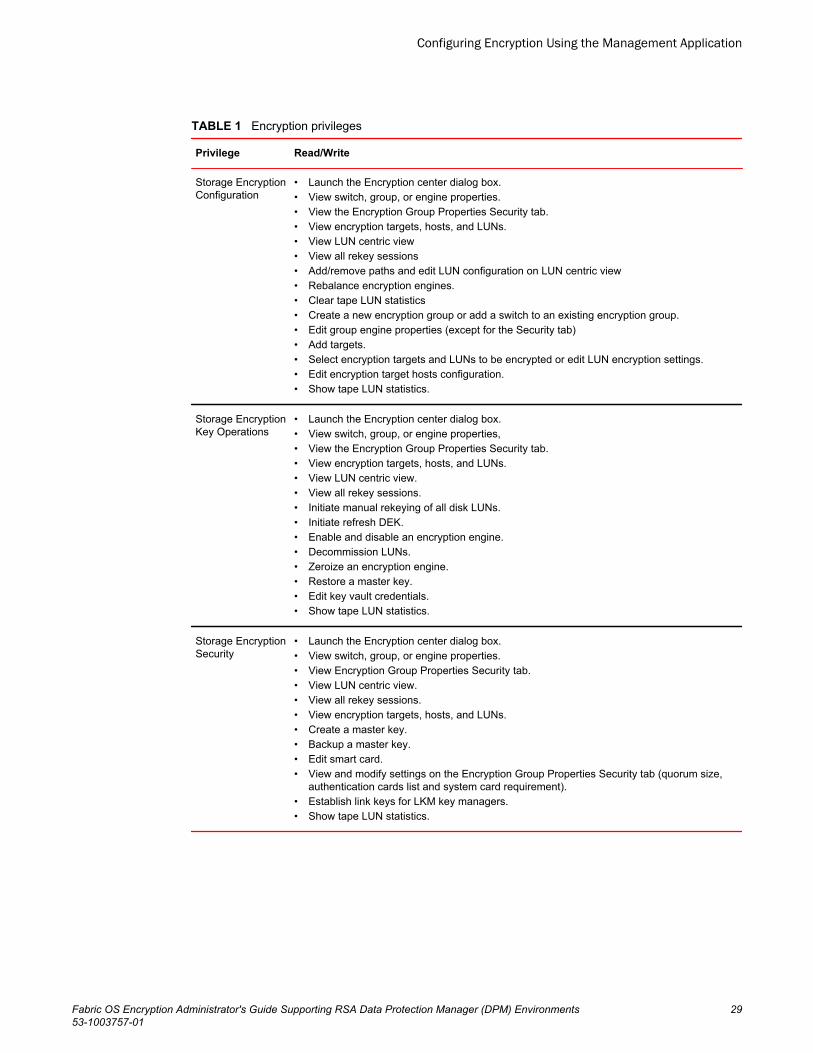
Encryption privileges TABLE 1
Privilege Read/Write
Storage EncryptionConfiguration
• Launch the Encryption center dialog box.• View switch, group, or engine properties.• View the Encryption Group Properties Security tab.• View encryption targets, hosts, and LUNs.• View LUN centric view• View all rekey sessions• Add/remove paths and edit LUN configuration on LUN centric view• Rebalance encryption engines.• Clear tape LUN statistics• Create a new encryption group or add a switch to an existing encryption group.• Edit group engine properties (except for the Security tab)• Add targets.• Select encryption targets and LUNs to be encrypted or edit LUN encryption settings.• Edit encryption target hosts configuration.• Show tape LUN statistics.
Storage EncryptionKey Operations
• Launch the Encryption center dialog box.• View switch, group, or engine properties,• View the Encryption Group Properties Security tab.• View encryption targets, hosts, and LUNs.• View LUN centric view.• View all rekey sessions.• Initiate manual rekeying of all disk LUNs.• Initiate refresh DEK.• Enable and disable an encryption engine.• Decommission LUNs.• Zeroize an encryption engine.• Restore a master key.• Edit key vault credentials.• Show tape LUN statistics.
Storage EncryptionSecurity
• Launch the Encryption center dialog box.• View switch, group, or engine properties.• View Encryption Group Properties Security tab.• View LUN centric view.• View all rekey sessions.• View encryption targets, hosts, and LUNs.• Create a master key.• Backup a master key.• Edit smart card.• View and modify settings on the Encryption Group Properties Security tab (quorum size,
authentication cards list and system card requirement).• Establish link keys for LKM key managers.• Show tape LUN statistics.
Configuring Encryption Using the Management Application
Fabric OS Encryption Administrator's Guide Supporting RSA Data Protection Manager (DPM) Environments 2953-1003757-01

Smart card usageSmart cards are credit card-sized cards that contain a CPU and persistent memory. Smart cards canbe used as security devices. You must have Storage Encryption Security user privileges to activate,register, and configure smart cards.
Smart cards can be used to do the following:
• Control user access to the Brocade Network Advisor security administrator roles• Control activation of encryption engines• Securely store backup copies of master keys
Smart card readers provide a plug-and-play interface that allows you to read and write to a smart card.The following smart card readers are supported:
• GemPlus GemPC USB• Indentive
NOTEOnly the Brocade smart cards that are included with the encryption switches are supported.
Authentication cardsWhen authentication cards are used, one or more authentication cards must be read by a card readerattached to a Brocade Network Advisor workstation to enable certain security-sensitive operations.These include the following:
• Performing master key generation, backup, and restore operations.• Registering or deregistering and replacement of authentication cards.• Enabling and disabling the use of system cards.• Changing the quorum size for authentication cards.• Establishing a trusted link with the NetApp LKM key vault.• Decommissioning a LUN.
When a quorum of authentication cards is registered for use, authentication must be provided beforeyou are granted access.
Registering authentication cards from a card readerTo register an authentication card or a set of authentication cards from a card reader, have the cardsphysically available. Authentication cards can be registered during encryption group or memberconfiguration when running the configuration wizard, or they can be registered using the followingprocedure.
1. Select Configure > Encryption from the menu task bar to display the Encryption Center dialogbox.
2. Select an encryption group from the Encryption Center Devices table, then select Group >Security from the menu task bar to display the Encryption Group Properties dialog box. TheSecurity tab is selected.
Smart card usage
30 Fabric OS Encryption Administrator's Guide Supporting RSA Data Protection Manager (DPM) Environments53-1003757-01

FIGURE 7 Encryption Group Properties dialog box - registering authentication cards
3. Locate the Authentication Card Quorum Size and select the quorum size from the list.
The quorum size is the minimum number of cards necessary to enable the card holders to performthe security sensitive operations listed in the previous steps. The maximum quorum size is five cards.The actual number of authentication cards registered is always more than the quorum size, so if youset the quorum size to five, for example, you must register at least six cards in the subsequent steps.
NOTEIgnore the System Cards setting for now.
4. Click Register from Card Reader to register a new card.
The Add Authentication Card dialog box displays.
FIGURE 8 Add Authentication Card dialog box
5. Insert a smart card into the card reader. Wait for the card serial number to appear, enter cardassignment information as directed, then click OK.
6. Wait for the confirmation dialog box indicating initialization is done, then click OK.
Configuring Encryption Using the Management Application
Fabric OS Encryption Administrator's Guide Supporting RSA Data Protection Manager (DPM) Environments 3153-1003757-01

The card is added to the Registered Authentication Cards table.7. Repeat Step 5 through Step 6 until you have successfully registered all cards. Ensure that the
number of cards registered equals at least the quorum size plus one.
Registering authentication cards from the databaseSmart cards that are already in the Management program’s database can be registered asauthentication cards.
1. Select Configure > Encryption from the menu task bar to display the Encryption Center dialogbox.
2. Select an encryption group from the Encryption Center Devices table, then select Group >Security from the menu task bar to display the Encryption Group Properties dialog box. TheSecurity tab is selected.
FIGURE 9 Encryption Group Properties dialog box - Security tab
3. Click Register from Archive .
The Authentication Cards dialog box displays. The table lists the smart cards that are in thedatabase.
FIGURE 10 Authentication Cards dialog box - registering smart cards from archive
4. Select a card from the table, then click OK .5. Wait for the confirmation dialog box indicating initialization is done, then click OK.
The card is added to the Registered Authentication Cards table.
Registering authentication cards from the database
32 Fabric OS Encryption Administrator's Guide Supporting RSA Data Protection Manager (DPM) Environments53-1003757-01

Deregistering an authentication cardAuthentication cards can be removed from the database and the switch by deregistering them.Complete the following procedure to deregister an authentication card.
1. Select Configure > Encryption from the menu task bar to display the Encryption Center dialogbox.
2. Select an encryption group from the Encryption Center Devices table, then select Group >Security from the menu task bar to display the Encryption Group Properties dialog box. TheSecurity tab is selected.
3. Select the desired authentication card in the Registered Authentication Cards table, then clickDeregister.
4. Click Yes to confirm deregistration.
The registered authentication card is removed from the table.5. Click OK.
The card is deregistered from the group.
Setting a quorum for authentication cardsThe quorum authentication feature requires a compatible Brocade Network Advisor release (version10.3 or later for pre-Fabric OS v7.0.0 and version 11.1 or later for Fabric OS v7.0.0 or later) thatsupports this feature. All nodes in the encryption group must be running Fabric OS v6.3.0 or later forquorum authentication to be properly supported.
To authenticate using a quorum of authentication cards, complete the following steps:
1. When using the Authenticate dialog box, gather the number of cards needed according to theinstructions in the dialog box. The registered cards and the assigned owners are listed in the tablenear the bottom of the dialog box.
2. Insert a card, then wait for the ID to appear in the Card ID field.3. Enter the assigned password, then click Authenticate.4. Wait for the confirmation dialog box, then click OK.5. Repeat Step 2 through Step 4 for each card until at least the quorum plus one is reached, then click
OK.
Using system cardsSystem cards are smart cards that can be used to control activation of encryption engines. You canchoose whether the use of a system card is required or not. Encryption switches and blades have acard reader that enables the use of a system card. System cards discourage theft of encryptionswitches or blades by requiring the use of a system card at the switch or blade to enable the encryptionengine after a power off.
When the switch or blade is powered off, the encryption engine will not work without first inserting asystem card into its card reader. If someone removes a switch or blade with the intent of accessing theencryption engine, it will function as an ordinary FC switch or blade when it is powered up, but use ofthe encryption engine is denied.
The system card feature requires a compatible Brocade Network Advisor release (version 10.3 or laterfor pre-Fabric OS v7.0.0, and version 11.1 or later for Fabric OS v7.0.0 or later) that supports thisfeature. All nodes in the encryption group must be running Fabric OS v6.3.0 or later for systemverification to be properly supported.
To register a system card from a card reader, the smart card must be physically available.
Deregistering an authentication card
Fabric OS Encryption Administrator's Guide Supporting RSA Data Protection Manager (DPM) Environments 3353-1003757-01

FIGURE 11 System Cards dialog box
The System Cards dialog box can be accessed by selecting a switch from the Encryption CenterDevices table, then selecting Switch > System Cards from the menu task bar. The RegisterSystem Card dialog box displays.
The System Cards dialog box contains the following information:
• Group System Card : Identifies if smart cards are used to control activation of encryption engines.• Registered System Cards table: Lists all currently registered system card serial numbers and to
whom the cards are assigned by first and last name. Also included are any free-form notes relatedto the cards.
• Register from Card Reader button: Launches the Register from Card Reader dialog box.• Deregister button: Launches the Deregister dialog box.
Enabling or disabling the system card requirementTo use a system card to control activation of an encryption engine on a switch, you must enable thesystem card requirement. If a system card is required, it must be read by the card reader on theswitch. You access the system card GUI from the Security tab.
Complete the following procedure to enable or disable the system card requirement.
1. Select Configure > Encryption from the menu task bar to display the Encryption Center dialogbox.
2. Select a switch from the Encryption Center Devices table, then select Switch > System Cardsfrom the menu task bar.The System Cards dialog box displays.
3. Do one of the following:
• Set System Cards to Required to require the use of a system card for controlling activation ofthe encryption engine.
• Set System Cards to Not Required to permit activation of the encryption engine without theneed to read a system card first.
4. Click OK.
Registering system cards from a card readerTo register a system card from a card reader, a smart card must be physically available. System cardscan be registered during encryption group creation or member configuration when running theconfiguration wizard, or they can be registered using the following procedure:
Enabling or disabling the system card requirement
34 Fabric OS Encryption Administrator's Guide Supporting RSA Data Protection Manager (DPM) Environments53-1003757-01

1. Select Configure > Encryption from the menu task bar to display the Encryption Center dialogbox.
2. Select a switch from the Encryption Center Devices table that is not already in an encryption group,then select Switch > System Cards from the menu task bar.
The System Cards dialog box displays. The Registered System Cards table lists all currentlyregistered system card serial numbers and to whom they are assigned. Also included are any notesrelated to the cards.
3. Click Register from Card Reader.4. Insert a smart card into the card reader.5. Wait for the card serial number to appear, then enter card assignment information as directed and
click OK.6. Wait for the confirmation dialog box indicating initialization is done, then click OK.
The card is added to the Registered System Cards table.
NOTEStore the card in a secure location, not in proximity to the switch or blade.
Deregistering system cardsSystem cards can be removed from the database by deregistering them. Use the following procedure toderegister a system card:
1. Select Configure > Encryption from the menu task bar to display the Encryption Center dialogbox.
2. Select the switch from the Encryption Center Devices table, then select Switch > System Cardsfrom the menu task bar.
The System Cards dialog box displays.3. Select the system card to deregister, then click Deregister.4. A confirmation dialog box displays. Click OK to confirm deregistration.
The card is removed from the Registered System Cards table.
Using smart cardsSmart cards can be used for user authentication, master key storage and backup, and as a system cardfor authorizing use of encryption operations. Card types identify if the smart card is a system card,authentication card, or recovery set.
The Smart Card Asset Tracking dialog box displays two tables: Smart Cards table and Card Detailstable.
• Selecting an authentication in the Smart Cards table, displays all group names for which the card isregistered in the Card Details table.
• Selecting a system card in the Smart Cards table displays all encryption engines for which the cardis registered by switch name and, for encryption blades, slot number in the Card Details table.
• Selecting a recovery card in the Smart Cards table displays, the group name, the card creation date,and the position of the card in the set (for example, Card 1 of 3) in the Card Details table.
Deregistering system cards
Fabric OS Encryption Administrator's Guide Supporting RSA Data Protection Manager (DPM) Environments 3553-1003757-01

Tracking smart cards1. Select Configure > Encryption from the menu task bar to display the Encryption Center dialog
box.2. Select Smart Card > Smart Card Tracking from the menu task bar to display the Smart Card
Asset Tracking dialog box.
FIGURE 12 Smart Card Asset Tracking dialog box
The Smart Cards table lists the known smart cards and the details for the smart cards.3. Select a smart card from the table, then do one of the following:
• Click Delete to remove the smart card from the Brocade Network Advisor database. Deletingsmart cards from the Brocade Network Advisor database keeps the Smart Cards table at amanageable size, but does not invalidate the smart card. The smart card can still be used. Youmust deregister a smart card to invalidate its use.
NOTEThe Delete operation applies only to recovery cards.
• Click Save As to save the entire list of smart cards to a file. The available formats are comma-separated values (.csv) and HTML files (.html).
Tracking smart cards
36 Fabric OS Encryption Administrator's Guide Supporting RSA Data Protection Manager (DPM) Environments53-1003757-01

Editing smart cardsSmart cards can be used for user authentication, master key storage and backup, and as a system cardfor authorizing use of encryption operations.
1. From the Encryption Center dialog box, select Smart Card > Edit Smart Card from the menu taskbar to display the Edit Smart Card dialog box.
FIGURE 13 Edit Smart Card dialog box
2. Insert the smart card into the card reader.3. After the card’s ID is displayed by the card reader in the Card ID field, enter the security
administrator password used to allow editing of the smart card, then click Login .
NOTEThe Card Password field is activated after the card ID is read, and the Login button is activatedafter the password is entered in the Card Password field.
4. Edit the card as needed. Note the following:
Editing smart cards
Fabric OS Encryption Administrator's Guide Supporting RSA Data Protection Manager (DPM) Environments 3753-1003757-01

• Card Assignment : A maximum of 64 characters is permitted for the user first and last name towhom the card is assigned. All characters are valid in the editable columns, including spaces.
• Notes : A maximum of 256 characters is permitted for any miscellaneous notes. Editing thesevalues in Brocade Network Advisor does not modify the information that is stored on the card.Notes are optional.
• The Change Password check box must be selected before you can enter the new passwordinformation. You must re-enter the new password for verification.
5. Click OK .
NOTEYou can view the status indicator at the bottom of the dialog box to determine card reader status.
Network connectionsBefore you use the encryption setup wizard for the first time, you must have the following requirednetwork connections:
• The management ports on all encryption switches and DCX Backbone Chassis CPs that haveencryption blades installed must have a LAN connection to the SAN management program, andmust be available for discovery.
• A supported key management appliance must be connected on the same LAN as the managementport, which supports of the encryption switches, DCX Backbone Chassis CPs, and the SANManagement program.
• In some cases, you might want to have an external host available on the LAN to facilitate certificateexchange between encryption nodes and the key management appliance. You may use the SANmanagement program host computer rather than an external host.
• All switches in the planned encryption group must be interconnected on a private LAN using theeth-0 and eth-1 ports located on the encryption switch or encryption blade. (We refer to these portsas RJ-45 gigabit Ethernet ports (labeled eth0 and eth1) for clustering and centralized managementof multiple encryption switches through a group leader.)
Blade processor linksEach encryption switch or blade has two GbE ports labeled Ge0 and Ge1. The Ge0 and Ge1 ports areEthernet ports that connect encryption switches and blades to other encryption switches and blades.Both ports of each encryption switch or blade must be connected to the same IP network and thesame subnet. Static IP addresses should be assigned. Neither VLANs nor DHCP should be used.These two ports are bonded together as a single virtual network interface to provide link layerredundancy.
All encryption switches and blades in an encryption group must be interconnected by these linksthrough a dedicated LAN before their encryption engines are enabled. Both ports of each encryptionswitch or blade must be connected to the same IP network and the same subnet. Static IP addressesshould be assigned. VLANs should not be used, and DHCP should not be used. Security parametersand certificates cannot be exchanged if these links are not configured and active.
The Blade Processor Link dialog box can be launched from the following locations:
• Select an encryption group from the Encryption Center Devices table, then select Group > HAClusters from the menu task bar. The Properties dialog box displays with the HA Clusters tab
Network connections
38 Fabric OS Encryption Administrator's Guide Supporting RSA Data Protection Manager (DPM) Environments53-1003757-01
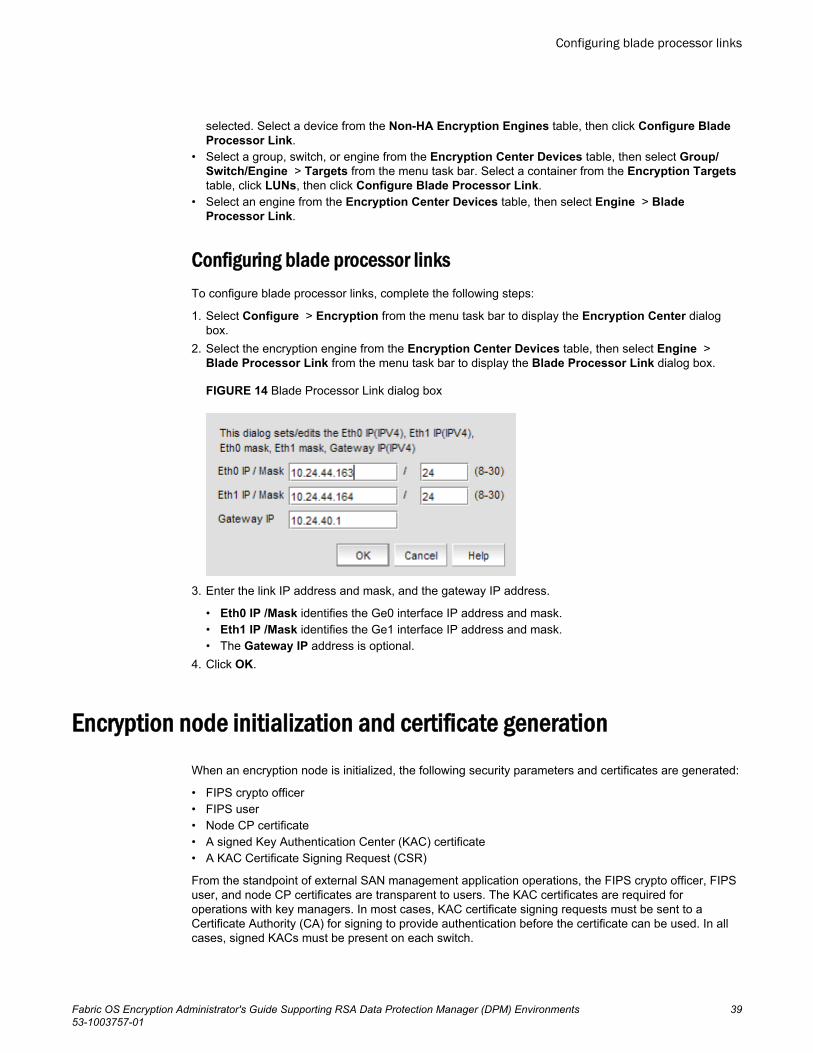
selected. Select a device from the Non-HA Encryption Engines table, then click Configure BladeProcessor Link.
• Select a group, switch, or engine from the Encryption Center Devices table, then select Group/Switch/Engine > Targets from the menu task bar. Select a container from the Encryption Targetstable, click LUNs, then click Configure Blade Processor Link.
• Select an engine from the Encryption Center Devices table, then select Engine > BladeProcessor Link.
Configuring blade processor linksTo configure blade processor links, complete the following steps:
1. Select Configure > Encryption from the menu task bar to display the Encryption Center dialogbox.
2. Select the encryption engine from the Encryption Center Devices table, then select Engine >Blade Processor Link from the menu task bar to display the Blade Processor Link dialog box.
FIGURE 14 Blade Processor Link dialog box
3. Enter the link IP address and mask, and the gateway IP address.
• Eth0 IP /Mask identifies the Ge0 interface IP address and mask.• Eth1 IP /Mask identifies the Ge1 interface IP address and mask.• The Gateway IP address is optional.
4. Click OK.
Encryption node initialization and certificate generationWhen an encryption node is initialized, the following security parameters and certificates are generated:
• FIPS crypto officer• FIPS user• Node CP certificate• A signed Key Authentication Center (KAC) certificate• A KAC Certificate Signing Request (CSR)
From the standpoint of external SAN management application operations, the FIPS crypto officer, FIPSuser, and node CP certificates are transparent to users. The KAC certificates are required foroperations with key managers. In most cases, KAC certificate signing requests must be sent to aCertificate Authority (CA) for signing to provide authentication before the certificate can be used. In allcases, signed KACs must be present on each switch.
Configuring blade processor links
Fabric OS Encryption Administrator's Guide Supporting RSA Data Protection Manager (DPM) Environments 3953-1003757-01
Setting encryption node initializationEncryption nodes are initialized by the Configure Switch Encryption wizard when you confirm aconfiguration. Encryption nodes may also be initialized from the Encryption Center dialog box.
1. Select a switch from the Encryption Center Devices table, then select Switch > Init Node fromthe menu task bar.
2. Select Yes after reading the warning message to initialize the node.
Steps for connecting to a DPM applianceAll switches that you plan to include in an encryption group must have a secure connection to the RSAData Protection Manager (DPM).
The following is a suggested order of steps needed to create a secure connection to the DPM.
1. Export the KAC CSR to a location accessible to a CA for signing.2. Submit the KAC CSR for signing by a CA.3. Set the KAC certificate registration expiry.4. Import the signed certificate into the Fabric OS encryption node.5. Upload the signed KAC and CA certificates onto the DPM appliance and select the appropriate key
classes.6. If dual DPM appliances are used for high availability, the DPM appliances must be clustered, and
must operate in maximum availability mode, as described in the DPM appliance userdocumentation.
Once completed, client registration occurs after key vault registration, when the Brocade EncryptionSwitch attempts to connect to the DPM server for the first time.
NOTEThe Brocade Encryption Switch uses the manual enrollment of identities with client registration toconnect with DPM 3.x servers. Client registration is done automatically when you upgrade to Fabric7.1.0 or later from an earlier Fabric OS version; no user interaction is required.
Exporting the KAC certificate signing request (CSR)1. Export the KAC CSR to a temporary location prior to submitting the KAC CSR to a CA for signing.2. Synchronize the time on the switch and the key manager appliance.
Time settings should be within one minute of each other. Differences in time can invalidatecertificates and cause key vault operations to fail.
3. Select a switch from the Encryption Center Devices table, then select Switch > Properties from themenu task bar to display the Properties dialog box.You can also select a switch from the Encryption Center Devices table, then click the Propertiesicon.
4. Do one of the following:
Setting encryption node initialization
40 Fabric OS Encryption Administrator's Guide Supporting RSA Data Protection Manager (DPM) Environments53-1003757-01

• If a CSR is present, click Export.• If a CSR is not present, select a switch from the Encryption Center Devices table, then select
Switch > Init Node from the menu task bar. This generates switch security parameters andcertificates, including the KAC CSR.
5. Save the file.The default location for the exported file is in the Documents folder.
The CSR is exported in Privacy Enhanced Mail (.pem) format. This is the format required in exchangeswith Certificate Authorities (CAs).
Submitting the CSR to a certificate authorityThe CSR must be submitted to a Certificate Authority (CA) to be signed.
The CA is a trusted third-party entity that signs the CSR. Several CAs are available and proceduresvary, but the general steps are as follows:
1. Open an SSL/TLS connection to an X.509 server.2. Submit the CSR for signing.3. Request the signed certificate.
Generally, a public key, the signed KAC certificate, and a signed CA certificate are returned.4. Download and store the signed certificates.
The following example submits a CSR to the demoCA from RSA:
cd /opt/CA/demoCAopenssl x509 -req -sha1 -CAcreateserial -in certs/<Switch CSR Name> -days 365 -CA cacert.pem -CAkey private/cakey.pem -out newcerts/<Switch Cert Name>
You can change the number of days that a certificate will expire based on your site's security policies.
Importing a signed KAC certificate into a switchAfter a KAC CSR has been submitted and signed by a CA, the signed certificate must be imported intothe switch.
Before you perform the following steps, you must first add the switch to the encryption group.
1. Select Configure > Encryption from the menu task bar to display the Encryption Center dialogbox.
2. Select a switch from the Encryption Center Devices table, then select Switch > Import Certificate.The Import Signed Certificate dialog box displays.
FIGURE 15 Import Signed Certificate dialog box
3. Browse to the location where the signed certificate is stored, then click OK.The signed certificate is stored on the switch.
Submitting the CSR to a certificate authority
Fabric OS Encryption Administrator's Guide Supporting RSA Data Protection Manager (DPM) Environments 4153-1003757-01

Uploading the CA certificate onto the DPM appliance (and first-timeconfigurations)After an encryption group is created, you need to install the signing authority certificate (CA certificate)onto the DPM appliance.
You will need the URLs of the DPM appliance setup page and the RSA management user interface.You must also have the proper authority level, user name, and password for each.
1. Open a web browser and connect to the DPM appliance setup page.2. Select the Operations tab, and then select Certificate Upload.3. In the SSLCAcertificateFile field, enter the full local path of the CA certificate.
Do not use the UNC naming convention format.4. Select Upload, Configure SSL, and Restart Webserver.5. After the web server restarts, enter the root password.6. Open another web browser window, and start the RSA management user interface.7. NOTE
The Identity Group name used in the next step might not exist in a freshly installed DPM. Toestablish an Identity Group name, click the Identity Group tab, and create a name. The nameHardware Retail Group is used as an example in the following steps.
Select the Key Classes tab.The key classes must be created only once, regardless of the number of nodes in your encryptiongroup or the number of encryption groups that will be sharing this DPM.
• kcn.1998-01.com.brocade:DEK_AES_256_XTS• kcn.1998-01.com.brocade:DEK_AES_256_CCM• kcn.1998-01.com.brocade:DEK_AES_256_GCM• kcn.1998-01.com.brocade:DEK_AES_256_ECB
a) Click Create.b) Type the key name string into the Name field.c) Select Hardware Retail Group for Identity Group.d) Deselect Activated Keys Have Duration.e) Select AES for Algorithm.f) Select 256 for Key Size.g) Select the Mode for the respective key classes as follows:
• XTS for Key Class "kcn.1998-01.com.brocade:DEK_AES_256_XTS"• CBC for Key Class "kcn.1998-01.com.brocade:DEK_AES_256_CCM"• CBC for Key Class "kcn.1998-01.com.brocade:DEK_AES_256_GCM"• ECB for Key Class "kcn.1998-01.com.brocade:DEK_AES_256_ECB"
h) Click Next.i) Repeat step a through step h for each key class.j) Click Finish.
Uploading the KAC certificate onto the DPM appliance (manualidentity enrollment)The Brocade Encryption Switch will not use the Identity Auto Enrollment feature supported with DPM3.x servers. You must complete the identity enrollment manually to configure the DPM 3.x server withthe Brocade Encryption Switch as described in this section.
Uploading the CA certificate onto the DPM appliance (and first-time configurations)
42 Fabric OS Encryption Administrator's Guide Supporting RSA Data Protection Manager (DPM) Environments53-1003757-01
You need to install the switch public key certificate (KAC certificate). For each encryption node,manually create an identity as follows:
1. Select the Identities tab.2. Click Create.3. Enter a label for the node in the Name field.
This is a user-defined identifier.4. Select the Hardware Retail Group in the Identity Groups field.5. Select the Operational User role in the Authorization field.6. Click Browse and select the imported certificate as the Identity certificate.7. Click Save.
The CA certificate file referenced in the SSLCAcertificateFile field must be imported and registered onthe switch designated as an encryption group leader. You might want to note this location beforeloading the CA certificate onto the encryption group leader.
DPM key vault high availability deploymentWhen dual DPM appliances are used for high availability, the DPM appliances must be clustered andmust operate in maximum availability mode, as described in the DPM appliance user documentation.
When dual DPM appliances are clustered, they are accessed using an IP load balancer. For a completehigh-availability deployment, the multiple IP load balancers are clustered, and the IP load balancercluster exposes a virtual IP address called a floating IP address. The floating IP address must beregistered on the Fabric OS encryption group leader using the cryptocfg --reg -keyvault command.
Neither the secondary DPM appliance nor individual DPM appliance IP addresses should be registered.The command to register a secondary DPM appliance is blocked.
Loading the CA certificate onto the encryption group leaderThe certificate for the CA that signed the switch KAC CSRs must be loaded onto the encryption groupleader. The group leader can then distribute the CA certificate to the encryption group members.
1. From the Encryption Center, select a group from the Encryption Center Devices table, then selectGroup > Properties from the menu task bar.
The Encryption Group Properties dialog box opens, with the General tab selected.
If groups are not visible in the Encryption Devices table, select View > Groups from the menu bar.
DPM key vault high availability deployment
Fabric OS Encryption Administrator's Guide Supporting RSA Data Protection Manager (DPM) Environments 4353-1003757-01

FIGURE 16 Encryption Group Properties with Key Vault Certificate
2. Click Load from File and browse to the location on your client PC that contains the downloaded CAcertificate in .pem format.
Encryption preparationBefore you use the encryption setup wizard for the first time, you should have a detailed configurationplan in place and available for reference. The encryption setup wizard assumes the following:
• You have a plan in place to organize encryption devices into encryption groups.• If you want redundancy and high availability in your implementation, you have a plan to create high
availability (HA) clusters of two encryption switches or blades to provide failover support.• All switches in the planned encryption group are interconnected on an I/O synch LAN.• The management ports on all encryption switches and DCX Backbone Chassis CPs that have
encryption blades installed, have a LAN connection to the SAN management program and areavailable for discovery.
Encryption preparation
44 Fabric OS Encryption Administrator's Guide Supporting RSA Data Protection Manager (DPM) Environments53-1003757-01

• A supported key management appliance is connected on the same LAN as the encryption switches,DCX Backbone Chassis CPs, and the SAN Management program.
• An external host is available on the LAN to facilitate certificate exchange.• Switch KAC certificates have been signed by a CA and stored in a known location.• Key management system (key vault) certificates have been obtained and stored in a known location.
Creating an encryption group
The following steps describe how to start and run the encryption setup wizard and create a newencryption group.
NOTEWhen a new encryption group is created, any existing tape pools in the switch are removed.
1. Select Configure > Encryption from the menu task bar to display the Encryption Center dialogbox.
FIGURE 17 Encryption Center dialog box - No group defined
2. Select a switch from the <NO GROUP DEFINED> encryption group. (The switch must not beassigned to an encryption group.)
3. Select Encryption > Create/Add to Group from the menu task bar.
The Configure Switch Encryption wizard welcome screen displays. The wizard enables you tocreate a new encryption group, or add an encryption switch to an existing encryption group. Thewizard also enables you to configure switch encryption.
Click Next on each screen to advance to the next step in the wizard. Steps might vary slightlydepending on the key vault type selected, but the basic wizard steps are as follows.
a) Designate Switch Membership.b) Create a new encryption group or add a switch to an existing encryption group.c) Select the key vault.d) Specify the public key filename.
Creating an encryption group
Fabric OS Encryption Administrator's Guide Supporting RSA Data Protection Manager (DPM) Environments 4553-1003757-01

e) Select Security Settings.f) Confirm the configuration.g) Configuration Status.h) Read Instructions.
FIGURE 18 Configure Switch Encryption wizard - welcome screen
4. From the Configure Switch Encryption welcome screen, click Next to begin.
The Designate Switch Membership dialog box displays.
FIGURE 19 Designate Switch Membership dialog box
Configuring Encryption Using the Management Application
46 Fabric OS Encryption Administrator's Guide Supporting RSA Data Protection Manager (DPM) Environments53-1003757-01

5. For this procedure, verify that Create a new encryption group containing just this switch isselected, then click Next .
NOTEIf you are adding a switch to an encryption, refer to Adding a switch to an encryption group on page54.
The Create a New Encryption Group dialog box displays.
FIGURE 20 Create a New Encryption Group dialog box
NOTEWhen one encryption engine in the HA cluster fails, the second encryption engine in the HA clustertakes over the encryption and decryption of traffic to all encryption targets in the first encryptionengine (failover). When the first encryption engine comes back online, the encryption group’s failbacksetting (auto or manual) determines whether the first encryption engine automatically resumesencrypting and decrypting traffic to its encryption targets. In manual mode, the second encryptionengine continues to handle the traffic until you manually invoke failback by way of the EncryptionTargets dialog box.
6. Enter an Encryption Group Name for the encryption group and select Automatic as the Failbackmode.
Encryption group names can have up to 15 characters. Letters, digits, and underscores are allowed.The group name is case-sensitive.
If the name for the encryption group already exists, a pop-up warning message displays. Althoughunique group names avoid confusion while managing multiple groups, you are not prevented fromusing duplicate group names. Click Yes to use the same name for the new encryption group, or clickNo to enter another name.
7. Click Next.
The Select Key Vault dialog box displays.
Configuring Encryption Using the Management Application
Fabric OS Encryption Administrator's Guide Supporting RSA Data Protection Manager (DPM) Environments 4753-1003757-01
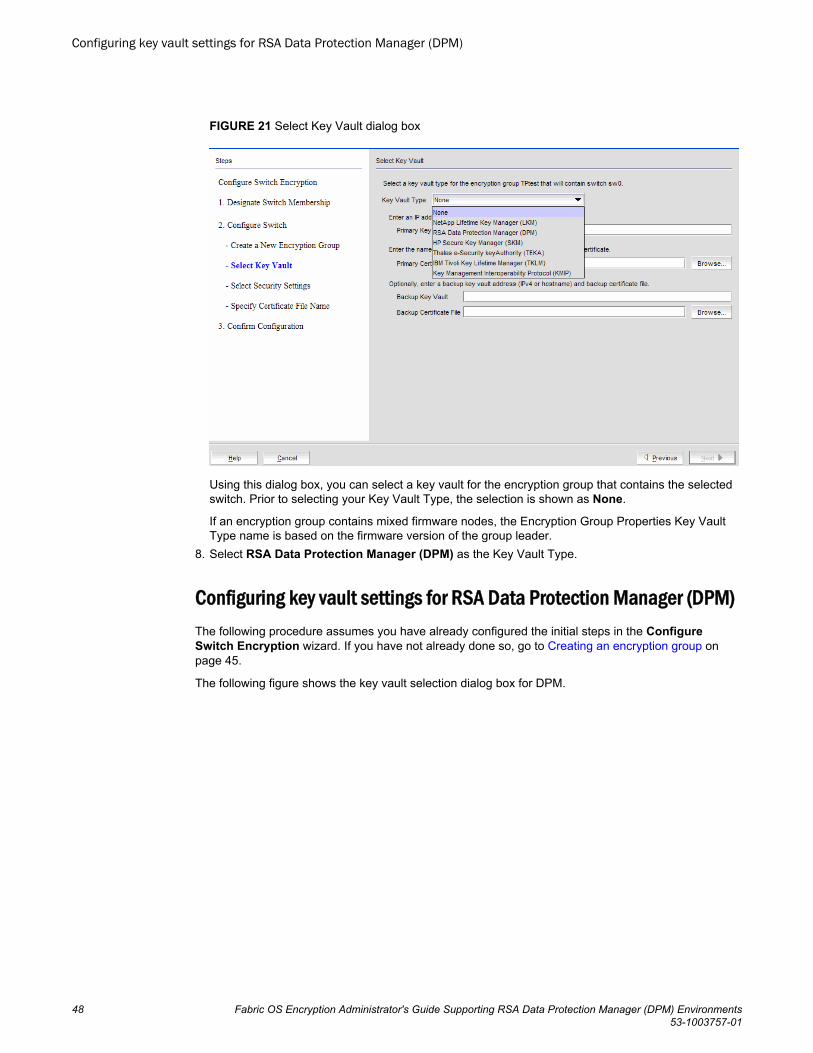
FIGURE 21 Select Key Vault dialog box
Using this dialog box, you can select a key vault for the encryption group that contains the selectedswitch. Prior to selecting your Key Vault Type, the selection is shown as None.
If an encryption group contains mixed firmware nodes, the Encryption Group Properties Key VaultType name is based on the firmware version of the group leader.
8. Select RSA Data Protection Manager (DPM) as the Key Vault Type.
Configuring key vault settings for RSA Data Protection Manager (DPM)The following procedure assumes you have already configured the initial steps in the ConfigureSwitch Encryption wizard. If you have not already done so, go to Creating an encryption group onpage 45.
The following figure shows the key vault selection dialog box for DPM.
Configuring key vault settings for RSA Data Protection Manager (DPM)
48 Fabric OS Encryption Administrator's Guide Supporting RSA Data Protection Manager (DPM) Environments53-1003757-01

FIGURE 22 Select Key Vault dialog box for DPM
1. Enter the IPv4 IP address or host name for the primary key vault.If you are clustering DPM appliances for high availability, IP load balancers are used to direct trafficto the appliances. Use the IP address of the load balancer.
2. Enter the name of the file that holds the Primary Key Vault’s CA Key Certificate file, or browse to thedesired location.This file can be generated from the key vault’s administrative console.
3. If you are implementing encryption on data replication LUNs used by the EMC Symmetrix RemoteData Facility (SRDF), you must select Enabled for REPL Support.
4. Click Next.The Specify Certificate Signing Request File Name dialog box displays.
Configuring Encryption Using the Management Application
Fabric OS Encryption Administrator's Guide Supporting RSA Data Protection Manager (DPM) Environments 4953-1003757-01

FIGURE 23 Specify Certificate Signing Request File Name dialog box
5. Enter the filename in which you want to store the certificate information, or browse to the filelocation.The certificate stored in this file is the switch’s Switch Certificate Signing file. You will need to knowthis path and file name to install the switch’s Switch Certificate Signing file on the key managementappliance.
6. Click Next.The Specify Master Key File Name dialog box displays.
FIGURE 24 Specify Master Key File Name dialog box
Configuring Encryption Using the Management Application
50 Fabric OS Encryption Administrator's Guide Supporting RSA Data Protection Manager (DPM) Environments53-1003757-01

7. Enter the location of the file where you want to store back up master key information, or browse tothe desired location.
8. Enter the passphrase, which is required for restoring the master key.The passphrase can be between eight and 40 characters, and any character is allowed.
9. Re-enter the passphrase for verification, then click Next.The Select Security Settings dialog box displays.
FIGURE 25 Select Security Settings dialog box
10.Set quorum size and system card requirements.
The quorum size is the minimum number of cards necessary to enable the card holders to performthe security sensitive operations listed above.
The maximum quorum size is five cards. The actual number of authentication cards registered isalways more than the quorum size, so if you set the quorum size to five, for example, you will need toregister at least six cards in the subsequent steps.
Setting quorum size to a value greater than zero or setting system cards to Required launchesadditional wizard dialog boxes.
11.Click Next.The Confirm Configuration dialog box displays.
Configuring Encryption Using the Management Application
Fabric OS Encryption Administrator's Guide Supporting RSA Data Protection Manager (DPM) Environments 5153-1003757-01
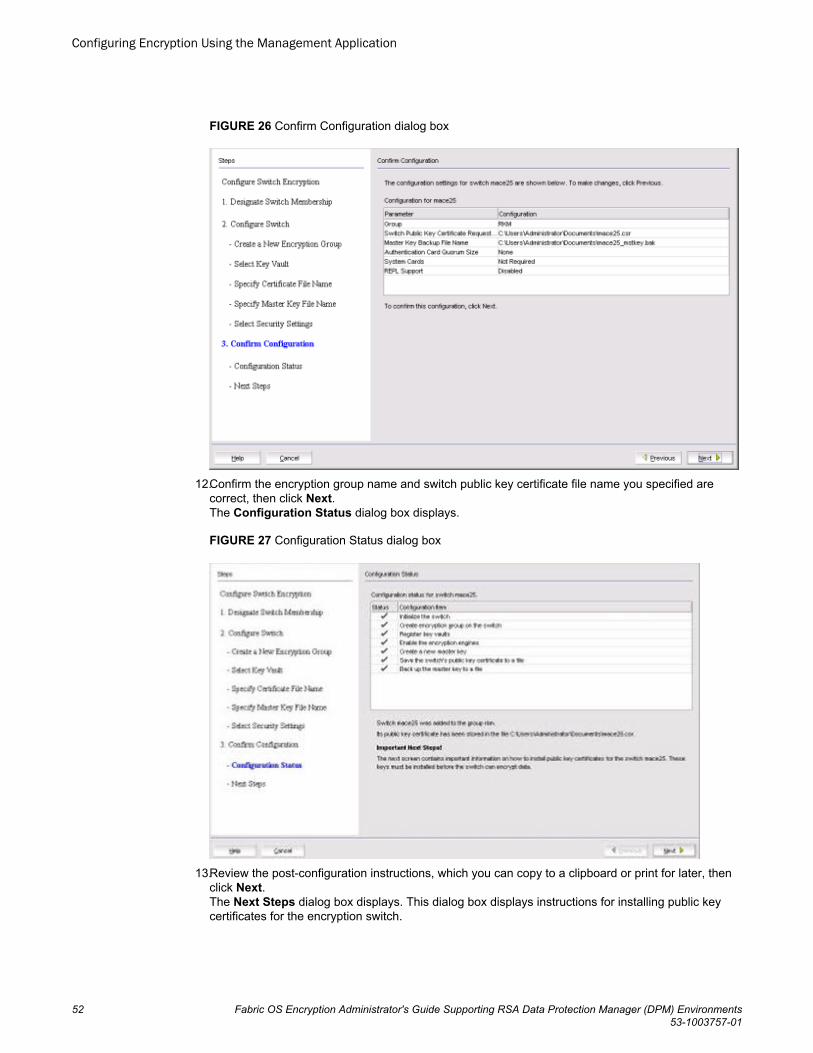
FIGURE 26 Confirm Configuration dialog box
12.Confirm the encryption group name and switch public key certificate file name you specified arecorrect, then click Next.The Configuration Status dialog box displays.
FIGURE 27 Configuration Status dialog box
13.Review the post-configuration instructions, which you can copy to a clipboard or print for later, thenclick Next.The Next Steps dialog box displays. This dialog box displays instructions for installing public keycertificates for the encryption switch.
Configuring Encryption Using the Management Application
52 Fabric OS Encryption Administrator's Guide Supporting RSA Data Protection Manager (DPM) Environments53-1003757-01

FIGURE 28 Next Steps dialog box
14.Review the post-configuration instructions, which you can copy to a clipboard or print for later, thenclick Finish to exit the wizard.
Understanding configuration status resultsAfter configuration of the encryption group is completed, Brocade Network Advisor sends APIcommands to verify the switch configuration. The CLI commands are detailed in the encryptionadministrator’s guide for your key vault management system.
1. Initialize the switch. If the switch is not already in the initiated state, Brocade Network Advisorperforms the cryptocfg --initnode command.
2. Create an encryption group on the switch. Brocade Network Advisor creates a new group using thecryptocfg --create -encgroup command, and sets the key vault type using the cryptocfg --set -keyvault command.
3. Register the key vault. Brocade Network Advisor registers the key vault using the cryptocfg --regkeyvault command.
4. Enable the encryption engines. Brocade Network Advisor initializes an encryption switch using thecryptocfg --initEE and cryptocfg --regEE commands.
5. Create a new master key. (Opaque key vaults only). Brocade Network Advisor checks for a newmaster key. New master keys are generated from the Security tab located in the Encryption GroupProperties dialog box.
6. Save the switch’s public key certificate to a file. Brocade Network Advisor saves the KAC certificatein the specified file.
7. Back up the master key to a file. (Opaque key vaults only). Brocade Network Advisor saves themaster key in the specified file.
Understanding configuration status results
Fabric OS Encryption Administrator's Guide Supporting RSA Data Protection Manager (DPM) Environments 5353-1003757-01

Adding a switch to an encryption group
The setup wizard allows you to either create a new encryption group, or add an encryption switch toan existing encryption group. Use the following procedure to add a switch to an encryption group:
1. Select Configure > Encryption from the menu task bar to display the Encryption Center dialogbox.
2. Select a switch to add from the Encryption Center Devices table, then select Switch > Create/Addto Group from the menu task bar.
NOTEThe switch must not already be in an encryption group.
The Configure Switch Encryption wizard welcome screen displays.
FIGURE 29 Configure Switch Encryption wizard - welcome screen
3. Click Next .
The Designate Switch Membership dialog box displays.
Adding a switch to an encryption group
54 Fabric OS Encryption Administrator's Guide Supporting RSA Data Protection Manager (DPM) Environments53-1003757-01

FIGURE 30 Designate Switch Membership dialog box
4. For this procedure, select Add this switch to an existing encryption group , then click Next.
The Add Switch to Existing Encryption Group dialog box displays.
The dialog box contains the following information:
• Encryption Groups table: Enables you to select an encryption group in which to add a switch.• Member Switches table: Lists the switches in the selected encryption group.
FIGURE 31 Add Switch to Existing Encryption Group dialog box
Configuring Encryption Using the Management Application
Fabric OS Encryption Administrator's Guide Supporting RSA Data Protection Manager (DPM) Environments 5553-1003757-01
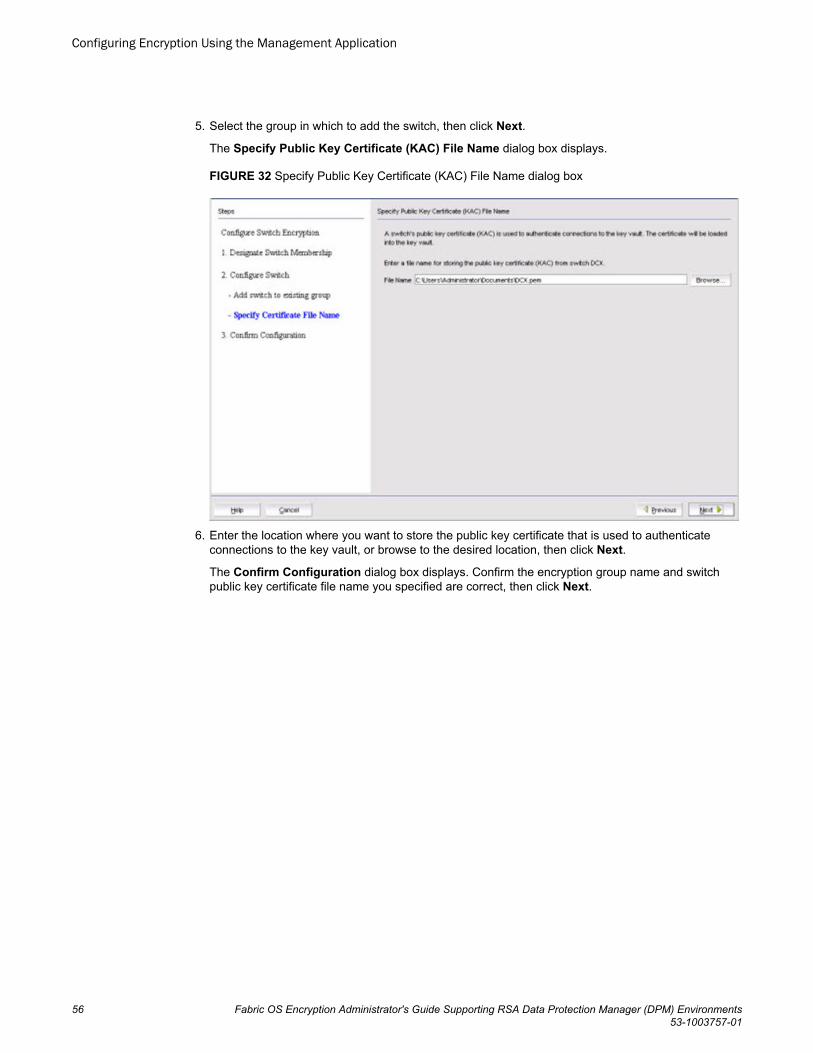
5. Select the group in which to add the switch, then click Next.
The Specify Public Key Certificate (KAC) File Name dialog box displays.
FIGURE 32 Specify Public Key Certificate (KAC) File Name dialog box
6. Enter the location where you want to store the public key certificate that is used to authenticateconnections to the key vault, or browse to the desired location, then click Next.
The Confirm Configuration dialog box displays. Confirm the encryption group name and switchpublic key certificate file name you specified are correct, then click Next.
Configuring Encryption Using the Management Application
56 Fabric OS Encryption Administrator's Guide Supporting RSA Data Protection Manager (DPM) Environments53-1003757-01

FIGURE 33 Confirm Configuration dialog box
The Configuration Status dialog box displays.
FIGURE 34 Configuration Status dialog box
All configuration items have green check marks if the configuration is successful. A red stop signindicates a failed step. A message displays below the table, indicating the encryption switch wasadded to the group you named, and the public key certificate is stored in the location you specified.
7. Review important messages, then click Next.
Configuring Encryption Using the Management Application
Fabric OS Encryption Administrator's Guide Supporting RSA Data Protection Manager (DPM) Environments 5753-1003757-01

The Error Instructions dialog box displays. Instructions for installing public key certificates for theencryption switch are displayed. These instructions are specific to the key vault type.
FIGURE 35 Error Instructions dialog box
8. Review the post-configuration instructions, which you can copy to a clipboard or print for later.9. Click Finish to exit the Configure Switch Encryption wizard.
Replacing an encryption engine in an encryption group
To replace an encryption engine in an encryption group with another encryption engine within thesame DEK Cluster, complete the following steps:
1. Select Configure > Encryption from the menu task bar to display the Encryption Center dialogbox.
2. Select an encryption engine from the Encryption Center Devices table, then select Engine >Replace from the menu task bar.
The Encryption Group Properties dialog box displays with the Engine Operations tab selected.
You can also display the Engine Operations tab by selecting an encryption group from theEncryption Center Devices table, selecting Group > Properties from the menu task bar, thenselecting the Engine Operations tab.
Replacing an encryption engine in an encryption group
58 Fabric OS Encryption Administrator's Guide Supporting RSA Data Protection Manager (DPM) Environments53-1003757-01
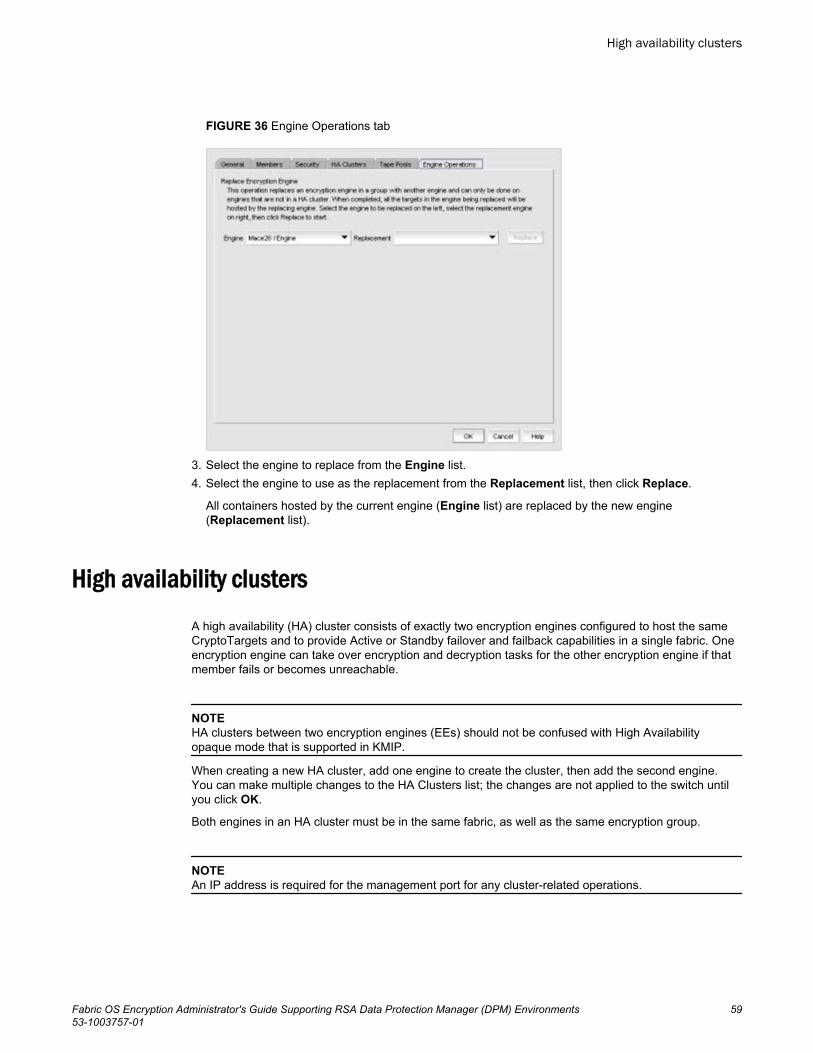
FIGURE 36 Engine Operations tab
3. Select the engine to replace from the Engine list.4. Select the engine to use as the replacement from the Replacement list, then click Replace.
All containers hosted by the current engine (Engine list) are replaced by the new engine(Replacement list).
High availability clustersA high availability (HA) cluster consists of exactly two encryption engines configured to host the sameCryptoTargets and to provide Active or Standby failover and failback capabilities in a single fabric. Oneencryption engine can take over encryption and decryption tasks for the other encryption engine if thatmember fails or becomes unreachable.
NOTEHA clusters between two encryption engines (EEs) should not be confused with High Availabilityopaque mode that is supported in KMIP.
When creating a new HA cluster, add one engine to create the cluster, then add the second engine.You can make multiple changes to the HA Clusters list; the changes are not applied to the switch untilyou click OK.
Both engines in an HA cluster must be in the same fabric, as well as the same encryption group.
NOTEAn IP address is required for the management port for any cluster-related operations.
High availability clusters
Fabric OS Encryption Administrator's Guide Supporting RSA Data Protection Manager (DPM) Environments 5953-1003757-01

HA cluster configuration rulesThe following rules apply when configuring an HA cluster:
• The encryption engines that are part of an HA cluster must belong to the same encryption groupand be part of the same fabric.
• An HA cluster cannot span fabrics and it cannot provide failover/failback capability within a fabrictransparent to host MPIO software.
• HA cluster configuration and related operations must be performed on the group leader.• HA clusters of FS8-18 blades should not include blades in the same DCX Backbone chassis.
NOTEHA cluster creation is blocked when encryption engines belonging to FS8-18 blades in the same DCXBackbone chassis are specified.
• Cluster links must be configured before creating an HA cluster. Refer to the section HA clusterconfiguration rules for instructions.
• It is recommended that the HA cluster configuration be completed before you configure storagedevices for encryption.
• It is mandatory that the two encryption engines in the HA cluster belong to two different nodes fortrue redundancy. This is always true for Brocade Encryption Switches, but is not true if two FS8-18blades in the same DCX Backbone chassis are configured in the same HA cluster.
NOTEAn IP address is required for the management port for any cluster-related operations.
Creating HA clustersFor the initial encryption node, perform the following procedure.
1. Select Configure > Encryption from the menu task bar to display the Encryption Center dialogbox.
2. Select an encryption group from the Encryption Center Devices table, then select Group > HACluster from the menu task bar.
NOTEIf groups are not visible in the Encryption Center Devices table, select View > Groups from themenu task bar.
The Encryption Group Properties dialog box displays, with the HA Clusters tab selected.3. Select an available encryption engine from the Non HA Encryption Engines table and a destination
HA cluster from the High Availability Clusters table. Select New HA Cluster if you are creating anew cluster.
NOTEIf you are creating a new HA cluster, a dialog box displays requesting a name for the new HAcluster. HA cluster names can have up to 31 characters. Letters, digits, and underscores areallowed.
4. Click the right arrow to add the encryption engine to the selected HA cluster.
HA cluster configuration rules
60 Fabric OS Encryption Administrator's Guide Supporting RSA Data Protection Manager (DPM) Environments53-1003757-01

FIGURE 37 Encryption Group Properties dialog box - HA Clusters tab
5. To add the second encryption node to the HA cluster, perform the following procedure.a) Select the HA cluster from the right panel.b) Select the encryption engine to be added from the left panel.c) Click the right arrow to add the encryption engine to the selected HA cluster.d) Click OK.
Removing engines from an HA clusterRemoving the last engine from an HA cluster also removes the HA cluster.
If only one engine is removed from the cluster, you must either add another engine to the cluster, orremove the other engine.
1. Select Configure > Encryption from the menu task bar to display the Encryption Center dialogbox.
2. Select an encryption group from the Encryption Center Devices table, then select Group > HACluster from the menu task bar.
The Encryption Group Properties dialog box displays, with the HA Clusters tab selected.3. Select an engine from the High Availability Clusters table, then click the left arrow.4. Either remove the second engine or add a replacement second engine, making sure all HA clusters
have exactly two engines.5. Click OK.
Swapping engines in an HA clusterSwapping engines is useful when replacing hardware. Swapping engines is different from removing anengine and adding another because when you swap engines, the configured targets on the former HAcluster member are moved to the new HA cluster member.
Removing engines from an HA cluster
Fabric OS Encryption Administrator's Guide Supporting RSA Data Protection Manager (DPM) Environments 6153-1003757-01

1. Select Configure > Encryption from the menu task bar to display the Encryption Center dialogbox.
2. Select an encryption group from the Encryption Center Devices table, then select Group > HACluster from the menu task bar
The Encryption Group Properties dialog box displays, with the HA Clusters tab selected.
To swap engines, select one engine from the High Availability Clusters table and one unclusteredengine from encryption engine from the Non HA Encryption Engines table, then click the dual arrow.
NOTEThe two engines being swapped must be in the same fabric.
Failback optionThe Failback option determines the behavior when a failed encryption engine is restarted. When thefirst encryption engine comes back online, the encryption group’s failback setting (auto or manual)determines how the encryption engine resumes encrypting and decrypting traffic to its encryptiontargets.
• In auto mode, when the first encryption engine restarts, it automatically resumes encrypting anddecrypting traffic to its encryption targets.
• In manual mode, the second encryption engine continues handling the traffic until you manuallyinvoke failback using the CLI or Brocade Network Advisor, or until the second encryption enginefails. When the encryption engine recovers, it can automatically fail back its CryptoTarget containersif the second encryption engine is not hosting them.
Invoking failbackTo invoke failback to the restarted encryption engine from Brocade Network Advisor, complete thefollowing steps:
1. Select Configure > Encryption from the menu task bar to display the Encryption Center dialogbox.
2. Select an encryption group from the Encryption Center Devices table to which the encryption enginebelongs, then click Group > HA Clusters.
The Encryption Group Properties dialog box displays, with the HA Clusters tab selected.3. Select the online encryption engine, then click Failback.4. Click OK, then close the Encryption Center dialog box.
Configuring encryption storage targets
Adding an encryption target maps storage devices and hosts to virtual targets and virtual initiatorswithin the encryption switch. The storage encryption wizard enables you to configure encryption for astorage device (target).
NOTEIt is recommended that you configure the host and target in the same zone before configuring them forencryption. If the host and target are not already in the same zone, you can still configure them for
Failback option
62 Fabric OS Encryption Administrator's Guide Supporting RSA Data Protection Manager (DPM) Environments53-1003757-01

encryption, but you will need to configure them in the same zone before you can commit the changes. Ifyou attempt to close the Encryption Targets dialog box without committing the changes, you arereminded of uncommitted changes in Brocade Network Advisor.
ATTENTIONAll nodes in an Encryption Group (EG) must be running the same Fabric OS version. Make sure all ofthe nodes in the EG have the same Fabric OS before you commit the changes.
The wizard steps are as follows:
1. Select Encryption Engine2. Select Target3. Select Hosts4. Name Container5. Confirmation6. Configuration Status7. Important Instructions
Adding an encryption target1. Select Configure > Encryption from the menu task bar to display the Encryption Center dialog
box.2. Select a group, switch, or engine from the Encryption Center Devices table to which to add the
target, then select Group/Switch/Engine > Targets from the menu task bar.
NOTEYou can also select a group, switch, or engine from the Encryption Center Devices table, then clickthe Targets icon.
The Encryption Targets dialog box displays.
FIGURE 38 Encryption Targets dialog box
3. Click Add.
Adding an encryption target
Fabric OS Encryption Administrator's Guide Supporting RSA Data Protection Manager (DPM) Environments 6353-1003757-01

The Configure Storage Encryption welcome screen displays.
FIGURE 39 Configure Storage Encryption - welcome screen
4. Click Next.
The Select Encryption Engine dialog box displays.
FIGURE 40 Select Encryption Engine dialog box
The list of encryption engines depends on the scope being viewed:
• If an encryption group was selected, the list includes all engines in the group.• If a switch was selected, the list includes all encryption engines for the switch.• If a single encryption engine was selected, the list contains only that engine.
Configuring Encryption Using the Management Application
64 Fabric OS Encryption Administrator's Guide Supporting RSA Data Protection Manager (DPM) Environments53-1003757-01

5. Select the encryption engine (blade or switch) to configure, then click Next.
The Select Target dialog box displays. The dialog box lists all target ports and target nodes in thesame fabric as the encryption engine. The Targets in Fabric table does not show targets that arealready configured in an encryption group.
FIGURE 41 Select Target dialog box
NOTEThe Targets list does not show targets that are already configured in the encryption group.
6. Select a target from the list.The Target Port WWN and Target Node WWN fields contain all target information that displays whenusing the nsShow command. You can also enter WWNs manually, for example, to specify a targetthat is not on the list.
7. Select a target type from the Type list, then click Next.
The Select Hosts dialog box displays. You can configure hosts for selected target device ports. Allhosts that are in the same fabric as the encryption engine are listed.
NOTEThe selected target and initiator port must be in the same zone, or an error will result.
Configuring Encryption Using the Management Application
Fabric OS Encryption Administrator's Guide Supporting RSA Data Protection Manager (DPM) Environments 6553-1003757-01

FIGURE 42 Select Hosts dialog box
8. Select hosts using either of the following methods:
• Select a maximum of 1024 hosts from the Hosts in Fabric table, then click the right arrow tomove the hosts to the Selected Hosts table. (The Port WWN column contains all targetinformation that displays when using the nsShow command.)
• Manually enter world wide names in the Port WWN and Node WWN text boxes if the hosts arenot included in the table. You must fill in both the Port WWN and the Node WWN. Click Add tomove the host to the Selected Hosts table.
9. Click Next.
The Name Container dialog box displays. You can specify a name for the target container that iscreated in the encryption engine to hold the target configuration data. The name is only neededwhen configuring the storage using the CLI.
The container name defaults to the target WWPN.
Configuring Encryption Using the Management Application
66 Fabric OS Encryption Administrator's Guide Supporting RSA Data Protection Manager (DPM) Environments53-1003757-01

FIGURE 43 Name Container dialog box
10.Enter the container name. The container name is a logical encryption name to specify a name otherthan the default. You can use a maximum of 31 characters. Letters, digits, and underscores areallowed.
11.Click Next.
The Confirmation screen displays. The confirmation screen confirms and completes configuration ofencryption engines, targets, and hosts.
FIGURE 44 Confirmation screen
12.Verify the information is correct, then click Next, which creates the configuration.
Configuring Encryption Using the Management Application
Fabric OS Encryption Administrator's Guide Supporting RSA Data Protection Manager (DPM) Environments 6753-1003757-01

The Configuration Status screen displays, which shows the status of the new containerconfiguration. The target and host that are configured in the target container are listed, as well asthe virtual targets (VT) and virtual initiators (VI).
NOTEIf you can view the VI/VT Port WWNs and VI/VT Node WWNs, the container has been successfullyadded to the switch.
FIGURE 45 Configuration Status screen
13.Review any post-configuration instructions or messages, which you can copy to a clipboard or printfor later, then click Next.
The Next Steps screen displays. Post-configuration instructions for installing public key certificatesfor the encryption switch are displayed. These instructions are specific to the key vault type.
Configuring Encryption Using the Management Application
68 Fabric OS Encryption Administrator's Guide Supporting RSA Data Protection Manager (DPM) Environments53-1003757-01

FIGURE 46 Next Steps screen
14.Review the post-configuration instructions, which you can copy to a clipboard or print for later, thenclick Finish to exit the Configure Switch Encryption wizard.
Next, you must zone the physical hosts and target together (if they are not already zoned together), andthen encrypt the LUNs using the Storage Device LUNs dialog box.
Configuring hosts for encryption targets
Use the Encryption Target Hosts dialog box to edit (add or remove) hosts for an encrypted target.
NOTEHosts are normally selected as part of the Configure Switch Encryption wizard, but you can also edithosts later using the Encryption Target Hosts dialog box.
1. Select Configure > Encryption from the menu task bar to display the Encryption Center dialogbox.
2. Select a group, switch, or engine from the Encryption Center Devices table that contains the storagedevice to be configured, then select Group/Switch/Engine > Targets from the menu task bar.
NOTEYou can also select a group, switch, or engine from the Encryption Center Devices table, then clickthe Targets icon.
The Encryption Targets dialog box displays.
Configuring hosts for encryption targets
Fabric OS Encryption Administrator's Guide Supporting RSA Data Protection Manager (DPM) Environments 6953-1003757-01
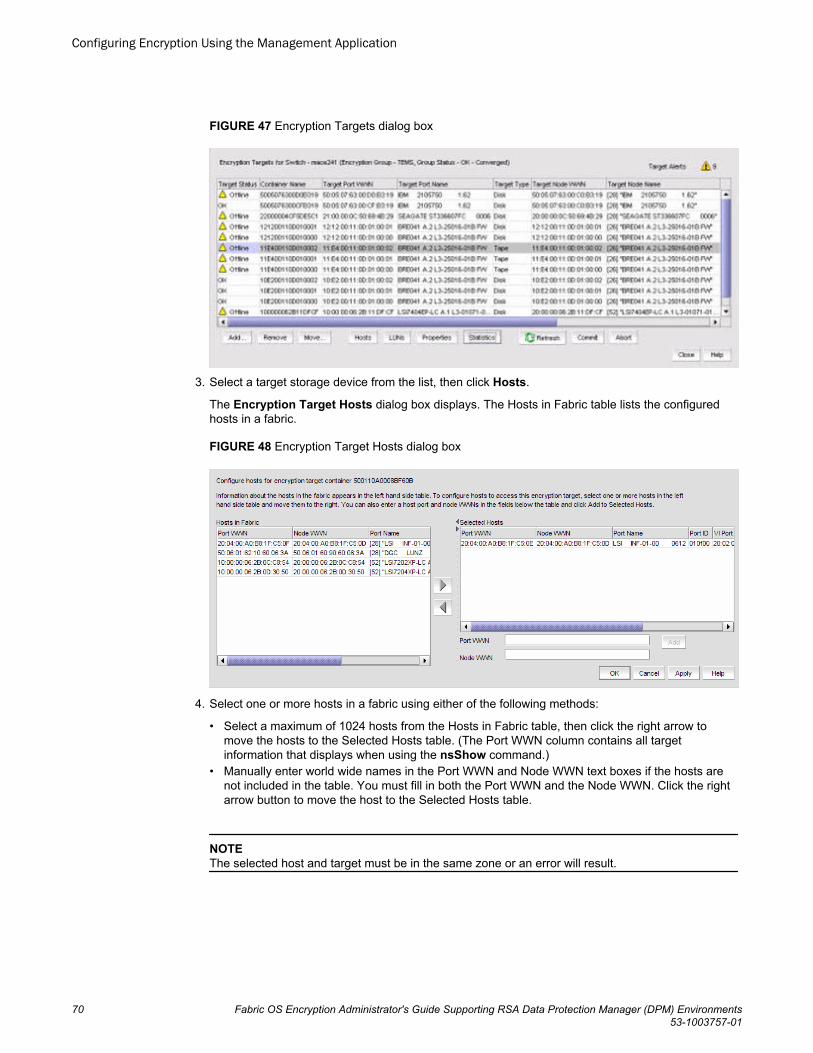
FIGURE 47 Encryption Targets dialog box
3. Select a target storage device from the list, then click Hosts.
The Encryption Target Hosts dialog box displays. The Hosts in Fabric table lists the configuredhosts in a fabric.
FIGURE 48 Encryption Target Hosts dialog box
4. Select one or more hosts in a fabric using either of the following methods:
• Select a maximum of 1024 hosts from the Hosts in Fabric table, then click the right arrow tomove the hosts to the Selected Hosts table. (The Port WWN column contains all targetinformation that displays when using the nsShow command.)
• Manually enter world wide names in the Port WWN and Node WWN text boxes if the hosts arenot included in the table. You must fill in both the Port WWN and the Node WWN. Click the rightarrow button to move the host to the Selected Hosts table.
NOTEThe selected host and target must be in the same zone or an error will result.
Configuring Encryption Using the Management Application
70 Fabric OS Encryption Administrator's Guide Supporting RSA Data Protection Manager (DPM) Environments53-1003757-01

NOTETo remove an encryption engine from the Selected Hosts table, select the engine(s), then click theleft arrow button.
5. Click OK or Apply to apply your changes.
Adding target disk LUNs for encryption
You can add a new path to an existing disk LUN or add a new LUN and path by launching the Add NewPath wizard. To launch the wizard, complete the following steps.
NOTEBefore you can add a target disk LUN for encryption, you must first configure the storage arrays. Formore information, refer to Configuring storage arrays on page 74.
1. Select Configure > Encryption from the menu task bar to display the Encryption Center dialogbox.
2. Select a group, switch, or engine from the Encryption Center Devices table, then select Group/Switch/Engine > Disk LUNs from the menu task bar.
The Encryption Disk LUN View dialog box displays.
FIGURE 49 Encryption Disk LUN View dialog box
The Encryption Disk LUN View dialog box provides a convenient way to view and manage diskLUNs that are provisioned from different hosts, to identify conflicts between configuration policies onstorage systems, and to provide a launching point for the Add New Path wizard for configuringmultiple I/O paths to the LUN.
The Storage Array selector determines which LUN paths are displayed in the table. You can selecta storage array from the LUN view prior to launching the Add New Path wizard. Only ports thatbelong to at least one target container are listed.
Use the Host selector to select a host from the LUN view prior to launching the Add New Pathwizard. Only ports that belong to at least one target container are listed.
3. Click Add to launch the Add New Path wizard.
The Select Target Port dialog box displays.
Adding target disk LUNs for encryption
Fabric OS Encryption Administrator's Guide Supporting RSA Data Protection Manager (DPM) Environments 7153-1003757-01
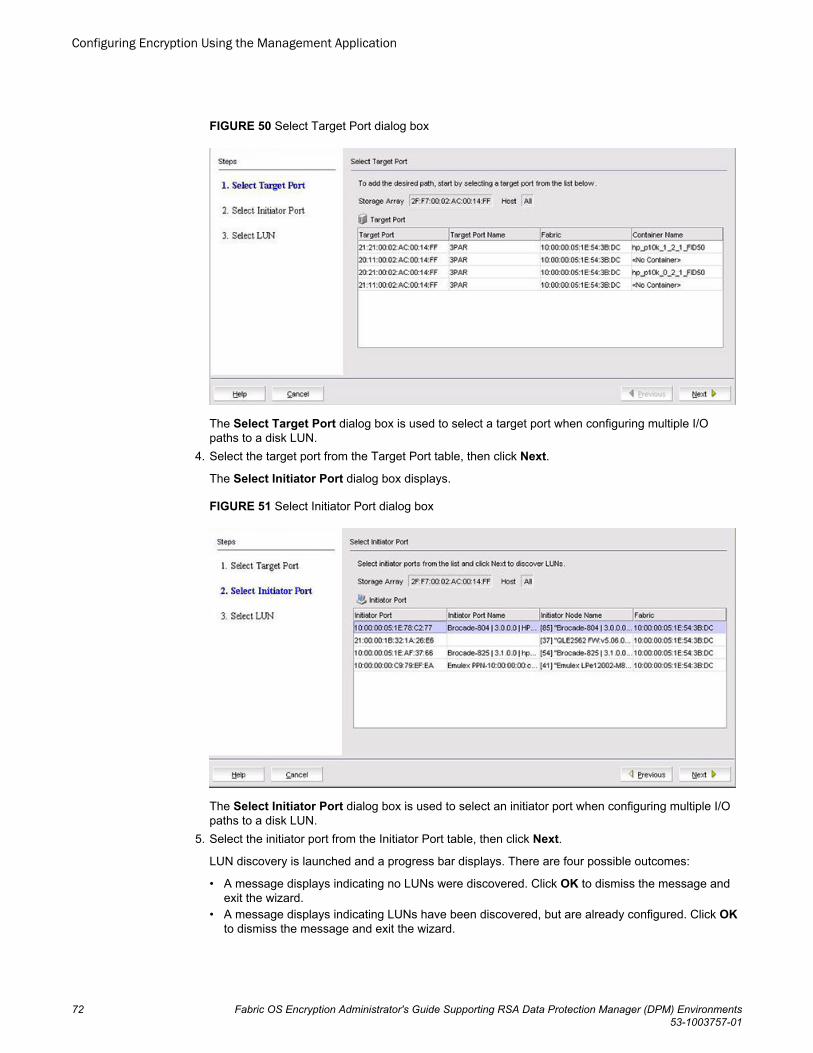
FIGURE 50 Select Target Port dialog box
The Select Target Port dialog box is used to select a target port when configuring multiple I/Opaths to a disk LUN.
4. Select the target port from the Target Port table, then click Next.
The Select Initiator Port dialog box displays.
FIGURE 51 Select Initiator Port dialog box
The Select Initiator Port dialog box is used to select an initiator port when configuring multiple I/Opaths to a disk LUN.
5. Select the initiator port from the Initiator Port table, then click Next.
LUN discovery is launched and a progress bar displays. There are four possible outcomes:
• A message displays indicating no LUNs were discovered. Click OK to dismiss the message andexit the wizard.
• A message displays indicating LUNs have been discovered, but are already configured. Click OKto dismiss the message and exit the wizard.
Configuring Encryption Using the Management Application
72 Fabric OS Encryption Administrator's Guide Supporting RSA Data Protection Manager (DPM) Environments53-1003757-01

• A message displays indicating that the target is not in the right state for discovering LUNs. ClickOK to dismiss the message and exit the wizard.
• The Select LUN dialog box displays, which lists discovered LUNs that are available.
FIGURE 52 Select LUN dialog box
The Select LUN dialog box is used to select a LUN when configuring multiple I/O paths to a diskLUN. Note the following:
• The values for Current LUN State are Encrypted, which is automatically selected if the LUN hasa key ID; Clear Text, and <select> for LUNs without a key ID. User selection is required.
• Thin provision support is limited to Brocade-tested storage arrays. The thin provisioned LUNstatus will be displayed as Yes for supported storage arrays only.
• A value for New LUN is displayed only if remote replication is enabled.6. Select the LUN from LUN list.7. Set the Current LUN State as required.
If the LUN already has an existing key ID, the Current LUN State field is automatically set toEncrypted. You can accept the automatically assigned state or change this value.
If REPL Support was enabled by the Configure Switch Encryption wizard, a New LUN check boxis presented and enabled by default. If this LUN is to be paired with another LUN for SRDF datareplication, the New LUN option must be enabled. If REPL support was not enabled, this check boxis not displayed.
8. Click Finish.
The new LUN path is added to the Encryption Disk LUN View table.9. Click OK on the LUN view to commit the operation.
NOTEThe maximum number of uncommitted configuration changes per disk LUN (or maximum paths to aLUN) is 512 transactions. The 512 LUN operations can be for the same LUN or be subjected to 25distinct LUNs. Adding or modifying more than 25 paths on the same LUN is not recommended unlessthe LUN is encrypted.
In environments where there are multiple paths to the same LUNs, it is critical that the same LUNpolicies are configured on all instances of the LUN. Be sure to return to the Encryption Disk LUNView dialog box to determine if there are configuration mismatches. Check under Encryption Mode
Configuring Encryption Using the Management Application
Fabric OS Encryption Administrator's Guide Supporting RSA Data Protection Manager (DPM) Environments 7353-1003757-01
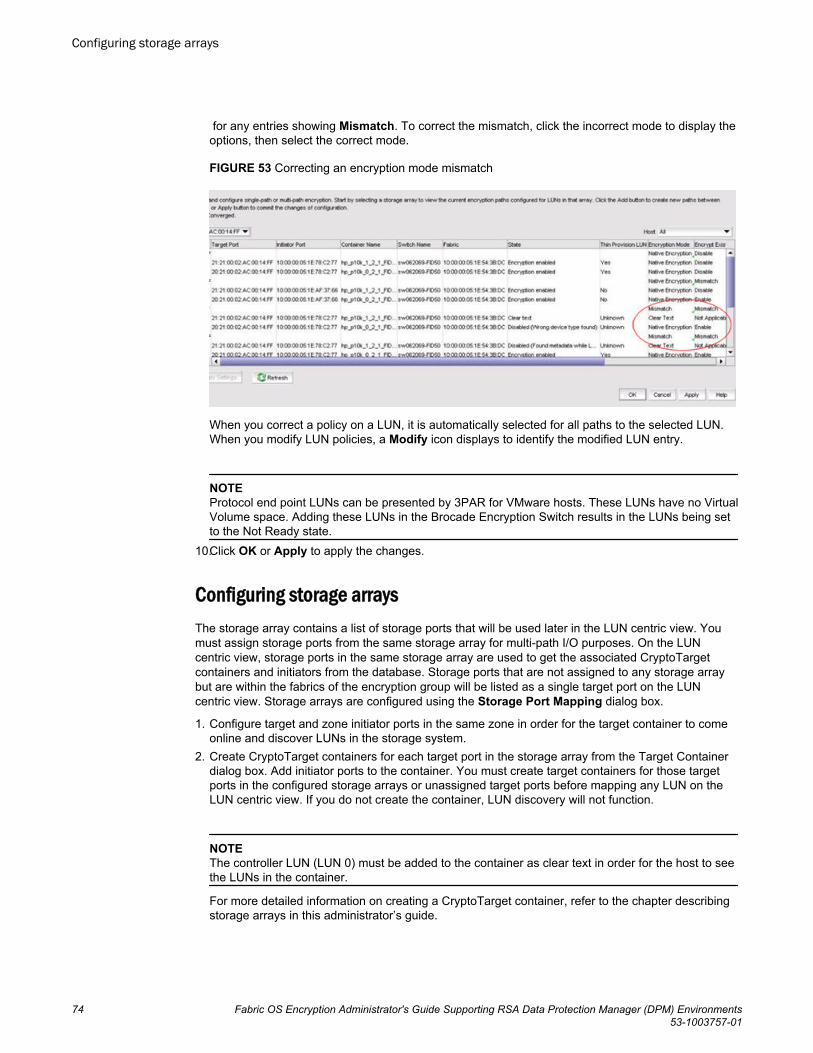
for any entries showing Mismatch. To correct the mismatch, click the incorrect mode to display theoptions, then select the correct mode.
FIGURE 53 Correcting an encryption mode mismatch
When you correct a policy on a LUN, it is automatically selected for all paths to the selected LUN.When you modify LUN policies, a Modify icon displays to identify the modified LUN entry.
NOTEProtocol end point LUNs can be presented by 3PAR for VMware hosts. These LUNs have no VirtualVolume space. Adding these LUNs in the Brocade Encryption Switch results in the LUNs being setto the Not Ready state.
10.Click OK or Apply to apply the changes.
Configuring storage arraysThe storage array contains a list of storage ports that will be used later in the LUN centric view. Youmust assign storage ports from the same storage array for multi-path I/O purposes. On the LUNcentric view, storage ports in the same storage array are used to get the associated CryptoTargetcontainers and initiators from the database. Storage ports that are not assigned to any storage arraybut are within the fabrics of the encryption group will be listed as a single target port on the LUNcentric view. Storage arrays are configured using the Storage Port Mapping dialog box.
1. Configure target and zone initiator ports in the same zone in order for the target container to comeonline and discover LUNs in the storage system.
2. Create CryptoTarget containers for each target port in the storage array from the Target Containerdialog box. Add initiator ports to the container. You must create target containers for those targetports in the configured storage arrays or unassigned target ports before mapping any LUN on theLUN centric view. If you do not create the container, LUN discovery will not function.
NOTEThe controller LUN (LUN 0) must be added to the container as clear text in order for the host to seethe LUNs in the container.
For more detailed information on creating a CryptoTarget container, refer to the chapter describingstorage arrays in this administrator’s guide.
Configuring storage arrays
74 Fabric OS Encryption Administrator's Guide Supporting RSA Data Protection Manager (DPM) Environments53-1003757-01
Remote replication LUNsThe Symmetrix Remote Data Facility (SRDF) transmits data that is being written to both a localsymmetrix array and a remote symmetrix array. The replicated data facilitates a fast switchover to theremote site for data recovery.
SRDF supports the following methods of data replication:
• Synchronous Replication provides real-time mirroring of data between the source Symmetrix and thetarget Symmetrix systems. Data is written simultaneously to the cache of both systems in real timebefore the application I/O is completed, thus ensuring the highest possible data availability.
• Semi-Synchronous Replication writes data to the source system, completes the I/O, thensynchronizes the data with the target system. Since the I/O is completed prior to synchronizing datawith the target system, this method provides an added performance advantage. A second write willnot be accepted on a Symmetrix source device until its target device has been synchronized.
• Adaptive Copy Replication transfers data from the source devices to the remote devices withoutwaiting for an acknowledgment. This is especially useful when transferring large amounts of dataduring data center migrations, consolidations, and in data mobility environments.
• Asynchronous Replication places host writes into chunks and then transfers an entire chunk to thetarget system. When a complete chunk is received on the target system, the copy cycle is committed.If the SRDF links are lost during data transfer, any partial chunk is discarded, preserving consistencyon the target system. This method provides a consistent point-in-time remote image that is not farbehind the source system and results in minimal data loss if there is a disaster at the source site.
SRDF pairsRemote replication is implemented by establishing a synchronized pair of SRDF devices connected byFC or IP links.
A local source device is paired with a remote target device while data replication is taking place. Whilethe SRDF devices are paired, the remote target device is not locally accessible for read or writeoperations. When the data replication operation completes, the pair may be split to enable normal read/write access to both devices. The pair may be restored to restore the data on the local source device.
The following figure shows the placement of encryption switches in an SRDF configuration. Whenencryption is enabled for the primary LUN, encrypted data written by the local application server to theprimary LUN is replicated on the secondary LUN. The data is encrypted using a DEK that wasgenerated on the local encryption switch and stored on the local DPM key vault. When each site has anindependent key vault, as shown in the figure, the key vaults must be synchronized to ensure theavailability of the DEK at the remote site.
Refer to DPM user documentation for information about how to synchronize the key vaults. Both sitesmay share the same key vault, which eliminates the need for synchronization across sites. Dependingon distance between sites, sharing a key vault may add some latency when retrieving a key.
Remote replication LUNs
Fabric OS Encryption Administrator's Guide Supporting RSA Data Protection Manager (DPM) Environments 7553-1003757-01

FIGURE 54 Basic SRDF configuration with encryption switches
NOTEWhen Symmetrix arrays are managed in-band, the gatekeeper LUNs must be added to the crypto-target containers as cleartext LUNs. Adding these as encrypted LUNs generates a CRITICAL error onthe console, and the other encrypted LUNs are not visible from the host.
Metadata requirements and remote replicationWhen the metadata and key ID are written, the primary metadata on blocks 1–16 is compressed andencrypted. However, there are scenarios whereby these blocks cannot be compressed, and themetadata is not written to the media.
If blocks 1–16 are not compressible on the local source device and metadata is not written, obtainingthe correct DEK for the remote target device becomes problematic. This problem is avoided byreserving the last three blocks of the LUN for a copy of the metadata. These blocks are not exposed tothe host initiator. When a host reads the capacity of the LUN, the size reported is always three blocksless than the actual size. The behavior is enforced by selecting the New LUN check box on the SelectLUN screen of the Add New Path wizard when adding LUNs for an SRDF pair.
Note the following when using the New LUN option:
• Both LUNs that form an SRDF pair must be added to their containers using the New LUN option.• For any site, all paths to a given SRDF device must be configured with the New LUN option.• All LUNs configured with the New LUN option will report three blocks less than the actual size when
host performs READ CAPACITY 10/READ CAPACITY 16.• If a LUN is added with the New LUN option and with encryption enabled, it will always have valid
metadata even if blocks 1–16 of the LUN is not compressible.• LUNs configured as cleartext must also be added with the New LUN option if they are part of an
SRDF pair. This is to handle scenarios whereby the LUN policy is changed to encrypted at somelater time, and to verify formation of DEK clusters and LUN accessibility prior to enabling encryptionfor the LUN. When cleartext LUNs are configured with the New LUN option, no metadata is writtento the last three blocks, but will still report three blocks less than the actual size when host performsREAD CAPACITY 10/READ CAPACITY 16.
• The New LUN option is used only if a DPM key vault is configured for the encryption group.• The New LUN option can be used only if replication is enabled for the encryption group.• If the local LUN contains host data, configuring it with the New LUN option will cause the data on
the last three blocks of the LUN to be lost. Before using the New LUN option, you must migrate thecontents of the LUN to another LUN that is larger by at least three blocks. The new, larger LUN canthen be used when creating the SRDF pair. The remote LUN of the SRDF pair must be of the samesize. The original smaller LUN with user data can be decommissioned.
Metadata requirements and remote replication
76 Fabric OS Encryption Administrator's Guide Supporting RSA Data Protection Manager (DPM) Environments53-1003757-01
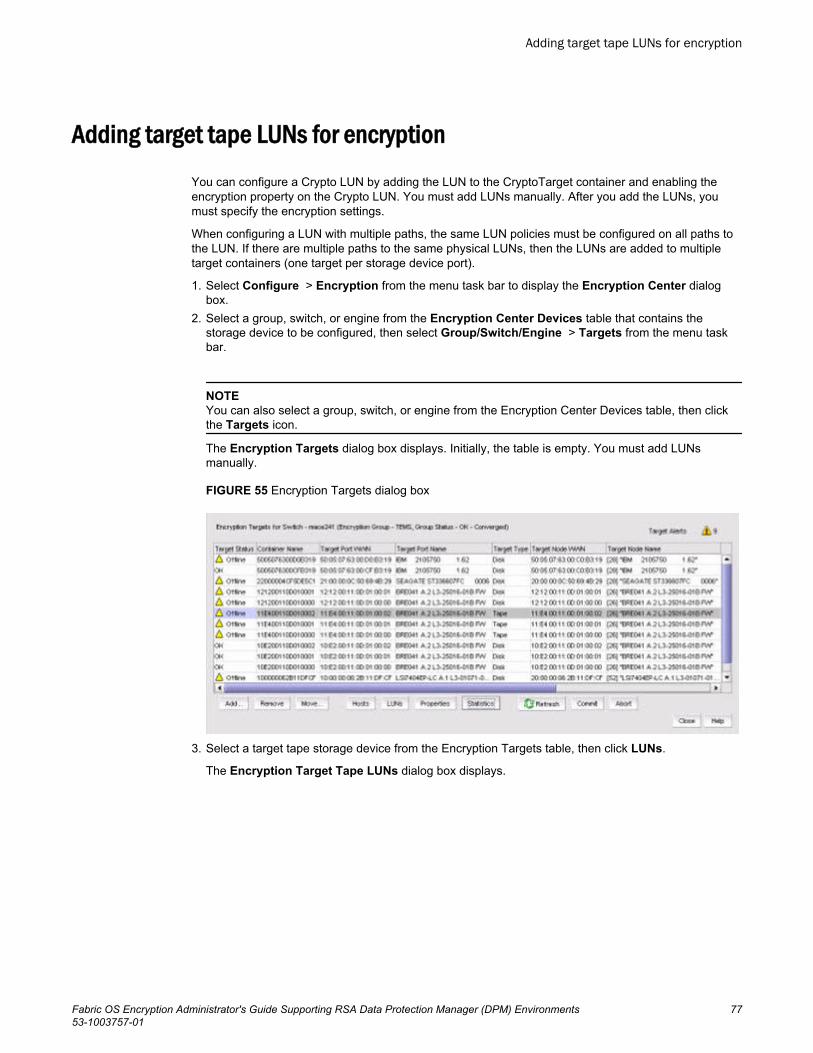
Adding target tape LUNs for encryption
You can configure a Crypto LUN by adding the LUN to the CryptoTarget container and enabling theencryption property on the Crypto LUN. You must add LUNs manually. After you add the LUNs, youmust specify the encryption settings.
When configuring a LUN with multiple paths, the same LUN policies must be configured on all paths tothe LUN. If there are multiple paths to the same physical LUNs, then the LUNs are added to multipletarget containers (one target per storage device port).
1. Select Configure > Encryption from the menu task bar to display the Encryption Center dialogbox.
2. Select a group, switch, or engine from the Encryption Center Devices table that contains thestorage device to be configured, then select Group/Switch/Engine > Targets from the menu taskbar.
NOTEYou can also select a group, switch, or engine from the Encryption Center Devices table, then clickthe Targets icon.
The Encryption Targets dialog box displays. Initially, the table is empty. You must add LUNsmanually.
FIGURE 55 Encryption Targets dialog box
3. Select a target tape storage device from the Encryption Targets table, then click LUNs.
The Encryption Target Tape LUNs dialog box displays.
Adding target tape LUNs for encryption
Fabric OS Encryption Administrator's Guide Supporting RSA Data Protection Manager (DPM) Environments 7753-1003757-01
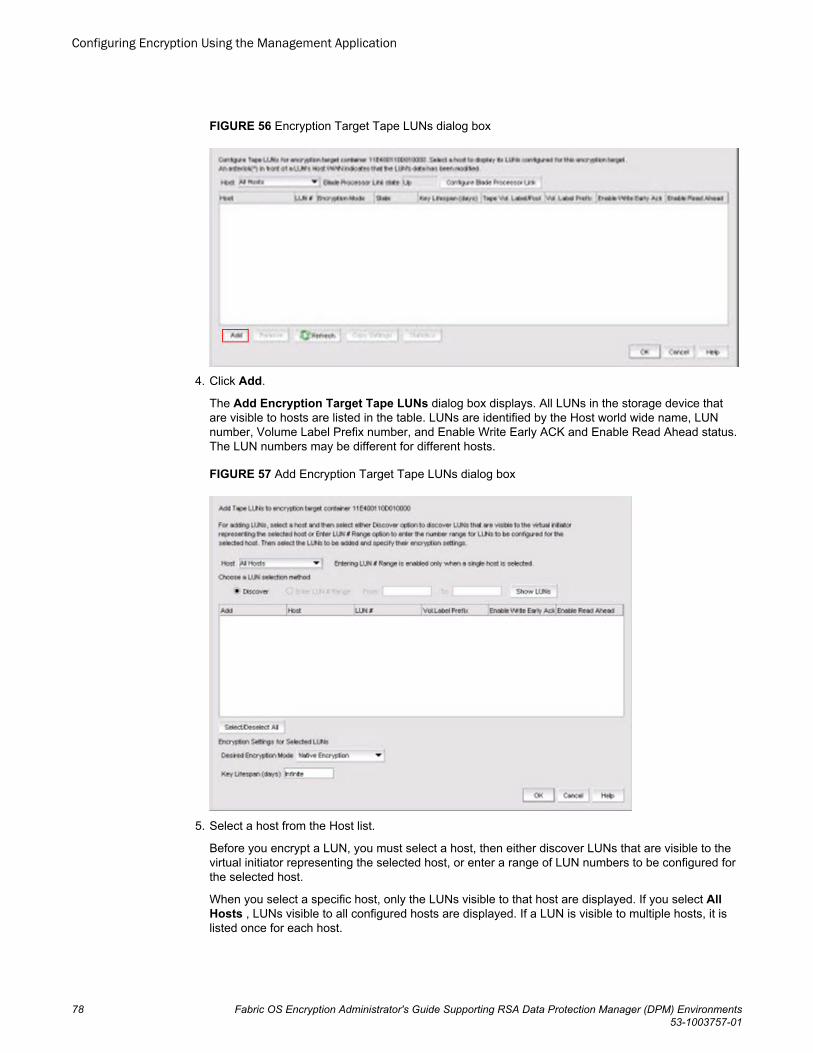
FIGURE 56 Encryption Target Tape LUNs dialog box
4. Click Add.
The Add Encryption Target Tape LUNs dialog box displays. All LUNs in the storage device thatare visible to hosts are listed in the table. LUNs are identified by the Host world wide name, LUNnumber, Volume Label Prefix number, and Enable Write Early ACK and Enable Read Ahead status.The LUN numbers may be different for different hosts.
FIGURE 57 Add Encryption Target Tape LUNs dialog box
5. Select a host from the Host list.
Before you encrypt a LUN, you must select a host, then either discover LUNs that are visible to thevirtual initiator representing the selected host, or enter a range of LUN numbers to be configured forthe selected host.
When you select a specific host, only the LUNs visible to that host are displayed. If you select AllHosts , LUNs visible to all configured hosts are displayed. If a LUN is visible to multiple hosts, it islisted once for each host.
Configuring Encryption Using the Management Application
78 Fabric OS Encryption Administrator's Guide Supporting RSA Data Protection Manager (DPM) Environments53-1003757-01

6. Choose a LUN to be added to an encryption target container using one of the two following methods:
• Discover : Identifies the exposed logical unit number for a specified initiator. If you already knowthe exposed LUNs for the various initiators accessing the LUN, you can enter the range of LUNsusing the alternative method.
• Enter a LUN number range : Allows you to enter a From value and a To value to manually enterthe logical unit numbers for the selected host(s).
7. Click Show LUNs.
The LUN needed for configuring a Crypto LUN is the LUN that is exposed to a particular initiator.
The table displays the following information:
• Host : The host on which the LUN is visible.• LUN # : The logical unit’s number.• Vol. Label Prefix : (Optional .) The user-supplied tape volume label prefix to be included in tape
volume labels generated b the switch for encrypted tapes.• Enable Write Early Ack : When selected, enables tape write pipelining on this tape LUN. Use this
option to speed long serial writes to tape, especially for remote backup operations.• Enable Read Ahead : When selected, enables read pre-fetching on this tape LUN. Use this option
to speed long serial read operations from tape, especially for remote restore operations.
NOTEThe Select/Deselect All button allows you to select or deselect all available LUNs.
8. Select the encryption mode. Options are: Native Encryption, DF-Compatible Encryption, andCleartext.
• If you change a LUN policy from Native Encryption or DF-Compatible Encryption to Clear Text,you disable encryption.
• The LUNs of the target that are not enabled for encryption must still be added to the CryptoTargetcontainer with the Clear Text encryption mode option.
NOTEThe rekeying interval can only be changed for disk LUNs. For tape LUNs, expiration of the rekeyinginterval simply triggers the generation of a new key to be used on future tape volumes. Tapes thatare already made are not rekeyed. To rekey a tape, you need to read the tape contents using a hostapplication that decrypts the tape contents using the old key, then rewrite the tape, which re-encryptsthe data with the new key.
9. Set the Key Lifespan setting, then click OK.
The selected tape LUNs are added to the encryption target container.
Moving targets
The Move Targets dialog box is used to redistribute which engine encrypts which targets. It is alsouseful for transferring all targets to another engine before replacing or removing engine hardware.Moving targets to another engine may be done while traffic is flowing between the host and target.Traffic is interrupted for a short time but resumes before the host applications are affected.
1. Select Configure > Encryption.
Moving targets
Fabric OS Encryption Administrator's Guide Supporting RSA Data Protection Manager (DPM) Environments 7953-1003757-01

The Encryption Center dialog box displays.2. Select one or more encryption engines from the Encryption Center Devices table, then select
Engine > Targets from the menu task bar. The encryption engine must be in the same group andsame fabric.
The Encryption Targets dialog box displays.3. Select one or more targets in the Encryption Targets dialog box and click Move.
The Move Targets dialog box is displayed.4. Select an encryption engine, then click OK to close the dialog and start the move operation.
Enabling and disabling tape LUN write early and read aheadThe tape LUN write early and read ahead feature uses tape pipelining and prefetch to speed serialaccess to tape storage. This feature is particularly useful when performing backup and restoreoperations, especially over long distances.
You can enable tape LUN write early and read ahead while adding the tape LUN for encryption, or youcan enable or disable these features after the tape LUN has been added for encryption.
To enable or disable tape LUN write early and read ahead, follow these steps:
1. Select Configure > Encryption from the menu task bar to display the Encryption Center dialogbox.
2. Select a group, switch, or engine from the Encryption Center Devices table, then select Group/Switch/Engine > Targets from the menu task bar.
NOTEYou can also select a group, switch, or engine from the Encryption Center Devices table, then clickthe Targets icon.
The Encryption Targets dialog box displays.
FIGURE 58 Encryption Targets dialog box
3. Select a target tape storage device from the table, then click LUNs.
The Encryption Target Tape LUNs dialog box displays.
Enabling and disabling tape LUN write early and read ahead
80 Fabric OS Encryption Administrator's Guide Supporting RSA Data Protection Manager (DPM) Environments53-1003757-01

FIGURE 59 Encryption Target Tape LUNs dialog box - Setting tape LUN read ahead and write early
4. In the Enable Write EarlyAck and Enable Read Ahead columns, when the table is populated, youcan set these features as desired for each LUN:
• To enable write early for a specific tape LUN, select Enable Write Early Ack for that LUN.• To enable read ahead for a specific LUN, select Enable Read Ahead for that LUN.• To disable write early for a specific tape LUN, deselect Enable Write Early Ack for that LUN.• To disable read ahead for a specific LUN, deselect Enable Read Ahead for that LUN.
5. Click OK.6. Commit the changes on the related CryptoTarget container:
a) Select Configure > Encryption from the menu task bar to display the Encryption Center dialogbox.
b) Select a group, switch, or engine from the Encryption Center Devices table that contains thestorage device to be configured, then select Group/Switch/Engine > Targets from the menutask bar.
NOTEYou can also select a group, switch, or engine from the Encryption Center Devices table, thenclick the Targets icon.
c) Select the appropriate CryptoTarget container, then click Commit.
Tape LUN statisticsThis feature enables you to view and clear statistics for tape LUNs. These statistics include the numberof compressed blocks, uncompressed blocks, compressed bytes and uncompressed bytes written to atape LUN.
The tape LUN statistics are cumulative and change as the host writes more data on tape. You can clearthe statistics to monitor compression ratio of ongoing host I/Os.
The encryption management application allows you to select tape LUN from either a tape LUNcontainer through the Encryption Targets dialog box, or from the Target Tape LUNs dialog box.
Tape LUN statistics
Fabric OS Encryption Administrator's Guide Supporting RSA Data Protection Manager (DPM) Environments 8153-1003757-01
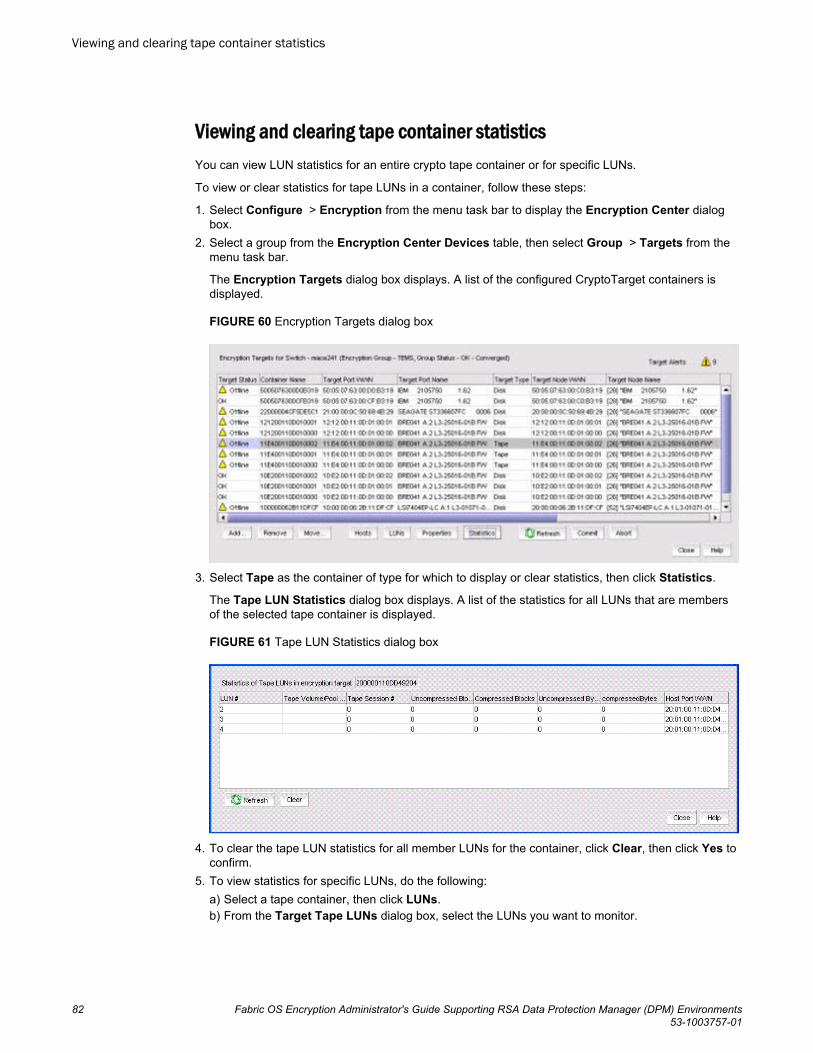
Viewing and clearing tape container statisticsYou can view LUN statistics for an entire crypto tape container or for specific LUNs.
To view or clear statistics for tape LUNs in a container, follow these steps:
1. Select Configure > Encryption from the menu task bar to display the Encryption Center dialogbox.
2. Select a group from the Encryption Center Devices table, then select Group > Targets from themenu task bar.
The Encryption Targets dialog box displays. A list of the configured CryptoTarget containers isdisplayed.
FIGURE 60 Encryption Targets dialog box
3. Select Tape as the container of type for which to display or clear statistics, then click Statistics.
The Tape LUN Statistics dialog box displays. A list of the statistics for all LUNs that are membersof the selected tape container is displayed.
FIGURE 61 Tape LUN Statistics dialog box
4. To clear the tape LUN statistics for all member LUNs for the container, click Clear, then click Yes toconfirm.
5. To view statistics for specific LUNs, do the following:a) Select a tape container, then click LUNs.b) From the Target Tape LUNs dialog box, select the LUNs you want to monitor.
Viewing and clearing tape container statistics
82 Fabric OS Encryption Administrator's Guide Supporting RSA Data Protection Manager (DPM) Environments53-1003757-01

Viewing and clearing tape LUN statistics for specific tape LUNsTo view or clear statistics for tape LUNs in a container, complete these steps:
1. Select Configure > Encryption from the menu task bar to display the Encryption Center dialogbox.
2. Select a group, switch, or engine from the Encryption Center Devices table that contains the storagedevice to be configured, then select Group/Switch/Engine > Targets from the menu task bar.
NOTEYou can also select a group, switch, or engine from the Encryption Center Devices table, then clickthe Targets icon.
The Encryption Targets dialog box displays.3. Select a tape target storage device, then click LUNs.
The Target Tape LUNs dialog box displays. A list of the configured tape LUNs is displayed.
FIGURE 62 Target Tape LUNs dialog box
4. Select the LUN or LUNs for which to display or clear statistics, then click Statistics.
The Tape LUN Statistics dialog box displays. The statistic results based on the LUN or LUNs youselected is displayed. Tape LUN statistics are cumulative.
Viewing and clearing tape LUN statistics for specific tape LUNs
Fabric OS Encryption Administrator's Guide Supporting RSA Data Protection Manager (DPM) Environments 8353-1003757-01

FIGURE 63 Tape LUN Statistics dialog box
5. Do either of the following:
• Click Clear to clear the tape LUN statistics, then click Yes to confirm.• Click Refresh to view the current statistics cumulative since the last reset.
Viewing and clearing statistics for tape LUNs in a containerTo view or clear statistics for tape LUNs in a container, follow these steps:
1. Select Configure > Encryption from the menu task bar to display the Encryption Center dialogbox.
2. Select a group, switch, or engine from the Encryption Center Devices table that contains thestorage device to be configured, then select Group/Switch/Engine > Targets from the menu taskbar.You can also select a group, switch, or engine from the Encryption Center Devices table, thenclick the Targets icon.
The Encryption Targets dialog box displays. A list of configured CryptoTarget containers isdisplayed.
FIGURE 64 Encryption Targets dialog box
3. Select Tape as the container of type for which to display or clear statistics, then click Statistics.
Viewing and clearing statistics for tape LUNs in a container
84 Fabric OS Encryption Administrator's Guide Supporting RSA Data Protection Manager (DPM) Environments53-1003757-01

The Tape LUN Statistics dialog box displays. The statistics for all LUNs that are members of theselected tape container are displayed.
FIGURE 65 Tape LUN Statistics dialog box
4. Do either of the following:
• Click Clear to clear the tape LUN statistics for member LUNs in the container, then click Yes toconfirm.
• Click Refresh to update the tape LUN statistics on the display.
Encryption engine rebalancingDisk and tape target containers can be hosted on the same switch or blade. Hosting both disk and tapetarget containers on the same switch or blade might result in a drop in throughput, but it can reduce costby reducing the number of switches or blades needed to support encrypted I/O in environments that useboth disk and tape.
The throughput drop can be mitigated by rebalancing the tape and disk target containers across theencryption engine. This ensures that the tape and disk target containers are distributed within theencryption engine for maximum throughput.
During rebalancing operations, be aware of the following:
• You might notice a slight disruption in Disk I/O. In some cases, manual intervention may be needed.• Backup jobs to tapes might need to be restarted after rebalancing is completed.
To determine if rebalancing is recommended for an encryption engine, check the encryption engineproperties to see whether rebalancing is recommended.
You might be prompted to rebalance during the following operations:
• When adding a new disk or tape target container.• When removing an existing disk or tape target container.• After failover to a backup encryption engine in an HA cluster.• After a failed encryption engine in an HA cluster is recovered, and failback processing has occurred.
Rebalancing an encryption engineTo rebalance an encryption engine, complete the following steps:
Encryption engine rebalancing
Fabric OS Encryption Administrator's Guide Supporting RSA Data Protection Manager (DPM) Environments 8553-1003757-01

1. Select Configure > Encryption from the menu task bar to display the Encryption Center dialogbox.
2. Select an engine, then select Engine > Re-Balance from the menu task bar.
A warning message displays, noting the potential disruption of disk and tape I/O, and that theoperation may take several minutes.
3. Click Yes to begin rebalancing.
Master keysMaster keys belong to the group and are managed from Group Properties.
When an opaque key vault is used, a master key is used to encrypt the data encryption keys. Themaster key status indicates whether a master key is used and whether it has been backed up.Encryption is not allowed until the master key has been backed up.
Only the active master key can be backed up, and multiple backups are recommended. You can backup or restore the master key to the key vault, to a file, or to a recovery card set. A recovery card set isset of smart cards. Each recovery card holds a portion of the master key. The cards must be gatheredand read together from a card reader attached to a PC running Brocade Network Advisor to restorethe master key.
Although it is generally not necessary to create a new master key, you might be required to create onedue to the following:
• The previous master key has been compromised.• Corporate policy might require a new master key every year for security purposes.
NOTEAny DEK in the key vault that is either compromised, or needs to be deactivated or destroyed, mustfirst undergo the decommissioning procedure.
When you create a new master key, the former active master key automatically becomes the alternatemaster key.
The new master key cannot be used (no new data encryption keys can be created, so no newencrypted LUNs can be configured), until you back up the new master key. After you have backed upthe new master key, it is strongly recommended that all encrypted disk LUNs be rekeyed. rekeyingcauses a new data encryption key to be created and encrypted using the new active master key,thereby removing any dependency on the old master key. Refer to Creating a master key on page96 for more information.
Master key actions are disabled if they are unavailable. For example:
• The user does not have Storage Encryption Security permissions.• The group leader is not discovered or managed by Brocade Network Advisor.
NOTEIt is important to back up the master key because if the master key is lost, none of the data encryptionkeys can be restored and none of the encrypted data can be decrypted.
Master keys
86 Fabric OS Encryption Administrator's Guide Supporting RSA Data Protection Manager (DPM) Environments53-1003757-01

Active master keyThe active master key is used to encrypt newly created data encryption keys (DEKs) prior to sendingthem to a key vault to be stored. You can restore the active master key under the following conditions:
• The active master key has been lost, which happens if all encryption engines in the group have beenzeroized or replaced with new hardware at the same time.
• You want multiple encryption groups to share the same active master key. Groups should share thesame master key if the groups share the same key vault and if tapes (or disks) are going to beexchanged regularly between the groups.
Alternate master keyThe alternate master key is used to decrypt data encryption keys that were not encrypted with the activemaster key. Restore the alternate master key for the following reasons:
• To read an old tape that was created when the group used a different active master key.• To read a tape (or disk) from a different encryption group that uses a different active master key.
Master key actionsMaster keys belong to the group and are managed from Group Properties.
Master key actions are as follows:
• Backup master key: Enabled any time a master key exists. Selecting this option launches theBackup Master Key for Encryption Group dialog box.
You can back up the master key to a file, to a key vault, or to a smart card. You can back up themaster key multiple times to any of these media in case you forget the passphrase you originallyused to back up the master key, or if multiple administrators each needs a passphrase for recovery.Refer to the following procedures for more information:
‐ Saving the master key to a file on page 88‐ Saving a master key to a key vault on page 89‐ Saving a master key to a smart card set on page 91
You must back up the master key when the status is Created but not backed up.• Restore master key: Enabled when no master key exists or the previous master key has been
backed up. This option is also enabled when using a DPM key vault.
When this option is selected, the Restore Master Key for Encryption Group dialog box displays,from which you can restore a master key from a file, key vault, or smart card set. Refer to thefollowing procedures for more information:
‐ Restoring a master key from a file on page 93‐ Restoring a master key from a key vault on page 94‐ Restoring a master key from a smart card set on page 95
• Create new master key: Enabled when no master key exists, or the previous master key has beenbacked up.
You must create a new master key when the status is Required but not created.
Active master key
Fabric OS Encryption Administrator's Guide Supporting RSA Data Protection Manager (DPM) Environments 8753-1003757-01

NOTEIf a master key was not created, Not Used is displayed as the status and the Master Key Actionslist is unavailable. In this case, you must create a new master key. Additional master key statusesare Backed up but not propagated and Created and backed up
Saving the master key to a fileUse the following procedure to save the master key to a file.
1. Select Configure > Encryption from the menu task bar to display the Encryption Center dialogbox.
2. Select a group from the Encryption Center Devices table, then select Group > Security from themenu task bar.
The Encryption Group Properties dialog box displays with the Security tab selected.3. Select Backup Master Key as the Master Key Action .
The Master Key Backup dialog box displays, but only if the master key has already beengenerated.
Saving the master key to a file
88 Fabric OS Encryption Administrator's Guide Supporting RSA Data Protection Manager (DPM) Environments53-1003757-01

FIGURE 66 Master key backup dialog box - Backup Destination (to file)
4. Select File as the Backup Destination.5. Enter a file name, or browse to the desired location.6. Enter the passphrase, which is required for restoring the master key. The passphrase can be
between eight and 40 characters, and any character is allowed.7. Re-enter the passphrase for verification, then click OK.
ATTENTION
Save the passphrase. This passphrase is required if you ever need to restore the master key fromthe file.
Saving a master key to a key vaultUse the following procedure to save the master key to a key vault.
Saving a master key to a key vault
Fabric OS Encryption Administrator's Guide Supporting RSA Data Protection Manager (DPM) Environments 8953-1003757-01

1. Select Configure > Encryption from the menu task bar to display the Encryption Center dialogbox.
2. Select a group from the Encryption Center Devices table, then select Group > Security from themenu task bar.
The Encryption Group Properties dialog box displays with the Security tab selected.3. Select Backup Master Key as the Master Key Action.
The Backup Master Key for Encryption Group dialog box displays.
FIGURE 67 Master key backup dialog box - Backup Destination (to key vault)
4. Select Key Vault as the Backup Destination.5. Enter the passphrase, which is required for restoring the master key.
The passphrase can be between 8 and 40 characters, and any character is allowed.6. Re-enter the passphrase for verification, then click OK.
A dialog box displays that shows the Key ID. The Key ID identifies the storage location in the keyvault.
Configuring Encryption Using the Management Application
90 Fabric OS Encryption Administrator's Guide Supporting RSA Data Protection Manager (DPM) Environments53-1003757-01

7. Store both the Key ID and the passphrase in a secure place. Both will be required to restore themaster key in the future.
8. Click OK after you have copied the Key ID.
Saving a master key to a smart card setA card reader must be attached to the SAN Management application PC to save a master key to arecovery card.
Recovery cards can only be written once to back up a single master key. Each master key backupoperation requires a new set of previously unused smart cards.
NOTEWindows operating systems do not require smart card drivers to be installed separately; the driver isbundled with the operating system. However, you must install a smart card driver for UNIX operatingsystems. For instructions, refer to the Installation Guide.
The key is divided among the cards in the card set, up to 10. The quorum of cards required to restorethe master key must be less than the total number of cards in the set, and no greater than five. Forexample, when the master key is backed up to a set of three cards, a quorum of any two cards can beused together to restore the master key. When the master key is backed up to a set of 10 cards, aquorum size of up to five cards can be configured for restoring the master key. Backing up the masterkey to multiple recovery cards is the recommended and most secure option.
NOTEWhen you write the key to the card set, be sure you write the full set without canceling. If you cancel, allpreviously written cards become unusable; you will need to discard them and create a new set.
1. Select Configure > Encryption from the menu task bar to display the Encryption Center dialogbox.
2. Select a group from the Encryption Center Devices table, then select Group > Security from themenu task bar.
The Encryption Group Properties dialog box displays with the Security tab selected.3. Select Backup Master Key as the Master Key Action.
The Backup Master Key for Encryption Group dialog box displays.
Saving a master key to a smart card set
Fabric OS Encryption Administrator's Guide Supporting RSA Data Protection Manager (DPM) Environments 9153-1003757-01

FIGURE 68 Backup Master Key for Encryption Group dialog box - Backup Destination to smartcards
4. Select A Recovery Set of Smart Cards as the Backup Destination.5. Enter the recovery card set size.6. Insert the first blank card and wait for the card serial number to appear.7. Run the additional cards through the reader that are needed for the set.
As you read each card, the card ID displays in the Card Serial# field. Be sure to wait for the ID toappear.
8. Enter the mandatory last name and first name of the person to whom the card is assigned.9. Enter a Card Password, and then re-enter the password for verification.
Record and store the password in a secure location.10.Click Write Card.
You are prompted to insert the next card, up to the number of cards specified in step 5.11.Repeat step 6 through step 10 for each card in the set.12.After the last card is written, click OK in the Master Key Backup dialog box to finish the operation.
Configuring Encryption Using the Management Application
92 Fabric OS Encryption Administrator's Guide Supporting RSA Data Protection Manager (DPM) Environments53-1003757-01
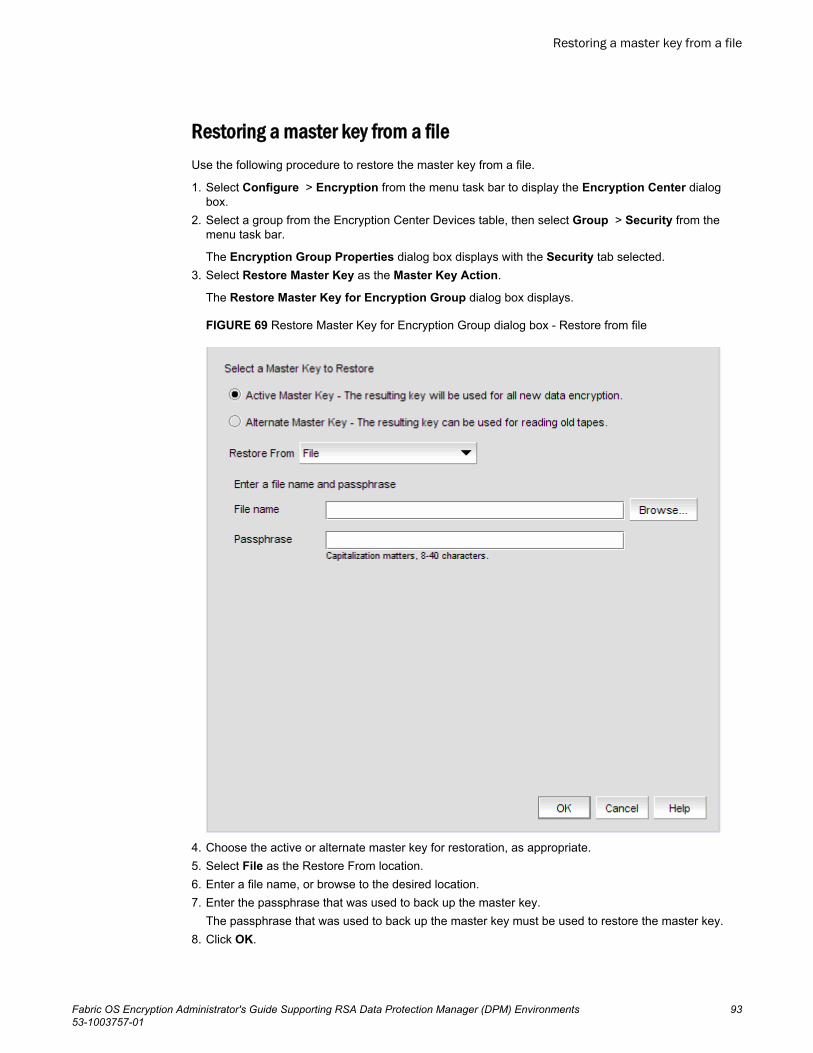
Restoring a master key from a fileUse the following procedure to restore the master key from a file.
1. Select Configure > Encryption from the menu task bar to display the Encryption Center dialogbox.
2. Select a group from the Encryption Center Devices table, then select Group > Security from themenu task bar.
The Encryption Group Properties dialog box displays with the Security tab selected.3. Select Restore Master Key as the Master Key Action.
The Restore Master Key for Encryption Group dialog box displays.
FIGURE 69 Restore Master Key for Encryption Group dialog box - Restore from file
4. Choose the active or alternate master key for restoration, as appropriate.5. Select File as the Restore From location.6. Enter a file name, or browse to the desired location.7. Enter the passphrase that was used to back up the master key.
The passphrase that was used to back up the master key must be used to restore the master key.8. Click OK.
Restoring a master key from a file
Fabric OS Encryption Administrator's Guide Supporting RSA Data Protection Manager (DPM) Environments 9353-1003757-01

Restoring a master key from a key vaultUse the following procedure to restore the master key from a key vault:
1. Select Configure > Encryption from the menu task bar to display the Encryption Center dialogbox.
2. Select a group from the Encryption Center Devices table, then select Group > Security from themenu task bar.
The Encryption Group Properties dialog box displays with the Security tab selected.3. Select Restore Master Key as the Master Key Action.
The Restore Master Key for Encryption Group dialog box displays.
FIGURE 70 Restore Master Key for Encryption Group dialog box - Restore from key vault
4. Choose the active or alternate master key for restoration, as appropriate.5. Select Key Vault as the Restore From location.6. Enter the key ID of the master key that was backed up to the key vault.7. Enter the passphrase that was used to back up the master key.
The passphrase that was used to back up the master key must be used to restore the master key.8. Click OK.
Restoring a master key from a key vault
94 Fabric OS Encryption Administrator's Guide Supporting RSA Data Protection Manager (DPM) Environments53-1003757-01

Restoring a master key from a smart card setA card reader must be attached to the SAN Management application PC to complete this procedure.
Use the following procedure to restore the master key from a set of smart cards.
1. Select Configure > Encryption from the menu task bar to display the Encryption Center dialogbox.
2. Select a group from the Encryption Center Devices table, then select Group > Security from themenu task bar.
The Encryption Group Properties dialog box displays with the Security tab selected.3. Select Restore Master Key as the Master Key Action.
The Restore Master Key for Encryption Group dialog box displays.
FIGURE 71 Restore Master Key for Encryption Group dialog box - Restore from a recovery set ofsmart cards
4. Choose the active or alternate master key for restoration, as appropriate.5. Select A Recovery Set of Smart Cards as the Restore From location.6. Insert the recovery card containing a share of the master key that was backed up earlier, and wait for
the card serial number to appear.
Restoring a master key from a smart card set
Fabric OS Encryption Administrator's Guide Supporting RSA Data Protection Manager (DPM) Environments 9553-1003757-01

7. Enter the password that was used to create the card.After five unsuccessful attempts to enter the correct password, the card becomes locked andunusable.
8. Click Restore.
You are prompted to insert the next card, if needed.9. Repeat step 6 through step 8 until all cards in the set have been read.10.Click OK.
Creating a master key1. Select Configure > Encryption from the menu task bar to display the Encryption Center dialog
box.2. Select a group from the Encryption Center Devices table, then select Group > Security from the
menu task bar.
The Encryption Group Properties dialog box displays with the Security tab selected.3. Select Create a New Master Key from the list.
A warning dialog displays.4. Click Yes to proceed.
Security settings
Security settings help you identify if system cards are required to initialize an encryption engine andalso determine the number of authentication cards needed for a quorum.
1. Select Configure > Encryption from the menu task bar to display the Encryption Center dialogbox.
2. Select a group from the Encryption Center Devices table, then select Group > Security from themenu task bar.
The Select Security Settings dialog box displays. The dialog box contains the followinginformation:
• Quorum Cards : Select the number of authentication cards needed for a quorum. The quorum isalways set to one card less than the number of cards registered. For example, if you registerthree cards, the quorum needed for authentication is two.
• System Cards : Determine whether or not a system card is required to initialize the encryptionengine
NOTEThe Select Security Settings dialog box only sets a quorum number for authentication cards. Toregister authentication cards, click Next to display the Authentication Cards dialog box.
Creating a master key
96 Fabric OS Encryption Administrator's Guide Supporting RSA Data Protection Manager (DPM) Environments53-1003757-01
Zeroizing an encryption engineZeroizing is the process of erasing all data encryption keys (DEKs) and other sensitive encryptioninformation in an encryption engine. You can zeroize an encryption engine manually to protectencryption keys. No data is lost because the data encryption keys for the encryption targets are storedin the key vault.
Zeroizing has the following effects:
• All copies of data encryption keys kept in the encryption switch or blade are erased.• Internal public and private key pairs that identify the encryption engine are erased and the encryption
switch or blade is in the FAULTY state.• All encryption operations on this engine are stopped and all virtual initiators (VI) and virtual targets
(VT) are removed from the fabric’s name service.• The key vault link (for NetApp LKM key vaults) or the master key (for other key vaults) is erased from
the encryption engine.
Once enabled, the encryption engine is able to restore the necessary data encryption keys from thekey vault when the link key (for the NetApp Lifetime Key Management application) or the master key(for other key vaults) is restored.
• If the encryption engine was part of an HA cluster, targets fail over to the peer, which assumes theencryption of all storage targets. Data flow will continue to be encrypted.
• If there is no HA backup, host traffic to the target will fail as if the target has gone offline. The host willnot have unencrypted access to the target. There will be no data flow at all because the encryptionvirtual targets will be offline.
NOTEZeroizing an engine affects the I/Os, but all target and LUN configurations remain intact. Encryptiontarget configuration data is not deleted.
You can zeroize an encryption engine only if it is enabled (running), or disabled but ready to beenabled. If the encryption engine is not in one of these states, an error message results.
When using an opaque key vault, if all encryption engines in an encryption group are zeroized, theencryption group loses the master key required to read data encryption keys from the key vault. Afterthe encryption engines are rebooted and re-enabled, you must restore the master key from a backupcopy, or alternatively, you can generate a new master key and back it up. Restoring the master keyfrom a backup copy or generating a new master key and backing it up indicates that all previouslygenerated DEKs will not be decryptable unless the original master key used to encrypt them is restored.
Setting zeroizationUse the Restore Master key wizard from the Encryption Group Properties dialog box to restore themaster key from a backup copy.
1. Select Configure > Encryption from the menu task bar to display the Encryption Center dialogbox.
2. Select an encryption engine from the Encryption Center Devices table, then select Engine >Zeroize from the menu task bar.
A warning dialog box describes consequences and actions required to recover.3. Click Yes to zeroize the encryption engine.
• For an encryption blade: After the zeroize operation is successful, a message displays noting thatthe encryption blade will be powered off and powered on to make it operational again. Click OK to
Zeroizing an encryption engine
Fabric OS Encryption Administrator's Guide Supporting RSA Data Protection Manager (DPM) Environments 9753-1003757-01

close the message. After the encryption blade is powered on, click Refresh in the EncryptionCenter dialog box to update the status of the encryption blade and perform any operations.
• For an encryption switch: After the zeroization operation is successful, you are instructed toreboot the encryption switch. Click OK to close the message, then reboot the encryption switch.After the encryption switch is rebooted, click Refresh in the Encryption Center dialog box toupdate the status of the encryption switch and perform any operations.
Using the Encryption Targets dialog box
The Encryption Targets dialog box enables you to send outbound data that you want to store asciphertext to an encryption device. The encryption target acts as a virtual target when receiving datafrom a host, and as a virtual initiator when writing the encrypted data to storage.
NOTEThe Encryption Targets dialog box enables you to launch a variety of wizards and other relateddialog boxes.
To access the Encryption Targets dialog box, complete the following steps.
1. Select Configure > Encryption from the menu task bar to display the Encryption Center dialogbox.
2. Select a group, switch, or engine from the Encryption Center Devices table, then select Group/Switch/Engine > Targets from the menu task bar.
NOTEYou can also select a group, switch, or engine from the Encryption Center Devices table, thenclick the Targets icon.
The Encryption Targets dialog box displays. The targets currently being encrypted by the selectedgroup, switch, or encryption engine are listed. If a group is selected, all configured targets in thegroup are displayed. If a switch is selected, all configured targets for the switch are displayed.
FIGURE 72 Encryption Targets dialog box
Using the Encryption Targets dialog box
98 Fabric OS Encryption Administrator's Guide Supporting RSA Data Protection Manager (DPM) Environments53-1003757-01

Redirection zonesIt is recommended that you configure the host and target in the same zone before you configure themfor encryption. Doing so creates a redirection zone to redirect the host/target traffic through theencryption engine; however, a redirection zone can only be created if the host and target are in thesame zone. If the host and target are not already configured in the same zone, you can configure themfor encryption, but you will still need to configure them in the same zone, which will then enable you tocreate the redirection zone as a separate step.
NOTEIf the encryption group is busy when you click Commit, you are given the option to either force thecommit or abort the changes. Click Commit to re-create the redirection zone.
Disk device decommissioningA disk device needs to be decommissioned when any of the following occurs:
• The storage lease expires for an array, and devices must be returned or exchanged.• Storage is reprovisioned for movement between departments.• An array or device is removed from service.
In all cases, all data on the disk media must be rendered inaccessible. Device decommissioning deletesall information that could be used to recover the data, for example, information related to master key IDsand cache files.
NOTEAny DEK in the key vault that is either compromised, or needs to be deactivated or destroyed, must firstundergo the decommissioning procedure.
After device decommissioning is performed, the following actions occur:
• Metadata on the LUN is erased and the reference is removed from cache on the Brocade EncryptionSwitch.
• The LUN state is shown as decommissioned in the key vault.• The LUN is removed from the container.
NOTEThe key IDs that were used for encrypting the data are returned.
When disk LUNs are decommissioned, the decommissioned keys are still stored on the switch. In orderto delete them from the switch, you must view them from the Decommissioned Key IDs dialog box.
When a device decommission operation fails on the encryption group leader for any reason, the cryptoconfiguration remains uncommitted until a user-initiated commit or a subsequent device decommissionoperation issued on the encryption group leader completes successfully. Device decommissionoperations should always be issued from a committed configuration. If not, the operation will fail with theerror message "An outstanding transaction is pending in Switch/EG". If this occurs, you can resolve theproblems by committing the configuration from the encryption group leader.
Provided that the crypto configuration is not left uncommitted because of any crypto configurationchanges or a failed device decommission operation issued on a encryption group leader node, this error
Redirection zones
Fabric OS Encryption Administrator's Guide Supporting RSA Data Protection Manager (DPM) Environments 9953-1003757-01

message will not be seen for any device decommission operation issued serially on an encryptiongroup member node. If more than one device decommission operation is attempted in an encryptiongroup from member nodes simultaneously, this error message is transient and will go away afterdevice decommission operation is complete. If the device decommissioning operation fails, retry theoperation after some time has passed.
Decommissioning disk LUNsUse the following procedure to decommission a disk LUN.
1. Select Configure > Encryption from the menu task bar to display the Encryption Center dialogbox.
2. Select a group, switch, or engine from the Encryption Center Devices table that contains thestorage device to be configured, then select Group/Switch/Engine > Targets from the menu taskbar.
NOTEYou can also select a group, switch, or engine from the Encryption Center Devices table, thenclick the Targets icon.
The Encryption Targets dialog box displays.3. Select a Target storage device from the list, then click LUNs .
The Encryption Target Disk LUNs dialog box displays.
FIGURE 73 Encryption Target Disk LUNs dialog box
4. Select the LUNs associated with the device, then click Decommission .
A warning message displays.5. Click Yes to proceed with the decommissioning process.
A LUN Decommission Status dialog box is displayed while the LUNs are being decommissioned.Click OK to close the dialog box.
If a rekey operation is currently in progress on a selected LUN, a message is displayed that givesyou a choice of doing a Forced Decommission, or to cancel and try later after the rekey operation iscomplete.
6. To check on the progress of the decommissioning operation, click Refresh . Whendecommissioning is complete, the LUNs are removed from the Encryption Target LUNs table.
Decommissioning disk LUNs
100 Fabric OS Encryption Administrator's Guide Supporting RSA Data Protection Manager (DPM) Environments53-1003757-01
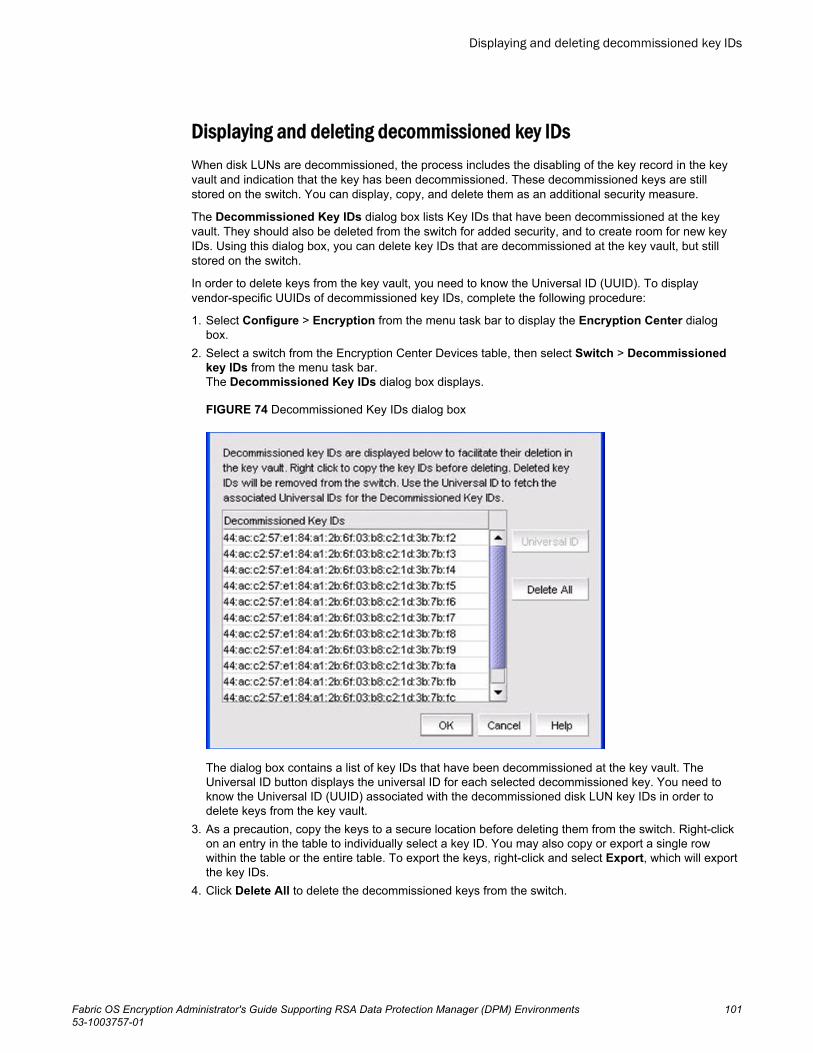
Displaying and deleting decommissioned key IDsWhen disk LUNs are decommissioned, the process includes the disabling of the key record in the keyvault and indication that the key has been decommissioned. These decommissioned keys are stillstored on the switch. You can display, copy, and delete them as an additional security measure.
The Decommissioned Key IDs dialog box lists Key IDs that have been decommissioned at the keyvault. They should also be deleted from the switch for added security, and to create room for new keyIDs. Using this dialog box, you can delete key IDs that are decommissioned at the key vault, but stillstored on the switch.
In order to delete keys from the key vault, you need to know the Universal ID (UUID). To displayvendor-specific UUIDs of decommissioned key IDs, complete the following procedure:
1. Select Configure > Encryption from the menu task bar to display the Encryption Center dialogbox.
2. Select a switch from the Encryption Center Devices table, then select Switch > Decommissionedkey IDs from the menu task bar.The Decommissioned Key IDs dialog box displays.
FIGURE 74 Decommissioned Key IDs dialog box
The dialog box contains a list of key IDs that have been decommissioned at the key vault. TheUniversal ID button displays the universal ID for each selected decommissioned key. You need toknow the Universal ID (UUID) associated with the decommissioned disk LUN key IDs in order todelete keys from the key vault.
3. As a precaution, copy the keys to a secure location before deleting them from the switch. Right-clickon an entry in the table to individually select a key ID. You may also copy or export a single rowwithin the table or the entire table. To export the keys, right-click and select Export, which will exportthe key IDs.
4. Click Delete All to delete the decommissioned keys from the switch.
Displaying and deleting decommissioned key IDs
Fabric OS Encryption Administrator's Guide Supporting RSA Data Protection Manager (DPM) Environments 10153-1003757-01
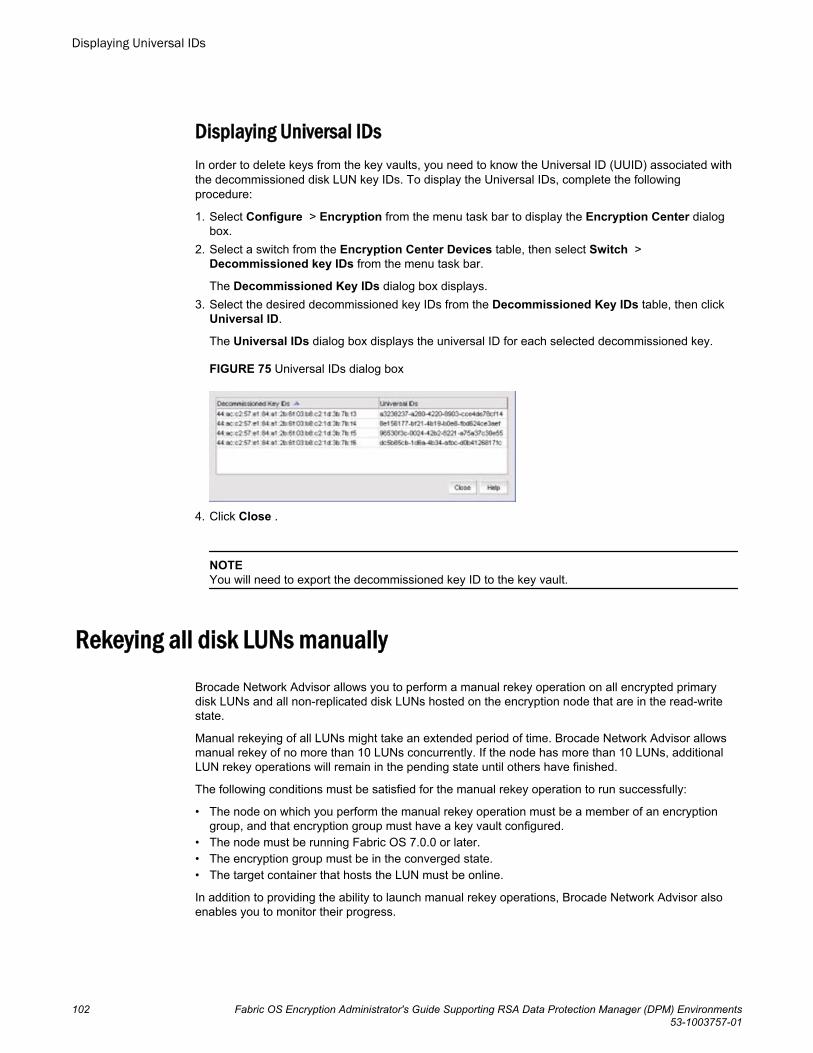
Displaying Universal IDsIn order to delete keys from the key vaults, you need to know the Universal ID (UUID) associated withthe decommissioned disk LUN key IDs. To display the Universal IDs, complete the followingprocedure:
1. Select Configure > Encryption from the menu task bar to display the Encryption Center dialogbox.
2. Select a switch from the Encryption Center Devices table, then select Switch >Decommissioned key IDs from the menu task bar.
The Decommissioned Key IDs dialog box displays.3. Select the desired decommissioned key IDs from the Decommissioned Key IDs table, then click
Universal ID.
The Universal IDs dialog box displays the universal ID for each selected decommissioned key.
FIGURE 75 Universal IDs dialog box
4. Click Close .
NOTEYou will need to export the decommissioned key ID to the key vault.
Rekeying all disk LUNs manuallyBrocade Network Advisor allows you to perform a manual rekey operation on all encrypted primarydisk LUNs and all non-replicated disk LUNs hosted on the encryption node that are in the read-writestate.
Manual rekeying of all LUNs might take an extended period of time. Brocade Network Advisor allowsmanual rekey of no more than 10 LUNs concurrently. If the node has more than 10 LUNs, additionalLUN rekey operations will remain in the pending state until others have finished.
The following conditions must be satisfied for the manual rekey operation to run successfully:
• The node on which you perform the manual rekey operation must be a member of an encryptiongroup, and that encryption group must have a key vault configured.
• The node must be running Fabric OS 7.0.0 or later.• The encryption group must be in the converged state.• The target container that hosts the LUN must be online.
In addition to providing the ability to launch manual rekey operations, Brocade Network Advisor alsoenables you to monitor their progress.
Displaying Universal IDs
102 Fabric OS Encryption Administrator's Guide Supporting RSA Data Protection Manager (DPM) Environments53-1003757-01

Setting disk LUN Re-key AllTo rekey all disk LUNs on an encryption node, complete these steps:
1. Select Configure > Encryption from the menu task bar to display the Encryption Center dialogbox.
2. Select the switch on which to perform a manual rekey from the Encryption Center Devices table,then select Switch > Re-Key All from the menu task bar.
FIGURE 76 Selecting the Re-Key All operation
If REPL support is enabled on the encryption group, a confirmation dialog box displays, askingwhether to rekey mirror LUNs. Click Yes to include mirror LUNs, or click No to exclude mirror LUNs.
A warning displays, requesting confirmation to proceed with the rekey operation.3. Click Yes.
Rekeying operations begin on up to 10 LUNs. If more than 10 LUNs are configured on the switch, theremaining rekey operations are held in the pending state.
4. Open the Encryption Target Disk LUNs dialog box to see LUNs being rekeyed and LUNs pending.a) Select Configure > Encryption from the menu task bar to display the Encryption Center dialog
box.b) Select the encryption switch from the Encryption Center Devices table, then select Targets from
the menu task bar.
The Encryption Targets dialog box displays.5. Select a disk LUN device from the table, then click LUNs.
The Encryption Targets Disk LUNs dialog box displays. The dialog box lists the status of the rekeyoperation.
Setting disk LUN Re-key All
Fabric OS Encryption Administrator's Guide Supporting RSA Data Protection Manager (DPM) Environments 10353-1003757-01

FIGURE 77 Pending manual rekey operations
Viewing disk LUN rekeying detailsYou can view details related to the rekeying of a selected target disk LUN from the LUN Re-keyingDetails dialog box.
1. Select Configure > Encryption from the menu task bar to display the Encryption Center dialogbox.
2. Select a group, switch, or engine from the Encryption Center Devices table, then select Group/Switch/Engine > Targets, or right-click the group, switch, or engine and select Targets.You can also select a group, switch, or engine from the Encryption Center Devices table, thenclick the Targets icon.The Encryption Targets dialog box displays.
3. Select a Target storage device, then select Group/Switch/Engine > Disk LUNs.
The Encryption Target Disk LUNs dialog box displays. Initially the list is empty. You must addLUNs manually.
FIGURE 78 Encryption Target Disk LUNs dialog box
4. Click Add.
Viewing disk LUN rekeying details
104 Fabric OS Encryption Administrator's Guide Supporting RSA Data Protection Manager (DPM) Environments53-1003757-01
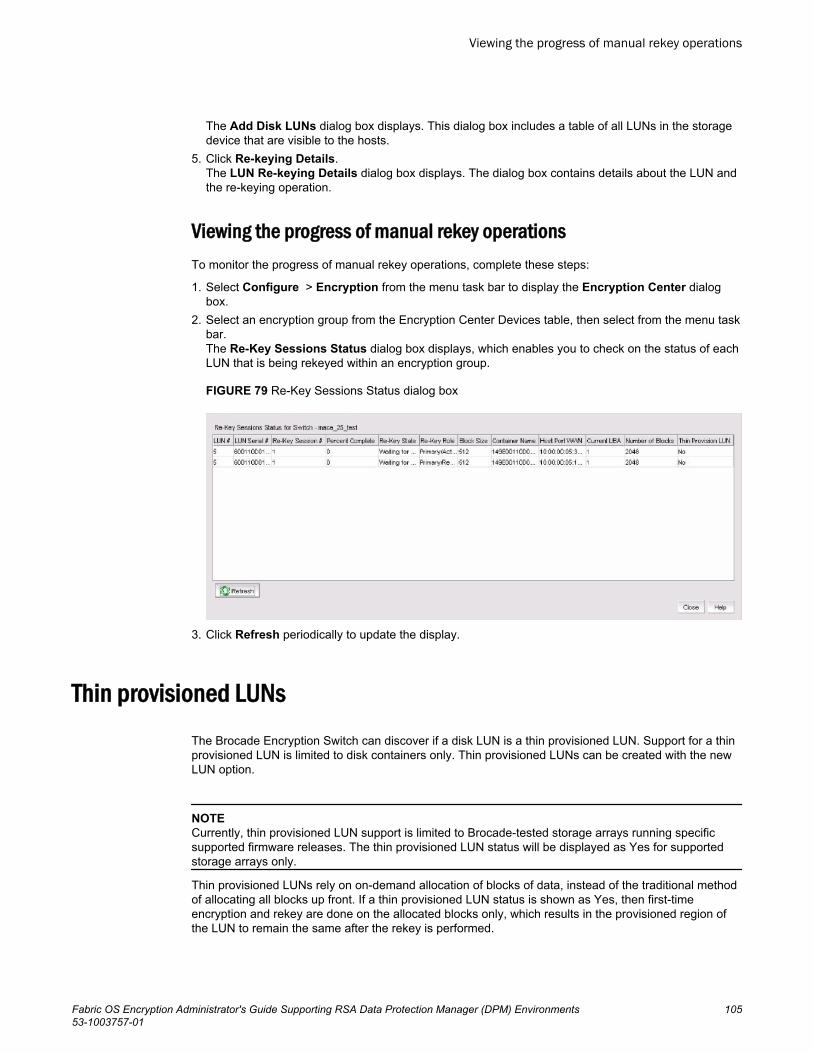
The Add Disk LUNs dialog box displays. This dialog box includes a table of all LUNs in the storagedevice that are visible to the hosts.
5. Click Re-keying Details.The LUN Re-keying Details dialog box displays. The dialog box contains details about the LUN andthe re-keying operation.
Viewing the progress of manual rekey operationsTo monitor the progress of manual rekey operations, complete these steps:
1. Select Configure > Encryption from the menu task bar to display the Encryption Center dialogbox.
2. Select an encryption group from the Encryption Center Devices table, then select from the menu taskbar.The Re-Key Sessions Status dialog box displays, which enables you to check on the status of eachLUN that is being rekeyed within an encryption group.
FIGURE 79 Re-Key Sessions Status dialog box
3. Click Refresh periodically to update the display.
Thin provisioned LUNsThe Brocade Encryption Switch can discover if a disk LUN is a thin provisioned LUN. Support for a thinprovisioned LUN is limited to disk containers only. Thin provisioned LUNs can be created with the newLUN option.
NOTECurrently, thin provisioned LUN support is limited to Brocade-tested storage arrays running specificsupported firmware releases. The thin provisioned LUN status will be displayed as Yes for supportedstorage arrays only.
Thin provisioned LUNs rely on on-demand allocation of blocks of data, instead of the traditional methodof allocating all blocks up front. If a thin provisioned LUN status is shown as Yes, then first-timeencryption and rekey are done on the allocated blocks only, which results in the provisioned region ofthe LUN to remain the same after the rekey is performed.
Viewing the progress of manual rekey operations
Fabric OS Encryption Administrator's Guide Supporting RSA Data Protection Manager (DPM) Environments 10553-1003757-01

Thin provisioned LUN support requires no action by the user. The Brocade Encryption Switch canautomatically detect if a LUN is a thin provisioned LUN.
Note the following:
• For thin provisioned LUNs that were previously full provisioned then converted to thin, adiscoverLUN command must be performed prior to any rekeying operations. Failure to do soresults in the full capacity of the LUN to be encrypted as if it were not thin provisioned. Updated thinprovisioned status can be verified using the cryptocfg --show -container -all -stat command andchecking the output for "Thin Provision LUN: Yes ". Similarly, if a thin- to full-LUN conversionhas been performed, a discoverLUN command must be performed for this LUN change to reflecton the Brocade Encryption Switch or FS8-18 blade.
• If a LUN is a thin provisioned LUN, LUN status is shown as Yes. (Thin provision support is limited toBrocade-tested storage arrays. The thin provisioned LUN status will be displayed as Yes forsupported storage arrays only.)
• If a LUN is not a thin provisioned LUN or if thin provisioning is not supported with the LUN, LUNstatus is shown as No. (This can be a result of the array not supporting thin provisioning, or theBrocade Encryption Switch or blade does not support the thin provisioning features of the array.Refer to the Fabric OS release notes for supported arrays.)
• If LUN status cannot be determined, LUN status is shown as Unknown.• If you are running a Fabric OS version earlier than v7.1.0, LUN status is shown as Not Applicable.• Zero detect with encryption is not supported.
Thin provisioning supportThin-provisioned logical unit numbers (LUNs) are increasingly used to support a pay-as-you-growstrategy for data storage capacity. Also known as dynamic provisioning, virtual LUNs, or thin LUNs,the same technology that allows storage administrators to allocate physical disk space to LUNs on anas-needed basis creates limitations around certain data-at-rest encryption operations that use theBrocade Encryption Switch or blade. Performing first-time encryption (FTE) (conversion of cleartext tociphertext) and data rekeying operations (applying new data encryption keys to ciphertext data) onthin-provisioned LUNs results in an attempt by the encryption switch to overwrite data up to the size ofthe logical size of the thin-provisioned LUN, rather than limiting FTE/rekeying to the size of thephysically allocated LUN size or to the data that has been written. This generally triggers the allocationof additional blocks to the thin-provisioned LUN, using up the amount of physical disk space that isavailable to the LUN and defeating the objective of using thin provisioning.
Additionally, for thin-provision capable storage products that support space reclamation based on datapattern recognition (for example, ‘string of zeros’), the encryption of such patterns will interfere with thespace reclamation functionality of the storage and should be avoided.
Certain types of storage have been successfully tested by limiting the use of thin provisioning to"greenfield" LUNs, or LUNs that do not have any written data yet. Rekeying operations on these LUNs,like FTE, are also not permitted. As these limitations are not feasible for most environments, therecommendation from Brocade is that any encrypted LUNs be fully provisioned with disk.
Viewing time left for auto rekey
You can view the time remaining until auto rekey is no longer active for a disk LUN. The information isexpressed as the difference between the next rekey date and the current date and time, and ismeasured in days, hours, and minutes.
Although you cannot make changes directly to the table, you can modify the time left using the CLI.
To view the time left for auto rekey, follow these steps:
Thin provisioning support
106 Fabric OS Encryption Administrator's Guide Supporting RSA Data Protection Manager (DPM) Environments53-1003757-01

1. Select Configure > Encryption from the menu task bar to display the Encryption Center dialogbox.
2. Select a group, switch, or engine from the Encryption Center Devices table for which to view the autorekey information, then select Group/Switch/Engine > Targets from the menu task bar.You can also select a group, switch, or engine from the Encryption Center Devices table, then clickthe Targets icon.
The Encryption Targets dialog box displays.3. Select a target disk device from the table, then click LUNs.
The Encryption Target Disk LUNs dialog box displays. The time left for auto rekey information islisted in the table.
FIGURE 80 Encryption Targets Disk LUNs dialog box - Time left for auto rekey
Viewing switch encryption properties
To view switch encryption properties, complete the following steps:
1. Select Configure > Encryption from the menu task bar to display the Encryption Center dialogbox.
2. Select a switch or encryption engine from the Encryption Center Devices table, then select Switch/Engine > Properties from the menu task bar, or right-click a switch or encryption engine and selectProperties.You can also select a group, switch, or engine from the Encryption Center Devices table, then clickthe Properties icon.
The Encryption Switch Properties dialog box displays.
Viewing switch encryption properties
Fabric OS Encryption Administrator's Guide Supporting RSA Data Protection Manager (DPM) Environments 10753-1003757-01

FIGURE 81 Encryption Switch Properties dialog box
The Encryption Switch Properties dialog box contains the following information:
• Switch Properties table: A list of properties associated with the selected switch• Public Key Certificate Request text box: The switch’s KAC certificate signing request, which
must be signed by a certificate authority (CA). The signed certificate must then be imported ontothe switch and onto the primary and backup key vaults.
• Encryption Engine Properties table: The properties for the encryption engine. There may be 0to 4 slots, one for each encryption engine in the switch.
From the Encryption Switch Properties dialog box, you can export the certificate signing request(CSR), import a signed public key certificate, and enable or disable the encryption engine state.
Exporting the public key certificate signing request from propertiesTo export the certificate signing request (CSR) under Public Key Certificate Request, complete thefollowing steps.
Exporting the public key certificate signing request from properties
108 Fabric OS Encryption Administrator's Guide Supporting RSA Data Protection Manager (DPM) Environments53-1003757-01
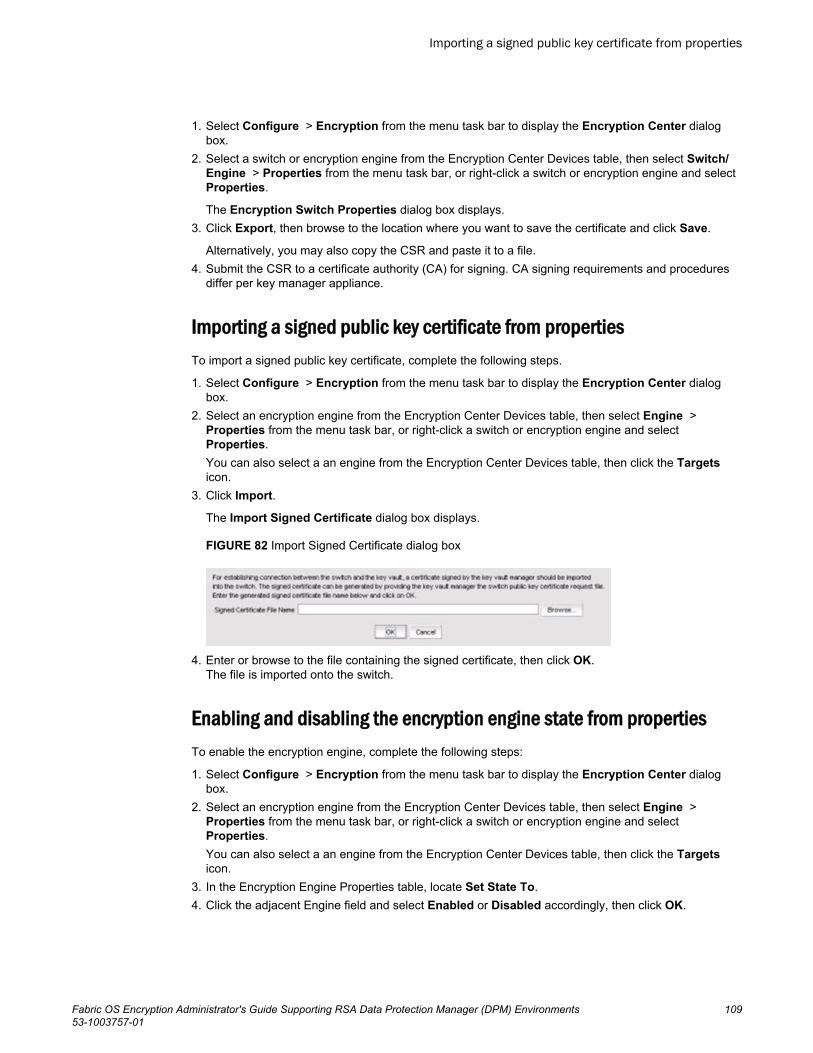
1. Select Configure > Encryption from the menu task bar to display the Encryption Center dialogbox.
2. Select a switch or encryption engine from the Encryption Center Devices table, then select Switch/Engine > Properties from the menu task bar, or right-click a switch or encryption engine and selectProperties.
The Encryption Switch Properties dialog box displays.3. Click Export, then browse to the location where you want to save the certificate and click Save.
Alternatively, you may also copy the CSR and paste it to a file.4. Submit the CSR to a certificate authority (CA) for signing. CA signing requirements and procedures
differ per key manager appliance.
Importing a signed public key certificate from propertiesTo import a signed public key certificate, complete the following steps.
1. Select Configure > Encryption from the menu task bar to display the Encryption Center dialogbox.
2. Select an encryption engine from the Encryption Center Devices table, then select Engine >Properties from the menu task bar, or right-click a switch or encryption engine and selectProperties.You can also select a an engine from the Encryption Center Devices table, then click the Targetsicon.
3. Click Import.
The Import Signed Certificate dialog box displays.
FIGURE 82 Import Signed Certificate dialog box
4. Enter or browse to the file containing the signed certificate, then click OK.The file is imported onto the switch.
Enabling and disabling the encryption engine state from propertiesTo enable the encryption engine, complete the following steps:
1. Select Configure > Encryption from the menu task bar to display the Encryption Center dialogbox.
2. Select an encryption engine from the Encryption Center Devices table, then select Engine >Properties from the menu task bar, or right-click a switch or encryption engine and selectProperties.You can also select a an engine from the Encryption Center Devices table, then click the Targetsicon.
3. In the Encryption Engine Properties table, locate Set State To.4. Click the adjacent Engine field and select Enabled or Disabled accordingly, then click OK.
Importing a signed public key certificate from properties
Fabric OS Encryption Administrator's Guide Supporting RSA Data Protection Manager (DPM) Environments 10953-1003757-01

Viewing encryption group properties
Whenever you add or change a key vault address, you must also load the corresponding key vaultcertificate. When adding or changing a key vault, if the switches in the encryption group have not beenpreviously registered with the new key vault, you must add the switch certificates to the key vault.
To view encryption group properties, complete the following steps.
1. Select Configure > Encryption from the menu task bar to display the Encryption Center dialogbox.
2. Select a group from the Encryption Center Devices table, then select Group > Properties from themenu task bar.You can also select a group from the Encryption Center Devices table, then click the Propertiesicon.
NOTEIf groups are not visible in the Encryption Center Devices table, select View > Groups from themenu task bar.
Unless otherwise specified, the Encryption Group Properties dialog box opens with the Generaltab displayed.
Viewing encryption group properties
110 Fabric OS Encryption Administrator's Guide Supporting RSA Data Protection Manager (DPM) Environments53-1003757-01

FIGURE 83 Encryption Group Properties dialog box
Removing a switch from an encryption group
You cannot remove the group leader unless it is the only switch in the group.
1. Select Configure > Encryption from the menu task bar to display the Encryption Center dialogbox.
2. Select a group from the Encryption Center Devices table, then select Group > Properties from themenu task bar.
NOTEIf groups are not visible in the Encryption Center Devices table, select View > Groups from the menutask bar.
Removing a switch from an encryption group
Fabric OS Encryption Administrator's Guide Supporting RSA Data Protection Manager (DPM) Environments 11153-1003757-01

3. Select the Members tab.4. Select the switch you want to remove and click Remove.
The switch is removed from the encryption group. The HA cluster and target container associated withthe switch are also removed.
If you remove the last switch from a group (the group leader), the HA cluster, target container, andtape pool associated with the switch are also removed, and the group is deleted.
NOTEIf the encryption group is in a degraded state, the HA clusters and target containers associated withthe switch are not removed. In this case, an error message displays.
Consequences of removing an encryption switchThe consequences of removing a switch from an encryption group are as follows:
• All configured targets on the switch are deleted from the switch’s configuration.• Any encryption being performed by the switch is halted.• If the removed switch was in an HA cluster, the switch can no longer provide HA support. HA
clusters that contained the encryption engine from the removed switch are deleted.
The consequences of removing the last switch in a group (which will be the group leader) are allswitch removal consequences noted above, plus the following:
• The encryption group is deleted.• All configured tape pools are deleted.
The following table explains the impact of removing switches.
Switch removal impactTABLE 2
Switch configuration Impact of removal
The switch is the only switch inthe encryption group.
The encryption group is also removed.
The switch has configuredencryption targets on encryptionengines.
• The switch is configured to encrypt traffic to one or more encryption targets.• The target container configuration is removed.• The encrypted data remains on the encryption target but is not usable until
the encryption target is manually configured on another encryption switch.
CAUTION
The encryption target data is visible in encrypted format to zoned hosts.It is strongly recommended that you remove the encryption targets fromall zones before you disable encryption. Otherwise, hosts might corruptthe encrypted data by writing directly to the encryption target withoutencryption.
The switch has encryptionengines in HA clusters.
The HA clusters are removed. High availability is no longer provided to theother encryption engine in each HA cluster.
Consequences of removing an encryption switch
112 Fabric OS Encryption Administrator's Guide Supporting RSA Data Protection Manager (DPM) Environments53-1003757-01

A warning message is displayed when you attempt to remove a switch or an encryption group. After youhave read the warning, you must click Yes to proceed.
Tape pools overviewTape cartridges and volumes can be organized into a tape pool (a collection of tape media). The samedata encryption keys are used for all cartridges and volumes in the pool. Tape pools are used bybackup application programs to group all tape volumes used in a single backup or in a backup plan. Thetape pool name or number used must be the same name or number used by the host backupapplication. If the same tape pool name or number is configured for an encryption group, tapes in thattape pool are encrypted according to the tape pool settings instead of the tape LUN settings.
Encryption switches and encryption blades support tape encryption at the tape pool level (for mostbackup applications) and at the LUN (tape drive) level. Since Tape Pool policies override the LUN (tapedrive) policies, the LUN pool policies are used only if no tape pools exist or if the tape media/volumedoes not belong to any configured tape pools.
All encryption engines in the encryption group share the tape pool definitions. Tapes can be encryptedby any encryption engine in the group where the container for the tape target LUN is hosted. The tapemedia is mounted on the tape target LUN.
Tape pool definitions are not needed to read a tape. The tape contains enough information (encryptionmethod and key ID) to read the tape. Tape pool definitions are only used when writing to tape. Tapepool names and numbers must be unique within the encryption group.
Adding tape poolsA tape pool can be identified by either a name or a number, but not both. Tape pool names andnumbers must be unique within the encryption group. When a new encryption group is created, anyexisting tape pools in the switch are removed and must be added.
1. Select Configure > Encryption from the menu task bar to display the Encryption Center dialogbox.
2. Select a group from the Encryption Center Devices table, then select Group > Tape Pools from themenu task bar.
NOTEIf groups are not visible in the Encryption Center Devices table, select View > Groups from themenu task bar.
3. Click Add.
The Add Tape Pool dialog box displays. The Name tape pool label type is the default; however, youcan change the tape pool label type to Number .
Tape pools overview
Fabric OS Encryption Administrator's Guide Supporting RSA Data Protection Manager (DPM) Environments 11353-1003757-01

FIGURE 84 Add Tape Pool by name dialog box
FIGURE 85 Add Tape Pool by number dialog box
4. Based on your selection, do one of the following:
• If you selected Name as the Tape Pool Label Type, enter a name for the tape pool. This namemust match the tape pool label or tape ID that is configured on the tape backup/restoreapplication.
• If you selected Number as the Tape Pool Label Type, enter a (hex) number for the tape pool.This number must match the tape pool label or tape number that is configured on the tapebackup/restore application.
5. Select the Encryption Mode.Note the following:
• The Key Lifespan (days) field is editable only if the tape pool is encrypted.• If Clear Text is selected as the encryption mode, the key lifespan is disabled.
NOTEYou cannot change the encryption mode after the tape pool I/O begins.
6. Enter the number of days to use a key before obtaining a new one, if you choose to enforce a keylifespan. The default is Infinite (a blank field or a value of 0), which is the recommended setting.
Configuring Encryption Using the Management Application
114 Fabric OS Encryption Administrator's Guide Supporting RSA Data Protection Manager (DPM) Environments53-1003757-01

NOTEThe key lifespan interval represents the key expiry timeout period for tapes or tape pools. You canonly enter the Key Lifespan field if the tape pool is encrypted. If Clear Text is selected as theencryption mode, the Key Lifespan field is disabled.
7. Click OK.
Encryption-related acronyms in log messagesFabric OS log messages related to encryption components and features may have acronymsembedded that require interpretation. Table 3 lists some of those acronyms.
Encryption acronymsTABLE 3
Acronym Name
EE Encryption Engine
EG Encryption Group
HAC High Availability Cluster
Encryption-related acronyms in log messages
Fabric OS Encryption Administrator's Guide Supporting RSA Data Protection Manager (DPM) Environments 11553-1003757-01

Encryption-related acronyms in log messages
116 Fabric OS Encryption Administrator's Guide Supporting RSA Data Protection Manager (DPM) Environments53-1003757-01

Configuring Encryption Using the CLI
● Overview....................................................................................................................... 117● Command validation checks......................................................................................... 118● Command RBAC permissions and AD types................................................................118● Cryptocfg Help command output...................................................................................121● Management LAN configuration....................................................................................122● Configuring cluster links................................................................................................ 122● Setting encryption node initialization.............................................................................124● Steps for connecting to a DPM appliance..................................................................... 125● Generating and backing up the master key for DPM.................................................... 132● Adding a member node to an encryption group............................................................ 134● High availability clusters................................................................................................136● Re-exporting a master key............................................................................................ 141● Enabling the encryption engine.....................................................................................143● Zoning considerations................................................................................................... 144● CryptoTarget container configuration............................................................................146● Crypto LUN configuration..............................................................................................152● Impact of tape LUN configuration changes................................................................... 160● Configuring a multi-path Crypto LUN............................................................................ 161● Decommissioning LUNs................................................................................................164● Decommissioning replicated LUNs............................................................................... 166● Force-enabling a decommissioned disk LUN for encryption.........................................167● Force-enabling a disabled disk LUN for encryption...................................................... 168● Remote replication LUNs.............................................................................................. 168● Using SRDF, TimeFinder, and RecoverPoint with encryption...................................... 171● Configuring LUNs for SRDF/TF or RP deployments.....................................................172● SRDF/TF/RP manual rekeying procedures...................................................................176● Tape pool configuration.................................................................................................181● First-time encryption......................................................................................................184● Thin provisioned LUNs..................................................................................................185● Data rekeying ............................................................................................................... 188
OverviewThis chapter explains how to use the command line interface (CLI) to configure a Brocade EncryptionSwitch, or an FS8-18 Encryption blade in a DCX Backbone chassis to perform data encryption.
This chapter assumes that the basic setup and configuration of the Brocade Encryption Switch andDCX Backbone chassis have been done as part of the initial hardware installation, including setting themanagement port IP address.
For command syntax and description of parameters, refer to the Fabric OS Command ReferenceManual
Fabric OS Encryption Administrator's Guide Supporting RSA Data Protection Manager (DPM) Environments 11753-1003757-01

Command validation checksBefore a command is executed, it is validated against the following: Active or Standby availability,RBAC availability, Admin Domain availability, and PortMember in the Admin Domain.
1. Active or Standby availability: on enterprise-class platforms, checks that the command is availableon the Control Processor (CP).
2. Role Based Access Control (RBAC) availability: checks that the invoking user’s role is permitted toinvoke the command. If the command modifies system state, the user's role must have modifypermission for the command. If the command only displays system state, the user's role must haveobserve permission for the command. Some commands both observe and modify system state andthus require observe-modify permission. The following RBAC permissions are supported:
• O = observe• OM = observe-modify• N = none/not available
3. Admin Domain availability: checks that the command is allowed in the currently selected AdminDomain. For information on Admin Domain concepts and restrictions, refer to the Fabric OSAdministrator's Guide.
Admin Domain Types are one or more of the following. If more than one AD type is listed for acommand, the AD type is option-specific. Display options may be allowed, but set options may besubject to Admin Domain restrictions.
SwitchMember Allowed to execute only if the local switch is part of the current AD.
Allowed Allowed to execute in all ADs.
PhysFabricOnly Allowed to execute only in AD255 context (and the user should own access to AD0-AD255 and have admin RBAC privilege).
Disallowed Allowed to execute in AD0 or AD255 context only; not allowed in AD1-AD254 context.
AD0Disallowed Allowed to execute only in AD255 and AD0 (if no ADs are configured).
AD0Only Allowed to execute only in AD0 when ADs are not configured.
Command-specific Checks whether the command is supported on the platform for which it is targeted.
4. PortMember: allows all control operations only if the port or the local switch is part of the currentAD. View access is allowed if the device attached to the port is part of the current AD.
Command RBAC permissions and AD typesTwo RBAC roles are permitted to perform Encryption operations.
• Admin and SecurityAdmin
Users authenticated with the Admin and SecurityAdmin RBAC roles may perform cryptographicfunctions assigned to the FIPS Crypto Officer, including the following:
‐ Perform encryption node initialization.‐ Enable cryptographic operations.‐ Manage I/O functions for critical security parameters (CSPs).
Command validation checks
118 Fabric OS Encryption Administrator's Guide Supporting RSA Data Protection Manager (DPM) Environments53-1003757-01
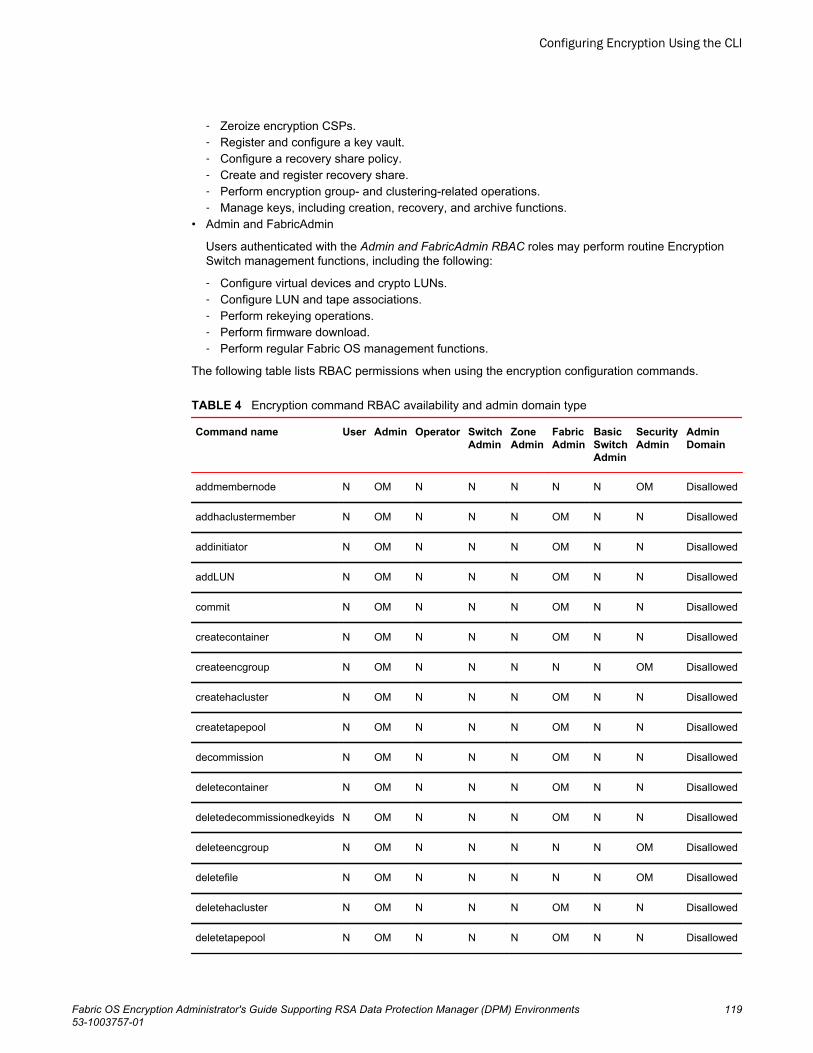
‐ Zeroize encryption CSPs.‐ Register and configure a key vault.‐ Configure a recovery share policy.‐ Create and register recovery share.‐ Perform encryption group- and clustering-related operations.‐ Manage keys, including creation, recovery, and archive functions.
• Admin and FabricAdmin
Users authenticated with the Admin and FabricAdmin RBAC roles may perform routine EncryptionSwitch management functions, including the following:
‐ Configure virtual devices and crypto LUNs.‐ Configure LUN and tape associations.‐ Perform rekeying operations.‐ Perform firmware download.‐ Perform regular Fabric OS management functions.
The following table lists RBAC permissions when using the encryption configuration commands.
Encryption command RBAC availability and admin domain typeTABLE 4
Command name User Admin Operator SwitchAdmin
ZoneAdmin
FabricAdmin
BasicSwitchAdmin
SecurityAdmin
AdminDomain
addmembernode N OM N N N N N OM Disallowed
addhaclustermember N OM N N N OM N N Disallowed
addinitiator N OM N N N OM N N Disallowed
addLUN N OM N N N OM N N Disallowed
commit N OM N N N OM N N Disallowed
createcontainer N OM N N N OM N N Disallowed
createencgroup N OM N N N N N OM Disallowed
createhacluster N OM N N N OM N N Disallowed
createtapepool N OM N N N OM N N Disallowed
decommission N OM N N N OM N N Disallowed
deletecontainer N OM N N N OM N N Disallowed
deletedecommissionedkeyids N OM N N N OM N N Disallowed
deleteencgroup N OM N N N N N OM Disallowed
deletefile N OM N N N N N OM Disallowed
deletehacluster N OM N N N OM N N Disallowed
deletetapepool N OM N N N OM N N Disallowed
Configuring Encryption Using the CLI
Fabric OS Encryption Administrator's Guide Supporting RSA Data Protection Manager (DPM) Environments 11953-1003757-01
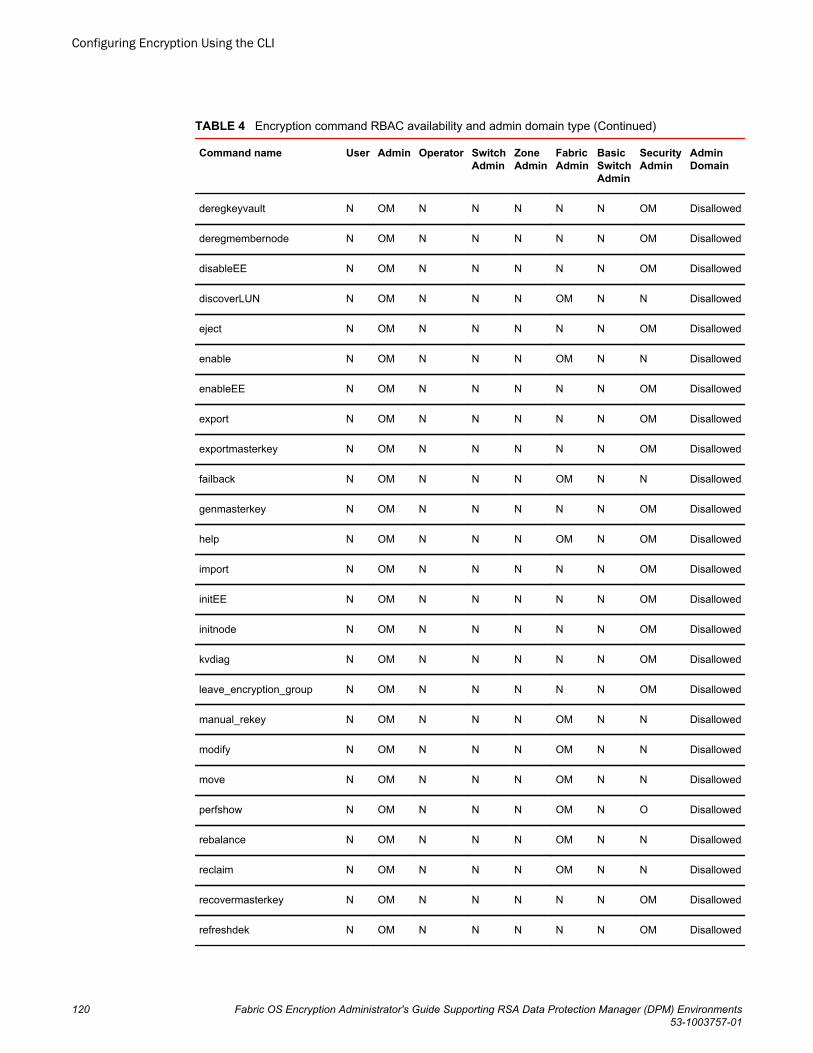
Encryption command RBAC availability and admin domain type (Continued)TABLE 4
Command name User Admin Operator SwitchAdmin
ZoneAdmin
FabricAdmin
BasicSwitchAdmin
SecurityAdmin
AdminDomain
deregkeyvault N OM N N N N N OM Disallowed
deregmembernode N OM N N N N N OM Disallowed
disableEE N OM N N N N N OM Disallowed
discoverLUN N OM N N N OM N N Disallowed
eject N OM N N N N N OM Disallowed
enable N OM N N N OM N N Disallowed
enableEE N OM N N N N N OM Disallowed
export N OM N N N N N OM Disallowed
exportmasterkey N OM N N N N N OM Disallowed
failback N OM N N N OM N N Disallowed
genmasterkey N OM N N N N N OM Disallowed
help N OM N N N OM N OM Disallowed
import N OM N N N N N OM Disallowed
initEE N OM N N N N N OM Disallowed
initnode N OM N N N N N OM Disallowed
kvdiag N OM N N N N N OM Disallowed
leave_encryption_group N OM N N N N N OM Disallowed
manual_rekey N OM N N N OM N N Disallowed
modify N OM N N N OM N N Disallowed
move N OM N N N OM N N Disallowed
perfshow N OM N N N OM N O Disallowed
rebalance N OM N N N OM N N Disallowed
reclaim N OM N N N OM N N Disallowed
recovermasterkey N OM N N N N N OM Disallowed
refreshdek N OM N N N N N OM Disallowed
Configuring Encryption Using the CLI
120 Fabric OS Encryption Administrator's Guide Supporting RSA Data Protection Manager (DPM) Environments53-1003757-01

Encryption command RBAC availability and admin domain type (Continued)TABLE 4
Command name User Admin Operator SwitchAdmin
ZoneAdmin
FabricAdmin
BasicSwitchAdmin
SecurityAdmin
AdminDomain
regEE N OM N N N N N OM Disallowed
regKACcert N OM N N N N N OM Disallowed
regKAClogin N OM N N N N N OM Disallowed
regkeyvault N OM N N N N N OM Disallowed
regmembernode N OM N N N N N OM Disallowed
removehaclustermember N OM N N N OM N N Disallowed
removeinitiator N OM N N N OM N N Disallowed
removeLUN N OM N N N OM N N Disallowed
replace N OM N N N OM N N Disallowed
resume_rekey N OM N N N OM N N Disallowed
set N OM N N N N N OM Disallowed
show N OM N N N O N OM Disallowed
transabort N OM N N N OM N N Disallowed
transshow N OM N N N OM N O Disallowed
zeroizeEE N OM N N N N N OM Disallowed
Legend: O = observe, OM = observe-modify, N = none/not available
Cryptocfg Help command outputAll encryption operations are done using the cryptocfg command. The cryptocfg command has a helpoutput that lists all options.
switch:admin> cryptocfg --help Usage: cryptocfg--help -nodecfg: Display the synopsis of node parameter configuration.--help -groupcfg: Display the synopsis of group parameter configuration.--help -hacluster: Display the synopsis of hacluster parameter configuration.--help -devicecfg: Display the synopsis of device container parameter configuration.--help -transcfg: Display the synopsis of transaction management.switch:admin> cryptocfg --help -nodecfg
Cryptocfg Help command output
Fabric OS Encryption Administrator's Guide Supporting RSA Data Protection Manager (DPM) Environments 12153-1003757-01

Usage: cryptocfg--help -nodecfg: Display the synopsis of node parameter configuration.--initnode: Initialize the node for configuration of encryption options.--initEE [<slotnumber>]: Initialize the specified encryption engine.--regEE [<slotnumber>]: Register a previously initialized encryption blade.--reg -membernode <member node WWN> <member node certfile> <IP addr>: Register a member node with the system.(output truncated)
Management LAN configurationEach encryption switch has one GbE management port. In the case of a DCX Backbone chassis withFS8-18 blades installed, management ports are located on the CP blades. The management port IPaddress is normally set as part of the hardware installation. A static IP address should be assigned. Toeliminate DNS traffic and potential security risks related to DHCP, DHCP should not be used.
For encryption switches and blades, the management port is used to communicate with a keymanagement system, and a secure connection must be established between the management portand the key management system. All switches you plan to include in an encryption group must beconnected to the key management system. Only IPv4 addressing is currently supported. All nodes,including the key management system, must use the same version of IP addressing.
Configuring cluster links
Each encryption switch or FS8-18 blade has two gigabit Ethernet ports labeled Ge0 and Ge1. TheGe0 and Ge1 ports connect encryption switches and FS8-18 blades to other encryption switches andFS8-18 blades. These two ports are bonded together as a single virtual network interface. Only one IPaddress is used. The ports provide link layer redundancy, and are collectively referred to as the clusterlink.
NOTEDo not confuse the gigabit Ethernet ports with the management and console ports, which are alsoRJ-45 ports located close to the gigabit Ethernet ports.
All encryption switches or blades in an encryption group must be interconnected by their cluster linksthrough a dedicated LAN. Both ports of each encryption switch or blade must be connected to thesame IP network and the same subnet. Static IP addresses should be assigned. Neither VLANs norDHCP should be used.
1. Log in to the switch as Admin or FabricAdmin.2. Configure the IP address using the ipAddrSet command. Only Ge0 needs to be configured. Always
use ipAddrSet -eth0 to configure the address. If an address is assigned to ge1 (-eth1), it isaccepted and stored, but it is ignored. Only IPv4 addresses are supported for cluster links.
The following example configures a static IP address and gateway address for the bondedinterface.
switch:admin> ipaddrset -eth0 --add 10.32.33.34/23switch:admin> ipaddrset -gate --add 10.32.1.1
Management LAN configuration
122 Fabric OS Encryption Administrator's Guide Supporting RSA Data Protection Manager (DPM) Environments53-1003757-01
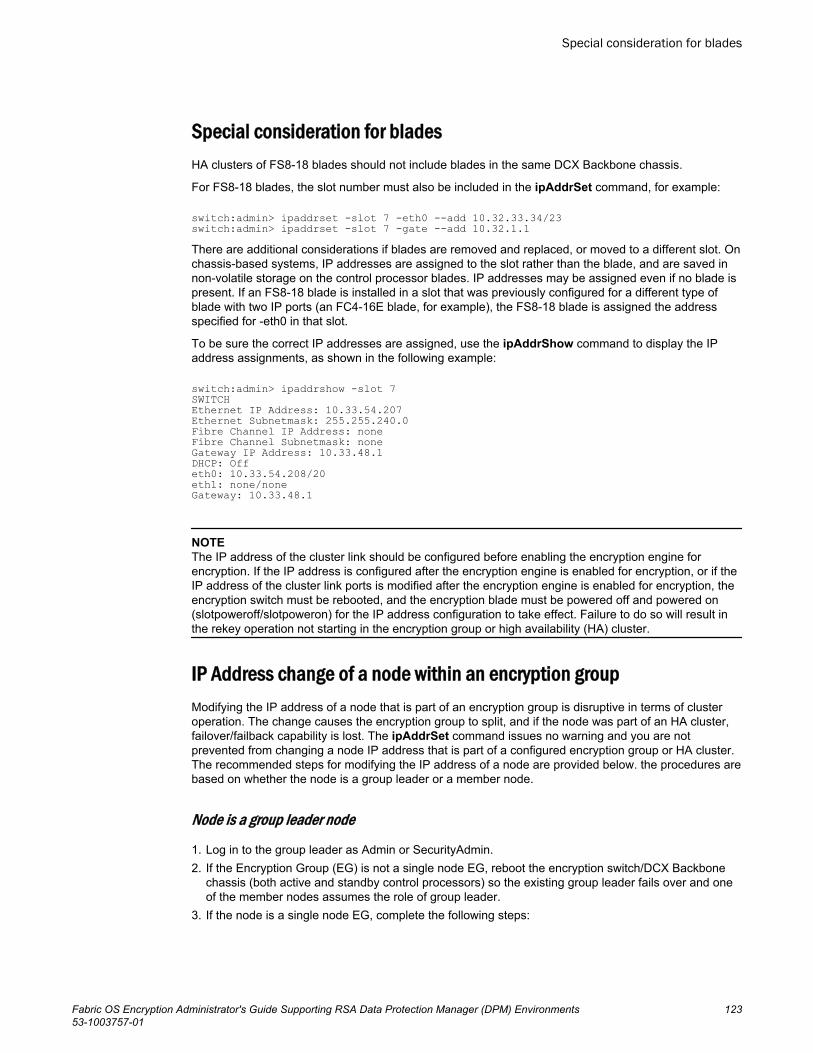
Special consideration for bladesHA clusters of FS8-18 blades should not include blades in the same DCX Backbone chassis.
For FS8-18 blades, the slot number must also be included in the ipAddrSet command, for example:
switch:admin> ipaddrset -slot 7 -eth0 --add 10.32.33.34/23switch:admin> ipaddrset -slot 7 -gate --add 10.32.1.1There are additional considerations if blades are removed and replaced, or moved to a different slot. Onchassis-based systems, IP addresses are assigned to the slot rather than the blade, and are saved innon-volatile storage on the control processor blades. IP addresses may be assigned even if no blade ispresent. If an FS8-18 blade is installed in a slot that was previously configured for a different type ofblade with two IP ports (an FC4-16E blade, for example), the FS8-18 blade is assigned the addressspecified for -eth0 in that slot.
To be sure the correct IP addresses are assigned, use the ipAddrShow command to display the IPaddress assignments, as shown in the following example:
switch:admin> ipaddrshow -slot 7SWITCHEthernet IP Address: 10.33.54.207Ethernet Subnetmask: 255.255.240.0Fibre Channel IP Address: noneFibre Channel Subnetmask: noneGateway IP Address: 10.33.48.1DHCP: Offeth0: 10.33.54.208/20eth1: none/noneGateway: 10.33.48.1
NOTEThe IP address of the cluster link should be configured before enabling the encryption engine forencryption. If the IP address is configured after the encryption engine is enabled for encryption, or if theIP address of the cluster link ports is modified after the encryption engine is enabled for encryption, theencryption switch must be rebooted, and the encryption blade must be powered off and powered on(slotpoweroff/slotpoweron) for the IP address configuration to take effect. Failure to do so will result inthe rekey operation not starting in the encryption group or high availability (HA) cluster.
IP Address change of a node within an encryption groupModifying the IP address of a node that is part of an encryption group is disruptive in terms of clusteroperation. The change causes the encryption group to split, and if the node was part of an HA cluster,failover/failback capability is lost. The ipAddrSet command issues no warning and you are notprevented from changing a node IP address that is part of a configured encryption group or HA cluster.The recommended steps for modifying the IP address of a node are provided below. the procedures arebased on whether the node is a group leader or a member node.
Node is a group leader node
1. Log in to the group leader as Admin or SecurityAdmin.2. If the Encryption Group (EG) is not a single node EG, reboot the encryption switch/DCX Backbone
chassis (both active and standby control processors) so the existing group leader fails over and oneof the member nodes assumes the role of group leader.
3. If the node is a single node EG, complete the following steps:
Special consideration for blades
Fabric OS Encryption Administrator's Guide Supporting RSA Data Protection Manager (DPM) Environments 12353-1003757-01

a) Delete the encryption group.b) Change the IP of the switch.c) Create the encryption group.
4. After the encryption group is converged, complete the steps noted in Node is a member node onpage 124.
Node is a member node
1. Log in to the group leader as Admin or SecurityAdmin.2. Eject and deregister the node from the encryption group.3. Change the IP address of the member node using the new IP address.4. Reboot the member node (the node on which the IP address has been modified).5. Register the node with the group leader using new IP address.
Setting encryption node initialization
When an encryption node is initialized, the following security parameters and certificates aregenerated:
• FIPS crypto officer• FIPS user• Node CP certificate• A signed Key Authentication Center (KAC) certificate• A KAC Certificate Signing Request (CSR)
From the standpoint of external SAN management application operations, the FIPS crypto officer,FIPS user, and node CP certificates are transparent to users. The KAC certificates are required foroperations with key managers. In most cases, KAC certificate signing requests must be sent to aCertificate Authority (CA) for signing to provide authentication before the certificate can be used. In allcases, signed KACs must be present on each switch.
1. Initialize the Brocade Encryption Switch node.
SecurityAdmin:switch> cryptocfg --initnodeOperation succeeded.
2. Zeroize all critical security parameters (CSPs) on the encryption engine.
SecurityAdmin:switch> cryptocfg --zeroizeEE [slotnumber]This will zeroize all critical security parametersARE YOU SURE (yes, y, no, n): [no]yOperation succeeded.
3. Initialize the new encryption engine.
SecurityAdmin:switch> cryptocfg --initEE [slotnumber]Operation succeeded.
4. Register the encryption engine.
SecurityAdmin:switch> cryptocfg --regEE [slotnumber]Operation succeeded.
5. Enable the encryption engine.
SecurityAdmin:switch> cryptocfg --enableEE [slotnumber
Node is a member node
124 Fabric OS Encryption Administrator's Guide Supporting RSA Data Protection Manager (DPM) Environments53-1003757-01

]Operation succeeded.
6. Check the encryption engine state using following command to ensure encryption engine is online:
SecurityAdmin:switch> cryptocfg --show -localEE
Steps for connecting to a DPM applianceAll switches you plan to include in an encryption group must have a secure connection to the DataProtection Manager (DPM).
The following procedure is a suggested order of steps for creating a secure connection to DPM.
NOTEDPM is formerly referred to as RKM. DPM 3.x servers are referred to as DPM. DPM is compatible withFabric OS 7.1.0 and later. RSA servers using the RKM 2.1.1 client are compatible with earlier FabricOS versions (for example, v7.0.1) are still referred to as RKM.
1. Initialize the encryption engines on every Fabric OS encryption node that is expected to performencryption within the fabric.
2. Export the KAC CSR to a location accessible to a certificate authority (CA) for signing.3. Submit the KAC CSR for signing by a CA.4. Import the signed certificate into the Fabric OS encryption node.5. Upload the CA certificate onto the DPM key vault.6. Upload the KAC certificate onto the DPM appliance, then select the appropriate key classes.7. If dual DPM appliances are used for high availability, the DPM appliances must be clustered and
must operate in maximum availability mode, as described in the DPM appliance user documentation.8. Create a Brocade encryption group.9. Register the DPM on the group leader by exporting the CA certificate for the CA that signed the DPM
certificate.
NOTEThe Brocade Encryption Switch does not use the Identity Auto Enrollment feature supported withDPM 3.x servers. You must complete the identity enrollment manually to configure the DPM 3.xserver with the Brocade Encryption Switch. Refer to Client registration for manual enrollment on page130.
Initializing the Fabric OS encryption enginesYou must perform a series of encryption engine initialization steps on every Fabric OS encryption node(switch or blade) that is expected to perform encryption within the fabric.
NOTEThe initialization process overwrites any authentication data and certificates that reside on the node andthe security processor.
If this is not a first-time initialization, make sure to export the master key by running cryptocfg --exportmasterkey and cryptocfg --export -scp -currentMK before running cryptocfg --initEE.
Steps for connecting to a DPM appliance
Fabric OS Encryption Administrator's Guide Supporting RSA Data Protection Manager (DPM) Environments 12553-1003757-01

1. Log in to the switch as Admin or SecurityAdmin.2. Synchronize the time on the switch and the key manager appliance.
They should be within one minute of each other. Differences in time can invalidate certificates andcause key vault operations to fail.
3. NOTENode initialization overwrites any existing authentication data on the node.
Initialize the node by entering the cryptocfg --initnode command.
SecurityAdmin:switch> cryptocfg --initnodeThis will overwrite all identification and authentication dataARE YOU SURE (yes, y, no, n): [no] y Notify SPM of Node CfgOperation succeeded.Successful execution generates the following security parameters and certificates:
• Node CP certificate• Key Archive Client (KAC) certificate
4. Zeroize all critical security parameters (CSPs) on the switch by entering the cryptocfg --zeroizeEEcommand. Provide a slot number if the encryption engine is a blade.
SecurityAdmin:switch> cryptocfg --zeroizeEEThis will zeroize all critical security parametersARE YOU SURE (yes, y, no, n): [no]yOperation succeeded.Zeroization leaves the switch or blade in the faulted state. The switch or blade is rebootedautomatically.
5. Initialize the encryption engine using the cryptocfg --initEE command. Provide a slot number if theencryption engine is a blade.
SecurityAdmin:switch> cryptocfg --initEEThis will overwrite previously generated identificationand authentication dataARE YOU SURE (yes, y, no, n): yOperation succeeded.This step generates critical security parameters (CSPs) and certificates in the CryptoModule’ssecurity processor (SP). The CP and the SP perform a certificate exchange to register respectiveauthorization data.
6. Register the encryption engine using the cryptocfg --regEE command. Provide a slot number if theencryption engine is a blade.
SecurityAdmin:switch> cryptocfg --regEEOperation succeeded.This step registers the encryption engine with the CP or chassis. Successful execution results in acertificate exchange between the encryption engine and the CP through the FIPS boundary.
7. Enable the encryption engine encryption services:
SecurityAdmin:switch> cryptocfg --enableEEOperation succeeded.
8. Repeat the above steps on every node that is expected to perform encryption.
Configuring Encryption Using the CLI
126 Fabric OS Encryption Administrator's Guide Supporting RSA Data Protection Manager (DPM) Environments53-1003757-01

Exporting the KAC certificate signing request (CSR)You can export the KAC CSR from the switch to file on a LAN-attached host, or you can attach a USBstorage device to the switch and export the KAC CSR to that device.
NOTEThe CSR is exported in Privacy Enhanced Mail (.pem) format. The is the format required in exchangeswith certificate authorities.
1. Log in to the Brocade Encryption Switch on which the CSR was generated as Admin orSecurityAdmin.
2. Export the CSR from the switch over an SCP-protected LAN connection to a file on an external host(for example, your workstation), or to a mounted USB device.If you export the CSR to a USB storage device, you must remove the storage device from the switchand attach it to a computer that has access to a third-party CA. The CSR must be submitted to a CA.
The following example exports a CSR to an external SCP-capable host at IP address192.168.38.245.
SecurityAdmin:switch> cryptocfg --export -scp -KACcsr 192.168.38.245 mylogin /tmp/certs/kac_dpm_cert.pemPassword:Operation succeeded.The following example exports a CSR to USB storage.
SecurityAdmin:switch> cryptocfg --export -usb KACcsr kac_dpm_cert.pemOperation succeeded.
Submitting the CSR to a certificate authorityThe CSR must be submitted to a Certificate Authority (CA) to be signed.
The CA is a trusted third-party entity that signs the CSR. Several CAs are available and proceduresvary, but the general steps are as follows:
1. Open an SSL/TLS connection to an X.509 server.2. Submit the CSR for signing.3. Request the signed certificate.
Generally, a public key, the signed KAC certificate, and a signed CA certificate are returned.4. Download and store the signed certificates.
The following example submits a CSR to the demoCA from RSA:
cd /opt/CA/demoCAopenssl x509 -req -sha1 -CAcreateserial -in certs/<Switch CSR Name> -days 365 -CA cacert.pem -CAkey private/cakey.pem -out newcerts/<Switch Cert Name>
You can change the number of days that a certificate will expire based on your site's security policies.
Exporting the KAC certificate signing request (CSR)
Fabric OS Encryption Administrator's Guide Supporting RSA Data Protection Manager (DPM) Environments 12753-1003757-01

Importing the signed KAC certificateThe signed KAC certificate must be imported into the Brocade Encryption Switch or blade thatgenerated the CSR and then registered.
You can import the signed KAC certificate to the switch from a file on a LAN attached host, or you canwrite it to a USB storage device, attach the USB storage device to the switch or blade, and import thecertificate from that device. The following describes both options:
1. Log in to the switch on which to import the certificate as Admin or SecurityAdmin.2. Enter the cryptocfg --import command with the appropriate parameters.
The following example imports a certificate named kac_signed_cert.pem that was previouslyexported to the external host 192.168.38.245. Certificates are imported to a predetermined directoryon the node.
SecurityAdmin:switch> cryptocfg --import -scp kac_signed_cert.pem 192.168.38.245 mylogin /tmp/certs/kac_signed_cert.pemPassword:Operation succeeded.The following example imports a certificate named kac_signed_cert.pem that was previouslyexported to USB storage.
SecurityAdmin:switch> cryptocfg --import -usb kac_signed_cert.pem kac_signed_cert.pemOperation succeeded.
3. Register the KAC certificate.
SecurityAdmin:switch> cryptocfg --reg -KACcert kac_signed_cert.pem primary4. Repeat steps 1 through 3 for every node in the encryption group.
Uploading the CA certificate onto the DPM appliance (and first-timeconfigurations)After an encryption group is created, you need to install the signing authority certificate (CA certificate)onto the DPM appliance.
You will need the URLs of the DPM appliance setup page and the RSA management user interface.You must also have the proper authority level, user name, and password for each.
1. Open a web browser and connect to the DPM appliance setup page.2. Select the Operations tab, and then select Certificate Upload.3. In the SSLCAcertificateFile field, enter the full local path of the CA certificate.
Do not use the UNC naming convention format.4. Select Upload, Configure SSL, and Restart Webserver.5. After the web server restarts, enter the root password.6. Open another web browser window, and start the RSA management user interface.7. NOTE
The Identity Group name used in the next step might not exist in a freshly installed DPM. Toestablish an Identity Group name, click the Identity Group tab, and create a name. The nameHardware Retail Group is used as an example in the following steps.
Select the Key Classes tab.The key classes must be created only once, regardless of the number of nodes in your encryptiongroup or the number of encryption groups that will be sharing this DPM.
Importing the signed KAC certificate
128 Fabric OS Encryption Administrator's Guide Supporting RSA Data Protection Manager (DPM) Environments53-1003757-01

• kcn.1998-01.com.brocade:DEK_AES_256_XTS• kcn.1998-01.com.brocade:DEK_AES_256_CCM• kcn.1998-01.com.brocade:DEK_AES_256_GCM• kcn.1998-01.com.brocade:DEK_AES_256_ECB
a) Click Create.b) Type the key name string into the Name field.c) Select Hardware Retail Group for Identity Group.d) Deselect Activated Keys Have Duration.e) Select AES for Algorithm.f) Select 256 for Key Size.g) Select the Mode for the respective key classes as follows:
• XTS for Key Class "kcn.1998-01.com.brocade:DEK_AES_256_XTS"• CBC for Key Class "kcn.1998-01.com.brocade:DEK_AES_256_CCM"• CBC for Key Class "kcn.1998-01.com.brocade:DEK_AES_256_GCM"• ECB for Key Class "kcn.1998-01.com.brocade:DEK_AES_256_ECB"
h) Click Next.i) Repeat step a through step h for each key class.j) Click Finish.
Uploading the KAC certificate onto the DPM appliance (manual identityenrollment)The Brocade Encryption Switch will not use the Identity Auto Enrollment feature supported with DPM3.x servers. You must complete the identity enrollment manually to configure the DPM 3.x server withthe Brocade Encryption Switch as described in this section.
You need to install the switch public key certificate (KAC certificate). For each encryption node,manually create an identity as follows:
1. Select the Identities tab.2. Click Create.3. Enter a label for the node in the Name field.
This is a user-defined identifier.4. Select the Hardware Retail Group in the Identity Groups field.5. Select the Operational User role in the Authorization field.6. Click Browse and select the imported certificate as the Identity certificate.7. Click Save.
The CA certificate file referenced in the SSLCAcertificateFile field must be imported and registered onthe switch designated as an encryption group leader. You might want to note this location beforeloading the CA certificate onto the encryption group leader.
Creating a Brocade encryption groupAn encryption group consists of one or more encryption engines. Encryption groups can providefailover/failback capabilities by organizing encryption engines into Data Encryption Key (DEK) clusters.
An encryption group has the following properties:
Uploading the KAC certificate onto the DPM appliance (manual identity enrollment)
Fabric OS Encryption Administrator's Guide Supporting RSA Data Protection Manager (DPM) Environments 12953-1003757-01

• It is identified by a user-defined name.• If an encryption group contains more than one node, the group must be managed from a
designated group leader.• If an encryption group consists of one node only, that node must be defined as an encryption group
leader.• All group members must share the same key manager.• The same master key is used for all encryption operations in the group.• In the case of FS8-18 blades:
‐ All encryption engines in a chassis are part of the same encryption group.‐ An encryption group may contain up to four DCX Backbone nodes with a maximum of four
encryption engines per node, forming a total of 16 encryption engines.
To create a Brocade encryption group, complete the following steps:
1. Identify one node (a Brocade Encryption Switch, or Brocade DCX Backbone chassis with anFS8-18 blade) as the designated group leader and log in as Admin or SecurityAdmin.
2. Enter the cryptocfg --create -encgroup command followed by a name of your choice.The name can be up to 15 characters long, and can include any alphanumeric characters andunderscores. White space or other special characters are not permitted.
The following example creates the encryption group brocade.
SecurityAdmin:switch> cryptocfg --create -encgroup brocadeEncryption group create status: Operation Succeeded.
The switch on which you create the encryption group becomes the designated group leader. After youhave created an encryption group, all group-wide operations are performed on the group leader.
Client registration for manual enrollmentFor new deployments, identity enrollment must be performed manually for the Brocade EncryptionSwitch to connect with the DPM 3.x servers.
When you migrate to Fabric OS 7.1.0 or higher from an earlier Fabric OS version, client registration isperformed automatically and no user intervention is required during the upgrade process.
Once completed, client registration occurs after key vault registration, when the Brocade EncryptionSwitch attempts to connect to the DPM server for the first time.
During registration of the key vault on the Brocade Encryption Switch, the following configuration filesare created:
• Init file: This file is created under /etc/fabos/certs/sw0/DpmInit.cfg. The init file contains staticconfiguration information. A sample init file is provided.
svcType=transportSvcconfigName=https_cfg_1clientCredentialFile=/etc/fabos/certs/sw0/kac.p12clientTrustedRoots=/etc/fabos/certs/sw0/kv.pemclientCredentialPassword=Password1client.registrationfile=/etc/fabos/certs/sw0/DpmReg_10.37.39.33address=https://10.37.39.33/KMS/rpc/emuport=443responseTimeout=10connectRetries=0connectTimeout=10certHostnameVerification=falseFIPSMode=falsesvcType=cacheSvcconfigName=cache_cfg_1nonPersistentCache=falsepersistentCacheFile=applicationId=B10_00_00_05_1e_53_89_eb
Client registration for manual enrollment
130 Fabric OS Encryption Administrator's Guide Supporting RSA Data Protection Manager (DPM) Environments53-1003757-01

cachePassword=Password1svcType=logSvcconfigName=log_cfg_1error=falsewarning=falseaudit=false
• Registration File: This file is created as /etc/fabos/certs/sw0/DpmReg_<KV IP>. The registration filecontains the current registration status of the client. A sample registration file before successfulregistration with the DPM server is provided.
client.registration_state = 0client.actmgmt_enable = 0client.app_name = B10_00_00_05_1e_53_89_ebclient.actmgmt_poll_interval = 0During a successful key vault connection and client registration, the registration file is updated withthe information provided by the DPM server. A sample registration file showing successfulregistration with the DPM server is provided.
client.actmgmt_enable = 0client.policy_signature =jGvUbFqw4iw64YB0MHrSbMeaVN9hd7EXFFQkUFMxd71kUd0NWSjl/pJO5mt4quppYdsvllgyXge8NdTbvsOGdtDGJxjpvRjQyi4YqWm/kzLiFlwRGMKcf2kkhDMdW3Is+cvUBmLJNiPkNCJ7xAYVaJ2tpWiQ/mBJfrTw7uuCcZY=client.rkm_svr_public_key =MIGfMA0GCSqGSIb3DQEBAQUAA4GNADCBiQKBgQC1Q73enodAh4FOY3YobU7d+DO6LZynnzbmYQSztn+JzxuuvUgzakKtKJO5FD+nWnDpcz9dd8ZHY7Gq2IMQBl5GL8Sjw6eGOklw7qG5LojlcuizXJ6hBk7sp1fEw1PRHb5v219IqoplAVB8masw+eYb9T0gssQQRepTGrmqzCCAXQIDAQABclient.app_id =0eeef136-f84b-4cd8-9d1a-1c5cdf86bd12-db26194e-9883-4aa6-8d62-ca98420fd016client.policy_name = DEFAULT_POLICYclient.applicationpolicy = 000102030405060708091011client.app_name = B10_00_00_05_1e_53_89_ebclient.registration_state = 3When the registration process is completed successfully, the registration state will be 3. If the state is0, registration is in progress.
DPM key vault high availability deploymentWhen dual DPM appliances are used for high availability, the DPM appliances must be clustered andmust operate in maximum availability mode, as described in the DPM appliance user documentation.
When dual DPM appliances are clustered, they are accessed using an IP load balancer. For a completehigh-availability deployment, the multiple IP load balancers are clustered, and the IP load balancercluster exposes a virtual IP address called a floating IP address. The floating IP address must beregistered on the Fabric OS encryption group leader using the cryptocfg --reg -keyvault command.
Neither the secondary DPM appliance nor individual DPM appliance IP addresses should be registered.The command to register a secondary DPM appliance is blocked.
Registering DPM on a Fabric OS encryption group leaderYou need to know the download location for the CA certificate. The path to the file was entered in theSSLCAcertificateFile field when you uploaded the CA certificate to the DPM appliance.
Also, if you are using an DPM cluster for high availability, you will need the virtual IP address.
1. Log in as Admin or SecurityAdmin.2. Set the key vault type to DPM by entering the cryptocfg --set -keyvault command.
DPM key vault high availability deployment
Fabric OS Encryption Administrator's Guide Supporting RSA Data Protection Manager (DPM) Environments 13153-1003757-01

The following example sets the keyvault type to DPM:
SecurityAdmin:switch> cryptocfg --set -keyvault DPMSet key vault status: Operation Succeeded.Successful execution sets the key vault type for the entire encryption group.
3. Import and register DPM on the group leader using the CA certificate for the CA that signed theDPM key vault certificate.The group leader automatically shares this information with other group members. It might take aminute to complete the operation.
SecurityAdmin:switch> cryptocfg --import -scp <CA certificate file> <host IP> <host username> <host path>SecurityAdmin:switch> cryptocfg --reg -keyvault <CA certificate file> <DPM IP> primary
NOTEIf you are using an DPM cluster for high availability, the IP address specified as <DPM IP> is thevirtual IP address of the DPM cluster.
4. As the switches come up, enable the encryption engines.
SecurityAdmin:switch> cryptocfg --enableEEOperation succeeded.
Generating and backing up the master key for DPM
You must generate a master key on the group leader, and export it to a secure backup location so thatit can be restored, if necessary. The master key is used to encrypt DEKs for transmission to and froma DPM.
The backup location may be a DPM, a local file, or a secure external SCP-capable host. All threeoptions are shown in the following procedure. Note that the Brocade SAN management applicationprovides the additional option of backing up the master key to system cards.
1. Generate the master key on the group leader.
SecurityAdmin:switch> cryptocfg --genmasterkeyMaster key generated. The master key should beexported before further operations are performed.
2. Export the master key to the key vault. Make a note of the key ID and the passphrase. You willneed the Key ID and passphrase should you have to restore the master key from the key vault.
SecurityAdmin:switch> cryptocfg --exportmasterkeyEnter the passphrase: passphraseMaster key exported. Key ID: 8f:88:45:32:8e:bf:eb:44:c4:bc:aa:2a:c1:69:94:2
3. Save the master key to a file.
SecurityAdmin:switch> cryptocfg --exportmasterkey -fileMaster key file generated.
4. Export the master key to an SCP-capable external host:
SecurityAdmin:switch> cryptocfg --export -scp -currentMK \192.168.38.245 mylogin GL_MK.mkPassword:Operation succeeded.
5. Display the group configuration.
SecurityAdmin:switch> cryptocfg --show -groupcfgEncryption Group Name: brocade
Generating and backing up the master key for DPM
132 Fabric OS Encryption Administrator's Guide Supporting RSA Data Protection Manager (DPM) Environments53-1003757-01
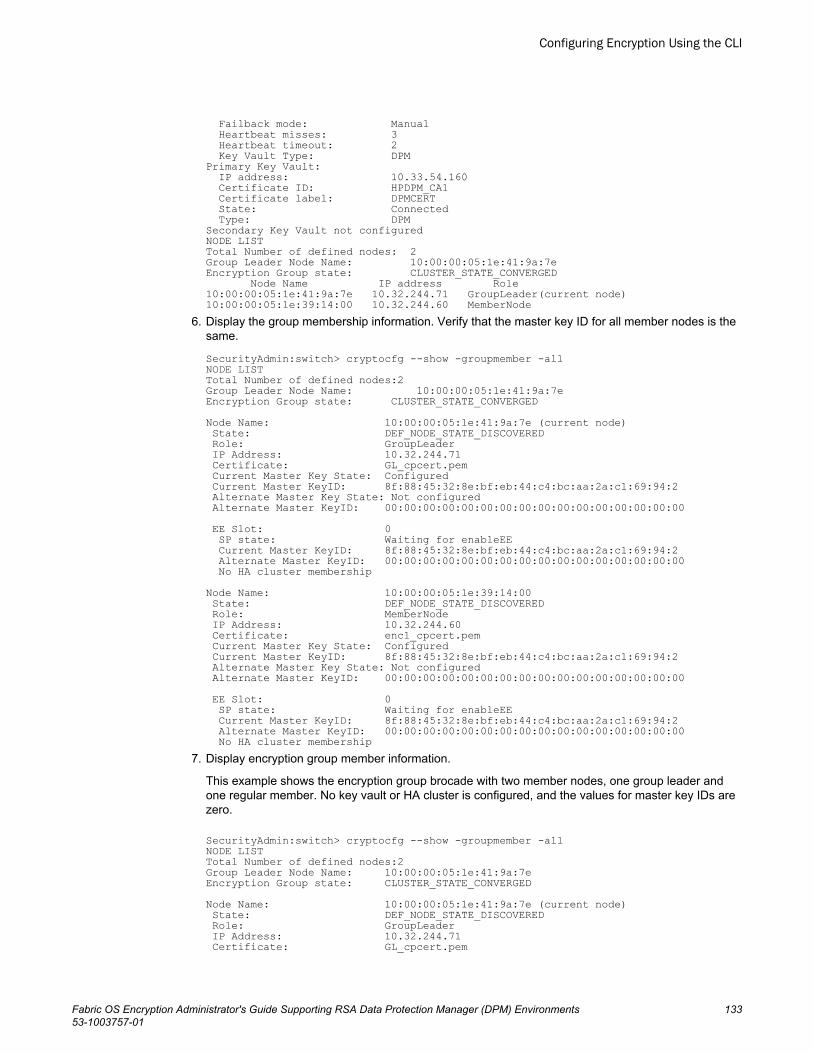
Failback mode: Manual Heartbeat misses: 3 Heartbeat timeout: 2 Key Vault Type: DPMPrimary Key Vault: IP address: 10.33.54.160 Certificate ID: HPDPM_CA1 Certificate label: DPMCERT State: Connected Type: DPMSecondary Key Vault not configuredNODE LISTTotal Number of defined nodes: 2Group Leader Node Name: 10:00:00:05:1e:41:9a:7eEncryption Group state: CLUSTER_STATE_CONVERGED Node Name IP address Role10:00:00:05:1e:41:9a:7e 10.32.244.71 GroupLeader(current node)10:00:00:05:1e:39:14:00 10.32.244.60 MemberNode
6. Display the group membership information. Verify that the master key ID for all member nodes is thesame.
SecurityAdmin:switch> cryptocfg --show -groupmember -allNODE LISTTotal Number of defined nodes:2Group Leader Node Name: 10:00:00:05:1e:41:9a:7eEncryption Group state: CLUSTER_STATE_CONVERGEDNode Name: 10:00:00:05:1e:41:9a:7e (current node) State: DEF_NODE_STATE_DISCOVERED Role: GroupLeader IP Address: 10.32.244.71 Certificate: GL_cpcert.pem Current Master Key State: Configured Current Master KeyID: 8f:88:45:32:8e:bf:eb:44:c4:bc:aa:2a:c1:69:94:2 Alternate Master Key State: Not configured Alternate Master KeyID: 00:00:00:00:00:00:00:00:00:00:00:00:00:00:00:00 EE Slot: 0 SP state: Waiting for enableEE Current Master KeyID: 8f:88:45:32:8e:bf:eb:44:c4:bc:aa:2a:c1:69:94:2 Alternate Master KeyID: 00:00:00:00:00:00:00:00:00:00:00:00:00:00:00:00 No HA cluster membershipNode Name: 10:00:00:05:1e:39:14:00 State: DEF_NODE_STATE_DISCOVERED Role: MemberNode IP Address: 10.32.244.60 Certificate: enc1_cpcert.pem Current Master Key State: Configured Current Master KeyID: 8f:88:45:32:8e:bf:eb:44:c4:bc:aa:2a:c1:69:94:2 Alternate Master Key State: Not configured Alternate Master KeyID: 00:00:00:00:00:00:00:00:00:00:00:00:00:00:00:00 EE Slot: 0 SP state: Waiting for enableEE Current Master KeyID: 8f:88:45:32:8e:bf:eb:44:c4:bc:aa:2a:c1:69:94:2 Alternate Master KeyID: 00:00:00:00:00:00:00:00:00:00:00:00:00:00:00:00 No HA cluster membership
7. Display encryption group member information.
This example shows the encryption group brocade with two member nodes, one group leader andone regular member. No key vault or HA cluster is configured, and the values for master key IDs arezero.
SecurityAdmin:switch> cryptocfg --show -groupmember -allNODE LISTTotal Number of defined nodes:2Group Leader Node Name: 10:00:00:05:1e:41:9a:7eEncryption Group state: CLUSTER_STATE_CONVERGEDNode Name: 10:00:00:05:1e:41:9a:7e (current node) State: DEF_NODE_STATE_DISCOVERED Role: GroupLeader IP Address: 10.32.244.71 Certificate: GL_cpcert.pem
Configuring Encryption Using the CLI
Fabric OS Encryption Administrator's Guide Supporting RSA Data Protection Manager (DPM) Environments 13353-1003757-01

Current Master Key State: Not configured Current Master KeyID: 00:00:00:00:00:00:00:00:00:00:00:00:00:00:00:00 Alternate Master Key State:Not configured Alternate Master KeyID: 00:00:00:00:00:00:00:00:00:00:00:00:00:00:00:00 EE Slot: 0 SP state: Operational; Need Valid KEK Current Master KeyID: 00:00:00:00:00:00:00:00:00:00:00:00:00:00:00:00 Alternate Master KeyID: 00:00:00:00:00:00:00:00:00:00:00:00:00:00:00:00 No HA cluster membershipNode Name: 10:00:00:05:1e:39:14:00 State: DEF_NODE_STATE_DISCOVERED Role: MemberNode IP Address: 10.32.244.60 Certificate: enc1_cpcert.pem Current Master Key State: Not configured Current Master KeyID: 00:00:00:00:00:00:00:00:00:00:00:00:00:00:00:00 Alternate Master Key State:Not configured Alternate Master KeyID: 00:00:00:00:00:00:00:00:00:00:00:00:00:00:00:00 EE Slot: 0 SP state: Unknown State Current Master KeyID: 00:00:00:00:00:00:00:00:00:00:00:00:00:00:00:00 Alternate Master KeyID: 00:00:00:00:00:00:00:00:00:00:00:00:00:00:00:00 No HA cluster membership
Adding a member node to an encryption group
Before adding a member node to an encryption group, ensure that the node has been properlyinitialized and that all encryption engines are in an enabled state.
During the initialization phase a set of key pairs and certificates are generated on every node. Thesecertificates are used for mutual identification and authentication with other group members and withthe key vault. Every device must have a certificate in order to participate in a deployment of encryptionservices. Some devices must have each other’s certificates in order to communicate.
After adding the member node to the encryption group, the following operations can still be performedon the member node if necessary. Initially, these commands should not be necessary if theinitialization procedure was followed:
• cryptocfg --initEE• cryptocfg --regEE• cryptocfg --enableEE
CAUTION
After adding the member node to the encryption group, you should not use the cryptocfg --zeroizeEE command on that node. Doing so removes critical information from the node andmakes it necessary to re-initialize the node and export the new KAC certificate to the groupleader and the key vault.
To add a member node to an encryption group, follow these steps:
1. Log in to the switch on which the certificate was generated as Admin or FabricAdmin.2. Execute the cryptocfg --reclaimWWN -cleanup command.3. Log in as Admin or SecurityAdmin.4. Export the certificate from the local switch to an SCP-capable external host or to a mounted USB
device. Enter the cryptocfg --export command with the appropriate parameters.
Adding a member node to an encryption group
134 Fabric OS Encryption Administrator's Guide Supporting RSA Data Protection Manager (DPM) Environments53-1003757-01

When exporting a certificate to a location other than your home directory, you must specify a fullyqualified path that includes the target directory and file name. When exporting to USB storage,certificates are stored by default in a predetermined directory, and you only need to provide a filename for the certificate. The file name must be given a .pem (privacy enhanced mail) extension. Usea character string that identifies the certificate’s originator, such as the switch name or IP address.
The following example exports a CP certificate from an encryption group member to an externalSCP-capable host and stores it as enc_switch1_cp_cert.pem.
SecurityAdmin:switch> cryptocfg --export -scp CPcert \192.168.38.245 mylogin /tmp/certs/enc_switch1_cp_cert.pemPassword:Operation succeeded.The following example exports a CP certificate from the local node to USB storage.
SecurityAdmin:switch> cryptocfg --export -usb CPcert enc_switch1_cp_cert.pemOperation succeeded.
5. Use the cryptocfg --import command to import the CP certificates to the group leader node.
You must import the CP certificate of each node you wish to add to the encryption group.
The following example imports a CP certificate named "enc_switch1_cp_cert.pem" that waspreviously exported to the external host 192.168.38.245. Certificates are imported to apredetermined directory on the group leader.
SecurityAdmin:switch> cryptocfg --import -scp enc_switch1_cp_cert.pem \192.168.38.245 mylogin /tmp/certs/enc_switch1_cp_cert.pemPassword:Operation succeeded.The following example imports a CP certificate named "enc_switch1_cp_cert.pem" that waspreviously exported to USB storage.
SecurityAdmin:switch> cryptocfg --import -usb enc_switch1_cp_cert.pem \enc_switch1_cp_cert.pemOperation succeeded.
NOTEIf the maximum number of certificates is exceeded you are prompted to delete any unusedcertificates using the cryptocfg --delete -file command and then try again.
6. Enter the cryptocfg --show -file -all command on the group leader to verify that you have importedall necessary certificates.
The following example shows the member node CP certificate that was imported earlier to the groupleader.
SecurityAdmin:switch> cryptocfg --show -file -allFile name: enc_switch1_cp_cert.pem, size: 1338 bytes
7. On the group leader, register each node you are planning to include in the encryption group. Enterthe cryptocfg --reg -membernode command with appropriate parameters to register the membernode.
Specify the member node’s WWN, Certificate filename, and IP address when executing thiscommand.
SecurityAdmin:switch> cryptocfg --reg -membernode \10:00:00:05:1e:39:14:00 enc_switch1_cert.pem 10.32.244.60Operation succeeded.
Configuring Encryption Using the CLI
Fabric OS Encryption Administrator's Guide Supporting RSA Data Protection Manager (DPM) Environments 13553-1003757-01

NOTEThe order in which member node registration is performed defines group leader succession. At anygiven time there is only one active group leader in an encryption group. The group leadersuccession list specifies the order in which group leadership is assumed if the current group leaderis not available.
Successful execution of this command distributes all necessary node authentication data to theother members of the group.
8. Display encryption group member information.
This example shows the encryption group "brocade" with two member nodes, one group leader andone regular member. No key vault or HA cluster is configured, and the values for master key IDsare zero.
SecurityAdmin:switch> cryptocfg --show -groupmember -allNODE LISTTotal Number of defined nodes:2Group Leader Node Name: 10:00:00:05:1e:41:9a:7eEncryption Group state: CLUSTER_STATE_CONVERGEDNode Name: 10:00:00:05:1e:41:9a:7e (current node) State: DEF_NODE_STATE_DISCOVERED Role: GroupLeader IP Address: 10.32.244.71 Certificate: GL_cpcert.pem Current Master Key State: Not configured Current Master KeyID: 00:00:00:00:00:00:00:00:00:00:00:00:00:00:00:00 Alternate Master Key State:Not configured Alternate Master KeyID: 00:00:00:00:00:00:00:00:00:00:00:00:00:00:00:00 EE Slot: 0 SP state: Operational; Need Valid KEK Current Master KeyID: 00:00:00:00:00:00:00:00:00:00:00:00:00:00:00:00 Alternate Master KeyID: 00:00:00:00:00:00:00:00:00:00:00:00:00:00:00:00 No HA cluster membershipNode Name: 10:00:00:05:1e:39:14:00 State: DEF_NODE_STATE_DISCOVERED Role: MemberNode IP Address: 10.32.244.60 Certificate: enc1_cpcert.pem Current Master Key State: Not configured Current Master KeyID: 00:00:00:00:00:00:00:00:00:00:00:00:00:00:00:00 Alternate Master Key State:Not configured Alternate Master KeyID: 00:00:00:00:00:00:00:00:00:00:00:00:00:00:00:00 EE Slot: 0 SP state: Unknown State Current Master KeyID: 00:00:00:00:00:00:00:00:00:00:00:00:00:00:00:00 Alternate Master KeyID: 00:00:00:00:00:00:00:00:00:00:00:00:00:00:00:00 No HA cluster membership
High availability clustersA high availability (HA) cluster consists of exactly two encryption engines configured to host the sameCryptoTargets and to provide Active/Standby failover and failback capabilities in a single fabric.Failover is automatic (not configurable). Failback occurs automatically by default, but is configurablewith a manual failback option. All encryption engines in an encryption group share the same DEK for adisk or tape LUN.
NOTEThe CLI does not allow creation of an HA cluster if the node is not in the encryption group.
High availability clusters
136 Fabric OS Encryption Administrator's Guide Supporting RSA Data Protection Manager (DPM) Environments53-1003757-01

HA cluster configuration rulesThe following rules apply when configuring an HA cluster:
• The encryption engines that are part of an HA cluster must belong to the same encryption group andbe part of the same fabric.
• An HA cluster cannot span fabrics and it cannot provide failover/failback capability within a fabrictransparent to host MPIO software.
• HA cluster configuration and related operations must be performed on the group leader.• HA clusters of FS8-18 blades should not include blades in the same DCX Backbone chassis.
NOTEHA cluster creation is blocked when encryption engines belonging to FS8-18 blades in the same DCXBackbone Chassis are specified.
• Cluster links must be configured before creating an HA cluster. Refer to the section Configuringcluster links on page 122 for instructions.
• Configuration changes must be committed before they take effect. Any operation related to an HAcluster that is performed without a commit operation will not survive across switch reboots, powercycles, CP failover, or HA reboots.
ATTENTIONAll nodes in an Encryption Group (EG) must be running the same Fabric OS version. Make sure all ofthe nodes in the EG have the same Fabric OS before you commit the changes.
• It is recommended that the HA cluster configuration be completed before you configure storagedevices for encryption.
• It is mandatory that the two encryption engines in the HA cluster belong to two different nodes fortrue redundancy. This is always the case for Brocade Encryption Switches, but is not true if twoFS8-18 blades in the same DCX Backbone Chassis are configured in the same HA cluster. HAcluster creation is blocked when encryption engines belonging to FS8-18 blades in the same DCXBackbone Chassis are specified.
Creating an HA cluster1. Log in to the group leader as Admin or FabricAdmin.2. Enter the cryptocfg --create -hacluster command.
Specify a name for the HA cluster and optionally add the node WWN of the encryption engine youwish to include in the HA cluster. Provide a slot number if the encryption engine is a blade.
The following example creates an HA cluster named "HAC1" with two encryption engines.
FabricAdmin:switch> cryptocfg --create -hacluster HAC 10:00:00:05:1e:51:94:00 2 10:00:00:05:1e:55:3a:f0 0 Slot Local/ EE Node WWN Number Remote10:00:00:05:1e:51:94:00 2 Local Slot Local/ EE Node WWN Number Remote10:00:00:05:1e:55:3a:f0 0 RemoteOperation succeeded.
3. Enter cryptocfg --commit to commit the transaction.
Any transaction remains in the defined state until it is committed. The commit operation fails if the HAcluster has less than two members.
HA cluster configuration rules
Fabric OS Encryption Administrator's Guide Supporting RSA Data Protection Manager (DPM) Environments 13753-1003757-01
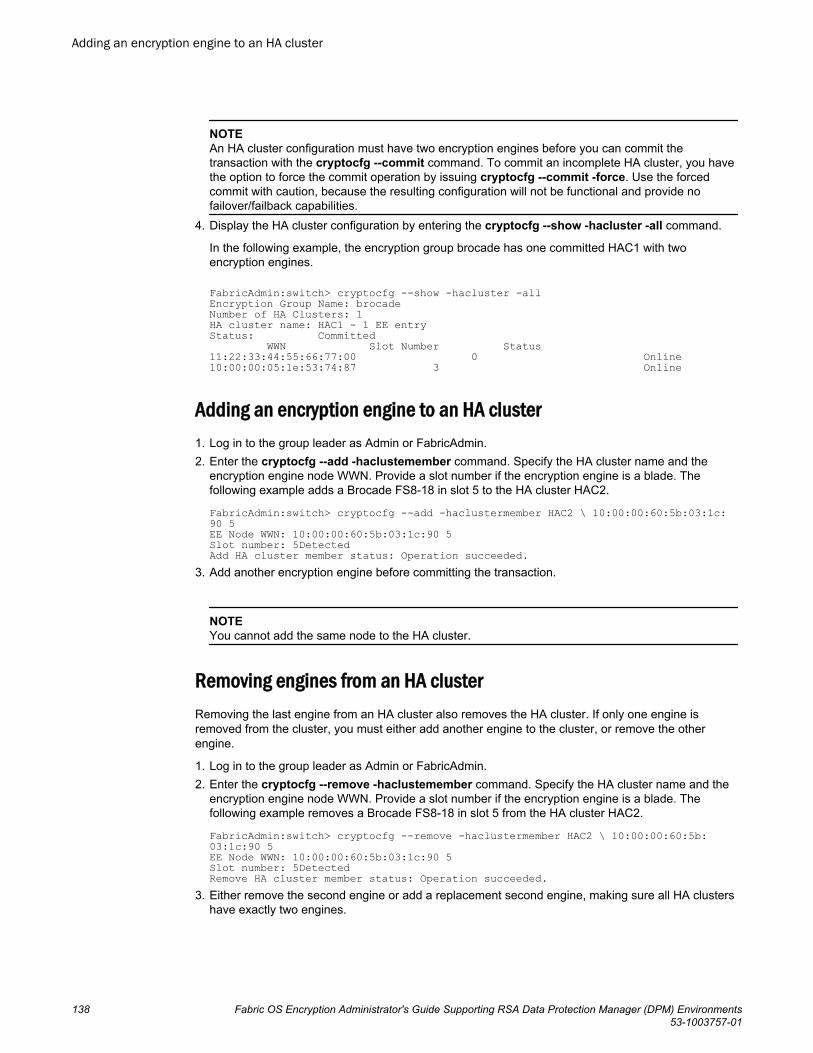
NOTEAn HA cluster configuration must have two encryption engines before you can commit thetransaction with the cryptocfg --commit command. To commit an incomplete HA cluster, you havethe option to force the commit operation by issuing cryptocfg --commit -force. Use the forcedcommit with caution, because the resulting configuration will not be functional and provide nofailover/failback capabilities.
4. Display the HA cluster configuration by entering the cryptocfg --show -hacluster -all command.
In the following example, the encryption group brocade has one committed HAC1 with twoencryption engines.
FabricAdmin:switch> cryptocfg --show -hacluster -allEncryption Group Name: brocadeNumber of HA Clusters: 1HA cluster name: HAC1 - 1 EE entryStatus: Committed WWN Slot Number Status11:22:33:44:55:66:77:00 0 Online10:00:00:05:1e:53:74:87 3 Online
Adding an encryption engine to an HA cluster1. Log in to the group leader as Admin or FabricAdmin.2. Enter the cryptocfg --add -haclustemember command. Specify the HA cluster name and the
encryption engine node WWN. Provide a slot number if the encryption engine is a blade. Thefollowing example adds a Brocade FS8-18 in slot 5 to the HA cluster HAC2.
FabricAdmin:switch> cryptocfg --add -haclustermember HAC2 \ 10:00:00:60:5b:03:1c:90 5EE Node WWN: 10:00:00:60:5b:03:1c:90 5 Slot number: 5DetectedAdd HA cluster member status: Operation succeeded.
3. Add another encryption engine before committing the transaction.
NOTEYou cannot add the same node to the HA cluster.
Removing engines from an HA clusterRemoving the last engine from an HA cluster also removes the HA cluster. If only one engine isremoved from the cluster, you must either add another engine to the cluster, or remove the otherengine.
1. Log in to the group leader as Admin or FabricAdmin.2. Enter the cryptocfg --remove -haclustemember command. Specify the HA cluster name and the
encryption engine node WWN. Provide a slot number if the encryption engine is a blade. Thefollowing example removes a Brocade FS8-18 in slot 5 from the HA cluster HAC2.
FabricAdmin:switch> cryptocfg --remove -haclustermember HAC2 \ 10:00:00:60:5b:03:1c:90 5EE Node WWN: 10:00:00:60:5b:03:1c:90 5 Slot number: 5DetectedRemove HA cluster member status: Operation succeeded.
3. Either remove the second engine or add a replacement second engine, making sure all HA clustershave exactly two engines.
Adding an encryption engine to an HA cluster
138 Fabric OS Encryption Administrator's Guide Supporting RSA Data Protection Manager (DPM) Environments53-1003757-01

Swapping engines in an HA clusterSwapping engines is useful when replacing hardware. Swapping engines is different from removing anengine and adding another because when you swap engines, the configured targets on the former HAcluster member are moved to the new HA cluster member.
1. Log in to the group leader as Admin or FabricAdmin.2. Enter the cryptocfg --replace -haclustermember command
<<old node WWN> [old slot number]><<new node WWN> [new slot number]>:Sample output is shown below.
Before:
sw153168:admin> cryptocfg --show -hacluster -allEncryption Group Name: disk_tapeNumber of HA Clusters: 1HA cluster name: dthac - 2 EE entriesStatus: CommittedHAC State: Converged WWN Slot Number Status10:00:00:05:1e:39:a6:7e 4 Online10:00:00:05:1e:c1:06:63 0 Onlinesw153114:FID128:admin> cryptocfg --replace -haclustermember dthac 10:00:00:05:1e:39:a6:7e 4 10:00:00:05:1e:39:a6:7e 12 Slot Local/ EE Node WWN Number Remote10:00:00:05:1e:39:a6:7e 12 LocalOperation succeeded.After:
sw153114:FID128:admin> cryptocfg --show -hacluster -allEncryption Group Name: disk_tapeNumber of HA Clusters: 1HA cluster name: dthac - 2 EE entriesStatus: DefinedHAC State: Converged WWN Slot Number Status10:00:00:05:1e:39:a6:7e 12 Online10:00:00:05:1e:c1:06:63 0 Onlinesw153114:FID128:admin>
NOTEThe two engines being swapped must be in the same fabric.
Failover/failback policy configurationFailover/failback policy parameters as outlined in the following table can be set for the entire encryptiongroup on the group leader.
Use the cryptocfg --set command with the appropriate parameter to set the values for the policy.Policies are automatically propagated to all member nodes in the encryption group.
Swapping engines in an HA cluster
Fabric OS Encryption Administrator's Guide Supporting RSA Data Protection Manager (DPM) Environments 13953-1003757-01

Group-wide policies TABLE 5
Policy name cryptocfg --setparameters
Description
Failoverpolicy
-failbackmode auto |manual
Sets the failback mode. Valid values for failback mode are:
• auto - Enables automatic failback mode. Failback occurs automaticallywithin an HA cluster when an encryption switch or blade that failedearlier has been restored or replaced. Automatic failback mode isenabled by default.
• manual - Enables manual failback mode. In this mode, failback mustbe initiated manually when an encryption switch or blade that failedearlier has been restored or replaced.
Heartbeatmisses
- hbmisses value Sets the number of Heartbeat misses allowed in a node that is part of anencryption group before the node is declared unreachable and thestandby takes over. The default value is 3. The range is 3-14 in integerincrements only.
Heartbeattimeout
-hbtimeoutvalue Sets the time-out value for the Heartbeat in seconds. The default value is2 seconds. Valid values are integers in the range between 2 and 9seconds.
NOTEThe relationship between -hbmisses and -hbtimeout determines thetotal amount of time allowed before a node is declared unreachable. If aswitch does not sense a heartbeat within the heartbeat timeout value, it iscounted as a heartbeat miss. The default values result in a total time of 6seconds (timeout value of two seconds times three misses). A total time of6-9 seconds is recommended. A smaller value may cause a node to bedeclared unreachable prematurely, while a larger value could result ininefficiency.
Policy Configuration Examples
The following examples illustrate the setting of group-wide policy parameters.
To set the failback mode to manual failback:
SecurityAdmin:switch> cryptocfg --set -failbackmode manualSet failback policy status: Operation Succeeded.To set the Heartbeat misses value to 3:
SecurityAdmin:switch> cryptocfg --set -hbmisses 3Set heartbeat miss status: Operation Succeeded.To set the Heartbeat timeout value to 3 seconds:
SecurityAdmin:switch> cryptocfg --set -hbtimeout 3Set heartbeat timeout status: Operation Succeeded.
Policy Configuration Examples
140 Fabric OS Encryption Administrator's Guide Supporting RSA Data Protection Manager (DPM) Environments53-1003757-01

Re-exporting a master keyYou can export master keys to the key vault multiple times instead of only once. The ability to export themaster key more than once enables you to recover the master key when needed.
When the master key is exported to the key vault for the first-time, it is stored with the actual master keyID. Subsequent exports are provided with additional exported key IDs that are generated by theBrocade Encryption Switch. Each additional time the master key is exported to the key vault, a differentkey ID is saved.
The master key can be recovered from any export using the exported master key ID and thecorresponding passphrase.
The cryptocfg --show -localEE command shows the actual master key IDs, along with the new masterkey IDs. Also shown are all exported master key IDs associated with a given (actual) master key.
NOTEYou need to remember the exported master key ID and passphrase you used while exporting themaster key ID.
The following command supports exporting master key IDs for a given master key.
SecurityAdmin:switch> cryptocfg --show -mkexported_keyids <MK ID>The following example lists the exported master key IDs for a given master key ID:
SecurityAdmin:switch> cryptocfg --show -mkexported_keyids e3:ae:aa:89:ec:12:0c:04:29:61:9c:99:44:a3:9b:92e3:ae:aa:89:ec:12:0c:04:29:61:9c:99:44:a3:9b:92e3:ae:aa:89:ec:12:0c:04:29:61:9c:99:44:a3:9b:93e3:ae:aa:89:ec:12:0c:04:29:61:9c:99:44:a3:9b:94e3:ae:aa:89:ec:12:0c:04:29:61:9c:99:44:a3:9b:95e3:ae:aa:89:ec:12:0c:04:29:61:9c:99:44:a3:9b:96e3:ae:aa:89:ec:12:0c:04:29:61:9c:99:44:a3:9b:97e3:ae:aa:89:ec:12:0c:04:29:61:9c:99:44:a3:9b:98e3:ae:aa:89:ec:12:0c:04:29:61:9c:99:44:a3:9b:99e3:ae:aa:89:ec:12:0c:04:29:61:9c:99:44:a3:9b:9ae3:ae:aa:89:ec:12:0c:04:29:61:9c:99:44:a3:9b:9bOperation succeeded.The exported key ID is displayed with the master key ID, as shown in the examples to follow:
Example: Initial master key export
SecurityAdmin:switch> cryptocfg --exportmasterkeyEnter passphrase:Confirm passphrase:Master key exported. MasterKey ID: 1a:e6:e4:26:6b:f3:81:f7:d8:eb:cc:0f:09:7a:a4:7eExported Key ID: 1a:e6:e4:26:6b:f3:81:f7:d8:eb:cc:0f:09:7a:a4:7e
Exporting an additional key IDExample: Subsequent master key exports
SecurityAdmin:switch> cryptocfg --exportmasterkeyEnter passphrase:Confirm passphrase:
Re-exporting a master key
Fabric OS Encryption Administrator's Guide Supporting RSA Data Protection Manager (DPM) Environments 14153-1003757-01

Master key exported. MasterKey ID: 1a:e6:e4:26:6b:f3:81:f7:d8:eb:cc:0f:09:7a:a4:7eExported Key ID: 1a:e6:e4:26:6b:f3:81:f7:d8:eb:cc:0f:09:7a:a4:7fSecurityAdmin:switch> cryptocfg --exportmasterkeyEnter passphrase:Confirm passphrase:Master key exported. MasterKey ID: 1a:e6:e4:26:6b:f3:81:f7:d8:eb:cc:0f:09:7a:a4:7eExported Key ID: 1a:e6:e4:26:6b:f3:81:f7:d8:eb:cc:0f:09:7a:a4:80Example: Recovering a master key using master key ID from the second master key export
SecurityAdmin:switch> cryptocfg --recovermasterkey -currentMK -keyID 15:30:f0:f3:5c:2b:28:ce:cc:a7:b4:cd:7d:2a:91:fcEnter passphrase:Recover master key status: Operation Succeeded.
Viewing the master key IDsThe show localEE command shows the actual master key IDs, along with the new master key IDs.Also shown are all exported master key IDs associated with a given (actual) master key.
NOTEYou will need to remember the exported master key ID and passphrase you used while exporting themaster key ID.
A subcommand is available to support exporting master key IDs for a given master key.
SecurityAdmin:switch> cryptocfg --show -mkexported_keyids <MK ID>The following example lists the exported master key IDs for a given master key ID:
SecurityAdmin:switch> cryptocfg --show -mkexported_keyids e3:ae:aa:89:ec:12:0c:04:29:61:9c:99:44:a3:9b:92e3:ae:aa:89:ec:12:0c:04:29:61:9c:99:44:a3:9b:92e3:ae:aa:89:ec:12:0c:04:29:61:9c:99:44:a3:9b:93e3:ae:aa:89:ec:12:0c:04:29:61:9c:99:44:a3:9b:94e3:ae:aa:89:ec:12:0c:04:29:61:9c:99:44:a3:9b:95e3:ae:aa:89:ec:12:0c:04:29:61:9c:99:44:a3:9b:96e3:ae:aa:89:ec:12:0c:04:29:61:9c:99:44:a3:9b:97e3:ae:aa:89:ec:12:0c:04:29:61:9c:99:44:a3:9b:98e3:ae:aa:89:ec:12:0c:04:29:61:9c:99:44:a3:9b:99e3:ae:aa:89:ec:12:0c:04:29:61:9c:99:44:a3:9b:9ae3:ae:aa:89:ec:12:0c:04:29:61:9c:99:44:a3:9b:9bOperation succeeded.The exported key ID is displayed with the master key ID, as shown in the examples to follow:
Example: Initial master key export
SecurityAdmin:switch> cryptocfg --exportmasterkeyEnter passphrase:Confirm passphrase:Master key exported. MasterKey ID: 1a:e6:e4:26:6b:f3:81:f7:d8:eb:cc:0f:09:7a:a4:7eExported Key ID: 1a:e6:e4:26:6b:f3:81:f7:d8:eb:cc:0f:09:7a:a4:7eExample: Subsequent master key exports
SecurityAdmin:switch> cryptocfg --exportmasterkeyEnter passphrase:
Viewing the master key IDs
142 Fabric OS Encryption Administrator's Guide Supporting RSA Data Protection Manager (DPM) Environments53-1003757-01

Confirm passphrase:Master key exported. MasterKey ID: 1a:e6:e4:26:6b:f3:81:f7:d8:eb:cc:0f:09:7a:a4:7eExported Key ID: 1a:e6:e4:26:6b:f3:81:f7:d8:eb:cc:0f:09:7a:a4:7fSecurityAdmin:switch> cryptocfg --exportmasterkeyEnter passphrase:Confirm passphrase:Master key exported. MasterKey ID: 1a:e6:e4:26:6b:f3:81:f7:d8:eb:cc:0f:09:7a:a4:7eExported Key ID: 1a:e6:e4:26:6b:f3:81:f7:d8:eb:cc:0f:09:7a:a4:80Example: Recovering a master key using master key ID from the second master key export
SecurityAdmin:switch> cryptocfg --recovermasterkey -currentMK -keyID 15:30:f0:f3:5c:2b:28:ce:cc:a7:b4:cd:7d:2a:91:fcEnter passphrase:Recover master key status: Operation Succeeded.
Enabling the encryption engineEnable the encryption engine by entering the cryptocfg --enableEE command. Provide a slot number ifthe encryption engine is a blade.
NOTEEvery time a Brocade Encryption Switch or DCX Backbone chassis containing one or more FS8-18blades goes through a power cycle event, or after issuing the slotpoweroff command followed by theslotpoweron command for an FS8-18 blade in a DCX Backbone chassis, the encryption engine mustbe enabled manually by the Security Administrator. Hosts cannot access the storage LUNs through thestorage paths exposed on this Brocade Encryption Switch or FS8-18 blade until the encryption engine isenabled. The encryption engine state can be viewed using the cryptocfg --show -localEE command,or by displaying switch or blade properties from Brocade Network Advisor. An encryption engine that isnot enabled indicates Waiting for Enable EE.
SecurityAdmin:switch> cryptocfg --enableEEOperation succeeded.
Checking encryption engine statusYou can verify the encryption engine status at any point in the setup process and get information aboutthe next required configuration steps or to troubleshoot an encryption engine that behaves inunexpected ways. Use the cryptocfg --show -localEE command to check the encryption enginestatus.
SecurityAdmin:switch> cryptocfg --show -localEE EE Slot: 0 SP state: Waiting for initEE EE key status not available: SP TLS connection is not up. No HA cluster membershipEE Slot: 1 SP state: Online Current Master KeyID: a3:d7:57:c7:54:66:65:05:61:7a:35:2c:59:af:a5:dc Alternate Master KeyID: e9:e4:3a:f8:bc:4e:75:44:81:35:b8:90:d0:1f:6f:4d HA Cluster Membership: hacDcx2 EE Attributes: Media Type : DISK EE Slot: 3
Enabling the encryption engine
Fabric OS Encryption Administrator's Guide Supporting RSA Data Protection Manager (DPM) Environments 14353-1003757-01

SP state: Online Current Master KeyID: a3:d7:57:c7:54:66:65:05:61:7a:35:2c:59:af:a5:dc Alternate Master KeyID: e9:e4:3a:f8:bc:4e:75:44:81:35:b8:90:d0:1f:6f:4d No HA cluster membership EE Attributes: Media Type : DISKEE Slot: 10 SP state: Online Current Master KeyID: a3:d7:57:c7:54:66:65:05:61:7a:35:2c:59:af:a5:dc Alternate Master KeyID: e9:e4:3a:f8:bc:4e:75:44:81:35:b8:90:d0:1f:6f:4d No HA cluster membership EE Attributes: Media Type : DISK EE Slot: 12 SP state: Online Current Master KeyID: a3:d7:57:c7:54:66:65:05:61:7a:35:2c:59:af:a5:dc Alternate Master KeyID: e9:e4:3a:f8:bc:4e:75:44:81:35:b8:90:d0:1f:6f:4d HA Cluster Membership: hacDcx3 EE Attributes: Media Type : DISK
Zoning considerationsWhen encryption is implemented, frames sent between a host and a target LUN are redirected to avirtual target within an encryption switch or blade. Redirection zones are created to route theseframes. When redirection zones are in effect, direct access from host to target should not be allowedto prevent data corruption.
Set zone hosts and targets together before configuring them for encryption. Redirection zones areautomatically created to redirect the host-target traffic through the encryption engine, but redirectionzones can only be created if the host and target are already zoned.
Setting default zoning to no accessInitially, default zoning for all Brocade switches is set to All Access. The All Access setting allows theBrocade Encryption Switch and DCX Backbone to join the fabric and be discovered before zoning isapplied. If there is a difference in this setting within the fabric, the fabric will segment.
Before committing an encryption configuration in a fabric, default zoning must be set to No Accesswithin the fabric. The No Access setting ensures that no two devices on the fabric can communicatewith one another without going through a regular zone or a redirection zone.
1. Check the default zoning setting. Commonly, it will be set to All Access.
switch:admin> defzone --showDefault Zone Access Modecommitted - All Accesstransaction - No Transaction
2. From any configured primary FCS switch, change the default zoning setting to No Access.
switch:admin> defzone --noaccessswitch:admin> cfgfsaveThe change will be applied within the entire fabric.
Frame redirection zoningName Server-based frame redirection enables the Brocade Encryption Switch or blade to be deployedtransparently to hosts and targets in the fabric.
NS-based frame redirection is enabled as follows:
Zoning considerations
144 Fabric OS Encryption Administrator's Guide Supporting RSA Data Protection Manager (DPM) Environments53-1003757-01

• You first create a zone that includes host (H) and target (T). This may cause temporary trafficdisruption to the host.
• You then create a CryptoTarget container for the target and configure the container to allow accessto the initiator.
• When you commit the transaction, a special zone called a "redirection zone" is generatedautomatically. The redirection zone includes the host (H), the virtual target (VT), the virtual initiator(VI), and the target (T).
• When configuring multi-path LUNs, do not commit the CryptoTarget container configuration beforeyou have performed the following steps in sequence to prevent data corruption. Refer to the section Configuring a multi-path Crypto LUN on page 161 for more information.
‐ Complete all zoning for ALL hosts that should gain access to the targets.‐ Complete the CryptoTarget container configuration for ALL target ports in sequence, including
adding the hosts that should gain access to these targets.
Host-target zoning must precede any CryptoTarget configuration.
NOTETo enable frame redirection, the host and target edge switches must run Fabric OS v6.1.1 and FabricOS v5.3.1.b or later firmware to ensure host and target connectivity with legacy platforms. In McDATAfabrics, the hosts and the switches hosting the targets require firmware versions M-EOSc 9.8 and M-EOSn 9.8 or later.
Creating an initiator - target zoneThe Initiator-Target zone should be created before you create the container. Otherwise, the frameredirection zone creation for the Initiator-Target pair will fail during a commit.
Only Port WWN-based zoning is supported when Frame redirection is in use. D,I zoning and NWWNbased zoning of initiator and targets are not supported with Frame redirection.
1. Log in to the group leader as Admin or FabricAdmin.2. Determine the initiator PWWN. Enter the nsshow command to view the devices connected to this
switch.
In the following example, the port name 10:00:00:00:c9:2b:c9:3a is the initiator PWWN.
FabricAdmin:switch> nsshow{Type Pid COS PortName NodeName TTL(sec)N 010600; 2,3;10:00:00:00:c9:2b:c9:3a;20:00:00:00:c9:2b:c9:3a; naNodeSymb: [35] "Emulex LP9002 FV3.82A1 DV5-4.81A4 "Fabric Port Name: 20:06:00:05:1e:41:9a:7ePermanent Port Name: 10:00:00:00:c9:2b:c9:3aPort Index: 6Share Area: NoDevice Shared in Other AD: NoRedirect: NoThe Local Name Server has 1 entry }The nsshow command shows all devices on the switch, and the output can be lengthy. To retrieveonly the initiator PWWN, do a pattern search of the output based on the initiator Port ID (a hexnumber).
In the following example, the PID is 010600.
FabricAdmin:switch> nsshow | grep 0106 N 010600; 2,3;10:00:00:00:c9:2b:c9:3a;20:00:00:00:c9:2b:c9:3a; na
3. Determine the target PWWN. Enter the nsscamshow command to review the remote switchinformation. .
Creating an initiator - target zone
Fabric OS Encryption Administrator's Guide Supporting RSA Data Protection Manager (DPM) Environments 14553-1003757-01

In the following example, the port name 20:0c:00:06:2b:0f:72:6d is the target PWWN
FabricAdmin:switch> nscamshownscamshow for remote switches:Switch entry for 2state rev ownerknown v611 0xfffc01Device list: count 13Type Pid COS PortName NodeNameNL 0208d3; 3;20:0c:00:06:2b:0f:72:6d;20:00:00:06:2b:0f:72:6d;FC4s: FCPPortSymb: [55] "LSI7404XP-LC BR A.1 03-01081-02D FW:01.03.06 Port 1 "Fabric Port Name: 20:08:00:05:1e:34:e0:6bPermanent Port Name: 20:0c:00:06:2b:0f:72:6dPort Index: 8Share Area: NoDevice Shared in Other AD: NoRedirect: NoAlternately use nscamshow | greptarget_PID to obtain the target PWWN only.
FabricAdmin:switch> nscamshow | grep 0208NL 0208d3; 3;20:0c:00:06:2b:0f:72:6d;20:00:00:06:2b:0f:72:6d;
4. Create a zone that includes the initiator and a target. Enter the zonecreate command followed by azone name, the initiator PWWN and the target PWWN.
FabricAdmin:switch> zonecreate itzone, "10:00:00:00:c9:2b:c9:3a; \ 20:0c:00:06:2b:0f:72:6d"
5. Create a zone configuration that includes the zone you created in step 4. Enter the cfgcreatecommand followed by a configuration name and the zone member name.
FabricAdmin:switch> cfgcreate itcfg, itzone6. Enable the zone configuration.
FabricAdmin:switch> cfgenable itcfgYou are about to enable a new zoning configuration.This action will replace the old zoning configuration with thecurrent configuration selected.Do you want to enable 'itcfg' configuration (yes, y, no, n): [no] yzone config"itcfg" is in effectUpdating flash ...
7. Create a zone that includes the initiator and a LUN target. Enter the zonecreate command followedby a zone name, the initiator PWWN and the target PWWN.
FabricAdmin:switch> zonecreate itzone, "10:00:00:00:c9:2b:c9:3a; \ 20:0c:00:06:2b:0f:72:6d"
8. Create a zone configuration that includes the zone you created in step 4. Enter the cfgcreatecommand followed by a configuration name and the zone member name.
FabricAdmin:switch> cfgcreate itcfg, itzone9. Enable the zone configuration.
FabricAdmin:switch> cfgenable itcfgYou are about to enable a new zoning configuration.This action will replace the old zoning configuration with thecurrent configuration selected.Do you want to enable 'itcfg' configuration (yes, y, no, n): [no] yzone config"itcfg" is in effectUpdating flash ...
CryptoTarget container configurationA CryptoTarget container is a configuration of virtual devices created for each target port hosted on aBrocade Encryption Switch or FS8-18 blade. The container holds the configuration information for asingle target, including associated hosts and LUN settings. A CryptoTarget container interfaces
CryptoTarget container configuration
146 Fabric OS Encryption Administrator's Guide Supporting RSA Data Protection Manager (DPM) Environments53-1003757-01

between the encryption engine, the external storage devices (targets), and the initiators (hosts) that canaccess the storage devices through the target ports. Virtual devices redirect the traffic between host andtarget/LUN to encryption engines so they can perform cryptographic operations.
Although an encryption engine can host more than one container for each target, it is notrecommended.
Virtual targets: Any given physical target port is hosted on one encryption switch or blade. If the targetLUN is accessible from multiple target ports, each target port is hosted on a separate encryption switchor blade. There is a one-to-one mapping between virtual target and physical target to the fabric whoseLUNs are being enabled for cryptographic operations.
Virtual initiators: For each physical host configured to access a given physical target LUN, a virtualinitiator (VI) is generated on the encryption switch or blade that hosts the target port. If a physical hosthas access to multiple targets hosted on different encryption switches or blades, you must configureone virtual initiator on each encryption switch or blade that is hosting one of the targets. The mappingbetween physical host and virtual initiator in a fabric is one-to-n, where n is the number of encryptionswitches or blades that are hosting targets.
FIGURE 86 Relationship between initiator, virtual target, virtual initiator and target
CAUTION
When configuring a LUN with multiple paths, there is a considerable risk of ending up withpotentially catastrophic scenarios where different policies exist for each path of the LUN, or asituation where one path ends up being exposed through the encryption switch and anotherpath has direct access to the device from a host outside the secured realm of the encryptionplatform. Failure to follow correct configuration procedures for multi-path LUNs results in datacorruption. If you are configuring multi-path LUNs as part of an HA cluster or DEK cluster or asa stand-alone LUN accessed by multiple hosts, follow the instructions described in the section Configuring a multi-path Crypto LUN on page 161.
LUN rebalancing when hosting both disk and tape targetsDisk and tape target containers can be hosted on the same switch or blade. Hosting both disk and tapetarget containers on the same switch or blade may result in a drop in throughput, but it can reduce costby reducing the number of switches or blades needed to support encrypted I/O in environments that useboth disk and tape.
The throughput drop can be mitigated by rebalancing the tape and disk target containers across theencryption engine. This ensures that the tape and disk target containers are distributed within theencryption engine for maximum throughput.
LUN rebalancing when hosting both disk and tape targets
Fabric OS Encryption Administrator's Guide Supporting RSA Data Protection Manager (DPM) Environments 14753-1003757-01

All nodes within an encryption group must be upgraded to Fabric OS v6.4 or a later release to supporthosting disk and tape target containers on the same encryption engine. If any node within anencryption group is running an earlier release, disk and tape containers must continue to be hosted onseparate encryption engines.
During rebalancing operations, be aware of the following:
• You may notice a slight disruption in Disk I/O. In some cases, manual intervention may be needed.• Backup jobs to tapes may need to be restarted after rebalancing completes.
To determine if rebalancing is recommended for an encryption engine, check the encryption engineproperties. A field is added that indicates whether rebalancing is recommended.
You may be prompted to rebalance during the following operations:
• When adding a new disk or tape target container.• When removing an existing disk or tape target container.• After failover to a backup encryption engine in an HA cluster.• After an failed encryption engine in an HA cluster is recovered, and failback processing has taken
place.
To rebalance an encryption engine, do the following.
1. Log in to the switch as Admin or FabricAdmin.2. Issue the cryptocfg --show -localEE command.3. Look for Rebalance recommended under EE Attributes in the output.4. If rebalancing is recommended, issue the cryptocfg --rebalance command.
Gathering informationBefore you begin, have the following information ready:
• The switch WWNs of all nodes in the encryption group. Use the cryptocfg --show -groupmember-all command to gather this information.
• The port WWNs of the targets whose LUNs are being enabled for data-at-rest encryption.• The port WWNs of the hosts (initiators) which should gain access to the LUNs hosted on the
targets.
Any given target may have multiple ports through which a given LUN is accessible and the ports areconnected to different fabrics for redundancy purposes. Any given target port through which the LUNsare accessible must be hosted on only one Brocade Encryption Switch (or pair in case of HAdeployment). Another such target port should be hosted on a different Brocade Encryption Switch,either in the same fabric or in a different fabric based on host MPIO configuration.
A given host port through which the LUNs are accessible is hosted on the same encryption switch onwhich the target port (CryptoTarget container) of the LUNs is hosted.
NOTEIt is recommended you complete the encryption group and HA cluster configuration before configuringthe CryptoTarget containers.
Gathering information
148 Fabric OS Encryption Administrator's Guide Supporting RSA Data Protection Manager (DPM) Environments53-1003757-01

Creating a CryptoTarget container1. Log in to the group leader as Admin or FabricAdmin.2. Enter the cryptocfg --create -container command. Specify the type of container, (disk or tape),
followed by a name for the CryptoTarget container, the encryption engine’s node WWN, and thetarget’s Port WWN and node WWN. Provide a slot number if the encryption engine is a blade.
• The CryptoTarget container name can be up to 31 characters in length and may include anyalphanumeric characters, hyphens, and underscore characters.
• You may add initiators at this point or after you create the container.
The following example creates a disk container named my_disk_tgt1. The initiator is added in step 3.
FabricAdmin:switch> cryptocfg --create -container disk my_disk_tgt \ 10:00:00:00:05:1e:41:9a:7e 20:0c:00:06:2b:0f:72:6d 20:00:00:06:2b:0f:72:6dOperation Succeeded
3. Add an initiator to the CryptoTarget container. Enter the cryptocfg --add -initiator commandfollowed by the initiator port WWN and the node WWN.
Note that the initiator port WWN must also be added to the LUN when the LUN is added to theCryptoTarget container.
FabricAdmin:switch> cryptocfg --add -initiator my_disk_tgt \ 10:00:00:00:c9:2b:c9:3a 20:00:00:00:c9:2b:c9:3aOperation Succeeded
4. Commit the transaction. The commit operation creates the virtual devices and the redirection zonethat routes traffic through these devices.
FabricAdmin:switch> cryptocfg --commitOperation Succeeded
CAUTION
When configuring a multi-path LUN, you must complete the CryptoTarget containerconfiguration for ALL target ports in sequence and add the hosts that should gain access tothese ports before committing the container configuration. Failure to do so results in datacorruption. Refer to the section Configuring a multi-path Crypto LUN on page 161 for specificinstructions.
5. Display the CryptoTarget container configuration. The virtual initiator and virtual target have beencreated automatically upon commit, and there are no LUNs configured yet.
FabricAdmin:switch> cryptocfg --show -container my_disk_tgt -cfgContainer name: my_disk_tgtType: diskEE node: 10:00:00:05:1e:41:9a:7eEE slot: 0Target: 20:0c:00:06:2b:0f:72:6d 20:00:00:06:2b:0f:72:6dVT: 20:00:00:05:1e:41:4e:1d 20:01:00:05:1e:41:4e:1dNumber of host(s): 1Configuration status: committedHost: 10:00:00:00:c9:2b:c9:3a 20:00:00:00:c9:2b:c9:3aVI: 20:02:00:05:1e:41:4e:1d 20:03:00:05:1e:41:4e:1dNumber of LUN(s): 0Operation Succeeded
6. Display the redirection zone. It includes the host, the target, the virtual initiator, and the virtual target.
FabricAdmin:switch> cfgshowDefined configuration:cfg: itcfg itzonecfg: r_e_d_i_r_c__fg red_1109_brcd200c00062b0f726d200200051e414e1d; red_______basezone: itzone 10:00:00:00:c9:2b:c9:3a; 20:0c:00:06:2b:0f:72:6dzone: red_1109_brcd200c00062b0f726d200200051e414e1d
Creating a CryptoTarget container
Fabric OS Encryption Administrator's Guide Supporting RSA Data Protection Manager (DPM) Environments 14953-1003757-01

10:00:00:00:c9:2b:c9:3a; 20:0c:00:06:2b:0f:72:6d; 20:02:00:05:1e:41:4e:1d; 20:00:00:05:1e:41:4e:1dzone: red_______base 00:00:00:00:00:00:00:01; 00:00:00:00:00:00:00:02; 00:00:00:00:00:00:00:03; 00:00:00:00:00:00:00:04Effective configuration:cfg: itcfgzone: itzone 10:00:00:00:c9:2b:c9:3a 20:0c:00:06:2b:0f:72:6d
NOTEYou may view the frame redirection zone with the cfgshow command, but you cannot use the zonefor any other applications that use frame redirection. Do not perform any further operations with thiszone, such as deleting the zone or adding the zone to a different configuration. Such operationsmay result in disruptive behavior, including data corruption on the LUN.
Removing an initiator from a CryptoTarget containerYou may remove one or more initiators from a given CryptoTarget container. This operation removesthe initiators’ access to the target port.
If the initiator has access to multiple targets and you wish to remove access to all targets, follow theprocedure described to remove the initiator from every CryptoTarget container that is configured withthis initiator.
NOTEStop all traffic between the initiator you intend to remove and its respective target ports. Failure to doso results in I/O failure between the initiator and the target port.
1. Log in to the group leader as Admin or FabricAdmin.2. Enter the cryptocfg --remove -initiator command. Specify the CryptoTarget container name
followed by one or more initiator port WWNs. The following example removes one initiator from theCryptoTarget container "my_disk_tgt".
FabricAdmin:switch> cryptocfg --rem -initiator my_disk_tgt 10:00:00:00:c9:2b:c9:3a Operation Succeeded
3. Commit the transaction.
FabricAdmin:switch> cryptocfg --commitOperation Succeeded
CAUTION
When configuring a multi-path LUN, you must remove all initiators from all CryptoTargetcontainers in sequence before committing the transaction. Failure to do so may result in apotentially catastrophic situation where one path ends up being exposed through theencryption switch and another path has direct access to the device from a host outside theprotected realm of the encryption platform. Refer to the section Configuring a multi-pathCrypto LUN on page 161 for more information.
Removing an initiator from a CryptoTarget container
150 Fabric OS Encryption Administrator's Guide Supporting RSA Data Protection Manager (DPM) Environments53-1003757-01
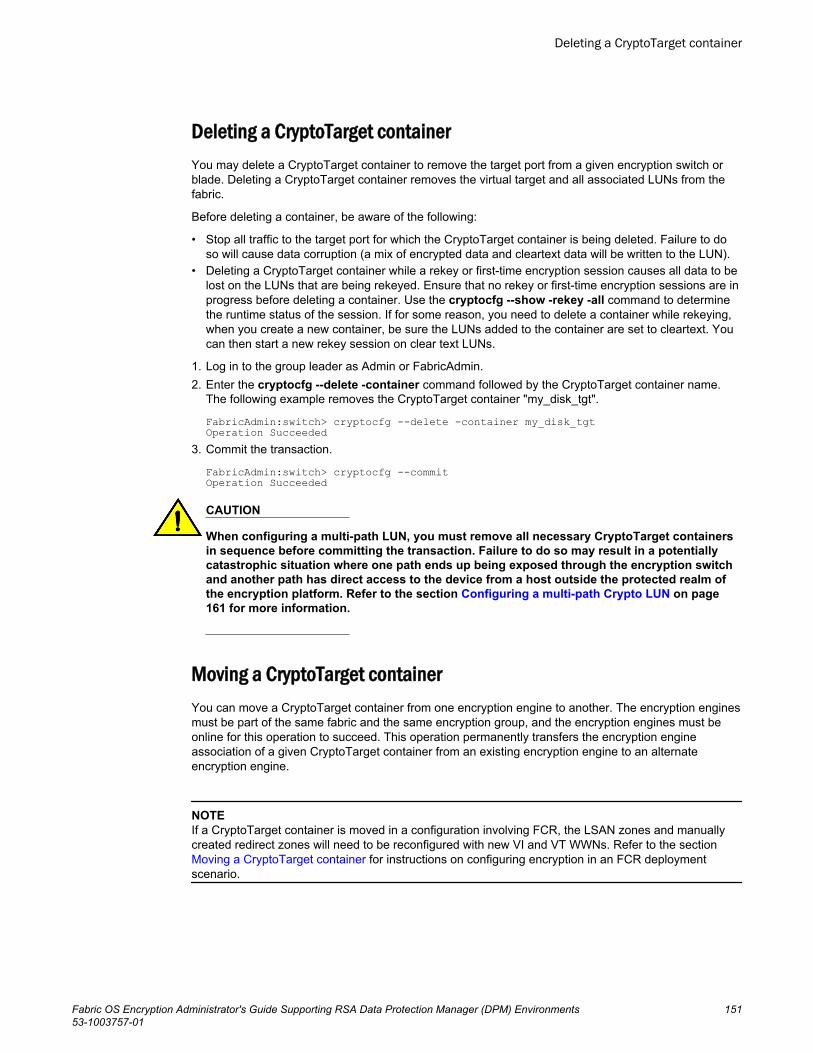
Deleting a CryptoTarget containerYou may delete a CryptoTarget container to remove the target port from a given encryption switch orblade. Deleting a CryptoTarget container removes the virtual target and all associated LUNs from thefabric.
Before deleting a container, be aware of the following:
• Stop all traffic to the target port for which the CryptoTarget container is being deleted. Failure to doso will cause data corruption (a mix of encrypted data and cleartext data will be written to the LUN).
• Deleting a CryptoTarget container while a rekey or first-time encryption session causes all data to belost on the LUNs that are being rekeyed. Ensure that no rekey or first-time encryption sessions are inprogress before deleting a container. Use the cryptocfg --show -rekey -all command to determinethe runtime status of the session. If for some reason, you need to delete a container while rekeying,when you create a new container, be sure the LUNs added to the container are set to cleartext. Youcan then start a new rekey session on clear text LUNs.
1. Log in to the group leader as Admin or FabricAdmin.2. Enter the cryptocfg --delete -container command followed by the CryptoTarget container name.
The following example removes the CryptoTarget container "my_disk_tgt".
FabricAdmin:switch> cryptocfg --delete -container my_disk_tgtOperation Succeeded
3. Commit the transaction.
FabricAdmin:switch> cryptocfg --commitOperation Succeeded
CAUTION
When configuring a multi-path LUN, you must remove all necessary CryptoTarget containersin sequence before committing the transaction. Failure to do so may result in a potentiallycatastrophic situation where one path ends up being exposed through the encryption switchand another path has direct access to the device from a host outside the protected realm ofthe encryption platform. Refer to the section Configuring a multi-path Crypto LUN on page161 for more information.
Moving a CryptoTarget containerYou can move a CryptoTarget container from one encryption engine to another. The encryption enginesmust be part of the same fabric and the same encryption group, and the encryption engines must beonline for this operation to succeed. This operation permanently transfers the encryption engineassociation of a given CryptoTarget container from an existing encryption engine to an alternateencryption engine.
NOTEIf a CryptoTarget container is moved in a configuration involving FCR, the LSAN zones and manuallycreated redirect zones will need to be reconfigured with new VI and VT WWNs. Refer to the section Moving a CryptoTarget container for instructions on configuring encryption in an FCR deploymentscenario.
Deleting a CryptoTarget container
Fabric OS Encryption Administrator's Guide Supporting RSA Data Protection Manager (DPM) Environments 15153-1003757-01

1. Log in to the group leader as Admin or FabricAdmin.2. Enter the cryptocfg --move -container command followed by the CryptoTarget container name
and the node WWN of the encryption engine to which you are moving the CryptoTarget container.Provide a slot number if the encryption engine is a blade.
FabricAdmin:switch> cryptocfg --move -container my_disk_tgt \ 10:00:00:05:1e:53:4c:91Operation Succeeded
3. Commit the transaction.
FabricAdmin:switch> cryptocfg --commitOperation Succeeded
Crypto LUN configurationA Crypto LUN is the LUN of a target disk or tape storage device that is enabled for and capable ofdata-at-rest encryption. Crypto LUN configuration is done on a per-LUN basis. You configure the LUNfor encryption by explicitly adding the LUN to the CryptoTarget container and turning on the encryptionproperty and policies on the LUN. Any LUN of a given target that is not enabled for encryption muststill be added to the CryptoTarget container with the cleartext policy option.
• The general procedures described in this section apply to both disk and tape LUNs. The specificconfiguration procedures differ with regard to encryption policy and parameter setting.
• You configure the Crypto LUN on the group leader. You need the Admin or FabricAdmin role toperform LUN configuration tasks.
• With the introduction of Fabric OS 7.1.0, the maximum number of uncommitted configurationchanges per disk LUN (or maximum paths to a LUN) is 512 transactions. This change in commitlimit is applicable only when using BNA.The commit limit when using the CLI remains unchanged at25.
• There is a maximum of eight tape LUNs per Initiator in a container. The maximum number ofuncommitted configuration changes per tape LUN remains unchanged at eight.
CAUTION
When configuring a LUN with multiple paths (which means the LUN is exposed and configuredon multiple CryptoTarget containers located on the same Encryption switch or blade, or ondifferent encryption switches or blades), the same LUN policies must be configured on all LUNpaths. Failure to configure all LUN paths with the same LUN policies results in data corruption.If you are configuring multi-path LUNs as part of a HA cluster or DEK cluster or as a stand-alone LUN accessed by multiple hosts, follow the instructions described in the section Configuring a multi-path Crypto LUN on page 161.
Discovering a LUNWhen adding a LUN to a CryptoTarget container, you must specify a LUN Number. The LUN Numberneeded for configuring a given Crypto LUN is the LUN Number as exposed to a particular initiator.
The Brocade Encryption platform provides LUN discovery services through which you can identify theexposed LUN number for a specified initiator. If you already know the exposed LUN numbers for thevarious initiators accessing the LUN, you may skip the LUN discovery step and directly configure theCrypto LUN.
Crypto LUN configuration
152 Fabric OS Encryption Administrator's Guide Supporting RSA Data Protection Manager (DPM) Environments53-1003757-01
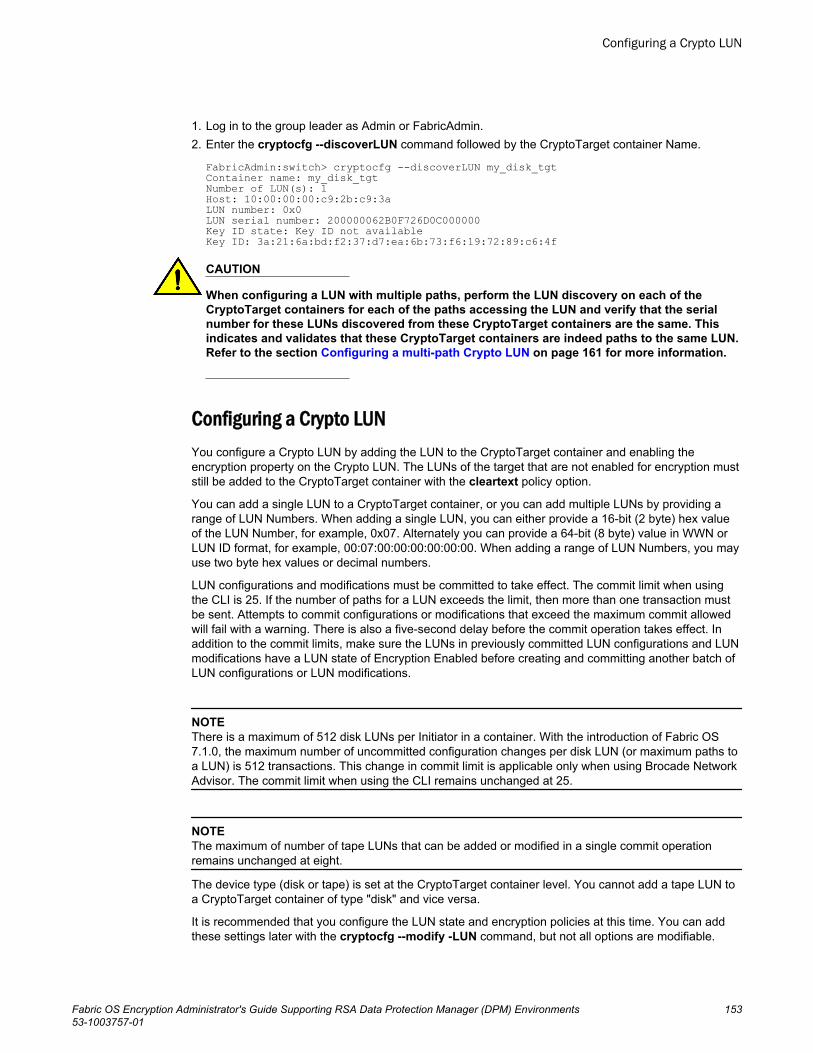
1. Log in to the group leader as Admin or FabricAdmin.2. Enter the cryptocfg --discoverLUN command followed by the CryptoTarget container Name.
FabricAdmin:switch> cryptocfg --discoverLUN my_disk_tgt Container name: my_disk_tgtNumber of LUN(s): 1Host: 10:00:00:00:c9:2b:c9:3aLUN number: 0x0LUN serial number: 200000062B0F726D0C000000Key ID state: Key ID not availableKey ID: 3a:21:6a:bd:f2:37:d7:ea:6b:73:f6:19:72:89:c6:4f
CAUTION
When configuring a LUN with multiple paths, perform the LUN discovery on each of theCryptoTarget containers for each of the paths accessing the LUN and verify that the serialnumber for these LUNs discovered from these CryptoTarget containers are the same. Thisindicates and validates that these CryptoTarget containers are indeed paths to the same LUN.Refer to the section Configuring a multi-path Crypto LUN on page 161 for more information.
Configuring a Crypto LUNYou configure a Crypto LUN by adding the LUN to the CryptoTarget container and enabling theencryption property on the Crypto LUN. The LUNs of the target that are not enabled for encryption muststill be added to the CryptoTarget container with the cleartext policy option.
You can add a single LUN to a CryptoTarget container, or you can add multiple LUNs by providing arange of LUN Numbers. When adding a single LUN, you can either provide a 16-bit (2 byte) hex valueof the LUN Number, for example, 0x07. Alternately you can provide a 64-bit (8 byte) value in WWN orLUN ID format, for example, 00:07:00:00:00:00:00:00. When adding a range of LUN Numbers, you mayuse two byte hex values or decimal numbers.
LUN configurations and modifications must be committed to take effect. The commit limit when usingthe CLI is 25. If the number of paths for a LUN exceeds the limit, then more than one transaction mustbe sent. Attempts to commit configurations or modifications that exceed the maximum commit allowedwill fail with a warning. There is also a five-second delay before the commit operation takes effect. Inaddition to the commit limits, make sure the LUNs in previously committed LUN configurations and LUNmodifications have a LUN state of Encryption Enabled before creating and committing another batch ofLUN configurations or LUN modifications.
NOTEThere is a maximum of 512 disk LUNs per Initiator in a container. With the introduction of Fabric OS7.1.0, the maximum number of uncommitted configuration changes per disk LUN (or maximum paths toa LUN) is 512 transactions. This change in commit limit is applicable only when using Brocade NetworkAdvisor. The commit limit when using the CLI remains unchanged at 25.
NOTEThe maximum of number of tape LUNs that can be added or modified in a single commit operationremains unchanged at eight.
The device type (disk or tape) is set at the CryptoTarget container level. You cannot add a tape LUN toa CryptoTarget container of type "disk" and vice versa.
It is recommended that you configure the LUN state and encryption policies at this time. You can addthese settings later with the cryptocfg --modify -LUN command, but not all options are modifiable.
Configuring a Crypto LUN
Fabric OS Encryption Administrator's Guide Supporting RSA Data Protection Manager (DPM) Environments 15353-1003757-01
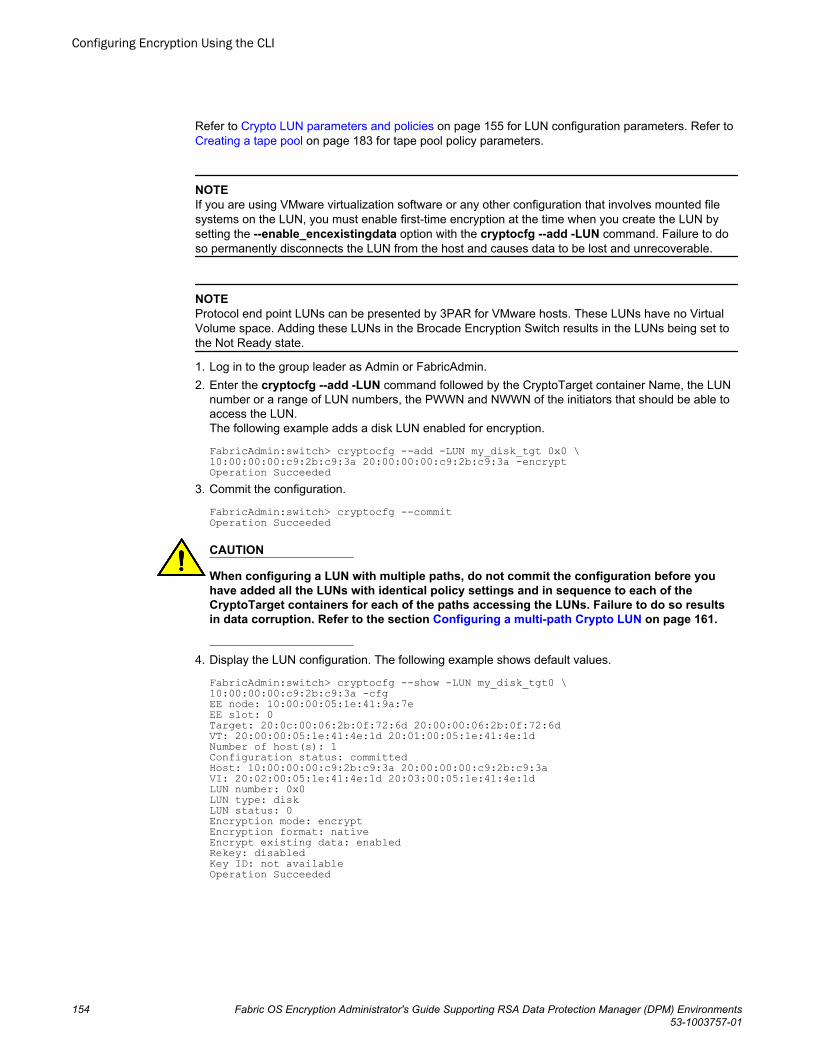
Refer to Crypto LUN parameters and policies on page 155 for LUN configuration parameters. Refer to Creating a tape pool on page 183 for tape pool policy parameters.
NOTEIf you are using VMware virtualization software or any other configuration that involves mounted filesystems on the LUN, you must enable first-time encryption at the time when you create the LUN bysetting the --enable_encexistingdata option with the cryptocfg --add -LUN command. Failure to doso permanently disconnects the LUN from the host and causes data to be lost and unrecoverable.
NOTEProtocol end point LUNs can be presented by 3PAR for VMware hosts. These LUNs have no VirtualVolume space. Adding these LUNs in the Brocade Encryption Switch results in the LUNs being set tothe Not Ready state.
1. Log in to the group leader as Admin or FabricAdmin.2. Enter the cryptocfg --add -LUN command followed by the CryptoTarget container Name, the LUN
number or a range of LUN numbers, the PWWN and NWWN of the initiators that should be able toaccess the LUN.The following example adds a disk LUN enabled for encryption.
FabricAdmin:switch> cryptocfg --add -LUN my_disk_tgt 0x0 \10:00:00:00:c9:2b:c9:3a 20:00:00:00:c9:2b:c9:3a -encryptOperation Succeeded
3. Commit the configuration.
FabricAdmin:switch> cryptocfg --commitOperation Succeeded
CAUTION
When configuring a LUN with multiple paths, do not commit the configuration before youhave added all the LUNs with identical policy settings and in sequence to each of theCryptoTarget containers for each of the paths accessing the LUNs. Failure to do so resultsin data corruption. Refer to the section Configuring a multi-path Crypto LUN on page 161.
4. Display the LUN configuration. The following example shows default values.
FabricAdmin:switch> cryptocfg --show -LUN my_disk_tgt0 \10:00:00:00:c9:2b:c9:3a -cfgEE node: 10:00:00:05:1e:41:9a:7eEE slot: 0Target: 20:0c:00:06:2b:0f:72:6d 20:00:00:06:2b:0f:72:6dVT: 20:00:00:05:1e:41:4e:1d 20:01:00:05:1e:41:4e:1dNumber of host(s): 1Configuration status: committedHost: 10:00:00:00:c9:2b:c9:3a 20:00:00:00:c9:2b:c9:3aVI: 20:02:00:05:1e:41:4e:1d 20:03:00:05:1e:41:4e:1dLUN number: 0x0LUN type: diskLUN status: 0Encryption mode: encryptEncryption format: nativeEncrypt existing data: enabledRekey: disabledKey ID: not availableOperation Succeeded
Configuring Encryption Using the CLI
154 Fabric OS Encryption Administrator's Guide Supporting RSA Data Protection Manager (DPM) Environments53-1003757-01

Crypto LUN parameters and policiesThe following table shows the encryption parameters and policies that can be specified for a disk ortape LUN, during LUN configuration (with the cryptocfg --add -LUN command). Some policies areapplicable only to disk LUNs, and some policies are applicable only to tape LUNs. It is recommendedthat you plan to configure all the LUN state and encryption policies with the cryptocfg --add -LUNcommand. You can use the cryptocfg --modify -LUN command to change some of the settings, butnot all options can be modified.
NOTELUN policies are configured at the LUN level, but apply to the entire HA or DEK cluster. For multi-pathLUNs that are exposed through multiple target ports and thus configured on multiple CryptoTargetcontainers on different encryption engines in an HA cluster or DEK cluster, the same LUN policies mustbe configured. Failure to do so results in unexpected behavior and may lead to data corruption.
The tape policies specified at the LUN configuration level take effect if you do not create tape pools orconfigure policies at the tape pool level. The Brocade encryption solutions supports up to a 1 MB blocksize for tape encryption. Also, the Logical Block Address (LBA) 0 block size (I/O size from the host)must be at least 1 K less than the maximum supported backend block size (usually 1 MB). This istypically the case, as label operations are small I/O operations. If this support requirement is not met,the Brocade encryption solution will not allow the backup operation to start to that tape.
NOTELBA 0 is not encrypted. Data sent to this block address is always sent as clear text.
LUN parameters and policiesTABLE 6
Policy name Command parameters Description
LUN state
Disk LUN: Yes
Tape LUN: No
Modify? No
-lunstate encrypted | cleartext Sets the Encryption state for theLUN. Valid values are:
• cleartext - Default LUN state.Refer to policy configurationconsiderations for compatibilitywith other policy settings.
• encrypted - Metadata on the LUNcontaining the key ID of the DEKthat was used for encrypting theLUN is used to retrieve the DEKfrom the key vault. DEKs areused for encrypting anddecrypting the LUN.
Key ID
Disk LUN: Yes
Tape LUN: No
Modify? No
-keyID Key_ID Specifies the key ID. Use this optiononly if the LUN was encrypted butdoes not include the metadatacontaining the key ID for the LUN.This is a rare case for LUNsencrypted in Native (Brocade) mode.
Crypto LUN parameters and policies
Fabric OS Encryption Administrator's Guide Supporting RSA Data Protection Manager (DPM) Environments 15553-1003757-01

LUN parameters and policies (Continued)TABLE 6
Policy name Command parameters Description
Encryption format
Disk LUN: Yes
Tape LUN: Yes
Modify? Yes
-encryption_format native Sets the encryption format. Validvalues are:
• Native - The LUN is encrypted ordecrypted using the Brocadeencryption format (metadataformat and algorithm). This is thedefault setting.
Encryption policy
Disk LUN: Yes
Tape LUN: Yes
Modify? Yes
-encrypt | -cleartext Enables or disables a LUN forencryption. Valid values are:
• cleartext - Encryption is disabled.This is the default setting. Whenthe LUN policy is set to cleartextthe following policy parametersare invalid and generate errorswhen executed: -enable_encexistingdata, -enable_rekey, and -key_lifespan.
• encrypt - The LUN is enabled toperform encryption.
Existing data encryption
Disk LUN: Yes
Tape LUN: No
Modify? Yes
-enable_encexistingdata | -disable_encexistingdata
Specifies whether existing data onthe LUN should be encrypted. Bydefault, encryption of existing data isdisabled. Encryption policy must beset to -enable_encexistingdata, andthe LUN state must be set tocleartext (default). If the encryptionpolicy is cleartext, the existing dataon the LUN will be overwritten.
Rekey policy
Disk LUN: Yes
Tape LUN: No
Modify? Yes
-enable_rekey time_period days | -disable_rekey
Enables or disables the autorekeying feature on a specified diskLUN. This policy is not valid for tapeLUNs. By Default, the automaticrekey feature is disabled. Enablingautomatic rekeying is valid only if theLUN policy is set to -encrypt. Youmust specify a time period in dayswhen enabling Auto Rekey toindicate the interval at whichautomatic rekeying should takeplace.
Key lifespan
Disk LUN: No
Tape LUN: Yes Modify?
Disks only. Tape: No
-key_lifespan time_in_days | none Specifies the life span of theencryption key in days. The key willexpire after the specified number ofdays. Accepted values are integersfrom 1 to 2982616. The default valueis none, which means the key doesnot expire. On tape LUNs, the keylife span cannot be modified after itis set.
Configuring Encryption Using the CLI
156 Fabric OS Encryption Administrator's Guide Supporting RSA Data Protection Manager (DPM) Environments53-1003757-01

LUN parameters and policies (Continued)TABLE 6
Policy name Command parameters Description
Write Early Ack Disk LUN: No TapeLUN: Yes Modify? Tape Only. Disk:No
-write_early_ack disable | enable Specifies the Tape Write pipeliningmode of the LUN. Two WritePipelining modes are supported:
• disable - Early acknowledgementof commands (internal buffering)for a tape lun is disabled.
• enable - Early acknowledgementof commands (internal buffering)for a tape lun is enabled. Thedefault value is enable.
Read Ahead Disk LUN: No TapeLUN: Yes Modify? Tape Only. Disk:No
-read_ahead disable | enable Specifies the Tape Read Aheadmode of the LUN. Two Read Aheadmodes are supported:
• disable - The LUN disables theTape read ahead and Tape LUNwill be operated in unbufferedmode.
• enable - The LUN enables theTape read ahead and Tape LUNwill be operated in buffered mode.The default value is enable.
NewLUN Disk LUN: Yes Tape LUN:No Modify? No
Specifies the LUN to be a configuredas a replication LUN for SRDF,TimeFinder or RecoverPoint.
Configuring a tape LUNThis example shows how to configure a tape storage device. The basic setup procedure is the same asfor disk devices. Only a subset of configuration options and policy settings are available for tape LUNs.Refer to Configuring a tape LUN for tape LUN configuration options.
1. Create a zone that includes the initiator (host) and the target port. Refer to the section Creating aninitiator - target zone on page 145 for instructions.
2. Create a CryptoTarget container of type tape. Refer to the section Creating a CryptoTarget containeron page 149 for instructions.a) Create the container, allowing the encryption format to default to Native.
FabricAdmin:switch> cryptocfg --create -container tape my_tape_tgt \ 10:00:00:05:1e:41:9a:7e 20:0c:00:06:2b:0f:72:6d 20:00:00:06:2b:0f:72:6dOperation Succeeded
b) Add an initiator to the CryptoTarget container "my_tape_tgt".
FabricAdmin:switch> cryptocfg --add -initiator my_tape_tgt \ 10:00:00:00:c9:2b:c9:3a 20:00:00:00:c9:2b:c9:3aOperation Succeeded
c) Commit the transaction.
FabricAdmin:switch> cryptocfg --commitOperation Succeeded
3. Configure the Crypto tape LUN. Refer to the section Configuring a Crypto LUN on page 153 forinstructions.
Configuring a tape LUN
Fabric OS Encryption Administrator's Guide Supporting RSA Data Protection Manager (DPM) Environments 15753-1003757-01

a) Discover the LUN.
FabricAdmin:switch> cryptocfg --discoverLUN my_tape_tgt Container name: my_tape_tgtNumber of LUN(s): 1Host: 10:00:00:00:c9:2b:c9:3aLUN number: 0x0LUN serial number:Key ID state: Key ID not Applicable
b) Add the LUN to the tape CryptoTarget container. The following example enables the LUN forencryption. There is a maximum of eight tape LUNs per Initiator in a container.
FabricAdmin:switch> cryptocfg --add -LUN my_tape_tgt 0x0 \10:00:00:00:c9:2b:c9:3a 20:00:00:00:c9:2b:c9:3a -encryptOperation Succeeded
NOTEWhen changing the tape LUN policy from encrypt to cleartext or from cleartext to encrypt, orthe encryption format from Brocade native to DF-compatible while data is being written to orread from a tape backup device, the policy change is not enforced until the current processcompletes and the tape is unmounted, rewound, or overwritten. Refer to the section Impact oftape LUN configuration changes on page 160 for more information.
c) Commit the configuration.
FabricAdmin:switch> cryptocfg --commitOperation Succeeded
d) Display the LUN configuration.
FabricAdmin:switch> cryptocfg --show -LUN my_tape_tgt 0x0 \ 10:00:00:00:c9:2b:c9:3a -cfgEE node: 10:00:00:05:1e:41:9a:7eEE slot: 0Target: 20:0c:00:06:2b:0f:72:6d 20:00:00:06:2b:0f:72:6dVT: 20:00:00:05:1e:41:4e:1d 20:01:00:05:1e:41:4e:1dNumber of host(s): 1Configuration status: committedHost: 21:00:00:e0:8b:89:9c:d5 20:00:00:e0:8b:89:9c:d5VI: 10:00:00:00:c9:2b:c9:3a 20:03:00:05:1e:41:4e:31LUN number: 0x0LUN type: tapeLUN status: 0Encryption mode: encryptEncryption format: DF_compatibleTape type: tapeKey life: 90 (day)Volume/Pool label:Operation succeeded.
NOTEThe -key_lifespan command option has no effect for cryptocfg --add -LUN , and only has aneffect for cryptocfg --create -tapepool for tape pools declared -encryption_format native. Forall other encryption cases, a new key is generated each time a medium is rewound and blockzero is either written or overwritten. For the same reason, the "Key Life" field in the output ofcryptocfg --show -container -all -stat should always be ignored, and the "Key life" field incryptocfg --show -tapepool -cfg is only significant for native-encrypted pools.
Configuring Encryption Using the CLI
158 Fabric OS Encryption Administrator's Guide Supporting RSA Data Protection Manager (DPM) Environments53-1003757-01
Removing a LUN from a CryptoTarget containerYou can remove a LUN from a given CryptoTarget container if it is no longer needed. Stop all traffic I/Ofrom the initiators accessing the LUN before removing the LUN to avoid I/O failure between the initiatorsand the LUN. If the LUN is exposed to more than one initiator under different LUN Numbers, remove allexposed LUN Numbers.
1. Log in to the group leader as Admin or FabricAdmin.2. Enter the cryptocfg --remove -LUN command followed by the CryptoTarget container name, the
LUN Number, and the initiator PWWN.
FabricAdmin:switch> cryptocfg --remove -LUN my_disk_tgt 0x0 10:00:00:00:c9:2b:c9:3aOperation Succeeded
3. Commit the configuration with the-force option to completely remove the LUN and all associatedconfiguration data in the configuration database. The data remains on the removed LUN in anencrypted state.
FabricAdmin:switch> cryptocfg --commit -forceOperation Succeeded
CAUTION
In case of multiple paths for a LUN, each path is exposed as a CryptoTarget container in thesame encryption switch or blade or on different encryption switches or blades within theencryption group. In this scenario you must remove the LUNs from all exposed CryptoTargetcontainers before you commit the transaction. Failure to do so may result in a potentiallycatastrophic situation where one path ends up being exposed through the encryption switchand another path has direct access to the device from a host outside the protected realm ofthe encryption platform. Refer to the section Configuring a multi-path Crypto LUN on page161 for more information.
Modifying Crypto LUN parametersYou can modify one or more policies of an existing Crypto LUN with the cryptocfg --modify -LUNcommand.
A maximum of 25 disk LUNs can be added or modified in a single commit operation. The maximumcommit for tape LUNs is eight. Attempts to commit configurations or modifications that exceed themaximum commit allowed will fail with a warning. There is a five second delay before the commitoperation takes effect.
Make sure the LUNs in previously committed LUN configurations and LUN modifications have a LUNstate of Encryption Enabled before creating and committing another batch of LUN configurations ormodifications.
The following example disables automatic rekeying operations on the disk LUN "my_disk_tgt."
1. Log in to the group leader as Admin or FabricAdmin.2. Enter the cryptocfg --modify -LUN command followed by the CryptoTarget container name, the
LUN Number, the initiator PWWN, and the parameter you want to modify.
FabricAdmin:switch> cryptocfg --modify -LUN my_disk_tgt 0x0 10:00:00:00:c9:2b:c9:3a -disable_rekeyOperation Succeeded
3. Commit the configuration.
FabricAdmin:switch> cryptocfg --commitOperation Succeeded
Removing a LUN from a CryptoTarget container
Fabric OS Encryption Administrator's Guide Supporting RSA Data Protection Manager (DPM) Environments 15953-1003757-01

CAUTION
When configuring a LUN with multiple paths, do not commit the configuration before youhave modified all the LUNs with identical policy settings and in sequence for each of theCryptoTarget containers for each of the paths accessing the LUNs. Failure to do so resultsin data corruption. Refer to the section Configuring a multi-path Crypto LUN on page 161.
LUN modification considerationsMake sure you understand the ramifications of modifying LUN policy parameters (such as encrypt/cleartext) for LUNs that are online and already being utilized. The following restrictions apply whenmodifying LUN policy parameters for disk LUNs:
• When you change LUN policy from encrypt to cleartext, you wipe out all encrypted data stored onthe LUN the next time data is written to that LUN. The following policy parameters are disabled: -enable_encexistingdata, -enable_rekey.
• When you change the LUN policy back to encrypt, for example, by force-enabling the LUN, -enable_encexistingdata and-enable_rekey are disabled by default, and you must configure bothoptions again.
• When you add a LUN as cleartext and later you want to change the LUN policy from cleartext toencrypt, you must set the-enable_encexistingdata option. If you do not, all data on that LUN islost, and cannot be recovered.
For tape LUNs, the -enable_encexistingdata, -enable_rekey, and -key_lifespan options are notvalid and therefore cannot be modified. When you attempt to execute these parameters whilemodifying a tape LUN, the system returns an error. Disabling-write_early ack or-read_ahead for tapeLUN will result in lower total throughput depending on the number of flows per encryption engine.
NOTEMake sure all the outstanding backup and recovery operations on the media are completed beforechanging the LUN configuration.
For disk LUNs-write_early_ack and-read_ahead are not valid and therefore cannot be modified.When you attempt to execute these parameters while modifying a disk LUN, the system returns anerror.
Impact of tape LUN configuration changesLUN-level policies apply when no policies are configured at the tape pool level. The followingrestrictions apply when modifying tape LUN configuration parameters:
• If you change a tape LUN policy from encrypt to cleartext or from cleartext to encrypt while datais written to or read from a tape backup device, the policy change is not enforced until the currentprocess completes and the tape is unmounted, rewound, or overwritten. This mechanism preventsthe mixing of cleartext data to cipher-text data on the tape.
• Make sure you understand the ramifications of changing the tape LUN encryption policy fromencrypt to cleartext or from cleartext to encrypt.
• You cannot modify the key lifespan value. If you wish to modify the key lifespan, delete and recreatethe LUN with a different key lifespan value. Key lifespan values apply only to native-mode pools.
LUN modification considerations
160 Fabric OS Encryption Administrator's Guide Supporting RSA Data Protection Manager (DPM) Environments53-1003757-01

Configuring a multi-path Crypto LUNA single LUN may be accessed over multiple paths. A multi-path LUN is exposed and configured onmultiple CryptoTarget Containers located on the same encryption switch or blade or on differentencryption switches or blades.
CAUTION
When configuring a LUN with multiple paths, there is a considerable risk of ending up withpotentially catastrophic scenarios where different policies exist for each path of the LUN, or asituation where one path ends up being exposed through the encryption switch and other pathhas direct access to the device from a host outside the secured realm of the encryptionplatform. Failure to follow proper configuration procedures for multi-path LUNs results in datacorruption.
To avoid the risk of data corruption, you must observe the following rules when configuring multi-pathLUNs:
• During the initiator-target zoning phase, complete in sequence all zoning for ALL hosts that shouldgain access to the targets before committing the zoning configuration.
• Complete the CryptoTarget container configuration for ALL target ports in sequence and add thehosts that should gain access to these ports before committing the container configuration. Uponcommit, the hosts lose access to all LUNs until the LUNs are explicitly added to the CryptoTargetcontainers.
• When configuring the LUNs, the same LUN policies must be configured for ALL paths of ALL LUNs.Failure to configure all LUN paths with the same LUN policies results in data corruption.
Multi-path LUN configuration exampleThe following figure shows a single LUN on a dual-port target that is accessed over two paths by a dual-port host. The two encryption switches form an encryption group and an HA cluster. The followingexample illustrates a simplified version of a multi-path LUN configuration.
Configuring a multi-path Crypto LUN
Fabric OS Encryption Administrator's Guide Supporting RSA Data Protection Manager (DPM) Environments 16153-1003757-01
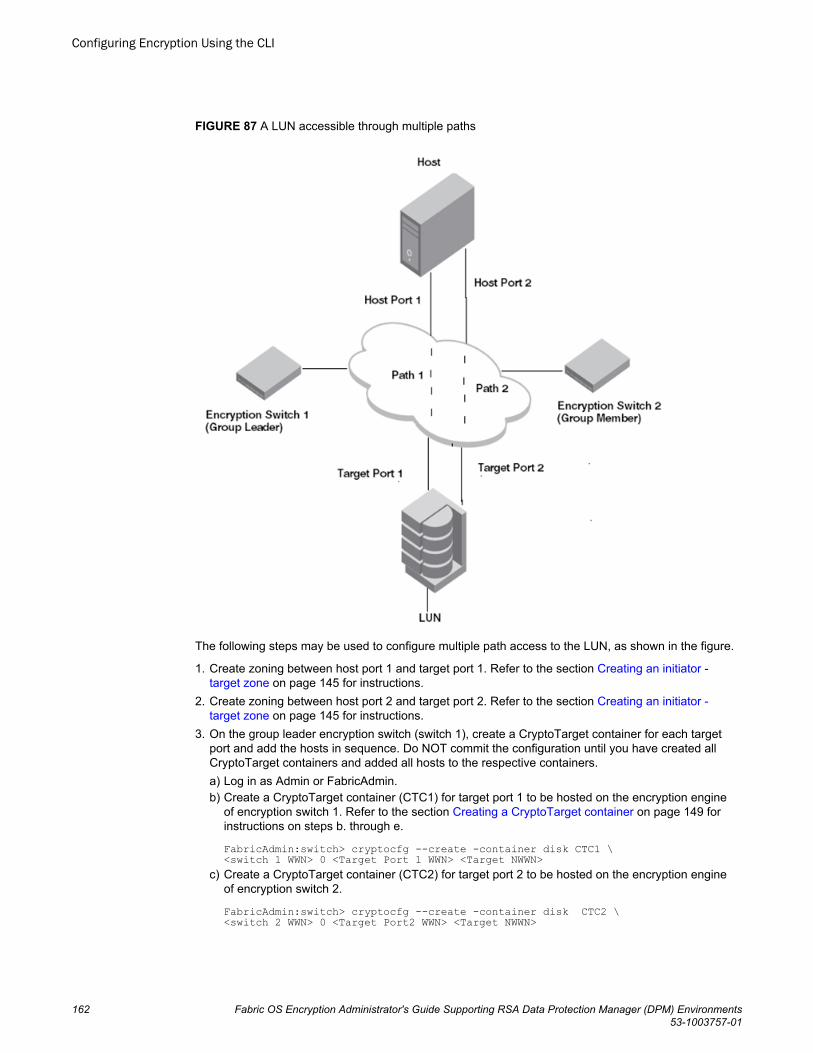
FIGURE 87 A LUN accessible through multiple paths
The following steps may be used to configure multiple path access to the LUN, as shown in the figure.
1. Create zoning between host port 1 and target port 1. Refer to the section Creating an initiator -target zone on page 145 for instructions.
2. Create zoning between host port 2 and target port 2. Refer to the section Creating an initiator -target zone on page 145 for instructions.
3. On the group leader encryption switch (switch 1), create a CryptoTarget container for each targetport and add the hosts in sequence. Do NOT commit the configuration until you have created allCryptoTarget containers and added all hosts to the respective containers.a) Log in as Admin or FabricAdmin.b) Create a CryptoTarget container (CTC1) for target port 1 to be hosted on the encryption engine
of encryption switch 1. Refer to the section Creating a CryptoTarget container on page 149 forinstructions on steps b. through e.
FabricAdmin:switch> cryptocfg --create -container disk CTC1 \ <switch 1 WWN> 0 <Target Port 1 WWN> <Target NWWN>
c) Create a CryptoTarget container (CTC2) for target port 2 to be hosted on the encryption engineof encryption switch 2.
FabricAdmin:switch> cryptocfg --create -container disk CTC2 \<switch 2 WWN> 0 <Target Port2 WWN> <Target NWWN>
Configuring Encryption Using the CLI
162 Fabric OS Encryption Administrator's Guide Supporting RSA Data Protection Manager (DPM) Environments53-1003757-01

d) Add host port 1 to the container CTC1.
FabricAdmin:switch> cryptocfg --add -initiator <CTC1> <Host Port1 WWN> \ <Host NWWN>
e) Add host port 2 to the container CTC2.
FabricAdmin:switch> cryptocfg --add -initiator <CTC2> <Host Port2 WWN> <Host NWWN>
f) Commit the configuration.
FabricAdmin:switch> cryptocfg --commit
Upon commit, redirection zones are created for target port 1, host port 1 and target port 2, host port2. These redirection zones include the virtual target VT1 for CTC1, the virtual initiator VI1 for hostport 1, the virtual target VT2 for CTC2 and the virtual initiator VI2 for host port 2. At this stage, thehost loses access to all LUNs until the LUNs are explicitly added to the CryptoTarget containers.
4. Discover the LUNs. Perform steps 4 a. through c. to discover the LUNs for ALL CryptoTargetcontainers in sequence. Refer to the section Discovering a LUN on page 152 for details on the LUNdiscovery process and a command output example.a) On the encryption switch 1 (the group leader), enter the cryptocfg --discoverLUN for the
container CTC1. The command output displays the LUNs present in the target as exposed fromtarget port 1 and as seen by host port1, the LUN Number, host port1 WWN, and the LUN SerialNumber.
FabricAdmin:switch> cryptocfg --discoverLUN CTC1
b) On the encryption switch 2, enter the cryptocfg --discoverLUN for the container CTC2. Thecommand output displays the LUNs present in the target as exposed from target port and as seenby host port 2, the LUN Number, host port1 WWN, and the LUN Serial Number.
FabricAdmin:switch> cryptocfg --discoverLUN CTC2
c) Review the output of the LUN discovery to ensure that the LUN serial number for ALL LUNs arethe same as seen from target-port 1 to host-Port 1 path and from target-port 2 to host-port 2.Identical LUN serial numbers validate the multi-path configuration.
5. Configure the LUN for all CryptoTarget containers in sequence by adding the LUN to eachCryptoTarget container with identical policy settings. Refer to the sections Configuring a Crypto LUNon page 153 and Crypto LUN parameters and policies on page 155 for more information.a) Add the LUN to the CryptoTarget container CTC1 with policies.
FabricAdmin:switch> cryptocfg --add -LUN CTC1 0 <Host Port1 WWN> \<Host NWWN> -lunstate cleartext -encryption_format native -encrypt \-enable_encexistingdata -enable_rekey 10
b) Add the same LUN to the CryptoTarget container CTC2. Use exactly the same LUN state andpolicy settings that you used for the LUN added to CTC1.
FabricAdmin:switch> cryptocfg --add -LUN CTC2 0 <Host Port1 WWN> \<Host NWWN> -lunstate cleartext -encryption_format native -encrypt \-enable_encexistingdata -enable_rekey 10
NOTEThe LUN policies must be exactly the same on both CTC1 and CTC2. Failure to do so results inundefined behavior and data corruption.
6. Validate the LUN policies for all containers. Display the LUN configuration for ALL CryptoTargetcontainers to confirm that the LUN policy settings are the same for all CryptoTarget containers.
FabricAdmin:switch> cryptocfg --show -LUN CTC1 0 <Host Port1 WWN> -cfg FabricAdmin:switch> cryptocfg --show -LUN CTC2 0 <Host Port2 WWN> -cfg
Configuring Encryption Using the CLI
Fabric OS Encryption Administrator's Guide Supporting RSA Data Protection Manager (DPM) Environments 16353-1003757-01
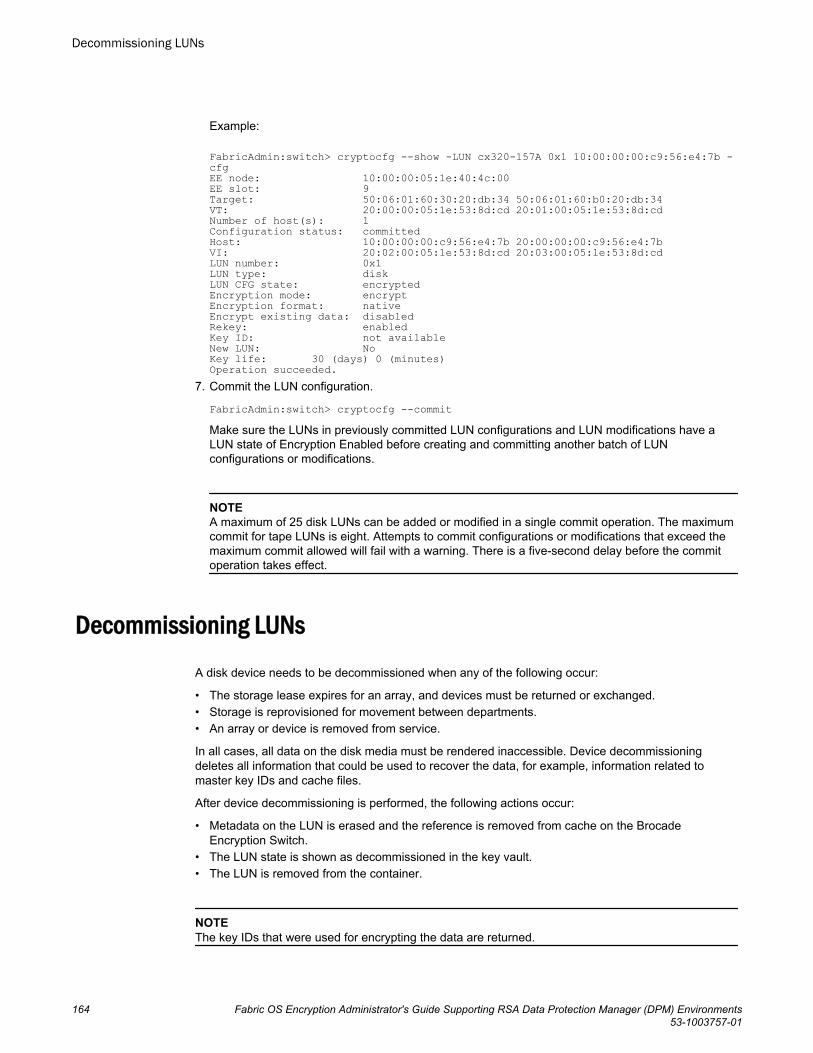
Example:
FabricAdmin:switch> cryptocfg --show -LUN cx320-157A 0x1 10:00:00:00:c9:56:e4:7b -cfgEE node: 10:00:00:05:1e:40:4c:00EE slot: 9Target: 50:06:01:60:30:20:db:34 50:06:01:60:b0:20:db:34VT: 20:00:00:05:1e:53:8d:cd 20:01:00:05:1e:53:8d:cdNumber of host(s): 1Configuration status: committedHost: 10:00:00:00:c9:56:e4:7b 20:00:00:00:c9:56:e4:7bVI: 20:02:00:05:1e:53:8d:cd 20:03:00:05:1e:53:8d:cdLUN number: 0x1LUN type: diskLUN CFG state: encryptedEncryption mode: encryptEncryption format: nativeEncrypt existing data: disabledRekey: enabledKey ID: not availableNew LUN: NoKey life: 30 (days) 0 (minutes)Operation succeeded.
7. Commit the LUN configuration.
FabricAdmin:switch> cryptocfg --commitMake sure the LUNs in previously committed LUN configurations and LUN modifications have aLUN state of Encryption Enabled before creating and committing another batch of LUNconfigurations or modifications.
NOTEA maximum of 25 disk LUNs can be added or modified in a single commit operation. The maximumcommit for tape LUNs is eight. Attempts to commit configurations or modifications that exceed themaximum commit allowed will fail with a warning. There is a five-second delay before the commitoperation takes effect.
Decommissioning LUNs
A disk device needs to be decommissioned when any of the following occur:
• The storage lease expires for an array, and devices must be returned or exchanged.• Storage is reprovisioned for movement between departments.• An array or device is removed from service.
In all cases, all data on the disk media must be rendered inaccessible. Device decommissioningdeletes all information that could be used to recover the data, for example, information related tomaster key IDs and cache files.
After device decommissioning is performed, the following actions occur:
• Metadata on the LUN is erased and the reference is removed from cache on the BrocadeEncryption Switch.
• The LUN state is shown as decommissioned in the key vault.• The LUN is removed from the container.
NOTEThe key IDs that were used for encrypting the data are returned.
Decommissioning LUNs
164 Fabric OS Encryption Administrator's Guide Supporting RSA Data Protection Manager (DPM) Environments53-1003757-01

When a device decommission operation fails on the encryption group leader for any reason, the cryptoconfiguration remains uncommitted until a user-initiated commit or a subsequent device decommissionoperation issued on the encryption group leader completes successfully. Device decommissionoperations should always be issued from a committed configuration. If not, the operation will fail with theerror message "An outstanding transaction is pending in Switch/EG". IF this happens, you can resolvethe problems by committing the configuration from the encryption group leader.
Provided that the crypto configuration is not left uncommitted because of any crypto configurationchanges or a failed device decommission operation issued on a encryption group leader node, this errormessage will not be seen for any device decommission operation issued serially on an encryption groupmember node. If more than one device decommission operation is tried in an encryption group frommember nodes simultaneously, then this error message is transient and will go away after devicedecommission operation is complete. If the device decommissioning operation fails, retry the operationafter some time has passed.
If a LUN is removed when undergoing decommission or is in a decommission failed state, or if acontainer hosting the LUN is deleted, you must use the -force option on the commit operation(cryptocfg --commit -force ). Failure to do so causes the commit operation to fail and a decommissionin progress error displays.
Upon a successful completion of a decommissioning operation, the LUN is deleted from all containershosting it, and all active paths to the LUNs are lost.
NOTEThe command used to decommission LUNs will not work after firmware has been downgraded to aversion of Fabric OS earlier than v7.1.0.
Complete the following procedure to decommission a LUN.
1. Log in as Admin or FabricAdmin to the node that hosts the container.2. Enter the cryptocfg --decommission command.
FabricAdmin:switch> cryptocfg --decommission -container disk_ct0 -initiator 21:01:00:1b:32:29:5d:1c -LUN 0
3. Enter cryptocfg --show -decommissionedkeyids to obtain a list of all currently decommissionedkey IDs to be deleted after decommissioning key IDs manually from the key vault.
FabricAdmin:switch> cryptocfg --show -decommissionedkeyids4. Enter the cryptocfg --show -vendorspecific_keyid command to list the vendor-specific key
information for a given key ID.
FabricAdmin:switch> cryptocfg --show -vendorspecific_keyid AA:8B:91:B0:35:6F:DA:92:8A:72:B3:97:92:1B:CA:B4uuid = b7e07a6a-db64-40c2-883a-0bc6c4e923e6
5. Manually delete the listed key IDs from the key vault.6. Enter the cryptocfg --delete -decommissionedkeyids command to purge all key IDs associated
with a decommissioned LUN.
FabricAdmin:switch> cryptocfg --delete -decommissionedkeyids
7. Enter the cryptocfg --show -decommissionedkeyids command to verify that the deleted key IDsare no longer listed.
The cache is also cleared when cryptocfg --zeroizeEE is executed on the encryption engine.
When a decommissioned LUN is reused and the decommissioned key IDs are listed using thecryptocfg --show -decommissionedkeyids command, the entire list of decommissioned key IDssince the first time the LUN was used is displayed.
Configuring Encryption Using the CLI
Fabric OS Encryption Administrator's Guide Supporting RSA Data Protection Manager (DPM) Environments 16553-1003757-01

NOTEIf you are funning Fabric OS 7.1.0 or later, and you want to downgrade to an earlier Fabric OSversion (for example, Fabric OS 7.0.x), after decommissioning a disk LUN, it is recommended thatyou remove the decommissioned key ID from the key vault before performing the downgrade.Otherwise, if the LUN is added back for encryption, the LUN will go to the disabled state as the keystate is decommissioned in the key vault.
Decommissioning replicated LUNsWhen trying to re-use primary R1 or secondary R2 replicated LUNs, you must first decommission theLUNs. When trying to re-use a decommissioned LUN, you must:
1. Delete the keys from the key vault.2. Add the LUN back into the container as cleartext.3. Modify the LUN to encrypted.
The following scenarios are provided:
• Decommissioning primary R1 LUNs only on page 166• Decommissioning mirror R2 LUNs only on page 167• Decommissioning primary R1 and mirror R2 LUN pairs on page 167
Decommissioning primary R1 LUNs onlyTo decommission the primary LUN and make the secondary LUN the primary LUN, complete thefollowing steps. Failure to do so could result in the LUN state showing as Disabled.
1. Log in as Admin or FabricAdmin.2. Split the R1/R2 sync.3. Make the R2 LUN write-enabled.4. Execute the rekey command on the R2 LUN.
FabricAdmin:switch> cryptocfg --manual_rekey <crypto target container name> <LUN Num> <Initiator PWWN>
5. Decommission the primary LUN.
FabricAdmin:switch> cryptocfg --decommission -container <container name> -initiator <initiator PWWN> -LUN <lun number>
6. Display the decommissioned key IDs.
FabricAdmin:switch> cryptocfg --show -decommissionedkeyids
7. Delete the respective key from the key vault. On the Brocade Encryption Switch, enter the followingcommand.
FabricAdmin:switch>cryptocfg --delete -decommissionedkeyids
NOTEFailure to rekey the secondary LUN might result in loss of data on the secondary LUN after theprimary LUN is decommissioned.
Decommissioning replicated LUNs
166 Fabric OS Encryption Administrator's Guide Supporting RSA Data Protection Manager (DPM) Environments53-1003757-01

Decommissioning mirror R2 LUNs onlyTo decommission the secondary LUN, complete the following steps:
NOTEDo not delete the key from the key vault.
1. Log in as Admin or Fabric Admin.2. Split the R1/R2 sync.3. Make the R2 LUN write-enabled.4. Decommission the R2 LUN.
FabricAdmin:switch> cryptocfg --decommission -container <container_name> -initiator <initiator_PWWN> -LUN <lun_number>
Decommissioning primary R1 and mirror R2 LUN pairsTo decommission both the primary and secondary LUNs, complete the following steps:
1. Log in as Admin or FabricAdmin.2. Split the R1/R2 sync.3. Independently decommission the R1 and R2 LUNs.
a) Decommission the R1 LUN.
FabricAdmin:switch> cryptocfg --decommission -container <container name> -initiator <initiator PWWN> -LUN <lun number>
b) Display the decommissioned key IDs.
FabricAdmin:switch> cryptocfg --show -decommissionedkeyidsc) Delete the respective key from the key vault. On the Brocade Encryption Switch, enter the
following command.
FabricAdmin:switch> cryptocfg --delete -decommissionedkeyidsd) Decommission the R2 LUN.
FabricAdmin:switch> cryptocfg --decommission -container <container name> -initiator <initiator PWWN> -LUN <lun number>
Force-enabling a decommissioned disk LUN for encryption
When trying to re-use primary or secondary replicated LUNs, you must first decommission the LUNs.When trying to re-use a decommissioned LUN, you must:
1. Delete the keys from the key vault.2. Log in as Admin or FabricAdmin.3. Delete the decommissioned LUN IDs from the Brocade Encryption Switch.
a) Display the decommissioned key IDs.
FabricAdmin:switch> cryptocfg --show -decommissionedkeyidsb) Delete the respective key from the Brocade Encryption Switch. Enter the following command.
FabricAdmin:switch> cryptocfg --delete -decommissionedkeyids
Decommissioning mirror R2 LUNs only
Fabric OS Encryption Administrator's Guide Supporting RSA Data Protection Manager (DPM) Environments 16753-1003757-01

4. Add the LUN back into the container as cleartext.
FabricAdmin:switch> cryptocfg --add -LUN <crypto target container name> <LUN Num | LUN Num Range> <Initiator PWWN> <Initiator NWWN> -lunstate cleartext
5. Enable the LUN.
FabricAdmin:switch> cryptocfg --enable -LUN <crypto target container name> <LUN Num> <Initiator PWWN>
6. Modify the LUN to encrypted.
FabricAdmin:switch> cryptocfg --modify -LUN <crypto target container name> <LUN Num> <Initiator PWWN> 0 -lunstate encrypted -encryption_format native -encrypt
7. Enter the cryptocfg --enable -LUN command followed by the CryptoTarget container name, theLUN Number, and the initiator PWWN.
FabricAdmin:switch> cryptocfg --enable -LUN my_disk_tgt 0x0 \ 10:00:00:00:c9:2b:c9:3aOperation Succeeded
Force-enabling a disabled disk LUN for encryption
You can force a disk LUN to become enabled for encryption when encryption is disabled on the LUN.A LUN may become disabled for various reasons, such as a change in policy from encrypt tocleartext when encrypted data (and metadata) exist on the LUN, a conflict between LUN policy andLUN state, or a missing DEK in the key vault. Force-enabling a LUN while metadata exist on the LUNmay result in a loss of data and should be exercised with caution. Refer to Chapter 6, Force-enablinga disabled disk LUN for encryption for a description of conditions under which a LUN may be disabled,and for recommendations on re-enabling the LUN while minimizing the risk of data loss.
This procedure must be performed on the local switch that is hosting the LUN. No commit is requiredto force-enable after executing this command.
1. Log in to the switch that hosts the LUN as Admin or FabricAdmin.2. Enter the cryptocfg --enable -LUN command followed by the CryptoTarget container name, the
LUN Number, and the initiator PWWN.
FabricAdmin:switch> cryptocfg --enable -LUN my_disk_tgt 0x0 \ 10:00:00:00:c9:2b:c9:3aOperation Succeeded
Remote replication LUNsThe Symmetrix Remote Data Facility (SRDF) transmits data that is being written to both a localsymmetrix array and a remote symmetrix array. The replicated data facilitates a fast switchover to theremote site for data recovery.
SRDF supports the following methods of data replication:
• Synchronous Replication provides real-time mirroring of data between the source Symmetrix andthe target Symmetrix systems. Data is written simultaneously to the cache of both systems in realtime before the application I/O is completed, thus ensuring the highest possible data availability.
• Semi-Synchronous Replication writes data to the source system, completes the I/O, thensynchronizes the data with the target system. Since the I/O is completed prior to synchronizing datawith the target system, this method provides an added performance advantage. A second write willnot be accepted on a Symmetrix source device until its target device has been synchronized.
Force-enabling a disabled disk LUN for encryption
168 Fabric OS Encryption Administrator's Guide Supporting RSA Data Protection Manager (DPM) Environments53-1003757-01

• Adaptive Copy Replication transfers data from the source devices to the remote devices withoutwaiting for an acknowledgment. This is especially useful when transferring large amounts of dataduring data center migrations, consolidations, and in data mobility environments.
• Asynchronous Replication places host writes into chunks and then transfers an entire chunk to thetarget system. When a complete chunk is received on the target system, the copy cycle is committed.If the SRDF links are lost during data transfer, any partial chunk is discarded, preserving consistencyon the target system. This method provides a consistent point-in-time remote image that is not farbehind the source system and results in minimal data loss if there is a disaster at the source site.
SRDF pairsRemote replication is implemented by establishing a synchronized pair of SRDF devices connected byFC or IP links.
A local source device is paired with a remote target device while data replication is taking place. Whilethe SRDF devices are paired, the remote target device is not locally accessible for read or writeoperations. When the data replication operation completes, the pair may be split to enable normal read/write access to both devices. The pair may be restored to restore the data on the local source device.
The following figure shows the placement of encryption switches in an SRDF configuration. Whenencryption is enabled for the primary LUN, encrypted data written by the local application server to theprimary LUN is replicated on the secondary LUN. The data is encrypted using a DEK that wasgenerated on the local encryption switch and stored on the local DPM key vault. When each site has anindependent key vault, as shown in the figure, the key vaults must be synchronized to ensure theavailability of the DEK at the remote site.
Refer to DPM user documentation for information about how to synchronize the key vaults. Both sitesmay share the same key vault, which eliminates the need for synchronization across sites. Dependingon distance between sites, sharing a key vault may add some latency when retrieving a key.
FIGURE 88 Basic SRDF configuration with encryption switches
NOTEWhen Symmetrix arrays are managed in-band, the gatekeeper LUNs must be added to the crypto-target containers as cleartext LUNs. Adding these as encrypted LUNs generates a CRITICAL error onthe console, and the other encrypted LUNs are not visible from the host.
Enabling and disabling remote replication modeAll of the nodes in the encryption group must be running Fabric OS v6.4.0 or later.
SRDF pairs
Fabric OS Encryption Administrator's Guide Supporting RSA Data Protection Manager (DPM) Environments 16953-1003757-01

After replication mode is enabled, the switch firmware cannot be downgraded to firmware versionsprior to Fabric OS 6.4.0.
NOTEDo not add a node running an earlier Fabric OS version to an encryption group that is running version6.4.0 or later if remote replication is enabled. Also, be aware that a Fabric OS 6.4.0 configuration file isnot blocked from being downloaded to a node running an earlier Fabric OS version.
1. To enable the remote replication features, enter the cryptocfg --set -replication enable command.When replication mode is enabled, starting first-time encryption (FTE) or manual rekey on LUNswithout metadata (due to uncompressible metadata blocks) generates a RASLOG entry, providingthe key ID that is used to encrypt the LUN. Key expiry rekey (or auto rekey) is disabled for LUNswithout metadata.
2. To disable replication mode, enter the cryptocfg --set -replication disable command.This operation will fail if there are LUNs configured with the -newLUN option in the encryptiongroup.
Adding replication LUNsReplication LUNs must be added to the container with the -newLUN option. Replication mode needsto be enabled prior to adding replication LUNs with -newLUN option, using the cryptocfg --set -replication enable command. The primary LUN and all mirror LUNs need to be added to theirrespective containers with the -newLUN option.
From the standpoint of the encryption switch or blade, the local and remote copies of the LUN areconfigured in different encryption groups. From the DPM perspective, DPM clusters at local andremote encryption groups must be configured as part of the same DPM cluster group.
Rekey operations for replicated LUNsAuto rekey is disabled for replicated LUNs. Sync between primary LUNs and mirror LUNs should bedisabled before starting manual rekey on primary LUNs. If sync is not disabled, the mirror LUN will bedisabled for host access. Once the primary LUN rekey is completed, the sync can be performedbetween the primary (R1) and mirror (R2) LUN. Manual rekey works only on primary LUNs. MirrorLUNs can be converted to primary LUNs by performing a manual rekey with the -include_mirroroption.
Be aware that when an individual primary LUN is rekeyed using the -include_mirror option, nowarning message is displayed prior to the rekey occurring.
If a rekey is invoked using the -include_mirror option, and the LUN is not a mirror LUN or a read-onlyprimary LUN, the rekey operation acts as usual.
NOTEcryptocfg --manual_rekey -all -include_mirror rekeys all the primary and mirror LUNs, not justmirror LUNs and out-of-sync primary LUNs. Enter only cryptocfg --manual_rekey -all if you want torekey only out-of-sync primary LUNs. The -include_mirror option is ignored if the command appliesonly to a primary LUN.
Adding replication LUNs
170 Fabric OS Encryption Administrator's Guide Supporting RSA Data Protection Manager (DPM) Environments53-1003757-01

Reading metadata after syncThe cryptocfg --refreshDEK command can be used to perform a read of the metadata and reprogramthe encryption tables with a new encryption key. After a sync from rekeyed primary LUN to the mirrorLUN, performing cryptocfg --refreshDEK will obtain the latest encryption keys for the primary LUN andconfigure that for encryption and decryption of the mirror LUN.
NOTEFor all multi-path LUN environments, it is critical to ensure that the target port settings (for example,os2007 bit, or spc-2 bit) for all paths to a given LUN are configured identically.
Using SRDF, TimeFinder, and RecoverPoint with encryptionThe EMC Symmetrix Remote Data Facility (SRDF), TimeFinder (TF), and RecoverPoint (RP) worktogether to provide reliable and efficient data recovery from a remote data facility.
SRDF transmits data that is being written to a local Symmetrix array to a remote Symmetrix array. Thereplicated data facilitates a fast switchover to the remote site for data recovery.
TF provides local storage replication for increased application availability and faster data recovery.
RP facilitates continuous data protection and continuous remote replication to enable on-demandprotection and point in time data recovery.
RecoverPoint Configuration RestrictionsThe Brocade encryption solution only supports Clariion-based splitting operations. The Clariion arraysat both the source and target sites must be configured so that the RP appliances have dedicatedcleartext target ports for access to the storage arrays. That is, every storage array target port utilized bya RP appliance for access to the Clariion array must not be configured as a CryptoTarget container.
Initial configuration requirements for SRDF, TF, and RPThe following are initial configuration requirements for SRDF, TF, and RP:
• For SRDF and RP, it is assumed that there is a clustered pair of DPMs at the local site and aclustered pair of DPMs at the remote site. The clustered pairs must then be configured as part of thesame key vault group.
• For TimeFinder, the source device (LUN) and the target device (LUN) must be located on the samestorage array.
NOTEIf replication is enabled, firmware downgrades to earlier Fabric OS releases will be disallowed until thereplication feature is disabled. The replication feature cannot be disabled if there are LUNs in theEncryption Group (EG) configured with the -newLUN option.
Reading metadata after sync
Fabric OS Encryption Administrator's Guide Supporting RSA Data Protection Manager (DPM) Environments 17153-1003757-01

SRDF/RP initial setup at the source (R1) siteReplication mode needs to be enabled before replicated LUNs can be added to the BrocadeEncryption Switch, and the master key must be exported.
1. Log in as Admin or SecurityAdmin.2. Use the following command to enable EG wide replication mode:
SecurityAdmin:switch> cryptocfg --set -replication enable3. Export the master key.
SecurityAdmin:switch> cryptocfg -exportmasterkey4. NOTE
The master key is being exported from the local site so it can be recovered and utilized by the EG atthe remote site. If the local and remote sites are both part of the same encryption group andtherefore share the same DPM cluster, this step is not required.
Make a note of the master key's ID. The master key ID can be obtained by running the followingcommand:
SecurityAdmin:switch> cryptocfg --show -localEE
SRDF/RecoverPoint remote target (R2) siteReplication mode needs to be enabled before replicated LUNs can be added to the BrocadeEncryption Switch, and the master key configured on encryption group at the source (R1) site must berecovered for use on encryption group at the remote (R2) site.
1. Log in as Admin or SecurityAdmin.2. Enable EG wide replication mode.
SecurityAdmin:switch> cryptocfg --set -replication enable3. Recover the master key configured on the local site EG to the remote site EG.
SecurityAdmin:switch> cryptocfg --recovermasterkey currentMK -keyid <key ID of master key from R1's EG>
Recovery of the master key at the remote site needs to be accomplished before adding replicatedLUNs to the encryption group configuration at the remote/target site.
Configuring LUNs for SRDF/TF or RP deploymentsThere are two possible LUN configuration scenarios LUNs to consider in SRDF/TF or RPdeployments:
• Creating new source LUNs that can later be replicated.• Migrating data from existing encrypted or cleartext source LUNs to LUNs that can be replicated.
For each of these scenarios, the following rules and notes apply:
• It is assumed that CryptoTarget containers (CTCs) have been created for all target ports at the localsite (and at the remote site if one exists) and that the appropriate initiators have been added toeach.
• SRDF R1 and R2 LUNs must be the same size.• TimeFinder (TF) source and target devices (LUNs) must be the same size.• RecoverPoint (RP) source and target devices (LUNs) must be the same size.
SRDF/RP initial setup at the source (R1) site
172 Fabric OS Encryption Administrator's Guide Supporting RSA Data Protection Manager (DPM) Environments53-1003757-01

• When changing encryption policies for the source LUN, the same policies must be applied to thetarget LUN.
• Once the LUN is added to the container using the -newLUN option, it must not be resized.• Auto/Key expiry rekey is not allowed for SRDF/TF/RP LUNs. Therefore the -newLUN option is not
compatible with the -enable_rekey option.
Steps for dealing with these scenarios are described in the following sections devoted to using SRDF,TimeFinder (TF) and RecoverPoint (RP) with the Brocade encryption solution.
Creating new source LUNs that can later be replicatedUse the following procedure to create a new source LUN capable of later replication. This proceduremust be completed once for every path/container that has access to the source LUN:
1. Log in as Admin or FabricAdmin.2. NOTE
This command assumes there is no valid user data on the LUN. Therefore, this command will havethe effect of destroying any existing user data on the LUN.
Create the new source LUN with the -newLUN option and -encrypt policy.
FabricAdmin:switch> cryptocfg --add -LUN <source_container> <new LUN num> <initiator PWWN & NWWN> -newLUN -lunstate cleartext -encrypt
3. Commit the configuration.
FabricAdmin:switch> cryptocfg --commit
Migrating LUNs with existing data to LUNs that can be replicatedAs part of the encryption replication solution, if a SRDF/TF/RP source LUN contains valid customer data(cleartext or encrypted), prior to replicating the LUN, the existing user data must be migrated to a newLUN that is at least three blocks larger than the current source LUN.
If your setup has an existing target LUN, it too will need to be deleted and then recreated as a LUN thatis identical in size to the new larger source LUN.
The steps for migrating data from the existing source LUN to a larger and replication-capable LUNdepend on whether the existing LUN contains encrypted data or cleartext data.
NOTER1 and R2 devices must be of the same size. If the LUNs are of different sizes and R1 does not haveprimary metadata, encryption of R2 LUNs will fail and the LUN becomes disabled. This is because thelocation of the secondary metadata differs for R1 and R2 LUNs that are not the same size. Normally, R1writes secondary metadata at its last three blocks, but because R2 is a different size, its last threeblocks do not contain metadata, causing the encryption setup to fail.
Migrating data for encrypted source LUNs
1. Log in as Admin or FabricAdmin.2. Create a new LUN with -newLUN option and -encrypt policy.
All paths to the new SRDF/TF/RP source LUN must be added to their containers with the -newLUNoption.
FabricAdmin:switch> cryptocfg --add -LUN <source_container> <new LUN num> <initiator PWWN & NWWN> -newLUN -lunstate cleartext -encrypt
Creating new source LUNs that can later be replicated
Fabric OS Encryption Administrator's Guide Supporting RSA Data Protection Manager (DPM) Environments 17353-1003757-01

3. Commit the configuration.4. Wait until the LUN is in encryption enabled state.5. Copy the data from the old LUN to the new LUN using the EMC host-based PPME (PowerPath
Migration Enabler) application.
Migrating data for cleartext source LUNs
1. Log in as Admin or FabricAdmin.2. Create a new LUN with -newLUN option and -cleartext policy.
FabricAdmin:switch> cryptocfg --add -LUN <source_container> <new LUN num> <initiator PWWN & NWWN> -newLUN -lunstate cleartext -cleartextAll paths to the new SRDF/TF/RP source LUN must be added to their containers with the -newLUNoption.
3. Commit the configuration.4. Copy the data from the old LUN to the new LUN using the EMC host-based EMC PPME
(PowerPath Migration Enabler) application.5. If first-time encryption of this LUN is required, configure the LUN for encryption and enable first-time
encryption as follows:
FabricAdmin:switch> cryptocfg --modify -LUN <source_container> <new LUN num> <initiator PWWN> -encrypt -enable_encexistingdataFor multi-path LUNs, you must repeat this step for each path before committing the configuration.
6. Commit the configuration.
Synchronizing source and target LUN SRDF/RP pairsThis section describes the proper procedure for establishing the local/remote LUN pair in a SRDF orRP environment.
NOTEThe remote/target LUNs must be added to their CryptoTarget Containers (CTCs) only after the localsite LUNs' encryption setup has been completed.
1. If necessary, create the remote/R2 LUN at the remote site ensuring that it is identical in size to thelocal/R1 site LUN. At this time, do not configure the remote LUN to be a part of any remote siteCTC.
2. Establish the local-to-remote LUN replication/synchronization and wait for the pair to become fullysynchronized.
NOTEDuring the initial SRDF/RP replication (or while replicating/synchronizing after a rekey of the sourceLUN), the remote/R2 LUNs must not be exposed for access to the remote site hosts. Although theSRDF/RP behavior may make the remote/R2 LUN read-only or not-ready, it is mandated that thetarget ports be physically taken offline. Once synchronized, if remote access to the target LUNbecomes necessary, the process of bringing the remote target ports online will ensure the correctData Encryption Key (DEK) is injected into every Encryption Engine (EE) with a path to the remoteLUN.
3. Verify the SRDF/RP pair is in a synchronized state using the EMC Solution Enabler or the RP GUI,depending on which technology you are implementing.
Migrating data for cleartext source LUNs
174 Fabric OS Encryption Administrator's Guide Supporting RSA Data Protection Manager (DPM) Environments53-1003757-01

4. Verify that the DEKs are synchronized between the local and remote DPMs. This can be donemanually for each LUN as follows:a) Issue the command cryptocfg --show -vendorspecifickeyid key_ID for each replicated LUN and
capture the UUIDs (Universally Unique Identifier) returned.b) Search for this UUID on the remote key vaults to ensure its presence.Alternatively, simply bringing the remote site LUNs online ensures the remote DEKs are present.
5. Bring the remote/R2 LUNs online.a) Bring all target ports through which the remote LUNs are accessible online.b) If not already created, add the remote/R2 CTCs for each path to each remote LUN.
FabricAdmin:switch> cryptocfg --create -container disk <remote target container name> EE_node_WWN [EE_slot] target_PWWN target_NWWN [-initiator initiator_PWWN initiator_NWWN [initiator_PWWN initiator_NWWN]...]
c) Add the remote/R2 LUNs to all of their respective CTCs.
FabricAdmin:switch> cryptocfg --add -LUN <remote container name> <remote LUN ID> <initiator PWWN & NWWN> -lunstate encrypted -encrypt -newLUN
6. Commit the configuration.7. Verify that the remote LUN states are “Encryption enabled” and their key IDs used for encryption are
the same as those used by the local/R1 LUNs.8. Verify that the Replication LUN type of the local/R1 LUNs is “Primary” and that of the remote/R1
LUNs is “Mirror.”9. Take all remote target ports associated with CTCs through which the remote LUNs are accessible
offline.
NOTEIf the DEK is not synchronized between the local/R1 site and the remote/R2 site, the remote/R2 LUNwill automatically become disabled.
Configuring TimeFinder target devicesUse TimeFinder (TF) to create any desired target devices, such as snapshots, clones, or mirrors.
The TimeFinder source and destination devices must be the same size.
NOTEYou may skip this section if host access to a target device is not required.
1. Log in as Admin or FabricAdmin.2. NOTE
If Target devices utilize the same target ports/containers as the source devices, you may skip thisstep.
Create the containers for the target ports through which TimeFinder target LUNs will be madeaccessible, and add all initiators that require access the target LUNs.
FabricAdmin:switch> cryptocfg --create -container disk <target container name> <EE to own container> <target PWWN> <target NWWN> -initiator <initiator PWWN> <initiator NWWN>
3. For each path to the target device/LUN, add the LUNs to their respective target containers.All paths to the TimeFinder target LUN must be added to their containers with the -newLUN option.
FabricAdmin:switch> cryptocfg --add -LUN <target container name> <target LUN ID> <initiator PWWN> <initiator NWWN> -newLUN -lunstate encrypted -encrypt
Configuring TimeFinder target devices
Fabric OS Encryption Administrator's Guide Supporting RSA Data Protection Manager (DPM) Environments 17553-1003757-01

NOTEIf the target device specified above is a snapshot of a cleartext LUN, the above command results inthat LUN becoming disabled. For cleartext snapshots, use the syntax -lunstate cleartext -cleartext.
4. Commit the configuration.5. Verify the target LUN state shows “encryption enabled” and the key ID used for encryption is the
same as the source LUN's key ID.
Configuring SRDF Gatekeeper LUNsGatekeeper LUNs used by SYMAPI on the host for configuring SRDF using in-band managementmust be added to their containers with a LUN state of cleartext, encryption policy of cleartext, andwithout the -newLUN option.
SRDF/TF/RP manual rekeying proceduresThe following topics describe encryption rekeying procedures relative to SRDF, TF, and RP.
TF snapshot rekeying detailsIn TimeFinder environments, rekeying a source LUN which has one or more snapshot target deviceswill result in full copy outs of the source devices to the target devices.
When source LUNs are rekeyed, the target snapshot LUNs will continue to utilize the older/originalDEK and therefore use of the refreshDEK command is not required. However, if an existing targetLUN/snapshot is recreated, then the refreshDEK command must be used on every path/containerwhich has access to the target device. The refreshDEK command forces the Brocade EncryptionSwitch to re-read the metadata on the target LUN and then updates the FPGA tables for the LUN if theDEK in the metadata has changed.
FabricAdmin:switch> cryptocfg --refreshDEK <target_container> <target LUN ID> <initiator PWWN>
NOTEManual rekeying is supported for TimeFinder snapshot target device LUNs using the -include_mirroroption; however, it would defeat the purpose of using snapshot LUNs because rekeying them wouldcause all blocks of the snapshot to be allocated to the virtual device (that is, the source and snapLUNs would have the same number of blocks).
TF clone/mirror rekeying detailsManual rekeying is supported for TimeFinder source LUNs and is not supported for target devices(clone, mirror) unless the source to target connection is first split.
1. Log in as Admin or Fabric Admin.2. Split the TF source/target LUN pair ensuring the data synchronization from the source LUN to the
destination LUN has been stopped.
Configuring SRDF Gatekeeper LUNs
176 Fabric OS Encryption Administrator's Guide Supporting RSA Data Protection Manager (DPM) Environments53-1003757-01

NOTEDuring all rekeying operations, data synchronization between the source and target LUN must bestopped.
3. During the rekeying operation, you can enable the target ports so the target LUNs can be accessedby the hosts in read-only mode.
4. Issue a manual rekey request for the source LUN.
FabricAdmin:switch> cryptocfg --manual_rekey <source container> <source LUN ID> <initiator PWWN>
5. Wait until the rekey operation on the source LUN has completed.If the source LUN has a rekeying error of any type, the TF source/target LUN pair should not beestablished/synchronized. The source LUN rekey must complete successfully before the source/target pair is re-established.
6. Remove target LUN access by using one of the following procedures:
• Ensure that no hosts read or write information to the TF target LUNs.• Make the target LUN not ready to the host by using the -not_ready option of TF clone/snap when
activating the target device.7. Start TimeFinder pair synchronization so the rekeyed data from the source LUN is copied to target
LUN.8. Verify that the TimeFinder pair is synchronized.9. If you want to bring the target LUN online for host access, once the TimeFinder pair has been
synchronized, perform the following command on every path/container that has access to the targetdevice:
FabricAdmin:switch> cryptocfg --refreshDEK <target_container> <target LUN ID> <initiator PWWN>
NOTEThe refreshDEK command forces the Brocade Encryption Switch to re-read the metadata on thetarget LUN, and then updates the FPGA tables for the LUN if the DEK in the metadata has changed.It is therefore imperative that this command be run after every rekeying operation that is completedfor TF target devices.
Rekeying local site (R1) SRDF LUNsManual rekeying is supported for SRDF R1 LUNs.
If it is required to rekey the R2 LUN, SRDF role reversal/swap is necessary. This procedure is coveredin Rekeying remote site (R2) SRDF LUNs on page 179.
1. Log in as Admin or FabricAdmin.2. Split the SRDF R1/R2 LUN pair ensuring that the data replication from the source R1 LUN to the
destination R2 LUN has been stopped.
NOTEDuring all rekeying operations, data replication between the source and target LUN must be stopped.
3. During the rekeying operation, you can enable the remote target ports so the target LUNs can beaccessed by the remote hosts in read-only mode.
4. Issue a manual rekey request for the source LUN.
FabricAdmin:switch> cryptocfg --manual_rekey <R1 source container> <R1 source LUN ID> <initiator PWWN>
Rekeying local site (R1) SRDF LUNs
Fabric OS Encryption Administrator's Guide Supporting RSA Data Protection Manager (DPM) Environments 17753-1003757-01

5. Wait until the rekey operation on the source LUN has completed.If the source LUN has a rekeying error of any type, the SRDF pair should not be established/synchronized. The source LUN rekey must complete successfully before the source/target pair isre-established.
6. Confirm that the rekey has completed on the source LUN.7. Remove the target LUN access by disabling all remote site target ports with access to the target
LUN.
NOTEIn environments in which the target ports through which the target LUNs are accessible cannot betaken offline because they are used to access other LUNs, before remote access to the R2 LUNs isestablished, the refreshDEK command must be issued for all CTCs associated with the remoteLUNs after the source LUNs have been rekeyed and synchronized with their target LUNs.
8. Re-establish the SRDF R1/R2 LUN pair so that the rekeyed data from the source LUN is copied tothe target LUN.
9. Verify that the SRDF pair is in a fully synchronized state using the EMC Solution Enabler.10.Verify that the DEKs are synchronized between the local and remote DPMs. This can be done
manually for each LUN as follows.
NOTEIf the DEK is not synchronized between the local and remote sites, the remote LUN willautomatically become disabled.
a) Issue the cryptocfg --show -vendorspecifickeyid key_ID command for each replicated LUNand capture the UUIDs (Universally Unique Identifier) returned.
b) Search for this UUID on the remote DPMs to ensure its presence.Alternatively, simply bringing the remote site LUNs online to the remote EEs ensures that theremote DEKs are present.
11.Bring the remote LUNs online.a) Restore target LUN access by enabling all remote site target ports (associated with remote site
CTCs) with access to the target LUN.b) Verify that the remote LUN states are encryption enabled and their key IDs used for encryption
are the same as those used by the local site LUNs.c) Take all target ports associated with CTCs through which the remote LUNs are accessible
offline.
Rekeying LUNs for RP deployments - local siteManual rekeying is supported for RP source LUNs.
If it is required to rekey the remote LUN, RP role reversal/swap is necessary as described in RekeyingLUNs for RP deployments - remote site on page 180.
1. Log in as Admin or FabricAdmin.2. Disable the RP source/target LUN consistency group, ensuring that the data replication from the
source LUN to the destination LUN has been stopped.
NOTEDuring all rekeying operations, data replication between the source and target LUN must bestopped.
Rekeying LUNs for RP deployments - local site
178 Fabric OS Encryption Administrator's Guide Supporting RSA Data Protection Manager (DPM) Environments53-1003757-01
3. During the rekeying operation, you can enable the remote targets ports so the target LUNs can beaccessed by the remote hosts in read-only mode.
4. Issue a manual rekey request for the source LUN.
FabricAdmin:switch> cryptocfg --manual_rekey <source container> <source LUN ID> <initiator PWWN>
5. Wait until the rekey operation on the source LUN has completed.If the source LUN has a rekeying error of any type, the RP pair consistency group should not beenabled. The source LUN rekey must complete successfully before the source/target pairconsistency group gets re-enabled.
6. Confirm that the rekey has completed on the source LUN.7. Remove target LUN access by disabling all remote site target ports with access to the target LUN.
NOTEIn environments in which the target ports through which the target LUNs are accessible cannot betaken offline because they are used to access other LUNs, before remote access to the remote LUNsis established, the refreshDEK command must be issued for all CTCs associated with the remoteLUNs after the source LUNs have been rekeyed and synchronized with their target LUNs.
8. Enable the source/target LUN consistency group so that the rekeyed data from the source LUN iscopied to target LUN.
9. Verify that the RP pair is fully synchronized state using the RP GUI.10.Verify that the DEKs are synchronized between the local and remote DPMs. This can be done
manually for each LUN as follows:a) Issue the command cryptocfg --show -vendorspecifickeyid key_ID for each replicated LUN and
capture the UUIDs (Universally Unique Identifier) returned.b) Search for this UUID on the remote DPMs to ensure its presence.Alternatively, simply bringing the remote site LUNs online to the remote EEs ensures the remoteDEKs are present.
11.Bring the remote LUNs online.a) Restore target LUN access by enabling all remote site target ports (associated with remote site
CTCs) with access to the target LUN.b) Verify that the remote LUN states are encryption enabled and their key IDs used for encryption are
the same as those used by the local site LUNs.c) Take all target ports associated with CTCs through which the remote LUNs are accessible offline.
After the rekey has completed, restoring from a bookmark taken prior to the rekey operation will result inthe source LUN becoming READ ONLY. Once you have restored from the bookmark, it is imperativethat you issue the refreshDEK command on all paths with access to the restored LUN.
NOTEIf the DEK is not synchronized between the local and remote sites, the remote LUN will automaticallybecome disabled.
Rekeying remote site (R2) SRDF LUNsTo rekey an R2 LUN, you must first do an SRDF role reversal.
Complete the following steps to reverse the R1/R2 LUN functional roles:
Rekeying remote site (R2) SRDF LUNs
Fabric OS Encryption Administrator's Guide Supporting RSA Data Protection Manager (DPM) Environments 17953-1003757-01

1. Issue the SRDF role swap command to change the old R1 LUN to the new R2 LUN and old R2 LUNto the new R1 LUN.
2. Split the SRDF pair.3. Issue the cryptocfg --manual_rekey <crypto target container name> <LUN Num> <Initiator
PWWN> -include_mirror command on the new R1 LUN (old R2 LUN).
NOTEThis command will fail with an error if the -include_mirror option is not provided with themanual_rekey request.
4. After the rekey is completed, disable the new R2 target ports.5. Establish the SRDF for replication and wait for the SRDF pair to be fully synchronized.6. Verify that the DEKs are synched up from the local site key vault cluster to the remote site key vault
cluster.
NOTEIn all operations prior to SRDF establishment, ensure that the DEKs are synchronized between thelocal and remote site key vaults.
7. Verify that the Replication LUN type of the new R1 LUN is now “Primary” and the Replication LUNtype of new R2 LUN is now “Mirror”.
NOTEVerify the DEKs and Replication LUN type for all multi-paths are consistent.
Rekeying LUNs for RP deployments - remote siteTo rekey a remote site LUN, you must first do an RP reverse direction. Complete the following steps toreverse the local LUN and remote LUN RP functional roles:
1. Issue the RP reverse direction command to change the old local LUN to the new remote LUN andold remote LUN to the new local LUN.
2. Disable the RP source/target LUN consistency group.3. Issue the cryptocfg --manual_rekey -include_mirror <new local LUN container> < new local
LUN ID> <initiator PWWN> command on the new local LUN (old remote LUN).This CLI command will fail with an error if the -include_mirror option is not provided with themanual_rekey request.
4. After the rekey is completed, disable the new remote target ports.5. Enable the RP source/target LUN consistency group and wait for the RP pair to be fully
synchronized.6. Verify that the DEKs are synched up from local site DPM cluster to the remote site DPM cluster.
NOTEIn all operations prior to enabling the RP source/target LUN consistency group, ensure that theDEKs are synchronized between the local and remote site key vaults.
Rekeying LUNs for RP deployments - remote site
180 Fabric OS Encryption Administrator's Guide Supporting RSA Data Protection Manager (DPM) Environments53-1003757-01

Behavior with hosts writing beyond reported capacityIf a host writes beyond the reported capacity of a source or destination LUN, it can cause the LUN tobecome disabled when exposed. Hosts must honor the READ CAPACITY10/READ CAPACITY16 datareturned by the Brocade Encryption Switch for SRDF/TF/RP source and destination LUNs.
Tape pool configurationTape pools are used by tape backup application programs to group all configured tape volumes into asingle backup to facilitate their management within a centralized backup plan. A tape pool is identifiedby either a name or a number, depending on the backup application. Tape pools have the followingproperties:
• They are configured and managed per encryption group at the group leader level.• All encryption engines in the encryption group share the same tape pool policy definitions.• Tape pool definitions are only used when writing tapes. The tape contains enough information
(encryption method and key ID) to enable any encryption engine to read the tape.• Tape pool names and numbers must be unique within the encryption group.• If a given tape volume belongs to a tape pool, tape pool-level policies (defaults or configured values)
are applied and override any LUN-level policies.• Tape drive (LUN) policies are used if no tape pools are created or if a given tape volume does not
belong to any configured tape pools.
NOTETape pool configurations must be committed to take effect. Expect a five second delay before thecommit operation takes effect.There is an upper limit of 25 on the number of tape pools you can add ormodify in a single commit operation. Attempts to commit a configuration that exceeds this maximumfails with a warning.
Tape pool labelingTape pools may be identified by either a name or a number depending on your backup application.Numbers are always entered and displayed in hex notation. Names and numbers are independent; it ispossible to have one tape pool with the name ABC and another with the hex number ABC.
The following rules apply when creating a tape pool label:
• Tape pool names are limited in length to 63 characters. They may contain alphanumeric characters,and in some cases, underscores (_) and dashes (-).
• Tape pool numbers are limited to eight hex digits. Valid characters for tape pool numbers are 0-9, A-F, and a-f.
• The tape pool label created on the encryption switch or blade must be the be same tape pool labelconfigured on the tape backup application.
• Refer to the tape backup product documentation for detailed instructions for creating tape pool labelsand numbers.
Behavior with hosts writing beyond reported capacity
Fabric OS Encryption Administrator's Guide Supporting RSA Data Protection Manager (DPM) Environments 18153-1003757-01

NOTEIt may be helpful to create the tape pool on the application first to determine possible namingrestrictions, then use the label generated by the backup application to create the tape pool on theencryption switch or blade.
• A tape pool must first be created on the encryption switch or blade before you can label the tapemedia and assign them to the tape pool. Failure to observe this sequence invalidates tape pool-level settings and policies, and default LUN-level settings are applied to the tape media.
CommVault Galaxy labeling
CommVault uses a storage policy for each backup. When configuring a tape pool to work withCommVault Galaxy, first create a storage policy on CommVault and then use the storage_policy_id(sp_id) as the label when creating the tape pool on the encryption switch or blade.
1. Open CommCellExplorer Views by selecting Start > Programs > Microsoft SQL Server 2005 >SQL ServerManagement Studio .
2. Expand the tree in the left pane and navigate to the following location:Comm_serve_computer_name\database_instance_name > Databases > CommServ >Views.
3. Edit the dbo.CommCellStoragePolicyquery as follows:a) Right-click the view and select Edit .b) Add the following (sp_id= ARG.id) as follows:
• SELECT Distinct• storagepolicy= ARG.name,• sp_id= ARG.id,
4. Save the query by selecting File > Save SQLQuery1.sql .5. Execute the query by right-clicking the query window and selecting Execute .6. Open the dbo.CommCellStoragePolicy view.7. Right-click the view dbo.CommCellStoragePolicy and select Open View .8. Use the sp_id for the storage policy as the tape pool label on the encryption switch or blade.
NetBackup labeling
NetBackup uses numbers to label tape pools. If you are using NetBackup as your application, followthese steps to obtain the tape pool number.
1. Log into the NetBackup application Windows host.2. Select Start > run, and type "cmd" in the dialog box.3. Navigate to C:\Program Files\VERITAS\Volmgr\bin and enter the following command:
C:\Program Files\VERITAS\Volmgr\bin> vmpool -listall===========================================================pool number: 0 pool name: Nonedescription: the None poolpool host: ANYHOSTpool user: ANYpool group: NONE===========================================================
4. Use the pool number as the tape pool number on the encryption switch or blade.
CommVault Galaxy labeling
182 Fabric OS Encryption Administrator's Guide Supporting RSA Data Protection Manager (DPM) Environments53-1003757-01

NetWorker labeling
NetWorker does not allow underscore characters in tape pool names. To ensure that you can use thesame tape pool name on your encryption platform and on your backup application, create the tape poolon NetWorker first before creating the tape pool on your encryption switch.
Creating a tape poolTake the following steps to create a tape pool:
1. Log in to the group leader as FabricAdmin.2. Create a tape pool by entering the cryptocfg --create -tapepool command. Provide a label or
numeric ID for the tape pool and specify the encryption policies.For policies not specified at this time, LUN-level settings apply.
• Set the tape pool policy to either encrypt or cleartext (default).• Set the encryption format to Brocade native (default).• Optionally set an expiration date in days for the key (default is no expiration). If the key_lifespan
parameter is set at the tape pool level to a value other than none (default), the tape value is usedover any LUN-level settings. If the key_lifespan parameter is not set at the tape level (default ofnone), LUN level settings apply.
The following example creates a tape pool named "my_tapepool".
FabricAdmin:switch> cryptocfg --create -tapepool -label my_tapepoolOperation succeeded.
3. Commit the transaction.
FabricAdmin:switch> cryptocfg --commitOperation succeeded.
4. Display the configuration. Enter the cryptocfg --show -tapepool command followed by the tape poolnumber or label and the -cfg parameter.
FabricAdmin:switch>cryptocfg --show -tapepool -label my_tapepool -statNumber of tapepool session(s): 1Tapepool 1:Tapepool label: my_tapepoolEncryption mode: encryptedEncryption format: nativeNumber of sessions: 0Tape sessions within the pool:Operation succeeded.
5. Configure the tape pool on your backup application with the same tape pool label you used to createthe tape pool on the encryption switch or blade. Refer to the manufacturer’s product documentationfor instructions.
6. On your backup application, label the tape media to assign to the tape pool. Refer to themanufacturer’s product documentation for instructions.
Deleting a tape poolThis command does not issue a warning if the tape pool being deleted has tape media or volumes thatare currently accessed by the host. Be sure the tape media is not currently in use.
NetWorker labeling
Fabric OS Encryption Administrator's Guide Supporting RSA Data Protection Manager (DPM) Environments 18353-1003757-01

1. Log in to the group leader as FabricAdmin.2. Enter the cryptocfg --delete -tapepool command followed by a tape pool label or number. Use
cryptocfg --show -tapepool -all to display all configured tape pool names and numbers.
FabricAdmin:switch> cryptocfg --delete -tapepool -label my_tapepoolOperation succeeded.
3. Commit the transaction
FabricAdmin:switch> cryptocfg --commitOperation succeeded.
Modifying a tape pool1. Log in to the group leader as FabricAdmin.2. Enter the cryptocfg --modify -tapepool command followed by a tape pool label or number. Then
specify a new policy, encryption format, or both. The following example changes the encryptionformat from Brocade native to DF-compatible.
FabricAdmin:switch> cryptocfg --modify -tapepool -label my_tapepool -encryption_format DF_compatibleOperation succeeded.
3. Commit the transaction.
FabricAdmin:switch> cryptocfg --commitOperation succeeded.
Impact of tape pool configuration changesTape pool-level policies overrule policy configurations at the LUN level, when no policies areconfigured at the tape pool level. The following restrictions apply when modifying tape pool-levelconfiguration parameters:
• If you change the tape pool policy from encrypt to cleartext or from cleartext to encrypt while datais written to or read from a tape backup device, the policy change is not enforced until the currentprocess completes and the tape is unmounted, rewound, or overwritten. This mechanism preventsthe mixing of cleartext data to cipher-text data on the tape.
• You cannot modify the tape pool label or the key lifespan value. If you wish to modify these tapepool attributes, delete the tape pool and create a new tape pool with a different label and keylifespan.
First-time encryptionFirst-time encryption, also referred to as encryption of existing data, is similar to the rekeying processdescribed in the previous section, except that there is no expired key and the data present in the LUNis cleartext to begin with.
In a first-time encryption operation, cleartext data is read from a LUN, encrypted with the current key,and written back to the same LUN at the same logical block address (LBA) location. This processeffectively encrypts the LUN and is referred to as "in-place encryption."
Modifying a tape pool
184 Fabric OS Encryption Administrator's Guide Supporting RSA Data Protection Manager (DPM) Environments53-1003757-01
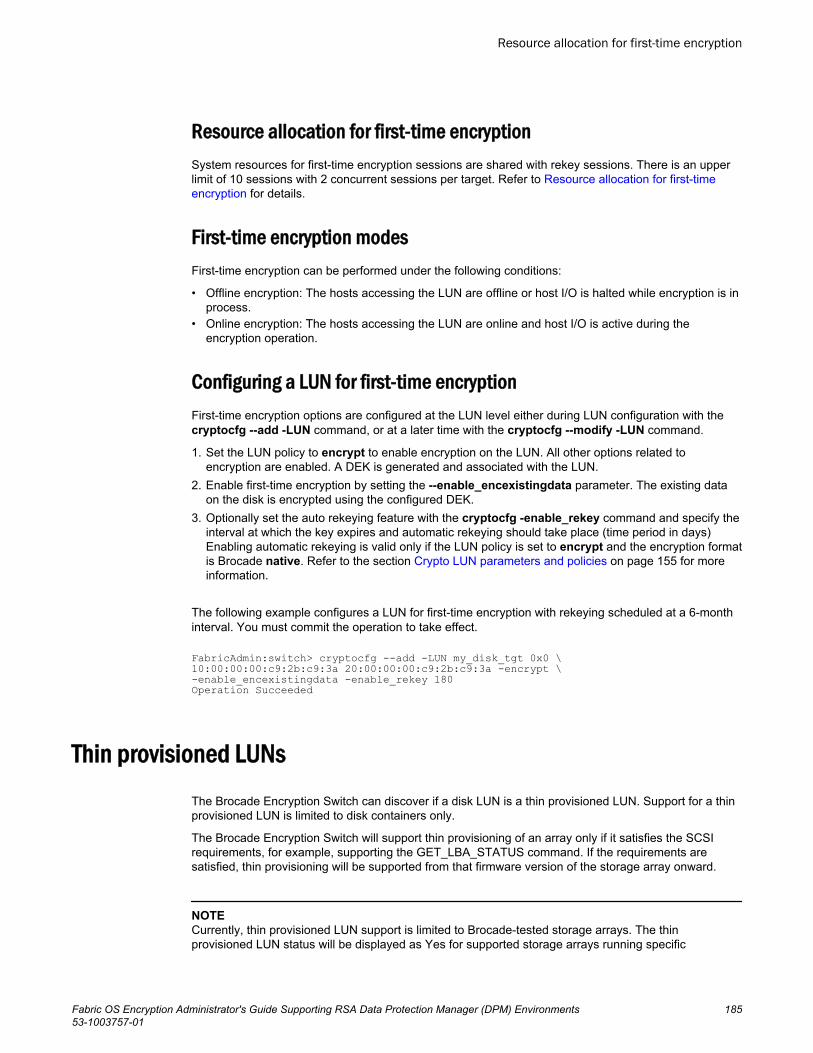
Resource allocation for first-time encryptionSystem resources for first-time encryption sessions are shared with rekey sessions. There is an upperlimit of 10 sessions with 2 concurrent sessions per target. Refer to Resource allocation for first-timeencryption for details.
First-time encryption modesFirst-time encryption can be performed under the following conditions:
• Offline encryption: The hosts accessing the LUN are offline or host I/O is halted while encryption is inprocess.
• Online encryption: The hosts accessing the LUN are online and host I/O is active during theencryption operation.
Configuring a LUN for first-time encryptionFirst-time encryption options are configured at the LUN level either during LUN configuration with thecryptocfg --add -LUN command, or at a later time with the cryptocfg --modify -LUN command.
1. Set the LUN policy to encrypt to enable encryption on the LUN. All other options related toencryption are enabled. A DEK is generated and associated with the LUN.
2. Enable first-time encryption by setting the --enable_encexistingdata parameter. The existing dataon the disk is encrypted using the configured DEK.
3. Optionally set the auto rekeying feature with the cryptocfg -enable_rekey command and specify theinterval at which the key expires and automatic rekeying should take place (time period in days)Enabling automatic rekeying is valid only if the LUN policy is set to encrypt and the encryption formatis Brocade native. Refer to the section Crypto LUN parameters and policies on page 155 for moreinformation.
The following example configures a LUN for first-time encryption with rekeying scheduled at a 6-monthinterval. You must commit the operation to take effect.
FabricAdmin:switch> cryptocfg --add -LUN my_disk_tgt 0x0 \10:00:00:00:c9:2b:c9:3a 20:00:00:00:c9:2b:c9:3a -encrypt \ -enable_encexistingdata -enable_rekey 180Operation Succeeded
Thin provisioned LUNsThe Brocade Encryption Switch can discover if a disk LUN is a thin provisioned LUN. Support for a thinprovisioned LUN is limited to disk containers only.
The Brocade Encryption Switch will support thin provisioning of an array only if it satisfies the SCSIrequirements, for example, supporting the GET_LBA_STATUS command. If the requirements aresatisfied, thin provisioning will be supported from that firmware version of the storage array onward.
NOTECurrently, thin provisioned LUN support is limited to Brocade-tested storage arrays. The thinprovisioned LUN status will be displayed as Yes for supported storage arrays running specific
Resource allocation for first-time encryption
Fabric OS Encryption Administrator's Guide Supporting RSA Data Protection Manager (DPM) Environments 18553-1003757-01

supported firmware versions only. Contact your service representative to determine if your storagearray is supported.
Thin provisioned LUNs rely on on-demand allocation of blocks of data instead of the traditional methodof allocating all blocks up front. If a thin provisioned LUN status is shown as Yes, then first-timeencryption and rekey are done on the allocated blocks only, which results in the provisioned region ofthe LUN remaining the same after the rekey is performed.
Thin provisioned LUN support requires no action by the user; the Brocade Encryption Switch canautomatically detect if a LUN is a thin provisioned LUN. You can, however, identify a thin provisionedLUN using the following commands.
cryptocfg --show -container -all -stat cryptocfg --discoverLUN -container cryptocfg --show -rekey -all cryptocfg --show -LUN tpdisk 0 10:00:00:00:c9:29:0f:01 -stat Note the following:
• For thin provisioned LUNs that were previously full provisioned then converted to thin provisioned, adiscoverLUN command must be performed prior to any rekeying operations. Failure to do soresults in the full capacity of the LUN to be encrypted as if it were not thin provisioned. Updated thinprovisioned status can be verified using the cryptocfg --show -container -all -stat command andchecking the output for "Thin Provision LUN: Yes". Similarly, if a thin-to full-LUN conversion hasbeen performed, a discoverLUN command must be performed for this LUN to change to reflect onthe Brocade Encryption Switch or FS8-18 blade.
• If a LUN is a thin provisioned LUN, TP LUN status is shown as Yes. (Thin provision support islimited to Brocade-tested storage arrays. The thin provisioned LUN status will be displayed as Yesfor supported storage arrays only.)
• If a LUN is not a thin provisioned LUN or if thin provisioning is not supported with the LUN, LUNstatus is shown as No. (This can be a result of the array not supporting thin provisioning, or theBrocade Encryption Switch/blade does not support the thin provisioning features of the array. Referto the Fabric OS release notes for supported arrays.)
• If LUN status cannot be determined, LUN status is shown as Unknown.• Zero detect with encryption is not supported.
FabricAdmin:switch> cryptocfg --show -container -all -statLUN number: 0xdLUN type: diskLUN serial number: 50002AC000BC0A50Encryption mode: encryptEncryption format: nativeEncrypt existing data: disabledRekey: disabledInternal EE LUN state: Encryption enabledEncryption algorithm: AES256-XTSKey ID state: Read writeNew LUN: NoTP LUN: YesKey ID: 4b:d9:4d:12:93:67:0e:0d:d1:e0:ca:aa:ba:34:29:dbKey creation time: Thu Sep 15 18:01:01 2011FabricAdmin:switch> cryptocfg --discoverLUN -containerHost: 21:00:00:e0:8b:90:7c:c0LUN number: 0xdLUN serial number: 50002AC000BC0A50TP LUN: YesLUN connectivity state: ConnectedKey ID state: Key ID not ApplicableFabricAdmin:switch> cryptocfg --show -rekey -allLUN number: 0x0LUN serial number: 50002AC002E70A50TP LUN: YesRekey session number: 0
Configuring Encryption Using the CLI
186 Fabric OS Encryption Administrator's Guide Supporting RSA Data Protection Manager (DPM) Environments53-1003757-01
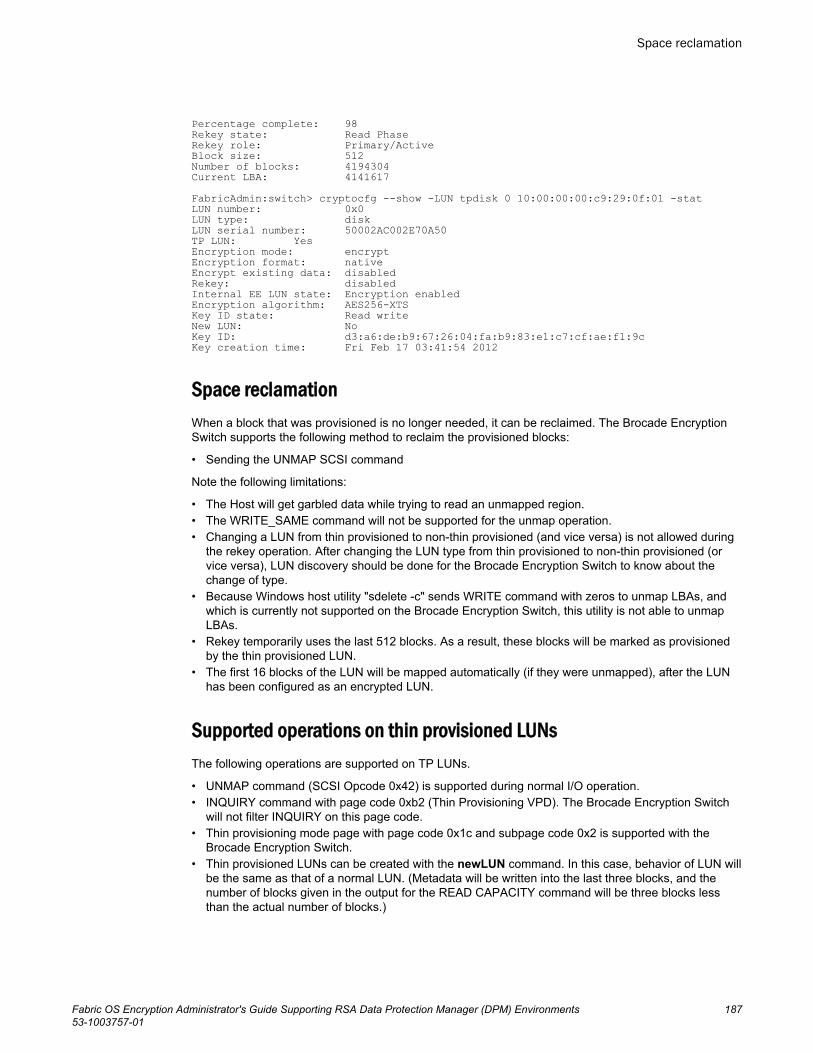
Percentage complete: 98Rekey state: Read PhaseRekey role: Primary/ActiveBlock size: 512Number of blocks: 4194304Current LBA: 4141617FabricAdmin:switch> cryptocfg --show -LUN tpdisk 0 10:00:00:00:c9:29:0f:01 -statLUN number: 0x0LUN type: diskLUN serial number: 50002AC002E70A50TP LUN: YesEncryption mode: encryptEncryption format: nativeEncrypt existing data: disabledRekey: disabledInternal EE LUN state: Encryption enabledEncryption algorithm: AES256-XTSKey ID state: Read writeNew LUN: NoKey ID: d3:a6:de:b9:67:26:04:fa:b9:83:e1:c7:cf:ae:f1:9cKey creation time: Fri Feb 17 03:41:54 2012
Space reclamationWhen a block that was provisioned is no longer needed, it can be reclaimed. The Brocade EncryptionSwitch supports the following method to reclaim the provisioned blocks:
• Sending the UNMAP SCSI command
Note the following limitations:
• The Host will get garbled data while trying to read an unmapped region.• The WRITE_SAME command will not be supported for the unmap operation.• Changing a LUN from thin provisioned to non-thin provisioned (and vice versa) is not allowed during
the rekey operation. After changing the LUN type from thin provisioned to non-thin provisioned (orvice versa), LUN discovery should be done for the Brocade Encryption Switch to know about thechange of type.
• Because Windows host utility "sdelete -c" sends WRITE command with zeros to unmap LBAs, andwhich is currently not supported on the Brocade Encryption Switch, this utility is not able to unmapLBAs.
• Rekey temporarily uses the last 512 blocks. As a result, these blocks will be marked as provisionedby the thin provisioned LUN.
• The first 16 blocks of the LUN will be mapped automatically (if they were unmapped), after the LUNhas been configured as an encrypted LUN.
Supported operations on thin provisioned LUNsThe following operations are supported on TP LUNs.
• UNMAP command (SCSI Opcode 0x42) is supported during normal I/O operation.• INQUIRY command with page code 0xb2 (Thin Provisioning VPD). The Brocade Encryption Switch
will not filter INQUIRY on this page code.• Thin provisioning mode page with page code 0x1c and subpage code 0x2 is supported with the
Brocade Encryption Switch.• Thin provisioned LUNs can be created with the newLUN command. In this case, behavior of LUN will
be the same as that of a normal LUN. (Metadata will be written into the last three blocks, and thenumber of blocks given in the output for the READ CAPACITY command will be three blocks lessthan the actual number of blocks.)
Space reclamation
Fabric OS Encryption Administrator's Guide Supporting RSA Data Protection Manager (DPM) Environments 18753-1003757-01

Data rekeyingIn a rekeying operation, encrypted data on a LUN is decrypted with the current key, re-encrypted witha new key and written back to the same LUN at the same logical block address (LBA) location. Thisprocess effectively re-encrypts the LUN and is referred to as "in-place rekeying."
It is recommended that you limit the practice of rekeying to the following situations:
• Key compromise as a result of a security breach.• As a general security policy to be implemented as infrequently as every six months or once per
year.
Rekeying is only applicable to disk array LUNs or fixed block devices. There is no rekeying support fortape media. If there is a need to re-encrypt encrypted tape contents with a new key, the process isequivalent to restoring the data from tape backup. You decrypt the data with the old DEK andsubsequently back up the tape contents to tape storage, which will have the effect of encrypting thedata with the new DEK.
Thin provisioned LUN limitations during rekey• The WRITE_SAME command will not be supported for the unmap operation.• The UNMAP command will be rejected during a rekey.• Rekey temporarily uses the last 512 blocks. As a result, these blocks will be marked as provisioned
by the thin provisioned LUN.• The first 16 blocks of the LUN will be mapped automatically (if it was unmapped), after the LUN has
been configured as an encrypted LUN.
Resource allocation for data rekeyingA maximum of 10 concurrent rekey sessions are supported per Encryption Group, with a maximum of10 concurrent rekey/encryption sessions per target container and 10 concurrent sessions per physicalinitiator. If your configuration has two containers that are accessed by the same physical initiator, youcannot have more than 10 concurrent rekey or encryption sessions. This includes both rekey (autoand manual) and first-time encryption sessions.
When scheduled rekey or first-time encryption sessions exceed the maximum allowable limit, thesesessions will be pending and a "Temporarily out of resources" message is logged. Whenever an activerekey of first-time encryption session completes, the next pending session is scheduled.
The system checks once every 15 minutes to determine if there are any rekey or first-time encryptionsessions pending. If resources are available, the next session in the queue is processed. There maybe up to an hour lag before the next session in the queue is processed. It is therefore recommendedthat you do not schedule more than 10 rekey or first-time encryption sessions.
Rekeying modesRekeying operations can be performed under the following conditions:
• Offline rekeying: The hosts accessing the LUN are offline, or host I/O is halted.• Online rekeying: The hosts accessing the LUN are online, and host I/O is active.
Data rekeying
188 Fabric OS Encryption Administrator's Guide Supporting RSA Data Protection Manager (DPM) Environments53-1003757-01

Configuring a LUN for automatic rekeyingRekeying options are configured at the LUN level either during LUN configuration with the cryptocfg --add -LUN command, or at a later time with the cryptocfg --modify -LUN command.
For rekeying of a disk array LUN, the Crypto LUN is configured in the following way:
• Set LUN policy as either cleartext or encrypt.
‐ If cleartext is enabled (default), all encryption-related options are disabled and no DEK isassociated with the LUN. No encryption is performed on the LUN.
‐ If the LUN policy is set to encrypt, encryption is enabled on the LUN and all other options relatedto encryption are enabled.
A DEK is retrieved from the key vault and verified with the metadata. (DPM)• Set the auto rekeying feature with the cryptocfg --enable_rekey command and specify the interval
at which the key expires and automatic rekeying should occur (time period in days) Enablingautomatic rekeying is valid only if the LUN policy is set to encrypt and the encryption format isBrocade native. Refer to the section Crypto LUN parameters and policies on page 155 for moreinformation.
NOTEFor a scheduled rekeying session to proceed, all encryption engines in a given HA cluster, DEK cluster,or encryption group must be online, and I/O sync links must be configured. Refer to the section Management LAN configuration on page 122 for more information.
1. Log in to the group leader as FabricAdmin.2. Enable automatic rekeying by setting the --enable_rekey parameter followed by a time period (in
days). The following example enables the automatic rekeying feature on an existing LUN with a 90-day rekeying interval. The data will automatically be re-encrypted every 90 days.
FabricAdmin:switch> cryptocfg --modify -LUN my_disk_tgt 0x0 \ 10:00:00:00:c9:2b:c9:3a -enable_rekey 90Operation Succeeded
3. Commit the configuration.
FabricAdmin:switch> cryptocfg --commitOperation Succeeded
Initiating a manual rekey sessionYou can initiate a rekeying session manually at your own convenience. All encryption engines in a givenHA cluster, DEK cluster, or encryption group must be online for this operation to succeed. The manualrekeying feature is useful when the key is compromised and you want to re-encrypt existing data on theLUN before taking action on the compromised key.
CAUTION
Do not commit this operation if there are any changes pending for the container in which therekey was started. If you attempt to do this, the system displays a warning stating that theencryption engine is busy and a forced commit is required for the changes to take effect. Aforced commit in this situation will halt any rekey that is in-progress (in any container) andcorrupt any LUN that is running rekey at the time. There is no recovery for this type of failure.
Configuring a LUN for automatic rekeying
Fabric OS Encryption Administrator's Guide Supporting RSA Data Protection Manager (DPM) Environments 18953-1003757-01

1. Log in to the group leader as Admin or FabricAdmin.2. Do LUN discovery by issuing the cryptocfg --discoverLUN command (before issuing the
cryptocfg --manual_rekey command) to avoid a potential I/O timeout because of a path statechange at the host.
3. Ensure that all encryption engines in the HA cluster, DEK cluster, or encryption group are online byissuing the cryptocfg --show -groupmember -all command.
4. Enter the cryptocfg --manual_rekey command. Specify the CryptoTarget container name, the LUNnumber and the initiator PWWN.
FabricAdmin:switch> cryptocfg --manual_rekey my_disk_tgt 0x0\10:00:00:05:1e:53:37:99Operation SucceededPlease check the status of the operation using "cryptocfg --show -rekey"
5. Check the status of the rekeying session.
FabricAdmin:switch> cryptocfg --show -rekey -allNumber of rekey session(s): 1Container name: cx320-157AEE node: 10:00:00:05:1e:40:4c:00EE slot: 9Target: 50:06:01:60:30:20:db:34 50:06:01:60:b0:20:db:34Target PID: 022900VT: 20:00:00:05:1e:53:8d:cd 20:01:00:05:1e:53:8d:cdVT PID: 06c001Host: 10:00:00:00:c9:56:e4:7b 20:00:00:00:c9:56:e4:7bHost PID: 066000VI: 20:02:00:05:1e:53:8d:cd 20:03:00:05:1e:53:8d:cdVI PID: 06c201LUN number: 0x1LUN serial number: 600601603FE2120014FC89130295DF1100010000000000000008000000000000Rekey session number: 0Percentage complete: 23Rekey state: Write PhaseRekey role: Primary/ActiveBlock size: 512Number of blocks: 2097152Current LBA: 488577Operation succeeded.
Suspension and resumption of rekeying operationsA rekey may be suspended or fail to start for several reasons:
• The LUN goes offline or the encryption switch fails and reboots. Rekey operations are resumedautomatically when the target comes back online or the switch comes back up. You cannot abort anin-progress rekey operation.
• An unrecoverable error is encountered on the LUN and the in-progress rekey operation halts. Thefollowing LUN errors are considered unrecoverable:
SenseKey: 0x3 - Medium Error.SenseKey: 0x4 - Hardware Error.SenseKey: 0x7 - Data Protect.
• An unrecoverable error is encountered during the rekey initialization phase. The rekey operationdoes not begin and a CRITICAL error is logged. All host I/O comes to a halt. All cluster membersare notified.
• For any unrecoverable errors that may occur during any other phase of the process, the rekeyoperation is suspended at that point and a CRITICAL error is logged. All cluster members arenotified. Host I/O to all regions of the LUN is halted. Only READ operations are supported for thescratch space region of the LUN used for storing the status block of the rekey operation.
After all errors have been corrected, you have two recovery options:
Suspension and resumption of rekeying operations
190 Fabric OS Encryption Administrator's Guide Supporting RSA Data Protection Manager (DPM) Environments53-1003757-01

• Resume the suspended rekey session. All DEK cluster or HA cluster members must be online andreachable for this command to succeed. If successful, this command resumes the rekey sessionsfrom the point where it was interrupted.
1. Enter the cryptocfg --resume_rekey command, followed by the CryptoTarget container name,the LUN number and the initiator PWWN.
FabricAdmin:switch> cryptocfg --resume_rekey my_disk_tgt 0x0 \10:00:00:05:1e:53:37:99Operation Succeeded
2. Check the status of the resumed rekey session.
FabricAdmin:switch> cryptocfg --show -rekey -all• Read all data off the LUN and write it to another LUN. In this case, you can cancel the rekey session
by removing the LUN from its container and force-committing the transaction. See Removing a LUNfrom a CryptoTarget container on page 159 for instructions on how to remove a LUN by force.
Configuring Encryption Using the CLI
Fabric OS Encryption Administrator's Guide Supporting RSA Data Protection Manager (DPM) Environments 19153-1003757-01

Suspension and resumption of rekeying operations
192 Fabric OS Encryption Administrator's Guide Supporting RSA Data Protection Manager (DPM) Environments53-1003757-01

Deployment Scenarios
● Single encryption switch, two paths from host to target................................................ 193● Single fabric deployment - HA cluster........................................................................... 194● Single fabric deployment - DEK cluster ........................................................................195● Dual fabric deployment - HA and DEK cluster.............................................................. 196● Multiple paths, one DEK cluster, and two HA clusters.................................................. 197● Multiple paths, DEK cluster, no HA cluster................................................................... 198● Deployment in Fibre Channel routed fabrics.................................................................199● Deployment as part of an edge fabric........................................................................... 201● Deployment with FCIP extension switches................................................................... 202● Data mirroring deployment............................................................................................203● VMware ESX server deployments................................................................................ 205
Single encryption switch, two paths from host to targetThe figure shows a basic configuration with a single encryption switch providing encryption betweenone host and one storage device over two the following two paths:
• Host port 1 to target port 1, redirected through CTC T1.• Host port 2 to target port 2, redirected through CTC T2.
Host port 1 is zoned with target port 1, and host port 2 is zoned with target port 2 to enable theredirection zoning needed to redirect traffic to the correct CTC.
Fabric OS Encryption Administrator's Guide Supporting RSA Data Protection Manager (DPM) Environments 19353-1003757-01

FIGURE 89 Single encryption switch, two paths from host to target
Single fabric deployment - HA clusterThe figure shows an encryption deployment in a single fabric with dual core directors and several hostand target edge switches in a highly redundant core-edge topology.
Single fabric deployment - HA cluster
194 Fabric OS Encryption Administrator's Guide Supporting RSA Data Protection Manager (DPM) Environments53-1003757-01

FIGURE 90 Single fabric deployment - HA cluster
The two encryption switches provide a redundant encryption path to the target devices. The encryptionswitches are interconnected through a dedicated cluster LAN. The Ge1 and Ge0 gigabit Ethernet portson each of these switches are attached to this LAN. This LAN connection provides the communicationneeded to distribute and synchronize configuration information, and enable the two switches to act as ahigh availability (HA) cluster, providing automatic failover if one of the switches fails, or is taken out ofservice.
Single fabric deployment - DEK clusterThe figure shows an encryption deployment in a single fabric with two paths between a host and atarget device.
Single fabric deployment - DEK cluster
Fabric OS Encryption Administrator's Guide Supporting RSA Data Protection Manager (DPM) Environments 19553-1003757-01
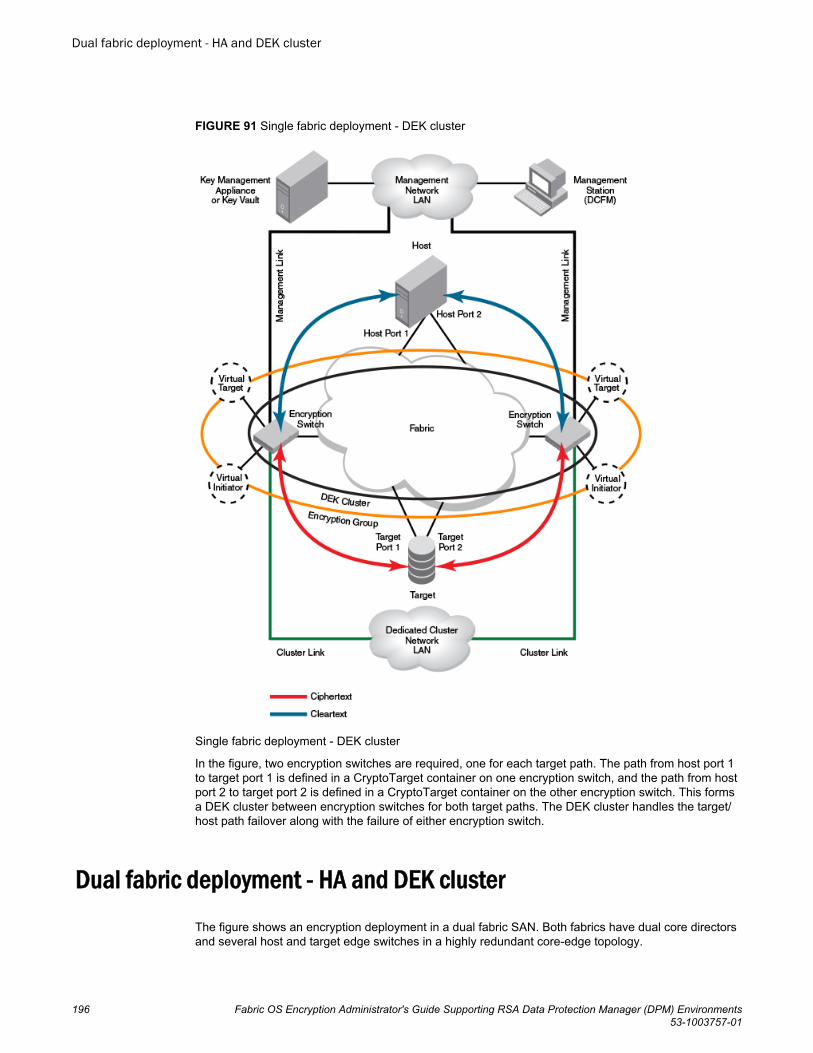
FIGURE 91 Single fabric deployment - DEK cluster
Single fabric deployment - DEK cluster
In the figure, two encryption switches are required, one for each target path. The path from host port 1to target port 1 is defined in a CryptoTarget container on one encryption switch, and the path from hostport 2 to target port 2 is defined in a CryptoTarget container on the other encryption switch. This formsa DEK cluster between encryption switches for both target paths. The DEK cluster handles the target/host path failover along with the failure of either encryption switch.
Dual fabric deployment - HA and DEK clusterThe figure shows an encryption deployment in a dual fabric SAN. Both fabrics have dual core directorsand several host and target edge switches in a highly redundant core-edge topology.
Dual fabric deployment - HA and DEK cluster
196 Fabric OS Encryption Administrator's Guide Supporting RSA Data Protection Manager (DPM) Environments53-1003757-01
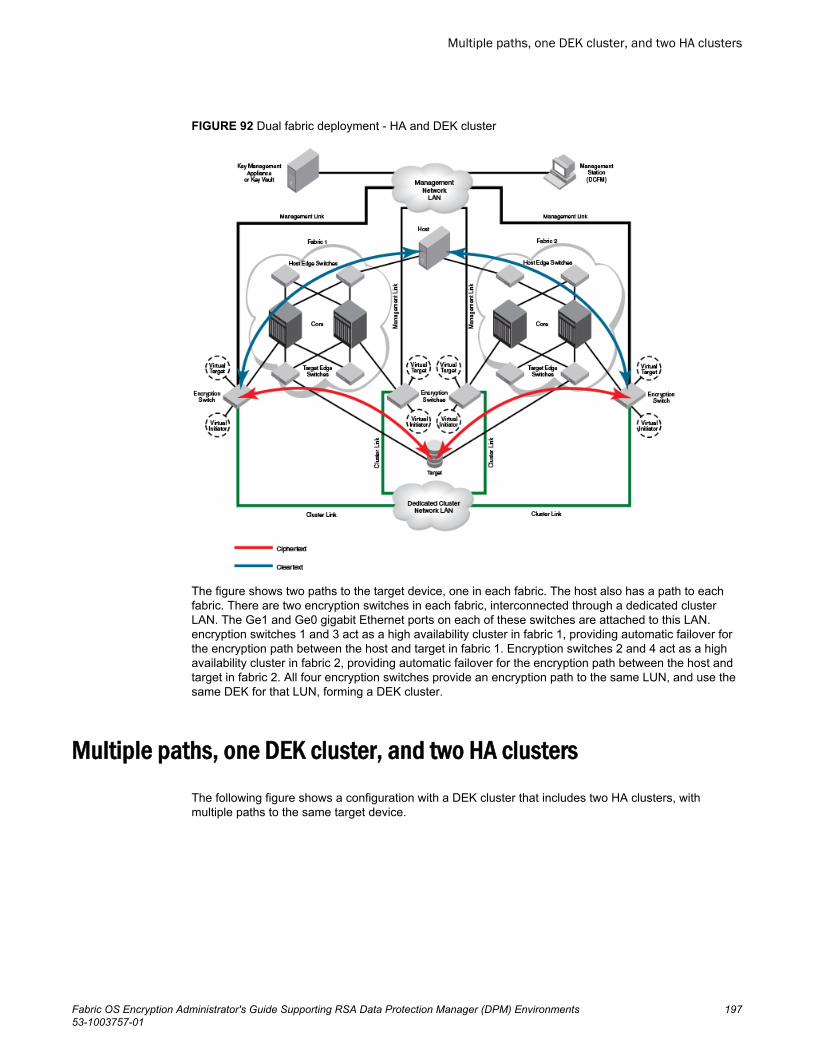
FIGURE 92 Dual fabric deployment - HA and DEK cluster
The figure shows two paths to the target device, one in each fabric. The host also has a path to eachfabric. There are two encryption switches in each fabric, interconnected through a dedicated clusterLAN. The Ge1 and Ge0 gigabit Ethernet ports on each of these switches are attached to this LAN.encryption switches 1 and 3 act as a high availability cluster in fabric 1, providing automatic failover forthe encryption path between the host and target in fabric 1. Encryption switches 2 and 4 act as a highavailability cluster in fabric 2, providing automatic failover for the encryption path between the host andtarget in fabric 2. All four encryption switches provide an encryption path to the same LUN, and use thesame DEK for that LUN, forming a DEK cluster.
Multiple paths, one DEK cluster, and two HA clustersThe following figure shows a configuration with a DEK cluster that includes two HA clusters, withmultiple paths to the same target device.
Multiple paths, one DEK cluster, and two HA clusters
Fabric OS Encryption Administrator's Guide Supporting RSA Data Protection Manager (DPM) Environments 19753-1003757-01
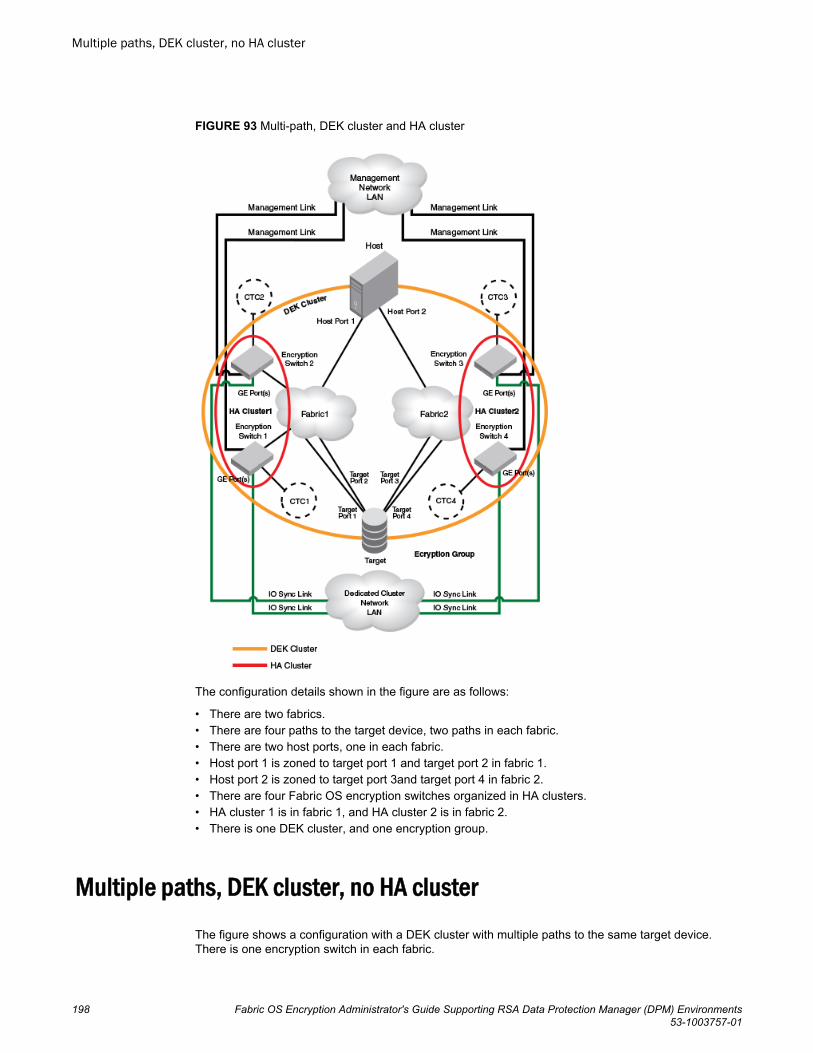
FIGURE 93 Multi-path, DEK cluster and HA cluster
The configuration details shown in the figure are as follows:
• There are two fabrics.• There are four paths to the target device, two paths in each fabric.• There are two host ports, one in each fabric.• Host port 1 is zoned to target port 1 and target port 2 in fabric 1.• Host port 2 is zoned to target port 3and target port 4 in fabric 2.• There are four Fabric OS encryption switches organized in HA clusters.• HA cluster 1 is in fabric 1, and HA cluster 2 is in fabric 2.• There is one DEK cluster, and one encryption group.
Multiple paths, DEK cluster, no HA clusterThe figure shows a configuration with a DEK cluster with multiple paths to the same target device.There is one encryption switch in each fabric.
Multiple paths, DEK cluster, no HA cluster
198 Fabric OS Encryption Administrator's Guide Supporting RSA Data Protection Manager (DPM) Environments53-1003757-01

FIGURE 94 Multi-path, DEK cluster, no HA cluster
The configuration details are as follows:
• There are two fabrics.• There are four paths to the target device, two paths in each fabric.• There are two host ports, one in each fabric.• Host port1 is zoned to target port1 and target port2 in fabric 1.• Host port2 is zoned with target port 3 and target port 4 in fabric 2.• There are two encryption switches, one in each fabric (no HA cluster).• There is one DEK Cluster and one encryption group.
Deployment in Fibre Channel routed fabricsIn this deployment, the encryption switch may be connected as part of the backbone fabric to anotherswitch or blade that provides the EX_port connections (Figure 95 ), or it may form the backbone fabricand directly provide the EX_port connections (Figure 96 ). The encryption resources can be shared withthe host and target edge fabrics using device sharing between backbone and edge fabrics.
Deployment in Fibre Channel routed fabrics
Fabric OS Encryption Administrator's Guide Supporting RSA Data Protection Manager (DPM) Environments 19953-1003757-01

FIGURE 95 Encryption switch connected to FC router as part of backbone fabric
FIGURE 96 Encryption switch as FC router and backbone fabric
The following is a summary of steps for creating and enabling the frame redirection zoning features inthe FCR configuration (backbone to edge).
• The encryption device creates the frame redirection zone automatically consisting of host, target,virtual target, and virtual initiator in the backbone fabric when the target and host are configured onthe encryption device.
• Create the frame redirection zone consisting of host, target, virtual target, and virtual initiator in boththe host and target edge fabrics, using the zone --rdcreate command.
Deployment Scenarios
200 Fabric OS Encryption Administrator's Guide Supporting RSA Data Protection Manager (DPM) Environments53-1003757-01

Always specify nonrestartable as a policy for creating redirection zones. The VI and VT port WWNscan be obtained by running the following command on the encryption switch or blade:
cryptocfg --show -container crypto_container_name -cfg After the redirection zones are created, commit the configuration with the cfgsave command.
• Create the LSAN zone consisting of host, target, virtual target, and virtual initiator in both thebackbone fabric and the target edge fabrics. Refer to the Fabric OS Administrator's Guide forinformation about LSANs, LSAN zoning, and Fibre Channel routing (FCR) configurations.
Deployment as part of an edge fabricIn this deployment, the encryption switch is connected to either the host or target edge fabric. Thebackbone fabric may contain a Brocade 7800 or 7840 extension switch or FX8-24 blade in a DCX orDCX 8510 Backbone, or an FCR-capable switch or blade. The encryption resources of the encryptionswitch can be shared with the other edge fabrics using FCR in the backbone fabric.
FIGURE 97 Encryption switch as part of an edge fabric
The following is a summary of steps for creating and enabling the frame redirection features in the FCRconfiguration (edge to edge):
Deployment as part of an edge fabric
Fabric OS Encryption Administrator's Guide Supporting RSA Data Protection Manager (DPM) Environments 20153-1003757-01

• The encryption device creates the frame redirection zone automatically, consisting of host, target,virtual target, and virtual initiator. when the target and host are configured on the encryption device.In the figure, the encryption device is connected to the host edge fabric.
• Create the frame redirection one consisting of host, target, virtual target, and virtual initiator in thetarget edge fabric, using the zone --rdcreate command.
Always specify nonrestartable as policy for creating redirection zones in case of the encryptiondevice. The VI and VT port WWNs can be obtained by running the following command on theencryption switch or blade:
cryptocfg --show -container crypto_container_name -cfg After the redirection zones are created, commit the configuration with the cfgsave command.
• Create the LSAN zone consisting of host, target, virtual target, and virtual initiator in both thebackbone fabric and the target edge fabrics. Refer to theFabric OS Administrator's Guide forinformation about LSANs, LSAN zoning, and Fibre Channel routing (FCR) configurations.
Deployment with FCIP extension switchesEncryption switches may be deployed in configurations that use extension switches or extensionblades within a DCX or DCX 8510 Backbone to enable long distance connections.
The following figure shows an encryption switch deployment in a Fibre Channel over IP (FCIP)configuration. Refer to the Fabric OS FCIP Administrator's Guide for information about creating FCIPconfigurations.
NOTEWe recommend disabling data compression on FCIP links that might carry encrypted traffic to avoidpotential performance issues as compression of encrypted data might not yield the desiredcompression ratio. We also recommend that tape pipelining and fastwrite also be disabled on the FCIPlink if it is transporting encrypted traffic.
When an encryption switch is deployed with an extension switch or blade in the same chassis orfabric, the encryption switch can use the FCIP functionality provided by the extension switch.
In the following figure, the host is using the remote target for remote data mirroring or backup acrossthe FCIP link. If the encryption services are enabled for the host and the remote target, the encryptionswitch can take clear text from the host and send cipher text over the FCIP link. For FCIP on theextension switch, this traffic is same as rest of the FCIP traffic between any two FCIP end points. Thetraffic is encrypted traffic. FCIP provides a data compression option. Data compression should not beenabled on the FCIP link. If compression is enabled on FCIP link, then encrypted traffic going throughFCIP compression may not provide the best compression ratio.
Deployment with FCIP extension switches
202 Fabric OS Encryption Administrator's Guide Supporting RSA Data Protection Manager (DPM) Environments53-1003757-01

FIGURE 98 FCIP deployment
Data mirroring deploymentThe following figure shows a data mirroring deployment. In this configuration, the host only knows abouttarget1 and LUN1, and the I/O path to target1 and LUN1. When data is sent to target1, it is written toLUN1, and also sent on to LUN2 for replication. Target1 acts as an initiator to enable the replication I/Opath. When an encryption switch is added to the configuration, it introduces another virtual target andLUN, and a virtual initiator in the I/O path in front of target1. The virtual target and LUN provided by theencryption switch is mapped to target1 and LUN1. Data is encrypted and the cipher text is sent totarget1, written to LUN1, and replicated on LUN2.
Only one DEK is used to create the cipher text written to both LUNs. A key ID is stored in metadatawritten to both LUNs. If possible, the metadata is written to every block with the LBA range of 1 to 16.This ensures that the encryption engine will be able to retrieve the correct DEK from the key vault whenretrieving data from either LUN1 or LUN2.
Data mirroring deployment
Fabric OS Encryption Administrator's Guide Supporting RSA Data Protection Manager (DPM) Environments 20353-1003757-01
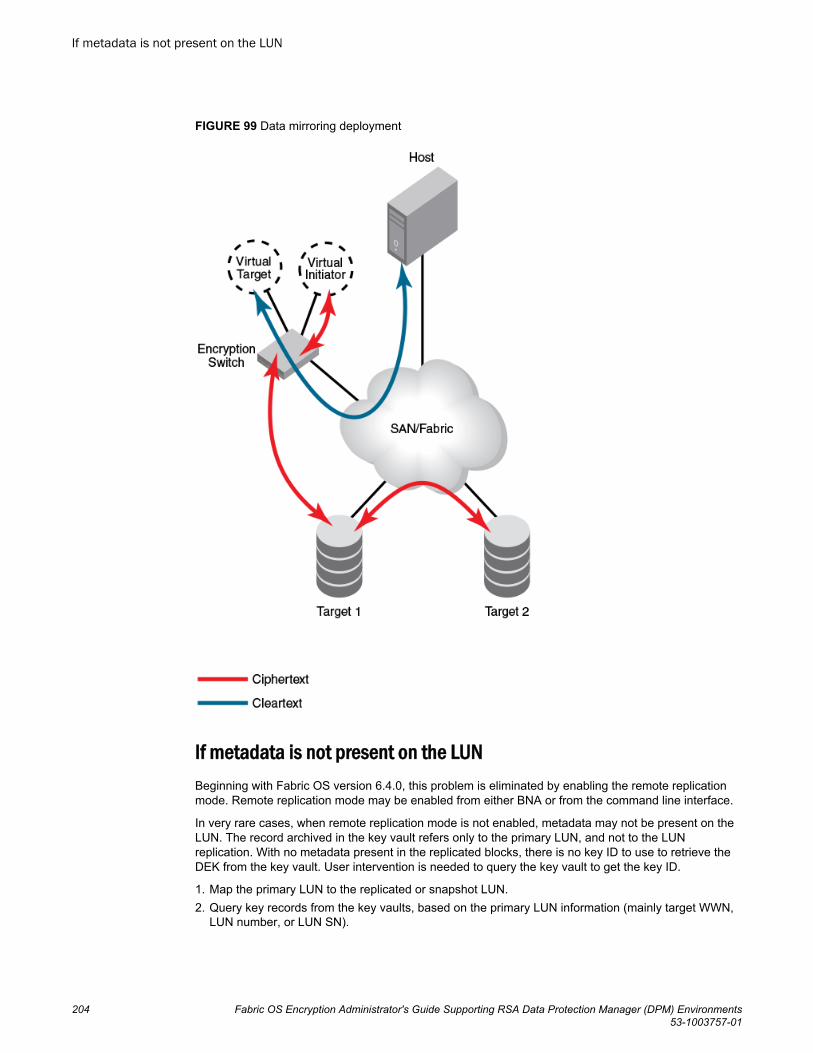
FIGURE 99 Data mirroring deployment
If metadata is not present on the LUNBeginning with Fabric OS version 6.4.0, this problem is eliminated by enabling the remote replicationmode. Remote replication mode may be enabled from either BNA or from the command line interface.
In very rare cases, when remote replication mode is not enabled, metadata may not be present on theLUN. The record archived in the key vault refers only to the primary LUN, and not to the LUNreplication. With no metadata present in the replicated blocks, there is no key ID to use to retrieve theDEK from the key vault. User intervention is needed to query the key vault to get the key ID.
1. Map the primary LUN to the replicated or snapshot LUN.2. Query key records from the key vaults, based on the primary LUN information (mainly target WWN,
LUN number, or LUN SN).
If metadata is not present on the LUN
204 Fabric OS Encryption Administrator's Guide Supporting RSA Data Protection Manager (DPM) Environments53-1003757-01

For this, you need to refer to key management system’s documentation to find out how to query keyrecords.
3. Identify the key used during the replication or snapshot of the LUN based on the creation and expirytime of the key at the time the LUN was replicated.
4. When the record is identified, provide the Key ID for the key record as input to the LUN addition forthis LUN on the encryption switch or blade.This is done from the key management system’s user interface. Refer to the user documentation forthe key management system.
VMware ESX server deploymentsVMware ESX servers may host multiple guest operating systems. A guest operating system may haveits own physical HBA port connection, or it may use a virtual port and share a physical HBA port withother guest operating systems.
Figure 100 shows a VMware ESX server with two guest operating systems where each guest accessesa fabric over separate host ports.
There are two paths to a target storage device:
• Host port 1 to target port 1, redirected through CTC T1.• Host port 2 to target port 2, redirected through CTC T2.
Host port 1 is zoned with target port 1, and host port 2 is zoned with target port 2 to enable theredirection zoning needed to redirect traffic to the correct CTC.
VMware ESX server deployments
Fabric OS Encryption Administrator's Guide Supporting RSA Data Protection Manager (DPM) Environments 20553-1003757-01

FIGURE 100 VMware ESX server, One HBA per guest OS
Figure 101 shows a VMware ESX server with two guest operating systems where two guests access afabric over a shared port. To enable this, both guests are assigned a virtual port.
There are two paths to a target storage device:
• Virtual host port 1, through the shared host port, to target port 1, redirected through CTC T1.• Virtual host port 2, through the shared host port, to target port 2, redirected through CTC T2.
In this case, the virtual host port 1 is zoned with target port 1, and the virtual host port 2 is zoned withtarget port 2 to enable the redirection zoning needed to redirect traffic to the correct CTC.
Deployment Scenarios
206 Fabric OS Encryption Administrator's Guide Supporting RSA Data Protection Manager (DPM) Environments53-1003757-01

FIGURE 101 VMware ESX server, One HBA shared by two guest OS
Deployment Scenarios
Fabric OS Encryption Administrator's Guide Supporting RSA Data Protection Manager (DPM) Environments 20753-1003757-01

VMware ESX server deployments
208 Fabric OS Encryption Administrator's Guide Supporting RSA Data Protection Manager (DPM) Environments53-1003757-01

Best Practices and Special Topics
● Firmware upgrade and downgrade considerations....................................................... 209● Configuration upload and download considerations..................................................... 211● HP-UX considerations...................................................................................................213● AIX considerations........................................................................................................ 214● Enabling a disabled LUN...............................................................................................214● Decommissioning in an EG containing mixed nodes.................................................... 214● Decommissioning a multi-path LUN..............................................................................215● Disk metadata............................................................................................................... 215● Tape metadata.............................................................................................................. 215● Tape data compression.................................................................................................215● Tape pools.................................................................................................................... 216● Tape block zero handling.............................................................................................. 216● Tape key expiry.............................................................................................................216● Configuring CryptoTarget containers and LUNs........................................................... 217● Redirection zones......................................................................................................... 218● Deployment with Admin Domains (AD).........................................................................218● Do not use DHCP for IP interfaces............................................................................... 218● Ensure uniform licensing in HA clusters........................................................................218● Tape library media changer considerations.................................................................. 218● Turn off host-based encryption..................................................................................... 219● Avoid double encryption................................................................................................219● PID failover ...................................................................................................................219● Turn off compression on extension switches................................................................ 219● Rekeying best practices and policies............................................................................ 219● KAC certificate registration expiry................................................................................. 221● Changing IP addresses in encryption groups............................................................... 221● Disabling the encryption engine.................................................................................... 221● Recommendations for Initiator Fan-Ins......................................................................... 222● Best practices for host clusters in an encryption environment...................................... 223● HA Cluster deployment considerations and best practices...........................................223● Key vault best practices................................................................................................ 223● Tape device LUN mapping ...........................................................................................224
Firmware upgrade and downgrade considerationsBefore upgrading or downgrading firmware, consider the following:
• The encryption engine and the control processor or blade processor are reset after a firmwareupgrade. Disruption of encryption I/O can be avoided if an HA cluster is configured. If encryptionengines are configured in an HA cluster, perform firmware upgrades one encryption engine at a timeso that the partner switch in the HA cluster can take over I/O by failover during a firmware upgrade.
Fabric OS Encryption Administrator's Guide Supporting RSA Data Protection Manager (DPM) Environments 20953-1003757-01

When switches form a DEK cluster, firmware upgrades should also be performed one at a time forall switches in the DEK cluster to ensure that a host MPIO failover path is always available.
• The following warning can be ignored if the nodes in an EG are running different versions of FabricOS.
"2011/04/12-18:41:08, [SPM-1016], 17132, FID 128, WARNING, Security database is out of sync."• If you are upgrading to Fabric OS 7.2.0 or later from v7.0.x, you must first upgrade the server to
DPM 3.2 before you can upgrade to Fabric OS 7.2.0.
NOTEDPM 3.1 server is not compatible with the earlier client. Refer to the "Fabric OS and DPMCompatibility Matrix".
General guidelinesGeneral guidelines for a firmware upgrade of encryption switches and a DCX Backbone chassis withencryption blades in encryption groups, HA clusters, and DEK clusters are as follows:
• Upgrade one node at time.• Do not perform a firmware upgrade when rekey operations and first-time encryption operations are
underway.• Do not start any manual rekey operations and first-time encryption operations during the firmware
upgrade process for all nodes in the HA/DEK cluster.
Guidelines for firmware upgrade of encryption switches and a DCX Backbone chassis with encryptionblades deployed in a DEK cluster with two HA clusters:
• Upgrade nodes in one HA cluster at a time.• Within an HA cluster, upgrade one node at a time.• Guidelines for firmware upgrade of encryption switches and a DCX Backbone chassis with
encryption blades deployed in DEK cluster with No HA cluster (each node hosting one path).
‐ Upgrade one node at a time.‐ In the case of active/passive arrays, upgrade the node that is hosting the passive path first.
Upgrade the node that is hosting active path next. The Host MPIO ensures that I/O fails over andfails back from active to passive and back to active during this firmware upgrade process.
‐ In the case of active/active arrays, upgrade order of nodes does not matter, but you still mustupgrade one node at a time. The Host MPIO ensures that I/O fails over and fails back from oneactive path to another active path during this firmware upgrade process.
• All nodes in an encryption group must be at the same firmware level before starting a rekey or first-time encryption operation.
Specific guidelines for HA clustersThe following are specific guidelines for a firmware upgrade of the encryption switch or blade whendeployed in HA cluster. The guidelines are based on the following scenario:
• There are 2 nodes (BES1 and BES2) in the HA cluster.• Each node hosts certain number of CryptoTarget containers and associated LUNs.• Node 1 (BES1) needs to be upgraded first.
General guidelines
210 Fabric OS Encryption Administrator's Guide Supporting RSA Data Protection Manager (DPM) Environments53-1003757-01

1. Change the failback mode to manual if it was set to auto by issuing the following command on thegroup leader:
Admin:switch> cryptocfg --set -failbackmode manual2. On node 1 (BES1), disable the encryption engine to force the failover of CryptoTarget containers and
associated LUNs onto the HA cluster peer member node 2 (BES2) by issuing the followingcommand.
Admin:switch> cryptocfg --disableEE3. Ensure that these CryptoTarget Containers and LUNs actually fail over to node 2 (BES2) in the HA
cluster. Check for all LUNs in encryption enabled state on node 2 (BES2). This ensures that I/O alsofails over to node 2 (BES2) and continues during this process.
4. On node 1 (BES1) enable the encryption engine (EE), by issuing the following command.
Admin:switch> cryptocfg --enableEE5. Start firmware download (upgrade) on the node 1 (BES1). Refer to the Fabric OS Administrator’s
Guide to review firmware download procedures.6. After firmware download is complete and node 1 (BES1) is back up, make sure the encryption engine
is online.7. On node 1 (BES1) initiate manual failback of CryptoTarget containers and associated LUNs from
node 2 (BES2) to node 1 (BES1) by issuing the following command.
Admin:switch> cryptocfg --failback -EE8. Check that CryptoTarget Containers and associated LUNs fail back successfully on node 1 (BES1),
and host I/O also moves from node 2 (BES2) to node 1 (BES1) and continues during the failbackprocess.
9. To upgrade node 2 (BES2), Repeat steps 2 to 8.10.After all nodes in the Encryption Group have been upgraded, change back the failback mode to auto
from manual, if required, by issuing the following command.
Admin:switch> cryptocfg --set -failback auto
Configuration upload and download considerationsSecurity information is not included when you upload a configuration from an encryption switch or blade.Extra steps are necessary before and after download to re-establish that information. The followingsections describe what information is included in a upload from an encryption group leader andencryption group member load, what information is not included, and the steps to take to re-establishthe information.
Configuration upload at an encryption group leader nodeA configuration upload performed at an encryption group leader node contains the following:
• The local switch configuration.• Encryption group-related configuration.• The encryption group-wide configuration of CryptoTargets, disk and tape LUNs, tape pools, HA
clusters, security, and key vaults.
Configuration upload at an encryption group member nodeA configuration upload at an individual encryption group member node contains the following:
Configuration upload and download considerations
Fabric OS Encryption Administrator's Guide Supporting RSA Data Protection Manager (DPM) Environments 21153-1003757-01

• The local switch configuration.• Encryption group-related configuration.• Encryption group-wide configuration of CryptoTargets, disk and tape LUNs, tape pools, HA clusters,
security, and key vaults.
Information not included in a downloadThe following certificates will be not be present when the configuration is downloaded:
• External certificates imported on the switch:
‐ key vault certificate‐ peer node/switch certificate‐ authentication card certificate
• Certificates generated internally:
‐ KAC certificate‐ CP certificate‐ FIPS officer and user certificates
The Authentication Quorum size is included in the configuration upload for read-only purposes, but isnot set by a configuration download.
Steps before configuration downloadThe configuration download does not have any certificates, public or private keys, master key, or linkkeys included. Prior to configuration download, you must generate and obtain the necessarycertificates and keys.
1. Use the following commands to initialize the encryption engine
cryptocfg --InitNodecryptocfg --initEEcryptocfg --regEEInitializing the switch generates the following internal certificates:
• KAC certificate• CP certificate• FIPS officer and user certificates
2. Import peer nodes/switches certificates onto the switch prior to configuration download.3. Import key vault certificates onto switch prior to configuration download.4. Create an encryption group with same name as in configuration upload information for the
encryption group leader node.5. Import Authentication Card Certificates onto the switch prior to configuration download.
Configuration download at the encryption group leaderThe configuration download contains the encryption group-wide configuration information aboutCryptoTargets, disk and tape LUNs, tape pools, HA clusters, security, and key vaults. The encryptiongroup leader first applies the encryption group-wide configuration information to the local configurationdatabase and then distributes the configuration to all members in the encryption group. Also anylayer-2 and switch specific configuration information is applied locally to the encryption group leader.
Information not included in a download
212 Fabric OS Encryption Administrator's Guide Supporting RSA Data Protection Manager (DPM) Environments53-1003757-01

Configuration download at an encryption group memberSwitch specific configuration information pertaining to the member switch or blade is applied.Information specific to the encryption group leader is filtered out.
Steps after configuration downloadFor all opaque key vaults, restore or generate and backup the master key. In a multiple node encryptiongroup, the master key is propagated from the group leader node.
1. Use the following command to enable the encryption engine.
Admin:switch> cryptocfg --enableEE [slot_num]2. Commit the configuration.
Admin:switch> cryptocfg --commit3. If there are containers that belonged to the old encryption switch or blade, then after
configdownload is run, use the following command to change the ownership of containers to thenew encryption switch or blade, assuming the host and target physical zone exists.
Admin:switch> cryptocfg --replace old_EE_WWN new_EE_WWN4. Commit the configuration.
Admin:switch> cryptocfg --commit5. Use the following command to check if the switch or blade has the master key.
Admin:switch> cryptocfg --show -groupmember switch_WWN6. If a master key is not present, restore the master key from backed up copy. Procedures will differ
depending on the backup media used (from recovery smart cards, from the key vault, from a file onthe network or a file on a USB-attached device). If new master key needs to be generated, generatethe master key and back it up.
If authentication cards are used, set the authentication quorum size from the encryption group leadernode after importing and registering the necessary number of Authentication Card certificates.
HP-UX considerationsThe HP-UX OS requires LUN 0 to be present. LUNs are scanned differently based on the type valuereturned for LUN 0 by the target device.
• If the type is 0, then HP-UX only scans LUNs from 0 to 7. That is the maximum limit allowed by HP-UX for device type for type 0.
• If the type is 0xC, then HP-UX scans all LUNs.
For HP-UX multi-path configurations:
• Add LUN 0 as a cleartext LUN.• Make sure to configure a dummy LUN 0 for each host accessing multi-path LUNs through CTCs in
the encryption switch.
cryptocfg --add -LUN cryptotarget_container_name 0 initiator_PWWN initiator_NWWN Best practices are as follows:
• Create a cryptoTarget container for the target WWN.• Add the HP-UX initiator WWN to the container.
Configuration download at an encryption group member
Fabric OS Encryption Administrator's Guide Supporting RSA Data Protection Manager (DPM) Environments 21353-1003757-01

• Issue the discover LUN CLI command on the container to discover the LUNs present in the target.• Based on the LUN list returned as part of LUN discovery, add the LUN 0 if LUN 0 is present in the
target (which is usually the case).
NOTEWhen an EMC-CX3 storage array is used with HP-UX the CX3 array exposes both 0x0 and 0x4000LUNs to the HP-UX host. 0x0 and 0x4000 LUNs have the same LSN. Both must be added ascleartext.
AIX considerationsFor AIX-based PowerHA SystemMirror host clusters, the cluster repository disk should be definedoutside of the encryption environment.
Ensure that Dynamic Tracking is set to "Yes" for all Fibre Channel adapters on the AIX system.
Enabling a disabled LUNWhen Metadata is found on the LUN, but current LUN state is indicated as cleartext or is beingconverted from encrypt to cleartext, the LUN is disabled and the LUN status displayed by the LUNShow command is "Internal EE LUN state: Encryption disabled ReasonCode".
The disabled LUN can be enabled by invoking the cryptocfg --enable -LUN command.
switch:admin> cryptocfg --enable -LUN cryptotargetcontainer_name LUN_Num InitiatorPWWN
Decommissioning in an EG containing mixed nodesIf you have an encryption group (EG) that contains mixed nodes (for example, one member node isrunning Fabric OS 7.0.0 and another member node is running Fabric OS 6.4.2), you might notice thatafter you decommission a LUN, the decommissioned Key IDs might not be displayed on the noderunning v6.4.2, even though the decommission operation was successful.
In a mixed encryption group consisting of nodes running Fabric OS 7.0.0 or later and an earlier FabricOS version, such as 6.4.x, the decommission operation will complete successfully and the LUNs willbe removed from the hosted containers; however, the list of decommissioned key IDs might not bedisplayed correctly from all nodes in the encryption group. To resolve this, ensure that the Fabric OSversion running on all nodes in an encryption group is the same version. Otherwise some of the cryptocommands might not work as expected.
AIX considerations
214 Fabric OS Encryption Administrator's Guide Supporting RSA Data Protection Manager (DPM) Environments53-1003757-01

Decommissioning a multi-path LUNWhen issuing a decommission command on a multi-path LUN on the Group Leader of an encryptiongroup, make sure you do not issue a second decommission request from another path to the same LUNfrom a member node. Doing so causes a timeout with an accompanying message, "EE(s) is busy.Please try it later."
You can avoid this scenario by making sure that a second decommission operation is not requested ona node where the LUN state is shown as "Commit in progress."
If you are in a position whereby you receive the error message, simply re-issue the decommissionrequest.
Disk metadataIf possible, 32 bytes of metadata are added to every block in LBA range 1 to 16 for both the nativeBrocade format and DF-compatible formats. This metadata is not visible to the host. The Host I/Os forthe metadata region of the LUN are handled in the encryption switch software, and some additionallatency should be expected.
NOTEFor encrypted LUNs, data in LBA 0 will always be in cleartext.
Tape metadataOne kilobyte of metadata is added per tape block for both the native Brocade format and DF-compatibleformats. Tape block size (as configured by host) is modified by the encryption device to accommodate1K metadata per block. A given tape can have a mix of compressed and uncompressed blocks. Blocklengths are as follows.
Encrypted/Compressed Tape BlockFormat
Compressed and encrypted tape block data + 1K metadata + ASCII 0 pad= block length of tape.
Encrypted Tape Block Format (NoCompression)
Encrypted tape block data + 1K metadata = block length of tape.
Tape data compressionData is compressed by the encryption switch or blade before encrypting only if the tape device supportscompression, and compression is explicitly enabled by the host backup application. That means if thetape device supports compression, but is not enabled by the host backup application, then compressionis not performed by the encryption switch or blade before encrypting the data. However, if the backupapplication turns on compression at the tape device and does not turn it off before logout or after thebackup or restore operation is complete, and a second host backup application starts using the same
Decommissioning a multi-path LUN
Fabric OS Encryption Administrator's Guide Supporting RSA Data Protection Manager (DPM) Environments 21553-1003757-01

tape device and does not explicitly turn off compression, compression will still be on when theencryption switch or blade issues a Mode Sense command to find target device capabilities, andcompression is used. In other words, if the host backup application does not turn off compression onthe target, the encryption switch or blade uses the compression feature of the target. Conversely, if thetape device does not support compression, the encryption switch or blade does not performcompression before encrypting the data. The same rules apply for decompression.
Data is compressed, encrypted and padded with ASCII 0 to the tape block length to simplify handlingat the encryption device. It is assumed that a tape target with compression enabled will be unable tocompress the seemingly random encrypted data, but will greatly compress the padded zero data thatfollows. Compressing data at the encryption device in conditions other than above does not create anyadditional space savings on the tape media.
Tape poolsWhen a new tape pool needs to be created, the following steps must be performed:
• Configure the tape pool with a maximum of 64 bytes of tape pool label first on the encryptiondevice. The tape pool label configured on the encryption device must be an exact match to the tapepool label (or number) configured on the tape backup application.
• Set the policies (such as encrypt or cleartext), format (such as native Brocade format or DF-compatible), and optionally specify a key life span for the tape pool.
Tape pools are unique across an encryption group. Tape pool configuration takes precedence overLUN level configuration.
Tape pool configuration is used only when labeling of tape media is done on the first write for the tapemedia. After tape labeling is done and metadata written, the tape pool configuration is no longer used.Tape pool configuration is not required for restoring data from the encrypted tape belonging to the tapepool, because the key ID is present in the metadata.
When the tape pool label configured on the encryption device does not match with any label that thebackup application sends as part of the first write (tape labeling) to the tape media, the tape pool levelpolicies are ignored and default LUN level policies are applied.
Tape block zero handlingThe block zero of the tape media is not encrypted and the data in the block zero is sent as cleartextalong with the block zero metadata header prefixed to the data to the tape device.
Tape key expiryWhen the tape key of native pools expires in the middle of a write operation on the tape, the key isused for the duration of any write operation to append the data on the tape media. On any given tapemedium, the same key is used for all written blocks, regardless of the time in between appendoperations.
With the exception of native pools, whenever you rewind a tape and write to block zero, a new key willbe generated that is unique to that tape. Only with native pools will the same key be used to write to
Tape pools
216 Fabric OS Encryption Administrator's Guide Supporting RSA Data Protection Manager (DPM) Environments53-1003757-01
multiple media. This key has a user-determined lifespan, which applies to the elapsed time betweenwrite operations to new tapes (after rewind).
Note the following:
• Key expiration does not apply to append operations, no matter how long in the future.• Key expiration never applies to read operations.• Key expiration never applies to LUN-based policies. A new key is generated every time a tape media
is rewound and written to block zero (label), regardless of whether the specified key life span hasexpired.
Configuring CryptoTarget containers and LUNsThe following are best practices to follow when configuring CryptoTarget containers and crypto LUNs:
• Host a target port on only one encryption switch, or one HA cluster. All LUNs visible through thetarget port are hosted on the same encryption switch, and are available for storing cipher text.
• Be sure all nodes in a given DEK or HA cluster are up and enabled before creating an encryptedLUN. If a node in the DEK or HA cluster is down, or the encryption engine is down or not enabledwhen an encrypted LUN is added to the CryptoTarget container, write operations will hang whenwriting metadata to the LUN, and I/O will timeout. Data integrity is not guaranteed in this condition.
• Before committing CryptoTarget container or LUN configurations or modifications on an encryptionswitch or FS8-18 blade, make sure that there are no outstanding zoning transactions in the switch orfabric. If there is an outstanding zoning transaction, the commit operation will fail and result indisabling the LUN. You can check for outstanding zoning transactions by issuing the cfgtransshowcommand.
• LUNs are uniquely identified by the encryption switch or FS8-18 blade using the LUN serial number.The LUN serial number must be unique for LUNs exposed from the same target port. The LUN serialnumber must be unique for LUNs belonging to different target ports in non-multipathingconfigurations. Failure to ensure that the serial numbers are unique will result in undefined behaviorand may result in faulting the encryption switch or FS8-18 blade.
• To enable host MPIO, LUNs must also be available through a second target port, hosted on asecond encryption switch, the same encryption switch or encryption engine. The second encryptionswitch could be in the same fabric, or a different fabric.
• Hosts should be able to access LUNs through multiple ports for redundancy.• For high availability and failover within the fabric, implement an HA cluster of two encryption
switches, and host the target port as a virtual target on one of the switches.• Do not change the WWN of any node after it has been deployed in an encryption group.• To minimize host IO disruption or time-outs during CryptoTarget container failover, it is
recommended that the devices (hosts, target ports) are connected to an edge switch in a fabric, andnot directly to Encryption switch/blade ports.
• Always use the following process when configuring the LUN for encryption, unless the LUN waspreviously encrypted.
1. Add the LUN as cleartext to the CryptoTarget container.2. When the LUN comes online and Host I/O starts flowing through the LUN as cleartext, then modify
the LUN from cleartext to encrypt and enable_encexistingdata options to convert the LUN toencryption.
An exception to this LUN configuration process is that if the LUN was previously encrypted by theencryption switch or FS8-18 blade, then the LUN can be added to the CryptoTarget Container withthe -encrypt and -lunstate encrypted options.
Configuring CryptoTarget containers and LUNs
Fabric OS Encryption Administrator's Guide Supporting RSA Data Protection Manager (DPM) Environments 21753-1003757-01
Redirection zonesRedirection zones should not be deleted. If a redirection zone is accidentally deleted, I/O traffic cannotbe redirected to encryption devices, and encryption is disrupted. To recover, re-enable the existingdevice configuration by invoking the cryptocfg --commit command on the group leader. If no changeshave taken place since the last commit, you should use the cryptocfg --commit -force command.This recreates redirection zones related to the device configuration in the zone database, and restoresframe redirection, which makes it possible to restore encryption.
To remove access between a given initiator and target, remove both the active zoning informationbetween the initiator and target, and the associated CryptoTarget Containers (CTCs). This will removethe associated frame redirection zone information.
Deployment with Admin Domains (AD)Virtual devices created by the encryption device do not support the AD feature in this release. Allvirtual devices are part of AD0 and AD255. Targets for which virtual targets are created and hosts forwhich virtual initiators are created must also be in AD0 and AD255. If they are not, access from thehosts and targets to the virtual targets and virtual initiators is denied, leading to denial of encryptionservices.
Do not use DHCP for IP interfacesDo not use DHCP for either the GbE management interface or the Ge0 and Ge1 interfaces. Assignstatic IP addresses.
Ensure uniform licensing in HA clustersLicenses installed on the nodes should allow for identical performance numbers between HA clustermembers.
Tape library media changer considerationsIn tape libraries where the media changer unit is addressed by a target port that is separate from theactual tape SCSI I/O ports, create a CryptoTarget container for the media changer unit andCryptoTarget containers for the SCSI I/O ports. If a CryptoTarget container is created only for themedia changer unit target port, no encryption is performed on this device.
In tape libraries where the media changer unit is addressed by separate LUN at the same target portas the actual tape SCSI I/O LUN, create a CryptoTarget container for the target port, and add both themedia changer unit LUN and one or more tape SCSI I/O LUNs to that CryptoTarget container. If only amedia changer unit LUN is added to the CryptoTarget container, no encryption is performed on thisdevice.
Redirection zones
218 Fabric OS Encryption Administrator's Guide Supporting RSA Data Protection Manager (DPM) Environments53-1003757-01

Turn off host-based encryptionIf a host has an encryption capability of any kind, be sure it is turned it off before using the encryptionengine on the encryption switch or blade. Encryption and decryption at the host may make it impossibleto successfully decrypt the data.
Avoid double encryptionEncryption and decryption at tape drives does not affect the encryption switch or blade capabilities, anddoes not cause problems with decrypting the data. However, double encryption adds the unnecessaryneed to manage two sets of encryption keys, increases the risk of losing data, may reduceperformance, and does not add security.
PID failoverVirtual device PIDs do not persist upon failover within a single fabric HA cluster. Upon failover, thevirtual device is s assigned a different PID on the standby encryption switch or blade.
Some operating systems view the PID change as an indication of path failure, and will switch over toredundant path in another fabric. In these cases, HA clusters should not be implemented. Theseoperating systems include the following:
• HP-UX prior to 11.x. The issue is not present beginning with 11.31 and later releases.• All versions of IBM AIX, unless dynamic tracking is enabled.• Solaris 2.x releases, Solaris 7, and later releases.
Turn off compression on extension switchesWe recommend disabling data compression on FCIP links that might carry encrypted traffic to avoidpotential performance issues as compression of encrypted data might not yield desired compressionratio. We also recommend that tape pipelining and fastwrite also be disabled on the FCIP link if it istransporting encrypted traffic.
Rekeying best practices and policiesRekeying should be done only when necessary. In key management systems, DEKs are never exposedin an unwrapped or unencrypted state. For all opaque key management systems, you must rekey if themaster key is compromised. The practice of rekeying should be limited to the following cases:
• Master key compromise in the case of opaque key vaults.• Insider security breaches.• As a general security policy as infrequently as every six months or once per year.
Turn off host-based encryption
Fabric OS Encryption Administrator's Guide Supporting RSA Data Protection Manager (DPM) Environments 21953-1003757-01
Manual rekeyEnsure that the link to the key management system is up and running before you attempt a manualrekey.
Latency in rekey operationsHost I/O for regions other than the current rekey region has no latency during a rekey operation. HostI/O for the region where the current rekey is happening has minimal latency (a few milliseconds)because I/O is held until the rekey is complete. The I/O sync links (the Ethernet ports labeled Ge0 andGe1) must be configured, and must both be connected to the I/O sync LAN to enable proper handlingof rekey state synchronization in high availability (HA cluster) configurations.
Allow rekey to complete before deleting a containerDo not delete a crypto container while rekey is in session or if rekey is not completed. If you want todelete a container, use the command cryptocfg --show -rekey -all to display the status of rekeysessions. If any rekey session is not 100% completed, do not delete the container. If you do delete thecontainer before rekey is complete, and subsequently add the LUN back as cleartext, all data on theLUN is destroyed.
Rekey operations and firmware upgradesAll nodes in an encryption group must be at the same firmware level before starting a rekey or first-time encryption operation. Make sure that existing rekey or first-time encryption operations completebefore upgrading any of the encryption products in the encryption group, and that the upgradecompletes before starting a rekey or first-time encryption operation.
Do not change LUN configuration while rekeyingNever change the configuration of any LUN that belongs to a CryptoTarget container/LUNconfiguration while the rekeying process for that LUN is active. If you change the LUN’s settings duringmanual or auto, rekeying or first-time encryption, the system reports a warning message stating thatthe encryption engine is busy and a forced commit is required for the changes to take effect. A forcedcommit command halts all active rekeying progresses running in all CryptoTarget containers andcorrupts any LUN engaged in a rekeying operation. There is no recovery for this type of failure.
Recommendation for Host I/O traffic during online rekeying and first-time encryptionYou may see failed I/Os if writes are done to a LUN that is undergoing first-time encryption orrekeying. It is recommended that host I/O operations are quiesced and not started again until rekeyoperations or first-time encryption operations for the LUN are complete.
Manual rekey
220 Fabric OS Encryption Administrator's Guide Supporting RSA Data Protection Manager (DPM) Environments53-1003757-01

KAC certificate registration expiryIt is important to keep track as to when your signed KAC certificates will expire. Failure to work withvalid certificates causes certain commands to not work as expected. If you are using the certificateexpiry feature and the certificate expires, the key vault server will not respond as expected. Forexample, the Group Leader in an encryption group might show that the key vault is connected;however, a member node reports that the key vault is not responding.
To verify the certificate expiration date, use the following command:
openssl x509 -in signed_kac_cert.pem -dates -nooutOutput: Not Before: Dec 4 18:03:14 2009 GMT Not After : Dec 4 18:03:14 2010 GMTIn the example above, the certificate validity is active until "Dec 4 18:03:14 2010 GMT." After the KACcertificate has expired, the registration process must be redone.
NOTEIn the event that the signed KAC certificate must be re-registered, you will need to log in to the key vaultweb interface and upload the new signed KAC certificate for the corresponding Brocade EncryptionSwitch identity.
You can change the value of the certificate expiration date using the following command:openssl x509 -req -sha1 -CAcreateserial -in certs/switchCSRname -days 365 -CA caceert.pem -CAkey private/cakey.pem -out newcerts/switchCertNameIn the example above, the certificate is valid for a period of one year (365 days). You can increase ordecrease this value according to your own needs. The default is 3649 days, or 10 years.
Changing IP addresses in encryption groupsGenerally, when IP addresses are assigned to the Ge0 and Ge1 ports, they should not be changed. Ifan encryption group member node IP address must be changed, refer to IP Address change of a nodewithin an encryption group on page 123.
Disabling the encryption engineThe disable encryption engine interface command cryptocfg --disableEE should be used only duringfirmware download, and when the encryption and security capabilities of the encryption engine havebeen compromised. When disabling the encryption capabilities of the encryption engine, be sure theencryption engine is not hosting any CryptoTarget containers. All CryptoTarget containers hosted on theencryption switch or FS8-18 blade must either be removed from the encryption engine, or be moved todifferent encryption engine in an HA Cluster or encryption group before disabling the encryption andsecurity capabilities.
KAC certificate registration expiry
Fabric OS Encryption Administrator's Guide Supporting RSA Data Protection Manager (DPM) Environments 22153-1003757-01

Recommendations for Initiator Fan-InsFor optimal performance at reasonable scaling factors of initiators, targets, and LUNs accessed,Brocade Encryption Engines (EEs) are designed to support a fan-in ratio of between four and eightinitiator ports to one target port, in terms of the number of distinct initiator ports to a Crypto Container(i.e., a virtual target port corresponding to the physical target port).
An encryption engine has 6 distinct encryption blocks with 4 ports, each port operating at 4 Gbps. Thearchitecture of the encryption blocks provides the potential for an aggregate 96 Gbps of full duplexencryption bandwidth, if the performance license is installed. The following figure shows the encryptionblocks within an encryption engine, and the host initiator to target port fan-ins. Each encryption enginecan host up to 256 distinct targets with a mapping of 1024 initiators accessing all the targets. Thisbrings the fan-in ratio for each target to be 1:4 initiators.
FIGURE 102 Fan-in ratios with performance license installed
The fan-in ratio for a target can be higher depending on the maximum bandwidth accepted by thetarget. If the I/O throughput across all initiator ports accessing the target port is well balanced, it isrecommended that the maximum fan-in ratio be kept to 8 Initiator ports to 1 target port for optimalperformance. Note that this recommendation holds for initiators running at 4 Gbps or less. If a mix of 8Gbps and other 4 Gbps or less initiator is used, then the maximum fan-in will depend on the maximumsustained bandwidth these initiators would be pushing together over the link to the same target portand across all the target ports hosted on a given encryption engine.
Recommendations for Initiator Fan-Ins
222 Fabric OS Encryption Administrator's Guide Supporting RSA Data Protection Manager (DPM) Environments53-1003757-01

NOTEIf the performance license is not installed, 48 Gbps of full duplex encryption bandwidth is available onthe encryption engine, Each of the six encryption blocks will use two ports instead of four, reducing thefan-in ratio by a factor of two.
Best practices for host clusters in an encryption environmentWhen host clusters are deployed in a encryption environment, follow these recommendations:
• If two encryption engines are part of an HA cluster, configure the host/target pair so they havedifferent paths from both encryption engines. Avoid connecting both the host/target pairs to the sameencryption engine. This connectivity does not give the full redundancy needed in case of encryptionengine failure and failover to another encryption engine in an HA cluster.
• For Windows-based host clusters, when a quorum disk is used, the quorum disk plays a vital role inkeeping the cluster synchronized. It is recommended that you configure the quorum disk to beoutside of the encryption environment.
• For AIX-based Power HA System Mirror host clusters, the cluster repository disk should be definedoutside of the encryption environment.
HA Cluster deployment considerations and best practicesIt is mandatory that the two encryption engines in the HA cluster belong to two different nodes for trueredundancy. This is always the case for Brocade Encryption Switches, but is not true if two FS8-18blades in the same DCX Backbone chassis are configured in the same HA cluster. In Fabric OS v6.3.0and later releases, HA cluster creation is blocked when encryption engines belonging to FS8-18 bladesin the same DCX Backbone chassis are specified.
Key vault best practices• Make sure that the time difference on the Brocade Encryption Switch and the key vault does not
exceed one minute.• When encrypted disk LUNs are to be configured or moved to an Encryption Group that uses a
different key vault, make sure to decommission the encrypted LUNs from the old Encryption Group.
NOTE
If you want to register a KMIP-compliant server on the Brocade Encryption Switch, refer to the FabricOS Encryption Administrator’s Guide Supporting Key Management Interoperability Protocol (KMIP)Key-Compliant Environments for configuration instructions.
Only new installations are allowed to use key vault type KMIP.
Best practices for host clusters in an encryption environment
Fabric OS Encryption Administrator's Guide Supporting RSA Data Protection Manager (DPM) Environments 22353-1003757-01

Tape device LUN mappingWhen performing LUN mapping, ensure that a given LUN number from a backend physical target isthe same across all initiators in the container. Failure to do so can result in unpredictable switchbehavior including blade/switch faults. Use the following command to list the LUNs in the target.
switch:admin> cryptocfg --discoverLUN container_name
NOTEIt is recommended that you follow the above rule if a given LUN on the backend target is LUN mappedto different initiators.
Tape device LUN mapping
224 Fabric OS Encryption Administrator's Guide Supporting RSA Data Protection Manager (DPM) Environments53-1003757-01

Maintenance and Troubleshooting
● Encryption group and HA cluster maintenance.............................................................225● Encryption group merge and split use cases................................................................ 233● Encryption group database manual operations.............................................................242● Key vault diagnostics.................................................................................................... 243● Measuring encryption performance...............................................................................244● General encryption troubleshooting.............................................................................. 246● Management application encryption wizard troubleshooting........................................ 251● LUN policy troubleshooting........................................................................................... 253● Loss of encryption group leader after power outage.....................................................254● MPIO and internal LUN states...................................................................................... 255● FS8-18 blade removal and replacement....................................................................... 257● Brocade Encryption Switch removal and replacement..................................................259● Deregistering a DPM key vault......................................................................................263● Reclaiming the WWN base of a failed Brocade Encryption Switch...............................264● Removing stale rekey information for a LUN................................................................ 264● Downgrading firmware.................................................................................................. 265● Fabric OS and DPM compatibility matrix...................................................................... 265● Splitting an encryption group into two encryption groups..............................................266● Moving an encryption blade from one EG to another in the same fabric...................... 267● Moving an encryption switch from one EG to another in the same fabric..................... 268
Encryption group and HA cluster maintenanceThis section describes advanced configuration options that you can use to modify existing encryptiongroups and HA clusters, and to recover from problems with one or more member nodes in the group.
All group-wide configuration commands are executed on the group leader. Commands that clear group-related states from an individual node are executed on the node. The commands require Admin orSecurityAdmin permissions.
Displaying encryption group configuration or status informationYou can use the cryptocfg --show -egstatus command to display encryption group configurationinformation and encryption group status information.
• cryptocfg --show -egstatus -cfg (Displays encryption group configuration information.)• cryptocfg --show -egstatus -stat (Displays encryption group status information.)
Removing a member node from an encryption groupThis procedure permanently removes a member node from an encryption group, as shown in thefollowing figure. Upon removal, the HA cluster failover capability and target associations pertaining to
Fabric OS Encryption Administrator's Guide Supporting RSA Data Protection Manager (DPM) Environments 22553-1003757-01

the node are no longer present. To remove a node from a group without disrupting these relationships,use the cryptocfg --replace command. Refer to the section Replacing an HA cluster member on page229 for instructions.
FIGURE 103 Removing a node from an encryption group
The procedure for removing a node depends on the node’s status within an encryption group. HAcluster membership and Crypto LUN configurations must be cleared before you can permanentlyremove a member node from an encryption group. To remove a node from an encryption group,complete the following steps:
1. Log in to the group leader as Admin or SecurityAdmin.2. If the node is part of an HA cluster, you must remove it. To do so, complete the following steps:
a) Remove the node from the HA cluster using the cryptocfg --rem -haclustermember command.b) Clear all CryptoTarget configurations from the member node using the cryptocfg --delete -
container command, or move the container using the cryptocfg --move - container command.3. Determine the state of the node. Log in to the member node and enter the cryptocfg --show -
groupmember command followed by the node WWN. Provide a slot number if the encryptionengine is a blade.
SecurityAdmin:switch> cryptocfg --show -groupmember 10:00:00:05:1e:41:99:bcNode Name: 10:00:00:05:1e:41:99:bc (current node)
Maintenance and Troubleshooting
226 Fabric OS Encryption Administrator's Guide Supporting RSA Data Protection Manager (DPM) Environments53-1003757-01
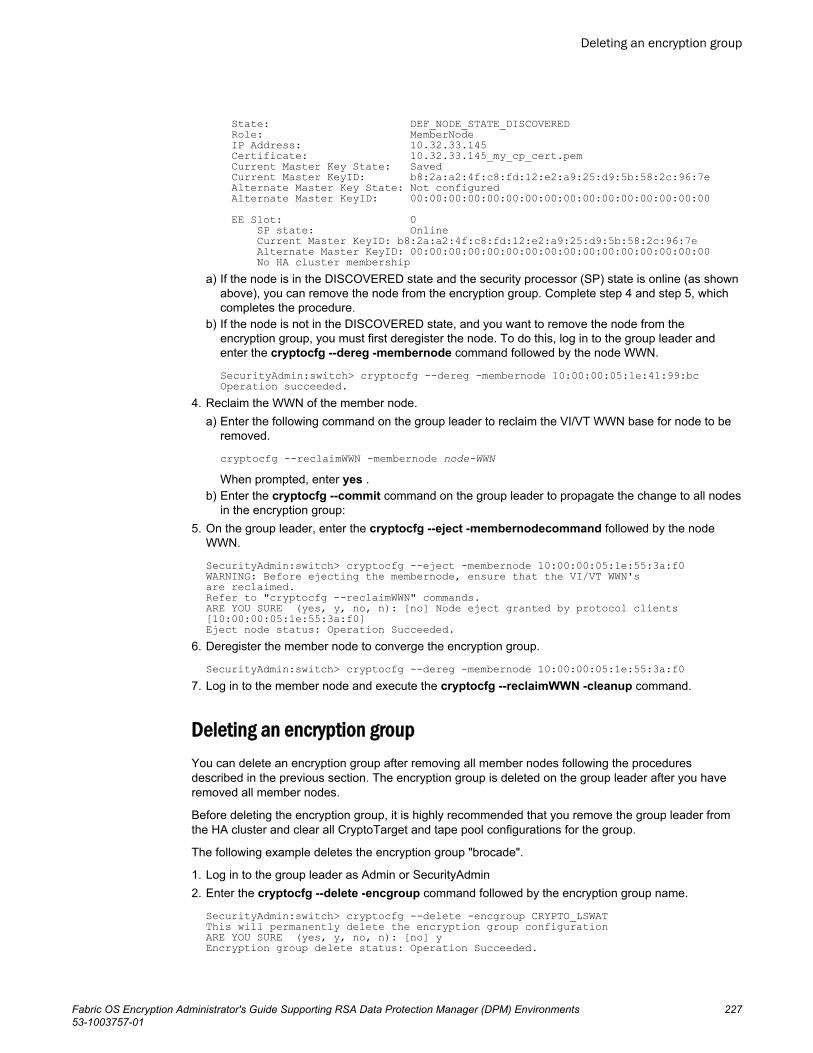
State: DEF_NODE_STATE_DISCOVERED Role: MemberNode IP Address: 10.32.33.145 Certificate: 10.32.33.145_my_cp_cert.pem Current Master Key State: Saved Current Master KeyID: b8:2a:a2:4f:c8:fd:12:e2:a9:25:d9:5b:58:2c:96:7e Alternate Master Key State: Not configured Alternate Master KeyID: 00:00:00:00:00:00:00:00:00:00:00:00:00:00:00:00 EE Slot: 0 SP state: Online Current Master KeyID: b8:2a:a2:4f:c8:fd:12:e2:a9:25:d9:5b:58:2c:96:7e Alternate Master KeyID: 00:00:00:00:00:00:00:00:00:00:00:00:00:00:00:00 No HA cluster membershipa) If the node is in the DISCOVERED state and the security processor (SP) state is online (as shown
above), you can remove the node from the encryption group. Complete step 4 and step 5, whichcompletes the procedure.
b) If the node is not in the DISCOVERED state, and you want to remove the node from theencryption group, you must first deregister the node. To do this, log in to the group leader andenter the cryptocfg --dereg -membernode command followed by the node WWN.
SecurityAdmin:switch> cryptocfg --dereg -membernode 10:00:00:05:1e:41:99:bcOperation succeeded.
4. Reclaim the WWN of the member node.a) Enter the following command on the group leader to reclaim the VI/VT WWN base for node to be
removed.
cryptocfg --reclaimWWN -membernode node-WWNWhen prompted, enter yes .
b) Enter the cryptocfg --commit command on the group leader to propagate the change to all nodesin the encryption group:
5. On the group leader, enter the cryptocfg --eject -membernodecommand followed by the nodeWWN.
SecurityAdmin:switch> cryptocfg --eject -membernode 10:00:00:05:1e:55:3a:f0WARNING: Before ejecting the membernode, ensure that the VI/VT WWN'sare reclaimed.Refer to "cryptocfg --reclaimWWN" commands.ARE YOU SURE (yes, y, no, n): [no] Node eject granted by protocol clients [10:00:00:05:1e:55:3a:f0]Eject node status: Operation Succeeded.
6. Deregister the member node to converge the encryption group.
SecurityAdmin:switch> cryptocfg --dereg -membernode 10:00:00:05:1e:55:3a:f07. Log in to the member node and execute the cryptocfg --reclaimWWN -cleanup command.
Deleting an encryption groupYou can delete an encryption group after removing all member nodes following the proceduresdescribed in the previous section. The encryption group is deleted on the group leader after you haveremoved all member nodes.
Before deleting the encryption group, it is highly recommended that you remove the group leader fromthe HA cluster and clear all CryptoTarget and tape pool configurations for the group.
The following example deletes the encryption group "brocade".
1. Log in to the group leader as Admin or SecurityAdmin2. Enter the cryptocfg --delete -encgroup command followed by the encryption group name.
SecurityAdmin:switch> cryptocfg --delete -encgroup CRYPTO_LSWATThis will permanently delete the encryption group configurationARE YOU SURE (yes, y, no, n): [no] yEncryption group delete status: Operation Succeeded.
Deleting an encryption group
Fabric OS Encryption Administrator's Guide Supporting RSA Data Protection Manager (DPM) Environments 22753-1003757-01
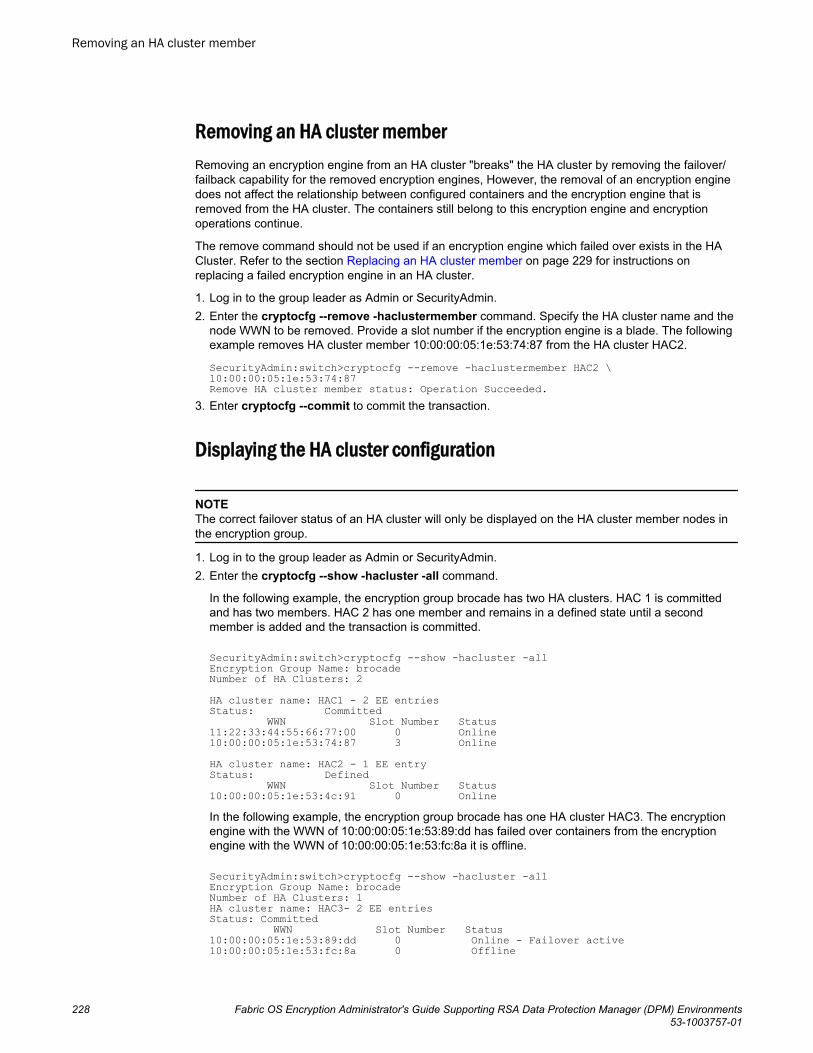
Removing an HA cluster memberRemoving an encryption engine from an HA cluster "breaks" the HA cluster by removing the failover/failback capability for the removed encryption engines, However, the removal of an encryption enginedoes not affect the relationship between configured containers and the encryption engine that isremoved from the HA cluster. The containers still belong to this encryption engine and encryptionoperations continue.
The remove command should not be used if an encryption engine which failed over exists in the HACluster. Refer to the section Replacing an HA cluster member on page 229 for instructions onreplacing a failed encryption engine in an HA cluster.
1. Log in to the group leader as Admin or SecurityAdmin.2. Enter the cryptocfg --remove -haclustermember command. Specify the HA cluster name and the
node WWN to be removed. Provide a slot number if the encryption engine is a blade. The followingexample removes HA cluster member 10:00:00:05:1e:53:74:87 from the HA cluster HAC2.
SecurityAdmin:switch>cryptocfg --remove -haclustermember HAC2 \ 10:00:00:05:1e:53:74:87Remove HA cluster member status: Operation Succeeded.
3. Enter cryptocfg --commit to commit the transaction.
Displaying the HA cluster configuration
NOTEThe correct failover status of an HA cluster will only be displayed on the HA cluster member nodes inthe encryption group.
1. Log in to the group leader as Admin or SecurityAdmin.2. Enter the cryptocfg --show -hacluster -all command.
In the following example, the encryption group brocade has two HA clusters. HAC 1 is committedand has two members. HAC 2 has one member and remains in a defined state until a secondmember is added and the transaction is committed.
SecurityAdmin:switch>cryptocfg --show -hacluster -allEncryption Group Name: brocadeNumber of HA Clusters: 2 HA cluster name: HAC1 - 2 EE entriesStatus: Committed WWN Slot Number Status11:22:33:44:55:66:77:00 0 Online10:00:00:05:1e:53:74:87 3 Online HA cluster name: HAC2 - 1 EE entryStatus: Defined WWN Slot Number Status10:00:00:05:1e:53:4c:91 0 OnlineIn the following example, the encryption group brocade has one HA cluster HAC3. The encryptionengine with the WWN of 10:00:00:05:1e:53:89:dd has failed over containers from the encryptionengine with the WWN of 10:00:00:05:1e:53:fc:8a it is offline.
SecurityAdmin:switch>cryptocfg --show -hacluster -allEncryption Group Name: brocadeNumber of HA Clusters: 1HA cluster name: HAC3- 2 EE entriesStatus: Committed WWN Slot Number Status10:00:00:05:1e:53:89:dd 0 Online - Failover active10:00:00:05:1e:53:fc:8a 0 Offline
Removing an HA cluster member
228 Fabric OS Encryption Administrator's Guide Supporting RSA Data Protection Manager (DPM) Environments53-1003757-01

NOTEIn this particular case, the correct status of Failover active is displayed only if group leader node isqueried. If the other node is queried, Failover active is not displayed, which is not consistent with theactual HA status.
Replacing an HA cluster member1. Log in to the group leader as Admin or SecurityAdmin.2. Enter the cryptocfg --replace -haClusterMember command. Specify the HA cluster name, the node
WWN of the encryption engine to be replaced, and the node WWN of the replacement encryptionengine. Provide a slot number if the encryption engine is a blade. The replacement encryption enginemust be part of the same encryption group as the encryption engine that is replaced.
SecurityAdmin:switch>cryptocfg --replace -haclustermember HAC2 \10:00:00:05:1e:53:4c:91 10:00:00:05:1e:39:53:67Replace HA cluster member status: Operation Succeeded.
3. Enter cryptocfg --commit to commit the transaction.
Case 1: Replacing a failed encryption engine in an HA cluster
Assume a working HA cluster with two operational encryption engines, EE1 and EE2. The target T1 ishosted on EE1 and target T2 is hosted on EE2. (Refer to the following figure.)
Replacing an HA cluster member
Fabric OS Encryption Administrator's Guide Supporting RSA Data Protection Manager (DPM) Environments 22953-1003757-01

FIGURE 104 Replacing a failed encryption engine in an HA cluster
EE2 fails and generates an offline notification. The target hosted on EE2 (T2 in this case)automatically fails over to EE1. Even though the target T2 is now hosted on EE1 because of thefailover process, the target association is still EE2, and the container status is displayed on the hostingnode as failover. Use the cryptocfg --show -containercrypto_target_container_name-stat commandto display the container status.
1. Invoke the cryptocfg --replace -haclustermember command on the group leader to replace thefailed encryption engine (EE2) with another encryption engine (EE3). This operation effectivelyremoves the failed encryption engine (EE2) from the HA cluster and adds the replacementencryption engine (EE3) to the HA cluster. The target associations (T2) from the failed encryptionengine (EE2) are transferred to the replacement encryption engine (EE3).
2. Commit the transaction. If failback mode is set to auto, the target (T2) which failed over earlier toEE1 automatically fails back to the replaced encryption engine (EE3).
3. Invoke the cryptocfg --reclaimWWN -EE command on the group leader followed by WWN of theDCX Backbone chassis and the slot number of the encryption engine to be removed.
4. Invoke the cryptocfg --commit command to sync the configuration in the encryption group.5. After the transaction is committed, remove the failed encryption engine from the encryption group.
Maintenance and Troubleshooting
230 Fabric OS Encryption Administrator's Guide Supporting RSA Data Protection Manager (DPM) Environments53-1003757-01

Case 2: Replacing a "live" encryption engine in an HA cluster
1. Invoke the cryptocfg --replace -haclustermember command on the group leader to replace the liveencryption engine EE2 with another encryption engine (EE3). This operation effectively removes EE2from the HA cluster and adds the replacement encryption engine (EE3) to the HA cluster. The targetassociations (T2) from the replaced encryption engine (EE2) are transferred to the replacementencryption engine (EE3).
2. Commit the transaction.3. Invoke the cryptocfg --reclaimWWN -EE command on the group leader followed by WWN of the
DCX Backbone chassis and the slot number of the failed encryption engine.4. Invoke the cryptocfg --commit command to sync the configuration in the encryption group.5. Remove the encryption engine EE2 from the encryption group.
FIGURE 105 Replacing a "live" encryption engine in an HA cluster
Deleting an HA cluster memberThis command dissolves the HA cluster and removes failover capability from the participatingencryption engines.
1. Log in to the group leader as Admin or SecurityAdmin.2. Invoke the cryptocfg --delete -hacluster command. Specify the name of the HA cluster you want to
delete.
SecurityAdmin:switch>cryptocfg --delete -hacluster HAC1Delete HA cluster status: Operation succeeded.
3. Enter the cryptocfg --commit command to commit the transaction.
Case 2: Replacing a "live" encryption engine in an HA cluster
Fabric OS Encryption Administrator's Guide Supporting RSA Data Protection Manager (DPM) Environments 23153-1003757-01

Performing a manual failback of an encryption engineBy default, failback occurs automatically if an encryption engine that failed was replaced or comesback online. When manual failback policy is set in the encryption group, you must invoke a manualfailback of the encryption engine after the failing encryption engine was restored or replaced. Failbackincludes all of the encryption engine’s target associations. Failback returns all encryption operations tothe original encryption engine after it has been restored, or it transfers operations to a replacementencryption engine if the original encryption engine was replaced. The failback operation can only beperformed within an HA cluster.
1. Log in to the group leader as Admin or SecurityAdmin.2. Enter the cryptocfg --failback -EE command. Specify the node WWN of the encryption engine to
which failover occurred earlier and which is now performing all encryption tasks (current encryptionengine), followed by the node WWN of the encryption engine to which failback should occur ("new"encryption engine). Specify a slot number if the encryption engine is a blade.
SecurityAdmin:switch>cryptocfg --failback -EE 10:00:00:05:1e:53:4c:91 \10:00:00:05:1e:39:53:67Operation Succeeded
Failover/failback example
The following example illustrates the states associated with the encryption engines during an activefailover and failback process.
• EE2 fails over to EE1.
SecurityAdmin:switch> cryptocfg --show -hacluster -allEncryption Group Name: brocadeNumber of HA Clusters: 1 HA cluster name: HAC3- 2 EE entriesStatus: Committed WWN Slot Number StatusEE1 => 10:00:00:05:1e:53:89:dd 0 Online - Failover activeEE2 => 10:00:00:05:1e:53:fc:8a 0 Offline• The failed EE2 has come back online, Failover is still active:
SecurityAdmin:switch> cryptocfg --show -hacluster -allEncryption Group Name: brocadeNumber of HA Clusters: 1HA cluster name: HAC3 - 2 EE entriesStatus: Committed WWN Slot Number StatusEE1 => 10:00:00:05:1e:53:89:dd 0 Online - Failover activeEE2 => 10:00:00:05:1e:53:fc:8a 0 Online• A manual failback is issued.
SecurityAdmin:switch> cryptocfg --failback -EE 10:00:00:05:1e:53:89:dd 0 \ 10:00:00:05:1e:53:fc:8a 0Operation succeeded.• After the failback completes, the cryptocfg --show -hacluster -all command no longer reports
active failover.
SecurityAdmin:switch> cryptocfg --show -hacluster -allEncryption Group Name: brocade_1Number of HA Clusters: 1HA cluster name: HAC3 - 2 EE entriesStatus: Committed
Performing a manual failback of an encryption engine
232 Fabric OS Encryption Administrator's Guide Supporting RSA Data Protection Manager (DPM) Environments53-1003757-01

WWN Slot Number StatusEE1 => 10:00:00:05:1e:53:89:dd 0 OnlineEE2 => 10:00:00:05:1e:53:fc:8a 0 Online
Encryption group merge and split use casesThis section describes the following recovery scenarios and related operations:
• A member node failed and is replaced on page 233• A member node reboots and comes back up on page 234• A member node lost connection to the group leader on page 234• A member node lost connection to all other nodes in the encryption group on page 235• Several member nodes split off from an encryption group on page 236• Adjusting heartbeat signaling values on page 236• EG split possibilities requiring manual recovery on page 237
A member node failed and is replacedAssume N1, N2 and N3 form an encryption group and N2 is the group leader node. N3 and N1 are partof an HA cluster. Assume that N3 failed and you want to replace the failed N3 node with an alternatenode N4.
ImpactWhen N3 failed, all devices hosted on the encryption engines of this node failed over to the peerencryption engines in N1, and N1 now performs all of the failed node’s encryption services. Rekeysessions owned by the failed encryption engine are failed over to N1.
Recovery1. Deregister the node N3 from the group leader node.
SecurityAdmin:switch> cryptocfg --dereg -membernode <N3 switchWWN>2. Reclaim the WWN base of the failed Brocade Encryption Switch.
SecurityAdmin:switch> cryptocfg --reclaim WWN -membernode <N3 switchWWN>3. Synchronize the crypto configurations across all member nodes.
SecurityAdmin:switch> cryptocfg --commit
NOTEWhen attempting to reclaim a failed Brocade Encryption Switch, do not execute cryptocfg --transabort . Doing so will cause subsequent reclaim attempts to fail.
4. Set up the member node: Configure the IP address of the new node that is replacing the failed node,and the IP addresses of the I/O cluster sync ports (Ge0 and Ge1), and initialize the node with thecryptocfg --initnode command.
5. On the new node that is to be added, invoke cryptocfg --reclaimWWN -cleanup .6. Export the CP certificate from the member node.7. Import the member node CP certificate into the group leader.
Encryption group merge and split use cases
Fabric OS Encryption Administrator's Guide Supporting RSA Data Protection Manager (DPM) Environments 23353-1003757-01

8. On the group leader node, register the member node with the group leader node. Enter thecryptocfg --reg -membernode command with appropriate parameters to register the membernode. Specify the member node’s WWN, Certificate filename, and IP address when executing thiscommand. Successful execution of this command distributes all necessary node authentication datato the other members of the group.
SecurityAdmin:switch>cryptocfg --reg -membernode \10:00:00:05:1e:39:14:00 enc_switch1_cert.pem 10.32.244.60Operation succeeded.
9. Establish the connection between the member node and the key vault.10.Register the new node with the key manager appliance.11.On the new node, invoke cryptocfg --initEE , and cryptocfg --regEE to initialize the encryption
engines.12.After the new node has come online, invoke the cryptocfg --enableEE command to enable crypto
operations on the node’s encryption engines.13.Replace the failed encryption engine on N3 with the encryption engine of the new node N4 to
restore broken HA cluster peer relationships. Use the cryptocfg --replace command.14.Remove the failed node from the encryption group. Follow the procedures described in the section
Removing a member node from an encryption group on page 225.
A member node reboots and comes back upAssume N1, N2 and N3 form an encryption group and N2 is the group leader node. N3 and N1 arepart of an HA cluster. Assume that N3 reboots and comes back up.
ImpactWhen N3 reboots, all devices hosted on the encryption engines of this node automatically fail over tothe peer encryption engine N1. N1 now performs all of N3’s encryption services. Any rekey sessions inprogress continue. Rekey sessions owned by N3’s encryption engine are failed over to N1.
RecoveryIf auto failback policy is set, no intervention is required. After the node has come back up, all devicesand associated configurations and services that failed over earlier to N1 fail back to N3. The noderesumes its normal function.
If auto failback policy is not set, invoke a manual failback if required. Refer to the section Performing amanual failback of an encryption engine on page 232 for instructions.
A member node lost connection to the group leaderAssume N1, N2 and N3 form an encryption group, and N2 is the group leader node. N3 and N1 arepart of an HA cluster. Assume that N3 lost connection to the group leader node N2 but still maintainscommunications with other nodes in the encryption group.
ImpactFailover to N1 does not occur, because the isolated node and the encryption engines’ encryptionservices continue to function normally. However the disconnect of N3 from the group leader breaks theHA cluster and failover capability between N3 and N1.
A member node reboots and comes back up
234 Fabric OS Encryption Administrator's Guide Supporting RSA Data Protection Manager (DPM) Environments53-1003757-01

You cannot configure any CryptoTargets, LUN policies, tape pools, or security parameters that wouldrequire communication with the isolated member node. In addition, you cannot start any rekeyoperations (auto or manual).
Refer to the section Configuration impact of encryption group split or node isolation on page 241 formore information on which configuration changes are allowed.
RecoveryRestore connectivity between the isolated node and the group leader. No further intervention isrequired.
A member node lost connection to all other nodes in the encryptiongroupAssume N1, N2 and N3 form an encryption group and N2 is the group leader node. N3 and N1 are partof an HA cluster. Assume that N3 lost connection with all other nodes in the group. Node N3 finds itselfisolated from the encryption group and, following the group leader succession protocol, elects itself asgroup leader. This action splits the encryption group into two encryption group islands. EG1 includes theoriginal encryption group minus the member node N3 that lost connection to the encryption group. EG2consists of a single node N3, which functions as the group leader. Both EG1 and EG2 are in adegraded state.
Impact• The two encryption group islands keep functioning independently of each other as far as host I/O
encryption traffic is concerned.• Each encryption group registers the missing members as "offline".• The isolation of N3 from the group leader breaks the HA cluster and failover capability between N3
and N1.• You cannot configure any CryptoTargets, LUN policies, tape pools, or security parameters on any of
the group leaders. This would require communication with the "offline" member nodes. You cannotstart any rekey operations (auto or manual) on any of the nodes. Refer to the section Configurationimpact of encryption group split or node isolation on page 241 for more information on whichconfiguration changes are allowed.
Recovery1. Restore connectivity between the two separate encryption group islands.
When the lost connection is restored, an automatic split recovery process begins. The current groupleader and the former group leader (N3 and N2 in this example) arbitrate the recovery, and the groupleader with the majority number of members (N2) becomes group leader. If the number of membernodes is the same, the group leader node with the highest WWN becomes group leader.
2. After the encryption group enters the converged state, execute the cryptocfg --commit command onthe group leader node to distribute the crypto-device configuration from the group leader to allmember nodes.
Should you decide to remove the isolated node N3, follow the procedures described in the section Removing a member node from an encryption group on page 225.
A member node lost connection to all other nodes in the encryption group
Fabric OS Encryption Administrator's Guide Supporting RSA Data Protection Manager (DPM) Environments 23553-1003757-01

Several member nodes split off from an encryption groupAssume N1, N2, N3, and N4 form an encryption group and N2 is the group leader node. N3 and N1are part of an HA cluster. Assume that both N3 and N4 lost connection with the encryption group butcan still communicate with each other. Following the group leader succession protocol, N3 elects itselfas group leader to form a second encryption group with itself and N4 as group members. We nowhave two encryption groups, EG1 (group leader N2 + N1), and EG2 (group leader N3 + N4).
Impact• The two encryption groups continue to function independently of each other as far as host I/O
encryption traffic is concerned.• Each encryption group registers the missing members as "offline".• The isolation of N3 from the original encryption group breaks the HA cluster and failover capability
between N3 and N1.• You cannot configure any CryptoTargets, LUN policies, tape pools, or security parameters on any of
the group leaders. This would require communication with the "offline" member nodes. You cannotstart any rekey operations (auto or manual) on any of the nodes. Refer to the sectionConfigurationimpact of encryption group split or node isolation on page 241 for more information on whichconfiguration changes are allowed.
Recovery1. Restore the connection between the nodes in the separate encryption group islands, that is,
between nodes N3, N4 and between nodes N1 and N2.
When the lost connection is restored, an automatic split recovery process begins. The two groupleaders (N3 and N2 in this example) arbitrate the recovery, and the group leader node with thehighest WWN becomes group leader. If the number of nodes in each group is not equal, the groupleader for the group with the largest number of members becomes group leader.
2. After the encryption group enters the converged state, execute the cryptocfg --commit commandon the group leader node to distribute the crypto-device configuration from the group leader to allmember nodes.
Adjusting heartbeat signaling valuesEncryption group nodes use heartbeat signaling to communicate to one another and to theirassociated key vaults. A configurable threshold of heartbeat misses determines how long anencryption group leader will wait before declaring a member node unreachable.
The default heartbeat signaling values are three heartbeat misses, each followed by a two secondheartbeat time-out. If three consecutive heartbeats are missed (by default, a time interval of sixseconds without a heartbeat signal), the encryption group leader node declares a member node asunreachable, resulting in an encryption group split scenario (EG split).
NOTE
It is highly recommended that all nodes comprising your encryption group and your key vaults be apart of a dedicated management LAN or on a LAN that is stable and not congested to avoid thepossibility of an EG split. The default values are appropriate for a LAN that is stable and notcongested.
In the unlikely scenario of an EG split, the encryption group automatically begins an auto-recoveryprocess. No user intervention is required unless the congestion in the network or network loss is
Several member nodes split off from an encryption group
236 Fabric OS Encryption Administrator's Guide Supporting RSA Data Protection Manager (DPM) Environments53-1003757-01

prolonged or continuous. Under such conditions, auto-recovery will most likely fail, as the encryptiongroup leader node will not be able to establish a clean series of heartbeats with the other membernodes.
If the management network becomes congested or unreliable resulting in excessive auto-recoveryprocessing or the need for manual recovery from EG splits, it is possible to set larger heartbeat andheartbeat time-out values to mitigate the chances of having the EG split while the network issues arebeing addressed. The following commands are issued from the encryption group leader nodes tochange the heartbeat signaling values.
switch:admin> cryptocfg --set -hbmisses numberswitch:admin> cryptocfg --set -hbtimeout timeWhere:
number Sets the number of heartbeat misses allowed in a node that is part of an encryption group before thenode is declared unreachable and the standby takes over. This value is set in conjunction with the time-out value. It must be configured at the group leader node and is distributed to all member nodes in theencryption group. The value entered specifies the number of heartbeat misses. The default value is 3.Valid values are integers ranging from 3–14.
time Sets the time-out value for the heartbeat in seconds. This parameter must be configured at the groupleader node and is distributed to all member nodes in the encryption group. The value entered specifiesthe heartbeat time-out in seconds. The default value is 2 seconds. Valid values are integers ranging from2–9.
NOTEThe collective time allowed (the heartbeat time-out value multiplied by the heartbeat misses) cannotexceed 30 seconds (enforced by Fabric OS).
The relationship between -hbmisses and -hbtimeout determines the total amount of time allowedbefore a node is declared unreachable. If a switch does not sense a heartbeat within the heartbeattimeout value, it is counted as a heartbeat miss. The default values result in a total time of 6 seconds(timeout value of 2 seconds x 3 misses). A total time of 6-10 seconds is recommended. A smaller valuemight cause a node to be declared unreachable prematurely, while a larger value might result ininefficiency.
EG split possibilities requiring manual recoveryIn the event the encryption group (EG) splits and is unable to auto-recover, manual intervention isrequired to get your encryption group re-converged. It is important to note that while the encryptiongroup is in a split condition, data traffic is NOT impacted in any way. However, EG splits do impact thecontrol plane which means that during an EG split, modification to your encryption group configurationwill not be possible.
When an EG split occurs, communications between one or more members of the encryption group islost, and EG islands form. An EG island is simply a grouping of EG nodes that still have the ability tocommunicate with one another. As part of the normal recovery procedure, each EG island will select agroup leader (GL) node.
Given that you may have up to four nodes per encryption group, an EG split may leave you with any ofthe following possible EG split combinations:
EG split possibilities requiring manual recovery
Fabric OS Encryption Administrator's Guide Supporting RSA Data Protection Manager (DPM) Environments 23753-1003757-01

• Two node EG split, resulting in two single node encryption groups. Each node is a group leadernode.
• Three node EG split, resulting in one of two outcomes:
‐ A two node encryption group with a single group leader node, and one single node encryptiongroup where the node is a group leader.
‐ Three single Node EGs, each of which is a group leader.• Four node EG split, resulting in one of three outcomes:
‐ One three node encryption group with a single group leader, and one single node encryptiongroup where the node is a group leader.
‐ A pair of two node encryption groups, with each encryption group having its own group leader.‐ Four single node encryption groups. Each node is a group leader.
EG split manual recovery steps
Regardless of which particular EG Split combination occurs, the recovery procedure is the same.
The following recovery procedures make the following assumptions:
• The networking issues that caused the EG split have been resolved.• The output of the cryptocfg --show -groupcfg command on every EG island shows the EG status
as being DEGRADED.
NOTEIf one or more EG status displays as CONVERGED contact technical support as the followingprocedure will not work.
To reconverge the EG, you will need to perform a series of steps. The following is a listing of the basicsteps involved - this listing is followed by an example with the details of each step:
1. Confirm that your EG is not in a CONVERGED state.2. Determine which GL Node will remain the GL Node once the EG is reconverged.
It is recommended to pick the GL from the largest EG island that exists (for example, if your EGislands do not all have the same number of members). If you have an EG island with 3 Nodes andanother EG island with just 1 Node, pick the GL from the 3 Node EG island.
3. Use the selected EG island's GL Node to deregister every node that is not in a DISCOVEREDstate.
4. Go to every other EG island and delete the associated EG.
NOTEOne additional step is needed here when a four node encryption group splits into a pair of two nodeencryption groups, with each encryption group having its own group leader. This single special caseis addressed in the Two node EG split manual recovery example on page 238.
5. Reregister all Nodes from that were a part of the other EG islands.6. Verify your EG is reconverged.
Two node EG split manual recovery example
The following example is a case where you have an EG split of a two node encryption group withnodes named Node181 and Node182. Node181 has WWN 10:00:00:00:05:1e:33:33 and Node182 hasWWN 10:00:00:05:1e:55:55:55.
EG split manual recovery steps
238 Fabric OS Encryption Administrator's Guide Supporting RSA Data Protection Manager (DPM) Environments53-1003757-01
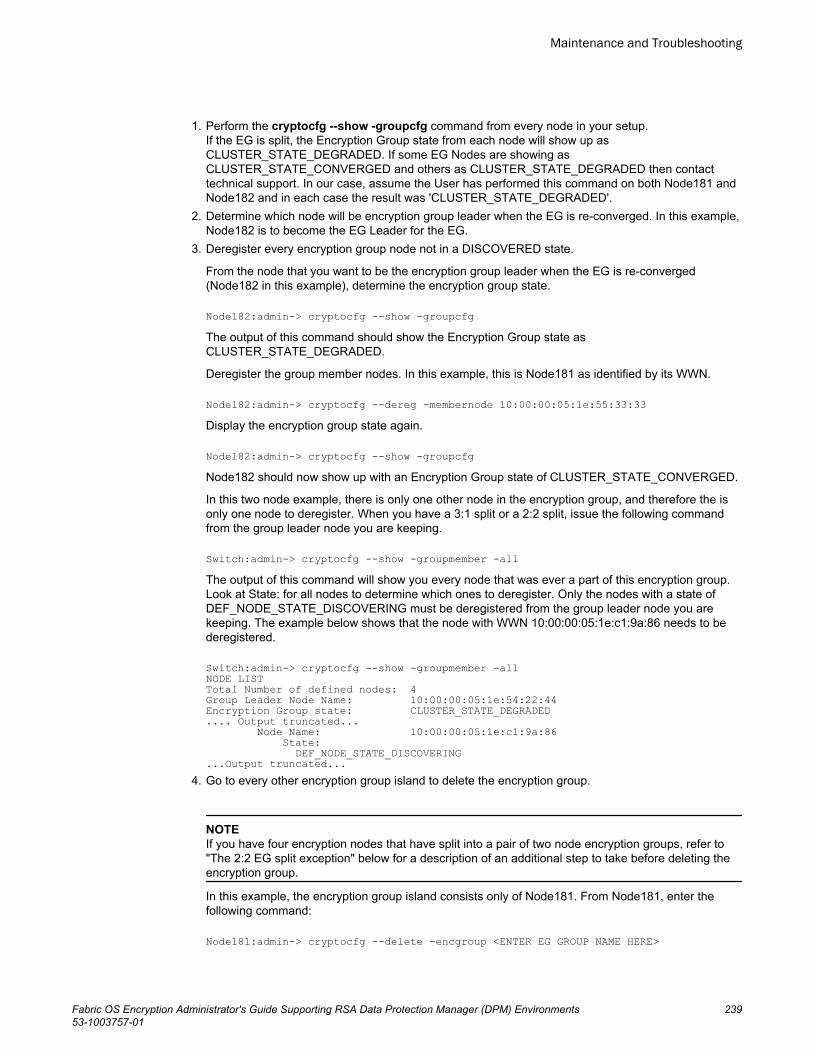
1. Perform the cryptocfg --show -groupcfg command from every node in your setup.If the EG is split, the Encryption Group state from each node will show up asCLUSTER_STATE_DEGRADED. If some EG Nodes are showing asCLUSTER_STATE_CONVERGED and others as CLUSTER_STATE_DEGRADED then contacttechnical support. In our case, assume the User has performed this command on both Node181 andNode182 and in each case the result was 'CLUSTER_STATE_DEGRADED'.
2. Determine which node will be encryption group leader when the EG is re-converged. In this example,Node182 is to become the EG Leader for the EG.
3. Deregister every encryption group node not in a DISCOVERED state.
From the node that you want to be the encryption group leader when the EG is re-converged(Node182 in this example), determine the encryption group state.
Node182:admin-> cryptocfg --show -groupcfgThe output of this command should show the Encryption Group state asCLUSTER_STATE_DEGRADED.
Deregister the group member nodes. In this example, this is Node181 as identified by its WWN.
Node182:admin-> cryptocfg --dereg -membernode 10:00:00:05:1e:55:33:33Display the encryption group state again.
Node182:admin-> cryptocfg --show -groupcfgNode182 should now show up with an Encryption Group state of CLUSTER_STATE_CONVERGED.
In this two node example, there is only one other node in the encryption group, and therefore the isonly one node to deregister. When you have a 3:1 split or a 2:2 split, issue the following commandfrom the group leader node you are keeping.
Switch:admin-> cryptocfg --show -groupmember -allThe output of this command will show you every node that was ever a part of this encryption group.Look at State: for all nodes to determine which ones to deregister. Only the nodes with a state ofDEF_NODE_STATE_DISCOVERING must be deregistered from the group leader node you arekeeping. The example below shows that the node with WWN 10:00:00:05:1e:c1:9a:86 needs to bederegistered.
Switch:admin-> cryptocfg --show -groupmember -allNODE LISTTotal Number of defined nodes: 4Group Leader Node Name: 10:00:00:05:1e:54:22:44Encryption Group state: CLUSTER_STATE_DEGRADED.... Output truncated... Node Name: 10:00:00:05:1e:c1:9a:86 State: DEF_NODE_STATE_DISCOVERING...Output truncated...
4. Go to every other encryption group island to delete the encryption group.
NOTEIf you have four encryption nodes that have split into a pair of two node encryption groups, refer to"The 2:2 EG split exception" below for a description of an additional step to take before deleting theencryption group.
In this example, the encryption group island consists only of Node181. From Node181, enter thefollowing command:
Node181:admin-> cryptocfg --delete -encgroup <ENTER EG GROUP NAME HERE>
Maintenance and Troubleshooting
Fabric OS Encryption Administrator's Guide Supporting RSA Data Protection Manager (DPM) Environments 23953-1003757-01

This will permanently delete the encryption group configuration
ARE YOU SURE (yes, y, no, n): [no] yesWARNING: Tape, HA cluster or Container is configured in this node.Do you want to do EG deletion and retain Tape, HA cluster or Container configurationARE YOU SURE (yes, y, no, n): [no] yesEncryption group delete status: Operation Succeeded.If you now perform a cryptocfg --show -groupcfg , you will see that no encryption group onNode181 is defined:
Node181:admin-> cryptocfg --show -groupcfgEncryption group not defined: Cluster DB and Persistent DB not present, No Encryption Group Created or Defined.The 2:2 EG split exception
The encryption group deletion procedure may be done directly in every scenario except when therehas been a 2:2 split. In that special case, the other encryption group island consists of one groupleader and one member node. The group leader node has taken over the group leader role, andhas been successful in contacting one member node, placing the member node in aDEF_NODE_STATE_DISCOVERED state. Before you can delete the encryption group, you musteject the discovered member node from the group leader node (EGisland2GLNode in the commandexample that follows). To determine which node is the discovered member node that needs to beejected, use the following command:
EGisland2GLNode:admin-> cryptocfg --show -groupmember -allNODE LISTTotal Number of defined nodes: 4Group Leader Node Name: 10:00:00:05:1e:54:22:44Encryption Group state: CLUSTER_STATE_DEGRADED.... Output truncated... Node Name: 10:00:00:05:1e:c1:9b:91 State: DEF_NODE_STATE_DISCOVERED...Output truncated...Eject the node shown above which is in the DEF_NODE_STATE_DISCOVERED state using thefollowing command:
EGisland2GLNode:admin-> cryptocfg --eject -membernode 10:00:00:05:1e:c1:9b:91You can now delete the encryption group from the member node using the cryptocfg --delete -encgroup command, and perform a cryptocfg --show -groupcfg command to verify that no encryptiongroup is defined on the member node as was done for Node181 in the two node example, as shownnear the beginning of step 4.
5. Reregister all nodes from that were a part of the other encryption group islands.
From Node182, you need to determine the CP certificate name associated with Node181. Use thefollowing command to look for Node182's CP certificate name:
Node182:admin-> cryptocfg --show -file -allThe output of this command will display a listing of all imported CP certificates. Identify thecertificate associated with Node181 and then use it to re-register Node181 as follows:
Node182:admin-> cryptocfg --reg -membernode 10:00:00:05:1e:55:33:33 <node181's certificate file name> <node181's IP address> Within a minute or two; the encryption group will re-converge.
6. Verify your encryption group is re-converged.
Node181:admin-> cryptocfg --show -groupcfgNode182:admin-> cryptocfg --show -groupcfg
Maintenance and Troubleshooting
240 Fabric OS Encryption Administrator's Guide Supporting RSA Data Protection Manager (DPM) Environments53-1003757-01
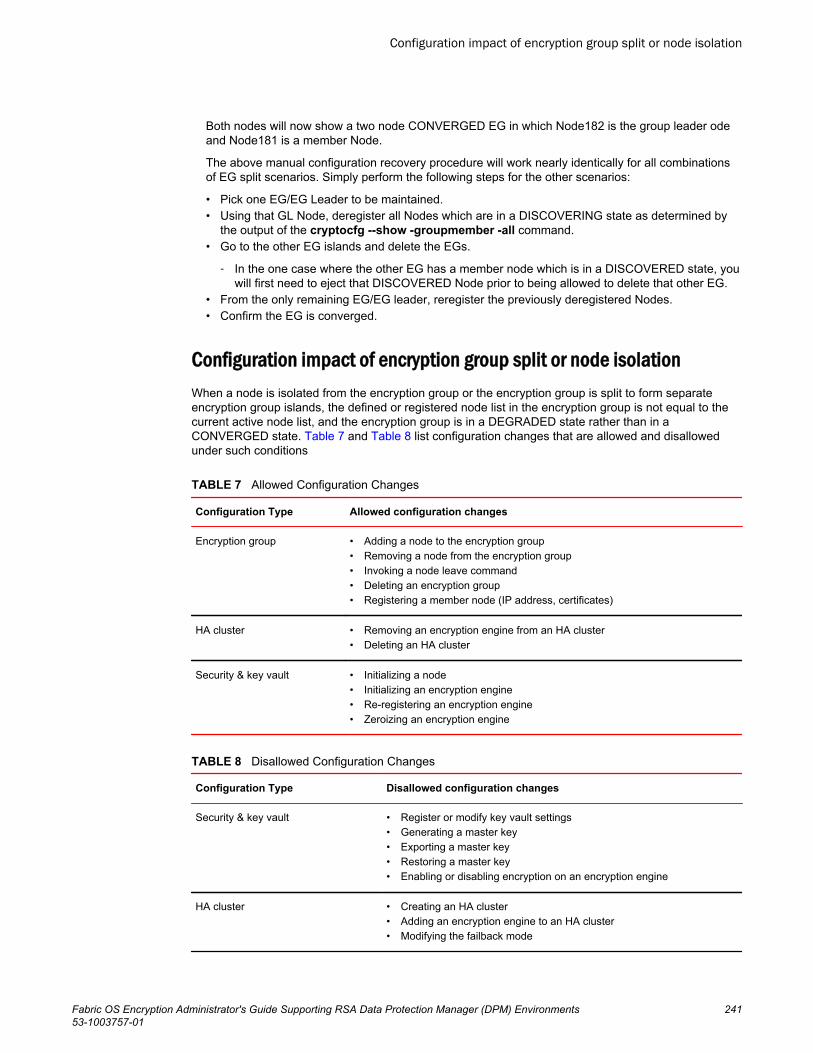
Both nodes will now show a two node CONVERGED EG in which Node182 is the group leader odeand Node181 is a member Node.
The above manual configuration recovery procedure will work nearly identically for all combinationsof EG split scenarios. Simply perform the following steps for the other scenarios:
• Pick one EG/EG Leader to be maintained.• Using that GL Node, deregister all Nodes which are in a DISCOVERING state as determined by
the output of the cryptocfg --show -groupmember -all command.• Go to the other EG islands and delete the EGs.
‐ In the one case where the other EG has a member node which is in a DISCOVERED state, youwill first need to eject that DISCOVERED Node prior to being allowed to delete that other EG.
• From the only remaining EG/EG leader, reregister the previously deregistered Nodes.• Confirm the EG is converged.
Configuration impact of encryption group split or node isolationWhen a node is isolated from the encryption group or the encryption group is split to form separateencryption group islands, the defined or registered node list in the encryption group is not equal to thecurrent active node list, and the encryption group is in a DEGRADED state rather than in aCONVERGED state. Table 7 and Table 8 list configuration changes that are allowed and disallowedunder such conditions
Allowed Configuration ChangesTABLE 7
Configuration Type Allowed configuration changes
Encryption group • Adding a node to the encryption group• Removing a node from the encryption group• Invoking a node leave command• Deleting an encryption group• Registering a member node (IP address, certificates)
HA cluster • Removing an encryption engine from an HA cluster• Deleting an HA cluster
Security & key vault • Initializing a node• Initializing an encryption engine• Re-registering an encryption engine• Zeroizing an encryption engine
Disallowed Configuration ChangesTABLE 8
Configuration Type Disallowed configuration changes
Security & key vault • Register or modify key vault settings• Generating a master key• Exporting a master key• Restoring a master key• Enabling or disabling encryption on an encryption engine
HA cluster • Creating an HA cluster• Adding an encryption engine to an HA cluster• Modifying the failback mode
Configuration impact of encryption group split or node isolation
Fabric OS Encryption Administrator's Guide Supporting RSA Data Protection Manager (DPM) Environments 24153-1003757-01
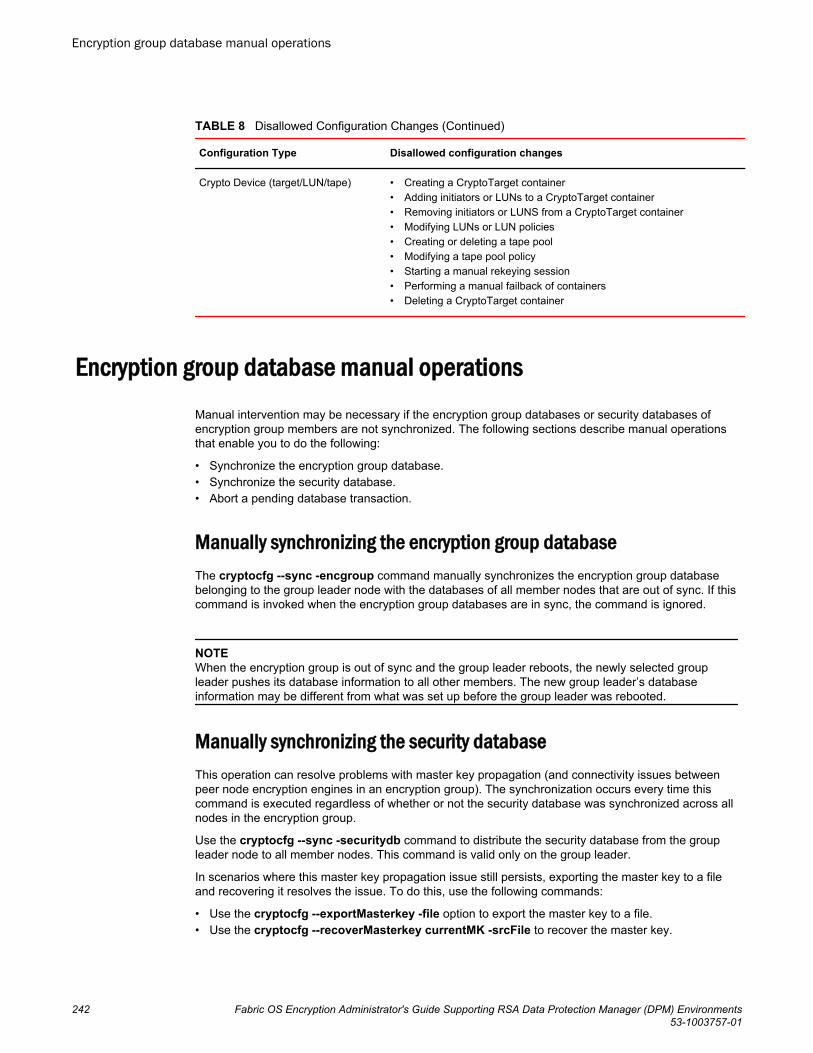
Disallowed Configuration Changes (Continued)TABLE 8
Configuration Type Disallowed configuration changes
Crypto Device (target/LUN/tape) • Creating a CryptoTarget container• Adding initiators or LUNs to a CryptoTarget container• Removing initiators or LUNS from a CryptoTarget container• Modifying LUNs or LUN policies• Creating or deleting a tape pool• Modifying a tape pool policy• Starting a manual rekeying session• Performing a manual failback of containers• Deleting a CryptoTarget container
Encryption group database manual operationsManual intervention may be necessary if the encryption group databases or security databases ofencryption group members are not synchronized. The following sections describe manual operationsthat enable you to do the following:
• Synchronize the encryption group database.• Synchronize the security database.• Abort a pending database transaction.
Manually synchronizing the encryption group databaseThe cryptocfg --sync -encgroup command manually synchronizes the encryption group databasebelonging to the group leader node with the databases of all member nodes that are out of sync. If thiscommand is invoked when the encryption group databases are in sync, the command is ignored.
NOTEWhen the encryption group is out of sync and the group leader reboots, the newly selected groupleader pushes its database information to all other members. The new group leader’s databaseinformation may be different from what was set up before the group leader was rebooted.
Manually synchronizing the security databaseThis operation can resolve problems with master key propagation (and connectivity issues betweenpeer node encryption engines in an encryption group). The synchronization occurs every time thiscommand is executed regardless of whether or not the security database was synchronized across allnodes in the encryption group.
Use the cryptocfg --sync -securitydb command to distribute the security database from the groupleader node to all member nodes. This command is valid only on the group leader.
In scenarios where this master key propagation issue still persists, exporting the master key to a fileand recovering it resolves the issue. To do this, use the following commands:
• Use the cryptocfg --exportMasterkey -file option to export the master key to a file.• Use the cryptocfg --recoverMasterkey currentMK -srcFile to recover the master key.
Encryption group database manual operations
242 Fabric OS Encryption Administrator's Guide Supporting RSA Data Protection Manager (DPM) Environments53-1003757-01
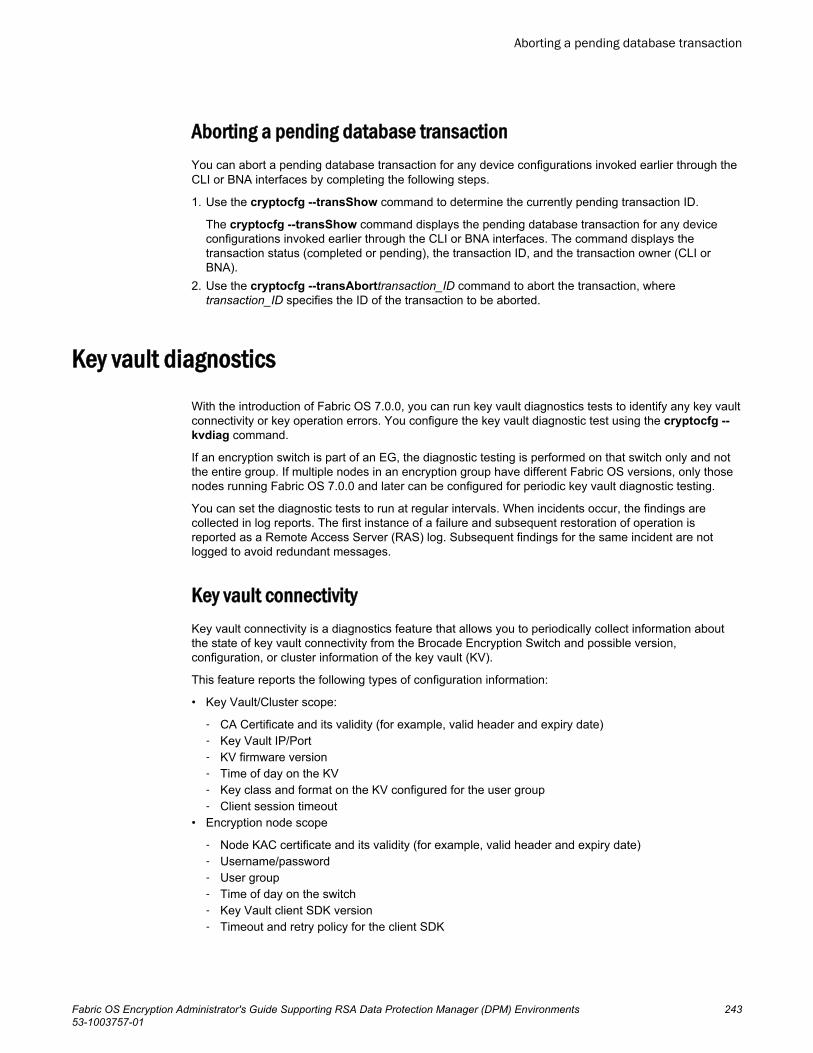
Aborting a pending database transactionYou can abort a pending database transaction for any device configurations invoked earlier through theCLI or BNA interfaces by completing the following steps.
1. Use the cryptocfg --transShow command to determine the currently pending transaction ID.
The cryptocfg --transShow command displays the pending database transaction for any deviceconfigurations invoked earlier through the CLI or BNA interfaces. The command displays thetransaction status (completed or pending), the transaction ID, and the transaction owner (CLI orBNA).
2. Use the cryptocfg --transAborttransaction_ID command to abort the transaction, wheretransaction_ID specifies the ID of the transaction to be aborted.
Key vault diagnosticsWith the introduction of Fabric OS 7.0.0, you can run key vault diagnostics tests to identify any key vaultconnectivity or key operation errors. You configure the key vault diagnostic test using the cryptocfg --kvdiag command.
If an encryption switch is part of an EG, the diagnostic testing is performed on that switch only and notthe entire group. If multiple nodes in an encryption group have different Fabric OS versions, only thosenodes running Fabric OS 7.0.0 and later can be configured for periodic key vault diagnostic testing.
You can set the diagnostic tests to run at regular intervals. When incidents occur, the findings arecollected in log reports. The first instance of a failure and subsequent restoration of operation isreported as a Remote Access Server (RAS) log. Subsequent findings for the same incident are notlogged to avoid redundant messages.
Key vault connectivityKey vault connectivity is a diagnostics feature that allows you to periodically collect information aboutthe state of key vault connectivity from the Brocade Encryption Switch and possible version,configuration, or cluster information of the key vault (KV).
This feature reports the following types of configuration information:
• Key Vault/Cluster scope:
‐ CA Certificate and its validity (for example, valid header and expiry date)‐ Key Vault IP/Port‐ KV firmware version‐ Time of day on the KV‐ Key class and format on the KV configured for the user group‐ Client session timeout
• Encryption node scope
‐ Node KAC certificate and its validity (for example, valid header and expiry date)‐ Username/password‐ User group‐ Time of day on the switch‐ Key Vault client SDK version‐ Timeout and retry policy for the client SDK
Aborting a pending database transaction
Fabric OS Encryption Administrator's Guide Supporting RSA Data Protection Manager (DPM) Environments 24353-1003757-01

The key vault client SDK version, and timeout and retry policy for the client SDK could differ acrossencryption nodes, depending on the firmware versions they are running.
This feature also reports the results of a vault connectivity check and the results of a validation checkon key operations. These results are specific to each encryption node. The operations done as part ofthis are:
• Connects to the key vault and performs a connectivity check, reports any possible issues in case offailure, for example, certificate issues, username or password issues, or connectivity issues.
• Attempts to retrieve a key and indicates any possible issues in case of failure.• Attempts to store a key on the vault and indicates any possible issues in case of failure.• Verifies if a key written is synchronized across the vaults in a cluster.
This check indicates only the synchronization capability at a given point of time, and does not meanall keys on the vault are synchronized. The need for manual synchronization of keys depends onthe point of key vault connectivity failure or user-initiated operations (for example, reboot) and is notidentified by the KV diagnostics report. However if such a failure occurs when diagnostics tests arerun, failures will be identified and indicated.
• Displays any errors returned from the key vault and indicates the possible issue with configurationor setup that needs manual intervention, such as synchronization of keys or reissuing certificates.
• In a situation whereby a key cannot be created on the vault, (for example, an error message shows"key exists," "not enough permissions," or "key creation failure"), verifies the failure and providesadditional information. The information shown will vary based on the key vault type.
Measuring encryption performance
With the introduction of Fabric OS v7.1.0, you can monitor the throughput of redirected I/O flowthrough an encryption engine (EE). In support of this functionality, the cryptocfg --perfShowcommand is used.
The cryptocfg --perfShow command displays the throughput performance between the external portsand the internal cryptographic processing modules, similar to the way that portPerfShow displaysthroughput performance at the external port. Throughput is measured as Bytes/second.
For example:
FabricAdmin:switch> cryptocfg --perfshow [slot] [-rx | -tx | -tx -rx] [-interval time] Where:
• Slot displays the throughput of redirected I/O flow through the EE in a given slot of the chassis.• -tx displays the transmit throughput of the redirected I/O.• -rx displays the receive throughput of the redirected I/O.• -tx -rx displays the transmit and receive throughputs of the redirected I/O.• Interval represents a numeric value (in seconds) between refreshes.
Note the following:
• The port number mentioned in the output is the user port where virtual entities (virtual initiators andvirtual targets) are hosted.
• For accurate results, ensure that the encryption engines (EEs) are online before executing thecommand. If an EE is offline, throughput results will be shown as 0.
Measuring encryption performance
244 Fabric OS Encryption Administrator's Guide Supporting RSA Data Protection Manager (DPM) Environments53-1003757-01

• Even though virtual entities are hosted in a single port of encryption FPGA, I/Os for those entities willbe sprayed across the ports that belong to the same port group of the hosted port. Each port groupbelonging to the encryption ASIC consists of 4 ports.
• To determine the throughput from or to a single host or target pair, the I/O from or to all other host ortarget pairs should be quiesced. This is similar to measuring throughput of a single device connectedbehind an NPIV port.
Example output to determine the throughput from or to a single host or target pair:
1. Determine the user port index on which the virtual entity is hosted.a) Get the PWWN of the virtual entity (virtual target/virtual Initiator) for which the performance needs
to be monitored by executing the cryptocfg --show -con container_name -stat command.
FabricAdmin:switch> cryptocfg --show -con tape1 -statContainer name: tape1Type: tapeEE node: 10:00:00:05:1e:55:4d:5eEE slot: 0EE hosting container: currentTarget: 50:01:10:a0:00:8d:f6:8a 50:01:10:a0:00:8d:f6:89Target PID: 690a00VT: 20:00:00:05:1e:55:4d:61 20:01:00:05:1e:55:4d:61VT PID: 012001Number of host(s): 1Number of tape session(s): 0Host: 10:00:00:05:1e:c3:2d:9b 20:00:00:05:1e:c3:2d:9bHost PID: 000000VI: 20:02:00:05:1e:55:4d:61 20:03:00:05:1e:55:4d:61VI PID: 012401Number of LUN(s): 1LUN number: 0x0LUN type: tape drive
b) The user port on which a particular virtual entity is hosted can be identified from the Port Index ofthe corresponding name server entry. For example, the port on which virtual target20:00:00:05:1e:55:4d:61 has been hosted can be identified by the following command.
FabricAdmin:switch> nsshow | grep -A 6 20:00:00:05:1e:55:4d:61N 012001; 3;20:00:00:05:1e:55:4d:61;20:01:00:05:1e:55:4d:61; na FC4s: FCP PortSymb: [21] "Crypto Virtual Target" NodeSymb: [54] "Cntr Name: tape1 Tgt Port wwn: 50:01:10:A0:00:8D:F6:8A" Fabric Port Name: 20:20:00:05:1e:55:4d:5e Permanent Port Name: 20:00:00:05:1e:55:4d:61 Port Index: 32 Share Area: No Device Shared in Other AD: No Redirect: Yes virtual Partial: No LSAN: No
c) Similarly, the port on which virtual initiator 20:02:00:05:1e:55:4d:61 is hosted can be identified byfollowing command.
FabricAdmin:switch> nsshow | grep -A 6 20:02:00:05:1e:55:4d:61N 012401; 3;20:02:00:05:1e:55:4d:61;20:03:00:05:1e:55:4d:61; na FC4s: FCP PortSymb: [24] "Crypto Virtual Initiator" NodeSymb: [37] "Ini Port wwn: 10:00:00:05:1E:C3:2D:9B" Fabric Port Name: 20:24:00:05:1e:55:4d:5e Permanent Port Name: 20:02:00:05:1e:55:4d:61 Port Index: 36 Share Area: No Device Shared in Other AD: No Redirect: Yes virtual Partial: No LSAN: No
2. Determine the perfShow output for the Brocade Encryption Switch or blade.a) Execute the cryptocfg --perfShow command to determine the I/O throughput.
FabricAdmin:switch> cryptocfg --perfshow 32 33 34 35 36 37 38 39 40 41 42 43
Maintenance and Troubleshooting
Fabric OS Encryption Administrator's Guide Supporting RSA Data Protection Manager (DPM) Environments 24553-1003757-01

===== ===== ===== ===== ===== ===== ===== ===== ===== ===== ===== ===== 5.4m 5.1m 0 0 0 0 5.4m 47.5m 0 0 0 0 44 45 46 47 48 49 50 51 52 53 54 55 Total ===== ===== ===== ===== ===== ===== ===== ===== ===== ===== ===== ===== 0 0 0 0 0 0 0 0 0 0 0 0 75.6m
In a DCX Backbone, the slot number is also displayed, along with the performance.
dcx:Admin> cryptocfg --perfshow slot2: 80 81 82 83 84 85 86 87 88 89 90 91 ===== ===== ===== ===== ===== ===== ===== ===== ===== ===== ===== ===== 5.4m 5.1m 0 0 0 0 5.4m 47.5m 0 0 0 0 92 93 94 95 96 97 98 99 100 101 102 103 Total ===== ===== ===== ===== ===== ===== ===== ===== ===== ===== ===== ===== 0 0 0 0 0 0 0 0 0 0 0 0 75.6m
3. Even though virtual entities are hosted in a single port of the encryption FPGA, I/Os for thoseentities will be sprayed across the ports belonging to the same port group of the hosted port. Eachport group belonging to the encryption ASIC consists of 4 ports. To calculate the throughput from orto a single host or target pair, please add the performance numbers of the 4 ports together for eachvirtual entity. The sum total of the redirected throughput is shown under "Total" of the cryptocfg --perfShow output.
NOTEFor the Brocade Encryption Switch or FS8-18 blade for which only the first encryption performanceupgrade license is installed, I/O traffic will be sprayed across 4 ports of the port group. OtherwiseI/O traffic will be sprayed across only 2 ports of the port group.
General encryption troubleshootingTable 9 lists the commands you can use to check the health of your encryption setup. Table 10provides additional information for failures you might encounter while configuring switches using theCLI.
General troubleshooting tips using the CLI TABLE 9
Command Activity
supportsave Check whole system configuration.
Run RAS logs.
Run RAS traces.
Run Security Processor (SP) logs (mainly kpd.log ).
configshow Check whole system persistent configuration database dump.
Check for SPM-, CVLM-, and CNM-related persistent database entries.
General encryption troubleshooting
246 Fabric OS Encryption Administrator's Guide Supporting RSA Data Protection Manager (DPM) Environments53-1003757-01

General troubleshooting tips using the CLI (Continued)TABLE 9
Command Activity
cfgshow Check for redirection zones starting with "red_xxx" in defined database for virtual and physical devices.
nsshow Check for crypto virtual target and crypto virtual initiator entries for VT/VI
cryptocfg --show -groupcfg Check key vault connection status.
Check encryption group/cluster status.
NOTECONVERGED status means the cluster is formed successfully.
cryptocfg --show -groupmember-all
1. Check encryption group/cluster member status.
NOTEDISCOVERED state means the member is currently part of a cluster.
2. Check encryption engine/SP and KEK status.
NOTESP state ONLINE means encryption engine is enabled for encryption with valid KEK (Link Key orMaster Key).
General errors and conditionsTABLE 10
Problem Resolution
Connection to a key vault returns a "Not Responding"message.
Determine if the default port has been changed on the key vault.
After you create an encryption group using RKM/DPM, anewly created container's LUN state changes between"Write metadata is pending" and "Write metadata is inprogress" with continuous [RKD-1001] messagesdisplayed on the console.
Power cycle the DCX chassis and then issue the cryptocfg --enableEE [ slot ]command to bring the container's LUN state to Encryption Enabled. If the eth0 IPaddress on the Brocade Encryption Switch or on the FS8-18 port blade has beenmodified, a reboot is required.
LUN state for some LUNS remains in "initialize" state onthe passive path.
This is expected behavior. The LUNs exposed through Passive paths of thetarget array will be in either Initialize or LUN Discovery Complete state so long asthe paths remain in passive condition. When the passive path becomes active,the LUN changes to Encryption Enabled. Use the cryptocfg --show -LUNcommand with the -stat option to check the LUN state.
Maintenance and Troubleshooting
Fabric OS Encryption Administrator's Guide Supporting RSA Data Protection Manager (DPM) Environments 24753-1003757-01

General errors and conditions (Continued)TABLE 10
Problem Resolution
A backup fails because the LUN is always in the initializestate for the tape container.
Tape media is encrypted and gets a key which isarchived in the key vault. The key is encrypted with amaster key. At a later point in time you generate a newmaster key. You decide to use this tape media to backup other data. You rewind the tape, erase the tape,relabel the tape, and start a backup from the start of thetape. When the first command comes from the host, thekey vault is queried for the tape media based on themedia serial number. Since this tape media was usedpreviously, the key is already present in the key vault forthis media serial number but this key is encrypted withthe old master key and that master key is not present inthe switch. You cannot create a new key for this tapemedia because, per policy, there can be only one key permedia.
Use one of two resolutions:
• Load the old master key on the switch at an alternate location. The key for thetape media can then be decrypted.
• Delete the key for the tape media from the key vault. This forces the switch tocreate a new key for the tape media.
Until you start the backup, the LUN remains in "initialize" state.
"Invalid certificate" error message received when doing aKAC certificate exchange between the BrocadeEncryption Switch and a key management systemappliance. This error is due to the Brocade EncryptionSwitch time being ahead of the appliance time.
Use one of two resolutions:
• Change the appliance time to match the start period of the KAC certificate.• Change the Brocade Encryption Switch time to synchronize with the appliance
time.
Upon completion, regenerate the KAC certificate and then do another KACcertificate exchange with the appliance.
"Temporarily out of resources" message received duringrekey or first time encryption.
Rekey or first-time encryption sessions are pending due to resourceunavailability. A maximum of 10 sessions including rekey (manual or auto) andfirst time encryption sessions are supported per encryption switch or blade andtwo sessions per target. The system checks once every hour to determine, ifthere are any rekey or first time encryption sessions pending. If resources areavailable, the next session in the queue is processed. There may be up to anhour lag before the next session in the queue is processed. It is thereforerecommended that you do not schedule more than 12 rekey or first timeencryption sessions.
HA cluster creation fails with error, Create HA clusterstatus: The IO link IP address of the encryption engine(online) is not configured, even though both theaddresses are set and accessible.
The IP addresses for the I/O link ports should be configured before enabling theencryption engine. Failure to do so results in unsuccessful HA Cluster creation. Ifthe IP addresses for these ports were configured after the encryption engine isenabled, reboot the encryption switch or slotpoweroff/slotpoweron the encryptionblade to sync up the IP address information to the encryption engine.
Rekeying fails with error "Disabled (Key not in sync)". Rekeying was started on a remote encryption engine but the local encryptionengine is not capable of starting rekey because the key returned from key vaultdoes not match with the Key ID used by remote encryption engine. You will needto re-enable the LUN after the keys are synced between two key vaults properlyusing the needs to cryptocfg --discoverLUN command.
cryptocfg --commit fails with message "Default zoneset to all access at one of nodes in EG."
Default zoning must be set to no access.
Maintenance and Troubleshooting
248 Fabric OS Encryption Administrator's Guide Supporting RSA Data Protection Manager (DPM) Environments53-1003757-01

General errors and conditions (Continued)TABLE 10
Problem Resolution
Decommissioning an R2 LUN (remote replication LUN)fails with a "Decommission LUN failed because of failurein over-writing metadata" error message.
Check the R2 LUN (remote replication LUN) state. If it is in "Disabled DataDecommissioning Failed" state, it indicates that the partner R1 (local) LUN wasdecommissioned with the R1 and R2 LUNs in sync.
To decommission the R2 LUN, take the following steps:
1. Split the mirror relationship so each LUN can be independentlydecommissioned.
2. Write enable the LUN.3. Decommission the LUN.
When a Brocade 7600 application platform is in the datapath, I/O errors may be encountered before reaching thescalability limit of 512 LUNs with 16 outstanding I/Os.
There is no workaround other than reconfiguring so that the 7600 and theencryption switch/blade are not in the same data path.
A performance drop occurs when using DPM on aMicrosoft Windows system to back up to a Scalar 500itape library.
Change the DPM behavior to send one request at a time by adding DWORD"BufferQueueSize" under HKEY_LOCAL_MACHINE\SOFTWARE\Microsoft\Microsoft Data Protection Manager\Agent, and set the value to 1.
Then restart DPM servers: MSDPM, DPMLA, DPMRA.
Continuous "Unrecoverable data decompression failure"error messages are observed on the console on writedisabled SRDF remote LUNs following a High AvailabilityCluster failback.
This is an expected behavior, and you may ignore the messages.
If any risk of data corruption is detected, the LUN is disabled, and you areinformed and prompted to refresh the Data Encryption Key (DEK).
When attempting to add a LUN to a container, the errormessage "Commit failed (db propagation)." is returned.
If you are using Fabric OS version 6.3.x, you may be attempting to add a LUNafter you have reached the limit of 512 LUNs per initiator in a container.Beginning with Fabric OS version 6.4.0, you will receive an error message thatinforms you that the maximum limit has been reached.
In an HA cluster after failover, when using the cryptocfg--show -hacluster -all command, the failover statusdisplays on one cluster member, but does not display onthe other cluster member.
In this particular case, the correct status is displayed when group leader node isqueried. If the other node is queried, the status not consistent with the actual HAstatus. To be sure of the correct status issue the cryptocfg --show -hacluster -all command on the group leader node.
You might observe continuous "unrecoverable datadecompression failure" (CFLC-1017) messages onMirror LUNs (R2) when they are WriteDisabled duringHA Cluster failback.
If you have not performed refreshDEK/port toggle/LUNdiscovery after the R2 LUN is established from the R1LUN, host I/Os will result in corruption. I/Os to themetadata region of the R2 LUN will result as"Unrecoverable data decompression failure" RASLOGs.
If you want to write to it, first set the LUNs to RW_enable, then do a discover LUNor refreshDEK, or toggle the target port.
Be sure to follow the correct procedures to make the R2 LUN available to thehost after it is established from the R1.
Troubleshooting example: encryption enabled CryptoTarget LUNThe LUN state should be Encryption enabled for the host to see the Crypto LUN.
switch:FabricAdmin> cryptocfg --show -LUN disk_container1 0 21:01:00:e0:8b:a9:ac:d2 -statContainer name: disk_container1Type: disk
Troubleshooting example: encryption enabled CryptoTarget LUN
Fabric OS Encryption Administrator's Guide Supporting RSA Data Protection Manager (DPM) Environments 24953-1003757-01

EE node: 10:00:00:05:1e:41:9a:88EE slot: 0Target: 50:06:01:60:10:60:06:3a 50:06:01:60:90:60:06:3aTarget PID: 030700VT: 20:00:00:05:1e:41:4d:79 20:01:00:05:1e:41:4d:79VT PID: 012401Host: 21:01:00:e0:8b:a9:ac:d2 20:01:00:e0:8b:a9:ac:d2Host PID: 030300VI: 20:02:-00:05:1e:41:4d:79 20:03:00:05:1e:41:4d:79VI PID: 012402LUN number: 0x0LUN type: diskLUN serial number: 600601604F0B0900847C800FCE0FDD1100000000000000000000E000000000000Encryption mode: encryptEncryption format: nativeEncrypt existing disableddata:Rekey: disabledLUN state: Encryption enabledEncryption AES256-XTSalgorithm:Key ID state: Read writeKey ID: c5:b7:d3:04:53:4b:f8:19:7d:46:87:a7:04:42:68:88Key creation time: Thu Jun 26 19:28:27 2014Operation succeeded
Troubleshooting example: encryption disabled CryptoTarget LUNIf the LUN state is Encryption Disabled the host will not be able to access the Crypto LUN.
switch:FabricAdmin> cryptocfg --show -LUN disk_container1 0 21:01:00:e0:8b:a9:ac:d2 -statContainer name: disk_container1Type: diskEE node: 10:00:00:05:1e:43:fe:00EE slot: 4Target: 50:06:01:61:10:60:06:3a 50:06:01:60:90:60:06:3aTarget PID: 890c00VT: 20:04:00:05:1e:41:4d:79 20:05:00:05:1e:41:4d:79VT PID: 01b201Host: 21:00:00:e0:8b:89:ac:d2 20:00:00:e0:8b:a9:ac:d2Host PID: 890800
Troubleshooting example: encryption disabled CryptoTarget LUN
250 Fabric OS Encryption Administrator's Guide Supporting RSA Data Protection Manager (DPM) Environments53-1003757-01
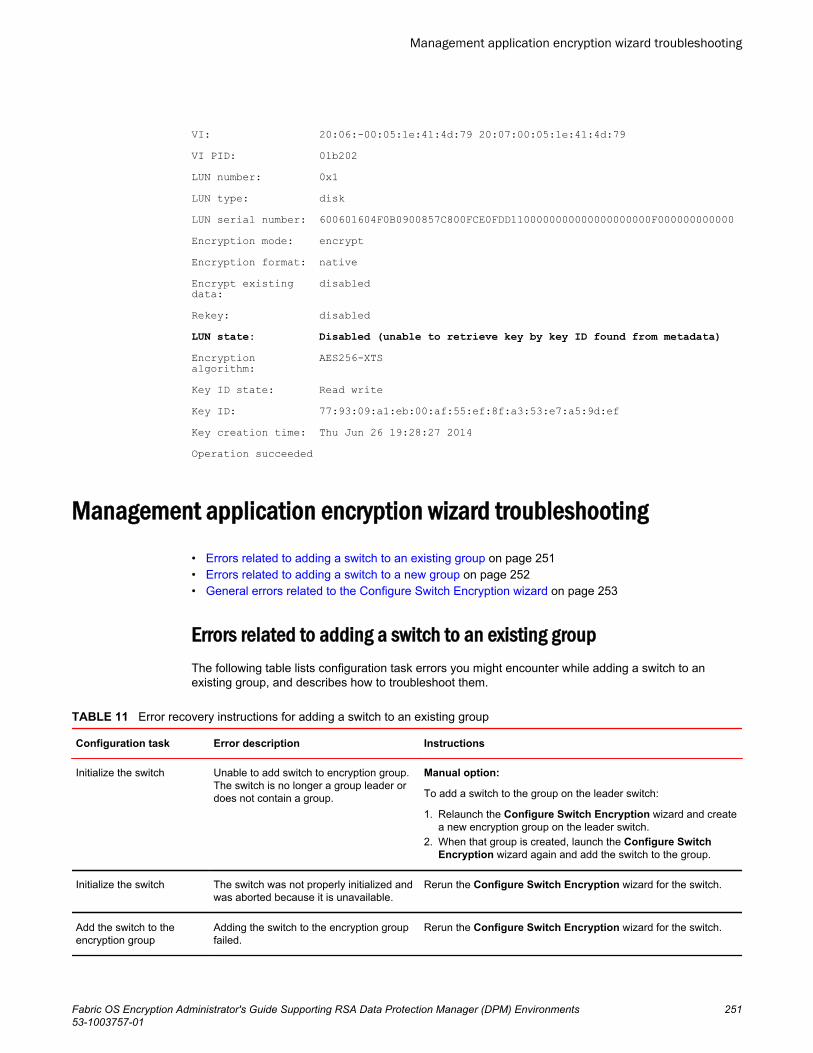
VI: 20:06:-00:05:1e:41:4d:79 20:07:00:05:1e:41:4d:79VI PID: 01b202LUN number: 0x1LUN type: diskLUN serial number: 600601604F0B0900857C800FCE0FDD1100000000000000000000F000000000000Encryption mode: encryptEncryption format: nativeEncrypt existing disableddata:Rekey: disabledLUN state: Disabled (unable to retrieve key by key ID found from metadata)Encryption AES256-XTSalgorithm:Key ID state: Read writeKey ID: 77:93:09:a1:eb:00:af:55:ef:8f:a3:53:e7:a5:9d:efKey creation time: Thu Jun 26 19:28:27 2014Operation succeeded
Management application encryption wizard troubleshooting• Errors related to adding a switch to an existing group on page 251• Errors related to adding a switch to a new group on page 252• General errors related to the Configure Switch Encryption wizard on page 253
Errors related to adding a switch to an existing groupThe following table lists configuration task errors you might encounter while adding a switch to anexisting group, and describes how to troubleshoot them.
Error recovery instructions for adding a switch to an existing group TABLE 11
Configuration task Error description Instructions
Initialize the switch Unable to add switch to encryption group.The switch is no longer a group leader ordoes not contain a group.
Manual option:
To add a switch to the group on the leader switch:
1. Relaunch the Configure Switch Encryption wizard and createa new encryption group on the leader switch.
2. When that group is created, launch the Configure SwitchEncryption wizard again and add the switch to the group.
Initialize the switch The switch was not properly initialized andwas aborted because it is unavailable.
Rerun the Configure Switch Encryption wizard for the switch.
Add the switch to theencryption group
Adding the switch to the encryption groupfailed.
Rerun the Configure Switch Encryption wizard for the switch.
Management application encryption wizard troubleshooting
Fabric OS Encryption Administrator's Guide Supporting RSA Data Protection Manager (DPM) Environments 25153-1003757-01

Error recovery instructions for adding a switch to an existing group (Continued)TABLE 11
Configuration task Error description Instructions
Enable the encryptionengines
A failure occurred while attempting toenable encryption engines on the switch.
1. Remove the switch from the group using the Group Memberstab on the Encryption Group Properties dialog box.
2. Rerun the Configure Switch Encryption wizard for the switch.
Manual Option:
1. Save the switch’s public key certificate to a file using theSwitch Encryption Properties dialog box.
2. Follow the Key Vault instructions for RSA/Decru/Other keyvault.
Save the switch’s publickey certificate to a file.
The switch’s public key certificate couldnot be saved to a file.
NOTEVerify that the path name and the filename that you are using are both valid andthat you have write permissions for the file.
1. Remove the switch from the group using the Group Memberstab on the Encryption Group Properties dialog box.
2. Rerun the Configure Switch Encryption wizard for the switch.
Manual Option:
1. Save the switch’s public key certificate to a file using theSwitch Encryption Properties dialog box.
2. Follow the Key Vault instructions.
Errors related to adding a switch to a new groupThe following table lists configuration task errors you might encounter while adding a switch to a newgroup, and describes how to troubleshoot them.
Error recovery instructions for adding a switch to a new group TABLE 12
Configuration task Error description Instructions
Initialize the switch Unable to initialize the switch due toan error response from the switch.
Diagnose the problem using standard switch CLI commands.
The switch was not properly initializedand was aborted because it isunavailable.
Rerun the Configure Switch Encryption wizard for the switch.
Create encryption groupon the switch
A failure occurred while attempting tocreate a new encryption group on theswitch.
1. Click the Refresh button on the Configure Switch Encryptiondialog box to synchronize the data and the database.
2. Rerun the Configure Switch Encryption wizard for the switch.
Register one or more keyvaults
A failure occurred while attempting toregister one or more key vaults for agroup on the switch.
1. Remove the switch from the group using the Group Members tabon the Encryption Group Properties dialog box.
2. Rerun the Configure Switch Encryption wizard for the switch.
Manual Option:
1. Launch the Encryption Group Properties dialog box and click theGeneral tab.
2. From the General dialog box, click Load from File to install keyvault certificates, and then click OK to save the information on tothe switch.
3. Follow the Key Vault instructions.
Errors related to adding a switch to a new group
252 Fabric OS Encryption Administrator's Guide Supporting RSA Data Protection Manager (DPM) Environments53-1003757-01
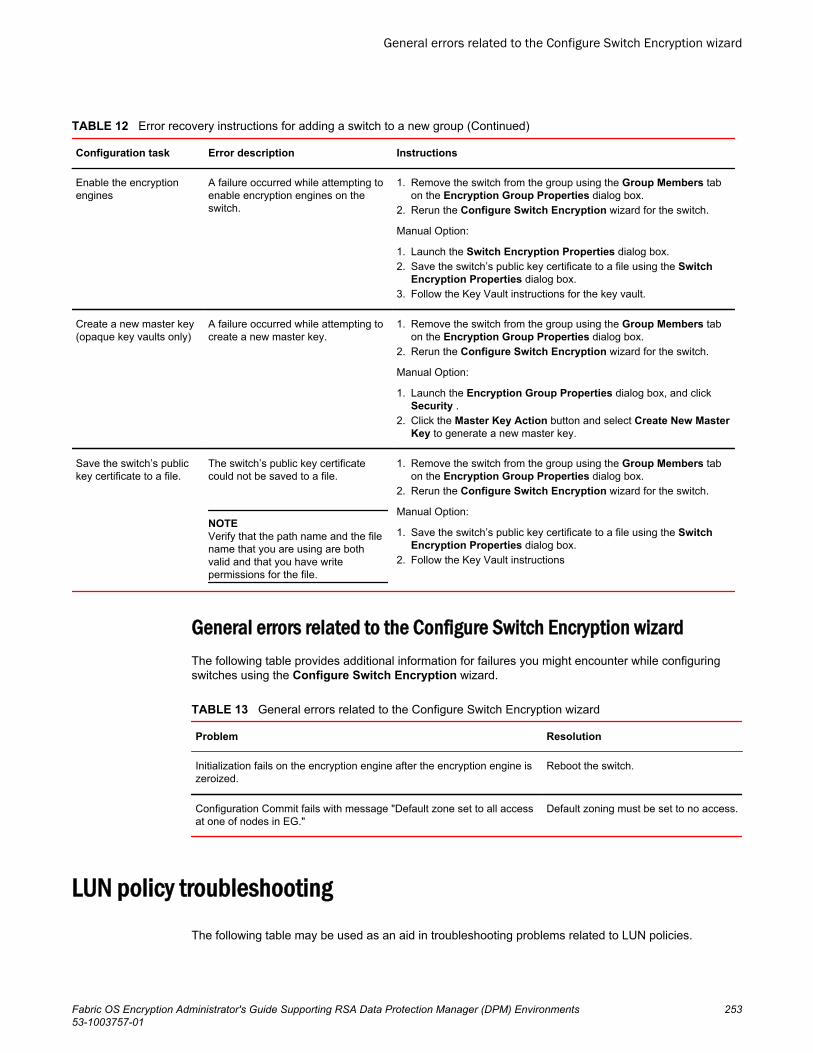
Error recovery instructions for adding a switch to a new group (Continued)TABLE 12
Configuration task Error description Instructions
Enable the encryptionengines
A failure occurred while attempting toenable encryption engines on theswitch.
1. Remove the switch from the group using the Group Members tabon the Encryption Group Properties dialog box.
2. Rerun the Configure Switch Encryption wizard for the switch.
Manual Option:
1. Launch the Switch Encryption Properties dialog box.2. Save the switch’s public key certificate to a file using the Switch
Encryption Properties dialog box.3. Follow the Key Vault instructions for the key vault.
Create a new master key(opaque key vaults only)
A failure occurred while attempting tocreate a new master key.
1. Remove the switch from the group using the Group Members tabon the Encryption Group Properties dialog box.
2. Rerun the Configure Switch Encryption wizard for the switch.
Manual Option:
1. Launch the Encryption Group Properties dialog box, and clickSecurity .
2. Click the Master Key Action button and select Create New MasterKey to generate a new master key.
Save the switch’s publickey certificate to a file.
The switch’s public key certificatecould not be saved to a file.
NOTEVerify that the path name and the filename that you are using are bothvalid and that you have writepermissions for the file.
1. Remove the switch from the group using the Group Members tabon the Encryption Group Properties dialog box.
2. Rerun the Configure Switch Encryption wizard for the switch.
Manual Option:
1. Save the switch’s public key certificate to a file using the SwitchEncryption Properties dialog box.
2. Follow the Key Vault instructions
General errors related to the Configure Switch Encryption wizardThe following table provides additional information for failures you might encounter while configuringswitches using the Configure Switch Encryption wizard.
General errors related to the Configure Switch Encryption wizardTABLE 13
Problem Resolution
Initialization fails on the encryption engine after the encryption engine iszeroized.
Reboot the switch.
Configuration Commit fails with message "Default zone set to all accessat one of nodes in EG."
Default zoning must be set to no access.
LUN policy troubleshootingThe following table may be used as an aid in troubleshooting problems related to LUN policies.
General errors related to the Configure Switch Encryption wizard
Fabric OS Encryption Administrator's Guide Supporting RSA Data Protection Manager (DPM) Environments 25353-1003757-01
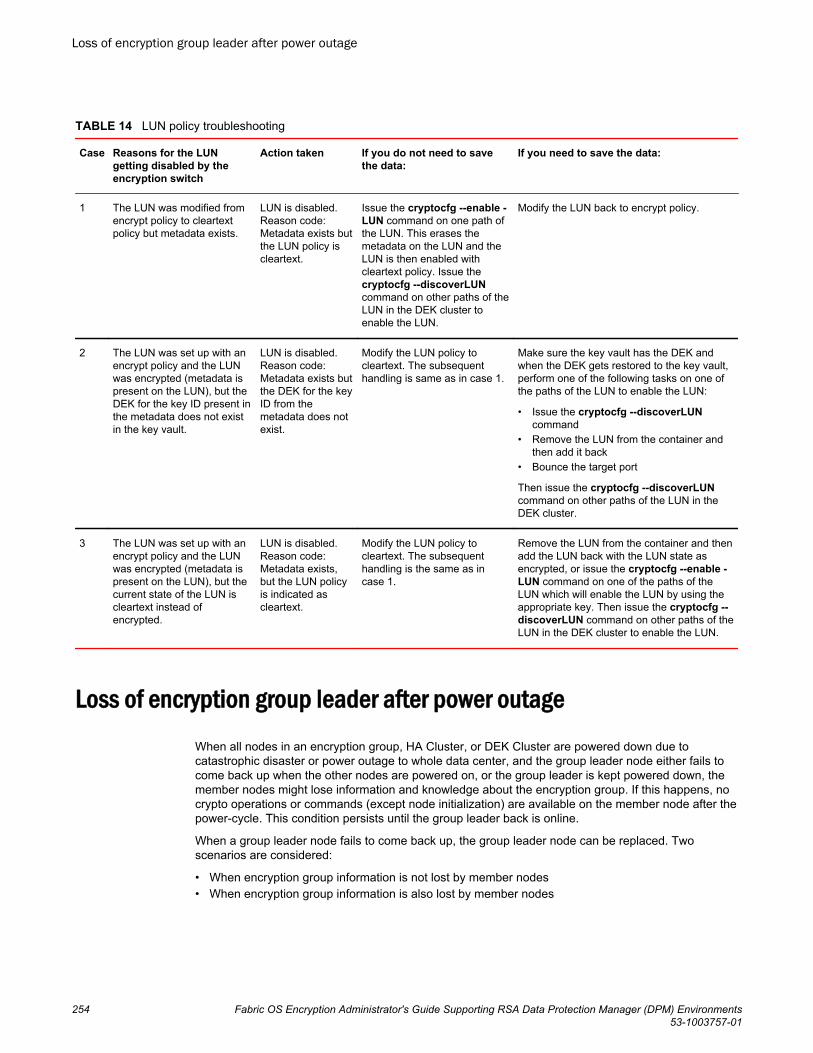
LUN policy troubleshootingTABLE 14
Case Reasons for the LUNgetting disabled by theencryption switch
Action taken If you do not need to savethe data:
If you need to save the data:
1 The LUN was modified fromencrypt policy to cleartextpolicy but metadata exists.
LUN is disabled.Reason code:Metadata exists butthe LUN policy iscleartext.
Issue the cryptocfg --enable -LUN command on one path ofthe LUN. This erases themetadata on the LUN and theLUN is then enabled withcleartext policy. Issue thecryptocfg --discoverLUNcommand on other paths of theLUN in the DEK cluster toenable the LUN.
Modify the LUN back to encrypt policy.
2 The LUN was set up with anencrypt policy and the LUNwas encrypted (metadata ispresent on the LUN), but theDEK for the key ID present inthe metadata does not existin the key vault.
LUN is disabled.Reason code:Metadata exists butthe DEK for the keyID from themetadata does notexist.
Modify the LUN policy tocleartext. The subsequenthandling is same as in case 1.
Make sure the key vault has the DEK andwhen the DEK gets restored to the key vault,perform one of the following tasks on one ofthe paths of the LUN to enable the LUN:
• Issue the cryptocfg --discoverLUNcommand
• Remove the LUN from the container andthen add it back
• Bounce the target port
Then issue the cryptocfg --discoverLUNcommand on other paths of the LUN in theDEK cluster.
3 The LUN was set up with anencrypt policy and the LUNwas encrypted (metadata ispresent on the LUN), but thecurrent state of the LUN iscleartext instead ofencrypted.
LUN is disabled.Reason code:Metadata exists,but the LUN policyis indicated ascleartext.
Modify the LUN policy tocleartext. The subsequenthandling is the same as incase 1.
Remove the LUN from the container and thenadd the LUN back with the LUN state asencrypted, or issue the cryptocfg --enable -LUN command on one of the paths of theLUN which will enable the LUN by using theappropriate key. Then issue the cryptocfg --discoverLUN command on other paths of theLUN in the DEK cluster to enable the LUN.
Loss of encryption group leader after power outageWhen all nodes in an encryption group, HA Cluster, or DEK Cluster are powered down due tocatastrophic disaster or power outage to whole data center, and the group leader node either fails tocome back up when the other nodes are powered on, or the group leader is kept powered down, themember nodes might lose information and knowledge about the encryption group. If this happens, nocrypto operations or commands (except node initialization) are available on the member node after thepower-cycle. This condition persists until the group leader back is online.
When a group leader node fails to come back up, the group leader node can be replaced. Twoscenarios are considered:
• When encryption group information is not lost by member nodes• When encryption group information is also lost by member nodes
Loss of encryption group leader after power outage
254 Fabric OS Encryption Administrator's Guide Supporting RSA Data Protection Manager (DPM) Environments53-1003757-01

Replacing failed group leader when group information is not lostUse the following procedure when encryption group information is not lost by the member nodes andone of the member nodes has taken the role of group leader:
1. From the new group leader node, deregister the old group leader node (which has failed) from theencryption group.
FabricAdmin:switch> cryptocfg --dereg -membernode <failed GLswitchWWN>2. Reclaim the WWN base of the failed Brocade Encryption Switch.
FabricAdmin:switch> cryptocfg --reclaimWWN -membernode <failed GLswitchWWN>3. Synchronize the crypto configurations across all member nodes.
FabricAdmin:switch> cryptocfg --commit
NOTEWhen attempting to reclaim a failed Brocade Encryption Switch, do not execute cryptocfg --transabort . Doing so will cause subsequent reclaim attempts to fail.
4. For any containers hosted on the failed group leader node, issue the cryptocfg --replace commandto change the WWN association of containers from the failed group leader node to the new groupleader node (or any other member node in the encryption group) for all containers on the encryptionengine.
5. Synchronize the crypto configurations across all member nodes.
FabricAdmin:switch> cryptocfg --commit
Replacing failed group leader when group information is lostUse the following procedure to replace the failed group leader node with a new node when encryptiongroup information is lost by member nodes.
1. On the new node, perform the switch/node initialization steps as described in Configuring EncryptionUsing the CLI on page 117.
2. Create an encryption group on the new node with the same encryption group name as before.3. Use the configDownload command to download previously uploaded group leader node and
encryption group configuration files to the new node.4. For any containers hosted on the failed group leader node, issue the cryptocfg --replace command
to change the WWN association of containers from failed group leader node to the new group leadernode for all containers on the encryption engine.
5. Synchronize the crypto configurations across all member nodes.
FabricAdmin:switch> cryptocfg --commit
MPIO and internal LUN statesThe Internal LUN State field displayed within the cryptocfg --show -LUN command output does notindicate the host-to-storage path status for the displayed LUN, but rather the internal LUN state asknown by the given encryption engine. Due to the transparent and embedded nature of this encryptionsolution, the host-to-storage array LUN path status can only be displayed by using host MPIO software.
For example, assume there are two paths from a host through two encryption switches to a LUNconfigured within an active/passive storage array. If the LUN is trespassed, and the active and passive
Replacing failed group leader when group information is not lost
Fabric OS Encryption Administrator's Guide Supporting RSA Data Protection Manager (DPM) Environments 25553-1003757-01

paths to the LUN are swapped, the host MPIO software will continue to indicate that only one path isactive to the LUN, but the Brocade Encryption Switch internal LUN states for both paths will now likelybe displayed as Encryption Enabled.
In active/passive storage array environments, for troubleshooting purposes, you may want to updatethe encryption engine Internal LUN States to match those of their host MPIO path states. You can dothis by running the cryptocfg --discoverLUN command for the encryption engines that own paths tothe LUN in question. This command forces a LUN discovery, causing the encryption engine's InternalLUN State to be updated.
Suspension and resumption of rekeying operationsA rekey may be suspended or fail to start for several reasons:
• The LUN goes offline or the encryption switch fails and reboots. Rekey operations are resumedautomatically when the target comes back online or the switch comes back up. You cannot abort anin-progress rekey operation.
• An unrecoverable error is encountered on the LUN and the in-progress rekey operation halts. Thefollowing LUN errors are considered unrecoverable:
SenseKey: 0x3 - Medium Error.SenseKey: 0x4 - Hardware Error.SenseKey: 0x7 - Data Protect.
• An unrecoverable error is encountered during the rekey initialization phase. The rekey operationdoes not begin and a CRITICAL error is logged. All host I/O comes to a halt. All cluster membersare notified.
• For any unrecoverable errors that may occur during any other phase of the process, the rekeyoperation is suspended at that point and a CRITICAL error is logged. All cluster members arenotified. Host I/O to all regions of the LUN is halted. Only READ operations are supported for thescratch space region of the LUN used for storing the status block of the rekey operation.
Once all errors have been corrected you have two recovery options:
• Resume the suspended rekey session. All DEK cluster or HA cluster members must be online andreachable for this command to succeed. If successful, this command resumes the rekey sessionsfrom the point where it was interrupted.
1. Enter the cryptocfg --resume_rekey command, followed by the CryptoTarget container name,the LUN number and the initiator PWWN.
FabricAdmin:switch> cryptocfg --resume_rekey my_disk_tgt 0x0 \10:00:00:05:1e:53:37:99Operation Succeeded
2. Check the status of the resumed rekey session.
FabricAdmin:switch> cryptocfg --show -rekey -all• Read all data off the LUN and write it to another LUN. In this case, you can cancel the rekey
session by removing the LUN from its container and force committing the transaction.
Stop all traffic I/O from the initiators accessing the LUN before removing the LUN to avoid I/O failurebetween the initiators and the LUN. If the LUN is exposed to more than one initiator under differentLUN Numbers, remove all exposed LUN Numbers. When there are multiple paths to a LUN, youmust remove the LUNs from all exposed CryptoTarget containers before you commit thetransaction. Failure to do so may result in a potentially catastrophic situation where one path endsup being exposed through the encryption switch and another path has direct access to the devicefrom a host outside the protected realm of the encryption platform.
1. Enter the cryptocfg --remove -LUN command followed by the CryptoTarget container name, theLUN Number, and the initiator PWWN.
FabricAdmin:switch> cryptocfg --remove -LUN my_disk_tgt 0x0
Suspension and resumption of rekeying operations
256 Fabric OS Encryption Administrator's Guide Supporting RSA Data Protection Manager (DPM) Environments53-1003757-01

10:00:00:00:c9:2b:c9:3aOperation Succeeded
2. Commit the configuration with the -force option to completely remove the LUN and all associatedconfiguration data in the configuration database. The data remains on the removed LUN in anencrypted state.
FabricAdmin:switch> cryptocfg --commit -forceOperation Succeeded
FS8-18 blade removal and replacementThe following procedures identify steps for removing and replacing an FS8-18 blade in a DCXBackbone chassis. The procedures assume that the replacement blade is being inserted in the sameslot as the old blade that was removed.
• For a multi-node replacement, refer to Multi-node EG replacement of FS8-18 blade on page 257.• For a single-node replacement, refer to Single-node EG replacement of FS8-18 blade on page 258.
Multi-node EG replacement of FS8-18 blade1. Power off the FS8-18 blade. Remove the I/O links and FC cables from the blade, noting where each
was attached so the replacement blade can be cabled properly.2. Log in as Admin or FabricAdmin.3. If the replaced FS8-18 blade is in member node, invoke the following command to reclaim the base
WWN.
FabricAdmin:switch> cryptocfg --reclaimWWN -EE <failed EE WWN> <slot number>4. Issue commit.
FabricAdmin:switch> cryptocfg --commit5. Replace the old FS8-18 blade with the new FS8-18 blade and reconnect the FC cables and I/O Link
cables.6. Insert the new FS8-18 blade in the same slot of the chassis that was used by the old FS8-18 blade.
Reconnect the I/O sync ports to the same private LAN as the I/O sync ports of the old blade, andconfirm that the IP address of the I/O sync ports (Ge0 and Ge1) is same as the previous IP address.
7. Zeroize the new encryption engine (EE) using the following command:
FabricAdmin:switch> cryptocfg --zeroizeEE [slotnumber]8. Invoke slotPowerOff and slotPowerOn commands.
FabricAdmin:switch> slotpoweroff [slotnumber]FabricAdmin:switch> slotpoweron [slotnumber]
9. If the encryption group (EG) has a system card authentication enabled, you need to reregister thesystem card through the Brocade Network Advisor client for the new EE.
10.Initialize the new EE using the following command:
FabricAdmin:switch> cryptocfg --initEE [slotnumber]11.Register the new EE using the following command:
FabricAdmin:switch> cryptocfg --regEE [slotnumber]12.Enable the new EE using the following command:
FabricAdmin:switch> cryptocfg --enableEE [slotnumber]
FS8-18 blade removal and replacement
Fabric OS Encryption Administrator's Guide Supporting RSA Data Protection Manager (DPM) Environments 25753-1003757-01

13.Verify the new FS8-18 blade EE has the same master key as the other EEs in the EG using thefollowing command:
FabricAdmin:switch> cryptocfg --show -groupmember -all14.If a master key is not present, restore the master key from a backed up copy. Procedures will differ
depending on the backup media used (for example, recovery smart cards, from the key vault, froma file on the network, or a file on a USB-attached device).
15.Check the EE state using the following command to ensure that the EE is online.
FabricAdmin:switch> cryptocfg --show -localEE
NOTEBecause the FS8-18 blade was inserted in the same slot as the previous blade, no change of HAcluster container ownership is required; the HA cluster configuration is retained.
16.If "manual" failback was set on the HA cluster, you must manually fail back the LUNs owned by thenewly replaced EE.
17.Check the EG state using the following command to ensure that the entire EG is in a converged andIn Sync state.
FabricAdmin:switch> cryptocfg --show -groupcfg
Single-node EG replacement of FS8-18 bladeThe following procedure applies to single or multiple FS8-18 blades.
1. Power off the FS8-18 blade. Remove the I/O Link and FC cables from the blade, noting where eachwas attached so the replacement blade can be cabled properly.
2. Replace the old FS8-18 blade with the new FS8-18 blade and reconnect the FC cables and I/O Linkcables.
3. Insert the new FS8-18 blade in the same slot of the chassis that was used by the old FS8-18 blade.Reconnect the I/O sync ports to the same private LAN as the I/O sync ports of the old blade, andconfirm that the IP address of the I/O sync ports (Ge0 and Ge1) is same as the previous IPaddress.
4. Log in as Admin or FabricAdmin on the replacement node.5. Zeroize the new encryption engine (EE) using the following command:
FabricAdmin:switch> cryptocfg --zeroizeEE [slotnumber]6. If the encryption group (EG) has a system card authentication enabled, you need to reregister the
system card through the Brocade Network Advisor client for the new EE.7. Initialize the new EE using the following command:
FabricAdmin:switch> cryptocfg --initEE [slotnumber]8. Register the new EE using the following command:
FabricAdmin:switch> cryptocfg --regEE [slotnumber]9. Enable the new EE using the following command:
FabricAdmin:switch> cryptocfg --enableEE [slotnumber]10.Verify the new FS8-18 blade EE has the same master key as the other EEs in the EG using the
following command:
FabricAdmin:switch> cryptocfg --show -groupmember -all11.If a master key is not present, restore the master key from a backed up copy. Procedures will differ
depending on the backup media used (for example, recovery smart cards, from the key vault, froma file on the network, or a file on a USB-attached device).
Single-node EG replacement of FS8-18 blade
258 Fabric OS Encryption Administrator's Guide Supporting RSA Data Protection Manager (DPM) Environments53-1003757-01

12.Check the EE state using the following command to ensure the EE is online.
FabricAdmin:switch> cryptocfg --show -localEE
NOTEBecause the FS8-18 blade was inserted in the same slot as the previous blade, no change of HAcluster container ownership is required; the HA cluster configuration is retained.
13.If "manual" failback was set on the HA cluster, you must manually fail back the LUNs owned by thenewly replaced EE.
Brocade Encryption Switch removal and replacementThe following procedures identify steps for removing and replacing a Brocade Encryption Switch.
• For a multi-node replacement, refer to Multi-node EG replacement of Brocade Encryption Switch onpage 259.
• For a single-node replacement, refer to Single-node EG replacement of Brocade Encryption Switchon page 261.
Multi-node EG replacement of Brocade Encryption Switch1. If possible, upload the configuration from the group leader node using the Fabric OS configUpload
command.2. Power off the Brocade Encryption Switch. Remove the Mgmt Link, I/O links, and FC cables from the
Brocade Encryption Switch, noting where each was attached so that the replacement BrocadeEncryption Switch can be cabled properly.
3. From the group leader node, invoke the following command to deregister the old Brocade EncryptionSwitch.
Admin:switch> cryptocfg --dereg -membernode <WWN of old Brocade Encryption Switch>
WARNINGDo not use Brocade Network Advisor to deregister a member node. Use the CLI only. Otherwise youwill remove containers belonging to the member node, which will need to be recreated after thereplacement is done.
4. From the group leader node, invoke the following command to reclaim the WWN base from the oldBrocade Encryption Switch.
Admin:switch> cryptocfg --reclaim -membernode <WWN of old Brocade Encryption Switch>
5. Issue commit.
Admin:switch> cryptocfg --commit6. Replace the old Brocade Encryption Switch with the new Brocade Encryption Switch and reconnect
the Mgmt link, I/O links, and FC cables.7. Reconnect the I/O sync ports to the same private LAN as the I/O sync ports of the failed node.8. Power on the new Brocade Encryption Switch. Note that the FC cables have not yet been plugged in.9. Set the IP address for the new Brocade Encryption Switch using the ipAddrSet command for the
Mgmt and I/O links. Check that the switch name and domain ID associated with the replacementswitch match that of the original.
Brocade Encryption Switch removal and replacement
Fabric OS Encryption Administrator's Guide Supporting RSA Data Protection Manager (DPM) Environments 25953-1003757-01

10.If the encryption group (EG) has a system card authentication enabled, you need to reregister thesystem card through the BNA client for the new EE.
11.Initialize the new Brocade Encryption Switch node using following command.
Admin:switch> cryptocfg --initnode12.Zeroize the new Brocade Encryption Switch using the following command.
Admin:switch> cryptocfg --zeroizeEE13.Initialize the new EE using the following command.
Admin:switch> cryptocfg --initEE14.Register the new EE using the following command.
Admin:switch> cryptocfg --regEE15.Enable the new EE using the following command.
Admin:switch> cryptocfg --enableEE16.Invoke the following command to clean up the WWN base on the new Brocade Encryption Switch if
it was used earlier.
Admin:switch> cryptocfg --reclaim -cleanup17.From the new Brocade Encryption Switch node, invoke the following command to export the CP
certificate of the new Brocade Encryption Switch.
Admin:switch> cryptocfg --export -scp -CPcert <host IP> <host user> <host file path>
18.From the group leader node, invoke the following command to import the new Brocade EncryptionSwitch node certificate on the group leader node.
Admin:switch> cryptocfg --import -scp <Certificate file name> <host IP> <host user> <host file path>
19.From the group leader node, run the following command to register the new Brocade EncryptionSwitch node as a member node on the group leader.
Admin:switch> cryptocfg --reg -membernode <New BES WWN> <Cert file Name> <Old IP address>
20.Export the KAC CSR from the new node and sign the CSR from the CA that signed the failed nodeCSR.
21.Import the signed CSR/Cert onto the new node.22.Register back the signed KAC CSR/Cert onto the new node using the following command.
Admin:switch> cryptocfg --reg -KACcert23.Remove the existing identity of the failed node from the DPM appliance.24.Create an identity for the new node, and upload the new node KAC certificate to the DPM
appliance.25.Check the EE state using the following command to ensure that the EE is online.
Admin:switch> cryptocfg --show -localEE26.From the new Brocade Encryption Switch, invoke the following command to set the default zone as
allAccess so the configuration from the existing Fabric is pushed to the new Brocade EncryptionSwitch.
Admin:switch> defzone -allaccess27.Invoke the following command on the new Brocade Encryption Switch.
Admin:switch> cfgsave28.Replace the FC Cables to the new Brocade Encryption Switch.29.Invoke the cfgSave command on any switch in that fabric. The fabric configuration from the existing
fabric will be merged into the new Brocade Encryption Switch.30.Verify that defZone is set as no access.
Maintenance and Troubleshooting
260 Fabric OS Encryption Administrator's Guide Supporting RSA Data Protection Manager (DPM) Environments53-1003757-01

31.If HA cluster membership for the old Brocade Encryption Switch was in place, move containermovement to the new Brocade Encryption Switch using the following procedure.a) Replace the old EE with the new EE using the following command on the group leader.
Admin:switch> cryptocfg --replace <WWN of Old BES> <WWN of new BES> b) Issue commit.
Admin:switch> cryptocfg --commitc) Replace the HA cluster membership from the old EE to the new EE using the following command
on the group leader.
Admin:switch> cryptocfg --replace -haclustermember <HA cluster name> <WWN of old Brocade Encryption Switch> <WWN of new Brocade Encryption Switch>
d) Issue commit.
Admin:switch> cryptocfg --commite) If "manual" failback was set on the HA cluster, user intervention will be required to manually fail
back the LUNs owned by the newly replaced Brocade Encryption Switch.32.If HA cluster membership for the old Brocade Encryption Switch was not in place, move container
movement to the new Brocade Encryption Switch using the following procedure.a) Replace the old EE with the new EE using following command on the group leader.
Admin:switch> cryptocfg --replace <WWN of old Brocade Encryption Switch> <WWN of new Brocade Encryption Switch>
b) Issue commit.
Admin:switch> cryptocfg --commit33.Check the EG state using the following command to ensure that the entire EG is in the converged
and In Sync state.
Admin:switch> cryptocfg --show -groupcfg
Single-node EG replacement of Brocade Encryption Switch1. Upload the configuration stored on the Brocade Encryption Switch you are replacing using the Fabric
OS configUpload command.2. Power off the Brocade Encryption Switch. Remove the Mgmt Link, I/O links, and FC cables from the
Brocade Encryption Switch, noting where each was attached so that the replacement BrocadeEncryption Switch can be cabled properly.
3. Power on the new Brocade Encryption Switch. Note that the FC cables have not yet been plugged in.4. Set the IP address for the new Brocade Encryption Switch using the ipAddrSet command for both
Mgmt and I/O links. Check that the switch name and domain ID associated with the replacementswitch match that of the original.
5. Initialize the new Brocade Encryption Switch node using following command:
Admin:switch> cryptocfg --initnode6. Zeroize the new Brocade Encryption Switch.
Admin:switch> cryptocfg --zeroizeEE7. If system card authentication was enabled, you must re-register the system card through the BNA
client for the new encryption engine.8. Initialize the new encryption engine using the following command.
Admin:switch> cryptocfg --initEE [slotnumber]9. Register the new encryption engine using the following command.
Admin:switch> cryptocfg --regEE [slotnumber]
Single-node EG replacement of Brocade Encryption Switch
Fabric OS Encryption Administrator's Guide Supporting RSA Data Protection Manager (DPM) Environments 26153-1003757-01

10.Enable the new encryption engine using the following command.
Admin:switch> cryptocfg --enableEE [slotnumber]11.Invoke the following command to cleanup any WWN entries which are used earlier.
Admin:switch> cryptocfg --reclaim -cleanup12.Recreate the EG with the same name as before using the following command.
Admin:switch> cryptocfg --create -encgroup <EG name>13.Invoke configDownload from the previous uploaded configuration.14.Enable the switch using the switchEnable command.15.Deregister both key vaults using the following command.
Admin:switch> crypocfg --dereg -keyvault <label name>16.Export the KAC CSR from the new node and sign the CSR from the CA that signed the failed node
CSR.17.Submit the CSR to a CA.18.Import the signed KAC certificate onto the new node using the cryptocfg --import command.19.Register back the signed CSR/Certificate onto the new node using the following command:
Admin:switch> cryptocfg --reg -KACcert20.Register the new node KAC Certificate with the DPM appliances and create an identity for this node
on the DPM appliance in the Identity Group and associate the identity with the newly created signedcertificate.
21.Register the DPM appliance cluster virtual IP and CA certificate onto this node. Import the key vaultcertificate file using the following command:
Admin:switch> cryptocfg --import -scp22.The DPM appliance can then be registered using the imported file using the following command:
Admin:switch> cryptocfg --reg -keyvault23.Remove the existing identity of the failed node from the DPM appliance Identity Group.24.If a master key is not present, restore the master key from a backed up copy. Procedures will differ
depending on the backup media used (for example, recovery smart cards, from the key vault, froma file on the network, or a file on a USB-attached device).
25.Check the encryption engine (EE) state using following command to ensure that the encryptionengine is online.
Admin:switch> cryptocfg --show -localEE26.Set the defzone as allAccess on the new Brocade Encryption Switch, so the configuration from the
Fabric is pushed to new Brocade Encryption Switch.27.Invoke the following command on the new Brocade Encryption Switch:
Admin:switch> cfgsave28.Reconnect the FC Cables to the new Brocade Encryption Switch.29.Invoke the cfgSave command on any switch in that fabric. The fabric configuration from the existing
fabric is merged into the new Brocade Encryption Switch.30.Verify that defZone is set as no access.31.If HA cluster membership for the old Brocade Encryption Switch was in place, move container
movement to the new Brocade Encryption Switch using the following procedure.a) Replace the old EE with the new EE using the following command on the group leader.
Admin:switch> cryptocfg --replace <WWN of Old BES> <WWN of new BES> b) Issue commit.
Admin:switch> cryptocfg --commit
Maintenance and Troubleshooting
262 Fabric OS Encryption Administrator's Guide Supporting RSA Data Protection Manager (DPM) Environments53-1003757-01

c) Replace the HAC membership from the old EE to the new EE using the following command on thegroup leader.
Admin:switch> cryptocfg --replace -haclustermember <HA cluster name> <WWN of Old BES> <WWN of New BES>
d) Issue commit.
Admin:switch> cryptocfg --commite) If "manual" failback was set on the HA cluster, you must manually fail back the LUNs owned by
the newly replaced Brocade Encryption Switch.32.If HA cluster membership for the old Brocade Encryption Switch was not in place, move container
movement to the new Brocade Encryption Switch using the following procedure.a) Replace the old EE with the new EE using following command on the group leader.
Admin:switch> cryptocfg --replace <WWN of Old BES> <WWN of new BES> b) Issue commit.
Admin:switch> cryptocfg --commit33.Check the EG state using the following command to ensure that the entire EG is in a converged and
In Sync state.
Admin:switch> cryptocfg --show -groupcfg
Deregistering a DPM key vaultEach Brocade Encryption Switch is associated with an identity and a client on the DPM 3.2 server.Before reregistering the DPM server on the Brocade Encryption Switch, make sure the previous cliententry is removed from the DPM server.
You can identify the client name of the Brocade Encryption Switch on the DPM Key Vault using thecryptocfg --show -groupcfg command, which displays the Client Username. A sample output isprovided.
SecurityAdmin:switch> cryptocfg --show -groupcfgPrimary Key Vault:IP address: 10.11.1.111 Certificate ID: RSACertificate label: dpmState: ConnectedType: DPMSecondary Key Vault not configuredAdditional Key Vault/Cluster Information:Key Vault/CA Certificate Validity: YesPort for Key Vault Connection: 443Time of Day on Key Server: N/AServer SDK Version: N/AEncryption Node (Key Vault Client) Information:Node KAC Certificate Validity: YesTime of Day on the Switch: N/AClient SDK Version: RKM-Client 3.1 27-Jan-2012Client Username: B10_00_00_05_1e_55_4d_a5Client Usergroup: N/AConnection Timeout: 3 secondsResponse Timeout: 25 secondsConnection Idle Timeout: N/AOnce identified, the client on the DPM Key Vault with the corresponding name should be deleted whenthe DPM is deregistered on the Brocade Encryption Switch. Otherwise reregistration of the DPM KeyVault will result in key vault connectivity failure on the Brocade Encryption Switch.
Deregistering a DPM key vault
Fabric OS Encryption Administrator's Guide Supporting RSA Data Protection Manager (DPM) Environments 26353-1003757-01
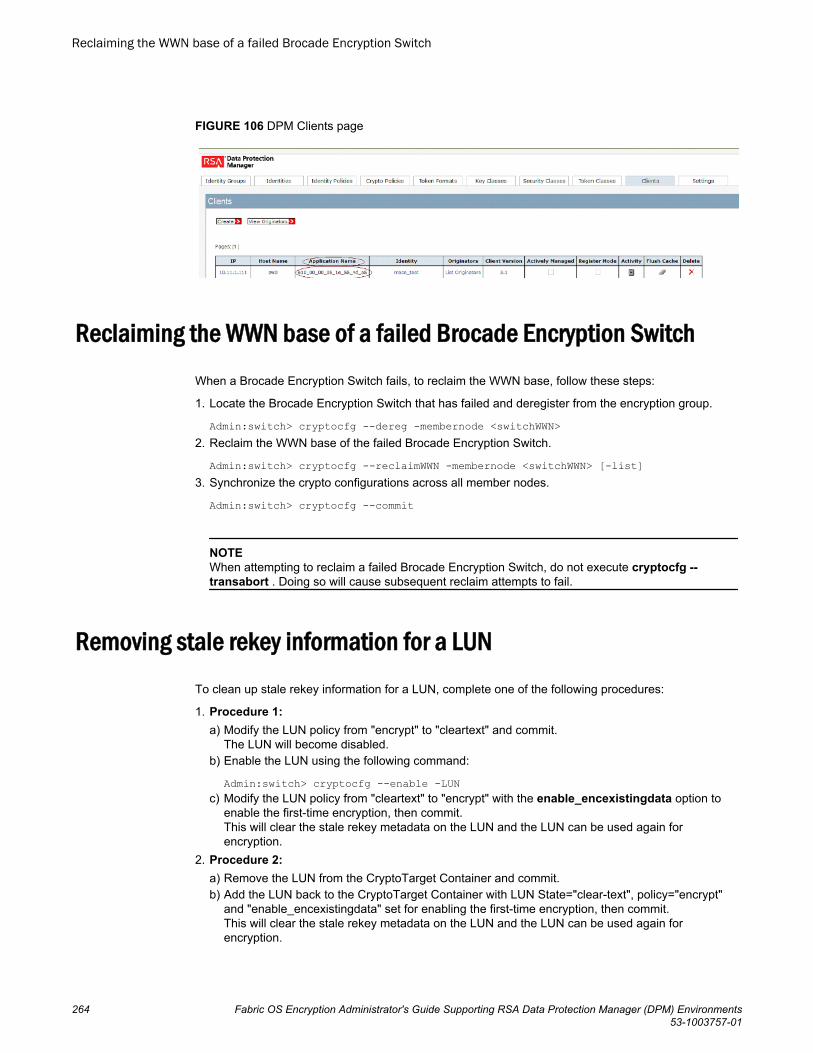
FIGURE 106 DPM Clients page
Reclaiming the WWN base of a failed Brocade Encryption Switch
When a Brocade Encryption Switch fails, to reclaim the WWN base, follow these steps:
1. Locate the Brocade Encryption Switch that has failed and deregister from the encryption group.
Admin:switch> cryptocfg --dereg -membernode <switchWWN>2. Reclaim the WWN base of the failed Brocade Encryption Switch.
Admin:switch> cryptocfg --reclaimWWN -membernode <switchWWN> [-list]3. Synchronize the crypto configurations across all member nodes.
Admin:switch> cryptocfg --commit
NOTEWhen attempting to reclaim a failed Brocade Encryption Switch, do not execute cryptocfg --transabort . Doing so will cause subsequent reclaim attempts to fail.
Removing stale rekey information for a LUN
To clean up stale rekey information for a LUN, complete one of the following procedures:
1. Procedure 1:a) Modify the LUN policy from "encrypt" to "cleartext" and commit.
The LUN will become disabled.b) Enable the LUN using the following command:
Admin:switch> cryptocfg --enable -LUN c) Modify the LUN policy from "cleartext" to "encrypt" with the enable_encexistingdata option to
enable the first-time encryption, then commit.This will clear the stale rekey metadata on the LUN and the LUN can be used again forencryption.
2. Procedure 2:a) Remove the LUN from the CryptoTarget Container and commit.b) Add the LUN back to the CryptoTarget Container with LUN State="clear-text", policy="encrypt"
and "enable_encexistingdata" set for enabling the first-time encryption, then commit.This will clear the stale rekey metadata on the LUN and the LUN can be used again forencryption.
Reclaiming the WWN base of a failed Brocade Encryption Switch
264 Fabric OS Encryption Administrator's Guide Supporting RSA Data Protection Manager (DPM) Environments53-1003757-01

Downgrading firmwareIf you are attempting to download firmware to an earlier Fabric OS version, for example, v7.0.x, youmight be prompted with the following error message, even if there are no failed decommissioned LUNs,and even if no decommissioned key ID list exists on a node:
"Downgrade is not allowed for this key vault type, as device decommission feature is in use. Please usecryptocfg --delete -decommissionedKeyIDs to disable device decommission. Make sure that no LUNis undergoing decommission or is in failed state."
If a device decommission firmware consistency check is enabled in the encryption group, firmwaredowngrades will be blocked until the firmware consistency check for device decommission feature isdisabled.
The firmware consistency check for device decommission is enabled when you execute the following:
Admin:switch> cryptocfg --decommission -container <container name> -initiator <initiatator PWWN> -LUN <lun number>The firmware consistency check for device decommission is disabled when you execute the following:
Admin:switch> cryptocfg --delete -decommissionedkeyidsThe success of the operation does not mandate that the firmware consistency check be disabled fordevice decommission.
NOTEWhen disabling the firmware consistency check, there should be no LUNs with pending decommissionor in a failed state. If the firmware download to a version earlier than Fabric OS v7.2.0 is disallowedbecause of any LUNs under decommission or in a failed state, you must either completedecommissioning, or remove the offending LUNs before retrying cryptocfg --delete -decommissionedKeyIDs to disable the firmware consistency check.
NOTEYou should not join a Fabric OS v7.0.1(x) node into an encryption group or eject a node with Fabric OSv7.2.0 or later when the firmware consistency check for the device decommission feature is enabled inthe encryption group.
Fabric OS and DPM compatibility matrix
DPM 3.1 introduces the GKA feature, which is incompatible with the RKM 2.1.1 client. DPM 3.2 offers asolution to resolve this incompatibility issue with the RKM 2.1.1 client. DPM client is compatible withDPM 3.x servers, but is not compatible with RKM 2.x servers.
Because of the limitations associated with the RKM 2.1.1 client and the DPM 3.1 server, it isrecommended that you move to DPM 3.2 server instead of v3.1.
The following table identifies Fabric OS and DPM compatibility.
Downgrading firmware
Fabric OS Encryption Administrator's Guide Supporting RSA Data Protection Manager (DPM) Environments 26553-1003757-01

Server version
Fabric OS version Client SDK RKM 2.7.x DPM 3.2
v7.0.1 and earlier RKM 2.1.1 Yes Yes
v7.1.0 and later DPM 3.1 No Yes
Splitting an encryption group into two encryption groups
In this example, which is represented in the following table, you have one encryption group with fournodes from which you want to remove two of the nodes and add them to a new encryption group.
Splitting an encryption groupTABLE 15
Encryption group Nodes
Original EG FOS1 (Group Leader)
FOS2
FOS3
FOS4
New EG1 FOS1 (Group Leader)
FOS2
New EG2 FOS3 (Group Leader)
FOS4
1. Enter the following command on FOS1 to reclaim the VI/VT WWN base for FOS3:
Admin:switch> cryptocfg --reclaimWWN -membernode <FOS3-WWN>When prompted, enter yes.
2. Enter the following command on FOS1 to propagate the change to all nodes in the EG:
Admin:switch> cryptocfg --commit3. Enter the following command in FOS1 to eject node FOS3 from the EG:
Admin:switch> cryptocfg --eject -membernode <FOS3-WWN>4. Enter the following command on FOS1 to deregister the ejected node from the encryption group:
Admin:switch> cryptocfg --dereg -membernode <FOS3-WWN>5. Enter the following command on FOS3 to clean up the encryption configuration on the deregistered
node:
Admin:switch> cryptocfg --reclaimWWN -cleanupWhen prompted, enter yes to each prompt.
6. Repeat steps 1-5 for FOS4.7. Create a new EG on FOS3:
Splitting an encryption group into two encryption groups
266 Fabric OS Encryption Administrator's Guide Supporting RSA Data Protection Manager (DPM) Environments53-1003757-01
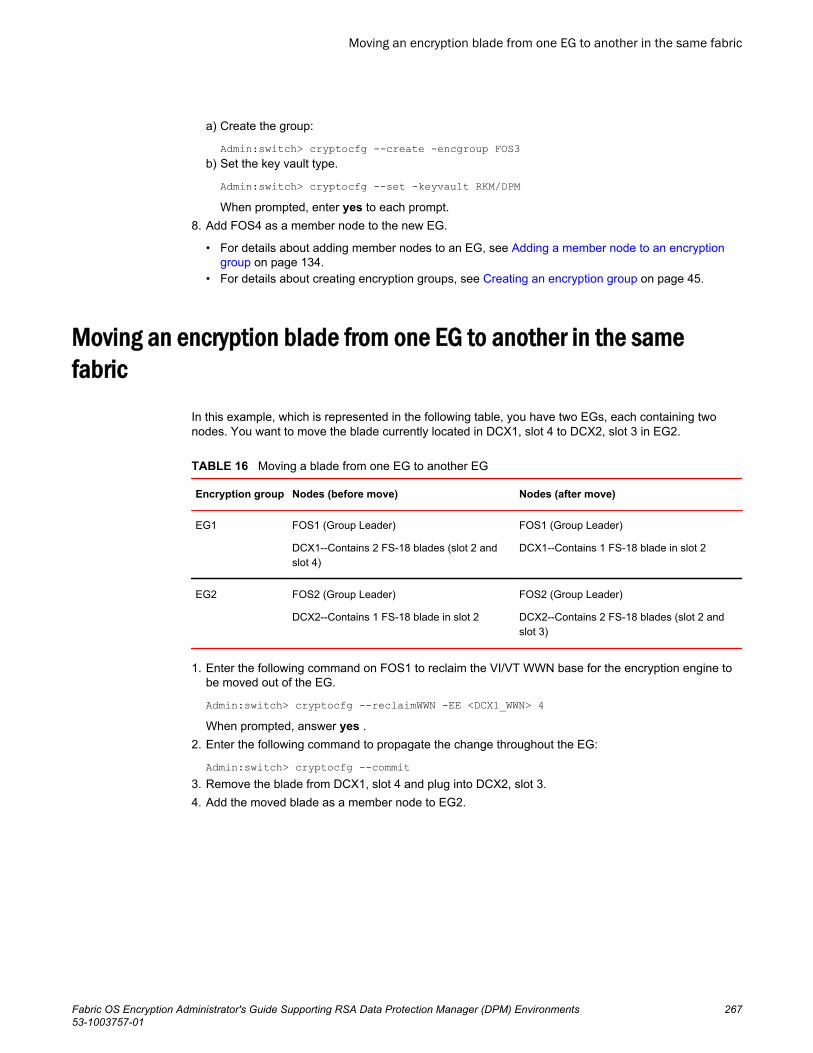
a) Create the group:
Admin:switch> cryptocfg --create -encgroup FOS3b) Set the key vault type.
Admin:switch> cryptocfg --set -keyvault RKM/DPMWhen prompted, enter yes to each prompt.
8. Add FOS4 as a member node to the new EG.
• For details about adding member nodes to an EG, see Adding a member node to an encryptiongroup on page 134.
• For details about creating encryption groups, see Creating an encryption group on page 45.
Moving an encryption blade from one EG to another in the samefabric
In this example, which is represented in the following table, you have two EGs, each containing twonodes. You want to move the blade currently located in DCX1, slot 4 to DCX2, slot 3 in EG2.
Moving a blade from one EG to another EGTABLE 16
Encryption group Nodes (before move) Nodes (after move)
EG1 FOS1 (Group Leader)
DCX1--Contains 2 FS-18 blades (slot 2 andslot 4)
FOS1 (Group Leader)
DCX1--Contains 1 FS-18 blade in slot 2
EG2 FOS2 (Group Leader)
DCX2--Contains 1 FS-18 blade in slot 2
FOS2 (Group Leader)
DCX2--Contains 2 FS-18 blades (slot 2 andslot 3)
1. Enter the following command on FOS1 to reclaim the VI/VT WWN base for the encryption engine tobe moved out of the EG.
Admin:switch> cryptocfg --reclaimWWN -EE <DCX1_WWN> 4When prompted, answer yes .
2. Enter the following command to propagate the change throughout the EG:
Admin:switch> cryptocfg --commit3. Remove the blade from DCX1, slot 4 and plug into DCX2, slot 3.4. Add the moved blade as a member node to EG2.
Moving an encryption blade from one EG to another in the same fabric
Fabric OS Encryption Administrator's Guide Supporting RSA Data Protection Manager (DPM) Environments 26753-1003757-01

Moving an encryption switch from one EG to another in the samefabric
In this example, which is represented in the following table, you have two EGs, each containing twonodes. You want to move FOS2 from EG1 to EG2.
Moving a Brocade Encryption Switch from one EG to another EGTABLE 17
Encryption group Nodes (before move) Nodes (after move)
EG1 FOS1 (GL)
FOS2
FOS1 (GL)
EG2 FOS3 (GL)
FOS4
FOS3 (GL)
FOS4
FOS2
1. Enter the following command on FOS1 to reclaim the VI/VT WWN base for the Brocade EncryptionSwitch to be moved out of EG1.
Admin:switch> cryptocfg --reclaimWWN -membernode <FOS1_WWN>When prompted, answer yes .
2. Enter the following command to propagate the change throughout the EG:
Admin:switch> cryptocfg --commit3. Enter the following command in FOS1 to eject node FOS2 from the EG:
Admin:switch> cryptocfg --eject -membernode <FOS2-WWN>4. Enter the following command on FOS1 to deregister the ejected node from the encryption group:
Admin:switch> cryptocfg --dereg -membernode <FOS2-WWN>5. Enter the following command on FOS2 to clean up the encryption configuration on the deregistered
node:
Admin:switch> cryptocfg --reclaimWWN -cleanupWhen prompted, enter yes to each prompt.
6. Add FOS2 as a member node to EG2.
Moving an encryption switch from one EG to another in the same fabric
268 Fabric OS Encryption Administrator's Guide Supporting RSA Data Protection Manager (DPM) Environments53-1003757-01
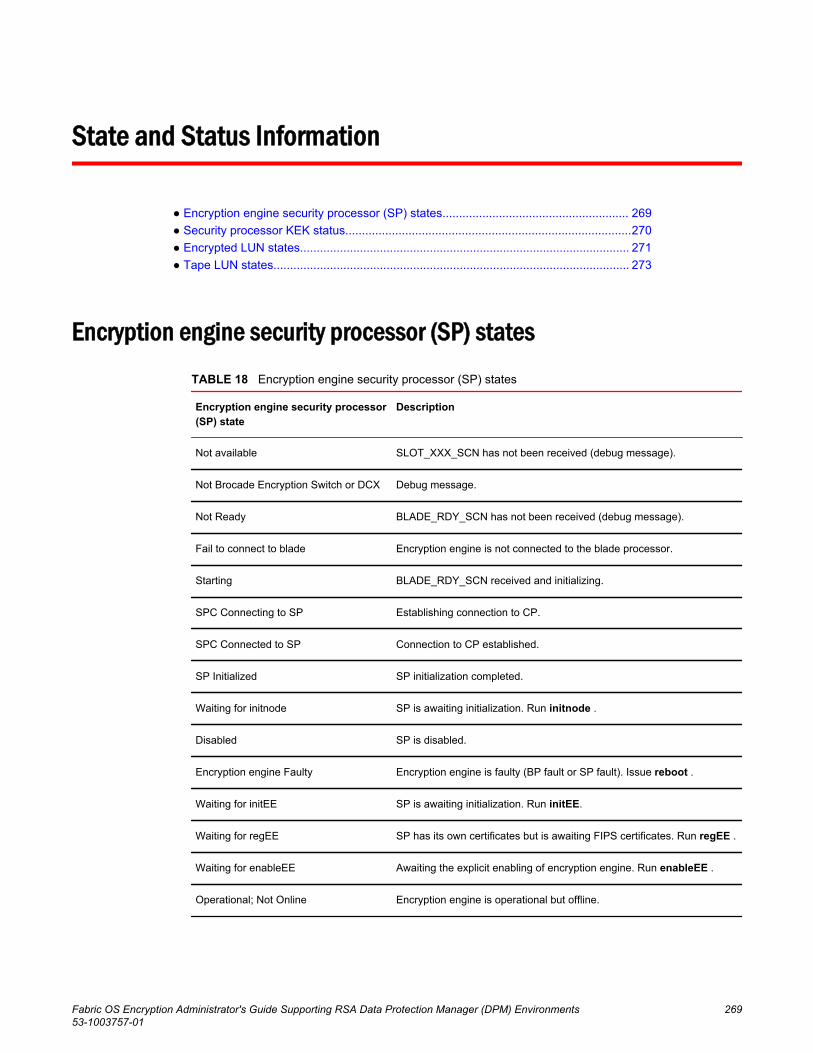
State and Status Information
● Encryption engine security processor (SP) states........................................................ 269● Security processor KEK status......................................................................................270● Encrypted LUN states................................................................................................... 271● Tape LUN states........................................................................................................... 273
Encryption engine security processor (SP) states
Encryption engine security processor (SP) statesTABLE 18
Encryption engine security processor(SP) state
Description
Not available SLOT_XXX_SCN has not been received (debug message).
Not Brocade Encryption Switch or DCX Debug message.
Not Ready BLADE_RDY_SCN has not been received (debug message).
Fail to connect to blade Encryption engine is not connected to the blade processor.
Starting BLADE_RDY_SCN received and initializing.
SPC Connecting to SP Establishing connection to CP.
SPC Connected to SP Connection to CP established.
SP Initialized SP initialization completed.
Waiting for initnode SP is awaiting initialization. Run initnode .
Disabled SP is disabled.
Encryption engine Faulty Encryption engine is faulty (BP fault or SP fault). Issue reboot .
Waiting for initEE SP is awaiting initialization. Run initEE.
Waiting for regEE SP has its own certificates but is awaiting FIPS certificates. Run regEE .
Waiting for enableEE Awaiting the explicit enabling of encryption engine. Run enableEE .
Operational; Not Online Encryption engine is operational but offline.
Fabric OS Encryption Administrator's Guide Supporting RSA Data Protection Manager (DPM) Environments 26953-1003757-01

Encryption engine security processor (SP) states (Continued)TABLE 18
Encryption engine security processor(SP) state
Description
Operational; Need Valid KEK No current master key or primary or secondary link key. Check the KEKstatus for more details.
Operational; Need Encryption Group Encryption engine is operational, but EG is not configured or EGinformation is not available. Check EG status.
Online Encryption engine is online.
Zeroized Encryption engine is zeroized
INVALID Encryption engine is invalid
Security processor KEK status
The following table lists security processor Key Encryption Key (KEK) status. Note that in the table, theKEK status is valid only in the "encryption engine awaiting encryption group" state and the "encryptionengine online" state.
Security processor KEK statusTABLE 19
KEK type KEK status Description
Primary KEK (current MK or primary KV linkkey)
None Primary KEK is not configured.
Mismatch Primary KEK mismatch between the CP and the SP.
Match/Valid Primary KEK at CP matches the one in the SP and isvalid.
Secondary KEK (alternate MK or secondaryKV link key)
None Secondary KEK is not configured.
Mismatch Secondary KEK mismatch between the CP and theSP.
Match/Valid Secondary KEK at CP matches the one in the SP andis valid.
Group KEK None Group KEK is not configured.
Mismatch Group KEK mismatch between the CP and the SP.
Match/Valid Group KEK at the CP matches the one in the SP andis valid.
Security processor KEK status
270 Fabric OS Encryption Administrator's Guide Supporting RSA Data Protection Manager (DPM) Environments53-1003757-01

Encrypted LUN states
Encrypted LUN states TABLE 20
LUN state String displayed
UNKNOWN Unknown
LUN_STATE_UNAVAILABLE LUN state unavailable.
LUN_STATE_INIT Initialize
LUN_DISC_START LUN discovery in progress.
LUN_DISC_COMPLETE LUN discovery complete.
LUN_SETUP_START LUN setup
LUN_CLEAR_TEXT cleartext encryption enabled.
LUN_ENCRYPT Encryption enabled.
LUN_READONLY_1 Read only (found native metadata while LUN is in DF mode).
LUN_READONLY_2 Read only (found DF metadata while LUN is in native mode).
LUN_READONLY_3 Read only (metadata key is in read-only state).
LUN_WR_META_IN_PROG Write metadata is in progress.
LUN_1ST_TIME_REKEY_IN_PROG First time rekey is in progress.
LUN_KEY_EXPR_REKEY_IN_PROG Key expired rekey is in progress.
LUN_MANUAL_REKEY_IN_PROG Manual rekey is in progress.
LUN_DECRYPT_IN_PROG Data decryption is in progress.
LUN_WR_META_PENDING Write metadata is pending.
LUN_1ST_TIME_REKEY_PENDING First time rekey is pending.
LUN_KEY_EXPR_REKEY_PENDING Key expired rekey is pending.
LUN_MANUAL_REKEY_PENDING Manual rekey is pending.
LUN_DECRYPT_PENDING Data decryption is pending.
LUN_LOGIN_REQ Login in progress.
Encrypted LUN states
Fabric OS Encryption Administrator's Guide Supporting RSA Data Protection Manager (DPM) Environments 27153-1003757-01

Encrypted LUN states (Continued)TABLE 20
LUN state String displayed
LUN_LOGIN_BUSY Login busy.
LUN_LOGIN_TIMEOUT Login timeout.
LUN_ACCESS_DENIED Login failure.
LUN_TGT_OFFLINE Target offline.
LUN_ACCESS_CHK Not ready (Read/Write access verification in progress).
LUN_DISCOVERY_FAILURE LUN discovery failure.
LUN_DIS_DEK_GET_API_ERR Disabled (Get key record API returns error).
LUN_DIS_DEK_GET_CB_ERR Disabled (Key retrieval from vault failed).
LUN_DIS_DEK_INJECT_API_ERR Disabled (Inject key API returns error).
LUN_DIS_DEK_INJECT_CB_ERR Disabled (key injection failure).
LUN_DIS_BAD_KEY_STATE_1 Disabled (New key is in rekey state but encrypt exist data is off).
LUN_DIS_META_KEY_NOT_FOUND Disabled (unable to retrieve key by key ID found from metadata).
LUN_DIS_META_KEY_MISMATCH_1 Disabled (Meta key is in rekey state but it is not the newest key).
LUN_DIS_META_KEY_MISMATCH_2 Disabled (Meta key does not match with one key found by LUN SN).
LUN_DIS_META_KEY_MISMATCH_3 Disabled (Meta key does not match with any key found by LUN SN).
LUN_DIS_BAD_META_KEY_STATE_1 Disabled (Meta key is old key and in rd/wr but new key is not in rekey).
LUN_DIS_NO_CFG_KEY_ID Disabled (Data state is encrypted but no key ID provided and metadatadoes not exist).
LUN_DIS_CREATE_KEY_API_ERR Disabled (Create new key API returns error).
LUN_DIS_CREATE_KEY_CB_ERROR Disabled (Create new key failure).
LUN_DIS_ADD_KEY_API_ERR Disabled (Add new key API returns error).
LUN_DIS_ADD_KEY_CB_ERR Disabled (Add new key failure).
LUN_DIS_REKEY_ACK_ERR Disabled (Rekey back with failure).
LUN_DIS_REKEY_DONE_ERR Disabled (Rekey done with failure).
LUN_DIS_WR_META_ACK_ERR Disabled (Write metadata back with failure).
State and Status Information
272 Fabric OS Encryption Administrator's Guide Supporting RSA Data Protection Manager (DPM) Environments53-1003757-01

Encrypted LUN states (Continued)TABLE 20
LUN state String displayed
LUN_DIS_WR_META_DONE_ERR Disabled (Write metadata done with failure).
LUN_DIS_LUN_REMOVED Disabled (LUN re-discovery detects LUN is removed).
LUN_DIS_LSN_MISMATCH Disabled (LUN re-discovery detects new device ID).
LUN_DIS_DUP_LSN Disabled (Duplicate LUN SN found).
LUN_DIS_DISCOVERY_FAIL Disabled (LUN discovery failure).
LUN_DIS_NO_LICENSE Disabled (Third party license is required).
LUN_DIS_WRONG_DEV_TYPE Disabled (Wrong device type found).
LUN_DIS_NOT_SUPPORTED Disabled (LUN not connected or supported).
LUN_DIS_CFG_KEY_NOT_FOUND Disabled (Unable to retrieve key by key ID specified from configuration).
LUN_DIS_META_FOUND Disabled (Data state is cleartext but metadata exists on the LUN).
LUN_DIS_BAD_KEY_STATE_2 Disabled (Data state is encrypted but there is one key which is in rekeystate).
LUN_DIS_BAD_KEY_STATE_3 Disabled (Key is in invalid rekey state for encrypted data).
LUN_DIS_BAD_KEY_STATE_4 Disabled (Key is in invalid rekey state while there is one key).
LUN_DIS_BAD_KEY_STATE_5 Disabled (Key is in unknown rekey state).
LUN_DIS_NO_LICENSE_2 Disabled (Found DF metadata while LUN is in native mode and thirdparty license is disabled).
LUN_DIS_LUN_NOT_FOUND Disabled (LUN not found).
LUN_DIS_GET_DEV_TYPE Disabled (Inquiry fails).
LUN_DIS_GET_DEV_ID Disabled (Inquiry device ID page fails).
LUN_DIS_META_FOUND_2 Disabled (Found metadata while LUN is cleartext).
LUN_STATE_UNKNOWN State of the LUN is unknown.
Tape LUN states
The following table lists LUN states that are specific to tape LUNs.
Tape LUN states
Fabric OS Encryption Administrator's Guide Supporting RSA Data Protection Manager (DPM) Environments 27353-1003757-01

Tape LUN statesTABLE 21
Internal names Console string Explanation
LUN_DIS_LUN_NOT_FOUND Disabled (LUN notfound)
No logical unit structure in tape module. This isan internal software error. If it occurs, contactBrocade support.
LUN_TGT_OFFLINE Target Offline Target port is not currently in the fabric. Checkconnections and L2 port state.
LUN_DIS_NOT_SUPPORTED Disabled (LUN notconnected orsupported)
The target port is active, but this particularLogical Unit is not supported by that target. Thisindicates a user configuration error.
LUN_DIS_WRONG_DEV_TYPE Disabled (Wrongdevice type found)
The logical unit on target port is active, but it isneither a tape or a medium changer. Thisindicates a user configuration error.
LUN_MEDIUM_CHANGER_ACTIVE Tape mediumchanger active
The logical unit is a medium changer, fully readyto handle tapes.
LUN_VALIDATION_PENDING Tape validationpending
The logical unit is either a tape drive or anattached medium changer, where changer andtape are on same LUN. Since the last LOAD,REWIND, or UNIT ATTENION, no host hasattempted to read or write to a tape in this logicalunit. There is no way of knowing if a tape is stillpresent, or the encryption state of the tape.
A host can issue a READ or WRITE to thelogical unit. At that point, it can be determinedwhether or not a tape is present or needs to bemounted, and whether or not data is ciphertext(encrypted) or cleartext.
LUN_VALIDATION_IN_PROGRESS Tape validation inprogress
The tape module has received the READ orWRITE command that triggers the validation oftape encryption mode, and is in the process offiguring out if the mounted tape medium isencrypted or not. This state should only appearbriefly.
LUN_CLEAR_TEXT Clear text The tape medium is present, and is in clear text.The encryption switch or blade has full read/write access, because its current tape policy forthe medium is also clear text.
LUN_ENCRYPT Encryption enabled The tape medium is present, and is in ciphertext(encrypted). The encryption switch or blade hasfull read/write access, because its current tapepolicy for the medium is also encrypted. See theEncryption Format field to find out if tape isencrypted in native mode or DataFort-compatible mode.`
State and Status Information
274 Fabric OS Encryption Administrator's Guide Supporting RSA Data Protection Manager (DPM) Environments53-1003757-01
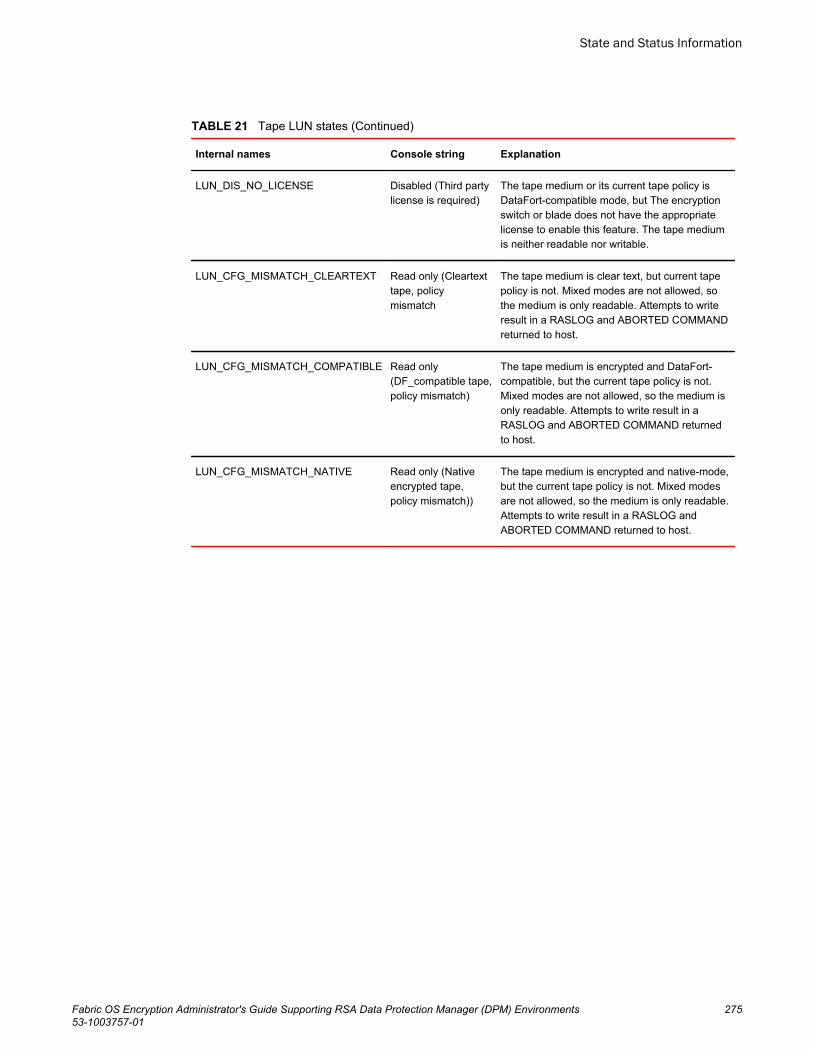
Tape LUN states (Continued)TABLE 21
Internal names Console string Explanation
LUN_DIS_NO_LICENSE Disabled (Third partylicense is required)
The tape medium or its current tape policy isDataFort-compatible mode, but The encryptionswitch or blade does not have the appropriatelicense to enable this feature. The tape mediumis neither readable nor writable.
LUN_CFG_MISMATCH_CLEARTEXT Read only (Cleartexttape, policymismatch
The tape medium is clear text, but current tapepolicy is not. Mixed modes are not allowed, sothe medium is only readable. Attempts to writeresult in a RASLOG and ABORTED COMMANDreturned to host.
LUN_CFG_MISMATCH_COMPATIBLE Read only(DF_compatible tape,policy mismatch)
The tape medium is encrypted and DataFort-compatible, but the current tape policy is not.Mixed modes are not allowed, so the medium isonly readable. Attempts to write result in aRASLOG and ABORTED COMMAND returnedto host.
LUN_CFG_MISMATCH_NATIVE Read only (Nativeencrypted tape,policy mismatch))
The tape medium is encrypted and native-mode,but the current tape policy is not. Mixed modesare not allowed, so the medium is only readable.Attempts to write result in a RASLOG andABORTED COMMAND returned to host.
State and Status Information
Fabric OS Encryption Administrator's Guide Supporting RSA Data Protection Manager (DPM) Environments 27553-1003757-01

Tape LUN states
276 Fabric OS Encryption Administrator's Guide Supporting RSA Data Protection Manager (DPM) Environments53-1003757-01

Index
Aadd commands
--add -haclustermember 138--add -initiator 149, 157, 161--add -LUN 153, 161, 185, 189
authentication cardsderegistering 33register from database 32registering from card reader 30setting a quorum 33
auto rekeyviewing time left 106
Bblade processor
links 38blade processors
configuring links 39Brocade Encryption Switch
See switch 19
Ccertificates
file names 134CLI
general errors and resolution 246using to configure encryption switch or bladeconfiguring
tasks to complete before encryption 117command RBAC permissions 118commands
ipaddrset 122ipaddrshow 123
command validation checks 118commit command, --commit 231CommVault Galaxy labeling 182configuration
of encryption group-wide policies 139storage encryption privileges 28warnings about multi-path LUNs 146, 150–153,159
configuration status resultsunderstanding 53
configuring
Crypto LUNs 152CryptoTarget container 146encrypted storage in a multi-path environment 63HA clusters using BNA 60HA clusters using the CLI 136smart cards 30tape LUNs using the CLI 157tape pools using the CLI 181
connectivityrecommendations 21
containeradding a LUN to CryptoTarget using the CLI 152,153creating a CryptoTarget 149deleting a CryptoTarget using the CLI 151discovering a Crypto LUN using the CLI 152moving a CryptoTarget using the CLI 151removing a LUN to CryptoTarget using the CLI 159removing an initiator using the CLI 150
Control Processorand RBACControl Processor 118
create commands--create -container 149, 157, 161--create -encgroup 129--create -hacluster 137--create -tapepool 183
creating a CryptoTarget container using the CLI 149cryptocfg command
Fabric OS Encryption Administrator's Guide Supporting RSA Data Protection Manager (DPM) Environments 27753-1003757-01

--add -haclustermember 138--add -initiator 149, 157, 161--add -LUN 153, 161, 185, 189--commit 231--create -container 149, 157, 161--create -encgroup 129--create -hacluster 137--create -tapepool 183--delete -container 151, 225--delete -encgroup 227--delete -hacluster 231--delete -tapepool 183--dereg -membernode 225--discoverLUN 152, 157--discover -LUN 161--eject -membernode 225--enable_rekey 185--enableEE 143--enable -LUN 167, 168--enable -rekey 189--export 134--failback -EE 232--import 134--initEE 125--initnode 125--manual _rekey 189--modify -LUN 159, 185, 189--modify -tapepool 184--move -container 151--regEE 125--reg -membernode 134--rem -haclustermember 225--rem -LUN 159, 256--remove -haclustermember 228--remove -initiator 150--replaceEE 225--replace -haclustermember 229--resume_rekey 190, 256--set -failback 140--show 134, 143--show -container 149--show -groupmember 134, 148, 189, 225--show -hacluster 228, 232--show -tapepool 183--zeroize 125
cryptoCfg commands, permissions for 118Crypto LUN
adding to CryptoTarget container using the CLI152configuring 152, 153modifying parameters 159parameters and policies 155removing 159
CryptoTarget containeradding a LUN 152, 153configuring 146creating 149deleting 151discovering a LUN 152moving 151removing a LUN 159removing an initiator from 150
CSRexporting from properties 108
Ddata rekeying 188DEK (data encryption keys) 23DEK life cycle 23delete commands
--delete -container 151, 225--delete -encgroup 227--delete -hacluster 231--delete -tapepool 183
deployment scenariosdeployment as part of an edge fabric 201deployment in fibre channel routed fabrics 199deployment with FCIP extension switches 202dual fabric deployment 196single fabric deployment 194, 195
deployment with admin domains (AD) 218deregister command,--dereg -membernode 225DHCP for IP interfaces 218discover commands
--discoverLUN 152, 157--discover -LUN 161
disk devicesdecommissioning 99
disk lunsdecommissioning 100rekeying manually 102setting rekey all 103viewing rekey details 104
disk metadata 215
EEE state
278 Fabric OS Encryption Administrator's Guide Supporting RSA Data Protection Manager (DPM) Environments53-1003757-01

disabling from properties 109enabling from properties 109
eject commands-eject -membernode 225
enable a disabled LUN using the CLI 214enable commands
--enable_rekey 185enableEE 143--enable -LUN 167, 168--enable -rekey 189
encrypted LUN states 271encryption
certificate generation 39configuration planning for the managementapplication 38, 44configure dialog box 27configuring
LUNs for first-time encryption 185definition of terms 17description of blade 20engines 19first-time encryption modes 184frame redirection diagram 23gathering information before using the setup wizard38, 44host and LUN considerations 17launching the encryption targets dialog box 98limitations 21node initialization 39overview diagram 22performance licensing for switch 20physical view of switch 19preparation 44selecting mode for LUNs 77solution overview 22viewing and editing group properties 110
encryption bladesport labeling 122special configuration considerations 123
encryption centerfeatures 27
encryption enginerebalancing 85
encryption engineseffects of zeroizing 97recovering from zeroizing 97security processor (SP) states 269states during an active failover and failback 232support for tape pools 113verifying status using the CLI 143zeroizing 97
encryption group
adding a switch using the management application54advanced configuration 225allowed configuration changes 241basic configuration 129configuration impact of split or node isolation 241creating using the encryption setup wizard 45deleting using the CLI 227disallowed configuration changes 241group-wide policy configuration 139merge and split use cases 233removing a node using the CLI 225switch connection requirements 122
encryption group propertiesediting 110using the restore master key 97viewing 110viewing encryption group properties 110
encryption group properties dialog boxHA Clusters tab 60
encryption groupscreating 45replacing an EE 58
encryption nodesetting initialization 40
encryption nodessetting initialization 124
encryption propertiesviewing properties 107
encryption switchdefinition of 19initialization 125port labeling 122
encryption targetsadding 63adding to virtual targets and virtual initiators withinthe encryption switch 62configuring hosts for 69using the dialog box 98using the dialog box to add Disk LUNs 100
ensure uniform licensing in HA clusters 218error recovery instructions
for adding a switch to a new group 252for adding a switch to an existing group 251
error recovery instructions for adding a switch to anexisting group 251errors related to the CLI 246export commands
--export 134
Ffailback
Fabric OS Encryption Administrator's Guide Supporting RSA Data Protection Manager (DPM) Environments 27953-1003757-01

invoking 62modes 62
failback command, --failback -EE 232failover and failback, states of encryption enginesduring 232field replaceable unit
See FRU 19file names, certificates 134FIPS mode 20firmware download considerations 209frame redirection
creating and enabling in an FCR configuration(edge to edge) 201deploying the encryption switch or blade to hostsand targets 144enabling 144prerequesites 144viewing the zone using the CLI 149
frame redirection zoningcreating and enabled in a FCR configuration 199
Ggroup-wide policies, examples using the CLI 140
HHA clusters
adding an encryption engine using the CLI 138adding engines 60configuration rules 60, 137configuring using the CLI 136creating using BNA 59deleting a member using the CLI 231displaying configuration using the CLI 228performing a manual failback of an encryptionengine using the CLI 232removing an encryption engine using the CLI 228removing engines 61, 138removing engines from 61replacing a member using the CLI 229requirements for 59rules 60, 137swapping engines 139swapping engines in 61
hostsconfiguring for encryption targets 69
HP-UX considerations 213
Iimport commands, --import 134initialize commands
initEE 125--initnode 125
initializingencryption switch using the CLI 125
initiators, removing from CryptoTarget container 150initiator-target zone, creating 145
KKEK security processor status 270key pair certificates 134key vaults
connections between encryption nodes 23
Llabeling
CommVault Galaxy 182NetBackup 182NetWorker 183
latency in re-key operations 220LUN
adding Crypto LUN to CryptoTarget container 153adding to a CryptoTarget container 152choosing to be added to an encryption targetcontainer 77configuration warning 146, 150–153, 159, 161configuring for first-time encryption 185configuring for multi-path example 161configuring policies using the CLI 155force-enabling for encryption 167, 168impact of policy changes 160modifying parameters using the CLI 159multi-path configuration requirements 148policy parameters 160removing Crypto LUN to CryptoTarget container159setting policy for automatic re-keying 189
Mmanual command, --manual_rekey 189manual rekey
viewing progress 105manual re-key 220master key
280 Fabric OS Encryption Administrator's Guide Supporting RSA Data Protection Manager (DPM) Environments53-1003757-01

active 87alternate 87backing up 25backup 87create new master key 87creating a new 86description of 86generating 25reasons they are disabled 86restore master key 87saving to a file 88
master keysactions 87active 87alternate 87creating 96overview 86restoring from a file 93restoring from a key vault 94restoring from a smart card set 95saving to a key vault 89saving to a smart card set 91
modify commands--modify -LUN 159, 185, 189--modify -tapepool 184
move commands, --move -container 151multi-path
configuring Crypto LUNconfiguring
for multi-path 161LUN configuration example 161LUN configuration warning 159, 161
multi-path configuration for encrypted storage using theManagement application 63multi-path LUN configuration requirements 148multi-path LUN configuration warning 146, 150–153,159
NNetBackup labeling 182network connections
requirements 38NetWorker labeling 183
PPID failover 219policies
configuration examples 140for Crypto LUN 155impact of LUN policy changes 160impact of tape pool policy changes 184modifying for LUNs using the CLI 160setting for LUN re-keying 189
privileges, user 28public key certificate
importing from properties 109
Rredirection zones 99, 218register commands
regEE 125--reg -membernode 134
rekeyingencrypted data on a LUN 188restrictions 188
re-keyingconfiguring a LUN using the CLI 189definition of offline 188definition of online 188initiating a manual session 189modes 188reasons for suspension or failure 190, 256warning 189
rekeying policies 219remove commands
--rem -haclustermember 225--rem -LUN 159, 256--remove -haclustermember 228--remove -initiator 150
replace commands--replaceEE 225--replace -haclustermember 229
restore master key wizard 97resume commands
--resume_rekey 190, 256role based access control (RBAC) permissions forcryptoCfg commands 118
Ssecurity processor (SP)
KEK status 270states for encryption engines 269
set commands--set -failback 140
show commands
Fabric OS Encryption Administrator's Guide Supporting RSA Data Protection Manager (DPM) Environments 28153-1003757-01

--show 134, 143--show -container 149--show groupmember 189--show -groupmember 134, 148, 225--show -hacluster 228, 232--show -tapepool 183
smart cardsconfiguring 30editing 37removing using the management application 36saving to a file 36tracking 36using 30, 35
statesencrypted LUN 271tape LUN 273
storage arraysconfiguring 74
storage encryptionconfiguration privileges 28configuring 63confirming the configuration statusencryption
configuring in a multi-path environment 63selecting the encryption engine for configuration63selecting the hosts 63specifying a name for the target container 63
storage encryption securityprivileges for 28
switch encryption configurationconfirm configuration using the managementapplication 54designate switch membership using themanagement application 54specify public key certificate file name using themanagement application 54
switch encryption propertiesediting 107viewing 107
switch removal, consequences of 112system cards
deregistering 35disabling 34enabling 34register from a card reader 34using 33
Ttape compression 215tape library media changer considerations 218tape LUN, configuring 157tape LUN states 273tape lun statistics
clearing container 82clearing for specific tape luns 83clearing for tape luns in a container 84viewing container 82viewing for specific tape luns 83viewing for tape luns in a container 84
tape metadata 215tape pool
impact of policy changes 184tape pools
adding 113CommVault Galaxy labeling using the CLI 182configuring 181creating using the CLI 183deleting using the CLI 183description of 113identifying using a name or a number 113labeling rules 181modifying using the CLI 184NetBackup labeling using the CLI 182NetWorker labeling using the CLI 183overview 113tape block zero handling 216tape key expiry 216
target disk lunsadding 71
targetsmoving 79
target tape lunsadding 77
terminology for encryption 17thin provisioned luns
general 105space reclamation 187
thin provisioningsupport 106
troubleshooting
282 Fabric OS Encryption Administrator's Guide Supporting RSA Data Protection Manager (DPM) Environments53-1003757-01

cfgshow command 246configshow 246cryptocfg --show -groupcfg command 246cryptocfg --show -groupmember command 246general encryption using the CLI 246general errors related to the Configure SwitchEncryption wizard 253management application wizard 251nsshow command 246supportsave command 246
troubleshooting examples using the CLI 249turn off compression on extension switches 219turn off host-based encryption 219
Uuniversal IDs
displaying 102user privileges
defined 28resource groups 28
using from encryption group properties dialog 97
Vvalidating commands 118verifying encryption engine status using the CLI 143virtual initiators, description of in an encryptionconfiguration 146virtual targets, description of in an encryptionconfiguration 146
Zzeroization
setting 97zeroize command
--zeroize 125zeroizing
effects of using on encryption engine 97zone
creating an initiator-target using the CLI 145
Fabric OS Encryption Administrator's Guide Supporting RSA Data Protection Manager (DPM) Environments 28353-1003757-01

284 Fabric OS Encryption Administrator's Guide Supporting RSA Data Protection Manager (DPM) Environments53-1003757-01