Everything You Need to Know About USB and Serial ...
84
Everything You Need to Know About USB and Serial Interfaces by N6TV For FRC June 8th, 2021
Transcript of Everything You Need to Know About USB and Serial ...

Everything You Need to Know About USB and Serial Interfaces
by N6TV
For FRCJune 8th, 2021

Presentation Overview
• Legacy PC Serial Ports
• USB Ports and Devices
• USB-to-Serial Adapters
• Using the Windows Device Manager
• Managing Serial Port Numbers
• Using Serial Ports for CW / FSK / PTT Keying
• Sharing Serial Ports
• USB Sound Cards
• Q & A

Legacy PC Serial Ports
• Originally a 25-pin male D-SUB connector (DB-25M), used with dial-up modems
• Smaller 9-pin male serial connector became standard (DE-9M) for serial, DB-25F for printers

Life was Simple
• One or two male DE-9 connectors on PC• Accessed as COM1: or COM2: • One DE-9 “CAT” or “RS232” connector on
radio• Female: Elecraft IC-7700 & IC-7800
• Male: Yaesu Kenwood

Computers “Improved”
• “Real” serial and parallel ports disappear, replaced by USB ports
• Radios (until recently) still had 9-pin serial ports
• Peripherals are still using 9-pin serial ports• RemoteRig boxes, Rotator controllers, SteppIR antenna
controllers, some band decoders, etc.
• Common Solution: USB-to-Serial adapters

USB 2.0 and 3.0 Ports
• Standard connector on most PCs and MACs
PC:
Radio:

USB-to-Serial Adapters
Reliability and Compatibility Varies Greatly1. Edgeport – Excellent, stable, supports
MMTTY directly2. Eltima – Included with microHAM interfaces3. FTDI – very good, stable, requires EXTFSK for
MMTTY. Used internally by Elecraft K3 & K4.4. Silicon Labs (built in to Icom, Kenwood,
Yaesu)5. Prolific – AVOID! Uninstall drivers, recycle.

Digi International Edgeport/4
• One USB 2.0 Type B connector
• Four independent DE-9M serial ports
• Windows automatically finds and installs drivers

Digi International Edgeport/8
• One USB 2.0 Type B connector
• Eight independent DE-9M serial ports
• Windows automatically finds and installs drivers

StarTech.com ICUSB2324I 4-Port FTDI
• One USB 2.0 Type B connector
• Four independent FTDI DE-9M serial ports
• Separate 5V Power Supply

StarTech.com ICUSB2328I 8-Port FTDI
• One USB 2.0 Type B connector
• Eight independent FTDI DE-9M serial ports
• Separate 5V Power Supply

microHAM uses Eltima drivers
• One USB Type B connector
• Custom Eltima serial port device drivers
• Custom cables for transceiver ports
• Virtual serial ports created by microHAM “Router”
microHAM MK2R+

Recommended FTDIUSB-to-Serial Adapters
FTDI CHIPI-X10 - $17 GearMo 2-port - $30
GearMo 4-port - $40

Prolific USB-to-Serial Adapters
• Widely available, cheap (but many counterfeits)
• Prolific Device Driver does not play well with others
• Please DO NOT USE them, ever
• Uninstall any Prolific device drivers with Device Manager
• Devices often look like this:

Connecting USB-to-Serial Adapters
• Connect FTDI, Elecraft, or Edgeport device to PC
• Windows (usually) locates and installs appropriate device driver(s)
• COM port numbers assigned sequentially
• Use Windows Device Manager to view assigned COM Port number
• COM port number will change if you connect a device to a different USB Hub (e.g. from USB 2.0 port to USB 3.0 port)

Connecting USB Radios / Devices
• Important: Install the manufacturer’s device driver first, then connect the device• Icom, Kenwood, Yaesu, microHAM• (Usually not required for Elecraft / FTDI)
• If you forget and connect radio first, use Device Manager to uninstall “Unknown Device”, then start over
• COM port numbers assigned sequentially
• COM port numbers can be changed

Using the Windows Device Manager
• Right click on Windows Start Button
• Click Device Manager-or-
• Windows Key + R (Run): devmgmt.msc
• Important Tip (before Windows 10):Always set the System Environment Variabledevmgr_show_nonpresent_devices to 1

Setting System Environment Variable
• Type “Environment” in Windows Search box or Windows Settings Search box
• Click “Edit the System Environment Variables”

Step 1 – Under Advanced tab click Environment Variables…

Step 2 – Under System variables, click New…

Step 3 – Add the new environment variable
Name: devmgr_show_nonpresent_devicesValue: 1
Click OK, then start Windows Device Manager

Windows Device ManagerAlways select View → Show hidden devices

Expand Ports sectionRight click gray (offline) devices, Properties

Click Driver TabCheck that Driver Provider is not Prolific
• If you see Prolific, click Uninstall Device

Uninstall the Prolific Deviceand Delete the Driver Software for this device

If Driver is FTDI, go to Port Settings tabClick Advanced… button

FTDI Default Options – not good, keys radio

Change the FTDI Options To This:

Disabling Serial Enumeration (unwanted keying) onLegacy Serial Ports (COM1:, COM2:)
• Requires Registry Edit (run regedit)• Create a System Restore Point to allow
recovery, just in case• Locate “UpperFilter” key under
HKEY_LOCAL_MACHINE\SYSTEM\CurrentControlSet\Enum\ACPI\PNP0501\0 (or similar)
• Rename key to OldUpperFilter• No more unwanted keying

Creating a Restore Point
• System Properties, System Protection, Create (or use Windows Search box)

Locate Device Instance Path in Device Manager
• Device Manager (devmgmt.msc), COM1:, Properties, Details

Locate Device Instance Path in Registry
• Regedit, HKEY_LOCAL_MACHINE\SYSTEM\CurrentControlSet\Enum\

Right Click, Rename Key to OldUpperFilters

Under USB Serial Bus Controllers:Right-Click each “Hub” device, Select Properties

Look for Power Management TabDo not allow computer to turn off this device

Another USB Dev. Management Tool:NirSoft’s USBDeview
• Stands for USB Device View• https://www.nirsoft.net/utils/usb_devices_view.html
• Scroll way down to the “Feedback” section to find download link:

USBDeview Screen Shot

Managing COM Port Numbers
• Over time, ever increasing unique COM port numbers are assigned by Windows, difficult to keep track
• Some software doesn’t support COM13: or higher
• Suggestion: renumber serial ports “left to right” to match your station layout, starting with transceivers
• First, use Windows Device Manager to uninstall all serial devices that you no longer use
• Right click on remaining COM ports, Properties, Port Settings tab. Click Advanced… button
• Renumber ports sequentially, COM3:, COM4:, COM5:, etc., “left to right”

Renumbering Serial Ports – Use Advanced Settings

What does “In Use” Mean?
• It means this COM port number was assigned to some device, maybe years ago
• It usually does not mean that you can’t use it during reassignment, especially if it is “grayed out” (hidden)
• Uninstalling disconnected devices first will help
• Usually safe to ignore this warning and click YES:

Labeling Serial Ports
• Example:
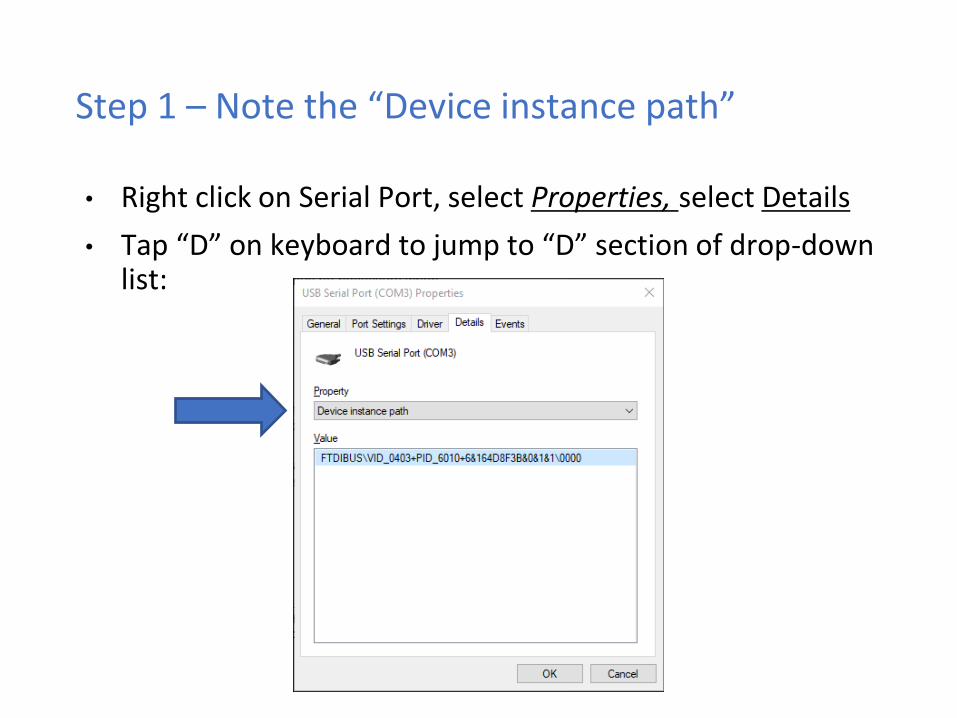
Step 1 – Note the “Device instance path”
• Right click on Serial Port, select Properties, select Details
• Tap “D” on keyboard to jump to “D” section of drop-down list:

Step 2 – Use Registry Editor (regedit)
• Navigate to HKEY_LOCAL_MACHINE\SYSTEM\CurrentControlSet\Enum
• Device Instance Path, Subkey 0000 will have the FriendlyName

Step 3 – Change the FriendlyName
• Double-click on FriendlyName (or Right-click, Modify…)
• Edit the FriendlyName value and click OK
• Note: If you renumber a serial port, Windows will change the name back to the default, so renumber first, then rename

What program is currently using my serial port?
• Use Windows Process Explorer
• https://docs.microsoft.com/en-us/sysinternals/downloads/process-explorer
• On Windows 10, run procexp64.exe as Administrator
• Click Search button (binoculars icon)
• Enter one of the following partial search strings:
\Device\VCP – FTDI virtual serial ports\Device\Edg – Edgeport virtual serial ports\Device\Ser – Hardware serial ports / CH340 (Mortty)\Device\Sil – Icom / Kenwood / Yaesu Silicon Labs ports\Device\VSer – Eltima / vspMgr virtual serial ports

Process Explorer Search – Example 1
Win-Test (wt.exe) has opened the FTDI Virtual COM Port (VCP)

Process Explorer Search – Example 2
OmniRig.exe (e.g. WSJT-X, Log4OM) has opened the FTDI VCP

Not sure what to search for?
• Open a program known to use a particular serial port
• In Process Explorer, drag the “Find Windows Process” icon on top of the program window
• Process Explorer will jump to the process corresponding to that program window

Select View, Lower Pane View, Handles,then sort by Name

Computer-generated CW, PTT, and FSK RTTY KeyingUsing Serial Port pins (DTR=CW or FSK, RTS=PTT)
• A simple hardware keying circuit, used for decades:

Elecraft K3 / K3S keying via serial port
• First transceiver to include computer keying circuit inside the radio
• Does not use RTS and DTR pins for RS232 “Handshaking”, freeing them for other purposes
• In K3, set CONFIG:PTT-KEY to RTS-DTR (vs. OFF-OFF)
• Works the same over a standard serial cable(CONFIG:RS232 = 38400)-or- the K3S USB connection(CONFIG:RS232 = USB)
• To prevent unwanted transmissions when PC reboots, change FTDI Port Settings:
• Uncheck “Serial Enumerator”
• Check “Disable Modem Ctrl At Startup”

Elecraft K4 keying via virtual serial port(s)
• Same as K3, but THREE (3) serial ports available for CW, PTT, and FSK keying and rig control
• In K4 menu, scroll to the Serial, entries, modify as shown:
• Change FTDI Port Settings:
• Uncheck “Serial Enumerator”
• Check “Disable Modem Ctrl At Startup”

ICOM Copies Elecraft K3, Adds FSK Keying
• CW, PTT, and FSK keying OK over USB virtual serial port
• Supported by IC-705, IC-7300, IC-7610, IC-7850, IC-7851
• IC-7300 generates just one virtual serial port
• IC-705, IC-7610, IC-7850, IC-7851 generate two virtual serial ports:
• To keep it simple use DTR pin for keying, RTS pin for PTT
• Use port “B” for MMTTY exclusively
• Mnemonic: CW : DTR : FSK • PTT : RTS : Send

ICOM: Determining COM Port A and B
• Use Windows Device Manger, right click on first COM port, Properties, Details tab, Device Instance Path, check last letter

ICOM IC-7300 Keying via USB Cable
• USB cable provides one virtual serial port• In IC-7300 SET > Connectors menu:
Set USB Keying (CW) to DTR-or-Set USB Keying (RTTY) to DTR
• Set USB Send to RTS• Logging Software, rig control Port (USB), set DTR=CW,
RTS=PTT• In MMTTY, use EXTFSK or EXTFSK64 to select COM port.• Cannot use logger at same time; rig has just one serial
port. But you can use the REMOTE (CI-V) connector with CT-17 or equivalent for rig control.

ICOM IC-705 Keying via USB Cable
• USB cable provides two virtual serial ports
• In IC-7610 SET > Connectors > USB Send/Keying:Set USB Keying (CW) to USB (A) DTRSet USB Keying (RTTY) to USB (B) DTRSet USB Send to USB (A) RTS or USB (B) RTS
• In Logging Software, rig control COM Port (A):DTR=CW, RTS=PTT
• In MMTTY, use EXTFSK or EXTFSK64 to select second COM Port (B):FSK=DTR, PTT=RTS
• Cannot set both ports to use hardware PTT, so use “Software PTT” on Rig Control Port (A) if necessary.

ICOM IC-7610 Keying via USB Cable
• USB cable provides two virtual serial ports
• In IC-7610 SET > Connectors > USB Send/Keying:Set USB Keying (CW) to USB1(A) DTRSet USB Keying (RTTY) to USB1(B) DTRSet USB Send to USB1(A) RTS or USB1(B) RTS
• In Logging Software, rig control COM Port (A):DTR=CW, RTS=PTT
• In MMTTY, use EXTFSK or EXTFSK64 to select second COM Port (B):FSK=DTR, PTT=RTS
• Cannot set both ports to use hardware PTT, so use “Software PTT” on Rig Control Port (A) if necessary.

ICOM IC-7850, IC-7851 Keying via USB Cable
• USB cable provides two virtual serial ports
• In IC-785x SET > Others menu:Set USB Keying (CW) to USB1 DTRSet USB Keying (RTTY) to USB2 DTRSet USB Send to USB1 RTS (CW) or USB2 RTS (RTTY)
• In Logging Software, rig control COM Port (USB1)set DTR=CW, RTS=PTT
• In MMTTY, use EXTFSK or EXTFSK64 to select second COM port (USB2)FSK=DTR, PTT=RTS
• Cannot use both ports for hardware PTT, so use “Software PTT” on Rig Control Port (USB1) if necessary.

Yaesu FT-991 Keying via USB Cable
• USB cable provides two Silicon Labs virtual serial ports:
• In Yaesu Menu, set030 232C TOT: 1000 msec (default is only 10 msec)033 CAT RTS: Disable (Turns off RS232 handshaking)060 PC Keying: DTR071 DATA PTT SELECT: RTS098 RTTY SHIFT PORT: DTR110 SSB PTT SELECT: RTS
• In Logging Software, rig control is via the “Enhanced” COM Port,CW / PTT via “Standard” COM Port: DTR=CW, RTS=PTT
• In MMTTY, use EXTFSK or EXTFSK64 with the “Standard” COM port: FSK=DTR, PTT=RTS

Yaesu FTdx101D or FTdx101MP Keying via USB
• USB cable provides two Silicon Labs virtual serial ports:
• In Yaesu Menu, set• OPERATION SETTING / GENERAL:
232C TIME OUT TIMER: 1000 msec (default is only 10 msec)CAT RTS: OFF (Turns off RS232 handshaking)
• RADIO SETTING / MODE SSB, RTTY, and PSK/DATA:RPTT SELECT: RTS (FSK will be by DTR)
• RADIO SETTING / MODE CW:PC KEYING: DTR (PTT will be by RTS)
• In Logging Software, rig control is via the “Enhanced” COM Port,CW / PTT via “Standard” COM Port: DTR=CW, RTS=PTT
• In MMTTY, use EXTFSK or EXTFSK64 with the “Standard” COM port:FSK=DTR, PTT=RTS

Kenwood TS-890 Keying via USB Cable
• USB cable provides two Silicon Labs virtual serial ports:
• Right click, Properties, Details tab, Location Path:USB1 is “Standard” Serial Port, USB2 is “Enhanced”
• In Logging Software, rig control is via the “Standard” COM PortCW / PTT / FSK keying may be assigned to DTR or RTS of either port
• Menu 17 Virtual Standard COM Port RTS: PTTMenu 18 Virtual Standard COM Port DTR: CW KeyingMenu 19 Virtual Enhanced COM Port RTS: PTTMenu 20 Virtual Enhanced COM Port DTR: RTTY Keying

N1MM+ Contest Software Configuration
• Select Config, Configure Ports, view Hardware Tab
• Check CW/Other box next to Rig’s Serial Port
• Click Set button

N1MM+ Contest Software Configuration (cont’d)
• Set DTR (pin 4) = CW, RTS (pin 7) = PTT

Win-Test Contest Software Configuration
• Set DTR (pin 4) = CW, RTS (pin 7) = PTT

Notebook PC:Windows Power Mode Affects Timing
• CW Timing over USB is usually very good if you set Windows Power Mode to Best Performance:

Desktop PC:Windows Power Options Affects Timing
• CW Timing over USB is usually very good if you set Windows Power Options to High performance:

FSK RTTY keying: MMTTY Setup Menu, TX Tab
• Set Port to EXTFSK64, then click Radio Command button

MMTTY Setup Menu, Radio command button
• Set Port to NONE, Group to Clear

MMTTY Setup Menu, Misc Tab
• Set TX Port to COM-TxD(FSK), click USB Port

MMTTY USB Port Menu
• Set Processing Method to C: Limiting Speed

EXTFSK Pop-Up Menu
• Select second COM Port, FSK=DTR, PTT=RTS

Serial Port Sharing and Conflicts
• In RS232 protocol, only one TXD line (Pin 3) can be connected between a PC and a Radio
• No other device may connect to Pin 3 if a PC is connected
• PC polls radio using Pin 3 (TXD), Radio sends response using Pin 2 (RXD)
• AUTO INFO mode provides same output without PC polling
• Multiple devices (SteppIR & Baby Loop controllers, Band Decoders, Elecraft / ACOM / SPE amplifiers) may monitorthe RXD line in parallel by only connecting to Pin 2
• RF-Kit amplifiers require connection to both Pins 2 and 3

Shameless Plug
• The N6TV “Serial Box” (S-BOX or S-BOX-USB with FTDI) provides parallel connections to RXD pin via standardD-SUB cables:
https://bit.ly/S-BOX
• It also includes four NPN keying circuits for rigs that do not support CW, PTT, or FSK keying via DTR or RTS, such as:Elecraft KX2 KX3, Yaesu FTdx3000 FTdx5000 FT-1000MP, Kenwood TS-990s TS-590s, ICOM IC-7600 IC-7700 IC-7800, …

Software for Sharing Serial Ports
• Software sharing: multiple programs simultaneously access the radio’s rig control serial port
• Implemented by VE3NEA’s OmniRig software
• OmniRig may be used by Win-Test, Writelog, HDSDR, WSJT-X, Log4OM, etc. for rig control
• But OmniRig is NOT supported by N1MM+, N3FJP, others
• OmniRig owns the serial port, acts as traffic cop, no collisions or conflicts between applications
• CW / PTT / FSK Keying via OmniRig port is not supported
• Consider N4PY Pegasus PlusAllows sharing of Radio COM port with up to five other applications
• Can I use VSPE instead? vspMgr? COM0COM?Maybe, but command collisions or VCP driver conflicts may occur

Radios with both USB and DE-9 connectors
• Elecraft K3, Yaesu FTdx3000: USB and Serial Port do not operate independently (must pick one)
• USB and Serial Port do operate independently in:• Elecraft K4• Kenwood TS-590S, TS-890S• Yaesu FTdx101D, FTdx101MP
• ICOM USB and CI-V Ports (3.5mm, not DE-9) mostly operate independently (if you set USB CI-V Port to Unlink from [REMOTE])
• Two devices can poll the radio at same time via independent serial ports, one USB and one DE-9 or CI-V.

USB connection to radio adds a new Windows Sound Card
• USB Audio CODEC
• Can be use for contest recording, voice keying, RTTY / FT8 decoding
• Multiple “USB Audio CODEC” devices, which is my radio?
• Right click on Speaker icon, then Open Sound settings

Click Sound Control Panel
• Faster way:Windows Key+ R (run):mmsys.cpl

Windows Sound Control Panel, Recording Tab

In Sound Control Panel, which sound card is my radio?
• Watch USB AUDIO CODEC devices
• A device will disappear and reappear when you disconnect and reconnect the USB cable from the back of the radio
• Select that device, then click Propertiesbutton
• Label both the Recording and Playback tabs with name of device, click Apply

Change Label and Icon of USB Audio CODEC

Change Icon of USB Audio CODEC Device

Key Points to Remember
• Use the Windows Device Manager to manage and renumber COM ports
• Always uninstall Prolific devices and drivers• Always change the FTDI Default Options• Consider labeling COM ports using Registry Editor • Try CW, FSK and PTT keying via virtual serial port
pins• Use DTR for CW/FSK, RTS for PTT• Understand serial port conflicts and sharing• Label your USB Audio CODEC devices

References
• http://www.qrz.com/db/n6tv - Links to this and other presentations
• https://www.nirsoft.net/utils/usb_devices_view.html - USBDeview
• https://docs.microsoft.com/en-us/sysinternals/downloads/process-explorer -Windows Process Explorer
• https://bit.ly/S-BOX - The “Serial Box” by N6TV

Q&A