ADC1000-USB Operating Instructions...interfaces to a notebook computer via the USB port and USB...
27
ADC1000-USB A/D Converter Operating Instructions Offices: Ocean Optics, Inc. 830 Douglas Ave., Dunedin, FL, USA 34698 Phone 727.733.2447 Fax 727.733.3962 8:30 a.m.-6 p.m. EST Ocean Optics B.V. (Europe) Nieuwgraaf 108 G, 6921 RK DUIVEN, The Netherlands Phone 31-(0)26-3190500 Fax 31-(0)26-3190505 E-mail: [email protected] (General sales inquiries) [email protected] (European sales inquiries) [email protected] (Questions about orders) [email protected] (Technical support) Rev. 2.03 05062005
Transcript of ADC1000-USB Operating Instructions...interfaces to a notebook computer via the USB port and USB...
ADC1000-USB A/D Converter Operating Instructions
Rev. 2.03
05062005
Offices: Ocean Optics, Inc. 830 Douglas Ave., Dunedin, FL, USA 34698 Phone 727.733.2447 Fax 727.733.3962 8:30 a.m.-6 p.m. EST
Ocean Optics B.V. (Europe) Nieuwgraaf 108 G, 6921 RK DUIVEN, The Netherlands Phone 31-(0)26-3190500 F ax 31-(0)26-3190505
E-mail: [email protected] (General sales inquiries) [email protected] (European sales inquiries) [email protected] (Questions about orders) [email protected] (Technical support)

Copyright © 2005 Ocean Optics, Inc. All rights reserved. No part of this publication may be reproduced, stored in a retrieval system, or transmitted, by any means, electronic, mechanical, photocopying, recording, or otherwise, without written permission from Ocean Optics, Inc.
This manual is sold as part of an order and subject to the condition that it shall not, by way of trade or otherwise, be lent, re-sold, hired out or otherwise circulated without the prior consent of Ocean Optics, Inc. in any form of binding or cover other than that in which it is published.
Trademarks
Microsoft, Windows, Windows 95, Windows 98, Windows Me, Windows NT, Windows 2000, Windows XP and Excel are either registered trademarks or trademarks of Microsoft Corporation.
Limit of Liability
Every effort has been made to make this manual as complete and as accurate as possible, but no warranty or fitness is implied. The information provided is on an “as is” basis. Ocean Optics, Inc. shall have neither liability nor responsibility to any person or entity with respect to any loss or damages arising from the information contained in this manual.

Table of Contents
1 Overview ...................................................................................................................1 Interface Options ................................................................................................................... 1 USB Port ...................................................................................................................................................................... 2 Serial Port .................................................................................................................................................................... 2
2 Using the ADC1000-USB .........................................................................................3 USB Port Overview ................................................................................................................ 3 Interface the ADC1000-USB to the Spectrometer ....................................................................................................... 3 Install the OOIBase32 Software................................................................................................................................... 4 Connect the ADC1000-USB to your USB Port............................................................................................................. 4 Configure the OOIBase32 Software – USB Port.......................................................................................................... 4 Configuring the Spectrometer ...................................................................................................................................... 5 Setting OOIBase32 Parameters................................................................................................................................... 6 Configuring Data Acquisition........................................................................................................................................ 7 Saving Wavelength Calibration Coefficients: USB Mode............................................................................................. 7 Serial Port Overview.............................................................................................................. 9 Connect the ADC1000-USB to your Serial Port........................................................................................................... 9 Install the OOIBase32 Software................................................................................................................................. 10 Configure the OOIBase32 Software – Serial Port...................................................................................................... 10 Configuring the Spectrometer .................................................................................................................................... 12 Setting OOIBase32 Parameters................................................................................................................................. 13 Configuring Data Acquisition...................................................................................................................................... 13 Saving Wavelength Calibration Coefficients: Serial Mode ......................................................................................... 14 ADC1000-USB-S Notes........................................................................................................ 15 ADC1000-USB-S Rear Panel .................................................................................................................................... 15
3 Troubleshooting.....................................................................................................16 Troubleshooting Device Driver Installation................................................................................................................. 16 An Older Version of OOIBase32 is Installed on the PC............................................................................................. 19 Software and Hardware are not Synchronized .......................................................................................................... 19 Serial Port Number is Unclear.................................................................................................................................... 20
4 Spectroscopic Accessories ..................................................................................21 Recommended Accessories............................................................................................... 21
Appendix 1 – Specifications ........................................................................................22 ADC1000-USB Specifications............................................................................................. 22 Pinouts.................................................................................................................................. 23 15-pin Accessory Connector Pinouts ......................................................................................................................... 23 9-pin Serial Connector Pinouts .................................................................................................................................. 23 Index...................................................................................................................................... 24
ADC1000-USB Overview
1 Overview The ADC1000-USB External USB A/D Converter is a plug-and-play high-speed analog-to-digital (A/D) converter designed for hassle-free instrument-to-PC interfacing. An A/D converter is necessary to interface all Ocean Optics spectrometers to PCs.
Interface Options
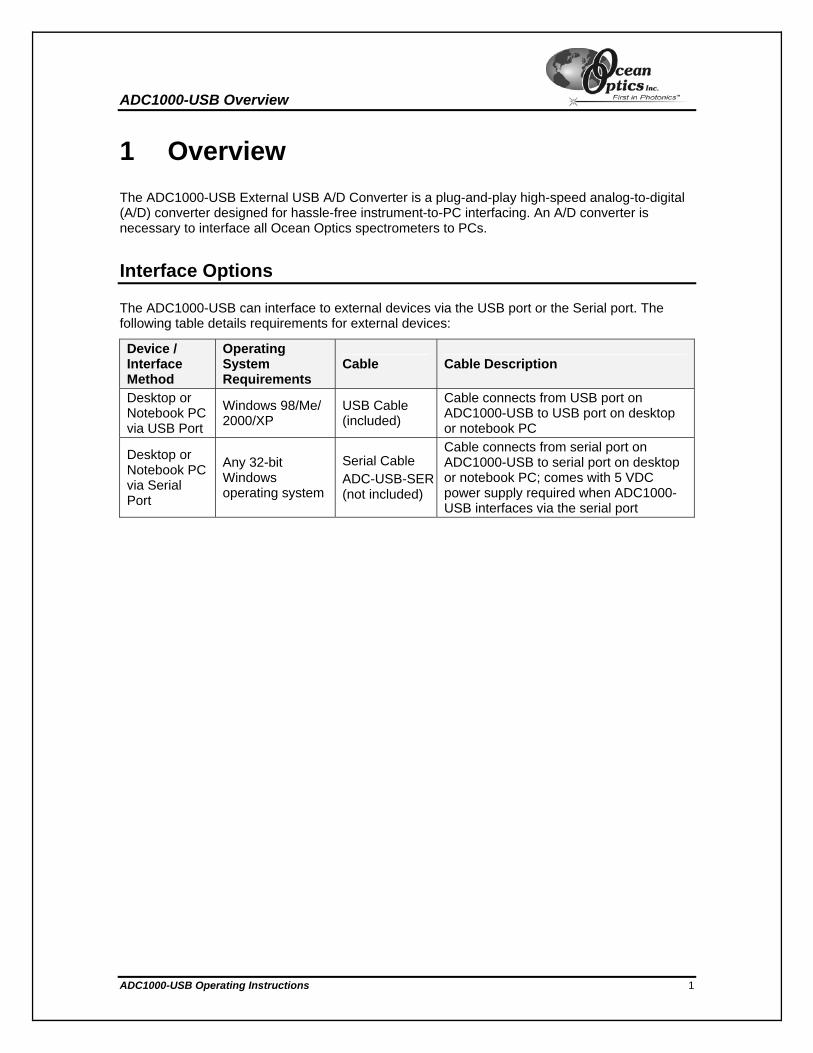
The ADC1000-USB can interface to external devices via the USB port or the Serial port. The following table details requirements for external devices:
Device / Interface Method
Operating System Requirements
Cable Cable Description
Desktop or Notebook PC via USB Port
Windows 98/Me/ 2000/XP
USB Cable (included)
Cable connects from USB port on ADC1000-USB to USB port on desktop or notebook PC
Desktop or Notebook PC via Serial Port
Any 32-bit Windows operating system
Serial Cable ADC-USB-SER(not included)
Cable connects from serial port on ADC1000-USB to serial port on desktop or notebook PC; comes with 5 VDC power supply required when ADC1000-USB interfaces via the serial port
ADC1000-USB Operating Instructions 1

ADC1000-USB Overview
USB Port The ADC1000-USB interfaces an S2000 Spectrometer to a notebook or desktop PC via a USB port. When interfaced to a PC via the USB port, the ADC1000-USB does not require an external power supply -- it draws its power from the PC to which it is connected.
The ADC1000-USB can connect via the USB port to any PC that uses a Windows 98/Me/2000/XP operating system and has OOIBase32 installed and configured for use with your ADC1000-USB. If multiple PCs meet these two qualifications, you can switch your ADC1000-USB and spectrometer among them.
The ADC1000-USB connects to the back of an S2000 Spectrometer and interfaces to a notebook computer via the USB port and USB cable.
Serial Port
ADC1000-USB Operating Instructions 2
The ADC1000-USB also has a serial port for interfacing the S2000 or S1024DW Spectrometer to PCs, PLCs and other devices that support the RS-232 communication protocol.

Using the ADC1000-USB: USB Mode
2 Using the ADC1000-USB The following sections provide instruction on configuring and using the ADC1000-USB via the USB port:
USB Port Overview
Note: To use the USB port on the ADC1000-USB, the PC to which you are connecting must run either the Windows 98, Windows ME, Windows 2000, or Windows XP operating systems.
USB connectivity is not available on Windows 95 or Windows NT systems.
Interface the ADC1000-USB to the Spectrometer If you ordered your S2000 Spectrometer and ADC1000-USB A/D Converter at the same time, the spectrometer and the A/D converter should share one housing (see the ADC1000-USB-S Notes section in this chapter). However, if you already owned a spectrometer and then purchased the ADC1000-USB separately, you must connect the ADC1000-USB to the back of the spectrometer. The picture below illustrates this connection:
S2000 Spectrometer ADC1000-USB
ADC1000-USB Operating Instructions 3
Note: Do not connect the ADC1000-USB to the PC at this time. You must install the OOIBase32 software first. If you connected the ADC1000-USB to your PC before you installed OOIBase32, you will NOT be able to use your spectrometer. See the Troubleshooting section for more information.

Using the ADC1000-USB: USB Mode
Install the OOIBase32 Software Consult your OOIBase32 documentation for instructions on installing OOIBase32.
Connect the ADC1000-USB to your USB Port The USB port on the PC will supply sufficient power to the ADC1000-USB only if the ADC1000-USB is connected to 5 or fewer spectrometer channels. If the ADC1000-USB is connected to more than 5 spectrometer channels, you will need an external power supply
Follow the steps below to connect the ADC1000-USB to the computer:
1. Locate the USB cable packaged with the ADC1000-USB.
2. Insert the square end of the cable into the side of the ADC1000-USB. Insert the flat rectangular end of the cable into a USB port on your PC.
If you installed OOIBase32 correctly, the Add New Hardware Wizard message appears. The driver (provided during the OOIBase32 installation) should automatically install.
Note: Wait 5-10 seconds between connecting the ADC1000-USB to the computer and starting the OOIBase32 software.
Configure the OOIBase32 Software – USB Port You will need to configure OOIBase32 before using the ADC1000-USB and your spectrometer. For details on using OOIBase32, consult the OOIBase32 Spectrometer Operating Software Manual, which can be found on the Software and Technical Resources CD and the Ocean Optics web site.
The following steps provide instruction on starting and configuring the OOIBase32 software with the ADC1000-USB:
ADC1000-USB Operating Instructions 4
1. Select Start > Programs > Ocean Optics > OOIBase32 and click on the OOIBase32 icon. If you are configuring OOIBase32 for the first time, the Configure Hardware screen appears:

Using the ADC1000-USB: USB Mode
2. Select S2000/PC2000/USB2000/HR2000 from the Spectrometer Type drop-down menu. Select ADC1000-USB from the A/D Converter Type drop-down menu. Select your ADC1000-USB from the USB Serial Number drop-down menu. Then, click the OK button. The User Name and Serial Number screen appears.
3. Enter a user name and software serial number, and then click the Next button. The Select Default Spectrometer Message appears:
4. Click the OK button. The Default Spectrometer Configuration screen appears.
5. Go to the OOIBase32 installation directory and select the file named XXX.spec, where XXX represents the serial number of your ADC1000-USB. Then, click the OK button.
Note: You will typically only set the parameters in this screen once -- when OOIBase32 is first installed and the software first opens. However, you can access this configuration screen at any time by selecting Configure > Hardware from the menu bar.
The system should now be configured to acquire data and respond to light. If you encounter problems, exit and restart the OOIBase32 program.
Configuring the Spectrometer The following section provides information on configuring your spectrometer and setting system parameters:
Open the Spectrometer Configuration Screen
Select Spectrometer > Configure from the menu bar. The Spectrometer Configuration screen appears:
ADC1000-USB Operating Instructions 5

Using the ADC1000-USB: USB Mode
Wavelength Calibration Tab
If your spectrometer and ADC1000-USB were packaged together, the displayed coefficients are read from a memory chip on the ADC1000-USB.
The numbers in the Wavelength Calibration tab must match the coefficients from the Wavelength Calibration Data Sheet that came with your spectrometer. If these numbers differ, copy the coefficients that are on the floppy diskette that you received with your spectrometer to your hard drive, or manually enter the values from the Wavelength Calibration Data Sheet and click the Write to ADC1000USB button.
Note: You can also update the Wavelength Calibration Coefficients using the USB Programmer.
A/D Interface Tab
Enter the same values as you did in the Configure Hardware dialog box (see the Configure the OOIBase32 Software – USB Port section for more information).
When you exit OOIBase32, this data is stored in the .spec file.
Setting OOIBase32 Parameters Select Edit > Settings from the OOIBase32 menu bar to open the OOIBase32 Settings screen.
From this screen, you can configure the following items:
• Configure options for saving, opening, and printing data
• Associate .WAV sounds with various program events
• Configure default-setting files
• Store data
• Copy data
ADC1000-USB Operating Instructions 6
• Configure warning messages

Using the ADC1000-USB: USB Mode
Configuring Data Acquisition Select Spectrum > Configure Data Acquisition from the OOIBase32 menu bar to open the Configure Data Acquisition screen.
From this screen, you can configure your data acquisition parameters such as integration time, averaging, boxcar smoothing, and several other parameters.
Saving Wavelength Calibration Coefficients: USB Mode You can store wavelength calibration coefficients unique to your S2000 Spectrometer on an EEPROM memory chip on the ADC1000-USB. Once they are stored in memory, OOIBase32 reads the wavelength calibration coefficients. This feature is only available when using the ADC1000-USB via the USB port.
Note: If you are using the ADC1000-USB via the serial port, proceed to the Saving Wavelength Calibration Coefficients: Serial Mode section.
Perform the following steps to save wavelength calibration coefficients using the USB mode:
1. Make sure that the S2000 Spectrometer and ADC1000-USB are connected to your PC.
2. Open OOIBase32 and select Spectrometer > Configure from the menu bar.
ADC1000-USB Operating Instructions 7
(Continued)

Using the ADC1000-USB: USB Mode
3. Select the Wavelength Calibration tab.
4. Enter in the values you acquired from Steps 5-6 in the Calibrating the Wavelength of the Spectrometer section.
ADC1000-USB Operating Instructions 8
5. Click on the Write to ADC1000USB button, then click the OK button.
Using the ADC1000-USB: Serial Mode
Serial Port Overview
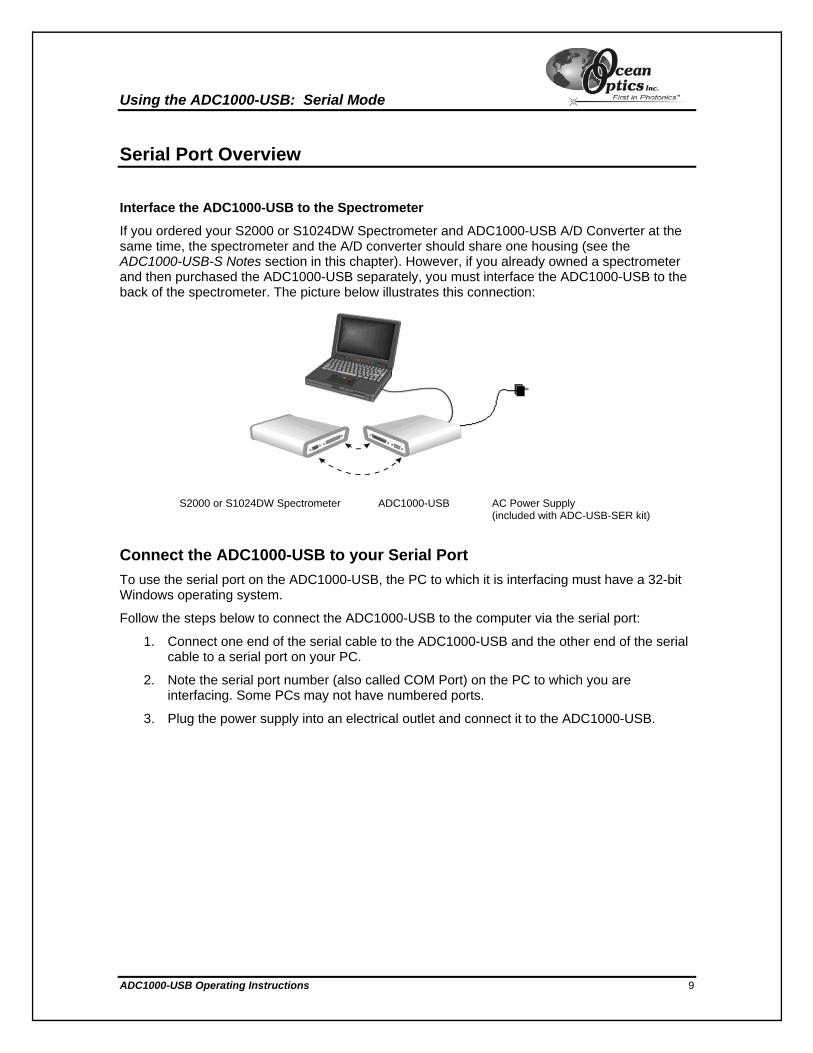
Interface the ADC1000-USB to the Spectrometer
If you ordered your S2000 or S1024DW Spectrometer and ADC1000-USB A/D Converter at the same time, the spectrometer and the A/D converter should share one housing (see the ADC1000-USB-S Notes section in this chapter). However, if you already owned a spectrometer and then purchased the ADC1000-USB separately, you must interface the ADC1000-USB to the back of the spectrometer. The picture below illustrates this connection:
S2000 or S1024DW Spectrometer ADC1000-USB AC Power Supply
(included with ADC-USB-SER kit)
Connect the ADC1000-USB to your Serial Port To use the serial port on the ADC1000-USB, the PC to which it is interfacing must have a 32-bit Windows operating system.
Follow the steps below to connect the ADC1000-USB to the computer via the serial port:
1. Connect one end of the serial cable to the ADC1000-USB and the other end of the serial cable to a serial port on your PC.
2. Note the serial port number (also called COM Port) on the PC to which you are interfacing. Some PCs may not have numbered ports.
ADC1000-USB Operating Instructions 9
3. Plug the power supply into an electrical outlet and connect it to the ADC1000-USB.
Using the ADC1000-USB: Serial Mode
Install the OOIBase32 Software Consult your OOIBase32 documentation for instructions on installing OOIBase32.
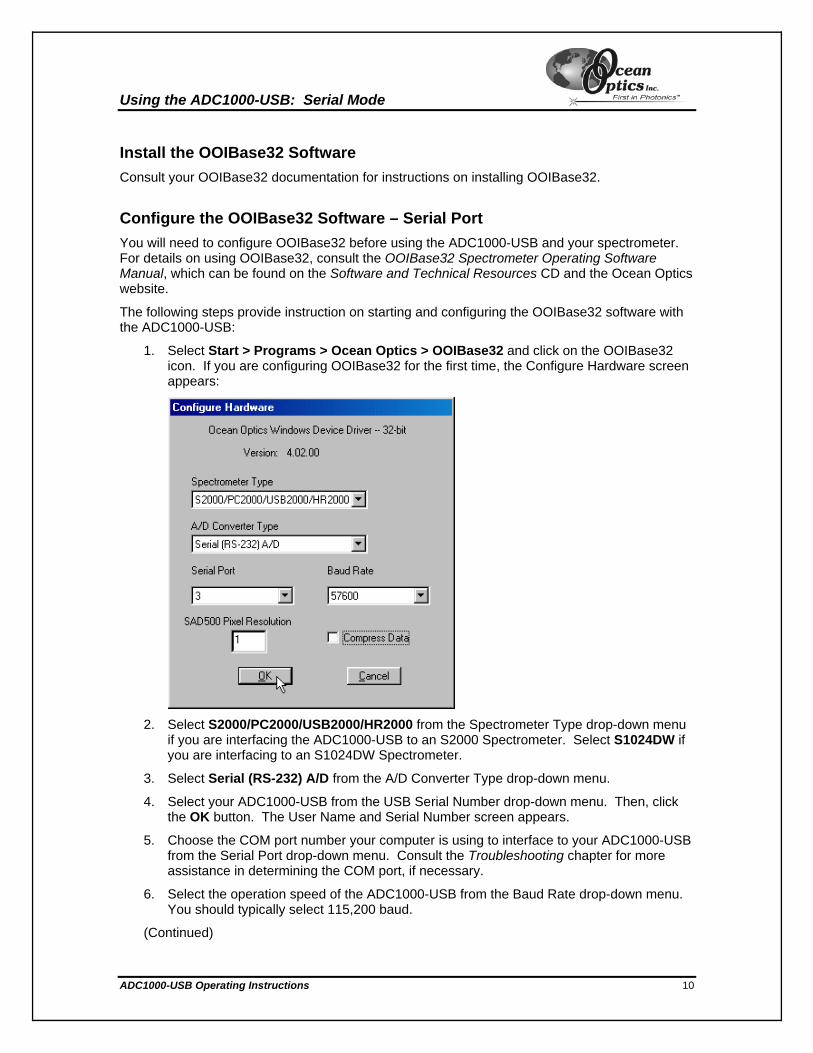
Configure the OOIBase32 Software – Serial Port You will need to configure OOIBase32 before using the ADC1000-USB and your spectrometer. For details on using OOIBase32, consult the OOIBase32 Spectrometer Operating Software Manual, which can be found on the Software and Technical Resources CD and the Ocean Optics website.
The following steps provide instruction on starting and configuring the OOIBase32 software with the ADC1000-USB:
1. Select Start > Programs > Ocean Optics > OOIBase32 and click on the OOIBase32 icon. If you are configuring OOIBase32 for the first time, the Configure Hardware screen appears:
2. Select S2000/PC2000/USB2000/HR2000 from the Spectrometer Type drop-down menu
if you are interfacing the ADC1000-USB to an S2000 Spectrometer. Select S1024DW if you are interfacing to an S1024DW Spectrometer.
3. Select Serial (RS-232) A/D from the A/D Converter Type drop-down menu.
4. Select your ADC1000-USB from the USB Serial Number drop-down menu. Then, click the OK button. The User Name and Serial Number screen appears.
5. Choose the COM port number your computer is using to interface to your ADC1000-USB from the Serial Port drop-down menu. Consult the Troubleshooting chapter for more assistance in determining the COM port, if necessary.
6. Select the operation speed of the ADC1000-USB from the Baud Rate drop-down menu. You should typically select 115,200 baud.
ADC1000-USB Operating Instructions 10
(Continued)

Using the ADC1000-USB: Serial Mode
7. Enter a value from 1-500 in the Pixel Resolution text box.
This value specifies that every nth pixel of the spectrometer will transmit from the ADC1000-USB to the PC. Sacrificing resolution equates to an increase in speed. The transfer of one complete spectra requires approximately 0.3 seconds at 115,200 baud. If you need information more frequently than 0.3 seconds per spectra, increase the resolution or enable data compression (see Step 8).
8. Select the Compress Data check box to enable the Compress Data function.
This option minimizes the amount of data transferred over the RS-232 connection. As transmission of spectral data over the serial port is a relatively slow process, enabling this function compresses every scan transmitted by the ADC1000-USB. This greatly increases the data transfer speed of the ADC1000-USB.
6. Click the OK button. The User Name and Serial Number screen appears.
7. Enter a user name and software serial number, and then click the Next button. The Select Default Spectrometer Message appears:
8. Click the OK button. The Default Spectrometer Configuration screen appears.
ADC1000-USB Operating Instructions 11
9. Go to the OOIBase32 installation directory and select the file named XXX.spec, where XXX represents the serial number of your ADC1000-USB. Then, click the OK button.
Note: You will typically only set the parameters in this screen once -- when OOIBase32 is first installed and the software first opens. However, you can access this configuration screen at any time by selecting Configure > Hardware from the menu bar.

Using the ADC1000-USB: Serial Mode
Configuring the Spectrometer The following section provides information on configuring your spectrometer and setting system parameters:
Open the Spectrometer Configuration Screen
Select Spectrometer > Configure from the menu bar. The Spectrometer Configuration screen appears:
A/D Interface Tab
Enter the same values as you did in the Configure Hardware dialog box (see the Configure the OOIBase32 Software – Serial Port section for more information).
ADC1000-USB Operating Instructions 12
When you exit OOIBase32, this data is stored in the .spec file.

Using the ADC1000-USB: Serial Mode
Setting OOIBase32 Parameters Select Edit > Settings from the OOIBase32 menu bar to open the OOIBase32 Settings screen.
From this screen, you can configure the following items:
• Configure options for saving, opening, and printing data
• Associate .WAV sounds with various program events
• Configure default-setting files
• Store data
• Copy data
• Configure warning messages
Configuring Data Acquisition Select Spectrum > Configure Data Acquisition from the OOIBase32 menu bar to open the Configure Data Acquisition screen.
From this screen you can configure your data acquisition parameters such as integration time, averaging, boxcar smoothing, and several other parameters.
ADC1000-USB Operating Instructions 13

Using the ADC1000-USB: Serial Mode
Saving Wavelength Calibration Coefficients: Serial Mode If you are interfacing the S2000 Spectrometer or S1024DW Spectrometer to your PC via the serial cable, you need to save the wavelength calibration coefficients to the .spec file that OOIBase32 accesses each time it opens.
Note: You cannot save the calibration coefficients to the EEPROM memory chip on the ADC1000-USB when using the serial mode.
To save wavelength calibration coefficients using the serial mode:
1. Open OOIBase32 and select Spectrometer > Configure from the menu bar.
2. Choose the Wavelength Calibration tab to update the wavelength coefficients within
OOIBase32.
3. Enter in the values you acquired from Steps 5-6 in the Calibrating the Wavelength of the Spectrometer section.
ADC1000-USB Operating Instructions 14
4. Click on the Apply button, then click the OK button.

Using the ADC1000-USB: Serial Mode
ADC1000-USB-S Notes
The ADC1000-USB-S does not function any differently from the ADC1000-USB. However, there are configuration notes specific to the ADC1000-USB-S that you must follow when using the ADC1000-USB-S.
ADC1000-USB-S Rear Panel The following image illustrates the rear panel of the ADC1000-USB-S A/D converter:
DO NOT USE
AC
S t
15-Pin ccessory onnector
Ensure that on the back to your spec
Power Inpu
When using source as loor more chadeliver enou
ADC1000-USB
Power Input
Power LED
you do not use thof the ADC1000-trometer.
t Specifications
the ADC1000-Ung as your spectnnels, you will negh power to acco
Operating Instruct
DO NOT USE
e upper 15-pin acUSB-S. Using the
SB-S in USB modrometer has 4 chaed to use an extemmodate all cha
ions
9-Pin erial Por
USB CableInput
cessory connector or the 25-pin ADC connector se ports may result in invalid data being returned
e, you do not need to connect an external 5V power nnels or less. However, if your spectrometer has 5 rnal 5V power source, as the USB cable cannot nnels.
15

Troubleshooting
3 Troubleshooting The following sections contain information on resolving some of the most common problems encountered when using the ADC1000-USB:
Troubleshooting Device Driver Installation Issue:
After connecting the ADC1000-USB to the PC, the Add New Hardware Wizard does not locate a device driver for the ADC1000-USB. Ultimately, a message appears stating that Windows has not installed a device driver.
Probable Cause:
You connected the ADC1000-USB to the PC prior to completing the OOIBase32 software installation. The ADC1000-USB driver is installed as part of the OOIBase32 package. If you connect the device to the computer prior to installing OOIBase32, no device driver will be available for the ADC1000-USB.
Resolution:
Follow the applicable steps below to remove the incorrectly installed device, device driver, and installation files.
Note: If these procedures do not correct your device driver problem, you will need to obtain the “Correcting Device Driver Issues” document from the document library located at http://www.oceanoptics.com/technical/engineering/
Remove the Unknown Device from Windows Device Manager
1. Open Windows Device Manager as follows:
Windows 98/Me:
• Go to the desktop and right-click on My Computer.
• Select Properties from the pop-up menu.
• Click on the Device Manager tab.
Windows 2000/XP:
• Click Start | Settings | Control Panel | System.
• Select the Hardware tab.
• Click on the Device Manager button.
ADC1000-USB Operating Instructions 16
(Continued)

Troubleshooting
(Remove Unknown Device from Device Manager Continued)
2. Locate the Other Devices option and expand the Other Devices selection by clicking on the "+" sign to the immediate left.
Note: Improperly installed USB devices may also appear under the Universal Serial Bus Controller option. Be sure to check this location if you cannot locate the unknown device.
3. Locate the unknown device (marked with a large question mark). Right-click on the Unknown Device listing and select the Uninstall or Remove option.
4. Click the OK button to continue. A warning box appears confirming the removal of the Unknown Device. Click the OK button to confirm the device removal.
5. Detach the ADC1000-USB from your computer.
Remove Improperly Installed Files
Windows 98:
1. Open Windows Explorer.
2. Navigate to the Windows | INF directory. If the INF directory is not visible, you will need to disable the “Hide System Files and Folders” option on in Windows Folder Options.
Note: If the INF directory is not visible, you will need to disable the “Hide System Files and Folders” and “Hide File Extensions for Known File Types” options in Windows Folder Options. You can access Windows Folder Options from Windows Explorer, under the View | Options menu selection.
3. Delete the OOI_USB.INF file in the INF directory.
4. Navigate to the Windows | System32 | Drivers directory.
5. Delete the EZUSB.SYS file.
6. Reinstall your Ocean Optics application and reboot the system when prompted.
7. Plug in the ADC1000-USB.
The system will now be able to locate and install the correct drivers for the ADC1000-USB.
ADC1000-USB Operating Instructions 17
(Continued)

Troubleshooting
(Remove Improperly Installed Files Continued)
Windows 2000:
1. Open Windows Explorer.
2. Navigate to the Windows | INF directory. If the INF directory is not visible, you will need to disable the “Hide System Files and Folders” option on in Windows Folder Options.
Note: If the INF directory is not visible, you will need to disable the “Hide System Files and Folders” and “Hide File Extensions for Known File Types” options in Windows Folder Options. You can access Windows Folder Options from Windows Explorer, under the Tools | Folder Options menu selection.
3. Delete the OOI_USB.INF and OOI_USB.PNF files in the INF directory.
4. Navigate to the Windows | System32 | Drivers directory.
5. Delete the EZUSB.SYS file.
6. Reinstall your Ocean Optics application and reboot the system when prompted.
7. Plug in the ADC1000-USB.
The system will now be able to locate and install the correct drivers for the ADC1000-USB.
Windows XP:
1. Open Windows Explorer.
2. Navigate to the Windows | INF directory. If the INF directory is not visible, you will need to disable the “Hide System Files and Folders” option on in Windows Folder Options.
Note: If the INF directory is not visible, you will need to disable the “Hide System Files and Folders” and “Hide File Extensions for Known File Types” options in Windows Folder Options. You can access Windows Folder Options from Windows Explorer, under the View | Options menu selection.
3. Delete the OOI_USB.INF and OOI_USB.PNF files in the INF directory.
4. Navigate to the Windows | System32 | Drivers directory.
5. Delete the EZUSB.SYS file.
6. Reinstall your Ocean Optics application and reboot the system when prompted.
7. Plug in the ADC1000-USB.
The system will now be able to locate and install the correct drivers for the ADC1000-USB.
Note: You can test to see if the ADC1000-USB is installed correctly by opening the USB Programmer. If the ADC1000-USB appears in the left pane of the USB Programmer window, the device is correctly installed and recognized.
ADC1000-USB Operating Instructions 18

Troubleshooting
An Older Version of OOIBase32 is Installed on the PC Issue:
The PC you wish to use with the ADC1000-USB has an older version of OOIBase32 installed on it.
Probable Cause:
Not applicable.
Resolution:
Install the latest version of OOIBase32 from the Software and Technical Resources CD. Alternately, you can download the latest version from the Ocean Optics website at the following address:
http://www.oceanoptics.com/technical/softwaredownloads.asp
You do not need to uninstall the older version first.
Software and Hardware are not Synchronized Issue:
The software and hardware do not seem to be synchronized.
Probable Cause:
A variety of factors may have caused the hardware and software to fall out of synchronization.
Resolution:
To resolve synchronization problems:
1. Exit OOIBase32 software.
2. Cycle the power on the ADC1000-USB
ADC1000-USB Operating Instructions 19
3. Restart the OOIBase32 software.
Troubleshooting
Serial Port Number is Unclear Issue:
The serial port used by the ADC1000-USB is unclear, or the serial ports on the PC are not numbered.
Probable Cause:
Not Applicable
Resolution:
Follow the appropriate steps below for your operating system to identify the serial port number:
Windows 95/98/Me
• Right-click on My Computer
• Select Properties
• Click on the Device Manager tab
Windows 2000/XP
• Right-click on My Computer
• Select Properties
• Select the Hardware tab
• Click on the Device Manager button
Windows NT
• Click the Start button
• Select Programs
• Select Administrative Tools (common) NT diagnostics.
Double-click on Ports (COM & LPT) to display the COM port numbers. Ensure there is no yellow or red warning sign next to the COM Port you are attempting to use.
ADC1000-USB Operating Instructions 20
Note: If the ports on your PC are not labeled and you don’t know the COM port you are using for your ADC1000-USB, you may have to resort to trial and error. If you choose the wrong serial port number, you will not see a dynamic trace responding to light near the bottom of the displayed graph. Instead, you will see a straight line at 0 counts.

Spectroscopic Accessories
4 Spectroscopic Accessories To find operating instructions on products such as light sources, sampling chambers, probes, fibers or any other of our spectroscopic accessories, check the Software and Technical Resources CD or our web site at www.OceanOptics.com/Technical/OperatingInstructions.asp.
Recommended Accessories
The following accessories are recommended for use with the ADC1000-USB A/D Converter:
Product Code Description Link
ADC-USB-SER
Serial Cable and Power Supply kit for use with ADC1000-USB
http://www.oceanoptics.com/products/ADcables.asp
USB-CBL-1 USB Cable to connect ADC1000-USB to USB port on desktop or notebook PC
http://www.oceanoptics.com/products/ADcables.asp
ADC1000-USB Operating Instructions 21

Appendix A: Specifications
Appendix 1 – Specifications
ADC1000-USB Specifications
Dimensions: 105.83 mm x 104.9 mm x 40.9 mm Weight: 230 g Power consumption: 150 mA @ 5 VDC Board architecture/design: USB and RS-232 interface external A/D board Sampling frequency: 1 MHz (maximum) Integration time: 3 milliseconds to 60 seconds
Data transfer rate: Via USB port, full scans (2048 wavelengths) into memory every 13 ms; Via RS-232, full scans into memory every 300 ms
A/D resolution/channels: 12-bit/8 channels
Operating systems:
Windows 98/Me/2000/XP when using USB port on desktop or notebook PCsAny Windows 32-bit operating system when using the serial port on desktop or notebook PCs Windows CE 2.11 and above when using the serial port on handheld PCs
Computer interface: USB and RS-232; if interfacing the ADC1000-USB to a PC via the serial port, a serial cable and 5 VDC power supply are required
Interface cable: Comes with cable for connecting the ADC1000-USB to a PC's USB port Serial cable required to connect the ADC1000-USB to PC's serial port
Spectrometer compatibility: Supports all S2000 Spectrometers and S1024DW Spectrometers Software compatibility: Supports all 32-bit Ocean Optics software Multiple-channel capability: Up to eight spectrometer channels
ADC1000-USB Operating Instructions 22

Appendix A: Specifications
Pinouts
The following section contains pinout information for 15-pin Accessory Connector pinouts and 9-pin Serial Connector pinouts:
15-pin Accessory Connector Pinouts When facing the 15-pin Accessory Connector on the ADC1000-USB, the pins are numbered as:
Pin # Description Pin # Description 1 Single Strobe Output 9 Analog Channel 1 Output 2 Multiple Strobe Output 10 Ground 3 +5 VDC 11 Analog Channel 4 Output 4 External Hardware Trigger Input 12 Analog Channel 5 Output 5 External Synchronization Input 13 Strobe/Lamp Enable TTL Output 6 Analog Channel 7 Output 14 Analog Channel 3 Output 7 Analog Channel 6 Output 15 Analog Channel 2 Output 8 Software Trigger Input
9-pin Serial Connector Pinouts When facing the 9-pin Serial Connector on the ADC1000-USB, the pins are numbered as:
ADC1000-USB Operating Instructions 23
Pin # Description Pin # Description Pin # Description 1 NC 4 NC 7 NC 2 Transmit 5 Ground 8 NC 3 Receive 6 Receive 9 NC
Index
1 15-pin, 23
9 9-pin, 23
A
A/D Interface, 12 A/D Interface Tab, 6 Accessories, 21 Accessory Connector, 23 ADC-USB-SER, 1, 21 Appendix 1, 22
D
Data Acquisition, 7 Configure - Serial, 13
Device Driver Installation, 16
I
Interface Options, 1
O
OOIBase32, 4 Configure - Serial, 10 Configure - USB, 4 Old Version, 19 Parameters - USB, 6 Parameters -Serial, 13
Operating System Requirements, 1 Overview, 1
Serial Port, 9
P
Pinouts, 23
R
Recommended Accessories, 21
S Serial Connector, 23 Serial Port, 2
Number, 20 Specifications, 22 Spectrometer, 5
Configure - USB, 5 Spectrometer Configuration Screen, 5, 12 Spectroscopic Accessories, 21 Synchronization, 19
T
Troubleshooting, 16
U
USB Port, 2 Overview, 3, 15
USB-CBL-1, 21
W
Wavelength Calibration Coefficients - Serial, 14 Wavelength Calibration Coefficients - USB, 7 Wavelength Calibration Tab, 6
ADC1000-USB Operating Instructions 24