Engine Compartment Inspection - CareerTech (CT) · Check power steering fluid and filter Check...
20
MAVCC—Diesel Technology: Preventive Maintenance Page 7–1 Unit Contents Student Page Student Components Learning Activities Sheet 7–3 Abbreviated Checklist 7–5 Objective Sheet 7–7 Expanded Checklist 7–9 * Job Sheets 1—Inspect and Adjust Alternator Drive Belts and Tensioners 119 2—Take Oil Sample, and Change Oil and Filter(s) 123 3—Inspect Engine Coolant Level and Condition 127 4—Pressure Test Coolant System and Radiator Cap 131 5—Make a Charging System Output Test; Determine Needed Repairs 135 6—Perform an Engine Compartment Inspection 139 * The Jobs Sheets are located in the Student Workbook Engine Compartment Inspection
Transcript of Engine Compartment Inspection - CareerTech (CT) · Check power steering fluid and filter Check...
MAVCC—Diesel Technology: Preventive Maintenance Page 7–1
Unit Contents
Student Page
StudentComponents
Learning Activities Sheet . . . . . . . . . . . . . . . . . . . . . . . . . . . . . . . . . . . . 7–3
Abbreviated Checklist . . . . . . . . . . . . . . . . . . . . . . . . . . . . . . . . . . . . . . . 7–5
Objective Sheet . . . . . . . . . . . . . . . . . . . . . . . . . . . . . . . . . . . . . . . . . . . 7–7
Expanded Checklist . . . . . . . . . . . . . . . . . . . . . . . . . . . . . . . . . . . . . . . . 7–9
* Job Sheets
1—Inspect and Adjust Alternator Drive Belts and Tensioners . . . . . 119 2—Take Oil Sample, and Change Oil and Filter(s) . . . . . . . . . . . . . 123 3—Inspect Engine Coolant Level and Condition . . . . . . . . . . . . . . . 127 4—Pressure Test Coolant System and Radiator Cap . . . . . . . . . . . 131 5—Make a Charging System Output Test; Determine Needed Repairs . . . . . . . . . . . . . . . . . . . . . . . . . . . . . . . . . . . . . 135 6—Perform an Engine Compartment Inspection . . . . . . . . . . . . . . . 139
* The Jobs Sheets are located in the Student Workbook .
Engine Compartment Inspection

MAVCC—Diesel Technology: Preventive Maintenance Page 7–3
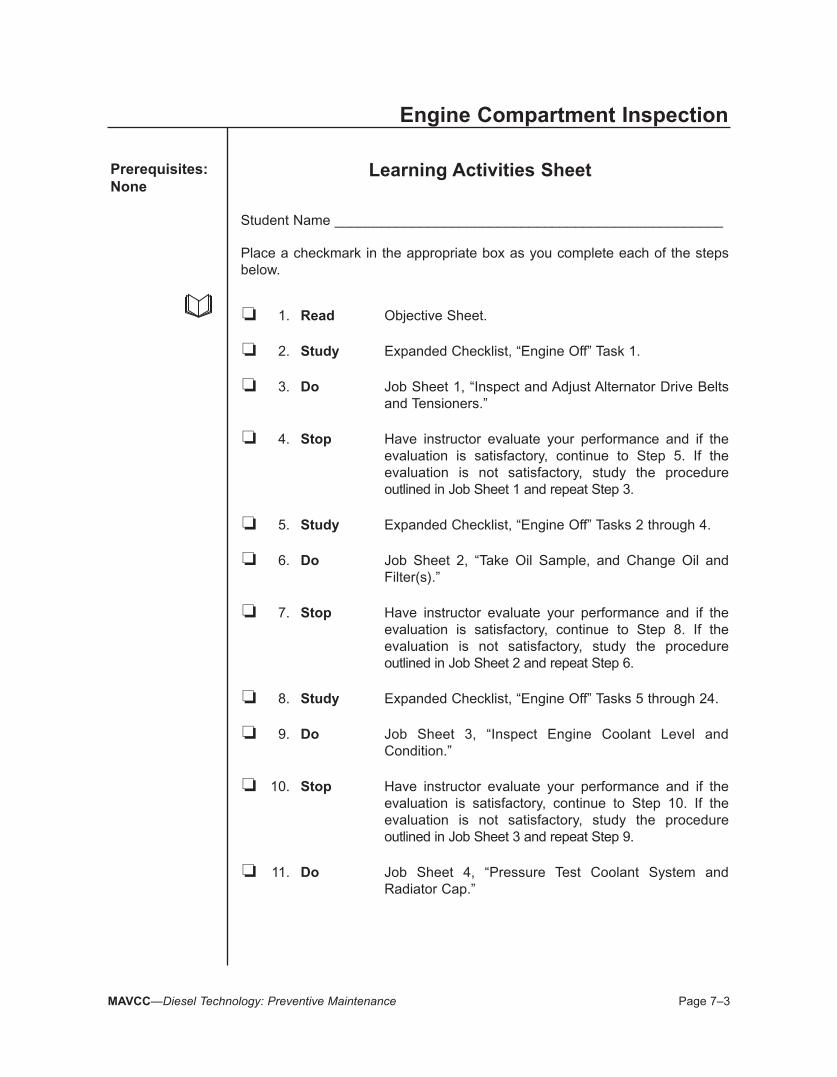
Prerequisites:None
Learning Activities Sheet
Student Name __________________________________________________
Place a checkmark in the appropriate box as you complete each of the steps below .
❏ 1 . Read Objective Sheet .
❏ 2 . Study Expanded Checklist, “Engine Off” Task 1 .
❏ 3 . Do Job Sheet 1, “Inspect and Adjust Alternator Drive Belts and Tensioners .”
❏ 4 . Stop Have instructor evaluate your performance and if the evaluation is satisfactory, continue to Step 5 . If the evaluation is not satisfactory, study the procedure outlined in Job Sheet 1 and repeat Step 3 .
❏ 5 . Study Expanded Checklist, “Engine Off” Tasks 2 through 4 .
❏ 6 . Do Job Sheet 2, “Take Oil Sample, and Change Oil and Filter(s) .”
❏ 7 . Stop Have instructor evaluate your performance and if the evaluation is satisfactory, continue to Step 8 . If the evaluation is not satisfactory, study the procedure outlined in Job Sheet 2 and repeat Step 6 .
❏ 8 . Study Expanded Checklist, “Engine Off” Tasks 5 through 24 .
❏ 9 . Do Job Sheet 3, “Inspect Engine Coolant Level and Condition .”
❏ 10 . Stop Have instructor evaluate your performance and if the evaluation is satisfactory, continue to Step 10 . If the evaluation is not satisfactory, study the procedure outlined in Job Sheet 3 and repeat Step 9 .
❏ 11 . Do Job Sheet 4, “Pressure Test Coolant System and Radiator Cap .”
Engine Compartment Inspection
Page 7–4 MAVCC—Diesel Technology: Preventive Maintenance
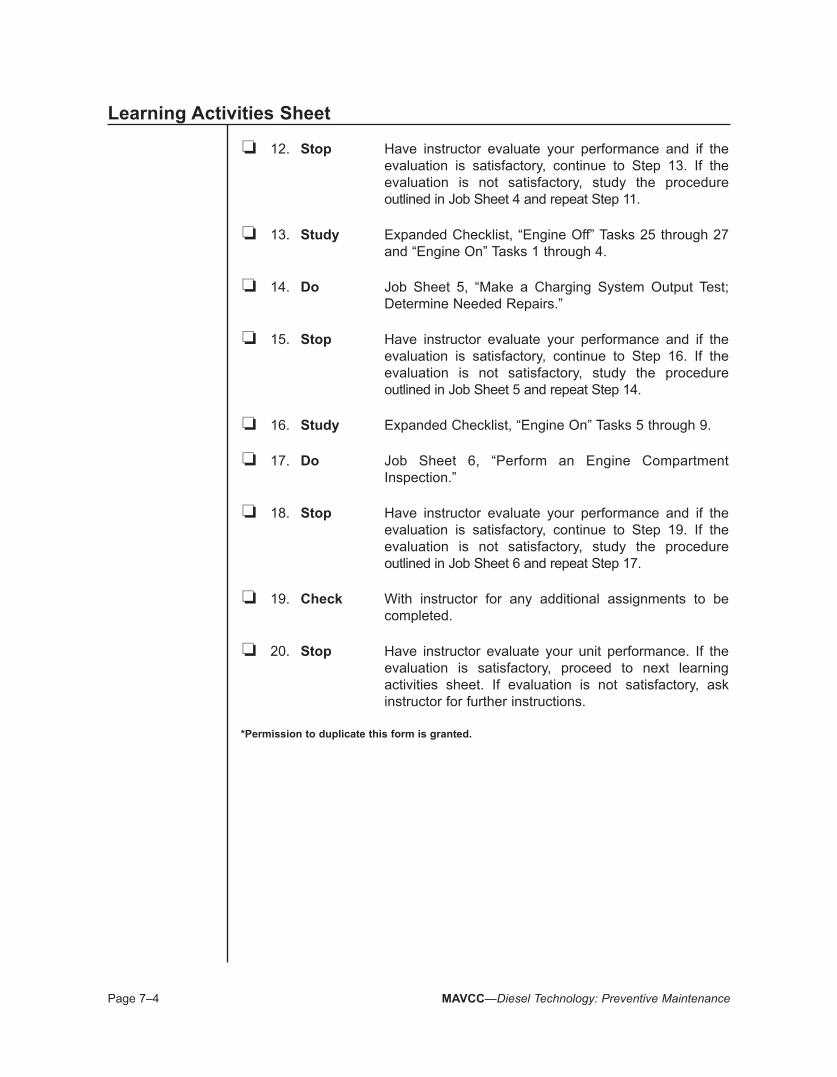
❏ 12 . Stop Have instructor evaluate your performance and if the evaluation is satisfactory, continue to Step 13 . If the evaluation is not satisfactory, study the procedure outlined in Job Sheet 4 and repeat Step 11 .
❏ 13 . Study Expanded Checklist, “Engine Off” Tasks 25 through 27 and “Engine On” Tasks 1 through 4 .
❏ 14 . Do Job Sheet 5, “Make a Charging System Output Test; Determine Needed Repairs .”
❏ 15 . Stop Have instructor evaluate your performance and if the evaluation is satisfactory, continue to Step 16 . If the evaluation is not satisfactory, study the procedure outlined in Job Sheet 5 and repeat Step 14 .
❏ 16 . Study Expanded Checklist, “Engine On” Tasks 5 through 9 .
❏ 17 . Do Job Sheet 6, “Perform an Engine Compartment Inspection .”
❏ 18 . Stop Have instructor evaluate your performance and if the evaluation is satisfactory, continue to Step 19 . If the evaluation is not satisfactory, study the procedure outlined in Job Sheet 6 and repeat Step 17 .
❏ 19 . Check With instructor for any additional assignments to be completed .
❏ 20 . Stop Have instructor evaluate your unit performance . If the evaluation is satisfactory, proceed to next learning activities sheet . If evaluation is not satisfactory, ask instructor for further instructions .
*Permission to duplicate this form is granted.
Learning Activities Sheet
MAVCC—Diesel Technology: Preventive Maintenance Page 7–5
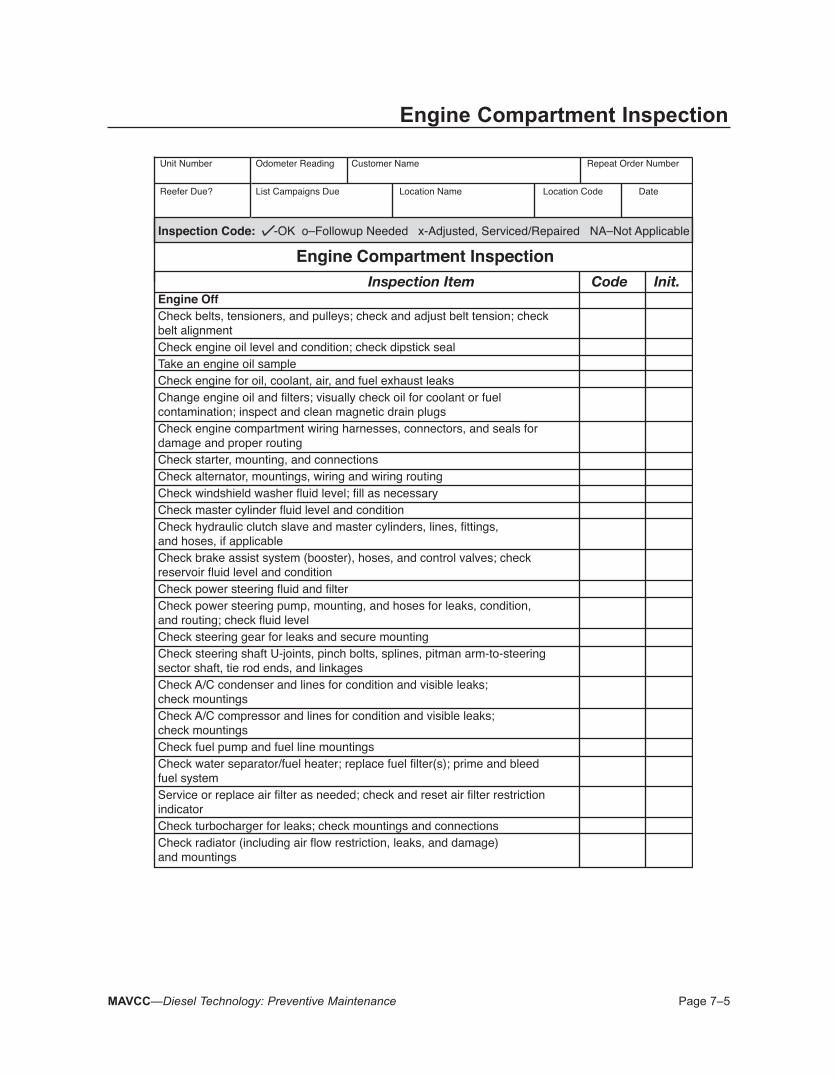
Inspection Code: -OK o–Followup Needed x-Adjusted, Serviced/Repaired NA–Not Applicable
Engine Compartment Inspection
Unit Number Odometer Reading Customer Name Repeat Order Number
Reefer Due? List Campaigns Due Location Name Location Code Date
Inspection Item Code Init.Engine OffCheck belts, tensioners, and pulleys; check and adjust belt tension; checkbelt alignmentCheck engine oil level and condition; check dipstick sealTake an engine oil sampleCheck engine for oil, coolant, air, and fuel exhaust leaksChange engine oil and filters; visually check oil for coolant or fuelcontamination; inspect and clean magnetic drain plugsCheck engine compartment wiring harnesses, connectors, and seals fordamage and proper routingCheck starter, mounting, and connectionsCheck alternator, mountings, wiring and wiring routingCheck windshield washer fluid level; fill as necessaryCheck master cylinder fluid level and conditionCheck hydraulic clutch slave and master cylinders, lines, fittings,and hoses, if applicableCheck brake assist system (booster), hoses, and control valves; checkreservoir fluid level and conditionCheck power steering fluid and filterCheck power steering pump, mounting, and hoses for leaks, condition,and routing; check fluid levelCheck steering gear for leaks and secure mountingCheck steering shaft U-joints, pinch bolts, splines, pitman arm-to-steeringsector shaft, tie rod ends, and linkagesCheck A/C condenser and lines for condition and visible leaks;check mountingsCheck A/C compressor and lines for condition and visible leaks;check mountingsCheck fuel pump and fuel line mountingsCheck water separator/fuel heater; replace fuel filter(s); prime and bleedfuel systemService or replace air filter as needed; check and reset air filter restrictionindicatorCheck turbocharger for leaks; check mountings and connectionsCheck radiator (including air flow restriction, leaks, and damage)and mountings
Engine Compartment Inspection
Page 7–6 MAVCC—Diesel Technology: Preventive Maintenance
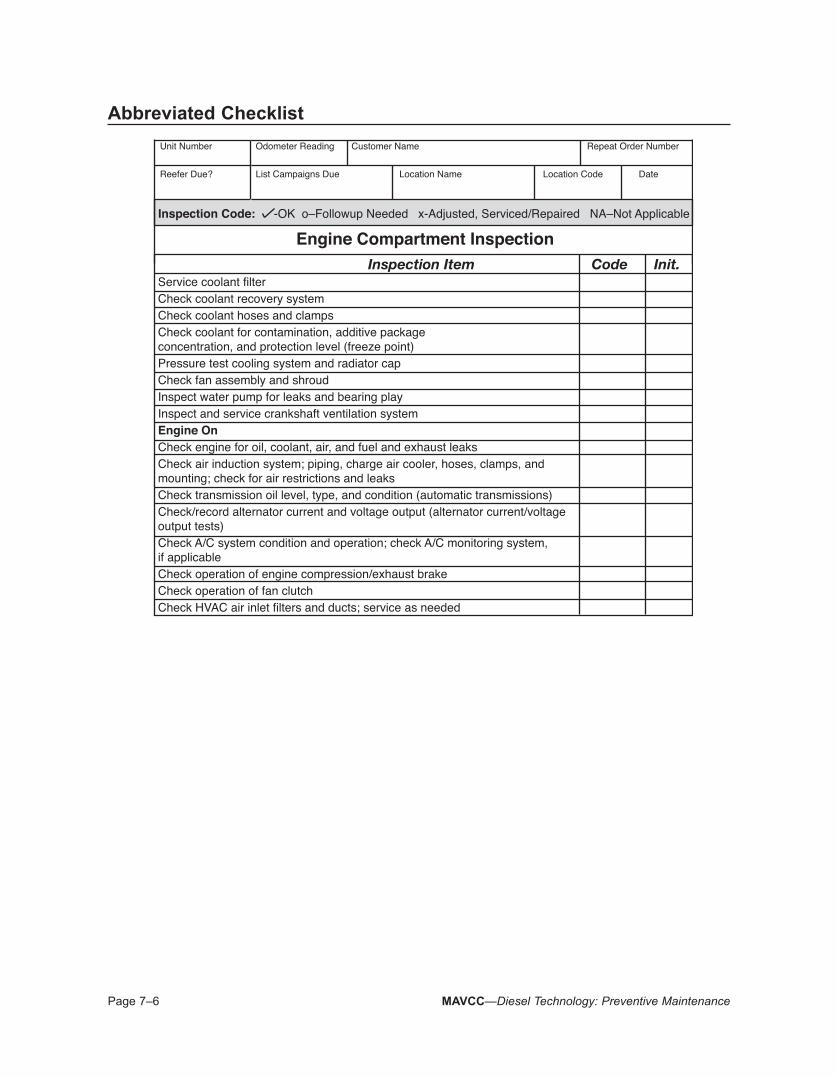
Inspection Code: -OK o–Followup Needed x-Adjusted, Serviced/Repaired NA–Not Applicable
Engine Compartment Inspection
Unit Number Odometer Reading Customer Name Repeat Order Number
Reefer Due? List Campaigns Due Location Name Location Code Date
Inspection Item Code Init.Service coolant filterCheck coolant recovery systemCheck coolant hoses and clampsCheck coolant for contamination, additive packageconcentration, and protection level (freeze point)Pressure test cooling system and radiator capCheck fan assembly and shroudInspect water pump for leaks and bearing playInspect and service crankshaft ventilation systemEngine OnCheck engine for oil, coolant, air, and fuel and exhaust leaksCheck air induction system; piping, charge air cooler, hoses, clamps, andmounting; check for air restrictions and leaksCheck transmission oil level, type, and condition (automatic transmissions)Check/record alternator current and voltage output (alternator current/voltageoutput tests)Check A/C system condition and operation; check A/C monitoring system,if applicableCheck operation of engine compression/exhaust brakeCheck operation of fan clutchCheck HVAC air inlet filters and ducts; service as needed
Abbreviated Checklist

MAVCC—Diesel Technology: Preventive Maintenance Page 7–7
Objective Sheet
SpecificObjectives
After completing this unit, the student should be able to perform an engine compartment inspection . The student should demonstrate these competencies by completing Job Sheet 6 .
UnitObjective
After completing this unit, the student should be able to:
1 . Inspect and adjust alternator drive belts and tensioners . (Job Sheet 1)
2 . Take oil sample and change oil and filter(s) . (Job Sheet 2)
3 . Inspect engine coolant level and condition . (Job Sheet 3)
4 . Pressure test coolant system and radiator cap . (Job Sheet 4)
5 . Make a charging system output test; determine needed repairs . (Job Sheet 5)
6 . Perform an engine compartment inspection . (Job Sheet 6)
Engine Compartment Inspection

MAVCC—Diesel Technology: Preventive Maintenance Page 7–9
Engine Compartment Expanded Checklist
Engine Off
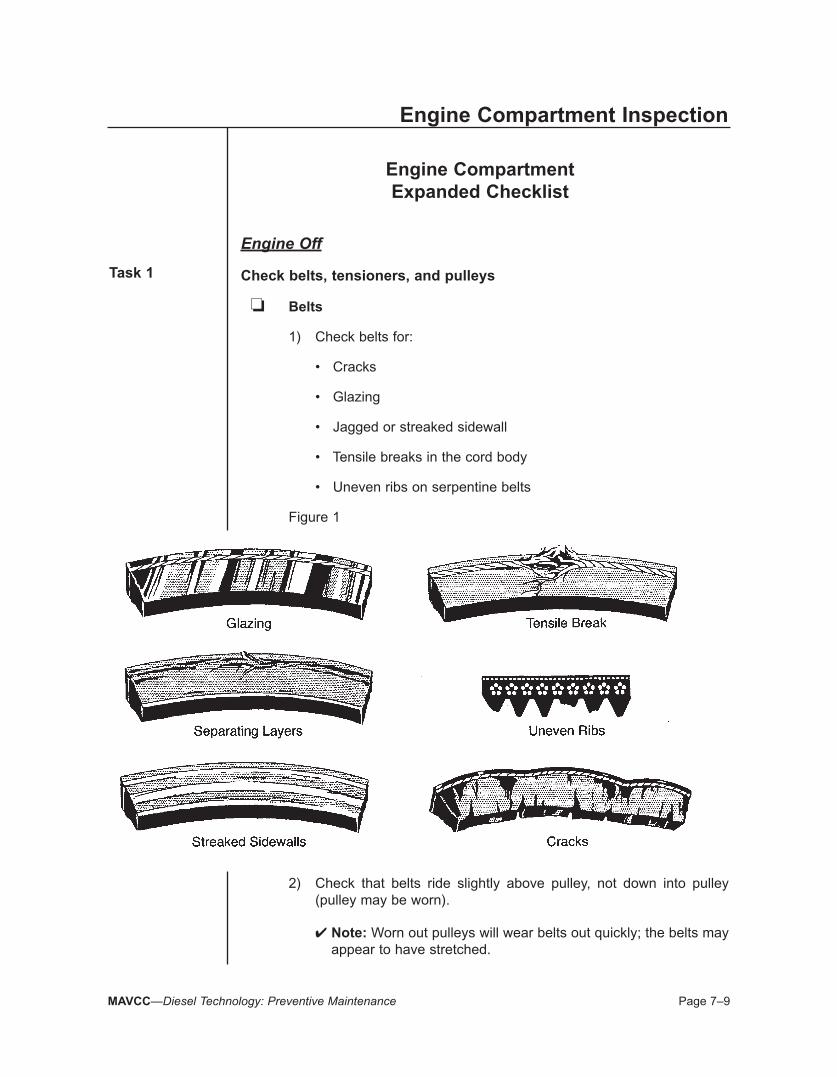
Task 1 Check belts, tensioners, and pulleys
❏ Belts
1) Check belts for:
•Cracks
•Glazing
•Jaggedorstreakedsidewall
•Tensilebreaksinthecordbody
•Unevenribsonserpentinebelts
Figure 1
2) Check that belts ride slightly above pulley, not down into pulley (pulley may be worn) .
✔ Note: Worn out pulleys will wear belts out quickly; the belts may appear to have stretched .
Engine Compartment Inspection
Page 7–10 MAVCC—Diesel Technology: Preventive Maintenance
❏ Tensioners—Check that belt tensioners are holding tension on the belt .
✔ Note: If a vehicle has an auto tensioner and the belt is loose, the belt must be replaced . They cannot be adjusted .
❏ Pulleys
1) Check that pulleys do not have excessive play or wobble .
2) Check that pulleys are aligned .
3) Check pulleys for foreign objects .
Task 2 Check engine oil and condition; check dipstick seal
✔ Note: Always clean around the dipstick with a clean rag before removing the dipstick .
❏ Check that oil is at the proper level .
❏ Check dipstick for signs of coolant and fuel contamination .
❏ Check that there's no oil leakage at the dipstick seal .
Task 3 Check engine for oil, coolant, air, and fuel exhaust leaks
❏ Check the entire engine compartment for any visible signs of leaks, focusing on seals, gaskets, hoses, filters, and drain plugs .
✔ Note: Sometimes it’s hard to determine where leaking fluids or exhaust are coming from . Once fluids get into moving parts, they may be sprayed all over the engine compartment .
Task 4 Change engine oil and filters, inspect and clean magnetic drain plugs, and take an oil sample
❏ Change engine oil and filters; inspect and clean magnetic drain plugs .
1) Start and warm the vehicle to operating temperature .
2) Drain the oil and check the magnetic drain plug for contamination .
✔ Note: Evidence of metal shavings or other contamination on the magnetic drain plug could indicate problems within the engine .
3) Replace the oil filter .
4) Refill with oil .
❏ Take an oil sample .
✔ Note: Oil samples should be taken from oil midway through the draining .
Expanded Checklist
MAVCC—Diesel Technology: Preventive Maintenance Page 7–11
Task 5 Check engine compartment wiring harnesses, connectors, and seals for damage and proper routing
❏ Wiring harnesses
1) Check that wiring harnesses are routed properly .
2) Check that wiring harnesses are clear of moving parts .
3) Check that wiring harnesses are clear of heat producing sources (exhaust, etc .) .
4) Check that wiring harnesses are not pinched .
5) Check that wire insulators are not cracked, chafed, or charred .
6) Check that wiring harnesses are not rubbing against other wiring or sharp edges .
❏ Connectors—Check that connectors are in good shape and show no signs of electrical arcing .
❏ Seals—Check that seals are not damaged .
Task 6 Check starter mounting and connections
❏ Check that the starter is securely mounted .
❏ Check that all electrical connections are tight and that wiring not rubbing or chafing .
Task 7 Check alternator mounting, wiring, and wire routing
❏ Check that the alternator is mounted securely .
❏ Check that all electrical connections are tight and not corroded .
❏ Check that electrical wiring is not rubbing or chafing .
Task 8 Check windshield washer fluid
❏ Check that windshield washer fluid container is filled to the proper level .
Expanded Checklist

Page 7–12 MAVCC—Diesel Technology: Preventive Maintenance
Task 9 Check brake master cylinder fluid level and condition
❏ Check fluid level and condition in master cylinder . Add as necessary .
✔ Note: When adding brake fluid, use only brake fluids approved for that application .
❏ Check for fluid leaks .
Task 10 Check hydraulic clutch slave and master cylinders
❏ Check hydraulic clutch slave fluid level and condition .
❏ Check for fluid leaks on master and slave cylinder .
❏ Check for proper routing and mounting of lines and fittings .
❏ Check lines, hoses and fittings for leaks .
Task 11 Check brake assist system (booster), hoses, and control valves; check reservoir fluid level and condition
❏ Check for secure mounting .
❏ Check power booster(s) for external leaks .
❏ Check control valve for external leaks .
❏ Check all lines and hoses for leaks or kinks .
❏ Check reservoir fluid level and condition .
Expanded Checklist
MAVCC—Diesel Technology: Preventive Maintenance Page 7–13
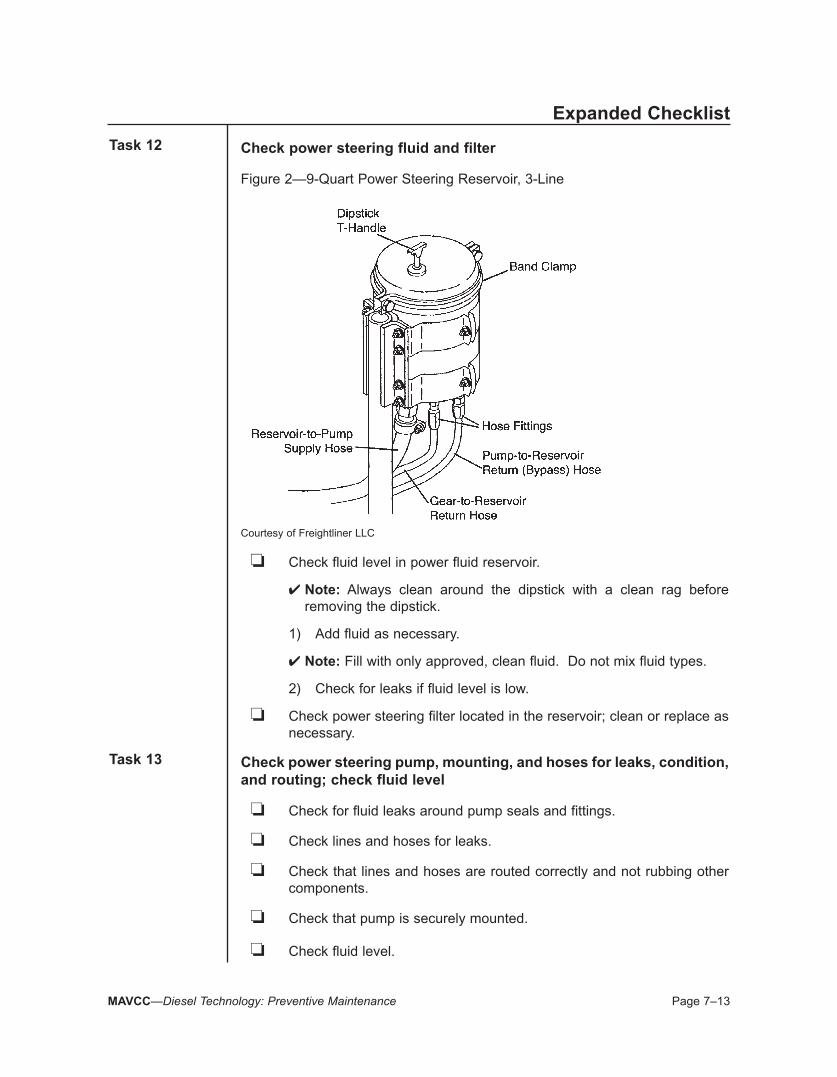
Task 12 Check power steering fluid and filter
Figure 2—9-Quart Power Steering Reservoir, 3-Line
Courtesy of Freightliner LLC
❏ Check fluid level in power fluid reservoir .
✔ Note: Always clean around the dipstick with a clean rag before removing the dipstick .
1) Add fluid as necessary .
✔ Note: Fill with only approved, clean fluid . Do not mix fluid types .
2) Check for leaks if fluid level is low .
❏ Check power steering filter located in the reservoir; clean or replace as necessary .
Task 13 Check power steering pump, mounting, and hoses for leaks, condition, and routing; check fluid level
❏ Check for fluid leaks around pump seals and fittings .
❏ Check lines and hoses for leaks .
❏ Check that lines and hoses are routed correctly and not rubbing other components .
❏ Check that pump is securely mounted .
❏ Check fluid level .
Expanded Checklist
Page 7–14 MAVCC—Diesel Technology: Preventive Maintenance
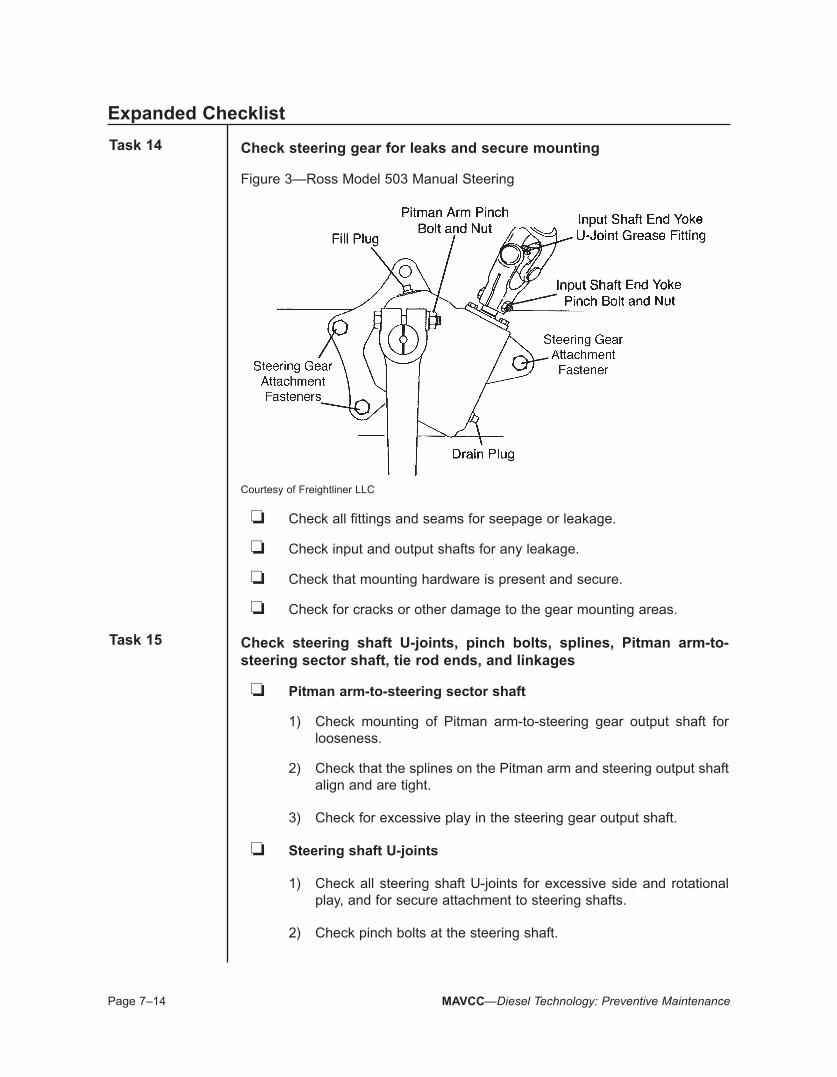
Task 14 Check steering gear for leaks and secure mounting
Figure 3—Ross Model 503 Manual Steering
Courtesy of Freightliner LLC
❏ Check all fittings and seams for seepage or leakage .
❏ Check input and output shafts for any leakage .
❏ Check that mounting hardware is present and secure .
❏ Check for cracks or other damage to the gear mounting areas .
Task 15 Check steering shaft U-joints, pinch bolts, splines, Pitman arm-to-steering sector shaft, tie rod ends, and linkages
❏ Pitman arm-to-steering sector shaft
1) Check mounting of Pitman arm-to-steering gear output shaft for looseness .
2) Check that the splines on the Pitman arm and steering output shaft align and are tight .
3) Check for excessive play in the steering gear output shaft .
❏ Steering shaft U-joints
1) CheckallsteeringshaftU-joints forexcessivesideand rotationalplay, and for secure attachment to steering shafts .
2) Check pinch bolts at the steering shaft .
Expanded Checklist

MAVCC—Diesel Technology: Preventive Maintenance Page 7–15
❏ Tie rod ends and drag links
1) Check tie rod ends for excessive axial play (in/out of joint) .
2) Check drag link joints for excessive axial play (in/out of joint) .
3) Check that the threaded portion of the tie-rod end assembly is inserted into the cross-tube for adequate clamping .
Figure 4—Tie-Rod End Adjustment
Courtesy of Freightliner LLC
❏ Linkage assist power steering cylinders
1) Check for secure attachment .
2) Check for leaks at fittings, hoses, and piston seals .
Task 16 Check A/C condenser/compressor and lines for mounting, condition, and leaks
❏ Check the front side of the condenser for debris that might cause an airflow restriction .
❏ Check that condenser is mounted tightly .
❏ Check condenser lines for condition and leaks .
❏ Check compressor for:
1) Broken brackets
2) Loose or missing bolts
3) Alignment of belt and pulleys
Expanded Checklist
Page 7–16 MAVCC—Diesel Technology: Preventive Maintenance
4) Condition of refrigerant hoses and for leaks
5) Dust caps on all service ports
6) Mounting and condition of condenser
Task 17 Check fuel pump and fuel line mountings
❏ Check that fuel pump mounts are secure .
❏ Check that fuel line mounts are secure .
✔ Note: Loose pump or line mounts may fail from the vibration of the engine and road if not secure .
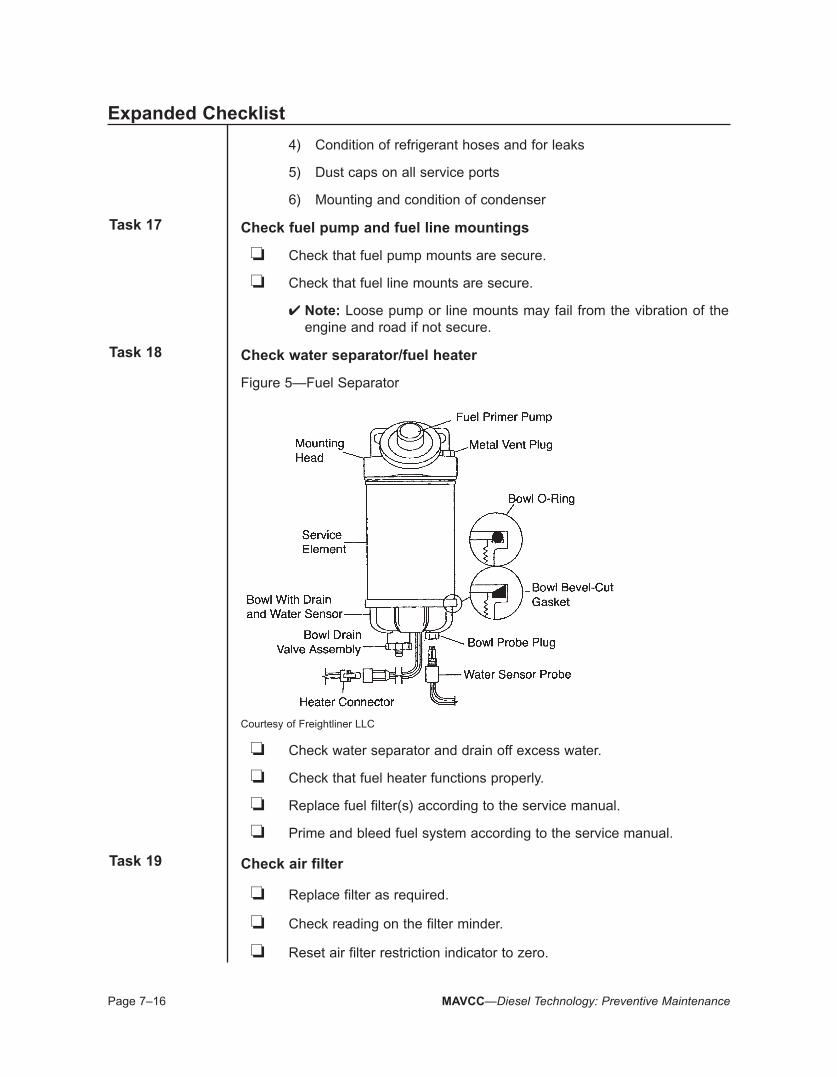
Task 18 Check water separator/fuel heater
Figure 5—Fuel Separator
Courtesy of Freightliner LLC
❏ Check water separator and drain off excess water .
❏ Check that fuel heater functions properly .
❏ Replace fuel filter(s) according to the service manual .
❏ Prime and bleed fuel system according to the service manual .
Task 19 Check air filter
❏ Replace filter as required .
❏ Check reading on the filter minder .
❏ Resetairfilterrestrictionindicatortozero.
Expanded Checklist
MAVCC—Diesel Technology: Preventive Maintenance Page 7–17
Task 20 Check turbocharger for leaks; check mountings and connections
❏ Check turbocharger visually for leaks .
❏ Check mounting for security .
❏ Check charge air hoses and pipes .
Task 21 Check radiator; service coolant filter
❏ Check radiator visually for leaks, damage, air flow restrictions (debris) .
❏ Check that radiator is securely mounted .
❏ Check coolant filter according to the service manual .
Task 22 Check coolant recovery system, and coolant hoses and clamps
❏ Check recovery system for holes and proper mounting .
❏ Check that the cap is secure .
❏ Check radiator hoses for leaks and cracks .
❏ Check clamps for tightness .
Task 23 Check coolant for contamination, additive concentration, and protection levels
❏ Contamination—Check that there are no contaminants such as oil, rust, or debris present in the coolant .
❏ Supplemental Coolant Additives (SCA)—Check coolant for proper inhibition either by test strip or titration method and record your reading on the checklist .
❏ Protection level (freeze point)—Check protection level using a refractometer and record your reading on the checklist .
✔ Note: Protection level should be between -25°F and -35°F . If the system has the correct protection level but additional coolant is needed, use a 50-50 solution to top off the system .
Task 24 Pressure test cooling system and radiator cap
❏ Pressure test cooling system and radiator cap to ensure correct pressure in the system .
Expanded Checklist
Page 7–18 MAVCC—Diesel Technology: Preventive Maintenance
Task 25 Check fan assembly and shroud
❏ Check fan shroud condition and mounting .
❏ Check blade assembly for cracks .
❏ Graspfanbladesandcheckforexcessiveplayintheshaft.
❏ Check for adequate clearance between all moving parts
Task 26 Inspect water pump for leaks and bearing play
❏ Check for missing/loose bolts, cracks, proper belt tension, and coolant leaks .
❏ Loosen the belt and pull the belt off of the pump . Spin the belt drive with your hands to see if it rolls smoothly and to determine if there is any movement or "play" in the driveshaft bearings .
Task 27 Inspect and service crankshaft ventilation system
❏ Inspect and service the crankshaft ventilation system according to manufacturer's specifications .
✔ Note: Vehicles may have closed or open ventilation systems .
Engine On
Task 1 Check engine for oil, coolant, air, fuel, and exhaust leaks
❏ Check all oil, coolant, air, and fuel lines for leaks .
❏ Check exhaust system for leaks .
Task 2 Check air induction system
❏ Check charge air cooler for leaks .
❏ Check piping for leaks .
❏ Check all hoses for leaks and restrictions .
❏ Check for cracked or broken mountings and brackets .
Task 3 Check transmission oil level, type, and condition (automatic transmissions)
❏ Check that transmission oil is at the “full” mark on the dipstick .
✔ Note: Always clean around the dipstick with a clean rag before removing the dipstick .
❏ Check oil for presence of water (milky color) or metallic particles (silver sheen) .
Expanded Checklist
MAVCC—Diesel Technology: Preventive Maintenance Page 7–19
❏ Check that the oil does not smell burnt .
❏ Check for the recommended type of oil before adding oil to the transmission .
Task 4 Check/record alternator current and voltage output
❏ Check and record alternator current output .
❏ Check and record alternator voltage output .
Task 5 Check air conditioning system
❏ Check that all controls function properly .
❏ Check for proper cooling in the cab .
❏ Check for proper level of refrigerant .
Task 6 Check operation of engine compression/exhaust brake
❏ Exhaust brake
1) Build air pressure to at least 85 psi .
2) With the engine at idle, activate the exhaust brake with the switch on the dash .
3) The brake should exhaust releasing the brake’s air supply system .
✔ Note: Accelerating the engine should release the brake .
❏ Engine compression brake—Use the procedures contained in theappropriate service manual .
Task 7 Check operation of fan clutch
❏ Check that the fan clutch engages at the correct temperature .
✔ Note: All fan clutches will engage when the engine temperature reaches a predetermined temperature which is above the thermostat opening temperature .
❏ Check that the fan clutch engages when the A/C system is engaged .
Task 8 Check HVAC inlet filters and ducts
❏ Check that HVAC inlet filters are clean .
❏ Check that the inlet ducts are clear of debris .
Expanded Checklist
Page 7–20 MAVCC—Diesel Technology: Preventive Maintenance
Task 9 Check exhaust system for leaks, proper routing, and damaged or missing components to include exhaust gas recirculation (EGR) system and after treatment devices, if equipped
❏ Mounting and damaged/missing components
1) Check muffler(s) for secure mounting to vehicle, pipes, or exhaust stacks .
2) Check for missing fasteners on exhaust pipes and mufflers .
3) Check supports for excessive rust or cracks .
4) Check muffler for holes, dents, or other damage .
5) Check for missing components (such as mufflers) .
❏ Leaks and routing
1) Check pipes and mufflers for any sign of leaks .
✔ Note: It is not permissible for the exhaust system to be leaking at a point forward of, or directly below, the driver/sleeper compartment .
2) Check that the exhaust outlet is aft or above any part of the vehicle designed to be occupied .
3) Check that the exhaust system does not rub or contact any other objects .
✔ Note: No part of the exhaust system shall be positioned in a location that could result in burning, charring, or damaging the electrical wiring, fuel supply, or any combustible part of the vehicle .
❏ EGR system and after treatment devices—Use the procedurescontained in the appropriate service manual .
Expanded Checklist