el series organ workshop - Yamaha Club
14
6 el series organ workshop JUNE / JULY 2006 ‘I share the universal sadness and shock that we are now without Tony Back. I used to attend his Elka demos and collected his LPs avidly and have always been struck by the beautiful sounds he produced and the mellifluous melodies he wrote. Taking over the baton in the magazine (as Glyn puts it), is a daunting task. But it’s important that we keep going. Tony always shared his knowledge unselfishly, and I am sure he would be the first one to say that the sharing should go on. I will do my best.’ Penny Part 1: We've Got Rhythm Penny Weedon looks at some rhythm techniques on the EL900 I adore my Yamaha EL900, so I tend to bridle if anyone suggests there is any feature of it that is less than perfect. But one criticism that some people make (not just of the EL, but of electronic keyboards generally) is that the rhythm unit is inflexible and can sound repetitive. Just as the flutes, guitars and violins on a keyboard are meant to emulate the Galways, Williams and Grappellis we know and love, so the rhythms are meant to emulate the Powells, Krupas - and Glennies. That last category in particular (the classical percussion section) is one we often forget about, but the EL900 is superbly equipped in that department. The rhythm track of a piece can fall into two categories: 1) The non-stop rhythm that would be provided by a band drummer who plays a steady rhythm throughout the performance. This is the equivalent of our rhythm unit. 2) The occasional cymbal crash, triangle ping and bass drum thump of a classical arrangement played by a symphony orchestra. This is the equivalent of our keyboard percussion. Let's look at both in more detail, and work out how we can 'humanise' them. Tricks with the rhythm unit... Do real live drummers fluctuate their tempos? Well, they're human, which means that there will be tiny irregularities in their beats. In all the bands that I have played in, once the drummer established a tempo, the only time the beat changed was at the end, where we often all slowed down through the last phrase. Can we copy this on our instruments? Well, our rhythm units certainly run at a regular tempo - they are, after all, computers. If you have ever tried to typeset a score on a computer by playing the music in live, you may well have found that Fig. 1 (below) came out as Fig. 2. A computer is so accurate in its time- keeping that it takes our human irregularities literally! On modern Yamaha keyboards, we can achieve a slow down at the end. On our Tyros keyboard, for example, we hit the ending button more than once and it plays the ending with a gradual ritardando. But can we do that on the EL900? Rits on an EL... I use three ways of achieving a slow-down at the end. Here are my recipes: Method one: 1) Set up the sounds you want to use for your piece and store them to pistons if you so desire. Fig. 1: How we think we play... Fig. 2: How the computer thinks we play...
Transcript of el series organ workshop - Yamaha Club

6
el s
erie
s or
gan
wor
ksho
p
JUNE / JULY 2006
‘I share the universal sadness and shock that we arenow without Tony Back. I used to attend his Elkademos and collected his LPs avidly and have alwaysbeen struck by the beautiful sounds he produced andthe mellifluous melodies he wrote.
Taking over the baton in the magazine (as Glyn putsit), is a daunting task. But it’s important that we keepgoing. Tony always shared his knowledge unselfishly,and I am sure he would be the first one to say that thesharing should go on. I will do my best.’
Penny
Part 1: We've Got RhythmPenny WWeedon looks at some rhythm techniques onthe EL900
I adore my Yamaha EL900, so I tend to bridle if anyonesuggests there is any feature of it that is less thanperfect. But one criticism that some people make (notjust of the EL, but of electronic keyboards generally) isthat the rhythm unit is inflexible and can soundrepetitive.
Just as the flutes, guitars and violins on a keyboardare meant to emulate the Galways, Williams andGrappellis we know and love, so the rhythms aremeant to emulate the Powells, Krupas - and Glennies.That last category in particular (the classicalpercussion section) is one we often forget about, butthe EL900 is superbly equipped in that department.
The rhythm track of a piece can fall into two categories:
1) The non-stop rhythm that would be provided by a band drummer who plays a steady rhythm throughout the performance. This is the equivalent of our rhythm unit.
2) The occasional cymbal crash, triangle ping and bass drum thump of a classical arrangement played by a symphony orchestra. This is the equivalent of our keyboard percussion.
Let's look at both in more detail, and work out how wecan 'humanise' them.
Tricks with the rhythm unit...
Do real live drummers fluctuate their tempos? Well,they're human, which means that there will be tinyirregularities in their beats. In all the bands that I haveplayed in, once the drummer established a tempo, theonly time the beat changed was at the end, where weoften all slowed down through the last phrase.
Can we copy this on our instruments? Well, ourrhythm units certainly run at a regular tempo - theyare, after all, computers. If you have ever tried totypeset a score on a computer by playing the music inlive, you may well have found that Fig. 1 (below) cameout as Fig. 2. A computer is so accurate in its time-keeping that it takes our human irregularities literally!
On modern Yamaha keyboards, we can achieve aslow down at the end. On our Tyros keyboard, forexample, we hit the ending button more than onceand it plays the ending with a gradual ritardando. Butcan we do that on the EL900?
Rits on an EL...
I use three ways of achieving a slow-down at the end.Here are my recipes:
Method one:
1) Set up the sounds you want to use for your piece and store them to pistons if you so desire.
Fig. 1: How we think we play...
Fig. 2: How the computer thinks we play...
7JUNE / JULY 2006
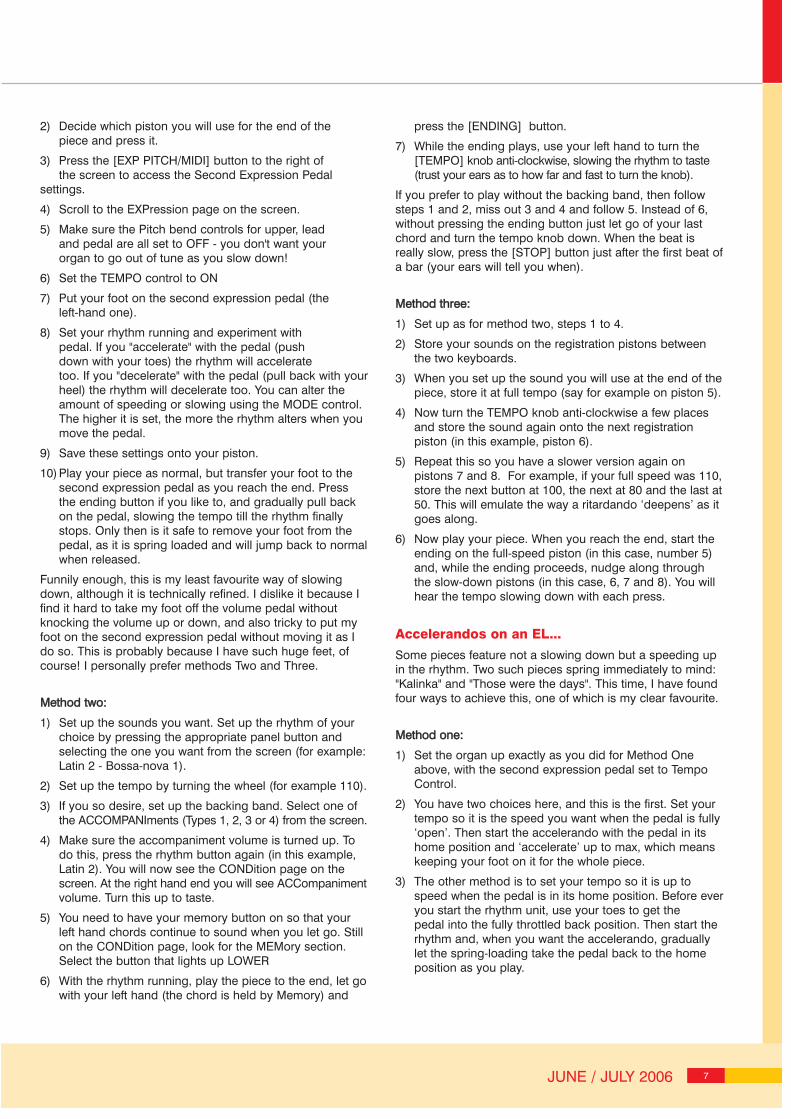
2) Decide which piston you will use for the end of the piece and press it.
3) Press the [EXP PITCH/MIDI] button to the right of the screen to access the Second Expression Pedal
settings.
4) Scroll to the EXPression page on the screen.
5) Make sure the Pitch bend controls for upper, lead and pedal are all set to OFF - you don't want your organ to go out of tune as you slow down!
6) Set the TEMPO control to ON
7) Put your foot on the second expression pedal (the left-hand one).
8) Set your rhythm running and experiment with pedal. If you "accelerate" with the pedal (push down with your toes) the rhythm will accelerate too. If you "decelerate" with the pedal (pull back with yourheel) the rhythm will decelerate too. You can alter the amount of speeding or slowing using the MODE control. The higher it is set, the more the rhythm alters when you move the pedal.
9) Save these settings onto your piston.
10) Play your piece as normal, but transfer your foot to the second expression pedal as you reach the end. Press the ending button if you like to, and gradually pull back on the pedal, slowing the tempo till the rhythm finally stops. Only then is it safe to remove your foot from the pedal, as it is spring loaded and will jump back to normalwhen released.
Funnily enough, this is my least favourite way of slowingdown, although it is technically refined. I dislike it because Ifind it hard to take my foot off the volume pedal withoutknocking the volume up or down, and also tricky to put myfoot on the second expression pedal without moving it as Ido so. This is probably because I have such huge feet, ofcourse! I personally prefer methods Two and Three.
Method two:
1) Set up the sounds you want. Set up the rhythm of your choice by pressing the appropriate panel button and selecting the one you want from the screen (for example:Latin 2 - Bossa-nova 1).
2) Set up the tempo by turning the wheel (for example 110).
3) If you so desire, set up the backing band. Select one of the ACCOMPANIments (Types 1, 2, 3 or 4) from the screen.
4) Make sure the accompaniment volume is turned up. To do this, press the rhythm button again (in this example, Latin 2). You will now see the CONDition page on the screen. At the right hand end you will see ACCompanimentvolume. Turn this up to taste.
5) You need to have your memory button on so that your left hand chords continue to sound when you let go. Still on the CONDition page, look for the MEMory section. Select the button that lights up LOWER
6) With the rhythm running, play the piece to the end, let gowith your left hand (the chord is held by Memory) and
press the [ENDING] button.
7) While the ending plays, use your left hand to turn the [TEMPO] knob anti-clockwise, slowing the rhythm to taste (trust your ears as to how far and fast to turn the knob).
If you prefer to play without the backing band, then followsteps 1 and 2, miss out 3 and 4 and follow 5. Instead of 6,without pressing the ending button just let go of your lastchord and turn the tempo knob down. When the beat isreally slow, press the [STOP] button just after the first beat ofa bar (your ears will tell you when).
Method three:
1) Set up as for method two, steps 1 to 4.
2) Store your sounds on the registration pistons between the two keyboards.
3) When you set up the sound you will use at the end of thepiece, store it at full tempo (say for example on piston 5).
4) Now turn the TEMPO knob anti-clockwise a few places and store the sound again onto the next registration piston (in this example, piston 6).
5) Repeat this so you have a slower version again on pistons 7 and 8. For example, if your full speed was 110,store the next button at 100, the next at 80 and the last at50. This will emulate the way a ritardando ‘deepens’ as it goes along.
6) Now play your piece. When you reach the end, start the ending on the full-speed piston (in this case, number 5) and, while the ending proceeds, nudge along through the slow-down pistons (in this case, 6, 7 and 8). You will hear the tempo slowing down with each press.
Accelerandos on an EL...
Some pieces feature not a slowing down but a speeding upin the rhythm. Two such pieces spring immediately to mind:"Kalinka" and "Those were the days". This time, I have foundfour ways to achieve this, one of which is my clear favourite.
Method one:
1) Set the organ up exactly as you did for Method One above, with the second expression pedal set to Tempo Control.
2) You have two choices here, and this is the first. Set your tempo so it is the speed you want when the pedal is fully‘open’. Then start the accelerando with the pedal in its home position and ‘accelerate’ up to max, which means keeping your foot on it for the whole piece.
3) The other method is to set your tempo so it is up to speed when the pedal is in its home position. Before everyou start the rhythm unit, use your toes to get the pedal into the fully throttled back position. Then start the rhythm and, when you want the accelerando, gradually let the spring-loading take the pedal back to the home position as you play.

8 JUNE / JULY 2006
el s
erie
s or
gan
wor
ksho
pMethod two:
1) Set the organ up exactly as you did for Method Two above, with the rhythm as you want it, some backing sounds if you wish, and the Lower Memory switched on.
2) When you reach your accelerando, let go with yourleft hand and wind up the tempo knob to taste. You can wind it up between each chord change, a little at a time.
This method is OK, but it requires finesse to wind theknob up incrementally - and that's as hard to spell asto do, in the heat of the moment.
Method three:
1) Set the organ up exactly as you did for Method Three above, with several pistons set to the identical sound for the accelerando.
2) This time, however, set each piston to a successively faster tempo. You might go 80, 100, 120 or whatever suits the piece.
3) When you reach the accelerando, start with the first of those pistons, and move through them at points where the music can sensibly speed up.
This method is alright too, but the notching up ofrhythm can sound rather crude unless you use lots ofpistons that only move up a few beats per minuteeach time.
Method four:
This is my favourite way because it is so flexible.
1) Set up the sounds you want to use for your accelerando passage.
2) Set the rhythm up at the fastest speed you want to achieve.
3) Go into the Condition page and select SFC, FC or Custom, depending on your method of playing.
4) Ensure that the Lower Memory is OFF.
5) Press [Synchro Start].
6) The rhythm will not play until you play on the lower/pedals, and when you let go it will stop again. This means you can achieve a really slow beat by playing really slow and detached chords/pedals. As you want to speed up, just play faster and the rhythm will follow you.
7) When you want the rhythm to run at full speed, just play your chords/pedals without letting go and the rhythm will run continuously.
This may sound complicated, but it's a cinch and itsounds so effective.
See you next time with some more tips for improvingyour EL playing.
Penny
Penny Weedon
We’re delighted to welcome Penny Weedon back to the Yamaha Club team - particularly as she has steppedin at such short notice. Although she will be well known to most of our readers there will be some who havenot met her before so... courtesy of her website www.pentone-music.com here is a brief biography.
Penelope Weedon was born in Buckinghamshire to a musical family, and started piano lessons at 4. Tuition onviolin, cello, classical guitar, trumpet and church organ followed. When she was 16 she won an Arts FestivalBursary to study piano with Christopher Elton, whilst continuing her organ studies with Julian Larkin. At 18 shewent to the Royal College of Music to study piano, organ and composition.
Disaster strikes: Like so many before her, Penny overdid the practice and found herself with both arms in plaster and hermusical studies apparently at an end. She left the College and trained as a secretary, before working in the recordingindustry and the police force. She eventually trained as a legal executive. Not until some years later did she resume herstudies and obtain her qualifications.
Second time lucky: Despite the late start, Penny has enjoyed an exciting musical career. Her pipe organ performanceshave taken her to Bristol's Colston Hall, the Croydon Fairfield Halls, Birmingham Town Hall and a plethora of churchesthroughout the UK. She has also given theatre organ concerts on some wonderful organs, not least the Wurlitzer in theTower Ballroom at Blackpool. Penny's passion for the keyboard orchestra has satisfied her ambition to play everyinstrument in the orchestra and to be a conductor. She has thrilled audiences countrywide, including Bournemouth PavilionTheatre, Birmingham Town Hall, Wolverhampton Civic Hall, The Arnold Theatre Nottingham, The Regis Theatre, andcountless music festivals and clubs.
Her other musical activities: Penny has broadcast widely, including an interview with Margaret Howard for Classic FM andthree appearances on Pick of the Week. For some years she presented the monthly "PennyWise" organ slot on BBC Southand West's "Organ Stop" programme. She also writes for the specialist keyboard press. Penny has worked as anexaminer for the London College of Music, has lectured and adjudicated at most of the major keyboard festivals andled holidays for Adult Education bodies such as Missenden Abbey, HF Holidays and the RNIB. Her experience withvisually impaired learners led to the production of her CD tuition course, A Keyboard at Your Fingertips.
Leisure time: In 2000, Penny married Tony Kerr, a graphic designer, and they share a love of music, motor-homesand cycling. Between them, they own six organs, a grand piano and twelve keyboards. They have recently taken upballroom dancing - badly.

6
el s
erie
s or
gan
wor
ksho
p
AUGUST / SEPTEMBER 2006
Part 2: We've Got Rhythm (continued)
Using the classical percussion sounds
Penny WWeedon looks at some rhythm techniques onthe Yamaha EL Series Electone
On the left cheek of our ELs are two buttons labelled‘Keyboard Percussion’. One button activatespercussion sounds on the lower keyboard, the otherpercussion sounds on the bass pedals.
When we press the lower keyboard/pedals we find thatpercussion instruments have been assigned to most ofthe keys.
Tip: Check that the volume control for the rhythmsection is not turned right down, and that the balanceis set halfway - so as to favour neither bass nor treblepercussion instruments.
On the original EL series instruments (EL90 / 70 etc.),the percussion sounds were pre-assigned to specificlower keyboard and pedal keys - selected by themanufacturer and locked into the instrument. Theflagship ELX1 and later models (EL900 / 700 / 500etc.) gave players the option of assigning percussioninstruments to keys of their choice by going into aUSER section.
The Preset Keyboard Percussion voices...
If we concentrate on the preset Keyboard Percussionsettings for a moment, we find that various usefulorchestral percussion instruments correspond to thefollowing notes...
Lower keyboard:
Key Percussion Voice
G1........................Concert bass drum
D3........................ Crash cymbal
E3 and F3............Orchestral cymbals
F#3......................Dry triangle
G#3..................... Ringing triangle
Key Percussion Voice
G3..................Tambourine
A3.................. Castanet
Pedals:
D2..................Crash cymbal
E2.................. Orchestral cymbal
There are lots of other sounds available on both lowerkeyboard and pedals, but they tend to be constituentsof a drum kit rather than classical symphonic percussion.
Using the Keyboard Percussion voices in aperformance...
Say, for example that we're playing the well known‘Last Night Of The Proms’ classic Land of Hope andGlory. Wouldn’t it be super to include the occasionalcymbal crash? Well, we can achieve this by playingthe note D3 on the lower keyboard (or note D2 on thebass pedals) with Keyboard Percussion. If we alsohappen to be playing either of those notes at thesalient moment, then it's relatively easy to add thecrash, in one of three ways:
1) As the salient note arrives you switch the KeyboardPercussion button on - play the note (triggering thecrash) - then switch the Keyboard Percussion button off again. In this way you get just one crash (whilst the button is switched on).
2) Alternatively you could leave Keyboard Percussion switched on all the time - but with the volume of therhythm section turned right down. In this case, you just turn the volume up for the instant you want the crash... then turn it down again.
3) Probably the simplest method is to create a registration (without Keyboard Percussion) and store it in a Registration Memory piston. Then storethe same registration (this time with Keyboard Percussion) in the next Registration Memory button. At the point in the music where you want the crash, call up the appropriate Registration Memory setting for just that note... then move back

7AUGUST / SEPTEMBER 2006
to the setting without percussion again. You can switch between the registration settings manually - or by using the kick switch located on the right of the expression pedal.
The big disadvantage of using preset percussion is the factthat the percussion sounds are fixed to specific notes. If, forexample, you want a cymbal crash at the exact momentwhere you need to play an Eb chord, you’ll somehow haveto include a lower keyboard or pedal ‘D’ - which, as the note‘D’ clashes horribly with the Eb, is going to sound a bit off.
You can either brazen it out (and hope the crash will drownthe ‘ripe’ note), or you can set up a silent registration just forthat note. For example, if you're going to play the crash fromthe pedals, turn both the pedal voices right down and savethat set-up for the crash. If you prefer to use your left hand totrigger the crash from the lower keyboard, store a registrationwhere the left hand is otherwise silent.
Assigning Keyboard Percussion voices...
On ELX-1 and the later EL900/700/500 series instrumentsyou can choose any Keyboard Percussion sound you wantto use and place it on the exact note where it will be mostconvenient. This is perfect as it means there will be no moreclashes of notes. Simply look through the music and findwhich note(s) you will be playing when you want the crash(or other Keyboard Percussion voice), and assign thepercussion voice accordingly.
In Fig.1 (above) I’ve written a short passage - and markedthe point where I want to add a cymbal crash. As I’m playingan ‘F’ chord at that point I can assign the cymbal to thelower keyboard placing it on one of the notes of the chord(F, A or C). Alternatively I could assign it to the bass pedal -note F.
It’s important to assign the crash cymbal to just one note.You might think that “for safety” you’ll place the cymbal onevery note of the chord - covering F, A and C on the lowerkeyboard and also F on pedal.
Don’t do it... because, if you do, the crash will sound phasedbecause triggering it from four different places at once (asyou play the full chord in performance) produces quite anasty sound.
How to assign the crash cymbal...
1) Press the [KEYBOARD PERCUSSION] button (lower or pedal to suit your preference.
2) You will be faced with a MENU page on the screen. Here you can use the PRESET settings we discussed earlier, or you can select one of 8 [USER] buttons.
Tip: If you have set no percussion sounds for the piece so far, select [USER 1].
3) Go to the next page... ASSIGN.
4) Check that there are no ‘left-over’ Keyboard Percussion instruments on the keyboard from a previous session. Clear unwanted percussion sounds by pressing andholding the [CLEAR] button whilst playing every note on the keyboard/pedalboard. If you hear a bleep, you have cleared out an old percussion setting.
5) Now you have a blank canvas... so scroll through the pages until you find the percussion instrument you want to use. You do this using the [INST] up and down buttons at the left of the screen.
6) Having located a percussion instrument you want to use, press and hold the corresponding button on the panel beneath the screen as you press the key/pedal where you want to assign the sound. You will hear a bleep to confirm this.
Tip: Whatever you do, get off that page quickly or you may find yourself programming other sounds by accident.One way to do this is to page back to the MENU page... or press a voice button - anything to get away!
7) Now save this set-up, (which contains the Keyboard Percussion assignments), to one of the Registration Memory buttons, ready for use at that all-important crash moment.
You can arrange a whole choir of Keyboard Percussioninstruments on your lower keyboard or pedals:
1) Some people like to put their crashes ‘out of the way’, maybe assigning them to the top pedal note (or lowest keyboard note). The idea here is that, because these notes are seldom used during a normal performance, they can leave Keyboard Percussion switched on all the time - then just bash the note(s) where the percussion sound(s) is assigned whenever needed.
2) You can produce some really interesting effects by ‘playing’ several Keyboard Percussion instruments together. If, as in Fig. 2 (below), you put all the orchestralcymbals on adjoining notes, you can hit the whole bunchand get a mega crash!
Fig.1: Adding a cymbal crash
We can assign thecymbal to any one (but only one) of these notes: F pedal or A, C, or F inthe left hand.
Fig.2: Layering different cymbals for added impact
The left hand notes (boxed) are silent except that each note has beenassigned a different orchestral cymbal.

8 AUGUST / SEPTEMBER 2006
el s
erie
s or
gan
wor
ksho
p3) Here’s another idea... (Fig. 3)
If you assign castanets or tambourines to all the notes on the keyboard you can create some breathtaking Spanish effects as you play chords with your left hand. Rather than playing all the notes of the chord precisely together, roll up the notes in a fast arpeggio to hear rapidly repeating castanet or tambourine sounds.
4) Even more exciting, why not mix them? Assign castanets to the bottom notes of the chords and tambourines to the top notes, as in Fig. 4
Once you start placing your Keyboard Percussion sounds to fit your music scores you’ll soon get hooked. I findthat I use the rhythm unit of my EL900 less and less, as I really enjoy playing the drums ‘live’. It makes for fargreater realism and avoids the boredom of bash ping bash ping bash ping bash ping all through a piece.
Fig.3: Rolling chords with castanets or tambourines
Each chord has a castanet (or tambourine) assigned to it. By rolling up the chord you get fast repeatedstrikes on the percussion instrument
Fig.4: Mixing castanets and tambourines
The ringed note has been assigned a castanet, the other notes in the chord have been assignedtambourines. Very Spanish!
She - by Penny WeedonPennnny Weedonn plaayss mmussic innsspirred by wommenn - onn Yaammaahaa Tyrross Keyboaarrdss
This album is very different from anything Penny has recorded before. From her concerts onEL organs she is often associated with a classical orchestral style of playing. Here, she usespiano as the solo instrument on every track - using the keyboard to provide some marvellouspop and big band backing styles.
Royalties from this album are to be donated to Cancer Research UK.
Tracks include: The Lady Is A Tramp ; She’s My Lovely ; Woman In Love ; Lady Be Good ; My Mother’s Eyes ;Lady In Red ; How To Handle A Woman ; She ; The Girl From Corsica ; The Girl That I Marry ; I’ve Got A Girl inKalamazoo ; Girl ; The Girl With Flaxen Hair ; Thank Heaven For Little Girls ; My Lassie Of Old Glasgow Town / ILove A Lassie ; Woman ; Sophisticated Lady ; The Girl From Ipanema ; Three Times A Lady ; When You’re In LoveWith A Beautiful Woman ; Sisters
SHE is available from: JPW Distribution, 24 Warden Hill Road, Cheltenham, GL51 3AWTel: 01242 701844 Price: £10 + £1.50 p/p

6
el s
erie
s or
gan
wor
ksho
p
OCTOBER / NOVEMBER 2006
Part 3: Panning: The Right (and left) Way To Do ItPenny WWeedon looks at the subject of panning on the Yamaha EL series Electone
I used to think that Panning was something you did to collect gold from a river. Until quite recently, I wasn't thatinterested in the panning controls on my organ either. But now that I use them, I realise they are pure gold! Ifyou've not been in the habit of using them, I hope you will try these tips and enjoy it as much as I have.
What is panning?
‘Panning’ refers to placing a sound somewhere in the stereo picture. When stereo was first introduced, my fatherspent hours messing about with loud speakers and pick-ups and stereo demonstration LPs. Only when he wassatisfied did he summon us kids to enjoy the result. Sure enough, the violins and timps and flutes were comingfrom the left, and the brass and cellos and basses were coming from the right, and the violas and oboes seemedto be uncannily on top of one's head. But you could only get this effect if you all sat dead-central. As my brotherwas oldest, he got the chair and my sister and I perched on his lap to share the experience.
Because our EL Electones boast a goodly spread of speakers at knee-level, we can direct sounds to left or right orsomewhere in between. The spread can only be 44 inches (the width of the organ) so you may think it is hardlyworth the bother. But once you have tried it, you will be hooked I am sure.
How the panning control works
Every time you select a voice, by pressing the button a second time you will open the screen that I like to think ofas the 'inside leg measurements'. (I will refer to this screen as the ILM screen from now on). One of thecomponents on that page is ‘Pan’ and, using the buttons below the screen, you can move the arrow from left toright, across seven possible positions, including dead centre. If you select any sound and try this while pressing anote down you will clearly hear the sound shift across the stereo spectrum.
How do we apply it to a sound set-up?
The easiest thing to pan is an orchestral arrangement. This is because an orchestra invariably sits on the stage inthe same lay-out:

7OCTOBER / NOVEMBER 2006
Full string orchestra
If you are playing an arrangement where you have strings onboth keyboards and on the pedals, this is how you wouldpan them...
Upper keyboard:You can make your strings sound high or low in pitch in twoways: one is to move your hand up and down the keyboardand the other is to adjust the [FEET] setting on the ILMscreen. 4' is really high, 8' is average and 16' is low pitch.
When the strings are high-pitched you PAN them fully left, asthey will be violins. If they're mid-pitch, you PAN them to thecentral position as they will be violas. If they sound low-pitched, PAN them towards the right (not fully right) as theywill be cellos.
Lower keyboard:If the chords are at the normal pitch, pan them towards theright (not fully right) as they will be cellos. Just occasionally,you might want your chords to sound higher than the tune.You could do this, as before, by moving your hand along thekeyboard or by adjusting the [FEET] setting on the ILMscreen. If they are high-pitched, pan them left or central.
Pedals:Your foot will be playing the bass line, which means it will bereplicating the double bass line. So you PAN your pedalsound fully right.
Adding percussion, woodwind and brass
You've probably guessed this by now, but here is what youwill do with these instruments...
Percussion: including timpani, cymbals, snare and bassdrums, triangles, vibraphones, xylophones, celestes and soon. PAN these fully left.
Woodwind: such as piccolos, flutes, oboes, clarinets,bassoons, english horns, saxophones and so on: PAN tothe central position.
Brass: including cornets, trumpets, trombones, horns,euphoniums and so on: PAN almost right (not fully right).Tubas: PAN fully right (they will be on the pedal part after all).
The Rhythm Sections
Many ‘pops’ orchestras (such as Bert Kaempfert, James Lastetc.) include a rhythm section featuring drum-kit, bass guitar,rhythm guitar and piano. They usually sit just in front of theconductor and should, therefore, be PANNED to the central
position. If you are running a rhythm, then the autoaccompaniment will correspond to this merry crew. This willautomatically be panned to the centre, so you don't need toworry about it.
Choirs
Simply due to their sheer size - and the fact that they need toproject over the orchestra - choirs usually stand right acrossthe back of the stage, on a raised platform. If you haveenough buttons spare, place choir voices on both the upperand lower keyboards. Then PAN the upper choir fully to theright (these are the soprano and alto voices) and the lowerchoir fully to the left (these are the tenor and bass voices). Ifyou can't do this, just use one button with the choir panneddead centre.
Soloists
Soloists are always central to a performance and they will becentral on the stage. So if you're setting up for a concertowith a solo piano or violin make sure to PAN your soloist tothe dead central position (or only one notch off) and youwon't go far wrong. The same goes for when you’re recreatingan Eddy Calvert trumpet or James Galway flute solo.
The volume effect of panning
Once you experiment with the PAN control, you will probablynotice that panning has an effect on the prominence of asound. Voices that are panned dead central are morenoticeable than those that are panned to the sides. Thefurther you pan a sound outwards, the more it sinks into thewoodwork - so you may have to adjust the volumes of eachsection to compensate. The central voices need not be soloud as the side voices.
Next time, in part 4 of my series, I’ll be showing how theREVERB feature can be used as a means of positioninginstruments.
PAN control on EL900
The PAN control on AR100Pan, like many other features the instruments have in common,works in just the same way on both EL and AR series instruments.

6
el s
erie
s or
gan
wor
ksho
p
DECEMBER 2006 / JANUARY 2007
Part 4: It’s all in the acoustic Penny WWeedon looks at the subject of reverb.
The human brain is amazing. Our ears convert soundinto movements of our ear-drums that cause waves inthe fluid of the inner ear that move tiny hairs that sparkoff electrical signals that travel to the brain to beconverted back into sound. Not only that... If a soundreaches one ear before the other, our brain tells uswhich side the sound was coming from. And if it hearsechoes of the sound coming afterwards it will work outroughly how far away the sound source is.
The EL organ is amazing too, isn't it? Not only is itchoc-a-block with lovely sounds, but we have lots ofways of adjusting them for added realism. In the lastissue we explored panning - in other words,positioning the sounds across the stereo spectrum.Today I am going to discuss how we can use reverb tomove sounds forward and back.
What is reverb?
Reverb is short for reverberation. If you clap yourhands in your front room, you will probably hear theclap and then the sound goes dead. If, on the otherhand, you clap your hands in a cathedral, you hear thesound of the clap followed by lots of little echoes as itbounces off all the hard surfaces around you. Theechoes from nearby columns come back to youquickly. The echoes that have bounced back from theend of the nave or the top of the tower take muchlonger. All these echoes blend into one long sustainedsound which we call reverberation.
Why use reverb?
I’d like you to imagine how many musicians you canget into your front room. You could almost certainlyget a piano in there, or a solo guitarist, or a harpist, ora solo singer. But how about a big band or asymphony orchestra or a choir? If your lounge is likeours, that would be out of a question.
Big forces need big venues to play in, and the bigger thevenue the more likely it is to have lots of reverberation.Yamaha have thought of this, and have given us thewherewithal to set up reverb for every type of venue.
How the reverb control works
On the main panel of your organ you’ll see a set of littlebuttons labelled "Reverb". When the lowest button ispressed, the reverb is at minimum. When the highestbutton is pressed, it's at maximum. Experiment withplaying a sound while you make this adjustment. Youwill notice that minimum reverb sounds very dry, asthough you're playing in the airing cupboard. Maximumreverb sounds much wetter, more like a subway.
Now look at the screen. You’ll see that you have threebasic types of Reverb: Room, Hall and Church. Asyou can probably guess, ‘Room’ gives the least reverband ‘Church’ gives the most. You can adjust the settingusing the corresponding buttons under the screen.
Also on the screen are two more settings: LENGth andDEPTH. Length tells you how long the echoing will last.If you set it to maximum (6) you will copy the type ofreverb you get in a cathedral that rings on and on. If youset it to minimum (0) you're back in the airing cupboardagain. Depth tells you how much of the echo you hear,mixed in with the basic sound. With depth turned tomaximum (24) you're fairly awash with reverb. Withdepth turned to minimum (0) there's no reverb at all.

7DECEMBER 2006 / JANUARY 2007
Overall and individual reverb
The settings I just illustrated are overall reverb settings thataffect the whole organ. You can also fine-tune the amount ofreverb on each section of the organ. If you select a voice (onthe new EL models - EL500/700/900), press its button againto get to the screen that shows its ‘inside leg measurements’(what I like to fall the ILM screen). You will see a category forREVerb. By using the button below the screen you can setthis between maximum (24) and minimum (0). This meansthat you could (if you wished) combine an orchestra playingat the Albert Hall with a clarinettist playing in your bedroom.You would just set the overall reverb to "Hall" and turn thelength to (say) 3 and the length to (say) 5. Then on the stringsound make sure the REVerb was turned to 24, while on theclarinet sound the REVerb was turned to 0. A weird ambition,admittedly, but feasible!
Reverb settings for different situations
Intimate surroundings: If you were in a cramped little jazzclub with, say, a drummer, bass player, pianist andsaxophonist playing to a squashed-in crowd of corduroy-wearers, then the acoustic would be very dull and dry. Tocopy this on the organ, select Room reverb and turn thelength and depth pretty low (say 1 and 6 respectively). Theindividual reverbs can be left at 24 as there is not muchreverb there to adjust anyway.
A medium venue: Perhaps your local organ club would be agood model for this. The building is probably fairlyabsorbent - wood or plaster but with plenty of curtains. Theaudience soak up quite a bit of sound as well. So toreplicate that acoustic you would opt for Hall reverb with thelength and depth about halfway up. Then set up your organsounds with the reverb at 24, as the overall adjustment hasachieved what you want.
A big concert hall: We're talking Royal Festival Hall now. Youmight set up an orchestra or choir and then select Hallreverb with the length at 5 and the depth at 22. Again, leavethe individual reverb settings at 24.
A big church: Imagine evensong at St Paul's Cathedral.Having set up your organ or choir, turn to the Church reverbsetting and put everything up to maximum. Lovely! You canleave the individual reverb levels at 24 again.
Moving people back and forth
You might be wondering why we have the individual REVerbsetting on the ILM screen. The reason is that you can use itto position instruments at the back and front of a sound, justas you can use pan to position them to right and left.
Imagine that you are at a Richard Clayderman concert. Thestage is laid out as usual with violins front left, double bassesfront right, and violas and cellos in between. The woodwindare in the centre, the brass on the back right and thepercussion section (timps, vibes and so on) on the back left.Mr Clayderman is right at the front in the middle, with a drumkit, electric guitar and rhythm guitar surrounding him. Wecan actually make the sounds appear in just this layout byadjusting our pan and reverb settings.
The individual REVerb settings work this way: the nearer youwant someone to sound, the less reverb you give them. Sohere is my shopping list of settings for this situation:
High strings: Panned left with moderate reverb
Middle strings: Panned central with moderate reverb
Low strings: Panned left with moderate reverb
Woodwind: Panned central with moderate reverb
Percussion: Panned full left with full reverb
Brass: Panned full right with full reverb
Piano: Panned central with low reverb
Rhythm section: Panning is preset. Both the accomp-animent and percussion sections need lowreverb.
How, you may be asking, do we change the rhythm sectionreverb? Well, you can select a rhythm and press its button asecond time to access the REVerb adjustment. There is alsoa second way of accessing all the reverb settings. That is topress the Reverb button on the top left cheek of the organ,then press the PAGE buttons to the right of the screen. Thereverb settings for every section will appear on those twopages.
You can have loads of fun with reverb. Imagine the TrumpetVoluntary. That needs a church reverb, but you can have twotrumpet sounds, one close and one far away. If you set upthe trumpet on two adjacent pistons you can give one lowreverb and the other maximum reverb. Try the examplebelow and see how exciting that sounds!
Play the main piece using Trumpet 3 with low reverb, but for the bar in the box change to the same trumpet but with maximumreverb. Set the volume of that trumpet lower so that it makes a real echo.

24
el s
erie
s or
gan
wor
ksho
p
FEBRUARY / MARCH 2007
Part 5: All In The Finger ActionPenny WWeedon looks at the subject of touch on theYamaha EL series Electone
Touch Sensitivity
Pardon the pun, but sensitivity is a touchy subject onelectronic keyboards. We have three different types oftouch sensitivity on our ELs: Initial Touch, After Touchand Touch Vibrato. They can be the source of greatmusical joy - but also the reason for much unexplainedfrustration.
When a new pupil arrives who has never played akeyboard, organ or piano before, my first move is toturn all the touch sensitivity off. Until they have built uptheir finger muscles and (if there are such things) theirear muscles, I would rather that every note came outsounding the same, no matter how weakly or stronglythey press the keys and pedals.
I'm sure we've all noticed that our fingers are differentlywired. Fingers 1 to 3 are strong and independent andfingers 4 and 5 cling together and are - well - wimps!As we learn our craft, we also learn to lighten up onthe first 3 fingers and give a bit of extra weight to thelast 2 so that they all come out sounding the same. Abeginner just can't cope with finding the notes andthinking about finger pressure at the same time.
But the day comes when we don't want all our notes tosound the same. We want some louder, some quieter.Or we want some with a bit of expressive vibrato andsome with no vibrato at all. And that's the point wherethe touch sensitivity comes in.
What does it do?
Initial Touch... mimics the effect you get on a piano.Literally, the harder you strike the key, the louder thesound. A gentle touch gives a quiet tone, a heavytouch gives a loud one.
After Touch... is something alien to a pianist. Onceyou've pressed the key down on a piano, that's theend of it. No amount of pressing will make anydifference. But on our keyboards, once the key isdown, we can make a great deal of difference if wethen adjust the pressure. Pressing down further willmake the volume swell up. Slightly releasing the
pressure on the key will make the volume drop.
Touch Vibrato... is very similar to After Touch. Extrapressure will make the vibrato kick in, and reducingpressure will make the vibrato stop.
How much touch sensitivity?
Touch Vibrato is either 'on' or 'off'. However, we have awide band of adjustment for both initial and aftertouch. If you select an instrument from any of the voicesections, then press the same button again, you willcome to a display that shows "Touch Tone", subdividedinto "Initial" and "After".
You will find that it takes 14 presses of the buttonsbelow the screen to take you from minimum tomaximum sensitivity. Are we really likely to use allthose positions?
The answer lies in (a) your playing style and (b) themusic you are playing. Let's look at them both in turn:
Your playing style:
I grew up playing pianos with very heavy keyboardactions. If I didn't bring my arms down like a navvy,nothing came out! Even on the light keyboard of myEL, I still play pretty heavily. I can turn the touchsensitivity up quite a long way and the notes will stillsound strongly. Most of my pupils, however, play withgreater delicacy (thank heavens, they haven't pickedup my heavy-handed habits). If they turn up the touchsensitivity too far, they are likely to find the notescoming out too quietly, and have to 'bash' the keysrather than play normally.
The only way to know if the touch sensitivity isadjusted correctly for you is to listen to your playing. Ifit sounds smooth but lacking in tonal variety, tryturning it up a little. If it sounds lumpy and bumpy, try
Initial / After Touch panel illustrated on EL700

25FEBRUARY / MARCH 2007
Play the whole piece gently except for the notes in boxes which require a strong finger action. You will hear strings on theirown until you play strongly, at which point the piano will sing through.
turning it down. Eventually you will find a point where it suitsyour physique and technique. My best level is about halfway up.
The music you're playing:
It pays to think about the instrument you're copying beforeyou select touch sensitivity settings. Which of theseinstruments are capable of playing some notes loud andsome notes quietly?
Piano ? Trumpet ?
Harpsichord ? Violin ?
Flute ? Timpani ?
The answer, of course, is all of them - so you could use initialtouch with any of these instruments. The harpsichord is leastcapable of great changes in volume, so use less initial touchto make it sound authentic.
Now look at those instruments again, and decide which onecan achieve a crescendo on a note while it is sounding?
A piano can't - and neither can a harpsichord. Once the notehas been struck, that's that. No matter how hard you pressdown on the key the extra pressure will make no differenceto the sound - so set the After Touch to zero for both of those.
A note held on a flute or trumpet can get louder if the playerblows harder. A violinist can swell the note by pressingharder with the bow, and bowing faster across the string...so you can certainly use After Touch with these instruments.
What about the timpani? A single timpani note can't getlouder once it has been struck, but if the drummer plays a‘roll’ then the sound can get louder and quieter. When youuse the ‘Timpani’ voice you don't turn up the after touch.When you use the ‘Timpani Roll’ voice you do. Timpanivoices are usually played from the pedals - you’ll find themunder the [TUBA] button - and it's easy to forget that thepedals on larger EL models are touch sensitive too. Usinglight and shade in the pedal part can give some really spell-binding effects.
Using quasi double-touch
If you've ever played a theatre organ, you may well havecome across the ‘double touch’ feature. This works byhaving some pipes that sound all the time (the first touch)and other pipes that only play when you press the keysreally hard (the second touch). If you have, for example, an8’ Flute voice on the first touch it will sound each note youplay (whether you press gently or firmly). If you also have,say, a Kinura (reed) voice on the second touch, this voicewill only sound the notes that are pressed down very firmly.
We can achieve a similar thing on our ELs:
1. Set up a string sound on Voice 1 (I like ‘String 2’ personally). Press the [STRING] button a second time soyou can see its 'inside leg measurements'. Select 8' in theFEET column and set the Initial Touch and After Touch values to minimum.
Pan the strings to the left of the stereo picture (that's where the violins sit on the stage) and turn the volume of this voice section to maximum.
then...
2. Set up a piano sound on Voice 2 (I usually opt for ‘Piano 1’ because it's gentle). As before, press the [PIANO] button again so you can see all the settings andturn the ‘Initial Touch’ to maximum. Make sure the Piano voice is set to 8' and panned to the centre.
Finally...
3. Pop some orchestral strings on the lower manual (panned half right) and on the pedals (panned full right).
Now try the second touch effect using the example below. The piano will only sound when you play the very loud (ff) notes.

24
el s
erie
s or
gan
wor
ksho
p
APRIL / MAY 2007
Part 6: The ups and downs of it all...Penny WWeedon concludes her tour of the EL range bylooking at the subject of pitch and tuning.
Coming to the Yamaha Electone from pipe organs, Iwas already quite 'tuned in' to footages. But I soonfound out that you can do a lot more than switchbetween 16’, 8’ and 4’ on an EL…
So what are footages?
Just to revise thebasics, if you look ata church organ youwill find pipes ofdiffering lengths, asyou will notice fromthis photo...
Standard pitch is achieved using pipes that are 8 feet long.
The notes sound an octave lower through pipes which are 16 feet long.
They sound an octave higher through pipes which are 4 feet long.
Some pipes are odd lengths, such as 51/3’, 22/3’ and 13/5’and these produce notes that are at a different pitchaltogether. Be careful if you use them alone as you’ll getan instant Les Dawson affect. Blending them with'normal' pitches, however, gives a lovely nasal effect.
If you hold down middle C and then flick through eachOrgan Flute footage in turn, these are the notes youwill hear...
The system of‘footages’ has beenhanded down frompipe organs (bothchurch and theatre) toelectronics and wasused to form the basisof the Hammondorgan drawbarsystem. Indeed it isstill very much inevidence in theorchestral organs andkeyboards we usetoday. We still have allthe footages (16’, 51/3’, 8’, 4’, 22/3’, 2’, 13/5’, and 1’)available for our organ drawbar sounds. However, forthe orchestral voices such as strings, flutes and so onwe have only 16’, 8’ and 4’ (and 2’ appears on thepedals of later ELs only). By adjusting and blendingthe footages we can achieve a whole kaleidoscope ofeffects.
How we adjust footages on ELs
Select a Voice on any section.
Press the same voice button again to access the Edit Screen.
Scroll to Page 1.
Locate the ‘Feet’ section.
Use the buttons below the screen to highlight the footage you want.
You will notice a 'Preset' setting in the 'Feet' column.This automatically adjusts the sound to the footagewhich is most suitable for the instrument you havechosen.
Transforming instruments
With so many instrumental sounds on offer, you maythink that when you want a cello or piccolo you simplylook for a cello or piccolo on your screen and select it.You will certainly not be disappointed if you do this, butyou can add extra instruments to your palette if youuse the footage controls.
There is only one ready-made cello available on ELs,but if you select any of the violin sounds you can then
Orrgann Pipees © Photographer: James SteidlAgency: Dreamstime.com
8ve
16’ 8’ 51/3’ 4’ 22/3’ 2’ 13/5’ 1’
‘Fooootagees’ shoownn oonn Hammmmoonnd drrawbarrs

25APRIL / MAY 2007
either play them an octave lower or adjust the footage from8’ to 16’ and play in the normal place to achieve differentcello sounds. Conversely, you can select the cello and raiseits footage to achieve an additional violin or viola sound.
Selecting any flute and raising its footage gives you extrapiccolos. Likewise, you can lower the footage of the piccoloto achieve another flute sound.
Avoiding conflicts
Have you ever noticed what an unpleasant sound you get ifyou put the same instrument on two sections at once? If youhaven't tried this yet, put String 2 on Upper Voice 1 and 2,with the footage and panning the same. You will hear thetwo versions of the sound 'fighting' with one another -'orrible! You can alleviate the problem by panning one stringfully left and the other fully right, but you can solve itcompletely by setting the footages differently.
If you keep one string at 8' pitch and move the other to 16',you get a lovely massed cello effect. If you mix 8' and 4' youget a high violin effect, superb for Mantovani. And if you mix16' and 4' you have huge symphonic strings that arewonderful for John Barry (Bond) or John Williams (JurassicPark) film music.
Putting the same voices on several sections and thenmaking sure they have different footages can produce somerich and exciting results.
Amazing pedal tricks
We normally think of the pedals as the source of our deepbass lines. However, if you bring the pedal footages up (4'on the earlier ELs, 2' on later ones) you can make the pedalsplay a high-pitched tune or long note. Say, for example, thatyou have put Strings 2 on the pedal and raised it to 4' or 2',you can then press the higher C pedal and keep it pressedwhile you play the opening of "London Pride" in the key of Con the keyboards. Or you could select the celeste or musicbox on the pedals - then run a rhythm using the ‘Custom’auto-bass pattern - and you’ll have created a lovely tinkly
counter melody under your piece without playing a note of itwith your hands!
Is this de tune?
It's a fact that so-called 'real' (as opposed to ‘electronic’)instruments such as trumpets, flutes and violins, are boundto be a bit out of tune. They are affected by the temperature,the humidity and the actions of the player. Even pipe organsand pianos can go out of tune. If you select honky-tonkpiano it has been de-tuned for you already, to give it that'beer in the works' sound.
To lend added realism to your playing it's quite fun to detunethe ‘soloists’ from time to time. For example, select Trumpet3 from the Lead Voice section, then press the same buttonagain to go to the Edit screen. Use the [PAGE] button toscroll along to Page 3. You can play around with the [TUNE]button to raise the pitch of the trumpet.
This may not be so noticeable whilst the trumpet playsalone, but if you combine the trumpet with another brassinstrument on Upper Voice 1 you’ll be able to hear thatthey're not sounding exactly the same pitch. As long as youdon't over-egg the pudding and keep the de-tuning withintasteful limits, you will get a much more immediate and 'live'sound.
Bend it like Bream
If you’re lucky enough to have an EL900, you can use theHorizon (Horizontal Touch) control to ‘bend’ your guitarstrings a little. Real guitarists achieve the same effect bypushing the string slightly sideways as they finger it. We cando the same on the EL900 by wiggling the key gently to righton a long note. Be careful that you don't turn the HorizontalTouch level up too far, though, otherwise you'll feel positivelygreen round the gills!
I hope you've enjoyed this exploration of the EL engineroom. It has been a pleasure to spend time with you over thepast 6 issues.
‘Fooootagees’ shoownn oonn oorrgann stoops - © Photographer: Matthew Gough / Agency: Dreamstime.com