Earth covered stone haven - cordwoodconstruction.org
84
THE OWNER BUILDER ♦ 182 April / May 2014 1 182 APRIL / MAY 2014 $ 8.95 Earth covered stone haven www.theownerbuilder.com.au Early settler’s bush hut Not so humble backyard sheds Fresco on lime render Cordwood family home Earthship adventure Pole framed timber beauty Thirty years of Topsy building SPECIAL FEATURE Stunning stonework
Transcript of Earth covered stone haven - cordwoodconstruction.org

THE OWNER BUILDER � 182 April / May 2014 1
18
2A
PR
IL /
M
AY
20
14
$
8.9
5
Earth covered stone haven
www.theownerbuilder.com.au
Early settler’s bush hut
Not so humble backyard
sheds
Fresco onlime render
Cordwoodfamily home
Earthship adventure
Pole framedtimber beauty
Thirty years of Topsy building
SPECIAL FEATURE Stunning stonework

NO
SERVI
CE
CONTR
ACTSNO
SERVI
CE
CONTR
ACTS
A&A WORM FARM WASTE SYSTEMS PTY LTD
National Head Office: Unit 5/2135 Frankston-Flinders Road, Hastings 03 5979 1887Email: [email protected] Web: www.wormfarm.com.au
Relia-Bale Constructions
Pete Sim: 0419 424 316 [email protected]
• Servicing the Hunter Valley & Northern NSW • Lic No 105866C• HIA GreenSmart Professional • Fully WHS compliant
We’ll help you with design, construction, wall-raising & rendering.
Sustainability is our goal.
We don’t only off er it, we live it.
THINKING STRAW BALE?Do it with us.
REGISTERED BUILDING PRACTITIONERSERVICING MELBOURNE AND SURROUNDS
DEAN – 0418 544 [email protected]
DBU-37947
• Building, carpentry & labour service• Oversee your project• Assist with constructi on schedule
• New builds and renovati on• Formulate your material lists• Coordinate your trades
www.glassford.com.au • [email protected]
Huff ‘n’ Puff Constructions • 0412 116 157
Custom straw bale workshops
Intensive 5–day workshops include: • theory and wall raising • lime rendering • building a HYBRID straw bale structure
• GANMAIN, NEW SOUTH WALESEaster Friday 18 April – Tuesday 22 April
• GANMAIN, NEW SOUTH WALESQueen’s Birthday 7 – 11 June
• GANMAIN, NEW SOUTH WALESLabour Day 4 – 8 October Earthbag and
Natural Building Workshops
ServicesGreen Carpentry
For more information or to register for a workshop: [email protected] • www.permastructure.com.au
Earthbag Super Adobe WorkshopsLearn Earthbag building principles and
techniques in a 7 day intensive workshop with Permastructure, Australia’s longest running earthbag school.
An exciting blend of theory and practical application from foundations to fi nishes.Taught by experienced Cal Earth Alumni.
NEXT WORKSHOPS: • Yarra Junction, VIC 7–13 April • Castlemaine, VIC 26 April – 2 May • Cooktown QLD 5–11 July
We price, supply and deliver building materials or kits to lock up stage for Owner Builders
Send us your plans
We will provide a
no obligation
FREE quote !
We fabricate
& supply your
materials
w w w. b b b u i l d i n g s u p p l i e s . c o m . a u Ph: 07 5455 5430
Our support guarantees your
success !
Delivery to your site
Australia wide !

THE OWNER BUILDER � 182 April / May 2014 3
Our cover story
78
Inside...
6
24
REGULAR FEATURES
Our details . . . . . . . . . . . . . . .4In house . . . . . . . . . . . . . . . . . 5Coming events . . . . . . . . . . 12Line ads . . . . . . . . . . . . . . . . . 13Coming soon . . . . . . . . . . . . 37Review/extract . . . . . . . . . . 52Directory . . . . . . . . . . . . . . . .54Online insights . . . . . . . . . 64Subscriptions . . . . . . . . . . . .65Back issues . . . . . . . . . . . . . 66We want your . . . . . . . . . . 69From the back porch . . . . .82
ISSUE Nº 182 April / May 2014
Special feature
78 STONE HAVEN
When the rock is available, build a stone house! This earth covered house presents a lovely stone face to the world.
28 STUNNING STONEWORK
Our readers showcase the clever and beautiful things that can be done with a rock or two...
6 AUSTRALIA’S FIRST EARTHSHIP
We get both designer and owner builder perspectives on this pioneering project.
14 RENDER GAMES
Fresco on lime render – Ken Longshaw continues the adventures involved in coating his straw bale walls.
70
58
42
20 REUSING SHIPPING CONTAINERS
VS. DIY ALTERNATIVES
We get some reader feedback on a previousarticle published in TOB 180 Dec 13/Jan 14.
24 ARTISANS PARK EARLY SETTLER’S
BUSH HUT
Making a ‘new’ storage shed look like an old hut.
38 EARTH RENDER
Wall preparation and application techniques.
42 THIRTY YEARS OF TOPSY BUILDING
As the Woman prepares to leave her Mountain...
48 THE GREEN SWING SHED
Backyard sheds don’t have to be boring at all.
58 THE WEDGE-TAIL EAGLE HOUSE
This pole framed mud brick beauty simply flies…
70 WHITE EARTH RESERVATION
CORDWOOD HOME
Collaborative construction of a natural, attractive community home instilled pride of ownership.
28

CONTACT USEmail: [email protected]
Web: www.theownerbuilder.com.au www.facebook.com/TheOwnerBuilder
Post: PO Box 64, Stockton NSW 2295,
AUSTRALIA
The Owner Builder Nº 182 April / May 2014 • © Copyright 2014 • ISSN 0728-7275
DIRECT PAYMENT Account Name: AfriCat Pty Ltd
BSB: 062 815
Account Number: 1023 4337
Please ensure that you use a unique reference, and inform us of
the payment and reference, when placing your order.
As a reference, use either: A. the subscriber number that is printed on the label of your
magazine envelope (fi rst number in top LH corner e.g.
0000733) OR
B. the fi rst 6 characters of your surname + your postcode.
For example: Lynda Wilson at PO Box 64, Stockton NSW 2295,
would have a reference of WILSON2295
DISCLAIMERWe thoroughly support the continued sharing of ideas amongst
owner builders. However, you should be aware that any particular
solution may not suit your situation or even be tolerated by
your council. Always be aware of on-site safety; just because a
photograph shows someone performing a task one way does not
necessarily mean that it is safe or suggested best practice.
The Owner Builder is an independently published magazine – the fi rst issue came out in 1981 – and it has been informing and inspiring owner builders ever since. Whilst it has changed in appearance over that time, it still remains true to its origins – to produce a unique publication that is of value to those who choose to be involved in creating their own shelter and to share and celebrate their creativity and hard work.
WHO’s WHOEditor: Lynda Wilson
Art director: Toni Lumsden
Sub editor: Helen Smith
Illustrations: Rob Hadden
Proofreader: Anna Ashton
Publisher: AfriCat Pty Ltd
ABN: 24 106 576 881
Distributed to newsagents by: Gordon & Gotch Ltd
Printer: Offset Alpine Printing
FRONT COVER PHOTOGRAPHThis earth-covered house gained stone walls for the front after a serendipitous windfall of 350 tonnes of free stone, courtesy of some local highway widening. Story starts page 78.
ENVIRONMENTAL CREDENTIALS• Cover is printed on Monza Recycled Satin (FSC Mix) and the
text is printed on Respecta Satin (FSC Mix) both with 55%
recycled fi bre and EFC (Elemental Chlorine Free) process
using the world’s best practice ISO 14001 Environmental
Management System.
• Monza Recycled is Certifi ed Carbon Neutral by The Carbon
Reduction Institute (CRI) in accordance with the global
Greenhouse Gas Protocol and ISO 14040 framework.
• The inks used in the printing are linseed oil based. Linseed oil is
a renewable resource, releases very low levels of VOCs and does
not require solvent for cleaning.
• Printed by Offset Alpine Printing under ISO 14001 Environmental
Certifi cation. OAP recycle 97.5% of their paper waste.
• The Forest Stewardship Council® (FSC) is an independent, not
for profi t, non-government organisation established to support
environmentally appropriate,
socially benefi cial, and economically
viable management of the world’s
forests.
DEADLINES:Nº 183 Jun/Jul 2014
Editorial – 1 April 2014
Advertising – 8 April 2014
Nº 184 Aug/Sep 2014
Editorial – 3 June 2014
Advertising – 10 June 2014
The Owner Builder offi ce is powered by a grid connected photovoltaic solar system, generating three times more power than is used.
Our details...
If ordering by mail, please note we have a
new postal address!
See note opposite page for changes to
posting during 25 March – 25 July 2014
4 THE OWNER BUILDER � 182 April / May 2014

Balancing work and leisure is a hard task for most of us, and especially for those owner builders trying to build a house while also working and raising a family. Somehow they just get on and do it – often a little (or a lot!) slower than if someone else was doing it. Socialising becomes a thing of the past, nights are spent pouring over books and diagrams, weekends and evenings on physical building work. At the end, the sense of satisfaction and amazement at what has been created outweighs most of the downsides, and life ‘as we knew it before’ can resume.
Here at TOB, we have been experiencing something of that. Workloads have increased and there is so much we’d still like to do e.g. build a better website, have online access for subscribers, host a forum, improve our online shop. You get the picture.
On top of all these other tasks, I have decided that I want to go travelling! This has not been a spur of the moment decision; in fact it has been nearly three years in planning. If I was employed elsewhere, I’d just put in the required unpaid leave form, hand over to someone else and go. Not so easy when you run the business AND you are also the only full time employee!
Luckily for me, I have the support of our indomitable art director Toni Lumsden. This has allowed my dream trip of four months walking across Spain to become a reality. Yes, the other team members will still be helping out as usual (Helen, Anna, Rob) but it is Toni who will be taking up the slack of the tasks that I do; posting, updating the database, chasing stories, dealing with advertisers, sweeping the fl oor, making tea...
During the next four months (25 March to 25 July) there will be no telephone ordering service – I just couldn’t expect anyone else to take that on as well! The postal and online ordering will still be functioning as normal, although a little slower due to the need to redirect post from NSW to Vic. However, there will be NO orders taken for books or hard copy back issues; PDF versions will be available and subscriptions (both hard copy and PDF) as usual.
I apologise if this makes things a little diffi cult for our readers over the next four months, but there really is no other way of tackling this – apart from me not going at all (which is not going to happen).
I will be keeping a keen lookout for building projects during my travels, and hope to be able to share a few gems with you all. Until next time, happy building!
In house...
CONTRIBUTORSThere are a number of contributors to The Owner Builder, not only providing articles but also behind the scenes support. We will feature a few of them in each issue, introducing the faces behind the names.
EUGENIE STOCKMANN is
one of the initiators of The
Green Swing: a small, inner
city, sustainable development
in Perth which aims to
showcase an alternative to
current medium density
townhouse developments. In
April 2013 The Green Swing became the Trustee for
a second development, which will consist of two
townhouses and fi ve apartments.
Lynda Wilson (publisher) is going on an extended European trip (keep an eye out for some travel photos over the next few issues).
As a result, no posting of hard copy back issue or book orders will take place between 25 March and 25 July 2014.
Orders for PDF copies and subscriptions will still be processed as usual.The phone will also not be operational during this time. However,
emails and online shop orders will still be dealt with and replied to.The wonders of modern technology, huh?
NOTE ErrataIn the article ‘Double glazing revisited’ in
TOB 181 Feb/Mar 2014, under Reducing noise (p.30) the ideal gap should have read 100mm instead of 10mm. 10mm is ideal for heat insulation, whereas 100mm is suggested for noise reduction. Each will still provide some of the other’s benefi t, but not to the optimum. So when it comes to double glazing or retrofi tting, be clear on the primary aim of the solution.
SHARYN MUNRO is the
author of three books and
many award-winning short
stories. Passionate about
the environment, seeing
sustainability as the only way
forward, she lives in a solar-
powered mud brick cabin on
her remote NSW wildlife refuge. She loves writing
OB stories ‘because owner builders are so creative
and connected to place.’ Photo courtesy Scott
Hawkins and Notebook magazine.
TONI LUMSDEN made her
fi rst cubby house at age three
and has been fascinated by
owner building ever since.
She produces TOB from the
home she shares with Rob
Hadden in central Victoria and
appreciates the irony of using
enough technology to put woman on the moon,
located in a building that appears transplanted
from the 15th century.
THE OWNER BUILDER � 182 April / May 2014 5

6 THE OWNER BUILDER � 182 April / May 2014
Australia’s First Earthship
environmental sustainability rather than relying on traditional carbon heavy building designs and materials. The resulting passive solar home uses thermal/solar dynamics for temperature stabilisation, incorporating renewable energy, food production, integrated water harvesting systems and in-house sewage treatment.
Recent Melbourne graduates of the Earthship Biotecture Academy (USA), David Aubor and Rachel Goldlust, joined with a number of skilled tradespeople, plumbing and electrical specialists to begin construction of a 180m2 modifi ed survival-model Earthship vaulted greenhouse dome dwelling in Queensland. Design of the structure took place between David Aubor (Duuvy) and the clients Bob and Shelley after a series of discussions about building on their property in Queensland.
Earthships are fi nally surfacing across Australia and Earthship Australia, a recently established incorporated community association, was privileged to be able to attend and facilitate construction of the fi rst Earthship to directly adapt designs from New Mexico in an Australian climate.
Earthships incorporate a mixture of biology and architecture, aiming to design buildings and community environments with consideration for
BY RACHEL GOLDLUST
A designers perspective...
A

THE OWNER BUILDER � 182 April / May 2014 7
receive the greatest passive gain in winter months, which compared to south east winters are not as consistently cold but still have drops to below 10oC at night.
In terms of site constraints the building footprint was sizeable considering the amount of earthworks and access required through the various stages of Earthship building, from tyre pounding, to building and placing the vaults on site and then berm building to provide temperature storage and stability. As such the total footprint of the cleared site was at least double the house footprint as it was necessary to have total access to all sides of the building across the timeframe and staging of the project. If you do not have clear access to allow for excavation or trucks near to the build site then you need to make proper preparations for transporting materials,
and the labour and/or equipment and timing to compensate for lack of access. As Earthships are often encouraged to take advantage of sloped sites for their ease of providing a supportive berm, it is also important to think about having access for trucks of earth or materials close to the site or a way of transporting large amounts of sand, gravel, earth and other building materials to where it is needed.
Materials
A complete materials list for this particular job is fairly exhaustive but the project used somewhere around 750 tyres, 100m3 of earth, 3 pallets of cement, lots of water, a truckload of gravel, 2–3 truckloads of sand, 1000s of aluminium cans and 7000 bottles from the nearby
The design was a close adaptation the Simple Survival Model of vaulted dome Earthship, with general plans supplied by Earthship Biotecture. With the experience of Rachel and Duuvy on site, alongside other volunteers with a wide range of experiences, the project was able to be completed in a relatively short period of time while keeping the costs of the build down, using as much recycled and reclaimed material as possible.
The building of the dwelling took place in two stages, the fi rst running for 5 weeks with around 50 volunteers, completing a majority of the work but failing to reach lock-up stage due to cyclonic weather conditions. The second stage, the fi nishes workshop, was run fi ve months later and incorporated another 40 volunteers coming to learn and live together for two weeks, completing the fi nal rendering, bottle wall construction and grey water planter fi nishing.
The project was run as a volunteer participation workshop, similar to the projects run in many countries overseas by Earthship Biotecture, which involved a workshop program which provided a series of talks, fi lms and discussions surrounding living self-suffi ciently and engaging with the broader themes of Earthship Biotecture, including a smaller-scale living mindset, community development and inclusion and thinking smarter in terms of resource consumption and use of materials.
Design considerations
The Earthship design was adapted to suit the slope of the site and NW orientation. Orienting the front face of the greenhouse to 45 degrees NE for mid-winter solstice was the motivation to
B

8 THE OWNER BUILDER � 182 April / May 2014
tavern. This build was also highly signifi cant for its decision to experiment with Hempcrete as a masonry and roof material.
Although Earthships use mainly recycled materials as the basis of their structure, they also require a range of timber, plastic and steel materials, which can often be sourced cheaply or freely but requires dedication (and time) to really keeping the costs down. Much of the materials were found at the tip or scavenged, alongside some of the excavation and plumbing work being done as a trade or barter.
Managing the project
Financing of the project was problematic as, this being the fi rst Earthship of its scale in Australia, there were few costing references to use and application from similar Earthships built in the USA were found to have quite different costings once completed on the ground in Australia. As in any home building project, the costs vary greatly
and often exceeds original estimates but the process was conducted in under 6 months, fi nishing about 85% of the structure.
Management of such large teams of people living in fairly rudimentary conditions was also a challenge; Shelley cooked and prepared most meals for the crew and volunteers over the two months, what a job!
Managing the multiple tasks and teams on site was a big challenge for the new Academy graduates, as was learning to work together in new circumstances with a range of trades and experiences. We have all learnt a great deal from this project and will hopefully take the lessons onto the next jobs as we endeavour to help facilitate Earthship dreams across Australia.
Earthship Australia in partnership with Earthship Biotecture New Mexico are collaborating to build fully certifi ed Earthships in Australia which will demonstrate successful alternative methods of green building, living and thinking for the community.
Arrow letters refer to photos
B
C
A

THE OWNER BUILDER � 182 April / May 2014 9
BY SHELLEY CLEMENTSI would like to share with you a story
of my gratitude for the crew of Earthship Australia and the building adventures my partner and I have shared with these amazing people.
Last year I met Duuvy in Nimbin. He had just moved to the area after completing the Earthship Biotecture Academy course in Taos with Mike Reynolds. Duuvy is confi dent and adventurous and keen to spread the ‘how to’ sustainable lifestyle message by holding seminars and builds. After forming a friendship with Duuvy, I began envisioning such a build on our own bush block in the central Queensland coast.
I had been to Mike Reynolds presentation in Bangalow with my boyfriend Bob earlier in the year. So when I excitedly went through ideas Duuvy
and I had been discussing, Bob decided it was a good idea to take on the ground breaking build. Ground breaking because of the Hempcrete to be used in the roof and for being the fi rst Earthship to be built in Australia through Earthship Biotecture students and run as a workshop.
The decision was made; we were building an Earthship! So with my excited ‘do it now’ attitude I had Duuvy in the car with me the next morning for a 9 hour drive north for our fi rst consultation. The site had the perfect aspect for passive solar design.
Collecting the materials was fun and crazy busy! A year probably would have
been more of an appropriate time frame; instead we took 10 weeks to collect what was needed, along with some materials we already had on site.
Stage One
The beginning of January saw the arrival of the fi rst crew and Duuvy ‘the man with the plan.’ He had selected 30 out of about 300 applicants to join us and learn how to build and be empowered through knowledge of sustainable building and lifestyle. Attendees received lectures on the theory of the concept, hands on building experience, bush camping, nutritious eating, lectures on permaculture and fun Friday entertainment. They worked their butts off! They showed us what it means to be
Earthship gratitude – an owner builder’s perspective...
C

10 THE OWNER BUILDER � 182 April / May 2014
community. It was hot and sweaty and there were biting insects and we got the tail end of a cyclone. Special songs were made and I would go to sleep at night listening to the camp chuckles. If you ever get the opportunity to join a build, do so! It will help shift your viewpoint by being surrounded by positive people. It will show you how many people from different walks of life can come together because they care for the our earth and people. It reinforces the fact that when we work together we make incredible achievements happen.
Caroline and Ian Todd also arrived. Caroline is a passionate teacher of permaculture and is also a part of the Terraeden Biotecture team with her husband Ian and with Duuvy. Ian was the steel construction man and the concreter. They arrived with their car loaded with a more then generous amount of tools, luggage, a dog, a cat and chooks! Another key player was Paul Nimbly, a jack-of-all-trades and a patient and confi dent teacher. Georg and Bob added building skills too.
So mid January rolled around and between crew, attendees, friends and family we had around 45 people living on site. Our plans for a two-week build stretched out to two months. In that time we pounded 750 tyres, constructed a large greenhouse, and completed two dome roofs with layers of Hempcrete, steel,
styrofoam insulation, water proofi ng membrane and concrete fi nal crust. We built tin can walls and installed plumbing and electrics. Impressive!! Everyone was worn out and our bank account depleted. We made a decision to have a break and do it all again in June.
In this fi rst stage, there were a few people that need special thanks. Dani Wolf – Chambers for her dedication, architecture skills and lovely nature. Rachel Goldlust, a community planner, Earthship Biotecture Academy graduate and initiator of Earthship Australia.
Stage Two
June came around fast and with it a new crew. We had the return of Dani, Rachel and Paul and of course Bob – legends! But we also had two new amazing legends – Rosa Scarlet and Campbell Imray. Rosa has worked alongside Mike Reynolds for more then a year; she is so determined and driven it was an honour to have her on site. Campbell Imray is the humble man that would be fi rst on site and last to leave. He has an amazing amount of natural building knowledge and he kept the energies high.
We felt a lot more organised for the fi nishes build stage, having learnt so much the fi rst time around and being on the site getting it ready the week beforehand. The stage was set to teach bottle wall construction, clay render, botanical cell construction fi nishes, internal bottle walls and arches, bottle brick making and roof water proofi ng. We welcomed the arrival of the new crew of 30 including some who had returned.
The second workshop fl owed nicely, with a motivated happy group of earthshippers buzzing around in teams, stomping mud for render, rendering domes, cutting glass bottles, bottle wall construction teams and installing plumbing and electrical.
We have achieved so much and have just had the biggest adventure this year. We started this build with the intention of building with love. In the words of Duuvy ‘If you make a lasagna with love it will taste amazing. If you make a lasagna with anger and frustration it will taste like crap,’ so we took that attitude to the job site and you could really feel it. I’ve
even had locals drop in and mention they noticed how good it felt and loved the vibe.
I want to fi nish my gratitude story with a massive thanks to every single one of the 120 plus people who have participated and added their personal touch. Incredible! I can’t thank you enough.
The facilitators of this project haven’t stopped building on different projects around the globe and here in Australia this year. More and more people are requesting to build an Earthship. It is really picking up momentum in Australia. �
� Earthship Australia
Working towards developing and fostering Earthship Biotecture in Australia. Rachel Goldlust.
rachelgoldlustearthshipaustralia.weebly.comwww.earthshipaustralia.org.auwww.facebook.com/groups/EarthshipAustralia
� Terraeden Biotecture
Designing habitats that operate on a closed cycle through integrated natural systems. David Aubor.
www.terraeden.org
� Earthship Biotecture
‘…the Earthship is the epitome of sustainable design and construction.No part of sustainable living has been ignored in this ingenious building.’
www.earthship.com
� Earthship New Zealand
Working to facilitate the proliferation of Earthships in New Zealand.
www.earthship.co.nz
� YouTube
Two video documentaries – search for ‘Australia’s First Earthship.’
www.youtube.com
� Other Australian Earthships
Earthship Ironbank, SAwww.earthshipironbank.com.au
Ghost Gum Farm, Qldwww.ghostgumfarm.com.au
Links & resources

THE OWNER BUILDER � 182 April / May 2014 11

NSW STRAW BALE WORKSHOPS
MUDGEE
2014
Comprehensive 3 day hands-on course at AREC conducted by Sam Vivers of Viva Living Homes. For more information, course dates and bookings see the website.02 6372 3899, www.arec.com.au
NSW NATURAL BUILDING WORKSHOPS
NOWRA
APRIL–MAY
Frank Thomas of Strawtec and James Henderson of Henderson Clayworks will be presenting 4 workshops:• Light Earth Construction• Clay Rendering and More• Clay Pizza Oven• Rocket Stove Construction. Come and learn from two of Australia’s most experienced earth builders.www.strawtec.com.au Facebook: Henderson Clayworks
SA PERMACULTURE DESIGN CERTIFICATE & COURSES
GAWLER
Open Day: 13 AprilPermaculture Design Certificate: April – MayWith David Holmgren (co-originator of permaculture), Graham and Annemarie Brookman and guest presenters. 10 days.Short courses:7,8 June: Building with straw bales21 June: Organic vegetables and free-range poultry22 June: Fruit and nut growing6 July: Introduction to PermacultureTours: Schools, individuals, groups. By appointment.The Food Forest is a multi award winning, certified organic permaculture farm and learning centre.. Contact Annemarie BrookmanPh/fax: 08 8522 6450www.foodforest.com.au
Coming events...WA FIRST INTERNATIONAL
CONFERENCE ON RAMMED EARTH CONSTRUCTION
UNIVERSITY OF WESTERN AUSTRALIA
10 – 13 FEBRUARY 2015
Two-day workshop aimed at communicating advances in the design and construction of rammed earth structures to engineers and practitioners, followed by a two-day conference aimed at disseminating and discussing recent advances in rammed earth research.www.ecm.uwa.edu.au/icrec2015
WA BALINGUP SMALL FARM FIELD DAY
BALINGUP OVAL
26 APRIL
‘Grow your own – rediscover the flavour’ is the theme for this year’s event.08 9764 1204www.balingupsmallfarmfieldday.com.au
NSW SUSTAINABLE NAMOI LIVING EXPO
BICENTENNIAL PARK, TAMWORTH
9 – 10 MAY
Loads of exhibits from a huge range of industries. Practical demonstrations from the experts. www.sustainablenamoiliving.com.au
NSW SMALL FARM FIELD DAYS
MUDGEE
11 – 12 JULY
Outstanding range of free seminars, talks and displays, including straw bale building demonstrations.02 6372 3899, www.arec.com.au
TAS AGFEST
LAUNCESTON
1 – 3 MAY
With over 700 exhibitors, this is Tasmania’s premier festival with a vast range of products and services on display.1300 243 378, www.agfest.com.au
SA TRADITIONAL TIMBER FRAMING WORKSHOP
ADELAIDE HILLS
2014
At Timber Frames of Australia we teach the ancient craft of wooden pegged mortice and tenon joinery, which is used to build structural frames for homes and outdoor structures. Have a look on our website and send us your expression of interest for 2014 courses. www.timberframes.com.au > News & Events > Workshops
NSW EARTH BUILDING WORKSHOPS
SHOALHAVEN AREA
YEAR ROUND
Comprehensive, practical hands-on earth building workshops and training programs. Workshops held elsewhere by invitation.Introduction to earth building, mud brick, cob, earth oven, earth floor, earth wall finishes and earth bag construction.Peter Hickson, 0408 425 855. Register your interest at www.earthbuildingsolutions.com.au
VIC STONE COURSES & OPEN DAYS
KALLISTA
APRIL-MAY
Beginner’s Stone/Feature Wall course: April 1&3 (evenings), 5&6 (all day).Beginner’s Stone Sculpture Course: Expressions of interest taken.Open Studios Weekend: Dandenong Ranges: May 3-4.Forest Edge Stone Art Gallery/Studio, 0412 812 144, www.forestedgestone.com.au
SA STRAW BALE WEEKEND CONFERENCE
SOUTH AUSTRALIA
SEPTEMBER
Full details will be published in later editions of TOB.Contact Lance Kairl (08 8555 4223) or Bohdan Dorniak (08 8344 8170) for details.
12 THE OWNER BUILDER � 182 April / May 2014

THE OWNER BUILDER � 182 April / May 2014 13
Line ads...STUDY FROM HOME: 450 courses – Landscaping, Poultry, Plant Varieties, Bookkeeping, Pet Care, Wildlife Management, Aquaculture, Dog Psychology and Training, Culinary Herbs, Roses, Garden Design, Organics, Fruit Growing, Goats, and much more! ACS Distance Education (Est. 1979), www.acs.edu.au or ph 07 5562 1088.
AUSTRALASIAN STRAW BALE BUILDING
ASSOCIATION: Promotes the use of straw bale construction as a sustainable building material. www.ausbale.org
LAND TRUST/ECOVILLAGE/INTENTIONAL
COMMUNITY: being considered for the north and north west environs of Melbourne. Expressions of interest are invited. For further information, see www.foodesigns.com.au or phone 03 9005 7860.
FOR SALE – BUILDING MATERIALS: Collected over 30 years. Located in central Victoria. Flooring, bridge timbers, bluestones, black speckled Hawthorn bricks, Oregon beams etc. For a detailed list contact David 0419 137 432.
CURRAWINYA SHARE FOR SALE: 8 hectare (20 acre) homesite on 2630 hectares (6,500 acres) that includes the Clarence and Cataract Rivers and their junction. Bordered by State Forest and National Park. Share price $120,000. Please contact: [email protected] or Terry02 6666 1382, view www.currawinya.com.au
FOR SALE: Large pole framed and stone solar powered home on acreage. www.castlemountain.com.au
Line ads and coming events...
ADD A PHOTO! A one column wide photograph (up to 40mm high) canbe added to your Line ads listing for an extra $15. Contact us for more details.
This is your opportunity to advertise goods or property you have for sale or
exchange, or upcoming events.
Deadline for next two issues:
Nº 183 Jun/Jul 2014
Tuesday 8 April
Nº 184 Aug/Sep 2014
Tuesday 10 June
Cost: 80 cents per word. Must be paid in advance.
Please include the following details for
our records: Issue you want your ad to appear,
your name, address, phone number and email
address. See ‘Our details’ page for contact details
BENDIGO HOME BUILDERS CLUB: Meets fi rst Saturday of each month at 3pm.Contact Carol 03 5435 3986.
THE LAST STRAW (TLS): The international journal of straw bale and natural building. www.thelaststraw.org
“TANGLEWOOD’N THINGS” OWNER
BUILDER PRACTICAL SUPPORT AND
ADVICE: Tools, vehicle and experience to assist struggling owner builders in Victoria. Phone 0425 803 678. Email: [email protected]
See photo below
NILLUMBIK MUDBRICK ASSOCIATION: To protect and promote the mud brick building industry. www.mudbrick.org.au
SOUTHERN FLINDERS OWNER BUILDERS
GROUP: Welcomes new members. 176 High St, Port Germein SA 5495. 0447 822 672.
CYPRESS SAWMILLER: Cypress Macrocarpa graded to F7 or better. Up to 400mm wide and 6.5m long (maximum width and length). Phone 03 5659 7211 or 0418 361 539. (Strzelecki)
FOR SALE: Stunning sustainable 3 bedroom/ 2 bathroom house by the sea at Corindi Beach, 30km nth Coffs Harbour. 150m to beach. Single lockup garage. Organic orchard and gardens. $470k ono. 0417 026 206.See photos below.
SHORT TERM RENTAL: Large caravan and part use of house in beautiful Sunshine Coast Qld location, for 1-3 months. $110 per week. Some basic carpentry work available. 07 5441 5994.
EARTH BUILDING ASSOCIATION OF
AUSTRALIA: Dedicated to furthering the use of unfi red earth in construction. www.ebaa.asn.au
FOR SALE: Energy effi cient architect designed house in rammed earth and radial timber, on 2.5 acres (1 hectare) in South Gippsland, 1.25 hours from Melbourne CBD. Double glazed windows, 1.5kW solar power system, solar HW, mains water and 22,000L tank. 4 bay shed, 3 paddocks and watercourse planted with natives. $575,000. Ph 03 5659 6331 bus, 0414 411 914 a/h or email [email protected]. See photo below

14 THE OWNER BUILDER � 182 April / May 2014
Render gamesFresco on lime render
the still fresh render as the way for me. I settled on the second – a fresco technique.
For one reason, I believed it would save money because:
1. I was sure it would be cheaper than painting – have you priced a bucket of paint recently? If you think 20 litres of acrylic paint at the local hardware is expensive, wait until you start to talk about ‘natural’ paints, the sort that a straw bale wall needs to allow it to breathe. Plus, new render is very thirsty. The fi rst coat
does not go far at all and, in total, the wall would need at least three coats. By my calculations I would not see much change from $1000 to just complete the exterior, and that’s doing the roller work myself.
2. Fresco would save on materials. Tinting the whole batch of render would consume a lot more oxides and pigments than the fresco technique with the same end. I wanted colour locked into the crystalline structure of the lime render. A small amount of colour applied to the surface of the fresh render should be suffi cient.
3. It would save on time by applying the colour as the render went off,
Following on from ‘Lime render on
exterior straw bale walls’ (TOB 180
Dec 13/Jan 14) and ‘Clay render on
internal straw bale walls’ (TOB 181
Feb/Mar 14), I am now into the fun
bit – the fi nal coat!
Fresco for the fi nal coat
That brings us to the fi nal coat and the colour for the external walls. I was determined to take my time allowing me to achieve three things; cost savings, control and a low maintenance fi nish. My research pointed towards a colour either in the fi nal render or applied on top of
BY KEN LONGSHAW

THE OWNER BUILDER � 182 April / May 2014 15
supposedly giving a permanent colour fi nish. I only had to do it once. Achieving ‘fresco’ colour could mean a low maintenance wall system, which equates to an even greater saving of time and money in the future. No paint, no turps, no cutting in, no drop sheets ever again. The Sistine Chapel was painted how many years ago and all it took was a wash to make it look brand spanking new again!
4. Finally, I fi gured that it might be fun to experiment with oxides and pigments to see what happens. So I purchased some books specifi cally on the technique of fi nishing lime render on straw bale. That kick started my creative juices.
My outlay so far: $38.00 for the books.
Experimenting with oxides
My local hardware stocked a small range of oxides. So I started there to try and get a feel for working with colour in a fresh lime render. I purchased a low key red oxide, a rich yellow oxide and a black to add some weight. I mixed the oxides in micro amounts with water taking care to measure accurately and keep good notes. I used a section of the future garage wall to lay up some test areas using lime render and started to paint with my colours. Using the oxides individually and in combination I managed some dirty browns and greys and even some clean earthy tones in between the red desert colours through to rich ochres. However, none seemed to be quite what I was looking for.
Cost so far: $75.42
1. Mixing lime render is easy in the concrete mixer. A fatty mix was found most suitable as a base for the fresco.
2. Adding pigment directly the render was tried and rejected as too costly.
3–4. Making a lime fresco using oxides and pigments involved many tests and much careful mixing and recording of the results. The fi nal colour chosen (after many experiments) was a cool taupe.
1 2
3
4

16 THE OWNER BUILDER � 182 April / May 2014
Green?
While the colours were fun and thought provoking, none spoke clearly about the home and how we saw it fi tting into our life and the local green patch we plan to create. ‘What about greens?’ came a suggestion.
I acquired a bucket of very promising green, though that started to get expensive at almost $40 a tub. While the green gave some vibrant and some cool swatches, instead of blending with the environment, it felt stark by contrast.
Outlay so far: $113.92
Applying the colour
So far the testing had shown that the hardest part is to get the colour consistent, especially as it takes time for the colour to ‘settle’ into its fi nal state when the render has fully cured. I
tried various tools and techniques and eventually fi gured that I had to apply the pure colour dry-ish, with a soft brush then go over it while damp with a sponge fl oat to get an even spread of tone. I also did some tests to get different surface textures. To give a smoother fi nal fi nish I steel trowelled some of the swatches and used a damp sponge to get some very rough. All of this I am sure a competent plasterer could have told me in two minutes, but I had fun!
Blue perhaps?
After the fi rst round of swatches dried, a committee of the whole extended family arrived at the consensus that the home needed a dark grey/blue to fi t in with the setting and to match the black windows and Colorbond Ironstone roof colour. I found out that blue oxide costs $285 per kg – the most expensive colour oxide available! I went the pigment route for the test instead. Blue pigment could be purchased in 35 gram lots for $16.
The experimenting and reading told me that the fi nal colour would not become evident until the lime had dried and set, which takes a number of days.
5
7
8
6
5. The garage wall was used to test colours – note test patches in background.
6. Painting on the fresco.7. Mist spraying the render to dampen it
prior to application of the fresco.8. Cleaning up the drops.
THE OWNER BUILDER � 182 April / May 2014 17
of sources. If you need a minimum of 100 tonne per month you can get any colour you want at a few cents a kilogram… everyone else seemed to cater to artists and sell in 6 gram lots. Some of the colour choices got me really excited – I saw a picture of a most beautiful ‘box’ of oxides and I wanted one! However, I stopped short of buying a set of ‘French oxides’ from the USA and was determined to fi nd something closer to home.
A kind straw bale renderer in the UK (Ian Kozlowski, www.decor-bristol.co.uk)pointed me to a German pigment manufacturer (www.mixol.de) and their site yielded the contacts for a fi rm in South Australia (Alexander Weyermann, www.goldleaf.com.au) who imports their pigments. The gentleman there was most helpful and I soon had a collection of small bottles of pigment – lime safe – in my hands.
Total outlay so far: $156.00.
Testing pigments
The tiny parcel arrived and I unpacked my suite of new colour pigments. Testing began on creating a taupe (I had also decided to use the lime paint with pigment application style) and I got a
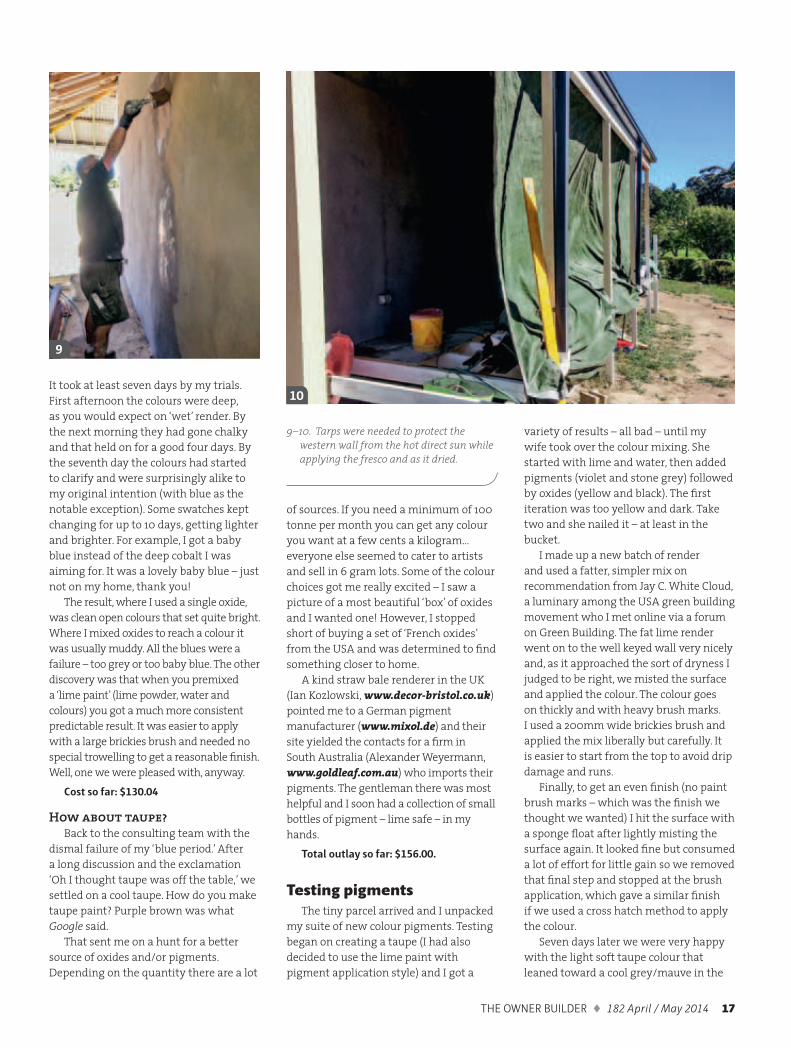
It took at least seven days by my trials. First afternoon the colours were deep, as you would expect on ‘wet’ render. By the next morning they had gone chalky and that held on for a good four days. By the seventh day the colours had started to clarify and were surprisingly alike to my original intention (with blue as the notable exception). Some swatches kept changing for up to 10 days, getting lighter and brighter. For example, I got a baby blue instead of the deep cobalt I was aiming for. It was a lovely baby blue – just not on my home, thank you!
The result, where I used a single oxide, was clean open colours that set quite bright. Where I mixed oxides to reach a colour it was usually muddy. All the blues were a failure – too grey or too baby blue. The other discovery was that when you premixed a ‘lime paint’ (lime powder, water and colours) you got a much more consistent predictable result. It was easier to apply with a large brickies brush and needed no special trowelling to get a reasonable fi nish. Well, one we were pleased with, anyway.
Cost so far: $130.04
How about taupe?
Back to the consulting team with the dismal failure of my ‘blue period.’ After a long discussion and the exclamation ‘Oh I thought taupe was off the table,’ we settled on a cool taupe. How do you make taupe paint? Purple brown was what Google said.
That sent me on a hunt for a better source of oxides and/or pigments. Depending on the quantity there are a lot
variety of results – all bad – until my wife took over the colour mixing. She started with lime and water, then added pigments (violet and stone grey) followed by oxides (yellow and black). The fi rst iteration was too yellow and dark. Take two and she nailed it – at least in the bucket.
I made up a new batch of render and used a fatter, simpler mix on recommendation from Jay C. White Cloud, a luminary among the USA green building movement who I met online via a forum on Green Building. The fat lime render went on to the well keyed wall very nicely and, as it approached the sort of dryness I judged to be right, we misted the surface and applied the colour. The colour goes on thickly and with heavy brush marks. I used a 200mm wide brickies brush and applied the mix liberally but carefully. It is easier to start from the top to avoid drip damage and runs.
Finally, to get an even fi nish (no paint brush marks – which was the fi nish we thought we wanted) I hit the surface with a sponge fl oat after lightly misting the surface again. It looked fi ne but consumed a lot of effort for little gain so we removed that fi nal step and stopped at the brush application, which gave a similar fi nish if we used a cross hatch method to apply the colour.
Seven days later we were very happy with the light soft taupe colour that leaned toward a cool grey/mauve in the
9
10
9–10. Tarps were needed to protect the western wall from the hot direct sun while applying the fresco and as it dried.
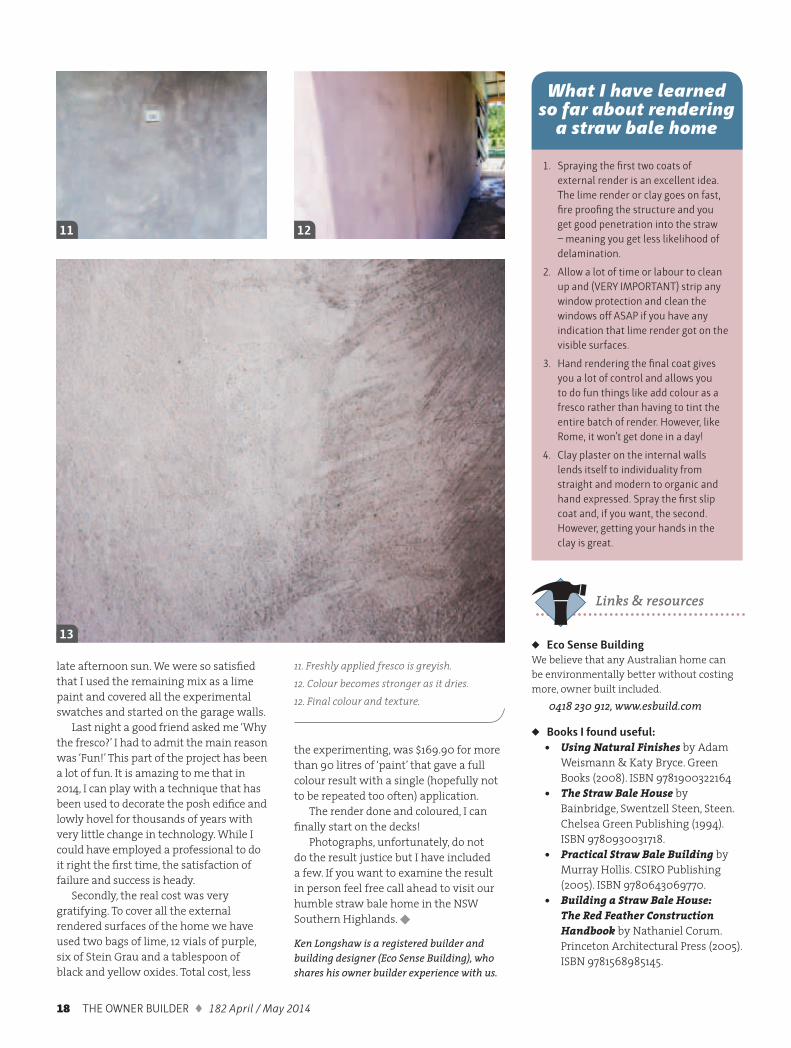
18 THE OWNER BUILDER � 182 April / May 2014
late afternoon sun. We were so satisfi ed that I used the remaining mix as a lime paint and covered all the experimental swatches and started on the garage walls.
Last night a good friend asked me ‘Why the fresco?’ I had to admit the main reason was ‘Fun!’ This part of the project has been a lot of fun. It is amazing to me that in 2014, I can play with a technique that has been used to decorate the posh edifi ce and lowly hovel for thousands of years with very little change in technology. While I could have employed a professional to do it right the fi rst time, the satisfaction of failure and success is heady.
Secondly, the real cost was very gratifying. To cover all the external rendered surfaces of the home we have used two bags of lime, 12 vials of purple, six of Stein Grau and a tablespoon of black and yellow oxides. Total cost, less
1. Spraying the fi rst two coats of
external render is an excellent idea.
The lime render or clay goes on fast,
fi re proofi ng the structure and you
get good penetration into the straw
– meaning you get less likelihood of
delamination.
2. Allow a lot of time or labour to clean
up and (VERY IMPORTANT) strip any
window protection and clean the
windows off ASAP if you have any
indication that lime render got on the
visible surfaces.
3. Hand rendering the fi nal coat gives
you a lot of control and allows you
to do fun things like add colour as a
fresco rather than having to tint the
entire batch of render. However, like
Rome, it won’t get done in a day!
4. Clay plaster on the internal walls
lends itself to individuality from
straight and modern to organic and
hand expressed. Spray the fi rst slip
coat and, if you want, the second.
However, getting your hands in the
clay is great.
What I have learned so far about rendering
a straw bale home
the experimenting, was $169.90 for more than 90 litres of ‘paint’ that gave a full colour result with a single (hopefully not to be repeated too often) application.
The render done and coloured, I can fi nally start on the decks!
Photographs, unfortunately, do not do the result justice but I have included a few. If you want to examine the result in person feel free call ahead to visit our humble straw bale home in the NSW Southern Highlands. �
Ken Longshaw is a registered builder and building designer (Eco Sense Building), who shares his owner builder experience with us.
� Eco Sense Building
We believe that any Australian home can be environmentally better without costing more, owner built included.
0418 230 912, www.esbuild.com
� Books I found useful:
• Using Natural Finishes by Adam Weismann & Katy Bryce. Green Books (2008). ISBN 9781900322164
• The Straw Bale House by Bainbridge, Swentzell Steen, Steen. Chelsea Green Publishing (1994). ISBN 9780930031718.
• Practical Straw Bale Building by Murray Hollis. CSIRO Publishing (2005). ISBN 9780643069770.
• Building a Straw Bale House: The Red Feather Construction Handbook by Nathaniel Corum. Princeton Architectural Press (2005). ISBN 9781568985145.
Links & resources
11
13
12
11. Freshly applied fresco is greyish.12. Colour becomes stronger as it dries.12. Final colour and texture.

THE OWNER BUILDER � 182 April / May 2014 19
1/1637 Main Rd, Research
03 9437 0733
www.grimesandsons.com
Mud Brick Renders and Finishes
Timber Stains and Oils
Porter’s Paints (Approved Retailer)
Timber Fire Retardants
Non Toxic, Low Odour, Timber Floor Coatings and Maintenance Systems
“In one day you can apply 3cm of render to 300m2 of wall. Try doing that by hand! It would take months! I will work with you and your volunteers. Call me to save yourself a lot of time and money.”
spray renderingspray rendering
Mark Beedle 0411 042 363
All issues contain valuable and timely information and are available for download in PDF format at US$6.00 each through the TLS website online ordering system. Subscriptions start at US$24.
The Last Straw JournalJeff Ruppert, Editor PO Box 1809 Paonia, CO 81428 USA
www.thelaststraw.org
www.ebaa.asn.au
Earth Building Association of AustraliaDedicated to promoting the use of unfi red earth as a building medium
MEMBERS BENEFIT FROM:• Regular newsletters & dedicated website• Promotion of business members• Representation at fi eld days & green expos• Annual meetings & seminars, great networking opportunities• Representation on various committees that infl uence earth
building for the future. • Publication of ‘Building with Earth Bricks & Rammed
Earth in Australia’
We want to feature YOUR home!
Contact us today: [email protected]
www.theownerbuilder.com.auwww.facebook.com/TheOwnerBuilder
You are justly proud of your home! We would like to acknowledge your efforts in the pages of The Owner Builder.
By sharing your owner building experiences, our readers can learn from you as you have learnt from others before.We’d all love to hear from you!

20 THE OWNER BUILDER � 182 April / May 2014
Reusing shipping containers vs. DIY alternative construction
is a fundamental advantage and certainly is streets ahead of a bulky extra-wide relocation requiring special permits, special services, restricted hours and very expensive specialised companies with specialised machinery.
His design does not appear to be modular nor liftable without specialised relocation. However, I agree that a modular shape to the same dimensions as a container should be cheap and easy to transport; anything oversize is going to be an expensive nightmare to ship. In addition, a self-fabricated box may not be liftable by crane or a side-loader for awkward sites.
3. They are weatherproof and need very little modifi cation on the whole, bar insulation – unless one begins cutting multiple or large openings willy-nilly to such an extent it defi es the purpose of a modular box for building in any case. There are multitude of ways in which they can be built with including stacking, cantilevering, part-burial, elevated etc. In many economically poor or housing-challenged countries they are proving over and over again to be a fantastic solution to accommodation and housing and to such an extent there is highly evolved architectural approach to making use of them, whether completely self-
contained or simply a component in a design. In one place in Europe there is a virtual town of container apartments, some ‘blocks’ standing as many as seven container ‘apartments’ high, each with private balconies.
4. They are cheap. I bought one including delivery with a crane, located to millimetre accuracy on prepared footings for a total of $1600, which also had a beautiful hardwood fl oor which has since been restored and looks exquisite. Like wise, I use a standard container as a guest house, granny fl at and offi ce.
Moving/relocating a container with a number of readily available dedicated services can be as little as $80/hour. I believe that an engineer certifi ed double opening reconditioned A-grade container can be obtained for around $4000.
I have consequently built my ‘house’ for an extra outlay of about $1300, albeit many hours work – de-rusting, welding, fabricating, painting etc. but no more than with any construction undertaking.
There is no requirement for extra ceiling height in the standard height container – a doorway needs to have 2.1m clearance so 2.3m height is adequate.
I have spoken to various councils about such abodes and many are embracing of
In response to Alan Gordon’s article ‘DIY alternative to the shipping container,’ whilst he has raised some considerations for owner builders he has missed the point of the shipping container ‘movement’ as such.
His breakdown of costs, for example, indicates to me a very optimistic appraisal and bargain basement budget only for both materials and labour. Getting somebody else to build one to such a specifi cation as he indicates in 24 hours at $25/hour... I don’t think so!!! In any case that’s not owner building.
The prospect of the shipping container as a viable shell for any kind of construction is a highly poignant one for many reasons:
1. There are many thousands of excess containers basically sitting about in Australia with no prospect of returning to the export country from which they came – this is due to a trade imbalance. Therefore the principle of using one in this country is fi rstly based on recycling and making do.
2. They are highly engineered and can support about 80 tonnes (plus), are easily loadable on purpose-built trucks, or with cranes, and can cross the land and sea cheaply by train and ship. The portability
Reader feedback
In TOB 180 Dec 2013 / Jan 2014, we published an article
by Alan Gordon about a DIY alternative of building a
space similar to that provided by a container. Some
response from readers was expected, and here we
have one from David Rogers. It is a privilege to have a
chance to discuss and comment on articles published,
and we welcome this sort of dialogue. Alan Gordon
has been given the opportunity to reply.
From David Rogers...

THE OWNER BUILDER � 182 April / May 2014 21
x 2.7m) recently. A local tilt tray operator loaded and secured it in about 15 minutes. It was delivered safely and positioned accurately without diffi culty. The 8m truck cost $110 per hour.
While some councils may ‘embrace’ shipping containers as housing, in my experience they are usually negative about them. Check with your council fi rst.
The Building Code of Australia is quite clear about permissible ceiling heights. Check these out thoroughly (taking in to account the fi nished internal height after fl oor and ceiling) before committing to the purchase of a standard container.
The bargain container described is a rare thing.
There is nothing academic about my commentary. As well as having built several similar modules over the years, I live comfortably in a custom designed and owner built module of similar
construction to the one in the case study.The module on the truck in the
accompanying photograph is part of a house – kitchen, bath/laundry and bedroom. While this particular module does not have external cladding it is of the same construction as the DIY module case study. It was shipped on 29th January 2014. The other picture shows my micro home during construction. Light, strong, demountable. �
Alan Gordon is a Building Designer based in Ballina, northern NSW. www.alangordon.com.au
Ed’s note: All the standard approvals for construction of a building (whether a brought in container or self constructed version) will still be required. Check with your local council and make sure everything is done to the Building Code of Australia.
them. You would still require engineering approval for the DIY cuboid construction suggested, whereas a standard decent grade shipping container does not as it’s already far in excess of the minimum engineered strength. Only Certifi cate of Occupancy must be obtained through the usual channels.
It would seem Alan has never put his academic idea of the DIY container to the test (i.e. built one or lived in one) nor is he open to the overwhelming abundance of facts, ideas and support for the ever-growing shipping container ‘movement,’
Alan Gordon replies...
as part of an owner builder approach and sustainable ethic as well as an exciting design prospect and living solution. Why go out and buy more new materials at a cost to the environment?
I hope you are able to print my letter with a view towards the principles and aims of your publication. Having both architectural training and owner builder experience, I feel very strongly that the published article, despite the disclaimer, serves no real purpose in serving the awareness of the public of the distinct advantages of modular design and re-
using existing constructions. To have been truly fair, perhaps an article (such as this letter) might also have been published about the great prospect of shipping container housing.
Ed’s notes: 1. A standard height container has an internal height of 2392mm. To allow for the required 2100mm clearance, this would mean 292mm is available for fl ooring, ceiling and insulation.2. We have included container housing in previous issues (TOB 155 Oct/Nov 2009, TOB 176 Apr/May 2013).
Readers who care to call their local steel and timber merchants will fi nd my material prices are pretty accurate.
The time indicated to construct is based on my current professional experience and assumes an effi cient semi-skilled worker with power tools. Without putting a dollar value on the labour the comparison would be unfair – the DIY module would be much cheaper than a dead container.
The DIY module illustrated in the article would not require ‘special permits, special services, restricted hours and very expensive specialised companies with specialised machinery’ to deliver. In fact, it could be up to 3.5m wide and 4.6m high (on the truck), and still wouldn’t involve any of the above. Your State Transport Authority or a good local transport operator can confi rm restrictions for your area. I shipped a similar unit (6.6m x 2.5m

22 THE OWNER BUILDER � 182 April / May 2014
FOR SALE: Skywood Springs
Offers over $450,000 Email: [email protected]
65.5ha mountain forest Wildlife Refuge, Upper Hunter, NSW Home of ‘The Woman on the Mountain’ (visit www.sharynmunro.com)
Rare peace, privacy and unafraid wildlife. Permanent water, temperate climate.
Set up for self-suffi ciency Stand-alone solar, 240V + 24V, charming ownerbuilt mudbrick/Colorbond cabin, wood cooking and heating, dams, unlimited spring water, 92,000 litres storage, plus large shed, glasshouse, bunkhouse, power shed and extra Colorbond insulated cabin.
Rainbow Power Company Ltd, 1 Alternative Way, Nimbin NSW 2480
02 6689 1430
LIC.198555C
Design your own systemfor clean renewable energy with our web based program
Off-Grid Solar Power
Living your dream
www.rpc.com.au
Delivery Australia-wide complete systems delivered to a depot near you with full instructions & support
systems expertly designed, installed or supplied as complete kits - leaving you to live your dream
Imaginea three bed-room house
with a quality off-grid solar power supply. This is now an affordable option for owner builders. You can enjoy clean, renewable power with no expensive grid-connect fees and no ever- increasing power bills.
12 x 200W Trina panels3.0kW Latronics inverter 60A Plasmatronics regulator33kWh Raylite battery bank1.2kW Victron chargerPanel framing, cabling, fusingPre-wiring including deliveryApproximately $22,000
talk to the experts - talk to RPC
For example:
i bi NSW 2480 LICLICLICLIC.198519851985198555C55C55C5C5C55C55C55C

THE OWNER BUILDER � 182 April / May 2014 23
Subscribe now
Easy order... www.theownerbuilder.com.auwww.facebook.com/TheOwnerBuilder
...to The Owner Builder magazine!
See ‘Our details’ page for address
If ordering by mail, please note we have a
new postal address!
!
Subscribers are the lifeblood of small, independent publications – thank you for subscribing!
Another 84 pages of inspiration just arrived.
Thank you all involved for a life guiding resource.
...Ben
Don’t miss out on another issue! • Issues delivered direct to your postbox.• Save 7.5% on the RRP.• Searchable and printable PDF, hard copy
magazine, or both.• Use the auto renewal option to ensure your
subscription continues uninterrupted.See Subscriptions page for the full range of options.
ONLINE MAIL

24 THE OWNER BUILDER � 182 April / May 2014
Artisans Park early settler’s
bush hut
Making new look old
Our intention was to reassemble the building and turn it into an extra guest accommodation within the park, using mainly recycled material already collected on site. We wanted to make the building resemble an early settler’s hut, as if it had been on the property for many years. The inside design was to be one of an old building gently restored back to life.
The location chosen had large existing trees to help the building quickly settle into the landscape. Reassembling the
building frame and roof was a simple process requiring only two people for four days. Our fi rst task was to clad the building; as we had collected a stack of standard timber fence palings, the cladding choice was to use these.
Wrap around verandahs
All old bush buildings had wrap around verandahs; these really add to the character of a building and help break up what is essentially a box design. Our verandah wraps around three sides having one side wide enough to park a tractor under. We sourced all our upright poles from the property, choosing to use stringy bark as they are normally the straightest and will regrow readily.
This building was originally a storage shed in the backyard of a suburban Sydney house. It was constructed from pine framed walls clad in fl at sheet fi bro with a Colorbond roof making, it a recent build; unfortunately for the new homeowners, the local council deemed it illegal and ordered its removal. The owners wanted to see as much of the building recycled as possible so contacted Artisans Park.
A professional removed the cladding before we started the disassembly process, which turned out to be quite simple and completed in just one day. The only item not recycled was the cladding; any steel nails, brackets and screws not needed were kept to be reused later.
BY GLENN MC MASTER
Left: Verandah fl ooring boards came with their own history and paint.Below: Modern conveniences in the bathroom.

The verandah fl oor is a random mix of old painted fl oorboards to give the effect that it had been painted many times over the years. We did not paint the fl oorboards; they are as we found them at various house demolitions. The roof uses any old iron we could fi nd, complete with rust and dints and, in some sections, doubled up to stop leaks.
To make the building look older we added stone walls, an outback toilet, clothes line, fi re pit and a fake power pole connected to the hut. The power line is just fencing wire. We scattered old items around in the garden beds, adding to the old settled look.
Above: Old fence palings were used for the external wall cladding and stringybark poles sourced from the property for the verandah, shown here still under construction.Right: All huts need an outhouse!
THE OWNER BUILDER � 182 April / May 2014 25

26 THE OWNER BUILDER � 182 April / May 2014

THE OWNER BUILDER � 182 April / May 2014 27
Self-contained design
Inside the building needed to be self-contained with a kitchenette, bathroom, a double bed and one bunk bed all in the space of 3.5 x 5m. The only way to achieve this was to move the bathroom out onto the verandah, freeing space up inside.
We lined inside with recycled cypress pine and MDF board left over from a local fl ower show. In between the rafters we inserted old roofi ng iron so that when looking up it appears to be the underside of an old roof. There is, in fact, insulation and a new Colorbond roof on top.
The bunk bed is a solid core door with stairs designed to hold everything in place. This design is extremely strong and gives the impression of a fl oating bunk bed.
We made the kitchen using recycled timber and an old sink, keeping it simple and functional. A gas hot plate and gas fridge complete the kitchenette.
The bathroom needed to be simple and functional. We managed to use all recycled fi ttings except the shower screen and base, as the one we had intended to use was far too big.
Living off the grid, we set up a very basic solar system for the hut using one 200 watt solar panel feeding into a 300Ah battery with a 2500 watt modifi ed inverter. All lights are 12v DC LEDs running through the solar controller unit. �
For more information on Artisans Park, visit their website or Facebook page: www.artisanspark.com.au, www.facebook.com/ArtisansPark
Costs Breakdown
Solar $995
Solar panel $180
Power inverter $200
Deep cycle battery $380
Solar controller $60
LED lights $75
Electrical cable $100
Plumbing
(not including water tanks) $2010
Hot water unit $860
Shower screen and base $150
Taps $100
Plumbing fees
and waste water pipe $900
Paint and fi nish $80
Paint (pre mixed colour
that no one wanted) $20
Clear coat $60
Hardware $1000
TOTAL $3085

The Owner Builder is all about sharing the experience.One way to do this is through special features like
this, where we concentrate on specifi c topics.In this issue we showcase some of the fabulous and
creative work done by owner builders who responded generously to our call for examples of their stunning examples of work created in stone.
SPECIAL FEATURE
Stunning stoneworkBush rocks, quarried rocks, found rocks, created rocks. They all rock!
Featured ideas for this issue will receive a copy of ‘The Complete Guide to Stonescaping’ by David Reed.
Published by Lark Books. Kindly donated by Capricorn Link. (www.capricornlink.com.au)
We hope you fi nd it inspirational as you contemplate, begin or continue with your owner building journey. Perhaps you will be tempted to share something you have done with us!
See p.69 for more details of upcoming features.
Located on the very edge of Sherbrooke
Forest in the Dandenong Ranges, I am
surrounded by inspiration.
These are some of the random walling
of various styles we have done around
Melbourne over the years.
The carved work piece is to show just
what can be done with stone; this particular
piece is set into a wall.
We also run basic courses in building
stone walls, in case you are inspired to give
it a go yourself!
� Forest Edge Stone
Experience the art of stone masonry and browse the many sculptures on display. Workshops and stone masonry demonstrations.
03 9752 0035, www.forestedgestone.com.au
BY PAUL SMITH
Links & resources
Stonemason artist
28 THE OWNER BUILDER � 182 April / May 2014

THE OWNER BUILDER � 182 April / May 2014 29
BY LYN HEHER
Bush rocks and crystals
My husband Stephen is a bricklayer and stone mason
by trade, so becoming an owner builder and building
with stone was not such a daunting task for him – just
some more hard work.
We collected all the rocks from our property. We had
the option of creek rocks or bush rocks. We chose the
bush rock for their colours and because they were much
easier to collect; we carried them downhill to the site
whereas the creek rocks would need to be carried uphill.
Stephen found the bush rocks hard to work with as
they were so irregular in shape. Another challenge was
fi nding the 90o rocks required for framing openings for
windows and doors. With his patience and perseverance
he managed to fi nd them and the results look wonderful.
The walls also have a variety of crystals built in
amongst the rocks; clear and rose quartz, tigers eye,
malachite, labradorite, a beautiful ocean jasper and two
large amethyst geodes, as well as others. I also collect
love heart rocks and we have included two of my large
ones in a rendered wall.
Our extension is gathering this beautiful energy
about it as it progresses; I never get tired of just looking
at the beautiful rock walls.
Stephen is glad all the hard rock work is now
complete – the rest of the work is easy compared to
the rock walls. But, Stephen says, it is all worth it. He is
building us a unique and beautiful home.
There is soooo much more to share about our owner
builder story, but that is for another time. �
Stunning stoneworkspecial feature

30 THE OWNER BUILDER � 182 April / May 2014
Labyrinthine endeavours
BY DON FIRTH
When my load of 75mm gravel arrived for the grey water pit,
Fiona pounced on all the big bits and announced with glee that she
was commandeering them for her labyrinth. Layout was done by
scribing concentric circles with a stick and string, tied to a centre
pivot and laying complete circles of stones. The cardinal points were
then established (at noon on mid-winters day to get true north) and
radial pathways/turns then picked out. The ‘dalek’ guardians are giant
electrical insulators from the Snowy Scheme.
Labyrinths have been in mans psyche for thousands of years. This
one is the exact size and pattern of the one built into the middle of
the nave fl oor of Chartres Cathedral in 1200AD. There are masses of
mathematical formulae involved, but it is basically 12 concentric circles
with the outer having a diameter of 12.455m. The length of the pathway
is 261.5m this happens to be 888 Roman feet, which is also the Greek
value for the name of Christ. Pilgrims who could not walk the medieval
pilgrimage to Santiago could instead walk (or crawl) this path to gain
salvation. The things you can learn from reading The Owner Builder!
Labyrinth or MazeA labyrinth is a pattern of lines creating a single pathway to a central
point, usually with axial symmetry. There is only one way ‘in’ and one
way ‘out.’ There are no choices or
dead ends.
A maze has a number of
blind ends and one or more
routes to a ‘central’ focus and is
usually asymmetrical in plan. The
delineation of the path is usually
done with a material that conceals
the rest of the pathways.
Why have a labyrinth?Apart from being a fun
landscape feature and potential
tourist ‘trap,’ a labyrinth is very
useful for spiritual and physical
development. It provides a quiet
contemplative pathway and the
constantly changing left and right
turns are good body posture,
balance and coordination training
for both young and old.
If only someone could explain
this to our wombats – they don’t
seem to care that there might be a
Minotaur in the middle, they just
walk straight through! �
See www.mymaze.de⁄chartres_technisch_e.htm for more technical data
Stunning stoneworkspecial feature

BY THEA ALVIN
Capacity plus opportunity...
Broad Circle‘Broad Circle’ (C) resides in the back
garden of a private doctor’s residence
in Vermont. The ‘Wall Star’ (A) also is a
residential piece, built for the founder of the
Yestermorrow Design/Build School, at which I
teach during the summers.
When working with clients or when
erecting sculpture in my own yard, I aim for
fi xtures (as well as evolving pieces) that are
both enjoyable to live with and a pleasure to
build, ‘Broad Circle’ being a prime example.
When in his rocking chair, beside his wood
fi re, the man who commissioned this piece
can look through it in to the forest, and walk
beside it as he and his dog enjoy the day.
I love the grace of heavy rocks, and their
shout-out to freedom and effortlessness.
yestermorrow.org
� My Earthwork
Thea Alvin is a vibrant USA based artist, designer and stone mason, who has been learning from and working with stone for 30 years. By encouraging the conversation between journey and destination, Alvin builds fl owing, twirling, free standing arches and ephemeral works as an expression of the energy she taps into. ‘Capacity plus opportunity’
www.myearthwork.com
Tres Mariposas‘Tres Mariposas’ (Three Butterfl ies) (B), was built in Canada from 45 tonnes of rubble as a
demonstration piece at the non-profi t Dry Stone Walling Association of Canada (DSWAC). This
piece and the Bonnaroo Doublet (D) (installed on the grounds of Bonnaroo, in Manchester,
Tennessee) were built to exist only temporarily. Both brought with them experience beyond
the fi nal sculpture. In the case of the Doublet, my crew and I were given what’s called ‘rib-rap
rubble – trash stone’ which is not at all fi t for walling, yet the show would go on. We were
there to install a performance piece, and performance it was: in the 46°C heat, the audience of
nearly 5000 VIP gathered, questions swarmed, I began to sweat from more than just the heat.
With the main arch standing, in about an hour I had worried the remaining stone together
in a second arch form, it stood for the clapping crowd, torrential rain followed. After the four
remaining days of the festival it stood strong, then we loaded it back into the bucket loader to
retire as a heap at the back of the festival fi eld. My theory is echoed in both of these temporary
pieces: beauty should look simple yet be very complex.
www.dswa.ca
B
A
C D
Links & resources
Stunning stoneworkspecial feature
THE OWNER BUILDER � 182 April / May 2014 31

I have been working on and off as a stone mason since I was 16.
These are a few of the projects I have recently completed using
bluestone and sandstone.
Sandstone stairs200mm high sandstone blocks were laid as the riser for steps
and then sandstone crazy pavers as the tread. I had a few Bombay
Sapphire gin bottles that I broke, tumbled in the mixer so they
looked like they had come out of the sea, then used as feature
highlights in conjunction with the crazy pavers.
Grange black brick stepsIt is important when laying old bricks to soak them in water before
putting them on a mortar bed as they are so porous that they dry the
mortar out and it falls apart.
Sandstone fi replaceThis is the fi replace in our house, built using sandstone blocks.
I faced each block with a bolster to create straight and level edges,
then laid them. We chose this stone from Toowoomba because of
the iron in it and all the other beautiful colours. A word of warning, I
had a stone with a leaf fossil that was going to be the keystone in the
fi re place, but unfortunately as materials were delivered on site, that
stone disappeared before it was laid… keep
your ‘treasures’ hidden.
I was enthused to send in some photos
and share my work after I saw a whale-shaped
fi shpond in your latest edition that reminded
me of one I worked on 20 years ago!
Editor’s note: the whale-shaped fi sh pond was featured in TOB 126 Dec 2004/Jan 2005.
BY JULES COOK
Smitten with stone
Stunning stoneworkspecial feature
32 THE OWNER BUILDER � 182 April / May 2014

THE OWNER BUILDER � 182 April / May 2014 33
BY KAYLEE SWIFT
This was my fi rst foray into stonework. It is incredible how many stones are needed
to build something, you collect barrowfulls and think it is enough but end up collecting
ten times more. The oven was inspired by instructions from the book ‘Your Brick Oven:
Building it & baking in it’ by Russell Jeavons.
We have had neighbourhood pizza nights and I have cooked the Christmas roast in it, as
well as mince pies, banana bread and a pavlova!
Footings were dug and poured with concrete. I built columns of concrete blocks to be
able to support the brick fl oor
of the oven. The blocks were
covered with stone, mortared
together. I built a dome with
cardboard templates and
polystyrene foam for the arch
of the doorway and carefully
created a dome of bricks over
this. The oven was then covered
in several coats of vermiculite
and cement mortar rendering. �
Ed’s note: We’ll be seeing more of Kaylee’s amazing rock work in the next issue’s Special Feature – ‘Animal Housing.’
A good pizza (oven) starts with a good base
All abilities playgroundStone beehive using 40mm bluestone
crazy pavers. I made a template out of
timber and used it to lay each ring of the
beehive. Each stone was cut with a pitching
chisel into a curve before being laid.
The beehive is 2m high, 2m in diameter
at the base and 200mm round at the top.
All the stone chips and old bricks from site
were thrown into the beehive, together with
a 9 sand:1 cement mix, to create a solid
structure for kids to climb on.
Eight-sided pyramid using 100mm
bluestone blocks. A brick saw was used to
cut the blocks, along with lots of math from
loving partner Ag to work out the angles.
Once I had the base layer right, the rest fell
into place pretty well. This was also fi lled
with offcuts from the job and a 9 sand: 1
cement mix.
Each job took approximately two weeks
to complete. �
Jules can be contacted on 0427 825 925.
Stunning stoneworkspecial feature

BY STEFAN NECHWATAL
Left: Mortared stone wall/bench
using a wide variety of stone
including slate, sandstone and
basalt, offset with a hedge of
miniature Escallonia and New
Zealand fl ax.
Left: Originally a slabbed bush fence post was concreted in ground,
with a collar above ground to shed moisture. After many years
the post rotted away and the whole concrete surround was dug
out intact with a crowbar. I thought, ‘What an amazing rustic pot/
container.’
I partly reburied it, covered the ‘collar’ with mosaics and applied a
cement wash oxide to the exposed base. It was then planted out with
miniature Liriope. Stepping pavers were constructed from old car
wheel rims fi lled with tinted concrete and pebbles were then pressed
into the wet surface. The pavers are set into a packing sand base,
with the tops at ground level.
Above: This is the corner detail ‘pillar’ of a stone bench. To enhance
this pillar beside the confl uence of 3 pathways, I wanted to create
some drama and height and specially chose feature rocks naturally
shaped like pinnacles. I mortared these in vertically to simulate a
mountain range; the Matterhorn was the inspiration. Rocks chosen
were mostly slate with interesting coloured quartz seams. Miniature
dinosaurs in pewter hide in the dark crevices to surprise!
Inspired
Stunning stoneworkspecial feature
34 THE OWNER BUILDER � 182 April / May 2014

THE OWNER BUILDER � 182 April / May 2014 35
Above right: A corner pillar links the steps to front door with the driveway wall, again
using a mix of stone types and vertical pinnacles and also some blue glass beads for
fun. The stepped stone wall alongside the
stairs is topped with a large pathway lamp.
The red gum staircase was fabricated in the
workshop, the slope excavated of soil and
the unit set into this cavity. The open tread
spaces were fi lled with tinted concrete with
a raised aggregate fi nish for foot traffi c.
A staircase similar in construction was
featured in TOB 115 Feb/Mar 2003, titled
‘Those dam steps.’ �
Above right: This is nature’s stonework, with all its colour and texture, and has inspired
me to travel beyond the norm for my work in stone.
The main Sailors Falls waterfall, on the southern end of the original basalt lava fl ow,
drops away to a deep temperate rainforest gorge. Pillars have faulted vertically and
many lie broken at the base. The grassy slope is the mullock heap dumped from the
original wooden trestle platform that carried hand trucks on a rail line from the
mineshaft opening, now blocked by these pillars.
Above: One of a series of carved
bowls in sandstone used as
water features, this one has a
lifelike rubber frog awaiting
unsuspecting insects.
Above: The wall adjoining the driveway was
constructed to replace a steep grassy bank that
was diffi cult to mow. It is a mix of mortared stone;
I always like an interesting medley of colour and
texture and deeply raked mortar joints to create
light and shade. My aim in the fi nished stonework
is to keep the viewers’ eyes ‘dancing.’
This was a deep structural wall built on a 150mm
reinforced concrete footing and mortared
concrete block work at the rear to make an
extremely strong embankment to contain the
avenue of Spartan junipers.
...by nature
� Paradiso Arts
Gallery, workshop and garden. Sculptural metal furniture made in Daylesford.
03 5348 6600www.paradisoarts.com.au
Links & resources
Stunning stoneworkspecial feature

Labyrinthine endeavours
BY EDDY BAKKER
I built this pond for our turtles,
using the local limestone collected
from around our hobby farm. I built
it freehand using string lines and I’m
chuffed at how it has turned out.
The pond itself has a hard, strong
black plastic liner. I was considering
building the pond with chicken wire and
concrete. However, its proximity to the
house footings made me a bit nervous.
Once the hole was dug I put the liner in
place and surrounded it with a concrete
edge. Then I put the stones on top of the
concrete edge and mortared them into
place.
The mortar I used had 9 parts yellow
plastering sand, 2 parts lime and ½ part
Brighton Lite cement. My father-in-law,
who is a builder, has always used a mix
of 9:2:1. The stone mason that did some
work for us doesn’t use any cement in
the mix at all. I decided to use some
cement (½part) because the wall is
exposed to the elements and the mortar
goes off a bit quicker with cement.
To build the walls I would mortar the
stones into position, then use a small
tool to do the pointing. Finally, I used
a rough sponge to smooth the joints
in between the stones. Traditionally a
hessian bag was used for this. The size
of the footings for the wall was 600mm
deep by 350mm wide, with reinforced
rods.
I worked out it is very important to
keep the stones clean as you go, but I
still needed to use an acid wash to get
rid of the ‘cementy haze’ at the end.
Using the acid wash brought out the
colours in the stone.
Building in stone is immensely
satisfying and I can’t wait to start the
next project. We would like to surround
our pergola with a 900mm high wall,
build a pizza oven and charcoal BBQ.
We’ll keep you posted! �
Stone turtle pond
Stunning stoneworkspecial feature
36 THE OWNER BUILDER � 182 April / May 2014

THE OWNER BUILDER � 182 April / May 2014 37
Cornish herringbone‘A Cornish Hedge is a style of hedge built of
stone and earth found in Cornwall, south-west
England.
The hedge is slightly wider at the bottom than
at the top, because of the large ‘grounder’ stones at
the base. The structure is very stable and will stand
for a hundred years or more. The hedge has two
stone faces with soil between the two walls. Bushes
such as gorse may grow on the top, rooted in the
soil between the walls. It is called a hedge because
of its living component. A professional hedger can
build about a metre of double-sided hedge in a day.
The materials used for the hedge vary in
different parts of the county because of the
underlying rocks. Building methods with slate are
different from those with granite since the sides of
each stone are relatively fl at. In building with slate
if the stones are small they will be laid ‘cursy-wavy’
or herringbone fashion, each course being inclined
either to right or left alternately. There would be
a foundation of larger stones and a row of coping
stones (larger than the rest) standing on edge to
complete the top.’
From en.wikipedia.org
Cornish herringbone is a style of walling known locally as ‘curzy way’ or ‘Jack and Jill,’ and is unique to North Cornwall’s heritage, possibly introduced as far back as the Romans.
A herringbone design is created as the slates are stacked in the stone. These boundary walls sometimes have ‘sheep
Coming soon...
Issue Nº 183 (June / July 2014) will be on sale from 1 June 2014
Look out for these features in upcoming issues of The Owner Builder magazine
• Steel framed straw bale
• Hybrid home
• Earth covered stone home
• An update on window terminology
• Renovating a 1920s brick bungalow
Garden wall in Mortehoe, Devon Photo: Charles Cuthbert
creeps’ built into them – an opening big enough for a sure-footed sheep to pass through to graze on the steep cliffs, but too small to allow the less nimble cattle through.
This style of hedge is particularly noticeable around the village of Tintagel.
Cornish Hedges – www.cornishhedges.co.uk
Stunning stoneworkspecial feature

38 THE OWNER BUILDER � 182 April / May 2014
Wall preparation When deciding to render a wall with earth based materials the surface of the wall may or may not need some work before we can begin. Wall surfaces generally fall into two categories. The fi rst is smooth walls. These walls already have the shape that we want and are ready for render. The second is rough walls. These walls need shaping, detailing and fl attening. To achieve this the rough walls need a coat of straw clay render to shape them into the desired form. This coat should be at least 25mm thick to give strength and stability to the wall. Straw clay render is also often used to fi ll in depressions and to shape window reveals, even if the whole wall does not get covered with it. Once rough walls have
Book extract...
Earth RenderPreparation, Application and Mixes
This is an extract from ‘Earth Render: The art of clay plaster, render and paints’ by James Henderson, as reviewed in TOB 181 February/March 2014. ISBN 9780975778203, RRP $33.
Published by Python Press (2013) (www.pythonpress.com)

THE OWNER BUILDER � 182 April / May 2014 39
received a coat of straw clay render they become smooth walls. Rough walls include straw bale, light earth and earth bag walls. Smooth walls include plasterboard, previously rendered walls and rammed earth walls. Smooth walls may or may not need some extra preparation before receiving a sand clay render.
The wall type itself asks for different strategies to ensure a good long lasting bond. Below is my experience to date, I suggest you try the methods and proceed with caution. Always test things before committing and constantly ask yourself what am I trying to achieve?
All walls to be rendered must be treated properly to ensure a good bond. Any loose or fl aking material should be scraped off. Cracks, holes and depressions should be fi lled, covered with gutter guard or mesh and allowed to dry. The entire wall should be solid and stable.
Depending on the substrate, different materials are used to treat prepare the wall. The three choices I use are water, clay slip and glue. Unsealed raw earth walls have clay on them already so they only need to be misted with water to reactivate the existing clay before rendering. Unsealed wall not created out of raw earth, like straw bale and earthbag walls need to be sprayed with clay slip fi rst to create a good bond. Previously sealed, painted or other really smooth walls need to be treated with glue. In this case the glue is mixed with sand, applied to the wall and allowed to dry.
Rendering onto previously painted walls or other really smooth surfaces When you fi nd yourself faced with rendering previously painted walls or other really smooth surfaces an adhesion coat should be used. An adhesion coat is a thick paintlike glue with some sand in it. This is brushed or rolled onto the wall to provide a physical key or grip to the smooth surface. Once dry a coat of render that contains a little of the same glue in it is applied. Either wheat paste or casein glue can be used as the glue in the adhesion coat. Follow the recipe in the glue section and add some sand screened down to 1mm. It is important to keep stirring the mix while applying to the wall as the sand always tries to drop out of suspension. We want a consistent spread of sand over the wall.
Rendering onto fresh plasterboard In new construction it is easier to add the sand to the plasterboard priming paint and use that as a combination sealer and adhesion coat. As the joint compound used with plasterboard is water sensitive, it is important to paint it with
‘EARTH RENDER – the art of clay plaster, render and paints’

40 THE OWNER BUILDER � 182 April / May 2014
something that makes the joint compound water resistant. This is so that all the water in the render we apply does not reactivate the joint compound, possibly leading to failure. Conventional plasterboard primer with sand works. Casein glue with sand will also do the job well. Wheat paste is not water resistant enough to trust to use over new plasterboard.
Thick render on smooth walls When a smooth wall wants a thick coat of straw clay render a better key or grip is needed than just an adhesion coat. This is to provide a physical key to make sure that the new render bonds to the wall. To provide the key a lath or mesh is needed. The use of earth based materials dictates staying away from metal lath or mesh as they can rust and cause failure. Reed mats are a good alternative that can be stapled to a wall. An adhesion coat should be painted on fi rst. While still wet the reed mats should be stapled onto the wall with 18 gauge galvanised staples. Make sure the staples are going into the wood framing. Coat the reed mat with more of the adhesion
Book extract... coat and apply a straw clay render that has some glue in it straight away. Working the render hard as it goes off will ensure a good bond. A top coat of straw clay or sand clay render can be easily applied once dry.
Rendering onto rammed earth and compressed earth bricks Some raw earth walls are really smooth and hard. Rammed earth and compressed earth brick walls need to be scratched up if you want to render them. Depending on the density of the wall this can be a tiring task. The idea is to create little 1mm to 3mm grooves every 50mm to 100mm horizontally on the wall. These little shelves give the backside of the new render little fi ns or keys that stick into the existing wall. An old fl at head screwdriver or the point of a brickies trowel can be used to make the grooves. Sometimes the wall is so hard that a shovel or crowbar is needed. A clay slip coat should be used when rendering. A sand clay render, with or without straw is all that is needed on these smooth hard walls. Most people may question why you would render them at all.
Rendering onto light earth Light-earth or straw-clay is a combination of straw with just enough clay to stick the straw together. This material has been stuffed into the walls of houses for over 1000 years. To create a light earth building a structural timber frame is fi rst constructed and the light-earth is tamped between temporary plywood forms. The forms are removed straight away and the walls are allowed to dry. Once dry they are rendered inside and out.
A light earth wall needs a nice thick layer of straw clay render to provide strength and shape to the walls. Water or clay slip is used to wet the walls prior to rendering. I tend to spray clay slip on to ensure a good bond. This is followed by 20mm of straw clay render and once dry 5mm of sand clay render. It is possible to apply 25mm of straw clay render and fi nish it off in one go if your mix is good.
Rendering onto mud brick The use of mud bricks in Australia is well known and loved. Unfortunately there has been a steady decline in their use with increasing energy standards. Most mud brick walls in Australia are fi nished by a process known as ‘bagging.’ Bagging is the application of a thickish

THE OWNER BUILDER � 182 April / May 2014 41
paint with a paint brush or dustpan brush. Once slightly dry the paint is rubbed with a bag traditionally, a sponge or a wet brush to smooth it out. Really old mud brick houses in Australia are rendered inside and out so that they look like any other masonry building. I have seen two examples from the late 1800’s. These were mostly rendered with river silt. As time and environmental ethics progressed the use of river silts has subsided. It is still possible to render a mud brick building with earthen render using clay subsoils, rather than river silt. Water is sprayed onto the wall to wet it down and either a sand clay or straw clay render goes straight on. Sand clay is used if the look of the bricks is to be maintained. Straw clay render is used to fl atten the walls and shape window reveals if so desired.
‘EARTH RENDER – the art of clay plaster, render and paints’
Rendering onto cob Cob walls are built by hand without the use of formwork. Cob is really an earthen concrete with some long straw for reinforcement. The large amount of aggregate it contains means it does not shrink much on drying. This gives cob amazing sculptural possibilities. When the walls are drying they are trimmed back with a shovel to the exact shape desired. This creates a perfect surface for render. Water is used to wet the walls and then a coat of sand clay render is applied. Straw clay render is often used to shape window reveals and create the other decorative details that cob homes are famous for.
Rendering onto straw bales With the steady increase of energy effi ciency standards in Australia over the last few decades the use of straw bales in the construction of homes has been on the increase. Straw bale homes have many advantages and certain idiosyncrasies. The use of clay renders on straw bale homes (at least internally) is critical to their longevity. Clay is so much more
moisture loving than the straw that it constantly pulls moisture out of the inside of the walls and keeps the straw preserved. The straw is wet with a clay slip coat just prior to applying a coat of straw clay render. How much render is needed depends on the amount of preparation done to the straw bales prior to rendering. I would not like less than 25mm of straw clay render over the bales. As the straw clay render is so thick it will not go off too quickly so we can keep topping up bits here and there for the next day or two. The straw clay render can be fi nished off if your mix is really good or a coat of sand clay render can go over the top. Most straw bale houses are rendered externally in Australia with a lime sand render for ease of maintenance. �

Thirty years ofTopsy building
As the Woman prepares to leave her Mountain
BY SHARYN MUNRO
A
42 THE OWNER BUILDER � 182 April / May 2014

THE OWNER BUILDER � 182 April / May 2014 43
I still think mud is a magical building material; bricks rendered so solidly dense by some alchemy that is more than the muck of dirt and water and straw that I pressed into the moulds. When I fi rst began to write for The Owner Builder, it was at the invitation of then-editor, the late and much-missed Russell Andrews, a passionate champion of mud brick building. I’d sent him a reader ‘Back Porch’ contribution about not having a back porch but a back excavation and various other excavations for projects-to-be, whose tongue-in-cheek style he liked so much that he asked me to write articles for him!!
Under current editor, Lynda Wilson, I continued to write regularly for TOB until my last book, Rich Land, Wasteland (Pan Macmillan/Exisle, 2012) overwhelmed my life, giving the impacts of unbridled coal and gas extraction fi rst call on my time. I resumed writing articles from late 2011, but erratically, as giving over 110 talks in four states drew me away. Lynda was understanding – and patient!
I hope 2014 will give me back a more balanced life and let me resume regular owner builder stories, as I love doing them. But I am not withdrawing from the battle for sanity until our mining and petroleum laws are changed so that people and the planet are valued as much as profi t. I owe it to my fi ve grandchildren.
The joys of a verandahThe fi rst Topsy act was adding a 3.6m
wide verandah to the northern front of the original 8m x 5m mud brick cabin. That is a delight in all seasons.
In spring the white wisteria briefl y hangs its fl ower clusters, like geishas’ hair ornaments, for me to marvel at through the window in front of my desk. In summer it is transformed by the living green blinds of the wisteria and glory vine that protect from sun and summer storms. The green is punctuated by the white perfumed trumpets of the liliums that rise above the railings each year, the delicate twinings of the Chilean jasmine’s furled white bells, and the ragged apricot blossoms of the climbing Crepuscule rose at the eastern end.
I watch the greens change to the fantastically vivid yellows and cyclamen pinks and burgundy reds of autumn. Then as the leaves fall for winter and leave an open tracery of twisting stems, I can see the forest beyond once more and the lower sunbeams reach across the verandah.
Out there we park things like tubs of fi rewood and kindling, the laundry basket and my old kerosene fridge containing tools; out there we dine, work, take fl op-down quick breaks, have coffee, read, sleep – and spy on the wildlife’s carry-ons. I had to erect a lattice gate at the top of the steps because the wallabies wanted to come up too and I was worried they’d break one of those long legs leaping back down; the wallabies do like to go under there for shade, and don’t mind me clumping about above them.
Having confessed all my owner builder and self-suffi ciency foibles and failures to the readers of my fi rst books, The Woman on the Mountain (Exisle, 2007) and Mountain Tails (Exisle, 2009), I continue that candour in my blog (www.sharynmunro.com).
I also celebrate the solace and pleasure of living amidst nature on my Wildlife Refuge here – and chart my education as I adapted to living with certain fellow residents, like the snakes.
From the 15 months of tent life with two small children in 1978, while we built our little mud brick cabin, to the present civilised, multiple building, self-suffi cient set up, it has been mostly unplanned, stop-start – and slow. Like Topsy, my remote little ‘village’ here has ‘just growed.’
Unfortunately I have also ‘growed’ too old to manage the self-suffi cient life on my own. I am blessed with unlimited water from my springs and unlimited wood for my cooking and heating and hotwater, and ample sunshine for my solar power system. However, unlike sunshine, the wood and the water require some effort. So does digging for growing trees and food. My knees and my wrists have decreed that it’s time to pass on my beloved sanctuary to someone else.
The magic of mud
One of the things I will miss most is living in a home made of natural materials, like mud and timber and stone – unless I am lucky and fi nd another such. As I spruce up my cabin to its Sunday best for sale, I have been reminded how much I love mud walls: their uneven texture, both inside, painted white (with natural paint of course), making the most of sunlight or lamp glow, and outside, simply bagged in its natural colour. I love that mud is so forgiving, so easy to work with: patchable, drillable, raspable, blendable.
Above left: Quaint diamond-paned timber windows above rock walls in bedrooms.Above: Dining and kitchen space.
B

44 THE OWNER BUILDER � 182 April / May 2014
All that for a few poles, some second-hand decking and corrugated iron! The smoked polycarbonate sheeting in the roof sections in front of the windows and the door, for light, was the only new material.
Years later, my son Sam installed a fi breglass shower bay at the eastern end; as it replaced the outdoor shower, I thought that was pretty posh. But years after that, a visiting friend, Geoff, helped it grow its own wind-proof enclosure, made from café blind clear heavy plastic, around itself and the dressing area. It is very welcome in a westerly, and doesn’t block the view.
Lesson 1: a verandah can be another living area, so make it wide enough!
Life at eye level
As circumstances changed we needed some private sleeping arrangements and so excavated into the bank at the rear of the cabin, poured a slab and built well-sealed rock walls against the cutting, with walls of windows above them. I commissioned an original leadlight from my sister, Colleen Munro, to grace the western wall where there would be minimal windows; for me leadlights and coloured glass add invaluable charm to a room.
The big day was when we sliced through the cabin rear mud wall with a bush saw – even re-using the bricks and the dust. What a terrifi c recyclable material!
These small (2.6m wide) light-fi lled rooms are a treat to be in. The bank was planted with prostrate grevillea and rosemary, which birds love, and room occupants can spy on them at eye level through the diamond-paned window wall – second-hand sashes used as casements.
We even managed to fi t a walk-in pantry between the two sleeping areas. Their tall doors being blank painted faces, I later felt called to daringly decorate them with a vaguely tree of life design.
Years later the fi breglass ceiling insulation in those rooms became occupied by some of my wild neighbours, namely the antechinuses, small carnivorous marsupials – cute, but messy and noisy. I’d made hessian ‘ceilings,’ and everything had to be removed by my long-suffering handyman, Steve Brown. It
8500
bedroom 2 bedroom 1
living
kitchen
verandah
shwr
pantry
up
11
70
0
C
Arrow letters refer to photos
A
C
D
B
E

THE OWNER BUILDER � 182 April / May 2014 45
walls – cove beading served to do more than cover edges. The rooms look totally charming now, the ceilings painted with off-white Bio Paint to blend the half-sanded pinks and blues, mint greens and creams of that era into a soft blur.
Lesson 3: don’t skimp on battens or frame timbers; someone may later want to fi x something you can’t imagine to them!
My creeping shedMy ex-partner’s hurriedly-built
workshop, added to the western end of the shed, was of tin insulated with fi breglass and foil, and lined with sheets of coated masonite where essential. It was intended to be temporary, but…
Now it’s my ‘guest accommodation wing.’ Naturally I wanted to complete the lining. Each wall’s timber frame had been constructed on the ground and stood in place on the yellow tongue fl oor to be joined to the other; they were fi ne for attaching the tin but not quite enough for lining. Glue was much employed.
Still, after screening the sliding windows (second-hand sashes on their sides), painting the interior and furnishing it with enough beds for 5-6, a fan, gas camp stove, wood heater, desk, provisions for making tea and coffee, playing music or simply lolling… it’s a nice room for visitors to have as their own space. They can smell the climbing
was not a pleasant task. We hadn’t picked wool insulation because we thought it would be too tempting!
I then bought corrugated foam eave-fi ller strips to block all the roof edges, including fi re-retardant ones for the ridge capping. While we were mucking about there, I also replaced the gutter, which was now over 30 years old, with half-round guttering topped with Leafguard, and installed a fi rst fl ush diverter for my drinking water tank.
Lesson 2: seal and critter-proof edges, especially where different materials meet, right at the start!
There’s a lot more insulation choices now, like Air-Cell or Foilboard or similar. This time I used StyRefl ex, light and rigid polystyrene sheets with foil both sides, easy to retrofi t. Or they would have been if enough battens had been put in originally…
Then I got Steve back to use the 100 year old lining boards given to me years ago by my friend and fellow owner builder, Inge Jensen. Masked and ear-muffed, Steve roughly sanded their lead paint layers and cleaned out the grooves. The worst of the broken tongues were cut off and the boards were screwed up from beneath, through the insulation sheets, to live again.
Because of the shortage of fi xing points – and the slight waviness of mud
Clockwise from above: Roos on the track; Crepuscule rose climbs to avoid the roos; my bookbound bedroom; indulgent pantry doors.
D

David Austen yellow rose or the Chinese jasmine below the window, wander outside under the jasmine-covered walkway, or sit under the dense shade of the big Nashi trees – if there’s room, as the wallabies claim that spot.
Lesson 4: re-read lesson 3!
The shed kept growing to accommodate the collection of free building materials and odd things that people offer me, and which I never refuse because it’s handy to have stuff to rummage through to make do when you’re a long way from a hardware store. My Dad’s sheds were always like that – and in fact I have a fair bit of his collection here – and my Uncle Brian’s. They were both carpenters, and when they died, I felt obliged to rescue the leftover scraps of timber they’d been hoarding under their houses… and I do mean scraps.
For years a spotted-tailed quoll nested in the horizontal pile of old doors in my shed; I haven’t been game to dismantle that pile, as the carnivorous quolls also use their nest as larder and loo. And besides, I keep hoping one will move back in – to keep the rose-eating possums away. Quolls eat possums.
Apart from the ‘guest wing,’ the shed has now crept sideways across the hill in the other direction to have three sections: the lockable workshop end, the weatherproof but not lockable middle, and a carport. The latter was erected in a day by my son and son-in-law when I fi nally got a vehicle that deserved to be under cover. You can’t do that sort of thing on a whim unless you have piles of second-hand materials on hand.
After a swap deal with owner builder friends who were moving and trying to rationalise their hoard, we replaced some of the iron on the workshop walls with old fi breglass sheets to improve the light.
Then there’s the separate power shed that bears the panels on top and the mechanics inside. It’s built with the tin from a Sydney friend’s demolished garden shed. Painted green, you’d never know. The cute fi ve-sided tin laundry
was later tacked on to the back of this. Painted green, they make a unit. Like the workshop and the shed, it’s hard to go past an existing wall; then you only have to build three.
Lesson 5: if you have storage room, never refuse free building materials … you never know when they’ll come handy or for what. If you haven’t got enough storage, use some of your earlier hoard to make more!
The smallest shedsIn the case of the toilet, I never
intended more than three walls. Having grown up with an outdoor toilet, of the pan variety, with the tiny fi bro room dark and spidery, I wanted a light fi lled loo with a view here – and I have it in my pit toilet up the hill. I’d expected that to be temporary, after which I’d build a composting loo closer to the cabin, but the deposited material just keeps decomposing in that 1.2m cube painfully excavated from the clay.
A full width polished kauri timber seat/box from the old Minmi courthouse, which makes it close to 120 years old, allows bird and bush and wallaby watching – and sunlight on bare knees if you choose your time right. I top up ceramic drinking water containers in the nearby rockery to bring the birds for me to watch. They in turn bring digested seeds of new rainforest plants to grow there!
And I mustn’t forget the glasshouse. With its automatic watering system (cheap as chips, self-installed) it’s enabled me to go away as much as I need, without fear of losing tree or vegetable seedlings or hopefully rooted cuttings, or my ginger and turmeric plants, which I grow in tubs in the warmth, and harvest the roots to eat.
The saga of building – and rebuilding – that glasshouse was told in TOB 88 Aug/Sep 98. It’s had a few glass panel replacements after a major hailstorm, but is still working well. I leave the shadecloth cover on all year now, wary of hailstones.
Weaning off owner buildingI also dread the move for the inevitable
rationalisation/sorting out process. Even though I say I won’t actually be building again, what about small projects? I mean, I never did build that bottle wall bathroom but I’ve saved all those lovely
From top: 1979, fi rst mud bricks laid; many more later, halfway up the walls; the roof timbers at last; about 15 years later, extending out back; me using a bush saw to cut through the rear mud wall into the extension.
46 THE OWNER BUILDER � 182 April / May 2014

THE OWNER BUILDER � 182 April / May 2014 47
green wine bottles; or what about that pile of old fence palings? They sand to a beautiful rich red like blue gum, and they might do for a rustic dado over a plasterboard wall where I end up…
I’ve seen owner builder friends move to ready built places that didn’t need any work. This pleased them at fi rst; there’d be time for leisure, gardening, travel – but somehow there’s always a project on the go, an add-on to house or shed, or a summerhouse or…? My friend Inge is a good example; about my age, she’ s just put in a new second-hand kitchen herself.
No, the self-reliant strain, the sustainability and frugality on which I was raised, is worth keeping, as is enough of my hoard to permit its continuation… in a smaller way. And I’ll get vicarious pleasure from writing about others’ bigger projects for The Owner Builder.
Owner builders are collectors and can-do-ers, recyclers and rethinkers; what an admirable species! �
Ed’s note: See advert p.22 for sale details.
� Insulation Industries
Incredibly helpful with advice and service, even for a tiddly customer like me.Newcastle NSW.
02 4961 4215.www.insulationindustries.com.au
� Hancock Speedway
Guttering and eave fi ller. Newcastle NSW.02 4952 3166,www.hancockspeedway.com.au
� Bio Wall Paint
Used on timber and mud, sourced from Painted Earth, Byron Bay, NSW
Painted Earth: 02 6685 7522,www.house-paint.com.auBio Products: 1800 809 448,www.bioproducts.com.au
Links & resources
E

48 THE OWNER BUILDER � 182 April / May 2014
The Green Swing shed
looked forward to moving into our new homes around Christmas 2012. Everyone was exhausted and looking forward to putting their feet up and relaxing during the hot summer months.
It wasn’t to be...Not long after our move we realised
that the list of jobs was still very long and some of them needed to be completed with some sense of urgency if we wanted to be able to rent out or sell the two apartments that were part of our small development. High on the to-do list was building the shed.
Why is building a shed urgent...
The construction of the two apartments was completed by the builder, but nobody was allowed to move into these until we received a Certifi cate of Occupancy. We were told that amongst the things we needed to complete to get the desired bit of paper was the shed, because it provided the legally required storage space for both apartments.
Our preference was for the shed to provide shared storage space for all four dwellings, however the planning codes require that a certain amount of storage space is provided for the exclusive use of a dwelling. To comply, our only option was to allocate the shed to the apartments.
The easy way out would have been propping up a fl at-pack tin shed. It was a very tempting option. We briefl y fl irted with the idea, even thinking it could be a temporary solution to deal with the red tape and replace it later on. We knew though that it was highly likely that this temporary solution would become a permanent one, and that we would never end up building our cute garden cottage. That simply did not feel right.
She’s got the lookWe always knew what sort of shed
we wanted. We all had a similar vision of a rustic looking shed, our own traditional Swedish style cottage. One that fi tted in with The Green Swing philosophy of low embodied energy, and using recycled materials where possible. Cycling around our local area we had spotted a great little cottage in
It is an Australian icon: The Shed. Found in backyards across the nation, they
come in a range of sizes, colours, shapes and styles. From humble metal boxes
to elaborate masterpieces. Many men and women across the nation smile when
they think of their shed; I smile when I think of our Green Swing shed. I think she
is a beauty.
BY EUGENIE STOCKMANN
No time to relaxMany owner builders start with
building the shed. For us it was the other way around; it was one of the last things we did. We are in an urban area and due to site constraints the space was needed to store building materials and move equipment around.
We always knew that our project The Green Swing would not be easy, however we underestimated the time it would take. After two long years of getting the necessary approvals and another year for construction we very much

THE OWNER BUILDER � 182 April / May 2014 49
For six long weekends, during the heat of summer, we toiled towards the fi nish line. The job was broken down into stages. The fi rst weekend we cleared and levelled the site and put in the stumps. We then continued with the bearers, fl oor joists, and walls. The roof and roof tiles completed the building. The kids enjoyed watching the progress and cheered us on from the balcony.
The fi nishing touch
The shed was fi nished, be it with old paint still peeling off the recycled weatherboards. It took a while before we picked up sandpaper and paintbrush. We simply could not decide on the colour; half the team preferred Swedish red, the other half was thinking of some shade of green.
someone’s backyard and all agreed we wanted to build something similar.
We had collected a lot of the materials we needed from a house demolition project we had done a few years prior – stumps, bearers, fl oor joists, studs, weatherboards and roof tiles – even three little leadlight windows that used to be part of the overhead cupboards in the old kitchen.
The fi nal design took into account legal requirements in relation to size of storage areas and building codes.
Getting started
It must have been late February 2013 when we decided to get started. I thought we could get straight into it, but of course we had to spend an entire day clearing the space: stacks of leftover recycled bricks, roof sheeting and other bits and pieces that we had been unable to throw out during the construction process (you never know when they may come in handy...).
We used the traditional way of building a wood framed house on stumps.
Above: The shed looks great with its newly applied coat of sunny yellow paint.Right and below right: The site fi rst had to be cleared before the stumps could be put in.
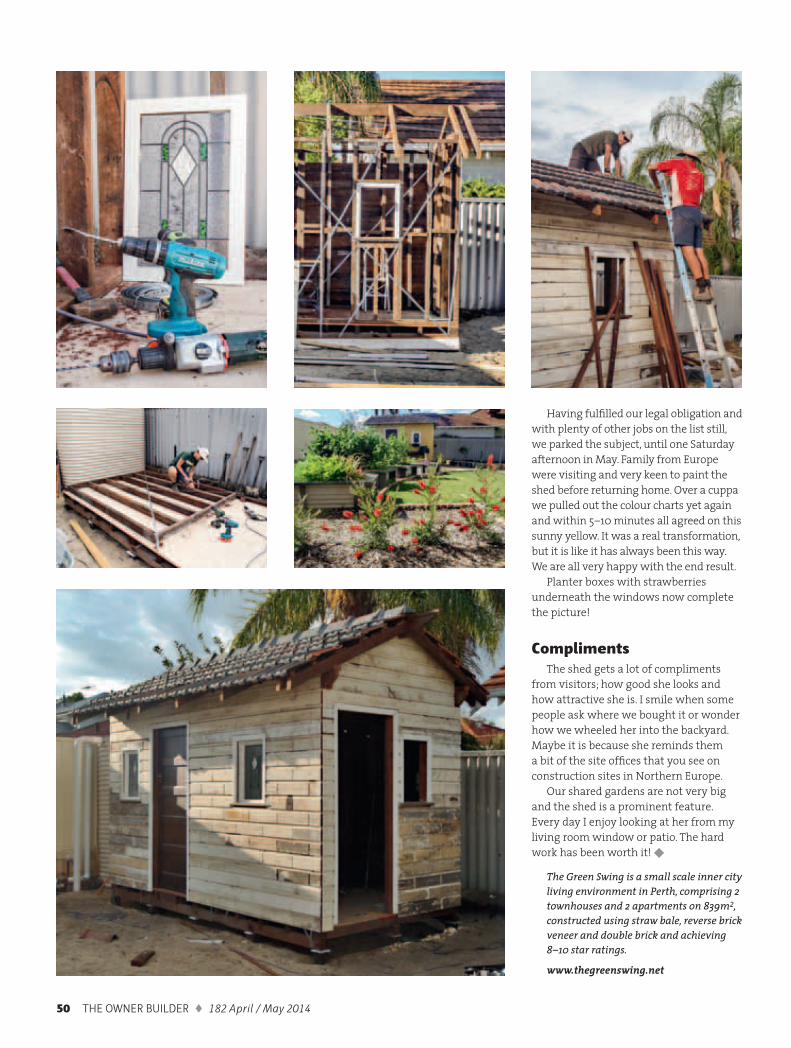
50 THE OWNER BUILDER � 182 April / May 2014
Having fulfi lled our legal obligation and with plenty of other jobs on the list still, we parked the subject, until one Saturday afternoon in May. Family from Europe were visiting and very keen to paint the shed before returning home. Over a cuppa we pulled out the colour charts yet again and within 5–10 minutes all agreed on this sunny yellow. It was a real transformation, but it is like it has always been this way. We are all very happy with the end result.
Planter boxes with strawberries underneath the windows now complete the picture!
ComplimentsThe shed gets a lot of compliments
from visitors; how good she looks and how attractive she is. I smile when some people ask where we bought it or wonder how we wheeled her into the backyard. Maybe it is because she reminds them a bit of the site offi ces that you see on construction sites in Northern Europe.
Our shared gardens are not very big and the shed is a prominent feature. Every day I enjoy looking at her from my living room window or patio. The hard work has been worth it! �
The Green Swing is a small scale inner city living environment in Perth, comprising 2 townhouses and 2 apartments on 839m2, constructed using straw bale, reverse brick veneer and double brick and achieving 8–10 star ratings.
www.thegreenswing.net

THE OWNER BUILDER � 182 April / May 2014 51
The Nillumbik Mudbrick Association Inc. welcomes members from within and outside the Nillumbik Shire who share their passion and commitment for the future of the earth building industry.
Passionate about earth building?
www.mudbrick.org.auwww.facebook.com/NillumbikMudbrickAssociation
AREC
Learn StrawbaleComprehensive 3 day course conducted
by Sam Vivers of Viva Homes
Classroom theory combined with hands on practical elements at our dedicated training site.
Start your project with the right information.
For more information, course dates & bookingswww.arec.com.au
phone: 02 6372 3899
Australian Rural Education Centre
Your Aussie Guide to Sustainability!Save heaps by growing vegetables, fruit, farming, readers DIY projects, cooking, preserving, natural animal care, craft ideas, home business, money saving tips and more!It’s all in Grass Roots magazine!
From newsagents or subscribe for $42.00.Grass Roots PublishingPO Box 117, Seymour, Vic 3661Ph: 03-5792-4000
$575,000 o.n.o.
Ph: 03 5659 6331 bus, 0414 411 914 a/h or email: [email protected].
Energy effi cient architect designed house in rammed earth and radial timber, on
2.5 acres (1 hectare) in South Gippsland, 1.25 hours from Melbourne CBD
• double glazed windows
• 1.5kW solar power system
• solar HW
• mains water and 22,000L tank
• 4 bay shed
• 3 paddocks and watercourse planted with natives
For sale

52 THE OWNER BUILDER � 182 April / May 2014
Olle Hagman Sweden
Olle Hagman’s cordwood cabin in Sweden
Olle used a clay based mortar for his cabin. This is how the early Swedish cordwood homes in the 1800’s were built and Olle is trying to meld the old with the new. Olle is a professor at Göteborg University in Sweden and authored two articles for the Cordwood Conference Papers 2011. He also attended the Conference in Winnipeg and did a fantastic job in presenting his papers documenting the 130 cordwood buildings in Sweden and the many cordwood barns in Norway. His papers are entitled:
A Social History of Cordwood Houses in Sweden Norwegian Cordwood Wall Technique
www.kubbhus.se
John Meilahn Copper Harbor, Michigan, USA
John Meilahn’s Cordwood in the Keweenaw
This handsome cordwood home is in the heart of the Lake Superior snowbelt. The builder John Meilahn is of proud, strong Finnish heritage. His creations shows his affi nity with wood. The railing for the spiral staircase is made of ONE piece of ash (boiled and bent). The kitchen counter tops have “fall” leaves fl oating in a clear epoxy sealant. The shelf on the right is left open as a cat perch (and quite a good one it is).
John is a builder by trade and runs North Shore Builders in Copper Harbor with Steve Peters. He builds traditional homes and alternative construction. If you are interested in contacting John his information is available in the Copper Harbor, Michigan phone book.
Book extract... ‘Cordwood Construction Best Practices’
Owner/Builders and ExpertsThis section features the writers, builders and websites that describe cordwood construction in all its many forms.
This portion also includes builders who have assisted others by writing of their progress or giving help on cordwood building sites. (Ed’s note: We feature two of the profi les included in this section).
See opposite page for a review of this book.

THE OWNER BUILDER � 182 April / May 2014 53
Cordwood ConstructionBest Practices
Richard Flatau
ISBN 9780615592701
Published by Cordwood Construction Resources, LLC (2012)
196 pages
Reviews... REVIEW BY ROB ROY
Richard Flatau’s new book Cordwood Construction: Best Practices is a visual feast and a celebration of cordwood masonry. That is why it’s so much fun to browse through – and be inspired by – its 196 large pages, almost all of which are in full colour.
But that’s just the beginning. True to his book’s subtitle, Richard has gathered together a great deal of ‘best practices’ information from projects he has worked on, as well as from colleagues who have presented authoritative papers at the two most recent Continental Cordwood Conferences: 2005 in Wisconsin (which the author co-hosted with his wife, Becky) and 2011 in Manitoba, where Richard was a major player and organiser.
The building of cordwood walls themselves is, of course, covered in detail, including various mortar options (Portland cement mixes, lime putty mortar, cob and paper-enhanced mortar – just to name a few) and insulation choices (sawdust and lime, cellulose, various foams, and more). But the text also tells how cordwood masonry relates to other ancillary building systems, such as footing options, timber framing, window and door installation, electricity and plumbing. Always, Richard is careful to show time-tested methods that will meet code. His more than 30 years of experience in building, writing about, and teaching cordwood masonry quietly permeates the entire book.
With regard to best practices, two instructional and inspirational sections stand out. The author details two recent highly successful – and code approved – structures with which
he and Becky have been personally involved in recent years: the Cordwood Education Center in Merrill, Wisconsin, and the White Earth Reservation Cordwood Home in Naytahwaush, Minnesota. In these comprehensive addendums, we see the projects progress from conceptualisation to – beautiful! – actualisation and learn how the best practices described earlier are integrated for structural integrity, longevity, energy-effi ciency, design creativity, and compliance. The Cordwood Education Center Addendum has a thorough two-page checklist of how to organise a group to work together to complete a building project. If you have a community project in mind, these two pages alone are worth the price of the book. �
Available from www.cordwoodconstruction.org (US$25 hard copy plus postage, US$20 eBook).
This review fi rst appeared in BackHome Magazine July/August 2012 (www.backhomemagazine.com).
Reviewer Rob Roy is director of Earthwood Building School in West Chazy, New York (www.cordwoodmasonry.com), teaching cordwood masonry and earth-sheltered housing since 1981.

54 THE OWNER BUILDER � 182 April / May 2014
FORMBLOCK AUSTRALIA PTY LTD
www.formblock.com.au
Formblock poured earth walls are ideal forbuilding a solid, comfortable home at low cost.It is a patented, modular system of formwork.Suitable for either stabilised earth or concrete.• High thermal mass performance• High wind prone resistance• High bushfire rating resistance, for earth walls• Highest level rating for sound proofingIn use for over 20 years, we supply Australia-wide.For further info [email protected] call Gary McGuigan 0418 404 200
AUSBALEwww.ausbale.org
The Australasian Straw Bale Building Association is an organisation that promotes the use of straw bale construction as a sustainable building material. Ausbale aims to exchange information, facilitate research and development of straw bale construction and to represent the Australasian straw bale building community.For information contact: Bohdan Dorniak, Treasurer08 8344 8170, [email protected]
FROGHOLLOW DESIGN
froghollow.iinet.net.au
Based in Central Victoria, we have set plans available that are:• Low cost• Easy to build• Environmentally conscious designs • Clear to read• Large scale plans• Ideal for first time builders. Visit website or contact Mike for free brochure.0429 433 471, 03 5345 1329,[email protected]
B & B BUILDING SUPPLIESwww.bbbuildingsupplies.com.au
Specializing in kits to lock up stage for owner builders! Send your plans for a free, no obligation quote for the supply and delivery of materials. [email protected],, 07 5455 5430
ECOHUT – CUSTOM PREFABwww.ecohut.com.au
Stylish, strong, energy-efficient.Steel post and beam FRAME KITS and SHELL KITS. And the INDIES – modular off-grid housing. Stock and Custom designs. 0401 833 411
EARTH BUILDING ASSOCIATION OF AUSTRALIAwww.ebaa.asn.au
Keep in touch with what’s happening in the field of building with unfired earth. Join Australia’s only association dedicated to furthering the use of this environmentally sustainable technology. Rub shoulders with Australia’s most experienced earth builders and share your own knowledge and experience with others.Write to: EBAA, PO Box 3210Eltham Vic 3095Phone: 0408 425 855
FACELESS GUTTER BRACKETS
www.gandgbrackets.com.au
No fascia boards or rafters required.Reduces building materials.Allows extended roof sheet overhang.Fixes directly to roof sheeting, also bullnose.Big problem solver.The brackets come in three gutter profiles.Sizes: 115mm + 125mm quad, high and low front; 150mm V round fits all V round profiles.Order direct online, payment C.O.D or direct [email protected] 0427 510 778 for contact or leave message.
EARTH BUILDING SOLUTIONSwww.earthbuildingsolutions.com.au
Delivering practical and sustainable building alternatives out of earth.We have over 30 years experience helping self-builders, communities and clients use earth building techniques to achieve their goals.Please visit our website to discover our full range of services. We can help you build anything from a pizza oven to an ecovillage using earth, the ultimate sustainable green building material. Peter Hickson, 0408 425 855Builder, Consultant and Trainer
AUSTRALIA
Architects, designers, builders and other service providersDirectory of services...

THE OWNER BUILDER � 182 April / May 2014 55
VICTORIA
JOHN KOCH POLE HOUSESwww.kochpolehouses.com
Building designer and structural engineer03 5931 3269. Mob: 0401 460 079E-mail: [email protected] and photo album CD – $35.
TIMBER FRAMES OF AUSTRALIAwww.timberframes.com.au
Using time tested mortice and tenon joinery methods our experienced timber framers craft beautiful frames for houses and outdoor structures. 08 8390 3150
AUSTRALIA (cont’d)
GRAND DESIGN WINDOWS
www.granddesignwindows.com.au
Makers of high performance Euro-style double/triple glazed energy efficient windows & doors.Made to order in traditional and contemporarystyles – Casement, Tilt & Turn, Double-Hung,Awning, Lift & Slide, Bi-fold & French Doors.Comfort double seals & hi-tech security locks,Eco-smart & insect screen options to suit anybuilding project. Australia’s most innovative and affordable windows and doors on the [email protected]: 0427 837 081 / 0421 593 998 ph: 03 5368 1212
RALF DETJENDesign and Construction
Sustainable buildings, energy efficient design.In post & beam, mud brick and timber.To completion or lock-up.Contract carpentry and owner builder assistance.Licenced in NSW, ACT and Vic. 28299C (NSW), 2007778 (ACT), DB-U 39832 (Vic)Based in East Gippsland, covering the ACT,Southern NSW & East Gippsland areas.Phone: 0427 128 988E-mail: [email protected]
TRACEY TOOHEY DESIGN & DRAFTINGEnergy efficient, environmentallyconscious and intuitive design.Services: Consulting, Design, Drafting and Thermal Performance Assessments.Wangaratta 03 5725 7305
MICHAEL ARCHBOLDwww.naturalstoneconstruction.com.au
Specialists in construction with mud brick and stone. Many years experience in sub-contracting with both builders and owner builders.Ph: 03 5435 3411 (Central Victoria).
GREEN POINT DESIGNwww.greenpointdesign.com.au
Solar architectureFriendly and professional service320 Neill St, Ballarat Vic 3350Phone 03 5338 8260
PETER LEES
www.cheaphomedesigns.com
Architect and Builder30 years experience in all modes of design for owner builders Australia wide. Call for FREE advice or send $29 for our book ‘Elevated Efficiency,’ which shows how to achieve the most efficient home design. Also includes 36 very flexible low cost designs, ready for you to adopt.15 Woolnoughs Road,Porcupine Ridge via Daylesford Vic 3461.03 5348 7650Also www.yachtcruisingdvds.com
BRAD HOOPER, ARCHITECTwww.bradhooperarchitect.com
Assisting with site selection through to selecting the paint colour on the front door, your project is tailored to your requirements, budget and site.Drummond 03 5423 9286, 0418 105 954
OVERWROUGHT METALWORK AND DESIGNwww.overwrought.com.au
Unique custom made wrought iron metalwork including gates, signs, furniture, handrails, security doors, firescreens and garden art. 0403 675 170
PERMACULTURE DESIGN COURSES
www.southerncrosspermaculture.com.au
At Southern Cross Permaculture InstituteNext PDC 21 March 2014 – 5 April 2014With RICK & NAOMI COLEMAN Dip Pc and guests• Residential 13 day course on established site
with internationally recognised teachers. • Cost: $1450. Includes morning tea, lunches and
beverages, free camping. Other accommodation and work exchange available. Couples discount.
• First 10 people get free permaculture book.7710 Bass Hwy, Leongatha Victoria03 5664 3301 or email [email protected]
METAMORPHIC SOLUTIONS Builder/Truss manufacturer
General building work Yarra Valley / surrounds. Design and construct hand made decorative trusses, shipped interstate. 0402 435 372, [email protected]

56 THE OWNER BUILDER � 182 April / May 2014
MAKE IT MUDBRICKS
www.makeitmudbricks.com.au
The mudbrick specialists.Manufacturers of superior quality customised puddled mudbricks.Suitable for load bearing or post & beam style homes.Can be drilled, nailed, sawn, painted or bagged.NSW South CoastOffice: 02 4422 9869Email: [email protected]
TERRA PRIMA SUSTAINABLE DESIGNSPh/fax: 02 4967 3641. Mob: 0409 126 353Buildings, Renovations, Permaculture Consultants. Based in Newcastle, servicing the Hunter Valley‘Drafting your design or helping to create it. A holistic service that gets you started.’Contact Natalie. [email protected] designs don’t cost the earth!
ECO SENSE BUILDINGwww.esbuild.com
Make your home more eco friendly, simply. We specialise in Owner Builder support. Straw Bale and Earth Render homes. Full carpentry and building services. Domestic sustainability consulting. Based in the Southern Highlands NSW. Builders Lic R91919Contact Ken Longshaw on 0418 230 912, [email protected]
WOODCON (T/as Murrawood Mud Bricks)Mud brick supplies – pressed onsite or delivered. Hardwood timbers, post & beam, sawn to size.Owner builder project advice and management.Contract or hourly rate building work. DBU-5531Matthew Cawood 0427 273 476, 02 6071 8486
NILLUMBIK ENVIRONMENTAL BUILDING SURVEYORSBuilding permit and inspection professionals. Specialising in:• Mud brick and pole frame construction;• Energy efficient housing;• Straw bale and stone houses;• Construction advice and problem solving.Registered building practitioners here to help you with your building project.Civic Drive, Greensborough Vic 3088.Ph 03 9433 3243, fax 03 9433 3366
BUSHFIRE (BAL) ASSESSMENTS AND 6 STAR ENERGY RATINGSwww.effectivethermalsolutions.com.au
Providing 6 star energy ratings and bushfire attack assessments.Call 03 5236 3231 or 0435 892 799
NILLUMBIK MUDBRICK ASSOCIATIONwww.mudbrick.org.au
To protect and promote the mud brick building industry, and strengthen Nillumbik’s standing as Australia’s most important mud brick region. Join today!
SUE MITCHELL, ArchitectC/o Post Office, Nyora Vic 3987Ph 03 5659 6331, fax 03 5659 [email protected] sensitive and innovative design in rammed earth, mud brick, stone and timber.
THE MUD BRICK CIRCUSwww.mudbrickcircus.com.au
When you buy mud bricks from us, you buy the experience of 30 years full-time in earth building. Phone 03 5422 6602.NOTE: Please phone us for the date of our next mud brick workshop. These one day workshops are largely a hands-on experience aimed at instilling confidence and competence in mud brick building.
BELGRAPHIK BUILDING DESIGNwww.belgraphik.com.au
Alternative Design SpecialistsEarth, straw bale, poles, Timbercrete etc.• Professional: Comprehensive plans• Practical: 30 years experience • Personal: We listen to you. Environmentally friendly, sustainable. Passive solar, energy efficient designs. Member BDAV, EBAA. Reg. Build. Pract. Vic & Qld.Belgrave 03 9754 7464
HENDERSON CLAYWORKSRediscovering and refining the world’s great earth building traditions.Carpentry and owner builder assistance for natural buildings. Straw bale, cob, light earth, mud brick, earth and lime renders. Over 10 years experience building natural buildings. Servicing Central Victoria from the Daylesford region.Call James Henderson 0458 131 262,[email protected] DB-U 37534
VICTORIA (cont’d)
NEW SOUTH WALES

THE OWNER BUILDER � 182 April / May 2014 57
NEW ZEALAND
TRADITIONAL TIMBER FRAMESwww.traditionaltimberframe.com.au
Mortice and tenon timber frames for all types of structures. Based in the southern highlands of NSW. Ph 0415 111 526
THE GREEN MILLwww.oldtimberfl ooring.com.au
Recycled timber. Specialising in hardwood flooring tongue & groove boards (end matched), milled from 70 year old timbers. $4/lineal metre. 02 6562 8252.
EARTHBOUND Design+Constructwww.earthboundeco.com.au
Eco-sustainable design/building. Solar and energy-efficient. Naturally healthy homes. Member EBAA & HIA. Lic 26508C.0427 592 093, [email protected]
PETER TOROKRendering, Carpentry
Supply of earth and lime renders, applied over straw, brick, gyprock, pumped or by hand. Tadelakt, cob pizza ovens, pump hire. Ph 0411 304 794, [email protected]
STUDIO WEST DESIGNwww.studiowest.com.au
Sharon Ponsford – Environmental DesignerSustainable and solar passive building design. Rammed earth, straw bale and [email protected]
STRAWTEGIC CONCEPTSwww.strawtegic.com.au
Straw Bale Building CompanyWe can help you from the ground up, but our specialty is rendering. (We have a pump!) Call Dave on 0417 998 944
GRAEME NORTHwww.ecodesign.co.nz
Earth, solar and environmental building design. Integrated permaculture site development.Ph: 09 4259 305, [email protected]
EARTH BUILDING ASSOCIATION OF NEW ZEALANDwww.earthbuilding.org.nz
Keep in touch with earth building in NZ.PO Box 1452, Whangarei NZwww.facebook.com/earthbuilding
ADOBE SOUTHwww.adobesouth.co.nz
Designer, earth and straw bale building, adviser to owner builders, consents and project facilitator. Ian Redfern, Whangarei Ph 09 436 4040, 027 490 2324
LOG BUILDERS’ ASSOCIATION OF NZwww.logbuildingnz.org.nz
Helping to foster log building in NZ221 Lees Pakaraka Rd, RD6 Masterton NZ 5886
NEW SOUTH WALES (cont’d)
SOUTH AUSTRALIA
QUEENSLAND
WESTERN AUSTRALIA
G.W. WITTMANN & ASSOC.Consulting Structural Engineers
Structural calculations, footing designand documentation for council approval.Ph: 08 8352 7764
HOUSE OF BALESwww.houseofbales.com.au
Experienced straw bale builder, consulting, building supervisor, owner builder assistance, spray rendering. Licence BLD 4899808 8555 4223, [email protected]
BOHDAN DORNIAK & CO. P/Lwww.bdcoarchitects.com.au
Environmentally sustainable architectural design, specialising in straw bale and alternative construction. Building Supervisor Licence BLD6482. ph 08 8344 8170, email [email protected]
ENVIRONMENTAL FARM GROWN TIMBERwww.treeplanter.com.au
European Sawmill. Hoop Pine, Red Cedar, Silver Ash.Unusual dimensions on request.Phone 07 5486 6147
studioGREEN architectswww.studiogreen.com.au
We are a boutique firm offering a holistic design service in S.E. Qld & N. NSW.Kurt Piccardi 0434 884 [email protected]
See our Media Kit online for details of Directory of
services advertising options.
www.theownerbuilder.com.au > select Advertising

58 THE OWNER BUILDER � 182 April / May 2014
The Wedge-Tail Eagle House
This pole framed timber beauty simply fl ies…
acquiring the skills of building in stone and salvaged wood.
This allowed him the time and patience to gain valuable knowledge of the site and develop his skills while cutting, stripping and drying the wood, as well as to fully appreciate the qualities of local naturally sourced materials. He began the many labour intensive tasks, also using traditional hand tools, cleaning bark from fallen trees with a draw-knife and then an adze for shaping the logs into uprights, beams and struts.
Time passed and he became known not only for his skills in building, but also his generous attitude in helping many others achieve their dream of building a house. In those days, by using the offi cial fi re wood collection license ($30) it meant he could use ‘50 big pieces of timber’
that had been felled and left by previous forestry clearing for his own house. These already seasoned hardwoods were transported, after being cut to size with a chainsaw, and then dragged to the house site with the aid of an ancient tractor.
Planning and building
Peter’s dream had begun but it would take him a further 12 years to complete from initial planning, through the approval stage, then to a fi nished building, with a few other house calls on the way to bring in the income to buy the necessary recycled building materials he would need to fi t-out his own home.
The plan for the house took the shape of a great wedge-tail eagle gliding over the valley, with fully extended wings. The body became the central living/kitchen areas, with French doors connecting both spread wings, creating a sizeable dwelling, fanning out on either side. One
Twenty-two years ago, four friends of German origin joined their resources and bought a property in the secluded green Orara Valley on the Mid North Coast of NSW. Nestled in the hills, protected from high winds and with their own running stream, it is a haven for fauna and fl ora, with sunlight streaming through the trees to the gardens. Peter Duwe and his friends allocated two hectares for each of their own house sites, after the council granted the land the status for multiple occupancy. Since then, the property has fi nally developed into six occupier shares.
Orientation
Peter’s house site is north facing. Having camped out on the land for the fi rst 10 years as a young man, he developed an intimate knowledge of the seasonal changes, prevailing winds, frost and rains that dictate life in the valley. He began his dream, a self-imposed journey, roughing it in a lean-to and gradually
BY HERO NELSON
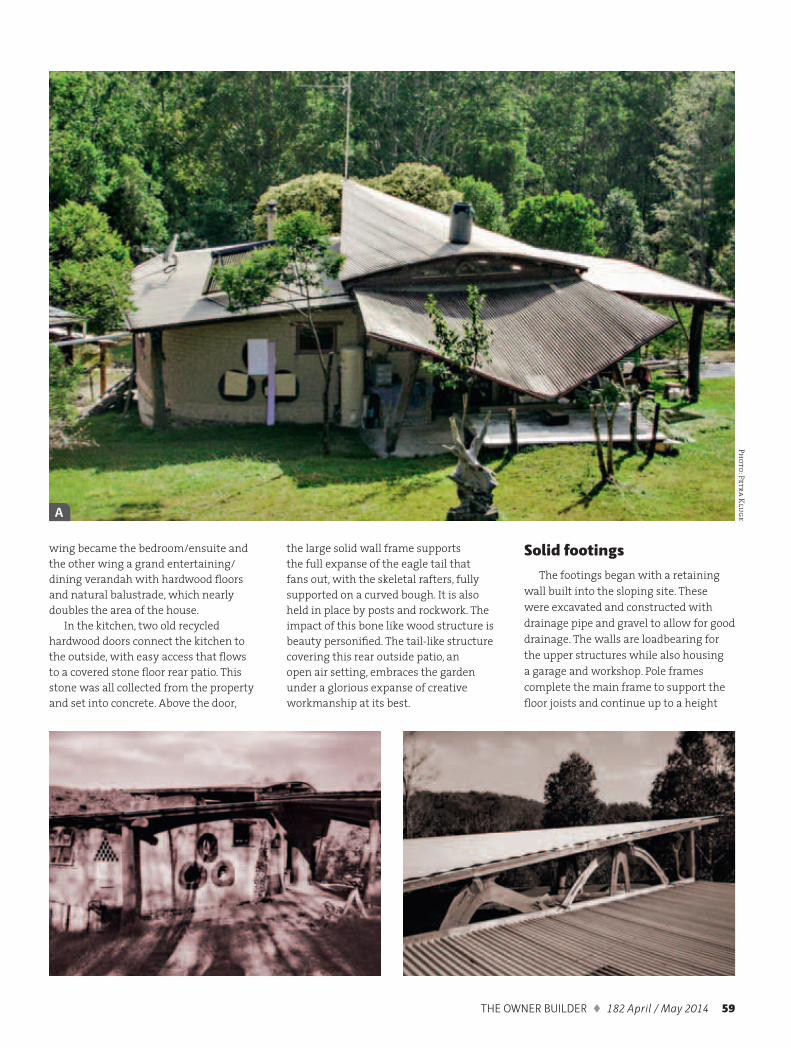
THE OWNER BUILDER � 182 April / May 2014 59
the large solid wall frame supports the full expanse of the eagle tail that fans out, with the skeletal rafters, fully supported on a curved bough. It is also held in place by posts and rockwork. The impact of this bone like wood structure is beauty personifi ed. The tail-like structure covering this rear outside patio, an open air setting, embraces the garden under a glorious expanse of creative workmanship at its best.
Solid footings
The footings began with a retaining wall built into the sloping site. These were excavated and constructed with drainage pipe and gravel to allow for good drainage. The walls are loadbearing for the upper structures while also housing a garage and workshop. Pole frames complete the main frame to support the fl oor joists and continue up to a height
wing became the bedroom/ensuite and the other wing a grand entertaining/dining verandah with hardwood fl oors and natural balustrade, which nearly doubles the area of the house.
In the kitchen, two old recycled hardwood doors connect the kitchen to the outside, with easy access that fl ows to a covered stone fl oor rear patio. This stone was all collected from the property and set into concrete. Above the door,
Ph
ot
o: P
et
ra
Klu
geA

60 THE OWNER BUILDER � 182 April / May 2014
of 8.5 metres at the centre for the atrium and upper loft overlooking the central living area.
The internal wall frames are formed from locally sourced bush poles and branches that have been stripped of bark, shaped, shaved, sanded and oiled. Many have naturally occurring bracing that is slotted into the fl oor joists, with dressed recycled timber used to form the walls. These have been infi lled with various recycled timbers, weather boards, mud brick, rammed earth, bottles and stained glass.
The structure is held down with the poles being fi xed to large, rounded shaped concrete footings, that were set directly into the ground, with custom made 152 x 152 x 152mm stirrups for the poles to be attached. These poles are set at 3.5 metres at the back, 8.5 metres at the centre (kitchen, living area and mezzanine) and 5.5 metres at the front to accommodate the three levels of the house.
The various techniques used form a harmonious whole, as the tree-formed, bird-like frame shapes this dwelling. Standing in the centre of the living area, looking up to the atrium fi lled with bespoke triangular window frames for ventilation, the light fl oods in under the expansive roofl ine. In this living room area, the central pole frame forms the body of the bird, yet also refl ects Peter’s heritage, like a great Viking longboat that has been upended to form the interior.
FlooringRecycling is taken to a new level here,
with the brush box polished fl oors bought in one lot and cut into 10m squared sections (including the joists). These were pushed into placed and secured onto the fi rst level platform with a tractor and two men. The tractor and chain blocks were used to raise many of the posts and beams. But as Peter suggests, ‘cleaning up the timber was the biggest job,’ putting it together ‘was simple.’
Ph
ot
o: M
ax
Kip
p
B

THE OWNER BUILDER � 182 April / May 2014 61
Heating and cooling
As a passive solar dwelling, the Colorbond roof keeps the building cool in summer with its wide eaves (wings) and the central mud walls act as a heat store, to radiate the wood heater warmth in winter and in summer act as a cold store mass, to keep the interior cool. The doors and verandah allow for cross ventilation in summer with the cooler breezes up the valley, while the adjustable high windows in the atrium allow for the air to be drawn up for heating the loft from the wood fi re in winter, or opened to extract the heat updraft in summer, controlling the airfl ow.
Peter keeps the property well maintained, keeping a 30–40 metre buffer between the house and the bush and continually slashing the long grass and re-growth. Filled with a passion for sustainable living and the joys of owner building, he has now embarked on an additional studio at the back of his property
lounge
kitchenbedroom
rob
e
desk
shwrbath.
18
00
0
14000
slow combustion wood stove
verandah
composting toilet
Pl
an
s: P
et
er
Du
we
porch
Arrow letters refer to photos
B
A

62 THE OWNER BUILDER � 182 April / May 2014
for a friend and has also built a 7 metre high pole stand for the new water tank to be fi tted, to allow it to be gravity fed. Then there is the rock wall for the garden.
There is a saying along the lines of ‘a man can build a house, but it takes a woman to turn it into a home.’ In this sense, Peter is very grateful for the arrival of his partner Petra Kluge four years ago, who has invested much love and energy to help in this process of transformation. Her computer skills have been instrumental with photos and plans.
This whole endeavour is an ambitious project that simply soars above the rest, in its intrinsic beauty and harmony with the land, a testimony to one man’s dream. �
� Peter Duwe
Licensed carpenter and craftsman with 25 years experience in bush pole construction. In his work he combines passive solar aspects with practicality and creativity. He is available to help with design and plans for council or general advice on how to get started (by arrangement).
02 6649 2210
Links & resources
Ph
ot
o: M
ax
Kip
pP
ho
to
: P
et
ra
Klu
ge
Ph
ot
o: M
ax
Kip
p
Anticlockwise from above: bottle pattern in wall; the highest point – 8.5m; the new water tower now delivers water under gravity pressure; twilight view of the north-west aspect; interior view of the loft at night.

THE OWNER BUILDER � 182 April / May 2014 63
CHOOKS + ORGANICS + SOLAR + HANDMADE HOMES + CULTURE + COMMUNITY
SUBSCRIBE NOW
03 5424 1814earthgarden.com.au
LOG BUILDERS’ ASSOCIATION of NZHelping to foster log building in New Zealand.
Newsletters, courses, conferences and house tours.
Annual membership available.221 Lees Pakaraka Rd, RD6 Masterton 5886, New Zealand
Log Builders’ Association of New Zealand Inc.
www.logbuildingnz.org.nz
Consider becoming a member of the
Alternative Technology Association:
With your membership you receive invaluable independent information that will help you with your sustainable build or renovation including:
Free advice service provided by ATA experts Subscription to both ReNew and Sanctuary magazines Online access to all back issues of both magazines Membership discounts on sustainable lifestyle products
and services And you will be entered to win a Tindo solar system
Are you planning a home build or renovation?
Visit: www.ata.org.au or call 03 9639 1500 to join
NEW PLANS BOOK!
Forward payment to: Peter Lees – architect 15 Woolnoughs Rd, Porcupine Ridge via Daylesford Vic 3461 Phone: 03 5348 7650 • Also www.yachtcruisingdvds.com
www.cheaphomedesigns.com
ONLY
$29
Flexible plans for homes, studios, B&B’s, sheds, whatever?Plans cost up to $1950, discounts for multiples, ready for building approval
Over 140 coloured photos, sketches, fl oor plans (all changeable) and text!
Ideas for using straw bale, brick, rammed earth, mud brick, stone,
timber, or material of your choice.
Discover how you can:• save heaps of money• build an extremely effi cient home• lessen impact on your environment
Henderson Clayworks
Rediscovering & refining the world’s great earth building traditions
Light earth • Straw bale Mud brick house repairs
James Henderson DB-U 37534
0458 131 262
NATURAL BUILDING workshops in April-May,
along with Frank Th omas. See: www.strawtec.com.au

64 THE OWNER BUILDER � 182 April / May 2014
• Top Tweets
Fine Homebuilding
@fhbwebInstall a Prehung Exterior Door Posted by patrick_mccombeInstalling an exterior door so it works – http://bit.ly/LoW9JX
Alt Technology Association
@ata_ausHow do you fi nd sustainably sourced timber for your build or
renovation? @sanctuarymag investigates – http://bit.ly/1drn3bk
The Fifth Estate
@FifthEstateAUNew Zealand @NZGBC clocks up 100th Green Star building,
and what a beauty it is – http://bit.ly/1dB4uBt
• Blog bytes
Del and Greg’s Owner Builder Adventure
tamborinehouse.blogspot.com.auWe have decided to leave the big smoke behind and live in
the paradise that is Mt Tamborine, 30kms inland from the Gold Coast, Queensland Australia. Follow our story as we build our own modest home with only minimal assistance from those blue collar millionaires (Aussie tradesmen). You’ll laugh, you’ll cry (no wait, that will be us!) you’ll shake your heads and mutter ‘crazy buggers.’
The Keep
www.thekeep-judithcollins.com40 years has fl own by as my husband Paul and I have
acquired extensive knowledge and hands-on experience in being self-reliant.
We live in a mud brick house, which was constructed from the earth on which it sits. A large extensive herb garden sits close to the kitchen. Chickens live in the stone fruit orchard.
• Pretty pins
Geodesic Domes
www.pinterest.com/cbriedis/geodesic-domesA great selection of Pins about geodesic domes.
Home: Timber Frame, Post & Beam
www.pinterest.com/compassrosette I prefer more squared timber, less round log….
• Facebook Favourites
Cobhearthome
www.facebook.com/cobhearthome
Cob building in Maleny! by Jodie. ‘I am realising a dream of designing & building a family home, that incorporates beautiful earthy cob walls.’
Woooohooo! It’s a day to remember... fi nished one wall, all the way to the high point of ceiling... Doesn’t it look GREAT?!
Build Naturally with Sigi Koko
www.facebook.com/buildnaturally
All of Sigi’s projects are designed to function in synchronicity with their environment.
As the ground thaws, it calls me to start digging...#clay soil that will get transformed into plasters, fl oors, paints, and, of course, cob. Do you have a spring project to transform your garden? A cob oven with an attached bench perhaps??
Dream big, and practice on something small...Here’s how: www.buildnaturally.blogspot.com/2013/06/build-
clay-cob-oven-in-your-yard.html
This bench was built by Patrick Hennebery of www.cobworks.com/photo-gallery on Mayne Island
Online insightsDigital ‘reviews’ – a selection of items found online that readers may fi nd interesting and inspirational...

THE OWNER BUILDER � 182 April / May 2014 65
Please select from the following subscription options:
New subscription
[ ] Begin subscription with the current issue:
Nº 182 (April / May 2014)
[ ] ...or... the next issue:
Nº 183 (June / July 2014)
Renewal or extension of existing subscription
Subscribe now...
�
NOTE: Your email address will not be divulged to any other organisation and will only be used for direct contact such as order queries, renewal notifi cations and digital purchases.
[ ] This order is a gift [ ]
Gift giver’s name . . . . . . . . . . . . . . . . . . . . . . . . . . . . . . .
Gift giver’s phone Nº . . . . . . . . . . . . . . . . . . . . . . . . . . .
Gift giver’s email . . . . . . . . . . . . . . . . . . . . . . . . . . . . . . .
. . . . . . . . . . . . . . . . . . . . . . . . . . . . . . . . . . . . . . . . . . . . . . . .
Gift giver’s address . . . . . . . . . . . . . . . . . . . . . . . . . . . . .
. . . . . . . . . . . . . . . . . . . . . . . . . . . . . . . . . . . . . . . . . . . . . . . .
Name . . . . . . . . . . . . . . . . . . . . . . . . . . . . . . . . . . . . . . . . . . . . . . . . . . . . . . . . . . . . . . . . . . . . . . . . . . . . . .
Address . . . . . . . . . . . . . . . . . . . . . . . . . . . . . . . . . . . . . . . . . . . . . . . . . . . . . . . . . . . . . . . . . . . . . . . . . . . .
. . . . . . . . . . . . . . . . . . . . . . . . . . . . . . . . . . . . . . . . . . . . . . . . . State . . . . . . . . Postcode . . . . . . . . . .
Phone Nº . . . . . . . . . . . . . . . . . . . . . . . . . . . . . . . . . . . . . . . . . . . . .
Email . . . . . . . . . . . . . . . . . . . . . . . . . . . . . . . . . . . . . . . . . . . . . . . . . . . . . . . . . . . . . . . . . . . . . . . . . . . . .
Please send order to:
[ ] Cheque [ ] Money order (make cheques and MOs payable to The Owner Builder magazine)
[ ] My Direct payment reference is: . . . . . . . . . . . . . . . . . . . . . . . . . . (see ‘Our details’ page)
BSB: 062 815 • Acct No: 1023 4337 • Acct Name: AfriCat Pty Ltd
[ ] Credit card – my credit card details:
Card Nº: ....... ....... ....... ....... ....... ....... ....... ....... ....... ....... ....... ....... ....... ....... ....... .......
Card expiry date: ........ / ........ [ ] Mastercard [ ] Visa CVV number ........ ........ ........
Name (on the card) . . . . . . . . . . . . . . . . . . . . . . . . . . . . . . . Signature . . . . . . . . . . . . . . . . . . . . . . . . . . .
NOTE: All details are required for credit card payments to be processed. Don’t forget your card expiry date and CVV number.
Payment details Please allow 2–3 weeks for delivery Payment enclosed:
TOTAL AU$
Subscription order form... This order form is also available to download from our website
This order form is also available to download from our website
Yes please, I would like to subscribe to The Owner Builder magazine
AUSTRALIA
Printed magazine only1 year $49.50
PDF fi le only (emailed)
1 year $40.00
Printed magazine + emailed PDF1 year $65.00
REST of WORLD
Printed magazine only1 year $AU75.00
PDF fi le only (emailed)
1 year $AU40.00
Printed magazine + emailed PDF1 year $AU90.00
NEW ZEALAND & ASIA/PACIFIC
Printed magazine only1 year $AU65.00
PDF fi le only (emailed)
1 year $AU40.00
Printed magazine + emailed PDF1 year $AU80.00
Notify gift giver when renewal is due
Automatic renewal option
Your card will be charged within 30 days of your subscription lapsing, until you cancel. You will receive notification of the auto renewal with the last issue of each subscription period.
e only
Don’t miss your renewal!
Please note:Lynda Wilson (publisher) is going
on an extended European trip from 25 March to 25 July 2014.
Orders for PDF copies and subscriptions will still be
processed as usual but may take a little longer to arrive.
Easy order... www.theownerbuilder.com.auwww.facebook.com/TheOwnerBuilder
See ‘Our details’ page for address
ONLINE MAIL
If ordering by mail, please note we have a
new postal address!

66 THE OWNER BUILDER � 182 April / May 2014
The cover and contents page for all back issues are being loaded onto our website. Currently all issues from #79 are there and the rest will be added when available.
A. Getting startedBuilding language 109, 110, 111, 136
Building process 136, 137
History 89, 95, 96, 97, 98, 115, 173
Owner building
Finance 138, 154, 175
Groups/community 84, 93, 123, 125, 127, 132,
134, 166, 169
Hints/advice/planning 55, 89, 107, 114, 119,
147, 159
House tours 119, 120, 129, 135
Insurance 147, 148, 149, 150, 151, 152, 154,
155, 158
Temporary accommodation 67, 68, 141
Regulations/legal issues/permits/
contractors/ subcontracting
61, 70, 75, 99, 109, 131, 132, 133, 134, 135,
136, 137, 139, 140, 147, 149, 159, 160, 162,
168, 172
Site work 67, 97, 110, 111, 130, 142
B. The design stageBuilding in stages 62, 68, 70, 105
Design methods
Bathroom design 94, 137
Designing plans 98, 120, 123, 162, 163, 174
Examples 55, 107, 114, 166
Feng Shui / Sacred Geometry 61, 89, 123, 137,
138, 139, 174
Heating/cooling 87, 92, 101, 103, 106, 117,
122, 124, 126, 134, 174
House surrounds 75, 102, 152
Kitchen design 91, 138, 139, 140
Model making 118
Principles/theory 89, 93, 95, 96, 97, 99, 104,
106, 118, 122, 139, 144, 157, 163, 168, 172,
178, 179, 180
Passive solar 106, 134, 135, 153, 178, 179
Thermal properties, energy performance and
R–ratings
55, 94, 100, 104, 106, 110, 114, 115, 126,
127, 133, 134, 137, 138, 142, 166, 167, 172
Tools 126, 133
Tropical areas 101, 102, 103, 104, 105, 106,
130, 131, 135, 171
Low cost ideas 148, 149, 160, 166, 167
This contents listing of available back issues of The Owner Builder appears every second issue, alternating with the detailed issue by issue guide.
Plans available for your use
Loft houses 107, 108, 110, 113, 128, 129, 132,
139
Single storey 62, 69, 73, 75, 92, 96, 108
1 bed 93, 106, 107, 113, 115, 116
2 bed 108, 110, 112, 114, 118, 120, 122, 124,
127, 130, 131, 137
3 bed 107, 110, 111, 116, 117, 119, 121, 134,
136, 139, 175, 181
Small houses 55, 61, 62, 70, 93, 108, 115, 118,
127, 162, 164
Staged construction 70, 89, 110, 133, 150
Two storey 75, 92, 107, 108, 138, 179
Unusual shapes 113, 114, 117, 123, 124, 125,
126, 136
Materials selection 107, 121, 125, 156, 159,
167, 168
C. Materials & methodsBrick (fi red)
Houses 55, 73, 96, 103, 104, 115, 121, 128,
129, 132, 135, 136, 138, 141, 142, 149
Arches 144, 145
Cavity clay blocks 147
Creative use of fi red bricks 95, 167
Reverse brick veneer 127, 166
Cob 84, 108, 132, 134, 135, 137, 152, 159, 163,
171, 173, 178
Concrete & its use 100, 110, 113
Houses 128, 135, 177
Earth building
Earthbags / sandbags 145, 147, 169, 175
General information 87, 110, 111, 113, 177
See also: in situ adobe, cob, mud brick,
poured earth, rammed earth
Ferroconcrete
Houses 70, 73, 75, 86, 89, 98, 101, 174
Construction 62, 70, 101
Heavy timber framing
Houses 92, 112, 136, 151, 162, 177, 179
Construction 84, 103, 133, 151
In situ adobe 69, 86, 91, 99, 116, 117, 118, 121,
122
Kit homes 124, 127, 129, 152, 154, 157, 158, 162,
167, 174, 178
Log houses 101, 125, 128, 152
Subject listing for back issues...
Mud brick
Houses 55, 62, 66, 67, 68, 69, 70, 73, 75, 84,
86, 87, 89, 91, 92, 93, 94, 96, 97, 98, 99, 100,
101, 103, 104, 105, 106, 107, 108, 109, 110,
111, 112, 113, 114, 115, 119, 121, 122, 123,
124, 125, 126, 127, 129, 131, 132, 134, 135,
136, 137, 138, 140, 143, 144, 148, 150, 153,
156, 157, 158, 159, 160, 161, 163, 166, 168,
170, 172, 179, 180
Additives to earth 104, 116
Domes, vaults 68, 84
Making & laying techniques 62, 66, 68, 69, 70,
87, 91, 96, 97, 106, 107, 109, 112, 113, 140
Plumbing 115
Tools 111, 113
Other materials/methods
A-Frame 120, 130
Bamboo 137, 148, 154, 171
Concrete block 94, 101, 112, 114, 116, 137,
150, 167, 169, 176
Containers 155, 176, 180
Cordwood 150, 155, 156, 160
Earthships/Tyres 67, 94, 122, 172
FC sheeting 94, 127, 130, 135
Formblock 132, 146
Hebel 129, 131, 136, 143, 146, 152, 170, 174,
180
Hemp 171
Insulated concrete forms 137, 138
Light earth 99, 103, 113, 114, 115, 117, 138,
145, 164, 165
Lime 97, 98
Slab & pug 127
Surface fi nishes/wall maintenance 73, 97, 98,
117, 118, 125, 141, 142, 146, 150, 163, 165,
171, 176, 180, 181
Timbercrete 119, 120, 121, 122, 123, 124, 126,
128, 132, 160, 177, 178
Wattle & daub 105, 136, 149, 176
Yurt 126, 140, 150
Pole frame
Houses 66, 67, 95, 114, 130, 161, 172
Construction 55, 70, 94, 130
Post & beam construction 105, 111
Poured earth
Houses 98, 105, 117, 131, 133, 141, 158, 167,
173
Construction 120
Back issues will be available as PDF only copies
between 25 March and 25 July
The Owner Builder back issues are a great way to build up a store of useful information
and inspiration to refer to again and again, no matter what stage you’re at.
Whatever your interests, there’s bound to be a TOB issue with something to offer.
Use our handy check list on these pages to fi nd the available issues containing the
information you’re after. Check the previous edition to see what other articles appear
in your chosen magazine. See page 68 for order form.
NOTE: Back issues are available as PDFs ONLY between 25 March and 25 July.

THE OWNER BUILDER � 182 April / May 2014 67
Rammed earth
Houses 69, 75, 86, 87, 89, 91, 95, 104, 107,
109, 113, 114, 127, 134, 135, 139, 148, 154,
156, 161, 165
Hybrid 181
Recycling/retrofi tting 84, 93, 97, 103, 107, 108,
115, 116, 122, 145, 153, 178
Relocating houses 62, 73, 97, 104, 106, 123, 158
Renovations/extensions 61, 63, 73, 87, 95, 97,
98, 101, 105, 111, 115, 116, 118, 123, 131, 138,
140, 143, 151, 152, 155, 159, 161, 162, 164,
166, 167, 169, 170, 172, 176
Roofs
Corrugated iron 75
Design 92
Guttering 104, 151
For mud brick walls 102
Moisture problems 99
Polyurethane 110
Shakes & shingles 63, 95, 177
Green/sod roof 73, 89, 94, 146
Trusses 63, 116, 173
Unusual shapes 108, 110, 114, 132, 181
Steel
Houses 124, 128, 134, 139, 140, 141, 145, 147,
149, 151, 152, 154, 158, 159, 161, 163, 167,
173, 177
Building with 149, 150, 151
Corrugated iron houses 67, 84, 93, 94, 96, 97,
102, 105, 107, 109, 111, 112, 114, 118, 124,
126, 133, 137, 139, 141, 143, 179
Frames 73, 135, 139, 141, 149
Internal lining 117
Stone houses
Composite blocks 104, 119, 120, 121, 122,
123, 125, 126, 127, 128
Bluestone/basalt 91, 94, 96, 106, 107, 111, 152
Fieldstone 55, 61, 63, 66, 67, 75, 84, 89, 92,
97, 100, 109, 115, 123, 126, 127, 133, 134,
136,143, 148, 149, 151, 154, 165, 175
Limestone 86, 93, 107, 120, 121, 122, 129,
131, 141, 177
Mud brick & stone 121, 125, 129, 136, 144
Other 113, 144, 146, 156, 164, 174
Sandstone 101, 102, 108, 116, 118, 129, 130,
135, 152, 180
Stone veneer 68, 108, 133, 146, 149, 157
Stone construction
55, 68, 89, 93, 94, 104, 106, 107, 111, 121, 126,
169, 172, 175
Buttresses 120
Drystone walling 154
Simulated sandstone 69
Straw bale
Houses 84, 89, 95, 98, 99, 100, 101, 106, 110,
116, 117, 118, 119, 121, 123, 127, 128, 129,
130, 131, 132, 133, 134, 136, 138, 139, 140,
141, 142, 144, 146, 151, 153. 154, 155, 159,
161, 162, 164, 165, 166, 168, 169, 171, 172,
173, 174, 176, 177, 178, 180
Construction 94, 107, 110, 124, 125, 129, 131,
146, 156, 160, 167
Hybrid 181
Tips 130, 131, 132, 133, 134, 135, 136, 137,
138, 139, 140, 141, 142, 163, 169, 170
Timber
Houses 68, 70, 86, 87, 89, 91, 93, 95, 99, 99,
101, 102, 103, 105, 107, 109, 112, 113,
117, 119, 127, 130, 134, 136, 137, 140,
141, 145, 152, 155, 160, 163, 166, 168,
170, 171, 175, 178, 179, 181
Bending 108
Chainsaw milling 96, 109, 173
Choosing 101
Framing & bracing 62, 66, 96, 97, 105, 111,
124, 134, 138, 177
Radially milled timber 116, 152
Slab construction 66
Sustainable use of timber 117, 174
See also heavy timber framing
Underground/earth-covered houses
61, 70, 108, 176
Walls – moisture/breathability issues
117, 118
D. Specifi c rooms & projectsBathrooms/baths etc.
Construction/renovation 135, 169
Outside 68, 69, 151, 155, 158
Waterproofi ng 150
Wooden bath 112
Ceilings 116, 133
Cellars/shelters 102, 110
Cabinets – earthen 148
Doors 89, 91, 93, 151, 152, 177
Floors
Bricks / fl oor tiles 61, 92, 145
Choosing which type 116
Concrete 112, 122, 123, 124, 136, 166, 168,
176
Earth/mud brick 66, 86, 92, 121, 125, 136
Mosaics 86, 105, 138, 176
Timber 121, 144, 165, 171, 176
Kitchens
Benches 142, 148, 162, 170
Cupboard doors 73
Pantries 63, 163
Splashback 140
Painting
Make your own 69
Natural 149
Tips 155
Roof insulation 131, 134
Sauna 150
Staircases 123, 140, 147, 174
Storage 172
Windows
Installation / construction 104, 117, 155, 164
Dormer windows 117
Double glazing/tinting 120, 156, 180, 181
Leadlight/mosaic 94, 104, 118, 128, 177
Overview 130
Unusual frames 94, 107, 177, 178
Walls, lining 156
Verandahs/pergolas/decks 86, 93, 100, 102,
117, 123, 134, 138, 143, 157, 158, 165, 166,
175, 180
E. Beyond the houseAnimals
Outdoor cat run 112
Chook houses 63, 73, 98
Farm projects
Dam jetty 67
Fencing 110, 111, 127, 173
Rotor (pumping water) 129
Small farm design 102
Garden projects
Children’s play equipment 117, 118, 175
Walls/fences/gates 73, 84, 100, 113, 115
Garden beds 178
Garden design 115
Glasshouses/starter frames 161
Observatory 119
Outdoor table 118
Paving 55, 101, 112, 115, 117
Ponds/water gardens 96, 126, 133
Sculpture 100, 115
Steps 98, 106, 109, 115
Sundial 125
Swimming pool 115, 148, 151, 173
Sheds 98, 103, 104, 108, 112, 115, 124, 142,
167, 175
F. Sustainable living & the environmentBuilding biology/chemicals 103, 125, 138, 153,
170, 176
Heating/fi replaces 124, 162, 167, 177
Hydronic heating 106
Permaculture 73, 100, 103, 128
Pest control/termites 55, 69, 105, 109, 180
Recycled building products 132, 136, 171
Solar power/appliances 70, 84, 89, 91, 93, 95,
98, 99, 101, 103, 117, 120, 142, 143, 146, 147,
148, 161
Sustainable living & choices 117, 135, 139, 172
Tanks and rainwater systems 63, 66, 68, 102,
112, 128, 147, 164, 179
Toilets, composting & waste management
103, 113, 117, 123, 140, 142, 163, 164, 176
Trees and footings 86
Water conservation ideas 139
G. Other bits & piecesBushfi re 125, 134, 143, 153, 156, 158, 159, 160,
170, 172
Shelters 154
Health & safety
Roof ladder 127
Scaffold, mobile DIY 132
Staying healthy 108
Pizza/bread oven 62, 126, 133, 167, 171
Security considerations 67
Tools
Chainsaws 128, 129
Chisels & planes 129
Saw horses 110
Trolleys & hoists 110, 164

68 THE OWNER BUILDER � 182 April / May 2014
Back issues – read all about it!
The Owner Builder back issues are a great way to build up a store of useful information and inspiration to refer to again and again.Select from over 100 back issues in our growing library of PDF versions including those no longer in print.See Back issues page or website for contents.
�
This order form is also available to download from our website
NOTE: Your email address will not be divulged to any other organisation and will only be used for direct contact such as order queries, renewal notifi cations and digital purchases.
[ ] This order is a gift
Gift giver’s name . . . . . . . . . . . . . . . . . . . . . . . . . . . . . . .
Gift giver’s phone Nº . . . . . . . . . . . . . . . . . . . . . . . . . . .
Gift giver’s email . . . . . . . . . . . . . . . . . . . . . . . . . . . . . . .
. . . . . . . . . . . . . . . . . . . . . . . . . . . . . . . . . . . . . . . . . . . . . . . .
Gift giver’s address . . . . . . . . . . . . . . . . . . . . . . . . . . . . .
. . . . . . . . . . . . . . . . . . . . . . . . . . . . . . . . . . . . . . . . . . . . . . . .
Name . . . . . . . . . . . . . . . . . . . . . . . . . . . . . . . . . . . . . . . . . . . . . . . . . . . . . . . . . . . . . . . . . . . . . . . . . . . . . .
Address . . . . . . . . . . . . . . . . . . . . . . . . . . . . . . . . . . . . . . . . . . . . . . . . . . . . . . . . . . . . . . . . . . . . . . . . . . . .
. . . . . . . . . . . . . . . . . . . . . . . . . . . . . . . . . . . . . . . . . . . . . . . . . State . . . . . . . . Postcode . . . . . . . . . .
Phone Nº . . . . . . . . . . . . . . . . . . . . . . . . . . . . . . . . . . . . . . . . . . . . .
Email . . . . . . . . . . . . . . . . . . . . . . . . . . . . . . . . . . . . . . . . . . . . . . . . . . . . . . . . . . . . . . . . . . . . . . . . . . . . .
Please send order to:
[ ] Cheque [ ] Money order (make cheques and MOs payable to The Owner Builder magazine)
[ ] My Direct payment reference is: . . . . . . . . . . . . . . . . . . . . . . . . . . (see ‘Our details’ page)
BSB: 062 815 • Acct No: 1023 4337 • Acct Name: AfriCat Pty Ltd
[ ] Credit card – my credit card details:
Card Nº: ....... ....... ....... ....... ....... ....... ....... ....... ....... ....... ....... ....... ....... ....... ....... .......
Card expiry date: ........ / ........ [ ] Mastercard [ ] Visa CVV number ........ ........ ........
Name (on the card) . . . . . . . . . . . . . . . . . . . . . . . . . . . . . . . Signature . . . . . . . . . . . . . . . . . . . . . . . . . . .
NOTE: All details are required for credit card payments to be processed. Don’t forget your card expiry date and CVV number.
Payment details Please allow 2–3 weeks for delivery Payment enclosed:Individual back issues AU$
Back issue packs $AU
TOTAL AU$
Back issues order form... This order form is also available to download from our website
Individual back issues – list your choice below: (PDF only 25 March – 25 July)
Pre-packed back issue packs (PDF only 25 March – 25 July)
I would like the following back issues:
My three alternatives in case you are out of stock in my selection:
[ ] D1. Straw bale Includes issues:
94, 99, 118, 119, 123, 125, 130, 131,
132, 133, 136, 138, 140, 153, 155, 156.
[ ] D2. Mud brick Includes issues: 97, 99, 108, 110, 112, 115, 116, 119, 122, 127, 138, 148, 150, 153, 157, 158.
16 selected back issues containing articles relevant to your favourite building methods – PLUS bonus TOB 1–25 PDFs. AU$50 each pack of PDFs
[ ] D3. Rammed earth Includes issues: 69, 86, 87, 89, 91, 104, 107, 109, 113, 114, 134, 135, 148, 154, 156, 161.
[ ] D4. Stone Includes issues: 55, 67, 101, 106, 108, 111, 126, 127, 129, 133, 134, 136, 146, 149, 152, 154.
If ordering by mail, please note we have a
new postal address!
Please note:Lynda Wilson (Publisher) is going
on an extended European trip. As a result, no posting of hard copy back issue or book orders will take place
between 25 March and 25 July 2014.
Orders for PDF copies and subscriptions will still be
processed as usual.
• PDF only 25 March – 25 July
Australia and worldwide
Single magazines $5.00
12 magazines $50.00
20 magazines $70.00
Individual back issue prices
� Don’t forget to give us your email address so we can contact you to organise the best way to send your PDFs, particularly for larger orders.
Easy order... www.theownerbuilder.com.auwww.facebook.com/TheOwnerBuilder
See ‘Our details’ page for address
ONLINE MAIL

For more information or to send material, contact us by email: [email protected] or post: PO Box 64, Stockton NSW 2295
Animal housingTOB 183 Jun/Jul 2014Have you custom designed and built
a home for your four-legged, winged
or scaled friends? They need all the
same design considerations that
our homes do (okay, maybe not an
ensuite…).
Deadline for material: Tues 8 April 2014
Truth windows, niches and sculptingTOB 184 Aug/Sep 2014Decoration is important! Truth windows
are as individual as the builder, niches
can be everything from whimsical to
functional, and surface sculpting is the
ultimate form of decoration.
We’d love to see your efforts.
Deadline for material: Tues 10 June 2014
We want your...
Animal housing ideas
featured in our next issue
(TOB 183) will receive a
one-year subscription to
The Owner Builder.
Send us YOUR ideas!
THE OWNER BUILDER � 182 April / May 2014 69
In response to requests we will continue to publish a series of articles on specifi c topics in upcoming issues. We’d like to celebrate and share your
creativity to inspire other readers. Please send us your ideas, stories, photos or sketches of work you’re especially fond and proud of
– anything from the very humble to the more ambitious.

70 THE OWNER BUILDER � 182 April / May 2014
White Earth Reservation Cordwood Home
tribe were enthusiastic about building a home that would be in harmony with the natural surroundings, be energy effi cient and use locally available resources. It would be designed and built with wood from the area and in accordance with Ojibwa home traditions. That is, the house would be a multi-generational home, it would incorporate a large family gathering area, the entrance would face east, and it would be comprised mostly of
renewable materials. These factors were taken into account whenever possible.
Interviews were conducted with Ojibwa Tribal members in 2008 by Design Coalition of Madison, Wisconsin to explore different living space possibilities. An architectural fi rm was hired to coordinate and include energy effi cient and best practice construction methods with this home. Initial plans were drawn and after many discussions and consultations they were modifi ed to meet the specifi c needs of the owner. Included in the plan was an energy ‘heel’ attic truss, which added 74m2 of
In September of 2008 the MMCDC (Midwest Minnesota Community Development Corporation) contacted us with regard to the possibility of building a cordwood home on the White Earth Reservation in north-west Minnesota. The idea was to provide attractive, affordable, energy effi cient housing on the reservation, while offering employment opportunities for the training of tribal cordwood masons.
The plan to work with the White Earth Tribal Land Offi ce allowed the home to be constructed on Tribal Trust Land. The local contractor and members of the
BY RICHARD & BECKY FLATAU
A

THE OWNER BUILDER � 182 April / May 2014 71
were milled on the two sides that would abutt the cordwood infi ll. They were left rounded on the interior and exterior.
After the footings and slab were complete, the cedar post and beam framework was erected and braced. The bracing is very important to maintain structural integrity and prevent sections from going out of square. The braces are only removed after the cordwood walls approach the 1.2 metre mark. The roof was completed and shingled; having the roof fi nished before cordwood construction begins means that the cordwood mortaring can take place, for the most part, out of the elements. If a section is not fi nished in time, it can be 'boarded up' for the winter and work can continue on the inside of the building. Attaching tarpaulins to the fascia boards is helpful when it is necessary to protect the mortar and the workers from the drying rays of the sun.
Electrical
There are many code compliant ways to run electrical wiring in a cordwood building. In general for wiring jobs we recommend that you follow your local building codes. In this particular instance the electrical contractor chose to run fl exible, plastic tubes (also called fl exible PVC conduit). In accordance with the blueprint, the 'blue smurf' wiring tubes were then installed throughout the building. The hanging blue tubes (with metal receptacles) were very irritating to work around during construction. The masons were constantly bumping into them while mortaring.
Cedar log ends
The window boxes (made of double 50 x 200mm) were hung, using the sturdy top plates as fastening points. The two
living space as upstairs rooms. The plans produced a three bedroom, two bath, 170m2 home. A large open plan kitchen, dining, living area was incorporated in the fi nal fl oor plan.
VisionThis article will undertake to describe
the processes and unique attributes of this very successful home building project. They are:• Effi cient design with owner input
(Ojibwa Tribal member) leading to functional space usage.
• 12:12 pitch roof (steep slope) provided an additional 74m2, adding two bedrooms and a bath upstairs.
• Insulated sand bed with radiant in-fl oor heating (coupled with off-peak power usage).
• Northern white cedar post and beam framework (a sacred tree in Ojibwa culture).
• 400mm northern white cedar cordwood log ends.
• High R-value foam insulation in centre cavity.
• Cold weather mortaring techniques.• Ojibwa design features mortared into
the cordwood walls.• Ojibwa mortaring crews hired.
We were fortunate to work with two very capable builders: Robert Zahorski, the general contractor and Bill Paulson, a tribal member who was the project coordinator. Each dovetailed into the other's strengths and the result was a building that evokes Ojibwa traditions, built with 21st century construction techniques.
Footings and frameIn the fall of 2009 the footing was
built, consisting of an insulated sand bed beneath a concrete slab. This sand bed will store heat during off-peak energy hours and then radiate it throughout the house during the high energy rate use in daylight hours. This is similar to radiant in-fl oor heat, except the large sand bed under the foundation is insulated and provides heat energy storage for the home.
The post and beam framework was erected by a local contractor. Cedar posts gathered from near the reservation
‘This was not a ‘spec house’ but
one that has a unique personality
and footprint. The purposes of
this undertaking were to produce
a natural, attractive home,
provide labour opportunities on
the reservation and instil pride of
ownership within a community
directed operation.’
Richard Flatau
Under fl oor – side view (artist’s rendering)
subsoil3/4"
(19mm) tubing
2" (25mm) foam board subsoil gravel
bed
high strength
blue board
cordwood walls
footingsand bed1/2" (13mm)
tubing

72 THE OWNER BUILDER � 182 April / May 2014
exterior door frames were 'roughed in.’ Later these would have doors with beautiful etched glass panels installed for both privacy and beauty.
Early in the process, the decision was made to use 400mm cedar log ends for the cordwood infi ll. This length would provide an insulation value of approx. R4. The logs had been cut and dried for four years in 2.5 metre lengths. After that they were cut into 400mm lengths and 70% of the logs were split to assure faster drying.
On the way to being stacked the logs were dipped in a borate solution (four cups of borax to four litres of water). Finally, the logs were stacked in single rows for drying. While stacked, the exterior ends of the log ends were brushed with a UV blocker so that the faces of the exterior log ends would maintain their colour. The interior log end faces were left natural.
Mortar mixing
A mortar mixer was purchased and three different individuals were trained on mixing proper cordwood ‘mud.’ It was very helpful to have an alternate ‘mortar mixer’ when someone had a scheduling confl ict.
The mortar mixture used was our favourite mix of:
Above: Back wall under construction – note foam above log ends.Left: South wall gradually rises.Below left: A happy foamer!

THE OWNER BUILDER � 182 April / May 2014 73
• 1 part Portland cement• 1 part hydrated lime Type S• 2 parts soaked softwood sawdust
(coarse)• 3 parts washed, coarse sand
The overall feel of the mortar is an adobe style texture, which is easily tuck-pointed with a spoon.
Injecting foam insulation
For insulation, the initial strategy was to use regular coarse softwood sawdust mixed with hydrated lime in the centre cavity (between inner and outer mortar), but a dearth of coarse, softwood sawdust in the area led to another decision. It was determined that injected closed cell foam was going to be used. The main advantages of injected foam are: high R-value (R1.2 per 25mm), it bonds well with the wood and tends to fi ll every nook and cranny. Cordwood builder Sandy Clidaras of Quebec has been a pioneer in using closed cell foam in single wall cordwood and so we consulted him for advice. Sandy generously gave of his time and information.
Convinced of the foam's merits, we ordered eight kits of foam insulation.
When using injected closed cell foam the cordwood wall is fi rst built in two-foot-high sections. Half-inch tubes are inserted in the centre cavity as the wall is being built. The mortar is left to harden for at least 24 hours (any sooner and the wall may be lifted by the pressure of the expanding foam). The foam is then injected into the tubes. The foam comes in two canisters, which must be warmed before being used and then shaken while injecting (this makes certain all the foam is used). You also need to wear protective gear.
Bill Paulson devised an ingenious method of making sure foam got in every crack and crevice. He was the 'main-man foamer' and if he detected a cavity was not completely fi lled he would drill a hole in the longitudinal middle of a log end, place a 10mm tubing hose into the log end until it reached the bottom and then inject foam into the unfi lled cavity. Bill developed a method of slowly pulling out the tube, as he injected the foam (one hand on the nozzle trigger and
one hand on the tube). He became quite accomplished at stopping the fl ow of the foam before it erupted over the top. It was helpful to have a ‘foam watcher’ telling the ‘foamer’ how close the expanding foam was to the top. After completion of the home, an infrared scan showed no 'cold spots' in the cordwood walls.
Cold weather mortaring
When we left to conduct another workshop in North Carolina the cordwood mortaring crew was about one third fi nished. Little did we know at the time that the fall of 2009 in north-western Minnesota would turn into one of the coldest on record. Finishing the cordwood infi ll in October meant tarping the house, covering the cordwood walls with blankets and 'fi ring-up' a propane heater. Starting a little later in the morning allowed the temperatures to rise a bit.
If at all possible, cold weather mortaring is something to avoid. If the water in the mortar mix freezes it can cause the mortar to fl ake and crumble. Since this home was built within a post
entry
kitchen
dining
up to attic
bedroom 1
bathroom
w.i.r. & laundry
living
14730
81
30
A
Arrow letters refer to photos

74 THE OWNER BUILDER � 182 April / May 2014
and beam framework there was no worry about structural integrity, but to have to re-mortar a complete wall or part of a wall would become a very labour intensive operation, especially since the mortar fl aking may not be immediately apparent.
If you must mortar in cold weather, it is imperative to fi nish all mortaring before freezing temperatures occur. If this becomes impossible, then precautions need to be taken to assure the mortar will not freeze:• The freshly mortared cordwood wall
must be covered with blankets or tarps and secured, so it is protected from freezing cold and wind.
• If there is a crew working on different sections (as was the case on this project) wrap the entire building with tarps to cover the work.
• Even though there is a little heat generated from the chemical reaction of the Portland cement and the water, it is not enough to prevent it from freezing when the temperatures plummet.
• On this project, not only did we tarp the entire house, but we placed a propane
heater in the middle of the house to keep the mortar from freezing.
• It is very important to keep the walls covered, except when mortaring, for at least seven days. According to masonry experts, masonry mortar takes seven days to dry and fourteen days to cure.There are ingredients that can be
added to the mortar mix to retard freezing (calcium chloride), but with the soaked sawdust in this mix, no one can adequately be certain that these non-freeze agents will work properly. So it is best to cover, seal and provide a source of heat if the temperature is going below – 7C degrees. Diminishing the amount of sawdust as temperatures drop can be helpful, as the retarding feature of the sawdust is less important.
On this project we were properly prepared to prevent the masonry from freezing during the very cold month of October 2009. While the precautions kept the cordwood walls from freezing, it added to labour costs by requiring time consuming ‘take-down’ every morning and ‘button-up’ in the evening. The cordwood masonry was fi nished by late October and the inside work commenced. The entire cordwood infi ll was accomplished in less than six weeks.
Native cordwood masons
One of the highlights of this project was meeting and teaching the cordwood mortaring group which had been assembled for this task. The crew was paid a good wage and learned valuable
Above: A very enthusiastic and happy crew!Bottom L–R: All buttoned up for winter; cold weather mortaring.

Above: Finished house in summer.Right: Becky and the crew tuckpointing.
masonry and construction skills in the process. They were enthusiastic and learned quickly. As the project went along, some of the guys started talking about building an Ojibwa Ceremonial Lodge and personal homes, using the abundant tamarack (Larix laricina, a deciduous conifer) on the edges of the surrounding wild rice lakes.
One of the many side benefi ts of being involved in this project was receiving gifts of hand harvested and processed wild rice. Even though the project was open to women applicants, there were no takers. Becky ended up being the only woman on the crew and enjoyed working with the guys.
THE OWNER BUILDER � 182 April / May 2014 75

76 THE OWNER BUILDER � 182 April / May 2014
Special effectsBill and Robert were instrumental in
making some of the artistic Ojibwa motifs in the White Earth Home. The owner of the home was a member of the Bear Clan, so Bill decided he would put a bear paw in the cordwood wall. It became one of the focal points of the house.
The Ojibwa medicine wheel is prominently displayed on the front wall. The feather blends attractively into the entrance wall. The cordwood home has been occupied for nearly two years and the owner, a school teacher on the reservation, raves about the naturally beautiful cordwood home.
We visited the home a year after completion to do any weatherising that might be required. We applied chinking around a few log ends that had loosened and stuffed a few round log ends that had checked (cracked) with white fi breglass. This well constructed home is easy to heat and blends beautifully into the surrounding woodland.
The home has caused quite a stir in the surrounding area, and there are plans for building a commercial law offi ce, a ceremonial lodge and more cordwood homes. We are proud of our involvement, and grateful for the friendships made, but we are also thankful to the tribal members who welcomed us and provided insight and assistance in making this home come to fruition. Being involved in a project of this magnitude was certainly a peak experience for us. �
Richard Flatau’s latest book Cordwood Construction Best Practices (2012) is a complete, detailed work (with colour photographs) on cordwood construction. It is available as an eBook, as are all of his other books including Cordwood Shed Plans, Cordwood House Plans, Cordwood Conference Papers 2011 and Cordwood and the Code: A Building Permit Guide.
His website is:www.cordwoodconstruction.orgHe also has a blog at: cordwoodconstruction.wordpress.com
Clockwise from above: Bill Paulson’s bear paw is a focal point; his feather blends into the entrance wall; stairs to upper level; porch in winter.

THE OWNER BUILDER � 182 April / May 2014 77
Building Better Farms
At your newsagents nowor subscribe online atwww.tacfarmer.com.au
If you have a farm – or are planning to buy one – Town & Country Farmer is the magazine Australian farm families turn to for practical ideas to help run their farm more efficiently.A subscription is a great investment – or gift.
03
We are a group of building industry professionals, researchers, owner builders and interested people who share our knowledge and experiences.Visit us at
and join our growing community of people committed to better building.
AUS BALE
/Ausbale
• 4 magazines per year keeping you in touch and up-to-date with what is happening in natural building in NZ
• Annual natural building conference and tour of innovative buildings
• Great networking platform for building professional, owner builders and those interested in natural building
FOR SALE • $395,000
Contact Valerie Andrews (03) 5468 1768 or for brochure email [email protected]
Stylish 2 bedroom passive-solar home designed by architect and former TOB editor, Russell Andrews.The property includes double garage with adjoining 3rd bedroom/home offi ce, carport, grid-interactive solar electric system, solar hot water, wood-heating and 75,500L water storage, set on 16 (~6.5 hectares) acre bush block in Dunolly, central Victoria (see www.dunolly.com.au)
As featured in TOB Nº 154

78 THE OWNER BUILDER � 182 April / May 2014
Stone Haven… or how I became a disabled pensioner
series of different radius curves and not really suited to formwork construction. Additionally we preferred the warm feeling of mud brick and lime render interior fi nishes, and most importantly no longer had the budgetary constraint of using the cheapest technique. Combined with now employing a stonemason skilled in the ‘half’ dry stone outer skin technique the choice became clear. We fi rst built the inner walls with concrete blocks or mud bricks and built the windows and doors into this layer. This got the building to lock up stage quicker and meant the building could be occupied sooner.
The dry stone look stonework is actually concreted with a back layer of coarse gravel mortar, using old broccoli boxes as a spacer to create a cavity thermal break in the wall. The stonework is 300mm thick and self supporting over the 2.8m height. The ‘air’ gap and slab step down gives a watertight fi nish and the outer spaces between the stone provides habitat for all manner of beasties.
The complex shapes needed for the window trim and lintels were formed from Hebel blocks, rendered with Liquid Terracotta by Megatreat. Hebel is much easier to shape than concrete block.
This was a case of a solution waiting for a problem to fi x! I had over ordered a whole pallet of Hebel for another part of the project. After this, I ended with two still left over, which I have since used as temporary plugs for my fi re bunker air vents!
Compared to form fi lling with rock and concrete, the method of stone construction we used is very time consuming and much more expensive
When Fiona and I were about to build our dream retirement home, the local state highway authority decided to widen the Princes Highway, which runs through our property. They bought a thin sliver of our land and started carting it away. Out of the magnanimity of our hearts we helped them speed the process and ‘allowed’ them to dump something like 350 tonnes of rock on our hillside. Thus was born the idea of something built with stone.
Hybrid approach
We bought a copy of ‘Stone House: A Guide To Self-Building with Slipforms ‘ by Tomm Stanley (reviewed in TOB 128 Apr/May 2005) and ‘Stone Primer’ by Charles McRaven (reviewed in TOB 148 Aug/Sep 2008) to start us on the way.
Editor’s note: Book reviews featured in back issues of TOB are also available on our website. www.theownerbuilder.com.au
By the time we got to the front of the house, it had become a complex
BY DON FIRTH
Below left: 350 tonnes of stone for free!Below right: Complex curves were achieved with a ‘half’ drystone wall technique.Top: This sculpture was made by a friend.

with paid labour. It is also not as structurally loadbearing and might not get engineering certifi cation if it must support the roof. For our house it was infi ll with the concrete roof supported on concrete fi lled columns.
In addition our Silurian schist stone had almost no bedding planes, is brittle and very hard, almost impossible to chisel to shape and agonizingly fi ddly to create more than one face at a time – as is needed around door and window openings. Most days saw no more than 1 square metre of surface completed, but the results speak for themselves.
The engaged column is a reminder of a trip to South America taken part way through the project. Unintentionally we recreated the Inca practice of sloping masonry to protect buildings from earthquakes. The Conquistadors thought they knew better and built vertical palace walls on Inca foundations. Many have since collapsed!
Above: View of the house from the front with the green roof already growing well.Right: Beautiful stonework – worth the effort!
A
THE OWNER BUILDER � 182 April / May 2014 79

80 THE OWNER BUILDER � 182 April / May 2014
Because one canIn keeping with the ancient infl uence
on the house design, there seemed room for a niche adjacent to the front entrance. To give a ‘grotto’ effect, I chose to line the inside with light coloured granite as a contrast to the main outside face stone – this represents an inner skin.
The actual construction of the niche made use of a drum to form the main barrel shape, surmounted by a ply form to assist with creating the arch. As the feature is next to the cellar door it, appropriately houses representations of Demeter (goddess of the corn and harvest) and Bacchus (or Dionysus, god of the grape harvest, winemaking and wine).
Stonework with inner skin of mud brick or concrete block
Rendered Hebel
Concrete blockwork
Progress on the stonework was a very slow process due to the characteristics of the stone.
Arrow letters refer to photos
A

THE OWNER BUILDER � 182 April / May 2014 81
Chimney
At the back of our ‘underground’ house we have an open fi re, thus creating this freestanding stack. I built it ship funnel shape to make it less boxy. The original cowling sent smoke down the chimney so for now it has my old BBQ plate on top, but when I fi nd that ideal fl at stone…
This is all that shows of a south elevation of the house.
Once you have built something with stone, you will never walk past a rock again without thinking, ‘That would make a great… .’ That is how the large rock above the niche found its place – it was exactly what I needed for that spot. �
Above left: Niche adjacent to front entrance.Above right: Sloping ‘Incan’ masonry.Right: Work around windows was agonisingly fi ddly getting more than one face right.Below: Open fi re chimney takes shape.

82 THE OWNER BUILDER � 182 April / May 2014
From the back porch...
BY PENNY BRIGHTON
Are you earthed?
I’m more than willing to admit that I fl it from new idea to next new idea at an alarming pace, a bit like a butterfl y from fl ower to fl ower. However, I like to think that unless I keep my mind open and try things out, I’m never going to learn anything new.
Over the past few months I’ve read and seen mention of earthing in a number of sources, both printed and online. Earthing is a way of conducting the energy of the earth into your body. In a nutshell, as I understand it, that means connecting physically to the earth, without any barriers. I’m not one for walking around barefoot much, I’m far too delicate for that… but doing so on the beach is great and has become part of my regular morning routine. Now I can’t honestly say I’ve noticed any massive change, but it is a little ritual that I look forward to each day. I also sometimes sit down at the end of my walk and do a little meditation (or sea watching, which is more my style).
A growing body of research is indicating that there are benefi ts to being earthed, including reducing infl ammation in the body, improving sleep and digestion, speeding up injury recovery and reducing stress. The simplest way is to walk on earth, grass or sand with bare feet (preferably a bit wet to increase conductivity), or to take a swim in the sea. In the past, we were naturally more connected to the earth, walking, gardening or tilling fi elds. Recently we have become more domesticated, living in insulated houses and wearing rubber soled shoes. Of course, as with all these ideas, you can take it to a whole new level – with a range of earthing sheets, mats, bands and patches available, even earthing footwear.
Being the type of person who really likes to ‘keep it simple stupid,’ I started thinking about how we could design our houses so that the fl oors were naturally earthed anyway, meaning that even walking around barefoot indoors would provide some benefi t.
According to Earthing Oz (www.earthingoz.com.au), even walking on a tile fl oor can have some benefi t. ‘It depends on whether the tile fl oor sits on a concrete slab or on the ground. If so, the energy could come through. If the tile sits on plywood or some other kind of wood, plastic, or vinyl understructure, you are not likely to get any conductivity. It also depends on what kind of tile; ceramic tile with a glazed fi nish on the surface will, like
glass, probably prevent the Earth’s energy from coming through.’
A search for ‘earthing’ on YouTube brings up a huge number of interesting videos. There is also talk of adding dedicated earthing systems to the plans for new buildings and even retrofi tting to existing buildings, but I’ve so far not been able to fi nd too much information about this.
So, my timber fl oors on timber bearers and joists on brick piers are just not going to do it for me. Back to the beach I go! �
Ed’s note: Do you have any experience with earthing? Can you explain how it could be applied to buildings? We’d love to hear from you.

Plant based, non toxicFree of harmful chemicalsIngredients fully declaredSafe for childrenLow allergenicEasy to rejuvenate
For our full product range visit www.livos.com.au - (03) 9762 9181
Natural & SafeSurface Treatments
SOLOMITEnvironmentally friendly products
STRAWBOARD CEILING MATERIAL� Reduces unwanted noise� Excellent heat insulation� Ease of application� No maintenance (no painting)� Fire resistance� Relaxed visual appearance
Dandenong 03 9793 3088Murtoa 03 5385 2260
www.solomit.com.au
� Made in Australia
FREECONTACT USFOR YOUR
DVD PACK!
Mill your own boards & slabs
easily with a Lucas Portable
Sawmill!
For more information contact us: Ph: 03 5728 7283Web: www.lucasmill.com
PORTABLE SAWMILLSPORTABLE SAWMILLS
20 Years & Still Going Strong
®
� Reclaimed Floorboards� Remilled Wideboard Flooring� Dressed Recycled Boards� Wharfdeck
– Durable native timbers in a broad deck range
[email protected]: 03 9391 0466 Fax: 03 9391 0477
190A Hall StreetSpotswood Vic 3015
RECYCLED TIMBER
• Water Repellents• Dust Sealers
VIC 03 9699 8202NSW 1800 832 437
QLD 07 5575 7759 TAS 03 6273 5800SA 08 8132 1166 WA 08 9335 5440
EARTH BUILDING
PROTECTION PRODUCTS
• Admixtures• Earth Renders
www.techdry.com.au

84 THE OWNER BUILDER � 182 April / May 2014
See more of Thea’s work and other stunning stonework in our special feature this issue, starting page 28.
9 770728 722003
02
‘Several summers spent working in English countryside estates mixed their memory with my imagination as I drew the initial drawings of this walled garden and private chapel. Stone by stone, with the support of assistants and gathered trades (wo)men, I built until all 350 tonnes were used.
The walls of the enclosed 23 x 15m garden reach 2.5m in height, with the chapel drawing visitors through to the back. This project is the embodiment of an undertaking, a once in a lifetime opportunity: one that I hold in highest regard. ‘ ...Thea Alvin
www.myearthwork.com
Chapel Gardens


![summit stone flyer 2013[1] - Wendland Nurserywendlandnursery.com/wp-content/Documents/County...Haven Hush Solace Timeless Due to the nature of concrete and variables in photography](https://static.fdocuments.in/doc/165x107/5fa4c7a489748229d42c49db/summit-stone-flyer-20131-wendland-nu-haven-hush-solace-timeless-due-to-the.jpg)