Dynamic IP & Hosted IP - IP Simple Service6 Dynamic IP & Hosted IP Windstream Online ... 03...
68
Dynamic IP & Hosted IP USER GUIDE
Transcript of Dynamic IP & Hosted IP - IP Simple Service6 Dynamic IP & Hosted IP Windstream Online ... 03...

Dynamic IP & Hosted IPUSER GUIDE

i
CONTENTS
Dynamic IP & Hosted IP
1.0 Windstream Online1.1 System Requirements1.2 How to Log In to Windstream Online
2.0 Enhanced VoIP Interface2.1 VoIP Services Interface2.2 VoIP Permissions2.3 My VoIP Features2.4 My VoIP Features – Definition of Features2.5 My VoIP Features – Changing Feature Status2.6 My VoIP Features – Schedules2.7 Adding a New Schedule2.8 Group Features2.9 Auto Attendant2.10 Auto Attendant2.11 Edit Auto Attendant2.12 Edit During Business Hours2.13 Edit After Business Hours2.14 Series Completion2.15 Create a Series Completion Group2.16 Edit a Series Completion Group2.17 Trunk Group2.18 Edit a Trunk Group – Call Forward Always2.19 Edit a Trunk Group – Capacity Management2.20 Edit a Trunk Group – Unreachable Destination

iiUser Guide
2.21 User Administration2.22 Search & Filter Functions2.23 Users Tab – Search2.24 Users Tab – Filter2.25 Lines Tab – Search2.26 Lines Tab – Filter2.27 Managing Other Users2.28 Manage User Features2.29 Manage User Permissions2.30 Reset Voice Messaging PIN2.31 Reset Voice Messaging Box2.32 Edit User2.33 Unassign Number2.34 Delete User2.35 Add / Remove Feature Controls2.36 Creating / Administering User Accounts2.37 Additional Features / Functionalities
3.0 Primary VoIP Interface3.1 VoIP Interface Online Help3.2 Search3.3 Group Level3.4 User Level3.5 Incoming Call Features3.6 Anonymous Call Rejection3.7 Call Forwarding Always

Dynamic IP & Hosted IPiii
3.8 Call Forwarding Busy3.9 Call Forwarding Busy – From Your Telephone3.10 Call Forwarding No Answer3.11 Call Forwarding No Answer – From Your Telephone3.12 Do Not Disturb3.13 External Calling Line ID Delivery3.14 Internal Calling Line ID Delivery3.15 Group Features3.16 Assigning Group Features3.17 Removing Group Features3.18 Activating Group Features3.19 Calling Line ID3.20 Assigning User Features by User3.21 Hunt Groups3.22 Series Completion Hunt Group3.23 Add a Series Completion Group3.24 Modify an Existing Series Completion Group3.25 Delete a Series Completion Group3.26 Circular Hunting3.27 Restricting Certain Incoming or Outgoing Calls3.28 Calling Plan3.29 Incoming Calling Plan3.30 Setting Up an Incoming Calling Plan for a Group3.31 Outgoing Calling Plan3.32 Outgoing Calling Plan Call Types3.33 Set Up an Outgoing Calling Plan (Group Account)

User Guide iv
3.34 Outgoing Digit Plan3.35 Digit Strings3.36 Set Up Custom Digits Strings3.37 Changing Profile Information3.38 Enterprise Profile Changes3.39 Group Profile Changes3.40 User Profile Changes3.41 Speed Dial 1003.42 Speed Dial 100 – From Your Phone3.43 Abbreviated Dialing3.44 Voice VPN3.44 Extension Dialing3.45 Outgoing Calls3.46 Outgoing Calls3.47 Call Return3.48 Line ID Blocking3.49 Speed Dial 83.50 Call Control3.51 Call Waiting3.52 Flash Call Hold3.53 Call Transfer3.54 Three-Way Call3.55 Utilities3.56 Feature Access Codes3.57 Additional Help

6 Dynamic IP & Hosted IP
Windstream OnlineThe WINDSTREAM Online interface allows customers to perform a variety of functions including:
01 View and pay invoices
02 Manage services in real-time
03 Add/change features
04 Route calls
05 View service reports
06 View trouble tickets
07 Contact Customer Care at 877-340-2600 for assistance
System RequirementsThe Control Panel is best viewed with Internet Explorer 7 or higher. Some problems may occur with Chrome, Firefox, and other browsers.
How to Log In to Windstream OnlineGo to www.windstreamonline.com type the Username and Password, click LOGIN or Register Now.
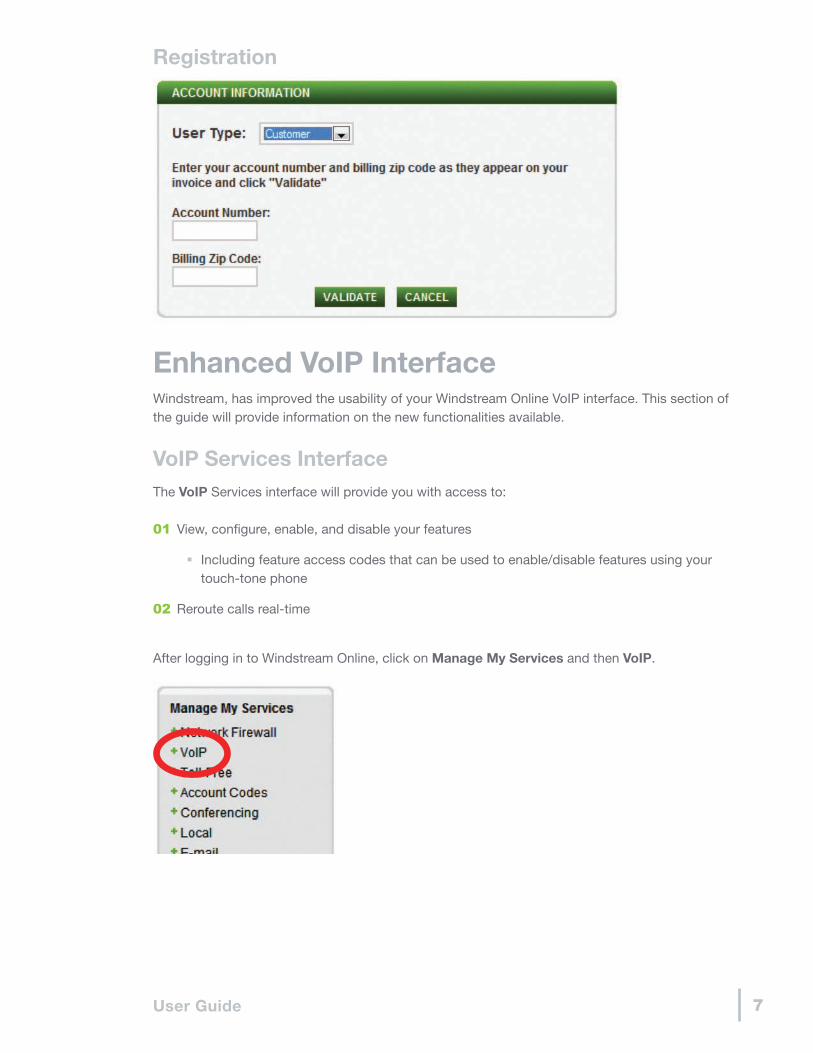
If no one has previously registered as the Account Administrator, click on Register Now; select User Type (customer) along with your account number and billing zip code. Select Validate. Follow the prompted steps to create your Username and Password for secure access to Windstream Online.
Win
dstr
eam
Onl
ine
7User Guide
Registration
Enhanced VoIP InterfaceWindstream, has improved the usability of your Windstream Online VoIP interface. This section of the guide will provide information on the new functionalities available.
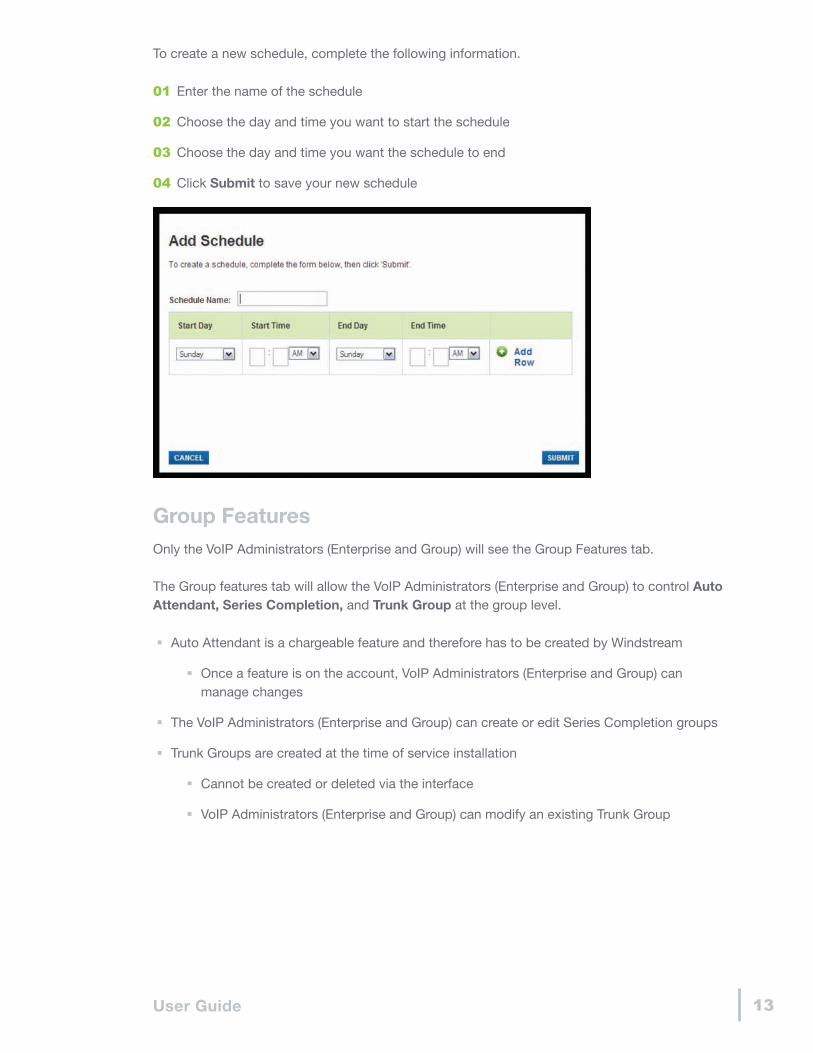
VoIP Services InterfaceThe VoIP Services interface will provide you with access to:
01 View, configure, enable, and disable your features
� Including feature access codes that can be used to enable/disable features using your touch-tone phone
02 Reroute calls real-time
After logging in to Windstream Online, click on Manage My Services and then VoIP.

8 Dynamic IP & Hosted IP
Once you click on VoIP, the following options are available based on your VoIP Permissions.
If you do not see the VoIP menu option, you have not yet been granted access to these features by your company’s Windstream Online Administrator. Please ask that individual to grant you access.
VoIP PermissionsThe VoIP Permission options provide different levels of access to control VoIP Services. You will be able to control services and features, based on the level of access assigned to your Windstream Online Username.
VoIP Administrator (Enterprise) � View all groups (locations) within your enterprise
� Manage VoIP features for each user
� Promote other users to Enterprise Administrators
� Demote non-Windstream Online Administrators from VoIP Enterprise Administrators
VoIP Administrator (Group) � View all users within that group (location)
� Manage VoIP features for each user in the group
� Manage users and roles, except VoIP Administrator (Enterprise)
� Promote other users to Group Administrators within your assigned groups
� Demote non-WOL Administrators from Group Administrator within your assigned groups
VoIP User (ANI) � Individual user/telephone number
� View account
� Manage VoIP features
Enh
ance
d Vo
IP In
terf
ace

9User Guide
The illustration below depicts the various levels of VoIP Permission access:
Each level of access can only control those features and configurations within and below their designated level of access. In the illustration above, the VoIP Administrator - Group for location #2 would only be able to control features and services for 3 Users: 720-529-1212, 720-529-1213 and 720-529-1214. This VoIP Administrator would not be able to control features and services for any users at Location #1 or Location #3.
My VoIP FeaturesTo change your VoIP features, click on My VoIP Features.
Based on your specific VoIP Services, the available features will appear. Below you will find the complete list of features currently available in the Enhanced VoIP Interface.

10 Dynamic IP & Hosted IP
To charge your VoIP features, select a feature control from the list below. VoIP features currently in use have a green/on status. Change additional VoIP features.
My VoIP Features – Definition of FeaturesHover your mouse over the icon for information on that feature
*NOTE: Features are only available with the specific IP Services.
Enh
ance
d Vo
IP In
terf
ace

11User Guide
My VoIP Features – Changing Feature StatusTo change your VoIP features, select the feature control from your list. VoIP features currently in use have a green/on status.
To edit an existing feature, click on the Pencil icon. The next screen will allow you to make the necessary changes. Simply complete the form fields and click Submit.

12 Dynamic IP & Hosted IP
My VoIP Features – SchedulesSchedules allow you to control how and when your features turn on/off (monthly, weekly, holidays). Create rules to determine when features will be on/off.
This part of the interface will allow you to create a new, modify, or delete schedules.
Adding a New ScheduleTo create a new Schedule, select Add New Schedule.
Enh
ance
d Vo
IP In
terf
ace
13User Guide
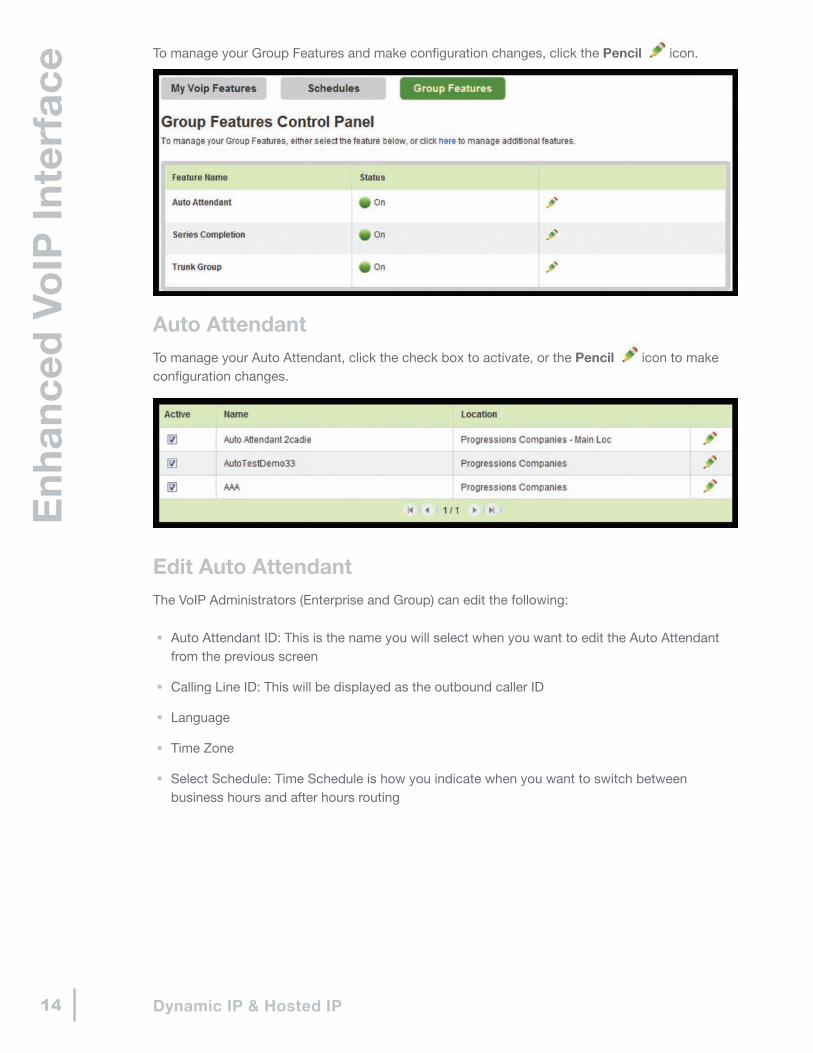
To create a new schedule, complete the following information.
01 Enter the name of the schedule
02 Choose the day and time you want to start the schedule
03 Choose the day and time you want the schedule to end
04 Click Submit to save your new schedule
Group FeaturesOnly the VoIP Administrators (Enterprise and Group) will see the Group Features tab.
The Group features tab will allow the VoIP Administrators (Enterprise and Group) to control Auto Attendant, Series Completion, and Trunk Group at the group level.
� Auto Attendant is a chargeable feature and therefore has to be created by Windstream
� Once a feature is on the account, VoIP Administrators (Enterprise and Group) can manage changes
� The VoIP Administrators (Enterprise and Group) can create or edit Series Completion groups
� Trunk Groups are created at the time of service installation
� Cannot be created or deleted via the interface
� VoIP Administrators (Enterprise and Group) can modify an existing Trunk Group
14 Dynamic IP & Hosted IP
To manage your Group Features and make configuration changes, click the Pencil icon.
Auto AttendantTo manage your Auto Attendant, click the check box to activate, or the Pencil icon to make configuration changes.
Edit Auto AttendantThe VoIP Administrators (Enterprise and Group) can edit the following:
� Auto Attendant ID: This is the name you will select when you want to edit the Auto Attendant from the previous screen
� Calling Line ID: This will be displayed as the outbound caller ID
� Language
� Time Zone
� Select Schedule: Time Schedule is how you indicate when you want to switch between business hours and after hours routing
Enh
ance
d Vo
IP In
terf
ace

15User Guide
Edit During Business HoursVoIP Administrators (Enterprise and Group) can setup the business hours rules by:
� Selecting the Key you want the callers to press
� Adding a Description
� Selecting the Action
� Adding the Phone Number

16 Dynamic IP & Hosted IP
Edit After Business HoursVoIP Administrators (Enterprise and Group) can setup the after business hours rules by:
� Selecting the Key you want the callers to press
� Adding a Description
� Selecting the Action
� Adding the Phone Number
Series CompletionVoIP Administrators (Enterprise and Group) can edit an existing Series Completion Group by clicking the Pencil icon. To create a new group, click Add New Group.
Enh
ance
d Vo
IP In
terf
ace

17User Guide
Create a Series Completion GroupAfter creating the new Series Completion Group, the VoIP Administrator (Enterprise or Group) is required to:
01 Create a Group Name
02 Select Group from the dropdown
03 Select Available Users to add to the Series Completion Group
� VoIP Administrators (Enterprise and Group) can also Search Users to add to the Series Completion Group by typing in the search field and then clicking Search
�
�
�

18 Dynamic IP & Hosted IP
Edit a Series Completion GroupWhen editing a Series Completion Group, the VoIP Administrator (Enterprise or Group) can:
01 Edit the Group Name
02 Select users to add to or remove from the Series Completion Group
� VoIP Administrators (Enterprise and Group) can also Search Users to add to the Series Completion Group by typing in the search field and then clicking Search
Trunk GroupVoIP Administrators (Enterprise and Group) can edit existing Trunk Groups by clicking the Pencil icon.
Enh
ance
d Vo
IP In
terf
ace

19User Guide
Edit a Trunk Group – Call Forward AlwaysVoIP Administrators (Enterprise and Group) can edit the Call Forwarding Always Action, by selecting from the following:
� None
� Forward to Phone Number/SIP-URI and then enter the number in the text box
� Reroute to Trunk Group and then select the trunk group from the drop-down list
*NOTE: The current trunk group should not be in the Reroute to Trunk Group drop-down list. If the group belongs to an enterprise, the Reroute to Trunk Group drop-down list includes all trunk groups in the enterprise. Also, when the trunk group is in a different group, the group ID of the trunk group is provided in parentheses “( )”.
Edit a Trunk Group – Capacity ManagementVoIP Administrators (Enterprise and Group) can configure the maximum, bursting capacity and capacity exceeded parameters for the trunk group.
For Incoming Capacity Exceeded Action, select from the following:
� None
� Forward to Phone Number/SIP-URI and then enter the number or URI in the text box
� Reroute to Trunk Group and select the trunk group from the pull-down list
*NOTE: The current trunk group should not be in the Reroute to Trunk Group drop-down list. If the group belongs to an enterprise, the Reroute to Trunk Group drop-down list includes all trunk groups in the enterprise. Also, when the trunk group is in a different group, the group ID of the trunk group is provided in parentheses “( )”.
� Capacity Exceeded Initial Value is configured by Windstream
� Capacity Exceeded Offset Value is configured by Windstream

20 Dynamic IP & Hosted IP
Edit a Trunk Group – Unreachable DestinationVoIP Administrators (Enterprise and Group) can configure the unreachable destination parameters for the Trunk Group.
Select the time from the Unreachable Destination Timeout drop-down list. The default value for it is 6 seconds.
For Unreachable Destination Action, select from the following:
� None
� Forward to Phone Number/SIP-URI and enter the number in the text box
� Reroute to Trunk Group and select the trunk group from the drop-down list
*NOTE: The current trunk group should not be in the Reroute to Trunk Group drop-down list. If the group belongs to an enterprise, the Reroute to Trunk Group drop-down list includes all trunk groups in the enterprise. Also, when the trunk group is in a different group, the group ID of the trunk group is provided in parentheses “( )”.
� Unreachable Destination Exceeded Initial Value is configured by Windstream
� Unreachable Destination Exceeded Offset Value is configured by Windstream
Enh
ance
d Vo
IP In
terf
ace
21User Guide
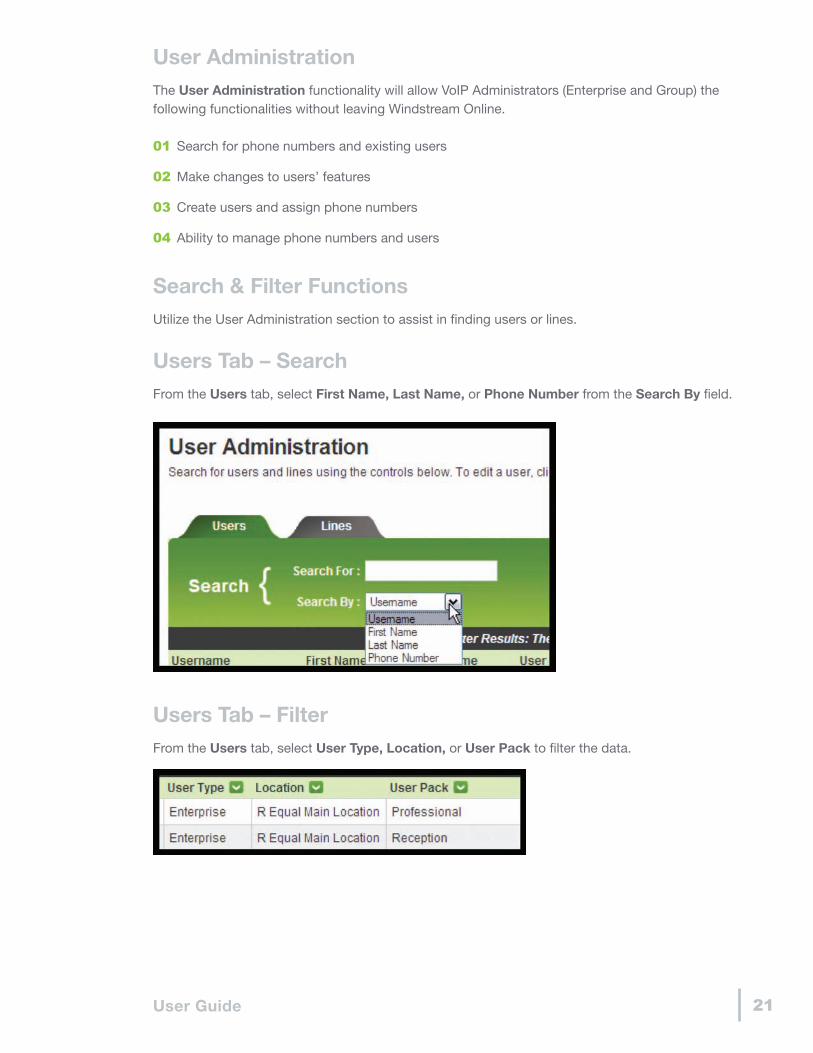
User AdministrationThe User Administration functionality will allow VoIP Administrators (Enterprise and Group) the following functionalities without leaving Windstream Online.
01 Search for phone numbers and existing users
02 Make changes to users’ features
03 Create users and assign phone numbers
04 Ability to manage phone numbers and users
Search & Filter FunctionsUtilize the User Administration section to assist in finding users or lines.
Users Tab – Search From the Users tab, select First Name, Last Name, or Phone Number from the Search By field.
Users Tab – Filter From the Users tab, select User Type, Location, or User Pack to filter the data.
22 Dynamic IP & Hosted IP
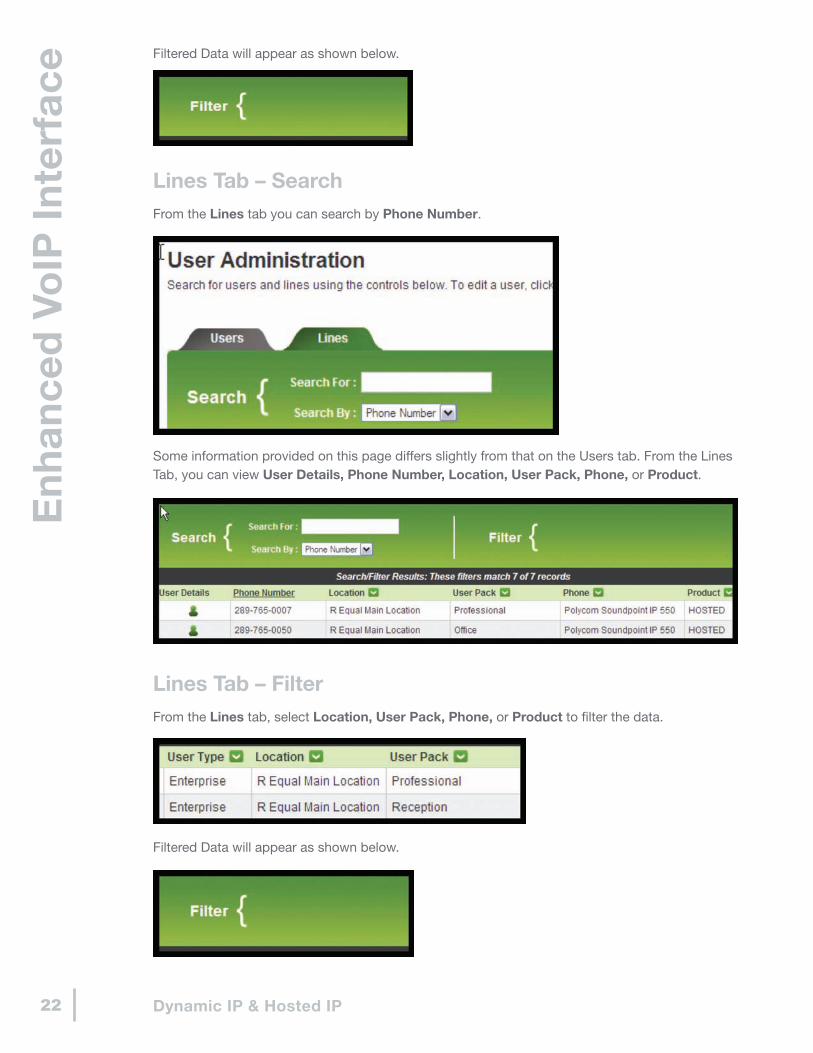
Filtered Data will appear as shown below.
Lines Tab – Search From the Lines tab you can search by Phone Number.
Some information provided on this page differs slightly from that on the Users tab. From the Lines Tab, you can view User Details, Phone Number, Location, User Pack, Phone, or Product.
Lines Tab – Filter From the Lines tab, select Location, User Pack, Phone, or Product to filter the data.
Filtered Data will appear as shown below.
Enh
ance
d Vo
IP In
terf
ace

23User Guide
Managing Other UsersUtilize the User Administration section to manage other users. Click on the user to determine what specific options are available.
Manage User FeaturesThis option will allow VoIP Administrators to make changes to other users’ features. By selecting Manage User Features, you will be taken to the My VoIP Features page. You will know you are making changes on another user’s phone by the box at the top of the page.

24 Dynamic IP & Hosted IP
Manage User PermissionsTo change the user permissions for the VoIP Interface, select Manage User Permissions.
Reset Voice Messaging PINTo reset the Voice Messaging PIN for a user, select Reset Voice Messaging PIN. Confirmation will be required.
Enh
ance
d Vo
IP In
terf
ace

25User Guide
Reset Voice Messaging BoxTo reset the Voice Messaging Box for a user, select Reset Voice Messaging Box. Confirmation will be required as this action cannot be changed once completed.
Edit UserVoIP Administrators (Enterprise and Group) can edit existing user information.

26 Dynamic IP & Hosted IP
Unassign NumberTo remove a phone number from a user, select Unassign Number. Confirmation will be required.
Delete UserTo delete a user from the VoIP Interface and Windstream Online, select Delete User. Confirmation will be required.
Add / Remove Feature Controls VoIP Administrators (Enterprise and Group) can modify assigned features to a user by clicking on the feature and then on the corresponding icon that will either add or remove it from the Assigned Features list.
*NOTE: Some features such as Voice Mobility 1 and Voice Mail are actually feature groups that contain other features. If you add or remove the feature group, you will affect all features in the feature group.
Enh
ance
d Vo
IP In
terf
ace

27User Guide
If you select a feature group, you will see the list of the features contained in the group at the bottom of the window as shown below.
Creating / Administering User AccountsIn order for users to configure the services on their specific telephone number, each user needs to have a Windstream OnlineUsername and Password created by the Account Administrator.
The VoIP Administrator can create users in Windstream Onlineby selecting User Administration.
From this page, VoIP Administrators may add, delete, or edit user permissions.
To create a new user, follow these steps:
01 Create New User and then click the arrow

28 Dynamic IP & Hosted IP
02 Complete information
*NOTE: The Username defaults to the e-mail address of the user. This may be changed by selecting a Username that is unique within all of Windstream Online.
03 You will need to create a Password that meets the security requirements. Hover your mouse over the to see the Password Rules.
Enh
ance
d Vo
IP In
terf
ace

29User Guide
There are three options for User Permissions
� OPTION 1
� Create a VoIP Administrator (Group or Enterprise)
� Select Account Administrator by putting a check in the box just below the field for the last name
� This option will also provide full account administrator rights for all other functions within Windstream Online
�
� OPTION 2
� Create a VoIP User with Windstream OnlineAdministrator rights
� Do not select the Account Administrator box
� Under User Permissions, select the options you want the user to have right over by putting a check in the desired boxes
�
�
�
� OPTION 3
� Create a VoIP User without Windstream OnlineAdministrator rights
� Do not select the Account Administrator box
� Do not select any options under User Permissions
30 Dynamic IP & Hosted IP
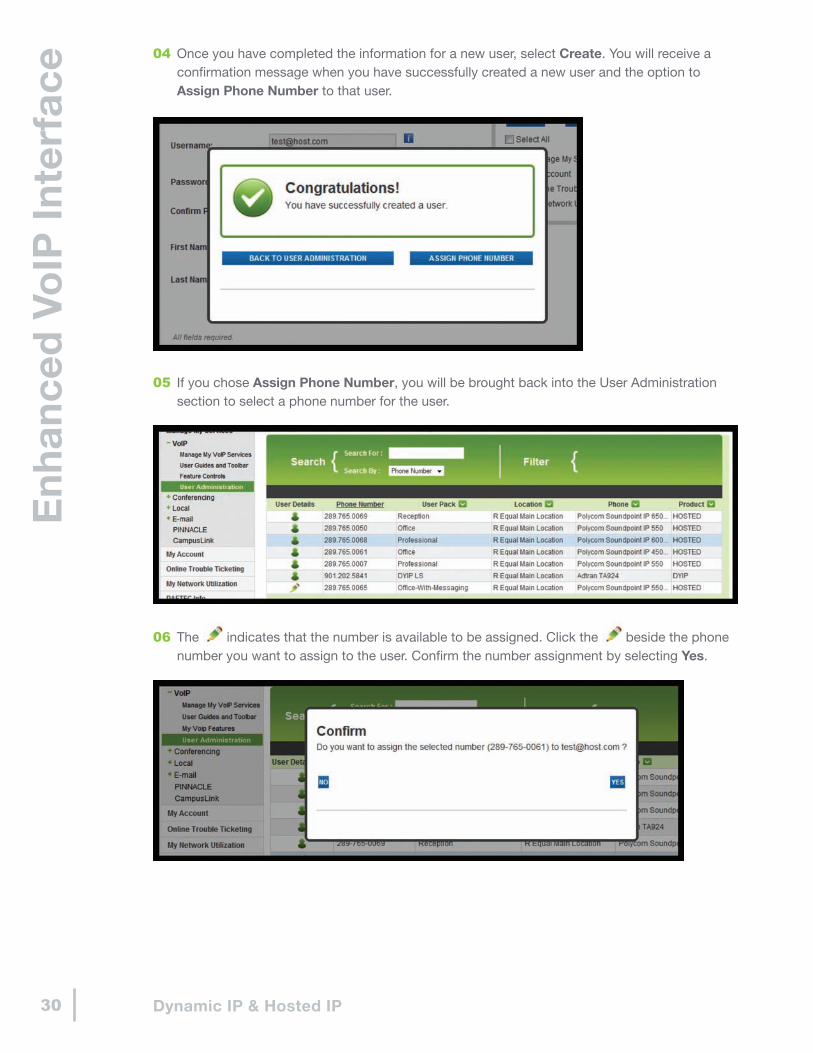
04 Once you have completed the information for a new user, select Create. You will receive a confirmation message when you have successfully created a new user and the option to Assign Phone Number to that user.
05 If you chose Assign Phone Number, you will be brought back into the User Administration section to select a phone number for the user.
06 The indicates that the number is available to be assigned. Click the beside the phone number you want to assign to the user. Confirm the number assignment by selecting Yes.
Enh
ance
d Vo
IP In
terf
ace

31User Guide
07 After confirming the addition of a phone number to a user, you will receive a confirmation message when you have successfully assigned the phone number and the option to Manage User Features for that user.
08 If you chose, Manage User Features, you will be directed to the My VoIP Features page. From this page, you can do the following:
� User Features (see My VoIP Features in the next section of this document)
� Schedules
� Group Features (this will only be visible for VoIP Administrators)
Additional Features / FunctionalitiesAt this time, the features control access allows you to make changes to some of the most common user features. If there is a change that needs to be made that is not available in the Enhanced VoIP Interface, you can access the Primary VoIP Interface in the following ways.
01 From Manage My VoIP Services, there is an option to move to the Primary VoIP Interface.
02 From My VoIP Features, there is an option to move to the Primary VoIP Interface.

32 Dynamic IP & Hosted IP
Primary VoIP InterfaceThe following section will define the features and functionalities within the primary VoIP interface.
VoIP Interface Online HelpEvery Web page in the Primary VoIP Interface has an integrated help tool. This help system is context-sensitive, and provides information and instructions for the commands that are on the specific page.
To use the Help tool, simply click on Help in the upper right hand corner of the page.
A page appears with additional instructions and/or information.
SearchTo assist in identifying a specific Group within an Enterprise or a specific user within a Group, Search capabilities are available. Search criteria will consist of one of the below options.
Group LevelSelect Groups.
Pri
mar
y Vo
IP In
terf
ace

33User Guide
If the search criteria used needs to be narrowed, additional criteria can be added by clicking the (+) button.
Select Group ID or Group Name.
Select Starts With, Contains or Equal To.
User LevelSelect Users.

34 Dynamic IP & Hosted IP
If the search criteria used needs to be narrowed, additional criteria can be added by clicking the (+) button.
Select Last Name, First Name, Phone Number, E-mail Address, or Trunk Group.
Select Starts With, Contains, or Equal To.
Only 20 users are displayed per page. Please note there are Next or Last options at the bottom of each page as shown below.
Pri
mar
y Vo
IP In
terf
ace
35User Guide
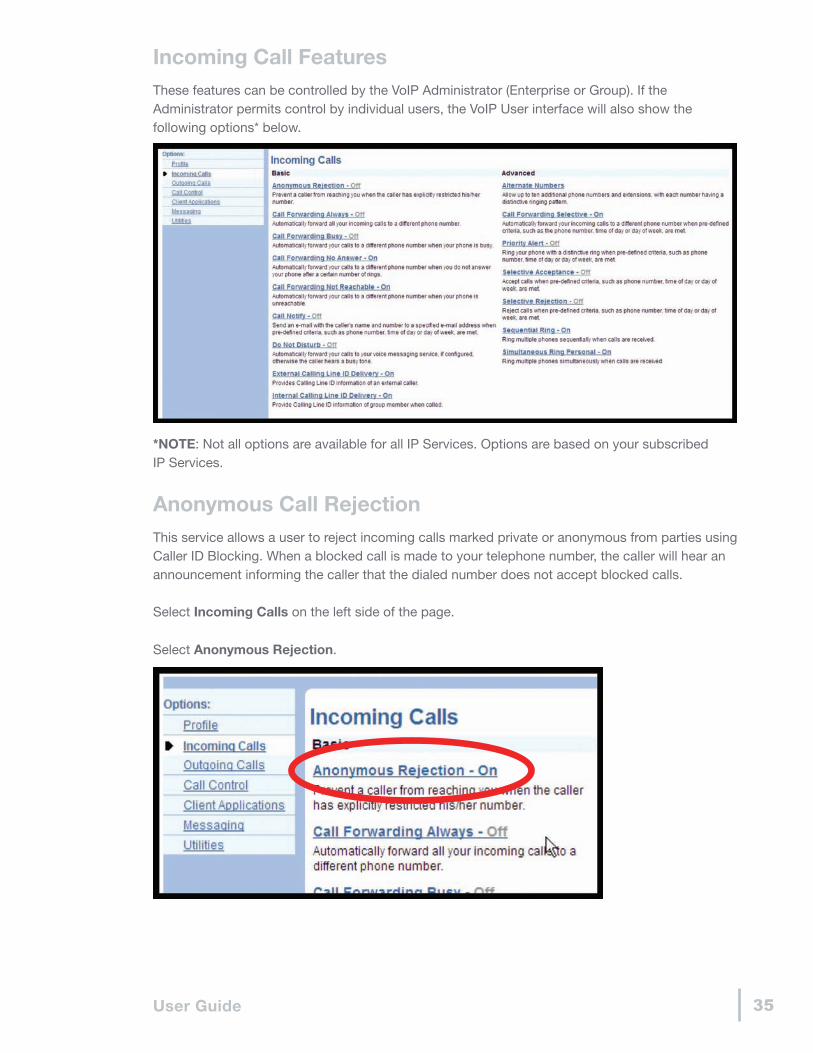
Incoming Call FeaturesThese features can be controlled by the VoIP Administrator (Enterprise or Group). If the Administrator permits control by individual users, the VoIP User interface will also show the following options* below.
*NOTE: Not all options are available for all IP Services. Options are based on your subscribed IP Services.
Anonymous Call RejectionThis service allows a user to reject incoming calls marked private or anonymous from parties using Caller ID Blocking. When a blocked call is made to your telephone number, the caller will hear an announcement informing the caller that the dialed number does not accept blocked calls.
Select Incoming Calls on the left side of the page.
Select Anonymous Rejection.

36 Dynamic IP & Hosted IP
Select On/Off.
Select Apply and then OK to submit the changes.
Call Forwarding AlwaysCall Forward Always enables users to automatically forward all incoming calls to a different phone number.
Select Incoming Calls on the left side of the page.
Select Call Forwarding Always.
Select the On/Off.
If selecting On, enter the phone number to forward all calls to in the Calls Forward To box. Include a “1” at the beginning of the number if forwarding to a telephone number that is a long distance call from the user’s phone. Long Distance charges will apply to calls forwarded outside Local Calling Area.
Select Play Ring Reminder when a call is forwarded to receive a brief ring splash on the phone when a call is forwarded.
Select Apply and then OK to submit the changes.
Pri
mar
y Vo
IP In
terf
ace

37User Guide
Call Forwarding Always – From Your Telephone � Pick up the receiver and dial *72
� Listen for a message prompt and then enter the number to which calls will be forwarded followed by the # key (Include a “1” at the beginning of the number if forwarding to a telephone number that is a long distance call from your phone)
� You can also press the # key to forward calls to the phone number that was previously used
� A confirmation message will indicate activation
� To deactivate, pick up the receiver and dial *73
� A confirmation message will indicate deactivation
*NOTE: Some phone systems will not send the ‘*’ or ‘#’ tones required to make this function work from the telephone. In this event, please use the Control Panel Instructions above.
Call Forwarding BusyThis service enables a user to forward incoming calls to another telephone number when on the phone.

38 Dynamic IP & Hosted IP
Select Incoming Calls on the left side of the page.
Select Call Forwarding Busy.
Select the On/Off.
If selecting On, enter the phone number to forward all calls to in the Calls Forward To box. Include a “1” at the beginning of the number if forwarding to a telephone number that is a long distance call from the user’s phone. Long Distance charges will apply to calls forwarded outside Local Calling Area.
Select Apply and then OK to submit the changes.
Pri
mar
y Vo
IP In
terf
ace

39User Guide
Call Forwarding Busy – From Your Telephone � Pick up the receiver and dial *90
� Listen for a message prompt and then enter the number to which calls will be forwarded followed by the # key (Include a “1” at the beginning of the number if forwarding to a telephone number that is a long distance call from your phone)
� You can also press the # key to forward calls to the phone number that was previously used
� A confirmation message will indicate activation
� To deactivate, pick up the receiver and dial *91
� A confirmation message will indicate deactivation
*NOTE: Some phone systems will not send the ‘*’ or ‘#’ tones required to make this function work from the telephone. In this event, please use the Control Panel Instructions above.
Call Forwarding No Answer This service enables a user to forward incoming calls to another telephone number after a designed number of rings.
Select Incoming Calls on the left side of the page.
Select Call Forwarding No Answer.
Select the On/Off.If selecting On, enter the phone number to forward all calls to in the Calls Forward To box. Include a “1” at the beginning of the number if forwarding to a telephone number that is a long distance call from the user’s phone. Long Distance charges will apply to calls forwarded outside Local Calling Area.
If selecting On, enter a number in the Number of rings before forwarding section.Select Apply and then OK to submit the changes.

40 Dynamic IP & Hosted IP
Call Forwarding No Answer – From Your Telephone � Pick up the receiver and dial *92
� Listen for a message prompt and then enter the number to which calls will be forwarded followed by the # key (Include a “1” at the beginning of the number if forwarding to a telephone number that is a long distance call from your phone)
� You can also press the # key to forward calls to the phone number that was previously used
� A confirmation message will indicate activation
� To deactivate, pick up the receiver and dial *93
� A confirmation message will indicate deactivation
*NOTE: Some phone systems will not send the ‘*’ or ‘#’ tones required to make this function work from the telephone. In this event, please use the Control Panel Instructions above.
Do Not DisturbThis service allows a user to direct calls as if the phone is busy and cannot receive calls. When Do Not Disturb is on, calls are forwarded to the same number selected for Call Forwarding Busy.
Select Incoming Calls on the left side of the page.
Select Do Not Disturb.
Pri
mar
y Vo
IP In
terf
ace

41User Guide
Select the On/Off.
Select Play Ring Reminder when a call is forwarded to receive a brief ring splash on the phone when a call is forwarded.
Select Apply and then OK to submit the changes.
External Calling Line ID DeliveryExternal Calling Line ID Delivery allows the Calling Line name and number for callers from outside your group to be displayed.
Select Incoming Calls on the left side of the page.
Select External Calling Line ID Delivery.
Select the On/Off.
Select Apply and then OK to submit the changes.

42 Dynamic IP & Hosted IP
Internal Calling Line ID DeliveryInternal Calling Line ID Delivery allows the Calling Line name and number for callers from inside your group to be displayed.
Select Incoming Calls on the left side of the page.
Select Internal Calling Line ID Delivery.
Select the On/Off.
Select Apply and then OK to submit the changes.
Group Features These features can be controlled by the VoIP Administrator (Enterprise or Group).
Assigning Group FeaturesSelect Profile on the left side of the page.
Select Groups.
Pri
mar
y Vo
IP In
terf
ace

43User Guide
Select Search.
Under the Group Name column, click the Group (location) you wish to assign group services to.
Select Resources.
Select Assign Group Services to view the services currently available and assigned to your group account.
Click the Add button to insert the features in the Assigned Services box on the right.
Select Apply and then OK to submit the changes.

44 Dynamic IP & Hosted IP
Removing Group FeaturesSelect the feature you wish to remove from Available Services box.
Click the Remove button.
Select Apply and then OK to submit the changes.
*NOTE: Use the CTRL and/or SHIFT button(s) on the keyboard to highlight multiple selections. If you remove Incoming Calling Plan or Outgoing Calling Plan, you will not be able to receive incoming or outgoing calls.
Pri
mar
y Vo
IP In
terf
ace

45User Guide
Activating Group FeaturesFeatures must be assigned to your group account before you can activate them. See Assigning Group Features above for steps on assigning features.
Select Profile on the left side of the page.
Select Groups.
Select Search.
Under the Group Name column, click the Group (location) you wish to assign group services to.

46 Dynamic IP & Hosted IP
Select Utilities.
Calling Line IDDisplay the name and/or number of the group for outgoing calls, which is used instead of a user’s name and number.
From the Utilities screen, select Calling Line ID.
This section will allow you to configure the Group Calling Line ID and the group name for outgoing calls. It is important to remember the group settings override any user settings.
For users without telephone numbers, to be able to make calls, the Group Calling Line ID must be set.
� Select None or the Group Number in the drop down box
� Click the first box – Use the group number, instead of the user number, in the outgoing Calling Line ID
� Click the second box - Use the group name, instead of the user name, in the outgoing Calling Line ID
Pri
mar
y Vo
IP In
terf
ace

47User Guide
*NOTE: The Calling Line ID Group Name displayed is configured on the Profile page for that Group.
Assigning User Features by UserSelect Users.
Click on Search.

48 Dynamic IP & Hosted IP
Under the Phone Number column, click the telephone number you wish to assign features to.
From the new screen, select Assign Services.
This will display the features that are currently available and assigned to the user.
Highlight the desired feature in the Available Services box.
Click the Add button to insert the features in the User Services box.
Select Apply and then OK to submit the changes.
Pri
mar
y Vo
IP In
terf
ace

49User Guide
Hunt GroupsOnly VoIP Administrators (Enterprise or Group) will be able to add/edit/delete hunt groups.
Series Completion Hunt GroupBasic hunting is titled Series Completion within the Primary VoIP Interface. Series Completion is used to create an ordered list of phone numbers (maximum of 11) that allow incoming calls to bypass a busy line and ring on another line that is available.
Add a Series Completion GroupSelect Profile.
Select Groups.
Click on Search.
Under the Group Name, select the Group (location).
Select Services.
Select Series Completion.
*NOTE: More than one basic hunt group can exist per Group Account, but a phone number/individual user can only be a member of one hunt group at a time.

50 Dynamic IP & Hosted IP
To create a hunt group, click the Add button.
Enter a name to be assigned to the hunt group in the Group Name box.Click on Search.
In the Available Users box, highlight the users that will be members of the basic hunt group.
*NOTE: Use your CTRL and/or SHIFT button(s) to highlight multiple selections.
Click Add to insert the highlighted users into the Assigned Users.
To adjust the hunting sequence, use Move Up/Move Down.
Modify an Existing Series Completion GroupSelect Search.
Select the hunt group from the list.
Add or remove users in the series completion by highlighting the user and clicking the Add or Remove button.
To rearrange the order of the users in the series, highlight the user in the Assigned Users box and click Move Up or Move Down to reposition the user.
Pri
mar
y Vo
IP In
terf
ace

51User Guide
Delete a Series Completion GroupSelect Search.
Select the hunt group from the list.
Click Delete.
Click OK.
Circular HuntingThe Circular Hunting service is used to create an ordered list of users so incoming calls can bypass a busy line and ring to the next available line. If the end of the list is reached and no lines are available, the call returns to the beginning of the list and continues until it has circulated once through each telephone number in the Series Completion group. Circular Hunting can be implemented by using a combination of the Series Completion, Call Forward Busy, and Call Forward No Answer features.
Assign a Series Completion to your group account by following the steps in the Series Completion section.
The last user in the hunt group will need to have the Call Forward Busy and Call Forward No Answer features added to their phone number.
To complete this action, set up the Series Completion Group as described above.
Restricting Certain Incoming or Outgoing CallsOnly VoIP Administrators (Enterprise or Group) will be able to restrict or allow specific call types/patterns.

52 Dynamic IP & Hosted IP
Calling PlanThe Calling Plan service allows the VoIP Administrator to control the type of calls made, received, transferred, and forwarded by users in a group. The Calling Plan is controlled by the settings in the Outgoing Calling Plan, Digit Strings, Outgoing Digit Plan, and Incoming Calling Plan.
Incoming Calling PlanThe Incoming Calling Plan feature gives the VoIP Administrator the ability to control types of calls received by users. These restrictions can be assigned to the entire group or to individual users in the group.
The call types for the Incoming Calling Plan include both predefined and administrator-defined types. The administrator-defined list consists of those defined in Digit Strings.
Pri
mar
y Vo
IP In
terf
ace
53User Guide
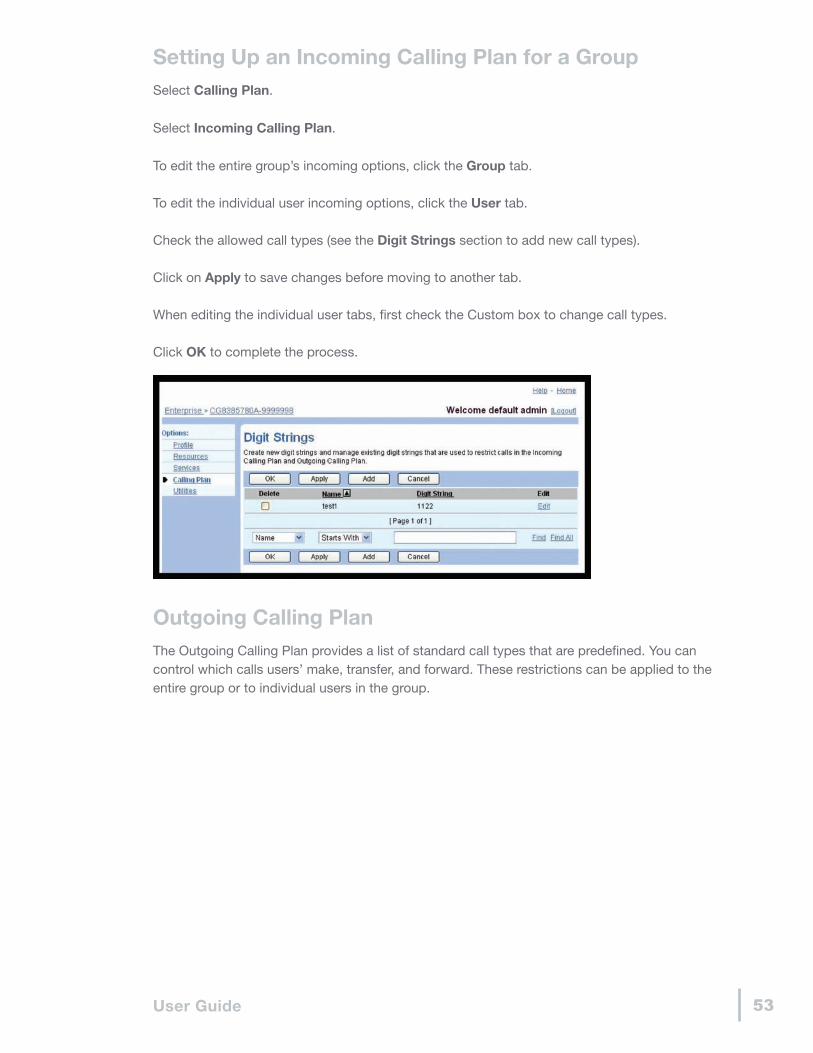
Setting Up an Incoming Calling Plan for a GroupSelect Calling Plan.
Select Incoming Calling Plan.
To edit the entire group’s incoming options, click the Group tab.
To edit the individual user incoming options, click the User tab.
Check the allowed call types (see the Digit Strings section to add new call types).
Click on Apply to save changes before moving to another tab.
When editing the individual user tabs, first check the Custom box to change call types.
Click OK to complete the process.
Outgoing Calling PlanThe Outgoing Calling Plan provides a list of standard call types that are predefined. You can control which calls users’ make, transfer, and forward. These restrictions can be applied to the entire group or to individual users in the group.

54 Dynamic IP & Hosted IP
Outgoing Calling Plan Call Types
Wildcard Digits:X = a single digit placeholder* = multiple digit placeholder
Call Type Description Digit Map *
Casual Calls Used to select other long distance carriers. 101xxxx
Casual Calls Used to select other long distance carriers. 101xxxx.
Chargeable Directory Assistance 1xxx5551212
Chargeable Directory Assistance xxx5551212
International 01
Local Xxxxxxx
Local Xxxxxxxxxx
Operator Assisted 0
Operator Assisted 00
Operator Assisted 0xxxxxxxxxx
Special Services I 411
Special Services I 1411
Special Services I 5551212
Special Services I 15551212
Special Services I 950xxxx
Special Services I 1950xxxx
Special Services I 500xxxxxxx
Special Services I 1500xxxxxxx
Special Services I 700xxxxxxx
Special Services I 1700xxxxxxx
Premium Services I 900xxxxxxx
Premium Services I 1900xxxxxxx
Premium Services I xxx976xxxx
Premium Services I 1xxx976xxxx
Premium Services I 966xxxxxxx
Premium Services I 1966xxxxxxx
Premium Services I 676xxxxxxx
Premium Services I 1676xxxxxxx
Toll 1xxxxxxxxxx
Toll Free 800xxxxxxx
Toll Free 1800xxxxxxx
Toll Free 855xxxxxxx
Toll Free 1855xxxxxxx
Toll Free 866xxxxxxx
Toll Free 1866xxxxxxx
Toll Free 877xxxxxxx
Toll Free 1877xxxxxxx
Toll Free 888xxxxxxx
Toll Free 1888xxxxxxx
Pri
mar
y Vo
IP In
terf
ace
55User Guide
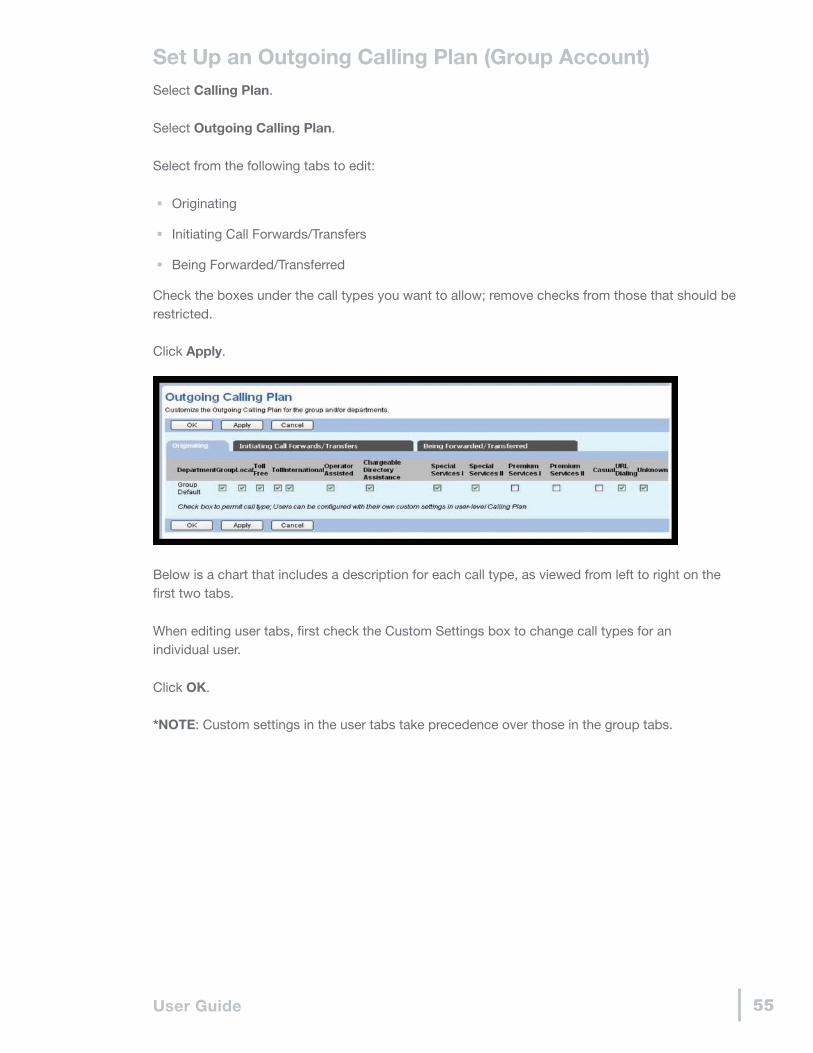
Set Up an Outgoing Calling Plan (Group Account)Select Calling Plan.
Select Outgoing Calling Plan.
Select from the following tabs to edit:
� Originating
� Initiating Call Forwards/Transfers
� Being Forwarded/Transferred
Check the boxes under the call types you want to allow; remove checks from those that should be restricted.
Click Apply.
Below is a chart that includes a description for each call type, as viewed from left to right on the first two tabs.
When editing user tabs, first check the Custom Settings box to change call types for an individual user.
Click OK.
*NOTE: Custom settings in the user tabs take precedence over those in the group tabs.

56 Dynamic IP & Hosted IP
Outgoing Digit PlanThe Outgoing Digit Plan feature adds flexibility to the Outgoing Calling Plan feature by giving the administrator the ability to list, add, modify, and delete outgoing digit plan settings for the group. The settings on the Outgoing Digit Plan define the customized types of calls that group members are allowed to make, forward, or transfer. The call types are configured as digit strings.
*NOTE: In order to assign digit strings, they first must be created. See the Digit Strings section below.
Select Calling Plan.
Select Outgoing Digit Plan.
Select from the following tabs to edit:
� Originating
� Initiating Call Forwards/Transfers
� Being Forwarded/Transferred
Check the boxes under the call types you want to allow; remove checks from those that should be restricted.
Click Apply.
Call Type Description
Group Calls within the user’s business group.
Local Calls within the local calling area.
Toll Free Free calls to numbers beginning with 1, usually followed by 800, 866, 877, or 888.
Toll Calls outside the local calling area.
International Chargeable calls to other countries.
Operator Assisted Calls made with the chargeable assistance of an operator.
Chargeable Directory Assistance
Calls made to Directory Assistance such as 411 or the area code followed by 555-1212.
Special Services I Calls to 700 numbers. These calls may or may not be chargeable.
Special Services II Customizable by the system provider.
Premium Services I Chargeable calls to 900 numbers.
Premium Services II Chargeable calls to 976 numbers.
Casual1010XXX or 10XXX chargeable calls. Example: 10-10-321, followed by the number you are calling.
URL Dialing Chargeable calls made to an e-mail address instead of a phone number.
Unknown Unknown call type.
Pri
mar
y Vo
IP In
terf
ace

57User Guide
Click OK.
*NOTE: Custom settings in the user tabs take precedence over those in the group tabs.
Digit StringsThe Digit Strings feature gives the VoIP Administrator the ability to set up custom digit strings to be used with the Incoming Calling and Outgoing Digit Plan features.
Each custom digit can be a 1-30 character combination, consisting of the digits 0-09 and the following wildcard characters:
� (*) – This wildcard can only be used as the last character of the digits string and matches any number of trailing digits
� Example: 1809* – this example prevents all calls to the 809 area code
� (?) – This wildcard can be used anywhere in the string and matches any single digit
� Example: 1319790622? – this example prevents calls to a call to 319 790 6220 through 319 790 6229
*NOTE: The wildcard characters cannot be part of the area code or country code of a digit string combination.

58 Dynamic IP & Hosted IP
Set Up Custom Digits StringsSelect Calling Plan.
Select Digit Strings.
Click Add.
In the Name box, enter a brief phrase describing the digit string.
In the Digit String box, enter the combination you wish to add.
Click OK.
Changing Profile InformationThis section will assist you in making Profile changes in the Primary VoIP Interface.
Enterprise Profile ChangesSelect Profile.
Select Groups.
Each Group is a physical location with VoIP service. If any changes need to be made in the Enterprise account information, contact Customer Care at 877-340-2600.
Group Profile ChangesSelect Profile.
Select Users.
Each User is associated with a Group location with VoIP service. If any changes need to be made in the Group account information, contact Customer Care at 877-340-2600.
Pri
mar
y Vo
IP In
terf
ace

59User Guide
User Profile ChangesA basic profile has been set up for each user. Most of the information assigned to a user’s profile can be changed.
To provide access to employees to maintain their User Profile and control some individual Calling Features, you will need to communicate secure Usernames and Passwords to each employee. Each Username is pre-set with the phone number of the individual. Each Password has been initially set with your Windstream Onlineaccount number. For security reasons, we recommend you change the default Password to a unique, secure Password for each employee.
To edit a user profile:
Select Users.
Select the User Account.
Select Profile.
Additional information:
Name Description Format
Last NameThe last name of the user assigned to this line. Initially set as the user’s phone number.. 1-30 characters
First NameThe first name of the user assigned to this line. Initially set as the 1-30 characters
User ID
The phone number assigned to this user. If you need to add a new phone number call Customer Care for assistance
10 digit phone number
Calling Line ID Last NameLast name displayed on caller ID for internal calls. The last name of the user assigned to this line. 1-30 characters
Calling Line ID First Name
First name that will be displayed for the user when delivering Caller ID information. This should always match the information in the First Name field. This will only affect calls within the group. 1-30 characters
Department This field is not used at this time. This will always be “None”.
Time ZoneThe time zone associated with the user’s physical location.
Select from the drop down list.
Additional InformationEnter additional information about the user (optional). 1-50 characters

60 Dynamic IP & Hosted IP
Speed Dial 100Speed Dial 100 allows VoIP Lines users to dial telephone numbers with a two-digit code (not available for VoIP Trunks or SIP Trunking).
Speed Dial 100 must be set up at the User level.
*NOTE: It is recommended to use two-digit codes in the 20-49 number range. Contact your administrator if you have questions.
Select Outgoing Calls.
Select Speed Dial 100.
Select Add to insert a new speed call entry.
Select a speed code number from the drop down.
In the Description box, enter a brief phrase describing the assigned speed code.
In the Phone Number box, enter the number that will be dialed when the speed code is entered. (Include a “1” at the beginning of the number if the call is long distance.)
Click OK.
Pri
mar
y Vo
IP In
terf
ace

61User Guide
Speed Dial 100 – From Your Phone � Pick up the receiver and dial *75
� Listen for 3 quick beeps followed by dial tone
� Enter the two-digit speed code
� Enter the phone number to be dialed when the speed code is entered. Include a “1” at the beginning of the number if the call is long distance. If 1+ dialing is required, long distance toll charges will apply.
� Press the # key to end, wait for a confirmation message to be played
Abbreviated DialingIf you have multiple locations configured within a single Enterprise Voice VPN, you have the capability to utilize abbreviated dialing between locations. Each location requires a location code, typically a two-digit numeric code (example: 21). Each user at a location would be configured in the VoIP Interface with an extension code from 2-6 digits, typically four to match their “station” number (example: 2234). Abbreviated dialing is then possible by entering the combination of location code digits and extension code digits when calling a user at another location in the Voice VPN (example: 21 2234). Users would be able to extension dial other locations (without using the location code) if no two users in the Enterprise, share the same extension code.
*NOTE: The extension code length must be the same for all locations within a Voice VPN. In the example above, all users at each location must have a four-digit extension code.
Voice VPNThis service allows the Enterprise Administrator to view the Location Code and Extension Length for each Group location within that Enterprise. The Location Code assignment cannot be done in the VoIP Interface. If any changes need to be made in the Enterprise location code information, contact Customer Care.
Select Profile.
Select Voice VPN.
All locations configured within the Voice VPN will be displayed.
Search criteria can be used to display a specific location or locations within the Enterprise Voice VPN.
The 1st criteria box includes Location Code, Min Extension Length, Max Extension Length and Selector. Location Code is the most reliable method to use for a search.
The 2nd criteria box includes Starts With, Contains and Equal To.

62 Dynamic IP & Hosted IP
When you click on Find on the right side of the screen (whether you define search criteria or not), it will return the locations that meet the specified criteria. To again view all locations in the Voice VPN, click on Find All.
*NOTE: If you have only one location in your Enterprise account or you have multiple locations that are not associated with the same Enterprise account, you will not have Voice VPN capability.
Extension DialingThis allows the VoIP Administrator (Group) to configure the number of digits for extension dialing.
Select Utilities.
Select Extension Dialing.
Select the Extension Length.
Click Apply.
Click OK.
Pri
mar
y Vo
IP In
terf
ace

63User Guide
Outgoing CallsThis section controls display features for outgoing calls.
Call ReturnCall Return allows you to call the last party that called, whether or not the call was answered. To call back the last party that called, just dial the call return feature access code (see your Feature Access Code page). If the calling number is not available, you receive an error message. Service configuration is not available in the VoIP Interface.
Line ID BlockingCalling Line ID Delivery Blocking allows you to block your number from being shown when calling other numbers. Members of your group can still see your number when they are called. You have the choice of turning it on or off for all calls and then selectively turning it back on or off using the feature access codes.
Speed Dial 8Speed Dial 8 allows users to dial the assigned code, then the 1-digit (2-9) speed dial number of the party they want to call
Call ControlDisplays features for Call Controls.

64 Dynamic IP & Hosted IP
Call WaitingCall Waiting allows you to receive another call while you are on the phone. You can turn it on or off for all calls and then selectively turn it back on or off using the feature access codes.
Flash Call HoldFlash Call Hold allows you to dial a feature access code to hold and retrieve calls. To hold the call, click the flash button or click the hang-up button once, then dial the Flash Call Hold feature access code. You can then make another call while the first call is held. Subsequent flashes followed by the Flash Call Hold feature access code cause the active and held calls to toggle. Service configuration is not available in the VoIP Interface.
Call TransferCall Transfer allows you to transfer a call to another phone using your phone. Service configuration is not available in the VoIP Interface.
Three-Way CallThree-Way Calling allows you to perform a conference call that can be initiated from your phone. Service configuration is not available in the VoIP Interface.
UtilitiesDisplays feature access codes, see detail below.
Feature Access CodesFeature Access Codes are the codes you can enter from your telephone to use some services. To use a service, dial the code on your telephone. You will find additional information on how to use each feature under the Calling Features section of this document. Feature access codes cannot be changed.
*72 Call Forwarding Always Activation *73 Call Forwarding Always Deactivation *90 Call Forwarding Busy Activation *91 Call Forwarding Busy Deactivation *92 Call Forwarding No Answer Activation *93 Call Forwarding No Answer Deactivation *69 Call Return *70 Cancel Call Waiting *57 Customer Originated Trace *78 Do Not Disturb Activation *79 Do Not Disturb Deactivation *75 Speed Dial
Pri
mar
y Vo
IP In
terf
ace

65User Guide
Additional HelpFor available features for your telephone number, contact your administrator.
For all other questions, please contact Customer Care 877-340-2600.

windstreambusiness.com 877.275.905711287 | © 2013 Windstream | 2.9
Dynamic IP & Hosted IPUSER GUIDE

windstreambusiness.com 877.275.905711287 | © 2013 Windstream | 2.9