
Dvd Flicks
67
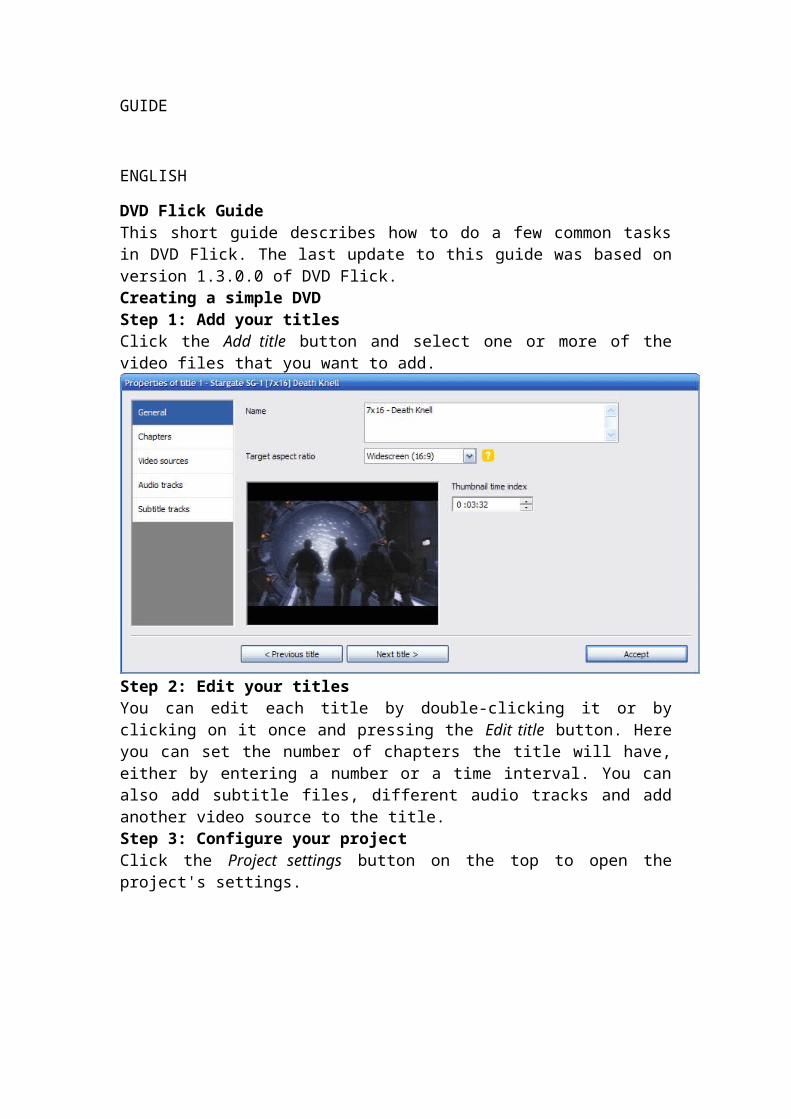
GUIDE ENGLISH DVD Flick Guide This short guide describes how to do a few common tasks in DVD Flick. The last update to this guide was based on version 1.3.0.0 of DVD Flick. Creating a simple DVD Step 1: Add your titles Click the Add title button and select one or more of the video files that you want to add. Step 2: Edit your titles You can edit each title by double-clicking it or by clicking on it once and pressing the Edit title button. Here you can set the number of chapters the title will have, either by entering a number or a time interval. You can also add subtitle files, different audio tracks and add another video source to the title. Step 3: Configure your project Click the Project settings button on the top to open the project's settings.
-
Upload
william-steven-wongso -
Category
Documents
-
view
81 -
download
3
description
Book
Transcript of Dvd Flicks
GUIDE
ENGLISH
DVD Flick GuideThis short guide describes how to do a few common tasks in DVD Flick. The last update to this guide was based on version 1.3.0.0 of DVD Flick.Creating a simple DVDStep 1: Add your titlesClick the Add title button and select one or more of the video files that you want to add.
Step 2: Edit your titlesYou can edit each title by double-clicking it or by clicking on it once and pressing the Edit title button. Here you can set the number of chapters the title will have, either by entering a number or a time interval. You can also add subtitle files, different audio tracks and add another video source to the title.Step 3: Configure your projectClick the Project settings button on the top to open the project's settings.

The only thing you really need to set here is the Target size under the General tab, and the Target format, and Encoding profile under the Video tab.For Target Size, choose the size of the disc you will be burning your project onto. Usually the default setting of DVD-5 (4.3 Gb) will be fine, but if you wanted to use a dual layer disc or any other common format, you can select that as well.For Target Format, you must choose which format is used on the standalone DVD Player you will be watching the DVD on. For most Europe, Asian, African and Oceanic countries this should be set to PAL, for most American countries to NTSC. Some DVD Players support both formats, in which case you should select the Mixed format. When using the Mixed format each separate title will be determined to be either PAL or NTSC, and encoded as such.For Encoding Profile, you must make a trade-off between the time it will take to encode the DVD, or the quality thereof. Generally Fast offers reasonable image quality, the difference between Normal and Best is almost unnoticeable. Though if you are going to make a DVD that is near or over 3 hours in length, it is not recommended to choose Fast but Normal or Best instead or the image quality will suffer.Step 4: Choose a destination folderAt the bottom of the screen you can choose where DVD Flick will put the encoded DVD files, as well as log files of the encoding process. It is important to put this folder on a fast harddrive, which has enough free space available. How much free space is needed is indicated on the lower right of DVD Flick's main window. Do not set this to your DVD drive's path, DVD Flick will first need to store the encoded data on a harddrive before it can burn it to a disc.Step 5: BurningDVD Flick can burn your encoded project straight to disc if it is completed successfully.
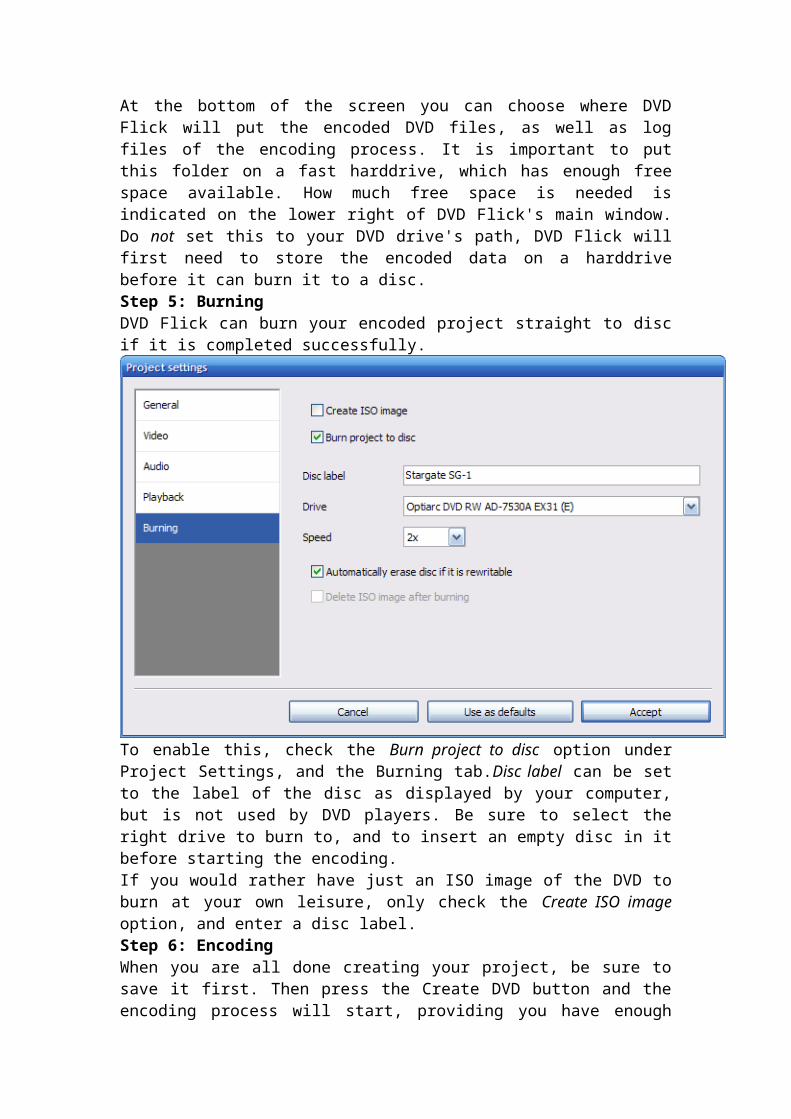
To enable this, check the Burn project to disc option under Project Settings, and the Burning tab.Disc label can be set to the label of the disc as displayed by your computer, but is not used by DVD players. Be sure to select the right drive to burn to, and to insert an empty disc in it before starting the encoding.If you would rather have just an ISO image of the DVD to burn at your own leisure, only check the Create ISO image option, and enter a disc label.Step 6: EncodingWhen you are all done creating your project, be sure to save it first. Then press the Create DVD button and the encoding process will start, providing you have enough free disc space. How long the encoding takes is very much dependant on the speed of your CPU, and the harddrive that the project's destination folder is on. It's best to let your PC do this during the night, or during a very long coffee break.Add subtitlesTo add subtitles to a title, all you have to do is edit the title, go to the Subtitles tab, and use the Add button to add subtitle files to the title. You can reorder them using the arrow buttons.
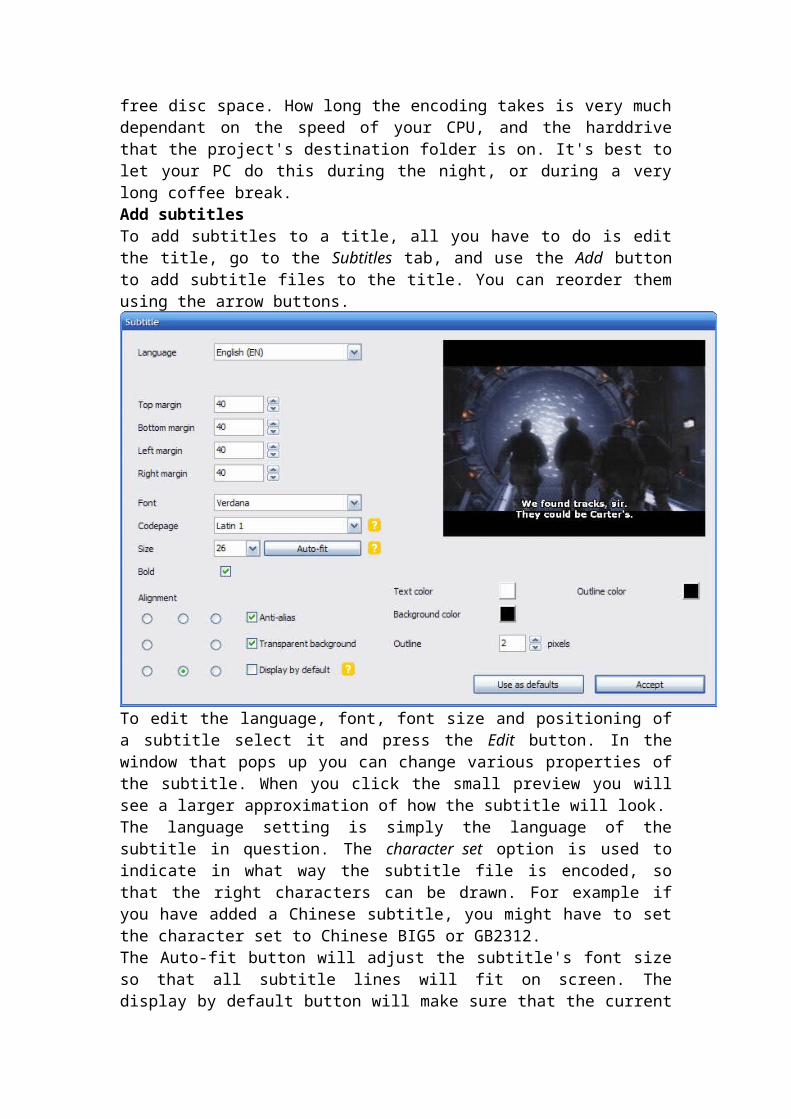
To edit the language, font, font size and positioning of a subtitle select it and press the Edit button. In the window that pops up you can change various properties of the subtitle. When you click the small preview you will see a larger approximation of how the subtitle will look.The language setting is simply the language of the subtitle in question. The character set option is used to indicate in what way the subtitle file is encoded, so that the right characters can be drawn. For example if you have added a Chinese subtitle, you might have to set the character set to Chinese BIG5 or GB2312.The Auto-fit button will adjust the subtitle's font size so that all subtitle lines will fit on screen. The display by default button will make sure that the current subtitle will be displayed automatically when the title containing it is played. If other subtitles have this set, only the first subtitle in the list will be displayed when the title starts.Add audio tracksA good example for when you want to add another audio track would be to add a second commentary track or some music.
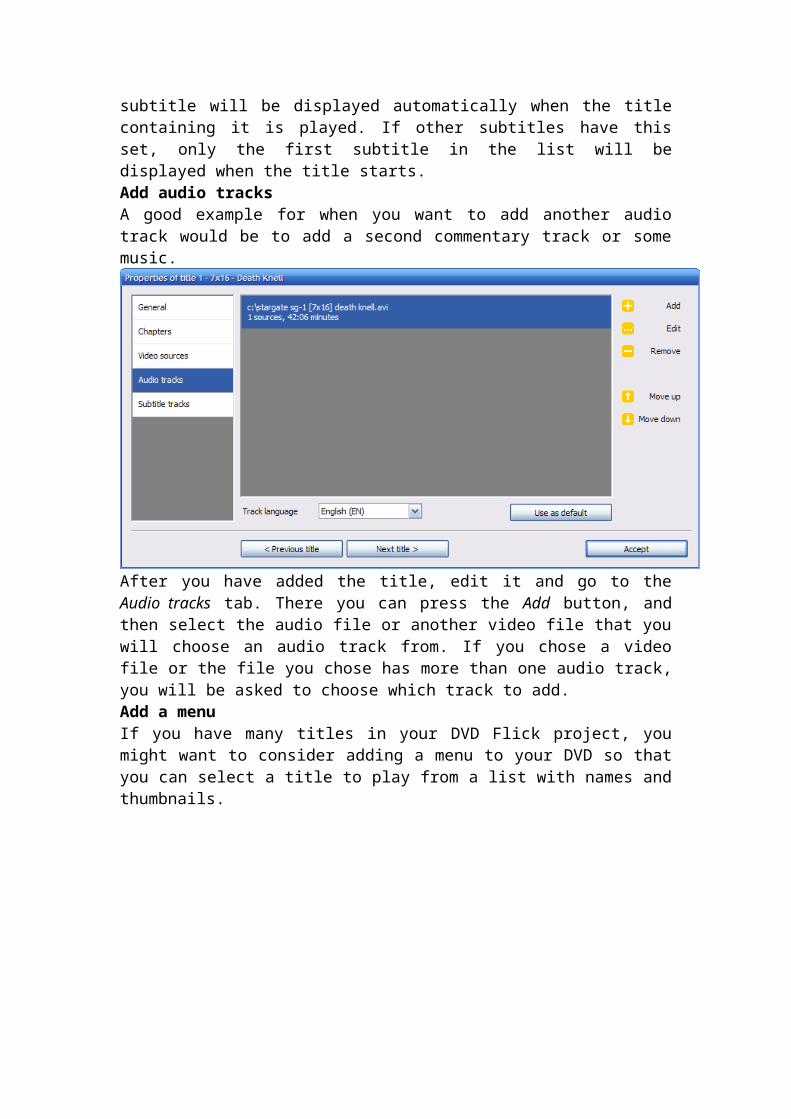
After you have added the title, edit it and go to the Audio tracks tab. There you can press the Add button, and then select the audio file or another video file that you will choose an audio track from. If you chose a video file or the file you chose has more than one audio track, you will be asked to choose which track to add.Add a menuIf you have many titles in your DVD Flick project, you might want to consider adding a menu to your DVD so that you can select a title to play from a list with names and thumbnails.
To add a menu, go to the Menu settings button. Here you can choose a template which will determine the appearance of the menu, as well as see it in action by clicking the Preview button. To exit the menu preview, either press ESC or right-click on the preview window. After you've chosen a template, be sure to enable the Enable menu checkbox so that the menu will be included on your disc.You can also view menu pages that allow you to select an audio track or subtitle from the currently playing title. To access this menu while a title is playing, most DVD players have a Audio or Subtitle button on their remotes.

INDONESIAN
DVD Flick Panduan
Panduan singkat ini menjelaskan cara melakukan tugas umum sedikit DVD Flick. Update terakhir untuk panduan ini didasarkan pada versi 1.3.0.0 dari DVD Flick.
Membuat DVD sederhana
Langkah 1: Tambahkan judul Anda
Klik tombol Add dan pilih judul satu atau lebih file video yang ingin Anda tambahkan.
Langkah 2: Edit judul Anda
Anda dapat mengedit setiap judul dengan mengklik dua kali atau dengan mengklik sekali dan menekan tombol Edit judul. Di sini Anda dapat mengatur jumlah bab judul yang diinginkan, baik dengan memasukkan nomor atau interval waktu. Anda juga dapat menambahkan file subjudul, track audio yang berbeda dan menambahkan sumber video untuk judul.
Langkah 3: Konfigurasi proyek Anda
Klik tombol Project pengaturan di atas untuk membuka pengaturan proyek.
Satu-satunya hal yang benar-benar perlu diatur di sini adalah ukuran Sasaran bawah tab General, dan format target, dan profil Encoding bawah tab Video.
Untuk Ukuran Target, pilih ukuran disk dimana Anda akan membakar proyek Anda. Biasanya pengaturan default dari DVD-5 (4,3 Gb) akan baik-baik saja, tetapi jika Anda ingin menggunakan dual layer disc atau format umum lainnya, Anda dapat memilih itu juga.
Untuk Target Format, Anda harus memilih format yang digunakan pada DVD player mandiri yang akan anda tonton . Bagi sebagian besar Eropa, negara-negara Asia, Afrika dan Kelautan ini harus ditetapkan ke PAL, untuk negara-negara Amerika paling NTSC. Beberapa Pemain DVD mendukung kedua format, dalam hal ini Anda harus memilih format Campuran. Bila menggunakan format Campuran setiap judul terpisah akan ditentukan untuk menjadi baik PAL atau NTSC, dan dikodekan seperti itu.
Untuk Profil Encoding, Anda harus membuat trade-off antara waktu yang diperlukan untuk mengkodekan DVD, atau kualitas daripadanya. Umumnya Cepat menawarkan kualitas gambar yang wajar, perbedaan antara Normal dan Best hampir tertara. Meskipun jika Anda akan membuat sebuah DVD yang dekat atau di atas 3 jam panjangnya, tidak dianjurkan untuk memilih Cepat tapi Normal atau sebaliknya Terbaik atau kualitas gambar akan menderita.
Langkah 4: Pilih folder tujuan
Di bagian bawah layar Anda dapat memilih mana DVD Flick akan menempatkan file DVD disandikan, serta file log dari proses encoding. Hal ini penting untuk menempatkan folder ini pada harddisk cepat, yang memiliki cukup ruang bebas yang tersedia. Berapa banyak ruang bebas yang diperlukan ditampilkan di bagian kanan bawah jendela utama DVD Flick ini. Jangan mengatur ini ke jalan DVD drive anda, DVD Flick pertama akan perlu untuk menyimpan data dikodekan pada harddisk sebelum dapat membakarnya ke disk.
Langkah 5: Pembakaran
DVD Flick bisa membakar proyek dikodekan Anda langsung ke disk jika berhasil diselesaikan.
Untuk mengaktifkan ini, periksa proyek Burn untuk pilihan disk di bawah Pengaturan Proyek, dan label tab.Disc Pembakaran dapat diatur untuk label disc sesuai dengan yang ditampilkan oleh komputer Anda, tetapi tidak digunakan oleh pemutar DVD. Pastikan untuk memilih drive yang tepat untuk membakar, dan untuk memasukkan disk kosong di dalamnya sebelum memulai pengkodean.
Jika Anda lebih suka memiliki hanya citra ISO dari DVD untuk membakar waktu luang Anda sendiri, hanya memeriksa pilihan Create ISO image, dan masukkan label disc.
Langkah 6: Encoding
Ketika Anda sudah selesai membuat proyek Anda, pastikan untuk menyimpannya terlebih dahulu. Kemudian tekan tombol Create DVD dan proses encoding akan dimulai, memberikan Anda memiliki cukup ruang disk bebas. Berapa lama pengkodean dibutuhkan tergantung sangat banyak pada kecepatan CPU Anda, dan harddisk yang folder tujuan proyek adalah pada. Itu terbaik untuk membiarkan PC Anda melakukan hal ini pada malam hari, atau selama istirahat kopi sangat panjang.
Menambahkan sub judul
Untuk menambahkan sub judul untuk judul, yang harus Anda lakukan adalah mengedit judul, buka tab Subjudul, dan gunakan tombol Add untuk menambahkan file subjudul untuk judul. Anda dapat menyusun ulang dengan menggunakan tombol panah.
Untuk mengedit bahasa, font, ukuran font dan posisi subjudul pilih dan tekan tombol Edit. Pada jendela yang muncul Anda dapat mengubah berbagai properti dari subjudul. Ketika Anda mengklik pratinjau kecil Anda akan melihat pendekatan yang lebih besar tentang bagaimana subtitle akan terlihat.
Pengaturan bahasa hanyalah bahasa subjudul yang bersangkutan. Pilihan set karakter yang digunakan untuk menunjukkan cara bagaimana file subtitle dikodekan, sehingga karakter yang tepat dapat diambil. Sebagai contoh jika Anda telah menambahkan subjudul Cina, Anda mungkin harus menyetel karakter diatur ke Cina BIG5 atau GB2312.
Tombol Auto-fit akan menyesuaikan ukuran font subtitle itu sehingga semua lini subtitle akan muat di layar. Tampilan dengan tombol default akan memastikan bahwa subtitle saat ini akan ditampilkan secara otomatis ketika judul yang mengandung dimainkan. Jika sub judul lain memiliki set ini, hanya subjudul pertama dalam daftar akan ditampilkan bila judul dimulai.
Tambahkan track audio
Sebuah contoh yang baik untuk ketika Anda ingin menambahkan track audio akan menambahkan jalur komentar kedua atau musik.
Setelah Anda telah menambahkan judul, mengedit dan pergi ke tab Audio trek. Di sana Anda dapat menekan tombol Add, kemudian pilih file audio atau file video lain yang Anda akan memilih track audio dari. Jika Anda memilih file video atau file yang Anda pilih memiliki lebih dari satu track audio, Anda akan diminta untuk memilih jalur untuk menambahkan.
Tambahkan menu
Jika Anda memiliki banyak gelar dalam proyek Flick DVD, Anda mungkin ingin mempertimbangkan untuk menambahkan menu untuk DVD Anda sehingga Anda dapat memilih judul untuk bermain dari daftar dengan nama dan thumbnail.
Untuk menambah menu, pergi ke tombol Menu pengaturan. Di sini Anda dapat memilih template yang akan menentukan tampilan menu, serta melihatnya dalam tindakan dengan mengklik tombol Preview. Untuk keluar dari menu preview, baik tekan ESC atau klik kanan pada jendela pratinjau. Setelah Anda telah memilih template, pastikan untuk mengaktifkan kotak centang, Aktifkan menu sehingga menu akan disertakan pada disk Anda.
Anda juga dapat melihat halaman menu yang memungkinkan Anda untuk memilih track audio atau subtitle dari judul yang sedang diputar. Untuk mengakses menu ini sementara judul diputar, sebagian besar pemain DVD memiliki tombol Audio atau Subtitle pada remote mereka.
SUMBER : http://www.dvdflick.net/guide/index_en.html
PERKEMBANGAN
Changelog
Version 1.3.0.7
Added: buttonSubtitleMenuX and buttonAudioMenuX button types that jump to a title's audio or button menu directly.
Changed: Removed "High" encoding priority setting. It is not useful anyway (no speed gain, only chokes other processes).
Changed: Updated FFmpeg to revision 19276.
Changed: Updated ImgBurn to version 2.4.4.0.
Changed: Removed "Enable menu" checkbox and replaced it by a "None" menu option.
Fixed: Overflow error when loading large files.
Fixed: Negative audio delays were not corrected.
Version 1.3.0.6
Fixed: Bug that caused certain files to be detected as having 0 FPS video.
Changed: Updated 7-zip, MPLEX, delaycut, FFmpeg and mkvextract to their latest versions.
Changed: Modifications to the installer script (XhmikosR).
Version 1.3.0.5
Added: 1.85 manual PAR option for titles.
Added: Copy timestamps option for titles.
Added: RealVideo 3 and 4 support. It's not perfect though.
Added: GSM audio support.
Changed: Made the Mosaic template less garish-looking. Not that it's been turned into a work of art now.
Changed: MPLEX is now used instead of TCMPLEX.
Changed: Updated FFmpeg to latest revision.
Changed: Adjusted default burn speed and speed warnings.
Changed: 2:3 pulldown is disabled by default now, but can be enabled from the advanced video options dialog.
Changed: The "Do you want to proceed" dialog is no longer shown.
Fixed: When running in unattended mode, "The project has been changed" dialog would still show up and keep DVD Flick from closing.
Fixed: UTF-8 subtitle support.
Fixed: Low\high burning speed warning even when burning to disc was disabled.
Fixed: Long duration of adding a new video source.
Version 1.3.0.4
Added: Option to ignore an audio track's delay (audio track edit window).
Added: Option to verify a disc after burning it.
Added: Option to eject the tray after burning a disc.
Fixed: Bug that would cause menu generation to die early on.
Changed: Better subtitle short duration detection (kbosward).
Version 1.3.0.3
Fixed: MPEG-2 stream copy bug, source height was ignored.
Fixed: A few issues with large system fonts.
Fixed: Encoding of H264 in Matroska.
Fixed: Wrong menu preview image when loading a project.
Fixed: Wrong highlight\select colors in menu preview.
Fixed: Subtitle reading bug on some UTF-8 files.
Changed: A message now shows up if a project file is invalid.
Changed: Listview improvements.
Changed: Upped scene change detection sensitivity.
Version 1.3.0.2
Fixed: Menu authoring failing with a File not found error.
Fixed: Lockup when generating n chapters. Again.
Fixed: Failure to multiplex using Mplex and more than one title.
Changed: Red message dialog images for critical\exclamation messages.
Version 1.3.0.1
Fixed: Pressing Abort while a stream is being extracted no longer continues to the next step.
Fixed: Lockup when generating n chapters.
Fixed: Lockup\out of memory error caused by the loading of m2v files that have a similarly named file loaded as a subtitle.
Fixed: Crash when using certain characters in destination folder names with menus turned on.
Fixed: 25 FPS menus, even though NTSC was the target format.
Changed: Disabled B-frame encoding and a few encoding tweaks. Less stuttering during dark scenes or fades.
Changed: FancyLists can now recieve focus, and the arrow keys can be used to select items in them.
Changed: Default browse folder upon first run is now the user's My Documents folder.
Version 1.3.0.0
Added: DVD menu functionality using templates. A few templates have been included already.
Added: Option for mixed format DVDs for DVD players that can play both PAL and NTSC.
Added: 23.976 FPS material now gets 2:3 pulldown performed on it when the target format is NTSC.
Added: The option to force audio channel output to mono, stereo, surround or to infer it from the source (auto).
Added: Option to always enable the first subtitle (under Playback).
Added: Detects display aspect ratio (also known as pixel aspect ratio) of many more filetypes.
Added: Option to go to the previous and next title when editing a title's properties.
Added: Option to have subtitles auto-fit into view.
Added: Subtitle lines that are too long are now chopped in two halves, otherwise they are clipped instead of just skipped.
Added: -startunattended commandline parameter which encodes a project specified with -load and quits. It only logs errors, doesn't display them.
Added: Welcome screen shown on first run.
Added: Option to override a video source's pixel aspect ratio.
Added: Option to specify burning speed.
Changed: Interface font adapts to system font setting.
Changed: Subtitle outline rendering is faster.
Changed: Better scaling\resizing\padding calculations for video.
Changed: DVD creation progress is better indicated.
Changed: Force subtitle is now named Display as default.
Changed: Slightly updated TCMPlex.
Changed: HTML tags are now stripped from subtitles (rendering them isn't supported).
Changed: SPUMux output is logged.
Changed: Improved SSA and SRT subtitle parsing.
Changed: Subtitles are now corrected for overlapping and too short durations.
Changed: When adding a title all subtitles with the same base name are added to it too.
Changed: Subtitle block dimensions are now always multiples of 2. Some DVD players only like such sizes and behave odd otherwise.
Changed: When adding multiple files they are now added in alphabetical order.
Changed: Tweaked encoding profiles.
Changed: AMR narrowband and AMR wideband audio is not supported by this version. Support may return in the near future.
Changed: Force MPEG-2 recompress option removed. 9 out of 10 MPEG-2 streams aren't fully DVD compliant anyway.
Changed: Copy MPEG-2 stream option added to force copying MPEG-2 video streams that conform to the proper image width and height.
Changed: 2nd encoding pass option removed. DVD Flick uses constant bitrate encoding thus it is useless.
Changed: Audio track sources must be equal in compression, samplerate and channel count.
Changed: Updated ImgBurn to 2.4.2.0.
Changed: When burning to disc is selected but not create ISO, no ISO image is created and a direct-to-disc burn is done.
Changed: Burner detection has been mostly rewritten. 95 - 99% of all burners should be detected now.
Changed: A title's thumbnail is now used as subtitle preview background (but still letterboxed).
Fixed: Audio delay could sometimes be detected as -1.
Fixed: Opening a project file did not work.
Fixed: Overscan border option adds top and bottom overscan bars again, now also of the proper size.
Fixed: Using MicroDVD subtitles caused incomplete encodes (up until the first subtitle).
Fixed: When running in portable mode, user profile directory is no longer created.
Fixed: Character set selection\support for subtitles.
Fixed: Creating chapters on every video source now works as expected.
Fixed: Audio delay for VBR audio in AVI files could sometimes be calculated to be in minutes.
Fixed: Bug that could cause discs that were too large to be created when an audio source was being copied (bad bitrate calculation).
Fixed: When changing the process priority during encoding it would be reset when the current operation finished.
Fixed: Crashing when an error occured. The error is now reported as it should be.
...and many more small changes and fixes throughout.
For the changelog of older releases please see the file changelog.txt in your DVD Flick installation folder or Start Menu.
INDONESIAN
Changelog
Versi 1.3.0.7
Ditambahkan: buttonSubtitleMenuX dan jenis tombol buttonAudioMenuX yang melompat ke audio judul atau tombol menu secara langsung.
Berubah: Dihapus "tinggi" encoding pengaturan prioritas. Hal ini tidak berguna pula (tidak ada keuntungan kecepatan, hanya tersedak proses lainnya).
Berubah: Diperbarui FFmpeg ke revisi 19276.
Berubah: Diperbarui ke versi 2.4.4.0 ImgBurn.
Berubah: Dihapus "Aktifkan menu" kotak centang dan diganti dengan pilihan "None" menu.
Tetap: Overflow kesalahan saat memuat file besar.
Tetap: penundaan audio yang negatif tidak dikoreksi.
Versi 1.3.0.6
Tetap: Bug yang menyebabkan file tertentu untuk dideteksi sebagai memiliki 0 video yang FPS.
Berubah: Diperbarui 7-zip, MPLEX, delaycut, FFmpeg dan mkvextract ke versi terbaru mereka.
Berubah: Modifikasi script installer (XhmikosR).
Versi 1.3.0.5
Ditambahkan: 1.85 panduan pilihan PAR untuk judul.
Ditambahkan: Copy timestamps pilihan untuk judul.
Ditambahkan: RealVideo 3 dan 4 dukungan. Ini tidak sempurna sekalipun.
Ditambahkan: dukungan audio GSM.
Berubah: Membuat template Mosaic kurang norak tampak. Bukan berarti itu telah berubah menjadi sebuah karya seni sekarang.
Berubah: MPLEX sekarang digunakan sebagai pengganti TCMPLEX.
Berubah: Diperbarui FFmpeg ke revisi terbaru.
Berubah: Disesuaikan standar membakar kecepatan dan peringatan kecepatan.
Berubah: pulldown 02:03 dinonaktifkan secara default sekarang, tetapi dapat diaktifkan dari dialog opsi video canggih.
Berubah: The "Apakah Anda ingin melanjutkan" dialog tidak lagi ditampilkan.
Tetap: Saat menjalankan dalam mode tidak dijaga, "Proyek ini telah berubah" dialog akan tetap muncul dan menjaga Flick DVD dari penutupan.
Tetap: UTF-8 dukungan subjudul.
Tetap: Rendah \ pembakaran peringatan kecepatan tinggi bahkan ketika membakar ke disk dinonaktifkan.
Tetap: durasi panjang menambahkan sumber video baru.
Versi 1.3.0.4
Ditambahkan: Opsi untuk mengabaikan penundaan track audio ini (track jendela edit audio).
Ditambahkan: Pilihan untuk memverifikasi disk setelah membakarnya.
Ditambahkan: Opsi untuk mengeluarkan nampan setelah pembakaran disk.
Tetap: Bug yang akan menyebabkan generasi menu mati sejak dini.
Berubah: Lebih baik subtitle durasi deteksi singkat (kbosward).
Versi 1.3.0.3
Tetap: MPEG-2 aliran bug copy, ketinggian sumber diabaikan.
Fixed: Beberapa masalah dengan font sistem besar.

Tetap: Encoding dari H264 di Matroska.
Tetap: Menu image preview Salah ketika loading proyek.
Tetap: sorot Salah \ pilih warna di pratinjau menu.
Tetap: Subtitle membaca bug pada beberapa UTF-8 file.
Berubah: Sebuah pesan sekarang muncul jika file proyek tidak valid.
Berubah: perbaikan ListView.
Berubah: Upped adegan sensitivitas deteksi perubahan.
Versi 1.3.0.2
Tetap: authoring menu gagal dengan File tidak ditemukan kesalahan.
Tetap: Lockup saat membuat bab n. Lagi.
Tetap: Kegagalan untuk multipleks menggunakan Mplex dan lebih dari satu judul.
Berubah: gambar dialog Merah pesan untuk kritis \ pesan seru.
Versi 1.3.0.1
Tetap: Menekan Abort sementara sungai sedang diekstraksi tidak lagi terus ke langkah berikutnya.
Tetap: Lockup saat membuat bab n.
Tetap: Lockup \ keluar dari kesalahan memori yang disebabkan oleh pemuatan file M2V yang memiliki sebuah file bernama sama dimuat sebagai subjudul.
Fixed: Crash ketika menggunakan karakter tertentu dalam nama folder tujuan dengan menu diaktifkan.
Tetap: 25 FPS menu, meskipun NTSC adalah format target.
Berubah: Disabled B-frame encoding dan tweak beberapa encoding. Kurang gagap selama adegan gelap atau memudar.
Berubah: FancyLists sekarang dapat menerima fokus, dan tombol panah dapat digunakan untuk memilih item di dalamnya.
Berubah: Default Kuliah folder pada run pertama sekarang saya pengguna Dokumen folder.
Versi 1.3.0.0
Ditambahkan: fungsi menu DVD dengan menggunakan template. Sebuah template beberapa telah dimasukkan sudah.
Ditambahkan: Opsi untuk DVD Format campuran untuk pemutar DVD yang bisa bermain baik PAL dan NTSC.

Ditambahkan: 23.976 FPS bahan sekarang mendapat 2:3 pull-down dilakukan pada saat format target NTSC.
Ditambahkan: Pilihan untuk memaksa channel audio output ke mono, stereo, surround atau untuk menyimpulkan dari sumber (auto).
Ditambahkan: Opsi untuk selalu mengaktifkan subtitle pertama (di bawah Pemutaran).
Ditambahkan: Mendeteksi layar aspek rasio (juga dikenal sebagai rasio aspek pixel) dari Filetypes banyak lagi.
Ditambahkan: Pilihan untuk pergi ke judul sebelumnya dan berikutnya ketika mengedit properti judul ini.
Ditambahkan: Pilihan untuk memiliki sub judul auto-fit ke tampilan.
Ditambahkan: Subtitle garis yang terlalu panjang sekarang cincang dalam dua bagian, jika mereka dipotong bukan hanya dilewati.
Ditambahkan:-startunattended parameter commandline yang mengkode sebuah proyek ditentukan dengan-beban dan berhenti. Ini hanya log kesalahan, tidak menampilkan mereka.
Ditambahkan: layar Selamat Datang ditampilkan pada penayangan pertama.
Ditambahkan: Opsi untuk mengesampingkan aspek rasio pixel sumber video.
Ditambahkan: Pilihan untuk menentukan kecepatan pembakaran.
Berubah: font Antarmuka menyesuaikan dengan pengaturan sistem font.
Berubah: Subtitle render garis lebih cepat.
Berubah: skala yang lebih baik \ Resize perhitungan bantalan \ untuk video.
Berubah: DVD kemajuan penciptaan lebih baik ditunjukkan.
Berubah: Angkatan subtitle sekarang dinamakan Tampilan sebagai default.
Berubah: TCMPlex Sedikit diperbarui.
Berubah: tag HTML sekarang dilucuti dari judul (membuat mereka tidak didukung).
Berubah: SPUMux output login.
Berubah: Peningkatan SSA dan SRT subtitle parsing.
Berubah: Sub judul sekarang dikoreksi untuk tumpang tindih dan jangka waktu terlalu pendek.
Berubah: Ketika menambahkan judul semua sub judul dengan nama dasar yang sama yang ditambahkan ke dalamnya juga.
Berubah: Subtitle dimensi blok sekarang selalu kelipatan 2. Beberapa pemutar DVD hanya menyukai ukuran tersebut dan berperilaku aneh sebaliknya.
Berubah: Ketika menambahkan beberapa file mereka sekarang ditambahkan dalam urutan abjad.
Berubah: tweaked profil encoding.
Berubah: audio AMR wideband narrowband dan AMR tidak didukung oleh versi ini. Dukungan dapat kembali dalam waktu dekat.
Berubah: Angkatan MPEG-2 pilihan recompress dihapus. 9 dari 10 MPEG-2 aliran yang tidak sepenuhnya DVD compliant pula.
Berubah: Copy MPEG-2 aliran pilihan ditambahkan untuk memaksa menyalin MPEG-2 video stream yang sesuai dengan lebar dan tinggi gambar yang tepat.
Berubah: encoding pilihan lulus 2 dihapus. DVD Flick menggunakan encoding bitrate yang konstan sehingga tidak berguna.
Berubah: Sumber track audio harus sama di kompresi, samplerate dan jumlah channel.
Berubah: Diperbarui ImgBurn ke 2.4.2.0.
Berubah: Ketika membakar ke disk yang dipilih, tapi tidak membuat ISO, ada gambar ISO dibuat dan luka bakar direct-to-disk dilakukan.
Berubah: deteksi Burner telah sebagian besar ditulis ulang. 95-99% dari semua pembakar harus terdeteksi sekarang.
Berubah: thumbnail Judul ini sekarang digunakan sebagai latar belakang pratinjau subtitle (tapi masih letterboxed).
Tetap: delay Audio kadang-kadang bisa dideteksi sebagai -1.
Fixed: Membuka file proyek tidak bekerja.
Tetap: option perbatasan Overscan menambahkan bar overscan atas dan bawah lagi, sekarang juga dari ukuran yang tepat.
Tetap: Menggunakan sub judul MicroDVD disebabkan lengkap encode (sampai subjudul pertama).
Tetap: Ketika berjalan dalam mode portabel, direktori profil pengguna tidak lagi dibuat.
Tetap: Karakter pemilihan set \ dukungan untuk sub judul.
Tetap: Menciptakan bab pada setiap sumber video sekarang bekerja seperti yang diharapkan.
Tetap: delay Audio untuk VBR audio dalam file AVI terkadang bisa dihitung menjadi dalam beberapa menit.
Tetap: Bug yang bisa menyebabkan cakram yang terlalu besar yang akan dibuat jika sebuah sumber audio disalin (perhitungan bitrate buruk).
Tetap: Ketika mengubah prioritas proses encoding selama itu akan reset ketika operasi saat ini selesai.
Tetap: Menerjang ketika kesalahan terjadi. Kesalahan kini dilaporkan sebagaimana mestinya.
... Dan kecil banyak perubahan dan perbaikan yang lebih seluruh.
Untuk changelog dari rilis sebelumnya silakan lihat CHANGELOG.txt file dalam folder instalasi Flick DVD atau Start Menu.
http://www.dvdflick.net/changelog.php
FEATURES / KELEBIHAN KELEBIHAN
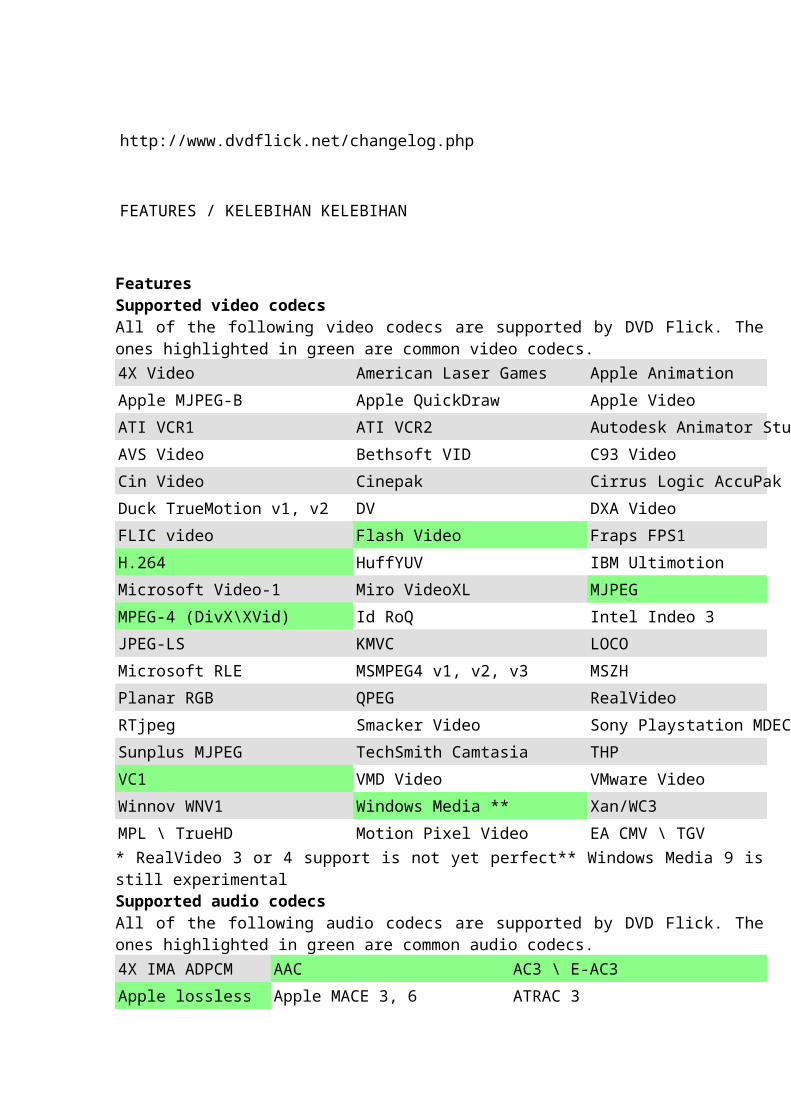
FeaturesSupported video codecsAll of the following video codecs are supported by DVD Flick. The ones highlighted in green are common video codecs.4X Video American Laser Games Apple Animation
Apple MJPEG-B Apple QuickDraw Apple Video
ATI VCR1 ATI VCR2 Autodesk Animator Studio
AVS Video Bethsoft VID C93 Video
Cin Video Cinepak Cirrus Logic AccuPak
Duck TrueMotion v1, v2 DV DXA Video
FLIC video Flash Video Fraps FPS1
H.264 HuffYUV IBM Ultimotion
Microsoft Video-1 Miro VideoXL MJPEG
MPEG-4 (DivX\XVid) Id RoQ Intel Indeo 3
JPEG-LS KMVC LOCO
Microsoft RLE MSMPEG4 v1, v2, v3 MSZH
Planar RGB QPEG RealVideo
RTjpeg Smacker Video Sony Playstation MDEC
Sunplus MJPEG TechSmith Camtasia THP
VC1 VMD Video VMware Video
Winnov WNV1 Windows Media ** Xan/WC3
MPL \ TrueHD Motion Pixel Video EA CMV \ TGV* RealVideo 3 or 4 support is not yet perfect** Windows Media 9 is still experimentalSupported audio codecsAll of the following audio codecs are supported by DVD Flick. The ones highlighted in green are common audio codecs.
4X IMA ADPCM AAC AC3 \ E-AC3
Apple lossless Apple MACE 3, 6 ATRAC 3
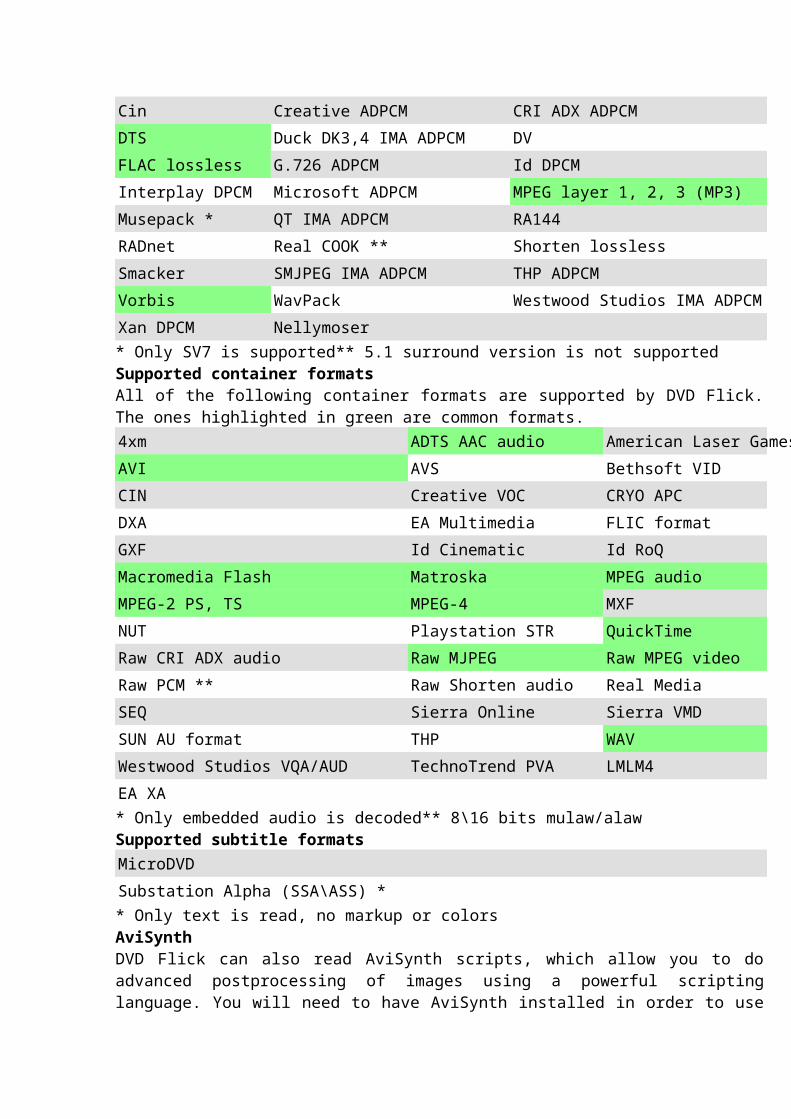
Cin Creative ADPCM CRI ADX ADPCM
DTS Duck DK3,4 IMA ADPCM DV
FLAC lossless G.726 ADPCM Id DPCM
Interplay DPCM Microsoft ADPCM MPEG layer 1, 2, 3 (MP3)
Musepack * QT IMA ADPCM RA144
RADnet Real COOK ** Shorten lossless
Smacker SMJPEG IMA ADPCM THP ADPCM
Vorbis WavPack Westwood Studios IMA ADPCM
Xan DPCM Nellymoser* Only SV7 is supported** 5.1 surround version is not supportedSupported container formatsAll of the following container formats are supported by DVD Flick. The ones highlighted in green are common formats.4xm ADTS AAC audio American Laser Games
AVI AVS Bethsoft VID
CIN Creative VOC CRYO APC
DXA EA Multimedia FLIC format
GXF Id Cinematic Id RoQ
Macromedia Flash Matroska MPEG audio
MPEG-2 PS, TS MPEG-4 MXF
NUT Playstation STR QuickTime
Raw CRI ADX audio Raw MJPEG Raw MPEG video
Raw PCM ** Raw Shorten audio Real Media
SEQ Sierra Online Sierra VMD
SUN AU format THP WAV
Westwood Studios VQA/AUD TechnoTrend PVA LMLM4
EA XA* Only embedded audio is decoded** 8\16 bits mulaw/alawSupported subtitle formatsMicroDVD
Substation Alpha (SSA\ASS) ** Only text is read, no markup or colorsAviSynthDVD Flick can also read AviSynth scripts, which allow you to do advanced postprocessing of images using a powerful scripting language. You will need to have AviSynth installed in order to use it's functionality in DVD Flick. AviSynth's homepage is at http://avisynth.org/.FFMPEGDVD Flick relies on the very powerful FFMPEG project to decode the many file formats and codecs it supports. FFMPEG is also used to provide audio and video encoding functionality in order to produce the final DVD.
FFMPEG's homepage can be found at http://ffmpeg.mplayerhq.hu/.
Fitur
Didukung video codec
Semua codec video berikut ini didukung oleh DVD Flick. Yang disorot dalam warna hijau adalah codec video umum.
4X Video American Laser Game Animasi Apple Apple Graphics
Apple MJPEG-B Apple QuickDraw Apple Video Asus v1 dan v2
ATI ATI VCR1 VCR2 Autodesk Animator Studio AVID DNxHD
AVS Video Bethsoft VID C93 Video CamStudio
Cin Video Cinepak Cirrus Logic AccuPak Kreatif YUV
Duck TrueMotion v1, v2 DV DXA Video Flash Video Layar
FLIC video Flash Video Fraps FPS1 H.261
H.264 HuffYUV IBM Ultimotion Cinematic Id
Microsoft Video-1 Miro VideoXL MJPEG MPEG-1 dan 2
MPEG-4 (DivX \ Xvid) Id Roq Intel Indeo 3 Interplay Video
JPEG-LS KMVC LOCO Lossless MJPEG
Microsoft RLE MSMPEG4 v1, v2, v3 MSZH On2 VP5, VP6
Planar RGB QPEG RealVideo Renderware TXD
RTjpeg Smacker Video Sony Playstation MDEC Sorenson Video 1, 3
Sunplus MJPEG TechSmith Camtasia THP Tiertex Seq Video
VC1 VMD Video VMware Video Westwood VQA
Winnov WNV1 Windows Media ** Xan/WC3 ZMBV
MPL \ TrueHD Gerak Pixel Video EA CMV \ TGV EA XA
* RealVideo 3 atau 4 dukungan ini belum sempurna
** Windows Media 9 masih eksperimental
Didukung codec audio
Semua codec audio berikut ini didukung oleh DVD Flick. Yang disorot dalam warna hijau adalah codec audio yang umum.
4X IMA ADPCM AAC AC3 \ E-AC3 AMR NB dan WB
Apple Apple Lossless MACE 3, 6 ATRAC 3 CD-ROM XA ADPCM
Cin Kreatif ADPCM CRI ADX ADPCM DSP Grup TrueSpeech
DTS Duck DK3, 4 IMA ADPCM DV EA ADPCM
FLAC lossless G.726 ADPCM Id DPCM Intel Music Coder
Saling DPCM Microsoft ADPCM MPEG layer 1, 2, 3 (MP3) MS ADPCM IMA
Musepack * QT ADPCM IMA RA144 RA288
Radnet nyata COOK ** Mempersingkat lossless Sierra Online DPCM
Kecupan SMJPEG IMA ADPCM THP Audio ADPCM Benar (TTA)
Vorbis WavPack Westwood Studios IMA ADPCM Windows Media 1, 2
Xan DPCM Nellymoser
* Hanya SV7 didukung
5,1 ** surround versi tidak didukung
Didukung kontainer format
Semua format kontainer berikut ini didukung oleh DVD Flick. Yang disorot dalam warna hijau adalah format umum.
4xm ADTS AAC audio American Laser Permainan ASF (WMV)
AVI AVS Bethsoft VID C93
CIN Creative VOC CRYO APC DV
DXA EA Multimedia FLIC format SWF *
GXF Id Cinematic Id Roq Interplay MVE
Macromedia Flash Matroska audio MPEG MPEG-1 sistem
MPEG-2 PS, TS MPEG-4 MXF Nullsoft Video (NSV)
NUT Playstation STR QuickTime Raw AC3
Baku CRI ADX audio yang Raw Raw MJPEG video MPEG Raw video MPEG4
Baku PCM ** Baku Mempersingkat Real audio Media Sega FILM / CPK
SEQ Sierra Online Sierra VMD Smacker
SUN AU Format THP WAV WC3 Film
Westwood Studios VQA / AUD TechnoTrend PVA LMLM4 MVI
EA XA
* Audio Hanya tertanam didekode

** 8 \ 16 bit mulaw / alaw
Didukung subtitle format
MicroDVD SubRip (SRT)
Substation Alpha (SSA \ ASS) * subview
* Hanya teks dibaca, tidak ada markup atau warna
AviSynth
DVD Flick juga dapat membaca script AviSynth, yang memungkinkan Anda untuk melakukan postprocessing maju gambar menggunakan bahasa scripting yang kuat. Anda akan perlu memiliki AviSynth diinstal untuk menggunakan fungsi itu dalam DVD Flick. Homepage AviSynth adalah di http://avisynth.org/.
FFMPEG
DVD Flick bergantung pada proyek FFMPEG sangat kuat untuk memecahkan kode format file dan codec yang mendukung. FFMPEG juga digunakan untuk menyediakan fungsionalitas encoding audio dan video untuk menghasilkan DVD akhir.
Homepage FFMPEG yang dapat ditemukan di http://ffmpeg.mplayerhq.hu/.
TENTANG DVD FLICK
About DVD FlickDVD Flick aims to be a simple but at the same time powerful DVD Authoring tool. It can take a number of video files stored on your computer and turn them into a DVD that will play back on your DVD player, Media Center or Home Cinema Set. You can add additional custom audio tracks, subtitles as well as a menu for easier navigation.Features
Burn near any video file to DVD Support for over 45 file formats Support for over 60 video codecs Support for over 40 audio codecs Easily add a menu Add your own subtitles Easy to use interface Burn your project to disc after encoding
Completely free without any adware, spyware or limitations
Tentang DVD Flick
DVD Flick bertujuan untuk menjadi kuat sederhana namun pada saat yang sama DVD Authoring tool. Ini dapat mengambil beberapa file video yang tersimpan di komputer Anda dan mengubahnya menjadi sebuah DVD yang akan diputar pada DVD player, Media Center atau Home Cinema Set. Anda dapat menambahkan track audio tambahan kustom, sub judul serta menu untuk navigasi lebih mudah.
Fitur
• Bakar dekat setiap file video ke DVD
• Dukungan untuk lebih dari 45 format file
• Dukungan untuk lebih dari 60 video codec
• Dukungan untuk lebih dari 40 audio codec
• Mudah menambahkan menu
• Tambahkan sub judul Anda sendiri
• Mudah digunakan antarmuka
• Membakar proyek Anda ke disk setelah pengkodean
Benar-benar gratis tanpa spyware, adware atau keterbatasan
GUIDE LAIN
DVD Flick is the all-in-one tool that can convert: AVI to DVD, FLV to DVD, HDMOV to DVD, MKV to DVD, MJPG to DVD, MPG to DVD, M2V to DVD, MP4 to DVD, M4V to DVD, NSV to DVD, NUT to DVD, QT to DVD, MOV to DVD, RM to DVD, SMK to DVD, OGM to DVD, WMV to DVD, ASF to DVD, 3GP to DVD, 3G2 to DVD. DVD Flick supports DVD Authoring, ISO image creating, DVD burning also in one tool. It is free software.
System requirementsA Pentium or AMD K-6 processor. Pentium 3 or later recommended, the faster the better.64 MB of free physical RAM, 128 MB or more is recommended.Windows 2000 Professional or Windows XP (Professional or Home), Windows Vista
Download the latest version of the DVD Flick website
How to use DVD Flick:
1. Open DVD Flick
2. Press "New project button" to create new DVD Flick project
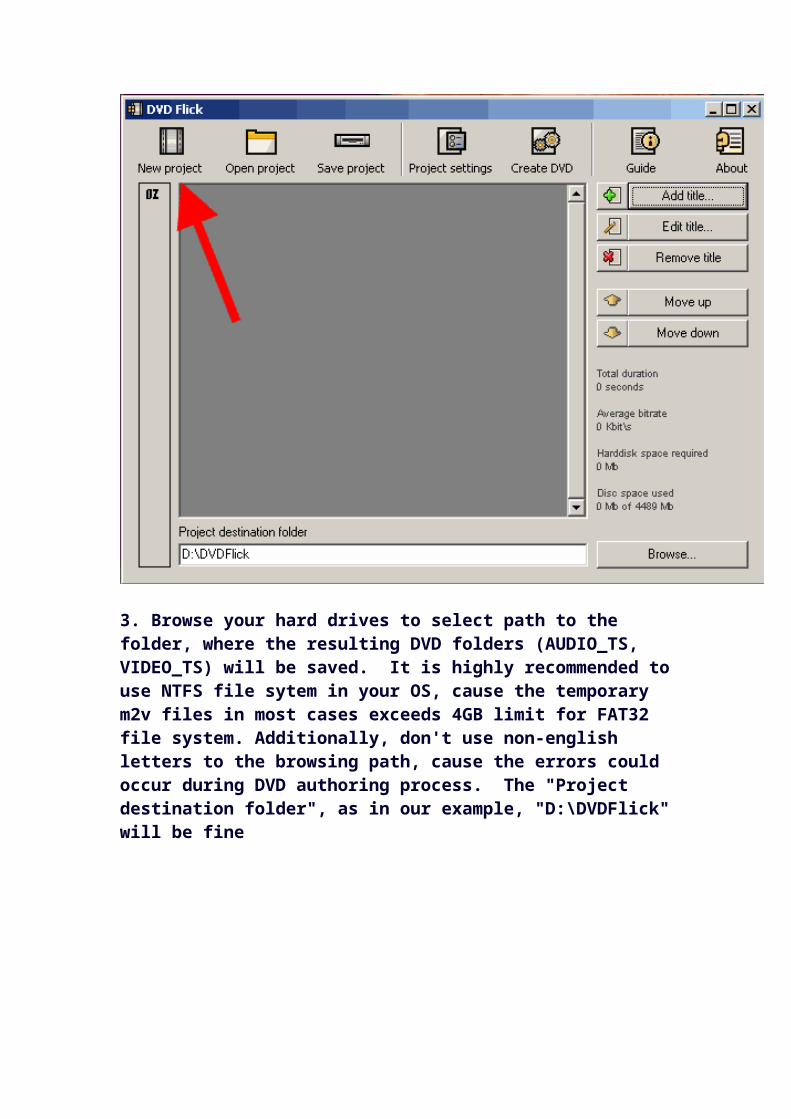
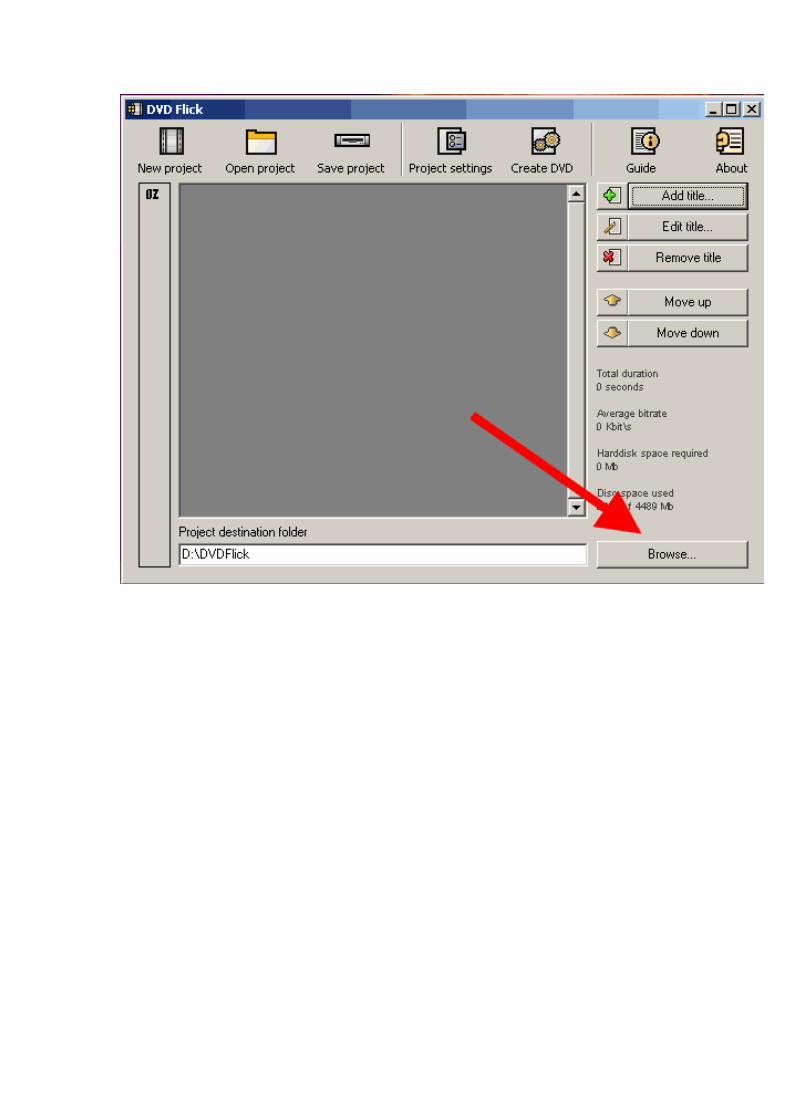
3. Browse your hard drives to select path to the folder, where the resulting DVD folders (AUDIO_TS, VIDEO_TS) will be saved. It is highly recommended to use NTFS file sytem in your OS, cause the temporary m2v files in most cases exceeds 4GB limit for FAT32 file system. Additionally, don't use non-english letters to the browsing path, cause the errors could occur during DVD authoring process. The "Project destination folder", as in our example, "D:\DVDFlick" will be fine

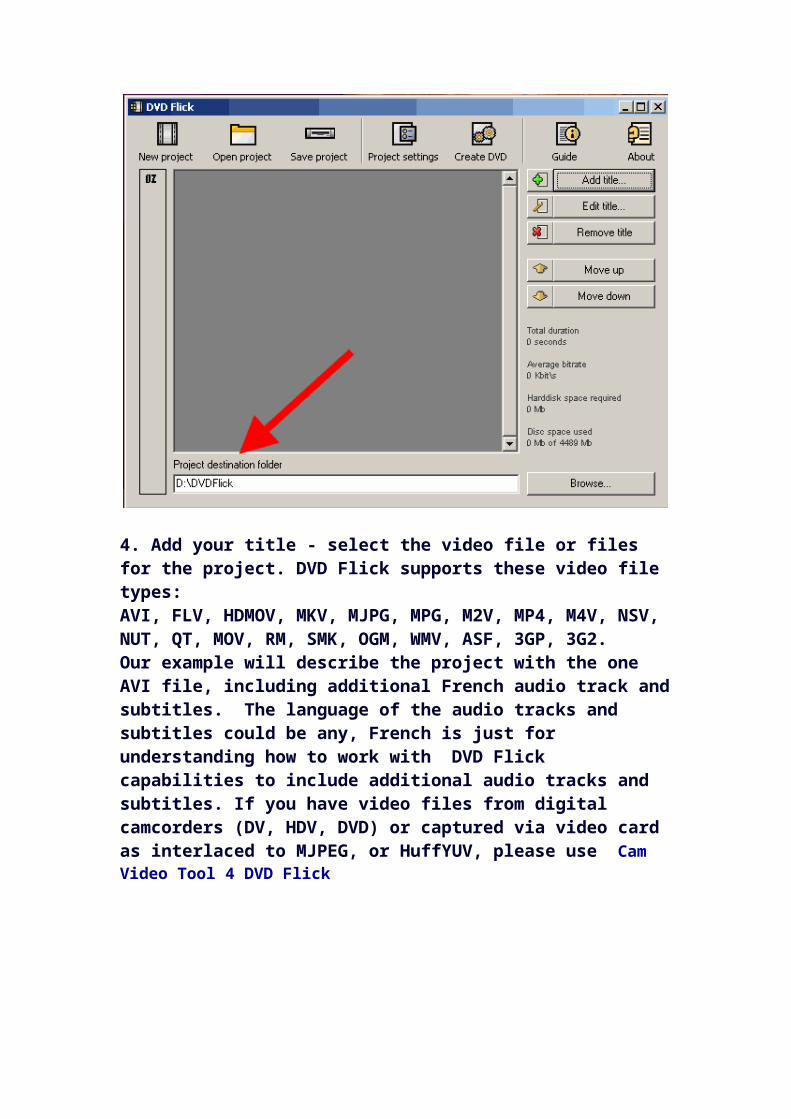
4. Add your title - select the video file or files for the project. DVD Flick supports these video file types:AVI, FLV, HDMOV, MKV, MJPG, MPG, M2V, MP4, M4V, NSV, NUT, QT, MOV, RM, SMK, OGM, WMV, ASF, 3GP, 3G2.Our example will describe the project with the one AVI file, including additional French audio track and subtitles. The language of the audio tracks and subtitles could be any, French is just for understanding how to work with DVD Flick capabilities to include additional audio tracks and subtitles. If you have video files from digital camcorders (DV, HDV, DVD) or captured via video card as interlaced to MJPEG, or HuffYUV, please use Cam Video Tool 4 DVD Flick

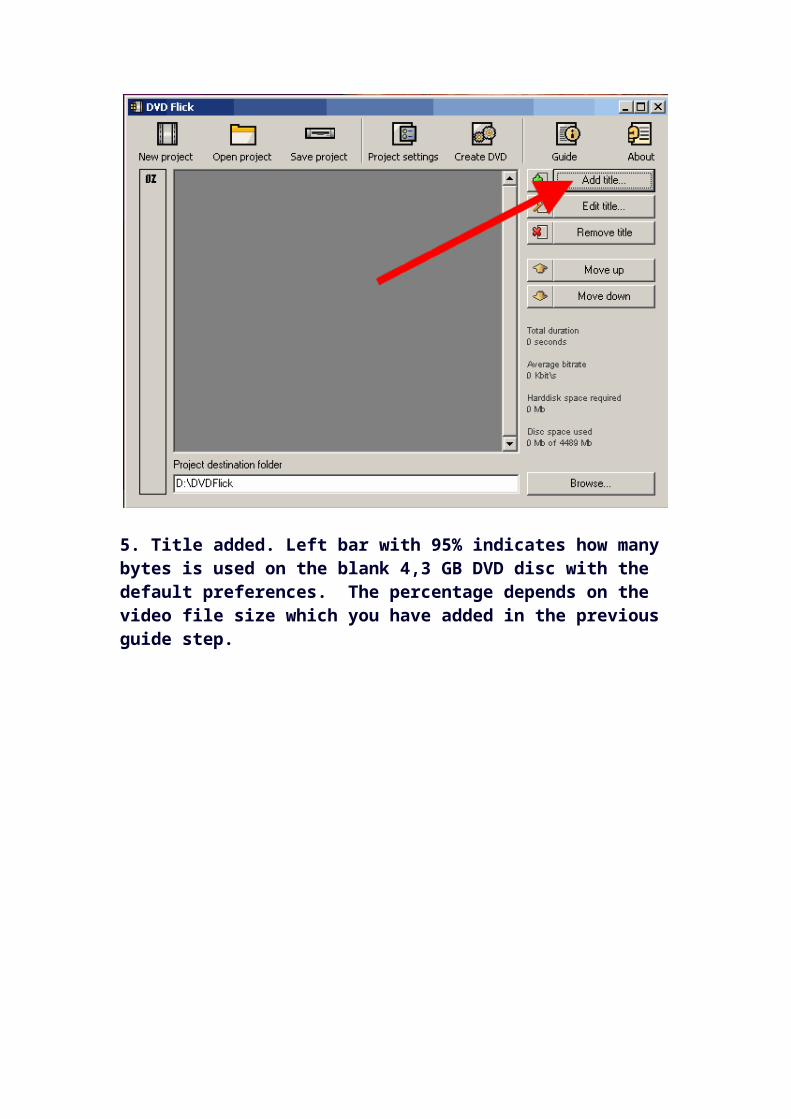
5. Title added. Left bar with 95% indicates how many bytes is used on the blank 4,3 GB DVD disc with the default preferences. The percentage depends on the video file size which you have added in the previous guide step.

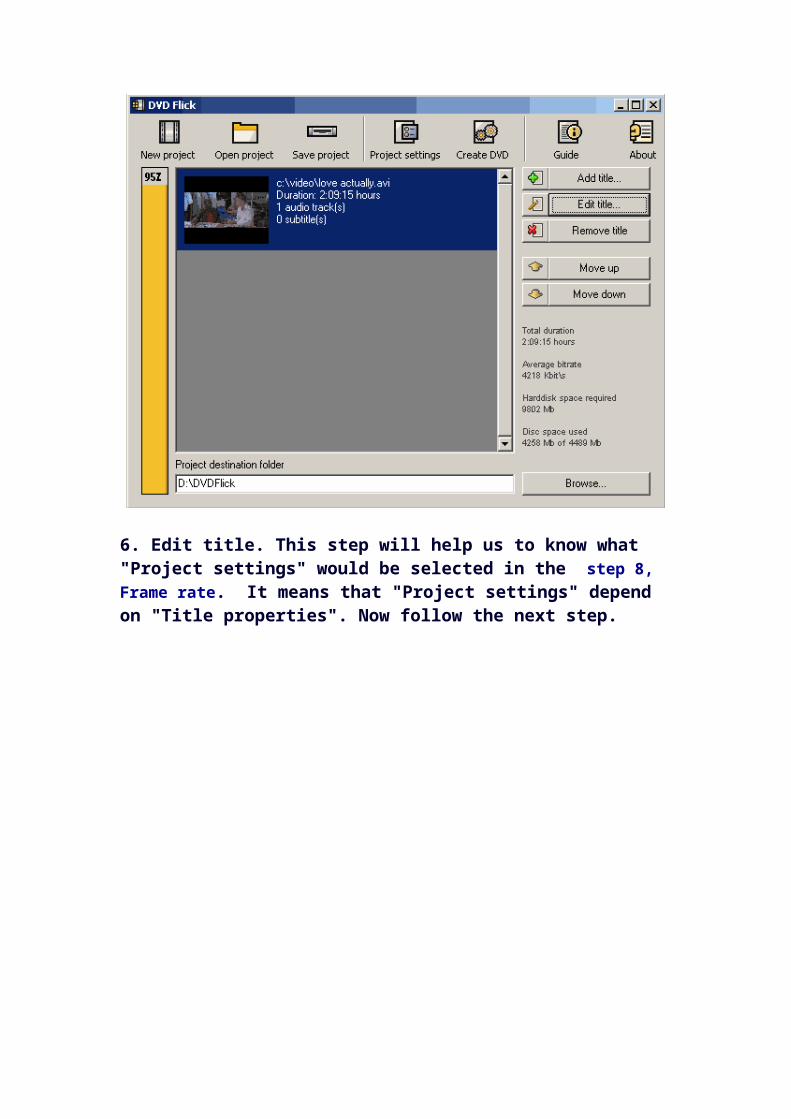
6. Edit title. This step will help us to know what "Project settings" would be selected in the step 8, Frame rate. It means that "Project settings" depend on "Title properties". Now follow the next step.

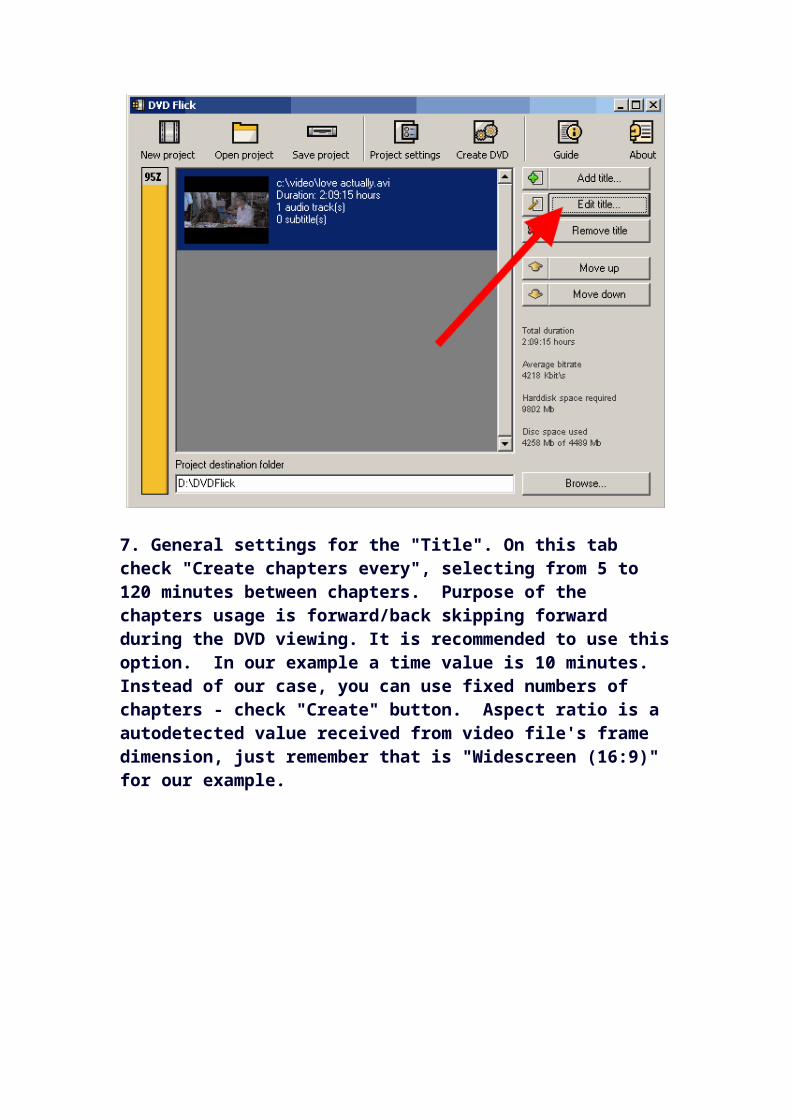
7. General settings for the "Title". On this tab check "Create chapters every", selecting from 5 to 120 minutes between chapters. Purpose of the chapters usage is forward/back skipping forward during the DVD viewing. It is recommended to use this option. In our example a time value is 10 minutes. Instead of our case, you can use fixed numbers of chapters - check "Create" button. Aspect ratio is a autodetected value received from video file's frame dimension, just remember that is "Widescreen (16:9)" for our example.
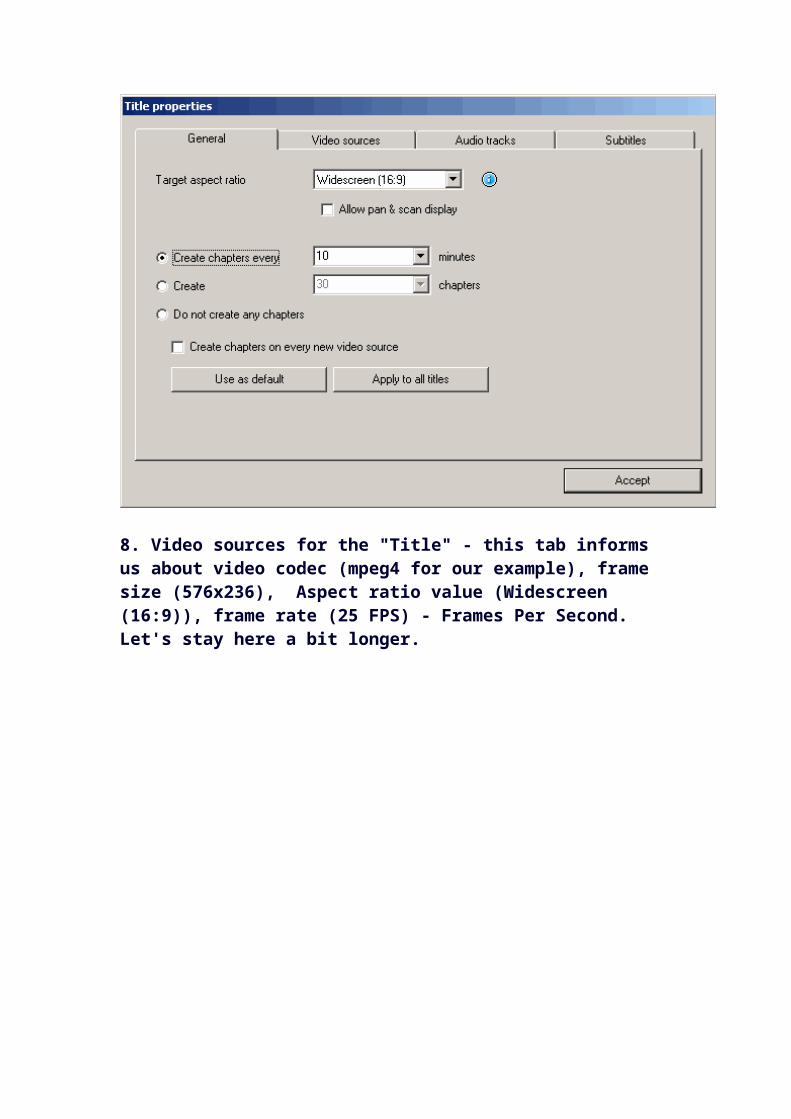
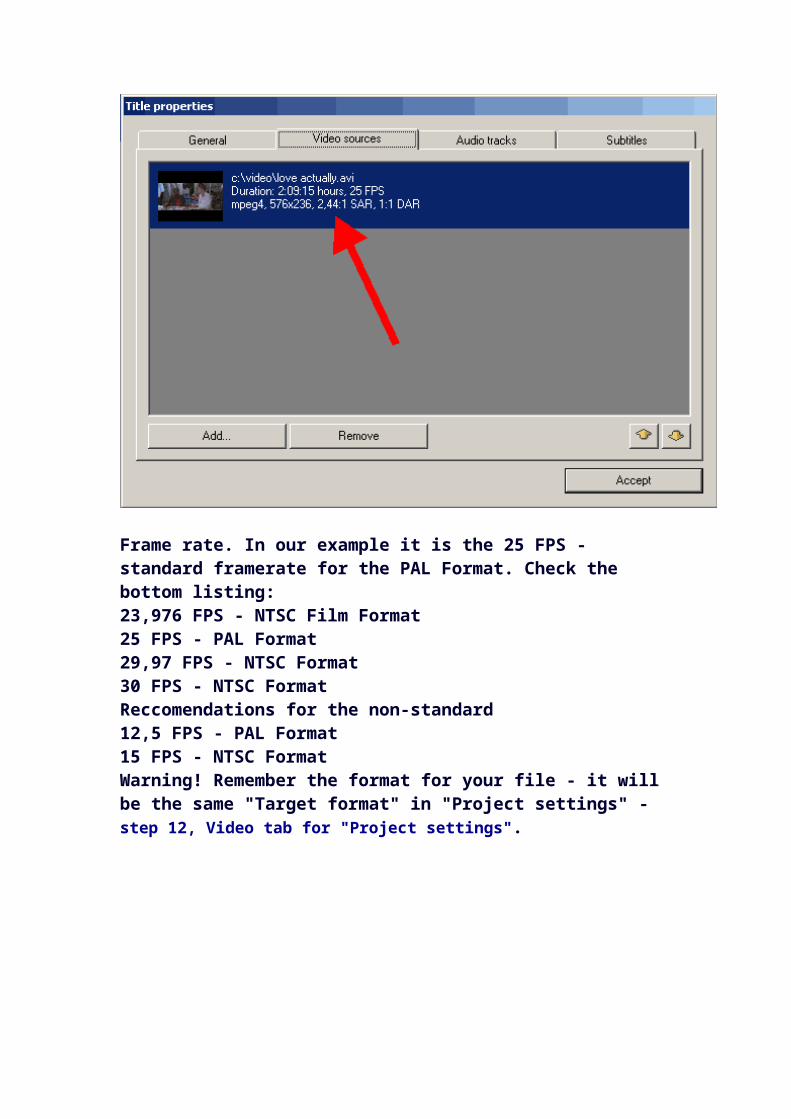
8. Video sources for the "Title" - this tab informs us about video codec (mpeg4 for our example), frame size (576x236), Aspect ratio value (Widescreen (16:9)), frame rate (25 FPS) - Frames Per Second. Let's stay here a bit longer.
The frame size is: 576x236 pixels. Let us divide 576 to 236 = 576/236 = 2,44(:1). The file will bw encoded as "Widescreen (16:9)" with some top and bottom borders. Please return to the "General" tab to check the same "Widescreen (16:9)" in the "Aspect ratio" listbox.
Frame rate. In our example it is the 25 FPS - standard framerate for the PAL Format. Check the bottom listing:23,976 FPS - NTSC Film Format25 FPS - PAL Format29,97 FPS - NTSC Format30 FPS - NTSC FormatReccomendations for the non-standard12,5 FPS - PAL Format15 FPS - NTSC FormatWarning! Remember the format for your file - it will be the same "Target format" in "Project settings" - step 12, Video tab for "Project settings".
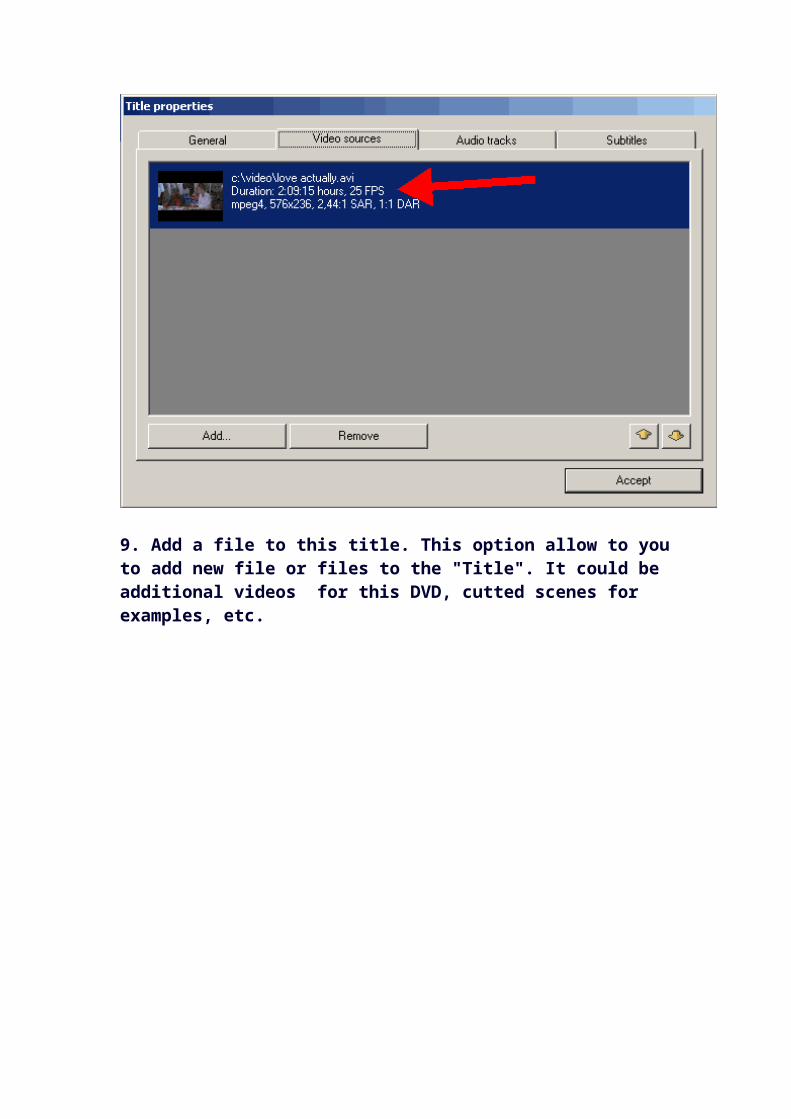
9. Add a file to this title. This option allow to you to add new file or files to the "Title". It could be additional videos for this DVD, cutted scenes for examples, etc.
Important thing is the same FPS for the main video file (green
arrow) and the additional file (red arrow).
Learned about this feature in DVD Flick. Remove the additional file.
10. Audio tracks tab. Still saved the additional audio from the the "love_sample.avi". It is easy to remove it. Press "Edit" button, then remove from the "Audio track sources" additional audio track.
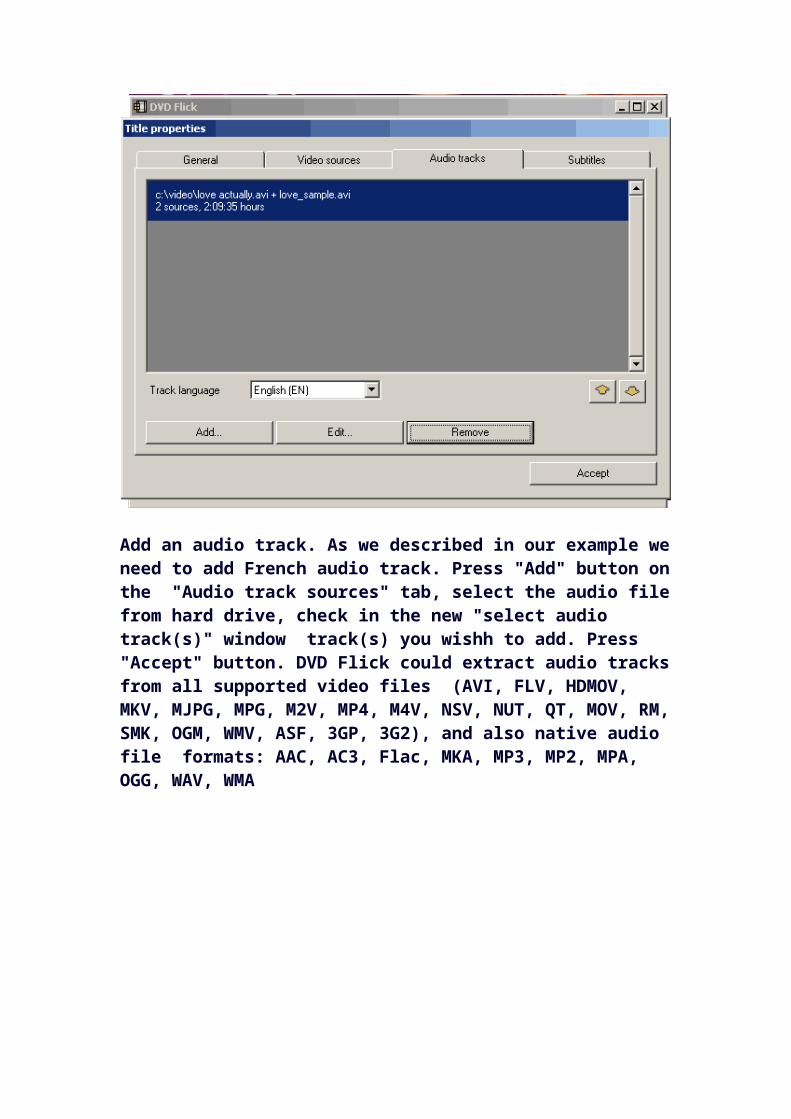
Add an audio track. As we described in our example we need to add French audio track. Press "Add" button on the "Audio track sources" tab, select the audio file from hard drive, check in the new "select audio track(s)" window track(s) you wishh to add. Press "Accept" button. DVD Flick could extract audio tracks from all supported video files (AVI, FLV, HDMOV, MKV, MJPG, MPG, M2V, MP4, M4V, NSV, NUT, QT, MOV, RM, SMK, OGM, WMV, ASF, 3GP, 3G2), and also native audio file formats: AAC, AC3, Flac, MKA, MP3, MP2, MPA, OGG, WAV, WMA

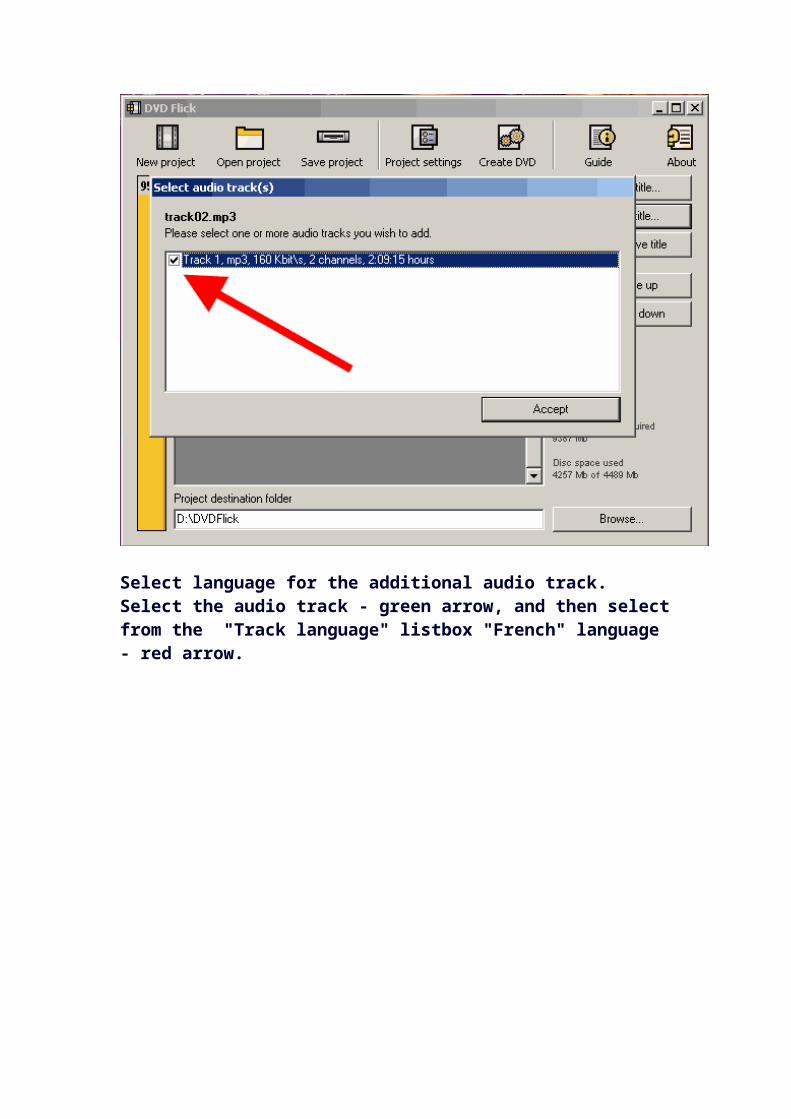
Select language for the additional audio track. Select the audio track - green arrow, and then select from the "Track language" listbox "French" language - red arrow.
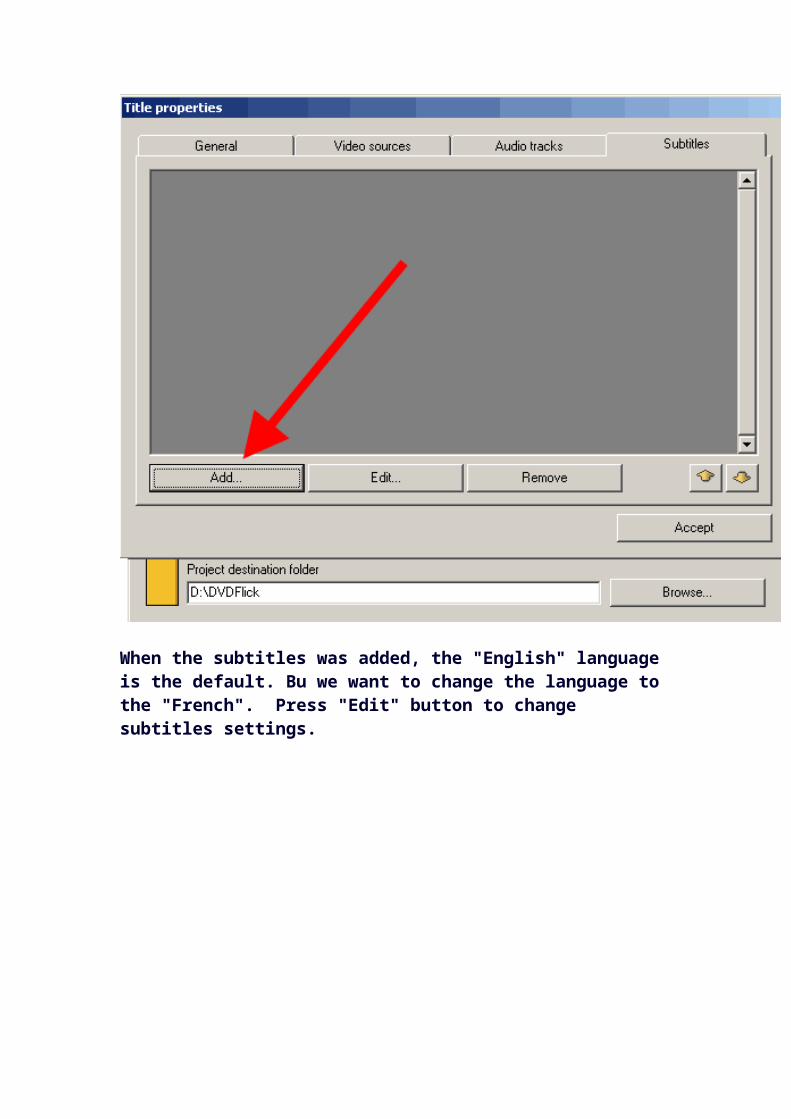
11. Subtitles tab. As you remember, we wish to add French subtitles. Press "Add" button on the "Subtitles" tab, and then select from disk file with subtitles. DVD Flick supports these subtitles formats: AQT, JS, RT, SMI, ASS, SRT, SSA, TXT.
When the subtitles was added, the "English" language is the default. Bu we want to change the language to the "French". Press "Edit" button to change subtitles settings.

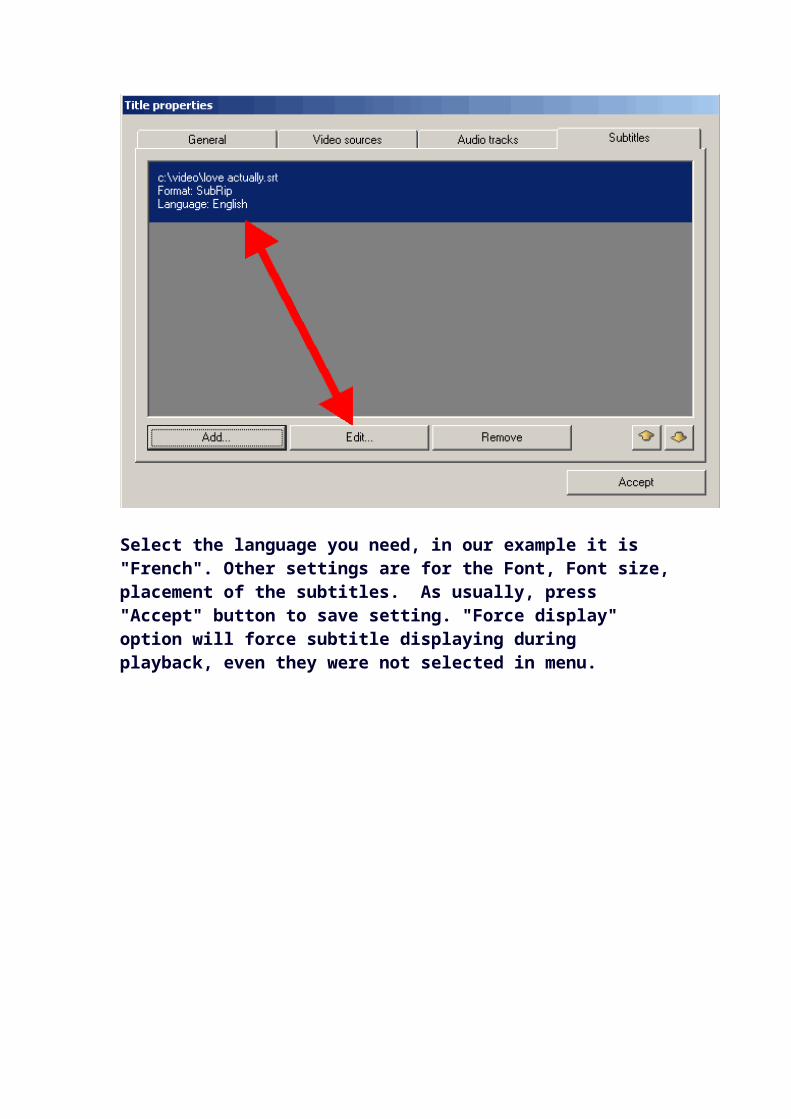
Select the language you need, in our example it is "French". Other settings are for the Font, Font size, placement of the subtitles. As usually, press "Accept" button to save setting. "Force display" option will force subtitle displaying during playback, even they were not selected in menu.

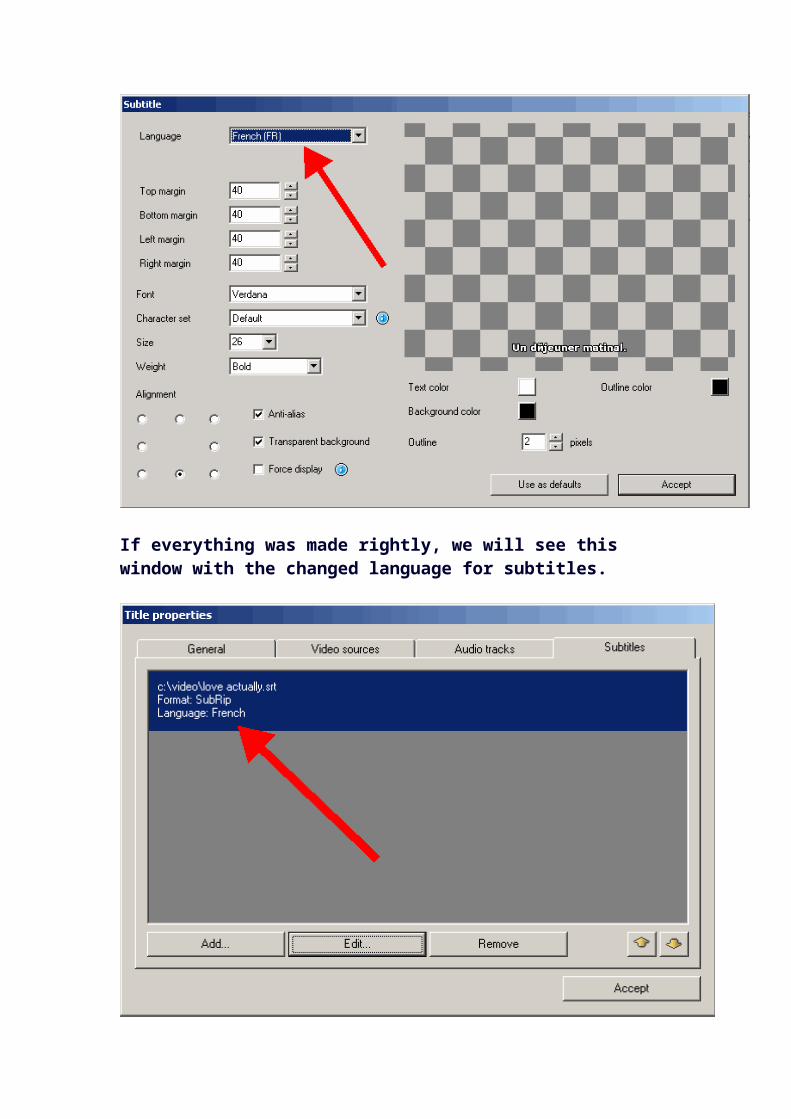
If everything was made rightly, we will see this window with the changed language for subtitles.
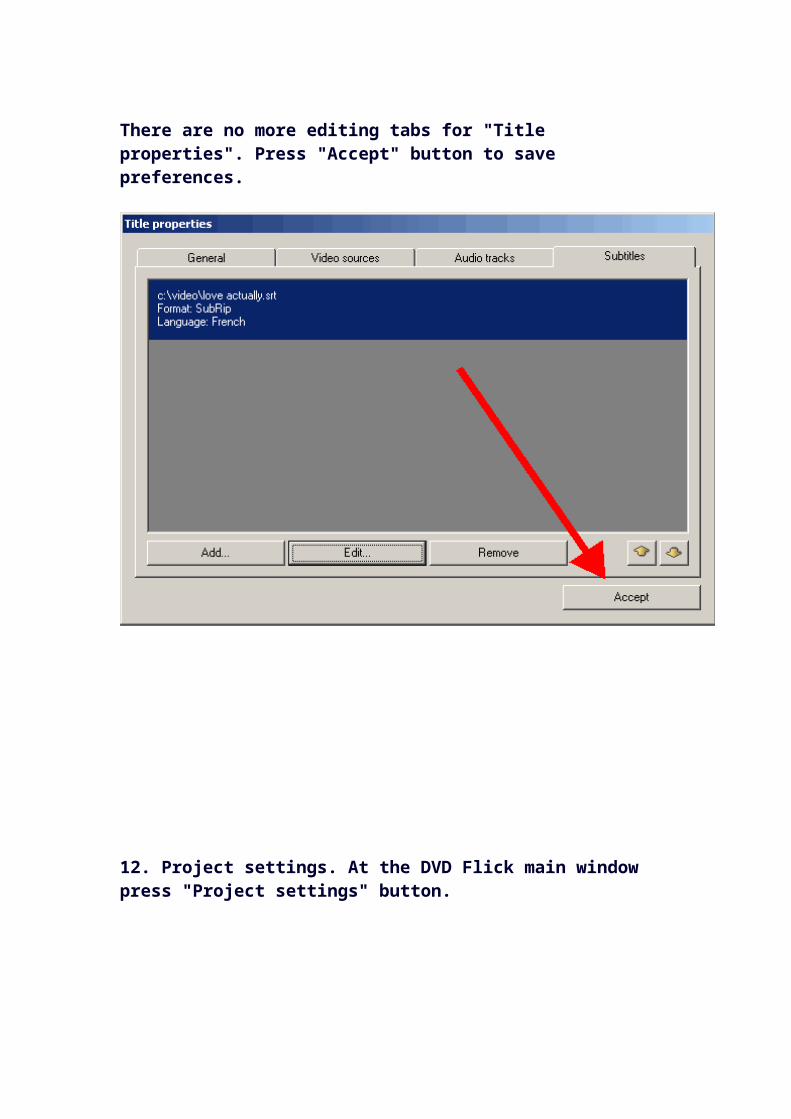
There are no more editing tabs for "Title properties". Press "Accept" button to save preferences.
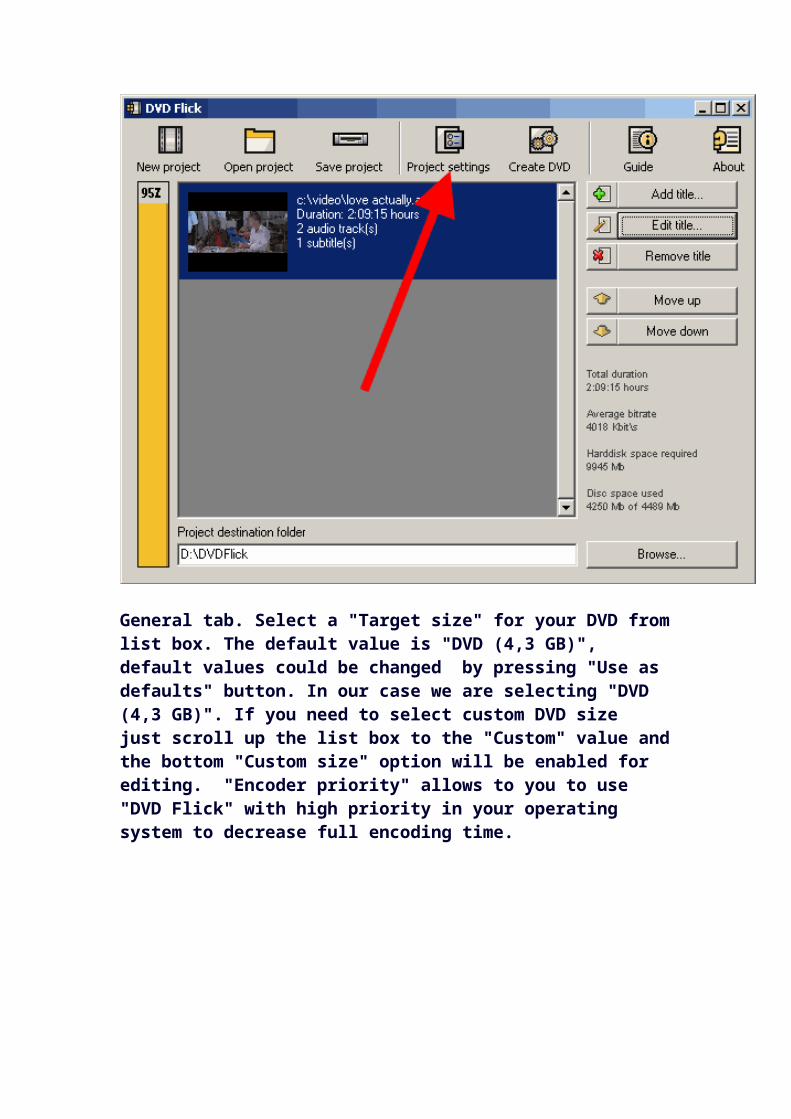
12. Project settings. At the DVD Flick main window press "Project settings" button.
General tab. Select a "Target size" for your DVD from list box. The default value is "DVD (4,3 GB)", default values could be changed by pressing "Use as defaults" button. In our case we are selecting "DVD (4,3 GB)". If you need to select custom DVD size just scroll up the list box to the "Custom" value and the bottom "Custom size" option will be enabled for editing. "Encoder priority" allows to you to use "DVD Flick" with high priority in your operating system to decrease full encoding time.

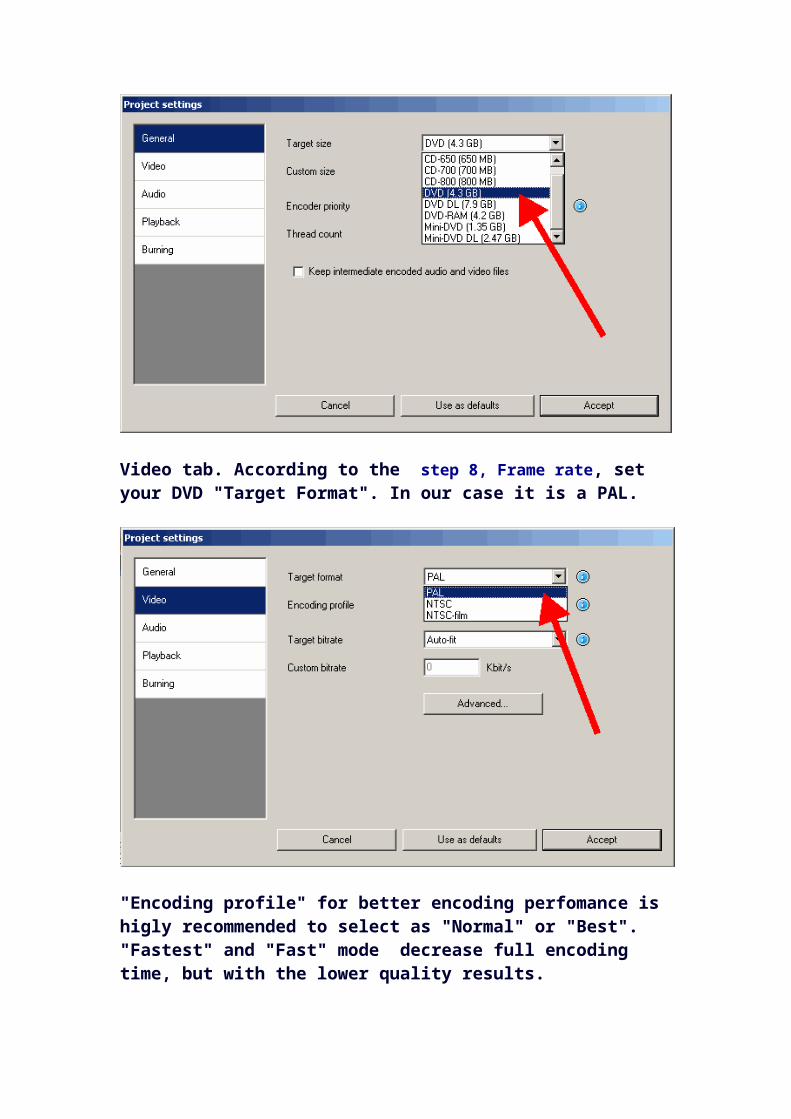
Video tab. According to the step 8, Frame rate, set your DVD "Target Format". In our case it is a PAL.
"Encoding profile" for better encoding perfomance is higly recommended to select as "Normal" or "Best". "Fastest" and "Fast" mode decrease full encoding time, but with the lower quality results.
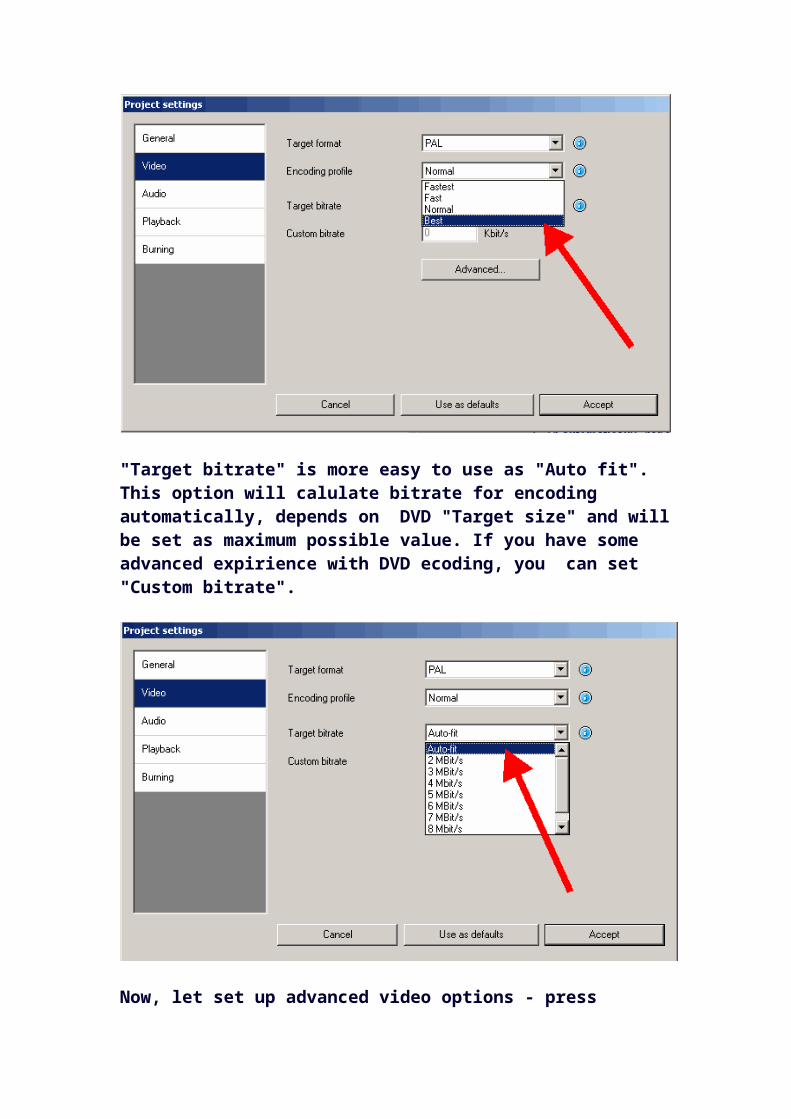
"Target bitrate" is more easy to use as "Auto fit". This option will calulate bitrate for encoding automatically, depends on DVD "Target size" and will be set as maximum possible value. If you have some advanced expirience with DVD ecoding, you can set "Custom bitrate".
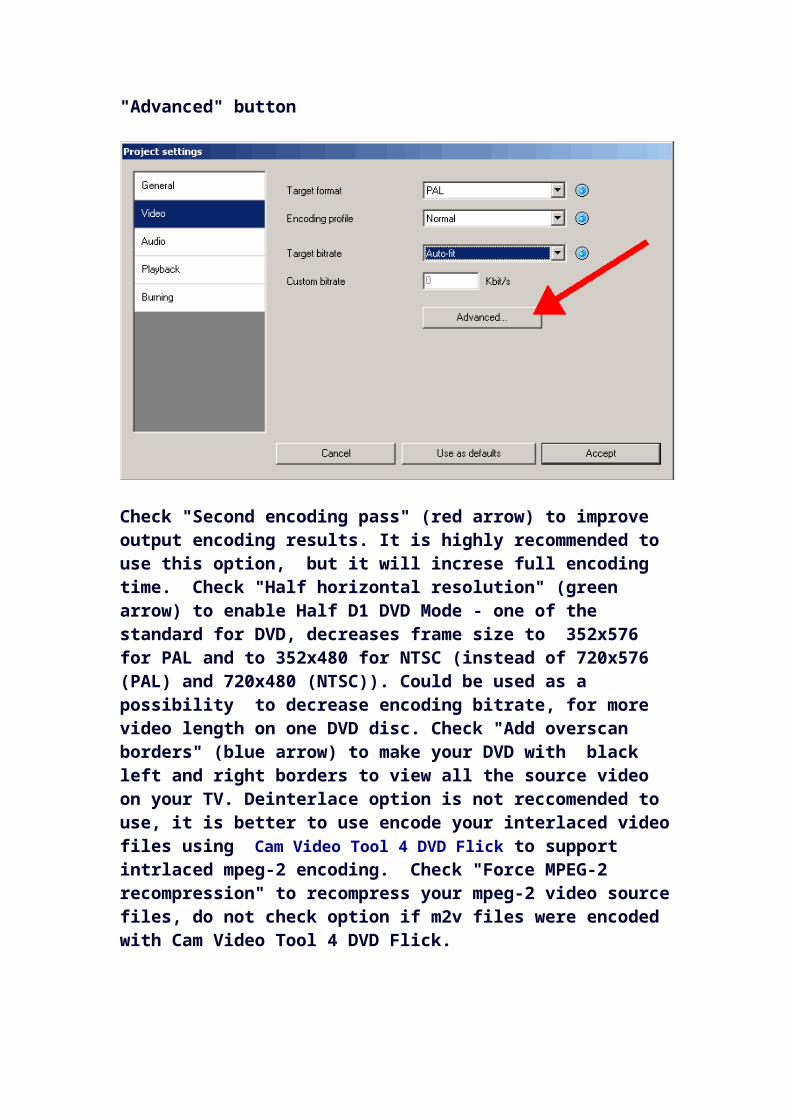
Now, let set up advanced video options - press "Advanced" button
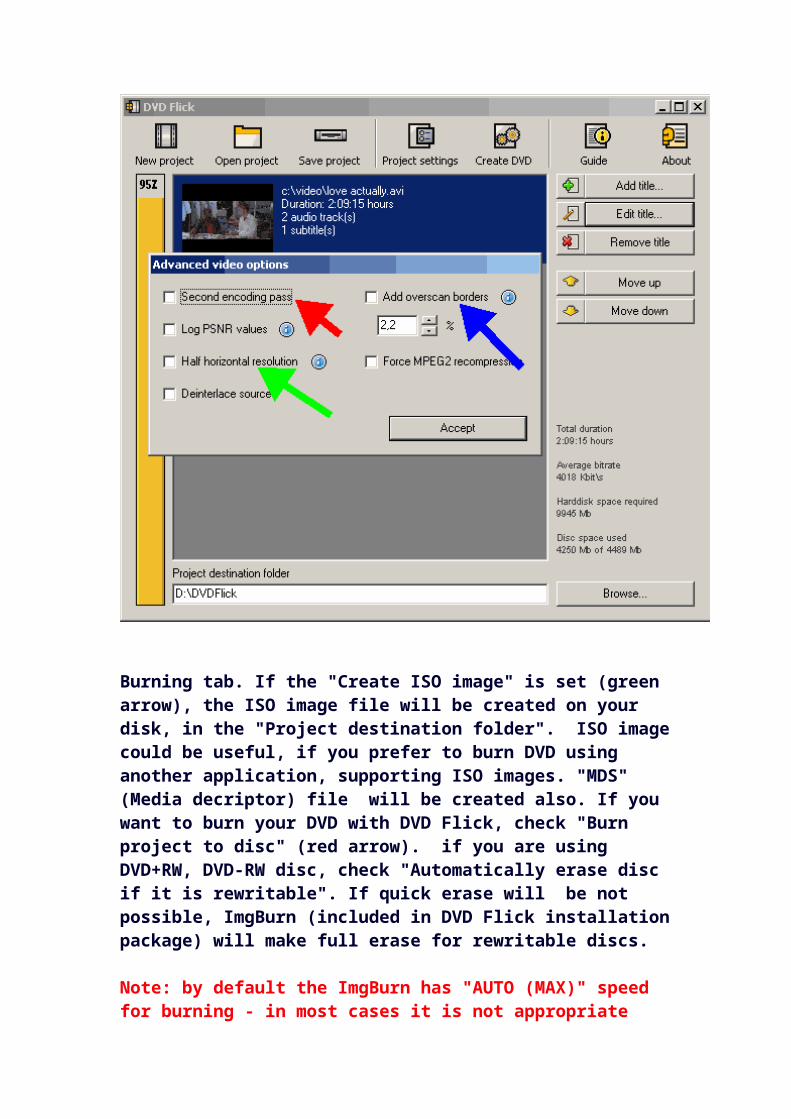
Check "Second encoding pass" (red arrow) to improve output encoding results. It is highly recommended to use this option, but it will increse full encoding time. Check "Half horizontal resolution" (green arrow) to enable Half D1 DVD Mode - one of the standard for DVD, decreases frame size to 352x576 for PAL and to 352x480 for NTSC (instead of 720x576 (PAL) and 720x480 (NTSC)). Could be used as a possibility to decrease encoding bitrate, for more video length on one DVD disc. Check "Add overscan borders" (blue arrow) to make your DVD with black left and right borders to view all the source video on your TV. Deinterlace option is not reccomended to use, it is better to use encode your interlaced video files using Cam Video Tool 4 DVD Flick to support intrlaced mpeg-2 encoding. Check "Force MPEG-2 recompression" to recompress your mpeg-2 video source files, do not check option if m2v files were encoded with Cam Video Tool 4 DVD Flick.
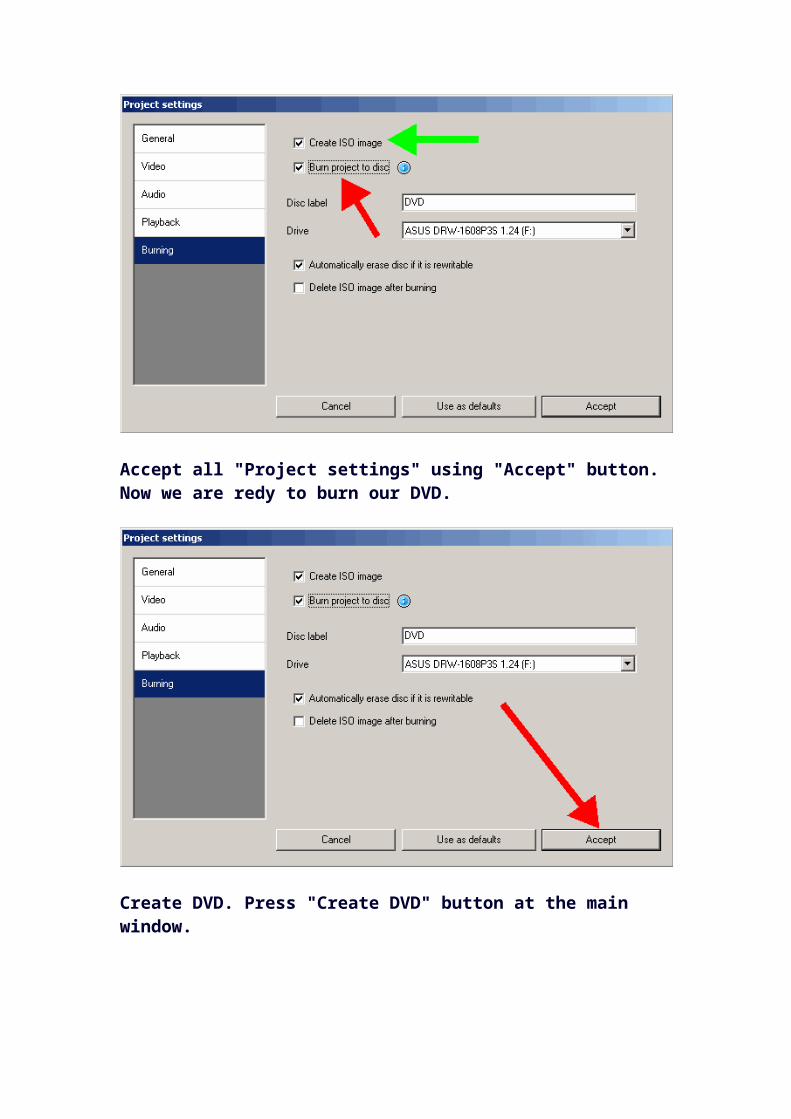
Burning tab. If the "Create ISO image" is set (green arrow), the ISO image file will be created on your disk, in the "Project destination folder". ISO image could be useful, if you prefer to burn DVD using another application, supporting ISO images. "MDS" (Media decriptor) file will be created also. If you want to burn your DVD with DVD Flick, check "Burn project to disc" (red arrow). if you are using DVD+RW, DVD-RW disc, check "Automatically erase disc if it is rewritable". If quick erase will be not possible, ImgBurn (included in DVD Flick installation package) will make full erase for rewritable discs.
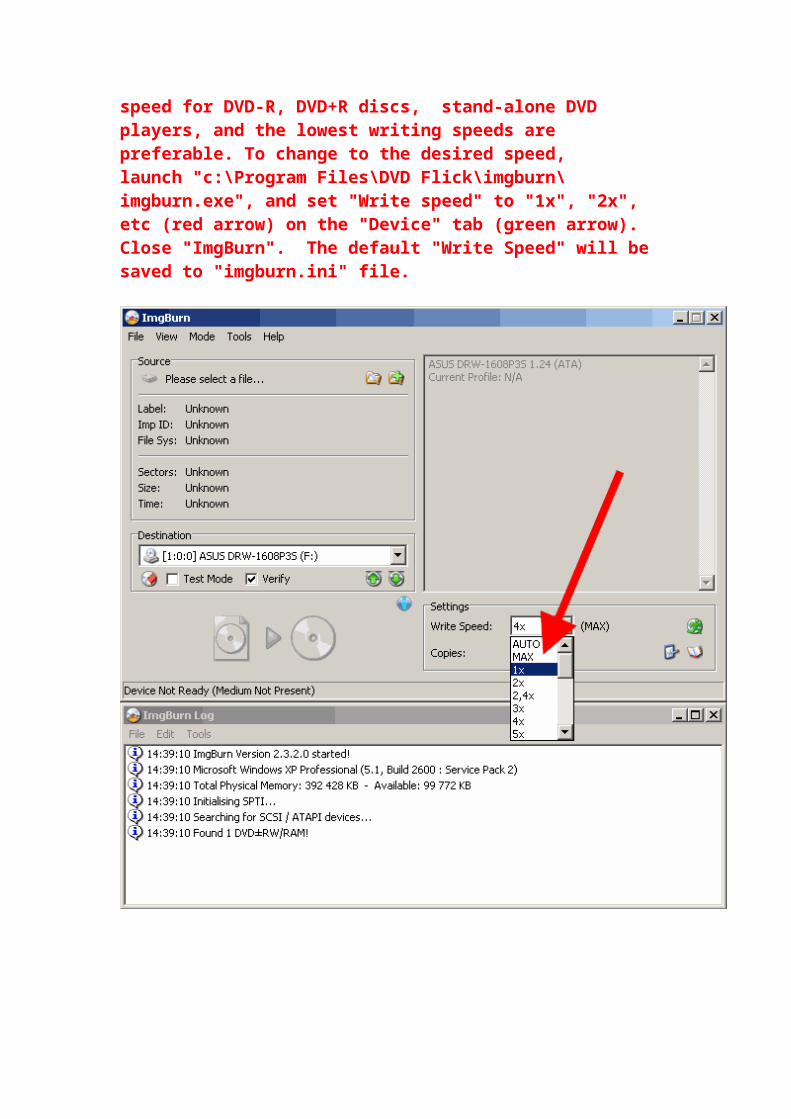
Note: by default the ImgBurn has "AUTO (MAX)" speed for burning - in most cases it is not appropriate speed for DVD-R, DVD+R discs, stand-alone DVD players, and the lowest writing speeds are preferable. To change to the desired speed,launch "c:\Program Files\DVD Flick\imgburn\imgburn.exe", and set "Write speed" to "1x", "2x", etc (red arrow) on the "Device" tab (green arrow). Close "ImgBurn". The default "Write Speed" will be
saved to "imgburn.ini" file.
Accept all "Project settings" using "Accept" button. Now we are redy to burn our DVD.
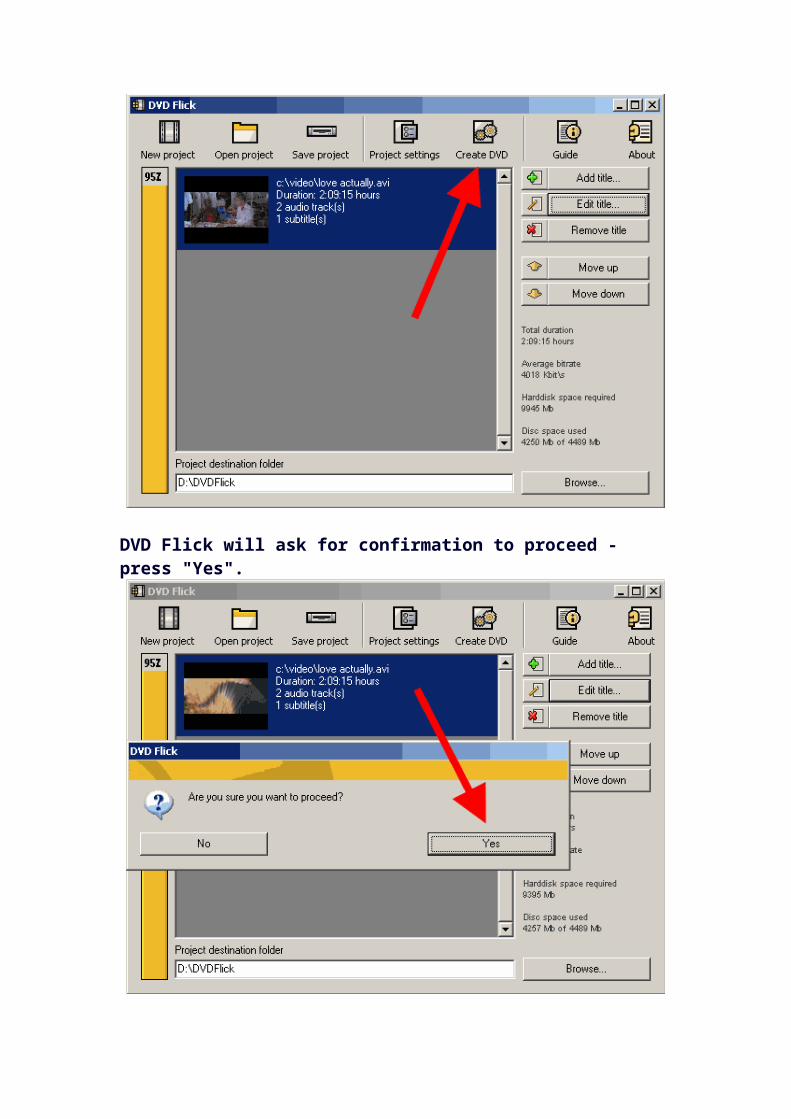
Create DVD. Press "Create DVD" button at the main window.
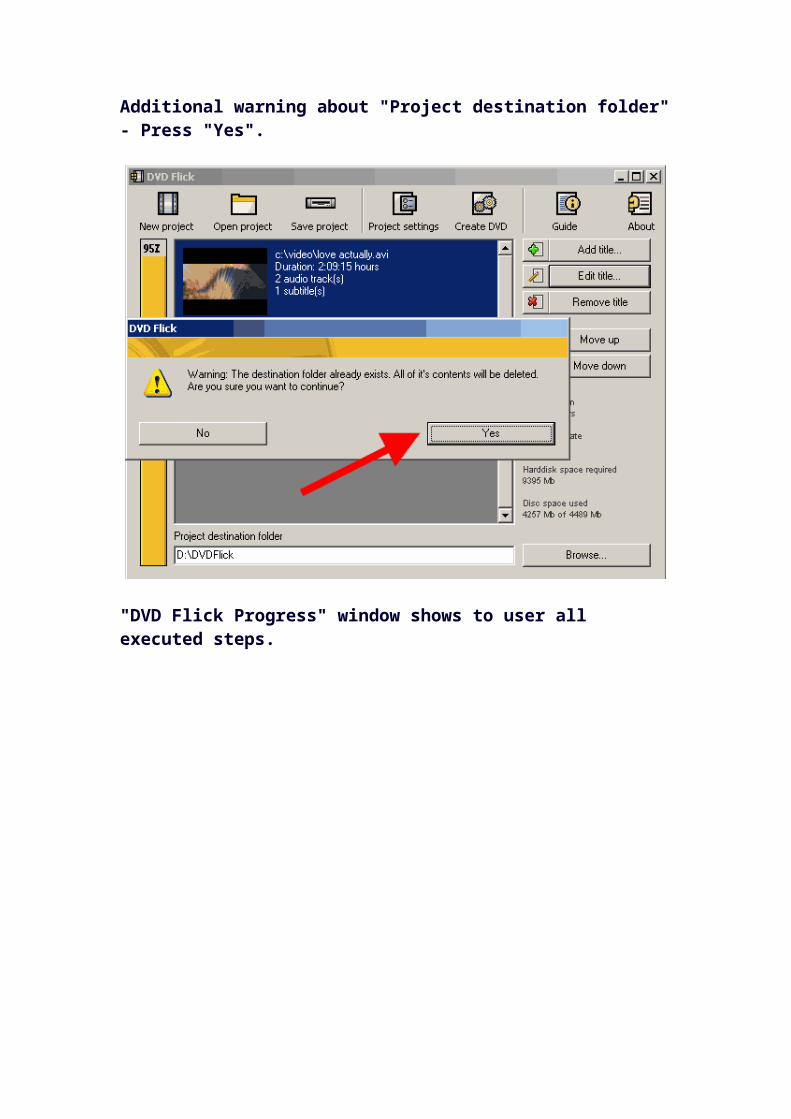
DVD Flick will ask for confirmation to proceed - press "Yes".
Additional warning about "Project destination folder" - Press
"Yes".
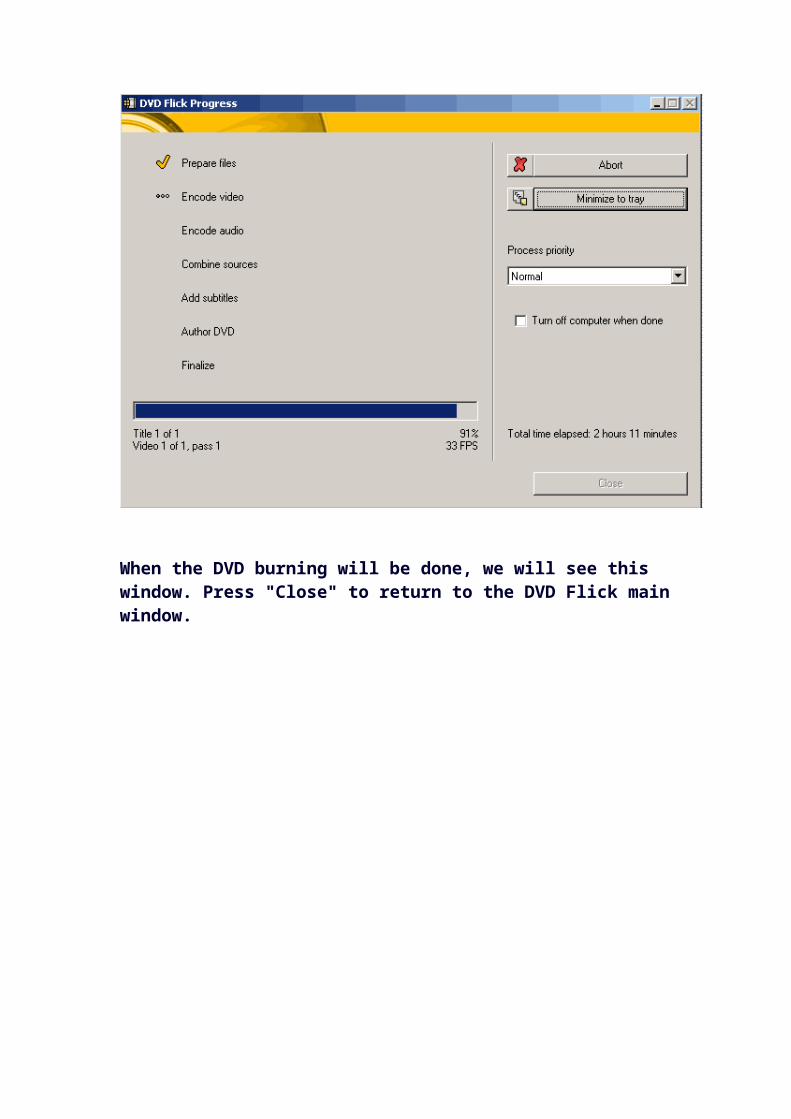
"DVD Flick Progress" window shows to user all executed steps.
When the DVD burning will be done, we will see this window. Press "Close" to return to the DVD Flick main window.
In the main window you can save DVD Flick project to your hard drive.An author of this guide hopes, that this tutorial was useful to understand how this great tool works.
DVD Flick adalah alat all-in-one yang dapat mengkonversi:
AVI ke DVD, FLV ke DVD, HDMOV ke DVD, MKV ke DVD, MJPG ke DVD, MPG ke DVD, M2V ke DVD, MP4 ke DVD, M4V ke DVD, NSV ke DVD, NUT ke DVD, QT ke DVD, MOV ke DVD, RM ke DVD, SMK ke DVD, OGM ke DVD, WMV ke DVD, ASF ke DVD, 3GP ke DVD, 3g2 ke DVD.
DVD Flick mendukung DVD Authoring, ISO image berkreasi, DVD burning juga dalam satu alat. Ini adalah perangkat lunak bebas.
Persyaratan sistem
Sebuah Pentium atau AMD K-6 prosesor. Pentium 3 atau kemudian direkomendasikan, lebih cepat lebih baik.
64 MB RAM fisik bebas, 128 MB atau lebih dianjurkan.
Windows 2000 Professional atau Windows XP (Professional atau Home), Windows Vista
Download versi terbaru dari situs DVD Flick
Cara menggunakan DVD Flick:
1. Buka DVD Flick
2. Tekan "tombol proyek baru" untuk membuat proyek baru Flick DVD
3. Menelusuri hard drive Anda untuk memilih path ke folder, dimana folder DVD yang dihasilkan (AUDIO_TS, VIDEO_TS) akan diselamatkan. Hal ini sangat dianjurkan untuk menggunakan sistim file NTFS di OS Anda, menyebabkan file M2V sementara dalam kebanyakan kasus melebihi batas 4GB untuk sistem file FAT32. Selain itu, tidak menggunakan non-Inggris surat ke jalan browsing, menyebabkan kesalahan dapat terjadi selama proses authoring DVD. "Proyek folder tujuan", seperti dalam contoh kita, "D: \ DVDFlick" akan baik-baik saja
4. Tambahkan judul Anda - pilih file video atau file untuk proyek tersebut. DVD Flick mendukung jenis file video tersebut:
AVI, FLV, HDMOV, MKV, MJPG, MPG, M2V, MP4, M4V, NSV, NUT, QT, MOV, RM, SMK, OGM, WMV, ASF, 3GP, 3G2.
Contoh kita akan menjelaskan proyek dengan file AVI satu, termasuk track audio tambahan Perancis dan sub judul. Bahasa dari track audio dan sub judul bisa apapun, Perancis hanya untuk memahami bagaimana bekerja dengan kemampuan DVD Flick untuk memasukkan track audio tambahan dan sub judul. Jika Anda memiliki file video dari camcorder digital (DV, HDV, DVD) atau ditangkap melalui kartu video sebagai interlaced ke MJPEG, atau HuffYUV, silakan gunakan Cam Video Alat 4 DVD Flick
5. Judul menambahkan. Bar kiri dengan 95% menunjukkan berapa banyak byte yang digunakan pada 4,3 GB DVD kosong disc dengan preferensi default. Persentase tergantung pada ukuran file video yang telah Anda tambahkan dalam langkah panduan sebelumnya.
6. Mengedit judul. Langkah ini akan membantu kita untuk mengetahui apa yang "Pengaturan Proyek" akan dipilih dalam Frame rate langkah 8,. Ini berarti bahwa "Pengaturan Proyek" tergantung pada "sifat Judul". Sekarang ikuti langkah berikutnya.
7. Pengaturan umum untuk "Judul". Pada pemeriksaan tab "Buat bab setiap", memilih 5-120 menit antara bab. Tujuan dari penggunaan pasal ini ke depan / belakang skipping maju selama menonton DVD. Disarankan untuk menggunakan pilihan ini. Dalam contoh kita nilai waktu adalah 10 menit. Alih-alih kasus kami, Anda dapat menggunakan nomor tetap bab - cek "Buat" tombol. Aspek rasio adalah nilai autodetected diterima dari dimensi frame video file, hanya ingat bahwa adalah "Widescreen (16:9)" misalnya kita.
8. Sumber video untuk "Judul" - tab ini memberitahu kita tentang video codec (mpeg4 untuk contoh kita), ukuran frame (576x236), Aspek nilai rasio (Widescreen (16:9)), frame rate (25 FPS) - Frames Per Second . Mari kita tinggal di sini sedikit lebih lama.
Ukuran frame: 576x236 piksel. Mari kita membagi 576-236 = 576/236 = 2,44 (: 1). File akan bw dikodekan sebagai "Widescreen (16:9)" dengan beberapa batas atas dan bawah. Silakan kembali ke tab "General" untuk memeriksa "Widescreen (16:9)" yang sama dalam listbox "Aspek rasio".
Frame rate. Dalam contoh kita itu adalah 25 FPS - framerate standar untuk Format PAL. Periksa daftar bawah:
23.976 FPS - NTSC Format Film
25 FPS - PAL Format
29,97 FPS - NTSC Format
30 FPS - NTSC Format
Reccomendations untuk non-standar
12,5 FPS - PAL Format
15 FPS - NTSC Format
Peringatan! Ingat format untuk file Anda - itu akan menjadi sama "Target Format" pada "Pengaturan Proyek" - langkah 12, tab Video untuk "Pengaturan Proyek".
9. Menambahkan file ke judul ini. Pilihan ini memungkinkan Anda untuk menambahkan file baru atau file ke "Judul". Bisa jadi video tambahan untuk DVD ini, adegan dipotong untuk contoh, dll
Yang penting adalah FPS yang sama untuk file video utama (panah hijau) dan file tambahan (panah merah).
Belajar tentang fitur ini di DVD Flick. Hapus file tambahan.
10. Audio trek tab. Masih disimpan audio tambahan dari para "love_sample.avi". Sangat mudah untuk menghapusnya. Tekan tombol "Edit", kemudian menghapus dari "sumber track Audio" track audio tambahan.
Menambahkan track audio. Seperti yang kita dijelaskan dalam contoh kita kita perlu menambahkan track audio Perancis. Tekan tombol "Add" pada tab "Audio sumber track", pilih file audio dari hard drive, cek di "track audio pilih (s)" baru window track (s) Anda wishh menambahkan. Tekan tombol "Terima". DVD Flick bisa mengekstrak track audio dari semua file video didukung (AVI, FLV, HDMOV, MKV, MJPG, MPG, M2V, MP4, M4V, NSV, NUT, QT, MOV, RM, SMK, OGM, WMV, ASF, 3GP, 3g2), dan juga format file asli audio: AAC, AC3, Flac, MKA, MP3, MP2, MPA, OGG, WAV, WMA
Pilih bahasa untuk track audio tambahan. Pilih track audio - panah hijau, dan kemudian pilih dari bahasa "Track bahasa" listbox "Perancis" - panah merah.
11. Sub judul tab. Seperti yang Anda ingat, kami ingin menambahkan teks bahasa Prancis. Tekan tombol "Add" pada tab "Sub judul", kemudian pilih dari file disk dengan sub judul. DVD Flick mendukung berbagai format sub judul: AQT, JS, RT, SMI, ASS, SRT, SSA, TXT.
Ketika sub judul itu menambahkan, "Inggris" bahasa default. Bu kita ingin mengubah bahasa ke "Perancis". Tekan tombol "Edit" untuk mengubah pengaturan sub judul.
Pilih bahasa yang Anda butuhkan, dalam contoh kita adalah "Perancis". Pengaturan lain adalah untuk font, penempatan ukuran font, dari sub judul. Seperti biasanya, tekan tombol "Terima" untuk menyimpan pengaturan. "Angkatan tampilan" pilihan akan memaksa subtitle menampilkan selama pemutaran, bahkan mereka tidak dipilih dalam menu.
Jika semuanya dibuat benar, kita akan melihat jendela ini dengan bahasa yang berubah untuk sub judul.
Ada tab editing lagi untuk "sifat Judul". Tekan tombol "Terima" untuk menyimpan preferensi.
12. Pengaturan proyek. Pada jendela Flick pers DVD utama tombol "Pengaturan Proyek".
General tab. Pilih "Target ukuran" untuk DVD Anda dari kotak daftar. Nilai default adalah "DVD (4,3 GB)", nilai-nilai default bisa diubah dengan menekan "Gunakan sebagai default" tombol. Dalam kasus kami kami memilih "DVD (4,3 GB)". Jika Anda harus memilih ukuran kustom DVD hanya gulir ke atas kotak daftar dengan nilai "Custom" dan bagian bawah "Custom size" opsi akan diaktifkan untuk mengedit. "Encoder prioritas" memungkinkan Anda untuk menggunakan "DVD Flick" dengan prioritas tinggi pada sistem operasi Anda untuk mengurangi waktu encoding penuh.
Video tab. Menurut tingkat langkah 8, Frame, set DVD "Target Format". Dalam kasus kami itu adalah sebuah PAL.
"Encoding Profil" untuk Perfomance encoding lebih baik higly dianjurkan untuk memilih sebagai "normal" atau "terbaik". "Tercepat" dan "Cepat" mode waktu penurunan encoding penuh, tetapi dengan hasil kualitas yang lebih rendah.
"Bitrate Target" lebih mudah digunakan sebagai "fit Auto". Pilihan ini akan calulate bitrate untuk encoding otomatis, tergantung pada DVD "ukuran Target" dan akan ditetapkan sebagai nilai maksimum yang mungkin. Jika Anda memiliki beberapa expirience maju dengan DVD ecoding, Anda dapat mengatur "bitrate Custom".
Sekarang, mari kita mengatur pilihan video canggih - tekan tombol "Advanced"
Periksa "pass encoding Kedua" (panah merah) untuk meningkatkan hasil output encoding. Hal ini sangat dianjurkan untuk menggunakan pilihan ini, tetapi akan increse waktu encoding penuh. Periksa "Setengah resolusi horizontal" (panah hijau) untuk mengaktifkan D1 Setengah Modus DVD - salah satu standar untuk DVD, mengurangi ukuran frame untuk 352x576 untuk PAL dan NTSC 352x480 untuk (bukan 720x576 (PAL) dan 720x480 (NTSC)). Dapat digunakan sebagai kemungkinan untuk menurunkan bitrate encoding, untuk panjang video lebih pada satu disk DVD. Periksa "Tambah perbatasan overscan" (panah biru) untuk membuat
DVD Anda dengan batas kiri dan kanan hitam untuk melihat semua sumber video di TV Anda. Deinterlace option tidak menyarankan untuk digunakan, lebih baik menggunakan menyandikan file interlaced video Anda menggunakan Cam Video Alat 4 DVD Flick untuk mendukung intrlaced mpeg-2 encoding. Periksa "Angkatan MPEG-2 recompression" untuk Rekompres mpeg-2 file sumber video Anda, jangan centang pilihan jika file M2V yang dikodekan dengan Alat Flick Video Cam 4 DVD.
Pembakaran tab. Jika "Create ISO image" diatur (panah hijau), file gambar ISO akan dibuat pada disk Anda, di "folder tujuan Proyek". Image ISO bisa berguna, jika Anda memilih untuk membakar DVD menggunakan aplikasi lain, mendukung ISO images. "MDS" (Media decriptor) file akan dibuat juga. Jika Anda ingin membakar DVD Anda dengan DVD Flick, periksa "Burn proyek untuk disk" (panah merah). jika Anda menggunakan DVD + RW, DVD-RW disc, ceklist "Automatically menghapus disk jika ditulis ulang". Jika menghapus cepat akan tidak mungkin, ImgBurn (termasuk dalam paket instalasi DVD Flick) akan membuat penuh menghapus cakram ditulis ulang untuk.
Catatan: secara default ImgBurn memiliki "AUTO (MAX)" kecepatan untuk pembakaran - dalam kebanyakan kasus itu tidak sesuai untuk kecepatan DVD-R, DVD + R disc, berdiri sendiri pemutar DVD, dan kecepatan menulis terendah lebih disukai. Untuk mengubah ke kecepatan yang diinginkan,
meluncurkan "c: \ Program Files \ DVD Flick \ ImgBurn \ imgburn.exe", dan set "Menulis kecepatan" untuk "1x", "2x", dll (panah merah) pada tab "Device" (panah hijau). Tutup "ImgBurn". Default "Write Speed" akan disimpan ke file "imgburn.ini".
Terima semua "Pengaturan Proyek" menggunakan "Terima" tombol. Sekarang kita redy untuk membakar DVD kami.
Buat DVD. Tekan "Buat DVD" tombol di jendela utama.
DVD Flick akan meminta konfirmasi untuk melanjutkan - tekan "Yes".
Tambahan peringatan tentang "folder tujuan Project" - Tekan "Ya".
"DVD Flick Progress" jendela menunjukkan kepada pengguna semua langkah dieksekusi.
Ketika DVD burning akan dilakukan, kita akan melihat jendela ini. Tekan "Close" untuk kembali ke jendela utama DVD Flick.
Di jendela utama Anda dapat menyimpan proyek Flick DVD ke hard drive Anda.
Seorang penulis buku ini berharap, bahwa tutorial ini bermanfaat untuk memahami bagaimana ini alat yang hebat bekerja.


![18B [c#6629] DVD DVD PDF 17B DVD DVD PDF ä&b) 1997 2004 ... · 18B [c#6629] DVD DVD PDF 17B DVD DVD PDF ä&b) 1997 2004 2010 1984-1985 2001 2002 2006 2009](https://static.fdocuments.in/doc/165x107/5c670dce09d3f2c14e8cf09a/18b-c6629-dvd-dvd-pdf-17b-dvd-dvd-pdf-aeb-1997-2004-18b-c6629-dvd.jpg)
