Substitution of xanthan gum (xanthomonas campestris), with ...
Detection of Xanthomonas campestris pv. campestris and pv. raphani on Brassica spp. seed
SEPTEMBER 2019
Developed by ISHI-Veg All rights reserved - ©2019 ISF
2
Detection of Xanthomonas campestris pv. campestris and pv. raphani on Brassica spp. seed.
Crop: Brassica spp.
Pathogen(s): Xanthomonas campestris pv. campestris and Xanthomonas campestris pv. raphani
Revision history: Version 6.1, September 2019
PRINCIPLE
Detection of viable Xanthomonas campestris pv. campestris (Xcc) and Xanthomonas campestris pv. raphani (Xcr) bacteria is typically assessed by dilution plating on two semi-selective media (mFS and mCS20ABN). Extraction of bacteria from the surface and the funiculus of the seed is enhanced by soaking. Suspect bacterial colonies are then confirmed by a pathogenicity assay.
A seed extract qPCR assay (SE-qPCR) may be used as a pre-screen. The test is complete if no Xcc or Xcr is detected and the seed lot is considered healthy. However, as qPCR detects both infectious and non-infectious bacterial particles as well as viable and non-viable bacterial DNA, a positive pre-screen SE-qPCR is followed sequentially by dilution plating and a pathogenicity assay to determine the presence of viable and pathogenic Xcc or Xcr.
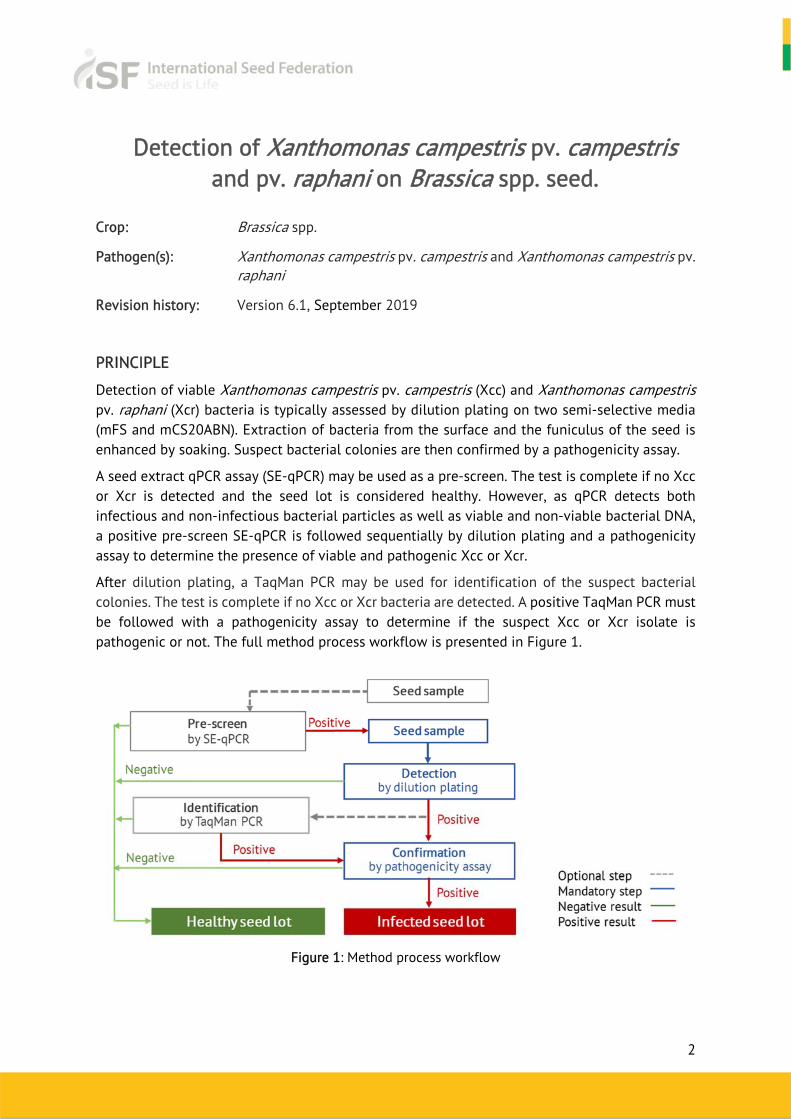
After dilution plating, a TaqMan PCR may be used for identification of the suspect bacterial colonies. The test is complete if no Xcc or Xcr bacteria are detected. A positive TaqMan PCR must be followed with a pathogenicity assay to determine if the suspect Xcc or Xcr isolate is pathogenic or not. The full method process workflow is presented in Figure 1.
Figure 1: Method process workflow
3
METHOD VALIDATION
The test for detecting Xcc and Xcr on Brassica spp. seed is an ISTA Rule (7-019a) (https://www.seedtest.org/en/seed-health-methods-_content---1--1452.html). It is also an NSHS Standard A (https://seedhealth.org/seed-health-testing-methods/).
An optional pre-screen using a bio-PCR assay and gel-based PCRs for suspect colony identification were also validated in previous versions of the method. In this version only the seed extract qPCR and the TaqMan PCR assays, respectively are included in the method.
The method is validated using cabbage seed. The pathogenicity assay was only validated for Xcc and not for Xcr.
RESTRICTIONS ON USE
As the test has been validated only for cabbage seed it is the responsibility of the user to determine empirically if the method detects Xcc and Xcr in other Brassica spp. seed.
This test method is suitable for untreated seed.
This test method has not been validated for seed treated with protective chemicals or biological substances. If a user chooses to test treated seed using this method, it is the responsibility of the user to determine empirically (through analysis, sample spiking, or experimental comparisons) whether the protective chemicals or biological substances have an effect on the method results.
This test method is not suitable for seed treated using physical techniques (such as hot water) with the aim of disinfestation/disinfection. A test for detecting Xcc and Xcr in disinfested/disinfected Brassica spp. seed is available as ISTA Rule (7-019b) (https://www.seedtest.org/en/seed-health-methods-_content---1--1452.html).
METHOD EXECUTION
To ensure process standardization and valid results, it is strongly recommended to follow the best practices developed by ISHI-Veg for PCR and Dilution Plating Assays in Seed Health Tests (see https://www.worldseed.org/our-work/phytosanitary-matters/seed-health/ishi-veg-method-development/).
SAMPLE AND SUB-SAMPLE SIZE
The recommended minimum sample size is 30,000 seeds with a maximum sub-sample size of 10,000 seeds.
4
Protocol for detecting Xanthomonas campestris pv. campestris and pv.
raphani on Brassica spp. seed
An extended version of this protocol is available on ISTA’s website: ISTA 7-019a: Detection of Xanthomonas campestris pv. campestris in Brassica spp. seed
(https://www.seedtest.org/en/seed-health-methods-_content---1--1452.html).
SAMPLE PREPARATION Material
Conical flasks or equivalent Orbital shaker
0.85% NaCl (w/v) with 0.02% Tween™ 20 (v/v) added after autoclaving
1. Extraction
1.1. Suspend each subsample of seeds in pre-chilled (2–4°C) sterile 0.85% (w/v) NaCl with 0.02% (v/v) Tween™ 20 in a conical flask or equivalent. The volume of NaCl should be adjusted according to the number of seeds used (use 10 mL of buffer for 1,000 seeds).
1.2. Shake on an orbital shaker set at 100–125 rpm for 2.5 h at room temperature (20–25°C).
1.3. Shake flasks to mix prior to further processing.
1.4. Proceed with the Seed-Extract qPCR or dilution plating.
SEED-EXTRACT qPCR Material
TaqMan PCR mix, primers and equipment Controls
DNA isolation kit e.g. Qiagen DNeasy Blood and Tissue kit Centrifuge
Table 1. Controls
Positive Extraction Control (PEC) A. cattleyae OR A. citrulli spike
Internal Amplification Control (IAC) A. cattleyae OR A. citrulli spike
Negative Process Control (NPC) Seed extract from healthy seeds or buffer
Positive Amplification Control 1 (PAC1) Xcc DNA
Positive Amplification Control 2 (PAC2) Xcr DNA
Non Template Control (NTC) PCR reaction mix with water
Positive Process Control (PPC) Positive seed sample
5
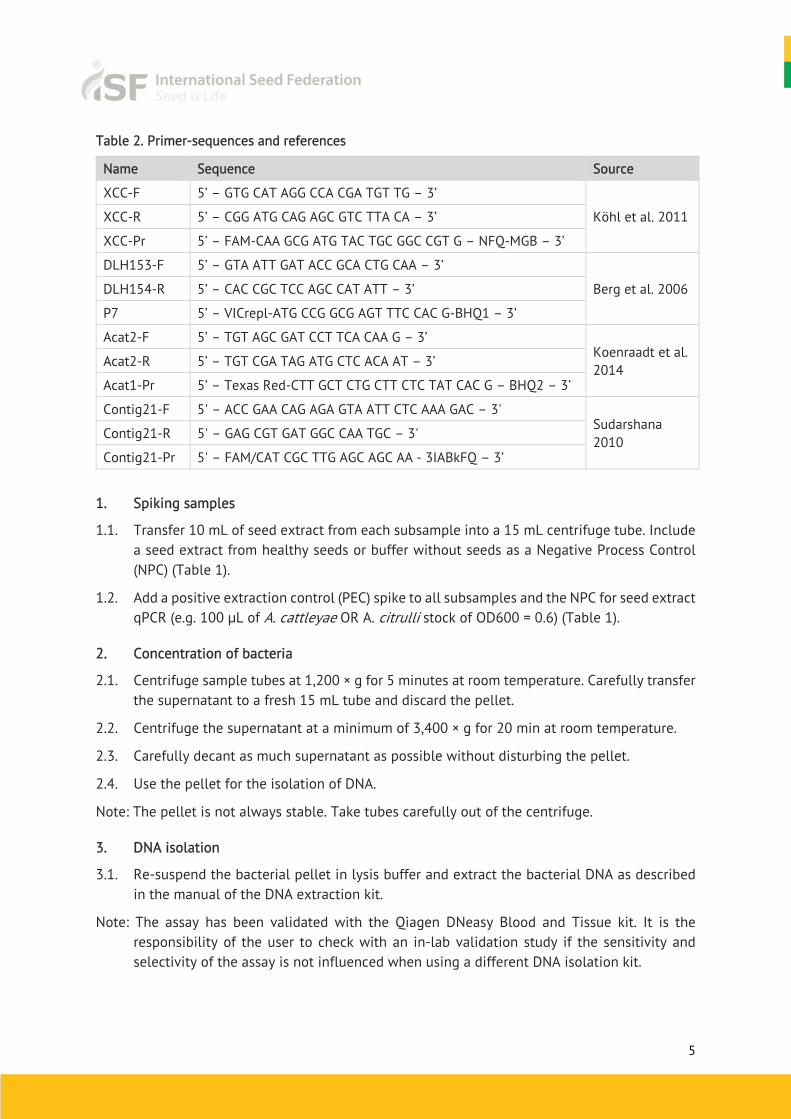
Table 2. Primer-sequences and references
Name Sequence Source
XCC-F 5’ – GTG CAT AGG CCA CGA TGT TG – 3’
Köhl et al. 2011 XCC-R 5’ – CGG ATG CAG AGC GTC TTA CA – 3’
XCC-Pr 5’ – FAM-CAA GCG ATG TAC TGC GGC CGT G – NFQ-MGB – 3’
DLH153-F 5’ – GTA ATT GAT ACC GCA CTG CAA – 3’
Berg et al. 2006 DLH154-R 5’ – CAC CGC TCC AGC CAT ATT – 3’
P7 5’ – VICrepl-ATG CCG GCG AGT TTC CAC G-BHQ1 – 3’
Acat2-F 5’ – TGT AGC GAT CCT TCA CAA G – 3’ Koenraadt et al. 2014
Acat2-R 5’ – TGT CGA TAG ATG CTC ACA AT – 3’
Acat1-Pr 5’ – Texas Red-CTT GCT CTG CTT CTC TAT CAC G – BHQ2 – 3’
Contig21-F 5' – ACC GAA CAG AGA GTA ATT CTC AAA GAC – 3' Sudarshana 2010
Contig21-R 5' – GAG CGT GAT GGC CAA TGC – 3'
Contig21-Pr 5' – FAM/CAT CGC TTG AGC AGC AA - 3IABkFQ – 3’
1. Spiking samples
1.1. Transfer 10 mL of seed extract from each subsample into a 15 mL centrifuge tube. Include a seed extract from healthy seeds or buffer without seeds as a Negative Process Control (NPC) (Table 1).
1.2. Add a positive extraction control (PEC) spike to all subsamples and the NPC for seed extract qPCR (e.g. 100 μL of A. cattleyae OR A. citrulli stock of OD600 = 0.6) (Table 1).
2. Concentration of bacteria
2.1. Centrifuge sample tubes at 1,200 × g for 5 minutes at room temperature. Carefully transfer the supernatant to a fresh 15 mL tube and discard the pellet.
2.2. Centrifuge the supernatant at a minimum of 3,400 × g for 20 min at room temperature.
2.3. Carefully decant as much supernatant as possible without disturbing the pellet.
2.4. Use the pellet for the isolation of DNA.
Note: The pellet is not always stable. Take tubes carefully out of the centrifuge.
3. DNA isolation
3.1. Re-suspend the bacterial pellet in lysis buffer and extract the bacterial DNA as described in the manual of the DNA extraction kit.
Note: The assay has been validated with the Qiagen DNeasy Blood and Tissue kit. It is the responsibility of the user to check with an in-lab validation study if the sensitivity and selectivity of the assay is not influenced when using a different DNA isolation kit.
6
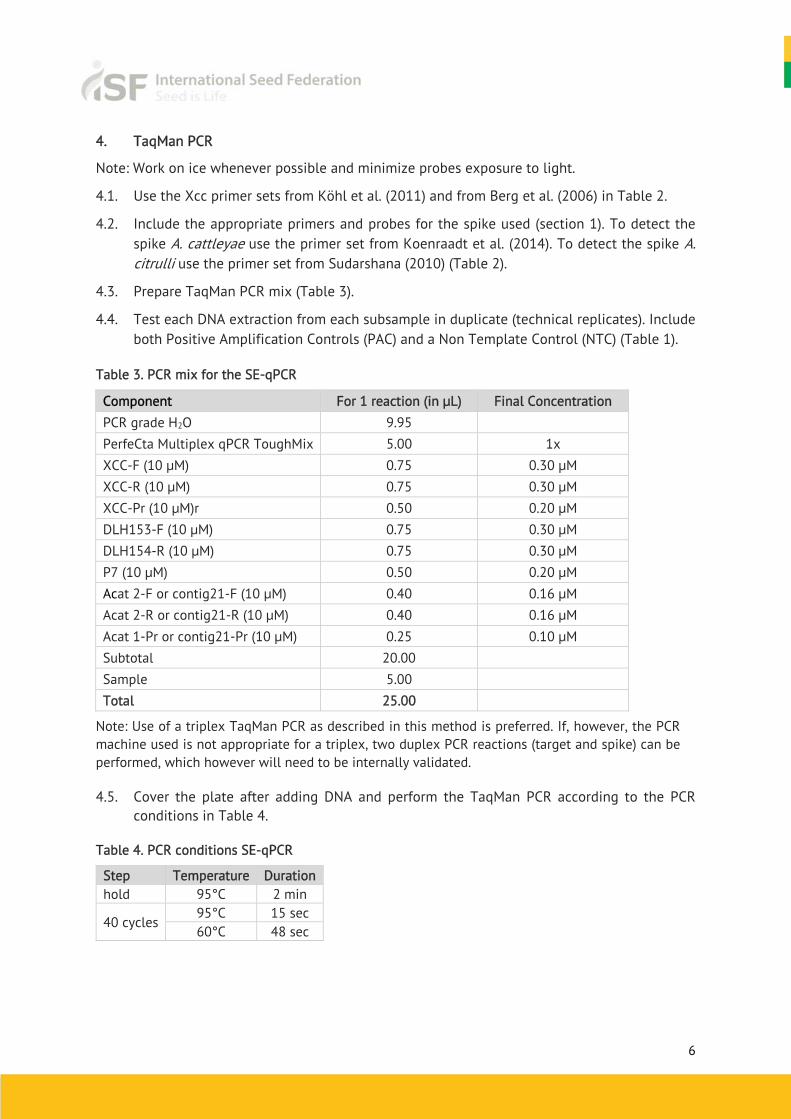
4. TaqMan PCR
Note: Work on ice whenever possible and minimize probes exposure to light.
4.1. Use the Xcc primer sets from Köhl et al. (2011) and from Berg et al. (2006) in Table 2.
4.2. Include the appropriate primers and probes for the spike used (section 1). To detect the spike A. cattleyae use the primer set from Koenraadt et al. (2014). To detect the spike A. citrulli use the primer set from Sudarshana (2010) (Table 2).
4.3. Prepare TaqMan PCR mix (Table 3).
4.4. Test each DNA extraction from each subsample in duplicate (technical replicates). Include both Positive Amplification Controls (PAC) and a Non Template Control (NTC) (Table 1).
Table 3. PCR mix for the SE-qPCR
Component For 1 reaction (in μL) Final Concentration PCR grade H2O 9.95 PerfeCta Multiplex qPCR ToughMix 5.00 1x XCC-F (10 μM) 0.75 0.30 μM XCC-R (10 μM) 0.75 0.30 μM XCC-Pr (10 μM)r 0.50 0.20 μM DLH153-F (10 μM) 0.75 0.30 μM DLH154-R (10 μM) 0.75 0.30 μM P7 (10 μM) 0.50 0.20 μM Acat 2-F or contig21-F (10 μM) 0.40 0.16 μM Acat 2-R or contig21-R (10 μM) 0.40 0.16 μM Acat 1-Pr or contig21-Pr (10 μM) 0.25 0.10 μM Subtotal 20.00 Sample 5.00 Total 25.00
Note: Use of a triplex TaqMan PCR as described in this method is preferred. If, however, the PCR machine used is not appropriate for a triplex, two duplex PCR reactions (target and spike) can be performed, which however will need to be internally validated.
4.5. Cover the plate after adding DNA and perform the TaqMan PCR according to the PCR conditions in Table 4.
Table 4. PCR conditions SE-qPCR
Step Temperature Duration hold 95°C 2 min
40 cycles 95°C 15 sec 60°C 48 sec
7
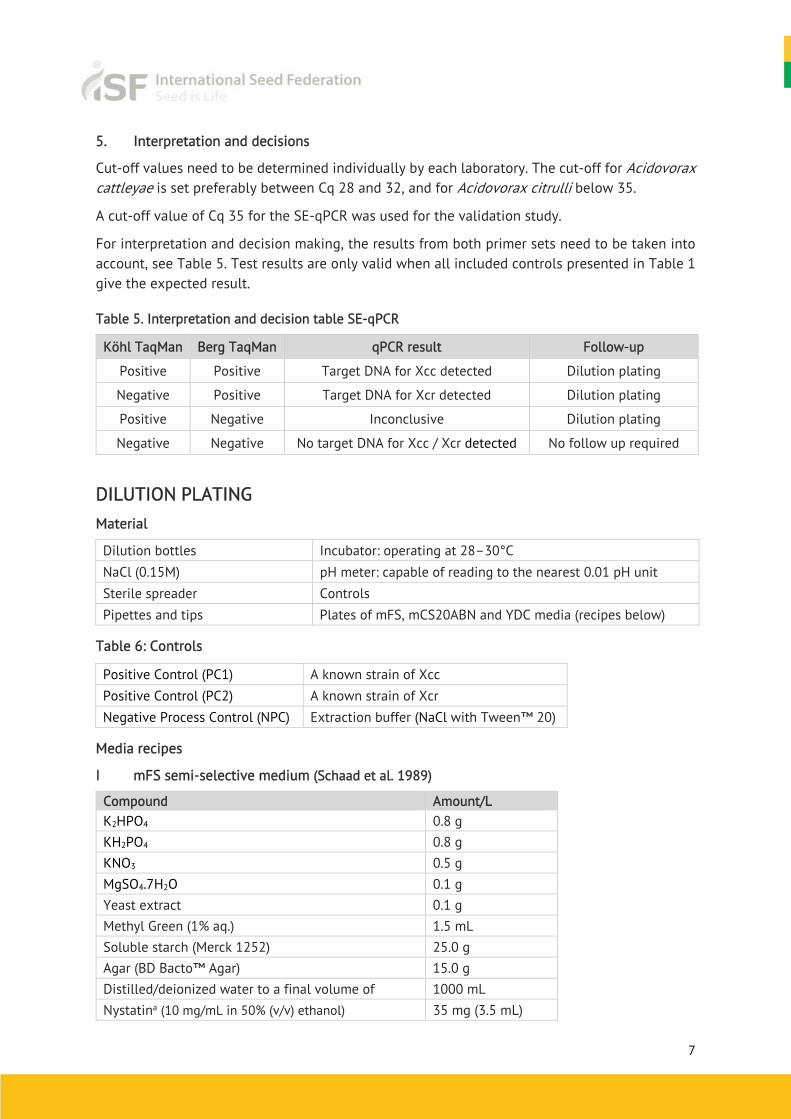
5. Interpretation and decisions
Cut-off values need to be determined individually by each laboratory. The cut-off for Acidovorax cattleyae is set preferably between Cq 28 and 32, and for Acidovorax citrulli below 35.
A cut-off value of Cq 35 for the SE-qPCR was used for the validation study.
For interpretation and decision making, the results from both primer sets need to be taken into account, see Table 5. Test results are only valid when all included controls presented in Table 1 give the expected result.
Table 5. Interpretation and decision table SE-qPCR
Köhl TaqMan Berg TaqMan qPCR result Follow-up
Positive Positive Target DNA for Xcc detected Dilution plating
Negative Positive Target DNA for Xcr detected Dilution plating
Positive Negative Inconclusive Dilution plating
Negative Negative No target DNA for Xcc / Xcr detected No follow up required
DILUTION PLATING Material
Dilution bottles Incubator: operating at 28–30°C NaCl (0.15M) pH meter: capable of reading to the nearest 0.01 pH unit Sterile spreader Controls Pipettes and tips Plates of mFS, mCS20ABN and YDC media (recipes below)
Table 6: Controls
Positive Control (PC1) A known strain of Xcc Positive Control (PC2) A known strain of Xcr Negative Process Control (NPC) Extraction buffer (NaCl with Tween™ 20)
Media recipes
I mFS semi-selective medium (Schaad et al. 1989)
Compound Amount/L K2HPO4 0.8 g KH2PO4 0.8 g KNO3 0.5 g MgSO4.7H2O 0.1 g Yeast extract 0.1 g Methyl Green (1% aq.) 1.5 mL Soluble starch (Merck 1252) 25.0 g Agar (BD Bacto™ Agar) 15.0 g Distilled/deionized water to a final volume of 1000 mL Nystatina (10 mg/mL in 50% (v/v) ethanol) 35 mg (3.5 mL)
8
Compound Amount/L D-Methioninea (1 mg/mL in 50% (v/v) ethanol) 3 mg (3.0 mL) Pyridoxine HCla (1 mg/mL in 50% (v/v) ethanol) 1 mg (1 mL) Cephalexina (20 mg/mL in 50% (v/v) ethanol) 50 mg (2.5 mL) Trimethoprima (10 mg/mL in 70% (v/v) ethanol) 30 mg (3 mL)
a Added after autoclaving.
II mCS20ABN semi-selective medium
Compound Amount/L Soya peptone 2.0 g Tryptone (BD Bacto™ Tryptone) 2.0 g KH2PO4 2.8 g (NH4)2HPO4 0.8 g MgSO4.7H2O 0.4 g L-Glutamine 6.0 g L-Histidine 1.0 g D-Glucose (dextrose) 1.0 g Soluble starch (Merck 1252)(CCP) 25.0 g Agar (BD Bacto™ Agar) 18.0 g Distilled/deionized water to a final volume of 1000 mL Nystatina (10 mg/mL in 50% (v/v) ethanol) 35 mg (3.5 mL) Neomycin sulphatea (20 mg/mL in distilled/ultra-pure water) 40 mg (2.0 mL) Bacitracina (50 mg/mL in 50% (v/v) ethanol) 100 mg (2.0 mL)
a Added after autoclaving
Preparation
1. Weigh all ingredients, except the antibiotics, pyridoxine-HCl and D-methionine.
Note: For starch hydrolysis the source of starch used in the selective media is critical. Verify that each new batch of starch gives clear zones of hydrolysis with reference cultures of Xcc.
2. Dissolve them in a suitable container in distilled/ultra-pure water.
3. Adjust pH to 6.5, if necessary.
4. Autoclave at 15 psi for 15 min at 121°C.
5. Prepare antibiotics, pyridoxine-HCl and D-methionine solutions, and filter sterilize as appropriate.
Note: Antibiotics stock solutions and other supplements prepared in distilled/de-ionized water must be sterilized using a 0.2 μm bacterial filter. Alternatively, add the antibiotic powder to the autoclaved distilled/de-ionized water. Solutions prepared in ethanol need no sterilization.
6. Allow medium to cool to approx. 50°C prior to adding antibiotics, pyridoxine-HCl and D-methionine solutions.
9
7. Mix the molten medium thoroughly but gently to avoid air bubbles and pour plates (18 mL per 90 mm plate).
8. Leave plates to cool down and dry under sterile conditions.
Storage of prepared plates
Store inverted plates in polythene bags at 4°C. Antibiotic activity will drop during storage, and needs to be checked at the moment of use.
Depending on the source of starch, pre-storage of plates in the refrigerator (4°C) for at least four days before use may result in more easily visible zones of starch hydrolysis.
III Yeast dextrose chalk (YDC) agar (Wilson et al. 1967)
Compound Amount/L
Agar (BD Bacto™ Agar) 15.0 g
Yeast extract 10.0 g
CaCO3 (light powder) 20.0 g
D-Glucose (dextrose) 20.0 g
Deionized water to a final volume of 1000 mL
Preparation
1. Weigh all ingredients and put them into a suitable oversized container (e.g. 250 mL of medium in a 500 mL bottle/flask) to allow swirling of the medium just before pouring.
2. Dissolve in 1,000 mL of deionized water by steaming the mix.
3. Autoclave at 15 psi for 15 min at 121°C and allow the medium to cool to approx. 50°C.
4. Swirl the bottle/flask to ensure an even distribution of CaCO3 and avoid air bubbles. Pour 22 mL on to each 90 mm plate.
5. Leave plates to cool down and dry under sterile conditions.
Storage of prepared plates
Store inverted plates in polythene bags at room temperature. Prepared plates can be stored for several months provided they do not dry out.
1. Dilution and plating
1.1. Prepare two serial ten-fold dilutions from the seed extract by i.) Pipetting 0.5 mL of the extract into 4.5 mL of sterile NaCl to give a 101 dilution and ii.) Pipetting 0.5 mL of the 101
dilution into 4.5 mL of sterile NaCl to give a 102 dilution. Vortex well all dilutions.
1.2. Pipette 100 μL of each dilution and the undiluted seed extract onto plates of the mFS and mCS20ABN selective media and spread over the surface.
1.3. Incubate plates at 28–30°C and examine after 3–4 days.
2. Positive control (culture or reference material)
10
2.1. Prepare a suspension of a known Xcc and Xcr strain in sterile NaCl or reconstitute standardized reference material according to the supplier’s instructions.
Note: Xcc and Xcr cannot be distinguished by their colony morphology.
2.2. Dilute sufficiently to obtain dilutions containing approx. 102 to 104 CFU/mL.
2.3. Pipette 100 μL of appropriate dilutions onto plates of both semi-selective media (mFS, mCS20ABN) and spread over the surface.
2.4. Incubate plates with the sample plates.
3. Sterility check (Negative Process Control)
3.1. Prepare a dilution series from a sample of the extraction medium (e.g. NaCl plus Tween™ 20), without seeds. Plate each dilution on the two semi-selective media, spread over the surface and incubate (as in 1.2. and 1.3.).
4. Examination of the plates
4.1. Examine the sterility check and positive control plates. There should be no growth on dilution plates being used as a sterility check. The number of bacteria on the dilution plates should be consistent with the dilution, i.e. it should decrease approx. ten-fold with each dilution.
4.2. Examine the sample plates for the presence of typical Xcc / Xcr colonies by comparing them with the positive control plates. Dilution plates prepared from the positive control isolate or reference material, should give single colonies with typical morphology. The numbers of colonies on dilution plates prepared from the positive control isolate or reference material should be similar on both media.
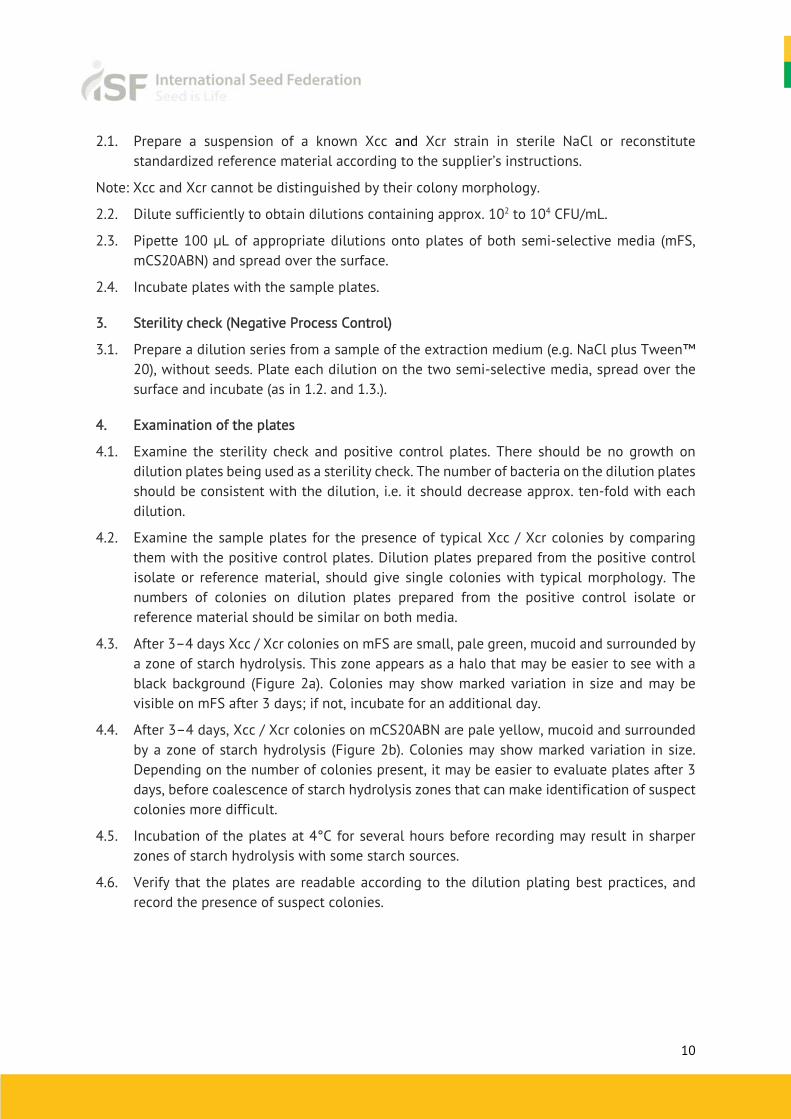
4.3. After 3–4 days Xcc / Xcr colonies on mFS are small, pale green, mucoid and surrounded by a zone of starch hydrolysis. This zone appears as a halo that may be easier to see with a black background (Figure 2a). Colonies may show marked variation in size and may be visible on mFS after 3 days; if not, incubate for an additional day.
4.4. After 3–4 days, Xcc / Xcr colonies on mCS20ABN are pale yellow, mucoid and surrounded by a zone of starch hydrolysis (Figure 2b). Colonies may show marked variation in size. Depending on the number of colonies present, it may be easier to evaluate plates after 3 days, before coalescence of starch hydrolysis zones that can make identification of suspect colonies more difficult.
4.5. Incubation of the plates at 4°C for several hours before recording may result in sharper zones of starch hydrolysis with some starch sources.
4.6. Verify that the plates are readable according to the dilution plating best practices, and record the presence of suspect colonies.
11
Figure 2. Plates of mFS (a) and mCS20ABN (b) after 5 d of incubation at 28°C showing typical colonies
of Xcc surrounded by zones of starch hydrolysis
5. Confirmation identification of suspect colonies
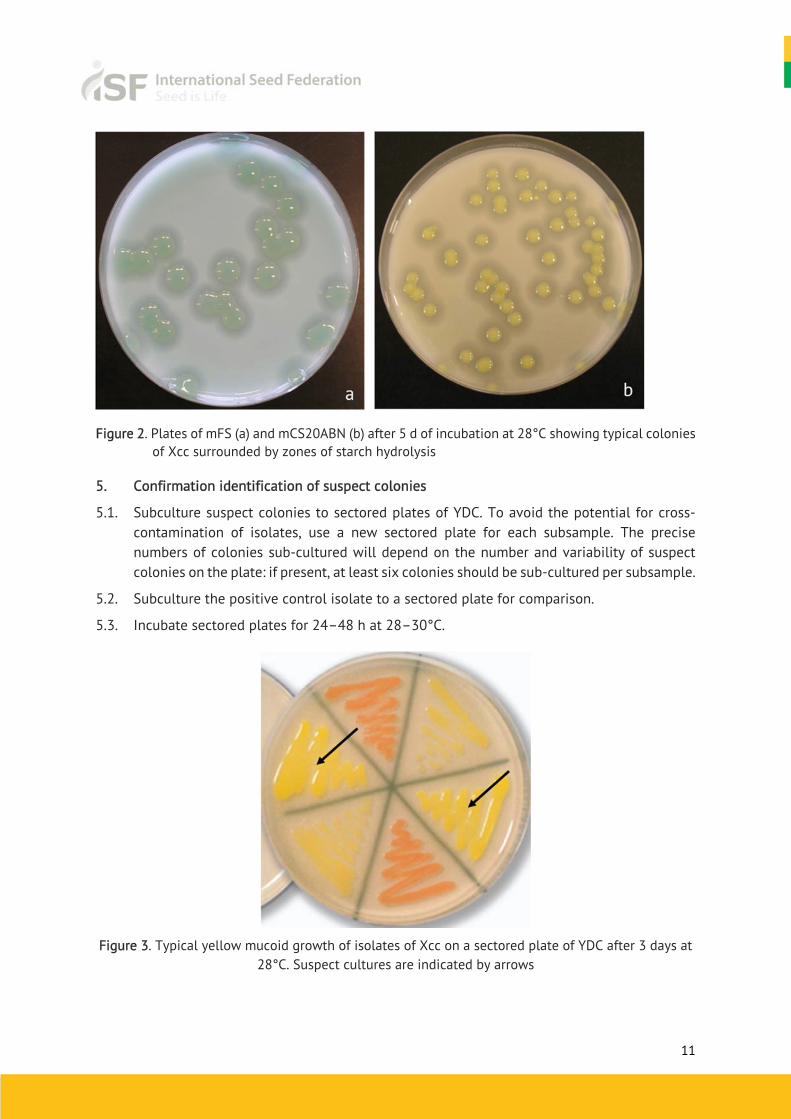
5.1. Subculture suspect colonies to sectored plates of YDC. To avoid the potential for cross-contamination of isolates, use a new sectored plate for each subsample. The precise numbers of colonies sub-cultured will depend on the number and variability of suspect colonies on the plate: if present, at least six colonies should be sub-cultured per subsample.
5.2. Subculture the positive control isolate to a sectored plate for comparison.
5.3. Incubate sectored plates for 24–48 h at 28–30°C.
Figure 3. Typical yellow mucoid growth of isolates of Xcc on a sectored plate of YDC after 3 days at
28°C. Suspect cultures are indicated by arrows
12
5.4. Compare the appearance of growth with the positive control. On YDC, Xcc / Xcr colonies are pale yellow and mucoid / fluidal (Figure 3). The positive control isolate(s) or reference material should give colonies with typical morphology on YDC.
5.5. The identity of the isolates can be confirmed by the TaqMan PCR. The pathogenicity of the isolates should be confirmed using known susceptible Brassica seedlings of known susceptibility by pathogenicity assay.
Note: As non-pathogenic isolates may also be present in seed lots it is essential to subculture at least the minimum number of suspect colonies specified (six per subsample), and to test the pathogenicity of all Xanthomonas-like sub-cultured isolates by a pathogenicity or PCR assay.
5.6. Record results for each colony sub-cultured
TAQMAN PCR FOR IDENTIFICATION OF SUSPECT COLONIES
Material
Controls NaOH (0.5M)
TaqMan PCR mix, primers and equipment Tris-HCl (1M) pH 8
NaCl (0.15M) Centrifuge
Optical Density (OD) meter
Table 7. Primer-sequences and references
Name Sequence Source
WU-F 5’ – CAA CGC GAA GAA CCT TAC C – 3´
Wu et al. 2008
WU-R 5’ – ACG TCA TCC CCA CCT TCC – 3´
WU-P1 5’ – TEXAS RED – ACG ACA ACC ATG CAC CAC CTG – BHQ2 – 3´
WU-P2 5´ – TEXAS RED – ACG ACA GCC ATG CAG CAC CT – BHQ2 – 3´
Table 8. Controls
Positive Process Control 1 (PPC1) Freshly prepared suspension of Xcc
Positive Process Control 2 (PPC2) Freshly prepared suspension of Xcr
Negative Process Control (NPC) Freshly prepared suspension of non-target colony
Internal Amplification Control (IAC) Universal bacterial primers (Wu et al. 2008)
Non Template Control (NTC) Nucleic acid-free water
Buffers
I NaCl 0.15M
Compound Amount/L Amount/500 mL
Sodium chloride (NaCl) 8.5 g 4.25 g
Distilled/de-ionized water 1000 mL 500 mL
13
Preparation
1. Weigh all the ingredients and dissolve them in 1,000 mL (or 500 mL) of distilled/de-ionized water.
2. Dispense the mix into appropriate containers and autoclave at 15 psi for 15 min at 121°C.
3. For extraction of seeds, add 20 μL of sterile Tween™ 20 per 100 mL after autoclaving.
II NaOH 0.5M
Compound Amount/L
NaOH 20 g
Distilled/de-ionized water 1000 mL
Preparation
1. Weigh NaOH and dissolve it in 1,000 mL distilled/de-ionized water.
2. Dispense the mix into appropriate containers and autoclave at 15 psi for 15 min at 121°C.
Storage for all buffers
Provided containers are tightly closed, the buffers may be stored at room temperature for several months before use.
1. DNA isolation
The template DNA from single colonies for qPCR can be obtained by several means. The method presented here was used for the validation of this protocol.
1.1. Make a slightly turbid cell suspension (OD600 nm approximately 0.05) in 1.0 mL sterile NaCl from the suspected cultures on YDC medium and the positive controls (Table 8). In addition, a non-suspect isolate should be used as a negative process control (NPC).
1.2. Centrifuge bacterial suspensions at 8,000 rpm for 5 min at room temperature. Discard the supernatant and re-suspend the pellet with 500 μL of 0.5 M NaOH.
1.3. Incubate for 10 min at 100°C.
1.4. Suspensions can be stored at –20°C until identification.
2. TaqMan PCR
2.1. Use the Xcc specific pair primers and probes from Köhl et al. (2011) and from Berg et al. (2006) (Table 2).
2.2. Use the universal primers and probes from Wu et al. (2008) (Table 7) to validate the PCR reaction.
2.3. Prepare the reaction mixture (Table 9 and 10 for duplex reaction).
14
Table 9. PCR mix TaqMan PCR Berg / Wu duplex
Component For 1 reaction (in μL) Final concentration
DLH153 (10 μM) 1.25 0.5 μM
DLH154 (10 μM) 1.25 0.5 μM
P7 (10 μM, FAM) 0.50 0.2 μM
Wu-F (10μM) 0.50 0.2 μM
Wu-R (10μM) 0.50 0.2 μM
Wu-P1 (TexRed, 10μM) 0.50 0.2 μM
Wu-P2 (TexRed, 10μM) 0.50 0.2 μM
PerfeCta multiplex tough mix (5x)* 5.00 1x
PCR grade H2O 10.00
Template DNA 5.00
Total 25.00
Table 10. PCR mix TaqMan PCR Köhl / Wu duplex
Component For 1 reaction (in μL) Final concentration
XCC-F (10 μM) 0.5 0.2 μM
XCC-R (10 μM) 0.5 0.2 μM
XCC-Pr (10 μM, Vic) 0.5 0.2 μM
Wu-F (10μM) 0.5 0.2 μM
Wu-R (10μM) 0.5 0.2 μM
Wu-P1 (TexRed, 10μM) 0.5 0.2 μM
Wu-P2 (TexRed, 10μM) 0.5 0.2 μM
PerfeCta multiplex tough mix (5x)* 5.0 1x
PCR grade H2O 11.5
Template DNA 5.0
Total 25.0
Note: make sure that the template DNA is at room temperature when added to the mix to prevent temperature linked chemical reactions prior to PCR
2.4. Perform the PCR reaction in a real-time PCR instrument according to the PCR conditions (Table 11).
Note: The preparation of the PCR mixture and the amplification PCR program should be adapted to available material and equipment of individual laboratories testing for Xcc under the condition that results will be validated by PCR controls. Validation studies showed that PCR results were more dependent on laboratory conditions than on PCR protocol when different PCR mixes, and amplification products were used in laboratories.
15
Table 11. PCR conditions TaqMan PCR
Step Temperature Duration
hold 95°C 10 min
40 cycles 95°C 15 sec
60°C 30 sec
2.5. Determine the cut off values; Cq values of positive controls should consistently be lower than 30. The cut-off Cq value of the internal amplification control (IAC) should be below 35, and the expected range is to be determined by the user based on experimental data.
Note: In the case of universal bacterial primers, positive reactions may occur in non-template controls (NTC) due to the presence of residual DNA in Taq enzyme reagents. The IAC Cq values from reactions on suspect isolates should indicate at least a 10-fold higher concentration of bacterial DNA than the IAC Cq values from the NTC reactions; the difference between Cq values should be more than 3.3.
5. Interpretation and decisions
For interpretation and decision making, the results from both primer sets need to be taken into account, see Table 12. Test results are only valid when all included controls presented in Table 8 give the expected result.
Table 12. Interpretation and decision table for the TaqMan PCR
Köhl TaqMan
Berg TaqMan
qPCR Result Follow-up
Positive Positive Target DNA for Xcc detected Pathogenicity test for confirmation
Negative Positive Target DNA for Xcr detected Pathogenicity test for confirmation
Positive Negative Inconclusive Pathogenicity test for confirmation
Negative Negative No target DNA for Xcc / Xcr
detected Negative, no follow up
PATHOGENICITY ASSAY Material
Brassica seedlings: susceptible to all races of the pathogen (e.g. B. oleracea ‘Wirosa’)
Sterile cocktail stick or insect pin
Table 13. Controls
Positive Process Control (PPC1) A known strain of Xcc
Positive Process Control (PPC2) A known strain of Xcr
Negative Control (NC) Sterile cocktail stick or insect pin
16
1. Pathogenicity assay
1.1. Grow seedlings of a Brassica cultivar known to be susceptible to all races of Xcc (e.g. cabbage ‘Wirosa’, see Vicente et al. 2001) in small pots or modules until at least 3–4 true leaf stage.
1.2. Scrape a small amount of bacterial growth directly from a 24–48 h YDC culture (e.g. sectored plate) with a sterile cocktail stick or insect pin.
1.3. Inoculate six of the major veins at a point near the leaf edges on the two youngest leaves by stabbing with the cocktail stick or insect pin.
1.4. The number of plants which should be inoculated will depend on the variability of the cultivar and experience of the operator, but 1–3 plants per isolate should usually be sufficient. It is better to inoculate more isolates with 1 plant per isolate than fewer isolates with 3 plants per isolate.
1.5. Inoculate with the positive control isolate and stab with a sterile cocktail stick or insect pin as a negative control. Positive control isolates as well as a negative control should be included in every pathogenicity test (Table 13).
1.6. Grow on plants at 20–25°C.
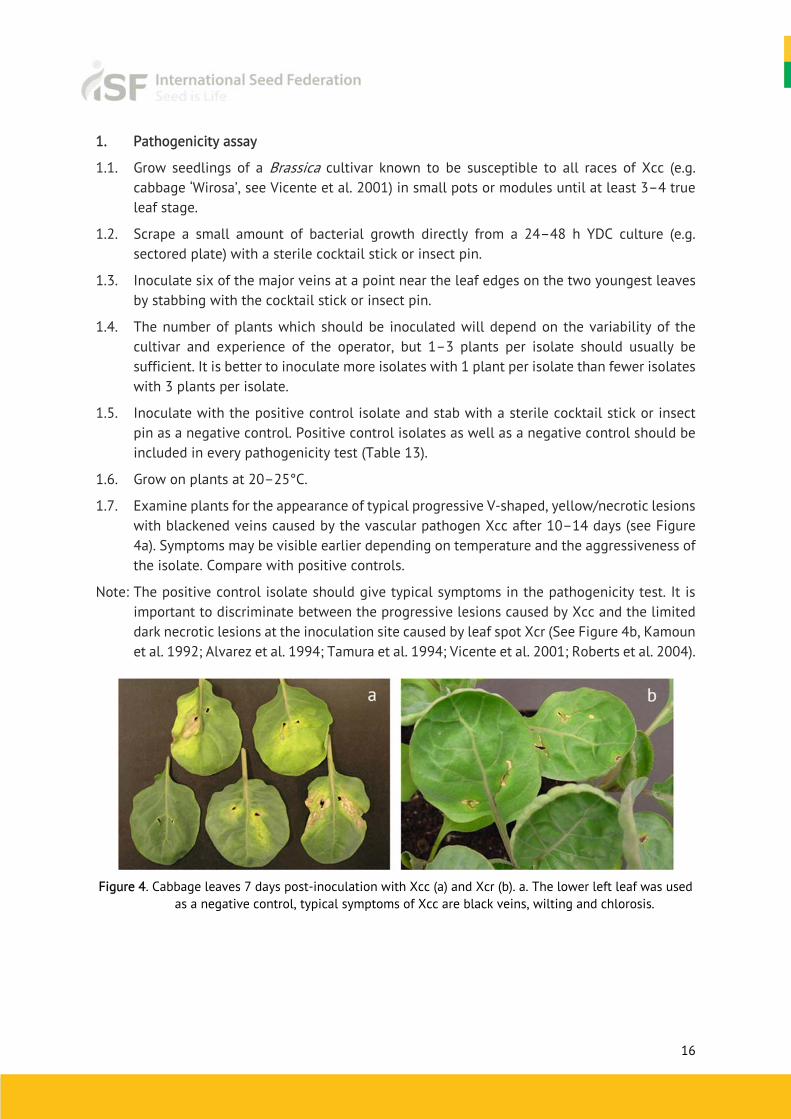
1.7. Examine plants for the appearance of typical progressive V-shaped, yellow/necrotic lesions with blackened veins caused by the vascular pathogen Xcc after 10–14 days (see Figure 4a). Symptoms may be visible earlier depending on temperature and the aggressiveness of the isolate. Compare with positive controls.
Note: The positive control isolate should give typical symptoms in the pathogenicity test. It is important to discriminate between the progressive lesions caused by Xcc and the limited dark necrotic lesions at the inoculation site caused by leaf spot Xcr (See Figure 4b, Kamoun et al. 1992; Alvarez et al. 1994; Tamura et al. 1994; Vicente et al. 2001; Roberts et al. 2004).
Figure 4. Cabbage leaves 7 days post-inoculation with Xcc (a) and Xcr (b). a. The lower left leaf was used as a negative control, typical symptoms of Xcc are black veins, wilting and chlorosis.
17
REFERENCES
Alvarez, A. M., Benedict, A. A., Mizumoto, C. Y., Hunter, J. E. & Gabriel, D. W. (1994). Serological, pathological, and genetic diversity among strains of Xanthomonas campestris infecting crucifers. Phytopathology, 84, 1449–1457.
Berg, T., Tesoriero, L. & Hailstones, D. L. (2006). A multiplex real-time PCR assay for detection of Xanthomonas campestris from brassicas. Letters in Applied Microbiology, 42, 624–630.
Kamoun, S., Kamdar, H. V., Tola, E. & Kado, C. I. (1992). Incompatible interactions between crucifers and Xanthomonas campestris involve a vascular hypersensitive response: role of the hrpX locus. Molecular Plant- Microbe Interactions, 5, 22–33.
Koenraadt, H., van Vliet, A., Jodlowska, A., Woudt, B., Ebskamp, M. & Bruinsma, M. (2014). Detection of Acidovorax citrulli in seed extracts of melon and watermelon with TaqMan PCR. 7th ISTA Seed Health Symposium. Edinburgh, United Kingdom, 12–14 June 2014.
Köhl, J., Vlaswinkel, M., Groenenboom-de Haas, B. H., Kastelein, P., van Hoof, R. A., van der Wolf, J. M. & Krijger, M. (2011). Survival of pathogens of Brussels sprouts (Brassica oleracea Gemmifera Group) in crop residues. Plant Pathology, 60, 661–670.
Roberts, S. J., Brough, J., Everett, B. & Redstone, S. (2004). Extraction methods for Xanthomonas campestris pv. campestris from Brassica seed. Seed Science and Technology, 32, 439–453.
Schaad, N. W. (1989). Detection of Xanthomonas campestris pv. campestris in Crucifers. In Detection of bacteria in seeds and other planting material (eds. A. W. Saettler, N. W. Schaad & D. A. Roth), pp. 68– 75. American Phytopathological Society, St. Paul, Minnesota, USA.
Sudarshana, P. (2010). ISHI AAc primers evaluation. ISHI-Veg meeting, July 2010.
Tamura, K., Takikawa, Y., Tsuyumu, S. & Goto, M. (1994). Bacterial spot of crucifers caused by Xanthomonas campestris pv. raphani. Annals of the Phytopathological Society of Japan, 60, 281–287.
Vicente, J. G., Conway, J., Roberts, S. J. & Taylor, J. D. (2001). Identification and origin of Xanthomonas campestris pv. campestris races and related pathovars. Phytopathology, 91, 492–499.
Wilson, E. E., Zeitoun, F. M. & Fredrickson, D. L. (1967). Bacterial phloem canker, a new disease of Persian walnut trees. Phytopathology , 57, 618–621.
Wu, Y-D., Chen, L-H., Wu, X-L., Shang, S-Q., Lou, J-T., Du, L-Z., & Zhao, Z-Y (2008). Gram stain-specific probe-based real-time PCR for diagnosis and discrimination of bacterial neonatal sepsis. Journal of Clinical Microbiology, 46, 2613–2619.