Cultural Care Au Pair Visa Instructions Cultural Care Au...
20
1 Cultural Care Au Pair Cultural Care Au Pair Cultural Care Au Pair Cultural Care Au Pair Visa Instructions Visa Instructions Visa Instructions Visa Instructions Below you will find clear instructions on how to apply for an au pair visa. The visa that you are applying for is called a J-1 visa from the US government. Your first step is to book an appointment at the U.S embassy for a visa interview, which is done by first filling out an online application. Embassy times are often fully booked long in advance, so do this as soon as possible. Once you have booked your appointment, please let us know which date your interview will be by emailing [email protected] The appointment you book cannot be earlier than 3 months or later than 2 weeks before your departure. You will be leaving your passport with the embassy and they take up to 10 business days to return your passport to you with the printed visa inside. Therefore it is important you have enough time to get it back before you travel. Once you have completed Once you have completed Once you have completed Once you have completed your visa application, paid the visa your visa application, paid the visa your visa application, paid the visa your visa application, paid the visa and booked a time at the embassy and booked a time at the embassy and booked a time at the embassy and booked a time at the embassy you need to you need to you need to you need to make make make make sure sure sure sure you have you have you have you have all their additional requirements all their additional requirements all their additional requirements all their additional requirements taken care before you visit the embassy for your visa taken care before you visit the embassy for your visa taken care before you visit the embassy for your visa taken care before you visit the embassy for your visa interview. interview. interview. interview. Be sure to answer all answers truthfully. Be sure to answer all answers truthfully. Be sure to answer all answers truthfully. Be sure to answer all answers truthfully. The U.S.Embassy will not issue your visa if some documents are missing or not correctly completed. Please read the following information very carefully. Please read the following information very carefully. Please read the following information very carefully. Please read the following information very carefully. How to apply online to book your appointment at the Embassy! How to apply online to book your appointment at the Embassy! How to apply online to book your appointment at the Embassy! How to apply online to book your appointment at the Embassy! **DS-160 is the official name of the online application** IT IS IMPORTANT THAT ALL THE INFORMATION IN YOUR APPLICATION IS IT IS IMPORTANT THAT ALL THE INFORMATION IN YOUR APPLICATION IS IT IS IMPORTANT THAT ALL THE INFORMATION IN YOUR APPLICATION IS IT IS IMPORTANT THAT ALL THE INFORMATION IN YOUR APPLICATION IS EXACTLY AS STATED IN YOUR PASSPORT EXACTLY AS STATED IN YOUR PASSPORT EXACTLY AS STATED IN YOUR PASSPORT EXACTLY AS STATED IN YOUR PASSPORT 1. Use this link to apply for the DS-160. https://ceac.state.gov/genniv/default.aspx 2. Choose Denmark on the location where you will be applying for the visa. Click on “start an application”. 3. Write down your application number since you will need it for future references. You can find it in the upper, right corner. 4. Choose a security question and write the answer for that question. After this step you will start filling out the form
Transcript of Cultural Care Au Pair Visa Instructions Cultural Care Au...
1
Cultural Care Au Pair Cultural Care Au Pair Cultural Care Au Pair Cultural Care Au Pair Visa InstructionsVisa InstructionsVisa InstructionsVisa Instructions
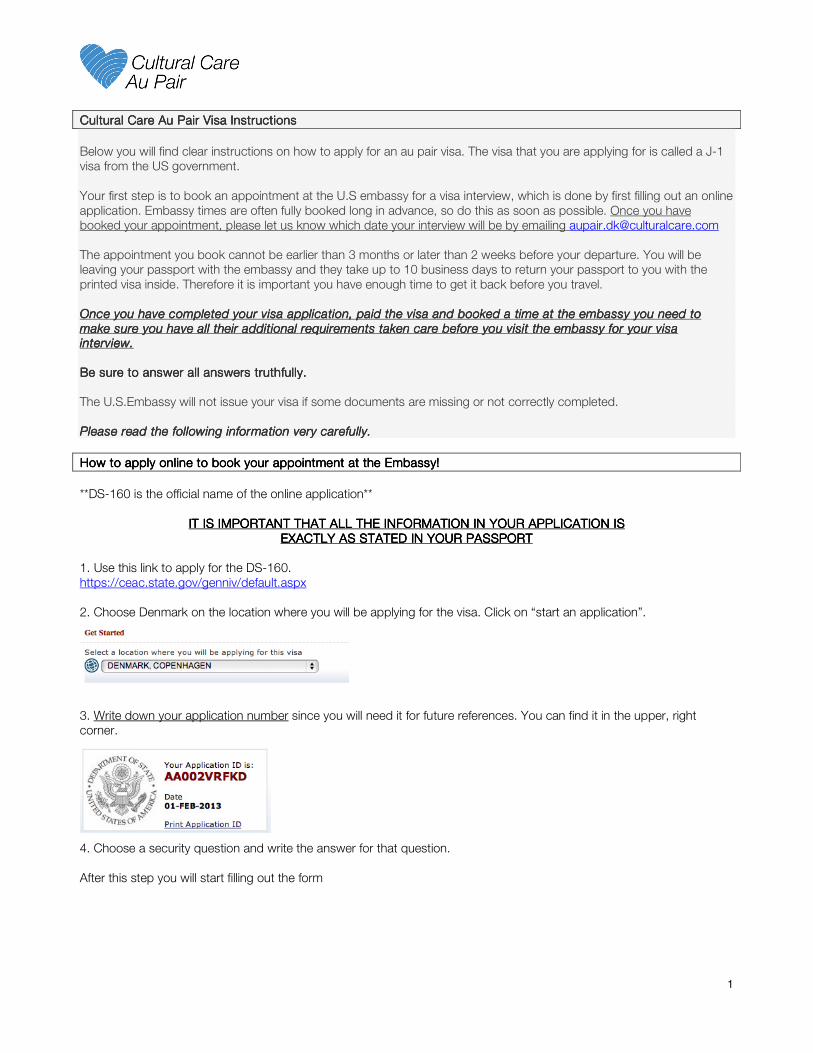
Below you will find clear instructions on how to apply for an au pair visa. The visa that you are applying for is called a J-1
visa from the US government.
Your first step is to book an appointment at the U.S embassy for a visa interview, which is done by first filling out an online
application. Embassy times are often fully booked long in advance, so do this as soon as possible. Once you have
booked your appointment, please let us know which date your interview will be by emailing [email protected]
The appointment you book cannot be earlier than 3 months or later than 2 weeks before your departure. You will be
leaving your passport with the embassy and they take up to 10 business days to return your passport to you with the
printed visa inside. Therefore it is important you have enough time to get it back before you travel.
Once you have completed Once you have completed Once you have completed Once you have completed your visa application, paid the visa your visa application, paid the visa your visa application, paid the visa your visa application, paid the visa and booked a time at the embassy and booked a time at the embassy and booked a time at the embassy and booked a time at the embassy you need to you need to you need to you need to
make make make make suresuresuresure you have you have you have you have all their additional requirementsall their additional requirementsall their additional requirementsall their additional requirements taken care before you visit the embassy for your visa taken care before you visit the embassy for your visa taken care before you visit the embassy for your visa taken care before you visit the embassy for your visa interview.interview.interview.interview.
Be sure to answer all answers truthfully. Be sure to answer all answers truthfully. Be sure to answer all answers truthfully. Be sure to answer all answers truthfully.
The U.S.Embassy will not issue your visa if some documents are missing or not correctly completed.
Please read the following information very carefully.Please read the following information very carefully.Please read the following information very carefully.Please read the following information very carefully.
How to apply online to book your appointment at the Embassy!How to apply online to book your appointment at the Embassy!How to apply online to book your appointment at the Embassy!How to apply online to book your appointment at the Embassy!
**DS-160 is the official name of the online application**
IT IS IMPORTANT THAT ALL THE INFORMATION IN YOUR APPLICATION IS IT IS IMPORTANT THAT ALL THE INFORMATION IN YOUR APPLICATION IS IT IS IMPORTANT THAT ALL THE INFORMATION IN YOUR APPLICATION IS IT IS IMPORTANT THAT ALL THE INFORMATION IN YOUR APPLICATION IS
EXACTLY AS STATED IN YOUR PASSPORTEXACTLY AS STATED IN YOUR PASSPORTEXACTLY AS STATED IN YOUR PASSPORTEXACTLY AS STATED IN YOUR PASSPORT
1. Use this link to apply for the DS-160.
https://ceac.state.gov/genniv/default.aspx
2. Choose Denmark on the location where you will be applying for the visa. Click on “start an application”.
3. Write down your application number since you will need it for future references. You can find it in the upper, right
corner.
4. Choose a security question and write the answer for that question.
After this step you will start filling out the form

2
Personal information 1Personal information 1Personal information 1Personal information 1
Surname (write as in Passport) – Write the English spelling of your last name. If you have more than one last name
write them all.
Given name (write as in Passport) – Write the English spelling of your given name. Write both your given name and
your middle names if you have any.
Full name in Native Alphabet – Write your whole name as it is spelled in Denmark. If it doesn’t work choose “Does not
apply”.
Have you ever used other names? – Religious names or other names that you are known for or have been known for
in the past. This is only if you legally changed your name. Nicknames do not apply. If not, answer no.
Do you have a telecode that represents your name? – If not, answer no.
Sex – Choose Male or Female
Marital status – Choose “single”
Date of birth (write as in Passport)
City (write as in Passport) – City of birth / Place of birth
State/Province – Answer “Does not apply”.
Country/Region – Choose the country you were born in.

3
Personal information 2Personal information 2Personal information 2Personal information 2
Nationality (write as in Passport) – Country of your nationality
Do you hold or have held a nationality other than the one you have indicated above? – If not answer “No”.
If you have held or you hold another nationality answer “Yes”.
If you have answered “Yes” on the question above you need to answer the following questions below.
National Identification Number – Answer “Does Not Apply”
U.S. Social Security Number – Answer “Does Not Apply”
U.S. Taxpayer ID Number – Answer “Does Not Apply”
Address and Phone InformationAddress and Phone InformationAddress and Phone InformationAddress and Phone Information
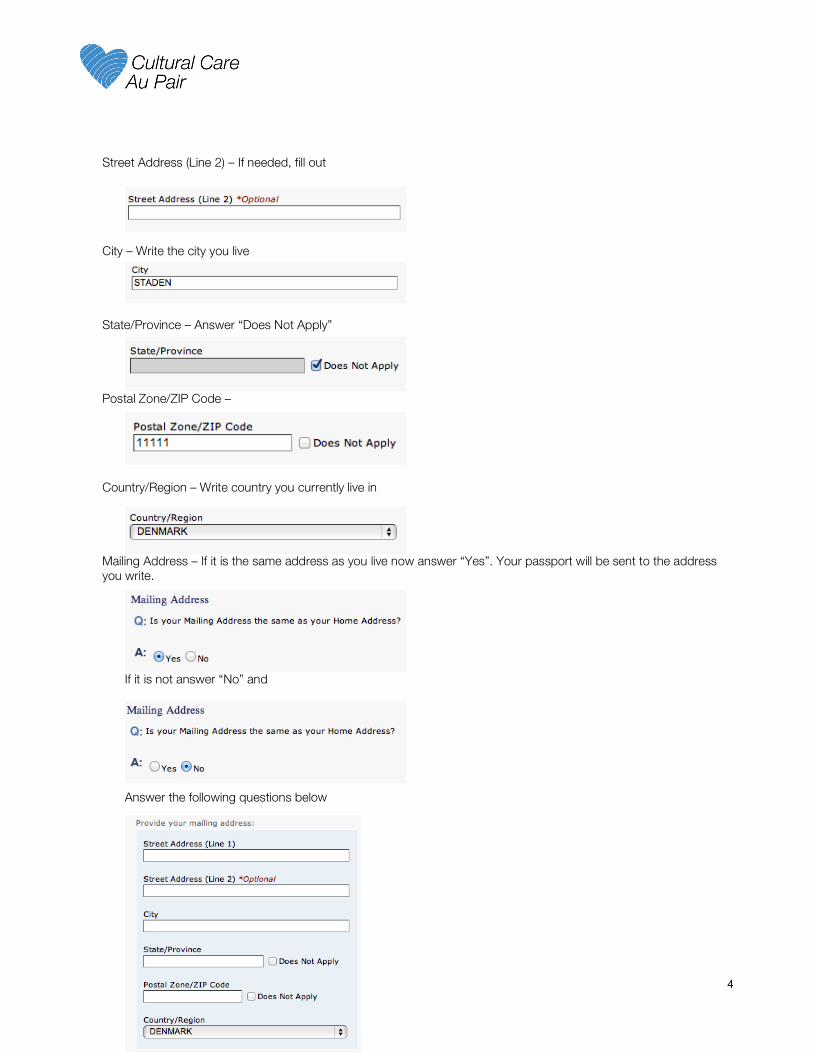
Street Address (Line 1) – Write your street address in Denmark
4
Street Address (Line 2) – If needed, fill out
City – Write the city you live
State/Province – Answer “Does Not Apply”
Postal Zone/ZIP Code –
Country/Region – Write country you currently live in
Mailing Address – If it is the same address as you live now answer “Yes”. Your passport will be sent to the address
you write.
If it is not answer “No” and
Answer the following questions below
5
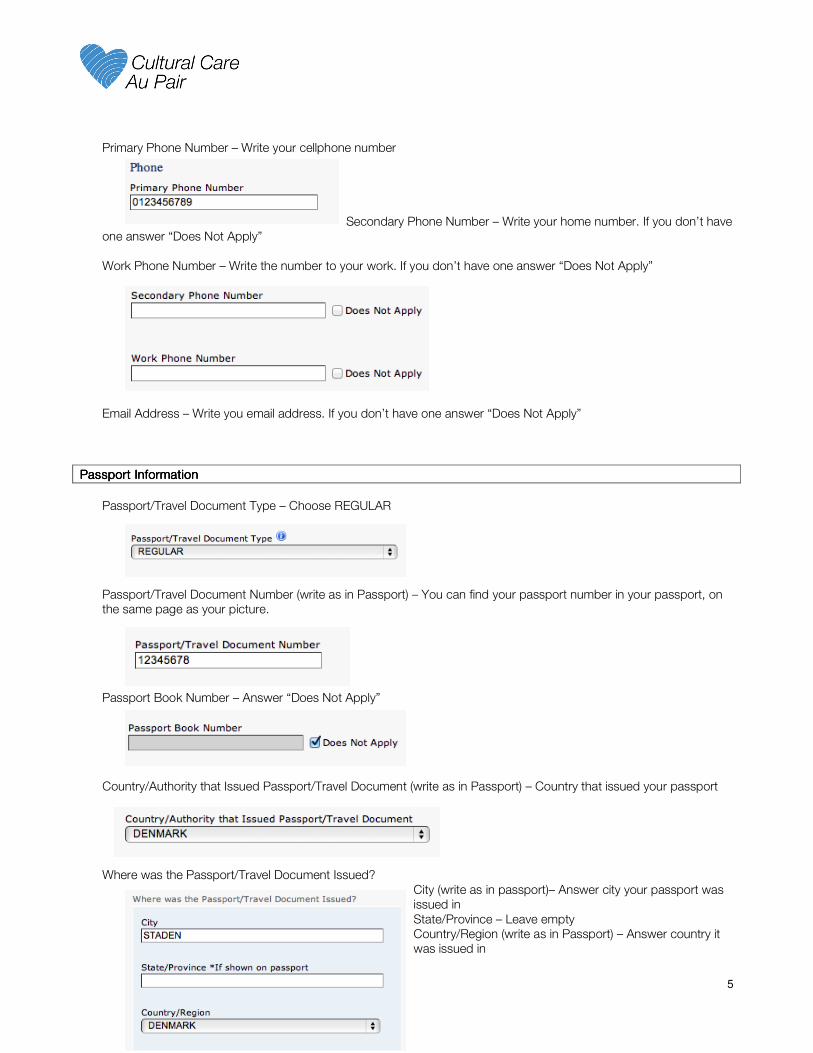
Primary Phone Number – Write your cellphone number
Secondary Phone Number – Write your home number. If you don’t have
one answer “Does Not Apply”
Work Phone Number – Write the number to your work. If you don’t have one answer “Does Not Apply”
Email Address – Write you email address. If you don’t have one answer “Does Not Apply”
Passport InformationPassport InformationPassport InformationPassport Information
Passport/Travel Document Type – Choose REGULAR
Passport/Travel Document Number (write as in Passport) – You can find your passport number in your passport, on
the same page as your picture.
Passport Book Number – Answer “Does Not Apply”
Country/Authority that Issued Passport/Travel Document (write as in Passport) – Country that issued your passport
Where was the Passport/Travel Document Issued?
City (write as in passport)– Answer city your passport was
issued in
State/Province – Leave empty
Country/Region (write as in Passport) – Answer country it
was issued in
6
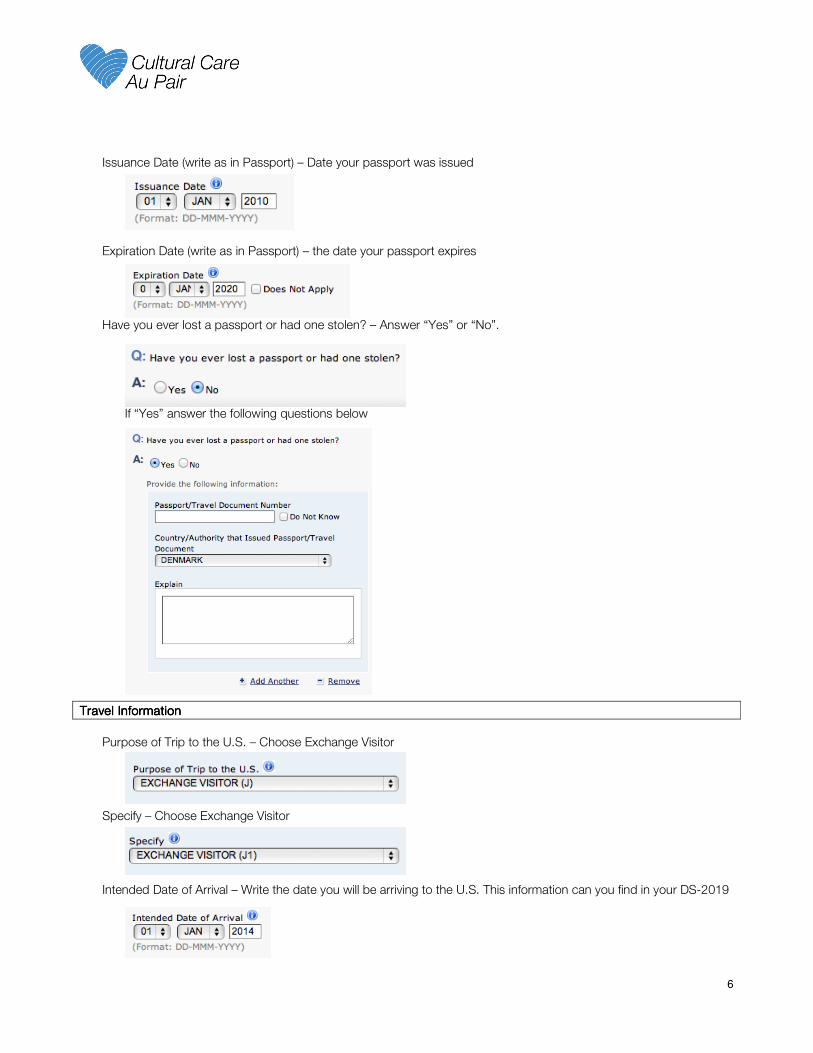
Issuance Date (write as in Passport) – Date your passport was issued
Expiration Date (write as in Passport) – the date your passport expires
Have you ever lost a passport or had one stolen? – Answer “Yes” or “No”.
If “Yes” answer the following questions below
Travel InformationTravel InformationTravel InformationTravel Information
Purpose of Trip to the U.S. – Choose Exchange Visitor
Specify – Choose Exchange Visitor
Intended Date of Arrival – Write the date you will be arriving to the U.S. This information can you find in your DS-2019
7
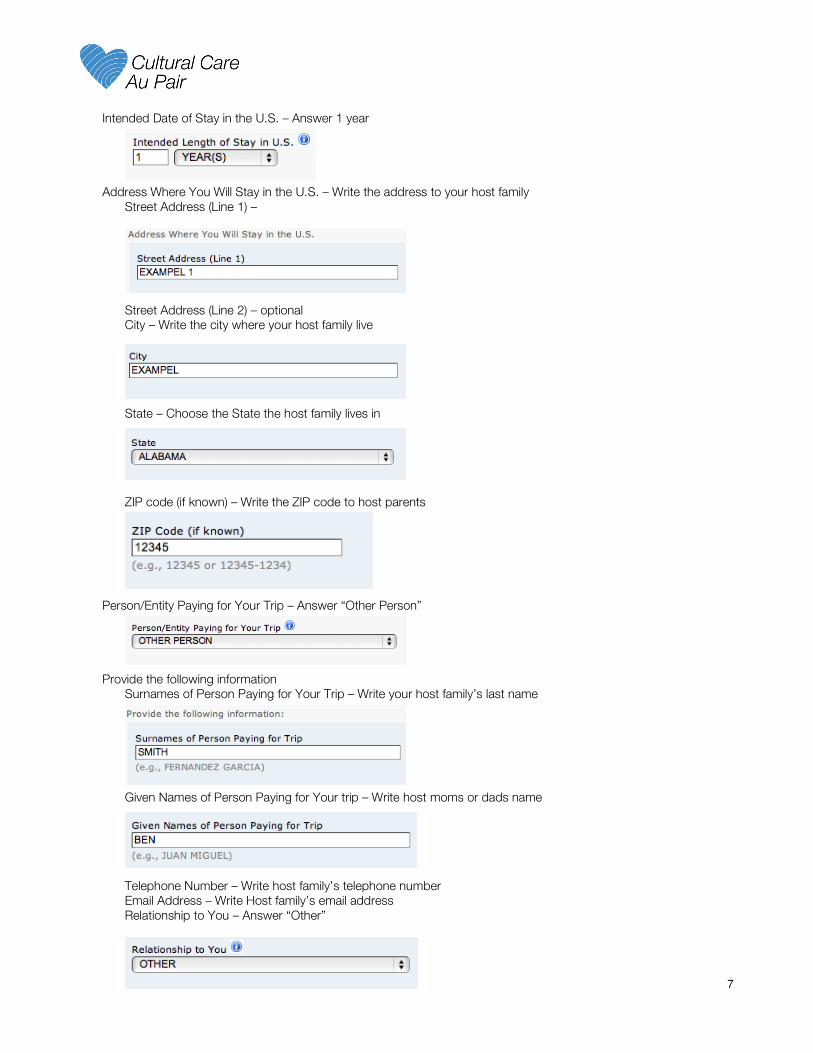
Intended Date of Stay in the U.S. – Answer 1 year
Address Where You Will Stay in the U.S. – Write the address to your host family
Street Address (Line 1) –
Street Address (Line 2) – optional
City – Write the city where your host family live
State – Choose the State the host family lives in
ZIP code (if known) – Write the ZIP code to host parents
Person/Entity Paying for Your Trip – Answer “Other Person”
Provide the following information
Surnames of Person Paying for Your Trip – Write your host family’s last name
Given Names of Person Paying for Your trip – Write host moms or dads name
Telephone Number – Write host family’s telephone number
Email Address – Write Host family’s email address
Relationship to You – Answer “Other”
8
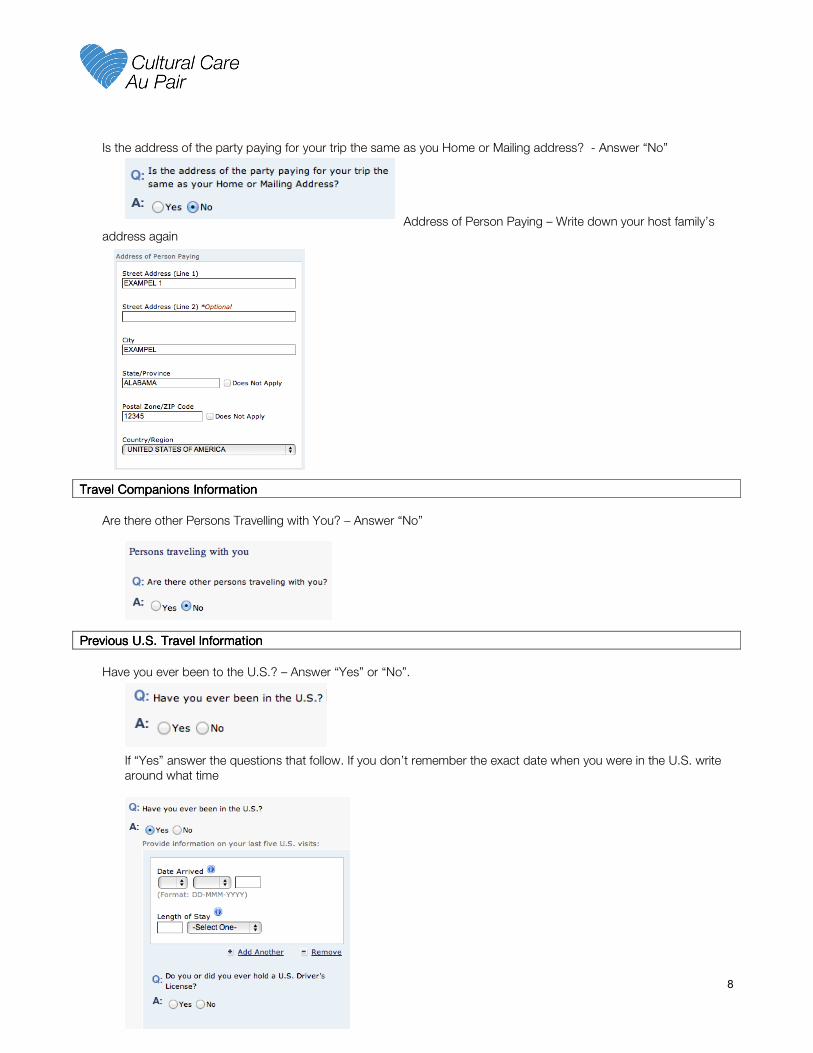
Is the address of the party paying for your trip the same as you Home or Mailing address? - Answer “No”
Address of Person Paying – Write down your host family’s
address again
Travel Companions InformatioTravel Companions InformatioTravel Companions InformatioTravel Companions Informationnnn
Are there other Persons Travelling with You? – Answer “No”
Previous U.S. Travel InformationPrevious U.S. Travel InformationPrevious U.S. Travel InformationPrevious U.S. Travel Information
Have you ever been to the U.S.? – Answer “Yes” or “No”.
If “Yes” answer the questions that follow. If you don’t remember the exact date when you were in the U.S. write
around what time
9
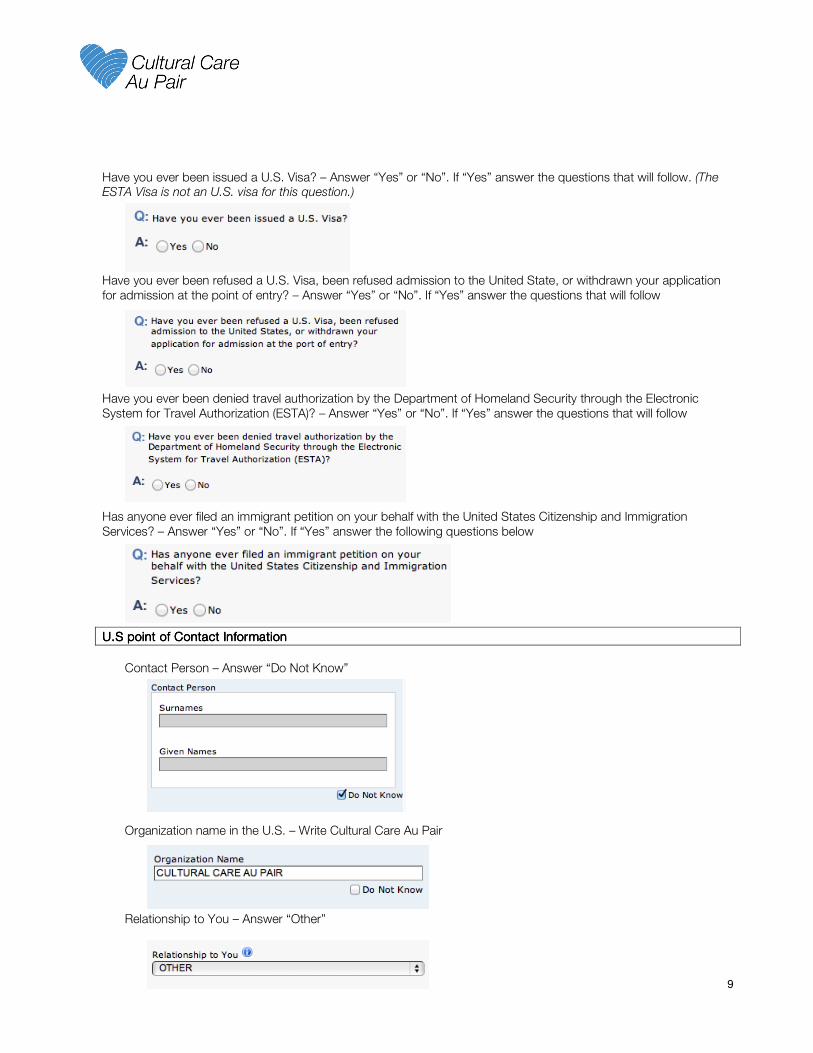
Have you ever been issued a U.S. Visa? – Answer “Yes” or “No”. If “Yes” answer the questions that will follow. (The ESTA Visa is not an U.S. visa for this question.)
Have you ever been refused a U.S. Visa, been refused admission to the United State, or withdrawn your application
for admission at the point of entry? – Answer “Yes” or “No”. If “Yes” answer the questions that will follow
Have you ever been denied travel authorization by the Department of Homeland Security through the Electronic
System for Travel Authorization (ESTA)? – Answer “Yes” or “No”. If “Yes” answer the questions that will follow
Has anyone ever filed an immigrant petition on your behalf with the United States Citizenship and Immigration
Services? – Answer “Yes” or “No”. If “Yes” answer the following questions below
U.S point of Contact InformationU.S point of Contact InformationU.S point of Contact InformationU.S point of Contact Information
Contact Person – Answer “Do Not Know”
Organization name in the U.S. – Write Cultural Care Au Pair
Relationship to You – Answer “Other”
10
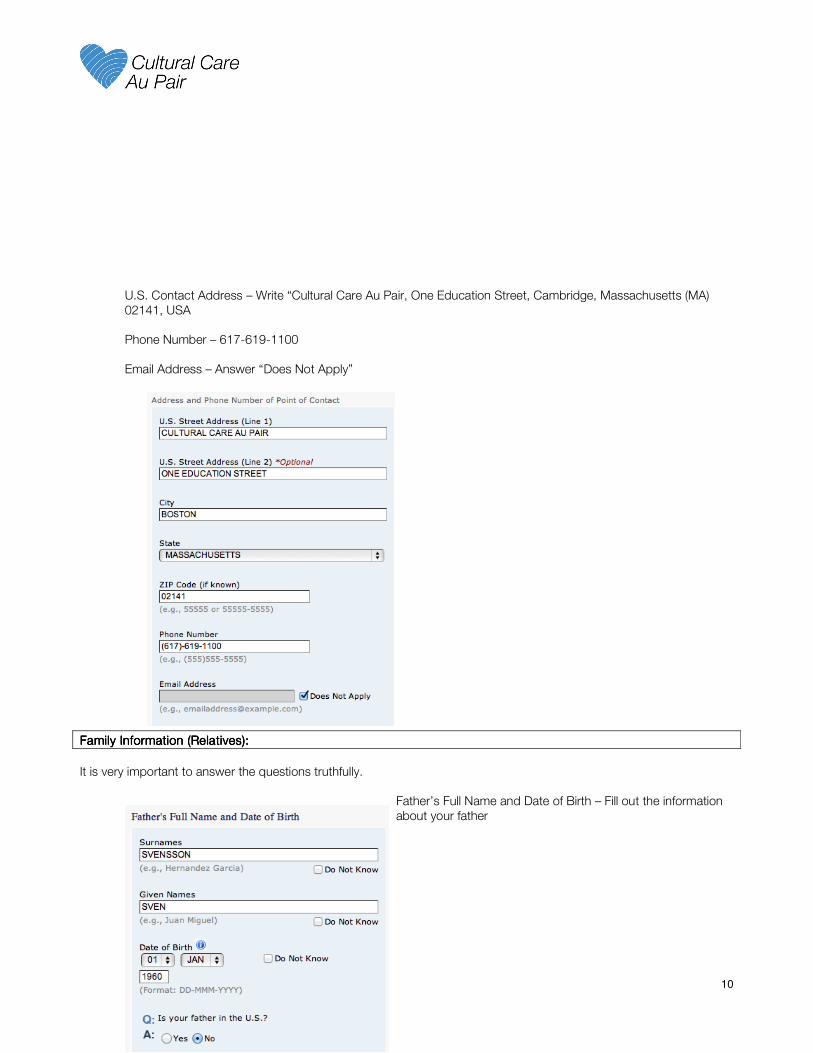
U.S. Contact Address – Write “Cultural Care Au Pair, One Education Street, Cambridge, Massachusetts (MA)
02141, USA
Phone Number – 617-619-1100
Email Address – Answer “Does Not Apply”
Family Information (Relatives):Family Information (Relatives):Family Information (Relatives):Family Information (Relatives):
It is very important to answer the questions truthfully.
Father’s Full Name and Date of Birth – Fill out the information
about your father
11
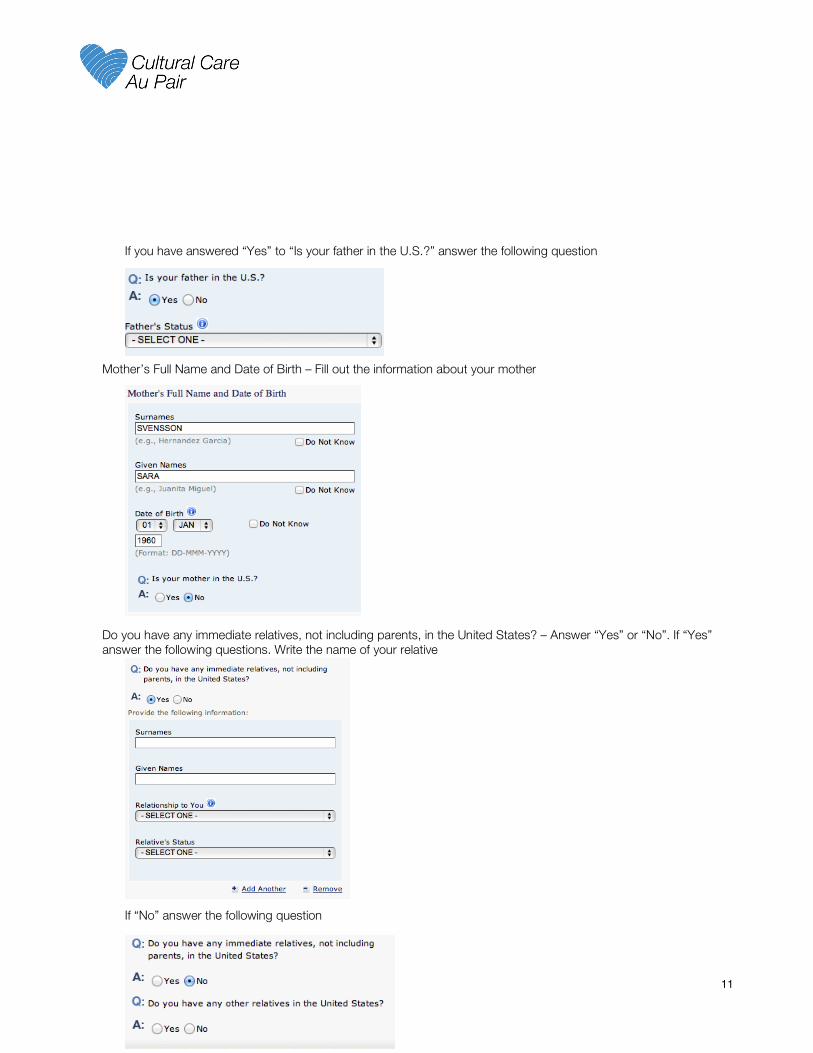
If you have answered “Yes” to “Is your father in the U.S.?” answer the following question
Mother’s Full Name and Date of Birth – Fill out the information about your mother
Do you have any immediate relatives, not including parents, in the United States? – Answer “Yes” or “No”. If “Yes”
answer the following questions. Write the name of your relative
If “No” answer the following question
12
Present Work/Education/Training InformationPresent Work/Education/Training InformationPresent Work/Education/Training InformationPresent Work/Education/Training Information
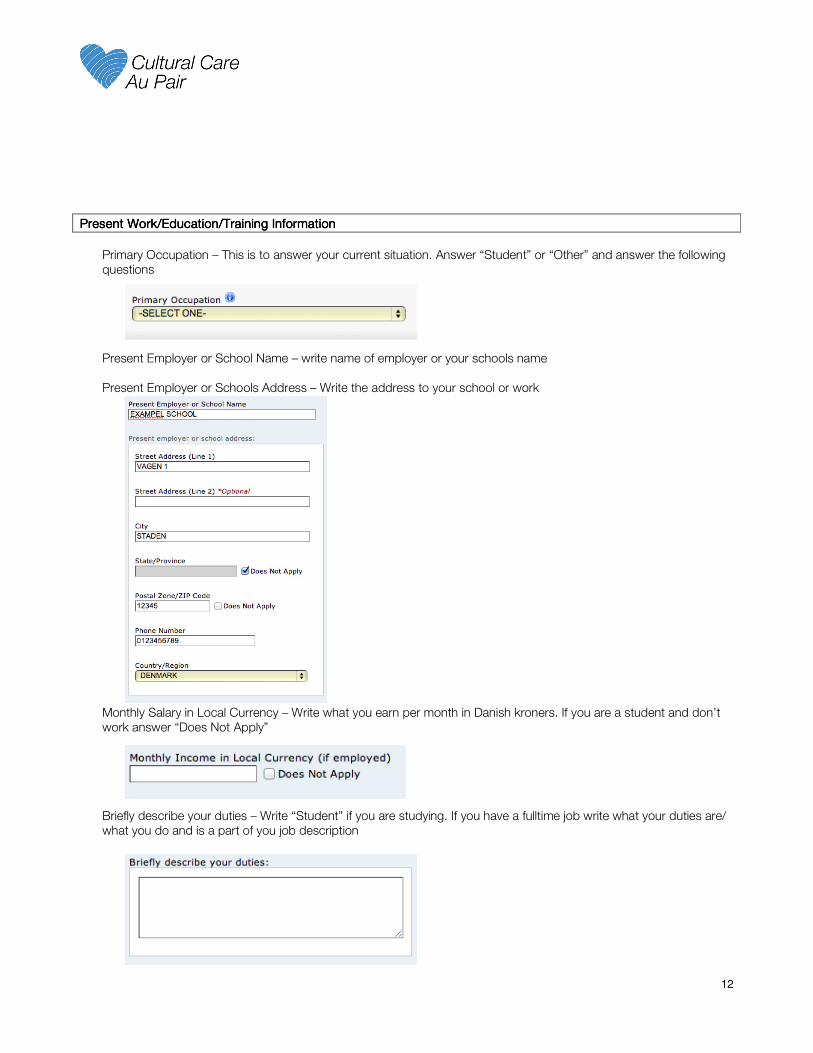
Primary Occupation – This is to answer your current situation. Answer “Student” or “Other” and answer the following
questions
Present Employer or School Name – write name of employer or your schools name
Present Employer or Schools Address – Write the address to your school or work
Monthly Salary in Local Currency – Write what you earn per month in Danish kroners. If you are a student and don’t
work answer “Does Not Apply”
Briefly describe your duties – Write “Student” if you are studying. If you have a fulltime job write what your duties are/
what you do and is a part of you job description
13
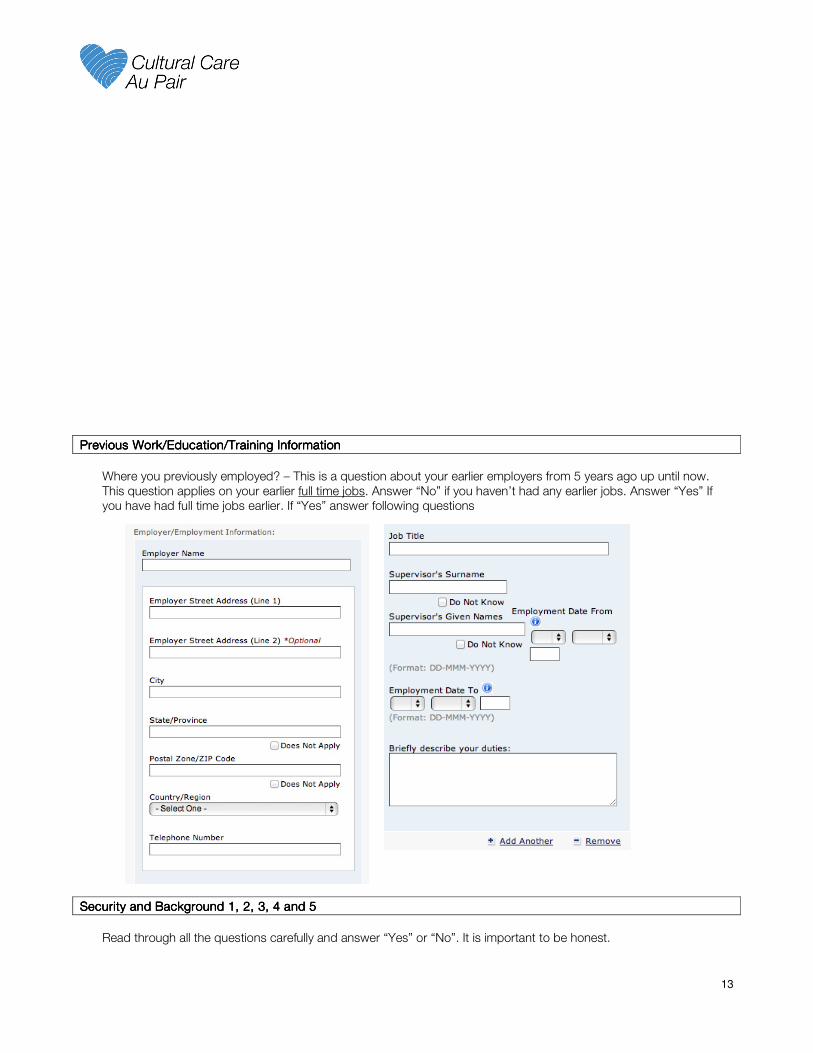
Previous Work/Education/Training InformationPrevious Work/Education/Training InformationPrevious Work/Education/Training InformationPrevious Work/Education/Training Information
Where you previously employed? – This is a question about your earlier employers from 5 years ago up until now.
This question applies on your earlier full time jobs. Answer “No” if you haven’t had any earlier jobs. Answer “Yes” If
you have had full time jobs earlier. If “Yes” answer following questions
Security and Background 1, 2, 3, 4 and 5Security and Background 1, 2, 3, 4 and 5Security and Background 1, 2, 3, 4 and 5Security and Background 1, 2, 3, 4 and 5
Read through all the questions carefully and answer “Yes” or “No”. It is important to be honest.
14
Additional Point of Contact Additional Point of Contact Additional Point of Contact Additional Point of Contact InformationInformationInformationInformation
Write the contact information to two other people in your country of residence (Denmark) – Write two people that you
are not family with like a close friend or neighbor
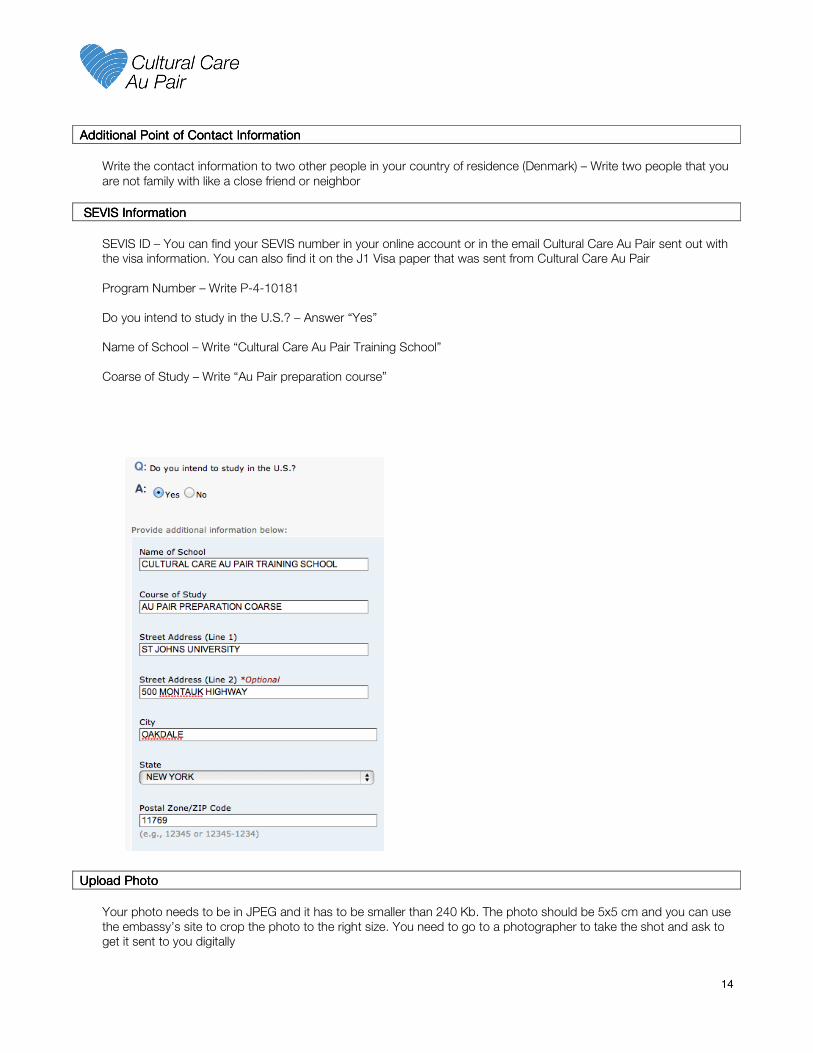
SEVIS InformationSEVIS InformationSEVIS InformationSEVIS Information
SEVIS ID – You can find your SEVIS number in your online account or in the email Cultural Care Au Pair sent out with
the visa information. You can also find it on the J1 Visa paper that was sent from Cultural Care Au Pair
Program Number – Write P-4-10181
Do you intend to study in the U.S.? – Answer “Yes”
Name of School – Write “Cultural Care Au Pair Training School”
Coarse of Study – Write “Au Pair preparation course”
Upload PhotoUpload PhotoUpload PhotoUpload Photo
Your photo needs to be in JPEG and it has to be smaller than 240 Kb. The photo should be 5x5 cm and you can use
the embassy’s site to crop the photo to the right size. You need to go to a photographer to take the shot and ask to
get it sent to you digitally
15
You will be asked to bring an additional printed copy to the embassy.
Personal, Personal, Personal, Personal, Address, Phone and passport InformationAddress, Phone and passport InformationAddress, Phone and passport InformationAddress, Phone and passport Information
It is important to go through all the information you have just entered and make sure it is correct. After this part you
will go through each part that you have filled out.
Sign and Submit Sign and Submit Sign and Submit Sign and Submit
When every step is done you first write your passport number and after that write the code you have to the right. This
is your digital signature. Click Submit.
You are now done with your application and will come to a confirmation page. It is very important to print the
information and application. Make sure that the barcode in the upper, right corner is visible and clear. If you don’t
have access to a printer you can have a copy send to you.
You need to bring this copy of the confirmation page to the embassy.
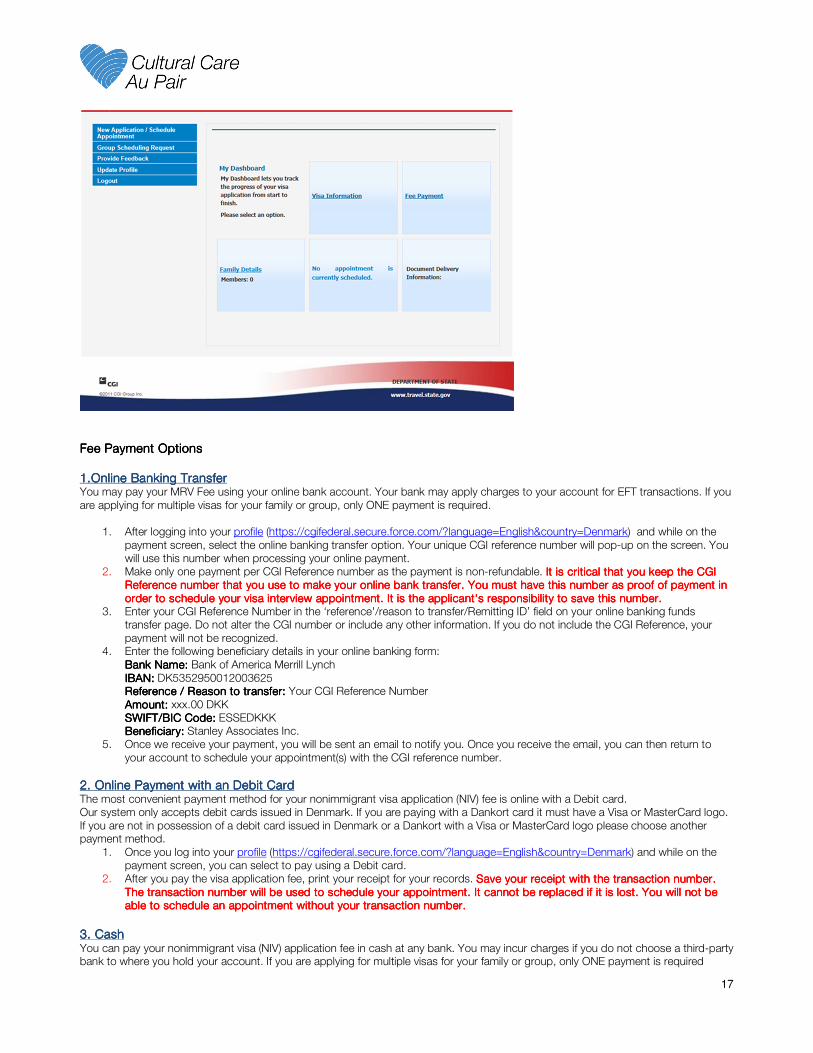
Pay your visa Pay your visa Pay your visa Pay your visa
Before you book your appointment you need to pay your visa. You may pay your visa fee onlineonlineonlineonline, with debit card, with debit card, with debit card, with debit card or in in in in
person at any bankperson at any bankperson at any bankperson at any bank. You are now registered on the applicant site and can choose the ‘schedule your appointment’ ‘schedule your appointment’ ‘schedule your appointment’ ‘schedule your appointment’
option to access the payment option details. See below for the steps.
Step 1Step 1Step 1Step 1
Log-in (https://cgifederal.secure.force.com/?language=English&country=Denmark) to the online applicant system and
where you have created a profile. Values are shown in U.S. Dollars (USD); however the Fee payable is in Danish Krone
(DKK). This page (http://ustraveldocs.com/dk/dk-niv-visafeeinfo.asp) has more information about the different visa
application fees.
Step 2Step 2Step 2Step 2
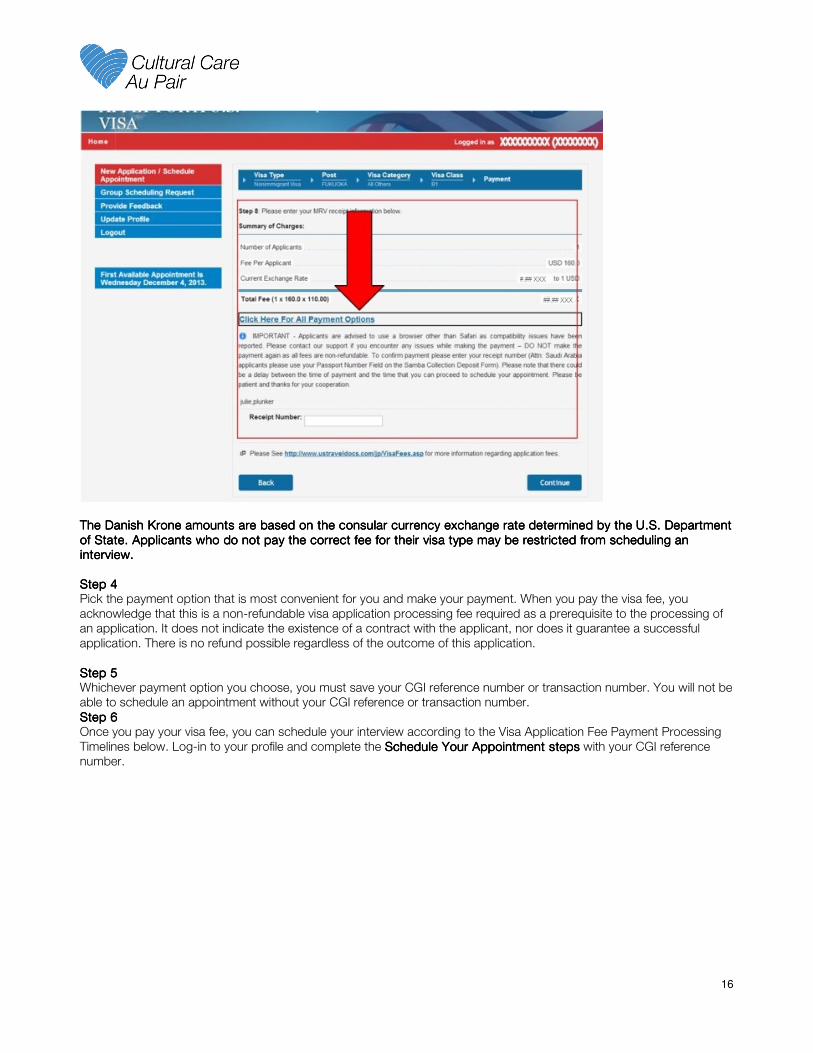
Click on Schedule My Appointment option on the left-hand side of your screen. Complete Steps for Visa Type, Post, Visa
Category and Visa Class.
Step 3Step 3Step 3Step 3
Once you are on the Payment screen, click on Payment Options to pick your form of payment. To review further payment
details read the Fee Payment Options sections below.
16
The Danish Krone amounts are based on the consular currency exchange rate determined by the U.S. Department The Danish Krone amounts are based on the consular currency exchange rate determined by the U.S. Department The Danish Krone amounts are based on the consular currency exchange rate determined by the U.S. Department The Danish Krone amounts are based on the consular currency exchange rate determined by the U.S. Department
of State. of State. of State. of State. Applicants who do not pay the correct fee for their visa type may be restricted from scheduling an Applicants who do not pay the correct fee for their visa type may be restricted from scheduling an Applicants who do not pay the correct fee for their visa type may be restricted from scheduling an Applicants who do not pay the correct fee for their visa type may be restricted from scheduling an
interview.interview.interview.interview.
Step 4Step 4Step 4Step 4
Pick the payment option that is most convenient for you and make your payment. When you pay the visa fee, you
acknowledge that this is a non-refundable visa application processing fee required as a prerequisite to the processing of
an application. It does not indicate the existence of a contract with the applicant, nor does it guarantee a successful
application. There is no refund possible regardless of the outcome of this application.
Step 5Step 5Step 5Step 5
Whichever payment option you choose, you must save your CGI reference number or transaction number. You will not be
able to schedule an appointment without your CGI reference or transaction number.
StepStepStepStep 6666
Once you pay your visa fee, you can schedule your interview according to the Visa Application Fee Payment Processing
Timelines below. Log-in to your profile and complete the Schedule Your Appointment stepsSchedule Your Appointment stepsSchedule Your Appointment stepsSchedule Your Appointment steps with your CGI reference
number.
17
Fee Fee Fee Fee Payment OptionsPayment OptionsPayment OptionsPayment Options
1.Online Banking Transfer 1.Online Banking Transfer 1.Online Banking Transfer 1.Online Banking Transfer You may pay your MRV Fee using your online bank account. Your bank may apply charges to your account for EFT transactions. If you
are applying for multiple visas for your family or group, only ONE payment is required.
1. After logging into your profile (https://cgifederal.secure.force.com/?language=English&country=Denmark) and while on the
payment screen, select the online banking transfer option. Your unique CGI reference number will pop-up on the screen. You
will use this number when processing your online payment.
2. Make only one payment per CGI Reference number as the payment is non-refundable. It is critical that you keep the CGI It is critical that you keep the CGI It is critical that you keep the CGI It is critical that you keep the CGI
Reference number that you use to make your online bank transfer. You must have this number as proof of payment in Reference number that you use to make your online bank transfer. You must have this number as proof of payment in Reference number that you use to make your online bank transfer. You must have this number as proof of payment in Reference number that you use to make your online bank transfer. You must have this number as proof of payment in
order to sorder to sorder to sorder to schedule your visa interview appointment. It is the applicant's responsibility to save this number.chedule your visa interview appointment. It is the applicant's responsibility to save this number.chedule your visa interview appointment. It is the applicant's responsibility to save this number.chedule your visa interview appointment. It is the applicant's responsibility to save this number.
3. Enter your CGI Reference Number in the ‘reference'/reason to transfer/Remitting ID’ field on your online banking funds
transfer page. Do not alter the CGI number or include any other information. If you do not include the CGI Reference, your
payment will not be recognized. 4. Enter the following beneficiary details in your online banking form:
Bank Name:Bank Name:Bank Name:Bank Name: Bank of America Merrill Lynch
IBAN:IBAN:IBAN:IBAN: DK5352950012003625 RefeRefeRefeReference / Reason to transfer:rence / Reason to transfer:rence / Reason to transfer:rence / Reason to transfer: Your CGI Reference Number
Amount:Amount:Amount:Amount: xxx.00 DKK
SWIFT/BIC Code:SWIFT/BIC Code:SWIFT/BIC Code:SWIFT/BIC Code: ESSEDKKK
Beneficiary:Beneficiary:Beneficiary:Beneficiary: Stanley Associates Inc.
5. Once we receive your payment, you will be sent an email to notify you. Once you receive the email, you can then return to
your account to schedule your appointment(s) with the CGI reference number.
2. Online Payment with an Debit Card2. Online Payment with an Debit Card2. Online Payment with an Debit Card2. Online Payment with an Debit Card The most convenient payment method for your nonimmigrant visa application (NIV) fee is online with a Debit card.
Our system only accepts debit cards issued in Denmark. If you are paying with a Dankort card it must have a Visa or MasterCard logo.
If you are not in possession of a debit card issued in Denmark or a Dankort with a Visa or MasterCard logo please choose another payment method.
1. Once you log into your profile (https://cgifederal.secure.force.com/?language=English&country=Denmark) and while on the
payment screen, you can select to pay using a Debit card.
2. After you pay the visa application fee, print your receipt for your records. Save your receipt with the transaction number. Save your receipt with the transaction number. Save your receipt with the transaction number. Save your receipt with the transaction number.
The transaction number will The transaction number will The transaction number will The transaction number will be used to schedule your appointment. It cannot be replaced if it is lost. You will not be be used to schedule your appointment. It cannot be replaced if it is lost. You will not be be used to schedule your appointment. It cannot be replaced if it is lost. You will not be be used to schedule your appointment. It cannot be replaced if it is lost. You will not be
able to schedule an appointment without your transaction number.able to schedule an appointment without your transaction number.able to schedule an appointment without your transaction number.able to schedule an appointment without your transaction number.
3. Cash 3. Cash 3. Cash 3. Cash You can pay your nonimmigrant visa (NIV) application fee in cash at any bank. You may incur charges if you do not choose a third-party bank to where you hold your account. If you are applying for multiple visas for your family or group, only ONE payment is required
18
1. After logging into your profile (https://cgifederal.secure.force.com/?language=English&country=Denmark) and while on the
payment selection screen, you can select the ‘Cash’ payment Option.
2. You will print a deposit slip that will contain a unique CGI reference number which you must include in your cash payment.
Please make only one payment per CGI Reference number as the payment is nonPlease make only one payment per CGI Reference number as the payment is nonPlease make only one payment per CGI Reference number as the payment is nonPlease make only one payment per CGI Reference number as the payment is non----refundable.refundable.refundable.refundable.
3. To pay the visa fee take the completed deposit slip to your bank. Include your CGI Reference number in the payment deposit
information. If you do not include the CGI Reference number or you do not pay the exact amount indicated on the deposit
slip, you will not be able to schedule you appointment.
4. After receiving your payment, the cashier will give you a receipt. Save your receipt as proof of payment.Save your receipt as proof of payment.Save your receipt as proof of payment.Save your receipt as proof of payment. 5. Once we receive your payment, you will be sent an email to notify you. Once you receive the email, you can then return to
your account to schedule your appointment(s).
For more info how to pay please follow the link below: http://ustraveldocs.com/dk/dk-niv-paymentinfo.asp
The fee for Exchange Visitors is at the moment 960DKK.960DKK.960DKK.960DKK.
Booking your appointment Booking your appointment Booking your appointment Booking your appointment
Now that you have done the DSNow that you have done the DSNow that you have done the DSNow that you have done the DS----160 and paid your visa you can book an appointment at the embassy. 160 and paid your visa you can book an appointment at the embassy. 160 and paid your visa you can book an appointment at the embassy. 160 and paid your visa you can book an appointment at the embassy.
Book the appointment already todaytodaytodaytoday but make sure that you choose one that is at least 10 days before you departureat least 10 days before you departureat least 10 days before you departureat least 10 days before you departure
and earliest 3 month before your departureearliest 3 month before your departureearliest 3 month before your departureearliest 3 month before your departure.
Visa Application Fee Payment Processing TimelinesVisa Application Fee Payment Processing TimelinesVisa Application Fee Payment Processing TimelinesVisa Application Fee Payment Processing Timelines
Payment MethodPayment MethodPayment MethodPayment Method Interview SchedulingInterview SchedulingInterview SchedulingInterview Scheduling Receipt Number for Scheduling Receipt Number for Scheduling Receipt Number for Scheduling Receipt Number for Scheduling
InterviewInterviewInterviewInterview
Debit Card Immediately after payment online Transaction Number
Online Bank
Transfer
After 1300h on the next business day (if paid
before 1500h) CGI Reference Number
Cash at Bank After 1300h on the next business day (if paid
before 1500h) CGI Reference Number
Please note: This means, if you e.g. pay via your online bank you can earliest book your appointment the next business day (if you payed before 15.00)
When you schedule your appointment online (https://cgifederal.secure.force.com/?language=English&country=Denmark),
you will need the CGI referenceCGI referenceCGI referenceCGI reference numbernumbernumbernumber or transaction numbertransaction numbertransaction numbertransaction number printed on your receipt. See the table below for
processing timelines.
Click on Schedule an appointmentClick on Schedule an appointmentClick on Schedule an appointmentClick on Schedule an appointment
19
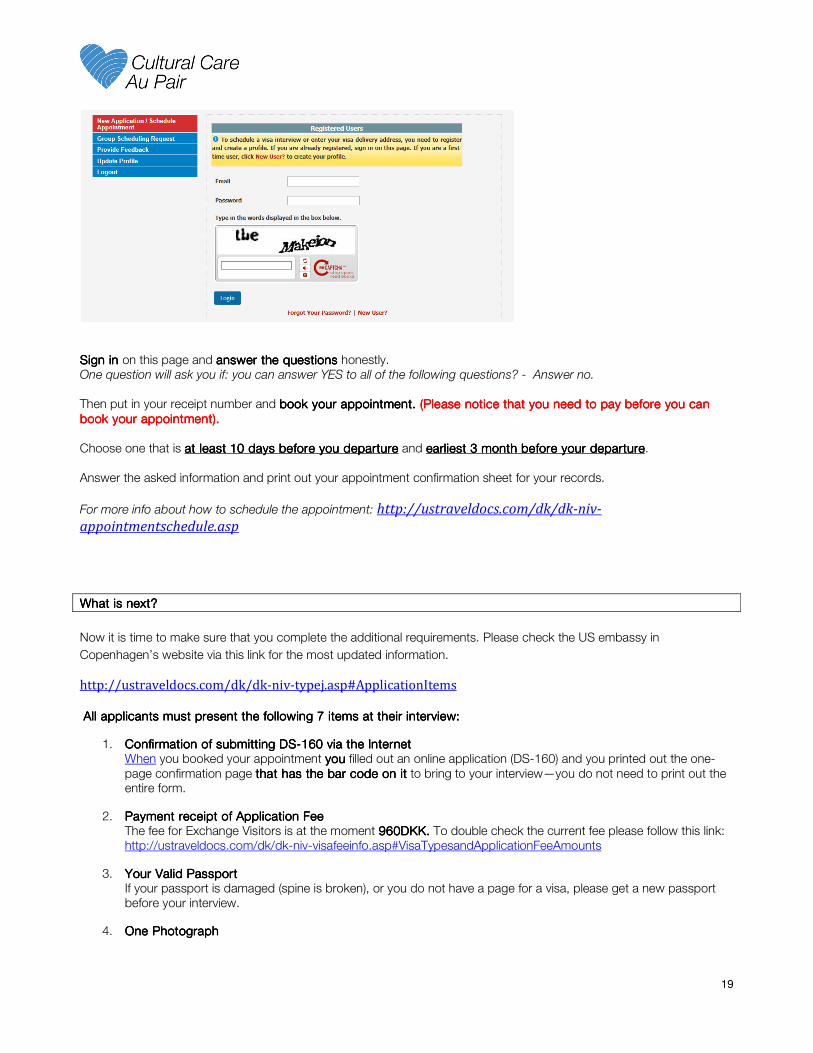
Sign in Sign in Sign in Sign in on this page and answer the questionsanswer the questionsanswer the questionsanswer the questions honestly.
One question will ask you if: you can answer YES to all of the following questions? - Answer no.
Then put in your receipt number and book your appointment. book your appointment. book your appointment. book your appointment. (Please notice that you need to pay (Please notice that you need to pay (Please notice that you need to pay (Please notice that you need to pay before you can before you can before you can before you can
book your appointment).book your appointment).book your appointment).book your appointment).
Choose one that is at least 10 days before you departureat least 10 days before you departureat least 10 days before you departureat least 10 days before you departure and earliest 3 month before your departureearliest 3 month before your departureearliest 3 month before your departureearliest 3 month before your departure.
Answer the asked information and print out your appointment confirmation sheet for your records.
For more info about how to schedule the appointment: http://ustraveldocs.com/dk/dk-niv-
appointmentschedule.asp
What is next? What is next? What is next? What is next?
Now it is time to make sure that you complete the additional requirements. Please check the US embassy in
Copenhagen’s website via this link for the most updated information.
http://ustraveldocs.com/dk/dk-niv-typej.asp#ApplicationItems
All All All All applicants must present the following 7 items at their interview:applicants must present the following 7 items at their interview:applicants must present the following 7 items at their interview:applicants must present the following 7 items at their interview:
1. Confirmation of submitting DSConfirmation of submitting DSConfirmation of submitting DSConfirmation of submitting DS----160 via the Internet160 via the Internet160 via the Internet160 via the Internet
When you booked your appointment youyouyouyou filled out an online application (DS-160) and you printed out the one-
page confirmation page that has the bar code on itthat has the bar code on itthat has the bar code on itthat has the bar code on it to bring to your interview—you do not need to print out the entire form.
2. Payment receipt of Application Fee Payment receipt of Application Fee Payment receipt of Application Fee Payment receipt of Application Fee
The fee for Exchange Visitors is at the moment 960DKK.960DKK.960DKK.960DKK. To double check the current fee please follow this link:
http://ustraveldocs.com/dk/dk-niv-visafeeinfo.asp#VisaTypesandApplicationFeeAmounts
3. Your Valid PassportYour Valid PassportYour Valid PassportYour Valid Passport
If your passport is damaged (spine is broken), or you do not have a page for a visa, please get a new passport
before your interview.
4. One PhotographOne PhotographOne PhotographOne Photograph
20
Even if you successfully uploaded a photo to the DS-160, please bring one regular passport style photograph to
your interview. The photo should be less than 6 months oldless than 6 months oldless than 6 months oldless than 6 months old and with a white backgroundwhite backgroundwhite backgroundwhite background. The ideal format is U.S. passport sized, measuring 5 cm x 5 cm.
5. Proof of FundsProof of FundsProof of FundsProof of Funds
Proof that you can support yourself during your entire stay in the U.S. This can be a statement from your bank or a print screen of your account
6. & 7. Your DSYour DSYour DSYour DS----2019 and SEVIS documents2019 and SEVIS documents2019 and SEVIS documents2019 and SEVIS documents
DS 2019 is sent to you from your home office in Stockholm. Make sure your name matches exactly the name in
your passport. SEVIS-receipt is something you will print out yourself. Please find the instructions in your e-mail.
If you have any questions at all about the visa process, please let us know right away!If you have any questions at all about the visa process, please let us know right away!If you have any questions at all about the visa process, please let us know right away!If you have any questions at all about the visa process, please let us know right away!
Sincerely,
Cultural Care Denmark